Transcripts
1. Introduction : Hello everyone. I'm Uni. And into this class we'll
draw cute food paths. This class doesn't require any prior experience
or fancy tools. We'll start from
scratch and we'll be using simple techniques
throughout the process. Everything you'll see will
be happening appropriate. However, if you
have other software or want to try
traditional materials, you are welcome to join. If you are ready to start, let's jump right into it.
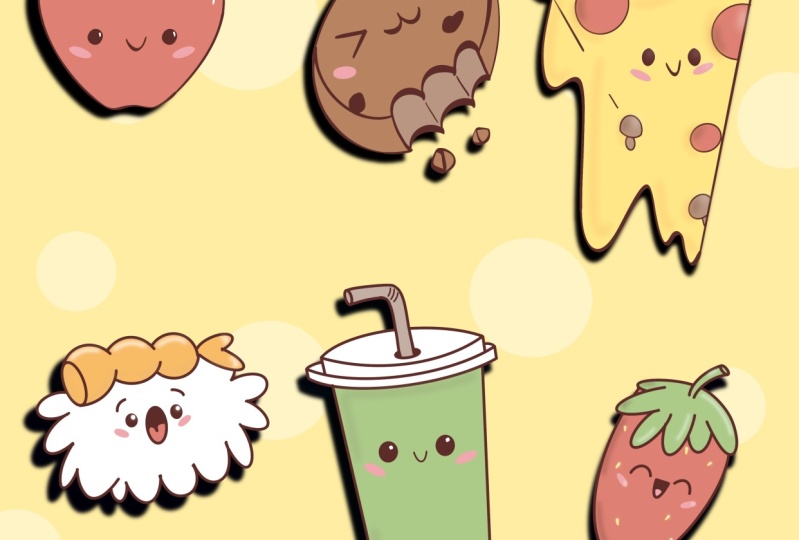
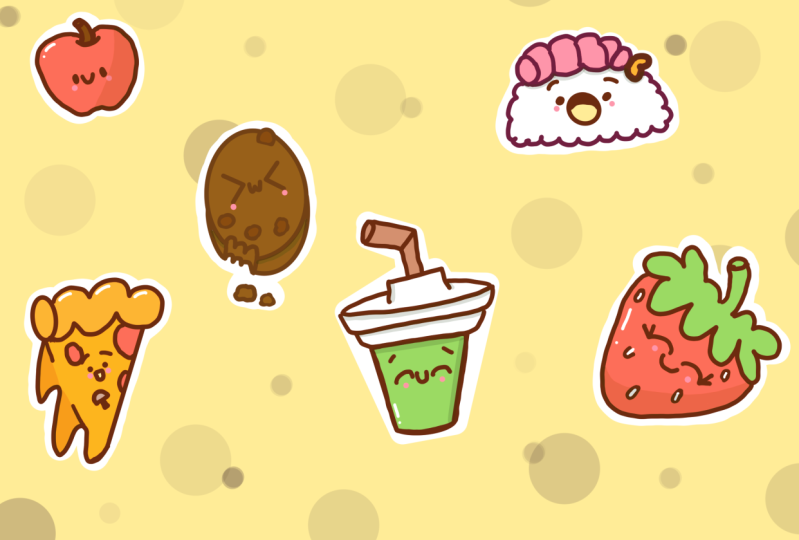
2. Sketch: Apple: Let's begin our class firstly by deciding what kind of canvas
we are going to be using. Today we are using a custom
canvas with the width of 2,300 pixels and the
height of 1,600 pixels. Dpi are at 300, and our color profile is set as SRGB with the slow number. When it's all done, let's
just hit Create and we will be redirected
to our new canvas. Let's just zoom it
out a little bit. The first thing that
we will need to do is to change the
background color. You can go to the Project
and ser Sap and download all the materials including
the color palette. Now let's just go to the layers and we'll go to the
background color layer. Here on the bottom you can see
your little color palette. And for us, it will
be easier to go under palette right here
on the bottom right. And here go under cards. When we have our cards on, we will see all
the colors, names. We will go and select the color with the
name, light yellow. Now let's just get back to our canvas and next thing
that we will need to do is to go and pick the first color that we are going to be using
for our sketch. So let us go on the
icon on the top right. And again, we will
go under cards, we will select the color with the name lines when we did it. We will go to our brush library. And then we will go to
the sketch and folder. And select any brush
that we like here. You can try the brush on your canvas if you
don't like it, get back to the
brush library and pick the brush that you
like when you did it. Let's just get back
to our canvas and the first sketch
that we are going to be creating will
be a little apple. We are going to the top left, and we will start by creating a shape of the
ellipse in that way, just manually creating the ship. And when we have it,
we will move on to the opposite side and we will create something similar here. Let's create another
ellipse and connect it on the bottom with
our first ellipse. Work more on the ship. When you have these two ships, let's just go to the
bottom right where we have our intersection
between these two ships. And we will add a little dent. We will create
something in that way. Let's just work more
onto the overall shape. We will go to the
sites and we will try to make them a little
bit more round it. When you have
something in that way, we will go over the top and
we will create another dance. Something similar to what
we have on the bottom, but this time a
little bit bigger. You don't need to
be very precise, very accurate with
your lines right now. Because later on we are
going to be creating our clean lines and we
will make them better. Now when we have
the first elements, let's just go to the eraser and we will erase all the
lines that we don't need inside when we have the
basic shape on the apple. Let's just get back to the brush and we will
go again to the top. We will step a bit
from this line that we have here and we will
create a line like that. When you have it, we
will go to one of the sides and we will
start creating a stem. Let's just go with
the lines like that. We will need to create
two parallel lines, a little bit narrower on the bottom rather that
we have it on the top. When we have these two lines, we'll go to the top and we will connect them with a
circle or an ellipse. So now let's work more
onto the stem shape. And when you have what you like, let just again go to our eraser and we'll erase
this line that we don't need. Now let's just take a look at the whole shape and decide whether we want to
adjust it or not. If we want, we can go
and do it very easily. What we need to do is to go to this magic one tool
over the top left. On the least we will
go under Liquefy. Here on the bottom you can
see we have a lot of options. What we need is option push, and we are going to be changing the size of this option push. You can just go to
the slider and find what works for you
when you did it. We will just go to our
lines on our canvas and we will just go and push it until we like the overall shape. Let's just spend some time
here and create what we like. When you're satisfied
with your sheep, let's just tap on our magic an dole one more time,
and one more time. Then we will get back to
our brush and we will go inside our apple and we will
add our facial features. Let's just go somewhere in
the middle part of our apple. The first thing that we
will need to do is to go and create a
little dot like that. You can vary its size, you can vary its position.
It's all up to you. When you have the first dot, let's move on to
the opposite side, and let's create
something similar here. When we did it, we
will go right between our eyes and we will add
a little smile again. Take a look at everything
that you have here. If you need to adjust
something, for example, make the eye a
little bit bigger, you are welcome to
go and do that. And when you are
done, let's continue.
3. Sketch: Cookie: Let's move on to
our next page that we will start by
going to our layers. And we'll create one more layer by tapping on the plus icon. When we have this new layer, we will get back
to the canvas and we will start creating a cookie. What we need to do is to
create a shape of the elipse. Let's just go and do
it just with one line. We're just going to our canvas and we are creating the shape. At the end, we will hold
it and you will see that we created a nice allpse. We can move our shape,
we can rotate it. We can make it
bigger or smaller by moving our apple pencil
from side to side. If you hold one of your
fingers on the screen, you will see that she snapped it to a perfectly round circle. If you lift it up on the top, you will see the option aided. And here you can see
that we have some nodes, we can just go and
play with them. For example, let's
just make it not a perfectly round circle,
but an ellipse. We will hold our apple pencil at some nodes and we
will find what we, if you want to rotate it
again, go and rotate it. If you want to move it, hold your apple pencil at the screen and find the
placement that you like. If you want to make
it bigger or smaller, just go right between the nodes, hold your apple pencil and just drag it diagonally up or down. When you're satisfied
with everything Here, let's just tap on the screen and we will go and work
more on the sheep. We will need to go and
add some thickness here. Let's just go to the bottom part and we will make a
little mark down. When you have this mark down, we will need to go to
the sides and we will need to connect these
sides with curves. And with this little mark down, let's firstly go
over our left side. We will go somewhere
to the middle part of our cookie, right here. And we will go and
create a curve. We will hold it at the end, We will try to move it to
this little mark down. If we need to adjust it, we will go over the top to the editing mode and we
will play with the nodes. Let's create something
in that way. When you have it in that way, let's just tap on the screen
to get away from this mode. And then we'll go to
the opposite side and create the same thing here. Again, go into the middle
part and we will create another curve here connecting it with our little markdown, holding it at the end, and go into our editing mode
to create a smooth curve. When you have the
result that you like, let's just tap on the screen and let's work more
onto our Shep. Firstly, let's just go to the
main shape of our cookie, and let's add additional
elements here. We will go and add
some chocolate chips. Let's just go and start
creating the shapes like that. Firstly, we'll go to
the top and we'll create a very rounded
triangle here. You can just go a little bit above the line
that we have here. And then on the bottom we will connect it with a little curve. If you want, you can go and grab your eraser and erase this
line that you don't need. And then we'll get
back to our brush and we'll go to the bottom
part of our cookie. And we will start adding
the same elements, but a little bit smaller. So let me just go and
add three of them. Try not to go to the middle
area over your main cookie, because here we are
going to be aiding the additional elements
such as facial features. So let us go and add
three of these elements. And then we will
continue by going to the bottom part and adding
more additional elements. When we have the
chocolate chips, let's just go to the
bottom part where we have our thickness and let
just add a little bite. What we need to do is to go right here where we have
a little mark done. We'll go to the line that we
have for our overall shape. And we will start by creating
the curves like that. Let's just add three
of these curves. And then we will
grab our eraser and erase this line on the
bottom that we don't need. If you think that maybe you want to adjust some parts
here, for example, maybe your little chocolate chip is a little bit too close
to this little part. We can just erase it and
put it somewhere else. For example, we
will just get back to our brush and
put it right here. Now when we are done, we will go to the
bottom and we will need to repeat the same lines, the same cut on the bottom line. Let's firstly go to the sides
from this little elements, and we will create the lines
going down in that way. Now when we know where
this element ends, let's just go to the bottom
and repeat our shapes. When we did it, we
will grab our eraser to and we will erase
this bottom line. Also, we can just get back to our brush and we can go
right between these elements where we have this little
dance and we will just go and end the lines the same way as we have them on our sides. When you have
something like that, let's just go underneath this element and we will
add a little crumble. Let's just go and
create a similar shape to what we have for
our chocolate chip, but this time we will add
a bit of thickness to it. Firstly, we are creating
something in that way, and then we'll go to
the right side and we will create a thickness
just in that way. If you want to add more
of these elements, you are welcome to
go and do that. For example, let's just
go a little bit to the left and create
a similar shape but a little bit smaller. When we have it, we will
go to the middle part of our cookie and we will
add a facial feature. Let's just firstly go to the left side and
we will create an, in that way when you have it, we will go to the opposite side and we will repeat it here. Try to put them on one line. And when you have the
result that you like, let's just go right
between them and let's add a very smiley mouth. We are just creating
something in that way. Just a digit three that is
reversed work on the sheep. If you need to adjust something, just go and manually adjust it. Use an eraser and your brush. If you want to adjust your cookie in a way
that is not manual, we can go again to our magic, want to liquefy and
adjust it from here. When you're satisfied
with everything here. Let's just tap again
on our magic 12. And then we will continue
by going to our layers and creating one more layer on top
to create our next sketch. Let's just get back to
the brush and we will go to this part that we
have on our top right, let's start creating
a pizza slice.
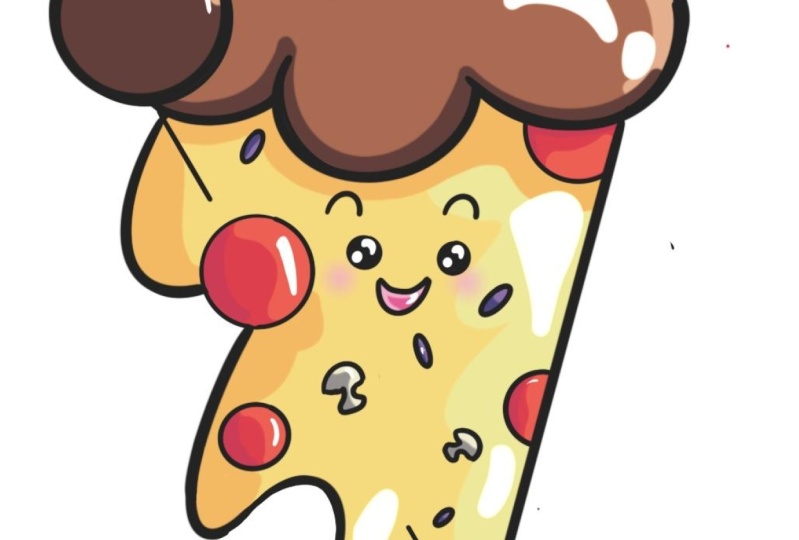
4. Sketch: Pizza: What we need to do is to
start by creating a triangle. In that way, when you
have this triangle, we will go to the top and
we will create a cross. Let's just do it in that way. We will go and create a shape
of the clouds on the top. We will create a shape
going in that way. Then on the bottom,
we will just reverse these lines and connect them together with what
we have on the top. Then when this shape is ready, we will go over our left side and we will create
a thickness here. In that way, we will
just go to this line and we will add another
circle or allpse. In that way, if you want, you can go to the riser two and eras the parts
that you don't need. When we are done,
we will get back to our brush and we will go to the left part where we have our thickness and we
will add a melting part. Let's just go right to this intersection between our
main shape and the crust. From here we will just go and
create the drips like that. You can vary their size, you can vary the amount of them. It's all up to you, find
what works for you. When you have the shape, let's just go inside and let's start adding the
additional elements. For example, let's
just go to the top left and we will add
a little pepperoni just by creating a shape of the ellipse or a circle
when you have it. Let's just go and add a few
more of these elements. But this time let's just make
them a little bit smaller. Again, try not to go
to the middle part because here we are going to be aiding art, facial features. If you want, you can go and add a little mushroom
too, for example. Let's just go to the bottom. And we will start by creating
half of the ellipse, or half of the
circle right here, connecting it with the
line going in that way. And then we will create a
little stem going in that way. When we are done with the mean shape of our
slice of the pizza, let's just go inside and let's
add our facial features. Again, we're going to the
middle part and let's just create something similar to
what we have for our Apple. Let's just start with
the similar is again, play rounds with the
position on these elements, play around with their size, with everything that you
want to play around with. When we have the eyes, let's just go and create
a mouth in that way. It will be something
similar to what we have for our cap
of the mushroom, but it will be reversed. Let's just start by creating
a line going in that way. And then we will create
a line on the bottom connecting it in that
way when you have it. If you want to add some
additional elements, for example, some eyebrows or
anything in that way, let's just go and edit. For example, let's just go
right above the ice and let's create little curves for our
eyebrows when we are ready, if we want to adjust something, we are welcome to go to our magic ansu liquefy and play around with
the whole sheep. Let's just spend some time here and create
what we would like. When you're satisfied
with the ship, let's just get away from our
adjustments and then we will continue by going to the bottom part and we will start creating a little sushi.
5. Sketch: Sushi: Firstly, we are
going to our layers. And we will create
one more layer above. Let's just get back
to our canvas, We'll go underneath the apple. The first thing that we will
need to do is to create a shape that we will turn
into the sushi body. What we need to do is to
create a shape like that. Again, we are creating half of the circle or half
of the allpse. Then we will go to the bottom and create a line
going in that way. When you have the basic shape, let's just go along
the lines and let's create some bumps that
will represent the rise. Just go in there and creating
the shapes like that. Very their size,
very their amount. It's all up to you when you
are done with the main ship. Let's just go to the
top and we will create a line that will help us to
build up a little shrimp. We will go and create
something in that way. When you have it, we
will go to the top. Firstly, we will go to
the left side and create a circle or an allpse in
that way when you have it. Later on we will go
over the top part and we will start creating
the bumps like that, try to make them
pretty round it. When you've finished
creating these bumps, let's just go and
create a little tip. What we need to do is to
create something like that. Let's work more on the
ship if you need to. Then we will go to our Es
and is all the lines that we don't need when
we have the sheep. Let's just get back to
our brush and we will go to this little dance that
we have for our shrimp. And we will continue
creating the lines, going down in that way, just creating the curves. Now when we have it,
let's just go to the middle part of
our rice elements and let's create the
facial features. Firstly, go in and creating the eyes similar to what
we have for our apple. Of course, if you would like to experiment and create
different facial features, you are always
welcome to go and do that when we have our eyes. Let's just go right
between them and create a big open
mouth like that. As always, you can use all the options that
we used before. So you can create
this mouth manually. Or you can hold your apple
pencil at the end and create a perfectly round circle
or a perfect allapselso. Let just go right
inside this mouth. And let's create a little curve like that that will
represent the tongue. We will also go to the top
part and we will sheet it. When we are done with this task, let us go above the eyes and let's create a
little eyebrows. When we are done one more time, going back to our layers and we will create one
more layer above. This time we will
create a little cup.
6. Sketch: Cup: Firstly, let's just go and create two descending
lines like that. When we have these two lines, we will go to the
bottom and connect them together with
a little curve. When we are ready with it, we will go to the
top and we will create a similar curve there. But firstly, let's just
go to the sides and we will step a bit from the
lines that we already have, these two diagonal
lines going down. And we will create
two little lines going in the same direction. When we have them, we will
go to the bottom part of them and we will create the parallel curve to what
we have on the bottom. Let's just go and create
something in that way. When we have it, we
will go to the top. And we will create a
similar curve there too. Now let's just step
a bit more outside, and again, create
two lines like that. Then we will go to the
top and we will create another curve going in the same way that all the
curves that we already have. Now when we have
something in that way, we will go to the top and we will create a
different shape here. What we need to do is
to step a bit from the sides and create the
lines going in that way. When we have these two lines, we will go to the top and we will create a little
curve like that, like a little dome. When we have it, we will need
to go to the sides where we have these little parts and
we will need to close them. We are just going there and creating the curves
going inside. Now when we have
something like that, let's just go to the top and
let's create a little straw. Firstly, let's just go and create two parallel
lines like that. Then when we have them, we will go to the top
and we will connect them with a little diagonal
line when we have it. In that way we will
go to the side and we will create two
more parallel lines. When we have something
in that way, we will need to close
these two lines the same way as we
have it on our apple. Let's just go and create
a little ellipse. Work on the shape
more if you need to. Then let's just go
to the middle parts, to our main shape of the cup, and let's create our facial
features one more time. Let's just go somewhere
to the middle. And let's start by creating
the eyes in that way. Just a half of the circle
or half of the ellipse. Let's create two of them. And then we will go right between and we will
create a smiley mouth. Let's just go with a mouth similar to what we
have on our apple. If you want to create some eyebrows or any other
additional elements, you are welcome to
go and do that. Now when we are
ready with our cup, let's one more time
go to our layers. We will create one more layer. And on this layer we will go to the last blank area and we will start creating
a little strawberry.
7. Sketch: Strawberry: Firstly, we will create
a shape like that. It will be a very
rounded triangle, make it very soft. And when you have
it, we will go to the top and we will start
adding a leaf here. Let's just go and create
something in that way. As always, you can
play around with the amount of these elements
with its size and with everything that you
want to play around with when you have
something like that. Let's just go to the middle part on this element and let's create a stem creating something similar to what we
have on our apple. Creating two parallel lines and connecting them with
a little element. When you have it,
let's just go and add the rest of the leaves
to this bly space. Work more on the
shape if you need to, then just grab our as the
lines that we don't need. Now when we have
something in that way, let's just get back to our
brush and let's just go to the middle part and let's
create our facial features. One more time. Let's just go to the middle part and start with the similar shapes for the eyes to what we
have on our cup. Let's create these two elements. If you want to add additional
elements, for example, something like eyelashes, you are welcome to
go and do that. We can just go and create
a little line like that. When we have these lines, let's just go right between them and we will go and
create our mouth. Let's just go with
a similar shape to what we have on our pizza. Just go in there and starting by creating a line
going in that way and then aiding the curve on
the bottom when you have it, let's just go to
some blank space on our strawberry and let's
just go and add some seeds. Very easily, we will just
go and add some ellipses. Try not to overdo, just
add a few of them. Now, if you want to
adjust something here, you are always welcome to go to the liquefied tool and
adjust it with the tool. Let's just spend some time here and try to create
something that we would like when you're satisfied
with your strawberry. Let's just get away from our liquefied tool and
let's just take a look at everything that we
have here and let's position our elements
differently. Very conveniently, we have created a new layer
for every element. We can just go to our layers, find the layer that
we want to adjust, select it, and go and adjust it. Let's just start
with our strawberry. Our layer number
six is selected. And we will go to this
arrow on the top left. Let's just use uniform methods. And you can see that we
have this bounding box. If we go to one of the corners
and hold our apple pencil, we will be making it
bigger or smaller. If you want to rotate it, we are going to this green
nodes holding it and rotating it to the place that
we want it to look like. When you are satisfied
with everything here we can find a different
placement for this element. We will need to hold
our apple pencil and just position it the
way that we will like. Find the position
for these elements, find the rotation,
find the size. And we will do the
same with all of the elements that we
have on our skitch. Firstly, let's just deselect everything by
heating on our icon. And then we will get
back to our layers. We'll go to the next layer and we'll position the
element differently. When this layer is selected, we will go to our arrow key uniform methods,
finding the placement. If we want to rotate it,
go into this green node. If we want to make it bigger, we are going to one
of the corners. When you are done, we will just deslect everything by
hitting on our arrow. And let just go through all of our elements and
let's position them differently when you are
satisfied with everything. Here, let's move on
to our next part, where we are going to be
creating our clean lines.
8. Clean Lines: Let's begin this part from
some tiny preparations. Firstly, we will
go to our layers. And we will need to combine
all of these layers together. Everything that we have for
our sketch is on one layer. We can do it in two ways. We can go and put one of
our fingers on the top and another finger on the bottom and make
a pinch movement. Or we can just go to
this layer on the top, tap on it, and
choose merged down. Let's just go and put all of
our sketches on one layer. Now when everything
is on one layer, we will go to this
icon and we will need to adjust the apacity
of our layer with this age. We will need to do it
to make sure that we see everything that we have
on our layer with this age. And it's not very disturbing. Let's just go to this icon and we will see this
slider capacity. We will hold our apple pencil on this slider and we will
move it to the left. Find the capacity
that works for you. And when you are done,
let's just tap on this layer one more time and
we will rename it as Sketch. To do so, we will need to tap on it and choose to
rename from the list. When you are done
with this task, let's just tap on the plus icon. We will create a new
layer and straightway, we will rename it
as clean lines. One more time tapping on the
layer and choosing rename. When we did it, we will need
to go to our brush library. We will go to the inking folder and we will select
technical pen. Or if you want, we can go to the calligraphy folder and
choose monoline brush. You can pick between
these two brushes, find what works for you. Let's just make the size of the brush a little bit smaller. And also, we will
just need to adjust one option of your
brush of choice. We will just need to get
back to your brush library. We will go to this brush that you've picked and then we'll need to tap on it and go
inside the brush studio. We will go under stabilization. And here on the top you can see that we have the
option streamline. This option streamline
has the slighter amount. If it's set on a very low value, we can go to the drawing pad
and try out how it looks. We are creating a line, we have a lot of
control over it, but this line is jagged. If we want a very smooth line, we will go to the
slighter amount and we will increase the
amount of streamline. For example, let's
set it at maximum. And let's try it one more time. On our drawing pad, you can see we are creating
a very smooth line and yes, we lost a bit of control here. You can play around with the amount of streamline
that works for you. And when you're satisfied, let's just go to this option
done on the top right. And we will hit
it. Now let's just go again and adjust
the size of our brush. Try out it on your canvas. If you feel that it is too much, go and decrease it. Find what works for you. And what we need
to do in this part is to create the closed lines. The closed line is the line that doesn't have engine gaps. Something in that way, if it looks like that
and if it has some gap, it will be hard for us later
on to add the color inside, try to create closed lines. Our main goal here is to recreate what we
have on our sketch. But also you don't need
to repeat everything with 100% of similarity to what
you have on your sketch. You can add some details, you can adjust some elements. All that we need is to somehow recreate the elements that
we have on this sketch. And remember that we will need to have closed lines very
easily and very quickly. Let's just go and create
our closed lines. When we are ready
to line our cap, let's just use one option
that procreate has. We will be creating
the symmetry drawing. We will get back to Un brush and then we will need to go to our range icon over the top
left, going under canvas. And we will need to
togal drawing guides. You can see that now
we have the cells, but it's not the
option that we need. We will need to go under den, drawing guides here
on the bottom. We will go under symmetry. It has just one line and it
also has this blue nodes. We will need to grab
it and we will need to put it right in the
middle of our cap. When you have something in
that way, let Jessie done, then everything that we are
going to be creating on one side will be mirrored
on the opposite side. Now, very easily, just
go to one of the sides and recreate the elements
that you have on your sketch, connect them nicely
in the middle. When you are done with all
the symmetrical lines, we will need to go and turn off this option of symmetry drawing. What we need to do
is to go again to our range icon and total
drawing guide from here. But also we will just need
to go to our layers and you will see that our layer
with clean lines is assisted. We will need to turn
it off manually. Let's just tap on it and let's drawing assist from the list. Now let's continue
recreating our elements. When we are done with
our clean lines, let's just go again
to our layers. And we will hide the
layer with this cage by tapping on this
little check mark. We will take a look at
everything that we have here and we will make sure that all
of our lines are closed. All the lines that
we have outside, if we need to go and
adjust some parts, if we need to make the lines more smooth or if
we need to close, go spend some time here and adjust everything
that we have here. When everything is alright, let's just go to our next part where we are going to
be aiding our colors.
9. Base Colors: Let's begin this part firstly
by going to our layers. And we will go underneath our
lier with the clean lines. And from here we will
create a new layer. We will rename
this layer as red. We will be creating
a new layer for every color that we are going
to be using into this part. So let's just start
with our red color. When we have a new layer, we will go to our color palette
and select the red color. If now we would want to go
and drag and drop the color, for example, to our apple. Nothing good will happen. Everything will be recolored. We will need to go
back to our layers. And we will need to go back to our lie with the clean lines, Tap on it, and select reference. When we have reference, we can use our lines that we have on this layer
on separate layers. So we will get back
to our li with the red and we will try
it out one more time. Just drag in and
dropping the color to our apple on the top. We have the option continue filling. Let's just tap on it. When we have this
color drop option on, we can go to other areas
entry, color them too. For example, let's just go to our strawberry and we
will just tap on it. Let's go to our
pepperonis entry. Color them in the same way. Now when we are done
with this color, let's just up on this little
check mark on the top. And then we will
go to our layers and create a new layer above. Let's rename it as Green. When we had this new layer, we are getting back to our
color palettes and you can decide which green you want
to use on your illustration. Select one of the
green colors and let's continue
recoloring our elements. Just dragging and
dropping the color, and continue filling when we
are done with this color, one more time going on top and
tapping on our check mark. Then we will go again to
our layers and create one more layer on top that
will our name as brown. Now when we have this new layer, getting back to
our color palettes and selecting beige color, let's just drag it to the
main shape of our cookie, and also to the crumbles
that we have on the. But when we are done
with this color, we will go back to our
color palettes and select the dark brown color
our color drop is on. So that means that we can
just go to the areas that we want to color with this
color and just tap on them. Now when we are done with
our chocolate chips, one more time going back
to our color palettes, and this time we will go and
select brown purple color. With this color, we
will go and recolor our little mushroom also
by using the same color. We will go to the
straw and add it here. When you are done
with this color, let's just go and tap on
our check mark on the top. And then we will get back
to our layers and we will create one more layer above
that will rename as yellows. Now when we have this new layer, getting back to our
color palettes, and let just start
with the color, with the name orange. We will recolor our shrimp and also the crust on our pizza. When we are done,
we will get back to our color palettes and select yellow color with
the yellow color. We will get back to our chemist and we will recolor our cheese. Now when we are done
with the cheese, we can go to these
little seed areas on the strawberry
and recolor dam. When we are done with
recoloring our seeds, lay, jet, tap on this
little jet mark on the top. And then we will go
back to our layers and create one more layer that
will rename as white. Now we are getting back to our color palettes and
selecting the white color. And we will drag it to our sushi and also to the top of our cup. When you've recolored
all of these areas, let's just tap on this little
check mark on the top. And then one more time
we will go back to our layers and create
one more layer above. Let's rename this layer
as miscellaneous. Now when we have this new layer, let's just go back to
our color palettes and select the pin red color, winds color, we will
recolor our mouths. When you are done with
recoloring these parts, let's just tap on our little
check mark on the top. Then we will go to our
sushi and we will add the same color that we have for our lines on the top part. Let's just pick the
same color from what we already have
onto our screen. To do that, we will just need to go and hold one
of our fingers on the screen until we have the needed color on the
top of this little tool. When you have it, we will
just go and drop this color. If you need to adjust
some parts manually, not colored parts, just
go and recolor them. Now let's just get back to the same color that
we were using before, this pin color, and we will
go and add some cheeks. To get back to the
previous color, we will need to go to this
icon on the top right. And we will need to hold
our apple pencil there. When we have the needed color, let's just go underneath the ice and let's
just put the dots. We'll be using the same color and the same brush that
we were using before. It is our monoline brush. Let's just go and add
our little cheeks. You can vary the size of your brush and find
what works for you when you are done
aging the cheeks. Let's just move on
to our next part, where we are going to be aiding our shadows and highlights.
10. Shadows & Highlights: Let's begin this fight firstly
by going to our layers. And we will go to our layer
with the clean lines. And we will turn off reference taping on the layer and choose a reference
from the list. Now we will go from
the bottom layer, so it is our with red
above this layer, we will create one more layer. Let's rename this
layer as Shadow. We want to add our
new elements only on the areas that we already
have on the previous layer. That means that we will need to go to this layer with shadow. We will need to tap on it and we will need to choose
clipping mask. Now everything that we are
creating on this layer will be seen only on the areas that we have on our
previous layer. Now let's just get
back to our layers. And we will need to adjust our layer with the
shadow a little bit. We want to create the shadow, so we will need to change
the blending mode. Let's just go to the
icon and we will find multiply
blending mode also. We will just go to the apastis
layer and we will set it at 30% If we want to
adjust it later on, we can always get back to
this option and adjust it. Now when we have
this layer all set, let's just get back
to our color palette. And let's select the color
with the name purple. With this color, and
with the same brush, we will go to one of the sides, for example, to
the bottom right. And we will just go and create
a curve going in that way. We will hold it
at the end and we will adjust the
placement of it too. If you want to adjust it by
going to the editing mode, you are welcome to
go and do that. All that we need is this nice curve, find
what works for you. And when you are
done adjusting it, let's just go underneath
this line and let's recolor the rest
of the area manually. Now we have our first shadow, and let's just go to the rest of the elements that we
have on our red color. And let's add our
shadows here too. Let's just go to the strawberry, and we will go to the same side where we have our
shadow on the apple. And we will just go and create
something similar here. We will just create a little
curve like that and then manually we will
go to the bottom and recolor the
rest of the area. Also here we have the
little elements on top. And this element will
cast the shadow to, let's just go
underneath our leaves. And we will just repeat the lines here and
add little shadows. If you think that maybe 30%
of opacity is not enough, you can always get
back to your layers. Go to your layer
with the shadow, go to the M icon and adjust the capacity to the level
that you will prefer. For example, let's just go with 45 per 50% And when you're
satisfied with your shadow, let's just go to the next layer, which is our green layer. Let's again create
one more layer above, and we'll rename it as Shadow. And the same way as before, let's just tap on this layer. Let's select Clipping Mask. And then we'll go to the icon and change the blending
mode to multiply. Let's again go with
50% of opacity. When we are done,
we can go and use the same color that we were
using for our previous part, or we can just go and select any other color
that you would like. For example, for green elements, let's just go with yellow green. With this color, let's just
go to our strawberry firstly. And we will add the shadow to the same side where we
have our main shadow. Just go in there and creating
a shadow in that way. Also, let me just
go to the stem. And again we will go to our right part and we will
add a little shadow here, the same way as with
our strawberry. We will go to our apple, and we will go to the stem. And we will add our little
shadow here for our cap. Let's just go to
the opposite side. We will just go there and create a line going in that way. Let's recolor the
rest of the area. And then we'll go underneath
the white part of the cap and we will put
our shadow in that way. Just repeat the curvature
that you have on top. If you have some little parts that you need to
recolor manually, just go and recolor them. If you feel that 50% of capacity is too
much or not enough, you are always welcome to
go back to your layers. Go to the shadow layer, go to the M icon and
adjust the capacity. From here, find the apasity
that works for you. And when you are done, let's
just go to our next layer, which is our brown layer. And let's create a
new layer above. Let's rename it as Shadow. The same way as before. Let's just clean this layer. And let's just go and change the blending mode
to multiply and set the apace to something
like 50% When we are done, we will get back to
our color palette one more time, and again, we'll select the purple
color with this color, we will go to the
cookie and we will go to this area where we
have our thickness. And we will put it in the
shadow completely the same. We will do with our little
crumbles on the bottom. Let's just put one of the sides
completely in the shadow. If you want to go to the areas where you have
the chocolate chips, we can just go and
put little shadows on them to a bit
underneath them. Let's just go to our
straw and we will put the bottom part
completely in a shadow. And then we'll go
to the top part and create a line
going in that way. If you want to put a little
shadow on the mushroom, you are welcome to
go and do that. Now if you want to adjust the apacity, you know
what you need to do. Go to the need layer
and adjust it. From here, find the apacity
that works for you. And then we'll go
to our next layer, which is our yellow layer. Let's create a new layer above, and let's rename it as shadows. Let's clean this slate
to a previous one. Let's change the blending
mode to multiply, and let's set the apastd to 50% Then we will get back
to our color palette. And let's select either
orange or gray, Orange. So select one of these colors, and let's just go and add
the shadow to our shrimp. So let's just put
the whole area that we have on our left in a shadow. And then we will go
to the bottom and we will start creating the
shadow in that way. When you are done
with this part, let's just do the same with
our crust on the pizza. This part that we
have on the left, we will put in a shadow
completely and then we'll go to the bottom and continue creating the lines
going in that way. Then just go underneath and
recolor the rest of the area. As we have our yellow part
right here on the cheese, we can just go and continue creating the shadow
underneath our crust. Just repeat the curvature on the lines that you
have on the crust. The same we will do to this
melting part on the cheese. Let's just go and completely
put it in the shadow. Now when you have something
like that, one more time. Going back to our layers. Going to our layer with white, creating a new layer above
renaming it as shadows. Let's clip it to
a previous layer. Let's just go to our icon and change the blending
mode to multiply. And let's set the apacity
to something like 50 or 45% When you are done, we will get back to our
color palette and select the color with the name
gray with this color. Firstly, we will go to the sushi and we'll go to the
bottom part of it. Let's just go and start creating
little bumps like that. And then we'll recolor
the rest of the area. If you want to go
underneath the shrimp, you are welcome to go and create a little line here that
will represent the shadow. The same thing we will
do with our little cup. Let's just go to the same side where we have our main shadow. And let's just put the
shadow in that way. When we have the shadow, let's adjust it
just a little bit. So we will grab an
eraser and we will go to the top part and erase
the line in that way. When you have
something like that, let's just get back to
our brush and we will go inside the cup and we will
add shadows right here. If you want to add
a little shadow on this area on the
top of the cap, you are welcome to
go and do that. We will need to go to
the same side and let's just create something in
that way very accurately. We will recover this part. If we need to adjust
something, for example, Re is the line and
make it more normal, we will just go back to our and is the part
that we don't need. When we are done with this, The rest that we need to do
is to create the highlights. What we need to do is to
get back to our layers and we will go above our
layer with miscellaneous. Let's create a new layer and let's rename it as Highlights. We will go and we can just keep the same normal layer
as it is set right now. Or we can go to
our blending modes and set it as, for example, we can also go to the
apastis slider and set it to 50% For now when we did it, let's just get back
to our color palettes and let's select white color. We will go to the opposite sides from where we have our shadows, and we will start creating
little highlights. For example, let's
just go to our apple, and let's create a highlight. In that way, you can go
with some little lines, with some dots or maybe
some peculiar shapes. Let's just go through all of our elements and let's add
our little highlights. Again, if you feel that maybe this amount of
apacity is too much, you can always go
back to your layers, go to the icon and adjust
the apacity from here. When we are done
with our highlights, we will do one more thing. Let just get to the
bottom of our layers. We'll go to our layer
with this sketch. And from here we will
create one more layer. You can keep the
name as it is right now or you can rename
it as you wish. What we are going to be
doing is firstly go into our slider of the size of
the brush and cretin it. And then we'll go
to the background and we will put some dots. Let's just go and create a
few elements in that way. Randomly put a few big dots. And when you are ready, let's decrease the size
of our brush and we will get back to our background
and put a few smaller dots. Try not to overdo it. When you have the
middle sized dots, let's just go and decrease
the size one more time. And let's create a few more
of these dots if you want. When you are ready
with these dots, we can go to our layers and adjust the capacity
of this layer. It is not that bright. For example, something
like 40% 45% will work perfectly when you
are done with this task. We are done with our class. Thank you for watching this
class review if you liked it and consider subscribing for
more I videos in the future. Looking forward to
seeing your projects.
 Uni Corn, ⭐Kawaii Art Enthusiast⭐