Transcripts
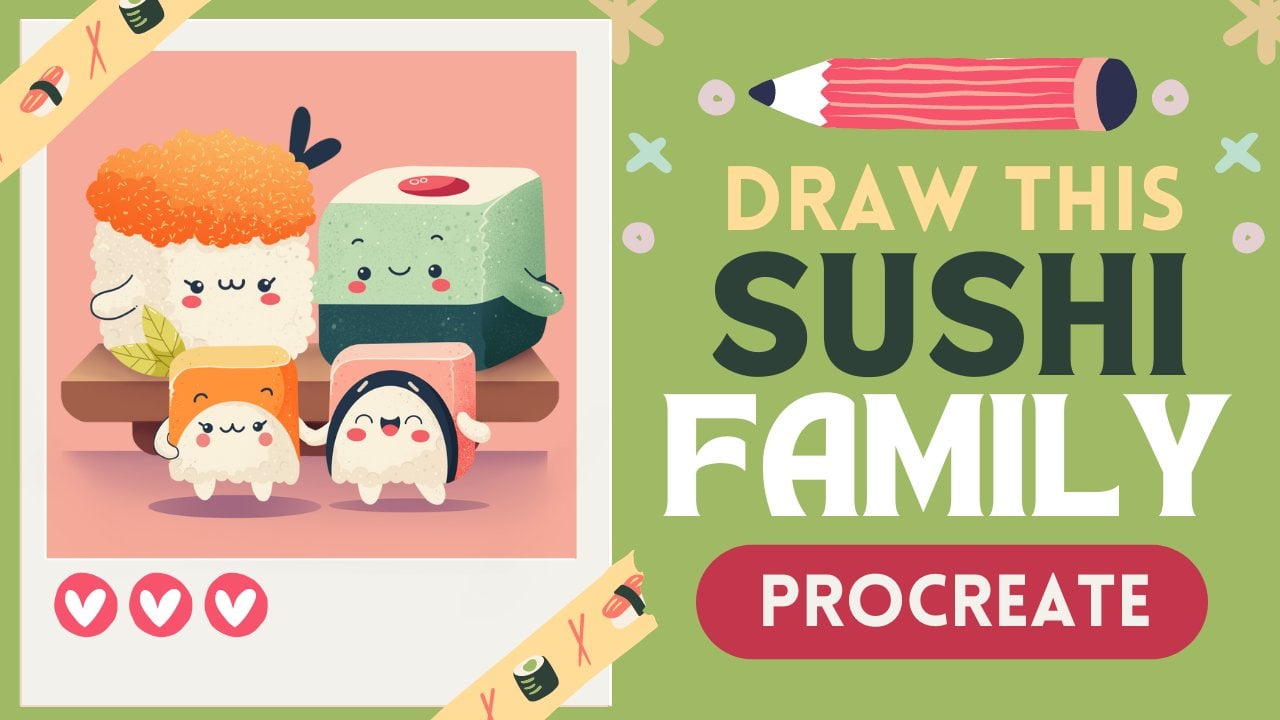
1. Introduction : Hello everyone, I'm uni and into this class we'll
draw cute sharks. This class doesn't require any prior experience
or fancy tools. We'll start from scratch
and we'll be using simple techniques
throughout the process. Everything you'll see will
be happening in Procreate. However, if you
have other software or want to try
traditional materials, you're welcome to join if
you are ready to start, let's jump right into it.
2. Sleepy Shark: Sketch: Let's start our
class by deciding what kind of Canvas
we are gonna be easy. You can see it is a very
simple standard square canvas that you can find in Procreate, both pixel width and pixel
height are set at 2048 pixels. As for DPI, we are using 300
and S for the color profile. We are using sRGB with this loan number
when it's all done, let us he'd done and we will be resurrected our new canvas. And now we will need
to decide what kind of colors where I'm
going to be using throughout the whole class. You can go to the project
and Resources tab and download all the materials. And when he did it a lake, just go straight to
our color palettes and we will check out
what we have here. Here we have two options of
how we can use our colors. They come back to
you and the carts. We will go to the cars because here we have
all the colors, names, and it will
be easier for us to navigate through
our color palettes. And I still here, Let's select our
first color that will be using for
our sketching part, and it will be magenta. When we have selected our color, we will need to go
and select them brush that we are gonna be using
for this kitchen parts. So let's just give it to them. Brush Library, let just
go under sketching. You can select any
brush that you like. For example, let's go
with six B pencil. Or if you want to
experiment a little bit, you can go to your Canvas and
try out different brushes, find what works for
you when you are done. Like just get back to our
canvas and let's start by creating a little
scheme that will help us to create our Sketch. Firstly, we will need to go and create a little help in shape. It will help us very much
with creating this gauge. And this first shape will
be as simple rectangle. We will need to go to our Canvas and we will create the shape just with one line without
lifting up our Apple Pencil. So firstly, let us go to
the area on the top-right. And from here we
will go and create the first-line going on the opposite side.
I won't go down. Then it will go along the
whole shape and we will end our sheep at the same
point that we have started. And the ends we are holding up our Apple Pencil and we will snap the shape to a better one. When you have
something like that, we will lift up our Apple
Pencil and we will go to the soap where we
have eliza option. For me it says polyline for you. It might be quadrillion
or maybe a rectangle. Let's just go there and
SAP on this option. One, the bottom, we
have a few options and if you have the option
rectangle, Let's select it. If you don't have the
option rectangle, you can go with any option
that you can find here. When we are at the editing mode, we can adjust our sheet. You can see we have the blue nodes and we can
just go and tweak them. For example, ledgers go and make this shape a little bit
bigger by going into the top node that we have inimitable and we will just
drag it a little bit up. Also, we can go and
adjust the position of our shapes by going to some blank space that
we have on our Canvas. Hold our Apple pencil there and move this shape
to the needed place. If you want to adjust the
lines that you have on the sides or if
you want to adjust the shape in any
way that you want, you can go and play
with these notes when you're satisfied
with everything here, we will just tap
on our screen and we will get away from
our editing mode. You can do it either with your finger or
with Apple Pencil. Now when we have this shape, ledgers go and create two more lines that will help
us to create our sketch. The first line will be vertical and the second line
will be horizontal, and they will go through the approximate
center of our sheep. So firstly, let's just go and
create the vertical line. We are going above our sheep
and we are creating a line going down the same way as we work creating our rectangle. We will hold our
line and the ends. And you can see if you move your Apple pencil
from side-to-side, you are adjusting the angle. We will need to try to make
this line very straight. If it's not in a
center, it don't worry, we will go to the top
two are edited Modes and we can move this
line towards the center. When you are satisfied, we will go away from our editing Modes and we
will do the same thing, but this time we will need to create a horizontally
aligned line. So again, I go into
one of the sides. We are going into the
approximate center and we are trying to create our
line at the ends. We are holding it and
we're adjusting our angle. If we need to move this line
more toward the center, we are go into our editing mode and we are moving it from here. So when you have
something like that, we will go away from our editing mode and we
will need one more line. This line will go on
our right part of the rectangle and
we will need to mark down one-third
of this part. So let's just go to
the right and we will just go and create
a little mark down. Try to make it one further. You can just go and create one more mark and make
sure that it is one-third. When you have it, we will
go again from the top to the bottom and we will create one more line going
from top to the bottom. The same way as before. We are creating airline at
the end we are holding it, even need to adjust the
angle we are adjusting it. If we need to adjust
it even more, if we need to adjust the
placement where I go into the editing mode and
a jazzing it from here. Now when we have
something like that, lie, just tap on our screen and we will get away from
our editing mode. We are almost done
with our scheme, but we will need to
do one more thing. We will need to go firstly
to our layers and we will get entry name this layer
with this key to Dessert, will need to tap on
the layer and we will choose Rename
from the list. Let's rename this as scheme. And one more thing that
we will need to do with this layer is to adjust
the opacity of this layer. We want to see what's
happening onto this layer. We want to use it, but we don't want it to be very bright. So let's just go to
this little icon. We will tap on it
and you can see that we have the opacity slider. We can grab it and we
can move it toward the left until we still can see what's happening
onto this layer. But when it's not distracting, That's when you have found
something that works for you. We will just tap on earlier one more time
to close this window. And when we did it, we
will need to go and create one more layer ledger
step on R plus icon. And let's rename this
layer as Sketch. So then just tap on
it and choose rename. And when we have the LEA
for our sketch layer, just go and start
making this gauge. So firstly, we will
need to go inside this little box
that we create it, and we will need to create
a shape of the ellipse. Firstly, we are
stepping EBIT from the left side and the
same way as before, we are creating our
shape just with one line without lifting
up our Apple Pencil. The end of the
line, we will hold our Apple Pencil and we will
then go to the editing mode. When we are in the editing
Modes, what we need to do, we will firstly go
and we will try to align our little
Alice horizontally. What we need to do is to put these little nodes on this side, on our little line that we have. When we have
something like that, we will go to the
left side and we will drag this node that we have
here more toward the center. When you have
something like that, where I go into our right side, we are going to this node
that we have here and we are dragging it to this line
that we have on the right. When we have
something like that, we will need to do
it one more time. We will need to go and
drag the whole shape down. So our nodes on the bottom
is such an Art Books. Then just go to some blank
space on our Canvas. We will hold our Apple
pencil there and we will drag the
whole shape down. When you have
something like that, we are ready to continue. So let just go away from our exit mode by
tapping on the screen, either with our Apple pencil
or with one of our fingers. Now, when we have the shape, we will need to continue
adjusting it and we will do it by using
the transform tool. We will go to our arrow
key on the top-left, and you can see that on the bottom we have
the option work. That's exactly what we need. When we are using a warp option. We have some notes on
this side and also we have some intersections in
sign this little bounding box. And that means that we
can go to any place inside this box and we can
adjust it, we can tweak them. We can just find
what works for us. So what we need to do firstly, we will need generally to go to the bottom part and
make it more flat. On the top, we will
make it more convex. So let's just start
from the bottom. We will go to this
little note that we have on the bottom left and
we're going to drag it down. You can see that we
are going beyond the frames of our box. For now. That's okay. We will continue
adjusting our shape. Now, let's just go to the
middle part on the bottom. We will drag it a little bit up and we will adjust
the whole shape. Now when we have
something like that, we will go to our
right side and we will drag both of these nodes
more toward the center. So firstly, let's just
go to the top and we will drag this little note down. We want to do this same
thing on the bottom, but this time we will drag
the nodes more to the top. So generally we are creating
a shape of a weird egg. The whole shape on the top, a little bit more convex. We can go to the top part of our bounding box and we can
drag it a little bit up. If you want to work
more on the shape, you are welcome to do it if you want to continue with
a different tool, ledgers go and continue. So firstly, let us get away from our transform tool by
tapping on the arrow key on the top-left and let just go to the magic one
tool on this list, we will find a liquefied. We are using push option. We can adjust the size
and we will need to go to the bottom-right part and we will need to
make it flatter. So let's just go and do
something like that. So what you are doing is just pushing the line a
little bit down. When you have
something like that, we are ready to tap on our magic 121 more time to get
away from this Modes, and we will go and manually
adjust the shape even more. Let's first go to our
curve that we have own. It's upright and we
will try to make the whole line more
even on both sides. So we will need to go
and smoothing it up, then just go and create
something like that. When you have this
curve on the top, we will need to move on
to our bottom right, and we will need to change
the curve that we have here. We will need to
create a little dance Let's just go to the
bottom and we will just go and continue
creating this curve. And when we are going up, we are creating LE cell dent. Try to make it smooth
and when you have it, we are ready to
move on and we are ready to start aging R2. So firstly, we will go to this intersection that we
have between airline that we have on the horizontal
axis and the line that is vertical on the right and
Frog this intersection, we will go firstly up with
a diagonal line like that. You can adjust its angle. It's all up to you. When you have this
first guy is in line, we will go down and we'll
create something similar here, but this time it will go
in a different direction, and this time it will
be a little bit bigger. So let just create
something like that. It's when we have these
two guys in Lines, we are ready to turn them
into our Tale and we will be using very simple technique
that will help us to do that. So firstly, we will
go to the top and we will create another ellipse. Then just go and create
something like that. Called it at the end as always. And if you need to
adjust it even more, we will go to our editing mode. Let's try to put our door that
we have on the top Street, on the end of the line
that we have just created. If you want to make this little tail a
little bit thicker, you are welcomed Hindus. When you're satisfied with it, we will go down and we will create something
similar here. Again, we are
starting by creating an ellipse and this time it position a little
bit differently. So again, we are holding our Apple Pencil at
the end of the line. And if we need to adjust it, we will go to the editing Modes. Let's make the tip of it
a little bit thinner. So we will go and
adjust its thickness. Play with their position on
this elements if you want to. And when you are done, ledgers get away from
our editing mode and let's erase all the
lines that we don't need. Now we will need to go to
this intersection between our two ellipses that
we have just created and we will need to create
a smoother connection. So let's just go there and turn this very straight
angle into a curve. When you have it one more time, grab the eraser tool and erase all the lives
that we don't need. And when we have RT ledgers, move on to the top and we
will create a theme here. So we will go to
this line that we have in the middle
of our rectangle. And from here we will create another guiding line going up. So let's create a
little curve like that. When you have it,
we will go and do something similar to what
we did with our teal. But this time, let just
go without a ellipse. We will just go and
create it manually. What we need to do is
to go a little bit to the side from this line
that we have just created, and then we will just
turn it into a thing. Try to make smooth connections between your Shapes
and when you are done, we will go to the bottom
part and we will create two more guiding lines that we will turn insert morphines. So firstly, we will go
to our left side and we will go to the water
that we have on the bottom. So you can just go and create a little mark down like that. And also to create the same mark down on this line that
we have in the middle. When you have these
two marks down, we will go to the left firstly, and from here we will create
another diagonal line, adjust its placement,
adjusts its angle, it's all up to you. When you have it, we will
turn it into a thin. So the same way as we did with our teal or our feet on the top. Let's just go and create
a singular sheep. When you're done, when
this first V01 Lynch's go to this little markdown
that we have on our right, and we will do the
similar thing here. So firstly, go into
this doors and we are creating
our guiding light. When you have it,
we will turn it into the shape that
we have on the left. Let us go and create it. When you have it,
what's left for us is to create our face. So let just go to this part that we have more on the left. And here we will be
creating our phase. Firstly, we will
go to the bottom and we will create
a very big smile. Just go in here near our fields. And between them we are
creating a curve like that. You can hold it at the end. As always, you can
adjust this to your liking if you want
to adjust it even more, go to the editing mode
and adjusted from here. When you have it, we will go above it and we will
create little eyes. So firstly, let just
step a little bit from this little smile
that we have just created. And we will make a
little mark down here. When you have this first dots, we will go to the opposite
side and we will try to put this same dot somewhere
in a similar place. So let's firstly go to our
little dot that we have won the rights and we will create
a convex shape like that. You can play around
with its curvature. You can play around
with its size. You can make it
even on both sides, or you can make one side
a little bit thicker. It's all up to you. When you have it
on the first site. Let's move on to
the opposite side and do this similar thing here. But we need to remember that these AI is a little
bit farther from us, so it will be a
little bit smaller. Let us go and repeat a similar shade that
we have on the right. And now when we have
the second eyelid, just go and add the gills. So we will go between our eye on the right and RFP in there. And we will need to add
three little curves. You can play with their
position and with their size. Or what we need to do is to create three little
lines like that. The very last thing
that we will do here is eight and
a little Tooth. Let's just go right underneath
our eye on the right, and we will create a
little shape like that. It is a very soft triangle. If you want to add a similar
shape on the opposite side, you are welcome to do it. Now when we are done with our
facial features, alleges, zoom out our Canvas
and take a look at the whole illustration
from the distance. Now we need to decide
whether we want to adjust some places or if we like
what we have right now, if you want to
adjust some parts, you are welcome to go
to the transform tool, to the Warp option or to the Liquify tool and
adjust it to your liking, spent a bit of
time on this part, and then we will add some
additional elements. So when you are done a
jazz in your shapes, Let's just grab our brush
one more time and we will go above our sheep
on this shark. And we will add some additional
elements such as flowers, maybe stars, maybe some little bubbles, and
something like that. So let's just go above our shape and create
some elements. We also can go to the bottom part and add some
additional elements there. So for example,
alleges Gil between our little phi and Art Sale and add a
few lines like that. If you want to add more details, you are welcome to do it. One more time ledgers, take a look at the whole
illustration from the distance, and if you liked it, We are ready to move on to the next part where we will
be aided. Our alliance
3. Sleepy Shark: Lines: Let's start our line in part by going and changing the brush. We will firstly go to
the brush library. It will go under inking and we will select the
technical pen. While we, I still here
into our brush library. We will go and adjust our brush because we want all of our
lives to be very smooth. Let's just tap on
our technical pen and we will go inside
the brush studio. Here on the left. We will need to go under
stabilization and see, will see that we have
the option streamline. Option streamline has
this slider amount. If we go with zero
amount and if we go to our Drawing Pad
and try out I'm brush, you will see that we have
a bit of a jagged line, but it is very controllable. If we go and change the amount, for example, for maximum, we will have very smooth brush, but we will lose
a bit of control. So you can play
with this amount of streamline and find what works for you if you
don't want to use it, you're welcome not to when you found the amount that
is right for you. Like just get to our Dan option and we'll get back
to our Canvas. What we need to do
next is to go to our layers and change the opacity on the
layer with the sketch. We will change it
because we still want to see what's happening
onto this layer, but we don't want it to be
very bright and distract us. So let's just go to
earlier with this gauge and we will tap on
this little icon. We will see that we have
the option opacity. It has this slider, and if we grab it and move it
somewhere the left, you will see that
your illustration now looks a bit
more transparent. So find the opacity
that works for you. And when you are
done, we will tap on earlier with this gauge
to close this window. Now when we have early
with this gauge, when we have prepared it, we will go and create
one more layer for early away
that whining part. So let just tap on the plus icon and we will rename
this layer as lengths. We also will need to drag this
layer underneath earlier. With this case, we
will see what's happening once earlier
with this Sketch. To do so, we will need to
grab R allele with the Lines, hold our Apple pencil on
it and dragging down. When you have
everything prepared, we will use this same
color and we will just go to our Sketch and we
will recreate the lights. All we need here is to create smooth lines and glow slides. So the whole Szilard of our
A-sharp should be closed. Let's just go and
very quickly do that. If you want, you can use their holding Apple Pencil at the end of the line and
using the QuickShape tool. And you can go to the eighth
note and adjust your lights. When they have
isolated Deanne Lynn, just go and make sure that everything is smooth and close. So firstly, we will go
to Arles and we will need to hide the layer
with the Sketch. To do so, we will go to this little check mark and we will happen It's
to hide the layer. Now, let just take a look at
the whole shape in general. And we will need the whole
shape in general to be close. You can see that we have the gaps here on the
top and the fin, and here on the tail. It's okay if you want to go and erase this little
protruding parts, you are welcome to do it if you want to keep them, keep that. So now let us go Zoom
in our Canvas and make sure that everything
is smooth and glossy. Eating it to adjust some parts, grant the eraser to erase the
parts that you don't need. And if you need to
add some parts, go grab the brush and add them. When the silhouette
looks good to you. Ledgers get back
to our list and we will unhide earlier
with the Sketch. So one more time where I go into our little check mark and
we are tapping on it. Now let's just go to
our facial features and we will recreate them
the same way as before. You can use all the options
that we use before. You can go and hold
your Apple pencil at the end of the line and use
the edit mode to adjust them. Now one more time, let us get back to Arles and we will hide the layer
with this sketch. Let's check out our Lines and find if we want to
adjust something, if we want, we will
go and adjust it. Also, we can go to the sides of our mouth and we can add
little lines like that. When we're done with our
facial features one more time, we're going back to
our layers and we will unhide our layer
with this sketch. Let's just go above
the shape and Google recreate all miss
additional elements. The same way as with
the main lines. We need all the
shapes to be closed. When you are creating a circle, you can just go
and start creating the shape the same
way as before. Hold your Apple pencil
at the end of the line and hold one of your
fingers on the screen, you will snap your shape to
a perfectly round circle. When you in recreating your
miscellaneous objects, like just get back to
the layers and we will hide our layer with the
Sketch. One more time. We'll go through the objects
that we just created and we will make sure that everyone of them is smooth and gloves. If you want to add some
additional elements, you are welcome to do it. When you identify a
jazz singer Shapes, ledgers get back to
our layers and we will hide earlier
with this scheme. Now one more time
we will take a look at the whole
illustration in general. And if we like it, we are ready to move on to the next part where it
will be agents are Colors
4. Sleepy Shark: Base Colors: Left that are color in part
from Santa, any preparations? Firstly, we will go
to our layers and we will need to select every
layer that belongs to R, a little shark, and we will
put them in the group. So we have one of
our layers selected. We will then need
to go to the rest of the layers and swap
them from left to right. When all three of
them are selected, we will go to this option
group on the top-right. Now let's just go to
this new group and we will tap on it and we will
rename it as sleeping shark. Now when we have the group
lead just go and position are shark right in a
center of our canvas. So our group is selected. We are go into the
transform tool, which is our arrow key. On the top-left,
we are going under a uniform and we will need
to go under snapping. You will see that we have the
option snapping here too. Let's select it and then
we will go to our Canvas. We will hold our Apple Pencil
at some blank space and we will need to find
this intersection with this orange lines. When you found them, you are right in the
middle of your canvas. Now, when we have positioned our Shark right in the middle, ledgers go and
deselect everything by hitting our heirarchy
one more time. Now let's continue by
going into our layers. And we will find
earlier with the lines, we will need to prepare it
because we will be aging, are colors on the differently. What we need to do is
to go to early with the Lines tab on it
and select reference. Now, if we go and create one, rarely we will be
agent the colors using these lines that
we have on this layer. But I Recoloring part will
be on the differently. So what we need to do next is to go to earlier with this scheme, select it and create one
more layer above it. Now let's rename this
layer as coloring. When we did it, we will go to our color palette and we will select the
color with the name, a light grayish blue. With this color, we
will just drag and drop it to the whole
shape of our Shark. Let's just go and
try to do that. You can see that we will need to put the color to the theme. So let's just go and
do it one more time. If you want, you can hit the
continue feeling on the top and you will find some places that you
want to add the color. You can go to them and you can just tap on them
and recolor them. So in that way, you can
recolor your elements to when you free colored
all the elements that you want to
have this color LED just hit this little check
mark on the color drop. When we add down with this part, ledgers go and select
a different color. So let's just go with
pink or pink to or any color that you like that we can add to the rest of the elements. You can combine the colors and create something
that you like. If you want to select a
different color one more time, go to the colored
palettes selected and edits to the objects that
you want to recolor. Also, if you have
some white elements, for example, like this tooth, we will need to add
the white color to two because if we go and hide
our background color, we will see that these
objects is not recolored. So let's just go and add the
white color to the tooth. The last thing that we will
add for our Base Colors will be a little elements
on the bottom of our Shark. We will go to our layers. We will go to our layer
with this scheme. And from here we will
create a new layer. You can rename this
layer as you like, or if you want, you can
leave it as it, It's. So now we will go back to
our color palettes and we will select the color
within the light gray. We will also go to
our brush library. We will go to the
calligraphy folder and we will choose
monoline brush. With this brush, we
will go underneath our shark and we will create
a little ellipses like that. All that we need is the same way as before,
a closed shape. You can hold your Apple pencil and the end of the
line and you can go to the editing mode and adjust the size
of your elements, its openness, and it's position. And when you have
something like that, ledgers go away from
our editing Modes and we will drag and drop the
color inside this shape. You can see that we can do that because we will need to
go back to early years and we will need to go
to early away the lines and we will need to
turn off reference, then just tap on
earlier with the lines. We will go to this
little list and we will select
reference from here. Now we will get back to
our layer number six, and we will drag
and drop the color inside this little parts. Now we are done with
our basic colors. So let's move on to the
next part where we will be aiding our Shadows
and Highlights
5. Sleepy Shark: Shadows & Highlights: Before starting this part, Let's add a few more details. Firstly, we will go
and change our brush. We are going to
the Brush Library, going under airbrushing and
select and medium blend. Then we will go to our color palettes and
select the white color. When we did it, we will need
to get back to the layers and we will need to select
our layer with coloring. From here, we will go and
create one more layer. So let just stop on
the plus icon and let's rename this
layer as Details. And now to make sure that
we are aging REG tells only on the existing areas that we have on the
previous layer. So we are not going beyond
the borders and we are not aiming at more details
outside our coloring part. We will need to clean this
layer to a previous one. We will go to this
layer with Details. We will tap on it and we
will choose clipping mask. Now, everything that
we are create an own. This layer will be
showing only on the existing color and that
we have on the previous one. So now with our new brush, with our new color and
all our new layer, we will go to the bottom
part of our Shark, All bit agent or a tiny parts. Firstly, let just go to this area that we
have near the fin. And from here we will
start agent are color. You can adjust the size
of your brush and we will go up until we
reach our little smile, and we will go a
little bit above it and we will repeat its shape. You can add a bit of a
white color to the thin, or if you don't want to, you can go and grab the smudge
tool and smudge it nicely. Or you can go and grab the eraser tool and
erase this little part. When we're done with
the front part, lunches go to our
right part and we will continue agent our
autonomy right here. If you're going a little bit beyond this tiny
part, don't worry, you will need to
grab the eraser tool and erase the parts
that you don't eat. When you're done with this part, we will go and add
little cheeks. So firstly, we will go
and change our color. We will deal with magenta
pink, or with pink. Number three, you decide what color on the
cheeks you would like. For example, let's just go
with pink number three. And with this color
with the same brush, we will go underneath our eyes and we will add
little chicks there. If you don't like
how one color looks, you can always get back and
try out a different color. Now when we are done
with the details, let just go and start. Aging are Shadows. Firstly, we will need
to go to our layers and we will need to go and
create one more layer. So we will start from the
layer with a Details. We will create one
more layer from here. Let's rename it as Shadows. We also will need
to clean this layer to a previous one so we
know how to do that. We will tap on the layer and we will choose Clipping mask. And also we will need to go and change the Blending
Mode of this layer. Blending modes are
different ways your layers can interact
with each other. So you can add different
visual effects with different blending modes. For this part, for this Shadows, we will be using
multiply blending mode. Let's just tap on
our N icon and we will find multiply into
these little list. Also, we will need to change
the opacity on this layer. So for now, let's
leave it at 15%. When we are done, we will tap on earlier with the
Shadows to close this window and we will go to our color palettes and select the color with the name purple. Then we will go to our brush library and we
will change the brush. So for example, we can go to the calligraphy
folder and choose monoline brush or go to the Incan and select
our technical pen. When you are done with
selecting the brush, lead jazz, go to this area underneath
the Fin on the right, and we will create
a shadow here. So firstly, we will just go and create a little curve like that. You can hold your line
and the end to adjust the angle and curvature
of your line. When you have
something like that, let just go underneath it and we will add the color
to the whole area. When you have this little
shadow alleges go to the other F01 and we will put the whole thing
in the shadow. So again, we are going there
and creating this shadow, just going along the shape. When you have these little
shadow alleges go to the tail. We will go to the bottom part, right underneath this little
line that we have and we will create another curves going through the whole shape. Hold your line at the end if you want to adjust it and then just go underneath it and
add the color to this area. If you need to
adjust some parts, grab the eraser tool
and adjust them. Let's also add a
little shadow to this little Tommy that we have between the tail and the theme. So again, I go in here to this area and we are
creating another curve. When you have your
line Lynches go underneath it and let's add
the color to this area. The last Shinar that we will add will be on our fine on the top. So let's just go to
the right part of it and we will create
a shadow like that. We adjust repeating the shape on the thing that we have. One rep. Right here on the bottom, we will go just above
this line that we have. And we will just recreate this line that will
naturally be here. When you have these two lines, let just go inside this
area and let's recolor it. If you need to go and
adjust some pirates, go and do that. If you think that maybe your shadows are too
bright or too dull, you can also go to your layers. You can go to your
LEA with a shadow, tap on the icon and a jazz
the opacity from here. Now, if you want, you can go to this little
miscellaneous objects and add the shadows to them too. If you don't want to do that, Let's move on to our Highlights. To start with our
Highlights, firstly, let's go to our
brush library and we will go to our
airbrushing folder. We will select media
and blend rash. We did it. We will get
back to our layers. And from here, from
our Shadows layer, we will create one more
layer to Let's just tap on the plus icon and let's rename
this layer as Highlights. Let's clean this layer
to previous one, so turbinates and
choosing Clipping Mask. Then we will go to our N
icon and for this part, we will change the
blending mode to overlay. Let's leave the
opacity at maximum. And then we will go to
our color palette and we will select the color
with the name pink three. When this color and width
are very soft brush, we will go over the top area and we will create a
slightly gradient. So what we need to do is to
go very slightly on the top, create a smooth
blends if you already did it or if you want to
adjust it in any way, you can grab this much tool
and try to blend it nicely. If you want to add this
effect to some other places, you are welcome to
go and do that. For example, we can go
to the top parts of our additional elements and
add this color to them. And when we are done with
our little gradient, we are ready to add
the actual Highlights. So firstly, let us go
to the brush library. We will go to the
calligraphy folder and we will choose
monoline brush. When we did it, we
are going back to our color palettes and we will select the white color wheel. We're working on this same
layer where we were aiding our gradient now with our new color and
with our new brush, when I go into the
top part of the head of our shark and we will add
the highlights in that way, you can hold your
line and the answer. You can go to the editing
mode and adjusted. You can adjust the thickness, adjust the size of it. It's all up to you. All that we need is to add
the highlights on the top. When we are done with
the first Highlights, let's continue by go
into the fin and we will add the highlight there to
the same way as before. Just go into this side and
creating the Highlights. Now let's move on to the tail. And again, we are going to the top part and we are
adding the highlight there. When we are done with itself, we will move on to our AFINN on the left and the highlight
to the top area. And the very last
highlight that we will add will be on the top of
the heads of our Shark. We will just go and add
a little dirt like that and it will be our
brightest spot on that hat. So now, if you want to add
a few more highlights, you are welcome to
go and do that. If you want to add
the highlights to your additional elements, again, go and do that. Now when we are done
with our Highlights, lead x21, Marie, think we
will go and recolor our eyes. So firstly, we are going
back to our layers. We are going to earlier with a Lines and above it we
will create one more layer. So let's just step
on the plus icon and for now let just
leave it as it is. Let's clip it to a previously by typing in it and selects
and Clipping Mask. Now on this layer, we will firstly go to our color palettes and we
will select the color with the name purple with this color and with the
same brush mono line, we will go over our eyes
and we will recolor them. When we did it, we
will get back to our color palettes and we
will select the white color. We will go inside our
eyes and we will add the highlights there to just go an inside and put
it a little dot. Now, if you want to go and recolor the lines on your
additional elements, you are welcome to
go and do that. When we are done with this task, one more time, we will
go back to our leaves. We will go to our
sleeping Shark group and we will collapse
the group BY go into this lethal V icon. Let's collapse it. And when we have only these groups selected, we will one more time
go to our Transform. So we will go and check out
whether it's snapping is on, and we will put it right in
the center of our Canvas. Again, we are looking to these
two lines that are orange. And now let's just
deselect everything by hitting our heirarchy
on the top-left. And we are done with
our first Illustration.
6. Pink Shark: Sketch: Let's add our second Illustration
By go into our leaves. Firstly, we will hide our group, we this sleeping shark. So we're going to our
little check mark here and we are tapping on it. And then we will create a new layer that will
rename as scheme. Let's just tap on the plus icon and let's rename this layer. Now when we have our new layer, we are going back to
our brush library. We are go into this
kitchen folder and we're selecting the same brush
that we were using before. When we have our new brush, we are getting back to the color palettes
and selecting again the color that we
used before for our first Sketch,
it was magenta. When we have it, we will start by creating our scheme the same
way as before. We're starting by creating
a little rectangle. Let's just go and
created the same way as we did with our
first illustration. We just need to go along the
whole shape of our canvas. And at the end of the line, we will hold our Apple Pencil. If we need to adjust
the shape even more, we will go to the top
to the 18 months. If you have the option
rectangle, you are good to go. If you don't have
it, you can use any other option and adjusted to the shape
of the rectangle. Let's just try to put it
more toward the center. So we will go to some
blank space that we have onto our canvas
or outside our Canvas. We'll hold our
Apple Pencil and we will move our shape. This time. Let's make it a
little bit bigger. So we will go to
one of the nodes, either to the top
or to the bottom. And we will drag it up or
down to make it bigger. When we have it, we
will go away from our editing Modes now
the same way as before. We will go to the middle
part of our rectangle and we will create a line that will represent the middle parts. Let's just go and create this line at the end
underlined who will hold it? We will adjust our angle and if we need to put it
more toward the center, we will go to our
editing mode on the top. Let's just try to
put it in a center. And when you have it, we will need to go and create one more vertical line the same way as with
our first scheme. So again, we're arguing to
one-third on our right part, we are making ozone Markdown
and we are creating a similar line that we already
have a jazz the angle, if you need to place
it differently, go to the editing mode and
adjusted when you have it. This time we won't be creating our line that is going
on the horizontal axis. We will create
something different. So we will go and
create a diagonal line. Let's first go
over our left side and we will create a line
going in that direction. Hold it and the end as always, adjust its angles so it
looks something like that. And when you are done, we will just go and start
creating our Sketch. So firstly, let us get back to earliest and we will adjust the opacity of early with
this game just a little bit. So we will go to
our an icon end. We will adjust the opacity by dragging our slider
towards the left side. When you're satisfied
with the opacity lead, just tap on early
with the scheme. And let's create
one more layer that will rename as Sketch. And when we have our scheme, we will need to
do the following. Firstly, we will go
to our left part on the rectangle
or the top of it. We will create an ellipse here. The same way as always, we are just grabbing
our brush and creating the shape with one line
and the hands on the line, we will hold our Apple pencil, will snap it to a better shape. And when we did it, we will go over the top two
are editing Modes. Now let's a jazz deposition and this size on this elements. Firstly, we will need to end up with something very rounded. So you can go with
Alice or with a circle. So you decide what you want to use and when you have
the shape that you like, ledgers make it a
little bit smaller. So we will just go
between the nodes and we will drag it
towards the center. When we have the
shape that we need, we will just go and position
it in a different way. We will need to
have more space on our boards and then
we have on the top. And we will need to move the whole shape more
toward the left side. When you have
something like that, we are ready to move on
from our editing mode. So let just tap on the
screen either with our Apple pencil or with
one of our fingers. And when we have
this first sheep, we will need to go and
start creating our curves. Firstly, let's just make sure that we know where
we need to go to. We will go to this intersection that we have toward
our right part, which is our intersection
between our line that is vertical and the
other line that is diagonal. This is the place where we
need to move our curves. Lynch's firstly go toward the bottom part and we will
need to create a very, very long tiny here. We are creating a
very concave shape. Let's just continue
by going into our line that we have on
our shape on the ellipse. And from here we adjust creating the lines go into Word
this intersection. When you have
something like that, we are ready to move
on to our two bytes. And this time we will go with a curve that will look
a little bit different. We will need to create
some kind of an S shape. So we are going toward
our top part and we are continuing this line that we have on the top of this Elis, we are creating a
shape like that The whole shapes should
be very rounded. And if it's not happening
for you from the first try, you can try it one more time if you want to adjust
the shape even more. Wiccan try to do it manually or we can use some
additional tools, such as work through
and Liquify. Let's firstly go or
the top part and let's make this whole curve a
little bit more curvy. If you like the result, how it is right now, you can keep it like that. Or if you want to adjust it. Alleges try out to go to our magic wand tool
and use Liquify tool, adjust the size and try to make the whole top part more rounded. We also will go to the
bottom and we will make these sheep on the bottom
a little bit more flat. When we have the sheath like
that led just get away from our liquefy tool by tapping
on our magic one tool. And let's continue
agent are Details. Let's first like you to this
intersection that we have on our right and we
will start creating our guiding lines for the tail. This time, let's go with
three different lights. So firstly, we will go to the top and create
a line like that. Then we'll go more toward the right side and
create another line. And then we'll go down and
create another diagonal line. Then when we have these
three guiding lines, we will need to
do the same thing as we did with the
previous Tale, but this time we
will need to create a three different ellipses. So let just start from the top and we will create
the first Alice. They're the same way as
always we are creating this year just with one line
and they end on the land. We are holding our Apple pencil. Let's adjust its
position and maybe adjust its size by going
into our editing mode, you can adjust the angles. You can adjust the tip of your Tale by making this
ellipse a little bit smaller, shrink it down if you want to, when you're satisfied
with the whole shape, ledgers go and create
two more ellipsis. When you are done with
your ellipsis ledgers, grab the eraser tool and we will erase all the lines
that we don't need. Now when we have the
T let just go to where it Art so part and
we will add the fin there. We will go to this line
that we have any middle and we will step a little
bit to the left from it. And we will create a
guiding line like that. You can play with its size, you can play with its curvature. It's all up to you when you
have your guiding line. Let's just turn it into our fin. Again, we are just repeating
this similar shape that we had before
on our first Shark. We are creating the
shape like that. Try to make a smooth connection
between these two shapes, the whole shape of
the body and our fin. And when you have it, ledgers go toward
the bottom part and we will add
another theme there. Let us find the middle part of these prior that we
have for our rectangle. So let's just make
a little mark down. When we have this markdown, we will go to the bottom
part of our body. And from here we will create a guiding line going
in that direction. When you have it, we
will go more toward the right side and we will
create another guiding line. There. We are moving more
toward Art Sale and create an, another guiding line like that. When you have these two guys in Lines Layer just turn
them into the fence. Firstly, go into worth
our left side and again we are creating
half of the ellipse here. And again, try to make nice and smooth connections
between two shapes. When you have the first
thing, let's move on. So we're at, our
next guy is in line, and let's create another theme there as it is a little
bit closer to us. Let's make it I be bigger
than the previous fin. And now we have the basic
shape of our Shark. If you like it, you
can keep it as it is. If you want to adjust
it in any way, you are welcome to go to
the Liquify tool or to the Warp option and
adjusted to your liking. And when you like the
shape of your Shark leg, just get away from
our liquefy tool and let's work on to
our facial features. Let's just grab our
brush and we will go to this intersection
that we have right here on the top between our heads and our
feet on the head. And from here we will go
down with another curve. So these curves, we'll
go through the center on this ellipse that we
have as a guiding line. Now when we hadn't
this guiding line, let just go and start by
creating a little smile there. So we are stepping
from the bottom part, you can make a little
mark down where you want to have
your little smile. When you have this
little mark down, let just go and
create a big curve going almost for the whole
shape of our ellipse. You can hold your
line and the ends. You can go to the editing mode and adjusted to your liking. When you have the curve
that you like ledger step on the screen to get away
from our editing mode. And ledgers go over this
line to add our little eyes. So firstly, we are going
toward our right side. We are stabbing a bit from Ireland that we
have just created, and we are creating
a shape like that. This will be a tilted ellipse. You can create it
manually or you can hold your line and
the end and adjust the shape with the editing Modes when you have the first
ellipse on the right, Let's move on to our left side, and let's create
something similar here. But this time our
ellipse will be tilted more toward
the opposite side, so more toward the center. And as this I is a little
bit farther from us. Let's make it a little bit smaller when you have the
shapes that you like, let just go inside them
and let's just shade them Now let us go underneath our eyes and we will add
little cheeks there. So we're just creating a
little ellipsis like that. When we have our eyes, Let's move on to
airline that we have for our smile and we
will add to Tooth. So firstly going over
our right side and creating a similar shape
that we had before. So just a very rounded triangle when you have it
on the first side, Let's move on to the
opposite one and let's create another shark tooth here. This time, it'll be a
little bit smaller. And the very last thing that
we will need to add here for our facial features
will be the gills. So let's just step a little
bit from our right cheek. And again, we will create
three lines like that. Now one more time. If you want to
adjust some parts, you are welcome to go to the Liquify tool or
to the Warp option. So let's just spend some
time there until we're satisfied with the whole
shape of our Shark. When you're satisfied
with your shape, only Shark ledgers get away from our liquefy tool or
from our warp option. And let's add the
additional elements. Firstly, we can do and do the same thing as we did before. Once our first illustration, we can mark down
where we are gonna be eight and a different
color for this tiny area. So firstly, let just
go to our face and we will go around between the
eyes and our little smile. And we will create a curve
going in that direction. We are creating some kind of the nose area and we are
going right to our theme. And when you habits, we will move on to part with our little line that
will represent our Tammy. When you have
something like that, we are ready with this part and we are ready to add
some additional elements. So for example, alleges go
through the whole shape of our shark and let's
add a few elements. For example, let's just go to our theme that we
have on the right and we will add a little dot here
just with a simple Alice. Also, we can go to the
top on the hat and we can add a little mark here in
the shape of the heart. You can play around with different shapes, with
different elements. Just go and add a few of them. When you are done with
adding some details to this Shark leg just
above our shark, and add a few more
additional elements. So for example, let's
start with a few hearts. Play around with
their size and with their placement at
a few more of that. When you add then
with the hearts leg, just go over the
top on the field. And let's add a few clouds so they can be very
randomly shaped. It's all up to you. Add some more elements, just feel the areas so
they are not that blank. If you want, you can go
and add some sparkles, some doors and
something like that. Just go and create a few
more of these elements. When we are done with
our little elements, lead just go underneath our shark and we will add
a little ellipsis there. So we will create
something like that. As always, you can
hold your line and the answer create
a perfect ellipse. And when you have it
alleges moving more toward the center of our shape. The last thing that we will need to do here is to position the whole Illustration more
in the center of our canvas. So firstly, let just go to
Arles and we will select both on the layers that
belong to these little shark. When they first
layer is selected, we go into the second one and we are swiping it
from left to right. We also can do and create
a group out of them. And we can rename this
group as happy shark. When the whole
group is selected, we are going to our
Transform tool, which is our arrow
key on top-left. And we are using uniform method and we're also using snapping, selecting snap in here too. Now, we will need to find
two guides in Lines, orange, one vertical
and horizontal. When we found that we are right in a center of our canvas. Now let's deselect everything by heating our arrow
key on the top-left. Let's take a look at our
Illustration from the distance. If we like it. If we don't want to
adjust anything, we are ready to move on to our next part where we'll
be creating our Lines
7. Pink Shark: Lines: Let's start our line in part
by going into the layers. And firstly, we will
go to earlier when this gauge and we will
adjust its opacity. So let's just step on the icon and we will move
this slider towards the left side until
we still can see what's happening on to
early with this gauge. But when it's not
that distracted, when you're satisfied
with the opacity. Let just tap on earlier with
the Sketch one more time. And we will go to earlier
with this scheme. And from here, we will create a new layer which will
rename as lights. Now when we have our new layer, ledgers get back to
our brush library. We will go into
the inking folder and we will select
technical pen. It just destabilisation
streamline if you want to. And when you are done with
preparing them, brush ledgers, get back to our color
palette and let's select the color with
the name dark magenta. When we have our brush, when we have our color, when we have our new layer late, just go and repeat
the lines that we have on earlier
with this gauge. And remember that all the lines should be closed very quickly. Let just go and do that. When you are done with
the main outlines leg, just get back to
our layers and we will hide our layer
with this Sketch. We will check out
whether everything is looking fine and
everything is closed. And if we have some places
that we need to adjust, we will go and adjust them. When you are done fixing
your outlines lead, just get back to Arles and get back earlier
with the Sketch. Let's continue. Aging
are facial features. When we are done with
our facial features, one more time ledgers get back
to the layers we will hide earlier with the Sketch
and we will check out how everything looks like. Just go inside our
little eyes and we will drag and drop the color
inside this places, a jazz the outlines
if you need to, and when you're satisfied
with everything here, we can move on to our next part where we will be agents
are basic Colors
8. Pink Shark: Base Colors: Start with this part. Firstly leg, just get
back to early years and we will hide the
layer with this scheme. Then we will select our
layer with a scheme, and we will create one more
layer above this layer, and we will rename
it as basic colors. Now to end the basic colors only differently from airlines, we will need to get back to earlier with the lines selected, tap on it and select
reference from the list. Now when we have this option
reference on earlier with the lines we are getting back to earlier with basic colors. And then we are going back to our color palettes to
select our basic color. This will be pink one. With this color,
we will go inside the shark and we will
edit to all the objects. We also need to remember that our teeth are now transparent, so we will need to get back to our color palette and
select the white color. With the white color, we will go inside the teeth
and we will add it there. And now, when we are done
with the basic colors, ledgers get back to
our layers and we will unhide earlier
with the Sketch. We don't need any more reference on the layer with the lines so we can go and get rid of it. So let just select
earlier with the Lines, tap on it and select
reference from the list. Now getting back to
our basic Colors and we will go to our
sheep, all the shark, and we will add our little
elements that we have here, little hard little dots
with the same white color. So let's just go and
very quickly do that. Let's just start from
the outlines and then we will go to
our brush library. We will change our
brush to monoline and manually recolor the inside
parts, all these areas. When you're done,
let us get back to our layers and we will unhide
our layer with this sketch. We will get back to
our color palettes and we will be aiding
our little cheeks. So you can select
any color that you like that will be
suitable for these parts. And to do so also, we will need to go to
our brush library and we will need to sweat
medium blend brush, and just go above or without
cheeks that we have on the layer with this gauge and we will add them with this brush. Take a look at your cheeks
without the sketch layer, if you like them, we are ready to move on to add this element that we have on the tummy for the time your lenses go and create
one more layer above, we will rename it as Tammy. We'll clean this layer
to a previous one, so tap on it and
select Clipping Mask. Now let us get back to our
color palettes and select the white color to know where to prove these
elements lead. Just get back to our
layers and we will get back earlier
with this sketch. Now, when we have this line, we will just go with our brush, the same one that we were
agent our cheeks with. And we will add our little
element for the tummy. Now, take a look at this elements without
the sketch lines. If you want to adjust something, go and adjust it. If you want to blend
it more appropriately, you can grab this much tool and go and soften these corners app. If you want to erase
some parts and grab the eraser tool and
erase these parts. When you are done one more
time where I getting back to our layers and we are getting back our layer with the sketch. Now let's just create one more leaf for our
additional elements. We will put it underneath
our basic colors. So we are again go
into earlier with this scheme and from here we
are creating our new layer. You can rename it
as miscellaneous. Now, let's just get
back to our brush, either mono line or
a technical pen. And then we will go to our
color palettes and we will select the color with the
name, lights and blue. We miss color. We will go to the bottom element
that we have here, and we will recreate it. So let just go and do that
the same way as before, starting by creating an ellipse. And then A1, the color insight. And with the same color, LED gels go above some of our hearts and we
will recolor them to when you have
the outlines for the hard sludge as drag and
drop the color insight. And now Lynch's get back to our color palettes and
select some pink color. And with this color, we
will get entry color one of our hearts
and our gloves. And the same way as before when you are ready with the outlines, drag and drop the color insight. Now, Lynch's get back to our color palettes and let's
select this orange color. With this orange color, we will go entry color
are a little sparkles. If you want to add some
additional elements, for example, a little dot, you can go and use
the same color or you can try out
something different. Now, let's take a look at the whole Illustration
without our sketch lines. So we are again go
into the layers and hide in the layer
with this sketch. Now Lynch's work, more ones
that are additional elements. So we will go to
this bottom elements and we will add some
additional elements there too. So firstly, we will get back
to our color palettes and we will select the white
color with the white color, we will go back to our layers. We will go to earlier with
miscellaneous objects. What we need to do is to
make sure that we will be aiding the elements only
inside the existing areas. And we don't want to create
one more layer here. So we can use one option
that Procreate hats. We will need to tap on the layer and we
will need to select Alpha Lock from deletes everything that we will
be creating right now. We will be creating only
on the existing elements. So now let's just go to this element that we
have on the bottom. We will go to the middle
part of it and we will create a little ellipse
there as always, hold it and the hands and
if you need to adjust it, if you need to place
a differently, go to the editing mode and
adjusted to your liking. Let's try to put it
right in the middle. And when you are done, we will go along the edges
of our elements and we will add a few half
of the circles or half of the
ellipses like that. If you want to choose
a different pattern, you are welcome to dict
and witnessing color. And we, the same technique, we will go to our hearts and we will add little
Highlights to them. So just with the dot, we will go to some of them
and we will add these dots. If you want to add a little
Highlights to the clouds, you are welcome to do it. And also witnessing color, we can go to our
elements here once they are clouds and we can separate
them from the clouds. So we won't go along this part, girls, and we will
create another outline. If you feel that you want to add some objects or if you
want to adjust something, go and do that. And when you are ready, we will move on to our
next part where we will be aiding our Highlights
and Shadows
9. Pink Shark: Shadows & Highlights: Let satisfied by
aging Irish Shadows. Firstly, we are going back to our colored palettes and we will select the
color with the name, lights see, and blue. With this color, we
are getting back to our layers and we are going
to the layer with the tummy. From here, we will create one more layer that we
will rename as Shadows. Let's clean this layer
to a previous one. So tapping on it,
selecting Clipping Mask. And then we will change
the blending mode to multiply S for the opacity. For now, let's keep it as 70%. Now let's just get back to our Canvas and we
will firstly go to our field that we
have on the left and we will put it in
the shadow completely. Now when the first
thing is done, alleges go to this little place that we have near
our second theme. And we will start from
here, agent Irish shadow. We will start by creating
a curve like that and doing for the whole
shape of our tummy. If you want to adjust
this curve in any way, go to the editing
mode and adjusted, try to repeat the line that
you have on the bottom. When you have your first curve, ledgers go underneath it and let's recolor the
whole area there. Now when the shadow is done, Let's move on to our right
part where we will be aging re shadow to the bottom part of
the tail end to our Tommie. Let's just go a little bit underneath this
line that we have one tiny and we will create
a curve similar to it. When we have this curve, let just go underneath it
and let's recolor this area. Now. Let's just go to
the bottom part of RT. We can just go in that way and create the curve like that. When we have our curves, ledgers go to the bottom part
entry color the whole area. When we are done with this area, we will need to add
two more Shadows. So firstly, alleges decrease
the size of our brush. And we will do to this top part that we
have own Art seal. We will add a little
curves there. When you have it, we will
recolor the rest of the area. And when these shadow is done, we will go to the top fin and we will add the shadow here. Let's firstly go to
the bottom part and we will recreate the
line that we have there. So just create the
curved like that. If you need to adjust
it in any way, go to the editing
mode and adjust it. When you have
something like that. Elaine, just go to
the top part and let's create our
shadow in that way. So we are just repeating the line that we
have own the rights. And when we have our
outlines leg as you increase the size of the
brush and we will add the color inside this area. Now, let's take a look
at all are Shadows. And if you need to
adjust some parts, ledgers, go and adjust them. Now when our Shadows are done, LED just add our highlights. So firstly, we're going back
to our layers and we will create one more layer above
our layer with the Shadows. Let's rename it as Highlights. As always, let's clean this
layer to a previous one. So tab and selecting
Clipping Mask. Then we will go to
our an icon and change the blending
mode to overlay. Then we will get back to our color palettes and
select the white color. We will do the same thing as we did with our first illustration. We will go to the top area of our shark and we will start
aging our highlight there. As always, you can play
around with the curve. You can make it thick, you can make it thin. It's all up to you when you
have the first Highlights. Let's move on to our
thin on the top. Let's create the
highlight there too. Now we will go to
the top of Art Sale and we will add the highlight
to this little place here. And also we will go to our theme that we
have on the right. And we will add a little
highlight there too. If you need to adjust them, Lines go and adjust that. And now we are almost done
with our Illustration, but ledgers get back to Arles. We will go to hourly away
the lines and above it, we will create one more layer. We will clean this lead
to a previous one and we will use it for
Recoloring our alliance. So now let us get back to our colored palettes
and lead select the color wheel then they
been grad with this color. We will firstly go to our little mouth and
we will recolor it. We also will go to our gills
and we will recolor them to, and now we will go to this
little protrusion lines that we have and we will
recolor them to also lead, just make all the lines that are inside of our Shark, these rats. And now the very last
thing that we will need to do is to add the
highlights to the eyes. So we argue into the
colored palettes. We are selecting the white
color and we are going inside of our eyes and we are
adding little dots there. If you want to add
more highlights or if you want to play
with this Shapes, all these little highlights, you are welcome to do it. And now let's just
take a look at the whole illustration
from the distance. And if we like it, we are done with our
second Illustration.
10. Colorful Shark: Sketch: Let's start our
last illustration from San tiny preparations. So firstly, we are going back
to our layers and we will go and collapse the whole
group with our happy shark. So let's just go to
the top of our group. We will select it
and we will go to this little V icon
near the checkbox. Like just tap on it. And when we have collapse, our group led just
hide it again where I go into our checkbox and
we are tapping on it. Now when we have
our blank canvas, we will go and create
one more layer and we will rename it as scheme. When we have our new layer, we are going back to
the brush library. We are going to this
kitchen folder and selecting the same brush
that we were using before. When you have it,
where I get them back to the color palettes
and selecting again the same
color that we were using before for our
Sketch in parts. It was magenta. So now when we have
everything prepared, let just start
creating our scheme. This time we won't be
creating a rectangle, but we will create a triangle. So let's just go to the
left part of our canvas and we will create a triangle
the same way as always, just with one line. So let's just go and create our sheep and Andy, end of it. We will hold our Apple pencil. Let's make the whole
shape a little bit tilted and ledgers go
to our editing mode. If you have the option
trading goes selected. If you don't have it, select something
different, but try to make the whole shape
look like a triangle. When you have
something like that, let just go to our triangle and we will make the whole
shape a little bit bigger. So again, we're arguing
between our nodes and we are dragging it to the side to
make the whole shape bigger. When you have this is like that. Let's just put it a
little bit more toward the bottom part and
S for the tilt part. Ledgers make it like
that when you have something similar to what you see right now on your screen, Let's just get away
from our editing mode and let's continue
making our scheme. So now we will do to our corner
that we have on the left. And from here we will just
create a line going up, hold it and the ends
a jazz the angle and try to put it right in the
middle of your training. Go when you have it. We will go to our left part
and we will need to create a line that will be parallel to the line that we have
right here on the right. Again, we can start by creating a little mark down that will represent some kind of one-fourth or one-third
on the whole shape. When you have it, we will just create a parallel
line going down. Hold it, enhance
age as the angle. If you need to move
it a little bit, go to the edited Modes
and adjust it when you are ready alleged as get
away from our editing Modes. And we are done with our scheme. If you want to move
the whole shape a little bit to the right, you are welcome to go to
the Transform tool and adjusted if you don't
want to move it, alleges go back to our layers. And firstly, we will go and change the opacity
on this layer. So I go into our an icon and drag and our opacity more
toward the left side. Now when we're
done, let's create one more layer on which we
will be creating our sketches. So let's just tap
on the plus icon entering name earlier as Sketch. And when we have
earlier for this gauge, like just go and firstly find an approximate center
of our triangle. We will again make
a little markdown. And when we have it, we will go toward
our top-right part. And here we will create another shape that will help us to create the
whole illustration. This time, it will
be an ellipse. The same way as
always just creating a shape with one line
and end the end of it. We are holding our Apple pencil. Now let's just go to our top to the editing mode and we
will adjust the shape. We will need to make it a
little bit more rounded. And we will need to make
this shape a little bit bigger on the bottom rather
than we have it on the top. So let just go to one of
the nodes that we have, for example, on
the bottom right, and we will drag it down when you have
something like that, ledgers get away from
our editing mode and let's continue
creating our Shark. So firstly, we will go to the
bottom part and we will be doing the same thing as we did with our previous
illustration. We will create a
very long Tommy. Again, we're starting by going to this line
that we have on our Alice and we're doing to this intersection that
we have on the left. So let just go and create a very long time
it with a curve. Try to make a smooth connection
with your ellipsoid. And if you need to
adjust some parts, maybe erase some Lines and grab the eraser tool
and erase that. Now when we have this very
long Tommy ledgers go to the top and let's create a similar shape that
we were using before. So we will be creating some
kind of an S shape layer. Just again go to the
top of our heads. And again, we are reaching this intersection that
we have on our left. Let's just go a little bit, abandon the whole shape
and we will create an S shape when we have this line leg just
a jazz our fee, so it's little bit, we will
go to our right part and we will need to create a
different connection here. We will try to make
it very not rounded. So what do we need to do is
to go to the bottom part firstly and create
a line going app. When you have this
line like that, we will continue
making this line and we'll combine it with a line
that we have on our top. In the end, we will need to
create something like that. You can soften this
corner that you have right here
on the top right. You can make it curvy. You can make it very straight. It's all up to you. When we have this
shape like that, alleges go and adjust it with our liquefy tool or
with our Warp Tool. So let's just work a
little bit on the sheep. And our goal is to make
a very long time it on the bottom and a very
rounded shape on the top. Let's just go and spend some
time adjusting our shapes. When you have a drop
shaped like that, let just go and add
our little seal. This and let's create
something fancy. We will go to this
intersection and we will create a little cross. So let's just do
something like that. When we have this
little cross ledgers create a shape of the butterfly. What we need to do is to create a little bow shape and
that will look like that. We will go firstly
over one of our sides and we will create a
little elements like that. If it's easier for you, you can start by creating
for ellipses to own that soap will be a little
bit bigger and two on the bottom will
be a little bit smaller. Or if you don't want to
create additional shapes, you are welcome to
go manually and create half on the
ellipsis like that. When we have the shape like
that ledgers guilt and adjusted by softening these
corners on this side. And also we can play a little bit with the whole
shape in general. So for example, we can go to the top little fins and
we can make them pointy. So in the end, we will end up with
a shape like that. If you want to adjust
the shape in any way, you can go to the magic one
tool and use liquefy option. Take a look at this
part from the distance. If you like it, You are
welcome to go away from the Liquify tool
and we are ready to continue agent the
rest of the elements. Firstly, let just go to the top and we will add a
little theme there. We have this guiding line on the top ledger step a little
bit from it to the right. And we will create
another guiding line going in that direction. When we had it, we will put it right in
the middle of our fine. So let just go over
allright part and we will create a similar shape
that we already seen before. So let's just create a
very elongated fin there. You can play around with the sheep and find
what works for you. Now let's just go to
the bottom right to this line that we
have as our triangle. And here we'll
create another thin. It will be a little
bit smaller than the one that we have on the top. Let's just go there and
create something like that. When we have it, we are ready to move on to our site flippers. So firstly, let us go to this
intersection that we have between our triangle and the line that is going
from the corner. And we'll create
another guiding line. It will be diagonal
and go in that way. You can play with the angle. It's all up to you. This will be the middle
part of our flipper. When you have this line, Let's just turn it
into our affine. So again, we are creating
half on the ellipse. You can make it rounded or
you can make it pointy. It's all up to you. Now when we have this
fin on the right, Let's move on to our left side and let's create another fin. But this time we will need to create two more guiding lights. Firstly, let's just go to our bottom part on
this fin on the right. And we will create a curve going through almost the whole
shape of our Shark. You can connect it
with this little door that we have in the
middle of our triangle. And when you have this
first guy is in line, we will go toward
the top part of our fin and we will create
a parallel curve there. When you have
something like that, we will go to our left bytes
and we will need to create a little box that later on
we will turn into our fine. So let's just go and create
something like that. Going Ellis, limit
beyond the frames of our Shark and Creating
a little box. You can make the lines straight
or you can make one of the sides a little bit bigger
when you have this shape, Just turn it into a thin. So firstly, we will
go over our top part and we will create
a shape like that. You can play with its curvature. You can play with its size. So you can play
with the openness on this half, on the olives. When you have it,
we will go toward our bottom part
and we will create another little ellipse there. And when you hand this little
ellipse on the bottom, we will go toward our
books on the other side, and we will end up
the whole shape. Let's just make these corners on the box a little
bit more rounded. And then we will go grab our eraser tool and erase all these slides
that we don't meet. We can work more on
the shape and make this whole side that we have on the right a
little bit smaller. So we will go to our boards
and part and we will cut it. You can play with the sheep, you can find what works for you. You can erase all the
lines that you don't meet. Now when you have this shape, we will need to add one more little shape that will represent the connection between the body and this
little thin lenses go to this corner that we
have on the bottom right, on this shape that we
have just created. We will create another
similar shape, but this time these elements will look to the opposite side. So what do we need to do is to create something like that. You can play with this size on this element if it's not
happening from the first try, try it out one more time. Take a look at the
whole illustration from the distance and when
you're satisfied with it, Let's continue by adding
our facial features. So now let's just
grab our eraser tool and erase these lines that
we don't need anymore. And we will go and
create a little smile. Firstly, we will go
between our little things, a little bit up to
them and we will create a little
curve. In that way. You can see that this
curve is a little bit bigger on our left side
than it is on the right. When we have
something like that, we will go and create
our little teeth. If you want to add little elements on this
side of our mouth, you are welcome to do it. And now let's just give a bath or a mouth and we
will add a little a, so we will go a little
bit higher than this intersection
that we have between our triangle and the
length is going from Mark Warner and we will
create a shape like that. On the top it will be
half of the ellipse and on the bottom it will
be just a little line. You can play around
with its size, you can play around
with its placement. It's all up to you. When you have it. Ledgers go
inside and we will shade it. Now, if you want waking, go over the top of
our mouth one more time and we can add a
little nostril right here. When we have is we will
need to add our gills. So we are going
between our feet, between our mouth
and between our eye. And we will add two lines and tool add a bit of
thickness to that. So what we're doing is
creating something like that. Now, let just go and add
some additional lines that later on we will turn
into the different color. So firstly, we will go
above our eye just a little bit and we will
define this nose area. Let's just go with a
fancy line like that. We also continue creating this line going eligible
been down to the theme. And then we will go and create another line
that later on, again, we will turn
into a different color. We will go underneath our
mouth and we will go through the whole shape of our shark
and to the end of our body. You can play around
with this curve. If you are satisfied with it, we will add one more detail
to the boards and part of our Tammy Lynch or
step a little bit from the tail and we will create
another little thin. So we will just go to this place and create
another triangle. As always, you can play
around with its size, with its placement with error, even if you don't want to edit, just keep it as it is. Now let's just take a look at the whole sketch
from the distance. And we need to decide whether we want to adjust something or not. If you want to play
with the sheep's, you are welcome to go either to the Warp option or
to the Liquify tool. Let just spend some time
there and when we are done, we are moving on to our next part where it
will be aiding or a Lines
11. Colorful Shark: Lines: Let's start our line in part from sand, sandy preparations. Firstly, we are going back
to our layers and we'll adjust the opacity of
earlier with the Sketch. Let's just tap on the icon. Let's grab our slider with opacity and lay
just drag it more toward the left side until we still can see what's
happening onto this layer. But when it's not that bright, when we are done with the
opacity changing light, just step on our sketch layer
one more time to close it. And let's create one more layer underneath earlier
with the Sketch. So we unselect an earlier
with this scheme. And from here we are creating one more layer that we
are renaming as lengths. Now when they have earlier, we are going back to
the Brush Library. We argue into the inking folder and select and our
technical pen. If you need to change the stabilization the
amounts of streamline, you are welcome to
go and do that when you're done with preparing
your brush ledgers, get back to our color
palettes and fled. Select the color
within the dark blue. With this color, we will go and recreate the lines that
we have on this sketch. Let's just go and
create all the lines that we have for
our main elements. Remember that you don't need to repeat everything that you have on your sketch with
100% of similarity. If you want to
adjust some parts, you are welcome to do it. All that we need is to
have the closed lights. Let's just go and
very quickly do that. When you are done lying in the main shapes ledgers go hide our layout
with this gauge. Take a look at the whole
illustration from the distance. Let's make sure that
everything is closed and smooth and then we will continue by aging
are facial features. When you have a facial
features one more time, Let's just go and hide our layer with this gauge lecture Cat, how everything is looking. And when you are done, Let's just go and add the
color inside our eye. If you want to
adjust some shapes, you are welcome to
go and do that. And now when we have all
of our main elements, let just go above our shark and let's add some bubbles
and some little stars. The same way as before. Just go and create a
few of these shapes. Now, let's make sure that all of our miscellaneous
objects are closed. And then we will go to our
lives and who will hide our layer with this scheme one more time,
inspecting every fan. And when we are done, we are moving on
to our next part where we will be
agents are Colors
12. Colorful Shark: Base Colors: Let's start our color inspired
by going into the layers. And firstly, we will
create a group from all the layers that we
already have for our Shark. So let's select them all
and let's hidden group. We will rename this
group as colorful Shark. Now Lynch's get back to earlier with the Lines and we
will need to set it as reference so we are
tapping in it and we are choosing reference from
the list when we did it, we will need to go down to
our LEA with this scheme. And from here, we will
create a new layer that will rename as Base Colors. Now when we had this Yulia, we are going back to our
color palettes and we will select the color
within AMC and blue. With this color, we will
go to the main shape of our shark and also to this little theme that
we have on the bottom. And we will recolor
these elements. Now let's get back to our
color palettes and we will select the color with
the name bright pink. With this color, we will go and recolor our offense
when we did it. We also can do and tricolor that seal with the same color. We can do it very easily
by going into early years, tapping on earlier with Base Colors and
select an Alpha Lock. When we have selected
Alpha Lock, we will be a1. They colors only on the existing areas that
we have on this layer. Now, let us get back
to our brush library. We will go to the
calligraphy folder. We will choose monoline brush. Now with the same color, we will go to artsy and we
will recolor it very easily. When we're done with this part, we are getting back to early years and we will
need to go to Arly with Base Colors
and we will need to turn off our Alpha Lock. So when my term we
add tapping on it and we are selecting Alpha
Lock from the list. Now let's just go to our little teeth and we will
add the white color here. So firstly, let us go to
our background color and we will hide it so we will know where we need to put our color. Then we're going back to
our colored palettes and selecting white color and
dragging and dropping it. Do they needed places? When you are done? Land jazz, getting back
to early years and we will unhide earlier with
the background color. We will go back to our color palettes and we
will select the orange color. With this color, we
will go to all of our miscellaneous objects
and we will recolor them. And also with the same color, we will add the color
to this little gills. And when we did it, we are
done with our Base Colors. So in the next part, we will be aiding the
additional elements
13. Colorful Shark: Details: Let's start working.
Once I Details by firstly go into our layers, we will need to go to
early with the Lines and we don't really need
our reference feature on. So let's just turn it off. We will tap on this layer and we will select reference
from the least. When we did it, we will get
back to our Base Colors layer and we'll create one more layer above which we will
rename as mask. Let's clean this layer
to a previous one. So tab and selecting
Clipping Mask. And when we did it, we will get back to our color palettes and we will select the color
within the pale orange. When we did it one more time, we'll get back to our
layers and we will unhide earlier with this sketch, we will recreate this top area that we have created
with the wavy lines. Lynches go and recreate it. When we have the outline, we will just drag and
drop the color inside. And you can see that we
recolored our teeth too. So let's just grab the eraser to erase this area just
within the razor to. When we are done, we will again back to
our lives and we will hide earlier with this
gauge just for 1 s, we will check out whether
everything is looking fine. And if we need to
adjust some parts, we will go and adjust them. One more thing that we
will do with this mask is eight and a different
color on the top. So let just go to this layer. We will tap on it
and we will select Alpha Lock when they have it on. We will again back to our
color palettes and we will select the color with
the name pink three. When this color we will go over the top area and we will
add a little line there. When you have
something like that. We also can go to this
little parts with the gills and we can erase
the parts that we don't need. Now when we are ready, we are getting back
to our Layers. And let's create one more layer above earlier with the mask. So we will tap on
the plus icon and let's rename this
layer as whites. One more time. Let's clip
it to a previous layer. So tap and selecting
Clipping Mask. And also we will go to our sketch layer and
we will unhide it. When we're done with this part, we will get back to
our color palettes and we will select
the white color. We will recreate this line
that we have on the WhatsApp. Let's create the full
counter with this outline, and we will then go and drag
and drop the color insight. So one more time where I
go into early years and we are hiding earlier
with the Sketch. If you want to go and add some additional elements
with this white color, you are welcome to do it. So for example, we can
go to the top part of our head and we can add a
few highlights in that way. So just go in there in some
spots of different sites. Play around with the shapes, with their position, with everything that you
wanted to play around with. If you want to go
to the other areas, you are welcome to do
it with this color to. For example, let us go to this bottom part and we will
add a few dots there too. Also, we will go to some
of our fields and we will add a few more dots
with the same color. We can go to our
additional elements and we can add Highlights. There are two ends
when we are done. The last thing that
we will add with this white color will be a
little element on our eye. We won't go to the
left side from our eye and we will repeat
the quantity of it. You can adjust the
thickness on this element. You can make it very
thin or very thick. It's all up to you. When you are done
with this part, alleges go to the bottom part of Art Summit and we will add
a different color there. Firstly, ledgers, get back
to our brush library. We will go under airbrushing and we will select
medium blends. When we did it, we will
get that to our list. We will go to R
allele with whites. We will tap on it and we
will select Alpha Lock. When it's locked, we are getting back to our color
palettes and we will select the
color with the name pink to with this color, we will go from our bottom left corner and we will be creating a very smooth gradient. So it does go and do that. If you already did or if you want to create a
smoother gradient, you can grab this much to end, create a nice blunt ends
when you it can lead us go and create one more layer above
earlier with the wax. Let's rename it as Details. One more time where I Clipping
it to our Base Colors. So we are tapping on it and
selecting Clipping Mask. And then we will go to our
color palettes and we will select the color with the name C and blue with this color, we will firstly go to the top of our ethene and we will be agent
a color here to this fin. We are using the same
brush that we use before. It is our airbrushing
medium blend. So let's just go to
the bottom part of our elements and we will
add the color in that way. When you have it here, let just go to our
fields that we have on the bottom
and on the right. And we will add a
color here to just go into the tips and create
an L. It'll blend here. The same we will
do with our tail. So again, go into
the bottom part and a generic color with
the same color, we can go to our
additional elements and we can add some
rainbow effect here too. So for example, let's just
go to the bottom part of our little bubbles and we
will add the same color here. When it's done, we will get
back to our color palettes and we will select the
color within the orange. With this color, we will
go firstly to our F01 on the top and we
will add the color here near our blue-collar. When this is done,
where I go into our little tail and we
will add a color here too. If you see that some places
are not looking fine, for example, we will
cover our white elements. You can go grab the eraser tool and erase this part
with the eraser tool. Now when this is done, we are getting Vector
Art Brush Library. We are going to the
calligraphy folder and we are choosing mono line brush. With this brush, we will go firstly and decrease
its opacity. So it is our second
slider on the left. Let's set it at 50
per cent for now. And we will go to
some of our places and we will add a few
dots with this color. Now when this is done, we are getting vector
I color palettes, and we will select the color
with the name dark purple. With this color, we will go
and add a few more dots to some places that you
want to add that vary their size, vary
their placements. If you feel that maybe
this opacity is too much, you can always go to your
slider and adjust it. If he wants to go and select some different
color, for example, the blue one, you are
welcome to go and do that and add a few more
dots with this color. When you are done
adding some dots, we can go to our
color palettes and select some pink color
with which we will go over the top of our additional elements and we will add the color here too. Again, we are creating some
kind of a rainbow effect. One more time we can go and change the opacity of our brush. And now, when you are done, Let's move on to our
Highlights and Shadows parts
14. Colorful Shark: Shadows & Highlights: Let's start inspired
by age and I Shadows. So firstly, we will get back the opacity of our
brush to maximum. And when we did it, we will
get back to our list and we will create one more layer above earlier with the details. So let's rename this
layer as Shadows. Let's clear this layer to a previous one and
then we will go to our an icon to change the blending mode to
multiply S for the opacity. For now, let's leave
it at 50 per cent. When we did it, we will get
back to our color palettes and we will select the color
with the name pink three, with this color, we
will firstly go to the bottom part of Art Sammy. We will try to recreate
this curve that we have here and this way we
will create our shadow. So let's just go
and try to do that. As always, you can
hold your line and the hands and you can
use the editor mode to adjust the curvature of your life when you add
on a jazz in your line. If you have some places that you need to adjust one more time, go and manually adjust them. Let's put a little
shadow underneath our body part that we
have own Art sales. So we just go in there and
repeating the line that we have for our bottom
part on the tummy. When we are done with this part, we are going to the theme
that we have on the bottom. And we will again repeat this same line that we
have for our atomic. When we are done with this byte, Let's go to our theme that
we have on the right, and we will add the
shadow in that way. Firstly, we will repeat the line that we have on our left, and then we will go and create a curve going from
our bottom parts. Try to make a nice and
smooth connection. And when you have it, we will go again to our field. But this time we will go to the thing that we
have on our left. We will put the
shadow underneath it. We will try to go
with the same color, or we can go and
change our color. So for example, let's try
with the same pink color. We will just go
there underneath it and we will repeat
the same shape. If you like how it
looks, you can keep it. If you want to go and change
the color of your brush, you can select purple, maybe seeing blue or dark blue. If you want to change the
sheep or your shadow, you are welcome to do too. We also can go to
this bottom part of the fin and we can put it in the shadow to Eating
you to adjust some places, grabbed areas are
two and a jazz them. Now let's just get back to our color palettes and let's
select a different color. So this time it will be C and blue with the
same blue color. We will go underneath our little white elements
that we have here, and we will put the
shadow under them. You can just go
there and overlap these little elements and we can fix it a little bit later. So for example, we
can go and select all of these objects on
earlier with the shadow. Let's just go to our S
ribbon icon and we will select freehand methods
with a free hands method, we will just go
and select all of these Shadows that we have
underneath our white elements. We will lipids around until
only this area is selected. Then we will go with three
fingers up and down, and we will select cut. Now we want MyTime
will slide from top to the bottom with three of our fingers and we
will choose Paste. Now you can see that we
have the same color, but we will go to Arles. We will see that we
have a new layer that is now called inserted image. We will go to our
an icon and we will change our blending
mode to Multiply. You can change the opacity
level to your liking, or you can keep the
same level that we used before for
our main Shadows. And now Land jazz
grant this layer and we will put it under
our LEA with whites. And that easily we can put
our shadows underneath our white elements without a need to erase the parts
that we don't need. Now, let us get back to earlier with the main Shadows and we will put in the shadow to the theme that we
have on the top. We will just go to
the right parts and we will create
a curve like that. Hold it and the end, if you want to adjust it, go to the editing mode. And when you have the
curve that you like, we will go to the
rest of the area and we will manually recolor it. And that's basically
eat for our shadows. So now let us go and create one more layer that we
will rename as Highlights. And again, we are clip in
this layer to a previous one. So let's tap on it. Let's select Clipping
Mask and we will go to our an icon to change the
blending mode to overlay. When we did it, we will go
back to our color palettes and we will select the white
color with the white-collar. We will firstly go over Art soap fin and we will create
a little highlight there. When this is ready, we
are getting back to our theme that we
have on our left. We are going to the
top area and we are adding a little
highlight there. The same thing we
will do with it, soap of our hats, ledgers go and create a big Highlights going
through the whole shape. Now let's go to Art seal. And again where I go
into the top area and we are aiding or
a highlight there. If you want to end the
Highlights to some other places, for example, they've
been on the right. You are welcome to do it. It's finally I'd done, let just move on to
Recoloring airlines. So firstly, we will select early with the
Lines and above it, we will create one more layer. We will clean this layer
to a previous one, and we will keep our
normal Blending Mode. Now we will get back to
our color palettes and we will select the purple color
or dark magenta color. You decide which
one you like more. And we will go to our
pink elements and we will recolor our Lines from
here with the same color, Lynches, Cute entry color, our teeth and our little mouth. And when we are done
with this part, we will get back to
our color palettes and we will select the color
with the name dark purple. With this color, we will
go and recolor our eyes. When you did it,
we will go back to our color palettes
and we will select the color with the
name Dell, purple. With this color, we will
go to our bottom and left area one day I and we will create a little
Highlights in that way. So create a curve. If you need to adjust it, you know what you need to do. You will need to go
to the editing mode and adjusted from here. Or if you want, you can
adjust it manually. Just tried to repeat
the shape that you have for the main
shape of the eye. And when you have it, we will get back to our color palettes and we
will select the white color. With this white color, we will go to the top part of our eye and we will add
our Highlights there. Let's just go and increase
the size of our brush and we will put one
dot on the top. If you want to add more of them, you are welcome to date. And now the very last
thing that we will need to do is to recolor the Lines of our additional elements
so you can go and decide what color you would
want to recolor them to. So for example, you can select
lights in blue, orange, or bright pink entry color
the light on these elements. When you're done with Recoloring Your lines on the
additional elements, we are done with our class. Thank you for
watching this class. Leave a review if you like this, and consider subscribing for more Kawaii videos
in the future, looking forward to
seeing your projects.
 Uni Corn, ⭐Kawaii Art Enthusiast⭐