Transcripts
1. Introduction: Hello everyone, I'm unique
and enter this class. We'll draw a few
cute frog stickers. This class doesn't require any prior experience
or fancy tools. We'll start from scratch
and we'll be using simple techniques
throughout the process. Everything you'll see will
be happening in Procreate. However, if you have other software or one to
try traditional materials, you are welcome to join if
you are ready to start, Let's jump right into it.
2. Sketching the Base of a Frog: Let's start our
class by deciding what kind of Canvas we
are gonna be using. You can see it is a very
simple square canvas because both pixel width and pixel
height are 2048 big cells. As for GPI there 300 and
S for the color profile, we are using sRGB with this loan number
and it's all done. Let's hit Done and it will be redirected to our new canvas. And now we need to
decide what kind of colors we are going to be
using for the whole class. You can go to the Project
and Resources tab. You can download
the color palette and you can follow along. And when he did it, Let's go strictly to our color palettes. And we will see that we have
few options of how we can use this colors that
convert view and the cards. We'll be using cars because
it will be a little bit easier for us to navigate
through this color scheme. And while we're still here
in our color palettes, Let's select our first
color for this cation part, it will be lines. Let's tap on this to select
when we have our color, Let's go and select the brush. So we are going to the
brush library or go into this kitchen folder and we are selecting procreate pencil. If you would like to use any other brush for sketching part, you are welcome to do it. And now, when we have our brush, when we have our color
for this question part, Let's start by creating
our first shape. And it will be an easy sheep
of a vertical ellipse, not too wide, but let's
just go and try to do that. We are going to be
doing it without an holding our Apple pencil
at the end of the line, hold your Apple
pencil and you will see that now your shape
is looking better. That is called quick shape tool. If you want to
adjust your shape, if you want to scale
it up or down, you will need to move
your Apple pencil from side to side
without holding it. If you want to
rotate your shape, just rotate your hand
with an Apple pencil. And when you are satisfied
with how it looks, Let's hold our Apple Pencil and we will go over
the top to edit shape. Here you can see that you have some nodes here and
you can tweak them. So for example, allege us shrink the shape a
little bit down. We will go to the bottom nodes. We will hold it with our Apple Pencil and
we will drag it up. So we will have
something like that. Not quiet and circle, but still a little bit circular. When you have
something like that, Let's just tap on the screen
with one of our fingers. When we have this shape, it's time to play a
little bit and to turn it into the
base of our frog. So we will be doing it
by using drawing guides. Firstly, we will need to go and turn on this drawing guides. So I go into this range, I can overwrite the top-left. We are going into Canvas and we are toggling
drawing guides. You did it. You will see that you have some cells right now, but cells are not what we need. We will need to use symmetry, so we will need to go
to Edit Drawing Guide. Now, on the bottom you have a little panel and we will
need to go to Symmetry. And when we turned on symmetry, you will see that we have the line that is going
from top to the bottom. And this line has two dots, one blue and one green. If you go to the green one, you will rotate your
line and it will affect the direction you
will create your symmetry. You should go to the blue one. You will be moving to
the different place. And that's what we need to do. We will need to go to
this blue dots and we will need to move it right
in the middle of our shape. We don't need to
be very precise, but we will need to try to
put it in approximate center. Let's go and do that. So just holding this little
dot and moving it to the center when you are ready ledgers he'd
done over the top. And now let's zoom
in our Canvas. If we go to one side, you will see if you just
draw something here, it automatically will
appear on the other side. And that's what we're
going to be different. We will be squishing this
shape just a little bit, so it will remain this circle, but our top part
will be a little bit narrower than our
shape on the bottom. So firstly, ledgers go and find 1 fourth of our
shape on the bottom, we will make a
little mark there. Now, we will need to go over the ones sites and we
will need to combine this line that we have for our sheep with the little
dot that we just put. So let's just go and
create the curve. If you think that maybe
this line is too high, you can put it lower. If you think that you need to create this shape a
little bit more squishy. You can go to the top and you
can create this line there. It's up to you. Now we are just creating the
basic shape for our frog. Play little bit with this line. And when you are ready, ledgers grab an eraser tool
and we will erase the line on the bottom because
we don't need it the same way as with
creating lines. We will need to go
just to one side, areas the line there and automatically it will be
erased on the other sites. Now, let's go and find
the center of the shape. We will make a little mark
there when we have it, we will be creating
a little Tommy here. So firstly, we will go
with a curve like that. So it's just as simple curve. And when we have
it over the soap, we will need to continue
creating this shape, go into the bottom. And we will need to continue by creating a line that will
reach this bottom line. So let's go and try to do that. And again, you can just adjust this size on
this little element. It's all up to you. You can try to repeat what we see right now on your screen. Or if you want to play around, you are welcome to do it. So when you reach the
bottom part of our shape, we will turn this little line
for our Tommy to Alito leg. So we will need to
elongate this line and we will need to create
a couple of tools. It's up to you how
many of them will be? It's up to you what size
they are going to have. We will need just to go and
do something like that. When you have the tools, we will need to loom the
shape a little bit around. We will need to
create a little curve to create a legitimate lack. So let's just go and
add another curve. You can play with the direction You can play with a thickness. It's up to you. Now let's grab an
eraser tool and we will erase the line
that we don't need. And when we have
something like that, we will need to think about the back legs and
we will need to imagine that this
frog is sitting. So let's just go to these parts and we will create
the shape like that. You can play with the
amounts of the toes. You can combine these
two shapes together or you can just leave
a little curve there. It's again up to you. When you have
something like that, ledgers go over it, it's soap and we
will create the base for our eyes and we
will do it in that way. Firstly, we will go to this
intersection and we will create one line going
in a 45-degree. When you have it, we will
go to this intersection. And here we will put
half of the circle and these have on the circle should be right in the
middle of this line. So let's go and try to do that. We will need to play with
the size of this elements. It's up to you. You can make it very small. You can make it big. It's up to you to
create a better shape. You can hold your Apple pencil at the end of the
line and it will snap to a better curve if you need to
adjust it even more, we are going to edit
shape or the top. Here we have the nodes and
we can play with them. Try to keep in mind that
this line that we've created going from the
center should be in the middle of our
sheep on the top, when we are satisfied
with how it looks like, just tap on the screen
with one of our fingers. We will grab an
eraser tool and we will erase all the lines
that we don't need. So it will be this
diagonal line and also it will be this line right
here between two shapes. And now we have the
base for our frog. So in the next part, we will be creating
the clean lines.
3. Adding the Clean Lines: Before starting an
airline in parts, we will need to do
some preparations. And the first thing that
we will do is making this shape that we've
created a little bit bigger. So we will do it in that way. We will go to the arrow key or our top-left and
we will tap on it. We will use uniform methods. And also we will need to keep in mind that
we will need to keep this slide or this symmetry right in
the middle of our shape. And we will need to make our shape bigger according
to this information. So firstly, let's zoom in our Canvas and we
will go to one node, either on the top, in the middle or on the
bottom in the middle. We will need to drag it up or down depending on the
node that you select it. Let's just for example, go to the bottom one. We will hold our
Apple Pencil and we will drag this node down. And we will need to
keep in mind also that we are creating for on
these illustrations on set, these little canvas
that we have right now. So we don't need to
overdo everything here. We don't need to over scale it. We just need to make
it just a little bit bigger and enough for ports. Four of these illustrations
to our Canvas. So when you have
something like that, Let's just go and
deselect everything by hitting our arrow
key one more time. So while we are still here
and doing our preparations, alleges go and change
the opacity level of this layer when we are going
to be creating our lines, we still want to see what's happening onto our
layer with the sketch. But now it is two
knots transparence, it's too bright and it
will be disturbances. So what we need to do, we will go to our
layers and we will see that we have just
one layer right here. We will need to go
to this icon and you will see that we have
the opacity slider here. If we grab this handle and
if we move it to this side, you will see that now your
sketch is trying to look more transparent and lenses leave
it at something 50, 55%. When we did it, Let's
clean everything up into our layers and we
will rename this layer. So we will tap on it. We will choose Rename and we will go with the name sketch. When we did it, we will need to create one more layer
for the clean lines. So we are tapping on the plus icon and
straightaway, Let's rename it. So tapping on it and
choosing Rename, we will call it clean lights. And it's now if you
go to this layer and if you try to
make some lines here, you will see that they are
appearing only on one side, so they are not symmetrical. We are not using this drawing
guides onto this layer, so we will need to turn it on. So let's get back to our layers. We will tap onto this layer with a clean lines and we will
choose Drawing Assist. Now, if we go and
create some line here, you will see that
it is symmetrical. It is mirroring on
the other side. And when we have
prepared earlier, we will need to go and select a different brush and we
will need to prepare it to. Firstly, let's go to
our brush library, will go into the
calligraphy folder and we will choose script brush. Now when we've
selected our brush, we can do one more thing. We can make it a little
bit more smoother. So we will need to
tap on this brush and we will go into
the brush studio. We will go to the
stabilization folder. And you can see that
we have the options streamlined and you have
that slider with amount. So we will just go and we will move this slider to maximum. You can try it out how it
works onto the drawing pad. You can see that the line
is looking more smoother. And if this amount is
not working for you, you can just try it out and try this onto
the drawing paths. So when you find what works
for you, just hit Done. And we will go to our
Canvas and we will recreate our lines that
we have on the sketch. And it doesn't mean
that you will need to recreate everything with
a 100% of similarity. Absolutely not. If you want to adjust
some elements, go for it. If you want to move
some elements. If you want to play with
the direction of the lines, maybe with the curvature, It's all up to you. Our main goal into this part, to create the closed slats and
the closed lines mean that we don't need to have
any gaps into our lives. Because later on
we are going to be adding the color and it will really help us to use the
lines that are closed. So now let's just adjust
the size of our brush. Let's set it at something like four or maybe five per cent. If you want to create the
thicker lines, go for it. And we will go and try to
create the closed lines. Also, while we're still here, we can play with the pressure of our brush because we've selected the brush
width pressure. If you push more, the line will be a
little bit thicker. If you are just slightly
push into your Apple pencil, the line will be thin. And that's how we are going
to be creating this lines. Let's just go and
try to create this lacks the same as before. You can use any tools
that we just explored. You can hold your Apple pencil
at the end of the line to create a better shape for half of the circle, for example. And you can go to
this soap to edit shape to adjust the
shape if you need to. And also try to make nice connections
between a few elements. So for example, like here, let us make this line thicker. When you are done
with a1, the lines, Let's go to our layers and we will hide our layer
with the sketch. We will need to go to
this little icon with a checkbox and we will
need to tap on it. And now we will go and make sure that our lines are closed. Also, if you think that some lines or maybe
too thick or too thin, you can go and adjust them. And when you made sure
that all your lines are looking good and
all of them are closed. We are ready to move on
to our next part where we are going to be adding
our basic coloring.
4. Ading Basr Colors & Making Copies: Let's continue making
art illustration by doing the following. Firstly, we will need to
turn off our drawing guides, and we will do it by going
to this wrench icon. We will go into Canvas and we
will toggle drawing guides. You can see that
this line that was going from top to the
bottom now disappeared. But actually it's
not enough if we go to this layer and if we
just create some line, you will see that
it is mirroring to the other side and
we don't need it. We will need to do
one more thing. We will go to our layers. We will go to the layer
with a clean lines. You can see that now there
is a little title assisted. We will need to tap
on it and we will need to choose Drawing
Assist from the list. Now, if we do the same thing, you will see that
everything works perfectly. It's not mirroring
to the other site. So now we are ready
to start adding our colors and we will do
it on a different layer. So let's get back
to our layers and we will tap on the plus icon. We will need to put this layer underneath our layer
with the clean lines. So when it is selected, we will hold it and
we will drag it down and straight
away, Let's rename it. So we will tap on it and
we will choose Rename, Let's call it coloring. And we are going to be adding
colors onto this layer. But before starting, we will
need to do one more thing. Because if we just
go to our colors, if we select the color and
if we drag and drop it, nothing good will happen. We will need to put
the color only on to the areas that we would
want to put this color. And when we don't
have anything on this layer that
doesn't work this way. So we will need to
do these things. We will need to
go to our layers. We will need to go
to our clean lines, select this layer, tap on
it, and choose reference. Now, if we get back to our
layer with the coloring, if we go and select
this green color, and if we go and drag it to
the area inside our sheep, only this area will be recolored
and that's what we need. That's how reference work. So now let us grant
the same color and recolor our little
legs on the back. And they have these ledgers
go and select another color. It will be light yellow and we will drag and drop
it into our Tommy. And we are almost done
with our coloring, so our base is done
when we have it. We will need to do
one more thing. We will need to go
back to our layers, and we will need to
group these two layers. So you can see that one layer is selected because it is blue. And we will need
to go to earlier with the lines and we will
need to select it to. So to do so, you will
need to go to this layer and you will need to swipe
it from left to right. Now two layers are selected and we will hit Group
over the top-right. Let's rename this group. We will go to this group, we will select it, we will tap on it and we will choose Rename. We will deal with frock one. And now when we have
just the first frog, we will need to make a few copies and this
view will be three. So what we're gonna
be doing, firstly, let us go and move these group
a little bit to this site. We will need to select this
group and we will need to go to this icon
with an arrow. We are using uniform method and also we can turn on Snapping. So let's get to the
bottom on this panel, we will tap on
snapping and we will toggle snapping into
this little menu. You can see when
you are going to be moving your element that you have some lights for now
that is not very meaningful, but it will help us
a little bit later. Let us move this frog a
little bit to the side, find it a better placement. And when you are satisfied
with its placement, ledger deselect everything by hitting our arrow
key one more time. Now when we have this, we will need to go and
make the duplicates. So we are going
back to our layers, and now we will select this group and we will swipe
it from right to left. You can see that we
have some options here, so we will go and
tap on duplicates. Straightaway. Let's rename it. We will again tap on the group and we will rename it this time. Let's go with frog two. You can see that all your
Canvas, nothing happens. And that's because
we have this copy on the same place that we have
our first illustration on. So we will need to go
and select this group. We will need to go
again to our arrow key. We are using uniform method. The snapping is turned on and we are moving this
shape to this side. And here you can see that
the lines are helping you. We will need to put this frog on the same line with
the first illustration. And you can see that we have
three lines which are blue. And they are showing you that this illustration that you are moving right now is on the same line with
the previous one. So let's just move it. Let's just follow these
three blue lines. And when we're satisfied with the placement one more time, Let's deselect everything
by heating our arrow key. We will need to do
it two more times. So firstly, we are
going to earlier, we are making a duplicate. So we are swiping this
group from right to left and choosing
Duplicate straightaway. Let's rename it, tap, rename frog three, and
now let's move it. So we will go to our arrow
key and let's move it under our first illustration
because later on it will be a little bit easier for us to
follow these directions. So we are grabbing
our illustration and we are moving it to the bottom. And again, you can see
that we have these lines. We are following them. And when we have
all three inline, we are on holding
our Apple pencil. Now when we are satisfied
with the placements, ledgers, deselect everything by
hitting our arrow key, and we will do the same
thing one more time. So we will create our
fourth frog one more time, going back to our layers, swiping the layer
from right to left, duplicate, straightaway,
renaming it. Now selecting this group, grabbing our arrow key and moving this
shape to this site. Now we are following
these three lines. Also, you can notice that we have the line
going horizontally and that means that we are at the same line with our
illustration on the left. So when you have
these four lines, we're just deselect everything
by heat and our arrow key. And now we have the base for our next part where we are going to be aiding their faces.
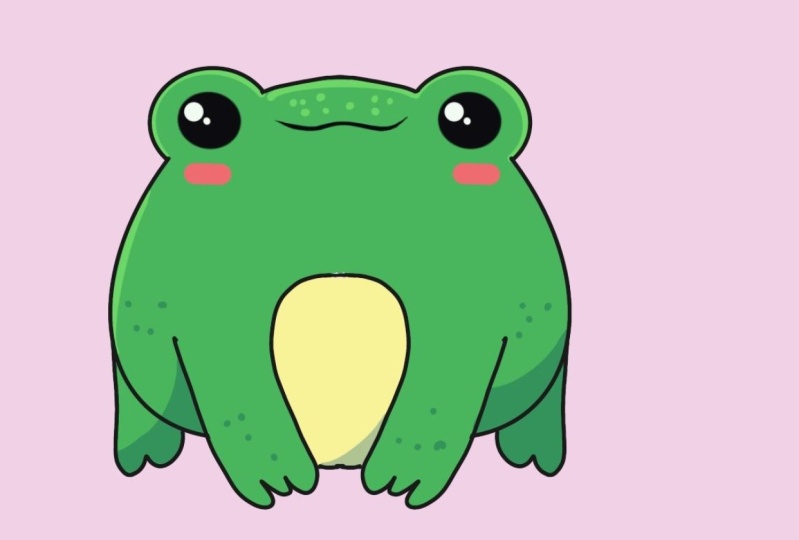
5. Making a Smiling Face : Let's start aging our faces. So firstly, we will go
to our color palettes and we will select
the same color that we used for the lines. It will be just the color
with the name lines. Let's tap on its deselect. And then we will go to our brush library and we
will change the brush. We will go to the
calligraphy folder and we will choose
monoline brush. Now with this brush selected, we will need to
go to our layers. And firstly, we will go to
the folder with frock one. Let's go to the layer
with the queen lines. Let's select it and let's
tap on the plus icon. Here. Onto this layer, we are going to be eight
and our facial features. Now we want to just rename it because we are
going to be creating a few layers and
later on when we combine them all together,
we will rename it. So now onto this layer 14, lead, just go and
start aging the ice. So zoom in here canvas, let's go and increase
the size of our brush. Maybe to maximum, maybe
not. It's up to you. And we will go to our left, do this little fields
that we have for our eye. And we will just
put the dot here, if you like this size, just leave it as it is. If you want to try
it one more time, maybe make it bigger or smaller. Try it one more time. When you have the first i, we will need to make a goal. But on the other side, we can just go menu and put these dots here
on the other side. But we want to make sure that these I will be
on the same line. So let's just go and
do it in another way. We will get back to our layers. We will swap this layer
with the first eye from right to left and we
will choose Duplicate. Now when we have the cobia, we will go to our arrow key. We are using snapping, we are using uniform
method and we are just moving this
to the other side. And again, we are following our three lights when
we have its lead, just deselect everything
by hitting our arrow key. And now we can get
back to earliest and we can combine these
two layers together. To do so, you will need to
go to the layer on the top. You will need to select it, you will need to tap on it, and you will need to
choose Merge Down. Now everything is on one layer
and now we can rename it. Let's just tap on it. Let's choose Rename and let's
name it facial features. When we have the eyes, we are ready to create a little Smiley mouth and we
can do it on the same layer, or we can create one
more layer and then make sure that our mouth
element is in a center. So let's do it in that way. We will get back to our layers. We will hit the plus icon and we will create
one more layer above. Now let's go and decrease
the size of our brush. And we will create a little Smiley mouth and it
will be the shape like that. You can see that the
line is quite wobbly, so we can go and change it. We are going back to
our brush library. I go into the monoline brush, we are going through
the stabilization and we are changing the
amount of streamline. You can play around with
this amount and find what works for you when you're
satisfied ledgers he'd done. And let's try it one more time. And you can play with the
distance from the eyes. You can play with the
position of the mouth. It's all up to you. Let's just go and create
a shape like that. We can grab an eraser
Tzu and we can make our sides of this
line a little bit pointed. So let us go and do that. Try to make these pointy
ends on both sides equal. Now we can go and adjust
the shape of the mouth. So firstly, we will need to make sure that it
is in a center. One more time we are
going into our arrow key. We are using snapping
and we are going and finding this blue line that is going from
top to the bottom. Now it is in the center. And you can see that our line is a little bit not
even on both sides. So we can adjust it
by going to work. Here you can see that we
have a few more nodes. So all these
intersections inside these little bounding
box, they are adjustable. You can just go and move them and find what
works for you. So for example, we can move this right side a little
bit to the top. If you want to rotate your line, you can go to the uniform
method one more time and you will need to go to this
green node over the top. You will need to hold
your Apple pencil there, and she will need to move
it in a circular direction. So find what works for you
and when you're satisfied, allege as guilt and
heat are heirarchy. One more time to
deselect everything. Now when our mouth part is done, let us go and add our little
highlights in the eyes. So firstly, we will get
back to our color palettes. We will select a
light gray color. We will increase the
size of our brush. And firstly, we will go
to just one of the eyes. So for example, let's
go to the left one. We will go over
the top of this I, and we will put the first
dot here when you have it, let us go over our right eye and we will try to put
this highlight on the same line and
we will try to keep the same position when you
have these big highlights, Let's decrease the size of
our brush and we will add one more highlight underneath this little highlight
that we already have. So putting the dots
on the left and then repeat the same
thing on the right. And now we have the
highlights in the eyes. The last thing that we
will do here is go into our color palettes and selecting the color with the name reds. Now let's go and increase
the size of our brush. We will go underneath the ice and we will
add little cheeks. You can go with a line or you
can go with the dot here. And again, you can
play with the size of these chicks when you
have it on one side, Let's move on to
the other one and let's repeat the
same thing here. Don't forget that you can go
over the top to Edit Shape. And here you can move this
element just for a little bit. And now we are done
with our first face. So let's move on
to the next one.
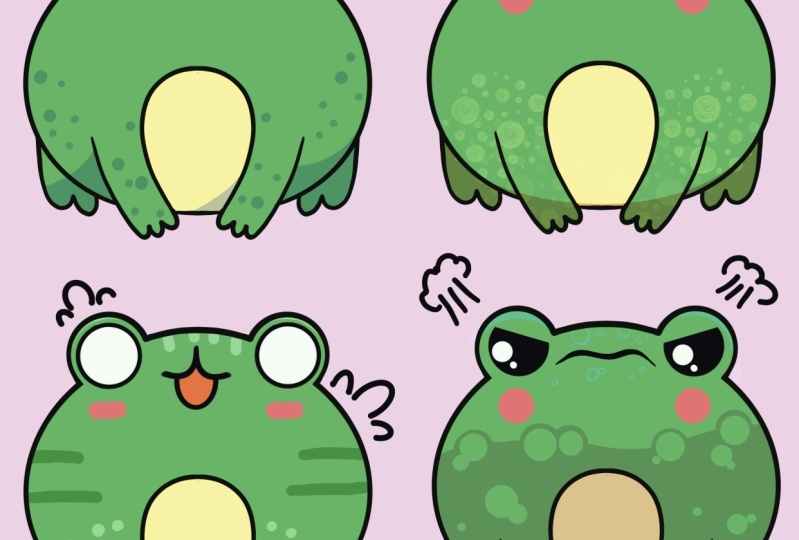
6. Making a Happy Face: So let's get back to our layers. And firstly, let's
make sure that all the facial features from our first frog are on one layer. So we are getting
into this layer where we have the mouth, the highlights, and the cheeks. We are tapping on it and we
are choosing merge down. And now everything
is on one layer. And that means that we
are ready to move on to our next folder with a frog two, we are selecting
clean lines layer and we add tapping
on the plus icon. Just for now, let's
leave it a neat. Later on we are
going to be creating more leaves and eventually
we will rename that. So now let us get
back to our canvas. Let's zoom in our second
illustration and we will go into the color
palettes and select the color within the lines. This time, let's create
a very happy frog. Firstly, ledgers go and
decrease the size of our brush and we will
go into our left part, into this little area that
we prepared for the eye. And we will start by this. We will create a diagonal line, hold it at the ends to
create a better line. And then we will need to
create another diagonal line. So let's go and do that. Again. Hold it at the end, and when you have it alleges
go to our arrow key. We will adjust, adjust a
little bit so we can find a different placement or we can rotate it just a little bit. So let's start
with the rotation. We are going to our
green nodes and we are moving it a
little bit in that way. When we have, it's
like that ledgers go and find a better
placement for it. Now when we did it, Let's just go and
deselect everything. So we are tapping on our
heirarchy one more time. And now when we
have the first i, we will need to go and
create another one. And we will be doing it
by creating a duplicate. One more time we're arguing
back to our layers. We're swiping this layer with this little V-shape
from right to left and we are
choosing Duplicate. Now let's get back
to our arrow key. And the first one we
will need to do is to flip this shape horizontally. You can find this option
into this little panel. So let's tap on Flip Horizontal. Now it looks in the
right direction and we will need to go and
move it to the right side. So one more time
doing the same thing, we are following these
three blue lines. When you did it. Ledgers guilt and
deselect everything by heating this arrow
key one more time. And now we are going back
again to our layers. And we will combine these
two layers together. So we will go to the top one, we will tap on it and we
will choose merge down. And now let's make sure that
our eyes in the center. So we will get back to our
heirarchy one more time. We are using snapping and
we are trying to find this blue line that
is going from top to the bottom when
we reached it, ledgers and hold
our Apple pencil. And let's deselect everything
by hitting our arrow key. Now when we have
the ice ledgers go and create one more
layer for our mouth. So again, going
back to our layers, tapping on the plus icon and here we will create
a shape like that. Firstly, we will
go right between the eyes and we will
create a horizontal line, hold it at the end, and then we will
go underneath it and we will create
half of the circle, hold the line and
the ends to snap. It's a better curve. If you need to adjust it, go to Edit shape or the top. Let's just make it a little bit bigger and maybe a
little bit rounded. So now when you have the
result that you like, ledgers go and tap on the
screen with one of our fingers. And when we have this shape, we will need to go and pull
the color inside of it. But if we just go to our top-right corner and if we just drag and
drop the color, nothing good will
happen again because we have one layer
set as reference. So let's go into our layers
and we will find it. I bet it is in the first folder and it
is in our clean lines. You can see there's a
little title reference. Ledgers go to this layer. Let's tap on it. Let's select reference here. And now if we get back to our layer with our little
shape for the mouth, and we will do the
same thing as before. So just go into our right corner and dragging
and dropping the color. It will work. So now let's just grab the
eraser tool and we will go to this side of our mouth and we will make them a little
bit more accurate. Let's make sure that the
shape is in the center. So we will need to go to
the layers and we will need to make sure that this
layer is selected. When it is selected, we're
arguing back to our arrow key. We are using snapping
and we are moving it until we reach this blue line that is going from
top to the bottom. When you have it, ledgers, deselect everything by
heating our arrow key. And we will need to add a little tank inside
our little mouth. And if we go and do it manually, it will be a little bit
time-consuming because we will need to be very accurate
with our bottom part. So we can use one trick. Firstly, ledgers go and change
the color of our brush. So I go into our
color palettes and we are selecting the
color with the name read. When we have it,
we will go back to our layers and we will go to this layer with
our little mouth. We will need to tap on it and we will need to
choose Alpha Lock. When we are choosing Alpha lock, we are drawing only own the areas that we already
have wanted this layer. We are not creating any details. We can deal with these
Alpha Lock turned on, on the bottom part of our mouth. And you can see, even if
we go beyond the frames, we are adding the elements only inside this area that we locked. So now let's just go and create
half of the circle there. Now when you have it, ledgers get back to our
layers and we will turn on this alpha log because onto this layer we would
want to add our cheeks. So one more time we're arguing to this layer where
it's happening, it, and we are choosing
Alpha log from the list. And now let's increase the
size of our brush and we will go underneath the eyes and
we will add our cheeks. So again, you decide what
shape you will come up with. You can go with the
same cheeks that you have on the
first illustration, or for example, these time, you can just put two
dots for the cheeks. And now let's get back
to our layers and let's combine all of our layers with a facial features
and let's rename it. So firstly, go into
the top layer, tapping on it and
choose Merge Down. Now tapping on this layer
and go into rename, Let's name it facial features. When we habits, we are ready to move on to our
third illustration.
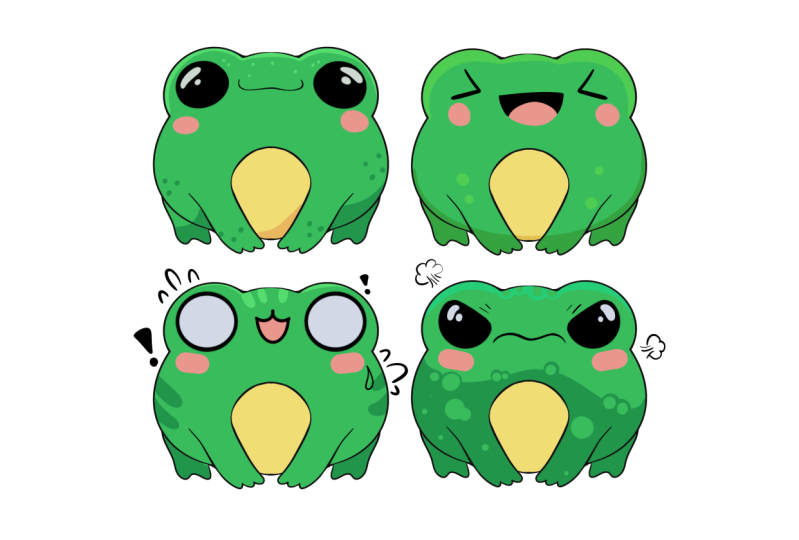
7. Making an Exited/Confused Face: Let's start adding the
facial features to our third illustration the same way as we did with
the second one. So firstly, we will go to
our layers and we will go to our third folder
with a frog three, we will go and select the
clean lines layer here, and we will need to create
one more layer above. So we are tapping
on the plus icon, now, legislated and neat. So now we have this
layer and we will go to our color palettes and we will
select a different color. So we will be using
the same color as we used for our alliance. It will be the color
with the name lines. Let's tap on it to select what we're going to be doing
with this illustration. We will create a pretty
complex emotion. It will have the blank eyes, it will have a wide open mouth, and it will be a
little bit sweaty. So that means that
it might be too excited or maybe it is confused. So let's just start by
creating our first. I fled, zoom in our Canvas to
the left side of our frog. And we will increase the size
of our brush to maximum. If this maximum is
not enough for you, you can do these things. You will need to go to
your brush library. You will need to go to
your monoline brush. You will need to
tap on it and you will need to go into properties. Here you have Brush behavior and under it you
have maximum size. You can just grab
this little handle and move it to this site until you find the right
amount of range of the value. So now let's just hit Done, select the size of the maximum, and let's just go and put
our dots for the eye. You can see that we put it
not in the middle part. So we will need to go to
our heirarchy one more time and we will need to find a better placement
for this shape. If you think that it is too big, you can just go
and scale it down by moving one of the corners. Let just make it
just a little bit smaller and we will
position it differently. So when they have
something like that, Let's deselect everything by hitting our heirarchy
one more time. Now, what we're gonna be doing, we will go firstly to
our color palettes, and we will select the
color with a light gray. Now when we have it, we will get back to our
layers and we will create one more layer above this
layer with our first i. So we will tap on the plus icon. We will decrease the size of
our brush just a little bit, and we will go and put these
white dots inside the eye. Now we need to make sure
that it is in the middle. So we are again going
to our arrow key. We are using snapping
and we will need to find this cross made from
two blue lines. Now let's just
leave it as it is. Or if you want to
adjust it even more, for example, make it bigger, you can go for it. If you change the size, you will need to do these
position in one more time. So you will need to go
and find this cross. When you have it. Ledgers, deselect everything
by hitting our arrow key. And now we will
need to get back to our layers and we will need to combine these two
layers together. So we're arguing
to this layer with the white circle
where it's happening. And we are choosing
Merge Down and we will need to make
a copy of this I. So with this layer selected, we are swiping and from right to left and choosing Duplicate. Now we have the coping and that means that we
will need to get back to our arrow key and we will need to move this
shape to the right. And again, we are following
our three blue lights. When you position
your elements lead, just deselect everything
by hitting our arrow key. And now we will
get back again to our layers and we will combine
these two layers together. So go into the top
one, tapping on it, and choose merge down
when we have the eyes, Let's make sure that
they are in the center. So we will one more time go to our arrow key and we will
find this line that is going from top to the
bottom when you have it's Fletcher deselect everything by hitting our Eric Yuan, my time. And now we are ready
to create the mouth. So we are going back to our layers and we are creating
one more layer above. We are going back to our
color palettes and we are selecting the color
with the name life. Now let's decrease the size
of our brush ledger checkout, how big it is, and when you
are satisfied with the size, we will do the following. We will go to the
middle parts and we will start by creating
a curve like that. Hold it and the ends. And if you need to
adjust it even more, go to the top to edit shape, adjust the curvature
until you are satisfied. And when you're satisfied, let Jess heat on the screen
with one of our fingers. And now we will need to
make a copy of this shape. We know how to do that. We will need to go
back to our layers. We will need to swap
this layer from right to left,
choosing Duplicate. With this new layer selected, we are going back
to our arrow key and we will need to
select Flip Horizontal. Now when it flipped, we are moving it to
the side and we are combining these two
shapes together. When it's done, Let's deselect everything by hitting
our arrow key. And now we are
again going back to our layers and we will merge
these two layers together. So go to the top one tab
and choose merge down. And now we have the top part of our mouth and we will need
to create the boats and one. So we will create
one more layer, tapping on the plus icon. We will put this layer underneath earlier
with the top part, so we are holding it and
we are moving it down. And on this layer, we will go to the bottom
part of our mouth and we will create half of the circle or half
of the ellipse here. So let's go and do that. You can vary its size, you can vary the curvature. It's all up to you. Hold your Apple pencil at the end of the line and if you need to adjust it even more, go to Edit shape or the top. Try to make the shape
even on both sides. And when you're satisfied
with the result alleged, just tap on the screen
with one of our fingers. If you have some places
that you need to erase, grab an eraser tool and do that. Now when we have this thing, we will get back to
our layers and we will combine all of our
mouth layers together. So I go into the top one. We are tapping in it and we
are choosing merge down. And now we are going to add
the color inside this area. So let's go back to our
color palettes and we will select the color with
the name red, orange. These color, we will drag
and drop inside our mouth. And now the last
thing that we will add here will be our cheeks. So let's get back to
our color palettes and we will select the color
with the name read. And again, it's up
to you what shape on the cheeks you would put here ledgers increase the
size of our brush. And for example, let's go
with a little line here. When you have it on one side, Let's move on to the other one and let's try to
repeat it there. If you need to adjust it, go to Edit shape or its job, and do that when you are ready, let's tap on the screen with
one of our fingers and we are ready to move on to
our fourth illustration.
8. Making a Grumpy Face: And again, we are starting
the same way as before. We are going back to our layers. And firstly, let's
make sure that everything that belongs to
our third illustration, all the facial features
are on one layer. So we arguing to the top one, we are tapping on it and we
are choosing Merge Down. And also we will
need to rename it. So let just tap on it. Let's choose Rename and
let's go with its side. So facial features. And now we are ready to go
into our fourth folder. We are selecting
clean lines here and we are tapping on the plus icon. For now, let's leave it a neat. Now we will need to get back
to our color palettes and we will need to select the
color with the name length. Now what we're gonna be doing for our fourth illustration, this time we are creating
a little bit moody frog. It will be a little bit grumpy, maybe a little bit angry. And again, we will start
by creating the eyes. So let's increase or
decrease your brush. And we will go to our left side and we will put the dot here, and we will do the following. We will grab the eraser tool
and we will cut it so parts. So let's just go and
create the diagonal line, erase the rest of the
circle on the top. And let's work on our
corners and we will solve in them and we will
make them note that straight. So when we have our first, I allege us go and
create a copy of it. So we are going back to our
layers and we are swiping this layer from right to
left, choosing Duplicate. Now with this layer selected, we are getting back
to our arrow key. And firstly, we will need
to select Flip Horizontal. So let's tap on it. Now when it flips, we are moving our
shape to the right. And again, we are following our three blue lines
when we have it. Let's deselect everything
by hitting our arrow key. And we will need to
go to our layers, and we will need to combine
these two layers together. So go into the top one, tapping on it,
choose merge down. And let's make sure that
our eyes are in the center. We are going back to our
heirarchy using snapping and we are finding this line
that is going from top to the bottom
when you have it, Let's deselect everything
by hitting our arrow key. And now we are ready to
create one more layer. And onto this layer, we are going to be
creating the mouth. And the mouth will be the same as we have on our
first illustration, but it will be reversed. It will be flipped vertically. So let just go to
our fourth picture. Let's decrease the
size of our brush. Firstly, try it out
and when you are satisfied with the
size of your brush, Let's create the mouth. Now, let's do the same thing as we did with our first mouth. We will grab an eraser tool and we will make the corners
a little bit pointing. If you want to
adjust it even more, or if you want to rotate it, we are going to our arrow key. If you want to rotate it, stay at a uniform methods
and go to this green node, rotate it to your liking, and if you want to
adjust it even more, Let's go into work. Let's play around
with these modes. When you are satisfied
with the result led just tap on our
heirarchy one more time, and now we are ready to move to our highlights,
to the eyes. So firstly, we are going
back to our color palettes. We are selecting the color
with the name aligned gray. We will go to our layers and we will combine these
two layers together. So firstly, go into the top one, it's happening, it choose
Merge Down and straightaway. Let's rename it. So we will tap on it, choosing Rename and we are going with incisal facial features. Now onto this layer, we will just go to our
first i and we will put the same highlights as we had on to our first
illustration. So firstly, let's increase
the size of our brush. We will go to one of the
corners and we will put the first highlights
when you have it there, we will go to our
eye on the right, and we will put the highlight here on our left part of this. We are trying to put the
highlights on this same line. So when you have the
first two highlights, Let's decrease the size of our brush and let's
go underneath it. And we will need to
put two more dots. If you wanted to come up with any other shapes
of the highlights, you are welcome to do it. So now when we have
the highlights, Let's get back to our
color palettes and we will select the color
with the name read. Now, let's increase
the size of our brush. And this time let's just put
two dots for our cheeks. And we are done with aging the emotions to the
phases of our frogs. In the next part, we are going to be
adding the details.
9. Smiley Frog: Shadoes, Highligts & Details: Let's find this part by
adding some shadows. So we will do it in that way. We will go back to our
layers and we will go to our very first
folder, frog one. And we want to add the shadows only on to our colored areas. So we will need to go
to this layer with our coloring and we would want
to create one more layer. So let's tap on the plus icon. We will straight away
rename it as shadows. And we want to add
the shadows only on the existing areas that we
have on our previous layer. And it will be easier
for us to use Alpha Lock because we are familiar
with how it works. But we want that to
be not that drastic. So if we would like to
adjust our shadows, we don't want to mess around with the layer
that we already have, so we will need to
use another option. Let's go to this new layer
that we have created. We will tap on it and we
will choose clipping mask on this layer if we go and if we start to
create some details, you will see that we are not
going to be on the phrase. So it works similarly
to the Alpha Lock, but it is not that drastic. It is on the different layer and we can always
start all over again. So now when we have this layer, we will need to adjust
it just a little bit. So firstly, we will need to change the blending
mode of the layer. Blending modes are
different ways your layers can interact
with each other. They are aiding different
visual effects. So to go into our
blending modes, we will need to go to this
icon we've been here before, and we will need to select
multiply blending mode. We will use it for
our shadows and it will be a little
bit too bright for us. So let just straightaway
reduce the opacity level. We will set it at 50 per cent, and now we will go back
to our color palettes. And here we have a
few colors to try on. So we have sine blue, we have orange, we
have green two, and we have magenta, pink, all these colors we can
use for our shadows. So let's just go with
the first color. It will be sine blue, and we will go to our
first illustration and we will add the shadows. So now we need to think what
eras will be in the shadows. So for example, we can start by adding the color
to the back leg. Let's start from the right one. Now we have the first shadow and let's create another one. So let's decrease the
size of our brush. And we will go to this
little area right here, and we will add a
little curve there too. You can hold your Apple pencil at the ends of the line and then manually recolor the area
underneath this curve. Now when you have these shadow, we will go to our Tommy and we will add another
shadow here as well. Again, we are starting
by creating our curve. You can adjust the
curvature if you wanted to go over the top to
edit sheet, go for it. And when we have
this curved lead, just add our color
to the bottom parts. If you have some places
that you need to erase, just go to the areas
or Sue and erase them. And the lush Chenault
that we will add will be right here. So we will go to these
little folds right here between the body and
between our little arm. And we will add a
little shadow here. So let's start by
creating the curve. We will go a little bit to
our little lag on the bag. We are creating these little
curve and then manually we will go underneath it and
we will recolor this area. If you need to adjust something, grab an eraser tool and erase everything
that you don't need. So now we have the basic color for our shadow and we
have our basic shadows. But it's not only the
one thing that we can do with this layer and
with the shadow color. So for example, we can
go and add some dots, and it will be our coloring
for these little frog. So let's just go and increase
the size of our brush. And we will go and
put a few dots. So that will be some
kind of a pattern. Try not to overdo it
and when you have it, we are ready with
our first shadow. And now we can go and
add a few highlights. So again, we are going back to our layers and we will need to create one more layer above. So we are tapping
on the plus icon. We are straightaway renaming it. So let's tap on this layer. Let's rename and let's name. It highlights the same as
with our previous layer. We will need to clip
it to our coloring. So let's tap on it and
let's choose clipping mask. And also we will need to change the blending
mode and opacity level. So let's just go to
this little icon and we will go to overlay
blending modes. Again, the opacity level we
will set at 50 per cent. Also, not only can just
move your little handle, you can just write down
the amount that you like. And now we will go back to our color palettes and we will
select a different color. So for example, let's
select this light, yellow and we will go to
the opposite side from where we have our shadow and we will add the
highlights there. So let's go to the top and let's create the
highlights there. We will go to this little
thing that we have in-between our eyes and
for the whole area, we will create the highlights. You can hold your Apple
pencil if you want, go to Edit Shape. If you want, grab an eraser tool and adjust your line
to your liking. And also let's go to the top of the eyes and let's add
the highlights there too. If you want, we can go
to one on this side. So for example, the left one, and we can add the
highlights here too. The same way as we
did with our shadows. These highlights are not only the way to add
the highlights, you can add some dots
to add some details. So let's grab our brush. Let's increase the size of it, and let's go to the soap and
we will add a few dots here. You can vary their size and
just try not to overdo that. When you are ready. We are done with our
first illustration. So let's move on
to the next one.
10. Happy Frog: Shadoes, Highligts & Details: Let's start adding
our shadows for our second illustration
the same way as before. So we are going
back to our layers, we are doing to
our second folder, frog two, we are going
to the coloring layer, selecting it, and we will need
to create one more layer. So let's tap on the plus icon. We will straight away
rename it as shadows. We need to clean this
layer to a previous one. So let just tap on it and
lead select Clipping Mask. And also we will need to change the blending
mode on this layer, and we will need to
change the opacity level. We are go into
this n icon and we I selected multiply
blending mode first. And then we are setting the
opacity at 50 per cent. When we did it, we are ready to get back to our
color palettes. And this time let's select the color with the name orange. When we did it, we will
create a different shadow. This time, we will go to the
bottom parts and we will create just a shadow going
through the whole bottom part. We will do it by
creating a curve. Hold your curve at the end. And if you need to go to
Edit shape over the top, go for it a jazz the curve tried to make it
even on both sides. And when you're satisfied, ledgers go and manually recolor
the areas on the bottom. And that's it for our shadow
to this illustration. So let's get back to our layers and we will create one more
layer for the highlights. Let's tap on the plus
icon straight away. Let's rename it as highlights. And let's clean this
layer so we will tap on it and we will
choose clipping mask. Also, we will need
to go and change the blending mode and
the opacity level. So we are going
into this n icon. We are selecting overlay
blending modes and we are setting the opacity
level at 50 per cent. And when we did it, we will use this
same color that we use for our shadow,
for our highlights. Firstly, let's go
over the top to our eye areas and we will
create the highlights there. Now when you have
these highlights ledgers and grab our
brush one more time, we will increase its
size and we will go over the top area and we will
put a few dots like that. And we will put a few more
dots to our front legs. Let's just go and do that. If you want to try out
different patterns, you are welcome to do it. If you think that maybe these highlights are
not quite working. If you want to make them
a little bit brighter, you can go back to your layers. You can get back to this
orally blending mode and change the opacity level. So for example,
maybe only this time we will set it at
seventy-five percent. And now we are done with
our second illustration. So let's move on
to the third one.
11. Excited/Confused Frog: Shadoes, Highligts & Details: Now let's get back
to our layers. We will go to our third folder and we will select
the color and layer. When it is selected, we are tapping on the
plus icon straightaway, we are renaming it
as the shadows. Let's clean this layer. So we will tap on it and we
will choose clipping mask. Then we will go to this icon. We will select multiply
blending modes, and we will set the opacity
level at 50 per cent. Now, let's get back to
our color palettes and we will select the color
with the name green to. Firstly, we will add the
shadows to our back legs. Let's go and manually
recolor these areas. Now we the same color. Let's decrease the size of
our brush and we will go to the front legs and we will
add some stripes here. If you need to erase
some parts and grab an eraser tool and do that. When we have this Tribes
on our front legs, Let's grab our brush one
more time and we will go to this side and we will add a
few stripes there as well. You can make them straight or
you can make them curve it. When you have this
traps on both sides, ledgers go to our layers and we will create one
more layer above. We will call it highlights. Let's clip it. So we are, it's happening. They're choosing clipping
mask and let's go and change the blending
mode and opacity. For the blended mode we
are using overlay and opacity level will
be at 50 per cent. Now let's get back to our
color palettes and we will select maybe this color
which is called light gray. So with this color, we will go and we will
add a few highlights. Firstly, let's go over the top and we will add the
stripes here as well. Vary their size, vary the
distance between them. If you want to add
the highlights to the top of the eyes, go for it. And when the same color
on the same layer, ledgers go and add a few
highlights on the front legs. So we will go and add
a few dots like that. And now we are almost done
with our third illustration, but let's add a
few more details. So firstly, we will get
back to our layers and we will go to the layer
with our clean lines. We will go and
change the color of our brush to the color
with the name lines, we will decrease the size
of our brush and we will go firstly to one side and we
will create some details here. We will go above the
shape of our frog. We will start by creating
the line like that, and we will add a few
more curves near it. So let's make them a
little bit smaller. When we have it on one side, Let's move on to the other one and we will do the
same thing here. You can go and you can
add them on the I, or you can go to the
side and add them here. So let's get to
the side and let's repeat the same thing starting from one big curve like that
and then create an FAQ more. These things will
represent some sweat. And now we are done with
our third illustration. So let's move on
to the last one.
12. Grumpy Frog: Shadoes, Highligts & Details: The same way as before. We are starting by
going to our layers, we go into our fourth folder, where I go into
our coloring layer and we are creating
one more layer above. So let's tap on the plus
icon and straight away, we will rename this
layer as shadows. Let's clean this layer, tap and then it's
choosing clipping mask. And let's go to this icon. We will select
Multiply Blend Modes, and we will set the
opacity at 50 per cent. When this is done,
we are getting back to our color palettes. And this time, let's select the scholar within
a magenta pink. And we will go to
the bottom part of our shape and we will create
a big shadow like that. Now let's increase the size
of our brush and manually, we will recolor
the bottom parts. When we have
something like that, Let's decrease the
size of our brush and we will go and add
a few bubbles. So go to this surface or this little shadow that we've created and create a few dots. You can vary their size and you can combine
them together. And now when we have it, we will do the following. We will grab our eraser tool and we will increase its size. We will go inside these
little shapes that we've created and we will
cut the pieces out. So very accurately, ledgers go and cut these little things. And also we can add the bubbles not only onto these little
areas that we've created, we can just go along the whole shape on the
bottom and we can create some bubbles with our eraser
to just create some pattern. As always, try not to overdo
it and when you are ready, let's go and create our new
layer for our highlights. So go into the layers below and above earlier with the
shadow right here, creating one more layer above,
straightaway, renaming it. Let's clean this layer, so tap on it and
choose clipping mask. And now we are going
into this n icon and we are going to the
overlay blending modes. As for the opacity for now, legislated at 50 per cent. Now let's get back to
our color palettes. And this time we will select the color with an AMC and blue. And this color, we will
go over our top areas and we will add some bubbles and also we will add
some highlights. So let's go and do that. When you are done with the
highlights on the ice sled, just put a few dots
for our bubbles. You can vary their size and
when you are ready with them, we will grab an eraser Tzu and we will erase
the middle parts. If you want the highlights to be a little bit more brighter, we can get back to our layers. We will go to our
highlight layer. We will go to this icon. We will change the
opacity level. So find what works for you. Maybe something like 90%, maybe a little bit less. Maybe you will move
it to the maximum. It's all up to you. And when you have it, we will do one last thing. It will be go into our
layer with a clean lines. We will get back to our color palettes and we will select the color
with the lines, and we will add
some angry icons. So firstly, we will go to one of the sides and we will
create the lines like that. When you have a few
lines like that, we will go over the
top of them and we will create a little
thing like that. And now when we have
it on one side, Let's move on to the other one, and let's repeat the
same thing here. Maybe we will go to
a different place, and now we are almost done
with our illustrations. The very last thing will be to change the background color. So let's get back to our layers and let's get to the bottom, to the layer with the
background color. We will tap on it
and we will select the very first color in
a row, and that's it. This is our stickers
with the frog. Thank you for
watching this class. Leave a review if you liked it, and consider subscribing for
more videos in the future.
 Uni Corn, ⭐Kawaii Art Enthusiast⭐