Transcripts
1. Introduction: Hello everyone, I'm uni
and enter this class. We'll draw a few summer
food illustrations. These class doesn't require any prior experience or offensive jokes will
start from scratch, and we'll be using
simple techniques throughout the process. Everything you'll see
will be happening. It procreate.
However, you can have other software or wants to try three
additional materials. You are welcome to join if
you are ready to start, Let's jump right into it.
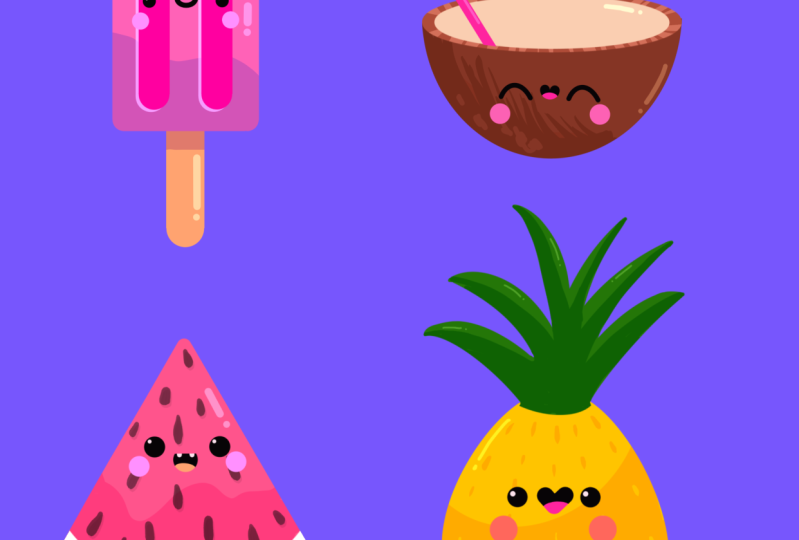
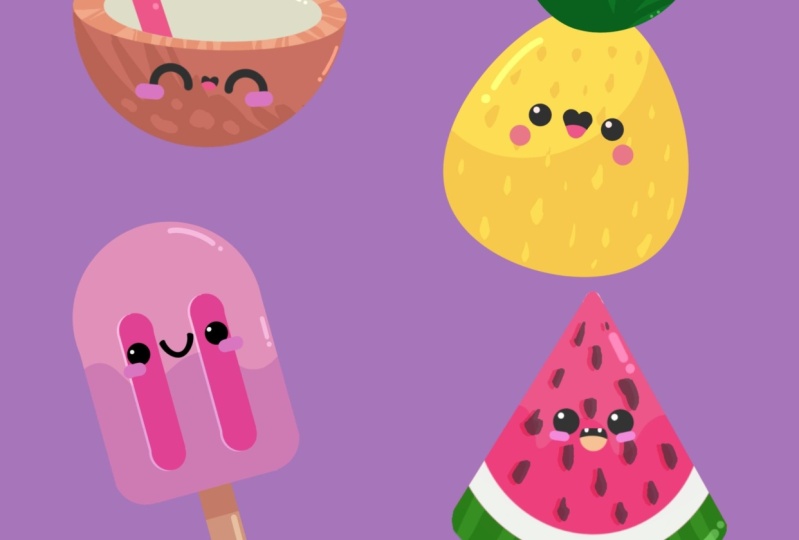
2. Popsicle: Base with Simple Shapes: Let's start our
class by deciding what kind of Canvas we
are gonna be using. You can see it is a very
simple square canvas because both pixel width and pixel
height are 2048 big sets, S for dpi there, 300 and S for the color profile. It is set as SRGB
with this low number. When it's all done,
let's hit Done and we will be redirected
to our new canvas. And now we need to
decide what kind of colors we are going to be using throughout the whole class. It can go to the Project
and Resources tab. You can download
the color palette and you can follow along. And when you did it,
Let's go straight to our color palettes and we will check out what we have here. Here we have two options of
how we can use this colors, the compact view and the cards. We'll be using cars because
they have all the colors, names and they are ready
for you to be used. And while we're still here
into our color palettes, Let's select the first color
for our first illustration. And our first illustration
will be a popsicle. I go into the very
first color in the very first row with
the name popsicle body. And we will tap on it to select. Now when we have
selected the color, Let's go and select the brush. So we go into the brush library. We are going into the
calligraphy folder and we are choosing
mono line brush. When we have them brush
ledgers go to the left, to the top slider and we will adjust the size of our brush. Now you can leave it
at something like 15, maybe ten per cent. If you wanted to go
with something a little bit thinner, go for it. But try to make sure
that you can see this line that you
have on your Canvas. Now when all the
preparations are done, ledgers go and start
creating our first shape. And our first shape will
be a very simple circle. And we will do it
without an holding our Apple pencil
from our canvas. Let's go and try to do that
at the end of the line. Hold your Apple pencil, and you will see that now your shape is looking
a little bit better. These tool that we
are using right now is called the
quick shape tool. But also you can notice that we have an ellipse here
and we will need to have a perfectly
round circle to do so without an holding
our Apple pencil, we will need to hold one of
our fingers on the screen. Now you can see that you snapped your shape to a
perfectly round circle. And also you can
notice that if you move your Apple pencil
from side-to-side, you will just scaling
it up and down. For now, legislated as something not too big
and not too small. And when they are satisfied
with everything here, let just on hold everything that we are
holding right now. And now we have a
perfect outline. And that means that we can
add the color insight. So we will go to our
top-right corner and we will drag and drop the color
into this middle part. Now you can see that we have
a perfectly field elements, but that doesn't look
like a Popsicle, right? So that means that
we will need to add more details and we will do
it on the different layers. Firstly, we will start by creating a rectangle
on the bottom. So let's go to our
layers and let's create one more layer by tapping
on the plus icon. Now when we have this layer
and when it is selected, we will go to our left and we will select this
icon with S ribbon. When you did it, you
will see that you have a little panel
on the bottom, and we will use the
rectangle here. So let's tap on it. This tool is called
the Selection Tool. And with these two, we will create the selection. Firstly, let us go
to the left side of our ellipse and we will start creating the
selection here. We, I go into their rights until we reach the
opposite side. You don't need to be
very precise right here. Just try to make the
selection like that. When you have it, we need to recolor it and we can do
it in two different ways. The first one is to
go to this panel on the boards and tap
on color field. But that might be a little
bit tricky later on because we are going to be
creating different selections. And when we're going
to be creating that, they will be colored
at the beginning. So that might be a
little bit confusing. So let's use another option
of recoloring this selection. Firstly, we will just tap
one more time on color field to get away from this
coloring parts that we made. And we will go to our
top-right corner and we will just drag and drop the
color inside this selection. So now when we did it, we will go and
deselect everything by hitting R S ribbon
icon one more time. And we will need to go
and adjust our sheet. We need our Popsicle
to be pretty solid so we don't need any stops right
here between the elements. So we will do it in that way. We will go to the arrow key or the top-left and
we will tap on it. We will be using uniform method and we will turn on Snapping. So firstly, tab on the
snapping and go to this little toggle with
snapping and turn it on. What we need to do. Firstly, ledgers go over
the right side and we will go to the middle node that
we have on the right, and we will just move
it to the right. You can see when we snaps
these sheep to a previous one, you will have this
line that is going vertically and another line
that is going horizontally. That means that we are
doing everything right. So when we have it on the right, Let's continue doing the
same thing on the left. So we go into our middle nodes and we are
just moving it to the left until we see this
line that is going vertically and this line
that is going horizontally. When we have it, ledgers, deselect everything by hitting our arrow key one more time. Now we have a decent results, but we also need to work on, so these corners, we want
to make them very cute, and that means that we want
to make them around it. But firstly, let us
go to our layers. And let's combine
these two layers that belong to our
shapes together. So to do so, we will need
to go to the top one. We will need to tap
on it and we will need to select Merge Down. And now everything that we have related to our base
of the popsicle is on one layer and we can go entry name this layer
for our convenience, we will need to tap on
this layer and we will need to select
Rename for the name. Let's go with a popsicle base. And while we're still
here in the earlier, let's create one
more layer so we will tap on the plus icon. We can go and work on to
our corners manually, or we can make it
in a different way. Let's do it in different ways. Firstly, we will go back
to our color palettes and we will select a new
color that is contrast. So for example, popsicle shadow. With this color, we will
go and create a lethal, an ellipse or a little circle. This circle will be
a little bit better. So let's just go and
create this little circle. Hold your Apple pencil
at the end of the line and to snap it to a
perfectly round circle, hold one of your
fingers on the screen. Adjust the size,
tried to make it not too big when you have
something like that, Let's just add the color
inside this element. So again, we are doing
to our top-right corner and we add dragon and
dropping the color inside. So when we have this shape, we will need to
do the following. We will go to our arrow
key or the top-left, and we will just move this shape to the corner that we
have on the bottom. And we will need to snap this
shape perfectly until you see one vertical line and one horizontal when you have it, Let's deselect everything by hitting our arrow
key one more time. And when we have it on one side, Let's just make a duplicate of this little ellipse and we will put it on the opposite sides. So we will go to our
layers and we will swap this layer with the
circle from right to left. Here, we will select duplicates. And now you can
see that you have this same layer with
the same shape. It is on the same place. We will need to move it
to the opposite side. So we are going to our arrow key and we are just moving it to the right when we see this
line that is going vertically, and when we see three lines
that are going horizontally, we are on holding
our Apple Pencil, and when we are ready, we are deselecting everything by hitting our arrow
key one more time. And now we will need to
go again to our layers. And we will combine
these two layers with the circles together and
we know how to do that. We will need to go to
the layer on the top. We will need to tap on it and we will need to select Merge Down. Now, we will do the following. We will go to this layer
with our two circles. We will tap on it and
we will choose, Select. We will have this little
panel on the bottom. And here we will need to
select invert when you see this moving lines going through these shapes of our circles,
that's what we need. Now, what we will do, we will go to our layers when these two
shapes are selected, and we will go to our previous
layer, the popsicle base. So let's select it. When we have selected, Let's grab an eraser tool. Let's zoom in our
Canvas and we will go to these corners
and we will very accurately arrays these corners when you are ready
with the first one, let's move on to the opposite one and let's do the
same thing here. When you are ready, ledgers, guilt and deselect
everything by hitting R S ribbon icon one more time. And now we can get back
to our layers and we can hide our layer with
these two circles. To do so, we will need to go
to this layer and we will need to tap onto this little
checkbox on the right. And now we have a
perfect popsicle base. So what we're gonna
be doing right now, we will create one more
layer and we will add more details to the
body of our popsicles. So let's just go to the plus
icon and we will tap on it. When we have this layer ledgers go to our color palettes and we will select the color with the name popsicle inner ends. When you grab this color, Let's just go and create another selection
for our inner parts. Firstly, let's make
sure that we are working on our new layer. And when we did it, we are getting back to
our S ribbon icon. So tap on it and we will
use rectangular selection. We will go to the middle part
of our little shape here, and we will create the
selection like that. You can play with the width, you can play with the height. It's all up to you. Just try not to overdo it. When you have
something like that. Let's just add the color inside. So we are going to our
top-right corner and we add dragging and dropping the color insights when you have it. Let's deselect
everything by hitting R S ribbon icon one more time. And now we need to go
and adjust our corners. We want to make them around it. We will do it on a
different layer. So firstly, we are going back
to our layers and we are tapping on the plus icon to
create another layer on top. Onto this layer, we will be working with the
same color and we will go to the top of our
shape of our rectangle, and we will add a circle here. Let's just go and
do it manually. Hold your Apple pencil
at the end of the line. Hold one of your fingers
on the screen to snap to a perfectly
round circle. And when you have it, Let's unfold ARAF scene and
let's put the color inside. We are going to our
top-right corner and we add dragging and
dropping the color. And now we need to adjust the shape and combine
these two shapes together without having any gaps or without having any steps. So we will need to go
back to our arrow key. We will need to adjust the size. We will need to make it
smaller until we have this line that is
going from top to the bottom on the right firstly, and then we will do
the same on the left. We will need to make sure that our shape on the top
having this same size, that our width on the
elements on the bottom. So now when we have it, we will need to go and
move this shape down. We are looking for these cross. You will have three
lines going down. Also, you will have one line
that is going horizontally. When you haven't led deselect everything by hitting our
heirarchy one more time. And when we have this
shape on the top, we will need to make a copy of these little elements and we
will need to move it down. So we are going back
to our layers and we will swap this layer
with our little circle, the pink one, from
right to left, we are choosing Duplicate. Now when we have this new layer, we are getting back to
our arrow key and we are just moving this shape down
the same way as before. We are looking for this cross. You have three lines going
down and one horizontal line. When you have it, ledgers, deselect everything by hitting our heirarchy one more time. Now, we will need to get back to our layers
and we will need to combine all these three sheets that belonged to the
inner part together. So firstly, we're
arguing to the top layer with our pink elements. We are tapping on it
and we are choosing Merge Down and we will
do it one more time. So tap on the layer, choose merge down and we can rename this layer by
choosing the name. Inner parts, tap on the
layer and choose Rename. Now when we have this
shape on the left, we will need to make
a copy on the right. And we will do the
same way as before. We will go to this layer
with the inner part. We will swipe it from right to left and we will
choose Duplicate. Now when we have this shape, we are going back to
our heirarchy on the top-left and we are moving
our shape to the right. Again, we are following three lines that are
going horizontally here. When you have something
like that, legend, deselect everything by heating our arrow key and we will get back to our layers and we will combine these two
layers together. So go into the top one, tapping on it, and
choose merge down. Now let's make sure that
these two shapes are in the middle of our shape on the
bottom, the popsicle base. So again, with this
layer selected, we will need to go
to our arrow key. We are using snapping and
we will need to go and find this line that is going
vertically when you have it, that means that your shape
right in the center. Now let's deselect everything
by hitting our arrow key and we are ready to
go and add this tick. So we will do it the same
way as with the inner parts. Firstly, we are creating our new layer by
hitting the plus icon, and we will go and
create the selection. So one more time, go
into the S ribbon icon, selecting a
rectangular selection, and go into the bottom and
creating the rectangle here, again, you can play
with the size, with the width, with
everything here. When you have this election, we will need to get back to our color palettes and we will need to select a
different color. This time it will
be popsicle stick. Let's select the color
and let's drag and drop the color inside
our selection. Now when we have
it's allege as heat the S ribbon icon one more
time to deselect everything. And we will need to work
on to our little corners. And we know how to do that. We will need to get
back to our layers and we will need to create
one more layer above. When we have this layer, we are going to the bottom and we are creating a circle here. So the same way as before, by using the same color, we are creating the shape. We are holding our Apple
pencil at the end, and we are holding one of
our fingers on the screen. So now let's adjust the size
maybe just a little bit, and we will go and drag and
drop the color in sight. Now when we have this shape, we will get back to our arrow
key and we will adjust it. So firstly, legis,
make sure that it is the same size that we
have for our stick. If you need to adjust the size, just go to the sides and adjust
these nodes until you see the line and put your little elements the way
that you see there cross. So you will have
three lines going vertically and one line
going horizontally. When you have it, Let's deselect everything by hitting
our arrow key. And we will go to our
layers and we will combine these two layers that belong
to our stick together, tapping on the layer on the
top and choose merge down. Also, we can just go
and rename this layer. Let's just tap on it. Ledgers hit Rename, and let's
go with the titles tick. You can see that this layer
is overlapping our Popsicle. So we will need to
move this layer underneath ledgers go when
this layer is selected, we will hold it and
we will just move it down under our Popsicle base. And now we have a perfect
base for our Popsicle. In the next part, we will
be adding more details.
3. Popsicle: Shadows & Highlights: Before starting this part legis, make sure that our
stick is in the middle. We know how to do that. Firstly, we will need
to make sure that our layer with this
tick is selected. And when it is selected, we are getting back
to our arrow key. We are using uniform method, we are using snapping. And what we are looking
for is this line that is going from top to the bottom
when you haven't slept, just deselect everything by hitting our Eric
you one more time. Now we are ready to
add some shadows. So firstly, let us get back to our color palettes and we will
select a different color. This time it will
be stick shadow. So let's tap on it to select
when we have a new color. Let's get back to
our layers and we will need to create
one more layer above. So we are selecting this layer
with this tick and we are tapping on the plus
icon and straight away, Let's rename it as a shadow. So we add tapping on the layer and we are choosing Rename. Now we need to
prepare this layer. We don't want to add
any more details. We want to work only on the areas that we have
on the previous layer. So on our layer with this tick. So what we need to
do, we will need to go to this layer
with a stick shadow. We'll need to tap on it and we will need to choose
clipping mask. And now if we just go to our Canvas and if we
try to paint something, you will see that we are adding details only on this tick, and that's exactly what we need. But also we will need
to prepare this layer. We will need to change
the blending modes. Blending modes are
different ways your layers can interact
with each other. So they are aiding
different visual effects. And as we are creating a shadow, we will need to use
multiply blending mode to go into this
Blending Mode menu, we will need to go to this icon and we will
need to tap on it. You can see there's
a lot of titles. What we need to find is
multiply blending modes. When we have it, we also need to change the
opacity level of our layer. Opacity is how
transparent your objects. So we will need to
go to this slider. We will need to grab it. And let's just leave it as 50 per cent if it will be a
little bit too bright for us, or if it will be too pale, we can always get back to this slider and we can
adjust the opacity level. So when we have
everything prepared, alleges get back to our canvas. Let's increase the
size of our brush. We will go underneath
our body of the popsicle to this tick and we will add the
shadow like that. If you want to adjust
the amount of opacity, you will need to get
back to your layers. You will need to go to
this dictionary layer, tap on the icon and
adjust the opacity level. So if you go to the left, it will be a little
bit too pale. If you go to the right,
it will be brighter. So for me, 50 per
cent works perfectly. And when you have the
first shadow layer and just move on to
the popsicle base, and let's create
another shadow here. So firstly, let us get back to our color palettes and we will go and select
a different color. This time it will
be popsicle shadow. Let's tap on it to select. Now, one more time we are
getting back to our layers. We are selecting hourly with a popsicle base and we are
creating one more layer above. Let's rename it as
popsicles shadow. Now, let's clean this
layer to a previous one. So we are tapping on the layer. We are choosing clipping mask. And now we will get back
to this icon and we will choose multiply
blending modes for the opacity level, less for now, set
it at 50 per cent. And now we will
go to our Canvas. We will go to the bottom part of our Popsicle and we will create a wobbly
shaped like that. When we have this shape, we will just go underneath
it and manually, we will recover it. If you think that this
shadow is too bright, we will need to get back to
our Popsicle shadow layer. We will go inside
this little window. We are tapping on the icon and we are changing the opacity. For now, let's just
leave it at 25 per cent. If you think that something
works better for you, go for it, and we are
done with the shadows. Now, let's go and
add some highlights. We will do it the same way, but we will use a
different blending mode. Let's start by going to our color palettes and we will
select a different color. This time, it will be
popsicle highlights. Let's tap on it to deselect. Now when we have the color, we are getting
back to our layers and we are going to stick. Firstly, Let's just go to the stick shadow and we will
create one more layer above. So we are tapping on the plus icon and we will
rename it as stick highlights. So let's tap on it and
let's choose Rename. Now we will need to
clean this layer to our Stieg and we will do
the same way as before. So we are tapping on hourly and we are choosing
clipping mask. And now we will need to go and select a different
blending mode. So we are going into
this an icon and this time we will select,
Add blending modes. As for the opacity, Let's set it at
something like 20%. If it will be too
bright or too pale, we always can get back
here and adjust it. Now, getting back to our Canvas and we are starting
from this tick. So we are going to
one of the sides and we are creating
our highlights. So for example, we can go
to the right and we can start by creating a very
simple line like that. We can hold it at the end
to create a better line. And when we have
it, we can just go underneath it and we can
put a little dot here. And we are done with our little
highlight for this tick. Now let's continue by adding our highlights to the
body of our Popsicle. So we will do the
same way as with this tick to go into our Layers, go into the popsicle
shadow layer and tapping on the plus icon, Let's rename it as
popsicle highlights. Let's clean this layer to our Popsicle base so
we are tapping in it. We are choosing clipping mask. And again, we are
doing to the n icon. We are choosing at
blending modes. And for now, let's leave
it at 20 per cent. Now we will go to the
opposite side from our shadow and we will start
creating our highlights. So for example, let's continue
agent our highlights. On the right, we will
just zoom in our Canvas and we will repeat this shape
that we have right here. So let's just go and
create the curve. Again. You can hold your Apple pencil at
the end of the line to create a better curve if you want to
adjust it even more, go to Edit shape or the top. Here you have some nodes
that you can tweak. And that means that you
can adjust your shape to your liking when you are satisfied with adjusting
these little nodes, just tap on the screen
with one of your fingers. When we have this little curve, ledgers get underneath it and we will put a little dot under it. Now, if you want to add more
highlights, just go for it. For example, we can go and add one more highlights that
will go vertically. And when we have it led, just add one more
highlights and it will be underneath earlier
with our inner part. So what we need to do, we will need to get
back to our layers. We will go to our
inner part layer and we will make a duplicate. So we are swiping this
layer from right to left. We are choosing Duplicate, and we will need to set this
layer as Ed blending modes. So we go into the n icon, we are going to
add blending modes and we are adjusting
the opacity to 20%. We will need to select a
different color to this part. So what we can do, we can just try to go to our top-right corner
and we can just drag and drop the
color to this areas. But it might be not
very successful because probably you
will have some lines. We can do it in a different way. We will need to go to
this layer that so B1, that is set as at
blending modes, we will need to tap on it and we will need to
choose Alpha Lock. It works the same way
as a clipping mask, but it is on the same layer. So we will be adding
the details only onto these areas that we
have onto this layer. Now, let us increase the size
of our brush and we will go over these shapes and we will recolor them when you did it. We will get back to our layers
and we will need to put this layer with our highlights underneath earlier
with the inner part. For our convenience, alleges go entering in this layer with the inner part and add blending mode or highlights
as the highlights. So tapping on it,
choose an array name and just a1 highlights
at the ends. So now we will need to
grab this layer and we will need to put it
underneath our inner parts. Let's just drag it down. Now you can see that we
don't have anything here and that's because we clipped
it to a previous layer. You can see there's
a little arrow and we need to get rid of it. So we will need to tap
on this layer and we will need to choose clipping
mask from the list. You can see any difference right now because we have this layer right underneath
our inner part and we will just need to move
it just a little bit. So when this layer is selected, we are going to our arrow key. We are using uniform method, we are using snapping. We will just move
it diagonally down. When you have
something like that, like just deselect everything by hitting our arrow
key one more time. And now we're almost
done with our Popsicle. The last thing that we will
need to add is the face, and we will edit
in the next part.
4. Popsicle: Facial Features: Let's start by going
to our color palettes and we will select the
color with the name ice. Let's tap on S3 Select. And when we have the color, Let's get back to our layers. We will go to the inner
part layer and we will tap on the plus icon to
create a new layer on top. Now let's treat
the way rename it, so we will tap on it and
we will choose Rename. We will go with a
title facial features. And once this layer, we will go firstly and increase
the size of our brush. We will go to the left
part and we will put the first dot for our first I
select just go and do that. You can adjust the size of your facial features
to your ligand. Now when we have the first i, we will go and add the co-pilot and we will put it
on the other side. So let us go back to
our layers and we will swap this layer with facial
features from right to left. We will choose Duplicate. Now with this new layer, with the facial features, we are getting back
to our arrow key. We are using uniform method. We are using snapping and we are moving our second
eye to the right. We are following our
three horizontal lines. And that will mean that we
are putting our ship on the same line with our
previous elements. When you are satisfied with the distance between the eyes, Let's deselect everything
by hitting our arrow key. And now we will get back to our layers and we will combine
these two layers together. So we are going to the top one. We are tapping on it and we
are choosing the Merge Down. And we will need to make sure that our eyes right
in the center. So with this layer selected, we are getting back
to our arrow key. We are using uniform method, we are using snapping and we are looking for this line that is going from top to the bottom. Also, you can just find the line that is
going horizontally. And that will mean
that you are putting your facial features right in the center of
the whole shape. So when you're satisfied
with the placement, Let's deselect everything by heating our arrow
key one more time. And now when we
have the eyes led, just go and add a little Smiley mouth and we will do it on a
different layer. So let us get back
to our layers. Let's tap on the plus icon and we will go and decrease
the size of our brush. For example, we can leave it at 15% or if it doesn't
work for you, you can just go and
adjust the size to your liking. What
we're gonna be doing. We will go between the
eyes and we will create the boards and part of the
circle or the ellipse. So let's just go
and try to do that. You can hold your
Apple pencil at the end of the line to
snap it to a better shape. And when you have it, ledgers go and make sure
that it is in the middle. So we are getting
back to our layers. We are making sure that
this layer is selected. We are getting back
to our arrow key and we are using uniform
method and snapping. And we are looking for this line that is going
through the center. And also we can find this
lambda zone horizontally. And that will mean that we are in the middle between our eyes. When you're satisfied with
the placement of your mouth, let just deselect everything
by hitting our arrow key, we can get back to
our layers and we can combine these
two layers together. So you go into the top
one, tapping on it, choose Merge Down, and we will need to add
two more things. Firstly, let's add the
highlights to the eyes. Let's get back to
our color palettes. Let's select the color with
the name IS highlights. When we have this color, we are getting big and decreasing
the size of our brush. And firstly, we will go to our left eye and we will
put the first dot here. Let's go over the top and
we will put these dots. When you have the first dots, let us move on to
the right and we will try to put it
on the same line, and we will try to put it on the same distance from
the top when you have it, the last thing that
we will add here will be the cheeks
under the ice. So we will get back to our
color palettes and we will select the color with the
name popsicle cheeks. Let's increase the
size of our brush just a little bit and
we will go underneath the eyes and we can choose from creating that little
lines for our cheeks, maybe a little ellipsis. Or if we want, we can just
put two dots and that will be our cheeks to let us go and
try to create this chicks. As always, you can hold your Apple pencil at
the end of the line to create a better shape and eating it to
adjust it even more, go to Edit shape over the top. Here we can make it smaller
or you can move it. Tried to make the cheeks
even on both sides. And when you're satisfied
with the results, Let's just tap on the
screen with one of our fingers and we are done
with our first illustration. But before finishing
up this illustration, alleges get back to
our layers and let's combine all these layers
inside the group. So what we need to do, we will need to select each layer that belongs to our Popsicle and we will need to
select it firstly, you can see that the
first layer is already selected and we will need
to go underneath it. We will need to swipe the
layer from left to right. Now two layers are
selected and we will need to do the same thing with
the rest of the layers. So let's go and do that. When we have selected
all the layers, Let's go over the top
and let's hit Group. Now, we can go to this new group title
and we can rename it. So tapping on it and
choosing Rename, we are going with
the name popsicle. And for our convenience, we can collapse this
group by going to this little icon
near the checkbox. And now let's move on to create an RS second
illustration.
5. Coconut: Base with Simple Shapes: For our second illustration, Let's create a coconut. So firstly, we are going back
to our color palettes and we are selecting the color
with the name coconut body. Let's tap on this to select
when we have a new color. Let's get back to our layers. And firstly, we will need to hide the group
with the popsicle. We collapse this group
and we will go to this little checkbox
and we will tap on it. Now when they have
the blank canvas, we are ready to create
one more layer. So let's tap on the plus
icon and straight away, Let's rename it as coconut body. Onto this layer, we will go and create a very simple
shape of an ellipse, the same way as before. We're just going to
our Canvas and we are creating the shape without
an holding our Apple Pencil. And at the end on the line, we are holding our Apple Pencil and we're snapping it
to a better ellipse. Now let's unfold
our Apple pencil and let's go over the
top to edit shape. Here we have some
nodes to tweak. So let just go to one
of the sides and we will move it a little
bit more to the side. So we will create
a rounder Alice. When you have
something like that, Let's just tap on the screen
with one of our fingers. And when we have the outline, we are ready to put
the color insight. So we are going back to
our top right corner and we add dragging and
dropping the color insights. And when we have these base, we are ready to
create more details. So firstly, let us get
back to our color palettes and we will select the color
with the name coconut h. Now when we selected the color, we will get back to our layers and we will
create one more layer. Let's tap on the plus
icon and straightaway, Let's rename it as coconut H. And onto this layer, we will go just a
little bit above the center of this shape
that we already have one. So our Canvas and we will create a horizontally aligned ellipse. And we will need to combine the ages of these two
ellipses together. So firstly, let us go
and create the shape of the horizontally aligned
Alice the same way as before, just creating the
shape and holding our Apple pencil at
the end of the line. Later on we will go to
Edit shape over the top and we will tweak
some nodes here. So firstly, let's just go
over the rights and we will try to combine our edges. Try to put these little
Arabs horizontally, as horizontal as you can. And when you have
something like that, Let's go over the soap note. We will drag it a
little bit up to make the whole shape a
little bit more open when you have
something like that, Let's just tap on the
screen with one of our fingers and we will add
the color inside the shape. So let us go to our
top-right corner and we will drag
and drop the color. We can go to our arrow
key and we can make sure that this whole shape
is aligned perfectly. So we can do to this side
notes the central ones, and we can just move them
until we see this line that is going from top to the bottom when you have it on one side, Let's just make sure that it is the same on the other one. When you have the perfect
alignment ledgers deselect everything by
hitting our arrow key. And now we will
do to our layers, we will go to our
coconut body layer. We will select it and we
will grab an eraser tool. With the eraser tool, we can adjust its size
and we will go over the top and we will
erase everything there. But I just go and
very quickly do it. And now we have a
very decent base, but we will need to
add the inner parts. Firstly, let us get back to our color palettes and we will
select a different color. This time, it will
be coconut inner. Let's tap on it to select
when we have the color, we will get back to our layers. We will go to our coconut, each layer, and we
will make a duplicate. Let's swap this
layer from right to left and we will
choose Duplicate. Now you can see the
difference because we have two similar layers, but we will go to the
top one and we will drag and drop the color
inside the shape. And we will get back to
this layer and we will rename it as coconut inner part. So let's tap on it and
let's choose Rename. Now when this layer is selected, we will get back
to our arrow key. We will use uniform method, we will use snapping, and we will go and
scale this thing down. For example, alleges go to our top right corner and we
will drag it diagonally down. When we have the
scale down shape, we will need to put
it in a center, so we are just dragging it and we are following these crops. When we have this cross, we are ready to move on. You can make this inner part as big or as small as you like. Just play around and
find what works for you when you have the
shape that you like. Let's just tap on our
heirarchy one more time to deselect everything and we are
almost done with our base. The last thing that
we will add into this part will be
a little straw. So firstly, it ledgers, get back to our color palettes and we will select the color with the name coconuts Draw
with this color selected. We are getting back to
our layers and we will create one more layer
above and straightaway. Let's rename it
as coconut straw. Now, onto this layer, we will grab our brush, we will adjust its size. We will go and create the
first line like that. When you have the first line, you can hold it at
the end secret. A better line, we will need to create another little line. So we will just
zoom in our Canvas. We can rotate it and we will need to create
a line like that. You can play with this size on this part and also you
can play with the angle. Also hold your Apple pencil at the end of the
line to adjust it. If you need to
adjust it even more, go to Edit shape over the top and tweak this little hand-offs. And when you are satisfied
with your straw, ledgers, tap on the screen with one of our fingers and we will need
to cut this little piece. So firstly, we will need
to move this little shape. Ellis will be done
because you can see that we have a very soft ending here and it is starting to add softly a little
bit too soon. So we will need to make
sure that this layer is selected and we will
go to our arrow key. We are using uniform method, we are using snapping and we are just moving it
a little bit down. If you want to
rotate this shape, go for this green node or the top and rotate it
to your liking. If you want to make the
shape a little bit bigger, you can go to one of
the corners and just scale it up or down
to your liking. So when you're satisfied
with this shape, ledgers Gill and deselect everything by hitting
our arrow key. And now we will
do the following. We will need to get back to
our layers and we will need to go to our layer with
the coconut inner part. We will need to
select this layer. We will need to tap on it
and we will need to choose, Select All wanted this
little panel on the bottom, we will need to select inverse. Now when this is selected, we are getting back
to our layers. We go into our
coconut straw layer. We are grabbing our eraser
tool and we are just going over the bottom part
and very easily erasing it. Now when we are ready, Let's deselect everything
by hitting R S ribbon icon. And we are ready to move on to our next part where we are going to be adding some shadows.
6. Coconut: Shadows & Hightlights: To start with this part, we will go to our color palettes and we will select
a different color. This time, it will be
coconut body shadow. Let's tap on it to select
when they have this scholar. When I get back to our
layers and who will need to go to the
coconut body layer? When it is selected, we are tapping on the
plus icon and we will create one more layer
above straightaway. Let just go and rename it
as coconut body shadow. We need to clean this
layer to a previous one, so we will tap on it and we
will choose clipping mask. And also we will need
to go and change the blending mode of this layer and the
opacity level of it. So we will go to this icon, and firstly, we will find
them multiply blending modes. When we have it, we will need to get back to our opacity slider and we will set it at 50 per cent for now. Now when the sender layer, and when we have our new color, we will actually go
and change the brush. So let's just get back to our brush library and we will
go into the inking folder. Into the inking folder, we will select 0 brush. With this brush, you can notice that it has a very
peculiar shape. And this shape
depends on how much pressure you put into
your Apple pencil. So if you just go with
a very low pressure, you will create some thin lines. If you, for example, starting with a high pressure and then you are
losing some of it, you will have a very
peculiar shape. And that's exactly what we
need because we want to convey these texture that
the coconut has some fibers. We will go and add the
shadow in this peculiar way. So what we're gonna
be doing exactly, we will go to one of the sides, for example, the left one, and we will start with
a very thick shadow. We will start by creating a
curve because we want to go with the direction that our
shape on the bottom has. Because either way, it will
be a little bit weird. So now let's just go
over the bottom part, over one of the
sides and we will create some pattern
with our shadow. If you already did something or if you want to
add more in details, we can set the same brush
for our eraser tool, and we will do it in that way. When the brush is selected, we will go to our eraser tool
and who will just hold on Apple pencil until we have a
little message on the top. Now we've set the same
brush for our eraser. For example, alleges go and add more details to our shadow. We will go and add a
few lines like that. If you want to add more details, just go for it, play around and find what works for you when
you're satisfied. Ledgers add another shadow
to our h of the coconut. So firstly, we are going back to our color palettes and we are selecting a different color. This time it will be
coconut H shadow. Let's savviness to select
when we have this color, let us get back to our layers. We will go to our layer
with a coconut edge. We will select it. We will do the same
thing one more time. We will create one more
layer and straight away, we will rename it as
coconut edge shadow. Let's clean this
layer by tapping on it and choose clipping mask. And also we will
go to this icon. We will select multiply blending modes and
S for the opacity, we will set it at 50 per cent. For now. Now, we will go to
the edge and we will start creating
the straight lines. They will need to go circularly so you can play with the distance
between them. You can play with amount
of pressure you use. You just need to go and
add a few lines like that. And when you did it, We are done with our shadows. Now, let's move on and
add some highlights. Firstly, we will
need to get back to our brush that we used before. It is in the calligraphy folder and it is called mono line. Now we will get back to our color palettes and we will
select a different color. This time, it will be
coconut highlights. Let's tap on its deselect. Now, we will get back
to our layers and we will start by adding the
shadow to the inner part. So let's select this layer. Let's tap on the plus icon. Let's rename it as coconut
inner part highlights, we need to clean this
layer to a previous one. So let just tap on it, let choose clipping mask. And we will go to
this icon and we will select Add blending modes
for the opacity level. Let's just draw out
20 per cent for now. Now we will again
back to our Canvas. We will increase or
decrease the size of our brush depending on what
size you're at right now. And we will go to
one of the sides and we will create
a curve there. So for example, let's go to the opposite side
from our shadow. It will be the right
one and we will create elites out curve here. If you want to add
more highlights, you are welcome to Zoom. For example, you can go
and add a little dots. Now when we have these
highlights on the inner part, ledgers get back to our layers and let's
add more highlights. We will do it in the same way. We will need to get
back to our layer with a coconut body and we will
create one more layer above. Let's rename it as
coconut body highlights. One more time we are getting
back to this, an icon. We are selected and
blending modes and we will set the opacity
level to 20 per cent. Now one more time
where I go into the opposite side from where our shadow is and we will create another curve here
for our highlights. If you want to add more
highlights, go for it. And the last highlighted we will add will be on the straw. So let us get back
to our layers. Let's go to our
coconut straw layer and we will create
one more layer above. So doing this same
thing, firstly, renaming this layer, Let's clean this leads to a
previous ones are happening. They're choosing clipping mask, then go into the icon
selected add blending mode, and opacity level
is at 20 per cent. Now let's go over
one of the sides of our straw and let's
add the highlights. And where we've added the
highlight to this straw. We are ready to
move on and we are ready to add the
facial features.
7. Coconut: Facial Features: To start with our
facial features, we will need to get back
to our color palettes and we will select the
color with the name ice. When we did it, we
are getting back to our layers and we will need to create one more layer above. So let's tap on the plus
icon and straight away, we will rename it
as facial features. And onto this layer, we will go to the bottom
part of our coconuts. Let's adjust the size of
our brush to our liking. And we will start by
creating the first curve. It will be very
happy Smiley face. So we will create
the curve like that. Hold your Apple pencil
at the end of the line. If you need to adjust it, go over the top to edit shape. Play with this little
handles here and find the shape that you like when you hand the
shape that you like, we will go and as
a duplicate of it. So we are going back
to our layers and we are swiping the layer
from right to left. We are choosing Duplicate. Now when we have the copy, we will go to our arrow
key or the top-left. We are using uniform method. We are using snapping
and we will move it to the other side
and we will follow these three blue lines when you are happy with the distance
between the objects, Let's deselect everything by hitting our arrow
key one more time. And we will get
back to our layers. And we will combine these
two layers together, go into the top one, tapping on it, and
choose merge down. Now let's make sure that
our facial features, our eyes are right
in the center. So with this layer selected, we are getting back
to our arrow key. We are using uniform method, we are using snapping
and we are looking for this line that is
going from top to the bottom when you have it, Let's deselect everything by hitting our arrow
key one more time. And now let us get back to our layers and let's
create one more layer. And onto this layer we will
add a very Smiley mouth. So lets just grab our brush. Let's increase its size and we will create
another curves. So let's just go with
something like that. You can hold your
Apple pencil at the end of the line as always. And if you need to adjust
the shape even more, go to Edit shape over the top. Here you will have some
handles and you can play with that when you have
the shape that you like. Let's just tap on the screen
with one of our fingers and we will need
to make sure that the shape is in the center. So let's just make sure that this layer is
selected and we will get back to our arrow key
uniform method snapping. And we will find this line that is going
through the center. You can play around
with the position of this mouth to make
it even cooler. You can put it a little
bit above the eyes. So when you have it, ledgers, deselect everything by
heating our arrow key. Now, we are ready to
get back to our layers and we are ready to combine
these two layers together. So go into the top one, tapping on it, and
choose merge down. Now we will add a little tongue inside
our shape of the mouth. And we can do it very easily by setting this layer
as an alpha lock. So let just tap on the layer and we will select Alpha
Lock from the list. Now we are getting back
to our color palettes and let's select the color
with the name coconuts, true, when they have this color, we are doing to the
bottom part of our mouth. And we will create a
little tongue here, play around with the size of it. And when you're
satisfied, allege us, get back to our layers and we
will tap on the layer with the facial features
and we will deselect Alpha Lock now onto
the same layer. We will get back to
our color palettes and we will select the
color for the cheeks. It'll be coconut cheeks. Ledgers go under our eyes and let's add some cheeks
the same way as before. We can create different
shapes for the cheeks. For example, you
can create the line or you can go with just dots. So let's just go there and
let's create our cheeks. Try to make them
even on both sides. And if you need to
adjust the shape, just go over the top to edit shape when you're satisfied
with how it looks, we are done with our
second illustration, but before finishing
up this part, ledgers go to our layers and let's clean everything up here. So we will need to
select each lay that belongs to our coconut, and we will need to
put it into the group, just wipe the leaves
from left to right. And then he'd group, Let's rename this Rubisco
into this new group. We will tap on it and
we will choose Rename. We will go with
the name coconuts. And again, we can collapse
this group by going to this little v icon near the checkbox and
just tapping on it. And now we are ready with
our second illustration. In the next part, we
will create a pineapple.
8. Pinaple: Base with Simple Shapes: Let's start this part by going
into our color palettes. And here we will
select the color with the name pineapple body. So when I tap and then
the color to select it, when we have the color, we are getting back
to our layers. And the first thing
that we need to do here is to hide our coconut group. So we are going into
this little checkbox on the right and
we will tap on it. When we have a blank canvas, we are ready to create
one more layer to lead. Just tap on the plus
icon and straightaway, Let's rename it as
pineapple body. When we have a new layer, ledgers get back to
our Canvas and we will start by creating a shape over
a perfectly round circle. We know how to do it. We just need to go
and start creating the shape without an
holding our Apple Pencil. And the end of the line, we will hold it and we will
snap it to an ellipse. Now without an holding
our Apple pencil, we will hold one
of our fingers on the screen and it will snap
to a perfectly round circle. Now we can adjust
the size by moving our Apple pencil from
side-to-side lead. Just leave it as something
not too big, not too small. And when we are satisfied
with everything here, Let's unfold everything that
we are holding right now. Now when we have the
perfect outline alleged, just go and add the
color inside of it. So we go into our
top right corner and we add dragging and
dropping the color insight. Now, when we have the shape, we are ready to
adjust it and make it more similar to a shape
of the pineapple. So let's just do the following. We will go to our
heirarchy on the top-left and we will
go to the web folder. You can see that we have this side notes and also you can see that we have some intersection inside of this bounding box. And that means that we can go to any place that you like
and we can just tweak it. So for example, let's just go to the bottom part and we will
go to the nodes on the right. We will move it a little
bit more to the right. When we did it on one side, allege us move on to the opposite side and we
will do the same thing here. Try to make it similar
on both sides. And when you have the
bottom side ready, let's move on to the soap and we will go just to
the middle parts. We will grab it and
we will move it up. If you want to adjust
the shape even more, you are welcome to do it. If you're satisfied with
how it looks, just for now, let us go to our hierarchy and we will
tap on it one more time. So now we have a perfect
shape for our pineapple, and that means that we are
ready to add more details. So firstly, we will
need to get back to our color palettes and we will need to select a
different color. We will select the color with the name pineapple leaves Bates. Let's tap on its deselect
when we have it, we are getting back to earliest and we will create
one more layer above. So let's tap on the plus
icon and straightaway, Let's rename it as leaps. And now we will go
over the top of our shape and we will
be adding the leaves. We can see that we have a
little problem with scaling because we don't really have some space for the
leaves on the top. So let's just do the follow-up. We will get back to
our layers and we will get back to our
pineapple body layer. When we have selected, we are getting back
to our arrow key and we are going into
the uniform methods. Let's just move it down and let's scale it a little bit down to go into one of the corners and moving
it diagonally down, Position it to the
way that you like it. And when you have some
space over the top ledge as deselect everything by hitting our arrow key one more time. And now we are ready
to get back to earlier with beliefs and we are ready to start creating this leaves. So let's just zoom
in our Canvas. Let's scale down our
size of the brush. Maybe let's leave it
at something like 10% or even less. And
we will go over it. It's up to the middle part of our pineapple and we will create the first
shape like that. So just go in and creating the curve at the
end of the line, we can hold our Apple Pencil. And when we have
the first curve, we will need to recreate it on the other side and we
will need to mirror it. Let's just go over the
top and we will try to create this same
curve going down. We will need to combine
the lines together. So at the end of the line, you can hold your
Apple pencil one more time if you want to adjust it, go to Edit shape over the top to weaken these
little notes. And when you are satisfied
with how it looks, let just tap on the screen
with one of our fingers. When you have this
shape like that, Let's just go and add
the color inside. Just make sure that
this shape is closed. Closed shape means that you
don't need to have any gaps on your lights when you are sure that you don't
have any gaps lie, just go to our
top-right corner and we will drag and drop
the color insights. Now, we are ready to create
more shapes like that, but maybe this time, ledgers make them a
little bit smaller. Firstly, let us go over our left side and we will
start the same way as before. Go into our bottom part and
creating the first curve. Hold your Apple pencil at the ends and create
a better curve. Now, go into the other side and creating this same
curve going down. Try to combine the
lines on the bottom. And if you need to adjust
this line even more, go over the top to Edit Shape. Tweak this little handles until we're satisfied
with the result. When you are done
adjusting this line, Let's just tap on the screen
with one of our fingers. Let's go over the
top right corner and we will drag and drop
the color insights, and we will do the same
thing a few more times. It depends on you how many on this leaves
you want to create. So let's just go over
the opposite side and we will create
a few more leaves. If you want to
adjust some shapes, maybe you want to play with the leaves on the top so you can just grab an eraser tool
and do what you need to do. Ledgers go and make these leaves on the top a
little bit more pointed. Just work on the
shapes and when you are satisfied with a top view, ledgers go to this part over the bottom and we will
make it very rounded. We will grab our
eraser tool and we will create a little curve here. If you don't want to
use the same brush that we are using
now for our eraser, you can get back to
your brush library and select a different brush. So for example, you can
go with the monoline one. Ledgers go over the bottom and we will create a curve here. So everything on the bottom
will be just one solid shape, the same as with
our basic brush. We can hold our Apple Pencil at the ends to create
a better curve. So now let's just go and create
this curve on the bottom. And we will manually erase all the things
that we don't need. And now we are ready to move on to our next part where we are going to be adding some details such as shadows and highlights.
9. Pinaple: Shadows & Highlights: Let's start this pi the
same way as always, we are going back to our
color palettes and we will solve the color with the
name pineapple shadow. So we add tab and then
the color to select it. When we're having your color, then we are getting
back to our layers. And firstly, we will go to
earlier with a pineapple body. So let's select it. And over the top we will
create one more layer. Let's tap on the plus icon. When we have a new
layer straightaway, Let's go enter name it as
pineapple body shadow. Let's click this layer
to a previous one so we are tapping in it and we
are choosing clipping mask. And now we need to go and change the blending mode and the
opacity level of this layer. So we go into the icon
and Firstly we are selected multiply blending
mode S for the opacity. For now, let's set
it at 25 per cent when we made all the preparations
with earlier ledgers, get back to our Canvas and we will start creating our shadow. And we will start by
creating a very big curve. So let's just go over
one of the sides, for example, the right one. And we will create
these big of the curve. You can hold your Apple pencil
and the end of the line. If you need to move your line without an holding
your Apple pencil, you can move it. And if you need to adjust
it even more, go over it. It's up to Edit Shape. Play with this
little handles until you're satisfied
with your shadow. Now when you have the
line that you like, Let's just tap on the
screen with one of our fingers and we will
go over the bottom of our shape underneath this little line that
we just created menu, we will go and
recolor these parts. When you have
something like that, let just go and add
a few more details. So firstly, we will go and
we will change the brush, going back to our brush library, going into the inking folder and select in the brush
way the name syrup, we will go over our left side and we will create a
few dots like that. You can add as many
details as you like. Just try not to overdo
it when you did it. One, the left leg just go and add some details on our shadow. So we will do it
with our eraser. So one more time we are going to our eraser and we are holding our Apple pencil there to send the same brush that we
use for our main brush. We will do the same thing
as we did on the left, but now with an eraser, Let's go and do that. When you have created the
pattern that you like, ledgers go to our leaves and
we will add the shadow here. So firstly, let's get back to our layers and we will do to
our layer with the leaves. Let's select it and let's
hit the plus icon to create one really above when we have
a new layer straightaway, Let's rename it
as leaves shadow. Let's clean this layer
to previous one. So we are tapping in it and we are choosing clipping mask. Now we go into our n icon and we are choosing
multiply blending mode. As for the opacity for now, let's leave it at 35 per cent. When we said earlier, ledgers get back to
our color palettes and let's select a
different color. This time it will be
pineapple leaves Shadow, tap in and select it. Now getting back to our Canvas. And if you want to
change your brush, for example, get it back
to the mono line one. You can go to the Brush
Library and do that. If you want to work
with the same brush, you are welcome to do. So. Now what we need to do, we will go to one of the
sides to our leaves. And we can go with the same site where we have our
main shadow on, or we can go to
the opposite side. It's all up to you. And we will need to go and treat this bunch on the leaves, not as a bunch, but as it, these
leaves are singular. We will go and we will add
the shadow to one leaf, then the next leaf,
and the next leaf. So let just go firstly to the, mainly that we have
created this big one. And we will go, for example, to the opposite side
from our main shadow. Just grab our brush. Let's adjust the size of it and ledgers go and create
the first curve. When you have created a ledger, zoom in our Canvas and
we will go to this side of this leaf and we will
try to create this shadow, go into the site. So we are repeating
the shape of a leaf. If we just made a
little mistake here, we can grab our eraser tool and we can erase
these little mistake. Now, manually,
ledgers get back to our brush and we will
recolor this inner part. And now we will go to the other leaf and we will
do the same thing here. So starting from the top and creating the first
curve, when we have it, we are going to the
sides and we are trying to create these curves going alone the direction manually recolor in
this inner part. And again, the same
way as before, go into the next leaf and
doing the same thing here, starting from the top,
creating our curve. When you have the
curve manually, let's recolor the bottom parts. If you have some minor mistakes or if you want to
adjust your curves. Ledgers, grab our
eraser tool and a jazz these places when we are
ready with our left side, let's move on to the right. And again, we will do
the same thing here, starting from the top and
creates an Irish shadow. When we have the curve, we are going to the
edge of our leaf and we are separating
it from the bunch, adding the color inside. And if we need to adjust it, grabbing our eraser
tool and doing our job, let's add the shadow
to our last leaf. Ledgers, create a nice
shadow on the boards. And so we will connect these little pieces
just with a curve. We don't really want these
corners to be that straight. So let's just go and create
the curves there too. So a jazz the shadows
to your liking. And if you think that it
looks a little bit too dark, we can always get
back to our layers. We can go back to
our icon right here, and we can go and
adjust the opacity. Maybe 25 per cent
will work better. Now when we are done
with our shadows, let's just go and
add some highlights. Firstly, we are getting back to our color palettes and we will
select a different color. This time it will be
pineapple highlights. Now, getting back to our layers, we are going back to our
earlier with the shadow, we are selecting it and we are tapping on the plus
icon straightaway, Let's rename it as highlights. Let's clear this
layer by tapping on it and selecting
Clipping Mask, go into the n icon and
select an ad blending modes. As for the opacity, Let's limit at 20 per cent. Now let's get back to
our brush library. Let's go to the
calligraphy folder and we will choose
monoline brush. We will go to the opposite
side from our shadow. And here we will add a little highlight the
same way as before. We are starting by
creating a little curve. So when you have
the first curve, Let's just add a
few more highlights by creating some dots. If you want to add
more highlights, you are welcome to do it. When we have this land for our highlights on
the body ledgers, get back to our layers. We will go to our layer with the leaves shadow and we will create one more layer above. Again, we will need to
name it as highlights. Let's clear this
layer. It's happening. It's true isn't clipping mask, go into the n icon, select an ad blending
modes for opacity, setting it at 20 per cent
and with the same color, we are going to our leaves
to the opposite side from our shadows and
add in some highlights. And when you're satisfied
with how it looks, Let's move on to our last
chapter for this illustration, which will be aiding
our facial features.
10. Pinaple: Facial Features: Let's start by going
into our color palettes and we will select the
color with the name ice. We are using monoline
brush and we are going back to our layers and we will create
one more layer. Above all the layers. Let's tap on the
plus icon and let's rename this layer
as facial features. Onto this layer, we will
increase the size of our brush and we will go to
one of the sides firstly, and we will put the first
dot for our first i. So let's go and do that. He just decides to your liking. And when you have
the first dots, we will go and make a duplicate. So getting back to our layers, swiping this layer
with facial features from right to left,
choosing duplicate. When you have the second layer, we are getting back
to our arrow key using a uniform method
using snapping. And we will move this second i2. The other sites, we are
following our three blue lights. When you are satisfied with the distance between the eyes, ledgers deselect everything
by hitting our arrow key. Now we are getting
back to our layers and we will combine these
two layers together, go into the top one, tapping on it, choose
and merge down. Now let's make sure that
our eyes are in the center. So at this layer, getting back to our arrow
key uniform method snapping, and we are following
these blue line that is going through the center
when you have it, Let's deselect everything
by hitting our arrow key. And now we will get back to our layers and we will
create one more layer. Above this layer, we will
create our little Smiley mouth. So we will go and we
will grab our brush, will increase its size, and we will do the following. We will go right
between the eyes and we will create a
V-shape right here. So create a one line going down and then straight
line going up. We are creating the
V-shape and we are holding our Apple pencil
at the end of the line. To adjust it, we will go
over the top to edit shape. Here you can see that
we have a lot of handles and we can tweak
them to our liking. So for example, let's
ends up with the shape of the heart when you have
the shape that you like. Let's tap on the
screen with one of our fingers and we
will adjust the shape. So ledgers go back to our arrow key and we will use
uniform method. We will use snapping. We will move this little
shape to the center. You can adjust its position
by moving it down or up, find what works for you. And when you're satisfied
with everything here, Let's deselect
everything by going to our arrow key and
tapping the next. Now, let's get back to
our color palettes. And firstly, we will select the color with eye highlights. Let's sadness, deselect. Let's go and decrease
the size of our brush. And we will go firstly to one on the eyes and we will
create one highlights. They're going over the
top area and putting this first dots when
you have it on one eye, let's move on to
the opposite one. And we will try to put this
same dot on the same line. When you have it bled does
get back to our layers. And we will combine these
two layers together. So we are tapping on
the layer on the top, we are selecting merge
down onto this layer, we will go and turn
on Alpha lock. So tapping on the layer
and choosing Alpha Lock. Now when we have
the alpha lock on, we are getting back to our
color palettes and we will select the color with
the name coconut straw. And with this color, we will go inside
our little mouth and we will create a little
chunk on the bottom. The same way as before. We are starting by creating
a curve here. Hold your Apple pencil and then manually recolor
the bottom parts. When you did it. Let's get back to
our layers and let's turn off the Alpha Lock
to add our cheeks. So tapping on the li and
choosing Alpha Lock. Now getting back to our
color palettes and we will select the color with the
name pineapple cheeks. And again, as always, you can choose what sheep on
the cheeks you would prefer. For example, we can
go and increase the size of our
brush and we can end up by adding just the dose for our cheeks when you
have it on one side, Let's move on to
the opposite side and let's put the cheek here. And when you are
done with this task, we are done with our
third illustration. And in the next chapter, we will create a watermelon.
11. Watermelon: Base with Simple Shapes: Before I started working on
to our last illustration, Let's get back to our
layers and we will need to select each layer that
belongs to our pineapple, and we will need to
put them in the group. So they firstly is
already selected. Now we are doing
underneath it and we are swiping the next layer
from left to right. When two layers are selected, we will do the same thing
with the remaining layers. So let's go and swap
them from left to right. When all of them are selected, we are going to the top right
and we are choosing group. Now let's rename this group
BY go into this new group, we will tap on it and
we will choose Rename. We will name it as pineapple. Now let's collapse
this group BY go into this little v icon
near the checkbox. And also while we're still here, let's hide our group. So we go into this
little checkbox and we are tapping on it. Now when we have
the blank canvas, let's create one more layer above for our last illustration. It's happened on the plus
icon and straight away, Let's rename it as
watermelon body. When we have this layer, we are getting back to our
color palettes and we are selecting the color with
the name watermelon body. Let's tap on this to select. Now let's get back to our slider on the left.
That's all brand. We will adjust the size of our brush and we will
get back to our Canvas. And we will start by creating a very simple shape
of the triangle. And we will do the
same way as before, as we create an
all of our shapes, we are going variables
leads to our Canvas and we are starting without an
holding our Apple pencil. Let's go and try to do that. When we have a
triangle at the end, we will hold our Apple pencil. We can try out to hold one of
our fingers on the screen. And if you're lucky, you will snap it to a
perfect shape of a triangle. If you're not so lucky, you can go over the
top to edit shape. You will have the option here. If you don't have this option, just go to this little
handles and try to create a better shape for your
triangle when you have it, let just go and
deselect everything by hitting our screen with
one of our fingers. When we have the outline ledgers go and drag and drop
the color inside. So we are going to our
top-right corner and we add dragon and dropping
the color to our shape. Now we are going to
be adding their read. So let's do the following. We will go back to our layers and we will create
one more layer. So we are tapping on the
plus icon and straight away, Let's rename it as ringed. When we have a new layer, we are getting back to the
color palettes and we are selecting the color with
the name watermelon rates. When we have a new color, when we have a new layer, we will get back to our
Canvas and we will need to create a shape of the
circle, the perfect one. So we know how to do that. We need to go and without an
holding our Apple pencil, we will create the shape
at the end of the line. We are holding our Apple Pencil
and we're holding one on the fingers on the
screen to snap it to a perfectly round circle. When we have
something like that, Let's unfold everything that
we are holding right now. And we will need to combine
these two shapes together. So we will need to snap our
outline to our triangle. Let's go to our arrow
key on the top-left, we are using uniform method. We are using snapping, and we will just move this shape down until we see the
line that is going vertically and until we see the line on the bottom that
is going horizontally. When we snapped it perfectly, we will deselect everything by heating our arrow
key one more time. And when we have
something like that, we are ready to add the color
inside this circular shape. So go into the top-right corner and dragging and
dropping the color. Now you can notice
that the first shape that we have on the top is
overlapping the previous one. So for convenience, we
can do the following. We can get back to our layers. We will go to our rent layer, and we will go to the icon. And just for now, we'll get it back later on. We will just go and
adjust the opacity. You still can see what's
happening onto this layer with the Marines and you can see what's happening underneath it. So that's what we need. When we have
something like that, we will need to go and
add one more circle. So let's just go and
make a duplicate. We will go to this
layer with earrings and we will swipe it
from right to left. We will choose duplicate. Now we have two similar layers. We will go to the top one and we will rename it as whites. When we have it's ledgers, get back to the color
palettes and we will select the color with the name
watermelon whites. Let's tap on it to select
when we have this color, we will drag and drop it to our shape and we will need to
make these shapes smaller. So let just select this
layer with the whites. We will go to our arrow
key using uniform method, using snapping, and we will
scale this shape down. When we scaled it down, we will need to put this
shape in the center. So we are looking for this cross one lines
going vertically, one lines going horizontally, and we can adjust the
size of the rent. So later on, we are going to be cutting the pieces
from this elements. And now you can play around
with the size of your reads. So when you're
satisfied with it, let's just deselect everything
by hitting our arrow key. And now we will need to go and make one more copy
of these elements. So going back to our layers and swiping the layer with the
whites from right to left. Choosing duplicates,
we will need to use this layer to cut
the previous objects. So let's just get back to
our color palettes and select some very bright
color for our convenience. So for example, we can go
with the popsicle shadow. Let's select it and let's drag and drop the
color insights. We will make this shape smaller. So again, we are going
back to our arrow key and we're scaling it down using uniform method, using snapping. They just go and try it out. Again. We are looking
for the cross to put it right in
the middle part. And also you can
play around with the size of this white elements. So just play around and
when you're satisfied, lead, just deselect everything
by hitting our arrow key. When we have the
shape like that, we will need to pay attention to the
intersection right here. We want this whole thing for Irene's to be not that circular. So we will need to go and make the whole thing a
little bit bigger. So what we're gonna
be doing, firstly, we are going back to our layers and for no further confusion, ledgers go to this
layer with the whites, which is not white but blue, and we will rename it as blue. And we will need to select all these three
leaves with a circle. So the first one is
already selected. Now we are going down and
we as wiping the layer from left to right when we have the second
layer selected, let's do the same with
this green thing. When all three
layers are selected, we are getting back
to our arrow key. We are using uniform method, we are using snapping
and Lynch's go to one of the corners and we will
scale this whole thing up. And now we will need to put
this thing in the center. So we are just dragging
it until we see the blue line that
is going through the center from
top to the bottom. And when we snapped
it to the board, something when we have this
line going horizontally, if you still think
that you're reading, think looking a little
bit too circular, you can go and scale this
thing up a little bit more when you are
satisfied with the result, alleges deselect everything
by hitting our arrow key. And now we are going to be cutting our elements
from one another. So what we're going
to be doing, firstly, going back to our layers and we go into our layer
with the whites. Let's select it,
Let's tap on it, and let's choose Select here. You can see that now only
these elements is selected. And we are getting back
to our layers and we are go into our layer
with the green circle, the marines onto this
layer when it is selected, we are getting
back to our Canvas and we will need to slide three fingers down from top to the bottom to invoke the
copy and paste menu. Here, we will select cuts. And now if we get
back to earlier, as you will see that
for this green thing, we have only the outline and this is exactly
what we need. Now we need to cut this
thing from the whites. When I go into our blue layer, we are selecting it, we are tapping on it and
we are choosing Select. Now when this thing is selected, we are getting back
to our layers. We go into the whites and we are going
back to our Canvas, swiping three fingers
down to invoke the copy and paste
menu, select and pets. And now we'll go
into our layers. We will hide our layer with the blue thing because
we don't need it anymore and we will need to erase everything
that we don't need. So firstly, we will get back to early with a watermelon body. We will selected WhatsApp on it and we will
choose Select here. We will go to our bottom panel
and we will select invert. And now we will just
get back to our layers. We will go to our rent layer. We will grab an eraser tool and we will do to the top part, we will erase everything
that we don't need. If you want to go and
change your eraser brush, just go for it. Now, just going along the top part and very
easily erase in it. And we will do the same thing
with our white outline. We can see it, but it is here. So let us get back
to our layers. We are doing to our white layer. And again, we are going through the top part and we are
a reason everything here to make sure that we erased everything
on our white layer, Let's just get back to
our background color and now we will turn on the
color for the background. So go in there and
we will select the color with the
name bank routes. Now makes sure that
everything for this white outline is
erased and we will go back to our layers
and we will need to erase this part on the bottom
of the watermelon body. Let's go back to this layer. We will deselect everything. We will grab our eraser
tool and we will go and very accurately erase
everything that we don't need. Now, when you have
something like that, let us get back to our
layers and we will go firstly to the layer
with our greenery means, we will go to the icon and we will turn on the full opacity. We will do the same with our
whites, go into this layer, go into the anti can answer
in our opacity to maximum. Now let's get back to our layer with their
reigns and we will go to this site and we will make them known
that straight. So grabbing our
eraser tool and just go in there and soften
it our corners, create the curve here, adjusted. And if you have it on one side, Let's move on to the other one and we will do the
same thing here. If you have some little
bars that are showing up, you can always get
back to your layers, to your layer with
a watermelon body, grab an eraser tool and erase everything
that you don't need. And now we have the base. So in the next part, we are going to be
adding some details.
12. Watermelon: Details, Shadows & Highlights: Let's tie this part by changing
the color of our brush. So I go into our color palettes. We are selecting
the color within them, watermelon, body shadow. Let's tap on this to select
when we have the color, we are using vector our layers. When I go into the layer
with the watermelon body, we will select it
and we will tap on the plus icon to create a
new layer straightaway, Let's rename it as
watermelon shadow. Let's clip this
layer so we will tap on it and we will
choose clipping mask. And then we will go to
this icon and we will choose multiply blending
modes for the opacity. Let's go with 30%. And now let's just adjust
the size of our brush and we will go to the bottom
part of it, our watermelon. And we will create the
wavy line like that. Randomly just create this
line and when you have it, go underneath it and manually
recolor the bottom parts. If you want to adjust
it in any way, just grab an eraser
tool and adjust it. Tried to make these
corners not too straight. And when you have
something like that, Let's continue by
adding the shadow and the stripes
owns that aren't. So firstly, we are getting back to our color palettes and we are selecting the color
with watermelon stripes. Let's tap on it says Select when we have
this color wheel I getting back to
our layers and we are going to arrange layer. We will create one really above, and we will rename
it as stripes. Let's clear this layer
to previous one. So we are tapping, we are
choosing clipping mask. When I go into this an icon, when I go into select
multiply blending mode. And for now, let's leave the opacity at 30
per cent again. And now we will just get
back to our Canvas and we will go and create the very straight
lines for the stripes, you can adjust their size, you can adjust the distance
between the lines. It's all up to you when you
have something like that, Let's continue by adding the seeds to our
watermelon body. So we will get back
to our layers, will go to the
watermelon shadow layer, and we will create
one more layer above. Let's rename it as seats. Let's clear this layer
to previous one. So tapping on it,
choose clipping mask. Let's set the opacity
level to 80 per cent. When we habits, we
are getting back to our color palettes and we are selecting the color
with the name ice. When I have a new color, we are getting back
to our brush library. We are going to the
inking folder and we are selecting the brush
with the name syrup. And now let's adjust the
size of our brush and we will go through this shape
and we will add some seats. So just go there and add
a few lines like that. Play with the size of the elements and with the
distance between them. It seems that 80% of opacity for our seats
is quite too much because it will be a
little bit hard for us to add the facial features
with the same color. So let's just get
back to our layers. Let's go to our layer
with this seats. Let's tap on the icon and lead decrease the opacity
to 55 per cent. If you want to play around with the amount of opacity
that works for, you, just go for it. Now when we have our seeds, ledgers go and add more details. We will need to add a little shadow
underneath this seats. So let us do the following. We will go to the seats layer and we will make a
duplicate of it. So swiping it from right to
left and choosing Duplicate. Now we will need to turn this layer into a
different blending mode. So let just go and turn on
the multiply blending mode. For the opacity, ledgers
go with 30 per cent as we did before with this whole thing of
the watermelon shadow. And we will need to change the color of our
little elements. And we can do it very easily by turning this layer
as an alpha lock. So let's tap on it. Let's choose Alpha Lock. Ledgers. Get back to our color palettes and we will select
the same color that we use for the body shadow,
watermelon, body shadow. Let's tap on this to select, Let's change our brush again to our calligraphy
monoline brush. And we will go over these seats and we will
just recolor them. When we have recolor them, we will need firstly to put them underneath earlier
with the seeds. So let's just hold
this layer when it is selected and we will move it down under hourly with
the seats for no confusion, Let's rename it
as seats shadows. And we will need to put this
layer a little bit as site. So let just select this layer. Let's grab our arrow key and we will just move
these diagonal adapt. You can go with any
direction that you like when you are satisfied
with the results. Largest SAP onto our
heirarchy one more time. And if you want to go and maybe
make these little things, little shadows a little
bit more bright. Just go for it. Go
back to your layers, go back to the seed shadow
and adjust the opacity here, maybe 45 per cent will
work a little bit better. And now we have everything
that we need for our shadows. So let's go and add
a little highlight. Firstly, we are going back to our color palettes and we're selecting the color with
the name watermelon wipes. Let's tap on this to select and then we'll get
back to our layers. Firstly, going back
to our layer with this seats and we will tap
on the plus icon here. Let's rename this
layer as highlights. Let's clear this layer
to previous ones. So tapping on it and
choosing clipping mask. And then we'll go to the icon. We will select
blending modes and we will change the opacity
level to 20 per cent. When we have it sled, just go and adjust the
size of our brush. And we will go to
one of the sides. And firstly, we will create just a line for the highlights. You can hold your Apple pencil
to create a better line. And if you want to
add more highlights, just go for it. When you have your
highlights on the main part of the watermelon ledgers go and add a little
highlight to the rent. So going back to our layers, go into the stripes layer, creating one more layer above, tapping on the plus
icon straightaway. Let's rename it as highlights,
clipping the layer. So tap in, choosing
clipping mask, go into the icon and select an ad blending modes
the same way as before, a positive at 20%. Now let's go to our reds and
let's create a curve here. You can hold your
Apple pencil at the end of the line to
snap it to a better curve. And if you need to adjust it, go over the top to edit shape. Here you have the arc option. And if you need to move
these elements, move it. If you want to adjust it by moving your little handles here, just go for it. If you want to add
more highlights here, just go and do that. And now we have
everything that we need. And the last thing
that we will add here will be our
facial features. So let's make them
in the next chapter.
13. Watermelon: Facial Features: Let's start this
part by going to our color palettes and we will select the color
with the name ice. Let's tap on this to select
and when we have it, we are getting back
to our layers. We are going to the layer
with the name whites. We are selecting it and we
are creating one more layer above by tapping on the
plus icon straightaway, Let's rename it as
facial features. And onto this layer, we will go and adjust
the size of our brush. And firstly, we will
go to the left parts and we will put the first
dose for the first i. Let's go and do that. When you have it on one
side slide just go to our layers and we will make
a duplicate of this layer. So swiping the layer
with the facial features from right to left and
choosing Duplicate. When we have the second layer
with the facial features, we are getting back
to our arrow key. We are using uniform method, we are using snapping and we are moving our second
i2, the rights. We are following these
three blue lines to make sure that we are putting the
second eye on the same line. And when you're satisfied with the distance between the eyes, let's just deselect everything
by heating our arrow key. And when we have to isolate, just get back to the
layers and we will combine these two layers together to liaise with the
facial features, go into the top one, tapping on it, choose
and merge down. We have everything on one layer. Let's make sure that our
eyes are in the center. So with this layer selected, we are getting back to our arrow key uniform method snapping. And we are looking for this line that is going
through the center. If you want, you can
find this line that is going through that middle
part, which is horizontal. And you will make
sure that it is in the whole center of
your whole piece. So when you are satisfied with the position large
deselect error vein by heating our arrow
key and we will go and create one more
layer for our mouth. So going back to the layers, tapping on the plus icon, Let's increase the size
of our brush and we will go right between the eyes and
we will put the dot here. When you have
something like that, let Jess got it. So parts you can play around with how much
you want to cut. If you want, you can cut
the whole half of it. If you want. Just cut a
little piece on the top. Let's just go and do that. When you cut this part, let us go to the sides and we
will solve in the corners. And when we have
our mouth legis, make sure that it
is in the center. One more time we
are going back to our arrow key uniform method snapping and we are looking for this line that is
going through the center. When we have it, Let's deselect everything and we will add a result sank and FU
teeth into our mouth. Firstly, we are getting back to our layers and let's combine
these two layers together. So we're going to
the top one with the mouth tapping on it
and choose merge down. Now let's turn on Alpha lock. So we are tapping on the layer
and choosing Alpha Lock. Now getting back to our
color palettes and firstly, let's select the color
with the name popsicle. Stick with this color, we will add a little
tongue on the bottom. So again, just go in there
and created a curve, play around with the size
and the curvature and then manually recolor
the bottom parts when you have the
tongue ledgers, get back to our color
palettes and we will select the color with
the name IS highlights. We will tap on this to select
and we will go to the top of our mouth and we will
add a little teeth. So just go over
the top and create little lines with
the same color. We can adjust the size
of it and we can go to our eyes and we can
add the highlights. So firstly, let's go over
our left one and let's put the first highlight there
when you have it on one side, Let's move on to the other one, and let's do the
same thing here. Try to put it on the same line. Now when we have our
facial features, ledgers get back to our layers. We will tap on the layer with our facial features and we
will turn off alpha lock. Let's get back to our
color palettes and we will select the color with the
name popsicle cheeks. With this color,
we will go and add the cheeks to our
little watermelon. So again, you can decide what shape on the cheeks
you would prefer. For example, you can go with just the lines or if you want, you can put the dots
for the cheeks, tried to make the cheeks
even on both sides. And if you need to adjust them, just hold your Apple pencil at the end of the line and go
all the way up to Edit Shape. And when you are satisfied
with how it looks, we are done with our
fourth illustration. And in the next chapter, we will position our elements on the canvas and we will
add some final touches.
14. Positioning & Final Adjustments: Firstly, let's get back
to our layers and we will need to select each layer that belongs to our watermelon, and we will need to
put them in the group. So the first layer
is already selected. We are going underneath and
we are swiping earliest from left to right until
all of them are selected. When all of them I
selected when I go into the top-right and we
are choosing group. Now let's hit this new group and we will rename
it as watermelon. Let's collapse this
group BY go into this little v icon
near the chatbox. And we also don't need this
layer with a blue circle. So let's select
this layer and we will swipe it from
right to left, and we will choose, Delete what we're going to
be doing right now. We will be selecting each
group one at a time, and we will be finding a different placement
for our elements. So let's start with
the watermelon. We will select the group. We are go into our arrow
key on the top-left, we are using uniform method. If you don't want
to use snapping, you can turn it off. You will need to tap on this
snapping and you will need to turn off snap in here
into this little menu. So now we can very easily move our shape if you
want to rotate it, go over the top to
green nodes and do that if you want to make it bigger or if you want to
make it smaller, go to one of the corners
and scale it up or down. So when you find the position
for your first elements, Let's deselect everything
by hitting our arrow key. Let's get back to our layers and let's select the next group. Let's go to this
little checkbox and we will tap on it to
unhide the layer. When we have our pineapple
onto our canvas, ledgers go to the
heirarchy and we will do the same thing one more
time using uniform method, just scaling it down. Or if you want, you
can make it bigger. Let's find a different
placement for this L nuts. When you are done, deselect everything by hitting
our arrow key. Let's get back to our layers. Let's unhide our group
with the coconut. Let's go back to our arrow key. Let's make it smaller. Let's find a better
placement for it. One more time. The last one we are going back to our layers
where I go into the popsicle group
and let's unhide it by tapping on this
little checkbox. When the popsicle
group is selected, we are getting back to
our heirarchy and we are finding a better placement
for our Popsicle. And when we have
positioned our elements, we can go and maybe look at our highlights and let us go and make them a
little bit brighter. If you want to do
the same thing with the shadow, you can do that. Let's just go and do
it on one elements. For example, we go
into our Popsicle, we are going and finding
our little highlight layer. It is going to be
stick highlight. Or if we want, we
can go only for the inner part highlights and we will go to the a icon here. So it is our Add Mode. And who will go and change
the opacity level here, Let's try out 35 per cent. And also we will
do the same with the popsicle
highlights on the top, go into the a icon and finding the right
a positive for us. Let's just go over all of our elements and we will
adjust our highlights. Play around with the amount of opacity and when
you're satisfied, we are done with our class. Thank you for
watching this class. Leave a review if you liked it, and consider subscribing for Rockaway videos in the future.
 Uni Corn, ⭐Kawaii Art Enthusiast⭐