Transcripts
1. Introduction: Hello, everyone. I'm uni, and into class, we'll
draw acute ice cream. This class doesn't require any prior experience
or fancy tools. We'll start from scratch
and we'll be using simple techniques
throughout the process. Everything you'll see will
be happening inpropri. However, if you have a software or want to try
traditional materials, you are welcome to join. If you are ready to start,
let's jump right into it.
2. Ice Cream: Let's begin our class firstly by deciding what kind of canvas
we are going to be using. Today, we're using a simple
standard square canvas that you can find in Procreate. Both our pixel width
and pixel height are set at 2048 pixels. Of course, if you
would like to use any other dimensions for
a canvas, go for it, our DPI are set at 300, and our color profile is set as SRGB with this slow number. When it's all done,
let just it done over top right and will be
redirected to our new canvas. Now, let you zoom
out our canvas, so we will see the whole canvas, and then we will need
to decide what kind of colors we are going to be using throughout the whole class. Of course, if you want, you
can use your own colors, but if you want to
follow along and use the same colors that you will
see throughout the class, please go to the
project and rush your stab and download
all the materials. So when we did it,
let's just go and start by changing the
color of our be rot. We will go to our
layers and we'll go to our beground color
layer. On the bottom. You can see we have our
color palette, but for us, it will be easier to go under palettes right here
on the bottom right, and here go under cards. Here we have all
the colors names, and it will be easier for us
to navigate through them. So our first goal
is to go and select either background or
alternative background color. You can go and choose
one of these colors. So just tap on it and you will change the color on
the whole background. When we did it, we will start
creating our illustration. We will just need to go
to our brush library, and we will need
to pick a brush. Lets just go inside
the brush library, we'll go to the
calligraphy folder and we will choose moonin brush. When we are at our Monne
brush and our brush library, let's just go and tweak one
option that this brush has, so all of our lines will
be very, very smooth. We will tap on our brush, and here in the brush studio, we will go under stabilization. Here on top, you can see we
have the option stream line, which has a slight amount. If it's set at a very low value, we can go to the
drone pad and try it out how it works
and how it looks. You can see we have a lot
of control over this line, but it is quite jagged, and it's okay if you want to
use the line in that way, if you want your line to
be very natural looking, you are welcome to
use it in that way, but also you can just go and tweak this amount
of stream line. For example, let's
set it to maximum, and we will one more time go to our drone pad and try
it out this time. So you can see we lost a bit
of control over our line, but our line is
very, very smooth. You can go to this option. You can find the amount of
streamline that works for you. Of course, if you don't want
to use it, don't use it. You can always get back to
this option and adjust it. So let's just go find the
amount that works for you, and when you are done, let
just done over our top right. Now, when we've
prepared our brush, let's just go to
our color palettes. Here, one more time, we
will go under cards, and we will use the color
with the name cone base. When we pick the color, let's just go and
use one option that will help us to
build up our code. We'll go under range
icon or our top left, we'll go under Canvas, and we will togle
drawing guide here. You can see now we
have these cells, but it's not the
option that we need. So we'll just need to go
under 80 drawing guide, and here on the bottom, we will go under
symmetry folder. When we have it, we see that we have just one line that is
going from top to the bottom, and it is going through
the center of our canvas. We are not touching anything. We are just going to the top
and we are heating down. So when we did it, everything that we are going
to be creating on one side will be appearing on
the opposite side mirrored. That's exactly what we need. So what we are
going to be doing, we will go to one of
the sides and we will create a curve going
down in that way. You can vary the size
of this element. You can hold your
line at the end, and you can see that when
we are holding our line, and if we are lifting
up our Apple pencil, we have this option on top. It is our editing mode. We have the option arc here
and when we are having this option arc and when we add the editing mode,
we have this nodes. So we can just go to one of the nodes or to
any of this nodes. We can hold our
Apple pencil there, and we can adjust our line. So now let's just go and
create a shape on the cone. So let's just go with
something like that. We also need to go to the bottom and make
a smooth connection between these two sides so we don't have any gaps,
any dams, anything. We will just need to have
a very smooth line here. When you're satisfied with it, we will just tap on our screen to get away from
our editing mode. Actually, we don't need this
symmetry option anymore. So let's just go
and turn it off. We will need to go
to our range icon. We will go under actions. We are going under canvas. We are toggling drawing
guide from here, but that's not enough. We will need to go
again to our layers, and you can see our layer, number one, when we have this
little curve is assisted. So we need to turn
it off manually. Let's just step on it and let's choose drawing assist
from the list. Now, we will go over
the top of the sheap and we will create a
line to close the sheap. So make sure that you don't have any gaps into this sheep. When we have something
in that way, let's just go to our
icon on the top right, and we'll just drag and
drop the color inside. Take a look at your
illustration right now, and if you need to
adjust some lines, if you need to adjust maybe this bottom part or anything
that you need to adjust, go and adjust it either with
your brush or your erasor. When you have the
shape like that, let's just go and move
it down a little bit, so we will have
the space on top. We will go under our arrow key. And on the bottom, we will
go under uniform method. Also, let me just
go under snapping and we will turn
snapping from the set x. That will help us to position our cone right in the center. We will just get
back to our canvas. We will hold our
apple pencil there, and we will be looking
for this orange line. If you are seeing two
lines, one vertical, and one horizontal, you are right at the center
on both axis. Let's position it in that way more so where at the bottom. If you want to adjust the sheep even more, you can
go and do that. For example, if you want
to make it smaller, you can go to one of
the corners and drag it down or up depending
on the corner. But if you moved it,
you will just need one more time to go and find this orange line to
put it in a center. If you want to adjust it
even more and not gradually, you can go under
free for method. When we are in the
free for method, let's just go on this node that we have in a
middle on the top, and we will just drag
it a little bit down. We will squeehe it
a little bit and we will make a nice
shape like that. When we're satisfied
with our shape, let go and heat our air key one more time
to close this window. When we did it, let go and add some additional
details onto our con, so we will just add
some waffle texture. We will go to our
layers and we will create one more layer about
this layer with our con. We want all of our lines
and all of our texture appear only on the areas that we have right
here right now, so we don't want to
go beyond the frames. Let's just go and clean
this lay to a previous one. We will tap on this new layer, and we will choose
clipping mask. Now, everything that we
are creating will be appearing only on
this yellow area. When we did it, let's just get back to our color palettes, and firstly, we will select cone lines that we
have right here. When we have this
color, let's just go and work on the
size of our brush, you can pick any
size that you like, you can try it out if you
don't like it, change it. We will need to go
along one side, and we will start creating
the curves going in that way. We will just go along
the whole shape in that way and we will try to
create the parallel lines. Also, if you want to go to
the editing mode and maybe move the line or maybe change the
curvature over your line, you are welcome to
go and do that. Now, let's just go with this direction and we will create the lines
going in that way. When you are done, going
in that direction, let's go again to
our color palettes, and we will select the second
color for our cob lines. When we did it, we will go
on the opposite direction, and we will create
similar lines here too. So let us go and start doing the same thing
as we did before, but go into the left. And when we are done
with this texture, let go and continue creating our main shape of the ice
cream that we have on top. So let us go again
to our layers, and we will create
one more layer. Onto this layer, we will
go to our color palettes, and we will select this
light beach color. We are using the same brush. You can go and change the size of your brush if you want to. All that we need to do is
to go along the top part, and we will be creating
a cloud shape. Let me just go with the
first shape like that. You can again hold
your apple pencil at the ends of your line, and we will just
go along the top, and we will start creating
this cloud shape. Again, make sure that you don't have any gaps
between your lines. You can make the sides
similar to one another, or you can just go and create some peculiar shapes.
It's all up to you. When you are done
with the outlines, let's just go and drag and
drop the color inside. We will color all the
areas that we have here, and let's just take a look at everything that we have here. If you want to adjust something, let's just go and do that. When we have our sheep, we will go again
to our arrow key, and you can see we can go
with our uniform method, free for method and adjust
the size. Over it first. Then if we want to
adjust it even more, we can go under warp option. Firstly, let's just
make it just a little bit bigger and we'll
position it in the center. We are again looking
for this orange line. You can go a little bit higher
or lower, it's all up to. You just find the position
that works for you. As for the work option,
let's just go under it, you can see now we have
not only the bounding box, but we already have
these little lines that are inside
this bounding box. That means that we can go to any line right here
and we can tweak it. For example, we can go right
here and we can drag it to the side and we will be
changing the whole shape. Let's just spend some time here and if you want to
adjust something, let's just go and change
the shape to our lichen. When you are overall
satisfied with the sap, let just on our
key one more time. Let's take a look at our
illustration right now, and if you want to add
something manually, maybe add something or
work more on the sap, you can go and manually do that. But if you are
satisfied with it, let's continue by going to our layers and let's create
one more layer on top. Onto this layer,
we will work onto the first creature that will put one to our little ice cream top.
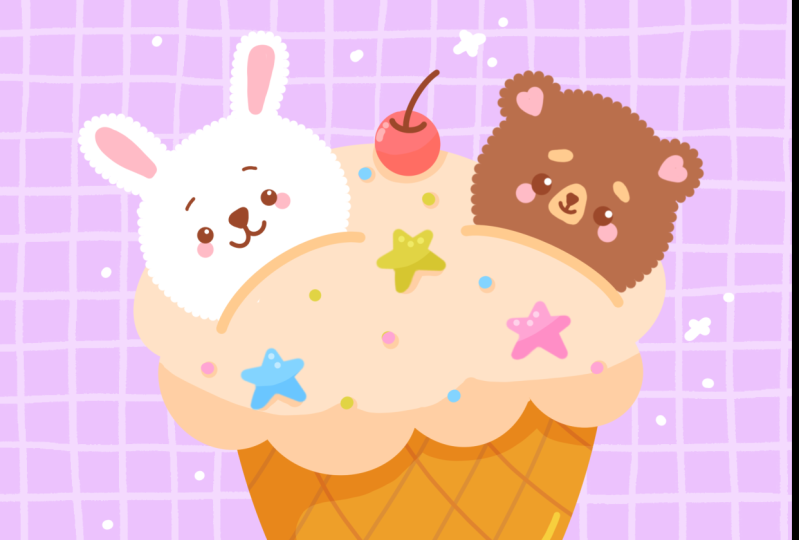
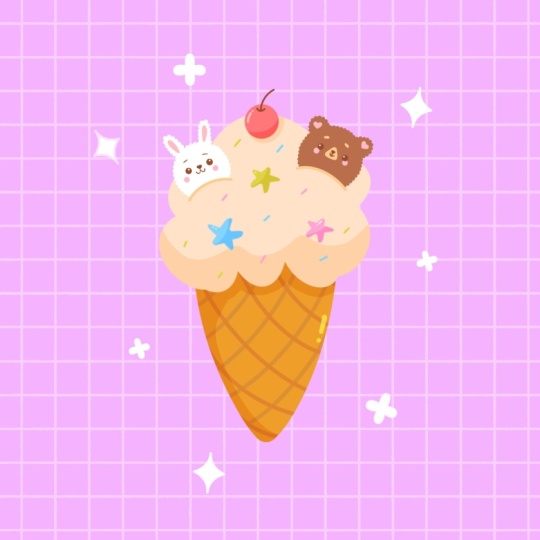
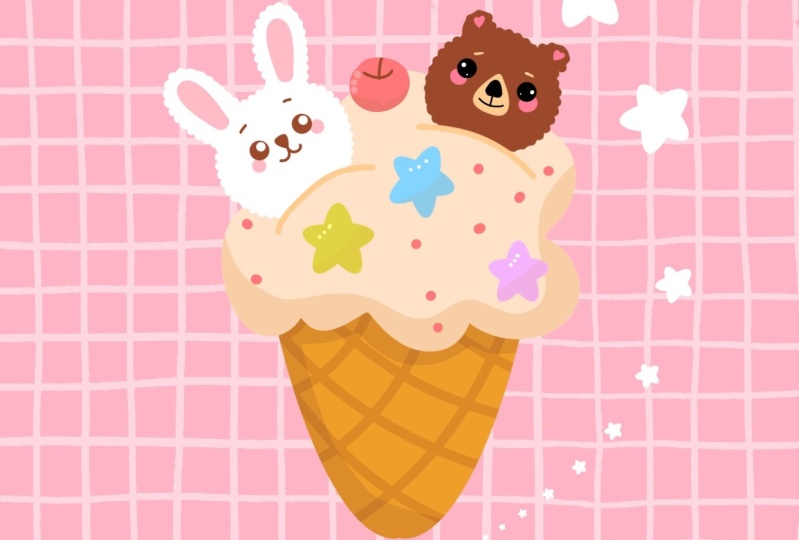
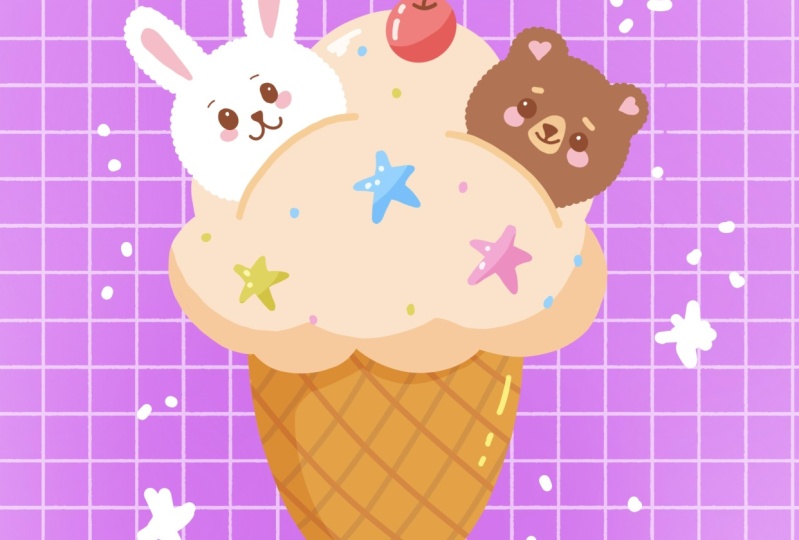
3. Bunny & Bear: When we have this
layer, let's just go to our color palettes and we
will select the white color. When we have the
white color selected, we'll go over one of the sides. For example, to the left one, and we will create a shape of the ellipse or a
sheap of the circle. Again, just with one line, create a sheap and then let's just go over the
top to our editing mode. Now, adjust it to your liking, work with this little nodes, adjust the size if you want to. To adjust the size when you
are at the editing mode, you will just need to go
right between the nodes, hold the apple pencil there
and drag it to the site. Find the size and the
shape to your liking. If you want to move the
shape at the editing mode, you can hold your
apple pencil at some blank space and just move your shape to the
place that you need. For example, let's
position it in that way. When we have our outline, let's just go and drag and
drop the color inside. When we did it,
let's just go over the top and let's add the ears. So we will go with a
simple shape like that. We'll go firstly over
one of the sides and we will create half of
the ipse like that. When we have the outline, let's just drag and drop
the color inside, and we will do the same
on the opposite side. Try to put it on
the same distance from the center and try to remain the size and the shape that you have
on your opposite side. When you have the outline, drag and draw the color inside, take a look at everything
that you have here and decide whether you need to
adjust something or not. If you need to adjust something, you know what you need to do, you either go to your key or
you are doing it manually. Also, if you have
some minor details that you would like to adjust, let's just go and use another
option that Procreate has. We will go under our magic one, two, and here we have
the option liquefy. We are not touching
anything on the bottom, we are going under push, and all that we are changing
is our slider with sides. This is our brush,
and with this brush, we can go to some places and we can push them and in that way, we can adjust our sheep. For example, we can just go to this little ear on our right and we can push it and make it similar to what we
have on our left. If you need to adjust
something in that way, let's just spend some
time here and adjust it. When you're satisfied, let just tap twice onto our adjustments. It is our magic one two, and then let go and continue creating the details
for these elements. We will firstly
go to our layers, and we will work onto
the whole shape here. We will add some fluffiness. Let's just create
one more layer, and we will go to
our brush library. We will go again to our
calligraphy folder, and we will go to
our monoline brush. Let just tap on
it, and we will go under stroke path onto our left. We will go to the
slider spacing, and we will go to
something about 50, 55%. You can see how
our brush changed. You can go and
adjust this option to your liking.
It's all up to you. We will go with
something around 55%, and when we are done, we will just it down over our top right. Now we will go and adjust
the size of our brush. You can try it out
onto your canvas, find the amount of the
size that she would like. And all that we need to do
is to go alone our outlines, and we will just go and
add the lines and we will create a peculiar outline
in some fluffy way. Let's just go and very easily
add this fluffiness. Okay. When you are done, we are going again to our
brush library, we are going to our
mon line brush, and we will get it back. All the spacing will go to zero, and then we will go and he
done again over our top right. So now let's just zoom
in our canvas and see whether we have something that we need to adjust manually. We might have some
minor gaps like here, so we will just go and
manually adjust them. When we are satisfied
with everything here, let's just go and add the facial features
to this creature. We will just go again
to our layers and we will top one plus icon
tocrete a new layer. Then we will go against
our color palette and we will select
dark red orange color. We will go and increase
the size of our brush, and we will first go to our middle part and we will
put two dots for the yes. Let's first go over our left and we will
put the first dot. Decide whether you want to
adjust the size of the brush. If it's not happening
from the first try, try out on more time. Just find the size of the brush that you would
like for this element. When we found the size, let's just go to the opposite
side and we will try to put the second eye
on the same line, and also we will try to put it on the same distance
from the center. Again, if it's not happening
from the first try, try it out one more time. When we have our yes, let's just go and
decreticize of our brush, and we will go and work
on the facial features. Let's just zoom in our canvas and we will go right
between the eyes, and we will create a
triangular shape like that. Very very soft triangle. When we have the outline, just drag and drop
the color inside, or just recolor it manually. So now, when we have
our little nose, let's decreticize of
our brush even more, and we will go to the
bottom part from the nose. We will go to the
sides and we will create a mouth
going in that way. So hold your line and the end, create this half of the
circle or half of the ops on one side and repeat it
on the opposite side too. Again, you can hold
your line and the end, you can go to the editing
mode and adjust it, make it similar on both sides. When you are satisfied
with everything here, just take a look at it
from the distance and decide whether we want to
adjust something or not. For example, we can
grab our razor and we can work on our
nose a little bit, so it is not that
twisted on one side. Also, you can just go
to your magic tool, liquefy and adjust it from here. Again, spend some time
here into this mode, and if you have
something to adjust, just go and adjust it. When we are done with our nose, let just up on our
magic wanto two times, and we will go and work more
on our facial features. With the same size on the brush, we will go above our eyes, and let's create
little eyebrows here. We will just go with
simple shapes like that. Of course, if you would
like to experiment, you are welcome to go
and do that you can create any facial
features that you like. When we have something
in that way, let's just go and add the
highlights to the eye. We'll just need to
pick the white color and we can do it from
our color palettes, but also as we already
have it onto our screen. Let's just go and
pick it from here. We'll just need to go to this white color and we will hold one of our fingers and we will invoke the eye dropper two. You can see if we
are moving this two, our color on the
top is changing. We'll just need to go to this white color and when
it is white on the top, we'll just lift
up our finger and our color right here onto
our color two will change. So when we did it, let's in criticize a brush one more time, and we will go to
one of the sides on our ice and we will put the
dot for the highlights. For example, let's just go to the top right and we will
just put one dot like that, and we will do the same
on the opposite side. Again, try to put it
on the same place, try to put it on the same line, and when you have it, let's continue by adding more details. Firstly, let's just go to
our layers and we will go to the fluffy part and we
will tap on the plus icon. When we are at this new layer, we will just go to
our color palette, and we will select
this pin red color. One more time, we will increase
the size of our brush, and we will go
underneath our eyes, and we will just put the
dots for our cheeks. Again, trying to put
them on the same line. And if you want, you can
go with different shape. You can go with a bigger
size of the brush. You can go not
underneath the yes, you can go a little bit lower or to the side.
It's all up to you. Just find what works for you. Also, with the same color, let's just go and decrese
the size of our brush my time and we will
go inside the ears, and we will create
the inner parts here. We will just go and repeat the initial shape that
we had for our ear. When we have this drop shape, let's just go and add
the color inside. If you need to adjust it
manually, just go and do that. When we have it on one side, let's just do the same
on the opposite side. Again, take a look at it
from the distance and decide whether you need to
adjust something or not. If you are satisfied
with everything here, let's just go to our
layers again and we will create another
creature that we will put on the
opposite side, we are going to this
layer where we have our facial features and we are creating one more
layer above it. When we have it, we will go to our color palettes and we will select the red orange color. When we have this color, we are going to the opposite
side and we are starting again by creating a shape on the Apse or a circle. You can create the same size, you can create the same
shape. It's all up to you. Let's just go to the
editing mode and adjust it, make it bigger or smaller, find the different placement, maybe find different shape. Let's just go and position
it to our liking. For example, let's just go
with something like that, and when we are satisfied with the position and
with everything here, let's just tap on the screen to get away from our editing modes. Now, let's just go and drag
and drop the color inside, and when we did
it, we will go on top and we will create
little ears here. So we will go again
with the same size on the brush or you can
increase adjust a little bit. And this time, as we are
creating a little beer, let's just go with half
of the circles like that. Again, you can play around
with the size of this element, you can go to the editing mode and adjust your shape from here. Maybe you want to adjust the placement of this
element. It's all up to you. When you find the size and everything that you
wanted to find here, let just up on our screen to get away from
the editing mode, and we will just drag and
drop the color inside. And when we have the
shape on the right, let's just do the
same on the left. Again, trying to put it on the same distance from
the center and trying to remain the size and the shape similar to what
we have on our right. When you have the outline ready, let's just get away
from our editing mode, and let just drag and
drop the color inside. When we have this basic sheep, one more time, let's just
go and add some fluffiness. Again, we are going
to our brush library, going into the mod line brush, going into our stroke path, and we are setting the same value that we used
for our first illustration. Something around 55%.
When we are done, let's just done, and let's just go and adjust the
size of our brush. We can do this on
the same layer or we can create one more layer
on top. It's all up to you. Now, the same way as before, we are just going on
our outline and we are creating some flaffinss
with this new brush. When we have this outline ready, let's just go against
our brush library, Monn brush, and we will
decrease our spacing. When we are done, heating
down over our top right, zooming in our canvas, whether we need to
adjust something or not, just taking a look at it, if we have something that
we need to adjust manually. Let's just go and adjust it. Now when we have
something in that way, let's just go again
to our layers, and we'll create one more layer
on top of this new layer. We will go again with
our facial features. Let's just go to our
color palettes and select the same dark
red orange color. One more time, go and adjusting
the size of our brush, and then we will go over one of the sides and we will
put the first dot. Let's just go somewhere here, we will put the first dot, and when we have it, we'll go on the opposite side and we will
try to put the second dot. Again, going into
the same line and trying to put it on the same
distance from the center. When we have both of our eyes, let's just go and create
the nose element. We will decreticize
of our brush, and we will go
again right between our eyes or a little
bit higher this way, and we will just go and
create the same shape that we had for the nose
on our little bunny. Let's just go with
little soft triangle. This time, maybe let's make
it a little bit smaller. And when we have
something in that way, let's just go on the bottom, we will create a little line
going down in that way. Of course, if you would like to change the size of your brush, you are welcome to
go and do that. Try out one more time. If you need to hold your line at the end
to make it straight. If you need to adjust it from the editing mode,
go and adjust it. And when we have
something in that way, let's just go with a
simple smile like that. Again, if you need to adjust it, go to the editing mode, adjust it to your liking. If you need to adjust
something even more, go to the liquefied tool
and adjust it from here. Now, when we are
overall satisfied, let's just go and tap
on our magic to twice, and then let's just go and add some additional
elements here. Firstly, add the same layer, let's just go and add the
highlights to the eye. Let's just go and pick the
white color from our bunny. Again, we are holding one of our fingers and we are
selecting the white color. When we did it, we
are going to our yes, we are increasing the
size of our brush, and we can go to the same side, where we had our highlights on the bunny or we can go
to the opposite side. You decide where you want your highlights to be and
just go and put the dot. Now when we have
something in that way, let's just go again to
our layers and we will go to the layer where we
have our basic sheep. From here, we will
create one more layer. Onto this layer, we will
go to our color palette. Firstly, let's just go with this color
with the name Bach. When we have this
color selected, we will go to our nose elements and we will create a
little snout here. We will just need
to go and create a very very soft triangular
sheep like that. You don't need to create
it just with one line. You can create
something in that way. You can just drag and
drop the color inside and work from what you
already have here. Let's just go and try to
work more on the shape, try to make it very, very
soft triangular one. We are just going along the lines and we are
adding some details. If you need to adjust
it either with the work option or with
your liquefied tool, let's just go and adjust it. When you have something
that you like, let's just go and
deselect everything by heating our magic one tool
twice with the same color, we will go above the eye, and we will create
little eyebrows here. Let's just go with
simple shapes like that. So just created a
simple ellipse, or if you want to work and
create some peculiar shape, you are welcome to
go and do that. When you have the first
eyebrow on the first side, let's just go to
the opposite one and create something
similar here. If you need to adjust
it in any way, grab an eraser, grab a brush, go to the warp option, go to the liquefy option, and adjust it to your liking. Now, when we are done
with our eyebrows, let's one more time, go to our color palettes and
select our pin red color. We will go and increase
the size of our brush. We'll go underneath our eyes, and we will add our
little cheeks here. Again, you can decide what
you want for your cheeks. You can go with any other
different placement for them or with any other
different shape, it's all up to you. When we are done
with the cheeks, we will go to the ears, and we will go and add
some peculiar shapes here. For example, let's just
go and create the hearts. We can do it on the
same layer or we can create a new layer
for this element. Let's first go to our layers and we will create one
more layer on top. We will go to one of the ear and we will go and create
our heart here. Work on the sheep
if you need to, and when you're
satisfied with it, we will just go and
make a copy of it. We will just go again
to our layers and we will go to this layer
where we have our heart. We will swipe it from right to left and we will
choose duplicate. When we did it, we have
two copies of our hearts. We will just need
to go to our key, we'll go under uniform method, and we will go and position this little heart
on the opposite side. When you have something
like that when you drag it to another side, we'll just need to go
to this green note. We will need to hold
our apple pencil there and we will make
a rotational movement. Find the placement
for these elements. Find the size, whether you
want to adjust it or not. When you're satisfied
with everything here, let's just go and tap our
error key one more time. Now, we can go to
our less and we can combine these
three layers together, so we will just need
to go to the top one, we will tap on it, and we
will choose merge down, and we will do it one more time. Now when we have
something like that, we are done with
our little beer. Now let's just take a
look at everything here and decide whether we want
to adjust something or not. We can go and select every layer that belongs
to one of our creatures. For example, when
the first layer with our elements on
the beer is selected, we can go to the next one. For example, the layer
with our facial features, and we will swipe it
from left to right. Now, two of these layers are selected and
we will need to go to our mean shape and swipe
it from left to right two. Now, when we have this, let's just hit group
over our top right, and we will have the group
for this whole bear. Let's just go to
this new group title and we will rename it as bear. We will tap on our new group and we will select
rename from the list. And we will do the
same with our bunny. We are firstly going to our layer with the
facial features. We are swiping our next
layer from left to right, and we are doing
it one more time. When all three
layers are selected, we are heating group, and we are renaming this
group as bunny. Now we can only
select the group, go to our key and
j the placement, and maybe the size of the element that we
have right here. Let's just spend some
time here and ad the placement and trot maybe
the size of these elements. When you are done
with the bunny, we will just go to our layers, we'll go to our beer, and we
will do the same thing here. Let's tratit it in that way. When we are satisfied
with everything here, let's just hit our
key one more time.
4. Beautification: Now, when we have
something in that way, let's continue working
on our illustration. This time, let's just go to our layers and we will create
one more layer on top. We will go to this color that
we have for our ice cream. We will hold our apple pencil there and we will
select the same color. When we did it, we will go on the bottom part of our
bunny and on our beer, and we will hide it inside
our little ice cream. We will just go and create
the curve going in that way. You can hold it at the end, you can vary the size of it, you can vary the curvature.
It's all up to you. When we have it in that way, let's just go and manually
recolor this area. When you did it with the ban, let's just go and do
the same with our bear. Again, go into the bottom and
creating our first curve. Again, if you want to
adjust the curvature, go to the editing mode, go and find what works for you. When you are done, let's
just go to the bottom and let's recolor
this area manually. Again, if you want
to adjust something, you can go and do
that by going to your arrow key or you can
go to your magic quant, liquefy and adjust it from here. When we have
something like that, let's just deselect
everything by heating our magic
one to two times. When we are satisfied
with everything here, let's just go and
add some details. Firstly, we will go
again to our layers and we will create one
more layer on top. We will go to the top
part that we have just created and we will
add a different color here. Let's just go to
our color palettes and we will select
the beach color. We will criticize of our brush, and we will just go on this
area that we have right here, and we will just repeat it
with a different color. Let's just go with
something like that, and we will do the
same on our beer. Now, when we are
done, with this task, let's just go again
to our layers, and we will create one
more layer on top. When we did it, we will go to our color palettes and we
will select the red color. With the red color, we will go right between our creatures, and we will create
a circle here. So let's just go with one line, we will create our sheep, and we will hold our
line at the end. We'll go to our editin modes, and we will try to
make it a circle. If you don't have the option
circle on top, don't worry. You can just go to the nodes and create a circle in that way. So when you have
a circular sheep, let's just go away
from our edit mode, Firstly, just find a
placement for this element. We are creating a little cherry. Let's just go and
position it in that way. When you're satisfied
with the placement, let's just tap on the screen to get away from
the editing mode, and let's just drag and
drop the color inside. When we have something
in that way, let's just go and
work on the details. We are going to
our color palettes and we are selecting our
dark red orange color. If you want, you can create a
new layer for this element, but also you can work
on the same layer. Let's just go and de
criticize of our brush, and we will go to
the top and we will firstly create a little
curve like that. When we have this curve, we will just go on top with
another curve like that. When we are done
with our cherry, let's just go and add
a few more details. Firstly, we are
going to our layers, we are creating one more layer
on top and we will go to our color palettes
and we will select one of these colors that
we have on the bottom. Let's just go with
magenta pink color. With this color, we will go to some blink area and we will
create a little star here. You can just start by creating a star going in that
way and then turn this very straight lines and straight corners into the
soft curves and soft lines. Let's just go and adjust
it to our lichen. If you want to adjust
it, in any way, you are welcome to go to
the liquefied tool or to your work option and
adjust it from here. When you are done
with this star, let's deselect it by
hitting twice our magic to, and let's just go and
make a copy of this star. Firstly, decide whether you want to adjust the size of it, so you can just go to k uniform method and
adjust the size from here. Position it to your in two, rotate it if you want to
find what works for you. When you are done, we will just go to our
layers and we will swipe this layer
with the star from right to left and we
will choose duplicate, and we will do it one more time. So now let's go to the
second layer with our star. We will just go to our key. We will go and find a different placement for this elements. For example, let
just go somewhere in the center and we will
create it in that way. When we are done with it, we will deselect it and we
will go again to our layers, we will go to our last
layer with our star, again, go into our okey and
position it differently. When you are done and
satisfied with your stars, let's just go and try
color two of them. We are now at this
star on the left. Let's just go to our
color palettes and select maybe C and blue
color very easily, we will just go and drag and
drop the color to this star. We will then go to our layers and we will go to
the second star. We will go again to
our color palettes and select this yellow color, and we will just drag and drop
the color to this please. Now, when we have these stars, let's just get back
to our layers. We can combine these
three layers together, so we can just top one
of our first layer, select merge down and
do it one more time. When we did it, we will go
and add a few more details. Let's just go and
create one more layer, and we can stay add this color that we
are using right now. We will go and increase the size of our brush, and very easily, we will just go and
add some sprinkles like that. Adding some dots. Okay. Try not to overdo
just add enough. And when you are done, we will just go and recolor
some of them. So we are going
again to our layers, we are going to this layer 16, where we have our sparkles. We will top on it, and we
will choose Alpha lock. When we are using alpha log, we can recolor only the areas
that we have on this layer. Let's just go again
to our color palettes and select magenta pink color. We will go and recolor
some of the sprinkles. When you are done
with this pin color, you can go and pick
the color from this blue star and
recolor some other areas. If you want to go and add
some different colors, for example, Con bees, maybe the beach color or any
other color that you like, go and select the color that you like and adjust some
of the sprinkles. So when you are overall
satisfied with everything here, we are almost done. We just need to go and add
some shadows and highlights. Firstly, let's just go to our layers and we
will go to the bota. We will go to this layer
where we have our cone and we will go to this clip layer
that we have for our texture. From here, we will create
one more layer and we will clean this layer
to our main shape too. So let just tap on this layer
and choose clipping mask, and then we will go and change the blending
mode of this layer. So let just tap on the N icon, and we will change
it to multiply. For now, let just keep
apacity at maximum, and we will go to
our color palettes and we will select
the cone base color. We will go and increase
the size of a brush, and we will go right
underneath the top part, and we will just repeat the
lines that we have here. Also we will just
go along one of the sides and we will create a curve going down in that way. Again, you can hold
your line in the end, you can go to the
edge mode and you can adjust the curvature or anything that you
want to adjust here. When you have
something like that, let's just go to this corner
and we will make it soft. You can just go and decret
the size of your brush and just work onto these
little elements. Okay. If you want to solve
on other corners, you are welcome to
go and do that. If you are quite satisfied
with everything here, let's just go and adjust
opacity on this layer. Let's just go again
to our layers. We will go to the icon on
the layer with the shadow, and let's just go to the slider
opacity and we will drag it to the left until we are
satisfied with the result. Something around 36%, 35%, maybe 40% will work the best. When we are done with adjusting the opacity of our shadow, let's just go to our next layer. It is our layer with top
part of our i square. Let's just go and create
one more layer on top. We will tap on it, and we
will choose clipping mask. We'll go to our icon and change the blending
mode to multiply. Again, let's just start with
opacity set at maximum, and then we'll go to
our color palettes and select our beach color
or light beach color. Select one of these
colors and let's just go over the bottom
part of our ice cream, and let's create
the shadow here. Let's just start with
little lines like that. If you want to add more shadows, you are welcome to
go and do that. When you have the outline, you can just go manually and recolor the rest of the area. If you want, you can go
underneath the stars, you can go underneath
this little cherry on top and you can
add the shadow here, to just repeating the shapes of the elements
that you have here. Now when we have this shadow, let's one more time,
go to our layers. We will go to our icon, and we will adjust the
opacity to our liking. Again, something around 35
40% will work perfectly. Now, we are done with this part. Let's just go to our cherry and let's just add our
shadow here too. One more time, we are creating
one more layer on top. We are clipping it,
we are going to our icon changing blending
mode to multiply. Let's select the
same color that we used for our cherry
and let's just go to the bottom part and create a little shadow
going on the bottom. Again, manually go to the
bottom and recolor this area. Let's just go again
to our lays and find the opacity that will work
for these little elements. Again, something around 40 45, maybe 35% will work the best. We will do the same
with our stars. One more time, going
to the needed layer, creating one more layer on top, clipping it to our
previous layer, going to our icon, and changing the blending
mode to multiply. Now, let's just pick the
color from our stars. Every one of them will be the color that we have
on the main shape, and we will just
go to the bottom and we will create a
shadow going in that way. Let's just do it two more times. Now, let's just get
back to our layers, and we will change the opacity, again, something around 40 45%. When you're satisfied with opacity and with
everything here, let's just go and
add some highlights. We will go above all the
layers that we have, and we will create
one more layer. We will go to our icon, and we will change the
blending mode to overly. For now, let's keep
it at maximum, and we will go to
our color palettes and select the white color. If you want to use
any other color, you are welcome to
go and do that. Now we will go and decrease the size of our brush
just a little bit, and we will go to the
opposite sides from our shadows and we will start
adding a little sparkles. We can go with some easy shapes. For example, some
lines, some dots, you can just go and
repeat the shape of your alment or just go and create
a few dots like that. Also, let's just
go to the cone and let's add a few
highlights here too. Now, let's just take a look and decide whether we
like the amount of opacity for this layer or if
we want to go and change it. We will go to our icon and we will find the opacity
that works for us. When you are satisfied
with opacity, we are done with our
main illustration. Now, let's just go and make
it a little bit smaller, so we will just need
to go and select every layer that we have
for this illustration. For the groups, we can just
go and select the groups. Go in there and selecting
every layer that we have here. Also, for convenience, you can go when you have
selected everything. You can put it in a group. When we did it, we
can just go on top. We can select this group. We can go to our air
key, using snapping, using uniform methods,
going to one of the corners and making the
whole illustration smaller. Let's find the placement for it. We will just need to go and
find these two orange lines. That way, we will know that
we are right at a center. Now when we have
something in that way, let's deselect everything
by hitting our arrow key, and then let's just go and add some additional elements
to the background. We will just go to our
layers and we will go to the bottom of
everything that we have here. We will go to this
layer that we have for our shadow for our
cone from here, we'll create one more layer. Then we will go to
the three layers that we have for our cone and we will drag them higher
than we have our new layer. So we will just hold our apple pencil when all
three layers are selected, and we are just
dragging them up. Now, we will get back to this layer that we have
created the new one, and we will go and find the brush that you can find
in a project and reap. So we will just add some
grit to our background. So when we have the grite brush, we are using the white color, and we will just go and add
the grite just like that. So go just with one line
and create the grit. Now, let's just go to our li and let's adjust the
opacity of this leer, find what works for you, and that is not very disturbing. When we have
something like that, let's just tap on
this layer to close this window and we'll create
one more layer on top. We'll get back to
our mon line brush, so we are again going to
our calligraphy folder, and we will go alone
this whole illustration, and we will add a
few sparkles here. Let's just go and increase
the size of our brush, and let's just go firstly
with simple shapes like that. Let's just go and
add three of them. Okay. When you did it, let's just go and decreticize our brush just a little bit, and we will go and put
a few dots like that. Again, try not to overdo just add a few that will be enough. And when you're satisfied
with everything here, we are done with our class. Thank you for
watching this class, review if you like
this and continue subscribing for more alive
videos in the future. Looking forward to
sing your projects.
 Uni Corn, ⭐Kawaii Art Enthusiast⭐