Transcripts
1. Introduction : Hello, everyone.
I'm Uni and into this class, Wdrow Cute Macros. This class doesn't require any prior experience
or anti tools. We'll start from
scratch and we'll be using simple techniques
throughout the process. Everything you'll see will
be happening in Procreate. However, if you have a sofa or want to try
traditional materials, you are welcome to join. If you are ready to start, let's jump right Is it.
2. Basic Scheme : Let's begin this
class firstly by deciding what kind of canvas
we are going to be using. Today we are using a
simple standard canvas that you can find in Procreate, our pixel width, and pixel
height are set at 2048 pixels. It is our square canvas. DPI 300 and our color profile is set as SRGB with
this low number. When it's all done,
let's just hit done over our top right and we will be redirected to our new canvas. Now we will need to decide
what kind of colors we're going to be using
throughout the whole class. If you want to use
your own colors, you're welcome to do it. If you want to
follow along and use the same colors that you will
see throughout the class, please go to the project and rehab and download
all the materials. When you did it, the first
thing that we will need to do is changing the
color of a background. Let's just go to our layers and we will go to a
background color layer. On the bottom, you can see, we have our color palette. For us, it will be easier to go under palettes right here on the bottom right and
here go under cards. We will have all
the colors names and it will be easier for us
to navigate through them. Now, let just tap on
our background color, and we will change the
color of our backgrounds. Now what we need to do is to
start creating our scheme. Let's firstly go to
our brush library. We will go to the
sketching folder and we will pick any brush that
you like from here. When you are done with your
selecting of the brush, let just go back to
our color palette. One more time, we'll
go under cards here, and we will select lines. Now, when we did it, let's
start by creating our scheme. The first thing that
we need to do is to create a rectangular sheep. Just with one line, let go and create the
sheep like that. In the end, we will hold it
to snap to a better sheep. Then we can just go to the
top to the option that popped up our editing mode
and adjust it from here. What we need is just
a sap of the retngo. We can just go to some nodes and we can just adjust
our sheap here. When you have the shape that
quite looking as a recta, let's just go and go away
from our editing mode. We will need to
tap on the screen, and we will just need to put this element right in the
middle of our canvas. We can do it very easily
by going to our key. We will go under snapping
right here on the bottom, and we will need to choose snapping right here
from the setting. When we did it, we will
go to the uniform method, we will hold our apple
pencil and the screen, and we will try to find
these two orange lines. For now, it doesn't matter
how our rectangle looks. We just need this little scheme so we can turn it into
something better. When we have this shape
place right in the middle, let's just go and
detalect everything by hitting our key
one more time. Now, when we have the sheap, let's just go to our layers, we will go to the
layer, number one, where we have the sheep, we'll go to the icon and we will change the opacity
of these elements. When we have it, let's just
go again to our layers. We will type on the plus icon, we will create a new layer, and then we will start recreating
the shape of our macro. What we need to do
firstly is to go under our range icon
over the top left. Here we will go under canvas and we will need to
toggle drawing guide. Now you can see we
have some cells that are going for the whole
shape of R canvas. It's not the option
that we need. We'll need to go under
eight drawing guide, and here on the bottom, we will go under symmetry. When we are choosing symmetry, you can see we have
just one line. It's again, not the
option that we need. We will just need
to go under options right here and we
will choose quadrant. When we have it, we are not
touching anything because now we have equal quadrants
all over our canvas. When we have it in that way, let's just tap done
over the top right. Now, what we are
going to be doing, we will be going to
one of the quadrants, and we will be creating a very soft corner for
what we have right now. Let's firstly go for example, to the squadrons on our left and we will create
a shape like that. You can decide how smooth
you want your shape to be. When we have the result
like that, if you want, you can go over the
top and create maybe a little curve there instead
of the very straight line. Just work on the
shape and try to find the shape of the
macron that you would like. If you need to erase some parts, grab an eraser and erase the
parts that you don't need. When you have the
result like that, let's get back to our brush, and we are going to be going to the bottom part and
changing it a little bit, so it will look more around it. But before doing
that, we will need to go again to our range icon, and we'll go under
80 drawing guide. We are going again under options right here and we
will select vertical. When we have it, we will it
down over our top right, and we will go to our magic quanto and we
will go under liquefy. On the bottom, we have
a lot of options, we will just need to
use the option push, and all that we are going to be changing is our
size of the brush. You can just go back to
this option back and forth and find the brush
size that you like. What we need to do is
to go to the bottom and make this whole shape a
little bit more around it. We will just go and push it so we will have the
shape that we want. If you want to work on the
top part in the same way, you are welcome to
go and do that. Create an overall
shape that you like, and when you are
satisfied with it, we will deselect everything by hitting twice onto
our magic ant. We'll get back to mbrush and
we will go to the middle and we will create a little cut by creating a first
curve like that. Let's first go to
the side and we will mark down our middle part, and we'll go a
little bit above it and create a curve
go in that way. You can hold it in the middle. Try to connect the shape nicely. If you have straight lines when you are holding
your apple pencil, let just go over the top and we will use the option
arc right here. You can go to the nodes
and you can adjust their placements so
it is looking nicely. When you have this first line, let's just get away from
our editing mode firstly, and then we will go underneath this line and we'll create
a parallel line like that. The same way we are
just creating our line, holding it at the end. If we need to adjust it, we are just going
to our editing mode and adjusting it from here. If you need to overlap the line so they look nice, it's okay. You can just grab
in the eraser later on and erase this line
that you don't need. Now when you have the
result like that, let's just go over the
top to this intersection between our first rectangle
and this main shape, and we will go to the top and create the first line
going in that way. These little guiding lines later on will be turned
into some ears. When we have the
result like that, all that we need to do is to turn off our symmetry option. Let's just go to our
range icon one more time. We will total drawing
guide from here, but also we will need
to go to our layers, and we will see that our
layer number two is assisted. Let's just tap on it and we will turn off drawing
assist manually. Now, if you want,
you can go under the end icon and
change the opacity. So find the opacity
that works for you. When you are done, you can go to the sleigh underneath
and you can hide it. And when you have
the shape like that, we are ready to move on
to our next part where we are going to be creating
our first clean lines.
3. Basic Lines + Frog: Let's begin this part, firstly by going to our brush library, and we will go to the
calligraphy folder. We will go and select
monoline brush, and as we want all of our
lines to be very smooth, we will go to our brush. We will go under brush studio under stabilization on the left, and we will be
tweaking our option streamline and its
slider amount. For example, if our amount of streamline is set at
a very low value, We can go to the drone pad
and try out how it works. We are creating a line, we are having a lot
of control over it, but it is quite jagged. If it's okay for
you, if you want to create a natural looking
line, it's okay. You can use the very low
amount of stream line. But if you want to create
very smooth lines, you can just go and
set it at maximum. For example, try out
onto your drown pad. You will see that you are
creating a very smooth line, but yes you lost a bit of
control over your line. You can just go to
this option amount. You can try out
different values. Find what works for you. If you don't want to use
it, you are welcome not to. Let just go to our Dane option over the top when you
found the right amount. Remember that you can always
get back to this option if you tried it onto a canvas
and if you didn't like it, just go there and adjust
the amount of streamline. When we have our brush set, let's just go and
change the size of it. We will just go to
our slider and we will set our brush at
something like 5%. If you want to make sure that all of your lines
will be the same, you can find the amount of
the size that you like, and you can see that now
we have our size at 5%, and when you have
this little window, we can just tap plus, and you will see
a little markdown onto your little slider. Later on, if you
will go and change the size of your brush to a bigger one or
to a smaller one, we can easily go to
this little markdown, tap on it, and you will get back to the size that
you like before. So now what we need to do? We will go again to our layers and we will create one
more layer on top. We will need to set
this layer as assisted. Let me just tap on
this layer and we will choose drawing assist
from the least. If you want, you can go back to your range icon and you can
go and toggle drawing guide, so you will have this line that is going from
top to the bottom. What we need to do is to recreate the lines that
we have right here, but also add some details. Let's first go to
one of the sides and let's start recreating
this line on the top. Let's just stop a bit from this cut that we have and
just recreate the line. We can use all the options
that we use before. We can hold our apple pencil. We can just go to
the editing mode and adjust our line from here. Try to create a nice connection between the lines in the middle. If you need to adjust them, go to the editing mode, if you need to
adjust it even more, if you need to erase some parts, grab an eraser and erase this
line that you don't need. Now, when we have
this first line, let's just get back to our
brush and we will go to this little place that we kept and we will go and create a
little element like that. Very easily and very smoothly, we are connecting it
with our main line, and we are just creating
a little line like that. When you have it,
we will go through the whole line that we have
right here on the bottom, and we'll be creating
these bumpy elements. Very easily, just
go and create them. Connect them nicely and
create a closed line. When you have this shape, let's just go to the bottom
and do the same thing. Firstly, we will recreate the line on the bottom
and then we will make the same shape right
here where we have our cut. If you have some
elements that you need to erase or
adjust in any way, grab your eraser
and adjust them. Try to make all of the
lines very smooth. When you have the
result like that, let's just get back to our
brush and we will go to one of the side and we will create a line stepping a
bit from our side. Let's just go and create
a line going in that way. When you have it, we will go a little bit higher than
we have this line on the bottom of
our top elements and we will create a little
curve going in that way. Again, try to make
it very rounded. If you're holding your line and if it's snapping to
a straight line, don't worry, go to
the editing mode and choose the option
arc from here. Adjust your line, try to
make it very rounded. When you have it, if you need
to adjust it in any way, grab in the razor and adjust it. Now, we have the
base for our sheep. Let's just go and prepare a few more of these
macrons for later on. What we need to do is
to go to our layers, and we will go to the
layer number three, and we will need to
make copies of them. Let's just go and
swim this layer from right to left and we
will choose duplicate. We will do it one more
time because today we're creating three of
these illustrations. For now, we can just go to
these two layers on top. We can go to the
little check marks, and we will just
hide these layers. Now let's continue working
on our first illustration. Let's just get back
to our layer number three that is our
original layer. Let's just go and train
in this layer as frock. Let's just tap on this
layer and choose Renee. Now, let's just get back
to our canvas and we will go to the lines that
we have on the soap, and we will create a
little bump like that. You can vary the size
of this element, and you just need to
create a rounded shape. Hold it at the end. If you need to go
over the soap to the editing mode and
edge acid from here. Also, when you are
in the editing mode, you can move your shape
for the side, for example. If you want to move
this shape a little bit closer to the edge that
you have on the side, you're welcome to
go and do that. Find the placement
for these elements, and when you are
satisfied with it, let's just get away
from our editing mode. Now, when we did it,
we will need to go to our eraser and we will erase this line right
here on the bottom. Again, try to connect your shape nicely on this area
on the bottom. Try to make not very
straight lines, try to make very soft lines. If you need to adjust some
parts manually, for example, maybe you have little gaps, get back to your brush
and adjust them. Okay. Take a look at your
illustration from the distance. If you like it, let's continue by creating
the facial features. For the facial features, we will use the same option
that we are using right now, but we will go and make the size of our brush
a little bit bigger. You decide how big you
want your yes to be. All that we need to do is to
go under these little bumps that we have on the top and
put little dot right here. When you have it, let's just
go and create our mouth. If you don't like the
position of the eyes, if you want to try it out,
you can go and do that. Also, you can try
different size of the brush to create
your elements. When you have what you like, let's just get back to our size of the branch
that is our original size, our 5% or even a
little bit lower, and we will go right between our eyes and we will create
a little mouth like that. Just create half of the circle or half of the ps
going in that way. The same way we can
hold our apple pencil, we can go to the
editing mode and adjust the curvature
of this element. It's all up to you. You can go and make it as big or
as small as you like. When you are done, let's
just zoom out our canvas, and we are done with the
first lines for our frog. So let's move on to the next part where we are going to be creating the lines
for our little beer.
4. Bear: Let's begin this part
firstly by going to our layers and we will hide
our layer with the frog. We will go to our next layer, our la number three, that
is the second layer. We will unhide it and we will
go and rename it as beer. Now, the same way as
before, we have our base. Let's just go to
the top and let's create a different
shape for the ears. Let's just go to this little
lines that we have here and let's create bigger
shapes for our ears. Firstly, let's just get back
the size of our brush to the same side that we have
right here on our main shapes, so we are just typing on
this little checkmark. When we have it,
let's just go and start creating a bigger
shape for the ear. Let's just make it very rounded and if you want to
position it differently, let's just go and do it
from our edited mode. Also, if you don't
want to use ps, you can go under circle, and you just will have
very rounded ears. Let's just find the position
for these elements. You can just drag them
to the side or maybe more toward the center.
It's all up to you. When you found the placement, let's just tap on the screen to get away from our editing mode, and then let's just go
inside one of the ears. We will use the same brush. We will just go to
the middle part and we'll create the
inner part on the ear. Let's just go and create the similar shape to
what we have on the top. We will hold it at the end, we will go to our editing mode and adjust it if we need to. If you want to play rounds with the placement
of these elements, you are welcome to
go and do that. You can take a look at your illustration
from the distance, decide whether you
like it or not, adjust it to your liking, and when you are done, adjusting it, let's just tap on the screen to get away
from our editing mode. Now, let me just go inside
the ear one more time. We will grab our eraser and we will ease these lines
that we don't need. Again, try to make
the connections between the lines very smooth. If you want to adjust
something manually, just go and adjust it. Now when we are done with
the ears, this time, let's just go and start by creating the shape
for our snout. What we need to do is to go
somewhere to the top area. We will use the same
branch, the same size, and we will need to go and
create an element like that. It will be a little
bit narrower on the top than it
is on the bottom. Let's create it in that way. When you have
something like that, we will go to the middle part, we will go a little bit
higher than the middle and we will create a
nose going in that way. As always, you can play
around with the size of the element with its position with everything that you
want to play around with. Let's just create this very
smooth triangle for the nose. When you have it, let's
just go underneath the nose and we will go and create a straight line going
down in that way. If you want, you can change
the size of your brush, so it will be a
little bit smaller. When you have these parts, let's just go to the bottom
and create a smile like that. Again, try to connect it
nicely on the bottom. If you need to adjust
the placement of it, go to the editing mode
and adjust it from here. If you want to adjust the size, again, go to one of the
nodes and adjust it. Again, take a look from the
distance to this element. If you like it, let's just get away from our editing mode, and then let's just go and start creating the rest
of the facial features, but we won't be using
our symmetry drawing. What we need to do is to go
firstly to our range icon, turn off drawing
guide from here, then go back to our lies, go to earlier with the bear, taponate and choose drawing
assist from the list. When we did it,
let's first go over our right part and we will
create an going in that way. So just create a
triangular shape like that. Hold it at the end. If you need to adjust the
placement or anything here, let's just go over the top. If you have the option triangle, it'll be easier to use it. Find the placement,
find the size, find everything that
you want to find here. When you are done
with this element, let just up on the screen, and then let's move
on to our mouth. We will just go to
one of the sides on our mouth and we'll
create a little t here, we will just create
something in that way. When we have it, let's just
go over our left side, we will increase the
size of our brush and we will put one dot
for our e here. Try to put your eye on the same line where you
have your first eye. Just go in there and
trying to position nicely. If you are not satisfied
with its position, but you are not just going
and matching this line, we can just do it in that way. We will go to the San icon. We will use the
free hands method and we will just
select this element. When this element is selected, we will go to our key, and we will just go and position this element to our liking. If you want to do it
with another element, you are welcome to
go and do that. Firstly, we are going
to R S ribbon icon, selecting our
elements, going into our ok and positioning
our element nicely. When you're satisfied,
let's just deselect everything by hating
S ribbon icon. Let's just take a look at
everything from the distance, decide whether we
like it or not, and if we like it, we are ready to move on to our next part where we'll
create a little kit.
5. Kitty: Let's begin this part firstly
by going to our layers, we will go and
hide with the bear and hide our number three
that we have on the top. Let me just go name it as qi. Now, our layer is assisted. If you need this line that is going from
top to the bottom, you can go and toggle
drawing guide from here. When you have it, let's just go to these areas that
we have on the top, and let's just start
creating our ears here. For our ears right here, we will create very
rounded triangles. But before doing that,
we are going back to the size of the bars that
we use for our main lines. It is our 5%. Let's just go
and create these elements. You can hold your
line in the end and snap it to very rounded curve. If you need to adjust it, go to the arc option on the top and find the position
that you would like. If you need to adjust
it, even more, just go to these nodes
and play with them. When you found what you like, let's just get away from
our editing modes and let's just go inside our ears, and let's create
the inner parts. You can just go with something similar to what you
had on your bear. Or for example,
we can just go to our eraser and completely
erase this line on the bottom, and then we will create
something different. When you have the
outline like that, let's just go to
one of the sides. For example, to the left one, and we will create a little
triangular shape like that. When you have it,
we will just go inside and we will shed it. When we have something
in that way, let's just go and start
creating our facial features. We will just go to one of
the sides, for example, to the right one, and we will create an e going in that way. Very happy. We will just
hold our line in the end. If we need to adjust
it, we will go over our top to the editing mode
and adjust it from here. When you have it,
let's just tap on our screen to get away
from our edited modes. Let's just go to our eyes. We will go to the side, and we will create a little
line like that. That will represent
a little eyelash. What we need to do
next is to go right between the eyes and we'll create a little nose like that. We are creating a little heart. You can just go and
create a curve, and if you need to
adjust something, let's just go grab our
eraser and adjust this line. When we have this little heart, let's just go again
to our brush, and we will go from it to
the sides on the bottom, and we will create
this kT mouth. Adjust the size on this
element, adjust the placement, if you need to go to the
editing mode and adjust it from here if you
need to So now, when we have our mouth, let's just go above our eyes, and we will create
little eyebrows like that for our
additional elements. When we have the eyebrows, let's just go to the bottom underneath our eyes and we
will create little whiskers. If you want to add any
more additional elements, you are welcome to
go and do that. When we did it, we
are done with our KT. Let's move on to
our next part where we are going to be
recoloring our elements.
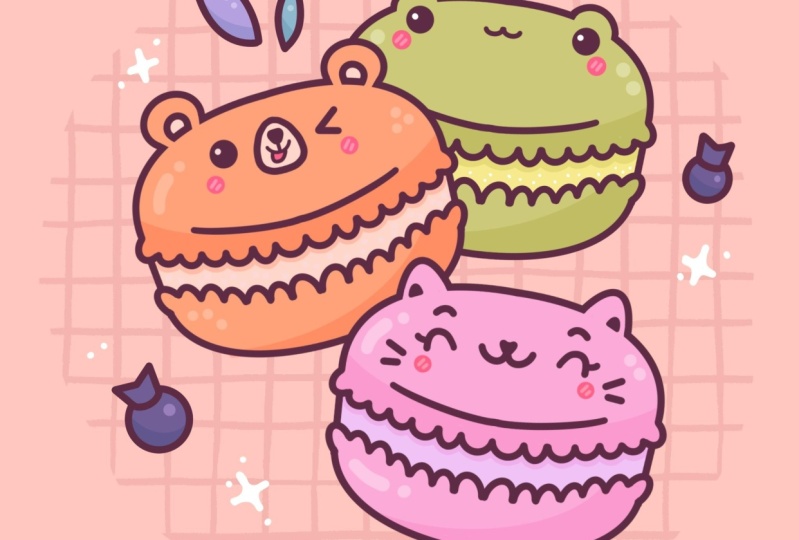
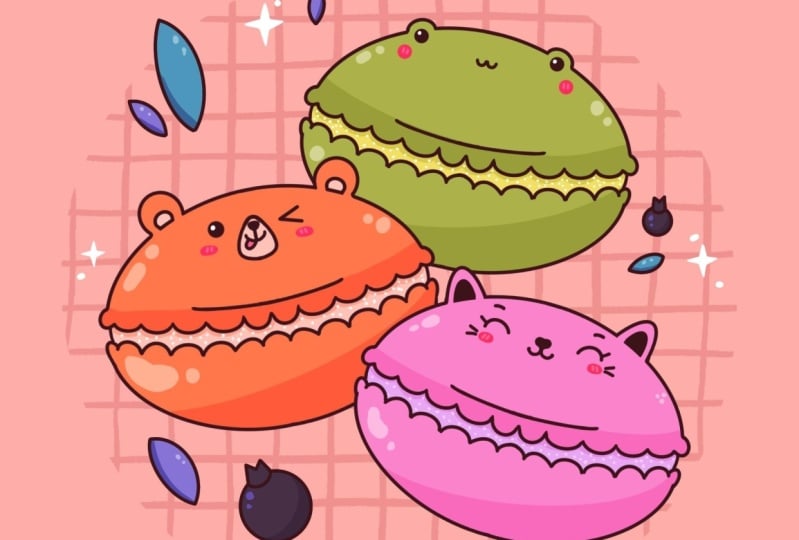
6. Frog Colors: Let's begin this part
firstly by going to our re icon and we will total
drawing guide from here. Then we will get
back to our list and we will go first
to with the kit, we will tap on it,
we will turn off drawing assist and we will
do the same with our frock. Let's just tap on it and
turn off drawing assist. Now we can go to the lier
where we have our sketch, we can just go and hide it. Then let's just go and start
recoloring our elements, but we will start doing
it from our frog. Firstly, we will hide with the kit and we'll unhide
our li with the frock. When we did it, let's
just go and create one more layer underneath our
layer with the frog lines. Let's just go to this
layer number two, and from here we will
tap on the plus CA. When we did it, we will
select these two layers, fro and this new layer. To do that, we will
need to go and select the second layer by
swiping it from left to right. When two of them are selected, we have the option group
over the top right. Let's just heat it. Let's just go and rename this
group as frock. Now, we will go to our
layer with frock lines, and we will tap on it and
we will choose reference. When we are using reference, we can use our lines
and we can recolor the elements in accordance with the lines on
a separate layer. When we did it, we will get
back to our number six, and we will then go to our color palettes and we will select the color with
the name yellow. With this color, we will
just go to the top part and to the bottom part
and recolor our frock. When we did it, we
will get back to our color palettes and
select light yellow color. With this color, we will
recolor this middle part. When we have recolored
our frock in that way, let's just go and add
some additional elements. We will go to this
layer number six and we will rename
it as base colors. And when you did it, let's just go and create one
more layer above it. Let's rename it as shadows. We want our shadows
to appear only on the areas that we have
on our previous layer. We will need to
do the following. We will need to tap
on our layer with the shadows and we will need
to choose clipping mask. Also, as we are
creating our shadows, let's just go and change the
blending mode to multiply. To do that, we
will need to go to this icon and change our
blending mode to multiply. As for the opacity,
let's just go with something like 30% for now. We can always get back to this option later
on and adjust it. Now, let's just go again
to our color palette, and we can decide
whether we want to use the yellow color or light
yellow for our shadows. Let's just try it out
with our yellow color. When we did it, we
will need to go to the bottom part and we will need to put something in the shadow. Firstly, let's
just go underneath this line that we
have on the top, and we will start creating the line going through
the whole sheep. You can hold it in the end, you can go to the
mo to adjust it. Let's just put it
right under this line. When you have it,
we will just go and tap on the screen to get
away from this mode, we will increase the
size of our brush, and we will go manually
try color this area. We can even go inside
this part that we have in a middle and we will just create the lines
going in that way. As we are creating the shadow underneath these
little elements, we will just go with
some bumpy line. When we have it in that way, let's just go to the bottom and create the shadow here too. Let's just go to our bottom right and start creating
our curve here. Hold it at the end. If you want to adjust the
curvature of it, go to the editing
mode and adjust it. Then when you have it, let's just go to
the bottom part and manually recolor the
rest of the area. Now, when we have our shadows, let's just go and
create the highlights. We will then go to our
layers and we will create one more layer above
our lay with the shadows. We will rename it as highlights. The same way as before, let's clip this led to a previous one and
then we'll go to our icon and change the
blending mode to overlay. For now, let just
keep it at Maximo and then we'll get back
and adjust this option. What we need to do is to go
back to our color palette, and we will select either
light grayish red color or our white color. Select one of these colors
and let's just go to the opposite sides from our shadows and we will just
go and put some highlights. We can just go with
several options. For example, we can
go with some lines, maybe some little dots,
just some sparkles. Decide what you want to
add for your highlights, and let's just go
to the bottom part two and create a few
of them here too. When you have it in that way, let's just go back
to our layers, we will go to our
icon right here and we'll adjust the apacity to
the level that we will like. For example,
something like 30 or maybe 40% will work the best. When we did it, let's just go and create a few more
additional elements here. We will just go firstly
to our layer with the frog and we will
turn off reference. Let's just tap on the layer and choose reference
from the lease. Now, we will go and create one more layer above this layer, and you can just go and rename this lay as
beautifications. When we did it,
let's just get back to our color palettes and we will firstly go and select
either hot pink or pink color. For example, let's just
go with our hot pink, and we will go under our eyes and we will
put little chicks here. I just the size of
your brush and just go under the eye and create
a little chick like that. If it's not happening
from the first try, go and try it out one more time. Try to put them on one line and on the same distance
from the center. When you did it, let's just go to our color
palette one more time, and we will select
a different color. We will then go to
our pink color. We will decrease the
size of our brush, and we will go inside our little cheeks and we
will create lines like that. When you did it, the last thing that we will need to do here is to go and add the
highlights to our eyes. One more time, let's
just get back to our color palette and select
again our white color. We will go to one of the eyes, firstly, for example,
to the left one, we will go to the top
part, for example, again to the left one, and we will put a little
highlight like that. If you want a bigger highlight, go and increase the size of your brush, put your highlight. When you have it on one eye, do the same on the other. Try to put it on the same
place and on the same line. If you want, you can also
go and decrease the size of your brush and go
to this middle part and add some sparkles here too. For example, let's
just go and put a few dots so it is a
little bit sparkly. Now we have our first
illustration done. Let's move on to
our next part where we are going to be
recovering our bear.
7. Bear Colors: Let's start this part firstly
by going to our layers, we will go to our
group with a frog and we'll go to this little V
icon near our checkbox. Let's just top on it and we will collapse the whole group. Now, let's just hide this group by going to this
little check mark, and then we will go
and unhide our bear. Let's select this layer and let's create one
more layer above. We will drag this
layer underneath our layer with the bear. We will select both of
these layers and we'll put them in the group that
we will rename as bear. Now, in just get back to
with the lines of the beer. We will tap on it and we
will choose reference. We will then go to
our lier number 11, and we will rename it
as our base colors. When we did it, we
will get back to our color palette and we will select this red orange color. Len drag it to the top part
and to the bottom part, and then we will get back
to our color palette. We will select our
light red orange and we will put it right
in the middle part. Also, we will recolor the
inner parts of the ears. With the same
color, we can go to our snouts and recolor it too. Also, let us go and
recolor our tongue, so we will get back
to our color palettes and select this pink
or hot pink color. Select one of them and
manually recolor this area. Okay. Now, the same way as with the previous
illustration. Let's first go to our layers and we will
create the shadows. We will go and tap
on the plus icon and let's retain this
layer as shadows. Let's clean this layer
to a previous one, then go into our icon and changing blending
mode to multiply. As for the opacity, going with the
similar value to what we had before on our
previous illustration. Something around 30%. When we did it, let's just get
back to our color palette. We will select the
same red orange color, and we will do the
same thing here. Firstly, we are going
to this bottom part, creating our shadow in that way, just repeating the same
steps that we had before. Recolor the bottom parts and create a wavy
shape in the middle. As for the bottom element, the same way as
before starting by creating a curve going on
the bottom in that way, holding our line and
the ends if we need to go into our editing mode
and adjusting it from here. Adjust the curvature and then manually recolor the
rest of the area. When you did it, let us
get back to our layers and we'll create one more layer that we'll rename as highlights. Let's clip it to
a previous layer. Let's go to our icon and change the blending
mode to overlay. You can keep it as maximum
right now, or if you want, you can go straightly
to 30 or 40% the same way as we
had it on our fro. Now let just get back
to our color palette, select either white or
discolor light gray red, and we'll just go to
the opposite sides and we will start creating
our highlights here. When you did it, let's just
get back to our layers, we will go to with
the bear lines. We will tap on it, and we
will turn off reference. We will create one
more lay on top that will rename
as beautification. Now, let's just use
our white color, and we will go and put
a highlight on our eye. Let's do the same thing
as we did with our frog. We will go to one
of the sides and we will put our little
highlight here. Now, if you want to go to the middle part and put
some sparkles here, you are welcome to
go and do that two. When you did it,
let's get back to our color palette and select either pink or hot pink color. And with this color,
we will go and put our cheeks
underneath the eyes. The same way as before,
just putting the dots, just trying to put
them on one line and on the same
distance from the eye. When you did it, let's get
back to our color palette, select the pink color if
you were using hot pink, and we will go inside our cheeks and we will add
our little lines here. When we are done with it, let's move on to our next part, where we will recolor our kit
8. Kitty Colors: Let's begin this part the same
way as the previous ones. We are going to our layers, we are going to our
group with the beer, we will collapse it,
and we will hide it. Let's unhide our layer with k lines and we'll create
one more layer above. We will drag this layer
underneath our lines. We will go and
select both of them. We will create a group. We will rename our
group as Kiti. Now, let us go to R
L with the lines, we will tap on it, we
will choose reference. We will go to number 16, and we will rename
it as base colors. Now let's get back to our color palettes and we will
select this magenta pink. Let's just drag this color to
the top and to the bottom. When we did it, we
will get back to our color palettes and
select just magenta, and we will put it
right in the middle. When we have it in that way, let's just go and start
creating our shadows. Go into our layers, creating one more layer above
with the base colors, renaming it as shadows. Let's clip it to a previous one. Let's just go to our icon, change the blending
mode to multiply, and let's go with
something like 30%. We will go again to our color palette and select
the same magenta pin color. Again, doing the same thing, go into the bottom part and
creating our first curve. Hold it at the end. If you need, go to the
editing mode, adjust it. Let's then go and manually
recolor the rest of the area. When you have this first shadow, let's just go to the bottom and let's create this big
shadow on the bottom. The same way as always
just holding our line, going over our top
to the editing mode, adjusting the curvature
of these elements, and then manually going to
the bottom entry color in it. When you did it, let's just
get back to our layers, and we will create one more
layer for our highlights. Again, clipping this
led to a previous one, going to the N icon to change
the blending mode overly. Let's just go with
something like 30 or 40% the same value that you used for your
previous illustrations, then we are going back to our color palettes and
selecting the white color. When we have it, we are going to the same
places as before, where we are going
to some other places to add our highlights. When you are done
with the highlights, let's just go again
to our layers. We will go firstly to our lay with the kitty, we
will tap on it, we will turn off reference, and we'll create
one more lay that will rename as beautifications. Now, let just get back to our color palettes and select
again our hot pink color. We will go underneath our eyes. We will criticize out brush, and we will put our
little cheeks here. When you are done, let just get back to our color palette, select just pin color, and add these lines
in the middle. Okay. When you did it, we are done with our
third illustration. If you want to stop right here, you are done with your class, but we will move on to our
next part where we will create a little composition with
all of our three elements.
9. Composition & Beautification: Let's begin this part firstly
by going to our layers. We will collapse our
group with the kid and we will unhide our groups
with bear and frog. Let's select our
group with the frog, and then we will go
to our arrow icon. Using our uniform
method, if you want, you can go and turn off snapping because we
actually don't need it. All that we need
to do is to go to this bounding box and find a better placement
for this element. Let's just drag it up and
if you want to rotate it, let's just go to the green nodes and make a circular movement. Let's just find a better
placement for this elements. For now, let's just
keep it like that. When we have it,
let's just go and deselect everything by
heating our arrow key. Then we will do the
same with our beer. Go and selecting our group, go and then to our key, uniform method, rotating it and finding a different
placement for it. We can overlap our
shapes. It's all good. When we did it, let us
go again to our liars, let select our
group with the ki, go again to our erroke and
finding a placement for it. When you are positioning
your elements, try not to touch one another, of them, just try
to overlap that. For example, let's position
our elements in that way. If you want to do it
in a different way, you are welcome to
go and do that. When we have something
in that way, let's just deselect everything, and let's position
our illustrations right in the middle
of our canvas. What we need to do is to go to our layers and select
all three of our groups. When they all are selected, we are going to our arrow. We are again going to snapping, turning it on here, then going to our
bounding box and finding the center with
these two orange lines. When you've positioned
them in that way, let's just deselect everything
by hitting our air key, and then let's just go and add some additional
elements here. Firstly, let's just
go to our layers, and let's just go to
the layer number two. We will create a new
layer here and we will go and create an additional
element underneath our saps. We will do it very easily with a brush that you can find
in a project and reser top. This brush is called
a brush grid, and we will just go
with this brush to our color palette and
select grid lines color. Then we will go to
the middle part and we will create a line
going in that way. We are basically creating
a circle or an ipse. We can position it differently. When we have the size that we like and the
position that we like, we can just go to our key and position it
differently if we want to. Again, we are using snapping and uniform method and we will just need to
position it right in the center as all of
our elements are. So position it in that
way, when you have it, let's just tap one key, and let's just go and add
some additional elements. For example, let's just
go with some sparkles. Let's go back to our layers. We will go and create
one more layer above this layer with
the little donuts, and then we will get back
to our color palettes and select either light gray
red color or white color. We will get back to
our previous brush, so it was our monoline brush and let just go and
add some sparkles. So for example, we will
go alone our elements and let's just go and create a few sparkles
going in that way. Try not to overdo it. Just try to create
a few of them. If you want, you can go
and also add some dots. For example, let's just go near the little sparkles and add one or two little
dots like that. If you want to go to
some other elements, some other areas,
you are welcome to go and add little
dots there too. When we have the
result like that, let's just go and add a few
more additional elements to finish up our
whole composition. What we need to do is
to go to our layers, we will go to a
group with the K, and a ballot we will
create one more layer. Let's rename it as
additional elements. When we did it, we will use the same brush, our
monoline brush, and we will go back to our color palettes and select
the color of our lines. Now, let's just
go to some areas. For example, we have
three areas right here, and we will add some leaves
and maybe some little beers. Firstly, let's just
go right here to the bottom right
between our sheeps, and we will go and firstly set the size of our brush
to what we had before. Let's just go there and
create a shape of the circle. Hold your line and the end, go to the top and select
the option circle. If you want to make
this shape bigger, when we are in the editing mode, you can go right
between the nodes, hold the apple pencil there
and drag it to the side. Find the placement
for this element too. You can take a look at your illustration from the distance and decide whether you like the position of these
elements or not. Find the placement that
you like when you have it, let's just tap on the screen, and let's go and adjust
this shape a little bit. Let's just go to the bottom
of this little berry and we will go and create a little curve going
up in that way. When you have it, we will go on the top and we
will create a letter. We will connect it with
the curve on the bottom. Hold it at the end,
and if you need to, let's just go over
our editing mode and adjust it from here. Generally, let's create
something like that. We will then go away
from our editing mode, we will go back to our
eraser and we will erase this line in a
middle that we don't need. When we are done, let's
just go to the top. For example, to the right again
to this place right here, and let's create another bear. This time, let's just make
it a little bit smaller. The same way just
creating our shape, holding it at the end, then going on the top and
select an option circle. If you need to change the size or the placement
of this element, let's just go and adjust it. When you are done, let's just go over the
top of this bear. Let's create a little curve, hold it in the ends,
and then let's just go over the top
and create our letter. Again, we will hold
it at the end. We will go to our edition
modes and adjust it from here. When you are done adjusting it, let's just grab our eraser and we will erase this
line in the middle. When we are done
with our berries, let's just go and
add a few leaves. We will go to some
other blank spaces and we will start
adding our leaves. For example, let's just start
right here on the top left. We will just go and create
a leave going in that way. Just a curve like that and another curve on
the opposite side. Connect it nicely. If
you need to adjust it, you know what you
need to do, go to the editing mode and
adjust it from here. If it's not happening
from the first try, try it out one more time,
create nice leaves. When you are done
with the first leaf, go to the site and create
a smaller leaf there. When you have the
first two leaves, let just go to some other places and let's add a few
more of this elements. If you want to
adjust your elements after you are done with them, you know
what you need to do. You will need to go
to the ribbon icon, select the element that
you want to adjust, select it, then go to the key and find a
different placement for it. When you are done with
creating the lines, let's just go and add
the color inside. Again, we're going
to our layers, we will go to the layer
with additional elements, we will tap on it and we
will choose reference. We will create one more
layer and we will drag it under need our layer
with additional elements. If you want to rename it, go and rename it. Now, we will just go to
our color palettes and we will go with dark purple
color for our berries. When you recolor the berries, recolor these top parts two, and then we will get back
to our color palettes and we will use purple and
C and blue for our leaves. When you are done,
let's just go and add the shadows and highlights
to the little parts. Again, we are going
to our layers. We can just go to this layer
with additional elements. We can turn off reference. We will go above this layer
where we have our color. Create one more layer. If you want to rename it
a shadow, just rename it. We just need to clip it to our previous layer and change the blending mode to multiply. Again, going on with 30% of opacity and with
one of the colors, either purple or dark
purple or SN blue, let just go to all of these elements and
let's add our shadows. If we want to be consistent
with our shadows, let's just go more toward the
right part on the bottom, and we will add
our shadows there. When we are done, let's just
go again to our layers, and we will add little highlights
to these elements too. We will create one more layer. Again, we will clip it
to the previous one. We will go to our icon and change the blending
mode to overlay. Go on with 40 or
30% similar value to what you had on
your main elements. Let them go to our
color palettes and select our white color, and let's just go to
the opposite sides from our shadows and we will
add our little highlights. And now, in just take a look at our illustration
from the distance, and if we like everything
that we have here, we are done with our class. Thank you for
watching this class, review if you liked
it and continue subscribing for more Cai
videos in the future. Looking for testing
your projects.
 Uni Corn, ⭐Kawaii Art Enthusiast⭐