Transcripts
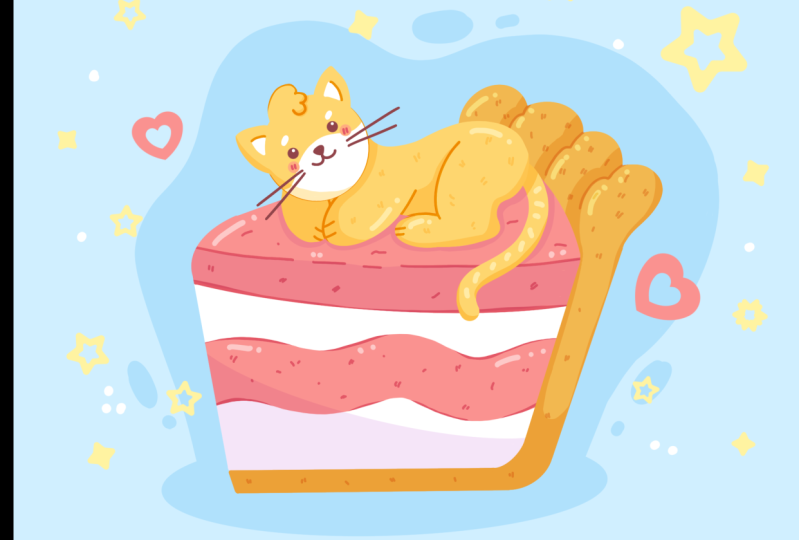
1. Introduction : Hello, everyone. I'm uni, and into class, we'll
draw a cute cat pie. This class doesn't require any prior experience
or fancy tools. We'll start from
scratch and we'll be using simple techniques
throughout the process. Everything you'll see will
be happening in Procreate. However, if you have a software or want to try
traditional materials, you are welcome to join. If you are ready to start,
let's jump right into it.
2. Sketch: Let's begin this
class firstly by deciding what kind of canvas
we are going to be in. Today, we're using a simple
standard square canvas that you can find in Procreate, both pixel we and pixel height
are set at 2048 pixels. RDPI are 300 and our color profile is set as
SRGB with this low number. When it's all done,
let just hit done over our top right and it will be redirected to our new canvas. Now, let's just zoom
out our canvas, so we will see the whole canvas, and then we will need
to decide what kind of colors we are going to vision
throughout the whole class. Of course, if you want, you can go and pick your own colors, but if you want to
follow along and use the same colors that you will
see throughout the class, please go to the
project and rush up and download
all the materials. When you did it, the first
thing that we need to do is go into our layers and change in the color
of our background. We will just go
to our background color layer here on the bottom, you can see you have
your color palette. But for us, it will be easier to go under palette right
here on the bottom, and here go under cards. Here we have all the
colors names and it will be easier for us
to navigate through them. So now let's just pick
the background color. And when we did it, we
will see that we've changed the color
of our background. Now, we will go and we will pick the brush
for our sketch. So let's just go to
the brush library, and we'll go to the
sketching folder. Here you can select any
brush that you like. You can try it out on ta canvas. If you don't like it, get
back to the brush library, select another brush and
find what works for you. When you found the
brush, let just go again to our color palette, and here we will go
again under cards, and we will select
dark red color. When we did it, we are all prepared to start
creating our sketch. Firstly, let's
just go and create a few lines that will
represent a little pie. What we need to do is to go more toward the bottom part of our canvas and we will start by creating two descending
lines like that. When we have
something like that, we'll go to the bottom
and we will create a line going on a
horizontal axis. When we have
something like that, we can work more on the shape. But for now, it
doesn't matter if it's not very nice and very
cute and very clean, we will fix everything later. When we have the
shape like that, let's just go over the
top and we will create another parallel line to what we have right
here on the bottom. Just creating a straight line
going on a horizontal axis. When you have
something like that, we will go to the
bottom and we will add a bit of thickness
to this bottom part. We are stepping a
bit from this line, and we are just creating a parallel line going
in the same direction. You can vary the size
on this element, you can make it very
thick or very thin, it's all up to you. When we have
something like that, we'll go over our right part and we will do the
same thing here. We will try to keep the same thickness that
we have on the bottom, and we'll just create another
parallel line right here. When we have it, we will go
to the corner that we have, and we will make a
very soft corner. We are creating a curve instead
of the very straight one. If you need to
adjust some lines, if you need to array something, grab an eraser and adjust
it to your lichen. Now, when we have
something like that, let's just get back to a brush and we will go to
the corner that we have right here
in the middle part and we will do the
same thing here. We are just softening
up the corner. When we have
something like that, let's just go over the top and let's work onto the
top part of our Pi. We will go to the sorer
that we have on our left and we will go with a
diagonal line like that. You can play around with the
thickness of this element. As always, you can make it
very thick or very thin. It's all up to you. When we have the
result like that, we'll need to connect it
with our shape on the right. Let's just go to this little
line that we have on top and we will create a curve
going down in that way. We are connecting it
with the mean shape, not with the thickness element. When we have it in that way, let's just go and work
on at the top part. Here we'll create some crust. Let's just go above this curve
that we have just created, and we will start creating
some bumps like that. You can vary their size,
you can vary their amounts. All that you need to do is
to try to make the sides of these elements quite parallel to the lines that you
have on your canvas. When you have enough
of these elements, we will need to connect them nicely with our bottom parts. Let's create another curve. Let's just don't go too
close to our sides and let's just not go too close and too crazy with this
last element here. Let's just go and create
a very soft curve. If you need to
adjust some parts, you are welcome to go and
adjust them. Work on the sheep. If you need to if you
want to erase some parts, you are welcome to
go and do that. So now let's just spend
some time adjusting our sheeps and when
you are done with it, let's just go and adjust
it a little bit more. When we have something
in that way, let's just get back to
our brush and we will go to the scorer that
we have on our left. We will go to this
triangular sheep and we will soften
the whole sheep up. Again, we are going to this
corner and we are just creating a soft curve instead of the very
straight corner. When we have
something like that, we can go down and we can connect these two
shapes together. We are just connecting the
line that we have right here as a line on the left with
our shape on the bottom. When we have something
like that, let's just work on our details
a little bit. We will go underneath this line that we have
right here on the top. That is our bottom
line of our triangle, and we will just go down and we will create another
parallel line like that. Just go in there and creating the same line that
we have on top. Again, you can play around with thickness of the elements. When we have
something like that, let's just go in the
middle part of our pi, and let's create a
wavy line like that. If you want to add
any other details, you are welcome to
go and do that. When we have the
first line like that, let's just go again and
add some thickness. We are going down and we are creating another parallel
curve like that. When we have the
result like that, let's work more on
the size of it. So we will just go to
our okey on the left, and on the bottom, we will
go under uniform method. You can see we have
this bounding box, and if we go to one of
the corners, for example, to our corner on the top right, we can hold our Apple pencil there and we can drak it down, so we will be adjusting
the size of this element. If you want to put this
element right in the center, we will need to go
under snapping, and we will need to toggle snapping right here
into our settings. When we did it, we will
get back to our canvas, we will hold our apple pencil, and we will just go and find one orange line that is going
from top to the bottom. That way, you will know that
you are putting your element straightly in the middle of your canvas on the
horizontal axis. Let's just find the placement
for these elements, and let's think whether we
want to adjust it or not. For example, I think that this little pie is a
little bit too tall. Let's just go and adjust it. We will go under free for
method and we will go to this node that we have in the middle of the top
of the bounding box. We will hold our apple pencil there and we will drag it down. Again, we are following the orange lines so that we know that we are
right in the center. We are not moving it to
the left or to the right. When you're satisfied
with the results, if you want to
adjust it even more, you can go under work
here you can see, again, we have the bounding box, but it has a lot of
intersections here, so we can just go
to some of them and we can adjust
our sheap even more. For example, we can go to
this side on the left, and make it more symmetrical to what we have on our right. We can just go to the node
that we have right here on the top and we can just
drag it to the center, and we can work on at
the sheap in that way. We can just spend some time here and work on at the
general sheap. When you're satisfied
with your Pi, let's just go and deselect everything by hitting
our arrow key. Now, when we have
these elements, let's just go to our layers and we'll create one
more layer above. For now, we don't need
to rename our layers, so let's just keep them
as they are right now. When we have the next layer, we will get back to our brush, and we will go on top of our Pi and we will add
a little key here. Let's first go and zoom in
our canvas and we will go to the top part and we will start by creating a
shape of the circle. Just creating a shape with one line and at the
end, we will hold it. You can stay at your ellipse, but if you want to use a
perfectly round circle, we can just go and do that. We'll go over the top
to this option ellipse. This is our editing mode, and here you have
the option circle. If you want to use the
circle, you can use it. Also, when we are in
the editing mode, we can adjust the
placement of our elements. To do that, we will need to
hold our Apple pencil at some blank space and just move our shape to the place
where we want it to be. If you want to make it bigger, you can go right
between the nodes. You can hold your apple pencil there and drag it to the side, so you will be making it bigger. When we have something
in that way, let's just move it
a little bit down. When we have it like that, let's just go away
from our edited mode by tapping on the screen. When we have our hat, let's just go and work
more on the body. Firstly, we will go over
our right side and we will create another
circle somewhere here. Again, with one line,
we will create our she. If you want again, go under
your ipse on the top, go and select circle and we will position it
somewhere like here. When we have something
in that way, let's just go and connect
our head with our body. What we need to do is to go
to the middle of our heat. Let's just make a
little markdown. From this markdown,
we will just go with a curve like that to connect
it with the bottom part. You can make a very
rounded curve, and you can make a
very visible dent. What we need to do is to
create something like that. Also, if you want,
you can go and create a very rounded
shape for these elements, so it will be a very
very rounded bomb. When we have
something like that, let's just go to the bottom and let's start
creating our legs. Firstly, let's just go
over our left side. We will go underneath our head. Let's just find the
center on this line. We'll make a little mark
down one more time. We will go a little
bit to the left from it and we will go with
the line like that. We're just creating
a very soft pole. When you have it in that way, we will go to the opposite side and we will create
another pole here. Again, we will start by going to this little markdown that
we have just created, and we will create a curve
going down in that way. Also, if you feel that your pie lines are too bright and they are
very disturbing. You can go back to your lies, you can go to your
leer number one, where we have our pine lines. We will go to the icon and you can see we have
this lighter opacity. We can grab it and we can
move it toward the left. It will be a little
bit more transparent. Now, when you are satisfied with the transparency with the
opacity on this layer, let's just get back
to our le number two, where we have our cat and
let's continue working on it. Now when we have this
curve on the side, let's just go and continue going up with this
curve like that. When you have it in that way, let's work more onto
our first poll, so we will just go and
make it more around it. We will go and create
it in that way. If you have the lines
that you want to erase, grab an eraser and erase them. Now, when we have
something like that, let's again get
back to our brush, and we will go and
create the back leg. We have this circle
for the back. Let's just go and start a little bit higher than the
middle part of it. We will go down with
another curve like that. When you have the
curve like that, let's just go and create
the bottom part on the poll we will just go and create a line
going in that way. We are creating just
half of the ps. Work more on the
sap if you need to, and then when you have
the sap like that, we will need to connect
it with our body. We will go to this
right part and we will go with a little
curve up like that. When you have it, we will go inwards and we will create
a line going in that way. Then we will just
connect it with the main shape of our body. Let's just go and create another curve going
up in that way. Of course, if you want to play
around with this element, you are welcome to
go and do that. When we are done with
it, let's just grab our erase or two and let's erase all the lines
that we don't need. When we have
something like that, let's just get back
to our brush and we will go and create a
little line for our tammy. We will just need
to go right between these legs and we will create just a curve going in that way. You can play around
with these elements. You can make a very chabby
cat or if you want, you can make a very slender cat. It's all up to you. When we
have the result like that, let's just go and create a t. We will go to
this bomb element. We will make a little markdown again somewhere in the middle. From it, we will just go down with the curve
going in that way. If you want to play
around with the sheep, let's just go and
play around with it. When we have the first curve, let's create another
curve right here, add the tap of our tail, and then we will just go and add the thickness to our tail. Okay. Suggest creating
a parallel curve, and when we have
something like that, let's just work more onto the
shape of our overall cat. Now, if we take a look at our illustration
from the distance, we could definitely say that our cat is a little
bit too long. Let's just go again to our key. Firstly, we will just
go to free for method. We'll go to this
node that we have on our middle part on the right, and we'll just drag it
more toward the left. Find the size that you like. Also, while we are still here, we can just go and play around with the position
of the elements. If you want to rotate
your elements, you can go to this green
note over the top. You can hold your apple pencil there and make a
rotational movement. S now, spend some time
here and play around with the position of your cat
and with an overall she. If you want to
adjust it even more, we can go under w and
adjust it from here. When we are overall happy
with the whole sheep, let's just go again to our
key and deselect everything. If you want to adjust
your cat even more, we can go under magic to and
we can go under liquefy. Here you can see we have a lot of options. It doesn't matter. We will just use
the option push. We don't touch any other
slider except our size slider. We can just go and adjust
the size of our brush, and if we want to
adjust some elements, we will just go and push them. Again, if you want to
adjust some parts, let's just go and adjust them. Don't worry if you pushed your
elements and for example, your circle doesn't
look very nice. It's okay. We can
fix it later on. Now, when you're happy
with the overall shape, let's just go and
deselect everything by hitting our magic
one tool two times, and then we will
again go to our brush and we will continue
working on our sheep. If you want to adjust this
element for your hat, you are welcome to
go and do that. For example, we can
just go and erase this whole hat and try
it out one more time. Let's just make it a
little bit bigger. Again, we are starting by
creating a shape of our circle. We will hold it at the end, we will go over
our editing mode, we will select circle and we will find the placement
for this element. Let's just go and
zoom out our canvas to position it
correctly and nicely. Now when we have
something like that, let's get back to our brush, we will go to this little gap
that we have right between our head and our little pow and we will create
another curve here. Just connecting the sheap when we have
something like that, let's just go over
the top and let's add some details for our head. For example, let's
just go and find an approximate center of our shape by creating
a cross like that. When you have it, we
will go over the top. For example, let's just
start with the left side, and let's create the ears. Firstly, we are going
to our left and creating a little
triangular shape like that. You can start with a
very straight triangle, and then if you want to, you can just go and turn these very straight
lines into the curves. Play runs with the
size of this element, play around with the
rounds of this element. It's all up to you. Find
what works for you. When you have this first ear, let's just go to
the opposite side and let's do something
similar here. This ear will be a
little bit hidden, so let's just make it just
a little bit smaller. We will try to put
it on the same line, and we also will try to put it on the same distance
from the center. Try to make the ears
similar to one another, and when you have
something like that, let's just go inside of them, and let's create the inner part. We are just repeating
the shapes on the ears and creating
little triangles here too. We will do it on both ears. If you have some lines that
she would like to erase, grab the eraser and eja
these little parts. When we have the
result like that, let's just go to the
bottom part of our phase. We will just go a little
bit lower than we have this line that is going
through the horizontal axis, and we will create
a little mask here. So we are just going there and creating a little
curve like that. Again, you can play around with the curvature on this element. You can play around with
the position of it, you can play around with everything that you want
to play around with. And when you have
it, we will go to this middle part and we will
create a little nose here. Let's just zoom in canvas and we will just go straightly
to the middle part, and we will start by creating
a very, very soft triangle. Again, you can play
around with the size of this element and
with its position. When you have the overall shape, let's just go inside
and let's shade it. When we have the nose, let's just decrease the size
of our brush a little bit, and we will go to the sides from our nose and we will
create a key mouth. We are just going firstly
over our left side and we are creating half of the circle or half of
the ellipse like that. You can do it manually or
you can create it by holding your line in the end and
going on the editing mode. When you are done with the
first shape on the first side, let's just move on
to the opposite side and let's create the
similar shape here. Again, you can play around with everything that you want to play around with right
here, when you are done, with the mouth, let go and increase the size of our
brush one more time, and let's just go
and add the yes. For the eye, let's just go
to this little dance that we have on our head above
our mask elements. Let's first go over
the left side, and let's create a circle or an ellipse of the size,
something like that. When you're satisfied with it, let's just go inside
and shade it. When you have the first eye, let's just go to
the opposite side and create something
similar here. Again, we are
trying to put it on the same line and on the same
distance from the center. When you have the second eye, let's just work a little
bit onto our details. Firstly, let's just go above
our eyes and let's create little elements for our eyebrows
in the shapes of epses. When we have
something like that, let's just go
underneath the eye, and let's create
little cheeks here. We will create just the shapes of the circles or the epses. If you want, we can go
and add the whiskers. Let's just go and create a
few lines going in that way. We will do it again
on both sides. When we have
something like that, let's work a little bit
on the top of our head. Let's just go and create
a little here element. We will step a little bit from the center line and we will go higher than the line
that we have for our heads. We will create a
curve like that. When we have this first curve, we will go down with
two more petals and we will make them
a little bit smaller. Let's create something
in that way. If you want, let's just go, grab our eraser and erase this line on the top
because we don't need it, and we will see more
clearly what we are doing. Now, when we are done, let's zoom out our canvas
and take a look at our illustration and
decide whether we want to add something
or adjust something. So for example, let's just
get back to arm brush, and let's just go to this pot
that we have on our right. Let's continue
creating this line, let's connect it with our heat. We will also go to the lines, and we will create a little
elements like that that will represent some
kind of the fingers. So we will do it on both sides. If you want, you can connect
them nicely in that way. Also, if you want,
you can go and create a little dent right here so you will see that it is a pour. And when we have
something like that, we will also go to this
leg that we have in the bag and we will add these
additional lines there too. Now, one more time, take a
look at your illustration and decide whether you want
to adjust something or not. If you want to,
you can go either to your arrow key
and work option, free form option, uniform
option, or if you want, you can go under adjustments, liquefied tool, and
adjust it from here. So now spend some time here and adjust your cat to your lichen. When you're satisfied
with the adjustments. Let's take a look
at our illustration from the distance and decide whether our cat is too big
for the Pi or if it's okay. If you want to adjust it, let's just go again
to our arrow key, we'll go on the uniform method, and we will go and maybe find a different placement or
different size for this at. Position it to your liking and when you're satisfied
with everything here, let's just go and deselect everything by heating
our arrow key. Now, when we have it, let's just get back
to our layers, we'll go to our number
one, where we have our Pi. We will grab our
eraser and we will erase all the lines
that we don't need. We will see more clearly
what we are doing. Now, when we have the
result like that, let's just get
back to our layers and we will combine
these two layers. If you want, firstly, you can get back to your
first layer with the Pi. Go again to our icon and
adjust the pacity to maximum, so you will see clearly what
we are doing here again. When we have it, let's just
merge these two layers together because we don't
need them to be separate. Let's just go to this
layer on the top. We will tap on it and we
will choose merge down. Now, if we want to work more
on the composition and maybe make the whole
illustration a little bit bigger. We know
which we need to do. We will just need to
go over our air key, and let's just go and make the whole illustration
a little bit bigger. Let's just go find the center by going to this orange line, and let's position it
nicely onto our canvas. Let's make it pretty big, but also let just have some
space around our elements. So let's just go with
the size like that. When we are done, let's
just deselect everything, and when we are done, let's just go and add some additional elements for our cat. We will just get
back to eye brush and we will go alone our sheep, and we will add some stars
and additional elements. We will just go and create
a few additional elements. You can go manually
and add some stars, very the size and position
of these elements. When you are done with
adding the stars, you can go and
create a few dots or maybe some sparkles or some additional elements
that you would like. If you want to add some hearts, you are welcome
to go and do that t. When you're overall done, one more time, let's just
get back to our arrow key, and let's make sure that we
are right in the center. For now, we will position the whole illustration
in a center falling these two orange lines, one vertical, and
one horizontal. That way we will know that
we are right at the center. When you found these two lines, just lift up your apple pencil and when you're satisfied
with everything here, let's just tap on our arrow
key to deselect everything. Now, let's continue by going to our next part where we'll start creating our basic colors.
3. Base Colors: Let's begin this part firstly
by going to early years, and we will go to
the layer number one and we will reneam it. Let's just stop on it,
and let's choose reneam. We will rename this
layer as Skech. Again, to make sure that
we see everything that is happening onto our canvas and that our lines are
not too disturbing. We'll go to our icon, and we will change the
opacity to something lower. Find the opacity
that works for you when you still can see what's
happening onto this layer, but when it's not that disturbing,
and when you are done, let's just tap on our lay with the skitch and let's
create one more layer. We will tap on the plus icon, and we will drag this layer underneath our layer
with the skitch. Let's just hold this layer
and we will drag it down. Now, when we did it, we will
go to our brush library, and we will go to the
calligraphy folder. We will choose mon line brush. But if you want to make
your lines very smooth, let's just go and
tweak one option off our mon line brush. Let's just tap on the brush
from the brush library, and we will go under
stabilization here on the left. You can see on the top,
we have our option streamline and we have
the slide amount. If it's set at a very low value, let's just go to our drone
pad and try out how it works. We can see that we
are creating a line, we have a lot of
control over it, but our line is quite jagged. If you want your lines
to look very natural, you are welcome to use it. But if you want to create
very smooth lines, we are going to the
slighter amount and we are adjusting
the value of it. If you set it at
a maximum value, we can just go again to our
drone path and try it out. You can see we have
a very smooth line, but it lost a bit of control. So you can decide whether
you want to use this option or if you want to adjust
the amount to your liking, if you want, you can go back
to Canvas, try out there. If you want to adjust it, you can always get back to
this option and adjust it. Find the amount that works
for you and when you're done, let just hit done
over our top right. Now, when we are done, let's just go to
our color palettes and let's select the
orange crust color. We will go and
criticize of our brush, and we will go and create
this crust element. Very easily, just go in there
and our main goal right now is to create the outlines
that won't have any gaps. Let's just go and
very easily do it. We can use all the options
that we used before. For example, if you want
to create a straight line, you can hold your
line at the end. If you need to adjust it, go over the top to the 18
mode and adjust it from here. Now, when you have the outline, let's just drag and
drop the color inside, and let's just go
again to our layers, and we will hide our layer with this case just for 1 second to make sure that our
outlines are nice and smooth. To do that, we will need to
go to this little checkmark, and we will need to tap on it. Now, let's just take a look
at everything here and decide whether we need to
adjust something or not. If we need to adjust something, let just go and
manually adjust it. When we are done
with this element, let's just get back to our
layers and we will unhide our layer with this cage by tapping on this little
checkmark run time. When we did it, let's just go
and create one more layer. We will tap on the plus icon and we will go again to
our color palette, and this time we will
select the white color. With the white color, we will
recreate this whole area. Again, the same way as before, just go and creating our lines, using all the options
that we used before. If you want, you can
go a little bit beyond the frames of your
element of the crust, later on we will adjust it. Again, when you
have the outline, let's just drag and drop
it to the whole area, and then let just get
back to our les and we will drag this layer underneath
our layer with the crops. Again, holding it and
dragging it down. Now, we will go again to our
er with the sketch and we will hide it to make sure
that everything looks nice. If you need to
adjust some parts, let just go and adjust the manually with our
ser and our brush. When you're satisfied
with these parts, let's just get back
to our layers and let's unhide our layer
with this kitch. If you want, you can go
and rename these layers. For example, for this layer
with our yellow elements, let just go and
rename it as crust, and we will go to
the white elements and rename it as kick. Now when we did it,
let's just go to this layer with our
cake and from it, we will create one more layer. We want to end the details
with a different color to all the areas that we have on our previous layer and we don't want to go beyond the frames. How can we do that? We will
need to go to this new layer, we will need to tap on it, and we will need to
choose clipping mask. Now, everything we
are going to be creating on this layer will be appearing only on the areas that we have on our layer
with the cake. So now, when we have it, let's just go back to our color palettes and let's
select this red cake color. We will go to the top part
and we will recreate it. Let's just go right here on this line that we have on
the bottom of the cake, and let's create our curve. Also, you don't need to
repeat everything with 100% of similarity to what
you have on your skage. If you want to create
a curve instead of the very straight
line that we had on our skage for these elements, you are welcome to
go and do that. Now when we have these
elements on top, let's just go to the top part. Let's create the line here too. Let's look the
shape around so we can just go and drag and
drop the color inside. Now, when we have the
result like that, let's just go to
this middle part, and let's create this shape too. You can do it very easily by recreating these lines
on the top and on the bottom just with a very low amount of
size for your brush, or you can just go and increticize of your brush and
do it just with one line. Now, when you are
done with this task, let's just go again
to our layers, and let's start
creating our cat. We will go above our layer with the crust and we'll
create one more layer. Let's just go to our
color palettes and let's select the color
with the yellow cat. We will decriticize
our brush and we will start by recreating
the shape for our hat. Again, we can just go
and create the outlines firstly and then adjust
them if we need to. You can use all the options
that we used before. As always, you can hold
your line in the end, go to the editing mode and
adjust your shape from here. You can see we have
some nodes here. We can just go to
one of the nodes, and we can just move it to the place that
we want it to be, so we can adjust the sap of our elements by
moving our nodes. Just hold your apple pencil and drag the nodes to the site. Now when we have this outline, let's just get away from
our editing mode and let's continue creating the
lines for our main sheap. When you have the closed sheep, let's just drag and
drop the color inside, and then we will go and recreate
the sheaps for our ears. When you are done with
this task, one more time, let's just get back to
list and hide earlier with the sage to see how it looks without the
lines of the sage. If we want to adjust
something here, let's just go grab our eraser and adjust the parts
that we want to adjust. When you're satisfied
with the overall shape, let's just get
back to our layers and hide our lier
with this sage, and let's continue
working on our fees. Firstly, let's just go and
end this mask elements. One more time, we will just go and create one more layer above, and we will clip it to
our previous layer by typing on the lier
and choose and clipping mask from the least. When we did it, let's
just get back to our color palettes and let's
select this white color. With the white
color, we will just go and recreate these elements. Loom the sheep around and then just drag and
drop the color inside. Also with the same color, we will go to these little areas in the middle part of the ears, our inner parts of the ears, and we will just recreate them. Again, with the same color, let's just go above our eyes, and let's create this
little eyebrows. Again, you can hold
your apple pencil at the end of the
line and snap it to a better shape and then just go manually try color
the rest of the area. Do the same on the
opposite side. When we are done with it, let's just go again
to our layers. Let's hide our with the
sage and check out how everything looks and whether we want to adjust something or not. For example, we
can work a little bit onto our inner
parts of the ears. We can connect them
more nice to our hat. When you have the
result that you like, let's just get
back to our layers and unhide lier with this sage, and then we will go and
create one more layer. Let just clip it to
the previous one, and if you want,
we can just go to all of these layers and
we can rename them. For example, for the heat, let just go and
rename it as heat. For these white elements, we can just go and
rename them as white and for our
layer number seven, the new layer, let go and
rename it as facial features. So now when we have a new layer, let's just get back
to our color palettes and let's select
our dark red color. We will first go and recreate
the shapes for our eyes. Let's just go and increase
the size of eye brush, and we will just put
the dots for our eyes. When you are satisfied
with the eyes, let's just decrease
the size of eye brush, and let's just go and recreate the nose and mouth elements. Again, for this mouth element, you can create the curve, hold it at the ends and adjust
it from your editing mode. When you're done
with the first side, do the same on the
opposite side. Try to make this shape parallel to the one that
you have on your left. When you are satisfied, take a look at your illustration
from the distance, decide whether you want to
adjust something or not. For example, let's just go to the nose and let's make
it a little bit smaller. When we have the
elements already onto our canvas and if we want
to adjust the size of it, for example, we can either go again to our arrow
key on the top left. But we can see if we
go right now straight away onto this lier everything will be selected right now. What we need to do
firstly is to go to our S ribbon icon and select
the free hands method. When it is selected,
we can just go and select the element
that we want to adjust. In that case, let's
just go for the nose. We will just select
only these elements and then we will get
back to our arrow key. Now, if you want just go
and adjust the size of your elements and position it to the place that is suitable
for these elements. When you are done, we will
need to deselect everything by going to the first
icon that we used. It was our S ribbon icon. If you want, you can go
over these lines that you have just adjusted and
make them more crease. When you are
satisfied with this, let's just go and create
our little whiskers. You can go and make the
size of your brush even smaller and just go and create a few lines
going in that way. You can see we can't
do it right now because we clipped our
layer to a previous one. You can do it either on a different layer or we can
just go again to our layers, and we can unclip this layer
from our previous layer. To do that, we will need to go again to our layer
with facial features, and we will use clipping
mask on our list. With this option,
let's just go and create our whiskers
on both sides. And when we're done
with the whiskers, let's just go and add
our little cheeks. Firstly, we will go again
to our color palettes and we will select this color
with the name peach cheeks. Let's increase the size
of our brush, and again, let go underneath the eye, and let's just put the
dots here for our cheeks. Okay. When you did it, let's
just go again to our layers, and we will hide our layer
with this cage to see whether we like the position
of these elements or notes. If we want to adjust them, let's just go and try
it out one more time, or if we are satisfied
with everything here, let's just go and add
additional elements here too. What we need to do
firstly is to go to our color palettes
and we will select this pink cake lines color. We will decrease the
size of our brush, and we will go right inside the cheeks and we will
add two lines like that. We will do the same
on the opposite side. When we did it, let go and add the highlights
for the eyes. What we need to do is to
pick our white color, as we already have
it onto our screen, let go and pick it from some places where we
have our white color. To do that, we will
need to hold one of our fingers on our screen and you will invoke
the eye dropper. You can see if we are moving our to our color on the
top is changing. We'll just need to go to
the place where we have our white color and then we'll
just lift up our finger. The color here changed, and that means that we can
just go and in criticize of our brush and go to our eyes and put our
little highlights. Let's just go over
one of the sides and let just put the
dots in that way. If you want to add
additional elements, you are welcome to
go and do that. You can go with some
peculiar shapes or you can just go and add a few
more dots like that. When we are done with this task, let's just get
back to our layers and let's unhide our li with the kitche then we will go and start recreating
the shape for our body. We will need to go first two
with the cross from here, let's create one more layer. Straightaway, let's
rename it as body. When we have it, let's just get back to
our color palettes. Again, we will select the
same color yellow cats, and we will go again and recreate the outlines
that we have for our cat. Again, if you want to
adjust some lights, if you want to
experiment a little bit, you are welcome to
go and do that. Close the sheep in
the area where you have the heat and then just drag and drop
the color inside. Now, one more time, let just get back to the liars and
hide earlier with the cage to check
out how everything looks and whether we need
to adjust something or not. If we have some places that
we would like to adjust, let just go and adjust them. When we are done with
it, one more time, let's just get back
to our layers and we will unhide our layer
with this cage, and then we will go and recreate the shape on the tail again
on the separate layer. One more time, go into our crust layer and creating
one more layer from here. With the same color, let's
just go and recreate the tail. You can do it again
with the same brush. You can just go and recreate this whole shape with two lines, or if you want, you
can go and increase the size of your brush
and just create one line. Okay. When you are done, let just go again to our layers. Let's hide our layer
with the sketch and adjust the placement of this
element if you want to. If you want to adjust
something else, you are welcome to
go and do that. When the tail is selected, also, you can just go and
remain this layer as tail. When it is selected,
we will go to our key, and if you want to
adjust the placement, let's just go and adjust it. For example, let's
position it in that way. When you are done with
adjusting your tail, let's just go to our next part. We will start adding
some details to our cat.
4. Details: Let's begin this part firstly
by going to our layers, and we will start by going and adding
some dividing lines, so we can see more clearly what is happening onto
our illustration. Firstly, let's just go to
our layer with the body, and we will also unhide
our layer with the sage, so we will see all these lines
that we need to recreate. When we are add our
layer with the body, we will create one
more layer above, we will rename it as details. Let's clip this layer
to a previous one, so we are tapping on the layer and choosing
clipping mask, and then we will go again
to our color palettes and we will select this
orange cat lines color. We will decreticize of our brush and we will go and
recreate these little lines. Very easily, let go and
start creating our lines. Again, we can use all the
options that we used before. You can hold your line
at the end and go to the editing mode to adjust
the lines from there. If you want to go and add
maybe some additional lines, you are welcome to
go and do that. When you are done,
let's just go and hide the layer with the sketch to
see how everything looks. When we are satisfied
with everything here, let's again go to our layers. We will go above our layer with white
element on the heat, and we will do the
same thing here. Let's just create one more layer and rename it as details. And again, let's just go and clean this layer
to a previous one, tapping and selecting
clipping mask. Using the same color and let go and find the places that we
want to add our lines to. If you need to, we just need to go again
to our layers and unhide our layer
with this cage so we can see more clearly what
we are going to be doing. Firstly, let's just go
to this little comb on the top and let go and
recreate the lines. Also, let just go
to our ears and we will go to one of the sides and we will create
the line like that. We will do the same
on the opposite side. Also, let's just
go to the bottom and let's create a
little line there too. We will just go and try create this whole curve that
we have on the bottom. We will have a little divider between our hat and the body. If you need to adjust
it, go over the top to the editing mode and
adjust it from here. Try to make the line even everywhere along
the whole shape, and when you are satisfied
with everything here, let's just go and tap on the screen to go away
from our editing mode. Now, let's get back to our
layers and hide earlier with this cage and decide whether we need to adjust
some parts or not. For example, let's
just grab our eraser and let's work onto these
little connections. We just don't need
these lines here. Let's again go and make the whole
illustration more clean. If you want, you can go and work more onto the lines
on the top two. Now, when we are done with aging and adjusting these lines, let's continue by going
again to our layers, and we will add some
additional lines to our pipe. Again, the same way as before, let's just go firstly
to our crust elements, and from here we will
create one more layer. Let's remain this
layer as details. Again, let's just clean this
layer to a previous one, and then we will go back to our color palettes and select
this crust lines color. We will go to the little
crust elements on top and we will start by creating the lines
going in that way. We will do it with all
these little dens. Also, we can just go
along the whole crust, and we can go and add some
additional elements here. For example, let's just go and add a few texture
lines like that. Let's just go and
put a few lines, a few dots, something
in that way. Try not to overdo
it, just add enough. When we are done with it, let's again go to our layers, and let's go to our cake. We will go to the pink elements and we will create
one more layer above. Again, let's rename
it as details. Again, let's just clip this
layer to a previous one, and then we will go to our colored palette and we will select the pink cake lines. We will go to this part
that we have right here. The part that is our side of the cake and not the two parts. To ease this process, let just get back to our lies and hide our er with this cake, and we will just go and
recreate these little lines. Again, we don't need to
create a whole line here. For example, we can just go and create a line with some gaps, creating some
beautifications here. Again, you don't need to follow the line that you
have on your skatee. You can just go and
adjust it to your liking. When we did it, let's just get back to our las and
hide our layer with the skatee then we
will go and add more details to
our pink elements. For example, let's
just go to this part, and let's go and add a few elements the same way
as we did on the crust. Let's just go and add
some little dots, little lines, maybe
some wavy lines. It's all up to you and
to your creativity. When we are done with the top, let's just go to
this middle part and let's create the lines here too. Firstly, let's just go along
this bottom part and we will go and create the
outline for this part. But if we go straightly
to this part, you can see that we are not
going only on the pink area, but we also are going
to this white area. So let's just go to our
layers and let's adjust it. We will go to this pin clear where we have the top
and this middle part. We will tap on it and
we will choose select. Now, these elements
are selected, and we will just need to
go back to our layers. We will go to earlier
with the details. We will get back to our brush, and we will easily go to this part and we can adjust
our lines right here, and we will be going only
onto this pin parts. Let's just go and
create some dashed line to the bottom part and to the top part of
this middle part. Also, you can just go to this bottom part and
create the line here too. Here we just can go and
increase the size of our brush and just go there and create a line going through
the whole shape. If it's not happening from the first try, try
out one more time. If you want to
create a dash line, you are welcome to
go and do that too. So now, when we are done, let's decrease the
size of our brush, and let's just go to
this middle part two, and let's create a few
additional elements, the same way as we did on our crust and onto our top part. When you are done,
let's deselect everything by hitting
our S ribbon icon. Let's take a look at
everything here and decide whether we want to
adjust some elements or not. If we are satisfied
with everything here, let's move on to our next part, where we'll add some
shadows and highlights.
5. Shadows, Highlights & Beautification: Let's begin this part firstly
by going to our layers, and let's just start
by going to our cake, as we are right here, and let's create one
more layer above. Let's renin this
layer as shadows. Again, let's just clean this layer to our
previous one tapping, selecting clipping mask, and
as we are creating a shadow, let go and change the
blending mode of this layer. We will go to this
icon and we will need to find multiply blending
mode from the lease. As for the opacity, for now, let's just go
with something like 40%. If it's too much or
if it's not enough, we will go and adjust
this option layer. Now when we are done
preparing this layer, let's just go back to our color palettes and we will
select the magenta color. With this magenta color, firstly, we will increase
the size of brush, and then let's just go over the bottom part of
the whole white area, and we'll go a little bit
to this pink area too. We'll just go and create the
curve going in that way. As always, you can hold
your line in the end, if you want to adjust
the curvature, go to the editing mode
and adjust it from here. Find the line that you
would like for your shadow. And when you have the curvature and everything that you like, let just go and tap on the
screen in criticize of our brush and manually recolor the rest of the area that
we have on the bottom. Okay. Now, when we are done, let's again go over the top
and let's add the shadow onto this part
that we have right here on the top
of the pink part. What we need to do again
is go into our layers. We will go again to
our layer number four, where we have this pink element. We will tap on it, we
will choose Select, and then we will go back to our layers to our layer
with the shadows. Now, let's just go
to this bottom part and create the shadow
going in that way. Again, hold it in the end if you need to when you
are done with it, let's decrease the
size of our brush, and let's just go
underneath the cat, and let's create little
shadows here too. We'll just go there and repeat the shape of the
cat in that way. When you are done with it, let's deselect everything by
hitting our S ribbon icon, and then let's decide
whether we like the amount of opacity
for this layer. If we want to adjust it, we will go to our layers, we'll go to our layer
with the shadow, go into our icon and adjusting the opacity from
the slider with opacity. Find the opacity that works for you and when you are done, let's just tap on the
screen and let just go and continue adding the
shadows to other areas. Firstly, let's just go to our next sp, which is our crust. Let's just go to the layer with the details that is
clipped to our crust, and let's create one
more layer from here. Let's rename it as shadows. Again, let just clean this
led to a previous one. Let's go to our icon and change the blending mode to
multiply for the opacity. Let's go with
something like 50%. Then let just get back to
our color palettes and select either the same color that we use for the main shape, orange cross or our
color with cross lines. Decide whether you want to
use one of these colors. You can also go with orange cat lines or peach
cheeks. It's all up to you. You can try out one color
if you don't like it, try with another color. Pick one of these colors
and let just go to some areas here and let's
create our shadows. Firstly, t just go to the
bottom and we will put the whole shape on the
bottom in a shadow. And we will continue creating the shadow
going in that way. We're just repeating
the line that we have for our cake elements, and then let the
criticize of our brush, and let's just go
closer to the cake, and we will add
another shadow here. Just repeating the line that we have for our main
shape of the cake. Connect the shadow nicely with
the shadow on the bottom, and let's just go to these little parts
that we have on top. We'll go right between them where we have the
dividing lines, and let's just start creating
a shadow in that way. When we have it on
the first patal, let's just go to the next one
and do the same thing here. Let's just go
through all of them and create peculiar
shadows like that. If you want to work
more on the sap, if you want to
create more shadows, you are welcome to
go and do that. Let's just add a little
shadow right here too, so we are just putting the right part of our shape
of the crust in a shadow too. When we are satisfied
with our shadows, let's decide whether we want to adjust the amount of opacity. Let's just go again
to our layers. Let's just go to our
layer with the shadows, and let's decrease it
just a little bit. For example,
something around 35%. When we did it,
let's just go and continue working on cat. Firstly, we are
going to the tail, and let go and create
one more layer above. Let's rename it as shadows. Again, we will clip
this layer and we will go and change the
blending mode to multiply. We will change the opacity to something around 40% for now. We will go again to our
color palettes, and again, you can decide which color you want to use for your shadows. Orange crust, yellow
cat, orange cat lines, beach cheeks, maybe cross
lines is all up to you. Select one of these
colors and let go and put the
shadow to our tail. Firstly, let's just make a little dividing part right
here on the top of the tail, where we have this intersection between our tail and the
main shape of the body. When we have it, let's just go more toward the bottom
part of our tail, and let's just work
on the shadow here. We will just go to
this wiggly part. We will put this
part in a shadow, and also we will just go
to the bottom part of our tail and we will put
this part in a shadow too. Okay. When we have the
shadow, going in that way, decide whether you want to adjust the opacity
of this element. If you want to go to the icon and adjust the opacity
to your liking. For example, around 60%
or 55% will work better. When we are done
with this shadow, let's just go again to our
layers, we'll go to the body. We have the layer with details, so let's just go to it, and from here, we'll
create one more layer. Let's rename this
layer as shadows and let's clip it and change
the blending mode again. For the opacity, let's
just go with 50% for now, and let's just go
and start edging the lines for the shadows
on our body on the cat. Firstly, let's just go
underneath the heat and we will just repeat the line
that we have for our hat. Hold it at the end, if you need to go to
the editing mode, go there and adjust the
curvature on your line. When you have this line, let's just go to this
pot that we have on our left and we will put
it completely in the shadow. We will also go to this
pot that we have on our right and we will create
a shadow going in that way. Just creating a curve there
and connecting it nicely with the shadow that we
have for our head element. When we have it in that way, let's de criticize of our brush, and let's go to the sty area and let's create a
shadow in that way. When you are done,
let's just go to the bottom part of our leg and let's create a
shadow here too. If you want to go right
here to the right area, you are welcome to go and
add the shadow here too. If you want, you can
go with the same color that you are using for
the shadows and add these additional
elements that we have on our crust and on
our k on the cat. For example, if you
want to do that, let's just go and do that. When we are done, let's continue
by going to our layers. We will go to our
layer with the hat. We'll go above all the
layers that are clips and we will create one more layer here that will rename as shadow. Again, let's clean this
layer to a previous one. Let's go and change the
blending mode to multiply. Opacity is around 50%, same color going over our left side right here and
creating our first curve. Adjust the curvature
if you need to, and then let go and manually recolor the rest of the area
that we have on the bottom. Also, let go to this
ear a little bit, and we will create
a shadow here too. Connect the shapes nicely. If you need to adjust something, wrap an eraser and adjust
the shape of your shadow. If you want to end the
shadow to other elements, for example, to
this com element, you are welcome to
go and do that. When we are done with it, we are almost done with
everything for our illustration. But let's just go and add some additional highlights to our cat and to other areas too. Let's just go again
to our layers and we will go above our layer
with facial features. We will create one
more layer that will rename as highlights. We won't be clipping
this layer anywhere. We will just go to our icon and change the
blending mode overlay. As for the opacity for now, let's again go with
something around 45 or 50%. When we are done,
let's just get back to our color palette and
select the white color. Let's just go and increase
the size of our brush, and we will go to the
opposite sides from our shadows and we will start
adding some highlights. For example, let's just start
from the body of the cat, and we will just go
to this top part of our body and we will add a
highlight going in that way. You can go with some
peculiar shapes, you can go with simple curves and maybe some little lines, little dots, little sparkles.
It's all up to you. When we have this
first highlight, let's just go to other areas. We will just go and add
a few more highlights. If you want, we will just
go along other areas, maybe to the ear or to the tail. For the tail, we can just go
with some particular shapes. For example, let's
just go and create the highlights going through
the whole shape of our tail. When we have
something like that, let's continue adding the
highlights to other areas. Let's just go again to our crust and we will start creating
our highlights here too. Just go into the opposite
sides from our shadows. The same thing with our cake, let's just go to the
opposite sides from our shadows and let's
add our highlights. When you are done
with the highlights, we are done with
our main shapes. Let's just go and work a little bit more onto the background. We will firstly go
to our layers and we will go and select every layer
that belongs to our cat. To do that, we have our
first layer selected. We will need to
go underneath it, and we will need to swipe our
layer from left to right. Now, two of these layers are selected and we will need to do the same thing swiping
from left to right with all the layers that
we have for our cats. When all the layers
are selected, we will go and hit group and we will go to the
new group elements. We will rename it as cat. Now, let's just go to the bottom and we will
create a new layer. To make it easier, we will just go
to our layer with the shadows that we
have on our cake, and from here, we'll
create one more layer. Let's rename it as
background elements. Now, we will go to these four layers that
we have for our cake. We will select them
and we will drag them higher than our new layer
with background elements. That way, everything
will stay in our group. In just get back to our
bground elements layer, and then we will go to
our color palettes. We will select the
bground details color. We will go and increase
the size of eye brush, just a little bit and
we will go underneath our cake and we will create
a shape of the ellipse. You can hold this shape at
the end, and if you want to, you can go over the top to the dicen modes,
adjust the curvature, adjust the placement
of the elements and position it in a way
that you would like. Let's just put it
somewhere in that way. Let's just tap on
the screen and then let go and drag and
drop the color inside. When we did it, let's
just go alone the sheap let's create some peculiar shape for this background elements. If it's not happening
from the first try, try it out one more time. Try to create
something very nice. When you have the overall sheep, dragging the color inside, if you want to work more on it, go and work on the outlines, and also let's
just go and create a few more elements
going long this sheep. For example, let's just go and create a few dots and sheeps. So just go and create
a few peculiar sheeps. When you are done
with this task, let's just go again
to our layers, and let's go and unhide our
layer with this skitch. We had some little
elements here. Let's just go and recreate
them on our background. We will go to our
background elements layer and from here we will
create one more layer. You can rename it as
details or if you want, you can keep it as it is. All that we need to
do is to go again to our color palettes and
we'll be using white color for our little sparkles and for the dots and stars color
for our little stars. Let's just go and recreate
the stars firstly. If you want to use the same
white color for the stars, you are welcome to
go and do that. Let's just spend some time here and recreate our elements. Again, remember that
you don't need to repeat everything with
100% of similarity. If you want to
adjust some parts, you are welcome to
go and adjust them. Maybe add some details
or on the contrary, go and get rid of some
details, it's all up to you. The main goal is not
to overdo everything. For the hearts,
let's just go and select either red
color or if you want, you can go with magenta or any other color that
you would like. Okay. Now, when you are done
recreating these elements, let's just get back
to our layers and let's hide the layer
with our sketch. Take a look at
everything here and decide whether you want
to add some elements. For example, let's
just go right here on the bottom and let's
create another heart. If you want to add more
elements or more dots or more elements in any way that you would
like to add them, you are welcome to
go and do that. If you want to adjust the
placement of the elements of what you already have onto your screen, you
know what you need to do. You will just need to go to S ribbon icon freehand method, select the elements,
go to the arrow key, and adjust the placement
of your elements. Okay. And when you are done adjacing your elements
and aging the elements, we are done with our class. Thank you for
watching this class, liver review if you
like to and continue subscribing for more Cai
videos in the future. Looking forward to
senior projects.
 Uni Corn, ⭐Kawaii Art Enthusiast⭐