Transcripts
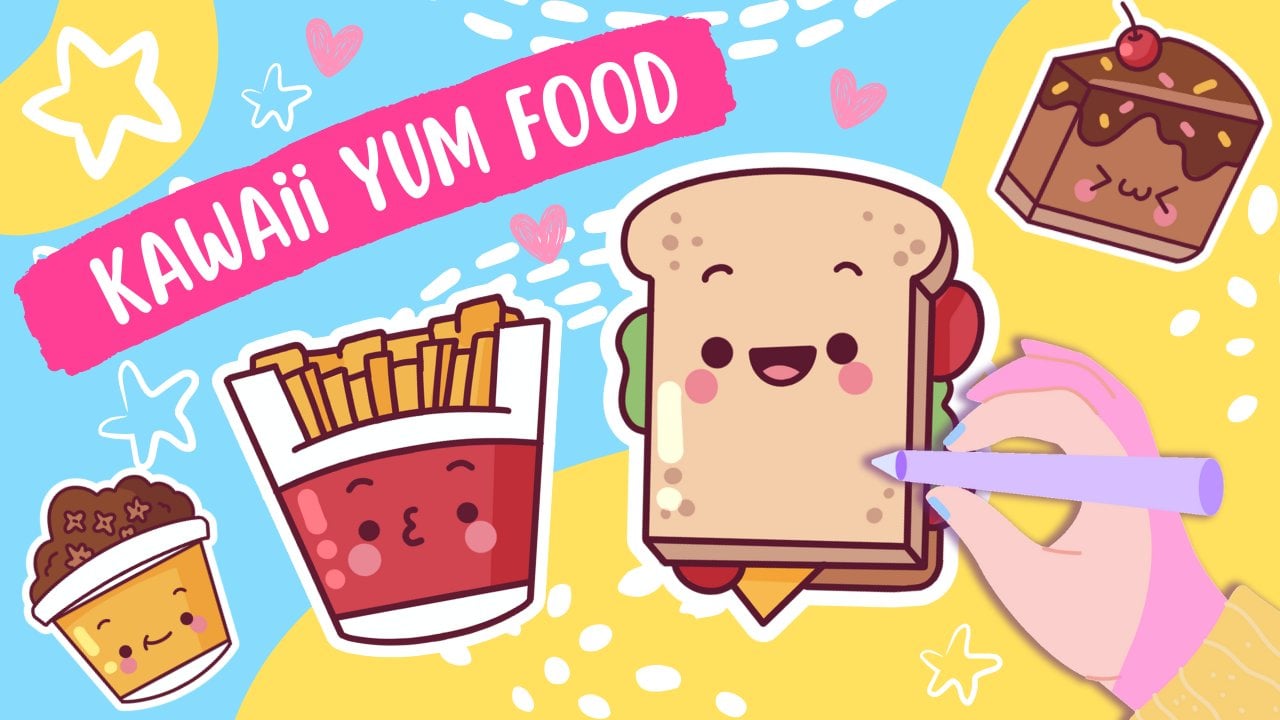
1. Introduction: Hello everyone, I'm uni
and into this class we'll draw a few Kawhi street
food illustrations. These glass doesn't require any prior experience
or offensive tools. We'll start from scratch
and we'll be using simple techniques
throughout the process. Everything you'll see will
be happening in Procreate. However, if you have other software or wanted to
try a traditional materials, you are welcome to join if
you are ready to start, Let's jump right into it.
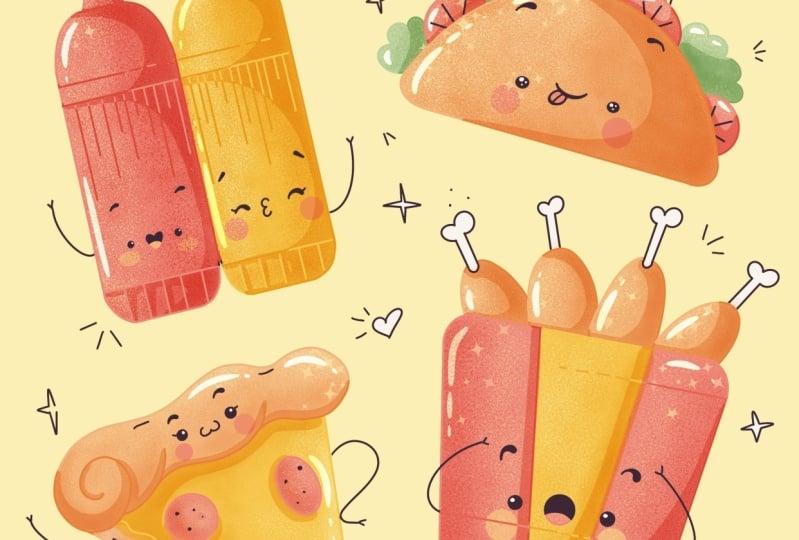
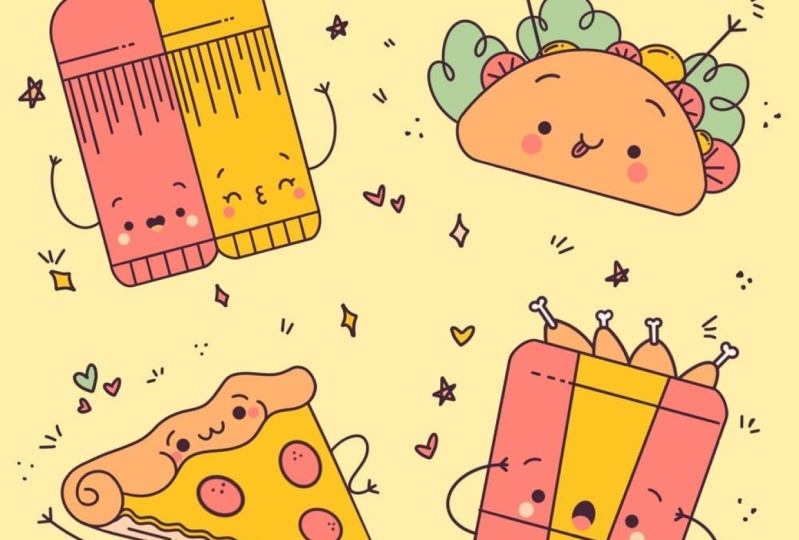
2. Ketchup & Mustard Sketch: Let's start our today's class by deciding what kind of Canvas
we are gonna be using. You can see it is a very
simple square canvas because pixel width and pixel height
are both at 2048 pixels. As for dpi there, 300 and S for the color profile, it is set as SRGB
with this low number. When it's all done,
let's hit Done and who will be
redirected to our canvas. Now we need to decide
what kind of colors we are going to be using
for the whole class. You can go to the Project
and Resources tab. You can download
the color palette and you can follow along. And when you did it, Let's go straight into our color
palettes and we will see that we have
two options of how we can use the colors compact. You and the cards will be using the cars because
they have all the colors, names and they are ready
for you to be used. And our first color for
today will be sketching. So let's tap on it to select. When we did it. We will
go to the Brush Library, it will go to this kitchen
folder and we will select procreate pencil for
our first sketch. If you want to use any other brush for your sketching part, you are welcome to do it. Now when we have the brush, when we have the color, Let's go to our layers and
we will rename this layer. So we will tap on it and
we will choose Rename. We will go and name it,
ketchup and mustard. We will be creating
a new layer for each sketch and who will be renaming them for
our convenience. So onto this layer
we will be creating a sketch of ketchup and mustard. And we will start with
a very simple shape. It will be a shape
of a rectangle. So let's go zoom in our Canvas and we will start by
creating the shape, and we will do it without an
holding our Apple pencil. Let's go and try to do that
at the end of the line. Hold your Apple Pencil and we will go over the
top to aided shape. Here you can see that we have some options and we will
need to select rectangle. Now, if you need to
adjust your shape, for example, to move it, you will need to go
between the nodes and we will need to rotate
your little shape here. And if you want to make
it a little bit bigger, you will just hold
your Apple pencil and you will move
it to this site. You will see that you are
making the shape bigger. Now, adjust your shape,
adjust the scaling, and when you're satisfied, just tap on the screen
with one of our fingers. Now we have the shape and we are ready to
add some details. So firstly, we'll
go over the bottom and we will create
another horizontal line. This time, we will step just a little from
the bottom line, and we will create this line. So let's go and try to do that. Hold it at the end of
the line and try to make the position of this slide similar to what we
have on the bottom. So the angle should be
the same and these lines should be parallel to each
other when you have it, Let's go toward itself and we will do the same thing here. But this time the shape that
we are going to be creating with another line should
be a little bit bigger. So we will go a bit
lower and we will create another horizontal
line, same as before. Hold it at the end of
the line and try to make it parallel to the line
that we have on the top. When you have it on
hold your Apple pencil, and let's continue
making our details. So firstly, it will
go over our boards to these two corners and we
will make them softer. So we will just
go and instead of that street corner that
we have here on the left, we will create a curve. Let's go and try to do that
when you have it on one side. Let's move on to
the other one and we will repeat the
same step here, tried to make the curves
even on both sides. And when you have
it on the bottom, Let's go over our job and we
will do the same thing here, but this time our corners will be a little
bit more curvier. Let's go and try to grade the
first curve over our left. When you have it on one side, Let's move on to another one and we will do this same thing here. The same way as on the bottom, tried to make this groove
even on both sides. And when we have the curves, when we have our
corners very soft, lads go and create more details. So firstly, we will need
to create a guiding line going through the approximate
center of our sheet. It will be vertical. Let's go over the
top and we will create a very straight
vertical line. Hold your Apple pencil at the end of the line to
snap it to a better line. And if you need to adjust it, go over it, it's
up to Edit Shape. You can move your line and
find the approximate center, which will be a little bit
better than you tried before. And when you have it, Let's just tap on our screen
with one of our fingers. And when we have this line, we will go over the
top and we will create a very
elongated triangle. So let's go and try to do that. Try to make these lines
even on both sides. And we will go over the top and we will cut
this little piece over the top by creating
a very horizontal line. So let just go and
try to do that. Now we can grab an eraser tool and we can erase everything
that we don't need. So firstly, let's cut
this little piece over our job and we will go and
also erase our corners. And when we have
something like that, we are ready to
add more details. So let's get back to
our brush and we will go over our boards
and to this part. And we will be creating
a vertical lines there. You can play around with how many of these lines
you're gonna be making. You can play around with
the distance between them. It's all up to you. Let us go and try to
create these slides. Try to make the distance
between them equal, going through the whole shape. You don't need to
be very precise. We are just creating the sketch. We will be adjusting
it later on. So don't worry too
much when you have this lines over the boards
and let's go to these parts. And we will be creating
vertical lines. Again. This time, they will
be a little bit more elongated and you can play
around with their amount. You can play around with the pattern that
they are making. It just up to you what you're gonna be creating
with these slides. You can play with the
distance between them. It's again up to you. Let's just go and create some pattern with
the vertical lines. When you are done with
this vertical lines, Let's go over these top parts and we will create
another horizontal line, ledger step a little
bit from the bottom, and we will create
this line there. When you have
something like that, Let's grab an eraser tool and we will just cut some
pieces like that. So we will create a dashed
line going to the right. When we have it,
we are done with the base and we can create a copy of this shape
because we are creating both
ketchup and mustard. To create a course,
we will need to go to our layers and we will
need to swipe this leg, ketchup and mustard
from right to left, we will choose Duplicate. Now I can see that we have two similar layers and we will need to move one of
them to the site. So let's go over our top. We will select the
layer and we will go to the Arrow key over the top-left. We will need to
use uniform method and we will need to
turn on snapping. Firstly, SAP on
this snapping and toggle this snap in
here over the top. Now when you have
this all turn on, we will need to go and move
our shape to this site. You can see that we
have the blue lines. And that means that we
are moving our shape going through the same line
that we have on our lifts. And that's what we need. But also we will need to
combine one line that we have going vertically with the land that we have on the
previous illustration. So they will be sharing one vertical line
when you have it, Let's deselect everything by theta1 are heirarchy
one more time. And now we will
need to go back to our layers and we
will need to combine these two layers together
because we don't want multiple leaves
for one sketch. Let's go over the top layer. Let's tap on it and we
will choose merge down. And now everything
is on one layer, and that means that we are ready to add some
facial features. Firstly, let's go to
our bottle on the left, and we will start by creating
two dots for the eyes. We have the line going
through the center. It will approximate center. And that will help us to
create the eyes very easily. So firstly, let's go or are left and we will
put the first dots. You can play with the size, you can play with the position, you can play with everything when you have the first dots. We will need to move to our rights and we will need
to do the same thing here. We will need to keep
the same size on the I, will need to keep
the same distance from this i2, the center. And we will need to put
this on the same line. So let's go and try to do that. When you have these two dots, Let's go over them and
let's create the eyebrows. And again, it's up to you what shape you would
want to create. It's up to you what size
you are gonna be pursued. It's a playtime. So let's go over our eyes. And for example, let's
create two shapes like that. When you have them, Let's go and create
our little mouth. So again, you can play around and find
what works for you. But if you want to follow along, alleges go and create
an ellipse like that. When you have it on one side, Let's go to the right
and let's mirror it. So at the end, we will have
this shape of their hearts. And when we have it, Let's go under our eyes and
let's add little cheeks. So we will be doing
there and we will be creating two ellipses, one on each side. You can play with their size. So you can play with
the distance from the eyes is again, up to you. Now we have our first phase, and let's move on to our
bottle on the right, and let's create
another phase there. So firstly, we go into this little left part and we will start by creating a curve. So this time it will
be something like that when you have
it on one side, Let's move on to the rights
and let's repeat in there. Again, we will need to create the same shape, the same size. We will need to
keep the distance from this shape to the center, and we will need to put
it on the same line. Let's go and try to do
that when you have it, Let's add more details
for these eyes. Firstly, we will zoom in our
Canvas and we will go to the outer corner and we will
create a line like that. If you want, you can create
a few of them and they will represent the eyelashes
if you want to continue. Ledgers go over our left and let's create
the same line here. Now when we have it, Let's
add our little eyebrows. Again, play around, find
the shape that you like. And for example, we can end
up with the shapes like that. Now when I have our eyebrows, Let's add a little mouth, and this time it
will be a QC mouth. So we will go right between our eyes and we will create
the shape like that. It will be a reverse
digit three. And when you have the mouth, ledgers go and
create our cheeks, go underneath the eyes and creating to an ellipsis
one on each site. And the very last
thing that we will add here will be lethal arms. It's optional if you
don't want to add them, just skip this part. If you want to continue, ledgers go to our sides, firstly over the left and we will create a
curve like that. When you have this curve, Let's go or the top of it. And we will create
two more lines. And we have our little arm here. Let's go to our rights and let's repeat the
same thing here. If you want to play around and find a different
shape for this arm, you are welcome to debts. And we are done with
our first sketch. In the next part,
we are going to be creating chicken baskets.
3. Chicken Busket Sketch: Let's start our second
sketch by go into our layers and we will hide our layer with the first sketch. So we will need to go
to this little icon with our chat box and we
will need to tap on it. When we did it, we have our blank canvas and we are ready to create
one more layer. So tap on the plus icon and straight away,
Let's rename it. So tap on the new layer and
choose Rename for the name. Let's go with chicken basket. Now onto this new layer, we will start very easily. We will create a
rectangle and we will do the same way as before without an holding
our Apple Pencil. So let's go to our
canvas and let's try to do that at the
end of the line. Hold your Apple pencil. And also you might
want to hold one of your fingers on the screen to
snap it to a better shape. And when you have it, Let's go over the top to Edit Shape. And here we can
select the shape of the rectangle to snap
it even better shape. And when they have it, ledgers
go and adjust, adjust. Elizabeth, we will be making these lines
that are vertical, a little bit more convergent. So we will go over our
boards and we will grab these nodes and we will put them a little bit
toward the center. Let's go and try to do that. When you have the
shape like that led, just tap on the screen
with one of our fingers. And now we will go and we will adjust the shape even more. So firstly, we are going
over our boards and we will need to turn this very straight corners
into the curves. First lego and over our left and creating the
first curve there. When you have it over one side, Let's go to another
one and let's repeat the same step and try to
make these curves equal. Now when we are ready
with the bottom part, Let's do the same over the top. So let's zoom in our
canvas and let's turn this very street
corners into the curves. When you have the
shape like that, we are ready to
add some details. And firstly, we will
go and we will add two more convergent
vertical lines going through the sheep. So we will need to make the distance between
the lines and between the lines
that we already have that are vertical equal. So let's go firstly and try
to create the first line. Hold your Apple pencil
at the end on this line to adjust the angle
and also to make this line straight when you
are satisfied less and hold our Apple pencil
and let's create another line over
r, right, parts. One more time, hold
it and the board Sam. And when you're satisfied
with this shape, we are ready to
add more details. Firstly, let's go over the board and we will create one
more horizontal line. Let's go and try to do that. Just hold your Apple pencil at the end of the line and try to make this line parallel to the one that we
have on the bottom. When you are satisfied, Let's hold it and let's grab an eraser tool to make this line a little
bit more interesting. It will be a little bit dashed. Now when we have it over
our boards and let's go over the top and we will
do the same thing here, but we will do it on
the opposite sex. So let's go and create the
horizontal line firstly, make it parallel to the line
that you have overdid soap. And when you are satisfied
and hold your Apple pencil, grab an eraser tool
and make a few cuts. Now when we habits, we are ready to move on over our job and we are ready
to add the chicken legs. So firstly, we will need to
create the guiding lines. We are going with a
different directions and we are adding four to
five lines like that. So let's go and
create the slides. On the bottom of
the guiding lines, we will be creating
chicken legs. And the basic shape that we will be creating will
be something like that. So it is a shape of
an egg or a peer. So ledgers go over the bottom parts and we
will create these shapes. You can vary their sizes, you can vary their shapes. It's all up to you. You can overlap the line that
you have already solved. We can very easily grab an eraser to and
later on erase it. And also you can
overlaid the shapes, just follow the
guiding lines and follow the direction
that they lead you to. Now, when we have the legs, we will go over the soap
and we will add the bones. So firstly, let's
zoom in our Canvas and we will need to create
two lines like that. They will be following the direction of
our guides in line. When we've reached
the top of this line, we will go over
the top of it and we will create a
digit three here, and that is our bone. So let's just go and
repeat it one more time. We will create two
lines like that, and we will go over the top and we will add the
digit three here. Now, let's repeat it two more times and let's
create the bones. When you are ready, you might want to add the cards where the bones touch the legs. And we can do it very easily by creating half of the circles. So let's go and add a
few of them to our legs. And now we are done
with our base. And that means that we are
ready to add a little face. So let's go to the
bottom part of our basket and we will
add the face here. The tip number two
will help you to position their face correctly
answer your elements. So we will need to create
one vertical line and one horizontal line that will go through the
center of our sheet. We don't need to be very
precise the same way as we did with our
masters and ketchup. Let's go and create the
first vertical line. Just find the
approximate center. Hold your line and the hands, and create the
very straight line going through the center
when you have it, Let's create a horizontal line. Now when you found the center, you can decide where
you want to put the face above or underneath
the horizontal line. So for example, let's
go underneath it and let's create the first two
dots for our ice here. Let's go firstly over our left and let's
create the eye here. As always, you can
vary the size, you can vary the placement. It's all up to you when
you have the first eye. Let's continue by
creating another one. On the right. We will
need to keep the distance between the line that we
have going into our center. We will need to put
it on the same line, and also we will need
to keep the same size. So let's go and try to do that. When we have the eyes, let's go over the top of them and we will add little eyebrows. Again, play with the shapes, play with the curves. It's all up to you when
you have the eyebrows, Let's add our little mouth. So we will go between
the ice and we will create a very
simple shape like that. It will be an ellipse. When we had this
ellipse ledgers go and create a little
tank insight. So we will add half of the
circle or half of the ellipse. And when the habits
pledges at our cheeks. So we are going underneath our eyes and we are
adding to an ellipsis, one on each side. Play with the size, play
with the placement. You are welcome to do
whatever you want. And the very last part, which is optional,
we can add the arms. So for example, let's
go over our sites and let's create very
expressive arms. We will start by creating
a curve like that. And at the end on this slide, we will add a few
lines like that. So when we hired on one side, Let's move on to the other one and let's do the
same thing here. And now we are ready
with our second sketch. So in the next part, we are going to be
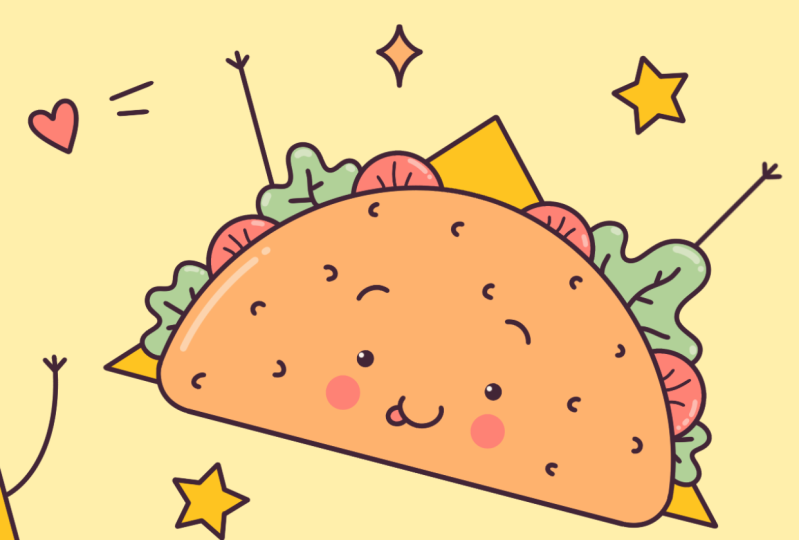
aging the taco.
4. Taco Sketch: Let's start our third sketch
the same way as before. We go into our
layers and we will hide our layer with
the previous sketch. So go into this layer
with the chicken baskets, go into our little icon with a checkbox and
we are tapping on it. Now when we have a blank canvas, Let's just tap on the plus
icon to create a new layer. And straight away, Let's tap on it and let's choose Rename. We will deal with the name
taco and also this layer, we will go and very easily
create a vertical ellipse. Let's go and try to do that. Hold your Apple pencil at the end of the line,
adjust the size, adjust the rotation if you
want to adjust it even more, go up to Edit Shape. Here you can play with
this little handles and adjust your shape
to your liking. You can shrink it down, or on the contrary,
make it very elongated. It's all up to you. Find what works for you and
when you're satisfied, lie. Just tap on the screen
with one of our fingers. And when we have this shape, we will need to add the
bottom part of our taco. That means that firstly, we will need to zoom
in our Canvas and we will go and create
a horizontal line. We will go just a
little bit above the center and we
will make this line, hold it at the end, adjust the angle and when you're satisfied, Let's hold it. Now when we have something
like that's led, just grab an eraser
tool and we will go underneath this line and we will erase these bottom parts. And when we have
something like that, ledgers go to these two corners and we will turn them
inside the curves. You know what you need to do? Firstly, go to the
left and create the curve there when you
have it on one side, Let's move on to
the other one and let's repeat the
same thing here. Try to make the corners equal. When we have the basic
shape of our taco, that means that we are
ready to add some feeling. And firstly, Alaska
with a tomato slices, we will go over our shape and we will add for half
of the circles. You can adjust their size, you can adjust the placement. It's all up to you. Let's just go and add
this half of the circles. You can hold your
Apple pencil at the end of the line to
create better shapes. And if you need,
you can go over it. It's up to Edit Shape, play around with the shapes
and create four of them. When we have them, Let's go inside of them and
let's add some details. So we will go and add
a few lines like that. And now when we have
our tomatoes alleged, just add some salads and it will have a very peculiar
curly shape. Let's go and create
something like that. Let's add three of them. You can overlap the shapes. Now when you have the salads, you can add more details. For example, you can
go with the peppers. They will have the same sheet that we have for our tomatoes, but they will be a
little bit smaller, or you can go with some cheats. So for example, you can play around and add some triangles. It's all up to you. Let's just go and fill
this blank places. If you want, you can go inside this new shapes and
add some details. Just simple lines like
that will be fine. And we are done with the
main shape of art Sacco. So let's go and add the face. And as before, you can start
by creating your guidelines. So firstly, let's create a
vertical line like that. Hold it at the ends and find
the approximate center. And now when you have it, let us create a horizontal line. Now you decide where you will go above this line or below it. And let's add the eyes. So for example,
let's go below it and let's start by
creating our first dot. Play with the size play
with the placements, play with Irvin that you like to play with when you
have the first one. Let's move on over the rights and let's repeat it over there. We will need to keep the same
distance from the center. We will need to put it on the same line and we will
need to keep the sides. Let's go and try to do that. When you have the
dots for the eyes, let's go and add our eyebrows. Again. You can play around
with their sheep. And when you have
this little eyebrows, Let's add a mouth. We will go right
between the eyes and we will start by creating
a curve like that. You can hold your
Apple pencil at the end of the line to
create a better shape. And when you have it,
Let's add a little tongue. We will go to one of the
sides and we will create half of the ellipse
here when you have it, Let's divided by two pieces. And when we have our little tank and the
whole mouth in general, let's go and add
our little cheeks. So going underneath the eyes
and creating our ellipsis. And the last part
is aging our arms. It is optional. So for example, let's go over the top and let's create the
lines like that. When you have these lines, Let's go over the
top of them and let's add a few more lines. And now we are ready
with our 3D sketch. In the next part, we
will create the pizza.
5. Pizza Sketch: One more time. Let's start our part
by going to the layers we will hide earlier with
the taco. Let's go to it. Let's go to this
little icon with the chatbox and let's tap on it. Now when we have a
blank canvas slide, just tap on the plus icon
to create a new layer. And we will go and tap on it, and we will choose Rename. So let's call it pizza. And onto this layer, we will start by
creating a guiding line. It will be something like that. You can play with the angle, but basically you
will need to create a diagonal guiding light when
you're satisfied with it. Angle ledgers go enter in
this line into a triangle. You can create an even triangle, or you can just go and make it a little bit
of a perspective. So basically we
will need to go to the sides on this line and
we will need to create two lines that will enter here on the bottom of our lines. So let's just go
and try to do that. When you have these two lines, Let's go over this soap and we will connect them
with another line. So let's do something like that. When you have it fly, just grab an eraser tool and erase the lines
that we don't need. And also, we will go to this corner and we will
turn it into a curve. You know what you need to do. Let's zoom in our
canvas and let's go to this corner and we will
create a curve there. Again, we will grab
an eraser tool and we will erase this
part that we don't need. Now when we have
something like that, we will need to add some
thickness to our slides. We will go to this slide. We will stop just a
little bit and we will create another line that
will repeat this line. Let's go and try to do that. You can do it manually
or you can create a very straight line by
holding your Apple Pencil. And we will need to connect
this line with this corner. So when you reached its allege
us create a curve there. When you have
something like that, we will go over our
top part and we will create a wobbly
line for our crust. So let's go and try to do that. We will loop it around. And when we reach this region, we will need to go and
create a little role. So it will be an end
in part of our pizza. We will go to this
line over the top. We will elongate it and we will create a little spiral here. And when we have it's ledgers, grab an eraser tool and we will erase all the extra lines
that we don't need. And when we have
something like that, ledgers go and add
some pepperoni is. So firstly, we
will need to go to this line and we will
need to follow it, will be create an
L ungated shapes, and we will be
following this slide. So let's go and
add three of them. If you need to adjust
the shapes even more, hold your Apple pencil and then go to Edit
shape over the top. When we have the shapes
for our pepperoni is ledgers go inside them and
let's add some dots here. And when we have them, Let's turn these slime
inside the cheese alive. So we will go and we will
create a very wavy line. Firstly, let's go over that slope of this line
just a little bit, and let's start
creating a wavy line. Let's grab an eraser tool and we will erase this
straight line. And now we will grab our
brush one more time and we will go underneath this wavy line and
we will repeat it. So we will add some
thickness to the cheese. When you have
something like that, ledgers go over the crust part and here we will add the face. And one more time, you can
help yourself by creating one horizontal line going
like that and one vertical. So when you have
the guiding lines, ledgers go over our left part and here we will
add the first eye. So again, we are
creating a circle here. You can play with the size
and you can play with the position from the center when you have it on one side. Let's move on over there, right? And let's repeat it. Let's adjust our eyes
just a little bit. We will go to the outer corners and we will add some eyelashes. You can create just one line, or you can play around and add as many lines as you like
when you have it on one eye. Let's move on to the other
one and let's repeated there. When you have
something like that, Let's just add our eyebrows. And again, you can play
with their shapes. When we have the eyebrows, Let's add a little mouth. And this time it will
be digit three and it will be positioned like
that when we have it, Let's go underneath the eyes
and let's add our cheeks. So go in there and
create into ellipsis. When we have
something like that, we can add a few details. So firstly, let's get back to our crust and we can create
a few lines like that. So they will be curves and
they will be showing that this part is not flat when
you have something like that. Let's go to these parts and we will add a few lines there. And the very last part,
which is optional, is aiding our little arms, go and play around with them. And when you are satisfied with your arms and with the
whole pizza in general, we are done with
our last sketch. In the next part, we will be
positioning our elements.
6. Positioning the Elements & Adding Details: Into this little part
will be positioning our elements and we will
be doing it in that way. So firstly, we are doing to
our layers and we are making sure that the layer that we want to transform is selected. So in that case, it is
pizza because it is the only layer that is now
showing onto our canvas. So it is selected
and I go into the top-left and we are
tapping on the arrow key. You can see that now we
have a bounding box and also that we have LE cell
panel on the bottom here, we will need to select
uniform methods. The bounding box is the
area that you can adjust. So for example, let's make
this elements smaller. To do so, we're going
to need to go to one of the corners and we
will need to drag it. For example, let's go to the corner that we
have omit so parietal. And we will hold
our Apple pencil on the nodes and we
will drag it down. Now let's find the
size that we like. And to have it allege us move our elements a little
bit to the bottom. So let's find a
better place for it. Also, we can rotate
our elements. And to do so, we
will need to go to the top of the bounding
box to this green nodes. We will need to hold it with our Apple Pencil and we
will need to rotate it. So find the position
that you like. You can play around with the
position to your liking. And when you're satisfied, let's just deselect
everything by hitting our arrow
key one more time. Now we have positioned
our first elements. Let's get back to our layers and let's unhide the next one. So let's say it will be tackled. Now when we have it, we need to select the layer. We will need to go to this
arrow key one more time. We are using uniform
method and now we are playing with
position in this element. So firstly, let's make
it a little bit smaller. Let's rotate it, and let's go to our rights and we will
position it somewhere here. When you are satisfied
with the placement, Let's deselect everything by hitting our heirarchy
one more time. And now we will do the same thing with the
two remaining elements. So let's get back
to the earliest. Let's unhide our chicken basket. Let's select the layer and let's go to the Arrow
key one more time. Let's make it smaller, and let's position it
here on the bottom right. Let's rotate it to. And when we're satisfied, let's just deselect
everything by hitting our arrow
key one more time. One more time. We are going back to
our earliest and unhide in earlier with the
ketchup and mustard. Let's select the layer and let's get back to the arrow key. Let's position it here on
the remaining free space. Let's rotate it,
make it smaller, do whatever you want to do here. Let's deselect everything by hitting our heirarchy
one more time. And now we will need to change the opacity level
of our layer's. Opacity level shows how transparent your
object on the layer. By default, air really it
comes with a 100% of opacity. And that means that they are Abbott scope of
their transparency. And we can change it because
we will need to create the lines that clean lines
over the top of our sketches. And we don't want
them to distract us, so we can do it in that way. Firstly, we are
going to the layers. And as it was very
useful for us to have all this elements
on the separate layers. Now it's not what we need. We will need to combine
all of them together. So we will need to go there and we will need to merge them. Let's go over our top layer. Let's sell assets, Let's tap on it and let's choose Merge Down. And we will do two more times. Tap on the layer, choose Merge Down,
tap on the layer, and choose merge down. And now everything that we
have here is on one layer. Also we can go and we
can rename this layer. We can name it sketches. And now we are ready to
change the opacity level. So we will need to
go to this icon. We will tap on it
and we will see that we have the opacity slider here. We can grab this little
handle and we can move it to the left until we reached
something like 50 per cent. You can see that now it is more transparent and it's
not that disturbance. It will be easier for us to
create the clean lines or it. Now when we have
something like that, Let's just add some details. So we will go to our blank spaces and we
will add some elements. For example, we can add
the heart or a sparkle, some doors or maybe
simplified food elements. So as gill and very
quickly add some elements. And when you are done a1
here and little details. Let's move on to
the next part where we are going to be
aiding the clean lights.
7. Adding Clean Lines: Let's start our
line in part from some very tiny preparations. Firstly, we will
go to our layers and we will need to create
one more layer above. We are tapping on the plus
icon and straight away, Let's rename this layer. So let's tap on it and we will choose Rename for the name. Let's go with clean lines. Now when we have our new layer, Let's go and select a different color for
airline in parts. So going back to
our color palettes, and this time we will use the
color with the name lines. So let's tap on it to select
when they have a new color, we will need to go and
select a different brush. So we are going to
the Brush Library, we are going to the
calligraphy folder, and we are choosing
monoline brush. When I have the brush, let's set its size at free
for maximum five per cent. And now we are ready to start recreating what we have on
our layer with the sketch. But it doesn't mean
that we will need to do it with a 100% of similarity. If you want to add some details, you are welcome to do it. If you want to adjust
some of them, go for it. If you don't want to
include some of them, again, you are pretty much welcome to do whatever
you want here. The main goal here is to
create the clean and close. That means that we will need
to avoid the wobbly lines. And that means that
we will need to have no gaps between our lines. So let's just go and start creating the lines for
our mustard and ketchup. Before starting, let's
do one more thing. We will go back to
our brush library and we will go to the monoline
brush. So let's tap on it. And here you can see that
we have some folders, something that we can adjust it. We will need to go to the
stabilization folder. Here you can see that we
have this streamline and we will change the amount
of the streamline, their greater the amount, the smoother the lines. So you can just go and
pull it to maximum. And you can check out how it works here in the drawing paths. So you can see that the
line is very smooth. And if you don't
like these amounts, just play around and
find what works for you. It will help you to
create NADH wobbly lines. When you have it, ledgers get done and lead, be redirected to
our Canvas again. So now let's just go and
start recreating airlines. And also here while
we are starting, we can use one tip. And this tip is to create the complicated shapes
from a simple shapes. So we will need to
think strategic. That means that before starting, we will need to go and
think how we can simplify Eric and how we can make
our aligns with ease. So we don't want to go and
create a singular shape here. We can go the same way as
we created our sketch. So we can start by creating a beak shape for
our rectangle here, it will be easier
for us to erase some parts rather than
create singular elements. So let's just go
and try to do that. And again, we can create these shapes the
same way as before. We can hold our Apple plant cell and we can go to Edit
shape or the top. We can select rectangle and
we can play with this nodes. So let us go and try to do that. When we have it, let just
continue adding the lines. When we are done adding
lines to our base, we are ready to move
on to the details. And by details I mean these vertical lines that are
going in the middle part, the vertical lines
on the bottom, and this horizontal
line over it. So parts, you can
see that it will be a little bit complicated
for us to recreate them, even though we have
these quick shape to, it is when we're holding our Apple pencil at
the end of the line, it will be hard for us
because these lines should be parallel to each other and
it'll be too time-consuming. So we can use another two ledgers give to our wrench icon, we will go into
the Canvas folder and we will choose
drawing guides. So let's toggle it. You will see that now
we have some grid and we can adjust it
to our preferences. So we will need to tap
edit drawing guide. If we take a look at the
bottom of our panel, we will see that we have
the green node here. And that means that we
can rotate our agreed. We will go and
rotate it the same way our allies are going
into our illustration. So let's just go
and try to do that. The grid should have
the same direction. When the grid lines are
following the same direction, we will need to do
one more thing here. We will need to toggle
assisted drawing. So let's tap on it. And when it's done legis, he'd done over the top. And now we can go over our shapes and we can
create them very easily. Let's try on the middle part. You can see how easily we
are creating this lines. So let's just go over these elements and
create these lines. So when we are done
with these lines, we don't need this
assisted drawing anymore. So we will need
to go to do this. We will get back
to our wrench icon and we will toggle
our drawing gut. And also we will need
to go to our layers. And you can see that
this layer with a clean lines now
is called assisted. We will need to turn it off. Let's tap on this layer and let's draw in essays
from the list. Now we can again freely
go and create our lights. So let's continue editing them. Before adjusting
your brush size, you will need to remember what value you
were using before. So we will be creating
every line with this value. To do so, you can just go to this little handle where you are choosing the size of the brush. You will have this little window and you can just tap Plus, and you will have a
little note here onto this little thing and you will know where you need
to go back to. So now let's
increase the size of our brush and let's add
the eyes and the mouth. For the mouth, we will
increase the size of our brush and we will go and
create the shape of the V. At the end of the line, we will hold our Apple pencil. You can adjust its size and also you can go to Edit
shape over the top. And here you have a few
nodes that you can play with when you're satisfied with how your mouth looks like. Just tap on the screen
with one of our fingers. We won't add the lines for our cheeks later on when we're are going to
be adding the colors, we will just put the dots
here with the color. When we are done with aging lines to our
first illustration, Let's continue by aiding the
lines to the other ones. You have all the
techniques that you need. You can play with the
amount of stabilization. You can use simple
shapes to start with. You can use the quick
shape tool and edit shape, and also you can
use drawing guides. So let just go and very quickly add the lines to the
remaining elements. When we are done lining
all of our objects, Let's go and make sure
that every line is closed. So we will go to our layers and we will hide our layer
with the sketch. So again, we are tapping on this little icon
with the checkbox. Now let's go through
our objects and let's make sure that all
the lines are close. If we want to adjust
some of that ledgers, grab an eraser and do that. And when everything is alright, let's move on to
the next chapter where we're going to be
color and everything.
8. Adding Colors: Let's start our coloring
part by going to the layers. We will need to create
one more layer for the color and we are
tapping on the plus icon. Now we will need to rename it. So tap on it and choose Rename. We will go with
the name coloring. We will need to put this layer underneath our layer
with the clean lines. So when it is selected, we will need to grab it, we will need to hold
it and we will need to move it underneath our
layer with the lines. And while we're still here, let's just change the
background color. So we will go to the layer with the background color and we will select the first color in a row. So this is gonna be
this yellowish one. Let's tap on it to select. Now our background
is recolored and we can continue
coloring our elements. So if we just go to
our color palettes and let just start with the
color red. Let's select it. If we go back to
earlier with the color, if we want to drag and drop
the color to the new place, for example, one of the bottles, nothing good will happen. Everything onto this
layer will be recolored, and it's not what we need. We want our color to be only on the places that we
need it to be, right? So we will need to
do one more thing. We will need to get
back to our layers and we will need to go to
our clean line slit. Let's select it,
Let's tap on it, and let's choose reference. And now if we get back to
earlier with the coloring, we can just go and drag and drop the color to
the needed place. And you can see that
works perfectly well. Now we can continue adding
the colors in that manner. So we go into our
top right corner, we are dragging the color
and we are dropping it, but it will be a little
bit time-consuming. So we will need to do
the following ledgers. Drag and drop the color to
one of the areas and we will go to the top to continue
feeling with Recolor. You can see that we
have a little handle here and now it is
positioned on a weird place. We can move it, let just
move it to our portal. And you can see that we are
recoloring our elements. And now we can
just go and tap on the needed places and they
will be recolored as well. So let's continue
recoloring our bottom. Let's use the same color
for our paper erroneous. So we are going there and we
are putting the same color. Let's recolor two straps on
our books with a chicken. Let's add the color here
onto this details too. And let's go to our
little taco and we will recolor arts and
made us with this color. Also wicking go along our hearts and some little
elements that we have on the backgrounds and recolor them to when you are done
with the first color. Let's get back to
our color palettes. I've led select another one. This time it will be yellow, orange, and we will do
the same thing as before. Firstly, we are going and
dropping the first color. You can see that we have
this little thing here. So we will need to put it on the needed place
when it is on aids. We will need to go and tap on the other elements
to recolor them. So recolor all the elements
that you want to be yellow. And let's continue by going to our color palettes and
selecting another color. Let's go with orange right now, we will grab our little
handle and we will move it to the places
that we want to recolor. You can see you need
to be very accurate because when you are
moving your Alyssa handle, the previous object will be recolored with the
same color too. So later on we will
need to go over it and maybe
manually recolor it. Now let us go with this color
and add it to our taco, to our pizza crust, and to our chicken legs. You can confirm
your adjusting by going to this magic one
tool over the top left. So you will need to
tap on it and you will need to tap on
it one more time. And now you can just do again, so your color palette, select a different color and
do the same thing as before. We're just grabbing the color and we are dragging
and dropping it. If we want to use continue
feeling with Recolor, we are tapping on it
and we are moving our little handle to the places that we want to be recolored. Let's continue with
this light orange color and we will put it only on to
the crust, on the WhatsApp. And the last color that
we will graph will be white or this light
grayish orange, but it looks like white. So we will just grab it and
we will go to our bones. So let's just drag the
color here and let's use continue with
Recolor and also with the same color
ledgers go over the rest of our hearts and
let's recolor them to. Now manually, we can recolor the remaining places
that we need to recolor. So for example, this
little tongue ledgers go back to our color palettes. Let's select the red color. Let's recolor it the same way we will do we
this little star. We will go to our
color palettes. We will select the yellow, orange color and manually
we will recover it. As you can remember, we had the cheeks on our
layer with the sketch. So we can just go to our layers. We can grab our sketch layer and we can move it to the top. And we can find where
that cheeks were, ledgers and hide this layer. And we will see where we
need to put the chicks. They'll forget that
you will need to get back to your layer
with the coloring. To do so, let just go back
to our color palettes and let's select the color that we would want to use
for our cheeks. So for example, to
this red blood cell, we won't be using the red color. We can select light orange. Orange. Let's do that. Increase the size of
your brush and just pull these two dots and
the same color we can use for our
little box here. So let's again increase
the size of our brush. And let's put this little cheeks for the rest of the elements. Let's grab the red color. Now let's get back
to our layers. And we will hide our
layer with the sketch. And we will go
over our elements, over our little eyes
and little mouth. And we will go and add a
little highlights there. And for the mouth,
we are going to be aging the little tanks. So let just go to
our earlier with the clean lines and we will
need to turn off reference. Firstly, we at SAP and the needs and we are
choosing a reference. And one more time we will
need to go to this layer. We will need to tap on it. We will need to
choose Alpha Lock. Alpha lock will
let you draw only on the existing
areas on this layer. So that means that you
are not going to be creating any more details. You will be adding details
only under the lines. So now let us get back to our color palettes and we will start by aging the little tanks. So let's just go and select the same color that
we used before. Or we can just go with the
orange one, for example. And we will go to this little
bottle with our ketchup, will go to the bottom part of it and we will add a
little tank here. You can see that
we are not going beyond the frames of the mouth. Now, let's do the same with
our elite sell chicken box, but we will go and select
a different color. So let's go with the rats. We will go to the
bottom part and we will add a
little tongue here. And in the same way, we will add little
highlights for the eyes, but we will need to go back to our color palettes and we will need to select this
whitish color. Let's just grab it. Let's make our brush size a little bit
smaller and let's go inside our eyes and we will add little dots
for the highlights. Start from the one eye and try to put this same dots on the other at the same line and try to put them on
the same distance. Ledgers go over our elements and let's put our highlights. And they're super very last
thing that we will do. We'll be adding some highlights. We will need to go to
our layers and we will need to create one more
layer above all the layers. So let's tap on the plus icon. Let's rename it as highlights. We don't want our highlights
to be very bright, so we will need to change the
opacity level of our layer. Let's go to this icon and we
will set it at 50 per cent. We will use this same
whitish color and we will go over our places
here over r elements, and we will do these things. We will go over one of the sides and we will add some
highlights like that. So you can add some
lines, maybe curves, maybe little dots, just go
over and try to not overdo it. And when we are done
with the highlights, we are done with our
whole illustration. Thank you for
watching this class. Leave a review if you liked it, and consider subscribing for more Kawhi videos in the future.
 Uni Corn, ⭐Kawaii Art Enthusiast⭐