Transcripts
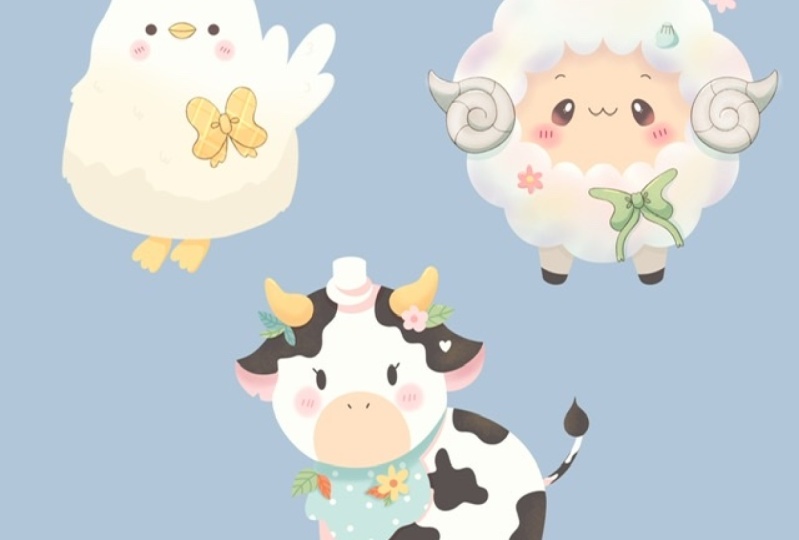
1. Introduction: Hello everyone, I'm uni, and into this class we'll
draw cute farm, any maps. These class doesn't require any prior experience
or fancy tools. We'll start from scratch
and we'll be using simple techniques
throughout the process. Everything you'll see will
be happening in Procreate. However, if you have other software or want to
try traditional materials, you're welcome to join if
you are ready to start, let's jump right into it.
2. Chicken: Sketch: Let's take our class by deciding what kind of Canvas we
are going to be using. You can see now it is said as standard square canvas
that you can find in Procreate or a width and
height are set at 2048 pixels. If you would like to use any other dimensions
for your canvas, you can go for it, but just make sure that your canvas
is big enough. When we are done
with the dimensions, we would need to check out
our DPI for this project. We are using 300. And when we are done with this, we will just need
to go and check out our color profile
for this class, we are using sRGB with this low number
when it's all done, ledgers hit Done and we will be a red directed to
our new canvas. When we have Art Canvas, we would need to decide
what kind of Colors and what kind of tools
we are going to be using throughout
the whole class. If you want to use the
similar materials, you can go to the Projects
and Resources tab and you can download
everything from there. When you are done
with this part, alleges go first,
that's our Colors. And let check out
what we have here. Here we have two options of
how we can use our colors, the compact you and the cards. We will go to the cards
because here we have our color names and it'll be easier for us to
navigate through them. And while I still here
into our colored palettes, Let's select our first
color for our first task. Our first task will be to
create a little Sketch. So now we will need to go and select some
color that will be contrast and that we could
see onto our canvas. So for example, we can
go with something like dark gray, dark brown, brown. Or if you feel very fancy, we can just go and
select this red color. When you're done with
selecting your color, we would need to go
and select our brush. If you have downloaded the
folder with the brushes, we will just go to it
and we will select our brush with a name,
Dao flat dancer. If you're not using
this brush set, you can just go to
the sketches folder and select any brush from here. You can try it out
onto your Canvas, find what works for you. And when you found your brush, we will just go and start
creating our Sketch. We're starting with this
sketch of a little cheek. And we will need to create our first element
that will be the hat. For the hat, we
are gonna be using an ellipse or circle ledgers, go to our Canvas and let start
creating these elements. What we need to do is to
go firstly to our Canvas, and we will very boldly go and create our sheep
just with one line. So we are not lifting up our pencil and we're
just creating the sheep. At the end of the line, we will hold our Apple
pencil and you will see that we snapped are
sheep to a better one. If you want to adjust the size, you can go with
your Apple pencil from side-to-side adjusted. And if you don't want
to use the ellipse, you can go and snap it to even better shape of
a perfect circle. Without lifting up
our Apple pencil, we will hold one of our
fingers on the screen and you will see that we snapped it
to a perfectly round circle. If you want to adjust
your sheep even more, we need to lift up everything that we are
holding right now. And we want to go to
the talk where we have a little options circle. Now we are inside
the editing mode. And when we are inside
the editing mode, we have some blue nodes that we can tweak and adjust our sheep. So you can see we have two
options, ellipse and circle. You can go between them. And if you want to adjust
your sheep manually, we can just go to any node
that you have right here. We can hold our Apple pencil
there and we can tweak it. If you want to play
jazz, play around. If you want to make your
shape bigger or smaller, you will need to go
between the nodes, hold your Apple pencil
there and then move your Apple pencil diagonally
app or diagonal down. If you want to move your
shape across your Canvas, you will need to go to any blank space that you
have on your canvas. Hold your Apple pencil there and move your shape to
the needed, please. Now when you're satisfied
with your sheep, alleges get away from
our editing mode. To do so, we will just need
to go and tap on our screen, either with our pencil or
with one of our fingers. Now when we have these sheep, we would want to adjust
it a little bit more. We would want to go to the top part and make it
a little bit narrower. And we would go to the bottom part and we will
make it a little bit wider. In that way, we will need to create some kind
of an egg shape. How we can do that when
we have our sheep, we are going to the arrow
key on the top-left, which is our transform tool. When you tapped on it, you will see that on the
bottom we have a new menu. And to this part
that we need to do, we will need to go under Warp. You can see that we
have a bounding box and it has four
nodes on the sides, and also it has some
grid inside of it. For example, we can
go to our notes on the top and we can move
them toward the center. Let's just go and try it out by going into our top right corner. And we will hold our
Apple pencil there and we will drag it a little
bit toward the center. You can play around
with this shape. You can make it a
little bit more sloppy. You can make it a
little bit more curvy. It's all up to you for now. Let's just go and do
something like that. When you have it
on one side, leg, just move on to
the opposite side and do the same thing here. Let's just go to our notes. We will hold our
Apple Pencil and we will move it
toward the center. Try to make it even
on both sides. If you want to make the bottom
part a little bit wider, we will need to do
the same thing, but we will need to move our
nodes more toward the sides. So let us go to the bottom and we will go to
the right side. Firstly, hold our Apple pencil there and move it toward
the right even more. When we have it on one side, you know what we need to do, we will need to go
to our left side and do the same thing here. Again, try to make it even. And when you are
done with this part, we can go and adjust
our sheep even more. You can play around with it. You can go to any
intersection that you have inside these bounding box
and you can tweak them to. For example, we can
go to the top part, to the middle part
of these elements. We can hold our Apple pencil there and we can drag it down. So we are somehow squishing or a sheep when you are
satisfied with it. Or if you want to play
around even more, you can go and do that. And when you're satisfied
with your sheep ledgers, go and tap on our heirarchy one more time to get
away from this Modes. Now when we have the first sheep that we will use for our head, we will need to go and
create another shape that we will use for the
body and for us, it'll be easier to go and
create one more layer. You can do everything
on one layer. It's up to you. If you want to use these tools, there's work to, for example, you will need to go and create one more layer because
it'll be really easy. Now let's just go to our layers. Let's just tap on R plus icon in the Layers panel and we
will create one more layer. So now when we have
the second player, we will go again to
our Canvas and we will do the same thing as we
did before with our hats. But this time we will need
to create a bigger sheep. So let's just go to our shape. We will go underneath
it to one on the sides and we will
start creating our sheep. We will need a bigger ellipse, the same way as before. We are creating our sheep manually and end the
end own the land. We are holding our Apple Pencil. If you want to adjust the
size of your elements, just move your Apple
pencil from side-to-side. If you want to rotate it, just go with your Apple pencil and rotated to the
place that you neat if you want to adjust it and if you want to make
it a perfect circle, you can hold one of your
fingers on the screen. And if you want to
adjust it even more, maybe find a different
placement or maybe adjusted to make
it not that rounded. We will need to lift
up our Apple Pencil and we will go to the
editing mode on the top, which now is called an ellipse. So now if you want to
adjust it in any way, we will just go and do that. If you need to make it bigger, you can go between the
nodes and adjust the size. If you want to adjust the
roundness of your elements, just go to the notes
and play with them. If you want to adjust
the placement, you know what you need to do. You will need to go to any blank space that
you have on your canvas and adjust the
placement by moving your Apple pencil
while holding it. So for example, let's ends up with something
like that when we have our second shape a little bit bigger
than our top parts, when you're satisfied with the position and with
everything here, Let's just tap on the screen
either with our finger or our Apple pencil to get
away from the editing Modes. Now, we will do the
same thing that we did with our shape of the head. We will go and adjusted
with the warp tool. So again, we're going
to our Transform tool. We are going under
Warp and we will make this shape a little
bit less rounded. So again, where I go into our notes on the top
and on the bottom, and we will make this
shape a little bit less rounded by moving this
node toward the sides. So let's start from the top, go into one of our nodes and moving it more toward the site. And when you are
done with the top, we will move on to the bottom
and do the same thing here. So you can see now our shape is more like a
rounded rectangle. And if you want to
adjust it even more, you are welcome to do it. When you're satisfied
with your shape. We can get away from our work methods and we can
go to the uniform method. So for example, if you
want to rotate your shape, you will go to the
top and green node. You will hold your
Apple pencil there. And you can just go and
move your Apple pencil in a circular direction to adjust that position
of your elements. If you don't want to rotate it, if you want to make
it bigger or smaller, we will go to one of the nodes. We will go, for example, and make this whole sheet
a little bit smaller. And we would want to make it
evenly from all these sites. We will need to go to our soap, note that we have any middle and we will just drag
it diagonally down. You can adjust the
size to your liking. And if you want to
make it bigger, you will go to the
opposite nodes on the bottom and you will do
the same thing from here. So now if you want to adjust the placement
of your elements, we will do the same thing that we did in our editing mode. We will go to any blank space. We will hold our Apple
pencil there and we will find the
position that we like. For example, let's end up
with something like that. And when you're satisfied
with your result, we will go away from
our transform tool, will all need to go
again to our arrow key on the top-left and we
will need to tap on it When we have this
scheme like that, we are ready to go and merge these two separate
layers together. So we will need to go
to our Layers panel. And you can see we have two layers for two
separate elements. We will go to the layer
that we have on the top. We will tap on it
and we will choose merge down from
this little list. Now, everything that we have for our scheme is on one layer. And now we need
to make sure that when we are going to be
creating our sketch, we will see it clearly and that our scheme is
non-distracting us. So we will need to go and change the opacity level of the slides. To do so, we will need to go
to earlier and we will need to tap on this little
icon near the chatbox. When we did it,
we open this menu and on the top we have
the option opacity. If we go to this
little slider and if we grab the handle and
moods or the left side, you will see that
you are changing the visibility and
transparency of your lens. So you can play around with the amount of opacity
that you like. If you want to
make it very pale, you're welcome to do it. If you want to make it a
little bit more bright, again, you're welcome to XR. It just find what works for you. When you're satisfied
with your opacity level alleges tap on this layer one more time to
close this window. Now Land jazz Gil
entry name this layer. So later on we won't
be confused with all of this amount of layers
that we're going to have. So we will need to tap on this layer and into
this little menu, we will need to choose
Rename ledgers, call this layer scheme. And now when we have this
layer with a scheme, ledgers go and create
one more layer that we will start using for our sketch. We know what we need to do. We will need to go
to R plus icon. We will need to heat it. And for now, let us leave our layer with the name
that it has right now. Let us get back to our Canvas
and we will start adjusting our sheep and turning it into this gauge of alittle chicken. Firstly, let just go to R hat. We will go to one of the
side, so for example, to the left side, and we will need to make a
little dent here. So R hat, looking
more like a hat. So let's just zoom out our Canvas ledgers
go to another site. For example, the left one. We will go to this
part right here, and we will try to
make a little debt. So we are going along
the line that we have one scheme and we are
creating a curve like that. You can play around
with the curvature. You can make the Dann
bigger or smaller. It's all up to here. When you have
something like that, we will need to
continue connecting our Shapes and make
them very smooth. So let's just go to
this intersection of two Shapes and we will
create another curve here. Now going down and
creating this shape here, just repeating the shape that
we have wanted iris scheme. If you want to adjust
it in any way, you are welcome to do it. If you want to make the bottom
part more rounded, again, you're welcome to
do it if you want to play around in
any different way. Again, you're
welcome to DIDT just go along this scheme
and create the line. When you've reached the
intersection of two shapes, you can do the same thing
as we did on the left side. So you can create a smooth
connection between them. Or you can just go and create a full curve just without
going into these parts, without making it
more prominent. So you can either do
something like that or you can go and create a
little dent here too. If you feel that your lines on the scheme or
too distracting, you can always go
back to your layers. You can go to your
layer with this scheme. You can go to the NI, can add, adjust the opacity on this
slider. When he did it. Don't forget to get back
to your main layer with the Sketch and you just need to continue
creating the line. So let's just go entropy in
the line that we have on the scheme and we will
finish up our Sketch. When we have
something like that, ledgers get back
to our layers and we will hide our layer
with this scheme. Do so we will need to go to
the layer with a scheme, and we will need to tap on this little checkbox
near the letter M. Now let us get back
to earlier with this gauge and we will
go and adjust our sheep. So for example, we
can do the same thing as we did before by going
to our Transform tool, by going to work and playing with the whole
shape in general. Or we can go to our adjustments, which is our magic one
tool on the top-left. And we can select the
option liquefied. When we are selecting liquefy, we have a few options here. For now we are going to
be using push option. Then just select it. You
can adjust the size, you can adjust the pressure, just play around with them. For example, legislative
the pressure at maximum and ledgers adjust the size so it is big enough for our Sketch. With this option, we
can go to some places. We can hold our Apple
pencil there and we can adjust it by tweaking it. We will need to hold our
Apple pencil there and we can adjust the shape
in that Easy Way. So for example, you can go and create a better
dance on the sides. Or if you want, you can adjust the bottom part of
your little scheme. For example, ledgers
go to the bottom and let's make this part
a little bit wider. Again, the same way as we
did with the Transform tool. We will go to the sides and
we will hold our Apple pencil there and we will just move
it more toward the site. Let's just play around
with these two and lend just make the bottom part
more rounded and more white. All you need to do is to
hold your Apple pencil and push two this side and try
to make everything smooth. If you want to
adjust other parts, you are welcome to do it. When you are satisfied
with the whole sheep. Ledgers. Get away from
our magic one tool. So we will go and
tap on it on the top-left and we can continue
creating our Sketch. So now let's just go to the bottom part and we will start creating our
little legs here. What we need to do
is to find firstly, the middle part of our elements. Let's just go and create
the line going from top to the bottom that will represent
the center of our sheep. Ledgers go very easily
the same way as we did with our ellipse
or with our circle. Just go in there, create an airline and
holding it at the yet. You can see when
we snap this line and if we are not lifting
up our Apple pencil, we can move our
Apple pencil from side-to-side and we can
adjust the angle of it. We will need to make
this line various trade. So try to do that. And if you need to
adjust it even more, we can go to our
editing mode by hitting this little lined
icon on the top here, Ethan, you to adjust
your sheep even more. If you still need to
find the better angle, you can go to one of the
nodes and adjust them. If you need to find a
different placements, maybe put it more
toward the center. Again, you know
what we need to do? We will need to go to one of our blank space on the Canvas. We will hold our Apple
Pencil and we will move this line to
the needed place. When you are done with this task ledgers get away
from our edited mode by hitting our screen either with our Apple pencil or
with our finger. When we are done with this part, we know where we need
to put our little legs. So firstly, let's just zoom in our Canvas to the bottom part. And we will go to this
intersection between this middle line
and the line that we have on the bottom
of our Sketch. Firstly, we will need to
create two more lines that will determine the direction
of our little legs. So firstly, let just do a little bit to this side
from this middle line, and we will create the
first line like that. You can play with a
different direction. It's all up to you. When you have the
first line like that, we will go to the
opposite side and we will try to create a
similar line there. Just make sure that
the distance between these elements and the
middle line is similar. Now, when we have these
two guys in lines, ledgers go and turn
them into little feet. So firstly, let's just
zoom in our Canvas. We will go to these two
guiding lines and we can start an RF feed
into different ways. The first one is very easy one, we will just go and create
an oval shape like that. On the top we will have a narrow part and on the
bottom it will be a bit wider. When you have
something like that, we can go to the bottom
part and we can split this thing on the bottom
and add a few fingers. So what do we need to do is to create a few loops like that. You can play around
with their amounts. You can play around
with their size. It's all up to you. The second option
that we have here, we can just go and we can lose this little part when we were creating our
little ellipses. Just very boldly go
there and create a few loops like that when
you have your little feet, Let's just go and we
will add a little tail. We will go to our right part, right between our two shapes where we have this little dance. And we will start again by
creating a guiding line. So we will go and look at our guiding lines that
we have on the feet. And we will try to do
the same thing here. So just go in there and
creating a line like that. You can play around
with its size. So always up to you, you
can play around with its height when you are satisfied
with your guiding line, we will do the same thing as
we did with our little feet. But this time we will need
to change the direction. So we will go to
the top and we will start by creating
a shape like that. Just very easily. You can start by
creating a digit three and then
create another loop. You can play around again with
the amounts on this loops. It's all up to you. You can play around
with the highest, you can play around with the
thickness of this elements. Just find what
works for you tried around a couple of times
and when you are satisfied, let us move on and we will
start creating a comp. On the top. We have our line that
we have in a middle, and it will be our guiding line. We are going to the
soap bars and again, we will create a few loops here. Again, you can start by
creating a guiding line. So let's just go to
this intersection between R hat part and
this means online. And we will create a curve
going in that direction. When you have
something like that, you know what we need to do? We will go and
create a few loops. This time, let's just add a bit of movements and we will go and create the similar shape that we had right
here on the tail. But this time it will
be a bit shifted. Again, play around, find
what works for you. You can adjust the
amount of this loops. You can adjust the flexibility
of the whole cone. It's all up to you when you're satisfied with your
little element, alleges, move on and
let's add our face We have this little
dance on the left and this dense will represent
the middle part of our face. So let's just go and create a horizontal line going through these debt the same way as we have created
our vertical line. We are just making a line. We are holding it at the end and we are adjusting its angle. We will need to create
a straight line. If you need to
adjust it even more, we are going to our
editing mode only job. And if we need to adjust it, we are adjusting it from here. If you want to find a
different placement for a facial features, you're welcome to move this line when you're satisfied
with its position, ledgers tap on the screen
and we will get away from our editing mode and we will be ready to start eating
our facial features. Firstly, let us go over our left side to
this line that we have just created and we
will make a little markdown. Let's just go to the middle
part of these elements. And when we have the
first mark down, Let's do the same, own
the opposite side. So we will try to keep the
same distance from the center. This would be our eyes. And if you feel that maybe
you want to put them a little bit more toward the center
or maybe go to the sides. You are welcome to Duke. Just find the position
that works for you. When we had this tumor exam. Let just turn this
little marks into our circles that will
represent the ice. So just go in there and you can play around
with their sites. So then just add
from the left side, we will go and
create a little dot. We will sheet it. And when we have it on one side, we will do the same thing
on the opposite sex. Try to give the same
distance and try to keep the same size
of this elements. When you finish this task, Let's just zoom
out our canvas and let's take a look at
our facial features. If you feel that maybe
you want to adjust them, now it's time to do that. If you want to play around with the size of this elements, if you want to play around
with their position, just go and do that if you're satisfied with everything here, ledgers continue by
creating a little beak, we will go straight into the intersection of
these two lines, the vertical one and
the horizontal one. And we will need to create a little curve on the top and a little curve
on the bottom. So let just go and start
creating this curve. Go into the top and
creating something like that when you have
it on the top, Let's just move on to the bottom and let's do the
same thing here. You can play around
with the curvature. Or if you don't want
to create the curves, you can go and create a little triangular
shape like that. Now again, Lynch's zoom
out our Canvas ledgers. Take a look at our
facial features. If you want to adjust something, go and adjust it. If you're satisfied
with how it looks, ledgers go underneath the eyes and we will add a little cheeks. So let's just go firstly
over our left side. We will get underneath
the eye and we will add a little circle there, the same way as before. You can start
creating your sheep and then hold your
Apple pencil and the, and hold one of your fingers on the screen and you will snap it to a perfectly
round circle. A jazz decides to your liking if you want
to adjust it, even more, ledgers go over the
top to Edison month, you can always zoom
out your Canvas to take a look at how you're
illustration is looking. If you want to move
your little elements, just go and do that when you are satisfied
with its position, let just tap on our
screen and we will go to the opposite side and we will try to add the
similar cheek there. Hold your Apple pencil
at the end of the line. Hold one of your
fingers on the screen, try to make the similar size that you have on the left side. Ledgers go now to the editing
mode and we will move these cheek to the
opposite side to make sure that we have the same
size on the cheek. Just holding our Apple pencil, moving it to the sides, making sure it's the same size. If you need to adjust it, just guilt between
the nodes and adjust the size when you're
satisfied with it. Ledgers, move it back
to our right side and let's try to find the
similar placement for this little cheek. As always, you can
zoom out your Canvas to take a look at your
illustration from the distance. And when you're satisfied
with everything here, again, I go and away
from our editing Modes. Now we are done with
our facial features and we will need to add
a few more elements. Firstly, let's just go and add some fluff parts
once or are sheep. So what do we need to
do is to go arise along the lines that we have for the quanta of our Illustration. And we will go and add a few
more elements like here. So just going along
the line and here and there we are adding
a few fluffy parts. Try not to overdo it and
just go within the lines. Also, we can go right inside our shape and we can add a
few fluffy parts on the body. So for example, let's
just go underneath our facial features
and we will add a few loop bards like that. Now we're almost done
with our Sketch. The last thing that
we will need to add is a little Beautification. For example, let's just
go to one on the sides of our body and let's
add a little bow. We will go to this
place underneath our facial features
near that sale. Or if you want to find a different placement for
your Beautification element, you are welcome to do it. All. We need to start with
ease LE cell books. So let's just go and create it. You can play around
with its size. You can play around
with this position. You can rotate it
to your liking. All we need is just
this little box. And when you have it, we will need a few
more in guiding lines. These lines will be diagonal. So let's just go from
one corner to the opposite one and
create two lines. When you have these objects, Let's just turn it into the bot. So firstly, we will
zoom in our Canvas. We will go to this
intersection in the middle part of
our little box. And we will need to start by creating a very
rounded rectangle. You can start by creating a simple straight rectangle and then turn the corners
into the softmax. When you are ready
with this task, ledgers go to the sides and we will create a first
loop on the top. So go into the left side, go into this line that we have and we are creating
something like that. As always, you can play
around with its position. You can play around with its
curvature with anything. When we have the first
thing on the left leg, just do the same
thing on the right, suggests repeating
the same movements. When you have the two top loops, ledgers go to the bottom and we will do the
same thing here. Again, just repeating
the same thing. When you have all four elements, alleges go to the sides and we will create a little
connections here. So firstly, the ledgers go to the left and we will
do the same thing that we had right here on
to our elites of chicken. So we will just need to create a little dance and connect
these two elements. So just going along the lines and creating a
little curve there. When you are ready,
we are moving to the opposite sides and
doing the same thing. Now, if you want, we can grab an eraser tool and erase all the lines
that we don't need. Later on, it'll be easier for us to navigate
through our Sketch. So let's just grab
our eraser and we will erase everything
that we don't meet. Now when they have
the basic sheep, we will need to
add to free ends. So again, we are getting
back to our brush. We argue into the middle part. And from this middle part, we will create again two
diagonal lines going down. The first one on the left
will look like that, and another one on the right
will be the opposite way. When you hand this
little guiding lines, we will need to turn them
into the little ballparks. So again, we're arguing
along the lines and we are creating something similar
to the legs that we have. And to this leads a
comb and a little tail. So again, creating a few
loops, but this time, let just add two of them when
you have it on one side, Let's move on to the opposite one and do the same thing here. When you are done, we are grabbing our eraser
tool one more time. And again, we will erase all the things that
we don't need. Now if you want to
adjust some parts. So for example, you zoomed
out your illustration and you think that maybe your bot is looking
a little bit off. We can go and change the things. We will need to select this part by going to the selection or selection tool is the S
icon into our top left. Here we will need to
select freehand methods, and we will just go
around this element and we will select
it, close the shape. And when only these
elements is selected, we are going to our
Transform tool, which is our arrow key. On the top-left. We are using uniform
methods and we can play with our
element from here. So if you need to move it, just hold your Apple pencil, add some blank space movies. If you want to rotate it, go to the green nodes over
the top and rotate it. If you want to make it bigger, go to one of the corners and
make your element bigger. If you want to adjust this
little part even more, we can go under Warp and
we can play with it here. When you're satisfied
with your creation, we will need to go away
from our editing mode. So let's just go and heat are S ribbon icon only top-left
to close the selection. And now we will look
at our Illustration. And if we want to
adjust something, we will go and grab
our liquefy tool. Or if we want, we can go again to
the transform tool, to the Warp option and
play with our elements. When you're satisfied with
how everything looks, we will close this editing mode. We will tap on our arrow
key on the top-left. And when you are done, we are ready to move
on to our next part, where we will be
aiding the Colors
3. Chicken: Base Colors: Before starting this part, let just make some preparations. Firstly, we will go
to our layers and we'll rename our layer
with the Sketch. We're WhatsApp on this layer and we will choose Rename from here. When we did it, we
will need to make a group of these two layers
that we already have. So when the first
layer is selected, we are going to our
layer underneath it and we are slides in our Apple
pencil from left to right. Now, when both of these
layers are selected, you can see that we have the option group
on its own price. So let just tap on it and
we will create a new group. Now, if we go to
our immune group, we can rename it to. So let's select it
firstly and then we'll tap on it
and choose Rename. Let's name this group chicken. When we are done with this task, we will need to
do the following. Firstly, we will go to earlier with the Sketch and we will change the opacity level
of these sketch lines. So let's just give it
to our sketch layer. We will tap on the icon and
we go into our opacity. Slider. Lynch has grabbed the
handle and find what works for us when you are
satisfied with the result, we are tapping on
our sketch layer one more time to
close this window. And then we will go to
earlier when this scheme, and from this layer, we will create one more layer. Let's just tap on the plus icon and we will rename
this layer as Buddies. When we have a new layer, the last thing that
we will need to do for the preparation part is to go to our background color
layer and change the color. So then just tap on it. We will go to our color
palettes on the bottom, and we will select the color
with a name and grayish. See in blue, when you Recoloring
Your background color, we are getting back to
our layers and we're making sure that we're
on the layer with body. When you are added, we will just need
to change the brush and who will need to
select a different color. So firstly, let just go
to our brush library. And if you are using the
same brushes that I'm using, if you download them from the project and
restaurants tab, you can just go to this folder
and select monoline brush. It is the basic brush. If you are not
using this folder, you can go to the
calligraphy folder and select monoline from here. While we are still here
into our brush library, we can make sure that
all the lines that we are going to be creating
our previous smooth. To do so, we will need to go and tap on our monoline brush. We will go inside
the brush studio. We will need to go
under stabilization. And here we have the
option streamline. You can see it has
this slider amounts. And if it's on the lower value, we can go and check
out how it works, where I go into our Drawing Pad and we are creating the line. You can see it as a
little bit jagged and we have a lot of
control over it. If things go and change the amount to
maximum, for example, we can start create a line and you will see
how smooth it is. We are losing a bit
of control and we can go and adjust the
amounts to our liking. So we still have
our control over the line and we still have
the very smooth line. So you can play around with
the amount of streamline. If you don't want
to use this option, you are welcome not to. And when you're satisfied with
the amount of streamlined alleges he'd done
over our top-right. Now when we have
prepared our brush, Let's just get back to
our color palettes and we will select the color
with the name White. Now what we need
to do is to go to our lines that we have for our body and we will
need to recreate them. Our main goal here is to go and create a very specific silhouette
that will be readable. And also we will need to create a very smooth and
very close lines. What I mean by close is that is not closed and
this is closed. So let's just go along the lines and we will create our outline. Try to make your
lines very smooth. You don't need to
repeat everything with 100% of similarity. If you want to
adjust some parts, you are welcome to do it. When you have your outline, we will go and drag and
drop the color inside it. But firstly, religious, make sure that our lines are closed. We will go to our
layers and we will hide our layer with the sketch. Now, let's just zoom
in our Canvas and let check out where there
everything is closed. And if it is, we will
just go and drag and drop the color to
the inside part. So we are you into
our color icon on the top-right and we're just dragging it to they
needed, please. If you see that you have
a little blank space between your original line
and this feeling part. Don't lift up your Apple
pencil and you will see that you have a
little option threshold. We will just move
our Apple pencil to the right until you
don't see this line. When you're satisfied
with everything, ledger zoom out our Canvas and let check out
our silhouette. If you can see that
it is a chicken, you are good to go. If you feel that maybe you
need to adjust some parts, maybe you need to go and
make some things smoother. Let's just go and do that. When all of your
outlines are smooth. And when you can definitely
say that the wholesaler, it looks like a chicken. We are ready to move on
and add other objects. So now let us get
back to our layers. We will go and unhide
earlier with this gauge. And we will start by going
and creating our little feet To do so, we will go again
to earlier with this scheme. We will select it and from here we will create
one more layer. Let's just rename it as fit. And now when we have
this new layer, we are going back to
our color palettes and let's select the color
within the light yellow. With this color, we will go and recreate what we have
for our little feet. When you have the outlines, we will need to make sure
that they are closed. So again, we can go back
to our layers and now we will hide our layer with the
body and with the Sketch. If you feel that
everything is closed, we will just go and drag
and drop the color here. Now let us get back
to the layers and we will unhide earlier
with the body. Let's make sure that
everything is looking nice and when you're
satisfied with it, we are ready to move on
and add other objects. So now let just go
to our body layer, and from here we will
create a new layer. Let's just tap on the plus icon and let's rename
this layer as bot. Now we will need to get
earlier with the Sketch back. So let just unhide it. We are still on earlier with
a bow and we will go use this same color and
recreate this bot that we have all our
layer with the Sketch. Again, we are creating
the outlines first. When the outlines I already, we are going back
to our layers and we will hide earlier
with the sketch. We are chicken out whether
everything is closed. It is we are dragging
and dropping the color inside the shape. Eating it to adjust some
parts may be smooth in them. You are welcome to do it. When we are done with the ball, we are going back to our layers and we are unhide
in earlier with the Sketch ledgers go and create one more layer
for our facial features. So again, tapping on the plus icon entry, naming the layer. Now when the same yellow color, we will go to the little bag
and we will recreate it. You also can hold your
lines and the answer to snap it to a better shape
if you need to adjust it, always go to the edit mode
and adjusted from here, a gesture sheep ledgers
Gil them to our layers. Let's hide earlier
we this gauge and if we're satisfied
with the sheep led, just drag and drop the
color inside each. You need to adjust something, grab the eraser tool, or grab your brush and adjust it when you
aren't down the way I getting back to our
layers and we are unhide in earlier
with the sketch. Now we will need to
recreate our little eyes. So let's just get back to our color palettes and let's
select a different color. This time you can
choose from dark gray and gray, brown or brown. So let's one of these Colors
and when you are ready, let just go and recreate
our little ice. Try to make them
the similar size. You can just always go
to the editing mode. You can make sure that they are the same if you need
to adjust them, just tweak this little nodes, find what works well. When you're satisfied,
move this IBAQ and just go away from
the editing mode and drag and drop
the color insects. When you are done
with your eyes, Lynch's get back to
our color palettes and let's select the color
within the light pink. With this light pink color, we will go and Edna cheeks. But firstly, we will go and change our brush
again where I go into Art Brush
Library and we are choosing medium blend brush. This is the standard brush that you can find
in airbrushing. Now, let's adjust this size and we will go to this
places where we have our cheeks on this gauge and we will just add the
cheeks with this brush. When you are done one more time, we're arguing back to our
layers and we will hide earlier with this gauge to check
out how everything looks. If you're satisfied
with your Base Colors, we are ready to move on
to our next chapter, where we will add
the Beautification
4. Chicken: Adding Details: Let's say this byte by adding
some color to the comp. Firstly, we will go
and check out that we have our monoline brush on. When we did it, we will go and
select light yellow color. Now, we would want to go to
the second segments that we have on our comb and we
will want to recolor it. And we would want to
make everything nice clean and we don't want to
create anymore objects. We just want to recolor the exact areas that we
already have onto our canvas. So how can we do that? We will need to go
to our layers and we will find our
layer with the body. Let's select it and above it, we will create one more layer. So let's just step
on the plus icon and we will rename
this layer as color. Now, if we just go to earlier and if we start
creating some lines, you will see that
we are going beyond the frames and it's
not what we need. We just want to go inside the shape and we would want
to add the color here. So what we can do, we will go to our
layers one more time. We will go and select
this layer with the comb. We will tap on it and we
will choose Clipping Mask. Now, if we do the same
thing by going into our canvas and starting
to create some lines. You will see that
we are not going beyond the friends in that way. We will go and end the color to this second
segment that we have, ones that are a comp ledgers follow the natural line
that we have here. Add some color if you need
to adjust some parts, grab the eraser tool
and adjust that. When you are done
with yellow color, Let's just go back to our color palettes and
let's select another color. This time, you can
choose between light orange or a doubt
orange gas cylinder color. And let's do the
same thing by going through the bottom
part of our comp and we will recolor it when you identify aiding
the color ledgers, grab the eraser tool and we will adjust our bottom part
of these elements. Lynch's make them a
little bit more pointed. If you want to adjust
it in any other way, for example, maybe make the bottom part a
little bit more curvy. You are welcome to do it. And the same way Lynch's go
and add a few more details. So we will firstly go to our
bot and to our little beak, and we will define them a little bit more by aiding the outlines. Firstly, let us go
and change our brush. So go into Art Brush Library. And this time we are
selecting six B pencil. When you did it,
we will go back to our Layers and let's
start from the bot. So we are selecting
earlier with the bow and we will need to create
one more layer above it. We know how to do that, just clicking on Art Plus icon, and let's rename this
layer as outlines. Now, we will need to clean
this layer to a previous ones. So we are, it's happening it, and we are choosing Clipping
Mask from the list. When we did it, we
will need to go and change the
color of our brush. So let's just go to
the color palette and let's select one color, either dark gray,
dark brown, or brown. You decide when you did it. We are going to
Art bow and ends. We are using Clipping Mask. We know that we won't be
going beyond the frames. We will just go to
the outlines that we have only sheep and we will go along them and we will create our new outlines within your
brush and within your color. Let's just go and try it out. Just go and close to our outlines and go in
and create an airlines. When you have reached this
fruit bars on the bottom, It's easier for you. You can go back to
your layers and unhide your layer
with this gauge. So that way you can repeat
the lines that you have here. Or if you want to
experiment a little bit and maybe try out
different things, you are welcome to go
freely without the layer, with this gauge and
create the outlines. If you need to adjust them far, is just grab the eraser tool and erase the parts
that you don't need. When you are done with
the main outlines, lynchers go inside and
add a few details here. So firstly, we will do in
define this middle part just by repeating what we had wanted earlier with the Sketch. You can play around
with this shape. You can make it
wider or narrower. It's all up to you. When you have this middle
part alleges go to the sides from it and we will add
a little faults here. We are going firstly
to the left side. We are making a little mark down right in the
middle of the sheep, and we will go to the side and
create a little loop here. When you have it on one side, we will move on to
the opposite side and we will do the
same thing here. If you need to start by
creating a little mark down. Again, if you need to
adjust some parts, just grab the eraser tool and erase the parts
that you don't need. If you want to continue in
some details to the bot, you are welcome to do it. And when you are down, we will continue by adding
the outlines to their beak. Firstly, let's just get
back to our layers. We will select the layer with the facial features and who will a great one more layer above it. Let's rename this
layer as outlines. Let's clip it to
a previous layer, so tap on it and choose
and Clipping Mask. And the same way as before with the same brush and
the same color. We are going to the beak and
we are creating the outline. When you add down
with the outline, ligers go and divide
are big to two parts. So we're going somewhere in the middle part and
creating a curve like that. You can hold your Apple
pencil at the ends of the line to snap
it to a better shape. And if you need to adjust it, we will go to our editing Modes and adjust airline from here, you can change the curvature
and it's position. It's all up to you. When you are done adjusting
this line LED just tap on the screen to get away
from our editing Modes. And we will do one
more thing here. We will go to our
color palettes and we will select the
color within the rats. With this color, we will go to our cheeks and we will
add a few lines there. So firstly, let us go to
the left one and we will go inside the cheek and we will create a view
diagonal lines here. When you are done
with the first cheek, Let's move on to
the opposite side, and let's do the
same thing here. And when you aren't done, we are ready to move on
to the next chapter where we are going to be adding
some highlights and shadows
5. Chicken: Shadows & Highlights: Let's say this part
by Firstly agent EBITDA gradient to the
bottom part of the body. We will go to our brush
library and we will select a different
brush medium blend. When we have it, we are using the same color that we used before, light yellow. We are going to earlier is to go to earlier with the
body and select it. When he did it, we will need to create one more layer above it. So let's just go and
hit R plus icon, and you will see that
it automatically clips to a previous layer and that's exactly what we need. Now let's just go entering
in this layer as gradient. And now for this part, we will need to do one more. I think we will need to change the blending mode on this layer. Blending modes are
different ways your layers can interact
with each other. So by choosing different
blending modes, you can create different
visual effects. And in that case,
we will need to select Multiply Blending Modes. Multiply blending
mode multiplies the color of the Blending
layer and the base layer. The result is always darker. So to change the blending mode, we will need to tap on our
little icon near the chatbox, and we will need to select, Multiply from this list. Let's just go and do that. S for the positive for now, let's set it at 20 per cent. Now when we are ready with
preparing earlier leg, just tap on it to
close this window. And we will go back
to our Canvas and we will go and create
our little gradient. So what do we need to do? Firstly, we will need to go and increase the size of our brush. And we will go
from the bottom to the middle part of our elements and we will be
aiding these credit. So we will need to put
a little pressure to the middle part and more
pressure to the bottom. Let us go and try to do that. So you can see in that way
our boards and part is more yellowish and our middle part is something in-between,
white and yellow. If you already this part, you can always go to
the smudge tool and smudge this middle part
until it blends perfectly. When you're satisfied
with adding the gradient, alleges go and start
agent Irish Shadows. Firstly, we will go and change
our brush one more time. So going back to
our brush library and we will select
monoline brush. With this monoline brush, we will go back to
our color palettes and we will select gray color. Now when we did it, we will go again to our layers and we will
create one more layer. Again. We are tapping on R
plus icon while we are selected in earlier
with the gradient, Let's rename this
layer as Shadows. And again, we will go and change the blending modes and we also will change the opacity level. So we are tapping on the icon. We are selecting
multiply Blending Modes. And again, for the opacity, Let's go with 20 per cent. It's not enough. Later on, we can always get
back and change this value. When we have our shadow layer, we are ready to start
adding our Shadows, but we need to remember that our Shadows should
be consistent. And that means that they
don't need to be put vary randomly and they should
follow one direction. And to do that, we will need to consider having a light source, or the objects that are closer to our light source
will be lighter. And all the objects that
are farther from it, they will be in the shadow. We can keep it in mind, or we can just go above
all of the layers. We can create one
more layer and we can put our little light source. So let's just do it in that way. We will create one
more layer and we will go to the top part. You can decide what side you want to put your
little Lights words, we will just go and
create a little arrow. Now when we have our little
light source ledgers, get back to our
layers and we will go back to our layer
with the shadow. We will start from the top. So we are taking a look at our
arrow and we see that each shines once our little comp
but are called is protruding. So that will mean that
it will cast the shadow. We will go underneath it and we will create our
first little shadow. We're just given
there and repeating the lines that we
have on our comb. Start by creating a
little outline and ledgers go and fill this
area with our color. Now when we have this
little cast shadow, we can say that we
will need to add a little shadow to the
bottom part of our comp. But if we just go right now to this area and if we
try to add our shadow, nothing good will happen. And that's because we
have our layer with the shadow underneath
earlier with the comb. So we can go to our
layers and we can just move this shadow layer above
earlier with the comb. To do so, we will need
to select our layer. We will need to hold our Apple pencil there
and just move it above. Now, if we go to our Corn, we will just create
the shadow here. And so when you have
the first Shadow, Legends move on and start
aiding the other ones. So now we are go into the bag and we will add a little
shadow underneath it. So again, we are
taking a look at our little arrow on the top and we are creating our
shadow in accordance with it. As always, if you need to erase some parts or adjust
them in any way, you are welcome to do it. When you're done with this task, let just go underneath our bot and we will
add the shadow here. So again, we're taking a
look at our little arrow and we are going and adding the
shadow in accordance with it. You can create very
tiny Shadows or you can just go very boldly and
create very thick Shadows. It's all up to you When you are done by aiding the shadow underneath
our little bow, ledgers go to the bottom part of our body and we will
create a shadow here. We will step Elizabeth from this side and we will just
go and repeat the sheep. We will go with fluffy line. When you hand this
first outline, we will go to the
bottom part and we will add the color
inside this area. If you want to work more once a this outline
that we have owned it, so you are welcome to do it. We also can go to the
sale and we can add some lines here to
when you are ready, ledgers go and decrease
the size of our brush. And if you're a member on
our layer with this sketch, we had some little
tiny lines like that. So we can just go
and repeat them. Just go along the whole
shape of the body and add a few of these
little digit three. Just try not to overdo it
and add a few of them. When you are done
with this task, we are ready to move on and add the shadow to other objects. So now let us get back
to our layers and we will go to our
layer with the feet. We will select it and we will create one more layer above two. So let's just tap
on the plus icon and let's rename this
layer as Shadows. Let's clean this layer
to a previous one, sad when they're
choosing Clipping Mask. And we are going to
our little an icon to select Multiply Blending
Modes for the opacity. Let's go with 20 per cent. Now, let us get back to
our color palettes and let's select the color with
the name bright orange. Now, let's make sure that we're on our layer with the shadow and we will go to the top
part of our little feet, to the bottom part
of our little Body. And we will add
our shadows here. So let's just repeat
the line that we have for the bottom
part of the body. Now when we have this
little shadow on the top, let just go and create a
little curve on the right. And we will create a shadow like that in this little
corner on the top. And when you're done
with the first foods, alleges, move on
to the other one and let's do the
same thing here. If you think that maybe
the shadow is too much, we are always ready
to get back to earlier is go to
our shadow layer, tap on our little MI can end a jazz the
opacity from here. So find what works for you and when you are done,
Let's continue, agent our Shadows by going into the bowl and we will do
the same thing here. So again, we are
going to earlier with outlines and from here we are creating one
more leaf layer. Just tap on the plus icon. Let's rename this layer as
Shadows. Let's clip it. Let's choose the
multiply Blending Modes. Let's add the opacity
at 20 per cent. When we are ready, we are going back to
the bottom part of our little bow and we are
aging our shadow here. So let just start from something like a middle
part of our sheep. We are going there and we are
recreating the line that we have on the bottom now going through this
shape and again, repeating the line
that we have on the water going through
the whole shape. Now let's just go to this free parts that we
have on the bow. We will start from our little outline that we have on the bottom
part on the bow. And we will repeat
this line going a little bit to
these three parts. When you have it on one side, we will do the same thing
on the opposite side. When you have these
two outlines lead, just go increase the size of our brush and we will
recolor these parts. Now one more time. Let's decrease the
size of our brush and let's add a little bit
more of our Shadows. So firstly, we will go to
this little loops that we have on the sides and we
will add the color here. We also can go to the free
part of our bot and we can add shadows here on the
right side to if you want, you can soften up the corners. And let's just take a look at
our bot from the distance. If you think that you
want to add more shadows, you are welcome to ensued. For example, we can go to our right part and we can
add the shadow in this way. And we also can do this same
thing for this middle part. So we are going to our right
side and we are adding a little shadow is you
need to adjust some parts. You are welcome to do it. And now we are ready
with our Shadows and we can go and add
some little highlights. So what we need to do, we, we'll get back to our
layers and we will go above all the layers that
we have for our chicken. So we can go to R allele with facial features to
earlier with outlines. And from here, we can
create one more layer. Let's rename this
layer as Highlights. For the highlights, we will choose a different
blending modes. So again, where I go into
our an icon and we can choose from screen,
adds an overlay. You can try this three
options out by yourself. But for now, let just select
that overlay blending modes. With the overlay blending mode, we can leave our
opacity at 100%. We need to go to our color palettes and
select sunlight color. We can select from white, light orange, light
being light yellow. You can select any
color that you like. For example, let's just
go with light yellow. With this light yellow color, we will go to the opposite from our Shadows sides and we will add little
Highlights there. For example, let's
start from our book. We will go to the top-left parts and we will add little
highlights there. We will be Eddington
just with a stroke. If you want to add
some additional dose or maybe some other shapes, you are welcome to do it. When you're done with
the first highlight. Let's move on to our right side and we will do the
same thing here, go into the top-left part
and aids and our Highlights. We also can go to our middle part and add
the highlights here to, again, go into our top-left side and aids in the Highlights. And now let just go to
the beak and we will add our highlight here to the
same way as with the bot. We are going to
Art soap left side and we are aging are a little
highlight there as well. We're almost done with
the whole illustration, but let's just add one
more Beautification. Think we will go to our layers and we will go to our
layer with the book. Let's select it, and let's
create one more layer above. So again, tapping
on the plus icon and let's rename this
layer as stripes. You can see that this layer clipped to our previous layer, that's exactly what
we need and we will need to go and change
our blending mode. We are tapping on
our little N icon, and again we are selected
overly Blending Modes. When we did it were arguing
back to our color palette. And Firstly, let just go and select the color
with the name rats. When we have it,
we will go back to our slider on the left and we will decrease the
size of our brush. And we will just
very boldly go to our little bow and we
will add some diagonal. Let's just go along the whole shape and add
a few of these lines. When you are done, we will
do one more thing. Again. We are going back to
our color palettes and we will select
another color. Let's select the color
within the light, yellow. Now we will do the same thing. We will go and add a few more
lines with these new color. You can repeat the direction or you can choose
a different one. And when you are ready with creating your pattern
on this little bow, we are done with
our illustration. Now let's just go back to
our layers and we will hide earlier with
our little arrow. Now, let us take a look at our Illustration
from the distance. And if you liked it, We are ready to move on
to our next illustration, which will be a little sheep
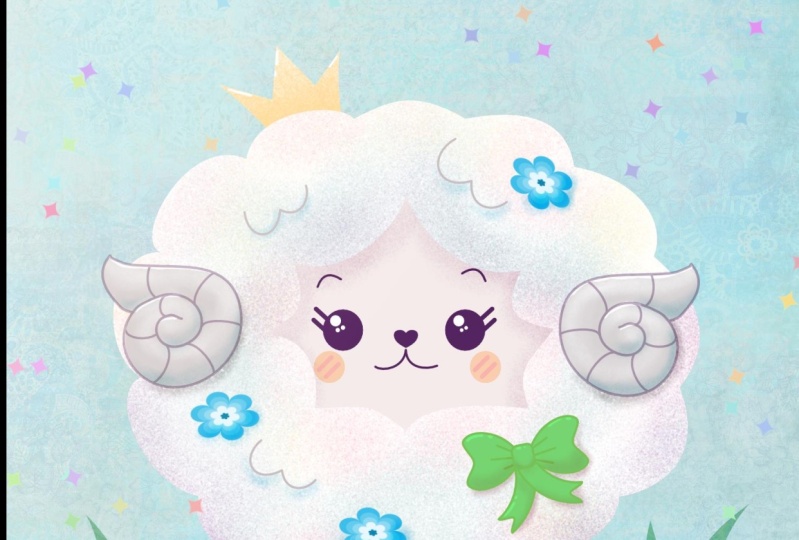
6. Sheep: Sketch: Let's start in a
second illustration from some tiny preparations. Firstly, we will
go to our layers and we will need to make
everything neat here. So we will go and collapse
our group with a chicken. So we will need to go to Art. So parts of the whole
group where we have our little title
chicken and we will go to this little icon
near the checkbox. Let's just tap on it and you will see that we
collapsed R group. That's exactly
what we need. Now. We will need to hide it. So we are going to
our little chat box. We are tapping in it and
now we have a clean canvas. Now let's just go and
create one more layer which will rename
as sheep Sketch. When we have our new layer, we are going back to our
brush library and we are selecting the same brush that we use for our first sketch. When you're satisfied
with your result, Let us get back and
select our brush color. So again, you can just pick any contrast color that you
could see onto your Canvas. You can go with something
dark or if you feel fancy, you can get back
to your red color. Now let's select the color and let's get back to our Canvas. When all the
preparations are done, we are starting to make
an error Sketch by creating a simple
shape of the circle. And we know how to do that. We will just need to
go to our Canvas and we will need to create the
shape just with one line. And the end of this line, we will hold our Apple Pencil. So let's just go
and try to do that. If you're sheep now is not
looking like a circle. Just hold one of our
fingers on the screen. And let's adjust the size of this element to
something pretty big. When you're in Zan Lynches go to our edit mode on the top. And we will try to put this circle that
we have right now, right in the center
of our Canvas. When you are done,
Let's just tap on the screen to get away
from our editing Modes. And now we will go and
adjust our shape with the Warp Tool the same way as we did with our hats
of the chicken. So again, we are going to our
arrow key on the top-left. We are going under Warp. We will do the same thing
that we did before. So firstly, we are
going to Art soap notes and we will move them more
toward the center ends. When you are done, I go
into the bottom and we are moving our nodes
more toward the sex. If you want to play around
with your sheep even more, maybe you want to
squish it a little bit. It's up to you when you have the sheep on the
head that you like, ledgers go and tap onto our heirarchy one more time
to get away from this Modes. Now when we have this scheme, we will use one more
tool that will help us to create the whole
sketch of the sheep. So we will be using
the Symmetry tool. Turn on our Symmetry tool. We will need to
do the following. Very slowly. I go
into our range. I can over-the-top plants. We are going under
Canvas and we will need to toggle Drawing
Guide when he did it, you will see that
you have then greed going through the whole
shape of your canvas. And that's kinda what we need, but we will need to choose
a different option. So we will need to go
under agent Drawing Guide. And you will see that on the bottom we have
tons of options. Don't be scared. We just need to go
under Symmetry. When we are choosing Symmetry, we have just a single line going through the
center of our canvas. And you might notice
that maybe your sheet that you have just
created for your scheme, not exactly in a center. That's totally okay. You have two options, how you can fix it. The first one is just
to leave it as it is, and maybe just use
it as a guide. And the second one is
to move this line of symmetry just to the
center of your sheep. To move the line, we will
just go to this little nodes in the center and we will
move it to the nearest place. When you are done with
your Drawing Guide, pledgers guilt and he'd done, and we will need to
do one more thing. We will need to
check out whether we Assisted these little Symmetry tool to the need that layer. So we go into our layers
and what we need to see is that our LEA with sheep
Sketch now is Assisted. If you have this little
title, your agood to go. If you don't have
this little option, we can turn it on the menu link. What we need to do is
to tap on the layer and choose Drawing
Assist from the list. When we have prepared
everything, legit, check out how I
Symmetry tool works. If we create something
on one side, you will see that
it automatically repeating on the other side, but it is reversed. That's exactly what
we need and that will help us to create our sheep. So what we're gonna be
doing for our sheep, we will just need to go alone this guiding
line that we have. And we will need to create
some fluffy elements. So we will go and we
will create some loops, some have on the circles. We will just create
a fluffy sheep. So let's just go to
the top and we will start from there on the top, we will need a solid
shape of a heel. So let's just go and create
something like that. Go to one on the size
that is comfortable for you and start creating
a shape like that, we will need to
create a solid sheep that is smooth on the top. And if it's not happening
for you from the first try, just try it out one more time. You can play around
with the whole sheep. We just need to create
some fluffy element here. So when you have your
first half of the circle, ledgers go to this
side and let's continue creating some loops. So let's just go along this
line that we have as a guide. And we will create a
few of these elements You can make them a
little bit smaller. You can make them a
little bit bigger. It's all up to you. Just create a sheep. When we've reached the bottom, lunches go and create
a solid element here to the same way
as we did on the top. Make a smooth connection
between the sides. And let's just take a look at our whole shape
from the distance. If you want to
adjust some parts, you are welcome to do it. If you need to grab the eraser
tool and erase some parts, again, you're welcome to do it. When you have the outlines
that you like, lead, just go to the bottom and
we will add little legs. So firstly, we are
going to one side. We are stepping from our
central line just a little bit. We are creating a
shape like that. That will be just a single line. When you have this
first-line ledgers go a little bit more
to where this side, and we will create another
diagonal line like that. You can play around
with their thickness, you can play around
with their size. It's all up to you. On the bottom, we
will connect our line by creating Alito circular line. If you need to adjust
some elements, grab the eraser tool and erase
the parts that you don't need if you want to work
more on the shapes, again, you are welcome to date. For example, we can go
to the bottom parts of our legs and at
one more curve, when you have
something like that, alleges go inside of our sheep and we will
add the facial features. Firstly, we will need to
find the place for our face. We will go and create some
fluffy parts here too. And we will do the same way as we did with the main shape. So firstly, let us go and
make a little markdown. So we won't go a little
bit above the center of our canvas and we will
make a little mark here on the line
when you have it. We will just go to
this side and we will start creating some
cutting elements. So what do we need
to do is to go and create a little shape like that. You can play around with its size just if
it's not happening from the first try to write out one more time and find
what works for you. If you want to position
a differently, again, find what works for you and
find what you like, Ethan, you to adjust them far as grandly areas are
tool and adjust them. When you're satisfied with
this facial elements, let just go and add the ice. We will go to this part that we have just created and again, lead, just find
the center of it. We will go and make a little
mark down on this mark, we will go to this
side and we will start creating an I here for the eye. We will have a sheep of the egg that will be
a little bit shifted. We will need to create
something like that. The top part is a little bit narrower and the
bottom part is wider. You can play around
with the size. You can play around
with its position. It's all up to you Eating
you to adjust some parts, you know what you need to do. You will need to grab the eraser to raise the price
that you don't need. Or maybe work with a brush. Work on the sheep, on the eye. And when you're
satisfied with it, ledgers go inside of this
shape to one on the sides. And we will create
another little element here inside the eye that
will be a Highlights. Let's just go to
the right side of our left eye and we will
create a little ellipses here. Again, you can play
around with it sets. When we are done, ledgers go inside the shape of our eye and we will shade it. If you want to add some other
elements such as eyelashes, you are welcome to do it. When we are done with our eyes, ledgers go above them and
we will add little brows. So we're just going above the
eye on one side and we are create an elliptic curve if you want to use a
different shape. Again, you're welcome to do it. When we add down with our eyes, let just go and add our
little mouth so we won't go right to this little
mark down that we have. And from it, we will
go to this side and we will create half on
this circle like that. Again, you can play
with its size. You can play with a curvature on this element all up to you. When you have your little mouth. We will need to do one more
thing with our Symmetry tool. We will need to go to
one of the sides and we will need to start
creating a little horn. So let's go to one of the sides. We will go to the line
where we have our eye. And from it we will just
go to the line that we have for our guiding
line right here. And we will make a
little mark down. When you have it
from this markdown, we will go and start
creating a spiral. So what we need to do is to
create something like that. You can play with its thickness, you can play around
with its size. Again, it's all up to you. At the end of your little horn, you can create a little line going in different direction. And then we will need to close this shape by adding
some thickness. Then just go to the end on
the line and we will create another curve going toward
the side of our little horn. Work on this shape even
more if you want to, and if you are satisfied
with the general shape, alleges grab our eraser tool and erase all the lines
that we don't need. If you're satisfied with, how are you a little horns look. We will just go inside
and we will add a few lines going through the
whole shape of this horns. So what we need to
do is to go and follow the direction
of our horn. So we are going and create
an few lines like that. You can make them straight
or you can use some curves. And when you are
done with this task, we are done with
our Symmetry tool. We don't need that anymore, so we will need to
go and turn it off. We are firstly go into
our wrench icon over the top-left and we will toggle
Drawing Guide from here, you will see that your line
of symmetry just disappeared. But if we go to our Canvas and if we try to
create something, you will see that we still are
using these Symmetry tool. We will need to go
and turn it off manually from our layer. Let's just go to the layers. We are going to our
sheep Sketch Layer, typing a need and
we are choosing Drawing Assist from the list. Now, if we're try it
out one more time, you will see that we are
creating just a singular line. Now, we are done
with Symmetry tool, but we are not done
with our sketch layer. Just go and add a
few more details. So firstly, ledgers go to one
of the sites on the soap, for example, right here. And here we will
add a little crown. Or if you don't want
to add a little crown, you are welcome to create any other element that you want. So for example, let's just
go between these two shapes. And we will start by creating
the guiding line like that. So these guys in line, we will turn into the crown. We will need to go to the
sides and we will need to create two diagonal
lines like that. Try to keep a distance
similar on both sides. And when you are done with
these two diagonal lines, we will just need
to go and connect them with this line that
we have in the middle. We will just go to
the top part of our left line and we will create a little triangular
shape like that. When you have it on one side, we will do the same thing
on the opposite sex. Work more on your
sheep if you need to. And when you are done, let just go and
create other details. So for example, ledgers go
and create another bot. We will go to the
right side and we will do the same thing that we
did with our little chicken. If you want to play
around with the sheep, or if you want to create
another element here, you are welcome to do it. For example, ledgers
go to our right side, right underneath our
facial elements, and we will create the box the
same way as we did before, but this time let's just
make it more elongated. When we have this box, we will need to go
inside and creates to diagonalize the
same way as before. And when we have them, we will start by creating this middle part again the
same way as we did before, but this time let just go
and pick a different shape. So for example, we will start by creating a line length that, and then we will go and create a similar
line on the bottom. When we have it, we
will go to the sides and we will connect
it with soft plants. Now when we have
our middle part, let just go to this side and
let's add our bot elements. So again, we are going
firstly to one of the sides and Creating
a little loop here. Let us go around all of these sides and let's
create other loops. Play around with this
size, all the elements. And when you have
all these for loops, let just go and
connect them together. So firstly, where I go
into one of the sides and we are creating the
shape like that. And we aren't doing the same
thing on the opposite side. When we have our
general shape of the bow legged years go
and create some free ends. So let us go to this
middle part of our bot and we will create a line
going down in that direction. When you have it on one side, ledgers do something similar
on the opposite sex. You can play around
with these slides. It's all up to you. When you have these
two guides in lines, we will need to turn them
into these free ends. So let just go and
add one more line, similar to what we already have. Again, you can play around
with the thickness on this line so you can play around with their distance from them, with everything that
you wants to play with. And when you have
these two lines, let just go to the
answer of them. And we will create two
elements like that. If you want to work more. Once it is elements, again, you're welcome to do it. Now, Lynch's grab
the eraser tool and we will erase all the
lines that we don't need. If you want to work more
ones than this element, you can either go
to our selection to use the freehand method
and very accurately selected, and then go to the
Transform tool and adjust it from there. Or you can go and select the Liquify tool and
adjusted in that way. When you have this
shade that you like, ledgers go from this Modes. And we will go to the sides
from our middle parts and we will add little loops here the same way
as we did before. You can go with a single line or it can create a few of them. When you are done with the bot, let just go and add
a few more details. Firstly, the same way as
we did with our chicken. We can just go and create some lines like
that to show that our element is not just flat and it has some little elements
that are protruded. For example, we can
go to the top and we can create this
big elements that later on we will put our shadow under and it won't
look very flat. So let's just go
along the whole sheep and add a few of these elements. And it's when you are
done with this part, leg just add a few more
additional elements. For example, leg just go
and add a few flowers. We will go to the opposite side from our bot and we will add a little flower here right on the top of this
little fluffy think. So let's just go and create
a little element like this. This is a little circle, and then we won't go
and create some petals. Now when we hand this
little flower leg, just go to the soap to
the opposite sides and we will just go above the
whole shape of our sheep. We will create a
similar flower here. If you want to add
other elements, you are welcome to do it. For example, you can go and
create some hair clips, lintels go underneath
this flower that we have just created, and we will create some clip
in a sheep of the shell. So firstly, we will go and create a little
elements like that. This is a little rectangle. You can go and soften
up the corners. And when you have
something like that, we will go underneath it and we will create a
shape like that. So this is a very big curves. So play around with the
sheep and when you have it, alleges go to the
top of this shape, right underneath our
little rectangle and we will create a few
lines going down in that way, Eating you to
adjust some shapes, just go and adjust them by using the eraser to your brush, warped so and maybe liquefied. So when you're satisfied
with your sketch, you can just grab the
eraser tool and erase this line that we use as a
guide to clean everything up. And when he did is we
are ready to move on to our next part where it
will be aiding our Colors
7. Sheep: Base Colors: Let's begin our
coloring part by going to Art Brush Library
and changing them rash. Again, we are using
monoline brush. When you have the
new brush ledgers, get back to the color palettes and we will select
the color with the name White with this
color and with this brush, we will go back to the layers. We will go and select a
group with a chicken. And from here we will
create one more layer. Let's rename it as body. Now, as we have two
leaves for our sheep, Let's select them together
and let's merge that. We are going to the group and we are renaming this
group as sheep. Now, let's get back to
earlier with this sketch, we will go and change the
opacity level of this layer, go into the icon and
adjusting the opacity. When you are done, we are going back to our layer
with the body and we will go and recreate this shape that we have for
the fluffy part. So again, let's just go
and create the outlines. When you have your main outline, lynchers go back to our layers. We will hide our layer
with the sheep and we will check out whether everything
is looking alright, whether our lines are
closed and whether we are ready to add
the color inside. If everything is looking fine, Let's just go grab the color and drag it to the middle parts. Now we will need to check out
whether this whole shape, this whole silhouette
looks like a sheep. If we want to adjust some parts, we will go and do that. We will just go make everything smooth and clean and nice. When you're satisfied with
the shape ledgers get back to our layers and we will unhide earlier with the sheep Sketch. When we are done, we will go and create one
more layer for the legs. Again, I go into our group
with a chicken and from here we will create
one more layer which will rename as lex. Now, let us get back
to our color palettes and let's select the
color with the name gray. We will go and recreate the
whole shapes of the licks. Makes sure that you
close the shapes so you are able to add
the color inside, add this color, and we will need to change the color
on the bottom. So let's just do it by
using the Alpha Lock. Alpha Lock works pretty
similar to the Clipping Mask, but we will be doing
these on the same layer. What we need to do is to
go back to our layers. We will select our
layer with the legs. We will tap on it, and we
will choose Alpha Lock. You can see now we have the checkerboard
around our elements. And that means that
we will be able to draw only on the
existing elements. Now let us get back
to our color palettes and let's select
dark gray color. With this dark gray color, we will go to this bottom part and we will just
add the color here. Now, Lynch's get
back to our layers and we will hide our
layer with the sketch. We will check out
whether everything is looking fine with our legs. And if it's not, we will
just go and fix it. When you're IDH1 fixing the legs if you
needed to lead us, get back to our
layers and we will unhide our layer
with the shapes, which also you can notice
that one our layers, we have the legs layer, not inside the group
with the sheep. We can, for example, collapse
our group with the sheep, grab our layer with the legs
and put it inside the group. And now Lynch's continue
agent are elements. Firstly, we will go to our layer with the body and above it, we will create one more layer, we will call it face. Now, we will get back to
our color palettes and we will select the color
within the same light orange. We will go and recreate this shape that we
have for our face. Make sure that your shape is closed so we can go to Arles, hide the layer with
a sheep Sketch, check it out and eat. It's okay. We will just go and drag and drop
the color insights. If you want to go and adjust some very strong
quantities here, you can go and do that. When you are done, a jazz singer, sheep blade, just get back to our
layers and we will create one more layer that will
rename as facial features. And now let us get back to our color palette and we will
select a different colors. So this time let's
select gray brown. We will get back to our leaves. We will unhide earlier with the sheep Sketch and we will go and recreate our
facial features. When you are done
with the main shapes, ledgers get back to our layers, hide the layer with this gauge
and a jazz the outlines, if we need to try to make everything as
smooth as possible. And when you are done, we can get back
to our layers and unhide earlier with the sketch. We will need to add our
Highlights to the eyes. So let's just go and select the white color by going
into our color palettes. And we will just go inside our eyes and add this
little elements. If you want to add some
additional elements, maybe some doors or maybe some stars or
something like that. You are welcome to do it. And when we are done with
our facial features, ledgers get back to our layers and we will create
one more layer. This time, it will be
the layer for the horns. And also here with two can
use our Symmetry tool. So let's just go and turn
it on so it'll be easier for us to create these
shapes for our horns. We will, again go back
to our range tool. We will go to Drawing Guide. You can see we have our Symmetry tool the same
way as we had it before, but we will need to go to
our layers and we will need to make this layer
with a horn Assisted Again, we are tapping on it and we are choosing Drawing Assist. Now when we did it, we will get back to
our color palettes and we will select the
color within the great, when we have it, we will
just go to one of the sides and we will recreate
the shape of our horn. Let's hide our layer with this
gauge to check out whether everything is looking fine and whether
everything is closed. If it is, we will just go and drag and drop
the color insights. If you need to
adjust some parts, you are welcome to
go and adjust them. Now, while we are still
using our Symmetry tool, let's just work on the details
inside our little horns. Firstly, we will go
and change the brush. So again, we are using
are six B pencil. We also will go back to our color palettes and we will
select a different color. You can select the same
color that you use for your facial features or
select something different. When we are done, we will get back to our layers. And firstly, we will unhide our layer with the
Sketch when you did it, we will get back to earlier with the horns and we will create
one more layer above it. So let's just tap on it. We will rename this
layer as Details. Let's clip this layer
to a previous one. So tab underneath and
choosing Clipping Mask. And also we will need to
make this layer Assisted. Let's just tap on it and
let's choose Drawing Assist. And now we will go inside
the shapes of our horns and we will recreate
this little lines that we have on to our sketch. Now let's just check it out without our lines on this gauge. If everything is looking fine, we are ready to move on. If you want to adjust them. Parrots go and
adjust these parts. When you are Deanne Lynn, just go and turn off
our Assisted Drawing. So firstly, we are going to the wrench icon
over the top-left. We are toggling Drawing Guide, and then we will need
to go manually and turn off Assisted Drawing
from both of our layers. Tapping on the first layer, selecting Drawing Assist, doing the same with
the second layer. Now let's unhide earlier with this gauge and we will
continue agents some details. So firstly, we will
select our layer with the details that is
attached to our horns. And from here, we will
create one more layer. We will rename it
as accessories. And on this layer we will go and recreate our objects
such as bot, little flowers and
this little hair clip. Let's start from the bot. We are going back to our color palettes and you can select any color
that you like. For example, this color
with the name green. When we did it, we
will just get back to our brush library and select the same brands
that we use before. And it was monoline with this
brush and with this color, we will go and recreate the
shape of our little book. Now let's make sure that
everything is nice, smooth and closed by going to Arles and hiding earlier
with the Sketch. If everything is alright, let just drag and drop
the color inside. And let's grab our eraser
tool and erase the parts that we don't need or that
part that we want to adjust. When you are done with the bow, we will get back to our list. We will unhide earlier
with this gauge and we will go and recreate
the other objects. So for example, let's start
from our little flowers. We will get back to our
colored palettes and we will select the
color we the name Pink. Firstly, with this color, we will go to our left Flower and we will recreate its shape. Drag and drop the color
when you are ready. And we will go and change
our color of the brush. Let's just go and select the color within
the light, yellow. Light yellow color. We will go and increase
the size of our brush. And we will just put
a little dot inside of it to create this
central elements. When you are done, we will go to the top and we will
recreate another Flower, Lynch's go and select
a different color. This time, it will
be light pink. We will do the same thing by recreating our outlines
of the flower, make sure that the
shape is closed. And when you are done, ledgers go and drag and
drop the color inside. And now we will get back
to our color palettes. We will select a
different color. This time, it might be white
or light yellow, you decide. And we will go increase
the size of our brush. And we will put this
central elements when we are done with
our second flower. The last thing that we
will need to add here is this little hair clip in
a sheep on the shell. Let's again go to our color palettes and we will
select a different color. This time, this
will be light-blue. With this color, we will go and recreate the whole sheep and the color insight when
you are ready and Lynch's go and hide our
layer with the sketch. We will check out whether
everything is looking fine and whether we want
to change some things. When you think that
everything looks good, alleges get back to our layers. We will unhide earlier with
this gauge and we will go and end this little outlines for our bot and for our hair clip. Again, where I go into our
layer with accessories, we are creating one
more layer above it and we are
renaming it as Lights Let's clip it to
a previous layer. So one more time we
add SAP underneath, we are choosing Clipping
Mask and we are going to change our
brush one more time. It will be six B pencil. When we have it, we
are going back to our color palettes and we are
selecting some dark color. You can choose the
same color that you use for your
previous outlines, or the color that you used
for your facial features. And when you have the color LED, just start by
recreating the lines that we have for our
little hair clip. If you want, you can add
only the lines inside or you also can go and
create the outlines, go in alone the whole sheep. When you are done with this
little hair clip ledgers, get back to our bot and let's recreate the
lines here too. If it's easier for you to hide the lines from your sketch, you are welcome to
go and hide them. When you are done with
the main outlines, we can get back earlier with this gauge and check out
what we need to add here. For example, let us go
inside these shapes and let's add this little loops
that we have on the sides. Remember that you
don't need to repeat everything with
100% of similarity. And if you want to
adjust some parts, you are welcome to do it. When you're in down, we will get back to our leaves. We will hide early
with this gage. We will check out how
everything looks. If you liked it. The last thing that
we will need to add will be a little crown. So let's get our layer
with the Sketch back and we will need to decide where we need to create this layer. We obviously want to put our little crown
behind our body. So let's just go to the
layer with the legs. We will select it and
from here we will create our little
crown on a new layer. When you have a new layer, we will go back to our
color palettes and we will select the color with
the name bright orange. When this color, we
will need to go back to Art Brush Library and select our brush with a
title mono line. When we have our color and
when we have our brush, we will go and recreate this
shape of our little crown. Make sure that the shape is closed and when
you are ready, let just drag and drop
the color insight. Now Lynch's get back
to our layers and we will hide our layer
with this Sketch. If you feel that maybe you
want to change some colors, you can do it in that way. So for example, let's take our little crown and
let's change its color. What we need to do is
to select the layer, then go to our magic wand tool and choose Hue, saturation
and brightness. Here on the bottom you
will see a few sliders that you can tweak and find
the color that works for you. So for example, let's make
our crown a little bit more yellow so we can play with the slider of
brightness and hue. When you found the color
that works for you, just go and tap on the magic 121 more time to get away
from this editing Modes. And now let us take a look at our little illustration
from the distance. And if you like everything
that she's see, we are ready to move on to our next part where we
will be aiding our Details
8. Sheep: Beautification: Let's tie this back by adding
some color to our whoo. We will turn it
into something very Kawaii and it will look
like Kinsey cotton. So firstly, let us go
to Art Brush Library and we will change the
brush to meet and blends. When we did it, we will go to our layers and we will find
earlier with the body, we will select it and we will create one more
layer above that, we will rename as colors. Let's clean this layer
to a previous one, and let's change the
blending mode to multiply. For now, we will leave
that up positive at 100%. And if we need to
adjust it later on, we always can get back to
this option and adjusted. Now when we have prepared
earlier ledgers, get back to our color
palettes and we will select the color
within the light blue. And now when we have our brush and when we have our color, we will go mostly to
the bottom part of our wall and we will go
with a very soft strokes. You can do just with one
movement or it can go and create singular
points with your brush. So what do we need to do is
to go very smoothly with very low pressure onto our Apple pencil and create
something like that. Try not to overdo it. You just need a very soft color. If you think that maybe
you overdid it a little bit and some parts
look very strong. You can always go to your smudge tool and blend
the color more appropriately. We just need to have a very soft results
when we are done with the boards and part
ledgers go to the top and we will add a few
more strokes here, two ends again, if
you need to smudge some parts and grab this match tool and adjust
the part that she needs. When we are done with
this color ledgers, get back to our colored
palettes one more time, and we will select another color and do the same
thing one more time. We will go and pick
the pink color, and we will repeat this
same step one more time. So we can go only to the
blank spaces that we have. Or if you want, you can
go and mix two colors. So what do we need to
do is to go and add some pink places very
easily, very softly. Ledgers go and add a
few of these strokes. If you think that maybe
you need to blend two colors and grab this much
to and blend them together. When we are done
with our pink color, we will do one more time, but this time with
light yellow color. Let's select it. And again, let's go and add a few
strokes with this color. And the very last color that we will use here will be purple. So let just go and select it. And when this color, we will mostly go to
the bottom parts into the part that we
have right here on the top where we have the face. And we will go again very softly and edit on these places. If you want to go with
more colors or if you want to experiment with
the position of this colors, you are welcome to do it. And when you are done with
aiding the last color, we are done with this part
and in the next chapter, we will be agents are Shadows
9. Sheep: Shadows: Start with our Shadows. We are again in needs to go
and create our light source. So let's firstly
go to our layers. We will go above all the
layers that we have for our sheep and we will
create one more layer. We can rename it or we
can leave it as it is. We don't really need it. We will hide it later on when
they hand this new layer, we will go above our sheep and we will
create a little arrow. So the same way as we did
with our chicken leg, just go to the same place to our top-left and we will
create a little arrow here. When we have the error, we know where we need to put our Shadows in
accordance with it. So now let's just get
back to our layers. Let's just start
from the bottom. We will go to our
layer with the legs. We will create one more layer and we will rename it as shadow. Let's clean this layer
to a previous ones. So we are tapping, we're selecting Clipping Mask. We are going to an icon change in the Blending
Mode to multiply, and we will go and send
the opacity to 20 presets. Now we will need to go and
change the brush to mono line. And we also will need to go to our color palette and select the color with the name gray. When we have
everything prepared, we are going to the bottom
and we will go underneath the rule and we will recreate
it sheep on the legs. So let's just go and do that. If you think that maybe 20% is not enough
for this shadow, you can always get
back to the layers. You can go to the MI, can own the layer
with this yellow and adjust the
opacity from here. So find what works for you
and when you are done, we are ready to move
on to our body. So let's go to the body, to this layer that we have
for the Colors and above it, we will create one more layer. Let's rename it. Let's change the
blending mode and let's clip it to a previous layer, S4, the opacity, we will
start with 20 per cent, and if you need to adjust
it later, we will do it. Now for the shadow on the wall, you can use different colors. You can use the same gray. You can go with light-blue, with light pink, or with
any color that you like. For example, let just
select light blue and we will go underneath the
objects that are on the wall. So firstly, we
will go underneath our little horns and we will
create the shadows here, repeating the same sheep. Don't forget to look
at your arrow to position this Shadows correctly. And again, if you feel that your 20% of opacity isn't working, you can get back to your shadow layer and
adjust it right away. When we are done with the horns, we will need to end the
shadow underneath the bow, underneath our Flower, and underneath our
little hair clip. So let's just go and add the shadows, repeating
our objects. Also, while creating
the shadows, you might find the places and some objects that are color wise similar to the color
of the shadow. So in that case, we can just go to our color
palettes and select a different color
for this object of our hair clip in a
shape on the shell, these colored light
blue is too similar. We will need to go and
select another one. And for example, ledgers go
with the color with an M, grayish see in blue. And with this color, we
will go and add our shadow. And now when we are done
with our main elements, lead just continue adding the
shadows to other elements. Firstly, we will go
to our layers and we will go to our
layer with the face. Let's create one more layer. Let's rename it, Let's clip it, and let's change the blending
modes for the opacity. Let's go with 50 per cent. And now we will go to
our color palettes and we will select the
color within named purple. Also, we will need to go to our brush library and change
the brush to medium blends. When they prepared everything, we will go to the top
part of our face, right underneath our Wu, and we will go and create
very soft shadows here. Just give an entry repeating the lines that we
have for our Wu. Now, we will grab
the smudge tool and we will blend
the colors nicely. When you have the nice
and smooth gradient between these two elements, we can go and change the opacity on this
layer if you need to, if you think that
it is, alright, we are ready to move on
to our next objects, and our next object
is our horns. We will go and select the layer and we will create one
more layer above it. It is already cleats, ledgers go and
rename it as shadow. And also lynchers go and
change our blending modes. And also let's change
the opacity to 50%. Now, we will go back
to our color palettes and we will select the
color with the name sin. With this color, we can use the same brush that we use
before our medium land. Or if you want to create
more prominent Shadows, you are welcome to change
the brush to monoline. When you have your brush, we are taking a look at
our error on the top and we are going to the places
that are farther from it. So let's just go
to our left horn. Firstly, we will go to the bottom part of it and we will start creating
our shadow here. So just repeating
the shape of it. And we are going inside after we have created the
shadow on the bottom. When with adding the
color inside this horn, we will also go to
this part on the soap, but we will go to
the bottom part of it and we will add
the shadow here. When we are done
with our first horn, we will go to the opposite one and we will do the
same thing here. So again, taking a look
at our arrow and go into the opposite side
from it to add our shadow, again, starting from the bottom. When you have the main
shadow on the bottom part, we are going inside
to the bottom part on this little hook and we are
adding the shadow here too. When we are done with it, we are going to the top sheep to its bottom part and aid
in the shadow on it. So when you are ready, we are ready to move on
to our next objects, that will be our accessories. So let's just go to our
layer with accessories. And from here we will create one more layer that
will rename as Shadows. Let's change the blending
mode to Multiply and send the opacity
level at 50 per cent. Now, we will start creating
our Shadows On the bot. So let just go firstly and change our brush to mono-layer. If you haven't done it before, when you are ready, we are going to
our color palettes and as we are creating
the shadow for the bot, firstly, we can
decide whether we want to use CN color or green. So you decide what color you
will use for the shadow. And when you are done, we will go and take
a look at our arrow. Firstly, we will be creating our Shadows in
accordance with it. So let's just go Zoom
in our Canvas to our little bow and we'll go to the bottom part and we will start creating our
Shadows the same way as we did with our first
bot on the chicken. We are going to the
bottom and repeating the same lines that we
have only bought some. When you are done with
the bottom parts, let us go inside these two
little hooks and we will add the color inside here to take a look at your
bot from the distance. If you want to
adjust some parts, go and adjust them when
you're already with the bot. Let's move on to our
little shell and we will add the shadow
here to the same way. Firstly, we are taking
a look at our arrow and we are going to the
opposite side from it, and we are aging our shadow. If you want, you can
add little shadows under the lights when
you aren't down. Let's move on to our flowers. We will firstly go to
our color palettes and we will change
the color to pink. We will go and add the
shadows to our petals. You can also go inside
this middle part and very accurately add
the shadow here too. When you are ready with
your first flower, we will go to the
opposite one and we will add our
shadows here too. Now, Linda's take a look at our Illustration
from the distance. And if we like it, we are ready to move
on to our Highlights.
10. Sheep: Highlights: Let's dive eight and our
Highlights by going to them Brush Library and changing
our brush to medium length. When we have our brush, we are going to our
layers and we are going above our layers
with a accessories. So above the layer with the lungs and full create
one more leaf here. Let's rename it as Highlights. We will go to our an icon and change the opacity
level to overlay. When we have it, we
will get back to our color palettes and we
will select the first color. It will be white. When we have it, we will go to our horns and
we will start from here. And just adjust the
size of our brush to something that will
suit our little horns. We will go to the
opposite sides from our shadow and we will start aging very soft Highlights here. So we are moving
closer to our arrow. And when we are ready
with our first horn, we will go to the
opposite side and we will do the same thing
with our other horns. And when you are ready, let's continue. Agents are Highlights. Firstly, by go into our brush library and
changing the brush. Again, I select an
R monoline brush and we are at the same layer with our Highlights using either the same color or
selecting something different. Let's continue with white color. And we will go to
our horns and we will add more
prominent highlights. I go in closer to the edge of our horns and we are aged more
prominent Highlights here. You can go just with the lines or if you want to add some dots, you are welcome to do it when you are done with
the first horn, Let's move on to
the opposite side and do the same thing here. Go into the soap parts and
we are aging are Highlights. When you are done, we are ready to move on to
all of our other objects. So let's just go to
our bot and we will go firstly to our color palettes and we will select
a different color. Let's just go with light yellow. With this light yellow, we will go to the
opposite side from our shadow and we will
add our Highlights. Also, we can add our Highlights to this
free ends of the book. When you are done, Let's move on to all
of our other elements. So for example, ledgers
go to our little shell. If you want to go with
this same yellow color, you are welcome to do it. You can try it out if
it's not working for you, you are always welcome to get
back to our color palette and select the color that will suit these little elements. So again, when I go
into the opposite side and we are aging our
little highlight here, Let's do the same
with our little crown and with the flowers. And when we are done
with these parts, let just go to our eyes and let's add the
color to them too. So firstly, we are
going to our layers and we are going to earlier
with facial features. We can go and create
one more layer. Let's rename it as Details. Let's clip it to
a previous layer. So select and Clipping
Mask from the list. And also we can go and change the blending
mode to overlay. Again. When we have it, we
can go to our layers and we can decide what
color we want to use. Light pink, pink or
light yellow ledger. Select one of them
and let's try it out. We will also need to go to our brush library and
change the brush, the media and blends. We will go to the boards
and parts of our eyes and we will add a very
smooth gradient here. So you can try out how
it works with one of the Colors and then
maybe go and change it. I won't go with
it being colored. Create a very smooth
gradient and add more pink color to the
boards and parts of the ice. If you need to adjust something or if you need to blend it more, you can always get to the smudge tool and
adjust it from here. When we are done with our eyes, ledgers go and add the cheeks. Firstly, we will go
back to our layers and we will go to our
layer with the face. We will need to create
one more layer. You can go enter
name it as cheeks. We will use normal
Blending Modes and the same brush that
we are using right now, this is medium blends, and also we are using
this same color. Let's just go underneath
our eyes and we will do the same thing as we
did with our chicken. Just very boldly go there
and add our cheeks. You can play around with
their intensity and you can play around with
their size and position. When you are ready, we will get back to
the brush library. We will select our
monoline brush and we will change the color to red. We will go inside our cheeks and we will add a few
diagonal lines there. Now we are done with our face and we also are done
with our Highlights. The last thing that we will do here is eight and
a bit of texture. So let's go above all of
the layers that we have even above earlier with the Highlights and we will
create one more layer. Let's rename it as texture. We will go and change our blending mode to
overlay one more time. And we will go and
change our brush ledger, select the brush with
the name gold dust. With this brush,
we will go back to our color palettes and
select a different color. For example, let's start with
light yellow color and we will go to our crown and we
will add this extra here. But we would want to
edit very neatly. So what we need to do, firstly, we are going and finding
earlier with the crown, Let's select it,
Let's tap on it, and let's choose,
Select from the list. Now we will be
aiding the color and texture only own the
area that is selected. So now let's just get back
to our new layer and we will go above our elements
and add the texture here. So for example, let's go
more to the top part. When you are ready, all we need to do is to deselect everything by
heating RAS ribbon. I can own the top. And we won't do the
same with our horns, with our little bow and maybe
with some other elements. Firstly, we are going to our color palettes and we will
select a different color. So for our horns, ledgers go and select
pink or light pink. When we have our color, we will do and find our
LEA with the horns. We will select it, we will
tap on it and we will choose, select from the list. Again, only these two
elements are selected. And when they are selected, we are going back to our
LEA with the texture. When we are here, we will go to these elements and very freely we
will add some texture. You can go to the
whole shape or you can avoid the areas
with the shadow. And when you aren't done, we will deselect
everything by hitting R S ribbon icon and we will
move on to our little boat. So firstly, we are going and finding R allele
with accessories. We are tapping on it and
we are choosing selects. Now when all of our
accessories are selected, we are going back to our
layer with its extra, and we are aging arts extra own these elements for
the bot Lynch's. Get back to our color
palettes and lead select the color within
the light yellow. We will go to our bright parts and we
will add the texture. If you want to end
the texture to the flowers and
to our hair clip, you are welcome to do it. When we are done with this part, Let's deselect everything by
hitting R S ribbon, icon. And lynchers go
to our layers and hide earlier with
our little arrow. If you want to go and
maybe tweak some Shadows, you are welcome to do it. If you want to
change the opacity, again, you're welcome to do it. If you want to add some elements or if you want to
adjust some parts, you are welcome to do it. When you're satisfied
with your result. We are ready to move on
to our next illustration, which will be a little cow
11. Cow: Head Sketch: Let's start working
on to our cow from some very
tiny preparations. Firstly, we will go
to our layers and we will collapse the
group with the sheep. So go into the top of the group, go into our little V icon here near the chatbox and
we will tap on it. When we did it, we
will go and hide this group BY go into
this little checkbox. Now when we have our
clean background color, we will go and create
one more layer. We will start creating
our cow from the head. So Lynch's go and rename
this layer as Sketch hat. Now when we have our new layer, we will go and
change our brush to the brush that we use
for our sketching part. So if you were using Delphi
that pencil selected, if you were using
something different, select the brush that
you used before. When you are done,
we will go back to our color palettes and we will select the color that we
will see on to our Sketch. Let's select something dark. And when we are done, alleges get back to our Canvas
and we will start creating our heads on the cow by creating a simple
shape of the circle. We know how to do that. We are just go into our
Canvas and creating the shape just with one line without
lifting up our Apple pencil, the end of the
land, we will hold it and we also will hold one of our fingers on the screen to snap it to a perfectly
round circle. When we are done with it, we will go to our top part where we
have our options circle, and we will try
to put our circle right in the middle
of our canvas. When we have it, we will go and adjusted the same way as
we did with other hats. Again, where I go
into our arrow icon, own the top-left and we
are going under Warp. Again. We are going to
the top two nodes and we will move them
more toward the center. When you are done
with the top nodes, Let's move on to
the bottom and we will move them more
toward the sides. Now let's squish it a little bit by going into
the middle part of Art soap notes and we
will just move it down. When you have
something like that, we are ready to move
on and we will use our Symmetry tool to
add the elements here. So let's firstly move
away from this mode. So we will go to our arrow
key on the top-left. We will tap on it. And then straight away, we will go under our
wrench icon under Canvas, and we will turn on
our Drawing Guide. You can see that we are automatically have
this line of symmetry. But if you don't just go under agent Drawing Guide Symmetry and adjust its position
if its needs it, we will need to try to position
it right in the center. So when you have it, we will hit Done and we will continue by adding our elements. So firstly, let us go
and add some ears. This start with our ears. Firstly, let's go and find the approximate horizontal
center of our sheep. We can do it very easily just by going into one of the sides and starting to create our
line going through the center. We will hone this
line and the ants and we will try to
make it straight. If you feel that maybe you are
not exactly in the center, you can always go
to the editing mode and find the approximate
center in that way. When you have it, we will tap on the screen. We will get away from
our editing mode and we can start
creating our ears. So now when we have
our center line, we will go to one on the sides and we will create
another markdown. We will go just above
this line a little bit. This would be our
center of the ear. So we can go to the
side and we can create another parallel line to the line that we
have in the middle. When you have it, we will use this line
to create our ears. Firstly, we will go to the
soap and we will create a line going from this
little line toward the top. So what we need to
do is to create a straight line going
up in a diagonal way. We will connect it
smoothly with our hats. And when you have
something like that, we can continue by
going to the bottom and creating another shape
that will end up our ear. So what we need to do is
to go to the bottom on this slide and to
create a little curve, go and strictly to our hat. And you can hold this
line and the end to adjust the curvature
on these elements. When you have
something like that, we will need to work
more once I the shape of our year lynchers go and turn this corner that
we have on the side, a very smooth corner. So what we need to do is to
go and create a curve here. You can play around with
this size on the year. You can play around with
all the curves here. It's all up to you. What we need to do is to create very cute ears when we have
this curve for our corner, Let's just work on this line
that we have on the top. We will need to turn it into
a curve to just go L on it. And we will create
a curve like that. We will need to
smoothly connected with our hats so we make it seamless. When you are done, take a look at your
illustration from the distance. If you want to
adjust some parts, you are welcome to do it. If you want to make your
ear a little bit smaller, you can always go to
the Liquify tool, select push, and go to one of the sides and adjust
your ear to your liking. When you have the
result that you like. Ledgers go away from our liquefy tool and
continue agent are elements. So now we will go
to the top and we will start creating
our little horns here. Firstly, we will go to the
middle part where we have our intersection between
our horizontal line and our line of symmetry. And from here, we
will go and create diagonal lines going
up in a 45-degree. You can play around with it. This line will be in
the middle of our horn. So when you have
it's ledgers go to the top and we will
go to the left side. Firstly, we are going and
creating the line like that. When you have this first curve, let us go to the bottom and
we will create another curve. But this time it
will look like that. When you have it's, we
will go and continue making our sheep by
creating another curve. So we are going to end on the line that we
have just created. And we are trying to create something similar to what
we have on the left, but we will need to make it a little bit
smaller on the top. So exactly what we
are doing is go into the top with the shape
of the bean like that. When you have something
like that led just work on to our connections. Let's make them very
smooth and very roundy. And also we can go
to the top part of our corn and we can make it
a little bit more pointed. So for example, let just
go to the left side and we will cut our little
curve a little bit here. If it's easier for you to
work with the Liquify tool, again, you can use it here. And when you like the
shape of your horns, no matter how you achieve that, alleges continue by going
into our middle part of the whole sheet and we
will start creating our ice. Here. We go into this line
that we have any middle. We are going to this side
from our central line. We will create a
shape like that. So it is a very
elongated ellipse and we can play around with
the distance from the center, with its size, with everything. When you have the
shape that you like, we will go inside it
and we will shade it. Take a look at your
illustration from the distance. If you want to
adjust some parts, go and adjust them. If you don't want to adjust anything and if you
want to continue, ledgers go to our
eyes and we will add one more element that will
represent the eyelashes. So let's just zoom in our canvas and let's go to, our left eye, will go to the top
left part of it, and we will add one
diagonal line going up. In that way, you can play
around with its size. So you can play around with its direction, with its sheep, with anything that you
want to play around with when you're
satisfied with your eyes. Let's continue by agent are
a little snot elements. So what we need to do firstly, we will go underneath this
line that we have any middle horizontal 1.3 will
make a little mark down here. When we have it, we will go to one
of the sides and we will start creating
elites old curve, go into the bottom
part of our face. So let's just go and create
something like that. At the ends of the line. We will hold our
line and we will go to that soap to edit sheep, to adjust the whole
shape in general. So let's just make this
shape a little bit smaller and more around it. If you want to adjust it
in any different way, you are welcome to date. Generally, what we need
is something like that. When you are done,
we will tap on the screen to get away
from our editing mode. If we need to go to the top and maybe smoothing
up this line, we will go and do that. And when we are ready
with our snot element, let just go to the sides and
we will add the nostrils. So again, we will go a little bit underneath this
line that we have, the top of the snout. And from here we will go to one of the sides and we will create the lines similar to what we did with our little eyelashes. So let us create
something like that. We will try it out. If it's not working, we
will do it one more time. So for example, now we will need to position it a
little bit differently, more close to our center. So let's just undo it
and we will go and position this element a little bit more toward
the center line. If you want to play around with their position
of this element, if you want to position
them differently, if you want to make a
different angle on them, you are welcome to do it if you want to make them
smaller or bigger. Again, it all up to you. When we have these two elements, we will go underneath
the ice and we will start making
our cheeks here. So first, let just go over
one of them and we will start very easily by creating
a shape of this circle. So again, the same
way as before. We are creating the
shape jazz with one line without lifting
up our Apple pencil, we are holding it at the end. And if we need, we will go
to Edit Mode and adjusted, adjust the size to your liking and adjust the placements
to your liking. To remember that you can
always take a look at your illustration from the
distance. If you like it. Ledgers go away from
our editing mode and continue working
on our sheep. The cheeks were
the last elements that we needed our
Symmetry tool for. So let just go and
turn off this option. What we need to do
firstly is to go to arrange icon or the top-left, we are going under Canvas and we will toggle Drawing
Guide from here. When we did it, we will
need to make sure that Arly with this gauge
is not Assisted. So we are going into
the layers we are going to earlier with
this gauge of the head, we are tapping on it and we
are choosing Drawing Assist. Now when we did it, we will go to the
hats to the top of it and we will start adding
some additional elements. Let's start from
some sports that later on we will
change the color of So firstly, let us
go to our left side, right underneath the horn, and we will create some
blobby shape like that. You can continue going
with the sheep to the ear or you can leave
it only on the head. And when you have
the first shape, Let's move on to
the opposite side and let's do something
similar here. You can repeat the exact shape
that you have on the left, or it can play around with a shape and find something new. And when you are done with
these shapes on the head, we will need to go to the ears and we will need
to define where we will have our for and where we will have our inner part of the year. So what we need
to do is to go to this intersection
between two lines that we have right here. From this intersection, we
will need to create a curve that will recreate
the same curve that we have on the bottom. So what we need to do
is something like that. When we have it on
the first year, Let's do the same,
own the opposite sex. If you want to add some
little spots on the ears, you are welcome to dydt. Also, we can go to one of
the ears and for example, adds a little element
like that here. When we are done with it, Let's continue ADNI Details by moving to the top-right
between the horns. And we will add a
little hat here. What we need to do
is to go between the horns and creates
a little ellipse here. Let just do something like that. Hello Julian and the hands and let just go to our editor mode. Let's try to position it right in the middle between our horns. And what we need
to do is to make the bottom part on this ellipse
a little bit more open. So we are going to this
node that we have here and we will drag it down when you
have something like that, position it nicely if
you haven't before. And when you are done, we will tap on the screen to get away from our editing Modes. Now, we will need to
go to the top of it and we will need to add
a little cylinder here. So firstly, ledgers grab our eraser tool
and we will erase everything that we have inside this little shape that
we have just created. Now we will grab our brush one more time and we will go to the middle of it
and we will make a little mark down. That way. We will know where the
center of this shape is. Now, we will go to the sides and we will need to create
two vertical lines. So let just go and make two more marks down on the
same line that we have. Our first mark down on. Try to make the distance from this side similar on both sides. When you have these
two marks down, alleges go from them to the top and we will create
a vertical lines. When you have them, we will grab our eraser
tool one more time and we will erase this line that
we have on the back. When we are done with this, we will go to the top part and we will create
another ellipse here. These ellipses should connect
these two vertical lines. So let's just go and
create our apps. As always, hold your line and the ends a jazz the size of it. If you need to adjust its
position or anything, let just go to our
editing Modes. Let's connect our sites with
the lines that we have. And also ledgers go to this node that we have on the
bottom of this ellipse. And we again will make it
a little bit more open. When we're done, Let's get
away from our editing Modes. And then we will go to the
bottom of our vertical lines and we will close the shape
by creating another curve. We will repeat the same curve that we have on the WhatsApp. As always, you can hold
your line and the, and you can adjust
its placement. It's curvature, It's everything. If you need to
adjust it even more, go to the editing mode. If you need to adjust
some parts and grab the eraser tool and HSM. Now we are done with our little hats and we can
go and add more details, for example, to the horns. Let's just go and add some
flowers and some leaves. We will first lego
to our left sides and we will start creating
some leaves here. We will start by going to our left side and we will
add the guiding lines. So let just go to
the left side of our left horn and we will
create a few lines like that. Now when you have
this guiding lines, we will need to go and
turn them into leaves. We will be creating the leaves
in the shape of the lemon. So let just go and create one curve going
on the left side. And then we will
continue by creating the similar sheep
on the other side. When you hand the first leaf, Let's turn this to other
guiding lines into the leafs to if you feel that maybe you want to clean everything up, grab the eraser tool and erase all the lines
that you don't need. When we have our additional
elements on the left, Let's move on to the right side, and let's add our additional
elements here to. Firstly, we will go
and create one leaf, and we will start again by
creating the guides in line. Let's just go to
our right part of our right horn and we will create a guiding
line in that way. When you have it led, just turn it into our leaf. If you want to erase some parts, go and erase them. Now when we have
our leaf ledgers go to the bottom part and we
will add a little Flower. What we need to
do is to start by creating a little circle. And when we have
our little circle, we will go around and we will
start adding some petals. Let's overlap are
elif and our horn. And then we will just grab our eraser tool and erase all the lines
that we don't need. If you want to adjust
your sheep in any way, you are welcome to do it. Now when we have our
additional elements, we are almost done
with the head, but we will need to
do one more thing. Remember how we edit a little dance to the
head of our chicken. We will need to do it here too. So let's just grab our
brush and we will go to our left sides and we will
create a little dance. Firstly, let just go to the
bottom part of our face, underneath the ear and we
will make a little mark down. From this markdown, we will go up and we will create
our little debt. You can make it very
big or very small. It's all up to you. Just try to make it very soft. And now when we have
our little dance, we will need to do
one more thing. We will need to put our
head more into perspective. When we are looking
at our illustration, when we are looking
at some parts, we will see that some parts are closer to us and some of
them are farther from us. The same way as it works
with our lightning. We will need to work on to the whole shape and feed
it into their perspective. So what we need to do, we will need to go to our arrow key. Firstly, we will
go under distort. You can see we have
this bounding box and the first thing that we will
do is go into the middle. Note that we have on the left. We will grab it and we will
move it toward the center. When you have
something like that, when your shape is more rounded, we will go to this
node that we have on the top and on the
bottom, on the right. And we will move them a little bit more
towards the sides, the top and the bottom one. So what we need to do firstly, is to go to the node on the top and we will drag
it a little bit up. You see how our sheep on the left stay in the
same and we will just need to go and work
on the right part because this part
will be closer to us. So when we worked ones
that are nodes on the top, we will go to the bottom and we will do the same thing here. We will grab it and we will move it a little bit more
toward the bottom. When you're done, when you're
satisfied with their sheep, we will go to the
uniform methods and we will rotate the shape. To rotate this shape, we go into our green nodes or the soap, and we will hold our Apple
pencil there and we will move it in a circle and movements a little bit
toward the left side. When you have
something like that, we will move more
toward this side. So we will have some
space to create our body. And when we have it
positioned in that way, let just go to our
Eric you one more time and we will
deselect everything. Now we have this
sheep on the head, and let's move on
to create our body
12. Cow: Body Sketch: Let's start working
once our body. And by doing firstly to earliest and creating
one more layer. Let's tap on R plus icon and let's rename this
layer as Sketch buddy. Now, we will go to our
Canvas and we will start by creating a
shape of the ellipse. Then just go and create a beak shape like that
the same way as before. We're just creating
our sheep and we are holding it at the ends. Snap it to a better sheep. And let's go to the top
two are editing Modes. What we need to do is to
position our element correctly. So firstly, lend just move it more toward the
left side until we have our left side on this ellipse right
underneath the eye. So let's just go and move it. When you had this little note on your left underneath
your eye lid, just work on our right part. We will make it a
little bit smaller. So let just grab this
node on the right and we will drag it
more toward the center. When you have the
sheep like that, we will need to make it
a little bit different. We will need to drag
it a little bit down, so we will have some space
between the ear and the body. Let's just drag it down until we have the
results like that. If you feel that maybe
they sheep is too rounded, you can go to the
bottom nodes and you can shrink it down
just a little bit. Generally we should end up
with a shape like that. And so when you are done, ledgers get away from
our editing Modes and we will start by creating
our ElectNext. So what do we need
to do firstly, is to go to the bottom part and we will need to define
where our legs will nT. So let just go to this
bottom line that we have on our body and we will
step a little bit from it. We will make a little mark down. Now when we have this
little mark down, we will need to go through
the whole shape of our canvas and we will need
to create a little curve. So let's just create
a curve like that. You can hold this line
and the hands and you can match it with this little
mark down that we've made. And if it's not quite alright, we always can get back to our edits and Modes and
adjusted from here. When you have there
result like that, like just get away from our editing mode by
tapping on the screen. Now when we know where we
need to finish our legs, we will need to make the guiding lines that will
help us to build this lex. So firstly, let us
go to our left side where we have this intersection
between two shapes, the body and our hats. And here we will create a
line going in that direction. If you need to adjust
it a little bit, we will go to our editing mode. We will move it right
onto this line. When you have the result
that we are ready to move on and add
more guiding lines. So when we have this first line, we will need to
continue by creating the second line for our
a second front leg. Lynch's take a look at this intersection
that we have between our little snout elements enter the hat and from
these little points, we will go down and we will create a slightly diagonal line. When you have
something like that, we are ready to move
on to our right side. And again, we will start by
going to the age of our body. And from here we will create
a line which will be again, a little bit diagonal. You can make it parallel
to the lung that you have just created for our
second front leg. If you need to adjust your
lawn or adjust its direction, you are welcome to go to the editing mode and
adjusted from here. When we have our third line, Let's continue by aiding
our last line for our legs. So we will step a
little bit aside from this line that we
have just creates it. And we can just go
and create something parallel to the line that
we have on the left. So something like that. Or if you want, we can go and change the
direction on this line and later on weekend heights
are back leg a little bit. So for example, you
can play around and create the
direction in that way. When we have all the
lines ledgers go and start turning
them into our legs. We will go to our front
part so to the left, and we will start with dislike
that we have right here. So when we have this line, we will go and we will need
to add some thickness here. So we will just
zoom in our Canvas and we will go a little
bit aside from it. And we will create
a line like that. You can play around and
make it as thick as you want when you have
the result that you like, we will need to go to the bottom and we
will need to connect these two lines with
a very smooth curves. So let's just go and create
something like that. When you are satisfied
with the result, we are moving on
to our next lab. So let just go to
this line that we have a little bit
further to the right. We will do the same thing. Here. We can go and turn this
line that we have to one of the sides on the leg or we can make it a center of our legs. You can try it out both ways
and find what works for you. When you found the position
on this leg that she like, we will need to go a little bit further to the top
and we will need to continue aiding the line here because this leg
will be upfront. So what we need to
do is to just go to the body and add a line here. And now when we have
our legs in the front, Let's move on to the back. And let's start from
our very right parts. Lend just make this line
that we have as a guide, a very curvy line. So we're just go into this Bomb elements and we will go and continue going
down with a curve. So try to make it very smooth. And when you reach the bottom, we will need to go and create another line that will add
the thickness to our leg. Lunges, step a
little bit as side and we will create a
line going in that way. When you have it,
we will need to turn these little
lines on the board, some into a curve. So let's connect our two lines. When you have it land,
just add one more leg and we will use this line
that we have for our guides. So let just go and we will create a little curve
going in that way. And in that way we will
create a little hygiene lack. So now if you need to
adjust some parts, if you want to erase
some elements, you are welcome to do it. If you want to work
more on the legs, again, you're welcome to do it. And when we are done
a jazz and our lines, let just go to the
bottom parts of our legs and we will
add this little toes. So what we need to do is
to step a little bit from the bottom line and create
another parallel line there. Let's just go through
all four legs and add this little elements
when you are ready, let just go and
add a little tail. We will go to the middle
part of our body. So let's just go and
make a little markdown. And from this little mark, we will deal with the curve up. Let's just create
something like that. You can play around
with its curvature. You can play around
with its size, with everything that she
wants to play around with. And when you have
this first-line, we will need to add
some thickness to it. So we will go either to
the top or to the bottom, and we will add another line that will be parallel
to the first line. When you have
something like that, we will go to the top and we will add a little
brush elements. Firstly, we, I go into our left part and we are
creating a shape like that. We will go down to
our right part and we will create a similar
line on this set. If you want to play
around with these sheep, again, you're welcome to do it. And now we are ready with
our main parts ledgers, grab our eraser tool and we will erase the parts
that we don't need. If you want to adjust
your shapes in any way, you can go to the
transform tool to the Warp option and
adjusted from here. Or you can go to your magic
wand tool and use Liquify. So play around with your shapes if you want to and
when you are ready, we will start
agents and Details. Let's take eight and our Details by adding some little spots. So we will go to the whole shape of our body and we will add a few more elements
the same way as we did on the top of our hats. Let us go along the whole body
and let's add a few spots. When we have
something like that, we will go to our layers
and we'll combine these two layers together if you don't want to adjust
anything here. So let's just go to the top
layer with our Sketch Body. We will tap on it and we
will choose merge down. And then we will go and create one more layer above it
to add more details. Now when we have our new layer, let just go underneath
the hats and we will start creating
a little cooler here. So what we need to
do is to go and create a line
underneath our hat. You can just go and create
a parallel line there. But if you feel that
maybe your hats, the bottom part of
it is too rounded, you can go a little
bit above it, flattened it up and
create a line like that. This will be the top
part of our color, and then we will need to go and create one more parallel
line on the bottom. So let's just step a little
bit from this new line and we will go and create
another parallel line. So what we need
to think about is that it will be a
little bit wider on our left side and it will go inside the sheep on our right. We will need to end up
with something like that. Now, let's just go
to our left side and we will make a
little curve there. Once add these two lines, we will connect them together. When we have
something like that, we will go underneath this little color and we
will add a little beep Here. What we need to do is to go
and create a wavy shape. On the bottom, we
will start from our little connection part
that we have just created. And we will go to the bottom and create a shape like that. If you want, you can go and
create some different shapes. If you want, you can
make it more rounded. You can make it less longer. It's all up to you. What we need is just
this little sheep. If you want to adjust
it in any way, grab your Liquify
tool and adjust it. What we need to pay
attention to is that our right part on
this beam should be a little bit bigger than
our left side because we are creating these into a
little bit of a perspective. When you're satisfied
with your sheep ledgers, go and deselect everything. We, we'll grab our brush
one more time and we will go and add some
details to the cooler. So for example,
Lynches go underneath our snout elements more
towards the right side. Here we will add
a little flower. So let just go and do the
same thing as we did here on the top and just add a
flower a little bit bigger. We started from a little
circle that is in the middle of our Flower and we are
going and agents and petals. When you have the
result, bet you like. You can grab the eraser tool and areas the lines
that you don't need. You also can go to your previous layer with
this gauge and areas, the part that you
don't need from here. Now, let's get back
to our layer with this little beep and we will
add a few more elements. So for example, let's just go to the left side and let's
add some little leaves. Let us go and add one
guiding line like that. And from here we will turn
this line into a little leaf. If you want to add more leaves, you are welcome to date. If you want to add
more elements, you are welcome to do it. When you are done
with this part, alleges get back to
our layers and we will combine these
two layers together. So we are going
to our top layer. We are tapping on it and we
are choosing merge down. Now when we have
everything on one layer, Let's just go to
our Transform tool, which is our arrow
key on the top-left, and we will go under uniform. We will make the whole shape
a little bit smaller and we will position it more toward
the center of our canvas. If you want to play
around with your shapes, you can go under warp or under liquefy and find
what works for you. And when you are completely
satisfied with your sketch, we are ready to move on to our next part where we
will be agents are Colors
13. Cow: Base Colors: Let's start our color in
part by changing the brush. So we will go to
the brush library and we will choose
monoline brush. When we did it, we are
getting back to our layers. And firstly, we
will go and change the opacity level of
earlier with this kitsch. So let's just go to RNAi, can go into our opacity
slider and finding that comfortable level of our opacity when
you aren't done, we will need to
close this and we will need to go to
our sheep group. And from the shim group, we will go and create
one more layer. So I just tap on the plus icon and let's rename
this layer as Body. When we have two layers
that belong to our cow, Let's select them both
and let's group them. We will rename
this group as cow. Now one more time we're getting back to earlier with the body. And when we did it, we will
go to our color palettes and we will select the
color with the name White. When we did it, we
will need to go along the whole shape of our cow and we will
need to recolor it. So let just go and create this
outline that will be very smooth and very close ledgers
go and very quickly DIT. And when we have our outline, lenders get back to Arles and we will hide our layer
with this gauge. Just for 1 s, we will check out whether
everything is closed. And if it is, we will go and we will drag and drop
the color insights. Now Lynch's take a look
at the whole shape. And if you feel that
maybe you need to go and change some parts may
be smooth and then up, you will need to go
and do that right now, when you're satisfied
with the sheep ledgers, get back to our
layers and we will get our layer with
this gage back. And now when we have our layer with this cage back leg just go to earlier with the body and we will create one
more layer above it, Typing then the blast icon
renaming this layer as sports, and we will need to clip
it to a previous layer. Now, when we have the LEA, we are going back to our
color palettes and we will select the color with
the name dark gray. When we did it, we will get back to our Canvas
and we will go alone the whole shapes of our little spots and
we will recreate them. So firstly, we are
creating our outlines and then we are color
dropping the color insects. If you want to play
around with your sports, you are welcome to
do it if you want to recreate them similarly to
what you have on your Sketch, you're welcome to do. Let's just go and add
this little spots. When you are done
with this sports, we will go to the top parts of our ears and we will add
the same color here too. So very accurately ledgers go
and add this little color. The same way. We will go to the
bottom parts of our legs and we will
recreate these tools. So let just go grab our brush and add this
color here to here. And when you are ready, we will go back to
our layers and we will hide earlier
with the Sketch. We'll check out whether
everything is looking fine. And if we need to
adjust some pirates, we will grab our eraser or our brush and we will go and
adjust this little parts. And when you are
ready one more time, we're getting back to
our layers and we will unhide our layer
with the sketch. Now we will need to
create one more layer. Onto this layer, we
will be Eating are snouts and our bottom
parts on the ears. So let's just go and
create one more layer, which will rename Details. We also will need to clean
this layer to a previous one. So let's just tap on it and
let's choose Clipping Mask. Now firstly, we will go
to our color palettes and we will select the color
with the name light orange. With this color, we will go and recreate this shape on the snout against starting
from the outline and then adding
the color insect. When you've created, check it out without delay
with this gauge. If you need to
adjust some parts, go and adjust them. When you are done adjustments, Let's just get back
to our layers. We will unhide earlier
with this gauge and we will go and change the
color of our brush. This time. Let just go with the color
within the light pink. And with this color, we will
go to the bottom parts of our ears and we will
recreate these Shapes layer. Just go again and do that. You don't need to be
very precise on the top. You can overlap the
shapes later on weekend adjusted by moving our
layer to the bottom parts. When you have it one more time, go into the leaves Haydn
earlier with the Sketch. And let's just drag this layer underneath earlier
with the sports. So we will need to select
the layer with Details. Firstly, we will hold
our Apple pencil on it and we will just
drag it underneath. Now you can see how
very neat our ears are and they are not overlapping
our dark spots anymore. Now, when you are satisfied
with your little ears, if you need to adjust some
Bears go and adjust them. And when you did it, we are ready to
add more elements. So again, let's just
go to our layers. Let's unhide earlier
with this gage, we will go to our layer
with this sports. From here we will create
one more layer, layer. Just tap on it, and let's
rename it as Horns. Now you can see when we
have added are dark spots. We have a little problem
determining where our little horns on the
layer with this Gage ends. So we can solve this problem
into different ways. The first one is just to go to our layer with the sports and hide it for now and go with
what we have right now. Or we can go to our layer with the Sketch and we can
change its color. So let's just do that one. We will go select our
layer with this gauge. Then we are going to
our magic one tool. We are going under hue,
saturation and brightness Here we can see we have
some sliders on the bottom. And we can go firstly and change the brightness,
for example. And then we can add some saturation and play
around with the colors. So try to find the color that is not that similar to
our dark sports. And when you are done, we will just deselect
everything by heating our magic one
tool one more time. Now getting back to our layers, go in that earlier
with the horns, go into our color palettes and selecting the color with
an IV, light yellow. With our light yellow color, we will go to the horns. And firstly, we will
recreate the lines that we have on
our sketch layer. Just go and do it on both sides with a
very smooth Lights. When you are done
with the outlines, Lynch has get back
to the layers and we will hide our layer
with the sketch. We will check out whether
our horns are very smooth. If they are, if we don't
want to adjust any pairs, we will just go
and drag and drop the color inside these parts. If you want to smoothen
up some parts, you are welcome to
do it either with the brush or with
an eraser tool. When you are done with
the horns ledgers, get back to Arles and we will unhide earlier with the Sketch. When we have it alleges go
to the top of our ahead. And let's recreate this
little hat that we have here. Firstly, we will go and
create a new layer. Let's just tap on
R plus icon and let's rename this
layer as accessories. Now when we have our new layer, we will get back to
our color palettes and we will select the color
with the name whites. With this color, we will go and recreate the whole shape of our little hats as always
starting from our outlines, Eating you to see
what's happening on the bottom part on
the hat where we have this little white line
that is overlapped by Y color that we
have on our cow. You can always go to the Leary's and hide the layer
with the body, the checkout, how it looks. If it's okay, Let's
just drag and drop the color insights if you want to adjust some
parts firstly, go to the leaves and hide the layer with this
gauge checkout, how it looks without
the sketch lines. And if you want to
adjust some parts, go and adjust them when you are satisfied with
your sheep ledgers, get back to our
layers and we will get back our layer
with the body. For now. Let's leave our head
just like that. Later on we will add some shadows and it
will look better. So for now, let just go unhide earlier with
this gauge and we will add our
little accessories that we have near the horns. So firstly, we will
go to our layers and we will select the color
with the name green. When this color, we will
go to our left part and we will Recoloring just the
middle part of our leaves. So let's again go and
create the outlines. Firstly, when you are done, we will just drag and
drop the color insights. For now we are done
with this green color. Let's just get back
to our color palettes and we will select the
color we, the name CAN. When this color, we
will go again to our left part and we will add two more least
with this color. Don't worry, if you are overlapping your
horn, It's alright. When you have the
first outline ledger, drag and drop the color. And when you are ready
with the first leaf, lead, just go to the bottom part and we will add another leaf there and the color inside then go to your list and hind
layer with the Sketch. Let your guard how it looks
without the sketch lines. If you need to
adjust some parts, go and adjust them. If you like how it looks
with the overlaps leaf, you can leave it as it is. If you don't like how it looks, we can go to our layers and we can go to
earlier with the horns. We will select it,
we will tap on it, and we will also hit
Select From here. We will select our horn. And now when our
horn is selected, we will get back
to the list and we will go to R allele
with accessories. Now, we will grab the eraser
tool and we will go and erase this little part that
we have overlapping our horn. So in that way, we will
put our lease on the back. When we are done, we will just deselect everything by going into our left part to this
little S ribbon icon. When we are done, we will go to our part and we will add
this accessories here too. So firstly, let us
get to our layers and we will unhide our
layer with the sketch. Now we will go to our
colored palettes and we will select again this green color with
the green color, we won't go and recreate this
little leaf that we have. One direct creating
the closed outlines and then end the color insights. Take a look at your leaf
without the sketch lines. If you need to
adjust some parts, just go and adjust them. Now let's just go and do the same thing that
we did on our left. We will go to early
with the horns. We will tap on it, and we will choose select
from the lease. When our horn is selected, we are getting back to
earlier with accessories. We are grabbing our
eraser tool and we are going to erase this part
that we don't need. When you are done, we will deselect everything
by hitting R S ribbon icon. When we are done with this part, we will go back to Arles and we will unhide the layer
with this sketch, we will need to recreate
this little flower. Let's firstly go to
our color palettes and we will select the color
within the light pink. With this light pink color, we will go and start
recreating the petals When your eye down,
just drag and drop the color insights
and as always, go hide the layer
with this gauge to check out whether you need
to adjust some parts. For example, we will
need to go and manually recolor this little
part that is now green. And now when we are
done with the petals, we will go back to the layers and hide the layer
with this gauge. And we also will go to our
color palettes to select a different color that will
add to our middle part. For this part, you
can go with pink or with red color selected, increase the size of
the brush and just put a little dot to
the middle part. When we are done, we are done with our
accessories on the head. So let's move on to
our little beep. We will recreate next. So firstly, again, where
I go into Arles and we are creating a new
layer for this part, let's greater than Yulia
entrance name it as BEP. Now when we have our new layer, we are going back to our
color palettes and we will select the color
within the light-blue. With this color, we will go and recreate the whole
shape of our beep. And the same with
the color to lend. Just go and recreate the lights. When you're done
with the outlines. One more time where I
get invective layers and we are hiding
earlier with the Sketch. Let's check out how it looks. And if it's okay, we will just drag and
drop the color insight. Eating. Need to adjust some parts, go and adjust them. When you are done with
this part, ellen, just add some additional
elements to this little beep. We will go and add some dots. So what do we need
to do firstly, is to go to our layers. We will select early
with the beep, we will tap on it and we
will choose Alpha Lock. When I choose an Alpha Lock, we are aging the details only
on the areas that we have wanted this layer so we won't
be going outside are beep. So what we need to
do now is to go to our color palettes and select the white color with
the white color, we will just go along the whole shape and we
will add some dots. Try not to overdo it. You can create them in a very random way or you
can find some pattern. When you're done with this part, we will go again to our layers and we will create
one more layer above it. We will need to create our additional
elements on the color. So firstly, let us go and
unhide earlier with the sketch. Now, we will go and create one more layer above
earlier with the beep. Linnaeus rename this layer
as beep accessories. And now let us get back
to our color palettes. We will start by recreating
our little leaves. So we are selecting the
color we the name green, and we are going alone
are shapes that we have for our leafs and we
are recreating our outlines. You can go with just
one green color or you can play around and
find some other colors, creating the outlines,
drag-and-drop the color inside. Always go to your layers and hide the layer
with this case to check out how everything looks without this gauge Lights. If you need to
adjust some parts, a jazz that when you are
done with the leaves, we will go and unhide
earlier with this gauge, and we will go and
recreate this big flower. For the flower, Let's select the color with the
name light yellow. And again, firstly,
we will start by recreating our petals in the color inside
and then check out how it looks without
this gauge lines. If you need to
adjust some parts, go and adjust them. When you are done with
the petals, again, we're going back to
our layers and we are unhide in earlier
with the Sketch. Let's go and select a
different color that we will add to the middle
part of our flower. You can go and select pink, maybe del, orange, red, or any color that you like, increase the size
of your brush and put little dots in
the middle parts. And when you are done, when this part one more time, Let's just go back
to Arles and hide our layer with this case to check out how everything looks. If you're satisfied with it, we will go and recreate
our facial features. For the facial features, ledgers get back to Arles and we will unhide the layer
with the Sketch. Then when we did it,
we will go and create one more layer above the
layer with beep accessories, like just create a new layer, enter, name it as
facial features. When we have a new layer, we are getting back to our color palettes and we
isolette in some dark color, dark gray, gray,
brown, or brown. Let's select the
color and we will go and recreate our eyes firstly, just go there and start by recreating the shapes
of our ellipsis. When you have the outlines, just drag and drop
the color insights. And when you are done, we will just go to the
top parts and we will recreate this leads
cell eyelashes. If you want to add some
highlights into the eyes, you are welcome to do. Just go and select the white
color and add some dots or little stars or anything that you want to add
the highlights width. When you're done with this part, lynchers go and recreate
our little nostrils. Again. We are increasing
or decreasing the size of your brush depending on what
size you are right now. And when you are done, we
will just go and create these little lines
for our nostrils. You can make just very
straight lines like that. Or you can turn the nostrils
into some little drops. When you are done, just go to the layers and hind layer with this gauge
to check out whether you need to adjust some parts and if you need to
just go and adjust this little parts when you
are ready with the nostrils. One more time, we
eigenvector the layers and we will unhide the
layer with this sketch, we will need to recreate
our little cheeks. So firstly, let just go back to our brush library and we will select the medium blend brush. With this brush, we will go back to the color palette and we will select the color within
the light beam or pink. When you have the color, we will go and adjust
the size of our brush. And we will just go to this little places that
we have on our Sketch. And we will add
our little cheeks, make them as bright as you like. And when you are done with
the main shape ledgers, get back to our brushes. We will go and select
monoline brush. When we did it, we
will get back to our colored palettes and we
will select a darker color. So if you were
using light being, you will select pink. If you were using pink, just go and select rats. So select any of these
Colors and ledgers. You're inside our
little cheeks and we will add a few
diagonal lines there. Now let us take a look at the whole Illustration
without our sketch lines. So we are going to Arles and hygiene earlier with the Sketch. Let check out whether
we want to adjust some parts or maybe
recreate some parts. And if we're satisfied
with everything, we are ready to move
on to our next part, where we will be aiding
our Highlights and Shadows
14. Cow: Shadows & Hoghlights: Let's say this bike by deciding where is
our light source. So firstly, I go
into early years and we are going above
all the layers that we have to create one more layer and put our little
arrow to the top. So you decide what
side you go this time. Just create a little arrow. This arrow will help us
to create our Shadows. So now when we habits, we are going back to the Layers. And let's start from our body as we have
two more leaves here, let just go to our
layer with the sports. And from here we will
create one more layer. Let's just tap on
the plus icon and let's rename this
layer as Shadows. Let's clip it to a previous one. And also we will go to
our anion and we will change the blending mode to
multiply S for the opacity. Let's set it at 50 per cent. For now, let's use this same pink
color that we have right now for our shadows. So firstly, we
will go underneath our little hats and we
will add the shadow here. Let's just go and create
a big shadow like that, repeating the same shape that we have for our little hats. Take a look at your arrow to know where your light source is. If you want, you can always hold your Apple pencil at the end of the line to
snap it to a better shape. And when you have the outline, ledgers increase the
size of our brush and let's add the color inside
this little shadow. With the same approach, we will go underneath
our little horns and our little accessories and we will add our little Shadows. Just go in there, taking
a look at our arrow and aid in the lines
for our little Shadows. When you are done
with this part, Let's go underneath are
cooler and the beep. And we will add
this shadow here to suggest going there,
repeating our lengths. If you feel that you need
to adjust some lines, you are welcome to
go and do that. When we are done with
it in the shadow to our cooler and
underneath the beep, we will go to the legs and to the bottom part of the body. So firstly, let us
go to our legs and lift decide what legs
are in the back. So we have this leg on the left, that is our front leg. This leg will be in the shallow because it
is in the back. So let's just go and add
the shadow here too. We can add the shadow
to the whole leg, or we can just take a little piece and
add the shadow here. Also, we will go to this little middle part between two legs and we
will add the shadow here to make sure
that this lag that we have on the right is in front. So when we have it, we will go slightly
further and we will define this lizard
leg one more time. So again, we're arguing
to the bottom part on the body and create an
L little shadow here. So just repeating
the line that we have on our bottom
part of the body. When we have
something like that, we will go a little
further and we will put the whole leg that we have
in the back to the shadow. Let's just go and
recolor this area. And also we will define this front leg a little bit
more by agent this shadow. When you have this
outline layer, just go and add the
color inside this area. If you need to
adjust some parts, maybe make the
lines more smooth. You are welcome to go grab the areas are two and
a jazz the outlines. And also let's add
our last shadow for the body and we will
edit to our little tail. So we will go to
this intersection between the body and our Tale, and we will add the
shadow here too. So what we're doing is just dividing this area firstly with a little line like
that and then go into the right with
a little curve. If you need to
adjust some parts, maybe erase some
little mistakes, you are welcome to
go and do that. And when you are dumb, lead, just get back to our
layers and we will go to our layer
with little hats. We have its own earlier
with accessories. So let's just go above
it and we will create one more layer that
will rename as Shadows. As always, we will tap on it. We will choose Clipping mask. We will go to our
an icon and change the blending mode to multiply
again for the opacity, Let's go with 50%. We will go to the top part
of our hats and we will make this little shadow underneath this cylinder
that we have on the top. If it's easier for you, you can go to your layers and unhandled layer with
this gauge to know where you need to put the shadow underneath our little cylinder. And let's make a
little shadow here. You can also go a little bit to the right to create a
little shadow like that. And also create the
line that is going vertically to define
this cylinder even more. When you are done, ledgers
get back to our leaves. Let's hide the layer
with this gauge. Let's grab our areas or two and a jazz this
little shadow. And when we identify with R hat while we're still here once
earlier with accessories, alleges go to our leaves and add some additional
elements here. So firstly, we
will need to go to our color palettes and we will need to select the
color within named Les. Just go Zoom in our Canvas, decrease the size of our brush Firstly, let's go over our
left sides and we will be adding the lines in the
middle of our elements. So what we need to do is
to go to the first leaf and create a line going through the
whole shape like that. When you have it, we will go to the sides and we will
create a few lines going in different directions when you have its
own the first leaf, Let's move on to the next one
and do the same thing here. Lynch's go through all
the leaves that we have and we will add
this stem elements. When we, I've done
with our leaves, Let's move on and
add more shadows. Firstly, we will
go to our horns, and from here we will go and
create one more layer again. So tapping on the plus
icon and creating the layer that will
rename as Shadows. Let's clip it to a previously. Let's go to the icon and change the blending
mode to Multiply. And also let us go and
set the opacity to 50%. When we are done, we will go to our
brushes and we will select medium blends
into when we're done, we're going back to
our color palettes and we are selecting the color either adult
orange or light orange. And now we will take a look
at our arrow and we will go to the opposite side
from it to the first horn. For example, let's start
with the right one. We'll go to the
bottom right corner. And from here we
will start creating a little shadow this way by
creating a little gradient. If you already did a little bit, you can grab the
smudge tool and try to make the blends that
will work for you. When you are done, we will go to the opposite horn and we
will do the same thing here, taking a look at our arrow and go into the opposite
side from it, Let's just go to our
bottom left corner. And from here we will
start making our gradient. Again. If you overdo
it a little bit, we will grab our smudge tool and we will try to
blend it nicely. When we are done with the horns, we will go and do
the similar thing to the top part of our pink
elements on the ears. So firstly, ledgers go to our Layers and let's
find our ears. We have them attached
to our body layer. So let's just go above all
the layers that we have for the body and we will
create one more layer. Let's rename this layer
as Shadows smooth. Let's attach this layer
to a previous one. So tapping on it and choose
and Clipping Mask go into our icon and choose multiply Blending Modes
where the opacity, Let's leave it at 50
per cent for now. Again, we're arguing back
to our color palettes and we will select
either light pink, pink, or red color. Select one of them. And ledgers go to
the top part of our pink elements and we will
add the gradient from here. You can see that we are
aiding the gradients not only to our pink elements, but to all the elements
that we have on our body. Don't worry, we'll
fix it later on. Now we need to add more color to the top part and blend it
nicely with the whole area. When you have something
like that led, just grab our smudge
tool and let's try to make a nice smooth blend. When you are done
with the first-year, Let's do the same, own
the opposite side. Again, go into the top part of our pink elements and
add more color here. And then we will add a little
blend to the bottom part. If you need to blend it
nicely and grab this much do and make this blend. When you're done
eating this shadow, we will need to
do the following. We will firstly go to our
layers and we will find earlier with Details where
we have our being elements. Let's select it,
Let's tap on it, and let's choose Select. When we have these
areas selected, we will go to this bottom panel and
we will choose Invert. When we have this
invert option on, we will go back to
Arles and we will go to our layer with the
name Shadows smooth. When we are in
this layer, we'll, we'll grab our eraser
tool and we will erase all the elements
that we don't need. And now let's
deselect everything by hitting R S ribbon icon. And let's take a look at how
everything now is looking. If you feel that maybe you have some elements that
you need to adjust. For example, like
here on our itself, we can easily grab
our eraser tool and very nicely go over
this part and erase it. And when we are
done with the ears, Let's add the similar
shadow to our beep and underneath this little
elements that we have on it. So firstly, let us go and
change the color of our brush. We will just go to
color palettes and select the color
we, the name CAN. When you have the color, we are going back to
the layers and we are trying to find our
layer with the beep. When we found it, we will go and create one more
layer above it. And we will do the same
things as we did before. We will rename it as Shadows, we will clip it and we will change the blending
mode to Multiply. And S4 the opacity, again, 50 per cent for now. When you are done with
their preparations, lynchers go to our beep and we will add the shadow
underneath our heads. So firstly, when I go in there, again with a similar brush, go in and creating a
slight shadow here. When you're satisfied
with the result, we can move on underneath our elements here
with the same brush. So again, take a look
at your arrow on the top to create this
very smooth shadow. Ends again, if you overdo it some parts or if you want
to adjust something, make very smooth shadows. You can always go to your smudge tool and you
can make a nice blend. Work a bit more
once a, the shadow. And when you are done, we will go and add the additional elements to
our accessories on the beep. So what we need to do
is to go to our leaves, find this layer with
beep accessories above. It will create one
more layer that will rename as additional elements. Let's clip it's your
previous layer. So tap and selecting
Clipping Mask. And then we will go to our N icon and set the
layer as multiplied Blending Modes for
the opacity you and with 50% when your eye down, we are going back to
our brush library and we are selecting
monoline brush. And we will do the
same thing as we did with our leaves on the top. So we're going to change
the size of the brush and make these additional
elements on the leaf. So we will go to the center of our leave and we will add
the first line like that. Then we'll go to the sides
and we will add more lines. Let's start with our
Greenleaf's firstly, because this color that
we are using right now, this C11 will work
better for them. And then we will go to
our orange leaves and we will change the color to add the additional
elements on that. When you are done within
Greenleaf's ledgers, get back to color
palette and select doubt orange or
bright orange color. With this color, we will do the same thing that we
did for our Greenleaf's. If you want to add some
details to this little flower, you are welcome to do it. If you don't want to
add any more details, we are ready to move on to
our little Highlights part. So firstly, let us get
back to our list and we will go above earlier
with facial features, will create one more Lee and we will rename it as Highlights. Now let us get to
our an icon and we will select it or
overlay blending mode. Let's for now leave
it as overlay. When we are done with this part, we will get back to
our color palettes and we will select
some bright color. So white, light pink,
or light yellow, you decide when we have our color ledgers go to the opposite from
our Shadows parts, and let's add little Highlights. Let's start with
our little horns. We are going to
the opposite sides and we are adding
little Highlights. Now let's move on to our flower. We will add a few
dots there too. If you want to add some
highlights to the leaves, again, you and do that. When you are done
with this part, we will go to our layers and we will
create one more layer. This will be the Highlights to, but we will add a little bit of the Highlights with
our gold dust brush. So again, let's rename
it as gold dust. And we will go to our an icon and change
the blending mode to overlay with the
same yellow color or if you were using
a different one. So at light yellow, we will go to our brush
library and we will select the brush width
and then gold dust. Now we will go to some dark areas and not
only to the dark areas, but mostly to them. And we will add
this little texture with our bright color. So let just go decrease
the size of our brush. And very accurately, we
will go to the top part of our ears and we will start
from here is in our gold dust. Let's then go over our horns and we will add a bit
of texture there too. Then we will go to our bottom part and we
will go to the back of our cow where I go into this
little elements that are dark and we will go over them and add this
little gold dust. Don't worry that you're
going a little bit beyond the frames
of your little cow. We will fix it later on. Now let's just go
to the tip of RT and we will add these
goals extra here too. And when you are ready, alleges clean everything up. And we will start
by going to Arles. And firstly, we will hide our
layer with a little arrow. Ledgers go tap on our little checkbox
and when we are done, we will need to clean
everything up around our cow. So firstly, we go in and find
an earlier with the body. Let's tap on it.
Let's select it. Let's select, select
from this little list. When we are here on the bottom, we will need to choose Invert. Now when this is selected, we are going back to
earlier with gold dust. We are grabbing our areas
or two and we are going over these areas that we don't
need this gold dust own. For now, you can leave
this area near the horns. We can fix it later on
by selecting the horns. So just go over them and erase the parts
that we don't need. Now when we, I've done
with the main sheep, Let's deselect everything
and let's areas, the areas near the horns. So again, I go into
our layers we are finding earlier with the
horns tapping on it, select it from the list. Now, again, on the bottom, we will choose Invert. Now when our horns are selected, we are going to earlier
with gold dust, we are going near
our horns and we are erasing these little areas. When you IRAC, Let's deselect everything by hitting
R S ribbon icon. Let's take a look at the whole illustration that
we have from the distance. And if we like it, we are done with our class. Thank you for
watching this class. Leave a review if you
liked this and consider subscribing for more Kawaii
videos in the future, looking forward to
seeing your projects.
 Uni Corn, ⭐Kawaii Art Enthusiast⭐