Transcripts
1. Introduction: Hello everyone. I'm Uni. And into this class,
we'll drop you ghosts. This class doesn't require any prior experience
or fancy tools. We'll start from
scratch and we'll be using simple techniques
throughout the process. Everything you'll see will
be happening in Procrit. However, if you have
either software or want to try
traditional materials, you are welcome to join. If you are ready to start, let's jump right into it.
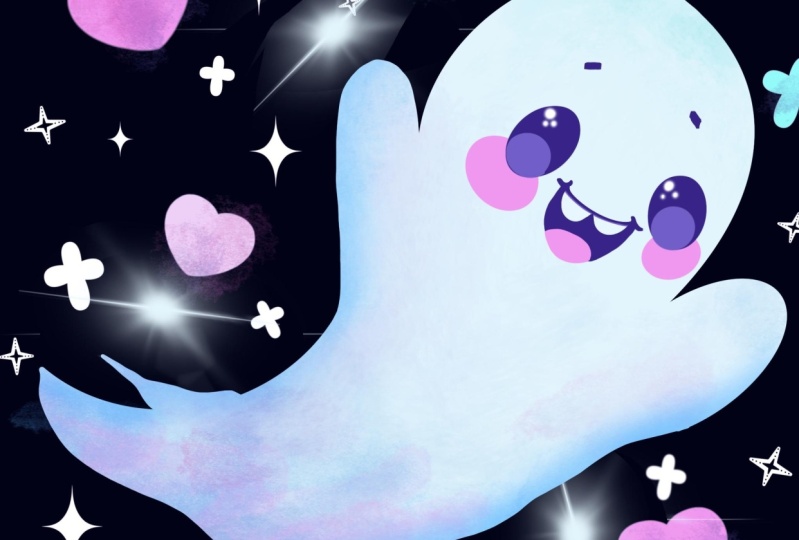
2. Drop Shape Ghost: Sketch: Let's start our class firstly by deciding what kind of canvas
we are going to be using. You can see it is a very simple standard square canvas
that you can find. In procreate, both
pixel width and pixel height are
set at 2048 pixels. But of course, if you
would like to use any other dimensions for
a canvas, just go for it. For GPI we are using 300, and for the color profile, it is set as SRGB with
this loan number. When it sell done, let's just
hit Done or our top right, and it will be redirected
to our new canvas. Now we will need to
decide what kind of colors we are going to be eaten throughout the whole class. You can use the colors
that you pick yourself, but if you want to follow
along with the class, go to the project
and resource up and download all the
materials when needed it. Let's just firstly go and change the color
of our background. What we need to do is
to go to our layers and we will go to our
background color layer. When you have this
window on the bottom, we have our ghost palette. But if you don't like this view, we can go over our palettes on the bottom right and
go under cards here. When we are the cards, we have all the colors, names and it will be easier for us to navigate
through these colors. For now, let's just go and find the color with the
title background, and we will just tap on it. In that way, we've
changed our background. Now let's just go and start preparing for creating
our first sketch. First thing that
we will need to do is to go and change our brush. So let's just go to
our brush library. We will go to the
sketch and folder, and here we can find a lot of brushes that you can
pick and try out, find the brush that
works for you. Try out on your canvas. If you don't like it, get
back to your brush library. Select another brush and
find what works for you. When you find the
brush that you like, let's just go to
our color palette. And again, you can go under
cars to see the colors names. For now, let me just pick some bright color that you
will see onto your canvas. So something like
pink, light grayish, C and blue C, and blue, or any other peel
color will work best. Let's select one of the colors. When we are done, we will
go and firstly start by creating the shape of
the ellipse very easily. We will go firstly over
our top right part, and we will create
the shape just with one line without lifting
up our apple pencil. Let's just go and start
creating the shape. And in the end, we will
hold our apple pencil. You will see that you
snap your shape to a better one if you
want to ate it. Move your apple pencil in
the circular movement. If you want to make
it bigger or smaller, just move your apple
pencil from side to side. For now, let's just keep
it at something like that. If you want to
adjust it even more, we can go over the top
to our editing mode. When we are at the editing mode, you can see that
we have some nose, we can just go to them
and we can adjust them. For example, if
you would like to make this shape a
little bit wider, you will go to one of the nodes that you have on the site. You will hold your
apple pencil there and drag it to the site to
make the shape different. For now, let's just
keep it as it is. If you want to move the shape, you will go to your blank
space on your canvas. Hold your apple pencil
somewhere there, and just move it to
the needed please. If you want to go away
from the edited mode, you will need to tap on the
screen to get away from it. If you miss this tool or if you accidentally taped onto your
screen and get away from it, you can always go to
the transform tool, which is our arrow
key on the top plate, and adjust your shape. From here on the bottom, we have the panel that
has a lot of options. If you are using uniform method, you will be adjusting
your shape evenly. If you are using
free form method, you can adjust it not evenly. Find the option that
works for you if you want to adjust the shape again. If you want to move the shape, go to the blank
space and move it to the place that
you need for now. Let's keep it at what
we have right now. And we will just go to our
Ok to deslate everything. When we have this shape, we will need to start creating the guiding line that will
help us to build up the body. Let's just go somewhere
to the middle of the shape and we will go down
with the curve like that. You can play around with
the curvature on this line. It's all up to you.
You can make it big. You can make it small
again, it's all up to you. When you have this first curve, let's just go to the sides and we will start
building up our body. We will firstly
go to the bottom. So we are going more to
our right part and we will go to the middle of the shape
that we have on the top. From here, we will go and create the curve going
down in that way. As always, you can play
around with this curve. Your main goal here is to create a smooth transition between the top shape and the shape that you are just now creating. You just need to
pay attention to this transition when you
have something like that. Let's just go over the top. We will create another curve. In that way, we will be
starting creating our body. Generally we are creating
a shape of the drop. Let's just go to the top part. And again, we will go to
the middle of the shape that we have on the
top very smoothly. We will go and create a
curve going in that way, when you have
something like that, we will need to combine
these two shapes together. Let's just go and create two
little shapes in that way. If it's easier for
you, you can start by creating a shape
of the allopse. You can hold it at the end
and adjust it if you need to. If you don't need to make
these axillary shapes, you are welcome to go
and just start creating this bottom part of the
allopse in that way. When you have the first shape, let's just go to the bottom and let's make a similar shape. But this time it will
be a bit bigger. Make a nice connection
between these two shapes. Always take a look
at your illustration from the distance to see
whether you like it or not. If you want to
adjust some parts, grab and eraser tool, erase the parts that you
don't need and adjust it with your brush when you
have something like that. One more time, let's just take a look at our illustration from the distance and decide whether you want to
adjust some parts. If you want, you can go to one tool that procrate has
and adjust it with it. What we need to
do is to go under magic one tool
over the top left. We will go under Liquefy. On the bottom we
have a new panel, we will need to use
the option push. You can adjust the size, the pressure, and anything
that you want to adjust here. All that we need to do is
to go to this line that we have on the bottom
and make it more curved. Let's just spend some time
here and adjust our line. If you want to play around
with the curve on the top. You are welcome to go and do that when you have the
shape that you like. Let's just go again
to our magic, one tool to deselect everything. Now let's just get
back to our arrow key. And let's just move the whole shape a little bit more toward the center so we will have some space to add more details. Let's just go hold
our apple pantel and move it to the center. You can make sure that you are putting your shape
right in the center by going to this
option snapping and toggling snapping from
this setting window. When you are using snapping, if you hold your apple
pencil and if you find these two
lines, orange ones, one on the horizontal axis
and one on the vertical one, you will see that
now you are putting your illustration right in
the middle of your canvas. When you found these two lines, you are welcome to unhold
your apple pencil. If you want to
rotate your shape, you are welcome to go
to this green node over the top and rotate it. Now when you have
the shape like that, let's just deslect everything by hitting our arrow
key one more time. And let's just go and
add more details. For example, let's just
go and add little arms. We will get back to arm brush. And firstly we will
go to our left side. We will go to the slope that
we have right here from the slope very easily we will go firstly by
repeating the shape. And then we'll go to
the side to create the shape similar to what
we have on the bottom. When you have this
little shape like that, let's just connect it with the body with another
smooth curve. All that we are creating into this illustration should
be extremely smooth. When you have the first arm, let's just go to
the opposite side, and let's create another arm. Try to put the second arm
on the same level that you have your first arm
on to make it happen. You can always go and create the guiding
line going through the whole ship to know where you need to end up your line. Now let's just go again
to our opposite side. We'll go to the same
curve that we have here. We will firstly go
and recreate it, and then we'll go to
the site and create a similar ship to what
we have on our lift. When you have the ship, you just need to go and smoothly connect it
with the whole body. You can always play
around with the ships. You can play around
with their side, with their position,
with everything that you want to
play around with. Now we have the basic
shape of our ghost. Let's just go and add
the facial features. We already have this line
that is going through the approximate center
of the whole ship. If you want to adjust this line, you can go and
create another line that will go more
through the center. When you have it, let's
just go and start creating the facial
features by adding the ice. We will firstly go
over one of our sites, for example, the left one. We will start by creating the shape of the
Allipse like that, again the same way as before. We will hold our apple pencil
at the end of the line. If we want to adjust the shape, we will go to our editing mode. Let's make very
big ice and let's just tell them a little
bit toward the center. When you have
something like that, find the position
that works for you. If you want to
move it, just hold your apple pencil at
some blink space, Move the shape, find
what works for you. When you are done, we will go to the opposite side and we
will create a similar shape, but this time just a
little bit smaller. Let's just go and create
it the same way as we did before just with one line and
we will hold it at the end. Try to make the til the same as it is on
the opposite side. If you need to adjust it, go to the editing mode when you have the
shape that you need. Let's just get away
from our edited modes. And we will go inside the shapes on the ice
and we will shape them. Now when we have the eyes, let's just go underneath them and we will
add little cheeks. Now firstly, let's go
over our left side, and we won't go and
create the shape of the ellipse or the
shape of the circle. You can do it manually, or the same way
as we did before. You can hold your apple pencil
at the end of the line. You can go over
your editing mode and adjust it from here. For now, we are
creating just a cage. So if you don't like it, you can always adjust
it later on when we are going to be
creating our clean shapes. For now, just mapping out
what we need to add here. When you have what you need, let's just go and add
our little mouth. Firstly, we'll go
right between our eyes just a little bit lower that
we have our middle part. Them. And we will start by creating a little
curve like that. When you have this little curve, we will go to the bottom and we will create
another curve. Going in that way
you can play around with the size and with the
curvature of this element. As always when you have it, let's just go grab
our eraser tool and we will as this line that is going through the
center because we don't need it anymore
when you have it, just go inside the mouth. And we will first go
to the bottom part. And we will create a
curve going through the bottom that will
represent our little tung. When you have it,
we will go over the top and we will
add two teeth. If you want to add any
other additional elements, you are welcome to
go and do that. Also, welcome to go
and play around with the whole shape of
your mouth if you want to adjust this
element or if you want to move it or maybe make
it smaller or bigger, what we need to do is to go over our top left to the ribbon icon. We'll use free
hand method and we will go around the
shape to select it. When only the shape is selected, we are getting back
to our arrow key, which is our transform, and we can adjust
our shape from here. Play around with the shape, find the placement, find the
size of it that you like. When you are done,
let's just tap on our ribbon icon one more
time to deselect everything. One more time if you want
to add any more details, for example the eyebrows
or something like that, maybe some additional
accessories. You are welcome to
go and do that. Now we have the general
shape of R and Ghost, but now it's also time that you need to play rounds
with your elements. Take a look at your
illustration from the distance and decide whether you
want to adjust some parts. For example, we can go and
adjust artificial features. Let's just go grab our
ribbon icon freehand method. We will select everything that we have for artificial features. Then we will go to our arrow
key to adjust these shapes. For example, let's
just go tractate them and make them a little bit
more horizontally aligned. If you want to make
these ships bigger, you can go to the
uniform method and go to one of the
corners and drag it. Find the position of these
elements that works for you. And when you are done, let's just deslect everything by hitting our S ribbon icon. Now let's just grab our
eraser tool and we will erase all the lines that we
don't need to keep it clean. Now one more time, let's take a look at
our illustration from the distance and decide whether we want to
adjust some parts. If we want, we can always
go to our magic one to liquefy and
adjust it from here. Also, if you want to make the bottom part a
little bit smaller, you can go to the option
that is called pinch. With this option, you can
go to the place that you want to make smaller
and tap on your screen. You can see that now
you are adjusting your shape by pinching it and
you are making it smaller. With this option, you can go and adjust your little shape just a little bit or too much if you want to
adjust it even more. If you want to expand it, go and use the option Expand. For example, with
the option expand, we can go over our top part and we can make it a
little bit bigger. Also, you can do
all these things, just the option push. Now let's spend some time here to adjust our ship
if we want to. When we are ready,
we will go and add more details when you're
satisfied with your ship. When you are done adjusting it, let's just tap on
our magic one tool one more time to get
away from this mode. Then we will get back to
our brush and we will go over the ship and we will add
some additional elements. For example, let's just go over the left top part and we
will add a little hard here. Let's just go and create
the ship like that. You can play runs with the
ships and you can feed them in by repeating the curves that you already have onto
your illustration. As a if you need to
adjust the shapes, go firstly and select the
shape that you need to adjust. If you need to move it or
make it bigger or smaller, go to the arrow key
on the top left. Find the position that works
for you for this element. Let's just go and create a
few more of these shapes. Let's just go along
the whole line that we have on our right and
add a few more hearts. If you want to add any
other different elements, you are welcome to
go and do that. For example, you can go with just the dots or
maybe some sparkles. As always, take a look at your illustration from the
distance if you like it. Let's one more time go
to our arrow key and let's position the
whole illustration more toward the center. Holding up our apple pencil
and finding these two lines. When you are done,
decide whether you want to make it
smaller or bigger. If you want to go and adjust it. And then again, position
it right in the center. When you are done ejatinate, let's just tap on our
arrow key one more time. And then we'll go to our layers. We will find our
layer where we have our skitch and we will
rename it as Skitch. To rename a layer, you
will need to tap on it and you will need to
choose rename from the list. Now let's just move
on to our next part where we are going to be
aiding our basic colors.
3. Drop Shape Ghost: Base Colors: Let's take this fight from
some tiny preparations. Firstly, we will go
and change our brush. So let's just go inside
the brush slide brief. We will go to the
calligraphy folder and we will choose
monoline brush as we want all of
our lines and all of our shapes to be very smooth. We would want to go and change
one option on our brush. What we need to do is to tap on our monoline brush
inside the brush studio. And on the left, we will
go under stabilization. When we are under stabilization, on the top, we have
the option streamline. This option streamline
has the slider amount. If it's set on the lower values, we can go to the drawing pad
and try out how it works. We can create a line, and you can see that we have a lot of control over this line. But this line is a little bit jagged and not at all smooth. If we want to make
a very smooth line, we will go to the option amount and we will drag it
toward the maximum. Again, we will go
to our drone path and try it out one more time. This time you can see that
we have a very smooth line, but we also lost a bit of
control over our line. You can go to this option
amount and you can play around with the value,
find what works for you. And again, if you don't
want to use this option, you are welcome not to find the amount
that works for you. And when you did it, let just go and it done over our top right. Now, when we have
prepared our brush, let just go and
adjust our layer. With this sketch a little bit, what we need to do is to make
it a bit more transparent. That way we will see what's
happening onto this layer, but it won't be that disturbing. And we will also see what's happening on the
different layers. What we need to do is to go to our layers and go to our
layer with the sketch. You can see we have
a little icon, we will tap on it and we will go inside this option on the top, we have this slider apacity. We can grab it and we can
move it toward the left until we still can see what's
happening onto this layer. But when it's not that bright, find the amount
that works for you. When you are done, let's
just tap on our layer with this cage one more
time to close this window. Also, let's just go and adjust the color of
this illustration. What we need to do is to go
to our magic one tool and we will need to go under hue
saturation and brightness, we will go to the
brightness slider and we will make
this illustration. All of our lines that we
have right now a little bit less bright when you
have something like that. Let's just tap on
our magic antol one more time to go away
from this mode. And when we are done, we will go back to
our layers and we will create one more
layer above our layer. With this sketch, we will
need to tap on the plus icon, and we will go and rename
this layer as Body. Also, we will just need
to rearrange our layers. We will need to put our Er with the body
underneath our layer. With this sketch, we are not overlapping our lines
on the previously, and we can see what
we need to recreate. To do so, we will need to go
to our lier with the body. We will need to hold it with
our apple pencil and drag it underneath our layer with
the skitch when we did it. Let's just go back to
our color palette. And if you were using some color that is not light gray and blue, let's just go and select it. And when we have this color, we will need to go and recreate the basic
shape of our ghost. We will need to
make it very smooth and we will need
to make it closed. So let's go and
recreate this shape. You don't need to recreate the whole outline just with one line without
lifting it up. You can go and
create the pieces of this line and you can connect
them smoothly together. And also you can use all the
options that we used before. You can create the
curve and hold it at the end to make
it a smoother curve. And also you can
go to the top to the editing mode and
adjust it from there. Now let's just go and recreate this line and we will make
it smooth and closed. When you have the outline, we will go and drag and
drop the color inside. We are going to our icon that
we have on the top right, and we are just dragging
it to the needed place. When you have
something like that, when you have a little
dark outline right between your shapes and your little outline that
you have just created. All that you need to do is not to lift up your apple pencil. When you drag and
drop the color, you will need to drag it
more toward the right side. You are adjusting the threshold between these ships and
you just need to find the amount that works
for you when you don't have this little outline
between your ships, when you drag and drop the
color to the main shape. If you have other
little shapes that you need to drag and
drop the color to them, go and drag it when you have the main outline and main
shape for our goals, let's just go and add these additional elements
to our background. What we need to do firstly, is to go back to our lis
and we will go and create one more layer on which we will create these
additional elements. Let's just tap on the plus icon. And also we will drag this layer underneath
our layer with the body. Let's just hold it, and
let's just drag it down. Let's also rename
this layer as hearts. Now let's just go and
select a different color, and we will recolor these little shapes and
we will recreate them. Firstly, let's just get back to our color palette and let's select the
color with the name. Either pink, grayish purple, light magenta, or magenta. Any pinkish color
will work best. Let's just go and
select one of them. And firstly, we will
go and recreate this big heart over
our left side. Create the closed shape, and when you are ready, drag
and drop the color inside. Now we can go around all of
these elements that we have onto this layer and recreate them with one color later on. If we want we can go and recolor these elements with one tool that procreate has very quickly. Let's just go and recreate all of these hearts
that we have with the same color when you have
all of the hearts recreated. Let's just go and add some dots. When you have all the
shapes that you need, let's just go and
recolor some of them. Firstly, we will need
to go to our liers. We will go to our
layer with the hearts. We will tap on it, and we will choose alpha log from the least. When we are using alpha log, we are adding the color and our elements on the ships that we already have
onto this layer. So we are not going
to be creating any more details outside the
ships that we already have. Now let's just go back to our color palettes and let's
select some bluish color. You can decide which one you want when you have this color. Let's just go to some of
our hearts and let's just go and recreate them very
easily just with the brush. Go to the places
and recolor them. If you want to use
any other color, you are welcome to go and
select the color that you like, color it with it. Now, when you are satisfied
with these elements, let's just get back
to our layers. We will go again to our
layer with the heart. We will tap on it and we will turn off alpha log
from this layer. Now we will go and select
our layer with the body. And above this layer, we will create one more layer that will rename as
facial features. When we have this new layer, we will get back to our
color palettes and we will select the color with
the name, dark purple. With this color, we will go
and recreate the shapes of our eyes and the basic shape of our mouth the same
way as before. Hold your apple pencil at
the end of the line when you have the outline dragon
drop the color inside. When you have the first eye, go to the opposite side
and create the second eye. When you have the eyes,
let's just go and recreate the basic shape of our
mouth when you have it, dragon drop the color inside. Now we will need to add our
little cheeks one more time. Let's just get
back to our liers. We will go to our
layer with the body. And from here we will
create one more layer. We can keep this
layer without a name, because later on we will combine these two layers with
our facial features together and they will have our facial features name
Onto this new layer, we will get back to
our color palettes and we will select
the pin color. With the pin color,
we will go and recreate our little
cheeks the same way. As always. Just create
the shape, close it. If you need to adjust it, go over the top to
the editing mode, find the placement,
find the size, find the rotation that you like. And when you're satisfied, drag and drop the color
inside this outline. When you have the first cheek, go to the opposite side
and add another one. If you need to adjust one of the cheeks or maybe two of them, first thing that
we will need to do is to go to our ribbon on freehand method and select the element that
you want to adjust. When you have this
element selected, go into our arrow key, go into the uniform method
or free form method, and adjusting our sheep. If you need to adjust
the second one, we will firstly deslect everything by hitting
our S ribbon icon. And then we will repeat
the same actions, find what works for you. Take a look at your
illustration from the distance. If you are ready
with these elements, let's just deslect everything by hitting our S ribbon icon. Now let's just get back to our layers and we will combine
these two layers together. To do so, we will
go to our layer on the top with the title,
Facial Features. We will tap on it and we
will choose Merge Down. Now let's just go and rename
it again as Facial Features. We can add our additional
elements on the same layer, but also we can just go
and create one more layer. And maybe it will be easier for us to adjust our elements. What we need to do is to go and create one more layer above. And let's rename it as Details. Make sure that we are
adding our details only on the existing areas that we
have on artificial features. We will need to clip this
layer to a previous one. We are doing something
similar to the alpha log, but we are doing it
on a separate layer. Let's just go to our
layer with the details. We will tap on it and we
will choose clipping mask. Now everything that we are
creating on this layer will be seen only on the elements that we have on our
previous layer. Now when we have this layer set, let's just get back to
our color palettes. Firstly, we will go and select the color with
the name purple. With this purple color, we will go to the
bottom parts of our eyes and we will add
literal elements here too. What we need to
do, firstly is to go to one of our
eyes, for example, to the left one, we'll go to the bottom part and we will
create another ellipse. Hold it in the end. If you need to adjust it, go and adjust it. If you want to go and
position it differently, again, you are welcome
to go and do that. If you want, you can go to your editing mode and
adjust it from here. Basically what we need
is something like that. When we have the outline, we will tap on the screen to get away from our editing mode, and then we'll drag and
drop the color inside. When we have this first shape, we will go to the opposite eye and we will do the
same thing here. If you want, you can go and manually adjust the bottom part. So it is repeating
the shape of our eye. We can grab the Erasor tool and go over this little
part and adjust it. Try to avoid very sharp corners. If you need to go and adjust
these very sharp elements, when you are done
with the first eye, let's move on to the opposite one and do the same thing here. Just grab in our Erasor
tool and trying to repeat the outline that we have on
our main shape of the eye. If on the contrary you will need to go and add some color, we will just go grab our brush and go to the bottom
part and recreate the line that we have on our main shape of the eye when you have
something like that. Let's just get back to
our color palette and we will grab our light greyish
sea and blue color. With this color, we will go to the top parts of our
eyes, for example, to the left one,
and we will go and add some additional
elements as highlights. Firstly, let's just go over our left top part and we will go and put
one dot like that. We will go to the
opposite eye on the other side and do
the same thing here. If you want to go and add
more of these elements, you are welcome to go
and do that you want. You can play around with
their shapes and with their amount when we
have our highlights. Let's just go and add the
teeth with the same color. Let's just tap a bit from the outline that we have for
our mouth and let's just go and recreate the
shapes that we have on our layer with the sketch When
you have the first tooth, let's just go over
our opposite side and let's recreate
another tooth here. Now we can also go to our layers and we can
hide our layer with this sage to see
more clearly what we are doing onto our main shapes. What we need to do is to go
to our layer with this cage. And we will need to tap onto this little chat
box near the icon. Now one more time, let's just take a look at our illustration. If we want to adjust some parts, let's just go and adjust them when you are
done with the teeth. If you remember, we had a
little tongue on the bottom. If you need, you can go to
your lis and unhide your li, with this cage to recreate it. If you don't need it, you
are welcome to go and pick the same color that we
were using for our cheeks. With this color,
we will recreate this element on the
bottom of the mouth, as we already have our color for the cheeks on our canvas. We can go and pick it from here. What we need to do is to
go to the needed color. And we will need to hold
one of our fingers on this color until we
see this little tool. When we have the color that we need on the top of the two, we will lift up our finger. Now we have the same
color that we need. Let's just go to the
bottom of our mouth. And let's recreate
our little tank here. Now let's one more time take a look at our illustration
from the distance and decide whether we need to adjust some parts or if we want
to adjust some parts. First thing that we will
need to make sure of is that all of our lines
are closed and clean, and we don't have any elements
that we need to recover. We don't have any
miscolored places. Let's just go and zoom in
our canvas, for example. You can see that here we have
a little line that we need to go back to our layers
with our hearts and recolor. We know how to pick the same color that we
already have onto our canvas. Let's just hold one of our
fingers on the screen. We will involve this little tool and when we have the
color on the top, we will just lift up our
finger with this color. We will go and recolor
this little part. Now in the same way,
let's just go over all of our shapes and let's just make sure that
everything is nice, smooth, clean, and don't
have any miscolored parts. Also, if you need to go and smoothen up some parts
or as some elements, you are welcome to
go and do that. And when you are done
adjusting your shapes, let's move on to our
next part where we are going to be aiding
the additional colors.
4. Drop Shape Ghost: Beautification: Let's tie this part firstly by going and changing our brush. Let's just go to
our brush library. We will go to the
airbrushing folder and we will select
medium blend brush. When we did it, we will
go to our layers and we will find our layer with
the body above this layer, we will create one
more layer that will rename as Gradient. Let's clip this layer
to a previous one. We will tap on it and we will choose clipping
mask from the list. When we did it, we will go to our color palettes and we will
select a different color. We can start by selecting
the color with the name, light magenta, or magenta. Pick one of these colors, and when you are done, we will go and increase the
size of our brush. And we will go over
the bottom part of our body and we will
add the color here. Let me just add it in that way. And then when you have
this little tip recolored, let's just go and
pick another color. For example, let's just go with the color purple, magenta. With this color, we will go and add another layer of color. Let's just go and recolor this little part
when you have it. We will go one more time to our color palettes and we
will select some blue color, for example, CN blue three, or CN blue or any blue
that you like here. Let's just go pick one of these colors and let's
add another layer. And when you have
something like that, we will need to make it blend. What we need to do is to go to our magic one tool and we
will select Gaussian bluer. On the top you can see we have
the option Gaussian blower 0% What we need to do is to go and add the percent of
our Gaussian blower. What we need to do is
to go to our canvas. We will hold our
apple pencil there, and we will drag it
toward the right side until we have a nice
and smooth blend. Something like 50%
55 will work best. But try out to make a very smooth blend when
you're satisfied with it. Let's just go and
tap on our magic, one tool one more time
to close this window. If you want to
adjust the colors, maybe make them a
little bit more bright, you are welcome to go to the magic 12 hue
saturation and brightness. You can go to the
sliders and you can play with them, for example. You can go to the saturation and make the colors more saturated. You can go to the brightness, make them darker, or
for example, lighter. If you want to adjust the colors in a more
proficient way, you are welcome to go to the hue slider and adjust
the colors from here, find what works for you. And when you are done, let's
just tap on our magic 121. More time to close this window. Now when we have this gradient, let's just more colors. What we need to do is to add a little shadow and also
some of the highlights. Let's just go to our layers. And let's just go and create one more layer above our
lay with the gradient. We will go and rename it
Highlights and Shadows. Again, let's just clip this
layer to a previous one. Typing and selecting,
Clipping mask. When we did it, we will
go to our brush library, calligraphy folder,
monoline brush. Now we will go and firstly
add just one little shadow. Let's just go and
select the color with the name and blue
three with this color. We will go over the top left part and we will just
go over our outline. And we will add a little
shadow in that way. Just create something like that. Try to make it
smooth if you want. You can make it
thick or very thin. It's all up to you when
you're satisfied with it. Let's just go again
to our color palette. And we will select
light grayish and blue, which is probably
our white color. When we have it, we will go to the bottom part and we will start creating a
little highlight there. Firstly, let's just go to this little til that we
have on the bottom. Straightly from this little
n that we have on the top, we will go and try recreating the line that we have
for our main outline. You can play around with the
thickness on this element and you can play around with everything here that you
want to play around with. Just try to make it very smooth. If you want to go and maybe add a little bit more
of the highlight, you are welcome to
go and do that. For example, we can go
more to the bottom part of this highlight and we can go and create the line
going in that way. And then we will
just go and turn it into some very sharp shape. Again, you can play around with the thickness of this element and try to make smooth
transitions between the shapes. You can need to adjust something gravinaries tool
and adjust it with it. Also, we can just go and
add little highlights to the bottom part of
our arm on the right. If you want to go and
add more highlights, you are welcome to
go and do that. You can also go to
the bottom part of the left arm and add
little highlight there. Just try to make sure
that you are not overlapping the highlight
with the shadow. And now let's just take a
look at our illustration. And we will need to decide whether we want to
adjust some parts. If we want, we will
go and adjust them. We also can go and create some peculiar shape
with our highlight. Also, we can, we can add our highlights to the top part of the hat. It's all up to you. We can go and add some dots. Maybe we can go and
add some little lines. You are welcome to go and add something that
you like here. Also we can just go and make our highlights a little bit
transparent on the sides. To do so, we will just need
to go to our eraser tool and we will need to select
medium blend for our eraser. With the medium
blend very easily, we will go over the lines
that we want to make more transparent and we
will make them transparent. Try not to overdo
it and try to make very smooth transitions between the solid ships and
more transparent ones. When we are done
with our main ships, let's just go and add some
highlights to our hearts. Let's just go to our layers. And let's just find our
layer with the hearts. And above it we will create one more layer that will
rename as highlights. Let's clip it to
a previous layer. Taping, clipping mask. And then we will use our
monoline brush to go over some of our elements
and to add our highlights. Again, go over some shapes,
add some highlights. You are welcome to add some dots and maybe some little sparkles. It's all up to you. If you want to adjust the
transparency of the elements, grab the eraser tool with a
medium blend brush and adjust it when you are ready adjusting
your little highlights, let's just go and add
some glue effects. What we need to do, firstly, is to add this glow
effect to our main shape. Let's just go back
to our lays and let's just find the
shape of our body. We will need to make
a copy of this layer. And we can do it very
easily just by sliding this layer from right to
left and choosing duplicate. Then we will need to go
to the layer that we have on the bottom and we will need to go and
change the color. For example, let's
just go and select the color with the name
purple or C and blue three. When we have the color selected, we will just go and drag
and drop it to this please. To make sure that
we did it right. We can go to our layers
and you can see that now our second body layer
has this new color. When we have this color, we will need to go and change the blending mode of the layer. Blending modes are
different ways your layers can interact
with each other. And by changing blending modes, you can create different
visual effects. For now, let's just
go to our icon and from the lest we
will select hard light. Or let's for now stop at and we will set the
apacity to maximum. Then when we have this layer set as and when we have
a different color, we will go again to our
magic an tu Gaussian blur. Let's just go and add the
blur around our elements, Find the amount of blur
that works for you. And when you're satisfied, let's just tap on
our magic an Tu one more time to get
away from this mode. If you want to adjust the
color of your little bluer, you are welcome to go back to the adjustments hue,
saturation and brightness. And play with the sliders
here. For example. Let's just go to saturation, and let's make it
almost to maximum. When you're satisfied, we are ready to go and play
with the hue slider. Find what works for you. And when you are done,
let's just go and tap on our magic anto one more
time to close this window. If you want to have multiple
colors for this glow, you are welcome to
go and do that. What we need to do
is to go firstly to our brush library,
airbrushing, medium blend. Then we will go
back to our layers. Go into the layer with the body, we will tap on it and we
will choose alpha lock. Then when we have this
layer set as alpha log, we will get back to
our color palettes and we will select
a different color. For example, let's
just go with magenta. With this color, we
will go to some of the places and we can
go and recolor them. Try to make very
smooth transitions. And when you are done, let's just get back
to our layers. Let's just get back to
our layer with the body. And we will tap on it
and we will choose alpha log from the
list to set it off. If you want, you can go to this layer and you can
rename it as glue. Now let's just get back to our layer with the hearts and
we will do the same thing. Firstly, we will go
to our layer with the hearts and we will
make a copy of it. We are swiping it
from right to left, and we are choosing duplicate. Now when we have
the second layer, let's straight away go
and rename it as glue. Now one more time, we are going to our icon to change the
blending mode to add. Now we will need to go and add the color to all of these elements that
we have right now. And we can do it very
easily, just in that way. We will need to tap
on our layer with the glue and we will
need to choose Select. Now all of these elements
are selected and we can select the color that
we want to add to our glue, for example, and blue three
on this bottom panel. We can choose color feel. Now if we take a look at our illustration from the layers onto this layer with the glue, every object that we have here will be recolored
with this blue color. Now let's just go
and add the bluer. We are going again
to our adjustments. We are going to
the Gaussian blur and we are adding
some blur here. Find the amount of blur
that works for you. When you are satisfied, you can go and
change the amount of saturation or brightness,
or the color. We are going again
to our adjustments, saturation and brightness. And let's just play with
our slides from here again. When you are done, let's
just tap on our magic 12. And if you want to recolor
the glow of some elements, we will need to get
back to our layers. Go to the layer with the glue, tap on it, and select alpha log. Now we will go again to
our brush library and we will make sure that we are using medium blend for our brush. We will select a different
color and we will go over the places that
we want to recolor, and we will just go and
manually recolor them. When we are done with this task, we are done with our
first illustration. Let's move on to our next part, where we will be
drawing a next sketch.
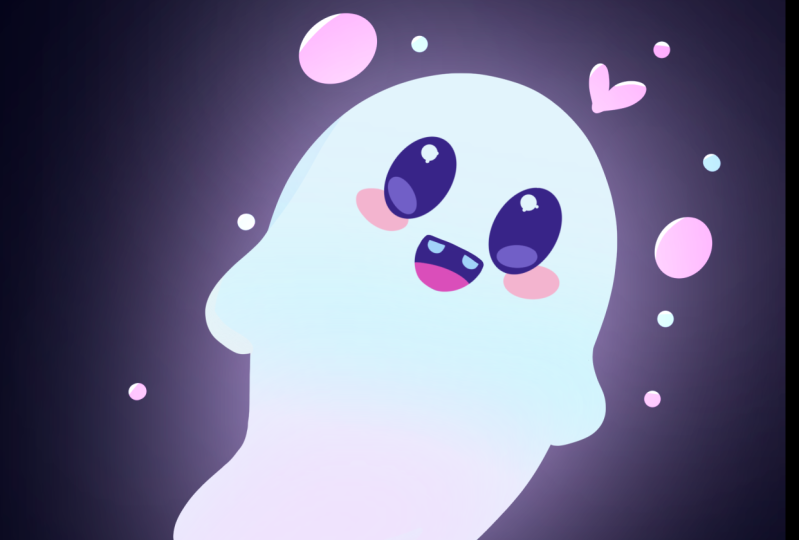
5. Blankie Ghost: Sketch: Let's start working onto
our second illustration. Firstly, by going to our layers. And we will clean
everything up here. What we need to do is to select every layer that belongs
to our first illustration, and we will put them
all in the group. When the first
layer is selected, we will go to the
next one and we will swipe it from
left to right. And we will do it
with every layer that belongs to our
first illustration. When we've selected every layer, we will go over our top
right and we will hit Group. Now when we have our new group, let's just go and select it. Let's tap on it one more time. And let's choose rename. We will rename this group
as drop shaped ghosts. When we are ready, let's
just collapse this group. We will need to
go to this V icon near the checkbox and
we will just tap on it. Now we can just go to
this little check mark. We can tap on it and we will
have our clean bankrupt. Now let's just go and create one more layer above this group, and let's rename it as Sketch. One more time, we will go
back to our brush library. We'll go to the sketching
folder and we will select our brush that
we were using before. When you have your brush, let's just go back to
our color palettes and let's select some
color that we can see on our color of the background when you
have your color selected, when you have your brush,
let's just get back to our canvas and
let's start sketching. Firstly, let's just go
over our top right part. And again, we will
start by creating a shape on the ellipse
the same way as before. We are just going there and
boldly creating our shape. At the end of it, we will
hold our apple pencil. Let's position it in that way. If you need to adjust
it in any way, please go to the
editing mode over the top and adjust
it to your liking. For example, let's
just put it more toward the center
when you have it. We will tap on our screen to get away from our editing mode. When we have the shape, let's just go to the sides and let's create some
peculiar shapes. For example, let's create something more looking
like an octopus. Let's go over our left side. Firstly, we will go
more to the top part of this allopse that we
have from the top part, we will go to the side
with the curve going in that way when you
have it on one side, let's do the same on
the opposite side. We are going to our right part, more toward the top
part of our ellipse. From here we are creating
a similar line to what we have on our left when we
have something like that. Let's just go over the
bottom and let's create the lines going in
that way you can play around with the amount on these faults and
also you can just play around with the position on these little tips that
you have right here. If you want, you can
make them very round it. If you want, you can
go and just twirl it a little bit to the top.
It's all up to you. Now it's time to
play with the shape. Let's just go and
work on our shape. If you want, you can go and use all the options that
we were using before. For example, you can
go to your magic one to liquefy and
adjust it from here. Or just go and manually
create the shape that you would like if you need
to erase some parts, grab an eraser to and erase the parts
that you don't need. And when you have the
general shape like that, let's just go and work on
to art facial features. Let's just go to the alopes that we have over the top part. And then if you need to, we can just go and find an approximate
center of the shape. You can do just by creating a line going from
top to the bottom. In that way, if you need to, you can hold your apple
pencil at the end of the line and snap it
to a better shape. If you need to adjust
the placement of it, please go over the top
to the editing mode. When you have the
first line like that, let's just tap on the screen. And let's just go and find an approximate
center of the shape. But now on the horizontal axis, let's just go and create
something in that way, you can go with
the straight line, or if you want, you can
go and create a curve. Now when we have the
lines like that, let's just go more toward
the left side of the lines. We will start by
creating the shape of the firstly going
over our left side and we are creating the
similar shape that we were creating before onto
our first illustration. Find the size that
you like and find the placement and the
rotation that you like to. You have the first shape. If you need to adjust it, go to the edited mode and adjust it when you have the
shape that you like. Let's just go inside of
it and let's shade it. Now let's just go more toward the right side and we will
add the similar shape there. Let's make it just a
little bit bigger. Take a look at your illustration from the distance
and find whether you like the
position of your eye or not adjusted to your liking. And when you are done,
let's just tap on our screen to get away
from our edited mode. And that will go inside the
shape and we will shed it. Now, we don't need
these lines that we have as axillary
lines anymore, so let's just grab
our eraser tool and let's erase these lines. Now. One more time, take a
look at your illustration from the distance and decide whether you want to adjust
the ice or not. If you want to adjust the ice, firstly go to the ribbon
on free hand method. But before selecting,
just turn off color Feel. Now let's just take our freehand method and select the eye if we
want to adjust it. And then we will go
to our arrow key on the top left uniform method. And we will just go and push this little eye a little
bit toward the left side. When we are ready, let's
just tap on our ribbon icon. And then we will go and
work onto our mouth. Let's again get back to our brush and we will go
right between the eyes. This time, let's just go with the peculiar shape of the heart. Let's just go more toward
the center of our eyes. From here, we will firstly create an allpse
going in that way. And then we will turn it onto the opposite side and create
another allpse in that way. Later on, we will
adjust it even more and create a better
shape of our mouth. Again, take a look
at your illustration if you want to adjust the mouth, its position or anything. If you want to make it
bigger or smaller, firstly, go to the ribbon icon and select the object that
you want to adjust. When you have it, we
are going back to our arrow key and we are
adjusting it from here, Find the size and the
placement and the rotation. That works for you.
And when you are done, let's just desalect
everything by hitting our S ribbon icon. If you want, you can go and
add additional elements. For example, let's
just go above the eyes and let's add little
eyebrows in that way. If you want to try out
a different shape, you are welcome to
go and do that. When you are done
with the eyebrows, let's just go underneath our eyes a little bit
to the side of them, and let's create our cheeks. This time let's just go with a smaller shape on the cheeks. This time let's create a
circle instead of the ellipse. Let's just go first
to one of the sides. And we will go
underneath our eye, and we will create our shape. We will hold it at the end. And also we will hold
one of our fingers on the screen without lifting
up our apple pencil. You will see that you snapped your shape to a
perfectly round circle. Each, you need to
adjust the placement. Go to the edited mode
and adjust it from here. And when you are done, we
will go to the opposite side. And we will do the
same thing here. When you are done,
let's just grab our eraser tool and we will erase all the lines
that we don't need. One more time, let's
just take a look at our illustration
from the distance. If you want to
adjust some parts, now it's time to go
and adjust them. If you want to go and
select everything that belongs to our facial
features and then go to the arrow key and adjust it from here you are
welcome to go and do that when you are satisfied
with your main shape, Let's just go and
deselect everything by hitting our S ribbon icon. And then let's just go and
add our additional elements. Again, we are getting
back to our on brush and let's just
go firstly over the top of our illustration and let's create some stars
and some sparkles. Let's just go and
add a few of them. If you want to add some
additional elements such as dots or maybe
some different shapes, you are welcome to go and do that when they are done
with our top part. Let's just go to the bottom and let's create
some lines there. For example, let's first
go over our bottom edge, and let's create the
similar line there, but this time it will
be a little bit dashed. Let's just go and create
something like that. When you have
something like that, let's just go over
some of these places and let's add additional
elements in that way, we will just go and create some wobbly shape like that
when you have it on one side. Let's just go to the
opposite one and somewhere create a little
bit smaller shape. If you want to go and
add some glowy dots, you are welcome to
go and do that. Now one more time,
let's just take a look at everything
from the distance. If we like it, we will go
to our arrow key on the top left and we will try to position everything right in the
middle of our canvas. Let's just hold our
apple pencil and let's just find these two
lines that are orange. If you want to adjust your
illustration in any way, you are welcome to
go and do that. Use liquefy tool, use the
option of free form method, uniform method, make
it smaller, bigger, find what works for you
if you want to rotate it, rotate it and when you are done, let's just deslect
everything by hitting our arrow key one more time and then we are ready to move on to our next part where we are going to be aiding
our base colors.
6. Blankie Ghost: Base Colors: Let's begin this part firstly by going to our brush library. Go into the
calligraphy folder and changing our brush to Mona line. When we did it, we
will go straightly to our layers and we will work onto our layer with the skitch. Let's just go to our icon and let's change the
opacity level of it. Find the amount of opacity
that works for you. When you are done,
let's just tap on our layer with the skitch to
close this little window. Also, we will just go to our magic on an tool
utration and brightness, and we will make the whole
illustration a little bit less bright when you
have something like that. Let's just tap on our magic
one tool one more time. Then we will go and select our light grayish
C and blue color. When we have our color, we will go back to our layers. Now let's just go and select the whole group with
our drop shape ghost. From here we will create one more layer that
will rename as Body. Now the same way as with
our first illustration, let's just go along the lines
that we have on our Skage. Let's recreate them. Let's just make closed, smooth and clean lines when you have the basic outline
when it is closed, let's just go and drag and
drop the color inside. Let's just take a look at our outlines without
the lines on the Skage. We are going to our
layers and we will hide our layer with the sage.
Just for 1 second. We will check out how
everything looks, and if we need to
adjust some parts, we will go and adjust them. Remember that we
will need to have a very smooth outlines. When we are ready,
we will get back to our liars and we will unhide
our layer with the skitch. Now let's just go and recolor these elements that we have in the background.
One more time. We are going to our
drop shape ghost group and we will on our plus
icon to create a new layer. Let's just go and rename this layer as
background elements. When we have a new layer, let's just get back to
our color palettes. And let just go and select some color that we are going to be creating our stars with. Let's firstly go and select the color with the name Magenta. We will go over our stars and we will create
just the outlines. When you have the outlines
for the stars one more time, let's just go to
our color palettes and select lighter pink color. You can go with light magenta, grayish purple, or pink. Select one of these
colors and then drag and drop the color inside
these little stars. Now with the same color that you put to the inner
parts of the stars, let's just go and recreate the shapes of our
little sparkles. Or if you want to go and change the color to white
or any other color, you are welcome to
go and do that. As for the lines that
we have on the bottom, let's one more time go
to our color palettes. And again, we will select
our magenta color. With this color, let's just
go and recreate our lines. Also to make the lines not that thick and not that
even on each side, we can just go and
change the brush. We will go back to
our brush library. We will go to the inking folder and we will select
technical pen. We will do the same thing
with this brush by taping it, going to the stabilization, and adjusting the
amount of streamline. Let's just tap down over
our top right when we are done adjusting the
amount of streamline. And with this brush, let's just go and recreate our lines. And when we are done adding
these lines one more time, let's just go to
the brush library. We will go to the
calligraphy folder and we will choose
monoline brush. And with the white car. Let's just go and add some dots. And when we are done
with this task, let's just go and add
the facial features. One more time, we are
going back to our layers. We will select our
layer with the body, and above it we will create one more layer that we will
rename as facial features. When we have a new layer, let's just get back to
our color palette and let's select the color with
the name, dark purple. With this color, we will go and recreate the shapes of our eyes, eyebrows, and the
shape of our mouth. Firstly, let's just
go to the ice. Just the outlines
if you need to find a different placement or find just a different
size of them. When you have the
outlines that you like, drag and drop the color
inside with the same brush. Let's just go and recreate our eyebrows the
same way as before, just going there and
creating the outlines. If you want, you can hold
your apple pencil at the end of the line to
snap it to a better shape. And when you have it, let's just go and recreate the mouth. What we need to do is to go and increase the
size of our brush. And then when we
have a bigger brush, we will just go there
to this place where we have our mouth and we will
create a shape like that. At the end of the line, we will hold our apple
pencil and you will see that you snap it to
something like a heart. Let's just lift up our
apple pencil and then we will go over the top
to our editing mode. Let's adjust it to
our liking when you've played enough and
found what works for you. Let's just tap on our screen to get away from
the editing mode. Now let's just go and
add our little cheeks. Firstly, let's just go again to our liys and we will go
again to our body layer. And from here we will create one more layer onto this layer. Let's just go again
to our color palette. And let's pick some pinkish
color, for example. This time let's just
go with magenta. With this color, we will go and recolorate these
elements for our cheeks. Now with the same color, let's just go and add some
tongue to our little mouth. But firstly, we will need
to go to our layers. And we will need to combine these two layers with our
facial features together. Let's just go to our layer with facial features that
we have on the top. We will tap on it and we
will choose merged down. We will go and rename this layer as facial
features one more time. Now when we have one layer for our facial features,
let's just tap on it. And let's choose alpha
Ok from the least. Now when we have alphalog
turned on with the same color, we will go to the bottom part of our mouth and we will
add a little tonk here. Play runs with the
shape and with the size of the tongue and then manually
recolor the bottom part. Now when we have the tune, let's just go back
to our list and we will hide the layer
with the sketch. When we have everything
without our sketch lines, we will get back to our
color palettes and again, we will go and select the
color with the name purple. With this color, we will
go to the bottom parts of our eyes and we will add these
additional elements there. The same way as with
our first illustration. Go into these places and adding them if you don't want to
add them on this layer. You are welcome to go to your layers and create
one more layer above, rename it as details and
clip it to a previous layer. In that way, it might be easier for you to adjust
these elements. Now just go into
the bottom parts, creating our shapes
on the ellipses, adjusting their rotation if you want to find
what works for you, if you want, you can go
and make them even bigger. When you have the first outline, you can just go and drag
and drop the color inside. When you have the first element, go to the opposite eye and
do the same thing here. If you need to adjust
some parts manually, please go and adjust them. Now when we have
these two elements, let's just get back
to our color palette. Select the white color, which is our light
grayish and blue. And we will go with this color to the top parts of our eyes. And we will add
our highlights the same way as we did with
our first illustration. When we are done
with our highlights, we are done with
our base colors. Let's move on to our next part, where we are going to be adding our additional colors
and glowing effects.
7. Blankie Ghost: Beautification: Let's begin this fight firstly by going to our brush library. We will change the
brush to medium blend, So we are in the air
brushing folder. When we have the brush, we will get back to
our lays and we will find our layer with
the body above. It will create one more layer that will rename as gradient. Let's clip this layer
to a previous one, taping on it and
selecting clipping mask. When we did it, we will go
back to our color palette. And this time let's just
work with pinkish colors. We will start by going
with magenta color, that we will use light magenta, and we will finish up
with grayish purple. Firstly, let's just
pick our magenta color. We'll go to the bottom
part of our ghost, and we will add the color here When you have
the first color. Let's just go again to our color palette and
select the lighter color. If you don't want to work
only with pinkish colors, you are welcome to go and select the colors that you want. Now with this next color, let's just go and create another
layer that we need here. When we have it, we
will get back to our color palettes and we will select grayish purple color. If you want to go with
pink before that, you are welcome to
go and do that. When you are done aiding the
layers with these colors, let's just go and
make ingredient. We are going to our magic antul, we are going to Gaussian blur. We are holding our apple pencil
at our screen and we are moving it toward the right side until we have a nice blur. Find the amount that works for you when you're
satisfied with it. Let's just tap on our
magic antul one more time. Then we will go one more
time to our adjustments. We will go to hue,
saturation, and brightness. And we will adjust our colors
from here if we want to, if you want to make
everything more saturated, go to the saturation slider. If you want to make it less
bright or more bright, go to the brightness slider. If you want to
change the colors, go to the hue slider. Find what works for you. And when you are done, let's just tap on our magic
one to one more time. When we have this nice gradient, let's just go and add some additional
elements as we did with our first illustration one
more time we are going back to our layers and above
our layer with the gradient. Let's just go and create
one more layer that will rename as highlights
and shadows. Let's clip this layer
to a previous one. Tap and select and
Clipping Mask. When we did it, we will go to our caliigraphy folder and we
will choose monoline brush. When we did it, we will get back to our color
palettes and we will start by adding some outlines that will represent
some shadows. And we will do it with
our magenta color. With this magenta color, we will go over the bottom part, just a little bit over the
left and over the right. And also we will go to the top part and we will
add our outline there. Let's just go and create
something like that. If you need to adjust
your outlines, maybe some thickness of them, you are welcome to
grab a ser tool and adjust the parts
that you need to adjust. When we are done
with these outlines, let's just go and add the
highlights and we can do it on a separate layer and then we can combine two layers together. Let's just go again to
our layers and we will go to our layer with the
gradient from this layer, we will go and
create another one. It will automatically clip
to our main body layer. When we have it, we
will just go back to our color palettes and we
will select our white color, which is our light
greyish and blue color. With this color, we will
go to the bottom part of our ghost and we will add thicker lines for
our highlights. We can even go a
little bit underneath our lines that we have
with this magenta color. Let's just go and create
something like that. You can play runs with the
thickness on these elements. If you just want to go and add additional highlights as dots
or maybe some little lines, you are welcome to
go and do that. Also, if we can make this illustration a little
bit more complex by going to this bottom
part where we have our gradient and add
some additional lines. For example, let's
just firstly go to our lies and we can combine
these two layers together. Or if they are okay with you, you are welcome to keep
them as they are right now. But then we will go to our
lie with the gradient. And from here we will
create one more layer. When we have it, we will go
again to our brush library. We will make sure that we
are using monuline brush, and with this monoline brush, we will go select
some pinkish colors and we will just go
and create some lines. For example, let's just go and pick our light magenta color. We will go over the
bottom part and we will go and create
some peculiar shapes. For example, let's just go and create
something like that. If you want to pick
different color, you are welcome to
go and do that. For now, let us work
with this color, but then if we
want to adjust it, we can grab another brush and recolor these little places. When we have these elements, let's just go back
to our layers. To this layer where we
have these elements. Let's just go to our icon and we will change the blending
mode, color, Bird. When we did it, we will go
to our Apace slider and we will find the amount of
apacity that works for us. When you are ready
with this task, we are ready to
move on and we are ready to add our glow effects. Now let us go to our body layer, and let's make a copy of it. We will swipe it
from right to left, and we will choose Duplicate. We will go to our
Lia underneath, and we will need to go
to our color palettes to select the color that we
want to add our glow with. For example, let's just
go with purple magenta. When we have the
color, we will just drag and drop it to our area that we have for our body to make sure that
you did it right. Let's just get back to our lies and let's make sure
that we did it right. When we have the color on this second layer with the body, we are ready to go to our icon and change the
blending mode to add. When we have it, we will go
back to our magic an tule. We'll go to Gaussian blur and we will add some bluer here. Find the amount that works for you and when you are
done one more time, if you want to,
we can go to hue, saturation and brightness and adjust this glow
effect from here. If you want to make
it more saturated, go to the saturation
slider, brightness, He, everything that you
want to play around with, you are welcome to
go and do that here. Find the color and the saturation level and brightness level
that works for you. And when you are done,
let's just tap on our magic antul one more time
to go away from this mode. When we are done,
we will go and add the glowing effect to
our additional elements. Let's just go to our layers. Let's just go to our
background elements layer, and let's make a copy of it. Let's just wipe it from right to left and choose Duplicate. And when we are done with it, we will go to our bottom layer and we will change the
blending mode to add. When we did it, we will go to our magic quanto,
Gaussian bluer. And we will add
some blower here. Find the amount
that works for you, and if you need to adjust it, go again to your utration and brightness and
adjust it from here. When you are done adding the glowing effects to the additional elements
in the background, let's just tap on
our magic one to one more time to
close this window, and then we will go
again to our lease. We will select every layer that belongs to
this illustration, and we will put
them in the group. Let's just go swipe the
lise from left to right, and we will do it with every lay that belongs to
this illustration. When we have all the layers
selected, we will hit group. We will go to our new group
and we will rename it, let's rename it as Blank Ghost. When we are done, let's
just collapse in group by going to this little
V cat, the checkbox. And when we did it, we are ready to move on
to our next part, where we are going
to be creating Kg for our third illustration.
8. Ghost With a Comb: Sketch: Let's begin this part again first by going to
our brush library. We will go to the
sketching folder and we will select
the brush that we were using before for our
sketching part when we did it, we will go back to
our lies and we will hide our group with
blanky ghost again. Let's just go to our
little checkmark. We will tap on it and when we
have the blank background, let's just go and
create one more li, that will rename as Sketch. Now one more time,
we're going back to our color palette and we will
select some quantrasclor. Select any color
that works for you. For example, light gray san
blue or any other color. When you have the
color and the brush, let's just get back
to our canvas and let's start creating
our skitch this time. One more time, let's
just go and start by creating the
shape of the Alps. This time let's just go
over our top part and we will go strictly to the
middle part of our canvas. Let's just go and create
a shape in that way. We will hold it at
the end as always. If we need to adjust
it even more, we will go over our top
to the edited mode. Let's just move it a
little bit down and maybe tilt it just a little bit
toward the right side. Let's just go right
between the nodes. Hold our apple pencil there. And let's just move it a little bit when we have
something like that, let's just tap on our screen to get away from
the edited mode. Now let's just go and create
a guiding line that will help us to build up the
whole body of this ghost. Let's just go through
the whole shape that we already have onto our canvas and let's create
a curve going in that way, you can play runs with the
curvature of this element. You can make it very
curvy or if you want you can just
make a slight curve. It's all up to you. Later on, we will just go and
recreate the shape of this curve and we will
make a little tail there. When we have this little shape, let's just go and start building up the whole body of our ghost. Firstly, let's just go over our left side and
we will go from the middle part
of our ellipse to this line that we have
as a guiding line. We will create a little
tip like that if you want, you can go a little
bit higher and create a curly tip like that. Work a little bit
more onto the ship. Try to make it solid and
try to make it smooth. If you are satisfied with it, let's just go over
our right part and let's connect the ships. We will go firstly over our
middle part of the Alps, and again we will create
a curve going down. In that way, we will create a connection between
these two ships that we have created right now. And now we just need to build up the whole ship
by adjusting it. Let us go and create everything
in a very smooth way. Let us go and work
onto our shape. On the bottom, we will just
go and create a curvial line. Again, if you want,
you can go and create a tip going up and then
make a little curl. Also, you can just work onto the thickness
of this element. You can go to one of the sides, for example, the right one, and you can go and create a
curvial line in that way. Generally what we need is to create a shape of
the drop again, but this time it has a
little tip as a til. Let us work onto our shape
a little bit more and create a nice smooth
and chubby shape. Have the general
shape that we like. Let's just grab our
eraser tool and we will erase all this
axillary line that we don't need when we have the general shape and when
our lines are pretty clean. Let's just go and adjust our
shape a little bit more. Firstly, we will go
to our arrow key on the top left and we will
use free for method. Let's just make the whole
shape a little bit Abi. We will go over the
top to the node that we have in the middle and
we will drag it down. Now we can see that our
shape is a little bit more rounded and that's
exactly what we need. If you want, you can go
then to our magic one tool, liquefy and adjust the
general shape from here. Spend some time here
and find what works for you when you have the
sheep that you like. Let's just go again to our
magic quantum one more time. We will tap on it and we
will go away from this mode. We'll get back to
our brush and now let's just go and add
some little arms. Let's firstly go
over our left side, and we will start by
finding the place where our curve on the bottom
is changing its direction. We will need to go and
make a little mark down, for example. It will
be somewhere here. From this little mark down, we will go up and we will create a curve that will help
us to build up our arm. Let's just go and make a continuation on this
curve on the bottom. We will just go and create
something like that. When you have this
little auxiliary line, let's just turn it
into the proper arm. What we need to do again, is to go to the
curve that we have on the bottom from this curve, we are just going up and
creating a continuation of it. You can play around with
the size of this element, with the chubbiness of it, with everything that you
want to play around with. Just find the arm that
works for you and try to make a smooth connection
with the general shape. When you have the first arm, let's move on to our right side. And let's do something
similar here. Here we will go to
this little tip where we have the
Dan from this dent. Let's again go and make
a little markdown. From this mark down. We will
go up and we will create another curve that will be a continuation of this
curve right here. Let's just go and create
something like that, very smooth and very nice. When we have it, we will go and turn it into a proper arm. Let's just go and again
create a shape of half of the circle or
half of the ellipse here. You can go a little
bit to the main shape, so you can create
something like that. Later on, we will work on the shape and we
can make it nice. Now let's just work
on the shape a little bit more and create
a smooth shape. Let's just go and make something similar to what
we have on our left. We will need our arms to
be similar to one another. Now let's just spend
some time here and let's adjust our elements. When you have the
arms that you like, let's just grab an
eraser tool and we will erase all the lines
that we don't need. When we are done, let's
just go over the top and let's add a little hair
element or a little comp. What we need to do again is to go firstly to our left side. And we will go and repeat the curve that we have
on the top of the head. Let's just go there
with our line. And then we'll go
up with the curve going in that way very smoothly. We are connected with our
main shape on the body. When we have this first curve, we are going to the tip of it and we are creating
a thickness to it. We are just repeating
what we have done. Then we will smoothly connect it with our ship on the bottom. Let's just go and create
something like that. As always, you can play around with everything that you
want to play around with. You can play around
with the size. You can play around with
the height of this element. It's all up to you when you
have the shape that you like. Let's just go and grab our
eraser tool and we will erase all the lines that we don't need when we have the general
shaped like that. Take a look at your
illustration from the distance and make sure that you don't
want to adjust anything. If you want, you can go
to your magic one tool, liquefy, and adjust
it from here. Spend some time here
if you want to adjust some parts and adjust
when you like the shape. Let's just deselect our
liquefied two again. We will get back to
our brush and we will start aiding
our facial features. Again, we have this line that is going
through the center, but as we have adjusted it, we can just go and make sure
that it is going through the approximate center just
by creating another curve. Try to make it smooth and neat. And when you have it, let's
just go on the sides. And let's start by
aiding our ice again. Let's just go over our
left side firstly, and we will go and create
the similar shape that we had on our first and
second illustration. If you want to play runs with
the shapes of your eyes, you are welcome to
go and do that. Now let's just go and create
the shape on the ellipse. We will hold it at the end. We will tilt it a little bit. If we want to adjust
it in any other way, we will go over the top
to our editing mode. Let's adjust it, let's find the placement for our elements. If you want to tilt the elements
more toward the center, you are welcome to go and do that when you have the
shape that you like. Let's just tap on our screen to get away from the editing mode. Now let's just go inside the shape that we
have for our eye, and let's just shade it. When we are done with this task, let's just go to
the opposite side, and let's just do
something similar here. This time we will make just a
little bit of a bigger eye. Let's just go and create
the shape of the, again, we will hold
it at the end. Let's just find the
placement for it. We will adjust the tilt, adjust the size, everything
by going to our editing mode. When you have it,
as you like it, let's just tap on
the screen and let's just get inside the shape
and we will shade it. Now let's just grab
our eraser tool and we will erase this line that
we have in the middle. And also we will erase
this line that we had for our ellipse very easily. Let just go and get rid of them. Now when we are done
with this task, let's just get back
to our brush and let's just create a
little mouth here. Let's just go right between the eyes and let's just
create a shape like that. We will have two half of
the circles on the bottom. When you have the
shape like that, let's just go underneath it and let's create a
curve going down. In that way you can
connect it with the sides of these
elements on the top. Or you can step
just a little bit from them and create
it in that way. As always, if you need to, you can hold your
apple pencil at the end of the line
and you can go to the ten mode to adjust these elements when you
found what works for you. Let's just go inside
the shape and we will add a little
tan care again. We're going and creating
another curve in that way. When we have
something like that, let's just take a look
at it from the distance. If we want to adjust something, we will go to our S ribbon icon. We will select the objects
that we want to adjust. We will go and adjust them
with our transform tool. Let's just spend
some time here and decide whether we want
to adjust some parts. And let's just go and
adjust them if we want it. When you are satisfied with adjusting your facial features, let's just go and tap on our ribbon icon one more
time to deselect everything. When we are done, let's just go and add more
additional elements. Firstly, we will go
underneath our eyes and let's just go and
add little cheeks. You decide what size and what
shape you want them to be. Let's just go and add them. When you have the
cheeks that you like, let's just go over the top
and let's add some eyebrows. Again, you can play
around with the shapes, and if you don't want
to add the eyebrows, you are welcome not to. When you have the lines that
you like for your eyebrows. Let's just go
around our elements and let's just add
some sparkles. Let's first go over our top, and let's just go and
add a few big sparkles like that if you want to play
around with your elements, if you want to add
something different, you are welcome to
go and do that. Let's just go all
over our elements and let's just add a few
more of the sparkles. If you want, you can go
and add some dots to. Now let's just take a look at our illustration from the
distance one more time, and again, decide whether we
want to adjust some parts. If you want to adjust some part, please go to the magic
one tool, liquefy, and adjust it from
here if you are generally satisfied
with the whole sketch. Let's just go to
our transform tool. We will use uniform
method and we will put our illustration right in
the middle of our canvas. Again, we are looking
for these two lines. If you want, you can go and make the whole illustration
a little bit smaller. And again, put it right in
the middle of your canvas. When you are done,
let's just tap on our error key
one more time and let's just go to our next part where we are going to be
aiding our base colors.
9. Ghost With a Comb: Base Colors: Once again, let just start our part from some
tiny preparations. Firstly, we'll go to
our brush library. We will go to the
calligraphy folder, and we will choose
monoline brush. When we did it, we will go
back to our layers and we will adjust the capacity of our
layer with the skitch. We are going to our icon, going to our opacity slider, and finding the capacity
level that works for us. When you found it,
let's just tap on our sketch layer to
close this window. And then we will go again to our adjustments,
hutration and brightness. And we will adjust the
brightness when you did it. Let's just tap on our magic
an tule one more time. Now let's just go back
to our color palettes. To select the color
with the name, light gray and blue
With this color, we will get back to
our layers and we will go to our
blinky ghost group. And from here we will create another layer that
will rename as Body. Now when we have this layer, let's just go and recreate
the basic shape of our ghost. Again, we will need
to create closed, smooth, and clean lines. Let's just go and do that. When we have the
closed outlines, let's just drag and
drop the color inside. Then we will go to our lies
and we will hide our li with this ch just for 1 second to see whether we want to
adjust some outlines. If we want to, we will go
and smoothen everything up when we are satisfied
with our general shape. Let's just get back
to our lies and we will unhide our li
with this skitch. Now let's just get back
to our blanky goes group. And from here we will
create one more li that will rename as
background elements. Now let's just go and
recreate our little sparkles. You can go and select any
other different color, or if you want to, you can go with the
same white color and recreate them with it. Now take a look at
your sparkles without the skitch lines and decide whether you want to
adjust some parts. If you need to adjust something, go and adjust it. When you are done
adjusting your sparkles, let's just get back
to our lies and we will unhide our lie
with the skitch. Let's just go all
over elements and let's add some dots
when you are done. One more time, we
are going back to our S and we will go to
our layer with the body. And from here we will create one more layer for
our facial features. Again, let just go and start
by recreating our eyes. Let's just go back
to our color palette and let's select
dark purple color. Let's just go and recreate
these two elements. Drag and drop the color to these elements when
you are ready. When you are ready,
let's just go and recreate the
shape of the mouth. Let just go firstly and recreate
these two little curves. You can hold your
apple pencil at the end of the line
if you need to go to the 18 modes and adjust it from here when you have
the general shape, let's just go to the bottom. And let's recreate this
big allpse here as always, hold it at the end. Try to put it on an even distance from the
center, on both sides. And when you have the shape, let's just go and drag and
drop the color inside. Make sure that you don't have
any blank spaces between your elements such as
outlines and the middle part. When you have the mouth, let's just go over the top and
recreate our little brows. When you are ready,
let's just go and add our little cheeks Again, we're going back to our lis and we are going to our
li with the body. From here, we will
create one more layer. And onto this layer
we will go back to our color palette and we will
select some pinkish color. You decide which one you want to use when you have the color. Let's just go and recreate
our shapes of the cheeks. And when you have the cheeks, let's one more time
go to our layers. We will merge these
two layers together. We are going to our
facial features layer. We're at taping it
and we are using merged down option
one more time. Let's just go and rename this
layer as facial features. Now when we have the
general facial features, let's just go and create
one more layer above it. We will rename this
layer as Details. Let's clean this layer
to a previous one. We are tapping on it and we
are using clipping mask. And then also we can go to our layer with the
sage and we can hide it now with the same color that we are using
for our cheeks. Let's just go inside the mouth. And let's add a
little tank here. When you have the general shape, just go to the bottom
and manually recolor it. Now let's just go and
change our color to purple. And again, we will
do the same thing as we did with our
previous illustrations. We will go to the bottom
parts of our eyes and we will add additional
circles or ellipses here. Let's just go and do that. When you are done with the
outlines for these elements, just drag and drop
the color inside. When you are ready, let's just go and pick the white color. We already have it
onto our canvas, so let's just invoke
our eye drop at z. When we have it, we will go over our top parts on the eyes and we will go and add some highlights the
same way as before. Let's just go over
our left top part and let's add the
highlights there. You can play around with
the amount of them, You can play around with their
size and with their ships. When we are ready
with this part, let's move on to our next part, where we are going to be aiding the additional colors
and glowing effects.
10. Ghost With a Comb: Beautification: As usual, we are starting this part by going to
eye brush library. We are going to the
airbrushing folder and we are selecting
medium blend brush. When we have our brush, we will go back to our layers. We will find our layer with
the body and above it we will create one more layer that will rename as ingredients. Let's clip it to
a previous layer tapping on it and
selecting clipping mask. When we have it, we are going
back to our color palette. And this time let's just go from purple magenta to C and blue to, we will start by purple magenta. And with this color, we
will go to the tip of our teal and we will start
adding the color there. Let just go and create
something like that. When you are ready, let just get back to our color palette. And then we will select
our CN blue color. With this color, we
will go and create the second layer of colors
right here onto our canvas. And when we have it,
we will get back to our color palette and
select CN blue to color. With this color, we will
go a little bit higher and we will add it
to our middle part. When you have
something like that, we will go to our magic
anto Gaussian blur. And we will add some blur
here to make a smooth blend. When you have a nice blend, let's just go to our magic antul one more time to
deselect everything. And if you want to
adjust the colors, you are welcome to go
again to the adjustments, satration and brightness,
and play with the sliders when you are
satisfied with your results. Let's just go and tap on our
magic antul one more time. Now let's just go and
start adding some details. So firstly, let's just get
back to our brush library. We will go to the
calligraphy folder and we will choose Moulin
Brush One more time. When we have it, we will
go back to our layers. And above our layer
with the gradient, we will go and create
one more layer. We will rename this
lie as Details. Let's tap on this lie and let's select Clipping
Mask from the list. Now we will get back to our color palettes and we
will select C and Blue color. Then we will go to this middle part where
we have our tail. Starting here, we will create some additional elements as we did it with our
second illustration. For example, let's create
some peculiar shape like that and we will add the
color to the middle part two. Let's create something
in that way. If you have some parts
that you want to erase, grab an eraser two
and erase them. For example, we can go and add these elements only
to the tummy area. We can just go to our arms
and erase it from here. Work on the shape even more. Try to make it very smooth. And when you are ready, we can go to our layers and we can change the blending
mode on this layer. Let's just go to our icon and let's try some
blending mode. For example, we can
go with color, Dodge, lighter color, soft light, or anything that you like. You can try out
different blending modes and find what works for you. For example, let's just use the same blending
mode that we were using for our previous
illustration. It was color burn. And let's just go a slider and let's adjust the capacity to
the level that we will like. Also, if you don't like this very prominent
line on the top, you can grab your smug too and blend everything nicely with the basic color when you
already with this element. Let's just get back
to our list and we will create one
more layer above our layer with the details we will remain this
layer as highlights. Let's clean this layer
to a previous one. Tap it on it and
selecting clipping mask. Then we'll get back to our color palettes and we will
select our light greyish, sea and blue with this color. We will go to the bottom part of our ghost and we will start adding the
highlights from there. Let's just go and create
this outline, please, with the thickness
on this element and try to make it very smooth. If you want to add some
additional highlights, you're welcome to
go and do that. For example, we can go
to the arm that we have on our right and also
to the tip of the tail. And we can add the
highlight there too, when we have our
highlights in that way. Let's just go and separate our body from the
arm that we have on the left and also on the right with the same color but
with a different brush, we will go and separate our
elements from one another. One more time, we are going
to our brush library. We will go to the inking
folder and we will select the brush that
we were using before. It was our technical pen brush. With this brush, let's just go to the places where
we want to add our separational lines and let's just add that very easily. We are just repeating the shape
that we have on our left. Firstly, just going down and repeating the shape and creating our highlight
in that way. You can always hold your line in the end and adjust it
from the editing mode. When you have the right curve, let just tap on our
screen and let just go and adjust the
whole line even more. We don't need it to go right
to the bottom of our shape, we can just grab our eraser tool and erase this line
on the bottom. And also let's just go and add some thickness to the
top of this line. Again, we are just
going there and repeating the shape
just with our brush. If you need to erase some parts, go grab an eraser tool and erase the parts
that you don't need. The same thing we will do
with our arm on the right. Again, let's just go to the arm. And the same way as before, we will just go and continue creating the arm just
within your curve. If it's easier for you,
you can go to your lis and unhide your lier with the Skage and repeat what you had there. When you are done, let
just tap on our lis, let's just go and hide
our lier with the Skage. And let's adjust our lines from here without the
lines of the sketch, the thickness to this line
that you have on the right. If you need to erase some parts, go and erase them. If you want to go and add additional highlights to
some of other places, you are welcome to
go and do that. You can use the
same brush that you are using right now
or you can get back to your brush library calligraphy
folder, monoline brush. Let's just go and add a few more dots and maybe some
lines for our highlights. For example, let's
just go to the bottom, to the tail, and we will
add a few dots there. Also, we will go
all over our body. And let's add a few
more highlights. Also, we can just go
to this place where we have this blue color
onto our bottom left. And we can add a bigger
highlight there. For example, let's just go and create a drop shape like that. When we have it,
we will just grab our smudge tool and
we will smudge it just a little bit so it will have some glowy
effect around it. If you want to add a few
more highlights in that way, you are welcome to
go and do that. But try not to overdo everything when you're
satisfied with everything. Here, let's just go and start
adding our glowing effects. One more time, we will start by adding the glowy
effect to the body. So let's just go and find the needed layer and we
will make a copy of it, swiping it from right to
left and choosing duplicate. And go into the
layer on the bottom. When we have it, we will go back to our color
palette and we will select the color that
we want to add for our glue. Let's just go with some C and blue three color and then we will add the additional
color later on. Let's just go and
drag it to our body. We will make sure that we did
it right onto our layers. When we have it, we will go to our layer with this blue color. We will go to our icon and we will change the
blending mode to add. When we did it, we will get
back to our magic an to, we are going to
Gaussian blur and we are adding some
blur to our sheep. Find the amount that works
for you, if you want, you can go and adjust the
color again by going to your magic one to hue stration and brightness pleay
with these layers. And find what works for you when you have the
color that you like. Let's just tap on our magic want to to go away
from this mode. And then we'll go and add some additional color
to other areas. Let's firstly go to our layers. Let's just go to this layer with the body that we
have for the glue. Also we can just
go and rename it. We will go and set this
layer as alpha log. When we have the alpha log on, we are getting back
to our color palettes and we will select
some additional color. For example, let's just go
with magenta or light magenta. We will make sure that we are using air brushing,
medium blend, and we will go to some
of the areas where we have our glow and we will
add our additional color. If you want to add
multiple colors, you are welcome to
go and do that. And again, if you want
to adjust the colors, you are welcome to go to the adjustments hustration and brightness and play with colors. From here, you can also go to the huitration and
brightness on the top when you are add
the huitration and brightness and you can
choose the option pencil. With the option pencil, you can go to some places and play with the
color from here. So when you are adding the additional color
with the pencil, you can go to the hue slider and adjust the color from here. In that way, you can go and add some dots with this color. And then you are welcome to go and go away from this mode. When we are done with our
basic glow of the main figure, let's just go and add the
glow to our sparkles. Again, we are going back
to our lis and we will need to find our
background elements layer. Let's make a copy of it. So we are swiping it and
we are choosing duplicate. We are going to
our bottom layer, and let's just go and
add some color there. Again, we will tap on the layer and we will use
the option select. Then we will go to
our color palettes and we will select some color. Then we will use the
option color field onto our bottom panel when we
are at the selection mode. When we are done,
let's just deselect everything by hitting
our S ribbon icon. And then we'll make
sure that we did everything right by
going to our layers and taking a look at our layer with the background elements where
we want to add our glue. Let's also rename this layer
as Glow when we did it. Let's just go to our icon and we will change the
blending mode to add. Again, we will go back
to our adjustments. We will go to Gaussian blur and we will add
some blower here. Find the amount
that works for you, if you want to adjust the saturation or
color or brightness. Go to the adjustments us
saturation and brightness. And play with the
sliders when you are ready to tap on the magic
onantule one more time. And if you want to adjust the color on some
of the sparkles. Let's just go back
to our layers. We will go to our
glue layer that is attached to our
background elements. We'll tap on it and we
will choose alpha log. We are using medium blend brush. We will select some other
color and we will go to some of our sparkles
and we will recolor them. And when you are
done with this task, we are done with our
third illustration. But before moving to
our final illustration, let's just get back to our lays and let's clean
everything up here. Again, we are selecting
every layer that belongs to our third illustration and we will put them into the group. Let's rename this group
as Ghost with the Comb. And when we are ready, let's just go to our V icon
to collapse the group. And now we are ready to move
on to our last illustration.
11. Ghost With a Flower: Sketch: Let's begin this part from
some tiny preparations. As always, we are going
firstly to our brush library. We are going to the
sketching folder, and we are selecting the
same brush that we were using for all of our
previous sketches. Let's select the brush,
and when we are ready, let us get back to our layers. We are going to our group
with Ghost with the comb. And let's just go and hide it by going to our
little chip mark. When we have a blank
background lay, just tap on our plus icon. We will create a new layer and we will rename this
layer as Sketch. When we have a ulier, we are going back to our color palettes
and we are selecting the same color
that we were using for our all sketching parts. For me, it was light
gray and blue. For you, it might be
something different. Let's just go and select
the color and we are ready to get back to our canvas
and start sketching. Firstly, let's just go over
the top part of our canvas. We will go somewhere to
the middle of it and we will start by creating
a shape of the ellipse. As always, let's just go and
create the shape like that. And at the end we will hold it. If you need to adjust it, we are going to
our editing mode. And what we need to
achieve here is to create an elongated ellipse that
will go in that way. We can go and make it a bit chubbier when you have
the shape like that. Let's just position it more toward the center
when you have it. Let's just tap on our screen to get away from
the editing mode. Now let's just go and
create a guiding line that will help us to
build up our body shape. Let's just go over the top of our ellipse and let's go
with the curve like that. When we have the
curve like that, we will need to go and
recreate the body. Firstly, let's just go over our left side and
onto our left side. Let's create a slim line. What we need to do is
to go somewhere to the middle of the shape
that we have on the top. And we will just go there and create a curve
going in that way. We will create a little curve over the bottom
and we will create a flatter line on the side when you have
something like that. Let's just go and continue
by going down and creating a little hook like
that when you have it, let's just go over
our right side and let's create
a peculiar curve. There we will go firstly
over the top of our allpse. Right from the top
we are going to the side and creating
a line going in that way you can
play around with the curve and make it
less curia or more curar. It's all up to you.
All that we need to do is to create a
very smooth shape. Let's just go and play
around with the shape, and let's create
something very smooth. When you have the general shape, let's just grab our eraser tool and let's erase the lines
that we don't need. When we have
something like that, let's just go and
adjust it even more. Firstly, by going
to our arrow key, we will go to the
uniform method and we will just rotate the
shape a little bit. We are going to our
green node over the top and we are moving
it toward the right side. Also, we can just straight go and position it more
toward the center. Find these two lines. Or if you don't have
them, just very easily just go and find the place that you
need to put it on. When you have it,
we will firstly go and tap on our arrow key. And then we'll go
to our magic quant liquefy with the liquefied
to let just go and adjust our ship even more
and create something cute when you play with your
ship enough to your liking, let's just go and
desalate everything by going to our magic
antu one more time. When we have it, we
will need to go and add our little arms again. We're going back to
our brush and firstly, let just go over our left side. We will go and find
a middle part of the whole ship
that we have right now and we'll make
a little markdown. When we have this mark down, we will go and start
creating the shape by going over the top and recreating the line
that we have here. We're just going and
repeating the line. And then we are going
a little bit to the side and creating a
curve going in that way. When you have this little curve, let's just go and create
a little cap in that way. And then we'll go and
connect it with our body. Play around with the shape. If you need to try to
make everything smooth, try to make the connections between the two
shapes smooth too. If you want to play around
with the general shape, you are welcome to go and
find what works for you. Remember that it's always
good to take a look at your illustration
from the distance to see whether you
like it or not. Let's just spend some time playing around with
our little arm. If you want, you can
go and do it manually. Or if it's easier for you, you can go to the liquefied
tool and adjust it from here when you have
the shape that you like. Let's just go grab
an eraser tool and we will erase the
lines that we don't need. The same thing we will
do on the opposite side. Firstly, let's just go and create another
auxiliary line that will show us where we need to
finish up the whole shape. We will go to the bottom
part of our arm on the left, and we will create a curve going through the whole
shape in that way, that way we know where
we need to finish up our line that we will
have for our arm. Let's just go over the
top and we will recreate the similar shape to what
we have on our left. Let's just go firstly to
our line on the right. We will go somewhere
above the middle point. If you need the middle point, you can go and create
a little markdown. We will go a little bit
above it and we will firstly go and repeat the curve
that we have on the head. And then we'll go
with a similar shape to what we have on our left. Let's connect the shape
together with our body, and let's work on it to
create a nicer shape. If you need to go and erase some lines that you don't need, you are welcome to
go and do that. For example, we can
go and get rid of this line that we have right here that we have for our body. Let's just go grab our eraser
to and erase this line. Now when we have it, we also can go and
erase this lines that we have as an auxiliary
line that we used for the bottom part of our arm and also our line that we
used for our Allipse. As for this line that we
have in the middle, for now, let's just keep it when we
have the general shape. Let's just go and add
our facial features. We will go again to our top
part of the whole shape, but this time let's
position art, facial features a
little bit more toward the left side
and in general, more in three quarters
of the whole shape. Let's just go over our top part. And we will start by creating the first eye the
same way as before. We are just going there and creating the shape
of the ellipse. As always, if you want to
experiments with the shapes, you are welcome to
go and do that. Play around with the tilt, play around with the position of your element with the size. If you want, you
can go and even try out circles instead
of the ellipses. When you have the first shape, let's just go inside of
it and let's shade it. Then let's just go and repeat the similar shape on
the opposite side. But remember that
this time we will need to put it more so
where the left side. If it's easier for
you, you can go and firstly erase this line that
you have in the middle. And then just repeat the shape
that you have on the left. As always, hold it at the end, adjust the size,
adjust the placement, adjust anything that you
want to adjust even more by going to the editing mode when you have
something like that, let's just tap on
our screen and let's just go inside the shape
and let's just shed it. Now let's just take a look at our illustration
from the distance. And let's go to our ribbon icon and adjust the ice even more. Firstly, when we selected
our ribbon icon, we will need to go
to our bottom panel and the select color feel. Then use freehand method and select these elements
that we want to adjust. When we have them selected, we are ready to go
to our arrow key on the top left using uniform
method or free form method. It's all up to you and adjusting the placement and maybe the
size of these elements. When you're satisfied
with everything regarding these little
eyes that you have, let's just go and
deselect everything by hitting our S ribbon icon. When we are done, let's just go and add our little cheeks. Again, we're getting
back to our brush. We are going underneath
our eyes and we are selecting the shape that we want to use for our cheeks. You can go with the
peculiar shape, for example, you can
use some hearts. Or if you want to go with
the classical shape, you are welcome to use
the circle or an ellipse. Have the shapes for the cheeks. Let's just go and
create a little mouth. Let's just go right between the eyes and let's create
the shape like that. If you want to experiment with your shapes for
the mouth again, you are welcome to go and do that when you have the
shape for your mouth. If you want, you can
go over the soap of your eyes and create
little eyebrows. Now let's just go and add
some additional elements. For example, let's just go
over the soap right part, and let's add a
little flower here. We will go to this blank
space that we have here. And let's just start by creating a middle
part of our flower. Firstly, let's just go and
find the place for it. So we can just roughly go and create a little
element like that. Into this little shape we
will create our flower. Let's just go inside this
little guiding line. And we will start by
creating the shape of the circle or an ellipse
when we have it. Well, firstly, there is this line that
we have for the head. Then we'll go and
add some petals. Let's just go all around this little shape that we
have just created. Let's just go and create some petals with the
shapes like that. You can play around
with the amounts of these elements with
the thickness of them. You can go and overlap them. You can play around with them and find what
works for you. If you want to go and
adjust it in any way, let's just go and adjust it. First thing that you
will need to do is to go to the ribbon icon
freehands method. Select this element and then go to Arrokey on the top left
and adjust it from here. Play around with the ship. Try to find what you like
when you're unsatisfied. Let's just go and add
a few more details. Firstly, let's just
go and deselect everything by hitting
our ribbon icon. And then we will go
inside our ship. All the goes to the middle part. And we will start by creating
a little hard there. Let's just go and
find the middle part. If it's easier for you,
you can go and create the guiding line going through
the center of your ship. When you have this little line, let's just go and
create a heart there. Our sheep on the
left will be just a little bit smaller than
our sheep on the right. Let's just go and create
our heart in that way. Play runs with the sheep. If you want, you can
make it very smooth. If you don't want to have
very straight corners, you are welcome to
soften them up. It's all up to you. You want to adjust
the shape even more. You are welcome to go
to the ribbon icon or to the liquefied tool
and adjust it from there. Now let's just take a look
at your illustration from the distance and decide whether we want to adjust some parts. If we want to, we will
go to our magic an to liquefy and we will
adjust it from here. Now let's just spend
some time there. And let just adjust some
elements that we want to adjust when you're satisfied
with everything here. Let's just go and
deslate everything by hitting our magic one
tool one more time. Then let's just go and add
some additional elements. Let's just go all around our elements and we
will add some heart, some sparkle, some stars, some dots, some glowy elements
that we turn them into. Later on, let's just go and create some of
these elements. When we are ready with
our additional elements, let's just go to our
arrow key one more time. We'll make the whole
illustration a little bit smaller by going to
one of the nodes. And then we'll position it differently to the middle
part of our canvas. Again, we are looking
for these two lines. If you want to rotate your illustration or
adjust in any other way, you are welcome to go and do that when you are satisfied
with everything Here, let's just tap on our error key and let's
move on to our next part, where we are going to be
adding our base colors.
12. Ghost With a Flower: Base Colors: Again, we are starting our part from some
tiny preparations. Firstly, we are going back
to our brush library. We are going to the
calligraphy folder, and we are choosing
our mono line brush. When we have the brush, we
are going back to the layers. We are going to
our sketch layer. And we will firstly go to our icon to adjust the
capacity of the layer. Let's find the capacity
that works for you. When you are satisfied with it, we will tap on our lay with the sketch to
close this window. Then we will go to our magic uantulusatration
and brightness. And we will adjust
the brightness of the lines when you are
satisfied with it. We will tap on our magic
antul one more time. Then we will go to our lies, we will go to our ghost
with the comb group. From here, we will
create one more lit that will rename as body. When we have it, we will
go to our color palettes. And again, if you were
using different color, we are going to select
light grays and blue color. With this color, we
will go and create the whole silt of our body. Let's just go and do it with
smooth and closed lines. When we have our
closed outlines, let's just drag and
drop the color inside. Then we'll go back to our
layers to make sure that our outlines and our whole
silhouette is nice and smooth. Let's just go and hide our layer with this itch
just for 1 second. And let's just go
and make sure that everything is nice,
smooth and clean. When you're satisfied
with your silhouette, let's just get back
to our layers and we will unhide our layer
with this itch. Now let us go and create
one melia underneath. So we are going to ghost
with the comb group. And from here we are
creating one morelia that we'll rename as
background elements. Now let's just go and
pick some pinkish color for our hearts and maybe
for some of our sparkles. And the rest of the
sparkles and the dots, we will recolor with
the white color. Now very easily, let us go
and recreate our elements. When you are ready,
let's just take a look at our little
background elements without the sketch
lines and let's decide whether we want
to adjust some parts. If we need to adjust something, let's just grab an
eraser two or our brush. And let's just go and
adjust our elements. And when you already adjusting
your background elements, let us get back to
our lies and we will unhide our lier
with this itch. When we have it, we will go
and select our body lier. And from it we will
create one more lier on which we'll
create our flower. So let's just go and
create one more li, and we will rename
this lie as flour. And now let just go to our
color palettes and select some color that you
like and that you want to use for this
flower element. For example, some pinkish or some purple colors will
be perfect for that part. When you have the
color that you like, let's just go and
recreate our elements. We will start by
recreating the petals, and then we will choose
a different color to add it to the middle part. When you have the
outlines for your flower, let's just drag and
drop the color inside. And then again, we
will go back to our color pals to select
a different color. You can pick any color that you like when you
have the color. Let's just go to
the middle elements and let's just criticize of our brush to put the dot when you have the
flower that you like. Let's just go and criticize of our brush to
what we had before. Then we will go back
to our layers and we will go again to our
lay with the body. And from here, we will create our layer for the
facial features. Let's just go and tap
on the plus icon. Let's rename this layer
as facial features. One more time, we
are going back to our color palettes
and we are selecting our dark purple color to recreate firstly our
shapes for the ice. Adjust the outlines
if you need to. And when you are done, let's just go and drag and
drop the color inside. Now with the same brush, let's just go and
recreate the shape for our eyebrows
and for the mouth. Now when we are done
with the basic outlines, let's just get back to
our layers one more time. Where I go into our
layer with the body. And from here we'll
create one more layer on which we'll
create our cheeks. Let's just get back to our
color palette and let's pick some color that will
be suitable for our cheeks. When you have the
color that you like, let's just go and
create our sheeps. Again, when you have the
outlines for your cheeks, drag and drop the color inside. Then we will go back to our lis and we will combine these
two layers together. Go into the top, one top in
it and select and merge down. Rename the lier as
facial features. Now let's just go about
this layer and let's create one more layer that
will rename as details. Let's clip it to
a previous layer. And when we did it, we will go to our Y with this
cage to hide it. Then we will get back
to our color palettes and we will change
our color to purple. With the purple color, we will go to the bottom
parts of our eyes and we will add these
additional elements again the same way as before. Let's just go and add them. When you have the outlines
dragon drop the color inside. When you have these
little parts, let's just go over the top
and let's add our highlights. Let's use the white color that we already have onto our canvas. So we will hold one
of our fingers. We will invoke our eye. Drop a O and then we'll go over the top left parts
and we will add our highlights the
same way as before. Or if you want to experiment, go and experiment
with the shapes, with the sizes, with everything that you want
to experiment with. When we are done with this task, we are ready to move
on to our next part, where we are going to be aiding our additional colors
and the glowing effects.
13. Ghost With a Flower: Beautification: As always, let just
start this part by going to our brush
library, ear brushing. And we will select
medium blend brush. Then we will go back to our lis. We will find our lay
with the body above. It will create one
more layer that will rename as gradient. Let's clip this layer
to a previous one. Tap on it and selecting
clipping mask when we have it. We are going back to our
color palettes this time. Let's just go with
some pinkish colors. Let's just start
from light magenta, then we'll use pink, and then we'll use
grayish purple starting from the bottom and going with the layers of our colors when we have
something like that. Let's just go to our magic
one tool, Gauchian bluer. And we will add
this little blend. When you are satisfied
with your Gaussian bluer, let's just go and
desalect everything by hitting on our magic
one tool one more time. And then we will go again to our adjustments,
stration and brightness. And we will play
with our sliders, find what works for you, and when you are
done, let just tap on our magic one tool to
desallect everything. Now we will go and we will add this additional element
that we had on our sketch. Let's firstly go to our layers. And we will create
one more layer above our layer with the credit. Let's just tap on the plus icon. And let's rename this
layer as Details. One more time we can clean
this layer to a previous one. Tap in selecting clipping mask. And then we will need to go and unhide our layer
with the skitch. When we have it, we
will go and we will recreate this little heart
that we have on our skitch. We are end the layer with the
details and we are going to our color palette to select a light greyish sea
and blue color. With this color,
let's just go and recreate our heart also, we will go to our
brush library and we will change our
brush to Monaline. When you are done with
recreating the outline, let's just go and drag and
drop the color inside. Now we will go
back to our layers and we will hide our
layer with this cage. We will take a look
at everything here and we will go to our
layer with our heart. We will go to our icon and we will change the capacity
just a little bit. When we have it just
a bit transparent, we are ready to
add more details. Firstly, let's just go
above this layer and we will create one more layer on which we will
add our highlights. As always, we are clipping
our lier to a previous one, and then we will go over our sides and we will
add our highlights. Firstly, let's just go to the bottom and we will add
the first highlight there. We will go all
around our ship and we will add the highlight
to the whole ship. Also, we can just go
to the bottom parts of our little arms and add
the highlights there too. As for the right part, we can go a little bit
beyond the frame and we can add a little highlight
going toward our heart. Let's just go and create
something like that. With this highlight, we are creating some separation also, we will just go to the
tip of this highlight. We will grab our eraser too, and we will make it pointy. Now let's just go
over our left side. And let's add the highlight to the bottom of the arm here too. If you want to, you can go
and make a little separation between the arm and the full body that
we have on the left. So you can just go and
elongate this line that we have right here for our
highlights on the bottom. And again, when you have
this highlight line, let's just go grab
our eraser to and let's make the tip of
it a little bit pointy. If you want to go and add additional highlights to
some colorful places, you are welcome to
go and do that. For example, let's just go to the bottom part and to the arms, and we will add a few highlights
in the shapes of dots. Let's just go and
very quickly do that, when you're satisfied
with the highlights, let's just go and add a few
highlights to our flower. Firstly, let's just
go to our li and let just find our
layer with the flower. If you want, you can go to the same layer and add
your highlights on it. And also if you don't want
to do it on the same layer, you are welcome to go and
create one more layer, rename it as highlights, and clip it to a previous
layer onto this layer. Let's just go and add a few
highlights on our flower. You can go with any simple shape as dots or maybe some lines. If you want, you
can go and create some peculiar shapes
for your highlights. You are welcome to go
and play around with these elements when you're satisfied with the
highlights on our flower. Let's just go and take a look at our illustration
from the distance. If you want to
adjust some parts, you are welcome to
go and do that. For example, let's
just go and find our layer with the details
where we have our heart. And let's just make it a
little bit more prominent. We will add a bit of
apacity to this layer. Let's just go to our icon. We will go to our apasity
slider and we will find the apacity that will be
seen onto our screen. Now when you are satisfied
with everything here, if you don't want
to adjust anything, we are ready to
move on and we are ready to add the
glowing effects. Now let's just go to our layers and let's just find our
layer with the body. We will go and make a
copy of this layer. Let's just wipe this
layer from right to left, and we will choose Duplicate. Now we are going to this layer that we
have on the bottom, and we will go to our
color palettes to select the color that we
want to put for our glue. For example, let's just go with some magenta color or
maybe purple magenta. Let's select one of
these colors and let's just go and
dragon drop it to our area that we want to recolor to make sure that
we did everything right. Let's just go and check
it out into our layers. When we see that
our second layer with the body is now pink, let's just go and
rename it as glue. And when we did it, we
will go to our icon. We will go and change
the blending mode to at when we did it. Let's just go to our
magic 12 Gaochen blur. And let's add some blur here, Find the amount that
works for you and when you're satisfied with the
amount of Gaussian bloor, let's just tap on
our magic wand tool. And if you want to
adjust the color, you are welcome to go to the adjustments Uitration
and brightness. And play with the sliders. For example, let's just go
and play with our saturation. And if you want to
change the hue, you are welcome to go to the
hue slider and play with it. Also remember that you can go to your Uitration and
brightness option on the top and select pencil. And select some areas with
the pencil entry, color them. But before doing that, remember that you will need to go back to your brush library and select the air brush and folder
medium blend brush. This brush you can
go to some places, entry color dam to play
around with the glue. And when you are ready, let's just go again and
tap on our magic 12. And then we will go and add the glue to our
additional elements. One more time, we are
going back to our layers. We are going to our layer with the background elements and
we will make a copy of it. Now we are getting back
to our bottom layer. We will tap on it and we will choose select from the list. Now we will go and
select the color. For example, let's just go
with something different. Let's just go with C and blue. Or N blue two, or N blue
three, something like that. With this color, we will go and use this option that
is called color feel. When we are done, we will
desalate everything by hitting our S ribbon
icon over the top left. And then we'll make sure that
we did everything right. So let's just go back to our lives and we
will see that all of our background
elements are colored in this blue color
when you have it. Let's just go again to our
magic want to Gaussian blur. And we will add
some blur to them. Find the amount
that works for you. If you want to
adjust the color or saturation or brightness of it, you are welcome to get
back to your magic. Want to hue saturation and brightness and play
with the sliders. And when you are done
playing with the color, let's just tap on
our magic an tule one more time to get
away from this mode. And when you did it, let's just go straight to our layers. And let's select every layer that belongs to
this illustration. We will put them in the group when you've selected all
the layers that you need. Let's just hit group
over our top right. And let's just go to
the top of it and let's rename this group as
Ghost with a Flower. And when you're done,
let's just go to our little V icon on this
group to collapse it. Now we are done with
our last illustration. Thank you for watching
this class leave, review if you liked it, and consider subscribing for more Cai videos in the future. Looking forward to
seeing your projects.
 Uni Corn, ⭐Kawaii Art Enthusiast⭐