Transcripts
1. Introduction: Hello everyone. I'm Uni. And into this class we'll
draw cute hallowin creatures. This class doesn't require any prior experience
or fancy tools. We'll start from
scratch and we'll be using simple techniques
throughout the process. Everything you'll see will
be happening in propriate. However, if you
have other software or want to try
traditional materials, you are welcome to join. So if you are ready to start, let's jump right into it.
2. Basic Scheme: Let's start our
class by deciding what kind of canvas we
are going to be using. You can see it is a very simple standard square canvas
that you can find. In procreate, both
pixel width and pixel height are
set at 2048 pixels. But if you would like to use any other dimensions for
a canvas, just go for it. As for DPI, we are using 300. And as for the color profile, it is set as SRGB with the low
number. And it's all done. Let's just hit done
over our top right and it will be redirected
to our new canvas. Now we need to decide
what kind of colors we are going to be using
throughout the whole class. You can go and pick the colors yourself and find
what works for you. But if you would like
to follow along and use the same colors that you will
see throughout the class, please go to the project
and Rester step and download all the materials
when you did it. And if you did it, the first thing that
we will need to do is to go and change the
color of our background. What we need to do is to go to our layers and go to our
background color layer. Let's just tap on it. And here in this new
panel on the bottom, we will see our Halloween
creatures palette. What we need to do is to
go and change the view, so we will know what color we will need for our background. We will go to the bottom right, and we will choose palettes. When we choose it, we
will see that we have two options of how we
can use our colors. The compactium and the
cards go to the cards, because here we have
all of the colors, names and it will be easier for us to navigate through that. Now let's just find the color with the name
background and let's just tap on it to select the color for our
actual background. When we did it, we
will just go away from our picking color
for our background. We will just tap on the screen. The next thing that
we will need to do is to start making our sketch. But we will start making
our sketch by creating a simple scheme that
later on we will use for all of the illustration that we are going
to be creating. This time, what we
need to do, firstly, is to go and find the color that will work onto our background. Let's just go to
our color palettes. And again, we will
go under cards. Let's select some bright colors. For example, yellow,
green, white, light yellow, CN, blue,
light grayish orange. Pick the color that you
like when you have it. We will need to go and select the brush that we are going to be creating our scheme with
when you have the color. Let's just go to
our brush library. We will go to the
sketching folder. And here you can select
any brush that you like. You can try out one
brush. Go to your canvas. Try out if you don't like it, get back to the brush library and find the brush
that works for you. When you find the
brush that you like, let's just get
back to our canvas and let's start
creating our scheme. The first thing that we
will need to do is to create a shape of the allpse. Very easily, we will just go somewhere to the middle
part of our canvas. And with one line, without
lifting up our apple pencil, we will start
creating our shape. At the end of the line,
hold your apple pencil, and you will see that you snap your shape to a better one. If you need to rotate it, you can move your apple pencil
in a circular movement. For this part, we will need
a horizontally aligned alop. So try to make it
very horizontal. If you need to make it bigger, you can move your
apple pencil from side to side when you have
something like that. Let's just go and adjust
it just a little bit more. What we need to do is to go
over the top to edge it, and here we are at
the editing mode. We are in the editing mode, you can see that we have
some nodes and we can go to the nodes and we
can adjust our sheep. Now let just go and make sure that we have our sheep
horizontally aligned. And to make sure that
we will need to go and put our nodes that we have
on the sides on one line, we can just go to this node
that we have on our right. We can hold our apple pencil there and just move
a little bit down. We have our nodes on the same line that we have
our nodes on the left one. When we did it, we will go and make the shape a
little bit bigger. We will just go to
one of the nodes, either to the top one
or to the bottom one. And we will open the shape up by creating
something like that. When you have the
ship like that, let's just go away from our
editing mode by tapping on the screen either with one of our fingers or with
our apple pencil. When we have the ship like that, we will need to
position it right in the center of our canvas. We can do it very easily by using the tools
that procreate has. What we need to do is to go to our arrow key on the top plate, which is our transform tool. We'll go under
uniform method that we have on the
bottom panel here. When we are using
uniform method, you can go to snapping
on the bottom left. And we will need to
togal snapping here too when we turned on snapping. If we get back to our canvas, hold our apple pencil
at some blank space, we can move our ship and we can find this intersection
with two orange lines. When we found this intersection, that means that we are right
in the center of our canvas. When you found
this intersection, just release your apple
pencil and let's just go and deselect everything by hitting our arrow key one more time. Now we know that we are
right in the center. And we can go and create the intersections that will show that we are
right in the center. That later on will help us
to build up our creatures. Let's just firstly
go to our layers, and let's create one more layer. We will tap on the plus icon. We will get back to
our canvas to create a straight line going
from top to the bottom. We will go and do the same
way as we did with our Alep. We are going above the ship
and just with one line, we are creating our ship. In the end, we are holding
our apple pencil and we are trying to adjust our
angle to make it straight. When you have
something like that, we are ready to go and pull this line right
in the center. As we are on the separate layer, we can go again to our
arrow key on the top plat. And again find the
center by moving our ship and finding the
vertical, orange line. When you found it, you will know that you are
right in the center. And now we will go and deselect everything by hitting our
arrow key one more time. Now one more time we are
going back to our layers and we will create one more
layer onto this layer. We will create a similar line, but it will be horizontal. This time let's
just go over one of the sides and let's
create our line. Hold it at the end and try to adjust the angle to
make it straight. When you have it, we are going to our arrow
key one more time. And we are finding our
orange guiding line, but now it will be horizontal
when you found it. Release your apple pencil, and let's just go and desalect everything by hitting
our arrow key. Now when we have the
scheme like that, let's just go back
to our layers and let's combine these
three layers together. To do so, we will need to
put one of our fingers on the top layer and one on the bottom and make
a pinch movement. When you have everything
on one layer. Let's just go and
create one more layer. Onto this layer, we
will create Eric Tingo. What we need to do firstly, is to go to the bottom part of our ellipse and find
its approximate center. Just make a little
markdown like that. Through this markdown, let's just go and create Eric Tingo. We will go and do the
same way as before, just with one line at
the end of the line, hold your apple pencil. And then we will go over the top to our option of
the edited mode. For me it's poly line. For you, it might be something different if you have
the option square. When you are opening up the editing mode,
you can tap on it. If you don't have
it, don't worry. We can go and adjust our
rectangle just manually. Now we can play around
with this shape. We can make it smaller,
or we can make it bigger. All that we need to do is
to make this square that later on we will turn into the body part of our creatures. If you want your body
parts to be smaller, you are welcome to go and adjust this element
and make it smaller. If you want it to be very
proportional to the heat, welcome to keep it as it is right now or even
make it bigger. Play runs with the sheep
just a little bit. Go to the nodes and find
what works for you. Just imagine that
the ship on the top, the ellipse later on will
be turned into the head. And the square will be
a part of the body. Find what works for you and when you are satisfied
with your result, let's just tap on the screen to get away from our editing mode. Now, one more time, we can go to our layers and we can combine
these two layers together. But this time let's just go
over our layer on the top. Let's just tap on it and
let's choose merge down. Now as we have
everything on one layer, let's just go one more time to our error key on the top left. Again, we are using snapping
and uniform method. Let's just go and make the whole shape a
little bit smaller. What we need to do
is to go to one of the nodes that we
have in the middle. Either to the top or to one of the sides,
or to the bottom. And let's just drag it to
the side, for example. Let's just go to
the node that we have in the middle, on the top. And we will drag it down to
make the whole shape smaller. Now we will position it
right in the center, the same way as before. Just go into some
blink space holding our apple pencil and
finding our orange lines. If you see that
your vertical line is not aligned to
this guiding line, you can just go and move it toward the place that
you need it to be. And then just go and deslect everything by hitting
our arrow key. That will help us later on when we are going to be creating the sketches and the actual illustrations for our creatures. When you have your shape
placed in the middle, let's just go to our arrow key one more time and
deslect everything. The last thing that we
will need to do here into the spart is changing the
apacity of this layer. Opacity shows how transparent your objects are on this layer. We just need
everything to be seen, but we don't need it
to be very bright. Later on, it will be easier for us to create an actual sketch. What we need to do is to make everything a little
bit more transparent. What we need to do is
to go to our layers and tap on the end icon
onto our layer. Here we can see that we
have the slighter capacity. We can grab it and we
can move it toward the left until we still can see what's happening
onto this layer. But when it's not that bright, find the capacity level
that works for you. When you're done, we will tap on our layer number one
where we have our scheme. Let's just go and
rename it as scheme. We will tap on our lier, and from the list we
will choose Rename. When we are done with this task, let's move on to our next part, where we are going to
be creating a sketch.
3. General Creature Base: Let's take this part by
going to our layers. And firstly, we will need to
create one more layer above. Let's just tap on the plus icon. And let's rename this
layer as scheme two. Into this part, we are
going to be creating a generic scheme of our shapes of the body
of our character. We will just create
the lines that later on we will turn into
different characters. Now what we need to do is
to use one of the options that Procrit has that is
called symmetry drawing. That means that if we are
creating something on one side, it will be mirrored on the
opposite side in the same way. Now when we have this new layer, we will need to do the full win. We will go under range icon over the top platts and we
will go under canvas. The first thing that
we will need to do is to turn on drawing guide. Let's just toggle it
and you might see the grid going through the
whole shape of your canvas. If you don't see the
lines, that's okay. You probably have them. But the lines are black and that is quite hard
for you to see that. What we need to
do is to go under eight drawing guides here. You can go to the top
panel where you have the colors and you can
select the different color, that will be contrast, and
you will see these lines. But now we will need to go and
choose a different option. We will need to go under
symmetry and we will have this line going from
top to the bottom again. If you don't see the line, go to the top panel and
find the quantrasclorow. When you see this line going through the center,
that is vertical, we will need to make
sure that this line is going through the middle
part of our illustration. We will need to match it with the line that we
have to our scheme. If you need to move it a little bit right to the
center of your line, you can go to the snow that you have in a center that is blue. You can hold your apple
pancil there and you can move your line of symmetry to the
middle part of this line. When you found the center
of your illustration, let's just go over the top
right and let just hit done. Now we will need to make sure that we turn
this layer that we are using right now for our scheme number
two as assisted, we will go to our
layers and we will see that now our scheme
two is assisted. It has a little title, that's exactly what we need
if we go to one of the sides, if we grab our brush and if
we try to create something, you will see that it is
mirroring on the opposite side. That's exactly what we need. Now let just go and start creating our basic
generic scheme. What we need to do, firstly, is to go to the bottom part of our ellipse to this
intersection that we have. And we will start by
creating a flat line. Let me just go and create
something like that. We will go to this line
that we have in the middle. From this line, we will go to the side to match the
line of our rectanga. When you have
something like that, we will go and we will try to connect it with our
generic ellipse. Let's just go and
create a line going up in that way you can play
rounds with the curves. You can go and make this line a little bit different
to your taste. Then we will go to the top
and we will create a curve. Going in that way, you can use the same options
that we use before. You can hold your line at the end to snap it
to a better one. If you want, you can go to the editing mode and
adjust the line from here. What we need to
have in general is a curvy line on the top and
flatter line on the botta. Let's just work onto
the whole shape a little bit more and let's
create something like that. When you have
something like that, let's just grab our
eraser tool and let's get rid of all the
lines that we don't need. Let's just try to make
our scheme very clean. Again, if you want to play around with your
shape even more, you are welcome to
go and do that. Just find the shape on the hat that you like when you
have something like that. Let's just go to the bottom and let's start
creating the body. Firstly, we will go and
create a shape like that. We will go to the bottom
part of our head. We will go to the
middle line and we will step a bit to the side. We'll make a little mark down. Again, you are making a markdown where you want to start
creating your body. If you want a chubbier body, go more toward the
lines that you have outside on your
rectangle from them, Just start creating
the shape in that way. We are just going
down with the curve. When you have
something like that, let's just go to the bottom and let's connect it
with another curve. You can always take a look at your illustration
from the distance, and that way you
will know that you need to adjust some
part or maybe make something different when you are satisfied with the
shape on the body, Let's just grab our eraser two. And again, let's erase the
lines that we don't need. When you have
something like that, let's just go and start
aiding the limbs. Firstly, let just go
and create little arms. We will go to this intersection between our body and the head. From this intersection,
we will go to the side and we will
create a shape like that. If it's easier for
you, you can start by creating a shape
of the allpse. Then connect it with the curves. Or maybe use the Azor tool and create the
shape in that way. Basically what we need
is something like that. As always, you can play
around with the shapes. You can make them
bigger or smaller, or you can just go and create different shapes for your arms. When you're satisfied with
everything that you have here, grab an azar tool and adjust your lines
to make them clean. If you want to play around with the shapes now it's
time to do that. When you have your arms and when you are
satisfied with them, let's just go to the bottom. And let's add the
legs, for example. Let's just go to
one of the sides. And we will go somewhere
near this intersection that we have between
our arm and our body. From this intersection,
we will go down with another
half of the ellipse. We will need to create
something like that. Just go to the line
that you have on the side and continue
by going down. You can just create a
nice curve and create a nice connection between these two shapes
with another curve. When you have
something like that, let us go and continue
creating the curve. Going toward the center
of our illustration. Create another curve to connect the whole
ship with the body. Play runs with these
shapes if you want, make the legs a little
bit bigger or smaller. Add another details
if you want to. And when you are ready
with the general ship, grab an eraser tool. Erase the lines that
you don't need. Now let's just take a look at our scheme from the distance. If you like it, we are ready
to move on to our next part. If you want to
adjust some parts, it's time to adjust these parts. For example, if you want, you can go and work
more, want some places. For example, the arms
make them bigger or smaller. Work on the legs. Work on the whole
ship of the hat and the whole body.
It's all up to you. That ship that we are
creating right now, later on will be turned
into our little creatures. So now it's time to work onto the ship and find
what works for you. Spend some time here and create
the scheme that you will like when you are satisfied
with your general shapes. Let's just go and turn
off our assisted drawing. What we need to do
is firstly to go to our range icon
over the top left. Go under canvas and to goal
drawing guide one more time. But that won't be enough
because if we go to our list, we still will see that our scheme number two
layer is assisted. If we go and try to
create something, you will see that it is
mirrored on the opposite side. We will just need and
manually turn it off. We will go to the layers. We will go to our layer
with scheme tube. We will tap on it and we will choose Drawing Assist
from the list. Now when we don't have
this title assisted, we can just go and
add the details and they won't be mirrored
on the opposite side. That's exactly what we need. Now we are ready to move
on to our next part, where we're going to be creating the first proper sketch
of our creature.
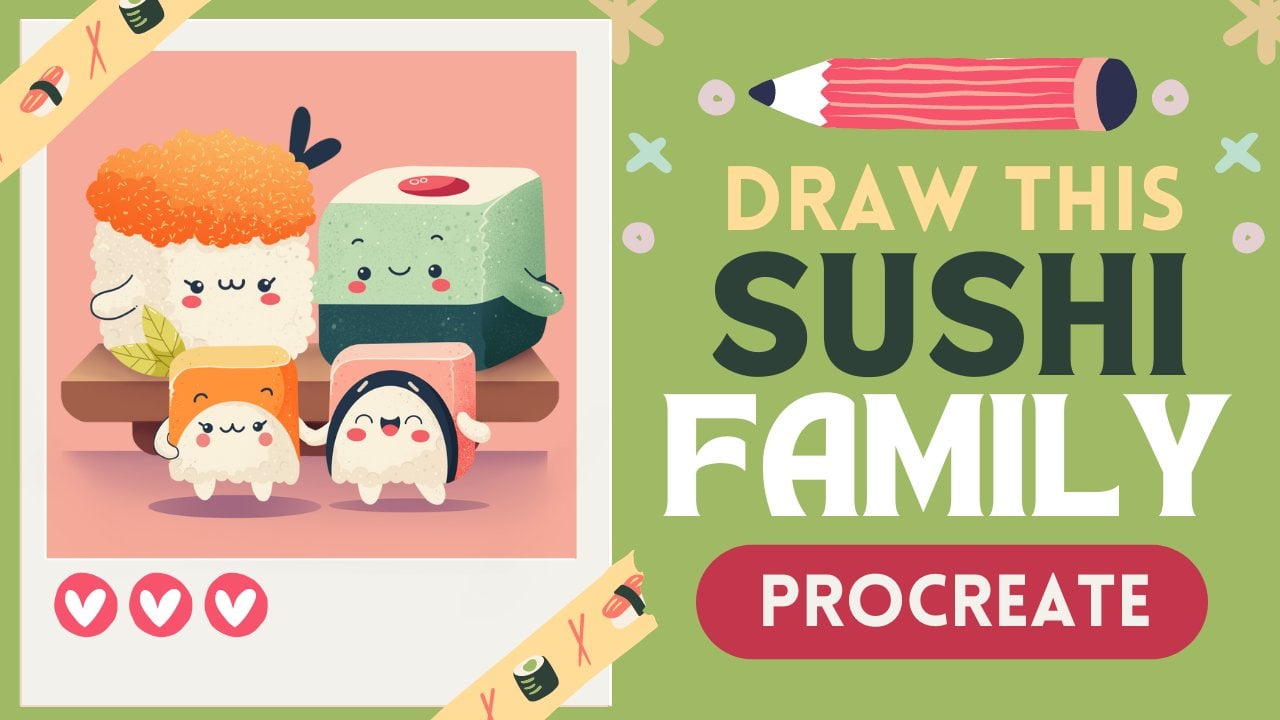
4. Bear: Sketch: Let's take this part first
by going to our layers. And we will go to our layer with scheme two and we will
make it more transparent. We are going to our icon and we are going to our
opacity slider. Let's just grab it
at moving toward the left side until we still can see what's happening
onto this layer. But when it's not that bright, find the opacity level
that works for you. And when you are done,
let's just tap on our layer with scheme two to close
this window from here, let's just tap on the
plus icon to create a new layer on
which we are going to be creating our first skitch. Let's rename this
layer as bare skitch. Now when we have our new layer, let's just go to
our color palette. And let's select some
contrast color so it will be easier for
us to see what we are doing onto our canvas and we are not confused with
the lines that we have. For our skitch, for example, something contrast like yellow, green, pink, magenta
will work best. Let's select one
of these colors, and when we are
done, we are ready to go and prepare our canvas. We will be using the same
brush and we will need to go and set our layer
with a bare sketch. As assisted, we are using the same option
that we were using before, our assisted drawing. Firstly, we are going to our
ranch icon overdo plate. We are going under canvas and we are totaling drawing guides. When we have this line, we will need to make sure that our layer is set as assisted. We are going back to
our layers and we can see that our lay with
bare sketch is now, doesn't have this
little title assisted. We will need to go and
turn it on manually. Let's just tap on our li with bare sketch and let's just choose drawing Assist
from the list. Now if we go to our canvas and if we try
to create something there, you will see that it is
mirroring on the opposite side. And that's exactly what we need. We will go and start
recreating what we have on our layer
with the scheme, or we can adjust it a
little bit and make it less my on the top, for example, let's just go over our
left side to the top of this head and let's make it
a little bit more squished. We will just go and start creating a line
going in that way, stepping a bit from the top. And we are creating a line going along the whole
shape of our head. We are creating a little
bit squished shape. When you have
something like that, we will go over
the bottom and we will recreate the line
that we have there. Now, work on the whole
shape in general and try to make it very
smooth and very soft. If you need to adjust spires, go and adjust them either with your brush
or with an razor. Two, when you have the
shape for the head, let's just go and create
the ears on the top. Firstly, let's just go and mark down where we
want to put them. We will firstly go over one
of the sides, for example, to the left one, we will go to the middle line that
we have from it. We will step a bit to the side and we will make a little
mark down like that. You can place the ears
wherever you want. You just need to play around
and find what works for you. For example, when we have
our first marks down, we will need to go a
little bit further. We will need to
put two more mark down a little bit
underneath these two ones. Let's just go to the left. And we will put two
more lines like that. We will go then and we will create half of the
circle over the top, and we will try to connect
these little mark downs. Let's just go and create the
shape just with one line. And at the end of
it we will hold it. You can play around
with the size of this element.
It's all up to you. If you feel that
maybe your marks down were not too correct, you can go and adjust the placement of your
elements to your liking. Let just go and hold
our apple pencil. And if you need to
adjust it even more, you can go over the top to the 18 mode and
adjust it from here. Play around and find
what works for you, find the shape that you like. You can always zoom
out your canvas and take a look at your
illustration from the distance to see whether you like when you're satisfied with the ears. Let's just get away from
our editing mode by hitting our screen either with one of our fingers or with
our apple pencil. Now let's just go and
continue adding some details. Firstly, let's just go inside the head and let's start
adding our facial features. We will start by adding the ice. Let's just go to this line
that we have in the middle. We will go a little bit
underneath it and we will start creating a shape of the Alps
on one side, for example. Let's just go over
our left side. Just go underneath this line
that we have in the middle. And creating a shape like that, you can do it manually,
or if you want, you can hold your apple pencil
at the end of the line, snap it to a better shape, and then go to the editing
mode and adjust it from here. You can tilt it or you can make it very straight.
It's all up to you. The same way you can
play around with the size of this element
and with its placement. When you are satisfied with the size and the
placement of your eye, Let's just get away from our editing mode by
hitting our screen. Now let's just go inside
the shape of the eye and we will shade it
when we are done, let just work onto
our nose area. We will go to the middle
part where we have our eyes. Let's just make a
little mark down. When we have this mark down, let's just go underneath it and let's create
a shape like that. We are creating
something similar to what we have for the
shape of our head. Let's just make it a
little bit smaller. If you need to
adjust some parts, grab an Erazor two and adjust
when you have this shape. Let's just go and
add a little nose. We will step a little bit
down from our line on the top for our nose area and we will create
a similar shape, but this time our little
part will look down. When you have this
very soft triangle, we will go underneath it and we will create a little
element like that. We are going down
from our nose and we are creating a little
half of the circle there. You can make the size of your brush smaller
for these details, play around with this element. You can make it very
big or very small. It's all up to you if you want, you can go and add some
additional elements. For example, little things. When you are done with these
little teeth elements, let's just go and create the size of eye
brush one more time. And we will go
underneath the eyes and we will add little
elements as cheeks, for example, go into
one of the sides, either to the right
or to the left. Go into our side of the eye on the bottom and creating
the shape like that. As always, you can play around with the size
of this element. You can hold your apple pencil
at the end of the line. You can make sure
that you are creating a very circular shape by holding one of your
fingers on the screen. When you are holding
up your apple pencil, if you want to adjust
the shape even more, you can go to the
editing mode and find the placement or find the
size that works for you. If you want to make your element smaller in the editing mode, you will need to go
right between the nodes. Hold your apple pencil there, and drag it to the site
to make it smaller. Find the position for this
element that works for you. And when you're done, let's just go away from our editing mode. Now we are done with
our facial features, but if you want to add some
additional elements such as eyebrows or maybe some
highlights to the eyes, you are welcome to
go and do that. If you are ready to continue, let's just go and
increase the size of our brush and we will go
to the body elements. For now, let's just
go and recreate everything that we have
on our little scheme. Just go in there and
recreating the lines. If you want to adjust
the lines in any way, you are welcome to
go and do that. But now let's just go and add some additional elements to make our bear a
little bit unique. Let's just go right underneath our facial features
and the whole head. And we will add a little
scarf there we will go first, right near our arm that
we have on one side. From here, we will start
creating some lines like that, going down in a triangular way. If you want to try
out different shapes, you are welcome to
go and do that. You can go over this
line that you have on your arm and
make a little loop here to make sure that
this element that we are creating for the scarf is
not just laying on the arm, but it is a little bit above it. Spend some time working on the lines on this little scarf. And when you are
done, let's just grab an eraser tool and let's erase all the lines
that we don't need. If you want to add some
additional elements, you are welcome to
go and do that. For example, let's just go to these little bumps that we have on our scarf and let's just add little
elements like that. And also, let's just go about these little elements and
we will create a line going in that way that later
on we will turn into a fold and create a nice scarf. Now when we have
something like that, let's just go to the top. And we will start by creating
the shape of our heat. To start with our heat, let's just go firstly and turn
off our assisted drawing. We will go to our range
icon over the top left. We'll go under canvas and we will togle drawing
guide from here. But also we will need to go back to our layers and we will need to turn off our assisted
drawing on this layer. Let's just tap on our layer with bare sketch and we will choose drawing assist
from the least. Now just for the convenience, let's just go above
this layer with their Skage and let's
create one more layer. We will be using it for as in
some details and it will be easier for us to erase some elements that
will be overlapping. Now also for convenience, let's just go to
our color palettes. And let's select some color
that will be contrast. For example, some green
color will work best. Now let's just go over
the top of the heads and we will start by creating
the shape of the ellipse. Let's just go along
the whole shape. And let's create a
shape in that way. Holder line and the ends. And let's just go and adjust it by going over the top
to the ads in modes. If you want, you can tilt
your elements to diesel. You will need to go
right between the nodes. Hold your apple pencil there, and move it in a
circular movement. Find the placement
that works for you. If you want to play around with the position
of this element, you are welcome to
go and do that. If you want to make
it more open again. You are welcome to go and
play around with the nodes. And when you're satisfied
with your line, let's just go away from our editing mode by
hitting our screen. And now we will go and grab
our eraser tool and we will erase these lines
that we don't need that are overlapping our face. Now when we have our
bottom part on the hat, let's just go over
the top right, between our little ears. We will create a
line going here that will represent the
top part of our head. When you have
something like that, we will need to go over this shape that we
have just created. And we will need to create
this part where the head goes. Let's just go and create a
little shape in that way. We will step a bit
from this line that we have in the center and
we will create a shape. Going in that way, you can create it manually,
or if you want, you can hold your apple
pencil at the end of the line and go to the
ten mode to adjust it. If you want to adjust the
shape of your head in any way, we can do the following. We can go to our arrow
key on the top left, which is our transformed tool. We won't be using Warp option, let's just select it
on the bottom panel. And you can see that now we have some additional lines in the middle part of
our bounding box. And that means that we can go and adjust them to our liking. We can go to any place
on this bounding box. We can hold our
apple pencil there, and we can drag it
to adjust our shape. For example, let's just
go to the middle part, and let's drag it
a little bit down. You can spend some
time here to adjust the shape of your head and
find what works for you. Let's just play
around with the ship. And let's just go
to our error key. When we are done, adjusting
our shape of the head. Also, if you don't
like the warp option, but you still want
to adjust the shape of your head or any
other elements, we can use another option
that procreate has. Firstly, we will
need to go under our magic one tool
over the top left. From this list, we
will need to choose Liquefy On the bottom panel, we will use the option
push and you can go to the sliders and
adjust it to your liking. Play with the size
of this element, the pressure, anything that
you want to play around with. All that we need to do
is to go to the places that we want to
adjust and push them. If you want to adjust some
elements with this tool, you are welcome
to go and do that when you are done playing
around with your Shep. Let's just go and
desalate everything by hitting our magic one
tool one more time. Now let's just go and add
some additional elements. For example, let's
just go to the edge of our head and let's add
additional elements like that. We will just go and
add some spikes. When you are done
adding these details, let's just go over the top of our head and let's add
additional element here, which will be a clover leaf. Let's just go and create
something like that. We will go to the top and we will create a hard
shape like that. And then we will go to the
sides and we will add two more of these shapes
when we are done. Let's just grab an eraser tool and erase the lines
that we don't need. If you want to adjust
this little detail, you know what you need to do. Go to the magic an
too liquefy and play around with this
shape When you are done. Let's just hit our
magic one tool one more time to
deselect everything. And then we will go
to the bottom part of our illustration and we will start adding some
additional elements. For example, let's just go
over one of the sides to the bottom where we have our little arm and our little leg. And we will start by adding
a little pumpkin here, again with the same color. We will go over
one of the sides. You decide whether it will be
a left side or right side. And we will start by
creating a shape like that. You can go straightly
to the area where you want to
add this element. Or you can go a little
bit to the site, create this element,
and then move it to the place that
you want it to be. For example, let's just
go to some blank space. And let's start by creating
a shape like that. Again, you can create it
manually, or if you want, you can hold your Apple
pencil at the end of the line and create
a better shape. If you need to adjust it, go over the top to
the editing mode and adjust it from here. When you have a little
shape like that, we will go to the bottom and
we will create a few loops. What we need to do is to
create something like that. We are creating a little
element like that and we are creating a few more
of them on the bottom. Try to make everything
very rounded. And if you need to adjust some parts, you know
what you need to do. Adjust it either with your brush or with your arrays or too. Now, when we have
the general shape, we will need to go to the top, where are little lines that we have on the
bottom will connect. And we will need to create a
few lines going in that way. To be more concrete, we will need to have
two lines like that. When you have these two lines, let's just go above the
whole shape and let's add a little tail in that way you can play around
with the tail. You can make it very straight or you can make a little curl. And when you have it, let's just go inside our little pumpkin. And let's add additional
elements there. We will add some currents. Let's firstly go over
one of our sides and we will create a
triangular shape like that. You can make the soft
triangle, or if you want, you can make a very straight angled triangle
when you have it. Let's just go inside the
shape and let's shade it. When you have it over
one of the sides, we will go to the opposite side and we will do the
same thing here. When you are done with the ice, let's just go and add
some little mouth. What we need to do is to
create a scary mouth. Let's just go firstly over
the top part and we will add a few lines going in that way you can play runs
with the whole shape. And when you're
satisfied with it, we will need to add
some thickness to it. What we need to do is to
go underneath these lines. And we will need to repeat them and connect them together. Let's just go over the bottom and let's make it a
little bit thicker. If you want to adjust these
little shapes in any way, what we need to do is to go and select the elements that
you want to adjust. For example, if you want to put the ice a little bit higher, we will firstly need to
go to our S ribbon icon over the top left and
select freehand methods. When we have selected
our freehand methods, all that we need to
do is to go around the shapes that we want to
adjust and select them. Let's just go and create
the loop like that. We will close it by
going to the end point. When you have only these areas that you want to
adjust, select it. We will need to go to our arrow
key on the top left here. We will use uniform
method to adjust it. If you need to move the shapes, just go to some blank space. Hold your apple
pencil and move it. If you want to make
this element smaller, go to some nodes and
make it smaller. If you want to make
it bigger, again, the same way, just go
and make it bigger. Now let's just play
around with the shape, and let's position
it differently so it is not glued to our mouth. Also, if you want to
rotate this object, you will need to go
to this green node over the bounding box. Hold your apple pencil there, and rotate the elements
to your liking. Always take a look at
your illustration from the distance to see whether
you like it or not. If you need to adjust
some other elements, you will need to do the
same thing one more time. If you are done with
these shapes of the ice. If you are done adjusting them, let's just go and
deselect everything by hitting our ribbon
icon. One more time. If you want to go and adjust the elements of the
mouth one more time, we are going back to
our ribbon icon using free hand method and selecting the element
that we want to adjust. When only the
element is selected, we are going to our
arrow key on the top left using uniform method or any other method
that you want to use. And we are adjusting our shape. When you are done adjusting
this little element, let's deslect
everything by hitting our S ribbon icon one more time. If you want to adjust the
whole shape of your pumpkin. One more time, we
are going back to our S ribbon icon using free hand method and
selecting the whole shape. If you want to play
around with the shape, go to the arrow key and
use the word method. If you want to make
it bigger or smaller, or rotated, go to
the uniform method. When you are generally
satisfied with your shape, let's just make it a
little bit bigger. And let's position
it differently by moving it closer to our bear. Let's just overlap our
little arm and little leg. If you want to rotate it, go to this little node on the top and find the
placement that works for you. As always, take a look at your illustration
from the distance to see whether you like it or not adjusted to your liking. And when you are done,
let's just deslect everything by hitting our S
ribbon icon one more time. Now when we are done with
our little pumpkin elements, let's just go and add a few
more additional elements. For example, we
can go underneath our bear and we can add some additional
elements like that. That later on we will
color differently and it will be some place
that our bear is sitting on. We can go with the wobbly line and create something like that. Play around with the
shape if you want. You can go and add some
additional elements. Maybe some drops or maybe some sparkles or
something like that. When we are done with
the bottom part, let's just go to some
blink spaces that we have on the sides and let's
add some hard elements. Let's just firstly go over
our left side and we will create a heart in that way when we have it on
the first side. Let's just move on on
the opposite side. And let's add another
element here. You can go with the same heart. You can make it
bigger or smaller. It's all up to you. If you want, you can add multiple
elements also, let's just go over the top to our head area and we will add some sparkles
there very easily. Let's just go and create
some shape in that way. If you want, you can go over this part and add a
few more of them. Try not to overdo it when you are done with
these little sparkles. Let's just go to the
head of our beer. And let's add a little
element there too. We will go to the middle part, to the top of the head, and we will add a
little curl there. Let's just go and create
something like that. We will start from the
top and we will go to the middle part and
create a little spiral. You can play around with
the whole shape in general. Just go and add a bit of
thickness over the top part. And just create a
shape in that way. Play around and find
what works for you. If you want to add
more elements, you are welcome to go and do that when you are
done with this part. When you are done with all the elements that
you wanted to add, we are done with our sketch. Firstly, let's just go over
our layers and let's combine these two layers
together where we have all of our bare elements. We will go to this layer
where we have our hat on, we will tap on it and we
will choose merge down. Now we are ready to move on to our next part where we are
going to be aiding our colors.
5. Bear: Base Colors: Let's tatis fight from
some tiny preparations. Firstly, we will go
and change our brush. We are going to
the brush library, and this time we are going
under calligraphy folder. Into the calligraphy folder, we will choose monoline brush
while we are still here, into our brush library, let's adjust our
brush just a little bit so it will help us to
create smoother lines. What we need to do is to
go to our monoline brush. Tap on it one more time, and we will go inside
the brush studio. On the left, we will go
under stabilization. Here you can see on the
top we have the option streamline which has
an option amount. When we are operating with a lower amount of
amount of streamline, you can go to the drawing pad
and try out how it works. We will be creating a line and we will have a lot
of control over it, but our line will
be quite jagged. If we want our lines
to be very smooth, we can just go and try out a different amount
of streamline. Let's just go and play around
and find what works for us. For example, if we set our amount of
streamline at maximum, we will be having a
very smooth line, but we will lose a bit
of control over it. Play around and find the
amount that works for you. If you don't want
to use this option, it's all up to you.
You found the amount. Let's just go and it done over our top right to go
away from this moat. Now when we are done
setting up our brush, let's just go back to our
layers and we will create one more layer on which we start creating our
little elements. We will be starting
from the bottom, so we will need to
create a new layer that will rename as Body. Let's just tap on the plus icon. And let's do that also to see
clearly what we are doing. And to repeat what we have on
our layer with this sketch. Let's just grab this
layer with body and we will drag it underneath our
layer with this sketch. To do so, we will just need to go to our layer with the body. We will need to hold it with
our apple pencil and drag it underneath our layer with the
bare skitch when we did it. One more thing that
we will need to do right now is to go
back to Arly with Bear sketch and let's just go and make all the
lines with one color. What we need to do is to go
to Arly with a bear sketch, tap on it, and
choose alpha lock. When we are using alpha log, we are operating only on the areas that we already
have onto this layer. We will not be creating any more details outside the
lines that we already have. Now when we have
our alpha log on, let's just get back
to our color palettes and let's select just one color. Any color that you
like, that will be seen onto our canvas, for example, let's just
select C and blue color. And let's increase the size
of our brush to maximum. We will just go along the lines
and we will recover them. And when we did it, we are ready to get back to our layers. We will go to this
layer with bar sketch. We will tap on it and we
will turn off alpha lock. And also we will just
go to this layer and we will adjust the opacity of
it. You know how to do that. We will need to go to
our icon and go to the slider with opacity and find the amount
that works for us. When you found this amount, let's just tap on our bare sketch layer to
close this window. And also, let just go
to the layers that we have underneath our skin
layers and we will hide them. So firstly, we'll go to our
lier with the skin two, we will go to this
little checkbox near the icon and we will tap on it. And we will do the
same with the scheme. Layer number one go into this little check mark
and we are tapping on it. Now we have only our
layer with a sketch. So let's just get
back to our lay with the body and we will go
and pick up some color. We will go again to
our color palette. And for example, let's start by selecting the color
with the name green. With this color, we will go and decrease the size
of our brush just a little bit and we will go and recreate the lines that
we have for the body. Let's just go and
do it very quickly. Just go in there if you want to use all the options
that you used before. If you want to hold your Apple pencil at the end of the line, please go and do that. That we need to do is
to recreate what we already have onto our
Lia with this sketch. If you don't want to
repeat everything with 100% of similarity, you are welcome to go
and change some things. All that we need to
do right now is to create closed and smooth lines. When you have the outlines done, let's just go and add
the color inside. So we are going to our icon with the color on the top right, and we are dragging it
to the needed, please. If you have something like that where you have little outlines between your first outline
and your main shape inside, you just need to not unhold your apple pencil and move
it toward the right side. When you are changing
the threshold, you can see on the top
we have this percentage. And you will just need
to find the amount that will cover this little
part that we had before. When you don't have any gaps between your outline
and the main mass, just lift up your
apple pencil and you are done recovering
this little parts. Now when we are
done with the body, let's just get back to
our layers and let's create another layer for
the rest of the aliments. Again, we are starting by
going from the bottom. Let's just go and we
will need to understand which elements will be up front
and which will be behind. Now we will need to go and recreate the element of our hat. Let's just go and
create one more layer. So we are tapping
on the plus icon. We will firstly need to go and recreate this element
that we have on the top. Let's just rename this
layer as Top of the Hat. Now when we have this layer, we are going back to
our color palettes and we will select the color
with the name purple. With this color, we will go to the top and we will recreate this element that we have
the same way as before. If you want, you can hold
your apple pencil at the end of the line and make
this shape very smooth. If you need to adjust it, go to the editing mode
and adjust it from there. When you have the first line, let's just go on the
bottom and let's connect the whole
shape in that way, you don't need to pay too much
attention to this line on the bottom because it will
be overled by other objects. When you have this shape closed, let's just go and drag and
drop the color inside. When we are done, we
will get the layers and we will create one more layer for the bottom part of our heat. Let's just rename this layer
as bottom of the heat. Now with the same color, let's just go and
recreate this element. If you want, you can go and pick up the different
color if you want. You can just continue with this one the same way as before, just creating the shape
and closing it up. When you have the outline, let's just get away from our
editing mode and let's just drag and drop the color
inside one more time, reminding you that you
don't need everything to be similar to what you
have on your Skage, But if you want to
adjust the lines and put them on the places that
you have on your Skage, all that we need to
do is to go under our magic 12 and under Liquefy, we will use our push option, and we will just push the
lines and put them on the places that we have them on our layer with the sketch. Let's just go and adjust that. When you are done
adjusting your lines, let's just tap on
our magic one tool one more time to get
away from this mode. Now let's just take a look at our lines and whether
we need to adjust that. You can do just looking at
your illustration or you can just go to your lies and hide
your Lia with bar Skitch. Take a look at the
whole siloutte. If you want to adjust it with your brush or with
your eraser tool, please go and do that. When you are satisfied
with your silhouette, let's just get back
to our lis and let's unhide our Lia
with bare skitch. Now let's just go and
start recreating our face. We will go and create one more Lia and we
will rename it as Face. Now we will just go and select the same color that we're
using for our body. You can go to your color palette and pick the color from here. But also you can just go to the color that
you already have on your canvas and hold one of your fingers there until
you have this little tool. When you have the color that you need on the top of the tool, you will just lift up
your finger when you, let's just go and recreate
the whole shape of our head. We can do it manually or we can use our familiar symmetry tool. Firstly, let's
just go underneath our range icon
over the top left. We will go to the canvas and we will togal drawing guide here. When we have our line going
from top to the bottom, we are going back to our layers and we will go to our
layer with the face. And we will need to manually
set it as assisted. Let's just tap on it and
let's choose drawing assist from the least
when we did it, let's just go and
recreate the shape of our head and our ears. When you have the
outlines ready, just drag and drop the
color inside these objects. Now when we are
done with our head, let's just go back
to our layers and let's recreate our
facial features. Firstly, we will go to our
layer with the face and we will turn off our assisted
drawing from this layer, tapping on the layer and
choosing drawing assists. Now let's create one more layer above that we will rename
as facial features. Also, we will use the same tool, our Symmetry tool,
onto this layer. Let's just go and
manually turn it on. We will tap on our layer
with facial features and we will choose Drawing
Assist from the list. Now let's just zoom in
our canvas and let's start recreating our
facial features again. We will start by going
from the elements that are underneath what
we need to recreate. Firstly is our cheeks and our little element that we have around our nose and mouth. Firstly, let's just go to our color palettes and let's select the color with
the name, dark green. With this color, we will go
and recreate our cheeks. When you have the
outlines ready, just drag and drop
the color inside. When you have these
two elements, let's just get back to
our color palettes. And let's select the color
with the name white. And with this color,
we will go to the middle part and
we will recreate it. Now when we have these elements that are going to be underneath, let's just go again
to our color palettes and select the color with
the name, background. With this color, we
will go and recreate our eyes elements again. When you have the outlines
dragon drop the color inside, you will have these elements
that are overlapping, so you just need to go and
manually recolor them. Now let's just go and
recreate our nose. We will get back to our
color palette and we will select the color with the
name dark being correct. With this color, we will go to the little nose
elements and we will remake it when you
have the nose. Let's just go again to our background color
and we will create these little elements on the bottom when you are ready
with the facial features. Firstly, let's just go
to our range icon over the top left and we will togal
drawing guide from here. Then we will get
back to our lays and we will turn off assisted from our layer with facial features tapping on the layer and
choosing drawing assist. Now let's just take a
look at our illustration. As it is right now without
our lines for the sketch. We are going to our
bear sketch layer. We are going to this
little checkbox and we are just tapping on it. Now we have something like that. So let's just continue
aiding our details. We will just go again and Unhide earlier with Bear Sketch, then we will go and
recreate this element that we have on the bottom,
underneath our head. This is some a beep. Let's just go to earlier
with the body and from here we will go and create
one more layer above it. Let's just tap on the plus icon. And let's rename this
layer as scarf or beep. And onto this layer
we will select the same color that we
are using for our heat. Let's just go and pick it
with our eye dropper tool. It's when you are holding one of your fingers on the screen
and picking the color. And we want to just
go and recreate this object the
same way as before. If you want, you can go
and do it manually or you can turn on assisted drawing
with a symmetry tool. If you just go to
your layers and if you go to the
layer with the scarf, tap on it and choose drawing
assist from the list, you will be able to recreate everything that you
have on this layer, even without this line that's going from
top to the botta. Close the shape on the top and then drag and drop
the color inside. Now let's just go and add the additional elements
that we have on our beep. Let's just go and create
them on a separate layer. Now, if you don't want to add any more details onto your
layer with the scarf, let's just tap on it and
turn off assisted drawing. Then above this layer, we will create one more layer. And this layer we will
rename as details. We also don't want to go beyond the frames that we have on
our layer with the scarf. We can make everything
safe and we can set this layer
as clipping mask. When we are setting the
layer as a clipping mask, we are working similarly to
what we had with alpha lock. We are working only
on the existing are that areas that we have
on the previous layer. What we need to do to set
this layer as clipping mask, we will go and
select it firstly, then we will tap
on it and we will choose Clipping
mask from the list. Now everything that we are
creating on this layer will be appearing only on the areas that we have on the
previous layer. Now let's just get back to our color palette and let's select the yellow green color. With this yellow green color, we will increase the
size of our brush and we will go and add these
additional elements. When you are done, we will
get back to our layers and we will create one more layer on which will create this fault. Let's just tap on the plus icon and let's rename
this layer as fault. Again, we will clip this
lier to a previous one, tap on it and choose
and clipping mask. Now when we have it,
we will get back to our color palette and we will
select some darker color. For example, dark blue purple. With this color, we will decrease the size
of our brush and we will go and recreate this little element that
we have on our skitch. When you have the outline, just drag and drop
the color inside. And let's just get back to our liers to hide our layer with the skitch so that we can check out whether
everything is looking nice. If you want to
adjust some parts, please go and adjust them. You also can notice that my hat is a little bit
jagged on the bottom. Let's just go to our layers and we will go to our
layer with the face, we'll pick up the same
color that we have for the main shape and we will just go and adjust this
line on the botta. When you are done, let's
just get back to our layers and let's unhide our layer
with the bare skitch. Now when we have it, let's just go above our
layer with the face. And we will create
one more layer here. Onto this layer, we will create this little curl that we
have on the top of the hat. Let's rename this layer as curl. We also will go and clean
this layer to a previous one. Tap on it and choose and
clipping mask if you want, you can do the same with
the facial features. So you can just go to the layer
with the facial features, tap on it, and choose
clipping mask. Now let's get back to our li
with the curl and we will go back to our color palettes
to select dark green color. With this color, we will go
and recreate this object. When you are done, let's just get back to our layers and let's go to our liya with the
top of the head above it. We will create one more layer
that will name as clover. You can clean this layer
to a previous one, so you can just tap on it and choose clipping
mask from the list. Now we will use the
same color that we're using for our little
elements on the scarf. You can just go there and
pick the color from here. Or if you want, you can go to a color palette and pick the
color from your palette. When you have this
color selected, let's just go and create this
little object on the top. When you have the outlines, let's just drag and
drop the color inside. Now let's just get back to
our layers and let's take a look at our illustration
without the cache lines. We are just going to
our little chat box and we are tapping on it. If you have created
some objects and if you want to adjust
the color of them, for example, of this clover, we can just go and
select the layer. We can just go to
our magic quant and we can select hue
saturation and brightness. Here we have some sliders on
the bottom, and for example, if you would like to
change the color of it, we will go to our hue slider. We can just go to the slider and find the color that we like. If we want to make it brighter, we will just go to our
brightness slider. And if we want to make
it more saturated, we will go to our
saturation slider. Find the color that works for you if you
want to change it. And when you are done, let's just go away
from this mode. So we will need to tap on our
magic onto one more time. Now when we are ready
with this element, let's just get back
to our layers. We will get back our
layer with the skitch. Now we will need to
make sure that we are adding all the details that
we have onto our skitch. We will need to go
back to our bottom of the heat and we will just need to create these
little spikes. Let's just go to the layer. We will select it, we will pick the same color
that we had here. And we will go along the whole shape of our
bottom of the heat. And we will add these
little elements you can go and increase the
size of your brush. And do it with the bigger
size of the brush. When you are done
with this task, let's just get back
to our layers. And we will go above our
layer with facial features. And we will create
one more layer here. We will remain this
layer as pumpkin. Now when we have our new layer, let's just get back
to our color palette and let's select
some orange color. You can pick any color that you have onto your
color palette, or also you can just go and
select the color yourself. For example, let's start with the color with the
name, Red, Orange. With this color, we will go and recreate the outlines
of our pumpkin. When you have the
outlines that you like, drag and drop the color inside. Then let's just go and
recreate this little tail. Firstly, we will go and increase the size of our brush
just a little bit, and we will just repeat the shape that we
have on our sketch. Also, you can
notice that we have a little triangular shape
here underneath our pumpkin. That is our arm and
our leg, for example. To hide this little part, we can just go and move our shape of the pumpkin
else bit to the right. To do so, we will need to select our layer
with the pumpkin, then go to our Erk
on the top left. Use uniform method and
just drag it a little bit toward the right if you want
to adjust the placement. If you want to adjust the
rotation, the size, anything, please go and do it
while we are here at our transform to
when you are ready, let's just get back to
our layers and we will create one more layer above
our layer with the pumpkin. We will rename it
as facial features. And we will clean this
layer to a previous one. Tap on it and choose
and clipping mask. When we did it, we
will get back to our color palette
and we will select the color with the
name, light yellow. With this color, we
will just go and create these elements or
facial features that we have on our pumpkin. When you have the outlines
dragon drop the color inside. And if you need to
adjust some parts, maybe make the
spikes more spiky, please go and adjust
them manually. When you are done
with this part, let's just get back to our
pumpkin layer and we will add these additional elements on the top by using our
alpha lock option. Let's just tap on our layer with pumpkin and choose
alpha lock from here. We will then go to our
color palettes and we will select
darker orange color. With this color, we will go
and recreate these two lines. We can also go through
the whole shape of our pumpkin and add
the lines in that way. Try it out, and if
you don't like it, just erase it and end
the lines on the top. Only. Now, when you are
done with the pumpkin, let's just go and add
the additional elements that we have in the background. We will just get back to
our layers and we will go to the bottom of
our layers panel, right to our scheme to layer. And from here, we will create one more layer onto this layer. Firstly, we will
just go and recreate this little panel that
our bear is sitting on. Let's just get back
to our color palettes and select some color
that will sit here. For example, we can use
the same color that we're using for our hats
and for our scarf. It was our purple color. With this color, we
will go and recreate these elements when
you have the outlines, let's just drag and drop the color inside
these little places. Now let's just go and recreate these elements that we
have on the background, our little hearts and
our little diamonds. Let's just go back to
our color palettes and for our hearts, let's select light
greyish orange color. We will just go and
recreate these elements. For the diamonds on the top, we will choose the
same color that we're using for
our little clover. Let's just go and use the
Eyedropper tool to select the same color and we will just go and recreate
these objects. If you need to
adjust some parts, please go and adjust them. Now when you are done
recreating these elements, let's just get back to
our layers and just for 1 second we will hide our
layer with bay sketch. We will take a look at our whole illustration
without our sketch lines. Now if you like
everything that you see right now and if you don't
want to adjust anything, we will need to go
to our next part where we are going to be aiding
some additional effects.
6. Bear: Details & Gradients: Let's take this part firstly, by adding some
details to the heat, we will go to our
layers and we will find the layer with the
bottom of the heat. Above this layer, we will create one more layer that
will rename as Details. Now let's clip this
layer to a previous one. We are typing on it and
choosing Clipping Mask. When we did it, we will go to our color palettes to select
a color with the name Pink. Now we will use
the same brush as before and we will go
through the whole shape that we have on the top
on our elements and we will create a line
with a different color. Let's create
something like that. At the end of the
line, you can hold it to snap it to a better shape. And if you want to
adjust it in any way, you are welcome to go to the editing mode and
adjust it from there. So let us go and try to make the thickness of the
whole line somehow. If you want to play runs with the thickness and end up
with some peculiar shape, you are welcome to go and do that when you have the
outline that you like. Let's just go away
from our editing mode and let's manually adjust
this line a little bit. What we need to do is to go to this element that
we have on the left and continue making the line going behind our little head. Let's just go and add a bit
of thickness to this line. When you are done here, let's just go over
our right part. And let's grab our
eraser tool to erase this little element that we have colored right here on the right. When we are done with our
first line over the top, let's just go right between the ears that we
have on our head. Let's add the similar
line here too. We are just repeating
the line that we have on the top of the head. As always, you can hold
your line at the end. And if you need to adjust it, please go to the editing mode
and adjust it from here. When we have these lines, let's just go and
adjust them even more. Firstly, we will go
to our brush library and we will change the brush. We will go under airbrushing and we will find medium blend brush. When we did it, we will
go again to our layers. And we will start
by adding details to the same layer that
we are right now on. What we need to do is to go to this layer and set
it as an alpha log. Let's just tap on it and choose
alpha log from the list. When we did it, we will go to our color palettes and we
will select dark green color. Or if you want to experiment, you can select any other
color that you like. For example, let's just go with dark green color very easily. We will go to our right part, to this line that
we have on the top, and we will start recoloring it. If you want, you can
go and adjust the size of your brush to make
your brush even smoother. What we need to do is to
create something like that. We are creating a
very smooth blend. If you want to use multiple
colors for this blend, you are welcome to go
to your color palettes and find some color
that will suit here. For example, something like purple or dark purple
will work best. The same thing we will do with this element that we
have on the botta. This time let's just go with
this dark purple color. And let's create
another blend here. Just create a nice gradient. And when you are ready, let's continue by going to other objects and adding
the gradient to them too. Firstly, let's just
go back to our layers and let us go to
our scarf element. We will go to this element
and we will tap on it and choose alphaog from the least One more
time when we did it, we are going back to
our color palette. And this time let's select
the color with the name, pink or light magenta. When you have the color, we will go to one of the sides. You decide which side it is. For example, let's just go over our left side because we have this lighter
element on the head, and we can assume that some light source is going
from this direction. Let's just go to the
same side on our scarf. And very easily we will
create a gradient on it too, with our brush,
with the big size. Let's just go and
create a blend when you have something like that and if you overdid it, for example, or if you want to
adjust it even more, you can go to the
smudge tool and smash the areas where
you have this blending. Or if you want to
adjust it even more, you can go under the magic
one tool over the top left, go to the Gaussian bluer. From here you can
create a better blend. What we need to do is to
hold our apple pencil on our canvas and move it to the right until you have
a smooth connection. What we need to do is to hold our apple pencil on our canvas and move it toward
the right side until we have a nice transition. So when you have the
gradient that you like, let's just go away from
our Gaussian Bloer by tapping on our magic
one Tol one more time. And let's continue adding some additional gradients to the whole elements that
we have right here. Next, let's just go to
our bottom on the head. We will tap on it and we
will choose alpha log. Again, from the
least we will use the same color that we're
using for this edge. So let's just go and
invoke our eye drop a tool by holding our one
finger on the screen. When you have this
little tool and when you have the color that
you need on the top, we will lift up our finger. And with the same air brush, we will just go over this edge
that we have on our left. And we will just add
a blend here, again, if you overdid it or if you want to create a
smoother transition, go under the magic an tool, Gaussian bloor, and
adjust it from here. When you are done
with this task, let's just get away from
our Gaussian Bloor by tapping on our magic
want tool one more time. Then we will go
again to our lies and we will go to our
lie with the face. One more time, let's just tap on it and let's choose alpha lock. When we did it, we
will go back to our color palette and we will select the color with
the name, Yellow, green. With the same brush,
we will go over our left side and we will start adding these
additional color. Let's just go and create
this nice transition. Try to make a smooth
blend between two colors. If you need to adjust it, you
know what you need to do. You will need to go under your adjustments Gaussian bluer, and adjust it from here. When you are done, we will go away from our adjustments
by tapping on our magic 12 and we will go and continue aiding
the additional colors. For example, let's just go
over our facial features and we will add the
additional color to these black elements. What we need to do, firstly, is to go to our ribbon icon, and we will use
automatic selection. When we are using
automatic selection, we can just go to the elements
that we want to select. We will just tap on them. If you need to
make sure that you are selecting everything
that you want to select, you just need to
do the same thing as we did with our
Gaussian Bloer. We will just go to
one of our objects. We will hold our
apple pencil there. And we will move
our apple pencil to the right until we have
the right threshold. When we have
selected everything, we will just go and
adjust the color when you've selected your
two elements for the eyes. Let's just go back to our color palette and let's select the
color with the name, either light magenta or pink. When we have it,
we will go back to our brush and we will increase
the size of our brush. And we will go over
the bottom parts on these elements and
we will create an effect like that
very smoothly. Just go there and create
something like that. You can play around and make a smooth transition
between two colors. Or if you want,
you can just make a very prominent
element like that. Play around and find
what works for you. And when you are done aiding the additional elements
to this little eyes, let's just go and
desalect everything by heating our S ribbon icon. When we are done with our eyes, let's just go to this
layer where we have our paddle and we will add the
additional color here too. We are going to our layers, finding this layer, typing
on it and selecting alpha. Look with the same brush
and with the same color. We will go over
our left side and we will add this
additional color here. If you want to go
and add more colors, you are welcome to
go and do that. Try not to add the
super bright color underneath your objects. If you want, you can go and
grab the darker color and add some kind overshadow underneath your pumpkin and the legs. If you want to adjust
something here, please go to the magic one to Guscin blower and make a
nicer transition if you want. Now when we have
this thing done, let's just go and
add more details. What we need to do next is to add some highlights
to the ships. Firstly, let's just go to
our brush slide group. Again, we will go to
our calligraphy folder and we will choose
monoline brush. Then we will get back
to our layers and we will find the layer with
the face about this layer, we will create one
more layer that will rename as highlights. To end the highlights, we will need to change
the blending modes. Blending modes on the layers are different ways your layers
can interact with each other. To change the blending mode, we will need to
go to the icon on our layer with the
highlights from the list. We will select the blending
mode with the name over lay. When we did it, we will go to our color palette and we will
select some bright color. For example, yellow
green, white, light yellow, light grayish
orange will be great. Select one of these
colors and let's go over the same left side and we will add the
highlight in that way. As always, you can
play rounds with the thickness on this
element when you are done. If you need to adjust something, please grab an eraser
to and adjust it. When you are done
with this part, let's just go and add more
highlights to this layer. So let us get back to
our brush, and firstly, we will go to our ears and we will add the
highlights In that way, we will go over the top part and we will add a few
dots like that. As always, you can play
around with the shape and you can play around with the
amount of these elements. When you are done with adding
these little elements, let's just go and add the
highlights to the eyes. We will do the same thing by going to our facial features. We have our facial features on a separate layer, for example, we can go to our color palettes and we can select white color on here and add the highlights on the same layer that we have
our facial features on. When we have our color, let's just go and increase
the size of our brush. We will go over the
left top parts of our ice and we will add
little highlights there too. Again, you can decide what kind of highlights
you want to add. If you want just simple dots, please go and add the dots. If you want to play
around with the shapes, you are welcome to
go and do that. When you are done with
these highlights, let's just go to our pumpkin, and let's add a little
highlight thereto. What we need to do is to
go and find a layer with the pumpkin and we will
create one more layer above. We will go and tre in
lay as highlights, again, similarly to
what we did before. We are going to
our N icon and we are finding overly
blending mode. You can pick a different color. So for example, you can go with light yellow or light
grayish orange. You can just go and end the highlight the same
way as we did before. With our face, we are
going to the same side and we are just repeating the line that we have on our elements. If you feel that maybe this
highlight is too bright, you can always go
to your layers. Go to the icon and adjust
the capacity of this layer. Find what works for you. And when you are done, we will move on
to our next part, where we are going to be adding some more lighting effects.
7. Bear: Glowing Effects: Let's tie this
little part firstly, by adding some gluing to these elements that we
have in the background. Firstly, we are going
to our layers and we will find this layer with
the background elements. We will select it, and now
we will need to select only these elements over
the top above our paddle. Without this paddle,
what we need to do is to go to our
S ribbon icon. Select free hands method. And with the freehand method, select only these elements
on the top, Loop it around. And when only these
elements are selected, we will need to make
a copy of them. To do so, we will need to
go to our screen with three of our fingers and swap them
from top to the bottom. When you have this
little window, we will need to choose
copy when you did it. We will need to do
it one more time. Again, go into our screen, swiping from top
to the bottom with three fingers, now
selecting paste. Now if you did it, we will need to go to our lies
and you will see that now you have a new layer that
is called inserted image. That's exactly what we
need and we will need to drag this layer underneath
our layer with the elements. Let's just hold it and drag
it underneath our layer 16. Now we will go to the
inserted image layer and we will tap on our icon. We will choose a
different blending mode, and this time it
will be hard light. When we have it, we will
go to our magic 12 and we will go under Gauss and bluer with the
Gaussian blur option. We will hold our apple pencil and the screen and
we will move it toward the right side until
we have this night glowing. When you found the
amount of glowing, that works for you, we will just deselect our magic one too. And now you can see that our elements on the top
are not too bright, so we can just go and adjust it. We will need to
do the following. We will go to our
inserted image layer, we will tap on it,
and we will choose alpha lock, for example. If we want, we can go and change the color around our hearts. If we go to our
color palette and select the color
with the name pink, we will go and change the brush to our air brushing,
medium blend. And we will go around
these elements and we will add a
different color to that. The same way we can go and add a different color to our
elements on the top. For example, if we want
to make it brighter, we can go and select a brighter color and
add it in the same way. Or we can go to our magic, an to hue saturation and brightness and
adjust it from here. For example, if you go and
adjust the saturation, you will see that you have a more saturated color underneath. And that's exactly what we need. You can go and play around with the element and find what
works for you when you did it. We will just go
to our magic anto one more time and
we will select it. And now we will do
the same thing with our elements on the
facial features of the pumpkin and with
the top element of the clover before adding
the glow to other elements. Let's enhance this effect on these elements
on the background. What we need to do is
to go to our lease. Firstly, we will go to
our inserted image layer. We will tap on it, and we will choose alpha log from the lease. We will turn it off, and when we did it, we will
go under our magic quanto, we will go to the bloom, and we will need to
do the same thing as we did with our
Gaussian bluer. We will tap one R screen
with our apple pencil and we will move it
toward the right side until we have the
result that we like. If you want, you can go to the sliders on the
bottom and play with them and find
what works for you when you have the
result that you like. Let's just go and
tap on our magic, an tool one more time
to deselect everything. Now, let's continue adding this bloom effect
to other objects. Firstly, let's just go
to our layers and we will go to our lay with
details on the scarf. Let's create another layer
with the same content, so we will just
duplicate this layer. To do so, we will need to go to our layer with
the details and we will need to
swipe it from right to left and choose Duplicate. When we have two layers
with similar quantent, we will go to the bottom one. And we will change the
blending mode of it. We will tap on our
icon and we will change the blending mode
that is called Hard Light. Now let's just
keep our part with the Gaocin Bloer and
straightly go to our Magic one tool
and Bloom option. Now the same way as before, we will hold our apple pencil on the screen and we will move it toward the right side until
we have the nice result. If you want, you can go to the burn option and
adjust it from here. Also, if you want
to change the color of the bloom or maybe
enhance it a little bit. Well, firstly need to go to our magic, one tool to
close the bloom option, and then tap on it
one more time and go under hue, saturation
and brightness. You can go to the saturation
and adjust it to maximum. If you want to adjust the color, you know what you need to do. You will need to go under hue slider and
adjust it from here. Find what works for you.
And when you are done, let's just tap on our magic
one tool one more time. Now let's continue by going to our next layer that we want
to add our glowing effect to. For example, let's just
go to our clover layer. We will create another layer
with the same content. One more time, we are going
to our clover layer and we are swiping it from right to left to choose duplicates. Now when we have
the second layer, let's just do the following. We will go to this layer
that we have on the top, and we will change its color. What we need to do is to
go to our color palette, select the white color and
drag it to this area that we want to recolor when we
have something like that. Let's just get back to
our layers and let's get back to our
clover that is green. We will go and make it just
a little bit bigger by going to our arrow
key on the top left. We are using uniform
method and we are just going to one of
the nodes that we have, either on the top
or on the bottom, and we are dragging it
to the side to make it bigger on the bottom firstly. And then on the top to when
we have something like that, we will just go and
desalate everything by hitting our arrow
key one more time. Now let's just add the same
effect that we had before. We are going to our layers. We are going to our lay
with clover that is green, we are going to our icon. And we are changing our
blending mode to hard light. When we have it, we will
go to our adjustments. We will go to our
Gaussian blur and we will add some blur
to this object. You already can see that we
have some bloom effects. But we will go to our magic
antule one more time, and we will go straightly to the bloom to add the
bloom to this area. Again, holding our apple
pencil there and dragging it toward the right side until we have the result that we like. If you want, you can go
to the burn slider and adjust it and find what works for you when you're satisfied. Let's just tap on our magic
one tool one more time. If you want, you can go and
make this area even bigger by going to your archey on the
top left One more time. Then if you want we can
go and unclip this layer. This gluing is going to the
background to what we need to do is to go to our layers and go to our layer with
the green gloer. Tap on it and choose
clipping mask. You will see that both of these areas now are not
clipped to our previous layer, and that's exactly what we need. Now if you want,
you can go and play around with the position
of these two elements. And you can do it very easily just by selecting
two of these layers. And then go into your
arrow key one more time. To select two layers, you will need one layer
to be selected already. And then you will need to go to the second layer and swipe
it from left to right. When you have two
layers selected, we are going to our arrow
key uniform method. And we are adjusting the size or the placement
of these elements. Find what works for you.
And when you are done, let's just tap on our
arrow key one more time. Let's continue by
adding some gluey affects to the inside
part of our pumpkin. What we need to do is
to go to our layers and find our facial features
of the pumpkin. We will make a copy
of this layer, so we are swiping it from right to left and choosing duplicate. We are going to the bottom
layer with facial features. We are going to our icon. And changing the blending
mode to hard light. Now let's just get back
to our magic an tu, you can go either to the Gaussian bluer firstly
and adjust it from here, or you can straightly go to the bloom and add the
bloom to these elements. When you're satisfied
with the result, let's just tap on our
magic an tu one more time, we will do one more thing. We will firstly
go to our layers. And we will clean
everything up here. Every layer that belongs to our beer will be
put into a group. Now let's just go and
select every layer that belongs to our beer. You
know how to do that. We will need to select
one layer firstly, and then swipe all
the layers that belong to our beer
from left to right. Let's quickly go and do that. When you've selected
all the layers that belong to our beer, we will go to our top right, and we will choose Group. Now everything is in the group. You can see the title,
New Group on the top. We can go to it and we
can rename it as Bear. Also, we can just go to this little V icon near the checkbox and
we can tap on it. And we will close the group. Now we will do one more thing. Let's just go to this group
that we have just created. And we will swipe it
from right to left. We will choose duplicate. Then we will go to the group
that we have on the bottom. We will tap on it and we will choose flattened
from the least. Now, everything that we have into this group is on one layer. What we do next is adding
the bloom to these areas. Now let us go grab this layer and we will go
to our magic one tool. We are going to
the Gaussian blur and we are adding
some blower to it. You can see how glowy. If you want to adjust it
and add the Bloom option, you can go and do that too. What we need to do is to tap
on our magic 121 more time, then go again to magic
12 and go under bloom. Play around if you want to. When you're satisfied, we are done with our first
illustration. If you want to adjust the amount of light onto this layer, let's just go to the layers. And we will go to this
icon near our checkbox. And we will adjust the
capacity of this layer, find what works for you, play around when you are done. Let's just move on
to our next part, where we are going
to be creating this Skatge for our
next illustration.
8. Mouse: Sketch: Let's start making
our second stage from some dining preparations. Firstly, we will
go to our layers. And we will put this
layer where we have our lights on inside the
group with the beer. Let's just hold it and let's
just drag it to the group. When we did it, we
will just go to this little check
mark on our group with the beer and
we will tap on it to clean out our background. Now when we have the
clean background, let's just get back our two
layers with the schemes. Again, we're going to
our little check marks, and we are tapping on them When we have our scheme
on the canvas, let's just get back to
our group with the beer. We will select it,
and from here we will create one more layer that
will rename as Sketch. Now when we have
our sketch layer, let's just get back
to the brush library. We will go to the sketching
folder and we will select the same brush
that we were using before for our first sketch. When you have the
brush, we will go to our color palettes and we will select the color that
will be contrast. For example, something like
yellow green will work best. When we are done with
our preparations, let's just start preparing
our canvas for our sketch. We will be using the same tool
that we were using before. It is our symmetry tool. Let's just go and turn it on. We are going back to our
range icon over the top left. We are going under canvas and we are totaling drawing guide. Now when you have this line, we will need to make sure
that our layer is assisted. We are going back to our layers. We are going to our
layer with this sketch, taping in it and turning
on drawing assist. Now let's just go and
start creating our sketch. For our second illustration, we are going to be
creating a little mouse. And let's just start from our head the same way as before. We will go to one of the sides. Firstly, we will
start recreating the lines that we have
here onto our scheme. Let's just go and recreate the line that we
have on the top. And then we will
go to the bottom and make the line more flat. Let's create
something like that, you can play around
with the curves. And when you found
what you like, let's just grab our sert and we will raise all the
lines that we don't need. Now when we have our
shape of the heads, let's just go and create
the ears for our mouth. We will go and create
very big ears. Firstly, we will go over one of the sides and we will
make a little mark down. We will know where we
need to put these ears. Let's firstly go over
one of the sides. And let's step a bit
from our middle line. And we will make a
little mark down like that When you have it, we will go more close to
this line that we have on our horizontal and we'll make a little
markdown like that. When you have these
two marks down, let's just go and create
a big curve like that. Going from our line that
we have on the side. We will go up and we will create a curve going to the top. You can play around with
the curvature as always. You can play around with the size and with
everything that you want to play around with when you have
something like that. Let's just go and
connect the ship with another markdown that
we have on our head. We will go with
the opposite curve and we will create
something like that. If you feel that you want
to adjust something, maybe put the ears a little
bit closer to each other, You are welcome to go and do that and play with the lines. Also, if you want
to make your ears even bigger again,
it's all up to you. You can go and make it
the way you like it. When you have the
shapes that you like, let's just grab
the Risar tool and let rise all the lines
that we don't need. Now when we have the basic
shapes for the ears, let's just go inside of them and let's create
the inner parts. Firstly, we are again
going over one of the sides and we are going
to this intersection that we have on the
top where we have two curves connected
from this intersection, we will go down with a
peculiar shape like that, you can always play
around with the ship. But basically what we need to create is
something like that. We are going down
with the curve, then we are making a
little bump like that, and we are going down with another curve going to the head. If you want to play
around with the shapes, you are welcome to
go and do that. When you're satisfied with the position on these elements, let's just grab the eraser tool and erase the lines
that we don't need. Now, when we are
done with our ears, let's just go and add
the facial features. Again, we are going
over one of the sides. We are going a little
bit lower than we have our line on the
horizontal axis, we will firstly go somewhere to the middle of the shape
that we have for the heads. And we will create
our eye the same way as we did before on our
first illustration. Let's just go and create a
little tilted. I like that. At the end of the line, we
will hold our apple pencil. We will adjust the
size if we want to. We will adjust the
tilt if we want to. If we want to adjust
the placement, we will just lift up our Apple pencil and we will
go on our editing mode. Find what works for
you, find the position, find the size, find the
placement of these elements. When you're satisfied,
let's just tap on our screen to get away
from our editing mode. Now when we are satisfied
with the shape, let's just go inside of
it and let's shade it. When we have our eyes, let's just go and add the nose. We will go right
between our eyes. We will go more to the
bottom part of them. And we will start by creating
a little line like that, and then we'll turn it
into a very soft triangle. When we have
something like that, let's just go inside of this
shape and let's shade it. Now when we have the nose, let's just go to the sides. And we will add a
little mouth element. We will create something
similar to what cats have. Let's just go and create
something like that. We are going to the
sides and we are creating a little
element like that. Play around with the
size of this element, with its alignment,
with its curvature, with everything that you
want to play around with. When you have
something like that, let's just go
underneath our eyes and let's add the elements
of our cheeks. Again, we are going more
towards the side of our eye. We are creating half
of the circle there. You can play around
with the size. If you want to make
sure that you are creating a perfectly
round circle, you can hold one of your fingers on the screen while
you are holding your pencil on the screen to
adjust adjust the placement. If you need to go to
the editing mode, please go there and
adjust your element from here to find what works for you. When you're done,
let's just get away from our editing mode now. Let's just take a look
at our illustration. And let's just continue adding our sketch by going to the body element
for this creature. Let's just go and create a shape of the pumpkin
instead of the body, we will create some of the costume that our
mouse is wearing. Let's just go to this part where we have our body on the scheme, and let's turn it
into a pumpkin. We already know how
to draw a pumpkin, so we will just go
to the side and we will start creating
the shape like that. Going down, we are creating
a very smooth curve. Then we'll go down and we
will create some segments. You can play around with the
amount of these segments. You can make three of them
or maybe five of them. It's all up to you. Let's just go and create a few of them. And let's close up the shape. When you're satisfied
with the amount of these segments and
with their position, let's just grab our eraser tool and let's erase all the
lines that we don't need. We also will need to work onto our segments on the
top of our pumpkins. So let's just go there and let's continue these lines going up. Also, if you want, you can go to the top
parts and you can make the head inside
this little pumpkins. We can just go and
we can continue making these little
segments in that way. And then we will just go
and erase this little lines that we have for our
head. It's all up to you. If you want your head to
be above the pumpkin, you don't need to create
these little elements. Now when you have
something like that, let's just go and
add our little legs and our little arms. We will just go to
the sides firstly, and we will create little arms the same way as we
did with our bear. Let's just go and create a
little element like that. When you have the little arms, let's just go to the
bottom of our pumpkin, and let's add little legs. Let's just go to
this intersection between these two
first segments. From here, we will create
a leg going in that way. As always, you can play
around with the shape. You can play around
with the size of it, with its position, with everything that you want
to play around with. If you want, you
can go to the leg and you can add little
segments like that. They look more like the lex when we have
something like that. Let's just go inside our little pumpkin and let's add the facial
features to it. Firstly, let's just go to the
side and let's add the ice. We will go to the
segment number two and we will create a soft
triangle like that. Go to the middle parts, and from here, let's
create this shape. When we have these shapes, let's just go inside and
shade these inner parts. Now let's just go and add our little mouth the same
way as we did before. Let's just go and start creating some little peaks like that
when you have the top part, let's just thicken it up by adding the lines on the bottom. Now let's just go and add more details without
our symmetry tool. Firstly, we are going back to our range tool and we are totaling drawing
guide from here. Then we are going
back to our layers. We are going to our lay with the sketch tabinate and choosing drawing
assist from here. Now let's also and we will hide our
layers with the scheme so we will have a clear look of what we have onto our
sketch right now. Let's just go and hide our
layers with the scheme. Let's take a look at
our illustration from the distance and decide whether we want to
adjust some parts. For example, let's
just go and put our facial features a little
bit lower to the head. We will need to go
to our ribbon icon, Select free hands method and
loop around the shape that we want to adjust when only
this area is selected, we will go to our arrow
key on the top left. We are using uniform
method and we will just go and
drag it a little bit down if you want
to make sure that you are putting
them in the middle. You just need to follow
these orange lines. Find the position of
these elements that you like and let's just continue
adding some details. Firstly, let's just
go and desalect everything by hitting
our S ribbon icon. And then we will go to
the top of the head. And let's create a little
hair element here. We will get back to
our brush and we will go right to the middle
between our ears. And we will add a little
element in that way. Basically what we are
doing is creating a little hair in that way when you have
something like that. Let's just get back to our eraser tool and we will erase all the lines
that we don't need. As always, if you want, you can go and play
around with the shape, or if you want, you can add
different accessories here. Just find what works for you. Always take a look at
your illustration from the distance to check out
whether you like it or not. Now, when we are ready
with these hair elements, let's just go and add some additional elements
to the bottom part. Firstly, let's
just go and create another wobbly shape that our little creature
will be sitting on. We're just going to the site and we are creating
something like that. As always, you can play
around with the shape, you can play around with,
the size of these elements. You can play around with
everything that you want to play around with when you have
something like that. Let's just go and
add more details. For example, let's first
go over one of the sides and let's create
a little element that will be some
kind of a lantern. The same way as before, you can go to some blank space and start creating
your element here. Then later on you can put it to the place that
you want it to be, or you can go and create
one more layer and make the shape on this layer and it will be even easier for you. Now let's just go and create
a little shape like that. We will create a
shape of the allpse. If you want to create
a different shape, you are welcome to go
and do that if you want. You can make your
shape manually, or you can hold your apple
pencil at the end of the line. When you are creating a line without lifting up
your apple pencil, let's make the
shape a little bit flatter on the bottom so it will be easier for
us to put it onto our illustration and
onto the ground. And now we will go to the top and we will create
a little handle. You can play around
with the shape, or you can just create
something simple like that. And when you have
the shape like that, let's just go inside
of this element. And let's add
additional element here that later on we will turn
into some glowy thing. So for example,
let's just go and create a shape of the bat. If you want to create
something different, you are welcome to
go and do that. Remember that you
will need to have some thickness
onto this element, because later on we will turn
it into the glowy thing. Now let's just go
and create a bat. What we need to do firstly, is to go somewhere to
the middle of the shape. And start by creating
a shape like that. If you want, you can go
and adjust the size of your brush to make it smaller when you have this little bump. Let's just go to the sides and let's create two more
elements like that. When you have the
shape like that, we will need to go and continue creating the
lines in that way. We are creating two
curves on the sides. When you have these two curves, we will need to go to
the bottom and add some thickness and close
up the whole shape. Let's just go firstly
over our left side and we will create two
more bumps like that. And then we will go and
create a few more of them. To close up the shape, what we need to do is
to create one more of these bumps and then
create a bigger one. Going in that way, when we have something like
that on one side, we will do the same on
the opposite side again. Let's start by
creating two bombs and then creating something similar to what we have on our left. If you need to adjust
your shape in any way, please go and adjust it. If you need to erase some
lines that you don't need, go and erase them. Now let's just take a look
at the silhouette from the distance and decide whether we want to
adjust something or not. For example, let's just put
this little silouette more closer to the center and
maybe rotated a little bit. What we need to do is to
go to our ribbon icon. Select the free hand method, and select this element. When it is done, we are
going back to our arrow key. And we are adjusting
the placement, rotation and everything that
we want to adjust here. When you found the position
that works for you, let's just go and
deselect everything by hitting our ribbon icon. And now we will get
back to our layers and we will combine these
two layers together. Let's just tap on our
layer on the top. And we will choose
merge down from the list when we are ready
with the whole object, let's just go and
find the placement for it onto our illustration. As we have it on
a separate layer, it will be easier for
us to do that just by going to our arrow
key on the top left, using uniform method and finding the placement
in that way. Let's just go and maybe put it right in the arm of
our little mouse. Firstly, we will drag it down, and then we can just go
and make it bigger and rotate it when we found the
perfect placement for it. Let's just go and
deselect everything by hitting our arrow
key one more time. Now we need to go back to our
layers and go to our layer with the sage and erase all the overlapping lines
that we don't need. Now take a look at your
illustration from the distance. Make sure that you like
it and you don't want to adjust anything
when you are sure. Let's just get back
to our layers. Going to arlier with the sketch, grabbing our little eraser to and erasing all the
overlapping lines. When you did it one more time, we are going back to our
layers and we will need to merge these two
sketch layers together. Let's just go to R on the top. We will tap on it and we
will choose merge down. Now when we have just one
layer for our sketch, let's just go and add
one more detail to it. So we are going back to
our brush and we are going to the opposite
side from our mouth. Let's just go and add
a few parts here, the same way as we
did with our bear. Let's just go and
create a few elements. If you want to create
different elements, you are welcome to
go and do that. If you want to add
additional elements to this little paddle
on the bottom again, you are welcome to
go and do that. The same way if you want to add more elements over the
top or more to the right, you are welcome to go
and add these elements. Now take a look at
your illustration from the distance and decide
whether you like it or not. Decide whether you want
to adjust some parts or not when you're
satisfied with everything. Let's just move on
to our next part, where we are going to
be aiding the colors.
9. Mouse: Base Colors: Let's start our part
with the basic colors by going to our brush library and changing the
brush to monoline. We are at the
calligraphy folder. And when we have
chosen this brush, let's just get back
to our layers and let's work onto our
layer with the sketch. Firstly, what we
need to do is to go and change the opacity
level on this layer. Firstly, what we need to
do is to go to our icon, go into our slider
with the opacity, and we will need to
drag it to the left until we still can see what's
happening onto this layer. But when it's not that bright, when we found the level of
the apacy that works for us, we will tap on our layer with the sketch to
close this window. And now we will go and change
the color of our lines, because we will be adding
very bright colors to our base elements
and it will be hard for us to see our
lines on the skitch. What we need to do is to
select this layer and then go to our magic to hue
satration and brightness. For this part, let's just go
firstly to our hue slider, and let's select some bluish
tones when we have it. We will also go to our
brightness slider and we will make the colors a little bit duller when we have
something like that. Let's just deselect
everything by hitting our magic one
to one more time. And then we will get back to our layers and we will
create a new layer. What we need to do is to go firstly to our group
with the bear. And from here we will tap on the plus icon and we
will create a new layer. We will rename this
layer as face. Now we will be
using the same tool that we were using before, which was our symmetry tool to recreate this
object of our face. Firstly, let's just go to our range tool
over the top left, we will go under canvas and
we will total drawing guide. When we did it, we will
get back to our layers. We will go to our
layer with the face, we will tap on it and we will choose drawing assist
from the least. When we have prepared
our layer and brush, let's just get back to our
color palette and let's select a different color this time it might be white or
light greyish orange. Select one of these colors
and when you are done, let's just go and recreate
the shape of the heat. You can use all the tools
that you were using before. You can hold your apple pencil
at the end of the line. You can go to the editing
mode and adjust it. Now we will focus only on
the shape of the heat. Just recreate the lines
and make them closed. When you have the closed
outline for your head, let's just drag in
Rome, the color inside. Now let's just take a look
at the whole silhouette. And let's make sure that we don't want to adjust anything. If we want to smoothen
up the lines, let's just go and do that. When you are done, let's just
get back to our layers and let's go and recreate the
shapes of the ears For us, it will be easier if our ears will be underneath our
layer with the face. Let's again go to our
group with the bear. And from here we will create
one more layer that will rename as ears the
same way as before. Let's just set this
layer as assisted. Let's just tap on it and
choose Drawing Assist. Then we will go and recreate the lines that we
have for our ears. Close the shape, and
when you are done, let's just drag and
drop the color inside. Take a look at your silhouette. If you want to
adjust some parts, go and adjust them. Now when you are done, let just get back to our layers. We will go to our layer
with the face and we will create one more layer above
it that will name as here. We don't need to
set it as assisted. So let's just grab our brush and let's recreate the sheep. If it's easier for you, you can go to the lies and you can hide these layers with face and ears and recreate the
sheep without them. As always, close the ship and
make the lines very smooth. And when you have the
outline that you like, just drag and drop
the color inside. Make sure that you don't
want to adjust anything, or if you need to adjust
anything, just go and adjust it. Now when you are satisfied
with this element, let's just get back
to our layers. And let's get back our
layers with face and ears. Now we will go and
recreate our elements for the hands and
for our little legs. Let's again go and
create one more layer. Again, for us, it
will be easier if these elements will be
underneath our face again. Go into our group
with the beer and creating a new layer that
we'll rename as Body. Again, let's just send
this layer as assisted. So we are tapping it and we are choosing drawing
assist from the least. Now let's just go and recreate our elements for the hands
and for our little legs. Close the shapes and
when you are ready, drag and drop the color inside. Now when we are done, we are getting back to our
layers and we will need to create one more layer
to recreate our pumpkin. You decide whether you want your pumpkin to be
above your hat. By knowing this information, you will need to create
a layer either above our layer with the body or
above the layer with the face. Let's create this new layer and let's rename it as pumpkin. Now one more time, let's just send this
layer as assisted. So we are tapping on it and
choosing Drawing Assist. And then we will go back to our color palettes and we will select one of these
orange colors. You can decide
which one you want to use when you have it. Let's just go and recreate the shapes that we
have for our pumpkin. Again, we are starting
from the outlines and then we will drag and
drop the color inside. When you are done
with this element, let's just get back
to our layers. Let's find our layer
with the pumpkin, let's tap on it, and
let's choose alpha log. When we have our alpha log on, we will get back to our color
palette and we will select a different color that
we are going to be creating this little
segments with. For example, we can go
with other orange color, either dual orange
or red orange. Or if you want to experiment and find a different
color for this part, you are welcome to
go and do that. If you need to take
a look at how it all looks without the
lines of this cache. You are welcome to
go to your lise and hide the layer with this
cache just for 1 second. If you need to adjust some parts onto your
layer with the pumpkin, please go and select
the color that you were using for the main object
and adjust it with it. Don't use the eraser
tool on this layer because you will be erasing
the parts of your pumpkin. And when you are done, let's just get back
to our lise and let's get back our
layer with the skitch. Now we will go and create one more layer above our
lay with the pumpkin. We will rename it
as facial features. Let's clip this layer
to a previous one. Tap on it and choose
Clipping Mask. And we will also set
this layer as assisted. Let's just tap on it and let's choose drawing assist
from the lease. When we did it, we
are getting back to our color palette and we will
select light yellow color. With this color, we will go and recreate our facial
features on the pumpkin. When you have the outlines, just drag and drop
the color inside. If you want to see how it looks without the
lines on this kite, please go to the layers and
hide the layer with the kach. If you want to adjust something, please go and adjust it. Remember to take a look at your illustration from the
distance to decide whether you like what you're doing
or not when you've adjusted the elements on
the pumpkin to your liking. Let's just get back
to our lies and let's unhide our layer
with the skitch. Now let us go and continue adding the
additional elements. Now we will need to get back
to our li with the face and we will need to
create one more layer above for our facial features. Let's just tap on the plus icon. And let's renam this
layer as facial features. We will clean this layer
to a previous one, taping on it and
chosen clipping mask. And then we will start with these elements that
we have underneath. Again, we are starting with
these elements of our cheeks. Let's also set this as assisted. So again, we are taping it
and choosing Drawing Assist. And then we will go to our color palettes and
we will select some suitable color for
our cheeks, for example. Let's just go with this bright
pan color when we have it. Let's just go and
recreate these elements. When you have the outlines, just drag and drop
the color inside. Then we also will
go and recreate these little elements
for our mouth parts. We will go firstly to
our color palettes and let's select the color with
the name, dark magenta. With this color, we will go and recreate these little parts. Adjust them if you need to, and when you have what you need, let's just go and add
the color inside. Now with the same color, let's just go and
recreate our eyes again. We are going to one
of the sides and we are recreating our one eye. We are holding our apple
pencil at the end of the line, and if we need to
adjust it even more, we are going to
the editing mode. When we have the outlines, we will drag and drop
the color inside. Then we will manually go to the overlapping part
and we will recolor it. Now let's just pick the same color that we
were using for the cheeks. We are invoking
our eye drop azul by holding one of our
fingers on the needed color. We have the color on
the soap that we need. We will go and we will
recreate our nose elements. When the outline is ready, drag and drop the color inside, and recolor the overlapping
part if you have them. Now when we are ready
with our facial features, let's just go to our ears and let's recolor the inner parts
with a different color. We will go back
to our layers and we will find our
layer with the ears. When we found it, we will go
and create one more layer. Above that we will
rename as inner parts. Let's clip this layer to a previous one and
also let's just set this layer as assisted with the same bright pink color. We will go and recreate these elements that
we have on the sites, close the shape, and
end the color inside. When you are done, let
just go and recolor these additional elements that
we have in the background. Firstly, let's just
go to our layers and let just unset all
these assisted layers. We will go tap on them and we will choose drawing
assist from the les. They all are not assisted. When you are done, we will
go again to our bare group, and from here we will
create one more layer. Let's remain this layer
as background elements. Again, let's just start
by adding the color to this little paddle that
we have on the bottom. We will go to our color
palettes and we will select the color from
the purple ringe. Select any of these colors,
and when you have it, let's just go and
recreate the shape of our paddle and these little
elements outside of it. When you have the outline, just drag and drop
the color inside. Now let's just go and recreate these little hearts
and diamond shapes. For the hearts, you
can go either with some pinkish color or with
white or light greyish orange. Let's just very quickly
go and recreate them. As for the diamonds, let's just go with pink color. When you are done with
these additional elements, all that we need to do is to recreate the shape that
we have on the right. So one more time, let's just
go back to our lies and let's create a new layer that
will our name as Lantern. Now when we have our layer, let's just get back to
our color palettes. And one more time, let's pick the color from the purple range. You can select the
same color that you were using for this
element of the paddle, or you can select
a different one. So find the color
that works for you. And when you are done, let's just go and create the sheep. For convenience, we will need to drag this layer above our
lay with the pumpkin. So let's just hold it
and let just drag it up. When you have the outlines, let's just drag and
drop the color inside. When you have the sheep, let's just go and
create one more layer above which will recreate
this little shape of the bat. Let's create a new layer
and let's rename it as bat. Let's clean this layer
to a previous one, and let's just go and
select a different color. For example, let's just go with bright pink or light magenta, decrease the size of your brush, and recreate the outline. When you have the outline, just drag and drop
the color inside. Now let's just take a
look at our illustration, at our base colors without
the lines of this sketch. Again, we're going
to our layers. And we are going
to our layer with the skitch to hide
it if you like. Everything that
you see right now, we are ready to move
on to our next part, where we are going to be
adding some lighting effects.
10. Mouse: Details & Gradients: Let's start this part firstly
by changing our brush. We are going to the brush light, go into the airbrushing folder, and we are selecting
medium blend. When we did it, we also don't need the
symmetry line anymore. Let's just go and get rid of it. We will go under our range icon. We will go under canvas and we will total drawing
guide from here. Now with our new brush and
with the same pink color, we will go back
to our layers and we will find our
layer with the ears. Let's just tap on this layer and let's set it as alpha look. Now we will go to the white areas that
we have on our ears, and very easily we will
add a second color here. What we need to do is to see this little hair
that we have here. If you overdid it,
you can always go to your smash tool and
try to make it blend. Or if you want, you can
go under your magic one to Gausha and bluer and
adjust it from here, find what works for you. And when you are
done, let's just tap on our magic one
tool one more time. If you are using it, let's continue adding these
additional colors. Now let's just get
back to our layers and we will go to the
inner parts of the ears. We will also send this
layer as alpha log. And when you did it, let's just go back to our color palettes. And let's select another
pin color with this color. And with the same brush, we will go to the bottom
parts of our inner parts of the ears and we will
add the second color here. If you want, you can go and
add a different color here. You will have a better blend
with these two colors. If you don't like
this pink color, you can always go to your disc option and adjust
the color from here. For example, let's
just go and play around with this
color of the pink. We will go to the right and
we will make it more bright. When we have the
color that we like, we will just go and add it to our ears when we have
something like that. Let's just go back to our
magic antule one more time. Go into the Gaussian blur
and adding nicer blend. When you have
something like that. Let's just get away from
our Gaussian blower by tapping on our magic
on E tool One more time, then we will go and continue
adding some details. For example, let's
just go and start working on our facial
features on our face. Let's just get
back to the layers and let's find our
facial features. When the layer with the
facial features is selected, we will need to
do the same thing as we did with our beer. We will need to go and
select only the ice areas. Let's just go to
our S ribbon icon. We are selecting automatic
selection on the bottom panel. Then we'll just tap on our ice. When on the ice are selected, we will go back to our brush. We will use the same
pink color that we have on our color palette,
which is bright pink. And we will go to
the bottom part of the ice and we will do the same thing as we
did with the beer. We will add the
second color there. You can create a
very smooth blend, or if you want, you can create
a more prominent blend. Let's just go and create
something like that. When you are satisfied
with your result, let's just go and
deslect everything by hitting our S ribbon icon. Now let's just go and continue adding the additional elements. Now let's just get back to our layers and let's
just go to our pumpkin. We will go and select
this layer and we will create one more
layer above it. We will rename this layer
as Additional color. Also, let's just go to our icon on this
additional color layer. And we will change the
blending mode to overlay. When we have this layer
selected as overlay, let's just get back
to our color palette. And let's select
light yellow color With the same brush that
we were using before, which is our air brush, We will go over
one of the sides, for example, the left one. We will add the blend here. Let's just go over and let's
create something like that. Create a nice and smooth blend. If you need to adjust it, please go to the magic one, to Gaussian blur, and
adjust it from here. If you want to change the color, let's just go to our hue, satration and brightness, and let's find the color
that works for us. For example, let's just go with something yellowish
and very saturated. And when you're satisfied
with this additional color, let's just go to our magic
one tool one more time to deselect everything
when we did it. We also will go to
our paddle that we have on the bottom and we will
add additional color here. Let's firstly go to our layers. And let's find this layer. We are going to our
background elements layer and we will tap on it. And either we can use our alpha log or we can
create one more layer above. It's all up to you, for example, Let's just go tap on this
layer and choose alpha log. Now we will go back
to our color palette, and let's start with this
bright pink color one more time to recolor the areas
that we have on our left. Again, don't put too
much brighter color underneath your mouse
and your little pumpkin. Just add a bit at the edge on the left when you have
something like that. Let's just go and
add darker color underneath our mouse and
our elements on the right. Again, we're going under our color palettes
and we are selecting, for example, dark
blue purple color. With this color, we
will go underneath our objects and we will
add it a bit here. If you want to add more colors or maybe darker colors
or brighter colors, you are welcome to
go and add them when you are satisfied with
what you have right here. Let's just move on
to our next part, where we are going to be adding some highlights and
some glowy effects.
11. Mouse: Glowing Effects: Let's begin this part firstly
by adding some highlights. But before doing
that, let's just go and change our brush again. We're going to our
brush library. We are going to the
calligraphy folder, and we will choose
monoline brush. When we did it, we will go
back to our color palette, and this time let's select the color with the
name, light yellow. When we have the
color picked on, we will go back to our layers. And we will start by adding some highlights to our pumpkin. Let's just find the layer with the pumpkin and above it we will create one more layer that will already name as highlights. It automatically clips
to our previous layer. When you have it, we will go to our icon and we will change
the blending mode to overlay. When we did it, we will go
over our left side and we will add a big highlight going through the whole shape
of our pumpkin Here, let's just go and create
something like that. If you want, you can go
and adjust the size of your brush and make it
bigger if you need to. You can go and hold your apple pencil at
the end of the line, and then go to the 18 modes
and adjust this curve. And when you have
this first highlight, decide whether you want to go to other segments and add
little highlights there too. And also, you don't
need to limit yourself just by creating
this little curve. You can go and create
little highlights as little dots or
maybe some sparkles. Just go somewhere
to these places on the segments and
add a few more dots. If you need to
adjust some parts, grab an eraser to
and adjust them. When you are ready with the sparkles and this
little highlights, Let's just go and continue
by adding our highlights to the eyes the same way as we
did before with our beer. Firstly, let's just go
back to our layers. And let's find the layer
with our facial features. Let's just go straightly
to this layer. And then we will go back
to our color palettes. And we will select the
color with the name white. When we have our color, we will go the same
way as we did with the bear on our top left part, and we will add a few
little highlights. You can go and play around with the amount of
these elements. You can play around
with their shapes and with everything that you
want to play around with. Let's just go and add
these little elements. When you are done,
let's move on to adding more elements
to our background. We will go and add
the glowing effects. What we need to do, firstly, is to go to our list and we
will need to select all of these layers that we have and we'll put them in the group. Let's just go and
select every layer that belongs to
our little mouse. And then we will hit
group over the top right. Let's rename this
group as mouse. Now let's just firstly go and work onto our
background elements. We will go and find our lead with the
background elements. Then we will select
only these elements that we have above
our little paddle. You know what you need
to do. We will need to go to our S ribbon icon. Select free hand method
and select these elements. When you have them selected, we will need to copy them. We are swiping
three fingers from top to the bottom and
we are selecting copy. Then we are doing
the same thing, swiping from top to the
bottom and selecting piece. Now if we go to our layers, we will see that we have a
new layer inserted image. That's exactly what we need. Let's just firstly
go to our icon and change the blending
mode to heart light. When we have it, we will
go to our magic antu. We will go to our
Gaucian blurer, and we will add
some blurer here. Find the amount that works for you when you are
satisfied with it. Let's just go and add
some bloom again, We are going to our magic an
tu and selecting the option bloom the same way as we did
with our Gaussian bluer. Let's just hold our apple
pencil at the screen and move it toward the right side until we are satisfied
with the results. If you want to change the
options on the bottom, you are welcome to
go and do that. When you're satisfied, let just tap on our magic one
tool one more time. If you want to change the
color of these little hearts, you can go and do the following. Firstly, we will get
back to our list and we will go to our li with
the inserted image. We will tap on it and we
will choose alpha lock. With the brush that
we have right now, we can go to our adjustments hue, stration and brightness. Here on the top, we can go to this huge stration
and brightness and tap on this little arrow. Here you can see
the option pencil. If you go to your elements that you want to your color
with your brush, you will be changing
the color of that. Let's just go over these
little elements of our hearts and just recolor
them with our brush. If you want, you can go to your hue slider and change
the color by moving it. If you want to change
the saturation, you are welcome to
go and do that too. Find the color that
works for you. And when you are
done, let's just go back and we will
tap on our magic, an Tol, to go away from our hue saturation and
brightness mode when we did it. Let's just go and add more
of these glowy affects. Again, we are going firstly to our layers and we will need to find a new layer that we
want to add the glue to. We will go to the
pumpkin and we will go to the facial
features on the pumpkin. Let's just go and make a
duplicate on this layer. We are swiping our li with facial features
from right to left. And we are choosing duplicate
the same way as before. We are going to our lid that we have underneath
this new duplicate. And we are changing our
blending mode to hard light. Now let just get back to
our magic quantu go into the Gaussian blur and adding
the blur to these objects, if you want, you can go to your Bloom option and add
the Bloom to these elements. If you want to go and change
the color one more time, you can go to your
adjustments hue, stration and brightness,
and play with the hue Saitration and
brightness lighters. When you are done, we are typing on our magic Uantu
one more time. And let's just go
and add some glue to this little bad that
we have on the right. Again, going back to our layers, finding our layer with the bat, swiping it from right to
left and choosing duplicate. Go into this layer
on the bottom and changing our blending
mode to hard light. Again, the same thing
as we did before. Go into our magic,
want to go into Gaussian blur and adding
Gaussian blur to this object. When we are done with
adding this Gaussian blur, let's just go and add some bloom play rounds with the sliders on the
bottom if you want to, if you want to add a different
color to this element, please go to the hutration and brightness and
adjust it from here. When you're done adding
the glow to this element, let's just tap on our magic
one tool one more time, and then we will go and add this overall glow
to the whole mouse. Again, let's just
go to our layers. Let's select the whole
group with our mouse. And firstly, we will
collapse it by going to this little V icon
near the check box. Now when we have
everything clean here, let's just go swipe the
group from right to left, and we will choose Duplicate. When we have the second group, we will go to the one that
we have on the bottom. We will tap on it and we will choose flatten When we have it. You can see that we have this alphalog turned
on onto this layer. Let's just go tap
on it and we will choose alpha log from the
lease to turn it off. When we did it,
let's just go and change our blending
mode to hard light, and now we can go and add
our Gaucianblure or Bloom. Now let's just go
to our Gaucianblur, and let's add some blur here. Find the amount
that works for you, and when you're satisfied, let's try to go to our Bloom and add a bit of Bloom
to these elements. If you feel that maybe
Bloom is too much, you can skim this option
and add just Gauchian Blo. If you want everything
to be very glowy, please go to the bloom
and add just a bit of it. When you're satisfied
with the result, we can tap on our magic, an Tu, and also we can just
go to our layers and we can adjust the
capacity of this layer. Again, let's just go to our background
elements layer and we will change the capacity
just a little bit. Also, if you have some
little elements like that, you can go and change the
color the same way as before. We can just go to our
background elements, tap on this layer, and
choose alpha lock. Then we can go to our brush
library and for example, go to the airbrushing folder
and select medium blend. With this brush, we can go and add different color
to the object. For example, let's
just go and select some magenta color,
for example, magenta. And we will go over these
little parts that we want to recolor and we
will go and recolor them. If it's not working
on this layer, you can always go
to your layers, open your group with the mouse, and find the layer that
you need to adjust. Probably it is our
inserted image layer and we can just go there, use alpha log, and recolor
these elements again. Now let's just take a look at our illustration
from the distance. And if we like it, we
are ready to move on to our next part where we are going to be adding a new sketch.
12. Cat: Sketch: Let's begin this part firstly by going to our brush library. We will go to the sketching
folder and we will select our brush that we were using before for our sketchy parts. When you have the new brush, let's just get back
to our layers and we will collapse our
group with the mouse. Let's just go to
the top and we will tap on this little V icon. And also we will
just go and drag these background elements inside the group with the mouse. Let's just hold it and
let's just drag it inside when we have everything
clean into our layers, let's just go to our group with the mouse and let just hide it. When we are done we will
select it and above it we will create a new layer
that will rename a sketch. And now the same way as before, we are going to our scheme
layers and we are hiding them. When we have our scheme layers, let's just go and change
the color of our brush to something more suitable
for our background color. For example, yellow, green, light yellow C, and blue. Anything that will work here, let's just pick it when
we have our new color, our new brush and our new layer. Let's just go and start
creating our next illustration, and this time it will
be a little cat. Firstly, let's just go and prepare our layer again
the same way as before. We will go to our range icon. We will go under canvas and
we will togal drawing guide. When we have our
line of symmetry, we will get back to the
layers and we will set manually our layer with the
sage as assisted drawing. Let's just tap on it and
let's select drawing. Assist from the list again, let's just go firstly to
our head and let's try to recreate the shape that
we have on our scheme layer. Let's just go and create the same thing that we have
on our layer with the scheme. When we've recreated the shape, let's just go and add
the facial features. We will go underneath
this line that we have in the middle that is horizontal and we will create big big eyes. Firstly, going over
one of the sides and creating the
shape of the ellipse. Let's just hold it at
the end and we will snap it to a better shape if
you need to rotate it, rotate it if you need to
adjust it in any other way. Let's go over the top
to our editing mode. Let's make them a
little bit more straight on our vertical axis. And also let's just make
them a little bit bigger and position them more closer
to the edges of our head. When you have
something like that, let's just go and tap on our screen to go away
from our editing mot. When we have our
eyes, let's just go inside them and let's
shade these parts. Now when we are done, let's just go and add our
little nose and mouth almonds. What we need to do is to
go right between our eyes. We will go a little bit closer to the bottom part of our eyes, and again, we will create a similar shape that we
had with our mouths. Let's just go and create an ellipse going
in that direction. You can play around with the
position of this element. You can play around
with the size of it. It's all up to you when you
have the shape that you like. Let's just go over our eyes and let's add little eyebrows. We will go and create a
little shape like that. As always, you can play
around with the shape. You can play around
with everything that you want to
play around with. With the position
of the elements, with the size of it,
with everything. Just find what works for you. When we are done
with our eyebrows, let's move on to the
bottom, to the body. And let's recreate again
what we have on our skin, just going along these
lines and recreating that. Of course, if you want
to adjust some parts, you are welcome to
go and do that. Now when we have
something like that, let's just go and add a little Victorian beep
on our neck of this cat. What we need to do is to go and create
something like that. Let's firstly go over
one of our sites and we will start creating these
little curves in that way. Let's just go and
create a few of them. For example, three or five. We will end up with
something like that. You can play runs
with the shapes. Let's just go grab
our ser two and let rise all the lines that we
don't need. Now let us go. And again we will
recreate the same line, but we will go a
little bit higher. We will create
something like that. Later on we will recolor this bottom part with a different color so
it will look great. Now when we have
something like that, let's just go and add
a few more details. For example, let's just go
straightly to the middle part and let's create a little
heart there when we have it. Let's just go to the side and let's add a
few more elements. If you want, you can go and add different elements
to your liking. You can make it as
simple or as complex as you like when
you have this beep. Let's just go and turn
off our assisted drawing. Firstly, we will go to
our range tool over the top left and we will total
drawing guide from here. Then we will get
back to our list. We will go to our
li with the sketch. We will tap on it and we will choose drawing a
list from the list. Now let's just go and add
some details manually. Let's just go firstly to the bottom part, to
one of the sides. And let's add the
tail, for example. Let's just go over
our right part. And we will start by creating a guiding line like that you can clear around
with the shape. As always, all that
we need to do is to create some of this curve. When you have it, we will
need to go and thicken it up. What we need to do is to repeat this line and make the tip of our tail a little bit thicker than our bottom
part of the tail. Let's just go and create
something like that. You can play rounds with
the whole shape in general and find what works for you When you have the
shape that you like, grab an eraser tool and erase all the lines
that you don't need. When we have the tail, let's just go over the top
and let's add some witch hat. Firstly, let's just go to
our lis and we will create one more layer above
our layer with the main skitch Onto
this new layer. We will be starting by
going to the top of the hat and we will create a shape of the ellipse the
same way as before. Just go in there and creating the shape and holding
it at the end. If you need to rotate
it, go and rotate it. If you need to make it bigger, go and make it bigger. If you need to adjust
it in any other way, please go to the editing mode over the top and
adjust it from here. When you found what
works for you, let's just tap on our screen to get away
from our editing mode. When we have this shape, let's just grab and eraser to, and let's erase this line
that is overlapping the head. When we are done, let's
just go over the top and let's create the actual
shape of the witchy hat. Firstly, let's just
go over the edge that we have for our
bottom part of the heat. And let's create a
few lines like that. We will go along the whole shape and we will add a
bit of ruffles. And when we have
it, we will go over the top and we will be creating
the shape of the heat. Firstly, let's just
go over our one side, for example, the left one. And we will need to create some kind of a triangular
shape like that. When you have the first
line going up in that way, we will go to the opposite side, somewhere to the same place. And we will create a
line going in that way. It is quite a triangular shape. And when we have
it, we will go over our first line and we will create a line
going in that way. When we are done with this line, we will need to continue
aiding the line. So we are creating some
kind of a soggy ship. What we need to do is to create a line going down
in that direction. When you have it, we will go and continue adding the
line in that way. And then we will continue
by creating the line and combine it with the line
that we have on the right. Let's just go and create
something like that. When we have the
shape like that, let's just go to the
tip of our head. And on this tip we will
add additional elements. For example, let's just go
and add some flamy effect. What we need to do is
to go and start by creating a little
shape of the elipse. Then from this ellipse, we will go up and we will
create a wobbly line like that. We will also go to
the opposite side, and we will try to combine
the shape together by creating some kind
of a flaming effect. We have something like that. Let's just grab our
eraser tool and let's erase all the lines
that we don't need. If you want to create
some other elements, you are welcome to
go and do that. For example, let's just go to this middle part of
our top of the head. And we will create a line that will represent some
kind of the bow here. What we need to do is to go to this intersection that
we have on our right, and we will go a little
bit underneath it. From here we will go along
the whole shape of our head. And we will create a
curve going in that way. When we have it, we will go
over our left side and we will balance our composition
by creating a little bow. We will have a similar
weight on both sides. We will go to this
intersection with the main line that
we have on our head. And with this curve that
we have just created here, we will create a little triangular shape
going in that way. If you want, you can go over the opposite side and
create the rest of the bow. When you are ready,
let's just grab the eraser tool and erase the
parts that we don't need. If you don't want to
add the bow element, you are welcome to go and add something
different right here. When we are done with it, let's just go over
the top of the head. Let's just add another
line there so we will have the illusion that our head is not just flying over the head, but it is sitting on it. So what we need to do is to go over our left side firstly, and then we will just go through the whole shape of the hat. And we will add the
line going in that way, you can play around
with this line. You can go and make
a curve instead, or just find the line
that works for you. Just try a couple of times
and when you are satisfied, grab an eraser tool and erase everything
that you don't need. Also, let just go to our liars and let just
get back to our lier with this cage and we will
erase this line that is overlapping our
heat when we did it. Also, we can just get
back to our layers and we can hide our layers
with the schemes. Now, take a look at
your illustration, and if you want to
adjust some parts, please go and adjust that. When you're satisfied
with your sketch, let's just get back
to our layers and let's combine these
two layers together. We are going to the
layer on the top, taping it, and choose and
merge down from the list. Now let's just go to our left part and let's create
the additional elements, for example, Again,
let's just go and create and lantern in a
shape of the pumpkin. If you want you can go and create one more layer later on. It will be easier
for you to adjust the placement and maybe
the size of this element. When we have this new layer, let's just go over our left
side to some blank space. And let's just start by creating a few segments of our Pumpkit. Let's just go and start by creating an ellipse in that way. And then we'll create
two more ellipses. Play runs with the shapes, and when you are
satisfied with them, let's just go to
our eraser tool. And let's erase the parts
that we don't need. Now, when we have
something like that, let's just go over the top and let's create a
little handle here. You can go with some
peculiar shape, or if you don't want to
create something peculiar, you are welcome to go and
create something in that way. Now let's just go
inside the shape and let's add our additional
elements as facial features. Let's firstly go over
one of our sides, and let's create a
triangle in that way. When we have it, we will go to the opposite side and we will create something similar to
what we have on our left. When we have these two shapes, let's just go inside of
them and let's shade them. Now let's just go between
these eyes and let's create a little triangle for
the nose when we have it. Let's just go and create our very scary mouth
the same way as before. We are just going and creating
some lines like that. When we have them, we will
go and thicken them up by creating the lines on the
bottom and shading that. Take a look at your pumpkin from the distance and decide whether you want to
adjust some parts. If you want to
adjust some parts, you will need to go
to the ribbon icon, select the area that
you want to adjust, and then go to the arrow key on the top left and adjust
this little part. Play runs with the
shapes in that way. If you want to
adjust it even more, you can go to your magic ansu liquefy and adjust it from here. When you're satisfied
with your design, let's just go and the
select our magic ansu. Then we will go back
to our arrow key and we will find a placement
for the elements. Let just move it closer
to our little cat. If you need to
adjust the rotation, you are welcome to
go and do that. If you want to overlap
your objects again, you are welcome to
go and do that. Find what works for you, find the placement
that you like. And when you are done,
let's just tap on our Arrokey one more time
to deselect everything. Then we will get
back to our lis. We will go to our
lier with this sage. We'll grab our eraser two, and we will erase all the
lines that are overlapped. Now let's just get back to our layers and let's combine
these two layers together. Go into the top one, tap on
it and choose and merge down. Also, we will just go to
the bottom part, and again, we will create
some little puddle that our cat is sitting on. Let's just go and create
a wobbly shape here. If you want to add
some more details, you are welcome to
go and do that. Also, if you want to go to some blank spaces that
you have around your cat, you are welcome to go
and add more details. For example, you can add some hearts or maybe
some diamond shapes. If you want to add some
other elements again, you are welcome to
go and do that. Now let's just take a look at our illustration
from the distance. And if we like it, we
are ready to move on to our next part where we are
going to be aiding the colors.
13. Cat: Base Colors: Let's type eight and R
colors by going firstly to our brush library and
changing the brush to Monel. When we did it, we will go
strictly to our layers. We will go to R with the sketch, and we will go and change
the capacity of it. We will need to tap on the icon, go into our opacity slider, and finding the amount of
capacity that works for us. When you found the level
that is working for you, Let's just tap on with the
sketch to close this window. When we are done, let's
just go and create a layer underneath our
layer with the skitch. Let's just select the
group with the mouse. And from here we will create one more layer that we
will rename as body. Now let's just get back to
our color palettes and let's select the color that you think will be suitable
for your cat. For example, purple,
dark purple, light magenta, magenta, or any
other color that you like. Let's just go and pick it
up and when you have it, let's just go and recreate
the shapes of our body. What we need to do firstly, is to go and turn on
our assisted drawing. If you don't need this line that is going from
top to the bottom, which is your symmetry line, you can strictly go to your lis, go to your li with the body, tap on it and choose
Drawing assist from here. Now let's just go and recreate the lines and then we'll drag
and drop the color inside. When we are done, let's just get back to our layers
and let's turn off assisted drawing to add our Tel typing on the layer
and choosing drawing Assist. Now let's just go and
recreate the shape of our tel and then again we will drag and drop
the color inside. Take a look at your lines without the lines on the skitch. If you need to adjust
something here, please go and adjust it. Try to make all the lines and all the outlines and all the
silhouettes very smooth. When you are done, let's
continue by going again to our layers and hiding
our layer with the skitch. Now let's just go and create this beep that we
have right here. Let's just create one more
layer and let's rename it as P. We will go and change
the color of our brush, so we are going to
our color palette. And let's just go and select either bright pink
or pink color. With this color, we will go
and recreate the main shape. Again if you need to, if you don't want to do
everything manually, you can go to your
layer with the beep and you can set this layer
as drawing assist, close the shape, and then just drag and drop the color inside. When you are ready,
let's just get back to our layers
and let's just go to our layer with the
P. We will tap on it and we will choose Drawing
Assist from the list. Now we will go and make the copy on this layer that will
recolor differently. Let's just wipe this
layer from right to left, and we will choose duplicate. We will go to one layer
that we have on the top. We will go to our color palette. We will select the white
color and we will drag it to the area when we have it. Let's just make sure that
we recolor the top one. When we have this
layer selected, we will go to our Re
key on the top left. We will use uniform
method and we will go either to our top node
or to the bottom one. And we will drag it up
or down, respectfully. Now let just drag our white
shape a little bit higher and we will position our
little inside parts, this little shapes that we have going on the bottom right
underneath one another. We will need to have
something like that. When you're satisfied
with the result, let's just tap on our air key
to get away from this mode. When we are done,
let's just go to our layers and we can go and combine these
two layers together. Firstly, let's just tap
on our layer on the top, and we will select merge
down from the lease. Now let's just pick the
same pink color and we will create these additional
elements with this color. We already have it
onto our canvas. So let's just go and hold one of our fingers on the
color that we need. We will invoke our eye drop a two and when we have
the color that we need, let's just go and recreate
these elements one more time. If you don't want to
create everything, you can go and tap on
this layer and select Drone Assist and just create
the elements on one side. If you want to add some
additional elements, maybe some dots going along the line that you have
on this wide element. You are welcome to
go and do that. If you don't want to add
some additional elements, we will need to get
back to our Lit. We will go to our
Li with the beep. We will tap on it and we will choose Drone Assist
from the list. Now let's just go inside this little herd that we
have just created. And menu. We will recolor it. Now let's continue by aiding
our next shape. Again, we will go
back to our lives. We will create one
more layer above and we will rename this
layer as Head. Now let's just pick the same color that
we used for the body. Again, we are invoking
our eye drop a tool and we will go and recreate
the shape of the head. When you have the general shape, let's just drag and
drop the color inside. And let's just take a look at the whole shape without
our sketch lines. We will take a look at it, and if we need to
adjust some parts, we will go and adjust them. When you're satisfied
with your result. Let's just get
back to our lives. We will unhide our
layer with the sketch. Let's just go and continue
eight in our details. Now let's just go above
our lay with the head. And we will create
one more layer there that we'll rename
as facial features. We can clean this
layer to a previous one or we can just
keep it as it is. We will need to go and send
this layer as assisted. Let's just tap on it and
let's choose Draw and Assist from the list
when we have it. Let's just get back to
our color palette and let's select the white
color for our eyes. If you want to use
any other color, you are welcome to go
and select this color. Now when we have the
color that we need, let's just go and
create our elements. When you have the outlines, just drag and drop the color
inside, win the same color. Let's just go and recreate these elements for our eyebrows. Again, drag and drop the color
when you have the outline. If you need to adjust
some little parts, go and adjust them. When you are ready
with the eyebrows, let's just go and recreate
this element for our mouth. We will go back to our color
palettes and we can go and select either background color
or our dark magenta color. When you pick the color, let's just go to these elements
and let's recreate them. When you have the outlines, just drag and drop
the color insight. Now let me just get
back to our liers. We will firstly go to our Lia
with the facial features. We will tap on it and we will choose drawing assist
from the list. When we did it, we will
create one more layer that will rename as
Bottom of the hat. Now let's just get back
to our color palettes and let's select the color
with the name, dark magenta. With this color, we will go and recreate our shape of the Alps. Let's just go and
very quickly do it. Adjust the line if you need
to or if you don't want to repeat everything that you have on your layer
with the skate. You are welcome to go and
adjust it to your liking. When you're satisfied
with your shape, let's just get away from
the editing mode and let's just drag and drop
the color inside the shape. We can see that we will need to have this bottom
part on the hat, right underneath our
layer with the face. Let's just go back
to our layers. We will hold this layer
with the bottom of the heat and we will drag
it underneath our heat. Now let's just go and
continue adding the details. For example, let's just go and create these little
elements as ruffles. We will need to put them underneath our layer with
the bottom of the heat. Let's just go to the
layer with the beep. And from here we will create a new layer that will
rename as ruffle. Now let's just get back to our color palettes and let's select some
different colors. For example, we can go
with light magenta, dark purple, or any color that you like for
these elements. And now, very easily, let just go increase
the size of our brush. And let just go and add these little elements
just with the big brush. If you pick the color and if you don't really like it, you
know what you need to do. You will need to go
to the magic an tu, use satration and brightness and adjust the color from here. And also, if you want to
adjust these little elements, you can always go to your magic ansu liquefy
and adjust it from here. When you are done
adjusting your elements, let's just tap on our
magic an tu one more time. And let's just go and
continue adding our details. One more time we
are going back to our layers and we will need to decide where we need to
put our top part of the heat. We will need to
put it underneath our layer with the raffle. Let's just go to our
lie with the beep. And from here we will
create one more layer. Let's rename it as Top
of the Heat Again. Let's just go and select
the same color that we were using for the
bottom part on the heat. Let's invoke our eye. Drop a two and then we'll go and recreate this element
that we have on the top, Close the shape, and then drag
and drop the color inside. Now let's just go and recreate these little elements that we have as additional elements. One more time we are going
back to our layers and we will create one more layer above
our li with top of the heat. Let's rename this layer as Bow. Now let us go to our color palettes and
select the white color, or maybe light greyish orange. With this color, we
will go and recreate this object when you have the outline dragon drop
the color insight. Now let us go and create one more layer for this element that we have on the right. Again, we're going to
our layers And let's create one more layer that
will rename as flame. Now let us go with
the same white color. We will recreate this object. If you want to adjust
it in any way, you are welcome to
go and do that when you have the outline dragon
drop the color insight. Now let us go and recreate the elements that we
have in the background. Firstly, let just get
back to our layers and we will go and find a
group with the mouse. We will create one
more layer there that will rename as
background elements. Now let us go and recreate
this element for our paddle. You can go and pick
one color that you already have
onto your canvas. For example, you can
select the color that you were using for these little
elements on our head. Let's invoke our eyedropu. We will select the
same color and we will go and recreate
this little paddle, close the shape, and then drag
and drop the color inside. If you want to adjust
it in any way, please go and adjust it when you already
adjusting your paddle. Let's just go and
continue adding our additional
elements that we have on our sketch. One more time. For our hearts, let's
select the white color, and for our little diamonds, you can pick any
color that you like. When we are done with
our background elements, let's just go and recreate
our little pumpkin. Again, we are going back to our layers and we will need to go above all the layers that we already have for our colors. We will create a new
layer from here. Let's just go and rename
this layer as pumpkin. When we have it, we will go back to our color
palettes and we will pick one of these orange
colors to recreate our sheep. One more time, let's just go and start by creating our outlines, and then we'll drag
and drop the color inside when we have it. Let's just go above
this layer and we will create a new layer
for our facial features. Let's just tap on the plus icon. And let's rename this
layer as facial features. Let's clean this layer
to a previous one. We will tap on it and choose clipping mask from the least. Then we'll go to our color
palettes and we will change our color to light
yellow with this color. Let's just go and recreate
our facial features. When you are done,
let's just get back to our list and we will hide
our layer with this gauge. We will take a look at
our whole illustration and we will find the places
that we need to adjust. And we will go and adjust that. Go to the needed
layer and adjust your little parts that
you need to adjust. And when you're satisfied
with how everything looks, let's move on to our next part, where we are going to be
aiding some visual effects.
14. Cat: Details & Gradients: Let's type this part. Firstly,
by going to our brush, we'll go to the
airbrushing folder and we will choose our
medium blend brush. When we did it, we will
start going to some of our elements and we'll be
adding our additional colors. For example, let's just go
and start from the head. We will go to our with the head. We will tap on it and we
will choose alpha lock. When we have our
alpha lock turned on, we can go to our color palettes and select the additional color. For example, let's just go with light magenta and
we will go very easily to our left side and we will create
a gradient here. Let's just go and create
something like that. If you want to create
a smoother blend, you are welcome to go to
your magic Ansu Guscin blur. If you want to go and
add additional colors, you are welcome to
go and do that. For example, you can go to
your color palette and select the bright pink color and edit
more toward the left side. Again, if you need to
make a smoother blend, you are welcome to go to your magic Ansu Gaochenblur
and edit from here. When you are done adding
this little elements, let's just go to the tail. And we will add it here too. Let's just go to our layers. And let just find
our body layer, we will go and tap on it and
we will choose alpha lock. When we have it, we will
go to our left side of the tail and we will add
our light effect here too. Let us go over this
part and we will add our additional color
on the left part. If you need to make
a blend more smooth, you are welcome to go to your magic Anto and Gaussian bluer. Also, you can just go to
the same layer and you can go and change the color of your brush to
some darker color. For example, magenta
or dark purple blue. And with this color, you can go underneath the
beep and you can add a little shadow with this
color if you overdid it. You can grab this much tool
and adjust it manually. If you want to add more shadows, you are welcome to
go and do that. You can add them to
the bottom part of the tail and right here
near your little pumpkin. When you are satisfied
with your result, let's just get back
to our layers. And we will go to our
top of the hat layer. We will tap on it, and we will choose alpha log from the list. One more time, let's
just go back to our color palettes and let's
select some brighter color. You can go with light
magenta or bright pink, or if you want to
pick any other color, you are welcome to
go and do that. When you have the color, we will go to the
left part and we will add our
additional color here. Also, we can go over the top of our hat and closer to
this flame element, We can add our additional
color here too. If you want to make
a smoother blend, you know what you need to do. You will need to go
over your magic, an Tu and go to
the Gaochen Bluer. When you have the
result that you like, let's just tap on our magic, an Tu one more time
to close this window. Then let's just go to our
white elements of the bow. And let's add additional
color here too. Let's just get back
to our layers. Let's find the Ed layer, let's tap on it, and
let's choose alpha log. We will go and select
some pinkish color, either light magenta
or bright pink. Very easily we will go to our right parts and we
will add our color here. Let's just make a
very smooth blend. And when we have this color, we will also go to
our bow elements, and we will go to
this little ribbon that we have underneath, and we will separate
these two elements. Let's just go and generally make this Homo ribbon that we
have going horizontally, a little bit more pinkish. If you overdid it,
you can go and grab this much tool and
adjust these parts. Also, let's just go to the
middle part of our bow. And the same way we will
separate these elements, we will go to the
surrounded element. And we will create
something like that. Again, if you overdid
it just a little bit, you can go and grab the smug to and adjust these
little parts, just make a nice blend. And then we can go to
the parts that we have on the side and we can create a little
element in that way. Again, if you need to smudge it, you are welcome to go grab
the smug brush and adjust it. When you are done
with this element, let's just go to our layers and let's just find our
background elements. We will go and tap on the layer, we will set it as alpha Og, and we will go with
the brighter color over our left side, and we will add the
additional color here. Also, we can just go again
to our color palette. Select some darker color,
for example, magenta. And we can go underneath
our cat and underneath our little pumpkin
and add little shadow to these elements if
you need to adjust it, if you overdid it
just a little bit, grab this much tool and
adjust it manually. Now, when we are ready with
this element on the bottom, let just go and add the additional color
to our little pumpkin. One more time, we are
going back to our lies. We are finding our
lie with the pumpkin, we are taping on it and we
are choosing alpha log. Then we will go to
our color palette. And we will select the
darker or lighter color. Select the color that you like. And let's just go over one
of the sides and let's add the additional color you need
to create a smoother blend. Go to the magic one, to Gauchan blue, and
add it from here. And when you're satisfied
with your result, let's move on to our next part, where we are going to be adding some highlights and
glowing effects.
15. Cat: Glowing Effects: Let's take this part firstly by going to our brush library. We'll go to the
calligraphy folder and we will change our
brush to monoline. When we did it, we will go to our layers and we
will start adding our highlights as we are at our layer with the pumpkin.
Let's start from here. We will create one
more layer above it, and we will rename this
layer as highlights. It's already clipped
to our previous layer. Let's just go to our icon. And we will change our
blending mode overlay. Then we will get back
to our color palettes. We will select
light yellow color, and we will go to our left side to create a little
highlight there. Let's just go over the edge and let's create our highlight. If you want to go to
the segments and if you want to add some dots
or maybe some sparkles, you are welcome
to go and do that when you're satisfied
with your highlights. If you want to go and
adjust the opacity, please go to the layers. Go to the highlight layer. Go to the icon and adjust the
opacity from your slider. Find the amount
that works for you. And when you are done, let's continue by going to our head, and let's create
a highlight here. Again, we will go and
create one more layer above that we will
rename as highlights. Let's clean this layer
to a previous one. Tap in selecting clipping mask. And then we will go to our icon to change the blending
mode overlay. Now let's just get back
to our color palette. And let's select
either light magenta or bright pink color. With this color, we will go
to our bottom left part. And from here we will start
creating our highlights. If you want to add some dots
and maybe some sparkles, you are welcome to
go and do that. If you feel that maybe
that color is not working, you are always welcome to
go to your magic anto. Use satration and brightness
and adjust it from here. For example, let us go and make this highlight a
little bit more bright. We will go to the brightness
slider and we will adjust the amount of brightness when you are satisfied
with the result. Let's just go and tap on our
magic an to one more time. Then we will continue by adding a little
highlight to the tail. Let's just go and find
our layer with the body. We will create one
more layer above. We will rename it as Highlights, and we will clip it
to a previous layer. Let's go to our icon and change the blending
mode to overly. Then again, we can go and
select the same color that we were using before
or pick another color. Let's just go over
this light part that we have on our tail. When you have the
highlight that you like, if you want to go and adjust it, you are welcome to
go to the magic anto eitration brightness
and adjust it from here. Now when we are done
with our highlights, let's move on to
some glowy effects. Let's just go to our layers. And let's just find
the first layer where we want to add our
bloom effects. Probably it will be our
background elements. Let's just go and select only the elements that
we have on the top, not our element on the bottom, that is our puddle again. Firstly, we are going
to our Rimon icon. We are using free hands
methods and we are selecting this element
that we have on the top. Let's make the copy
on this element. So we are swiping with
three fingers from top to the bottom and
firstly selecting copy. Then we are doing
the same thing with our fingers and we
are selecting pastes. Now let's make sure
that we've made a copy. When we have it,
we will just go to our icon and we will change the blending
mode to hard light. We also can grab this layer
and put it underneath our layer with the
background elements or we can keep it
as it is right now. Now let's just go to
our magic, an tool. We will go to our
Gaussian blur and we will add the bloor
to these elements. Find the amount
that works for you, and when you are satisfied
with the result, let's just go and add
some bloom again. We're going to our
magic wand tool, and we are selecting
the option Bloom. Let's just go and
add a bit of it. If you want to play around with the sliders on the bottom, you are welcome to
go and do that. Now, let's just tap on our magic one tool to go
away from our Bloom option. And then let's
just go and change the color that we have
underneath our heart. Firstly, we are getting
back to our layers. We are going to our
inserted image. We are tapping it
and we are choosing alpha lock with the same
brush that we have right now. Let's just go over this
little part that we want to recolor and let's just go and recolor it when you are ready. Let's just go and continue
aiding our glowy elements. Now let's just get
back to our layers and let's find our layer
with the flame. Let's make a copy of it. So we are swiping
our layer from right to left and we are
choosing duplicate. Let's just go to the
layer underneath it and we will go and
change the color of it. For example, let's just
tap on this layer that we have underneath and we
will set it as alpha log. When it is set as alpha log, we will go and add
a different color here to know that
we've added our color. We can just go and hide earlier with the flame
that we have about it. And then we can just go to
our color palette and pick the color that we like that we want to add to this element. For example, let's
go with pink color. Let's select bright pink
and we will drag and drop it to this area
when we have it. Let's just get back to
our layers and let's hide our lier with the flame
that we have on the top. And also we will just go to this layer with
the pink flame. We'll tap on it and we
will turn off alpha lock. Now let's just go to this icon and we will change our blending
mood to hard light. Then you know what
we need to do. We will need to go to our
magic Anu Gaussian blur and add the blur here. Find the amount
that works for you. And then let's just go
again to our magic Ansu, and we will use
the option Bloom. Let's just add a bit of Bloom here when you find the
amount that works for you. Let's just go to other elements that we want to add
our bloom effect to. One more time, we are going
back to our layers and we are finding our facial
features on the pumpkin. Let's just make a
copy of this layer. So we are swiping
it from right to left and we are
choosing duplicate. We are going to the
layer on the bottom and we are changing our blending
mode to hard light. One more time if you want, you can go to your
magic one tool and use gas and blow firstly, and then go to the bloom effect. Find the amount of bloom
that works for you. And when you are done, let's just tap on our magic, an tool one more time
to deselect everything. Now, the very last thing that we will need to do is to add this overall glow
behind our cat. Firstly, let's just get
back to our layers. And we will select all the
layers that belong to our cat. When we did it, we will go
and make a group out there. Let's just go and rename
this group as Cat. And then we'll
make a copy of it. Now we will go to this group with the cat that we
have on the bottom. We will tap on it and
we will choose flatten. Now we will turn off our
alpha log from this layer. So we are taping on it and
we are choosing alpha log. Now let's just get
back to our icon and let's change the
blending mode to hard light. When we did it, let's
just go back to our adjustments and let's
just go to Gaussian blur. Let's add a bit of blur here. If you want to add more
of this glow effect, please go again
to the adjustment and go to the Bloom option. When you are ready,
let's just tap on our magic one tool one more
time to deselect everything. Now let's just get back to
our layers and let's just put the background elements
layer where we have off our glue to our
group with the cat. We are holding this layer and we are dragging it
toward the group. Now let's just take a look at our illustration from the
distance and if we like it, we are done with our class. Thank you for
watching this class live review if you liked it, and continue subscribing for
more I videos in the future. Looking forward to
seeing your projects.
 Uni Corn, ⭐Kawaii Art Enthusiast⭐