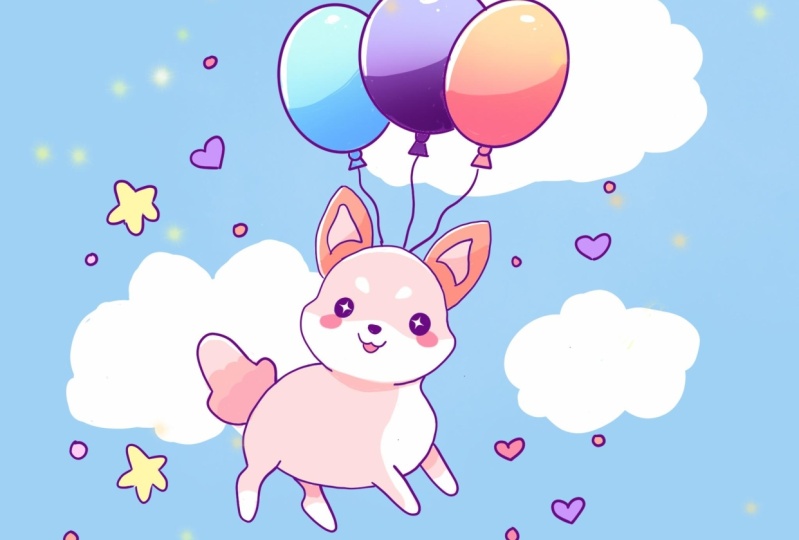
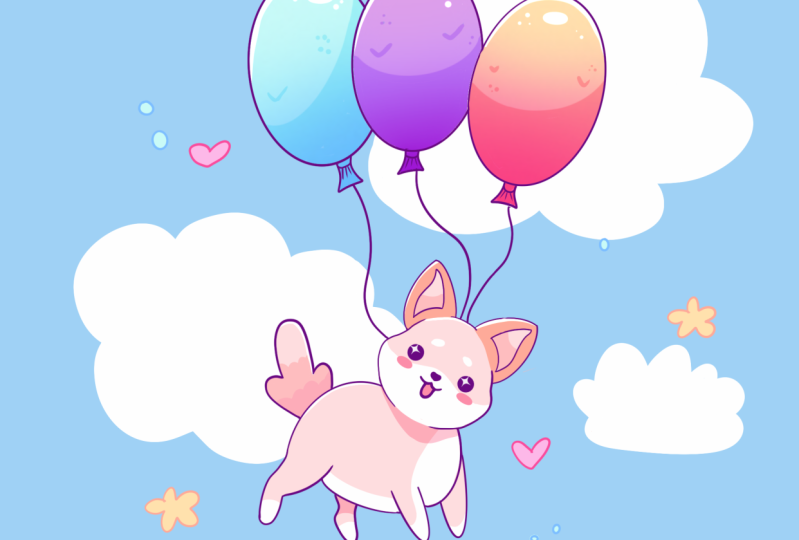
Transcripts
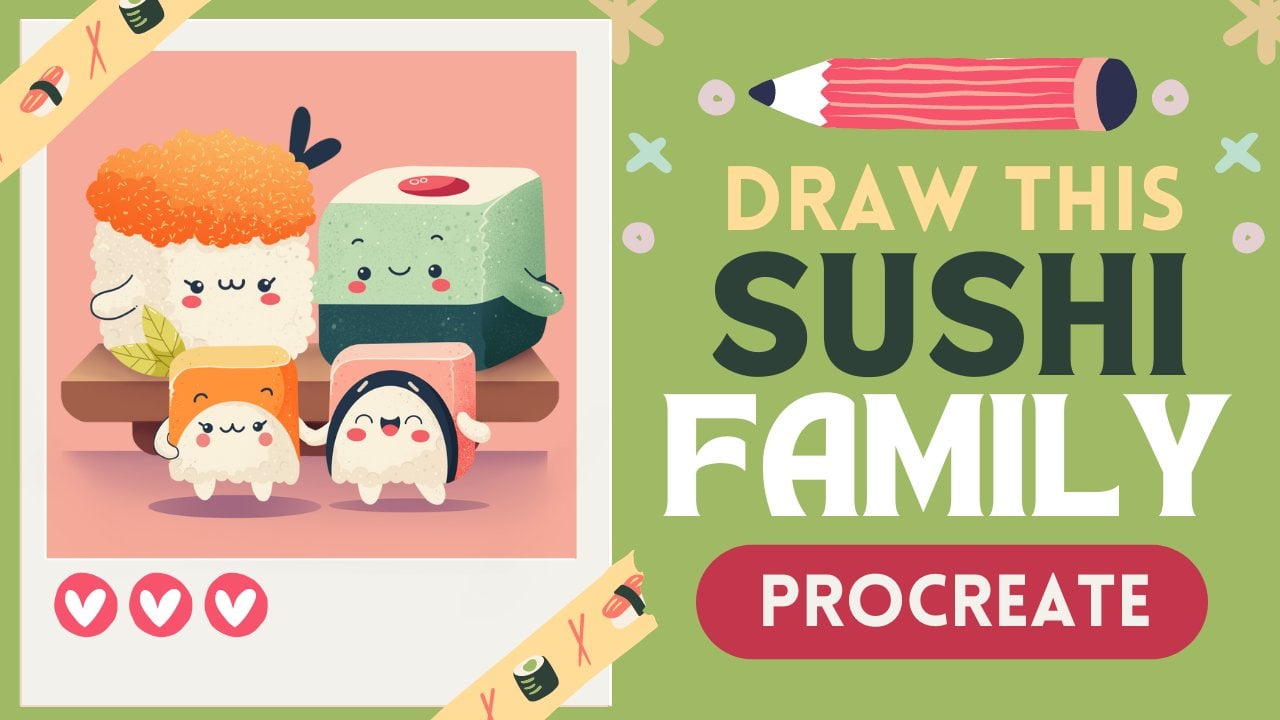
1. Introduction : Hello, everyone. I'm Uni
and into this class, we'll drop youth animals
with the ballots. This class doesn't require any prior experience
or fancy tools. We'll start from
scratch and we'll be using simple techniques
throughout the process. Everything you'll see will
be happening in procreate. However, if you
have other software or want to try
traditional materials, you are welcome to join. If you're ready to start, let's jump right into it.
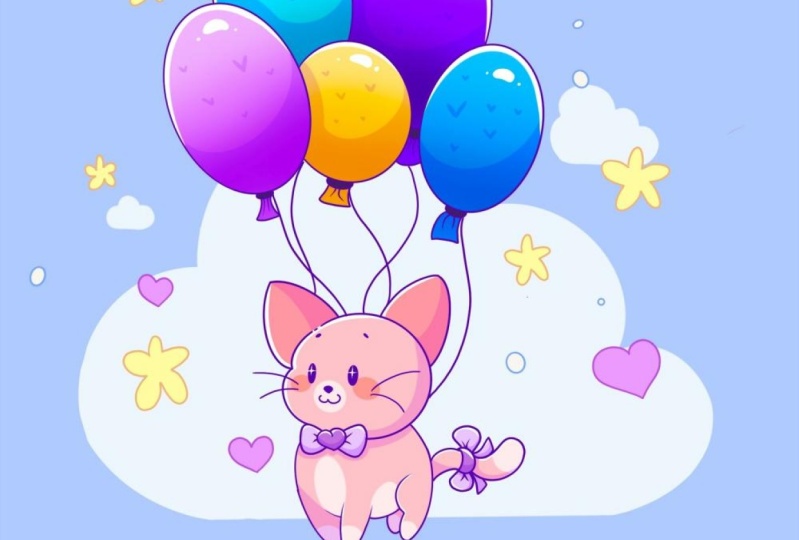
2. Cat: Scheme: Let's type our class by deciding what kind of canvas we
are going to be using. You can see it is a very simple standard square canvas
that you can find. In procreate, both
pixel weight and pixel hide are set at 2048 pixels. If you would like to use any other dimensions
for your canvas, just go and select that. As for DP I, we are using 300 and as for the
color profile, we are using SRGB
with the slow number. When it's all done,
let's just it done and will be redirected
to our new canvas. Now we will need to
decide what kind of colors we are going to be using throughout
the whole class. If you want, you can
select your own colors, but if you want to follow
along with the class, please go to the
project and Res Sap and download all the materials
when you did it. Let's just go straight to our color palettes and let's
check out what we have here. Here we have two options of
how we can use our colors, the compact and the cards. We will go to the
cars because here we have all the colors
names and it will be easier for us to
navigate through them while we are still here
into our color palettes, let's select the first color
that will help us to create a scheme that itself will help us later to create
the whole illustration. Now let's just go and
select some color that won't be that bright
and won't be that du, for example, something
like pink or maybe yellow will
work best for us. Select the color that you like. And then we will go
to our brush library and we will select the brush. We will go to the
sketching folder. And here you can see that
you have a lot of options. You can go to your canvas, you can play around
with these brushes and find what works for you. But again, if you
want to follow along, let's just go and
select six B pencil When we have our brush and
when we have our color, we are ready to start
creating our scheme. Firstly, we will go more to the bottom part of our canvas. And we will start by creating a curve that is going in
a vertical direction. We don't need this curve
to be very convex. We don't need it to
be very protruding. We just need to go and
create something like that. When you have it,
we will need to go and find its
approximate center. Let's just go and
by ying our line, we will just go and make
a little mark down. When we have this mark down, we will go to the top of
it and we will create an ellipse that will help us
later on to create a head. Firstly, let's just go
and just with one line, we will create our shape. Let's create
something like that. Don't lift up your apple pencil, Just create the shape. And at the end of the line
just hold your apple pencil. You can see that if you are
rotating your apple pencil, you are rotating your shape. And if you are moving
it from side to side, you are making
bigger or smaller. Let's try to make
it very straight. But if you need to
adjust it even more, we will lift up our
apple pencil and we will go to the top where we
have the option edited. This is the editing mode, and you can see that
here we have some nodes. Let's just go and adjust this
element just a little bit. We will need our
part on the left to be smaller than our
part on the right. You can see we have the nodes. We will just go to our node
that we have on the left. We will hold our apple
pencil there and we will grab it and move it more
toward the right side. The same thing we will
do on the opposite side. We will grab our
nodes and we will drag it more again
toward the right side. We will need to have this
very elongated ellipse. We will need to
position it right on our markdown that
we have created. When you have
something like that, we are ready to get away from our editing mode and
we will need to tap on our screen either with
our pencil or with our finger when we have
our first element, let's just go a little bit down and we'll create
another element, similarly to what we
have done right now. We will go and create
another ellipse, but this time it
will be a little bit bigger and a little
bit narrower. One more time, let's just go to the middle part of our
first ship from here. Again, the same
way we will create our ellipse with one line. We are creating our ship, and at the end of it we are
holding our apple pencil. Try to make it straight. And when you have it,
we will go to the top, to the editing mode. Now let's adjust it
just a little bit. We will go to our top node
and we will drag it a little bit more to the top when you
have something like that. Let's just go to our node on the left and we will drag it
more toward the right side. We just need a little
protruding part onto our left when you
have something like that. Let's just go to the right and we will do the
same thing here. We will make the whole
shape a little bit smaller. One more time, we are
going to this node and we are dragging it
more toward the center. Also, we will go and we will try to adjust the shape
by rotating it. To do so, we will need to
go right between our nodes. We will hold our
apple pencil there. And we will move it in
a circular movement. Just slightly adjust it and try to put it in this way
when you have it. We will go away from
our editing mode by typing on the screen. When we are done with this part, let's just go to the
top and we will create two more lines that later
on will turn into the ears. Firstly, we are going
to our left side, to this element that
we have on the bottom. And we will go to this
little part right here and we will
find its center. Let's just make a
little mark down. From this mark down, we will go up with
the straight line, which will be diagonal. Let's just create
something like that. You can adjust the angle by moving your apple pencil
from side to side. In the end, we will need to
have something like that. When you are done
with the first line, we will need to go more
to the right side. And we will need to do
the same thing here. Let's just go to the right, and let's find an approximate
center of this part. Again, we will make
a little mark down into this element that
we have on the bottom. When we have this
little mark down, we will step a little bit
to the right from it. And from this part we
will go and create another line that will go in the opposite direction
from the first line. Try to keep the angle similar to what you
have on your left. And when you are
done, we will go and continue
creating our scheme. Let's just go underneath our
second ellipse and we'll create one more
ellipse that later on we will turn into the body. Let's just go
underneath the shape, and one more time we will create the shape of the ellipse
just with one line. And at the end of our line we
will hold our apple pencil. Let's create a smaller shape. And when you have it, we
will go over the top to our editing mode to
adjust just a little bit. Now let's just go
to our right part, to the node that we have here, and we will need to drag
it more toward the right. Our top, all that we have for our head is on the same
line that our body, when you have
something like that, we are ready to move
on and we are ready to go to our node that
we have on our left. And we will need to drag
it more toward the center. When you have the
body like that, let's just go and continue
creating other elements. Let's just get away
from our edited mode by tapping on the screen. Now when we have these parts, let's just go and
create a little til. We will go to this body element. We will go to our right
part and we will make a little markdown right in
the middle of the shape. From this little markdown, we will go toward the right side and we will
create a line like that, you can play around
with its curvature. You can play around with the playfulness on
these elements. This will be a tail, so you can create
a similar shape. Or you can play
around and find what works for you when you
have something like that. Let's just go and create a few more lines that will
be representing our legs. Firstly, let's just go over the bottom part of
our bottom ellipse. We'll go toward the
left side and we will go right to this line that
we have in the middle. We will just go and step a little bit to
the left from it, and we will create a line
going in that direction. When you have the first line, let's just go more
toward the right side. We will step from this
line that we have in the middle and we will create the line that
will look like that. The angle will be different, but the size will be similar. Now when we have
these two lines, let's just move on
to the right part. And let's create the
lines for the back legs. Now let's just move
on to the right. And we will create another
line going in that way. If you want, you can
move a little bit toward the center and create
another line like that. When we have
something like that, that is our scheme
and we can move on to the next part where we are going to be creating our skitch.
3. Cat: Sketch: Let's start this part
firstly by going to our layers and we will go and rename this layer
with our scheme. Let's just step on the layer and let's choose rename
from the list. We will name this
layer as scheme. When we did it, we
will go and create one more layer that we
will rename as Sketch. When we are done with this task, we will go to our
color palettes. And we will select the
color that will be different from the one that
we were using for our scheme. For example, let's
just go and select the color with the
name, dark magenta. When we have our color, let's just go and
increase the size of our brush just a little bit, and we will go and start
creating our sketch. Firstly, let's just
zoom in our canvas, and we will start by creating
the shape on the heat. We will go and we will merge
these two elements that we have on the top and we will
make the shape of the hat. Let's just go to the spit
that we have on the left. We will start recreating
the lines that we have on the top and we will
just go with our line. And very smoothly we will
create a shape like that. We are creating a little
dance on the side. Then we are just repeating the lines that we
have right here. The same thing we
will do on our right, but here we'll create a
flat shape like that. Let's just repeat the lines
that we have on the top, then if we need to
adjust something, let's just go to the places that we need to adjust and
let's adjust them. For example, let's just
grab our eraser tool and let's make this part on
the left more prominent. We are going to this
Dan that we have. We are just cleaning
everything up to know that we will need to have this
little D when you have it. If you want to go and
adjust some other parts, you are welcome to go and
do that when you have it. Let's just go toward the top part and let's
create the ears. We will firstly go
over our left side. We will go to this
line that we have. This line should be somewhere
in the middle of our ear. From this line, we will go to the sides and we will
create two curves. Firstly, let's just go
to the top of our line. And we will create a curve going down more
toward the left side. We will create
something like that. You can play rounds with
the curvature on this line. If it's not happening
from the first try, you can go and raise this line and create it one more time when you have
something similar to what you right now
see on your screen, we will go to the
opposite side and we will create a similar curve, but this time it will look
in a different direction. Let's create
something like that. You also can play runs
with this tip of our ear. You can make it very
pointy, or if you want, you can make it very soft
and turn it into a curve. When you have the
first ear like that, let's just go to
the opposite side, and let's do something
similar here. Firstly, one more time, we are going to the top
part of our line here. From the top part, we are going with two
curves on two sides. Firstly, let's just go over our left side and create
a B curve like that. When you have it, we will go to the opposite side and we
will create a similar curve. Try to make the ears
even on both sides. That one on the right might be a little bit bigger.
It's up to you. You have something like
that. Let's continue by going to the bottom. And we will start
creating our body. We will need to connect
these two shapes. We will go to this
little part right here, and we will need to create a curve that will connect
these two shapes together. Let's just go
firstly to this line that we have on the
ellipse on the bottom. We will start to create
the similar line, but we will go and make a curve, going to connect
it with the head. We are going a little bit beyond this line that we
have on our skin. When we have a very
soft curve like that. Let's just go and recreate the whole body
that we have here. Let's just go and repeat the similar lines
that we have on our skin as for this and
that we have on our right, we can go and create the
smoother curve here, but if you don't want
to, you can just repeat the line that you
have on your scheme. Maybe make it a little bit softer when you have
something like that. Let's just go and
create our little legs. Firstly, let's just go to this line that we
have on the left. And we will go and create
a curve like that. If it's easier for you,
You can start by creating an ellipse the same way as we were creating it for our hat. You can hold your apple pencil
at the end of the line. You can go to the editing mode, and then you can erase the
parts that you don't need. Basically what we need to do is to create
something like that. And we will need to create
it in a smooth way. We will need to connect it
with the shape of our body. Pay more attention
to this part on the left where we have our
connection with the body. Try to make it very smooth. When you have the first leg, let's just go to our right part. To the front leg and
we will create it. Let's just go to this
line and we will turn it into something similar to
what we have on our left. But this time let's just
go a little bit beyond the frame of our body and let's create the
shape like that. Again, you can play runs with
the softness of your lines. If you want to create
the pointed tips of the pose, you are
welcome to do it. If you want to make
them very soft, again, you're welcome to do it. Basically what we need is to
create something like that. If you want, you can go and overlap one leg over the other. When we have the second leg, let's just grab an eraser two and we will erase the
lines that we don't need. We will go to the
part that we have on our leg and we
will just erase it. When we are done
with our front legs, let's move on to our
back and we will go to the right most leg and it will have a little
bit different shape. Firstly, let's just
go to this line that we have and we will need to
create a shape like that. We are going a little bit
beyond this frame that we have for our body and we are creating
something like that. Firstly, we are
creating a little dan, going more toward the
right and then we are creating a similar shape
that we had before. We are connecting with our
body with a very smooth curve. Again, if it's not happening
for you from the first try, you can try out to make
an ellipse firstly, and then add a circle on the top and connect these
two shapes together. Try it out one more time when you have the
shape like that, let's just go and
add our last leg. We have this little
line on our scheme, you can go and turn it into a leg going in that direction. Or if you want, you can
go and create a leg going towards our right
part. Something like that. Now let's just grab
our eraser tool and let's erase all the lines
that we don't need. Now when we are done
with our little legs, let's just go and
create the tail. We are just going above this
line and we are creating another line just following this line that we
have on our scheme. Then we will go underneath this line that we
have on our scheme. Again, we are repeating
the whole shape. When we have these two lines, we can connect them with
the lines like that. If you want to find something
that works for you, you are welcome to
go and experiment. You can try out
different shapes. You can just create a
smooth curve there. Or if you want,
you can just play around when you found
what works for you. Let's just go and create
some additional elements. Firstly, we will go underneath the head and we will
add a little bow here. What we need to do firstly, is to find the center
on this shape. We have our line that
we have on our scheme. Let's just go to this line. We will go more toward the right from it and we will
create a heart here. Let's just go and create a shape like that, very soft heart. When we have our little heart, we will go to the sides and
we will create this bow. Firstly, let's just go over our left side and we will
create a shape like that. It will be Eric Tingle, but it will have the shape
a little bit narrower on our heart and a little
bit wider on the sides. Let's create
something like that. We are not going beyond
the frame of our head. When you have the
shape like that, we will go to the
opposite side and we will do something
similar here. But this time, let's just
go and create a full shape. We are going beyond the
frame of our heads. This time this element
will be a little bit bigger from what we
have on our left. You can play around
with the shape, You can make the
very soft corners, or if you want, you can
make them straight. When you have the
general shape like that. Let's just grab an
eraser tool and we will erase the lines
that we don't need. Now we will go
back to arm brush. We will go to the
sides from our heart, right in the middle part. And we will create
little lines like that, one on each side. Now we have our little bow. Now let's just go and add one more detail and we
will go to our tail. Here we will add another bow. Firstly, let's just go more
toward the tip of our tail. And we will create a
little ellipse like that. When we have it, we will go underneath it and we will create a shap similar to what we
had on our bow on the left. Let's just create
something like that. When we have it, we will
go to the top and we will create another similar
shape of the bow. If you want to go and add
the free ends on the bow, you are welcome to
go and do that. Now when we are done, let's just grab an eraser too, and we will erase all the
lines that we don't need. Now when we have our second bow, we are ready to go and
add the facial features. Firstly, let's just
go to our head, and let's find an approximate
center on the whole shape. Let's just go to
the line that we have going through
the middle part, and let's just make
a little mark down. Right in the middle
of the shape, we have this little
marked down and we will start by
creating a little nose. Firstly, we will go
right underneath this little mark down and
we will create another dot. Let's just go and create
something like that, a little bit bigger
than our marked down. If you want to
create a cat's nose like the real shape of it, you can just go and
create a triangle like that when we have our nose, let's just go to
the sides from it. And we will create the ice, firstly going over
our left parts and we will create a big shape
on the ellipse like that. Again the same way as always. We are just going and creating
the shape with one line. And we are holding
it at the end, just the size if you like to. If you want, you can go
over the top to editing mode and adjust the
position on these elements. Let's move it more
toward the left side, but not too far from the center. Also, let's try to position it the way that our bottom part of this element of the eye is a little bit smaller than
our shape on the right. So it's positioned a little bit, not in a center that
we have our nose on, but more toward the top parts. When we have
something like that, when we positioned
it in that way, we are ready to get away from our edited modes and we are ready to go to the
opposite side. And we are ready to create the second eye here the
same way as before. We are just going toward
our right part and we are creating the
shape of the alls. At the end of the line, we
are holding our apple pencil. And then we will go over the
top to our editing mode. We will need to make
sure that our eye on the right is a little bit bigger than our eye on the left. That's because we are creating our facial features
and actually the whole cat a little bit in the perspective when we are creating things
in the perspective, the objects that
are closer to us, they look a little bit bigger. Now let's just move
this eye that we have just created on the
right to the left eye. What we need to do is
to go to our canvas. We will need to hold our apple pencil at some blink space. And we will just move it
toward our left side, make sure that it is just
a little bit bigger. If you need to adjust it, go
to the nodes and drag them. When you have a bigger shape, we will just move it back
toward the right side. And we will need to
position it a little bit differently from what
we have on our left. We will need to move it
more toward the right, so we have not an even distance from the center to our objects. Our distance from the
center to our right eye, just a little bit bigger. When we've dragged our shape
toward the right side, we will just go and put it
more toward the top part, so we will have our
eyes on one line. Let's just go and do that. And when you are done,
let's just get away from our edited mode by
tapping on our screen. Now let's just go inside the
eyes and we will shape that if you want to go and if you want to add some
additional elements, for example some eyelashes. You are welcome to
go and do that. When we are done with our eyes, let just go right underneath our little nose and we will
add a little smile here. We will just go and
create a curve like that. If you want to go and
create the cat's mouth, you can go and create
something like that. When you are done, let
just grab our eraser to and we will erase
this little dog that we have on the top. If you want to add additional
elements such browse, you are welcome to
go and do that. Now let us go underneath our eyes and we will
add the cheeks. We will firstly go over
our left side and we will create another ellipse just
right underneath the eye. You can play around with
the size on this element. You can make it round
it, you can make it elliptical if you want, you can position it differently.
It's all up to you. Basically, what we need
to do is to create the shape of the ellipse when
you have it on the left. Let's just move on to the right. And we will do the
same thing here. This time it will be
a little bit bigger. If you need to adjust it, go to the editing mode
and adjust it from here. Now, when you are done, let's just get away
from our editing mode. If you were adjusting
your cheek, and we will go right
to our cheeks, we will add some whiskers. Firstly, going over
our left side, go into our little cheek and creating the
lines like that. You can play around with the
curvature of these lines. You can play around
with their size and with their amount. When you are done with the left side, let's
go to the right. And let's do something
similar here. Now take a look at
your illustration. Think about whether
you want to add more details if you want
to go and add them, for example, let's just add
little brows over the top. And also let's just go
and add a little element right above our eyes that later on we will
color differently. Let's just go right between
the eyes to the top. And we will create
the curve like that. And now we are done
with our main elements. And let me just go and
adjust it even more. Firstly, what we need to
do is to go to our layers. And we will go to our layer with the scheme and
we will hide it. To hide the layer, we
will need to go to our little check mark
near the letter, and we will need to tap on it. Now we can look at the whole illustration without
our lines on the scheme. And if you want to
adjust some parts, let's just go and adjust them. For example, let's
just go and change the size of our head
just a little bit. We will put this little
protruding part on the right, more toward the center. What we need to do is to go to our magic one tool
over the left. We will choose the
option liquefy. You can see that
we have a panel on the bottom and we will need
to select the option push. We have this slider with size and it will change the
size of our brush. With this brush, we can
go to some lines that we have and we can push them toward the center
or to the sides. Let's just go to this
part that we have on the right and let's just push
it more toward the center. With this tool, we
can go over some of the places that we want to
change and we can change them. Let's just spend a little time here and let's
adjust our sketch. When you are done,
adjusting your shapes, let's just deselect
everything by hitting our magic one
tool one more time. When we are done with
our main element, let's just go and
add some details. Firstly, we will go
underneath our little cat and we will add a little alps
like that one more time. The same way as always, we are creating the shape
just with one line. We are holding it at
the end and we will just go and adjust it
with our editing mode, let's just make
it very straight, so if it's a little bit tilted, let's just go to our nodes and we will put
them on one line. We will make this shape a little bit smaller
and we will put it right underneath our cat when you have
something like that. Let's just get away
from our editing mode. We will go to this
little part that we have just created and
we will shade it. Now let's just go and add
some additional elements. Firstly, we will
go over the top of our cat and we will
add some balloons. What we need to do is to go and create a couple of circles. Let's just go firstly
over our top, and let's create the first
circle the same way as before. We are creating it
just with one line. If you want it to be a circle, you can hold your apple
pencil and hold one of your fingers on the screen to snap it to a perfectly
round circle. If you want to keep
it as an ellipse, you are welcome to go
and select an ellipse. When you are done with
creating the shape, if you want, you can go over
the top to the Edison mode. You can make it smaller,
You can make it bigger. You can rotate it. Do whatever
you want to do with it. For example, let's just rotate it a little
bit differently. And let's position it closer to our cats when you have
something like that. Let's just go and deselect everything by
hitting our screen. Now let's just go and create
a couple more of the shapes. You can vary their size, you can vary their rotation. Let's just create five
of these elements. If you are overlapping
the shapes, let's just go and decide
which one of them will be in the front parts and which one of them
will be on the back. Let's just grab an eraser tool and let's erase the lines
that we don't need. For example, let's
just make this shape that we have right in the
middle, right in front of us. We will go inside it and we will erase all the lines
that we have inside. We will do the same with
our shape on the right. Let's just go inside of it and let's erase this line
that we have here. When we are done with
the front elements, let's do the same with
the back ones again. We will go toward our ships and we will erase
the lines that we don't need. Before that, we will need
to decide which ones of these little ships
are closer to us. For example, let's just go
to this balloon that we have on our left and we will erase this line that
we have inside. The same thing with
our right balloon. Let's just go to this
line that we have in this little part that
we have in the middle, and we will erase
this little line. Now when we have the basic
shapes for our balloons, we will need to go to the bottom parts of them and we will need to add the flat
tail of the balloons. Firstly, let's just go
to one of our elements, and we will go to the
bottom part of it. And we will add a little
triangle like that. You can make it very big. You can make it very small. If you want to add more details, you are welcome to
go and do that. For example, we can go
to the top part of it and we will make a little
element like that. We also can go inside this
little triangle on the bottom. And we can add a few
lines like that. So now let's just go through all of our elements on the top, and let's add these flat
tails on the balloons. When we had these little tails, let's just go and add
some little ropes. We will go to the
middle parts of our flat tails and we will add the lines go into our cats. You can make them straight
or you can make them curvy. Now let's just take a look at
the whole illustration from the distance and let's decide whether we want
to change something. For example, let's just go and make our cat just a
little bit smaller. What we need to do is to go to our top left part and we will need to select this
S ribbon sheet. Let's just go and select
freehand methods. And with the freehand method, we will just go
along the shape of our cat and we will
start selecting it. Let's select everything
that belongs to our cat, so we are not selecting
our balloons. We will need to go
along the whole shape. And we will just
need to close it when only this
element is selected. We are going to our
transform tool, which is our arrow
key on the top left. We are using uniform methods and you can see that we
have this bounding box. We will go to one of the corners and we will drag this corner, for example, on the top one. We will just go
and drag it down. We will make the
whole cat element a little bit smaller and we will position it a little
bit differently. Let's just go and position it
more toward the left side. Basically, we are putting
it more toward the center. When you have
something like that, let's just deselect
everything by heating our S ribbon icon. Now let's just
grab our brush and let elongate our
lines for the ropes. Now we are almost done
with the whole sketch, but let's just go and
add a few more details. Firstly, we will go and add a
cloud right behind our cat. What we need to do
is to go somewhere to the bottom part of our legs. And we will need to create
a shape going in that way. So let's just go and create a straight line going like that. We will go through
the whole shape and then we will go over the top to our line to our
editing mode and we will put it more
toward the top part. Let's just put it right
underneath our little belly. And when we have this line, let's just get away
from our editing mode. When we have it, we will
go on the top of it and we will start creating
the curves like that. You can play around
with the shapes, you can play around
with the amount on this little dance.
It's all up to you. Let's just create
this big cloud. Play runs with the shape. And then let just grab our eraser tool and we will erase the lines
that we don't need. If you want to adjust
your shape in any way, you know what you need to do. You will need to go to
your magic one tool over the top left and
you will need to use liquefied to play runs with the size of your brush and
play rounds with the elements. When you are done,
adjusting your shape, If you were adjusting it, let's just get away
from our liquefied by tapping on our magic
one tool one more time. Now let's just grab our brush one more time and let's just go and add some additional
elements around our cat. Let's just go and add some
stars, maybe some hearts, some dots, something like that. Miscellaneous objects. If you need to
adjust some parts, go and adjust them. If you need to erase
some elements, go and erase them. When you are done creating
your little elements, let's just take a look at the whole illustration
from the distance. And then we will just go and put everything right in the
middle of our canvas. To do so, we will
need to go back to our error key on the top left. So let's just tap on it. And we will again
use uniform method, but before using it, we will go and select snapping. You can see this option
snapping on the bottom left. Let's just tap on it
here in the sentence. We will need to toggle snapping to when we have
selected our snapping. Let's just go hold
our apple pencil at some blank space
and what we need to see is these two orange lines. When you have them, we are right in the middle
of our canvas. When you see these two lines, let's just unhold
our apple pencil. And let's deselect everything by hitting our arrow
key on the top. Now we are done with our skate. Let's move on to the next part, where we are going to
be aiding our lines.
4. Cat: Clean Lines: Let's start our line,
in part by going to the brush library and we
will change our brush. We'll go under ink and folder and we will
select technical Pen. While we are still here
inside our brush library, let's just go and adjust our
brush just a little bit. We want all of our lines
to be very smooth, so we will need to go
and tweak one option. When our technical
pen is selected, we will tap on it
with our apple pencil and we will go inside
the brush studio. Over our left, we will
go under stabilization. And here you can see that we
have the option stream line. This option stream line has a slighter amount when
it's set at the low. If we go to our drawing path, we can just create a line
and see how it works. Right now, you can see that we are creating a very jagged line, but we have a lot
of control over it. If we go and adjust the
amount of streamline, you can see that now we
are creating a very, very smooth line, but we are
losing a bit of control. Let's just go and find the amount of streamline
that works for us. If you don't want
to use this option, you are welcome not to just
play around with this option. Find what works for you, find what is comfortable for you. Let's just go over our
top right and we will it done when we are ready with
adjusting this option. Now when we have our brush, we will go to our layers and
we will adjust our layer. With this sketch, we want it to be a little bit transparent. We don't want it
to be very bright, and we still need to see what's happening
onto this layer, but we don't need
it to bother us. What we need to do is to go and adjust the capacity
level of this layer. To do so, we will need to go to this little icon
near the checkbox. Let's just tap on
it. On the top you will see that we have
the lighter opacity. We can grab it and we
can move it more toward the left side until we still can see what's
happening here. But when it's not that drastic and when it's not that bright, find the capacity
that works for you. And when you are
done, let just tap on our sketch layer one more
time to close this window. Now we will go and
create one more layer. Let's just tap on the plus icon. And let's rename
this layer as lines. Now we are going to be using the same color that we
were using for our sketch. It was dark magenta. And what we need to do, firstly, is to go to our cats. And we will need to create the outlines that
will be closed. We need all of our lines that we have outside to be closed. But if we have some
lines inside the shape, they might be not closed. For example, let's
just start by going to our ear and we will start
creating the lines. Here we are, trying to recreate the lines that we
have on our sketch, but we don't need them to be 100% similar to what
we have on our sketch. If you want to
adjust some lines, if you want to
experiment a little bit, you are welcome to do it. Let's just go and start creating our lines from the ear,
as mentioned before. And also when you are creating
lines with this brush, the technical pen that
we are using right now, you can see that
if we are putting more pressure over
our apple pencil, our line is getting thicker. If we are relaxing our arm, our line is getting thinner. In that way, you can go and play around with that
line and you can adjust the pressure
and you can just create a better and
interesting lines. Now let's just go
and start creating our lines going
outside of our cat. Remember that we
will need to create the closed lines when we
are done with our ears. Let's just go and recreate
the outline for the hat. Let's just start
from the left side. We will go a little bit closer to the middle
part of our ear. And from here we will start very easily to create our line. So we are starting with
a very low pressure. We will just go and start by
creating a very sharp tip. And then we will put
more pressure over our brush and we will
create a thicker line. So let's just go and recreate the shape that we
have on our sketch. And let's just continue by
creating the line going down. If you need to
adjust some parts, grab an razor tool
and adjust them, we will need a very smooth line. When you are done with
this line on the bottom, let's move on again to the top. We will step a little bit from this line that we
have on our ear, going a little bit more
toward the left part. And again, we are starting
with a very low pressure and creating a line going to the right in that
way With this line, we will go a little bit to our ear that we
have on the right, so we are having a
little tip here. And then we will go
to the bottom part, to the other line that
we have on our ear. And again, we will
start a little bit upper than we have our line. And then we will go and
create it going down. Now when we are
done with our head, let's move on to the bottom and we will recreate
this little bow. Let's just go and recreate
it with the solid line. If you have a little
gap right here between our heart
elements and the head, let's just go and
create the line here. When you are done,
let's just move on to the body and let's
add the lines there. We will go and create this big curve going
down in that way. Then we will go
to the second leg that we have in front and we
will recreate it firstly, now we will go to the line that we have for our chest area. And let us go and create a little outline like
that when you have it. Let's move on to our back part. And again, we will
start by creating this little leg that
we have on our right. Continue making the
shape and close the whole shape by recreating the second leg and the tummy. When you are creating the
connections between the shape, try to make the
lines thick there. Now done with this part, let's move on and recreate
our tel when you are done, let's just go inside the head and we will add
our facial features. Let's just start by recreating the ice the same way as before. Let's just go and create the
ellipses for these elements. If you need to adjust the shape, please go to the editing
mode over the top. When you are done with
the outlines for the ice, let's just drag and drop the
color inside these shapes. We are going over our top right, we are dragging our icon with the color just to these places
that we need to recolor. Now let's just go and
recreate our little nose, our mouth, our brows, and our little whiskers. For now, we are not
going to be recreating our cheeks and this
little element right between the eyes. We will add these parts
on our coloring parts. Now when we are
done with our cat, let's just get back
to our layers. And we will hide our layer
with the sketch just for 1 second to check out
how everything looks, whether it's all closed, or if we need to
adjust some parts. If we need to adjust some parts, let's just go and adjust them. Make sure that all of
your outlines are closed. And when you are
done with this part, let's just get back
to our layers and let's unhide our layer
with the sketch. Let's continue
adding our elements. So we will go and start
creating the ropes and our little balloons
the same way as before. We can use our option with
the Quick shape tool. It's when we are holding our apple pencil at the
end of the line. To create these shapes, let's just go and recreate the lines that we
have on our skitch. When you are done
with recreating the lines of our balloons, let's just get back to
our lies and one more time we will hide our
layer with the skitch. We will make sure that
everything is closed and smooth. If we need to adjust some parts, let's just go and adjust
them when you are done, let's just get back
to our lies and we will unhide our layer
with the skitch. Now let's just go and on the same layer we will recreate our
miscellaneous objects. The miscellaneous
objects we will go to, our little hardships
to our little stars, little dots,
everything like that. We are not recreating our little parts
underneath the cats, and we are not recreating these big clouds very
easily, very quickly. Let's just go and recreate
these little elements. When you are done recreating
these parts one more time, let's just get back
to our lies and we will hide our li
with this skitch. Let's check out whether
everything is closed and smooth. If we need to adjust some parts, let's just go and adjust them. When you are done
with this part, we are ready to move
on to our next part, where we are going to
be aiding our colors.
5. Cat: Base Colors: Lets start our color, in part by changing the color
of our background. What we need to do is
to go to our layers. And we will need to create one more layer that will
rename as background. Let's just drag this layer underneath all these layers
that we already have. When it is selected,
we will hold it and we will drag it down underneath
our layer with the scheme. Now we will go to
our color palette. We will select the color
with the name Blue, and we will just drag and drop the color to the whole canvas. Now we have the color
for the background. Let's just get back
to our layers and let's adjust our layers
just a little bit. Firstly, we will go to
our layer with this sage. We will select it
and we will drag it higher than we have our
layer with the lines. One more time, when
it is selected, we are holding it and
we are dragging it up. Now we are going to be using our lines layer to create
our coloring parts. We don't want to go to this layer with the lines
and add the color here, because later on maybe we would like to change the
color of our lines. And it will be very
problematic for us. If we had our colors here, we will need to go and add a new layer for the parts
that we want to recolor. But before doing that, let's just go and adjust one option. We will go to our
layer with the lines. We will select it,
we will tap on it, and we will choose
reference from the list. When we are choosing reference, we can go to any layer that is separate from our
layer with the lines, and we can use these
lines on this new layer. What we need to do next is to go to our layer with the scheme. And from here we will create one more layer that
will rename as cats. Now when we have our new layer, we are getting back to
our color palettes and we will select the color with
the name, Light magenta. We will just go and
drag the color to one of the areas that
we have on the cats, and then we will go to the
top to continue filling. When you have this option on, you can just go to the places
that you want to recolor. You can just tap on them, and with one tab you can
recolor the whole area. Let's just go tap on these
places and let's recolor that when you have everything
recolored for cats. Let's just go over
the top where we have this option color drop. We have this little check mark, we will need to tap on it. Now we will go back
to our layers and we will create one more layer
for our accessories. Let's just tap on the plus icon. And let's rename this layer as accessories when we
have it One more time, where are getting back
to our color palettes? And this time let's select the color with the name, Purple. With this color, we
will go color our bows. If you have some little parts
that you need to recolor, you can just go entry,
color them manually. Now, when we have
the basic colors, let's just go and
add some details. Firstly, we will get
back to our layers and we will unhide our
layer with the skitch. You can see that we have this little element on the face that we need
to recolor differently. Let's just go back to
our layer with the cat. And from here we will
create one more layer. Let's rename it as mask. We would want to add this element right inside the shapes that we already have. We don't want to go
beyond the frames. Let's just go and clean
this layer to previous one. What we need to do is to go
to our layer with the mask. We will need to tap
on it and we will need to choose clipping
mask from the list. Now if we go to our areas and if we want
to add something here, you can see that we are not
going beyond the frames. We are adding our elements only inside the shapes
that we already have. Now let's just get back to our color palettes and we will select the color
with the name white. When we have it, we will just
go and recreate this line. Maybe we will go a
little bit down and create a mask on the
bottom part too. Let's just go firstly
and create the outline. When you have the
outline on the top, you can just go to the bottom
and recreate the line here. Then you can just go and add
the color inside this part. But if you did it in that
way and if you would like to add the color just
by dragging and dropping it. Firstly, we will
need to get back to our layers and we
will need to go back to our Er with the lines and turn off reference
when you did it. We are getting back to our
lier with the mask and we can easily go and add
the color in that way. When you are done
with this part, we will just get back
to our layers and we will hide our layer
with the skitch. Let's just check out how it looks and whether we want
to adjust something. If you want to
adjust some parts, just go and adjust them. Now when you are done
with this mask element, let's just go and add the
color inside the ears. We can go and create
another layer, or we can just go to this layer with the mask and
add it from here. Now let's just go back
to our color palettes and let's select the color
with the name pink one. When we have selected our color, let's just go to
our ears and let's create our outlines to
recolor the whole ear, just repeating the lines that we already have on our lines. When you have the outlines, just drag and drop the color. If you need to adjust
some parts, for example, adjust the curvature on this line that you
have just created, it you can grab and erase our tool and erase the
parts that you don't need. Now let's just use the same color and we will
add our little cheeks. But before doing that, we are getting back
to our layers and we will unhide our layer with
this cache one more time. Let's just go to the areas where we have our little cheeks. And again, with the same color, we will go and
recreate these parts. When you are done, go back to your layers and hide your
layer with this cache. Now when we are
done with our cats, let's just go and start adding the colors to our balloons. Firstly, we will go to
Li with accessories. We will go from here and
create one more layer. Let's rename it as balloon. We will need to get
back to lie with the lines and one more
time, turn on reference. Now getting back to
li with balloon, we will go and add the
color to one of them. Firstly, for example,
let's just go and select the color with
the name light Grays on. With this color, we will go to our balloon that we have on the right and we will
drag and drop it here. Don't forget to add the color to this little flat
end of our balloon. Now when we have recolored
our first balloon, let's just add a bit
more color to it. What we need to do is to
go back to our layers and we will create a little
gradient on our balloon. What we need to do is
to go to our layer, we will tap on it and we
will choose alpha lock. You will see that now you have the checkerboard around
your element here. That's exactly what we need. Alpha lock works pretty
similar to clipping mask, but we are at the same layer. We are not adding more elements going beyond the frames
that we already have. Are adding them only inside the objects that we already
have onto this layer. Now when we have this
layer set as alphalok, let's just get back
to our brush library. We'll go to the
calligraphy folder and we will choose
monoline brush. We will go back to
our brush studio. We will go to the stabilization, and we will change the
amount to almost minimum. Now let us hit Done, and we will go back to
our color palettes. We will select the next
color, which is our light. We will increase the
size of our brush and we will go and make
a stroke in that way. When you did it, we
are getting back to our color palettes and we will select the color with
the name, dark blue. We will go to the bottom of our balloon and we will
add the color here. When you have
something like that, we will need to
do the following. We will go to our magic one
tool over our top left. We will go under Gaussian blur. And we will need to go hold our apple pencil
at the screen. And we will need to
move it more toward the right side until we
have a smooth gradient. Something about 25% 30% will work perfectly When you are
satisfied with your gradient, let's just go and
deselect everything by heating our magic one
tool one more time. Now we will go and do the similar thing to all
the balloons that we have. Let's just go and
create one more layer. And on this layer we will add the color to
the next balloon. Let's just get back to our
color palettes and let's select the color with
the name, Light Yellow. With this light yellow color, we will go to one
of the balloons and we will add the color to it. Remember to add the color
to this little flat part. When you are done, we
are getting back to our layers and we will set
this layer as alpha log. Now we are getting back to our color palettes and we will go and select
some different colors. You can play around with everything that you
have here if you want, you can go and find
your own colors. All that we need to do is
to create nice gradients. For example, let's just go and select the color with
the name pink to. We will go and increase
the size of our brush. And we will go over bottom
part of our balloon. And we will add the
strokes like that. When you are ready, we are getting back to our
magic one tool, going under Gaussian blur. And we are adding some blur here until we have a nice
and smooth gradient. When you are done, we are
deselecting everything by hitting our magic
one tool one more time. Now let's just get back
to our layers and let's create one more layer
for our next balloon. So again, if you want, you
can rename these layers, but later on we will merge
all of them together, so they will have
the name balloon. Now on the new layer, let's just get back to our color palettes and
let's select some color. For example, let's just
select the color with the name pink tube
or maybe magenta. And let's just go and recolor
some of our elements. Let's just remember
that we will need to add the color to
our flat part two. When you are done
with recoloring it, let's just get back
to our layers. Let's just tap on this layer and we will choose alpha lock. When we are done, we
are getting back to our color palette and let's select the color with
the name pink three. We will go and increase
the size of our brush. We will go over
the bottom part of our balloon and we will
add the new color here. When you are ready
one more time. Going back to our adjustment, go into our Gaussian
bluer and in the bloor until we have a
nice and smooth gradient. When you are ready, we are
deselecting everything by hitting our magic
one to one more time. Let's just do the same thing with the two remaining balloons. You can go and select
your own colors, or you can just go and repeat what you will see
on your screen. Firstly, we are again
going back to our layers. We are creating a new layer. We are going back to
our color palettes and we will select
some color here. For example, let's just go
with this purple color. With this purple
color, we will go and recolor one of our balloons. And we will add the
color manually to our flat and of our balloon
when we are ready. Getting back to our liars, tapping on the lier
and selecting alpha. When we are done getting back to our color palettes and
selecting some different color, for example, let's just go with the color, bright magenta. We will go over our bottom part and we will add the next color. Then we'll get back to our magic Anu Gaussian blur and we
will add the gradient. Also, if you think that
maybe it's too much, we can go and adjust
our color in that way. Firstly, let's
just get away from our Gaussian blur by
heating our magic an tu. Then we'll hit our
magic an tule one more time and we will go to hue
saturation and brightness. Here we can see that we have
some sliders on the bottom. For example, for
this little balloon, let's just go and
make it less bright. We will go to our
brightness slider and we will drag it more
toward the right part. If you want to adjust the color, you will need to
go to the slider and find what works here. So find the gradient
that works for you. And when you are
done one more time, we are hitting our magic one
tool to select everything. Now let's just go entry
color our last balloon. Again, we're going back to our layers and we are
creating one more layer. When we have our new layer, we are getting back to our
color palettes and let's just go and select the color
with the name light on. With this color, we will go
entry color our balloon. And then we will just go and set this color as alpha lock. We did it getting back to our color palette and
selecting some darker color. For example, let's just
go with dark blue again. We will go to the bottom part and we will add the color here. When you are ready
one more time. Going back to our adjustments, Gaussian bluer and
aiding the bluer. If you want to adjust the color, go to the hue, saturation
and brightness. When you are done, let's deslect everything by
heating our magic. One tool one more time. And we will get back to
our layers and we will just merge these all layers
that belong to our balloons. Let's just go put one
of our fingers on the layer 12 where we
have our last balloon. One of our fingers on our lier that we have for
our first balloon, and we will make
a pinch movement. When everything is on one layer, we are ready to go create one more layer for our
miscellaneous objects. Let's just go hit our plus icon. And let's remind this
layer as miscellaneous. Now let's just go to our
color palettes and let's start adding different colors
to our little objects. For example, let's just pick our yellow color to
recolor our star elements. We will use the pink
color for the hearts and maybe some blue color for the bubbles very easily
and very quickly. Let's just go and
recolor our elements. If you want to play
runs with the colors, you are welcome to do it. Now when we are ready
with recoloring our miscellaneous
objects one more time, we are getting back
to our layers. We will go to our layer with the lines and we will turn off our reference typing
on the layer and choosing reference from
the list when we did it. We are getting back
to earlier with this gauge and we are hiding it. We will need to add our additional elements
to the background. Let's just go to our
Er with background. We will select it from here. We will create one more layer. We will go and rename this
layer as background elements. And now let us get back
to our color palettes. We will firstly grab
our purple color. And with this purple color, we will recreate
this little element underneath our cat the
same way as always, just go in there and
creating the shape just with one line by
holding it at the end. If you need to adjust it, please go to the editing mode
and adjust it from here. When you are done, we
are getting back to our editing mode and we will drag and drop the
color to these plates. Now when we have the elements, let us get back to
our color palette. And let's select the color
with the name white. When we have this
color selected, we will get back to
our brush library. We will go to our
monoline brush. We will tap on it,
we will go under stabilization and we will adjust the amount
of stream line. When we did it, we will
just go and recreate this outline that we
have for our clouds. If you want to adjust
it in any way, if you want to play
around with the shape, you are welcome to
go and do that. All that we need to do is to create the outline right now. Make sure that your outline is closed and then drag and
drop the color inside. When you are done
with this part, let us get back to our layers and let's hide the
layer with the skitch. Let's check out whether we
want to adjust some parts. And if we want, let
us go and adjust the. And when you did it, we are
done with our base colors. So let's move on
to our next part, where we are going to be aiding
the additional elements.
6. Cat: Shadows & Highlights : Let's tap this part by
adding little shadows. Firstly, we will go back
to our brush library. We will go to the ink and folder and we will select
our technical pen. When we did it, we will
go back to our layers and let's just start adding
the shadows to our cat. We will go and select
the layer with the mask, and above it we will create one more layer that
will rename as shadows. Let's clean this layer
to a previous one. Tapping and selecting
clipping mask. Then we will need to
do one more thing. We will need to change the
blending modes of this layer. Blending modes are
different ways your layers can interact
with each other. By changing blending modes, you can change visual
effects of your layer. Now let's just go to this
little icon near our checkbox. We will tap on it,
and from the list we will select multiply
blending modes. As for the opacity for now, let's go with 50%
When we are done, we will tap on our layer with the shadow to close this window. When we have our layer
for the shadows prepared, let us get back to
our color palette. And let's select the color
with the name purple. With this color, we will go to our ears and we will
add the shadows here. We will go over our right parts, over our right ear. And we will just create
a curve like that. Hold it at the end if you want
to create a smooth curve, when you reach
this line that you have for your recoloring
part on the ear, we will just go to the side and we will just create a
shadow in that way. We will then go and
close the shape, and then we will just drag
and drop the color inside. We will do the same
thing for our next ear. On the left again, we are going over
our right parts and we are creating
the first curve here. You can play runs
with the curvature, you can play runs with
the size of the elements. It's all up to you. You have this first curve. Let's just go and
create two more curves, and then we will just add the
color inside if you want, you can just go back
to your layers. You can go to your
layer with the shadows. Go to this M icon and
adjust the opacity. Play around with the slider
and find what works for you. If you want to make
it very bright, go and drag your slider
toward the right side. If you want to make it a
little bit more transparent, go over the left side,
find what works for you. And when you are done, tap on your layer with the shadow
to close this window. When you are done,
let's just get back to our color palettes and let select the color with
the name pink one. With this color, we will go over our right part on the face. We will add another
shadow here too. Let me just go to
this right part. And we will go and create
a curve like that. You can adjust the curvature by going to your editing mode. When you are done, we will just go to the
bottom part and we will recreate this area
and add the color inside. If you think that maybe this
one shadow is too much, we can do the following. We can go to our S ribbon
icon over the top left. And we can use freehand method. And we can select
this area that we have recolored just
now, very accurately. Just go and select this area
that you want to adjust. And then we'll go and adjust it When only this
area is selected, we are going over
our magic ansu, we are tapping it,
and again we are going under hue,
saturation, and brightness. We will go to our
slider with brightness and we will drag it more
toward the right side. When you are satisfied
with the shadow, let's just get back to
our top left parts and we will tap on our ribbon icon
to deselect everything. And now we will just go
and add more shadows. So now let's just go underneath
this little bow that we have on the neck and we will
just add the shadow here. We are just going
underneath it and we are repeating the lines
that we have here. We also need to end the
shadow underneath the head. So let's just go and
repeat this line here too. And then manually, we will add
the color to this, please. Now, when we are
done with this bow, let's just go to our legs. Firstly, we will go to this
leg that we have on our left, and we will completely
put it in the shadow. So we are just going in that way and we are recreating this part. Now let just repeat the lines
that we already have here. And then we will drag and
drop the color insight. And then we will go to our leg that we have
over the right part. And again, we will do
the same thing here. We will just go there
and add the color. Now let's just go to the tail. We will go right to
this connection with the body and we will
create a curve like that. We will then go over the left part and manually
we will recolor it. If you want to add
the whole shadow going along the
whole bottom part, you are welcome to
do it if you want. We can also add the little shadow to this
part over our right part. Now we are done with
our shadows on the cat, so let's just go and
add the highlights. We will go again to
our layers and we will create one more layer above
our layer with the shadows. We will rename this layer as
Highlights one more time. Let's clip this layer
to a previous one. And then we will go
to our end icon. And we will change the
blending mode to add. When we have it, we
are getting back to our color palettes and we will select the color
with the name white. Now we will go to the opposite
sides from our shadows. We will add our
little highlights. Firstly, let's just
go to the ears. And we will go and
create big highlights like that when you have
it on the first ear. Let's move on to the next one, and let's add the highlight on the opposite side
from our shadows. When we are done with our ears, we will go to the top of
our heads and we will add a big highlight going
along the whole shape. If you need to
adjust some parts, grab an eraser tool
and adjust them. Now we will go to
our legs and we will add little highlights
over the left part. The same thing with our til. We will go over the top part and we will add our
highlight here. Now we are done with our
highlights for the cats. Let's just get back
to our layers. We will go to Li
with accessories. And we will start
by adding shadows. Again, we are selecting
Li with accessories. We are tapping on
the plus icon and we are renaming this
layer as shadows. Let's clip this layer
to a previous one. Let's go to our icon and change the blending mode to
multiply for the opacity. We can start with 50% Now
let's just get back to our color palettes and
let's select the color either with the name
purple, maybe dark blue. If you want, you can try out dark magenta, what
works for you. And then we will just
go over our elements, over the bottom
parts of them and we will start
adding the shadows. Let's just go to this bow that
we have on our right part. And let's just end
the shadow here. Just repeat the
shape and also add a little shadow underneath this little line that
you have in the middle. When you are done
with the right part, let's just do the
same thing with our heart elements and with
our little bow on our left. If you have some inner elements, you can go and end the
shadows to them time. Now let's just get
back to our layers. Let's create one more layer and let's rename it as highlights. Let's clip it to previously, and let's go and change
the blending mode to add. When we have it, we are getting back to our
color palettes. We are selecting white color, and we are going over
the top parts and we are adding our highlights
over the top parts. We also will need to go on our bow that we
have on the tail. And we will need to add
the shadows and highlights here too while we are
add li with highlights. Let's just go over the top parts and let's add our highlights. Firstly, then we will get
back to lie with the shadows. We will get back to
our color palettes. We will select the same
color that we were using for our main bow and we will go over the bottom parts and we
will add our shadows. Now when we are
done with our cats, let's just get back
to our layers. Let's just go over our
layer with balloons. And we will create one more
layer for shadows here. Let's just tap on the plus icon. Let's rename the
layer. Let's clip it. And let's change the
blending mode to multiply for the
opacity one more time. Let's just go with 50% for now. When we are done, let's just
start adding our shadows. We will go to the bottom
parts, and if you want, you can select just one
color for the shadow parts. For example, purple
will work perfectly. If you want, you can go
and find the colors that are similar to the main color that you have on your balloon, and you can add the
shadow with this color. For example, for
the blue balloon, let's just go with
dark blue color. We will go over the bottom
part and we will start by creating our outline
when you have it, let's just go over
the whole shape on the bottom and we will
create the outline here. When you are ready, just drag
and drop the color inside. When you are done,
we are getting back to our color
palettes and we will find some color that will work well with our
yellow elements. For example, let's just go
with pink two or pale orange. You can play around with two colors or maybe find
something different. You just need to find
what works for you. Again, when you have your color, let's just go over
the bottom part and let's create the outline. If you need to adjust it,
go over the editing mode and adjust it when you
have your first outline. Let's just go to the bottom, and let's recolor the
area with the same color. Let's just go to
our pink balloon. And let's add the
shadow here too. As here we have
overlapping balloons. We will need to go a little bit above them or to
the side of them, and we will need to repeat
the lines that we have. We will need to go and create
the curves in that way. When you have the main shadow, let's just go underneath it and let's add the color
to the whole area. Now let's just get back
to our color palettes. Let's select the color
with a dark blue. And with this color,
we will go to both of our remaining balloons and
we will add the shadows. When we are done
with the shadows, if you want to go and
adjust the capacity, go to your layer
with the shadows, go to the M icon and adjust
the capacity from here. When you are done, let's just
create one more layer above our layer with the
shadows and we will rename it as highlights. Let's clean this layer
to a previous one. Tap in selecting clipping mask. Then we are going over our icon and changing the
blending mode to add. When we have it, we
are going back to our color palettes and
selecting the white color. With this color, we will
go over the top and we will start by creating
curves on the top. Let's just go and start
creating our curves that will be recreating the curve that
we have on our main shape. With this highlight, you can go a little bit over our shadows, or you can just
keep this part and finish your highlight right
where your shadow starts. Now when we have the
first highlight, let's just go over all of our
balloons in the same way, we will add these
highlights on them too. When we have these highlights, let's just go again over the
top parts of our balloons, and let's add little
elements like that. Firstly, let's just go
over one of the balloons and we will add a big
ellipse like that. We will hold it at
the end as always. We will go inside
and recolor it. And if we want to
add more elements, more highlights, for
example, some dots, maybe some little sparkles
or anything like that, we can just go and add
them in the same way. Let's just go over all of our balloons and let's
add these highlights. Also, if you want to add more
details to your balloons, you can get back to your layers and go back to your
layer with shadows. When we have it, we will just get back to our
color palette and we will select the color that is similar to what we have
for the main color. For example, for the purple
one, let's select purple. And let's just go inside. And let's add some
additional elements. For example, little
elements like that. If you want to change the
color maybe to the blue one, you are welcome to
go and do that. Now let's just go over all of our balloons and let's add
these additional elements. Now what we need to
do is to recolor the lines that we have on
our miscellaneous objects. Let me just get
back to our layers. We will go and select
our layer with the lines and we will create
one more layer above it. We will clip this layer
to a previous one. Tap on it and select
and clipping mask. Let's just get
back to our brush. We will go to our technical pan. We will tap on it and we will adjust the amount
of stream light. When we did it, we
will just get back to our color palettes and
we will find similar, or something like near similar colors that we have
on our miscellaneous objects. And we will go over the lines
and we will recolor them. For example, for
some pink elements, we can go pink one, pink two, Maybe bright magenta pink
three, or something. That will work here.
You can try it out a few times and find
what works for you. Let's just go over all
of our elements and let's recolor that
when you did it, the last thing that
we will need to do is adding the
highlights to the ice. Firstly, let's just get
back to our layers and we will create one more layer
above our lie with the lines. Let's just tap on the plus icon. Let's clip this layer
to a previous one, and let's rename it
as ice highlights. We will then go to our
color palettes and we will select the white
color when we have it. We will just get back to
our brush library and we will use this brush with the name Glider,
Scatter, Sparkle. You can find this brush in
a project ad dresser tab. We will grab this brush, will adjust its size
and we will go over one of our eyes and we
will put a dot here. You can see that it is going a little bit
beyond the frame, because this brush reacts on your apple pencil.
But don't worry. We can just put these little
elements and then we can go over our top left
to our transform to, this is our error
key on the top left. And then we will just go and
adjust this little elements. Let's just make it a little bit smaller and let's
position it differently. We will put it more
toward our left part and we will position it in
that way when you have it, let's just deslate everything. And let just go and
make a copy of it. Make a copy, we will need
to go over our layers. And we will need to swipe this
layer from right to left. We will need to
choose duplicates. When we have a second layer, we will just need to go
again to our transform tool. And we will need to drag these new elements
over our next eye. Let's position it somewhere
in the same place. And if you want, you can go and make it just a
little bit smaller. If you need to rotate it, you can go over the
green nodes over the top and move your apple pencil
in a circular movements. When you are done
positioning your elements, let's deselect everything by heating our arrow
key one more time. Now let's just get back to our layers and let's combine
these two layers together. So we will go over our top one, we will tap on it and we
will choose merge down. Now we will need
to go and create one more copy on this layer to make these elements a
little bit more bright. One more time, go into our
layer with ice highlights, swiping it from right to left,
and choosing duplicates. If you need to make
it even brighter, you can go and make
one more copy and then you can combine all
of these layers together. Let's just go tap on our top layer and we
will choose merge down. Now let's just take a look at our illustration from the
distance and if you like it, we are ready to move on to our next part where we are
going to be creating a dog.
7. Dog: Scheme: Site working on our dog, by going to our layers and
by making some preparations. We see that we have
one layer selected. And we will need to go through
all of our layers that belong to our cat and we
will need to group that. To select the second layer, we will need to go to one of the layers that is not selected. And we will need to swipe
it from left to right. Now let's just go through
all of our layers that belong to the cat
and let's select them. When we are done with this task, we will go over our top
right and we will it group. Now we have the group and we have this little
title, new group. Let's just tap on it. Let's
step on it one more time. And let's just go and
rename this group as Cat. And now to make everything
clean into our layers, let's just go and
collapse this group by going to this little V
icon near the check box. Let's just tap on it. When we have our layers set in that way, let's just go and hide
this group with our cats. So we will have the
blank canvas and we can start creating
our dog again. We're, I go into our little check mark we are taping on it. And when we have
the blank canvas, let's just go and
create one more layer that we will rename a scheme. When we have our new layer, we are going back to
the brush library, where I go into the sketching
folder and we are selecting the same brush
that we were using before for our sketching parts. When we have our brush,
we are getting back to our color palettes and we will select the
color for this part. For example, let's just use the same color that
we used before, and it was dark magenta. When we have
everything prepared, let's just get back
to our canvas. We will go more to
the bottom parts, and we will start by creating
a sheep on the circle. Very easily, the same way as we are creating all of our ships. We are going to our canvas, and just with one line, we are creating our sheep. At the end of the line, we are holding our apple pencil. Now, we snapped it
to a better shape, but it is an ellipse and we'll need a perfectly
round circle. Let's just hold one of our
fingers on the screen. Without lifting up
our apple pencil, we snapped it to a
perfectly round circle. If we need to adjust the
size of our element, we will just move our
apple pencil from side to side when we have
something like that. Let's just unhold everything that we are holding right now. Now, if you need to adjust your element, if you
need to move it, for example, let's just go over our top to
the editing mode. Let's just move this element
more toward the left side. It is more in the center. When we have it, we will tap on the screen to get away
from our editing mode. And now we will need to go and add some additional
guiding lines. Firstly, we will need to
define our approximate center. We will just go and create one vertical line
and one horizontal, but we want to
create our dog and our whole illustration also be tilted toward the right side. We will go not with
the straight lines, but we will create
our diagonal lines. Firstly, let's just
go over the top of our ellipse and we will create a line going through
the approximate center. In that way, if you need
to adjust the angle, hold your apple panel
at the end of the line, You can move it to adjust
this angle when you are done. If you need to move it
more toward the center, let's just go over the
top to the edited mode. And let's move it more
toward the center. When you have it, we will tap on the screen and we will
do the same thing, but this time we
will be creating a horizontal line going over our left or our right parts and going through the whole shape
with our straight line. Let's hold it at the end. Let's adjust the angle, try to make it straight
when you have it. We will go over the top again
to our editing mode and we will put it more toward the
center when you have it. In that way, let's
just tap on the screen and let's get away
from our editing mode. Now when we have
this little scheme, we will go and create another element on the
bottom of our head. Firstly, let's just go
again to the bottom. We will start by going underneath this line that
we have in a center. We will go along the
whole shape and we will create another half
of the ellipse like that hold your line and the ends adjusted so it is
even on both sides. When you have
something like that, let just lift up our apple
pencil and we will go over the top and we will create another horizontal line going
through the whole shape. We are just repeating
the same line that we have over the top, but we are moving
it a little bit to the bottom when you have
something like that. We are ready to move on over the top part and we are ready to add the lines that later on we will turn into the ears. Let's go over the top
curve that we have here. We will go firstly
over our left side. We will need to make
a little markdown in the center of this
curve when you have it, we will do the same
on the opposite side. Again, let's just find an approximate center and we will make a little mark down. When we have these
two little points, we will go to the top and we
will add two diagonal lines. Firstly going over our left side and creating the
line in that way. This line later on will
be turned into an ear. It will be right in the middle. You can play around with
the position of this line. You can play around
with the angle. Just remember that it will
be in the center of the ear. Now when you have the
first line like that, let's just move on
over our right side. And let's do the
same thing here. Just creating the
line similar to the size of what we
have on our left. And try to make the
angle on this line, again, similar to what
you have on your left. When you have these two lines, we are ready to add a few more guiding points that later on will help
us to make the ears. Firstly, let's just go
over our left side and we will step a little bit from this middle
line that we have. And we'll make a little mark down like that when we have it. We will do the same with
the horizontal line. Try to keep the distance from the point to
the middle line. Similar on top and on the bottom when you
have it on your left. Let's just do the
same on the right. And again, try to
make the distance from the center
similar on both sides. Now when you have this layout, let's just go and
add the body again. We are going to the bottom
part and we are going to this line that we have
right here on our main ship. From it we will just go and
create a ship on the ellipse, hold your line and the ends. And let's just go over the
top to the editing mode. And let's adjust it. Firstly, let's just move it a little bit. We will rotate it. We are going right
between our nodes and we are holding our apple
pencil to rotate the ship. Let's position it in that
way, and when you have it, if you want to make
it bigger or smaller, it's all up to you. You
can go and do that. But generally, what we
need is to make it just a little bit bigger than
the shape of our head. You have it, let's
just tap on the screen to get away from
our editing mode. When we have the
scheme like that, let's just go and add a
few sticks that later on we will turn into
the tail and our legs, firstly going over
our right part and we are going to this line
that we have right here. From this line we will go
a little bit beyond it, and we will create a
line going in that way. When you have it, we will
step a little bit more toward the left side and we will create another stick going
in that direction. When we have these
two little lines, let's just go over our left. And firstly, we will go
more toward the left, so to the bottom
part of our dog. We will step a little bit from
the end point that we have on our ellipse and we will create a line going
in that direction. When we have it, we
will step more toward the center and we will create
another leg in that way. And now let's just go to the left and we
will create a tail. So we will go and create
a line going in that way. And when you are done,
let's just go and make the whole scheme
a little bit smaller. We will just go to our
arrow key on the top left. So it is our transform too. We are going to our arrow
key on the top left, which is our transform. We are using uniform method
and we are going to one of the corners to drag it down and make it a
little bit smaller. So when you have the size pretty similar to what you right
now see on your screen, let's just move it more
toward the center. And when you are
done, we will deslect everything by hitting our
arrow key one more time. Now we are ready to move on to our next part where we are
going to be aiding our skitch.
8. Dog: Sketch: Let's tap our sketch in part
by going to the layers. And firstly, we will adjust the capacity of our
layer with the scheme. Let's just tap on our icon on
the layer with the scheme. And we will grab our
capacity slider. And we will move it more
toward the left side until we still can see what's
happening onto this layer. But when it's not that bright, when you're satisfied
with the capacity, let's just tap on our layer with the scheme one more time
to close this window. Then we will just go and tap on our plus icon and we will
rename New Layers Sketch. We will be using
the same brush that we were using before
for this scheme, but if you want to go to the Color Palace and
select more qutrasclor, you are welcome to
go and do that. If you want to use the
same color that you were using for the scheme again,
you're welcome to do it. Now when you pick your color and when you have your brush, let's just get back to
our canvas and we will be starting recreating the
shapes that we have here. We firstly start by creating
the shape of the hat. We will need to combine
these two elements together. Firstly, let's just go over
the top to our ellipse, and we will repeat the
line that we have here. We are just going and
repeating this line. And then when we
reached the point where we need to connect
two shapes together, we will just go and create
a little curve like that. And in that way we are
creating a little dent. Now when we have it, we will just go over the bottom part. And again, we will
repeat the line that we have on our skin. Again, when you've reached the right part where you
need to create a dent, it will be easier to go and start by creating the line over the top part and then creating the dent in the same way that
you have it on the left. Try to make it even
on both sides. If you need to adjust something, grab an eraser tool and erase the parts that
you don't need. Now, let just go over the top and we will be
recreating our ears. We have this little markdown. Firstly, let's just go
over our left side. We will go to this little door that we have on the bottom, and we will create
a curve like that. When you have it,
we will go over our right part and we will create another curve going to this line that we
have as a markdown. When you have it, we will do the same thing on
our right part. Try to make the ears, even if you want to experiment. If you want to play
around with the ears and maybe find a different
shape for the second ear, You are welcome to
go and do that. But when you are
ready with your ears, let's just go inside
the shapes and we will add these inner
parts of the ears. Firstly, let's just go
over one of the ears. We will go to the bottom part and we will create
a curve like that. When you have this
curve on the bottom, we will go over our left
side and we will create a very smooth line like
that when you have it, we will go and connect this shape with a smooth
curve on the right. When you have this inner part, let's just go over
our right ear. And let's do the same
thing here again. We are starting by going to the bottom and
creating this curve. When you have it, we are
going to the right part and we are creating the
shape of letter. When we have this curve, we are connecting our shape with a smooth curve on the left. If you need to
adjust some parts, grab the razor to
and adjust that. Now when you have
something like that, let's just connect our head on the top by creating
a little curve there. Then we can move on and we can start adding the
facial features. Firstly, let's just
go to this point that we have our dance
on from this line. We will just go
along the whole ship and we will create a
curve, the mask element. In that way you can play around with the curvature
of this element. If you are satisfied with it, let's just go to the sides
and we will add our ice. Firstly, going over
the left side, we are going to this little
dan that we have here. We will create a ship on
the ellipse or a circle, the same way as always, just creating the ship with one line and holding
it at the end. If you need to adjust it, go over the top to the
editing mode and find the position that works
for you when you have it. Just tap on the screen and let's move on to
the opposite side. And do the same thing here. Try to put it on the same line. And try to make the
distance from the center, even on both sides. Also, try to make it the same size as you have it on the left. And when you have the
shape that you like, let's just go inside our
eyes and let's shade them. Now when we have our eyes, let's just go and
add a little nose. We will go right to the middle part where we
have our guiding line. And we will go right underneath
this little mask element. So go into this middle part. And creating the
nose in that way, we are creating a
very soft triangle. You can play around with its
size and with its position. And if you need to
adjust something, grab an eraser tool
and adjust it. When you are done, we will
go and add a little mouth. We are stepping a little
bit from our nose and we are going to the sides
with the shapes like that. It will be a half
of the circles. Again, you can play
around with the size of the elements when you
have these two ships. Let's just go and
add one more ship on the bottom when we
have our little mouth, let's just go and add little
cheeks underneath our eyes. Again, we are going firstly
over our left side. We are going right
underneath the eye and we are adding a
little alop here. Play around with the size. If you need to
adjust the position, go over the top to
the editing mode when you have it
on the first side. Let's move on to
the opposite one. And let's do the
same thing here. Try to make this
even on both sides. And try to position it in a similar way when
you have the cheeks. Let's just grab and
erase the tool, and we will erase this little
line that we don't need. The last thing that
we will add to our facial features
will be the browse. Let's just go above our eyes. We will go first
over the left side. We will go more toward the
right part of the left side. And we will create a shape like that when you have it
on your first side. Let's move on to
the opposite one. And let's do the
same thing here. If you want to play around with the position
of these elements, maybe of this curvature, you can go and adjust them
in a way that you like. Now let's just go to
our layers and we will hide our layer with the
scheme just for 1 second. We just take a look at the whole part that we
have right here done. And we will go to
our liquefied tool and we will adjust
it a little bit. Let's just go to
our magic quanto. We will go and select
liquefy option. We will use push and
we will just go and adjust the shape of our
head to our liking. For example, let's just go over the bottom part of our head and let's push it more toward the top so it is a
little bit flatter. If you want to adjust
some other parts, you are welcome to
go and do that. Spend a bit of time
right here and adjust your element the
way that you will like it. And when you are satisfied
with the shape on the head, let's just go and
deselect everything by hitting our magic 121 more time. When we are done, we are getting back to our layers
and we will un, hide our layer with
the scheme again. Now let's continue by
creating the body. Firstly, let's just go
over our right part, and we will connect
these two shapes with a very, very soft curve. Let's just go and repeat
the line firstly. And then we'll go up and create a softer element
when you have it. In that way, we will continue by going
to the middle part. When we have it, we will just go and start
creating the legs. Firstly, let's just go
over the right part. We will turn this line that we have over the right into a leg. This line will be
right in the center. And what we need to do is
to create a ship like that. If it's easier for you, you can always start from the ellipse and then erase the
parts that you don't need. If you need to
adjust some parts, just go and adjust when
you have the first leg. Let's just go and
create another one. We are going to this line that
we have on the right again and we will create
the similar ship that we have created
just before. Let's just go and put this line that we have on the scheme
right in the middle. And we will create another ship. In that way you can play
runs with the ship. You can make the pose
very pointy or very soft. It's all up to you
when you have it. Let's just go and create
the line for the tummy. And then we will go and start creating our legs from the
leg that we have on the left. Firstly, let's just create
a very soft bomb element. We are going to
this intersection that we have on our scheme, and we are just repeating it, but we are going more
to the bottom and creating a very big
and soft curve. When you have this
rounded shape, we will go to the tip of the line that we
have just created. And we will go outside from it and create a straight
line like that. When you have it, we will
go to the bottom and we will create another
straight line like that. Now let's just go toward our right part and we will
continue creating our leg. We will firstly need to go and create a little
curve on the bottom. And then we will need to repeat the line that we have
right here on the left. We are just making a parallel
line when you have it. We are going to the top
with the curve in that way. Now let's just go and
soften up the corners by creating the curves instead of this very straight corners. If you want to adjust
the leg in any way, you are welcome to
go and do that. If you want to go and
adjust this curve on the bottom and make it
less pointy on the site, you can just go and
traverse it and make a very soft curve for the leg when you have
something like that. Let's just grab
an eraser two and let's erase the lines
that we don't need. Now when we have this
leg on the left, we will need to
recreate the last leg. It will have the similar shape
that we have on our left, but we can simplify
it just a little bit. Firstly, let's just go and take a look at this line that
we have on the scheme. We will go from the ellipse with the line going in that way. Then we will go outwards
and we will create a line the same way as we
have created it right here. When we have this little dance, we will go down and we will create a line going in that way. When you have it, we will
make a curve on the bottom. And then we will end up the whole shape with
the curve going up. Now let's just go and soften up the corners and maybe adjust
the shape a little bit. When you are done
adjusting this little G, let's just go and recreate
the shape for the tummy. When you are done, let's just
go and recreate the tail. What we need to do is to take a look at this line that
we have right here. We will go a little
bit to the side of it, for example, to the left one. We will start by creating the shape like that
when you have it. We will go up and we will
create a bush tail like that when you have this
big curve on the top. Let's just continue by creating the similar shape that
we have on the left. Play runs with the shape. If you need to
adjust some parts, go grab an eraser tool and adjust the elements that
you need to adjust. Now when we are done
with our sketch, let's just go back to our layers and we will hide our
layer with the scheme. We will take a look at
the whole illustration. If we need to go and
adjust some parts, we will go and do that if we
want to adjust it even more. We will go to our magic an tu to our liquefy option and we will adjust the parts that
we want to adjust. So let's just spend
some time here and adjust our scag to our lichen. And when you are done with
adjusting your shapes, let's just deselect
everything by hitting our magic an
Tu one more time. When you are done
adjusting your dog, let's just go over
it and we will start creating our balloons
one more time. Let's just go over the top and let's create three balloons. You can overlap them, you can place them differently. Just find what works
for you and make these three balloons
the same way as before. We are creating our shapes, just holding our line, the ends. And if we need to adjust it, we are going over the
top to our editing mode. When you are done
with the shapes, let's just go to the bottom
of each one of them and we will add our flat ends
the same way as before. We are just going there
and creating triangles. If you want to add some
additional elements, just go and add them. When you are done, let's
just go and add the ropes. And also we can just go and grab our eraser tool and erase the lines that we don't
need on our balloons. Just decide which one of them you want to
be in the front. When you are done
with the balloons, let's just get back
to our brush and let's go and add some
additional elements. Firstly, one more time, we're going underneath our dock and we are creating a
little ellipse like that, the same way as always, we are holding our
line in the end. We are trying to make the shape very flat and very horizontal. If we need to adjust it, we are going over the top to our editing mode
when you have it. Let's just go and
add a few clouds. Firstly, we'll go
over the top and we will add the
clouds in that way. When you have it,
we will go towards our sides and we will add a
few more clouds, for example. Let's just go over the
left side and let's just add the cloud like
that when you have it, we will go and add a
smaller cloud on the right. Now let's just go and add a
few more additional elements. For example, let's just
go and add a few stars, maybe some hearts
or some sparkles. If you need to go and
erase some parts, please grab an eraser two and
erase these little parts. When you are done with adding
the additional elements, let's just get back
to our layers. And we will select both layers
that belong to our dog. We can just go straight away
and put them in the group. Just tap on the group on the top right and we will rename
the group as dog. When the group is selected, we are going back
to our arrow key, which is our transform
to our snapping is on. And we can just go and adjust the size of the
whole illustration. And we will need to
put it more toward the center to make sure that
we are right in the center. We will need to look for these two orange lines
When you found them, you are positioning your
elements correctly. When you are ready, let's
just go and deselect everything by hitting our
arrow key One more time. Now we are ready to move on to our next part where we are
going to be aiding our lines.
9. Dog: Clean Lines: Let's add our line, in part by going firstly to
our brush library. And we will change our brush. We are going to
the inking folder. We are selecting technical pen, and then we will go and tap on our technical pen to adjust
the amount of streamline. When you are done,
we are heating down and then we are going
back to our layers. Firstly, let's
just go and adjust the opacity level of the layer. With our sketch,
we are tapping on the icon and we are adjusting
opacity to our liken. When we are down, we will tap on the layer one more time
to close this window. And then we will go and create one more layer that we
will rename as lines. When we are done, we are getting back to our
color palettes. And this time let's select
the color with the name. Dark, magenta, pink. With this color, we
will go and recreate all the lines that we have outside the same way as before. We are going to our dog and we are creating these lines
that we have outside. If we want to create
some lines inside, if we want to have some
gaps there, we can do that. But generally, the shape, the whole shape of our
dog should be closed. Now, very easily, let's just
go and create these lines. When we are done with
the basic outlines, let's just go and recreate
art, facial features. We will add the
lines to our eyes, to the nose, and to the mouth. Now when we are done with
the facial features, let's just get back
to our layers. And we will hide our layer with this cage just
for 1 second to check out whether all of our
lines are smooth and closed. If you need to
adjust some parts, please go and adjust that. When you are done
adjusting your lines, let's just get back
to our layers. And again, we will
go to our layer with the cage and
we will unhide it. Now let's just go and
create the lines for our balloons and for our
miscellaneous objects. When you are done recreating
your little elements, let's just get
back to our layers and we will hide our layer with this cage one more
time to check out whether everything is
closed and smooth. If you have some places
that you need to redo, please go and red that. And when you are
done one more time, let's just go back to our list. We will unhide our li with
this cage and then we will move on to the
next part where we are going to be
aiding our colors.
10. Dog: Base Colors: Let's start our color,
in part by going to the lis and we will do
some preparations here. Firstly, let's
just go and create one more layer for
our background color. We will go to our
li with the scheme, we will tap on the
plus icon and we will rename this
layer as background. Now let's put this
layer underneath. And it will be easier
to do if we grab our Y with the scheme
and if we drag it up, hold the layer and drag it up above our lay
with the background. When we have this new
layer with background, let's just go and add the color. We are going back to
our color palette and we will select the color with the name C and blue that we have on the bottom
of our palette. Let's select it, and
then we will just drag and drop the color
to the whole canvas. When we are done with this task, we are getting back
to our layers. We are going to our
layer with the sketch. And we will drag it above
our layer with the lines. Let's just hold it
and drag it up. When we did it, we can
go and hide it for now. Then we will go to our
layer with the lines. Tap on it one more time, and we will select reference. When we have the reference on, we are ready to go underneath
the layer with the lines. And from here we will create one more layer that
will rename as dog. And now let's just get back
to our color palettes and let's select the color with
the name, light greyish red. With this color, we will go and add the color inside our dog. Let just go and do that, recolor all the
elements and then at this little check
mark on the top, when you are done,
we will just go and add a different
color to our mouth, and also we will
recolor our ears. Firstly, let just get back to our color palettes and let's
select some pink color. If you want, you can
go with the red color. Megan, pink, three, pink, two, pink, one, whatever
color you want. When you have
selected your color, just drag and drop
it to the mouth. When you are done,
we will go back to our color palettes and we will select the color with
the name, Red, Orange. With this color, we will
go to the outside part of our ears and we will recolor them to make it
very easily for us. Let's just go and turn
on Alpha lock again, we are going to our Lias. We are going to our Lia with the dog tapping on it
and selecting alpha. Now we will go to
the outside parts and we will recolor
them with our brush. If you want to go to
the brush library and if you want to adjust the
amount of streamline, you are welcome to do it when we are done with
recoloring our ears. Let's just go back
to the layers. We can go to this
layer with our dog. We will tap on it and we will choose alpha log to turn it off. Then we will go and
create one more layer above that will
rename as Details. Let's clean this layer
to a previous one. Tap on it and select
and Clipping mask. Now we will go and turn on
our layer with the sketch. We will just go and recreate these elements that
we have on our face. Firstly, let's just get back to our color palette and let's
select the white color. With this white color, we
will go to the bottom part of our face and we will
recreate this mask elements. You can create the
outline for this shape, but if you want to
add the color inside, you need to go to
your liars and turn off reference from the
layer with the lines. When you've added this element, let's just go back to the liars. And we will hide our
layer with this sage to check out how it looks
without these lines. If we want to adjust something, we will just go and adjust it. We also will need to go inside
this little mouth element. We will need to grab
our eraser tool and we will need to
erase this little part. When we are done, we are
getting back to our layers. And again, we will
unhide our layer with this sage to add more details,
the same white color. Let's just go and add these
little browse elements. When you are done
with the browse, we are getting back to
our color palettes and we will select the color
to add our cheeks. You can use the same color that you were using
for your mouth. Now one more time, we
are getting back to our liars to hide the
liar with this skitch. When we did it, we will just go and select the
same white color. And we will go and add it to the tummy area and to
the lex if you want. You can go to your color palette and select the white
color from here. But also you can go to
your canvas because you already have the
white color on it. And you can invoke
the Eyedropper tool. To do that, you will need to go to the color that
you want to pick, hold one of your
fingers there until you have a little
option like that. When you have the color on the top of the color
that she needs, we will just un hold our finger. When we have this white color, we are ready to go to
the bottom part of our body and we are ready to add some additional elements. We will add a little
element on the chest. Let's just go and
create it in that way. When you have the
curve like that, we will continue creating
this curve going to the Pow, let's create something in
that way and then we will just go to this area and we
will recolor it manually. Let's just go to this leg
that we have on the right. We will go to the tip of it, and again we will
add a little curve, play around with this curve, and then just go to the
bottom part and recolor it. When we are done,
we are going to the tummy area and we are just creating the
line in that way, just repeating the line
that we have on the bottom. When you have it, we will
just go and recreate the other lines and then we'll drag and drop the color inside. The same way we will go to the both of our legs that
we have on the left, we will go to the tips of them
and we will add our color. Now we are done with the
S colors for our dog. Let's just go to our
layers and we will create one more layer
for the balloons. So let's create the layer and
let's rename it as balloon. Now we will need to get back
to the layers one more time. And we will need to go to
Lie with the lines to set it as reference tapping
and selecting reference. Getting back to Lia
with the balloon. And we will go to
our color palettes and we will select
some color here. For example, let's just
go with some blue color. Let's select this light
greyish CN color and we will drag it to the shape
that we have on the left. Don't forget to
recolor this area on the Bota the same way as
with our first illustration. We will need to go
back to our layers. We will need to go to
Lia with the balloon. We will need to tap on it and we will need to choose alpha lock. We also can get back
to our brush library. We can go to the
calligraphy folder and we can choose
monoline brush. If you need to adjust
the stream line, please go and adjust it. Now when we have our brush, we are getting back
to our color palettes and we are selecting
the second color. That later on we will
turn in a whole gradient. Let's go and select the color
with the name light, CN. With this color, we will go to the middle part and we will
create a line in that way. When you have it, we will get
back to our color palettes. We will select some other color, for example, dark blue. And we will go to
the bottom area, and we will create
another line here. And now when we have
something like that, we will go back to
our magic one tool. We will go to the
Gaussian blur and we will add this gradient
when you have it. We will tap on our magic
one tool one more time. And if you want to adjust
the colors in any way, you are welcome to go
to the adjustments. You are welcome to go
to hue saturation and brightness and
play with the hue, find what works for you. And when you are done,
let's just tap on our magic one tool to
deselect everything. And then we will get
back to our lives and we will create one more live
for the second balloon. So let's just go and
select other color. For example, let's
just go with purple. Let's select this
blue color that we have used for our first
illustrations background. And we will just go and
drag it to our balloon. Don't forget to recolor
this area on the button. And now the same way
as the first balloon, getting back to our layers, tapping on the layer, choosing alpha
lock, going back to our color palette and selecting
some different color. For example, let's
just go with purple. The same way as before, going more to the Botton part
and adding our little line. If you want to add any
additional colors, go select them and add them. When you are done going
back to our adjustments, go into our Gaussian blur
and adding the bluer. If you want to adjust
the color again, go into our magic one to go into few saturation and brightness
and adjusting it from here. And now let us go and add the color to our
remaining balloon. Again, let us go and
do it in the same way. Firstly, go into the
layers creating the layer. Go into our layer and adding the color to it
when you have it. Again, we're go into our layers. We are tapping on the layer and we are choosing alpha log. Then we will go and select some additional colors and then we will add them to our balloon. When you are done, go
into our magic one to go into Gaussian blur
and aid in the bluer. And when you are done, we
are deselecting everything. And if we don't want to go to
huatration and brightness, we are going back to
our layers and we will create one more layer for
our miscellaneous objects. But before doing that,
let's just go and merge all of our layers
with the balloons together. We will go to the top one. We will tap on it and we
will choose Merge down. And then we'll do
it one more time, taping and select
and merge down. Now let's just go and create our layer for the
miscellaneous objects. And now let's just go and add the color to these
additional elements. And when we are
done one more time, we are going back to our layers. And firstly, we will go
to R with the lines. And we will turn off reference
because we don't need it anymore typing and selecting
reference from the list. Now let's just get
back to earlier with this sage and
we will unhide it. We will need to add our additional elements
to the background. Let's just go to Ar
with the background. And from here we will
create one more layer. Let's rename it as
details if you want, you can clean this
layer to a previous one in that way you won't
be confused later on. Let's just tap on it and
let's select Clipping Mask. Now we will go back to our
color palettes and let's first go to our bottom
of our color palette. We will select dark blue color. With this dark blue color, we will go underneath
our dog and we will recreate this
element here the same way as always just creating the shape
with one line and holding it at the end If we
need to adjust it in any way. We are going over our
top to the editing mode. When we have the outline, just drag and drop
the color inside. When you are ready,
let's just get back to our color palette and let's
select the white color. With this white
color, we will go and recreate our clouds again the same way as always just creating the outlines and then dragging and dropping the color inside. When you are done,
let just get back to the layers and let's hide
the layer with the skitch. We will check out whether we
need to adjust some parts, maybe smoothing them up. And when we are done, we are ready to move on
to our next part, where we are going to be aiding our shadows and highlights.
11. Dog: Shadows & Highlights: Let's begin this part by
going to our brush library. We will go and change the
brush to technical pan. When we did it, we are
going back to our layers and let's start adding
our shadows to the dog. We will go above our layer with the dog where we
have our details. And we'll create one
more layer above it that will rename as shadows. Let's clip it to
a previous layer, typing, selecting,
clipping mask. And then we'll go to our icon to change the blending
mode to multiply. As for the capacity, let's go with 50% For now, When we are done
setting the layer, we are getting back
to our color palette and let's select
some pinkish color. For example, you can
go with the color with the name rat with this color. Firstly, we will go
to the inner parts of our ears and we will add
the curves in that way. Now let's just go underneath these lines that we
have just created. And we will just go and
add the color manually. Now with the same color, we will go to the middle part of our tail and we will
add the shadow here. Let's just go and create
something like that. Recreating something
like a fur here. Just create the outlines and drag and drop the color inside. When you are done, we will get back to our color
palette one more time. We will select some
brighter color. For example, let's just go either with pink
on E or pink two. With this color, we will
go underneath the head of our dog and we will add
a little shadow there. Let's just go and firstly
create a curve in that way. When we have this
curve on the bottom, we will go straight underneath the head and we will repeat
the line that we have here. When you are done, repeat the line that you have on
the side if you have it. And then let's just go and drop and drop the color inside. If you need to adjust
this little shape, you are welcome to
go and do that. If you want, you can
grab an sort tool and make it more triangular
on one of the sites. Now with the same color, we will go to one of our legs
that we have on the back. If you want, you can go and put the whole leg in a shadow. Or if you don't want to do that, you can just go to
the top part of it and you can add the
shadow in that way. If you want to add more shadows, you are welcome to
go and do that. The last one that we
will add together will be on the bottom
part of our tail. Let me just go and create
another shape like that. When you are done
with the outlines, just drag and drop
the color inside this part or recolor
it manually. When we are done with this
little shadow on the tail, we are done with the
shadows on our dock. Let's just go and add the
shadows to our balloons. We are selecting the
layer with the balloons, we are creating one
more layer above. We will rename it as shadows. We will clip it and we will change the blending
mode to multiply. As for the capacity as always, let's start with 50% Now let's just get back
to our color palettes. And again, you can select
just one color for the whole shadows that you are going to be adding
to the balloons. Or if you want, you can go and select the similar colors to what you have on your balloons and add the shadows
with this color. Let's just go to
the bottom parts of our balloons and let's
start adding the curves. Drag and drop the color when you are ready with the curves. When you have the first shadow on your first balloon, again, if you want to use the
same color to all of them, you are welcome to
go and do that. If you want, you
can go and select another color and start
adding another shadow. We will do the same thing with
the last of our balloons. If you want to go and change the capacity level
on these shadows, you can go to your layers. Go to your layer
with the shadows, go to the M icon and adjust
the capacity from here. For example, let's make it a
little bit more transparent. If you want to go and add
some additional elements, maybe some doors or some
little marks to the balloons, you are welcome to go
and do it on this layer. When we are done, we are ready to start adding
our highlights. Let's just get back to the
layers and we will create one more layer above our layer with the
shadows on the dock. Firstly, let's just
tap on the plus icon. And let's rename this layer. Let's clean this layer
to a previous one. And then we'll go to our icon to change the
blending mode to at, for the capacity keeping
it at maximum for now. Then we're going to
our color palettes and selecting white color
with this white color. We will go to some of our
places on the top where we don't have our shadows and we will start adding
little highlights. For example, let's
start with our ears. We will go to the
tips of them and we will start adding big
highlights like that. We also will go to
the top part of our heads and we will add a big, big highlights in that way, if you want to go to the
tail and to other areas, you are welcome to go
and do them and add your little highlights when you are done with aging the
highlights to your dog. Let's just get back
to the layers. Let's just go to our li with
shadows on the balloons. And from here again, we
will create one more lier that will rename
as highlights. Let's clip it. Let's go and change the
blending mode to add. And now with the
same white color, we will go firstly
over the top parts of our balloons and we will go and add the highlights
in that way. When we are done
with the outlines, we will go to the top
parts of our balloons. And the same way as with
our first illustration, we will add the
elements like that. Now we are almost done
with our illustration. All that we need to do is to add the highlights to the ice of our dog and to recolor the lines on our
additional elements. Let's start by adding the
highlights to the ice. We can go back to
our layers and we can go to our group
with the cat, find the layer with
ice highlights, and make a copy of it. To make a copy, we will need to go to the
layer and we will need to swipe it from right
to left and choose Duplicate. When we have the second layer, we are tapping on it
and we are dragging it to the top of our
group with the dock. We are going above the
layer with the lines. Now when we have this layer, we are grabbing our
transformed tool and we are dragging it
to the needed please. You can rotate it, you
can make it bigger, you can do whatever you want
to do with these elements. When you are done one more time, we will tap on our
transformed soul to deselect everything. And then we will
go to our layers. We will go above our layer with the lines and
we will create one more layer to recover the lines of our
additional elements. Let's clean this layer
to a previous one. Let's go and grab the brush. Either we are using
mono line brush from the calligraphy folder, or we can go to the airbrushing
and select medium blend. When we have our brush on, we will go and select similar
colors to what we have onto our additional elements
or something different, and we will go and recolor
these little elements. When you are done
recoloring your lines, we are done with
our illustration. Thank you for watching
this class liver View, if you liked it, and consider subscribing for more Cali videos in the future. Looking forward to
seeing your projects.
 Uni Corn, ⭐Kawaii Art Enthusiast⭐