Transcripts
1. Introduction: Hello, everyone. I'm uni, and each of this class, we'll
draw cute summer stickers. This class doesn't require any prior experience
or fancy tools. We'll start from
scratch and we'll be using simple techniques
throughout the process. Everything you'll see will
be happening in Procreate. However, if you
have other software or want to try
traditional materials, you're welcome to join. If you are ready to start,
let's jump right inside.
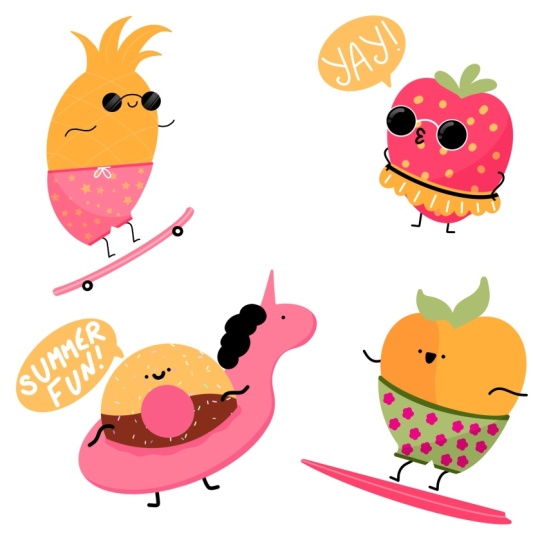
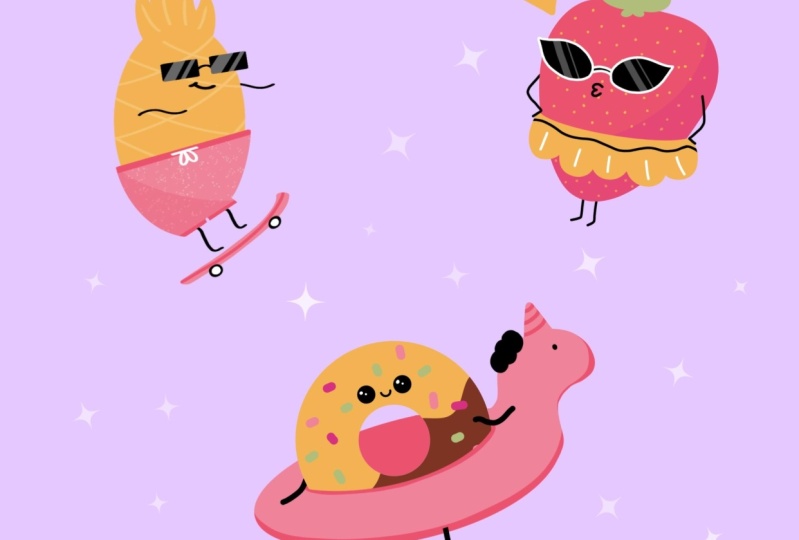
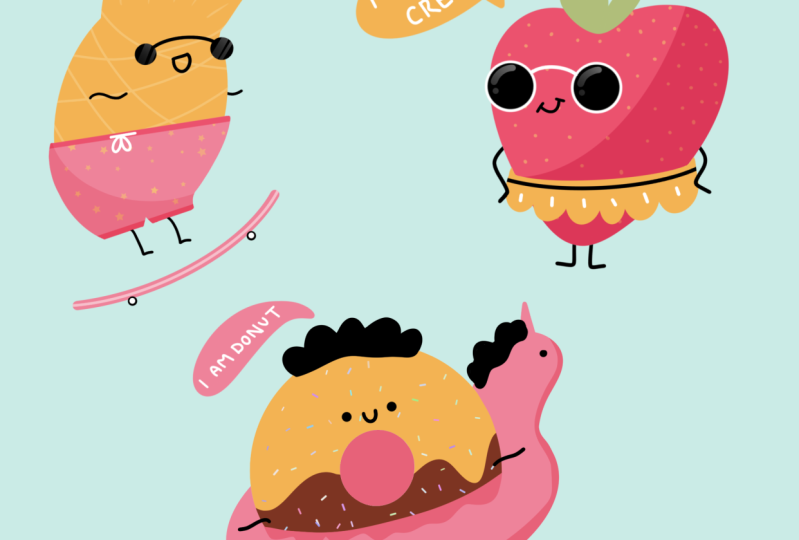
2. Pineapple : Begin our class firstly by deciding what kind of canvas
we are going to be using. Today we're using
a simple standards where canvas that you
can find in procreate, both pixel width and pixel
height are set at 2048 pixels. Of course, if you
would like to use any other dimensions for
your canvas, just go for it. Our DPI are set at 300 and our color profile is set as
S RGB with this low number. It's all done, let
just he done and will be redirected
to our new Canvas. The first thing that we will
need to do is to decide what kind of colors
we're going to be using throughout
the whole class. Of course, if you would like
to use your own colors, you are welcome to
go and do that. But if you want to
follow along and use the same colors that you will
see throughout the class, please go to the
project reser stab and download all the materials. Also while you are at
the project reser stab, download the brushes that
we're going to be using today. Now when everything
is downloaded, let's just go to our brush
library, and firstly, we'll go to the
calligraphy folder and we will choose
mono line brush. If you want to make all of
your lines very smooth, we can just go and tack one
option off our mo line brush. They just tap on it and we
go inside the brush studio. On the left we go
under stabilization, and here on the top, we have the streamline option. It has a slight amount and basically it is set
at a very low value. We can go to the
drone pad and try out how it works
and how it looks. You can see when we
are creating a line, it is turning out a
little bit jagged, and if you would like
to use it in that way, if you want your lines
to look very natural, you are welcome to
use it in that way. But if you want your
lines to be very smooth, you can just go
to this option to the streamline amount
and you can adjust it. Let's just set it at maximum and let's just go and try
it out one more time. You can see we lost a bit
of control over our line, but it is very, very smooth. You can play around
with the amount of streamline, find
what works for you. You can get back to your canvas right out there and basically, later on, if you want
to change this option, you can always get back
to it and change it. Now, let's just go and heat down when you found the
amount of streamline that you And let's just go to our color palette and here
we'll go under carts, and we will find our colors that we have downloaded from
the project and reser tap. The first color that we
are going to be using will be our color with
the title orange. When we have it, let's
just go and zoom in our camas to the place that
we have on our top pleft, and the first thing that we will create is going to
be a Little Alipse. Let's just go and
just with one line, we will create our set. Let's just go with
something like that and at the end of our line, we will hold our apple pencil. You can see now we snapped
our shape to a better one. We can make it
bigger or smaller by moving our apple pencil
from side to side. We can rotate it by moving
a rotational movement. For now, let's just go
with something that big. When you are satisfied with
the position rotation, size, and everything here, let's just lift up
our apple pencil. On the top, you can see
we have the option added. We can just go there and
you will see that we are at the editing mode and at the editing mode,
we have some notes. We can just go to them
and we can tweak them. For example, let's
just go to one of the notes that we
have on the side. We will hold our Apple pencil there and we will
drag it ttle bit toward the side and we will
open up our whole sheep. If you want to move the sheep, we will hold our Apple
pencil at some blank space and we will move our sheep to the place you want it to be. So when we have the
result like that, let's just go away
from our editing mode by tapping on the screen. When we have our outline, let's just go to our icon
on the top right and we'll just drag and drop
the color inside this area. When we did it, let's just go again to our
brush, slide bri, we'll go again to the
calligraphy folder, and this time we will
select the script brush. Our script brush is
pressure sensitive, so we can adjust the pressure to our apple pencil and
create peculiar shapes. We will just go or the two
part and we will create a leafy part as we are creating
a little pineapple here. Let's just go and create
something in that way. You can vary the amount
of these elements, you can vary the
rotation of them. You can vary everything
that you want to vary here. All that you need is
to create the outline that won't have any gaps
inside your outline. Let's create
something in that way and when you're
overall satisfied, let's just drag and
drop the color inside. When you have the
result like that, if you have some little
miscolred pieces, let's just go over them and
let's manually recolor them, and overall let's just
work on our outlines. Let's just go and
make the corners a little bit more pointy. Let's just go over them
with our brush and with our eraser and let's
just make them pointy. When you are overall satisfied, let's just take a
look at it from the distance and decide
whether we like it or not. If we want to adjust something, let's just go and adjust it. But overall, if
you are satisfied, let's just go and add
some details here. Firstly, we will
go to our layers, and we will create one more lay above our layer with
the main sheep. We want all of our
details to appear only on the areas that we
have on our previous layer. Let's just tap on this new lay and we will choose
clipping mask. Now, we will go to
our color palette, and we will select
the yellow color. With this yellow
color, we will go over the soap with the
same script brush, and we will just go and add a few additional
elements like that. You can vary their amounts. Again, you can vary their size, you can vary everything
that you want to vary here, create a few additional
elements like that. When you are done
with this element, let's just get back to
our brush library and we will go again to
our monoline brush. Let's just make the size of our brush a little bit smaller, and we will go along our
basic shape on the bottom, and we will create
some pattern here. Let's just go with
the lines like that. We will go all over our one side and we will create
parallel curves going up. Again, you can vary
the amount of them, you can vary the size of them. It's all up to you just try to make them
parallel to one another. If you want, you can hold
your line at the end and go to the tent mode and
adjust them from here. But basically, what we need
is something like that. When we are done with one side, let's just go to the
opposite side and create similar lines going on
the opposite direction. When you have the result
that you like one more time, let's just get back
to our layers, and let's create one
more layer on top on this layer with the
additional elements. When we have this new layer, we will go to our color palette and let's like the
pink red color. Let's increase the size of
our brush just a little bit, and then we will go and add the additional
element on the bottom. Let's just go a little bit lower than we have
the middle part of our pineapple and we'll create a straight line going through the whole shape
of our Pineapple. Hold your line at the end
if you want to and go a little bit beyond the
frames of your initial sheet. When we have the
result like that, let's just go over
one of the sides. For example, let's
start from the left and we will go down with
the curve like that. Again, if you want, you can
hold your line at the end. If you want to go
to the ten mode, you can go there and adjust the curvature or the size or
the rotation of this line. Basically, what we need
is something like that. When you are done with it, let's just go and tap on the screen to get away
from our edited mode. Now, let's just go to the
opposite side and create the second side of our pens as we are creating a pens
for our little pineapple. Firstly, we are going into
this little protrudan part and we are repeating the
shape of our main shape. Let's just go with a
little curve like that. If you're holding your line at the end and if it's snapping
to a straight line, you can go to your edited mode and here you will
have the option arc. Now let's adjust it, let's just make it something
in that way. When you are overall
satisfied with the ship, let's just go away
from our editing mode. Now when we have the
result like that, let's just go again to this line that we are creating
on our right, and let's just go down with
another curve like that. When you have this little line, let's connect it
with our line on the left with another
straight line. Again, we are creating
our sheep in that way. We are making sure
that we don't have any gaps in our outlines, and when we are sure
we are just going and dragging and dropping
the color to this area. Now, take a look
and decide whether you need to adjust
some parts or not. If you need to go with your
brush or with your eraser, adjust the parts that
you need to adjust, and then let's just grab
our eraser and let's just go to the middle part
of our bottom element, and let's just make
a little cut here. We will just go and create a
little triangle like that. When you have the
result like that, let's just go and add some
additional details here. Firstly, we are going again
to our less and we will create one more lay on top
of our lay with the pants. One more time, we'll tap on our y and we will
choose clipping mask. When we did it, we
will go again to our color palette and let's select the color with
the name yellow. When we did it, when we have
our color and new leer, we will go to our
brush library and we will select one of the
brushes that you downloaded. It will be the brush with the name glitter
scatter star feel. When we have this brush, let's just go and put
a few dots like that. Find the pattern that you like, you can just go with one
line and without lifting up, create some pattern in that way. We can just go and put some dots and create a pattern
going in that way. If you need to erase
some elements, grab an eraser and erase them, just find what works for you. When you're satisfied
with everything here, let's just go again to our
brush library and we will get back to our calligraphy folder and we will choose
more line brush. When we did it, one more time, we are going back to our layers, and let's create
one more layer on top of our layer
with our pattern. Again, we are tapping on it and we are selecting
clipping mask. Now, when we have the new layer, let's just add a
few more details. We will go again to our
color palette and this time, let's select hot pen color. We will go and increase the size of our brush
just a little bit, and firstly, we'll
go over the top, and we will create a
line going in that way. So we adjust creating a parallel line to what we
have on our main shape. If you want, go to
the editing mode and adjust it from here, find the thickness on this
element that you would prefer. Also try to position it
strictly horizontal. You have the result
like that, let's just do the same on
our bottom part. Again, we are just going through the bottom element and
creating a line like that. Again, plea runs with the
thickness, if you want to, when you are overall satisfied, let's just stop on the
screen to get away from our edited mode if you
were at the edited mode. Now when we have this result, let's just get back
to our color palette and let's the white color. We will go and
decrease the size of our brush just a little
bit, and one more time, we will go over this hot pink element that
we have on the top, we will find the
middle part of it, and we will create a little
additional element like that. Again, just creating
a straight line that will go on a
horizontal axis. When you have it,
let's just go to the bottom of it and let's
create a few loops like that. For example, let's
just go with two. When we are done, we are
done with our pants mostly. When we have the
result like that, let's just go and add a
little shadow to our pants. What we need to do firstly is to go to our color palette and let's select either pot
pink or pin red color. When one of these
colors is selected, we will go to our layers and we will create
one more layer on top of our layer that we
have on the top right now. Let's just again tap on it and let's select
clipping mask. Now, as we want to
create a shadow, let's just go to this en
icon near our chat box, and we will go and change the
blending mode to multiply. For the opacity for now, let's just go with 100%. Later on when we create our
shadow, we will change it. Now let's just get
back to our canvas and let's just go over one of
the sides of our pants, and let's create
a little shadow. For example, let's just go
with the shape like that. We will create a first curve
that will go in that way, or if you want to experiment, you can go with
any other shadow. When you have the
result like that, let's just go and increase
the size of our brush and we will go and menuly recolor
the rest of the area. When you did it, let's
again go to our layers. We will tap on the icon
on our layer that we have on the soap and we will
go to the pacity slider. Let's just hold
it and let's just drag it toward the left until we like the result and until we like the opacity for shadow. For example, let's just
go somewhere 30-35%, or if you want, you can just go and find the amount of
opacity that works for you. When you're overall satisfied, let's just tap on this layer to get away from this
little window. Now, as we have our
little shadow here, let's just go and create our facial features
and our legs and arms. Firstly, let's just go and
create one mola on top, and then we will go to our color palette and
select the black color. With the black color, firstly, we will go and
decrticize of our brush, and then let's firstly go
and create little legs. So let's just go more close to this little cut
that we've created, and let's just go with
simple shapes like that. Of course, if you
want to adjust it, if you want to experiment with the legs or different
sheavees for them, you are welcome to
go and do that. Basically what we need
is something like that. When we have the
result like that, let's just go over the top and let's create
little arms here. We will go firstly
over our left side. Let's just go and find
an approximate center, and we will firstly go to the
left as mentioned before, and we will create a
little element like that. Of course, if you would like to experiment and create
something different, you are welcome to
go and do that. When we have our first arm, let's just go to
the opposite side and create something
similar here. Let's just go and create a
similar sheep on our right. When we have the
result like that, if you like how it
looks in that way, you are welcome to
keep it as it is. But if you want, we can just hide our legs
underneath our pants, and also work onto this little arm that
we have on the right because probably our body
will be overlapping this arm. Let's just go and
do the following. We will go to our
liars and we will go to our La with
the basic sheep. We will select it,
we will tap on it, and we will choose
select from the list. Now we have selected the basic sheep and
when it is selected, we will go to our les
and we will get back to our La with our
arms and our legs. When we did it, we will
get back to our eraser, and we will go and erase these
parts that we don't need. Firstly, we will erase this part on the top,
and as you can see, we are not touching our
legs because we have these pants elements overlapping
that we have right here. We will just need to
do the same thing. We will go to our lease, we will go to a with the pants, we'll tap on it, and
we will choose select. Now, when our pants
are selected, we are getting
back to our lease, we are going to our
lier with our legs, we are grabbing our eraser and we are just erasing
this top parts. Now when we have the
results like that, let's deselect everything by
hitting our S ribbon icon, and then let's just go and work onto our official features. Firstly, let's just get back to our layers and let's create
one more layer on top. We will go and get back to our brush and we'll go and
increase the size of it. Let's create the
glasses firstly. We will just go and put
two dots in that way. You can vary the size on these elements and the
distance from them. When you're satisfied with
what you have created, let's just go and decrease
the size of our brush, and let's go and create this
middle part of our glasses. We will just go and create
a little curve like that. Hold it at the end,
if you want to go to the sin mode to
adjust the curture. Take a look at your
illustration from the distance and decide
whether you like it or not. If you want to adjust something, try it out one more time. So now when we have
the result like that, let's just go and add little
highlights to our glasses. Let's just get back
to our list and let's create one more layer on top of our layer
with the glasses. Let's just tap on it and
let's select clipping mask. We will go to the n icon and we will change the blending
mode to lighten. For now, let's keep the
opacity at maximum, and we will go to
our color palette, and we will select
the white color. Let's increase size of our brush and let's just go
to our glasses, and let's create two
lines like that. Try to make them parallel to one another and also try to position them on some similar plate on both little
elements right here. When you have the
result like that, let's just go and de create the size of a brush
and let's just go and add another highlight
of a smaller size. Again, try to make these lines parallel to the previous ones. If you have some little
parts that you need to erase with your eraser,
go and do that. When you are done, let's
just get back to our lease, we will go to this LI icon, and we will go and change the capacity to the level
that we would prefer. Again, something around 30, 35% will work best. Also, let's just go and make it a little bit
more interesting. We will go to our eraser and we will go to the
airbrushing folder, and we can select
either soft blend or medium blend brush. When this brush is
selected for our eraser, we will go and
increase the size of our brush and very, very softly, we'll go to the
bottom and we will start erasing these
little parts. We are creating a little
gradient with our highlights. When you have the
result that you like, let's just get back
to our normal eraser. When you have it in that way, let's just get back
to our layers and let's just go either
to this layer where we have our legs and our arms or to the layer where
we have our glasses. Let's just get back
to our black color. Let's just get
back to our brush, and let's just go and
add a little smile right between our
elements for our glasses. You can experiment with any official features that you like. For example, let's just go with something simple like that. Now when we have the
result like that, let's just go and add additional
elements on the bottom, and it will be a
little skateboard. Let's just get back to our las. We will go to the layer that we have on the
top and from here, we'll create one more layer. When we have it, we will get
back to our color palette, and we will select
our pin red color, or if you want to experiment, you can go with any other
color that you like. When you have the
color selected, let's increase the
size of our brush, and we will go to the
bottom and with one line, we will create a
shape like that. Again, you can hold
it at the end. If you want to go to your editing mode and
adjust it from here, you are welcome to
go and do that. Basically what we need is
something in that way. When we have it, let's
just tap on the screen, and let's just add a
little additional element in the middle of our skateboard. Firstly, we are going
back to our layers. We are creating one
more layer on top, tapping on it, and
selecting clipping mask. Now, let's just get back to our color palette and
select the white color. Let's decretize of our
brush and let's just repeat the same shape that
we have for this element, but just go in the middle of it. Adjust it if you need to adjust it through
your editing mode, and when you have the
result like that, let's just get
back to our lease. Let's just go to the
n icon and let's adjust the opacity to
something a little bit lower. When you have the
result that you like, let's just go and create
one more layer on top, and then we will go to our color palette and
select the black color. When the color is selected, we will go and increase
the size of our brush, and let's just go and
create little wheels. Firstly, we will just go
and put two dots like that. When you have the
result like that, let's get back to
our color palette and select the white color. When we have it selected, we will go and decrease the size of the brush just a little bit, and we will go to the middle
part of this little wheels, and we will just go and put
the second dot like that. You can experiment with
the size of the brush, you can make the wheels
a little bit thick. Just try to put the second dot right in the middle
of your first one. And do the same on
the opposite side. When you have the
results like that, we are done with our
first illustration. Let's just go to our
layers and let's select every layer
that belongs to it. When the first
layer is selected, we will go to the next one and we will swipe it
from left to right, and we will need to
do it quite a few times until all of these
layers are selected, and we can put
them in the group. When they all are selected, we are heating group
over our top right, and let's just go to the top, we will tap on this new group, we will tap on it
one more time and we will rename it as Pineapple. And now when the
group is selected, let's just go to this
arrow key on the top left. On the bottom panel, we will use uniform method, and we will make this illustration
a little bit smaller. We will just go to one of
the corners and we will drag it up or down
depending on the corner, and when we have it in that way, let's just find a better
placement for it. Again, we are holding
our apple pencil at some blank space and we are moving our illustration to some area that we
would prefer to see. If you want to
rotate it, we will go to this green
node over the top, we will hold it and we will
make irrotational movements. Find the placement, the size and rotation that you like,
when you are done, let's just hit our error key, and let's move on
to our next part, where will create our
next illustration.
3. Strawberry: Let's begin this part firstly
by going to our layers, and we will go to our group
with the pineapple and we will tap on this little
V icon near our chatbox. We'll collapse our group to make it very clean
into our layers, and we will tap on the plus
icon to create a new layer. When you have a new layer, let's just get back to
our color palette, and let's elect
this hot Pin color. The first element that we will create will be a hard sheat. Let's just go and create
something in that way. You can play around
with the overall sheep, try to make the
outline very smooth, and when you have the
result like that, let's just drag and
drop the color inside. If you want to adjust
it in any way, you are welcome to
go and do that. When you are overall
satisfied with your sheep, let's just get
back to our layers and create one
more layer on top. Let's tap on this layer and
let's choose clipping mask. When we did it, we will get
back to our color palette and let's the color
either orange or yellow. When you have the
color selected, let's just go and make the size of our brush
a little bit smaller and we will go along the whole shape that we
have for our strawberry, and we will put a few dots. Let's just go spend
some time here and create this little
pattern with our dots. When you are satisfied
with the results, let's just get back to
our list and decide whether we like the opacity
for these elements or not. If you want to adjust them, let's just go to our icon
on the lay with our seeds, and let's just go and
decrease the opacity level. When you are overall satisfied, let's just go and create one
more layer on top and either with the same color or with
the color with the orange, let's just go to the bottom part and create a little skirt here. Firstly, let's just go ttle bit lower than our middle part, and let's create a
curve like that. Again, we're going a little bit beyond the frames
of our main sheap. If you want to
adjust the curvature or the placement
on this element, go to the edited
mode and adjust it. When you're satisfied
with your first curve, let's just go to
the bottom from it and let's create a
sheap like that. We will just go with some petals and let's create it in that way. You can adjust the size
on these elements. You can adjust the
amount of them. You can adjust and you can
that you want to adjust here. Just make sure
that your outlines are closed and
when you are done, let just drag and drop
the color inside. Now, take a look at your skirt, and if you need to adjust something with the
eraser or with a brush, please go and adjust it. Now when we have the
result like that, let's just go and add
some additional elements. Firstly, let's just get back to our color palette and
select the black color. With a black color, we'll get back to our last and we will create one more layer above
our layer with our skirt. Let's tap on it and let's
select clipping mask. Let's increase the size of
our brush or decrease it, and we will just go over
the top part and we will continue creating
a similar shape to what we have on the top. J create a little line that will be parallel
to the top part. If you need to adjust it, go to the ein mode and adjust it. If you want to continue creating the additional elements
with the same color, you are welcome to
go and do that. But if you want, we
can go and select the white color and go and create some
elements like that. When you are overall
satisfied with this skirt, let's just go and add the additional elements on
the top of our strawberry. Firstly, let's just get back to our color palette and select
the yellow green color, and then we will go and create one more layer from our layers. When we have our color
and our new layer, let's just go right into this
d that we have on the top, and let's create some
leafy part here. We can experiment
with the amount of these elements
with their sheats, and with everything that you
want to play around with. Create a leafy part like that or something similar to what
you see on your screen. When you have the outlines, let's just drag and
drop the color inside. If you have some
miscolred pieces that you need to
adjust manually, please go and adjust them. When you and these
leafy parts done, let's just go again to our les and let's create one
more layer on top. Let's just go and create our little arms and
our little legs. Again, when the new
layer is created, let's just get back
to our color palette and select the black color. When the black
color is selected, let's just go firstly
over the bottom part, and let's create
little legs here. Of course, you can experiment, but overall, let's just go with something simple like that. When you have the legs,
let's just go a little bit higher than we
have our skirt, and let's create
little arms like that. Again, if you want
to experiment, please go and experiment. Now we will do the same
thing as we did before. We will erase the parts
that we don't need. Let's just go to our liars and let's just go
to our main sheep, where we have our heart. We will tap on it and
we will choose select. When our sheep is selected, we will go again to our
liars and we'll go to our leer where we have
our legs and arms. Let's just go to our eraser and let's erase the parts
that we don't need. Again, for this arm that
you have on your right, you can keep it as it is, or if you want to can
erase this part on top. When you are satisfied
with everything here, let's just deselect
everything by hitting our S ribbon icon. When we have the
result like that, let's just go again to las and let's create one
more layer on top. Let's create another
pair of glasses. Firstly, let's just go back to our color palette and let's select the white
color this time. We will go and increase
the size of our brush and we will just go and
put a dot like that. A just the size of this
element for your liking. For example, you can go with a bigger size of your brush
or with a smaller one. Just find what works for you. When you have the
result like that, let's just go to our layers
and we will go to the layer where we have this white dot
and we'll make a copy of it. We will just need to
swine this layer from right to left and we
will choose duplicates. Now, when we have a copia, let's just get back
to our color palette and select the black color. When the black
color is selected, we will just drag and
drop it to this area, and then we will just go and make this element a
little bit smaller. Now when we have
this black element, we will just go
to our arrow icon and we will use uniform method. Firstly, let's just zoom in canvas and we
will go to this dote that we have on the bottom in a midle and we will drag
it a little bit up. So find the size that you like, and when you have
it in that way, we will need to do the same with our dot that we have on the top. Again, we are going
to this middle part and we are dragging it down. Try to make this outline even everywhere
along this element. If you need to move
this shape, move it. If you're satisfied
with how it looks, let's just go and deselect everything by heating
our arrow key. Now when we have the
result like that, and if you don't want to
adjust it in any way, let's just go again to our lays and we'll merge these
two layers together. Let's just go to this
layer on the top, we will tap on it, and we
will choose merge down. Now let us go and make
a copy on this element, swiping our layer from right to left and choosing duplicate. Now, when this new
layer is selected, we are going to our
error key and let's just go and move the
shape toward our right. Position it to your liking
and when you are done, let's just hit our arrow key. Then let's just go
again to our layers. If you don't want to adjust
your elements in any way, let's just go and merge
these two lays together. Let's just tap on our lay on the top and we will
choose merge down. When we did it, let's
just get back to our color palette and
select the white color. Let's decrease the
size of our brush, and let's just go and create this middle part of our glasses. Again, just make it just with one line, hold it at the end, go to the edition
mode and adjust it, and when you have the
result like that, let's just find a different
placement for this element. Now when we have
everything on one layer, we are going to our error
key uniform method, and let's just go and find a better placement
for this element. Let's just move it a little
bit toward the left, and if you want to rotate it, you know what you
need to do, just go to this green node
and rotate it. If you want to make the whole
element bigger or smaller, go to one of the nodes and adjust the size of your glasses. Find the placement for them two. When you are overall satisfied
with everything here, let's deselect everything
by heating our arrow key. Now let's just go and add
our little highlight here. Again, we are going to our lease and let's create
one more le on top. Let's tap on it and let's
select clipping mask. Then we will go to our icon and we will change the
blending mode to lighten. This time, let's just go with
simple shapes like that. We are getting back
to our brush and we will just go and increase
it just a little bit, and we will go with
the shape like that. We will create a little curve and then we'll put a little dot. Let's just go in that way. We will do it on both sides. When you are done, let's
just get back to our layers. Let's just go to this LI icon and let's adjust the
opacity of this layer. Again, the same way as before, we are going back to our eraser, we are going to our
medium blend or soft bland brush from
the airbrushing folder. Let's just go to the bottom part and very easily we will start erasing this bottom part and
create this glossy effects. When you are done,
let's just get back to our original brush
for our eraser, and then let's just go and add a little element for our mouth. Firstly, we are getting back
to our layers and let's just go to our layer with
our legs and arms. Let's just get back
to our black color and then we'll get
back to our brush. Let's adjust the size of it, and let's just go with little
mouth going in that way. Of course, if you
want to experiment, you are welcome to
go and do that. When we have our mouth done, let's just go and
create a little shadow going on the bottom
part of our strawberry. Let's just get back
to our layers, we will go to this layer
where we have the seeds. We will create one more
layer on top of it. Let's tap on it, and let's
select clipping mask. We will go to the end icon and change the bland in
moot to multiply. For now, let's keep
it at maximum. We will then go to
our color palette and select the dark
magenta pin color, or if you want to
use any other color, you are welcome to
go and do that. Now when we have
the color selected, let's just go and create a
curve going in that way. If you want to make
a different shadow, you are welcome to
go and do that. If you need to adjust it
from your editing mode, again, you are welcome
to go and do that. Now, when we have
the first curve, we can just go and loom the whole shape
around in that way. Again, we don't have any gaps, and we will just drink and
drop the color to this area, or if you want to can go and menually recolor
the bottom part. When we have R shadow, let's just get back to our lies. Let's just go to
the slew, R shadow, we will tap on the icon and
let's adjust the opacity. Again, let's go with
something around 35, maybe 40% or find the
pasty that works for you, when you're satisfied, let's
just tap on the screen, and let's just go
above all the layers that we have and we will
create one more layer. Onto this layer, we
will get back to our color palette and let's select again our orange color. When the color is selected, let's just go and create
a little speech bubble above the head of
our strawberry. Basically, you can go with
any shape that you like. This time, let's just
go with something simple as a circle
or an ellipse, if you need to adjust it, move it, go to the 18
mode, and do that. When you have the
ellipse, let's just go and create a little
triangle like that. Then we'll just go and drag and drop the color
inside these areas. Now let's just go and
select the white color, and let's just write down something inside
this speech bubble. You can go with anything
that you want to add here. When you are done, let just
get back to our lays and let's select every lay that
belongs to our strawberry, and then when all of them are selected, we will hit group. We will go to our new group and we will rename
it as strawberry. Now when the group is selected, let's just go to our error key, uniform method, make it bigger, smaller, ratated, find a
different placement for it. Just play around and find the
placement for this element. When you are done, let's
just hit our error key, and let's move on
to our next part, where we will create
our next illustration.
4. Donut: Begin this part first by
going to layers, and again, we will collapse group by
hitting this V C N checkbox. We will then go and create one more layer, and to this lay, we will go to our color palette, and again, we will
select the orange color. When the orange
color is selected, we will go underneath
our pineapple and we will create a
shape on the circle. Again, just starting
with an lipse, holding it at the end, going into our editing mode
and adjusting it from here. If you have the option circle underneath this editing
mode, you can hit it. If you don't have
it, you can just go and manually adjust it. Now, let's just make
it a little bit smaller from our editing mode and we can do it very easily by going right
between the nodes, hold our apple pencil there and just drag it
toward the center. Now, when you have the
result that you like, let's just go away from our editing mode by
tapping on the screen. When we have our outlines, let's just go and drag and
drop the color inside. Now, when we have the
result like that, we will just need to
get back to our eraser, we will make the size of
it a little bit bigger and we will go to
the middle part and we will make a little cut. You can do it just with
one dot with your eraser. We can just start by creating a similar shape to
what you have outside, create a similar shape, hold it at the end,
go to the ellipse. If you have the option
circle, find it. If you have to move it more toward the center,
go and do that. When you find the placement
for this element, go away from the
editing mode and manual erase the
rest of the area. Now when we have
our little donut, let's just go and add additional
elements on the bottom. Firstly, let's just get
back to our original brush. Let's just get back
to our layers, and let's just tap
on this new layer, and we will choose Alpha L. You can see now we
have the checkerboard around our element and that means that we are
going to be adding the new details only on the existing areas that
we have on this layer. When we have it in that way, let's just get back
to our color palette and let's like the
dark red orange color. We will go and increase
the size of eye brush, and let's just go and create
a chocolate part like that. You can go with any
shape that you like. A that we need to
do is to create the clothe shape and drag and drop the color on this area, or if you want, you can just
go and manually recolor it. Adjust it to your liking,
when you are done, let's just go and de
criticize of our brush, and let's just go and add additional elements
to our donut. Firstly, let's just get back to our lease and let's create
one more lay on top. Let's tap on it, and let's
select clipping mask. Now we will go and
add some sprinkles. Firstly, let's just get back to our color palette and
select the sprinkles color. When it is selected, we are
going to our brush library, and we will use one of the
brushes that you downloaded. Now we are going to be
using the brush with the name rounded
rectangle confetti. Again, the same way as we did with our little
stars on the pants, let's just go and
add some sprinkles. When you have enough
on the sprinkles, let's just get back to our
brush library, and again, we will select our
monoline brush and then decide whether you want to adjust the opacity on these elements or if
you are okay with them. Let's just go and create
one more layer on top. Onto this layer, we
will go and create the rubber ring around
our little doughnut. Firstly, let's just go
back to colic palettes and let's select either
hot pink or pink color. And when we have
this color selected, let's just go and create the elements right here
above our little doughnut. We will just go with
the simple shape of the ellipse like that. Hold it in the end, if
you need to adjust it, go to the ein mode and
adjust it from here. Let's just go with
something like that. When you are satisfied
with this element, let's just drag and
drop the color inside, and also let's just go and turn it into some
peculiar shape. Let's just go over
our right part and let's create another
shape like that. When you have it,
let's just drag and drop the color inside, and let's just de criticize of ey brush, just a little bit, will go to the heat part and we will create
a little horn here. Where if you want to experiment and create something different, you are welcome to
go and do that. If you want to adjust the sheep, in any way, grab your eraser, grab your brush, and adjust it. Now when we have the
results like that, we will need to cut
some parts of it, so our doughnut is inside of it. What we need to do is
to go to our lease and we'll go to our layer
with that doughnut sheep, we will tap on it, and
we will choose select. One more time, we're
going back to our s, we will go to our new layer
with our rubber ring, and we will go and
grab our eraser. Let's just increase
the size of our brush, and let's just go a
little bit lower, then we have our sheep for
this hole on our doughnut. Let's create a first
curve like that. Adjust it to your liking, go to the engine mode
and adjust it from here, adjust the placement
of it if you need to, and when you are overall
satisfied with it, let's just go and erase the
rest of the area menually. We're just going
over the top part and erasing it in that way. Now when we are
done, let's deselect everything by hitting
our S ribbon icon. If you want to adjust
something menually, again, you are welcome
to go and do that. When we have the
result like that, let's just go and add some
additional elements here. Firstly, let's just go
again to our lease. We will go ad this lie
with our rubber ring, and we will go and
select the black color. Let's just go very
accurately and add some hair part
right here on the top. Let's just go with
something simple like that. When you have the
shape like that, let's just drag and
drop the color inside. If you want to adjust
it in any way, you are welcome to
go and do that. Also with the same color, let's just go and put
a dot for the eye. Of course, if you want to add more details with this color
or with any other color, you are welcome to
go and do that. When we have the
result like that, either on the same layer
or on the new layer, let's just go and add our legs, arms, and the facial
features for our donut. Let's just go and
create one more layer. And then we will just
go to the bottom part and we will start by creating
the shapes for our legs. Again, you can vary their size, you can vary what you want
to see for your legs here. For now, let's just go with
something simple like that. When you have the
result like that, let's just go to the sides and let's create
little arms here. Again, let's just go with
something simple like that. Now when we have the
result like that, let's just go and erase the
parts that we don't need. For the arms, let's just keep
them as they are right now. But for the legs, let's erase this little
part on the top. Let's again go to
lease and we will go to A with our rubber ring. We will tap on it, and
we will choose select. When we did it, we
are getting back to ours going to where
we have our legs, grabbing our eraser and
erasing the parts on top. Now when we have the
result like that, let's deselect everything by
hitting our S ribbon icon. Let's make sure that we are at the layer where we want to
add our facial features, and when we are at this layer, let's just go above our
whole on our doughnut. Let's just go with simple
facial features like that. Firstly, let's just go
and select our brush. Let's decrease
size of our brush, and let's just go and create
a little mouth like that. Of course, if you
want to experiment, you are welcome to
go and do that. When you have the little mouth, let just go and in
criticize of our brush, and we will go to the
sides from our mouth, and we will just put
the dots for our eyes. Try to put them on the same
distance from your mouth. If you want to add
any other details, any additional elements here, you are welcome to
go and do that. If you want to adjust
the shapes that you already have
onto your Canvas, and if there are multiple of
these elements on one layer, we can adjust some
of them in that way. We can just go to the Stan icon and we will select the
free hands methods. Let's select this element
that we want to adjust. For example, let's just go
with our facial features. When only this
element is selected, we are going to our error key. From here again, we are using uniform method and we are
doing our thing here. We are adjusting our shape here. Adjust the placement,
adjust the rotation, if you want to adjust the
size, go and do that. When you're satisfied
with everything here, we will need to go and
deselect everything by hitting the first icon
that we were using and it was our S ribbon icon. Now when we have the
result like that, let's just go and add a little
shadow to our rubber ring. Let's just get back to our list. Let's just go to this layer
with our rubber ring. We will create one
more layer on top. We will tap on it, we will
choose clipping mask, and we will go to our en icon to change the blending
mode to multiply. Then we'll go to
our color palette and select either hot pink, pin cred, or dark magenta pink. Select one of these colors
and let's just go and put the first shadow
right here on the bottom. Just go through the
whole sheep and create a line going in that way. If you want to adjust it, go to the editing mode and adjust it, if you want to add more shadows, you are welcome to
go and do that. For example, let's just
go to the bottom part of this horse element and create
a little shadow like that. If you want to connect it with
the shadow on the bottom, you are welcome to
go and do that. Also, let us go to this hole
that we have on our donut, and let's just put it
completely in the shadow. When you do it, let's de
criticize off our brush and let just go right here and create a peculiar
shadow like that. If you have some elements
that you want to erase, you are welcome to
go and do that. When you have all the
shadows that you need here, let's just go and adjust
the opacity of the shadow. Go into the lis,
go into our icon and adjusting the
opacity to our lichen. Find the pacity that works for
you and when you are done, let's just go again
to our lis and select every lad that belongs
to our little doughnut. We'll put them in
the group and we will go and tn in
this group as donuts. When the group is selected, let's just go again to
our okey, uniform method, make it smaller, make
it bigger, rotate it, find a different
placement for it, find what works for you. When you are done,
let's just hit our air key and
maybe if you want, we can just go and add the additional
bubble speech like that we have on our
little strawberry. For example, let's just
go again to our layers. We'll go over all the
layers that we have here inside the group
with our donuts. We'll create one
more layer on two. Let's just get back
to our color palette and select the pin red color. Let's just go and create a speech bubble
going in that way. When you have the sheep, just drag and drop the color inside, adjust it to your liking, if you need to adjust something, add the color manually,
if you need to add it. When you have the bubble speech, if you don't want to
adjust it in any way, let's just go and
grab our white color, and let's just write down
something inside it. If you want to
adjust this element, please go to the error key
and adjust it from here. When we are done
with this element, one more time, let just go and select our group
with the donut. We will go to our er
key Uniform method, and let just go and find the
placement for this element. When you are satisfied
with the position and everything here
with these elements, let's just hit our key, and we are done with our class. Thank you for
watching this class, L review if you like
it and consider subscribing for MCI
videos in the future. Looking forward to
seeing your project.
 Uni Corn, ⭐Kawaii Art Enthusiast⭐