Transcripts
1. Introduction: Hello everyone. I'm Uni. And into this class will
draw cute yammyfoot. This class doesn't require any prior experience
or fancy tools. We'll start from
scratch and we'll be using simple techniques
throughout the process. Everything you'll see will
be happening in Procrit. However, if you have other software or monster
traditional materials, you are welcome to join. If you're ready to start, let's jump right into it.
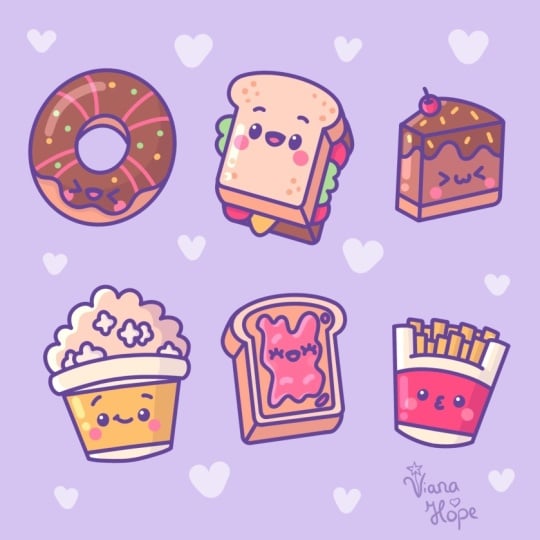
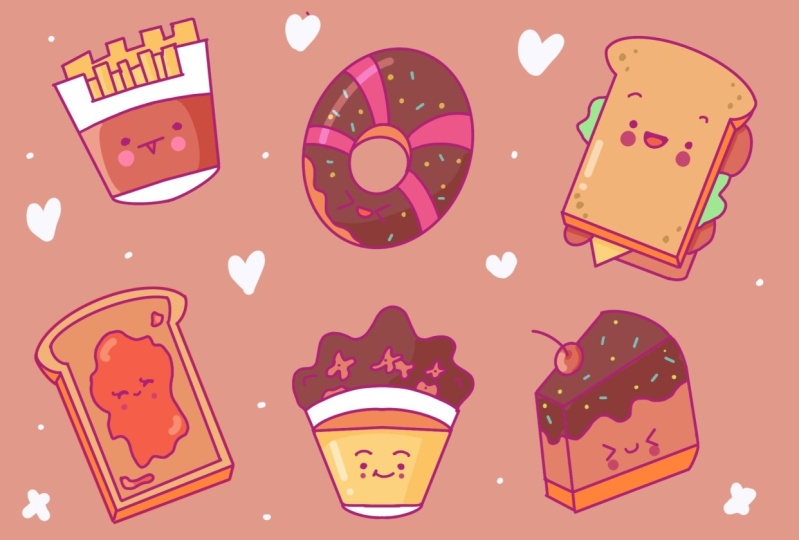
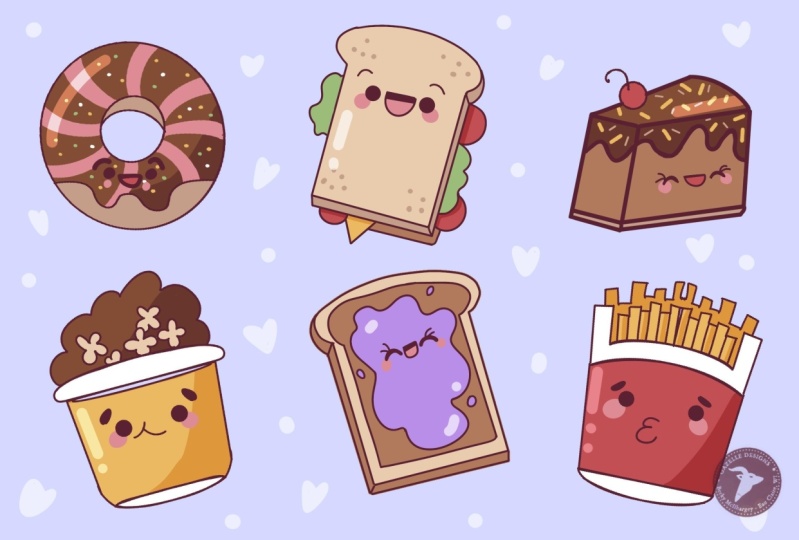
2. Sketch: Donut: Let's begin our class firstly by deciding what kind of canvas
we are going to be using. Today we're using a custom
canvas with the width of 2,300 pixels and the
height of 1,600 pixels, DPI R 300, and our color profile is set as
SRGB with this low number. When it's all done,
let just create over our top right and what will be redirected to our new canvas. Now let's just zoom it out a little bit so we will
see the whole canvas. And then we will need to change the color
of our background. But before that, we will
need to decide what kind of colors we're going to be using throughout the whole class. If you want to follow along, please go to the
project and rusher, tap and download all the
materials when you did it. Let's just go and change
the color of background. We will go firstly to
our layers and we will tap on the background
color layer on the bottom. You can see you have
your color palette. For us, it will be easier to
go under palette right here on the bottom right and
go under cart right here. We will see all the colors, names and it will be easier for us to navigate through them. Now let's just tap on our background color and we will change the color
of our background. Now let's just get back to our canvas and the first thing that we will need to do before starting our sketches is to select the brush and
the color for them. Firstly, let's just go
to our brush library, and we'll go to the
sketching folder. We have a lot of brushes here. You can pick any
brush that you like, you can try it out
onto your canvas. If you don't like it, get
back to the brush library, select another brush,
and find what works for you when you found the
bars that you like. Let's just get back to our color palettes here one more time. We will go underneath
the cards and we will go and select the
color with the name lines. When we did it, we are ready to start creating
our first sketch. Let's just go to
our top left part. And we will start by
creating a shape of the ellipse very easily,
just with one line. We will create a
shape in that way. Hold it at the end, and we will snap it
to a better shape. We can rotate it, we
can make it bigger or smaller by moving our apple
pencil from side to side. Let's just make it in that way. And then we will
go over the top to this option aged and you will see we have
some nodes here. We can just go hold our
apple pencil on some of the nodes and we can adjust
the shape of our element. Let's just make it a
little bit more rounded and a little bit more elongated. When we have
something like that, if you want to move it, you can hold your
apple pencil at some blank space and move it
to the place that you like. Find the size, find
the rotation and the position that you will
like when you are done. Let's just get away from our edited mode by
tapping on the screen. Now when we have
this first ship, we will need to go inside
and we will need to add this cut that we
have on our donuts. Let's just go and
create a similar shape to what we already have. The same way as before. Just creating the shape with one line and holding
it at the end. A just deplacement. Adjust deritation. Adjust everything that
you want to adjust. If you need to go to the top, to the editing mode and
adjust it from here, let's just go and do that. Let's position it
right in the center. And let's create something in that way when you are satisfied
with everything here. One more time tapping on the screen to get away
from our editing mode. Now when we have the
shape like that, we will need to go inside our doughnut and we will need to add some
thickness to it. We will go to this
little cut and we will go underneath the
line that we have on top, and we will create another
curve the same way as before, just creating the shape
and holding it at the end. If you want, you can go on the edited mode and
adjust it from here. We need to make this line
mention the line that we have on the top of the
main shape of our donut. When you are satisfied
with everything here, let's just tap on the screen to get away from our editing mode. Now let's just go and
create the facial features. We will go to the
bottom part and we will start by
creating the eyes. Let's just go and firstly
create the shape like that. When you have this first shape, let's just go to
the opposite side and create something
similar here. Try to put your
elements on one line, but you don't really need to be very precise here,
very accurate. Later on, we are
going to be creating our clean lines and we can adjust everything that
we need to adjust. Now when we have our eyes, let's just go right between them and let's create a little mouth. We will start by creating
a line going in that way. Then we will go to the
bottom and we will create half of the circle or
half of the ellipse here. You can adjust the size, you can adjust everything
that you want to adjust here, and create what you would like. Of course, if you would like to experiment with facial features, you are always welcome to go and create what
you would like. If you want to adjust
something here, we can go and do that. For example, if you want to
move your mouth a little bit. Let's just go and
do it in that way. We'll need to go to the ribbon
icon here on the bottom. We will select the
free hand method. When we did it, we will just need to select the
element that we want to. Just so in that case,
it will be our mouth. We will just go around
and select this element. When only this
element is selected, we will go to this
little error key on the top right and we will go
under our uniform methods. When it is selected, we can just go hold our apple pencil at some blank space and adjust this element that
now is selected. If you want to adjust
it in any other way, you are welcome to
go and do that. Green notes will rotate it all these blue notes will
make it bigger or smaller. Find what works for you
and when you're satisfied, let's just go and
deselect everything by hitting on the first
icon that we were using. It is our ribbon icon. Now when we have our
facial features, let's just go and add
some additional elements. Let's just go to
the bottom part and let's add some
melting element here. Of course, if you want to work more onto your
facial features, you are welcome to
go and do that. We can just go again to our ruban icon freehands
method and make this whole facial
feature element a little bit smaller and make
a position it differently. We are doing the same
thing we are selecting, we are selecting our ero chey and moving it to the
place that we want. If we want to make
it smaller again, go into one of our corners
and making it smaller. If we want to rotate it,
go into the green notes. Let's position it in that way, a little bit higher, closer to this cut that we
have in the middle. And when we have it set in
that way one more time, let's just deslect everything by hitting our S ribbon icon. And then let's continue by
creating this melting part, the same brush and we are just
going to the bottom part. And we will create some
elements going in that way, you can adjust the size of them, you can adjust the
amount of them, you can make them very curvy. You can just work
thoroughly on the shape, create something that you will like if you need to
erase some parts, go to the eraser and erase
the parts that you don't need, work on the shape. And when you're satisfied
with the melting part, let's just go to the top part. And let's create a
few more elements that later on we will
recolor differently. This time let's just go and create some elements like that. We will go alone our doughnuts and we will create a few lines. Of course, if you would like
to add some other elements. If you want to
experiment a little bit and create something different, you are always
welcome to go and do that when we are working
onto our frosting. When we are done with it, let's just go between these little parts and we will create a few elements like that. That later on we will
turn into some sprinkles. We are not going to
this middle part where we have our
facial features because it won't be seen when you are satisfied
with everything Here, let's continue by
creating another skitch.
3. Sketch: Sandwich: We will firstly
go to our layers. And we will create one more
layer above this layer, because it will be easier for us to adjust our layers layer on. Now when we have this new layer, let's just get back
to our canvas and let's create a little toast. What we need to do, firstly, is to go and create Eric Tingle. We will be doing it
the same way as we did with our shape
of the ellipse. We are just creating
it with one line. Let's just go and create
the shape like that, and then we will
hold it at the end. We've created the shape in
that way and we will go to this option that's
popped up on the top. We have a few options
here you can just go and for example,
select Rectangle. You will have less of the nodes and we
can work with that. What we need to do is to create a little bit
different shape. We will just go to one
of the sides and we will drag it more toward
the opposite side. We are making this shape
a little bit more narrow. When you have
something like that, let's just go and maybe make
it a little bit smaller. To do that we will need to
go right between the nodes. We'll need to hold
our apple pencil there and then just move it toward the opposite side when you have
something like that. Let's find the placement for this element when you are
satisfied with everything here, let's just tap on our screen
to get away from this mode. When we did it, we will go over the top and we will
create this crust here. Let's just go firstly
over the left side. And let's create a
shape like that. When you have it on one side, we will go to the opposite
side and do the same thing here when you have
it in that way, we will go to the
top and we will connect these two
shapes with a curve. You can go and
create it manually. You can create a
line a few times, or you can just go
and do it just with one line and then go
to the editing mode. Let's connect them in that way. We will hold our
line in the end. We will go over the top
to the editing mode and we will adjust the
curvature a little bit. It's not that, let's just
go to this little node on the top and we will
drag it a little bit down when we have
something in that way. Let's just tap on the screen. Let's go to our eraser. We will erase this top
part that we don't need when you have
something like that. Let's just get back
to our brush and let's add some
thickness to our toast. Firstly, we will go to the
bottom part, to the corners. And we will go from these corners and create
the lines like that. We will need to make these
lines parallel to one another. Let's create the first one, and then we'll go to
the opposite side and create a similar shape here. Also, we will just go to
the intersection between our crust and the main shape and create a similar line here. Now when you had these
little elements, let's just go and create
a few lines that will be parallel to the lines that we already have on the main
shape of our tools. We can do it just with one
line, the same way as before, just creating the shape
and holding it at the end, go into the top and
creating the Polly line. Now let's adjust it and make these lines parallel
to the main shape. When you are done,
let's just tap on the screen to get
away from the molt. Now let's just work
more on the shape where we have some little elements that we need to adjust. Let's just grab an
eraser and erase. Then we will get
back to arm brush and we will need to go
to the crushed elements. And we will need to connect the top part of it with the shape that we
have on the bottom. Let's just go right here. And we will create a
line going in that way. Now when we have
something like that, let's just go and make
a copy. Omnis element. We will use it later on
to create a we sketch. We have this element
on a separate layer. We will just need to go
to the layers and we will need to make a
copy omnis layer. To do that, we will
need to swipe it from right to left
and choose duplicate. Now we have the cope onus layer. For now, let's just
go and hide it. We'll need to tap on this
little checker mark. And then we will get back
to our previous layer, layer number two and we will continue working
onto these elements. Now when we have
something like that, let's just go and add
some additional elements. For example, we will
go to the sites and we will add some green elements. We will just go and create some way shapes for the lettuce. When you have this first shape, let's just go to
the opposite side and let's create
something similar. Here we are, creating
some salt leaves. And then let's just go on top and create half
of the circles, or half of the apes
for some tamas. Now we just need to fill the
areas with some elements. Let's just go to the bottom and create another tamera here. Also, we'll go to the bottom, bottom part here, we'll
create another Tamera. If you want to add some
additional elements, some other elements, you are always welcome to
go and do that. Also, let's just go to the
middle part and create a little triangle for the cheese when you have
something like that. Let's just go to the
bottom and we will add the second part
of our sandwich. We will just need to
go right here and we will need to create another
line going in that way. We will just go a little
bit beyond the frames of the first element and we will just need to repeat
what we have here. What we're doing is just
repeating the lines. You can go and make this line very parallel to what
you have on here. If you want to go there
right between your Tamias, you are welcome to
go and do that. If you don't want
to do that, it is enough to create
this little part. And also if you want, you can go to the
corner and soften it up if you have some parts
that you need to adjust. For example, here
is this corner. You are welcome to go and
adjust your elements. Now when you have
something in that way, let's just go to the middle part and we will add our
facial features. If it's easier for you, you can go and create the cross like that so you will know where you need to go with your
facial features. We will go a little bit above this line that we have
on the horizontal axis. And we will start by
creating a first dot like that you can vary the size of this element at its position. When we have this first dot, let's just go to
the opposite side and create something
similar here. Try to put it on the same line. Try to put it on the same
distance from the center. And try to make the size
of it similar to what you have on your left when
we have something like that. Let's just go between our eyes and let's
create a little mouth. Let's just go with something similar to what we
have on our donut, but we will also add
a little tank inside. Firstly creating the
line on the top, Then we are creating a
little shape on the bottom. And then we'll go inside and
create a tank in that way. If you want, you can go
inside this mouth and shade the top parts if you want to add some
additional elements, for example some eyebrows, you are welcome to
go and do that. Let's just go and add a little curves like
that for our eyebrows. Also, we can just go to the main shape of our
toast and we can add a few dots that later on we can recolor differently and add
some texture to our toast. Let's just go and add
a few dots like that. Now when we are done
with these elements, let's just go again
to our layers. And we will create
one more layer about this layer with
our first toast. We will go to this part that
we have on our top right, and we will create a
little cake piece.
4. Sketch: Cake: Firstly, let's just go and
create a shape like that. When you have it, we
will go to the bottom and we will create a line
going in that direction. When you have this line, we'll go to the top
and we'll create a quite parallel line to
what we have on the bottom. When we have the
rectangle like that, let's first go over
the top and we will create a line going
in that direction. When we have it, we will go to the corner that we already have on the top and we will create a shape going
in that direction. When we have it, we will go
to the bottom and we will make a parallel line to what we have right here on the top. Let's just create a
line going in that way. When we have this new line, let's just go to the right. And we will connect
these two lines with a parallel line to what we
have right here on the left. Can the shape on the
top when you have it. Let's just go to these two
lines that we have on the top, and let's create a curve. We are just going to this corner and we are creating
a curve in that way. The same way as
before. You can hold your Apple pencil at
the end of the line. You will be able to
go over the Soap to the editing mode and
adjust it from here, make the line that
you would like, and then let us get away
from our editing mode. Let's grab an eraser and erase the lines
that we don't need. Now let us get back to our brush and we will
go to the corners. For example, the corner that we have right here on
the bottom right. And we will soften it up. We will create a
little curve here. Again, if you need, go
and grab an eraser. And erase the lines
that you don't need, Get back to the brush and let's
add some beautifications. Firstly, let's just go
to the bottom and let's create parallel lines to
what we have on the bottom. We will color them
differently later on. Now when you have
something like that, let's just go to the middle part and add our facial features. As always, you can
experiment with facial features and create
something on your own. Let's just work with
something similar to what we have on our donuts. We will just go and create
the lines like that. Again, try to put them
on the same line, and when you have the eyes, let's just go right
between them and let's create a little
mouth in that shape. We are creating a digit three that is turned
horizontally. If it's not happening
from the first try, you can always grab an eraser, erase it, and create it one more time when you
have something like that. Let's just go to
the top part and let's create another
melting part. We will start from our left
side and let just go along the whole shape and create
the melting elements again. You can experiment with them. You can experiment
with their amounts, with their size, with everything that you want to
experiment with. When you're satisfied
with the parts, let's just go to the top
and add a little cherry. We will go right
here and we will create a shape of the
circle or an ellipse. You can hold it in the end. Go to the edited
modes and adjust the placements and the
size of the element. Let's just overlap this
top part a little bit, but we are not going
to the corner. Let's position it in that way. And when you are done, let's
just tap on the screen. Let's just grab our eraser and erase this line
that we don't need, that is insight right now. Now when we have this shape, let's just grab our
brush one more time. And we will go and add a
little stem going like that. If you want, you can go
underneath this stem and create a little curve
so it will look like the stem is going
from a little m. Now let's just go over the top part where we
have our chocolate, and let's just go and add
a few elements like that, the same way as we
did on our doughnuts. We will later on turn these
elements into the sprinkles. Now when we have the results, we are ready to move
on to our next sketch.
5. Sketch: Popcorn: Again, we are going
to our layers. And let's create one more
layer above the previous one. When we have this new layer, let's just go underneath
our doughnut and let's create a basket
with the popcorn. Firstly, let's just go and create two descending
lines like that. When you have these two lines, we'll go to the bottom and we will create a curve
going like that. You can play around with
the sheep on this curve. You can make it very curvy, or if you want, you can make
it almost a straight line. When you are done, let's just go over the top and let's create a straight line like
that when you have it. In that way, we will first go to the top
and we will create another straight line to connect these two lines that
we have on the sides. Then we will go and step
a bit from the sides and we will create
similar lines to what we have right here
for the mean sheep. Now when you have
something like that, let's just go to the
sides and we will create a curve going in that way through the whole
shape of our basket. When you have it, we will go
over the soap and we will create a parallel curve to
what we have on the bottom. If you held your line and it's snapped to the perfectly
straight line, you can go over the soap and adjust the option to arc here, Let's just make it parallel to what we have on our bottom. Then we will just go again to our eraser and erase all the
lines that we don't need. If you want, you can work on the top parts of these elements. For example, we can go to
the corners and we can soften them up again, clean everything up
with the eraser. And then let's just
go over the Soap and let's create the
shape of the popcorn. What we need to do right
here is to go along the Soap and we will go
with some bumpy shapes. Just randomly create
the shape like that. You don't need to
be very symmetrical on both sides when you
have this main shape. Let's just go inside and let's create a few popcorn parts. What we need to do
is to create shapes. Going in that way,
you can create a few petals, for example, four or five, and just create three or four or
five elements like this. You can overlap them, you can put them separately
from one another, just create a few
little crumbles like that when we have
it in that way. Let's just go to
the middle part of our basket and let's create
the facial features here. Let's firstly go
and create the ice, similar to what we
have on our toast. We are just going
there with the dots. You can vary their size
and their placement. You know what you need to do. Just create two
dots for the ice. If you want to experiment, you are welcome to go and
do that for the mouth. Let's just go right between the eyes And we will
create a simple smile, but we will raise one
of the corners up. When we have the
smile like that, we will go over the soap where
we have this raised corner and we will create
a little shape like that when we have it. We will go above
our eyes and let's just go and create
lit cell eyebrows. Let's just go and
create similar shapes to what we have on our toast. But this time let's
just go and play around with the position
of our eyebrows. If you want to adjust
the shapes or if you want to adjust some elements, you know what you need to do. We will go to our S ribbon icon. Select the element that
we want to adjust. For example, let's select the whole element of
our facial features. And let's just move
it a little bit down. We will go when it is selected, to our arrow key. And we will just move it down. If you want to adjust the
placement any other way, you are welcome to
go and do that. If you want to make it
smaller or bigger again, you are welcome to
go and do that. When we are done with
repositioning these elements, let's deselect everything by hitting on our S Ribbon icon. And then let's continue
creating our next skitch.
6. Sketch: Toast: We will go to our
layers and we will be working with a
copy of the toast. So let's just go and unhide it. We will tap on this
little check mark and we will go and
select this layer. When we have it selected, we will go to our ero
key on the top left. We will go on the uniform method and we will just
drag the shape down. We will hit flip horizontal. And also let's just go and make it just a little bit smaller. We'll rotate it too. Just go there and find the
position and the rotation that you like when you have everything set in the
way that you like. Let's just go and desalect everything by hitting
on our arrow. Now when we have this ship, let's just go and add
some additional elements. Firstly, let's
just go inside and let's create the same
shape that we have here, but a little bit smaller, just repeating the lines
that we already have. But stepping a bit from the sites when you
have this shape, let's just go inside
of it and we will create a very peculiar shape that later on will be a jelly. Let's just go and create
something in that way, again creating some
melting parts. If it's not happening
from the first try, try it out one more time. Just create some nice shape. You also can go and maybe add some little dots like that
that later on we will recover. Similarly, they are
just some spill out when we have the
shape that we like, let's just go inside of
it and let's add art, facial features this
time let's just go with half of the
circles for our eyes. Let's just go and create
the first shape like that. And then we will go
to the opposite side and create something
similar there. When we have the shapes, let's also go to the top of them and let's create
little lines like that that will represent the
eyelashes when we have them. In that way, if you need to adjust it in any way,
you are welcome to go. And that also, we will just go right
between the eyes and we will create a little
mouth similar to what we have on
our first toast. If you want to add additional
elements such as eyebrows, you are always welcome to go and that now we are done
with the elements. Let's just go again two, our layers, and let's create
one more layer above. We will go to the last
blank area that we have on the bottom right and
we will create the fries.
7. Sketch: Fries: What we need to do is firstly to create something similar to
the shape of the basket. Let's just go and again create two descending
lines like that. When you have these two lines, we will go to the
bottom and we will connect them together
with a curve. Again, you can play around
with its curvature, with everything that you
want to play around with. When you are done, we
will step a bit from this line and we will create
a straight line like that. When you have it, we
will go to the top. We will elongate these
lines a little bit, just create the similar lines. Then we will go inwards and we will create a little
lines like that. When you have these two lines, we will go again down, and then we will go and
create a curve like that. Then we will step a bit
from this first curve, and again we will create
a line going in that way. When you have it in that way, let's just go and create
the actual fries. What we need to do firstly, is to step a bit from this element that
we have right here. We'll go right in the
middle on both sides. And then we will go and start creating the random shapes like that when you have
something in that way. Let's just go down and
we will be starting to create single fries again, create different sizes
for these elements. You are welcome to go and
make some of them thicker, some of them thinner.
It's all up to you. Just go along the whole
line and create a few of these elements when
you have your fries. Let's just go to
the middle part of the whole element and let's
add artificial features. Let's just go again
with the similar ice to what we have on our toast. And let's create
the same dots here. When you are done,
let's just go right between them and let's
create a kissy mouth. If you want to add some
eyelashes or any other elements, you are welcome to
go and end them. Now we are done
with our sketches. Let's just go and position them differently onto our canvas. What we are going
to be doing, we will be going to our layers. We will be selecting
the layer that we want to adjust and
we will be going to our error key and adjust the placement and maybe
size of our elements. Let's just start with our fries. When this layer is selected, go into our error key. Go into our uniform method and adjusting the
placement and everything that we want to adjust from here when you are done selected. And then get back to the layers, go to the next layer
and do the same thing. Now very quickly, let's just
do the same thing with all of our elements
and let's position them nicely onto our canvas. When you're satisfied with the position of all
of your elements, let's move onto our next part, where we again to be
creating our clean lines.
8. Clean Lines: Let's begin this part firstly by changing our sketches
just a little bit. We will go back to our
layers and we will need to put all of the layers that
we have here onto one layer. We can do it very
easily in two ways. We can put one of our
fingers on the top layer and another on the bottom
and make a pinch movement. Or we can go to the top layer, tap on it and choose merge down, Select one of the ways, and put all of your
layers on one layer. When everything that belongs
to the kit is on one layer, we will need to
change the capacity of this layer just a little bit. It will be easier for us to see what's happening on our canvas. To do so, we will need
to go to the icon. We will tap on it, and we will
go to the slider Opacity. We will hold our slider
and we'll move it more toward the left until we still can see
what's happening here. But when it's not that bright, when you're satisfied
with the apacity, let's just tap on the
layer one more time. And let's just go and rename
this layer as sketch. Tap on the layer and choose
Rename from the list. Now when we did it, let's
just tap on the plus icon. And let's rename this
layer as clean lines. When you are done, let's just
go to our brush library. We will go to the
calligraphy folder and we will choose
mono line brush. While we are still here, let's adjust one option, open this brush because we want all of our lines
to be very smooth. Let's just step on
the brush and we will go inside the brush studio. We will go under
stabilization and we will change the
amount of streamline. If it's set at a
very low amount, you can go to the drawing pad
and try out how it works. We will create a line that
will be quite jagged, but we will have a lot
of control over it. If it's okay with you, you are welcome to use
it in that way. If you want to adjust
the streamline, you are welcome to go to
this slider and adjust it. Let's just set it at maximum, and let's try it out onto our
drawing pad one more time. You can see how
smooth this line is, but yes, we lost
a bit of control. You can play around
with this slider, find what works for you. Remember that you can always get back to this option and adjust it later on if you need to find the amount
that works for you. And when you are
done, let's just hit done over our top right. Let's just go and set
the size for our brush. Find the size that
works for you. So something like 4%
will work perfectly. Maybe 3% if you want to remember the size of the brush so you can
use it later on, you can tap on this
little slider, and in this little window
we will need to tap on. Plus you will see that now
we have a little markdown. And if later on you will
increase the size of your brush, you can very easily get back to this markdown and use the same brush that
you were using before. So now our main
goal is to recreate everything that we have
on our, with this sage. Maybe not with 100%
of similarity, but we will need to make it quite similar to
what we have here. But also we will need to make
sure that all of our lines, all the lines that we
have outside are closed. When we are talking
about the closed lines, that means that we
don't need to have any gaps between our lines. This line is not
closed and if we have some gaps later on when we are going to be
aiding our colors, it'll be hard for us to just drag and drop
the color inside. Just pay attention to your lines and try to avoid the gaps. You can use all the options
that we were using before. You can hold your apple pencil
at the end of the line. You can go to the Edison mode. It's all up to you. Let's just go very quickly and recreate the shapes that
we have on our sketch. When we need to
create the elements that are quite symmetrical
on both sides, we can use one option
that procreate has, let me just go to
our range icon. We will go under canvas and
we will total drawing guides. You will see that now
we have the cells, but that's not the
option that we need. We will need to go under eight drawing guides and we will need to go under symmetry. You can see that we
have this vertical line and it has a node. We just need to drag it to the place that
we want it to be. Just go and find the middle
part of your element. So let's just start
with our basket. When you put it
right in the middle, we will it down
over our top right. Now, everything that we are
creating on one side will be mirrored on the
opposite side in that way. Let's just go and
recreate our elements. When you are done with the
symmetry on this element, let's just go to our thrice and let's create the symmetrical
elements here too. What we need to do
is to go again to our range icon going under aged drawing guide and go into this node that we
have on our basket. Let's just move
it to our thrice. Also, if you need to rate the line so it is not
just straight line, we can go to the green node and find the position
that works for us. Try to put it right
in the middle. And when you are satisfied with the position of this line,
let's just hit done. Let's just go and recreate
our elements again. When you are done with
the symmetrical elements, let's just go and
turn off this option. Firstly, we are going
again to our range icon. We are totaling drawing
guide from here. Then we will just need to
go to our layers and we can see that our layer with the clean lines is now assisted. We will need to turn it off. Let's just stop on the layer and choose Drawing Assist
from the list. Now let's just go and continue creating the rest
of the elements. Now when we are mostly
done with our lines, let's just go to our layers and we will hide our layer
with this sketch. Let's just check out whether
everything is looking nice, all the lines are closed, and if we don't need
to adjust some parts, let's just spend
some time here and adjust the parts if we
need to adjust something. If you are satisfied
with your clean lines, let's move on to
our next part where we are going to be
aiding our basic colors.
9. Base Colors: Let's begin this part firstly
by going to our layers. And we will need
to go and create a new layer right between these two layers that
we already have. Let's just go to
earlier with this cage. And from here we will
tap on the plus icon. Let's rename this
layer as brown. We won't be creating
a new layer for every color that we're
going to be using. In this part, again, we are typing on earlier and choosing rename
from the list. Now when we have this new layer, we can go to our color palettes and select the color
with the name beach. If we now go to
some areas that we want to recover and if we
drag and drop the color, nothing good will happen. We will need to set one of our layers with the clean
lines to something different. So we will be able to do
that on a separate layer. Now let's just get
back to our layers. We will go to our layer
with the clean lines. We will tap on it and we
will choose reference. Now if we have our reference on, if we go to our previous
layer brown one, and if we go to our
icon on the top right. And if we would like to drag
the color to the place, we can easily do that. Also on the top we have the
option continue filling. We can just use it to recolor other areas that will
have this color. When you have it, we can
just go to the continue filling and we will need to go to other areas and we
will just tap on the. So just select some
parts that you want to recolor with this color
and go and tap on them. So let's recolor
our bred elements. When you are done
with this color, we will need to tap on this
little check mark on the top. Then we will go
to our layers and we will create
another layer on top. Let's rename it as chocolate. When we have this new
layer, one more time, we are going back to
our color palettes and we will select the
color with the name, dark brown with this color. We will go to this
part on our doughnut. We will use continue
filling and we also will recolor this top
part of our cake. If you want, you can recolor some other areas to your lichen. When you are done
with this color, let's just tap on this little
check mark on the top. And you can see that we miss this little part
on our doughnut. We can just go back to
our layer with brown and we can pick the
color from our canvas, because we already
have this color here. We will just need to go
to the needed color. And we will need to
hold one of our fingers there until we have
this little too. We will need to move it to the place where we
have the needed color. When you have this
color on the top, on the to, you just need
to raise up your finger. Now you can see that here
we've changed our color. That means that we
can just go and drag the color to
the needed place. Now when you are done, let's
just get back to our layers. Let's go again to our
layer with brown. And from here we will
create another layer. Let's just go entry,
name it as middle brown. When we have this new layer, let's just get back
to our color palette and select this brown color. With this color, we will go
entry color this part on the K. If you want to recolor some other
areas with this color, you are welcome to
go and do that. For example, we can go to this bottom part of the
crust entry color tip. When you've recolored everything that you want to recolor
with this color, let's just tap on this
little check mark on the top again. We will go to our layers. We will go to ar with chocolate. We will create one
more layer that will rename a pale brown. Now when we had this new layer, let's just get back
to our color palette. Let's elect this
pale beige color. Let's just drag it to our toast. When you are done, let's
just tap on our check mark on the top and just get
back to our layers. Let's just get back to early with the middle
brown and recolor. This area that we
have on our toast. Again, we can go and
pick the color from our canvas when you have it. Let's just go and drag
and drop the color right here when you have
something like that. Let's just go again
to our layers. And again, we will go above all the layers with the color, and we will create
one more layer above. Let's just go and rename
this layer as Red. Now we are going back
to our color palettes. Let's select this
red color and let's recolor some areas that's
supposed to be red. For example, our Tamtas. Let's continue feeling coloring some elements that we want to be red when you are done typing
on our little check mark. Going back to our lis, creating a new li that
we'll rename as yellow. Now when we had this new layer, going back to our color palette, selecting the yellow color and recoloring some other areas. For example, the cheese and maybe the basket that
we have on our left. Also with this color, we will recolor our fries. When you end down with
this color, one more time, tapping on our check
mark on the top, going back to our
layers and creating one more layer that
will rename as green. Now going back to
our color palette, selecting the green color, and with this color, let's
recolor the slid leaves. If you have the
result like that, if you are spilling the
color all over your canvas, what you need to do is to go to the area that you
want to recolor. And don't lift up
your apple pencil. You can see on the top we
have the option threshold. We will just need to go and find the amount of this
threshold that will work for us and that will fill the area that we want to
fill and not spill out. When you are done
with this color typing on the check mark. Going back to our layers, creating one more
layer that will rename as pink on this layer. Let's just get back to
our color palettes and let's select this
pink red color. With this color, we will
go and recolor our jelly, and also our mouths also, if you recolor your
jelly, for example. And if you don't
like this color, you can do the following. We will need to go to our magic 12 hue
saturation and brightness. You can see on the bottom
we have some sliders. We can just go to
the hue slider and adjust the color from
here, for example. You can just go with
some color like that. You can go to the saturation, you can adjust it from here, find what works for you. When you're satisfied
with this color, you just need to go
again to a magic onantu, tap on it and
continue recolor in the rest of the areas
with the previous color. With this pin cred color. Let's just go and recolor the tongues Also for the element that we have
right here on our mouth. We can just go and
pick the color, the same one that we were using for our lines on this layer. We can just go and fill
the area with this color. Again, we are invoking our
eye dropper to by holding one of our fingers on the screen and then just dragging
and dropping the color. Let's just one more
time, go to our lis, create one more li
entry, name it as white. Now going back to
our color palette and selecting this white color. With this color, we
will go to the top of the basket and also
to the top and bottom part of our
little elements on the right entry
color these parts. Now take a look whether
you've recolored everything. If you have some elements
that are miscolored, we just need to go to the
unit layer and manually recolor these areas
For this little part, let's just get back
to our layers. We will go to our
layer with the pink. We will get this
color that we used here and manually recolor
this little part. Now when we are done
with our basic colors, just go and add some
additional elements. Remember, we had some additional elements on the doughnut, also, we had some elements
on the top of our key. So let's just go and add
these additional elements. Let's firstly go to our layers, and let's find our
layer with this kitch. We will select it,
we will hold it, and we will drag it above
all the layers that we have. Now let's unhide it. And then we will see the
lines that we have here. If you need, we can just go to the icon and adjust the apastis. You will see them more clearly. Then let's just get back to
our layer with the brown, so our chocolate layer from here we will
create one more layer. Let's just stop on the plus icon and let's rename this
layer as beautification. Now we want to see the details that we are going
to be creating right now, only on the areas that we already have on the
previous layer. We will need to clean
this layer with beautification to
the previous one. To do, we will need to tap on the layer and
choose clipping mask. Now everything that we
are creating here is appearing only on the areas that we already have
on the previous layer. Now let's just go and recreate these elements that we
have on our sketch. You can pick any
color that you like and add any additional
elements that you like. When you are done
with the first color, let's just go and pick some bright colors and add
some dose for the sprinkles. When we are done
with the doughnuts, let's just go to the
chocolate part on the top of the cake and
do the same thing here. Also, we will need to go to our layer with the
top of the toast. And we will need to add some
additional elements here. We will need to
go to our layers, and we will go to our layer
with the pale brown here. We can go to the same layer
and add our details here. Or we can create a new layer the same way as we did with
our previous layer. It is up to you if you
are creating a new layer, don't forget that you
will need to clip it to a previous layer and
use it in that way. Now let's just go to this layer and go and select
the beige color. With the beige color,
we will just go and put some dots for our
little part here. ' Now let's one more time go to our layers and hide our layer
with the sketch. And take a look at our
illustration from the distance. Now we are done with
our base colors, but let's just go and add
more beautifications. Firstly, let's just go
and add some cute cheeks. We will get back to
our layers and we will go above our
layer with the white. Let's just tap on the plus icon. And let's rename this
layer as cheeks. Let's select the pin color, the one that we have
in our color palette. Pin crates. Let's just
start creating the cheeks. Let's increase the
size of our brush, and let's just go
underneath the eyes. And let's start creating our little cheeks right
here on this pin color. Maybe it's not seen enough, we can just go and select another color for the
cheeks right here. To do so, when you
have the cheeks on, we can go to our ribbon icon. We can select the elements. And then go again to our
magic quanto hue satration. And brightness adjust
the color from here. When you're satisfied,
let's just go and deslect everything by
heating our ribbon icon. Now when we are done
with our basic colors, let's move on to our next part, where we are going to be adding some shadows and highlights.
10. Shadows & Highlights: Let's begin this part firstly
by going to our layers. And then we will go to our
li with the clean lines. And we'll turn off reference. We are selecting our
layer, tapping on it, and selecting reference from
the list when we did it. Let's just go to the bottom. We will select our
layer with chocolate. We will go to the layer
with beautification. And from here we will
create one more layer. Let's just tap on the plus icon. And let's rename this
layer as shadow. We will clean this layer
to a previous one. Tapping, selecting,
clipping mask. And we will start
eating the shadows. So we will just need
to go and change the blending mode as we
are creating the shadows. We will need a multiply
blending mode. To change the blending mode, we will need to go
to the icon and we will need to find
multiply from the least. As for the opacity for now, we can go with something
like 30 or 50% And later on, if it's not enough
or if it's too much, we can always get back to
this option and adjust it. For now, let's just stay at 30% We will tap on the
layer to close it. Then we will go back
to our color palette and select the color
with the name purple. You can go with the
same color that you used for your
main shape here, or you can try out
some other colors, Maybe it will look better. Now with this color,
let's firstly go over the bottom part and we
will create a curve. Let's just go with
something like that. You can hold your
line in the end, you can go to the editing
mode to adjust the curvature. It's all up to you when
you have this first curve. Later on manually, we will go underneath it and we
will recover this area. You can see that maybe
the 30% is not enough. Let's just get back
to our layers. We will go to the M icon
and adjust the opacity. Also we can see that
maybe we don't want the shadow to be on these parts that we
have on the frosten. What we need to do is to go
to the layer with the shadow. When it is selected, we
will hold it and we will drag it underneath our
layer with beautification. Decide how you want it
to look and where you want your shadow layer
to be when you have it. Let's just go to the rest of the areas that we
have with this color. And let's just go and add
the shadows there too. The next one will
be our popcorn. Let's just go there and
create a line like that. We will go to the same side. We will go underneath this
curve that we have just created and we will just
add the color manually. If you want, you
can go underneath this little elements that you have for your popcorn and
create the shadows on them too. Underneath that, when you
have this shadow right here, we will go to the chocolate
part on our cake and we'll put the whole thing that we
have underneath in a shadow. When you are satisfied with it, let's just get back to
our layers and let's just go to the next layer where
we want to put our shadows. Let's just go to our
layer with yellow. From here, we will
create one more layer. We will rename it as
Shadow one more time. Let's clean this layer. And let's just go to the icon to change the blending
mode to multiply, let's just go with 40, or maybe 50% We will go
again to our color palettes, and this time we will
select the yellow color. With this color, we will
just go to one of the sides. For example, if we are
starting with our basket, Let's just go to the same side where we have our
first shadow on, so it is our right part and
we will just go there and create a shadow going
in that way manually. Let's recolor the rest of
the area if you want to go underneath this white part and create a curve here that
will represent the shadow. You are always welcome
to go and do that. Create the shadow in that way. And let's move on to
our fries right here. Let's just decrease
the size of our brush. And let's just go to
some of the fries. And let's put one of the
sides to the shadow. We can go to the cheese too, and create a line on the soap, So it is some a shadow
going from our toast. When you have done this, let's just go to some other areas that we
want to add our shadows to. Now let's just go and add the
shadow to other elements. Let's just go back
to our layers. And let's just find the layer T. We will create one
more layer above. We will redeem it as shadow. Let's clean this slate
to a previous one. Go into the icon, changing blending
mode to multiply and changing the capacity
to something like 45, 50% when we did it. Let's just get back
to our color palette and let's select
the same red color. We will go and add the shadow to all the red
elements that we have. Let's again go and
start from our fries. And we will create the first curve or line and
create a shadow in that way. Then we will go to the rest of the red areas and add
the shadows to them. To in the same way you can go through all
of the elements or you can keep some of
them the same way as they are right now
without any shadows. When you're satisfied
with your shadows, it's time to add the highlights. Let just go again to
our layers and we will go above all the layers that
we have for our colors. It is our layer with the cheeks. Let's select it and let's
create one more layer. Let's rename it as Highlights. Now we can keep the
blending mode as normal, or we can go and
change it to Ed, or overly, you can try out one of them if
you don't like it, get back to it and
adjust it later on. Let's just start with Ed and we will change the
capacity to something like 30% Let's just then go to our color palettes
and select the white color. We will go to the opposite sides from where we have our shadows. Or suppose shadows like we have on our toast, for example. And we will be going above and we will be
creating our highlights. For example, let's
just start with our donuts and let's go and increase the
size of our brush. We'll go over the top part and we will create a highlight. Going in that way, you
can go with some lines. You can go with some
little elements, some sparkles, maybe some dots. Everything that you want to
create your highlights with. Then let's just go along all of the elements
that we have, again, to the opposite
sides from our shadows. And let's just go and
add our highlights. If you feel that
maybe the opacity on elements are a
little bit too much. Let's just get
back to our liers. Go into R li with
the highlights, go into the icon. And adjusting the
capacity from here. Again, if you want to try out
a different blending mode. Let's just go to the overly. Let's just check out
how it looks with it. If you like it more, you can
keep it as overly or if you want to change it back to you are welcome to
go and do that. Find the apacity of the
highlights that works for you. And when you are done, let's just go and add some beautifications
for our background. What we need to do is to
go again to our liers. We'll go to the bottom. To the bottom, to the bottom. And we will go and
create one more lier. Right here, above li with Brown. Let's just tap on the plus icon. You can keep the lie without any name or you can
rename it to your liking. And we will need to drag this lie underneath
our lier with brown. Let's just hold it
and drag it down. Now when we have this layer, we will be using the
same white color. We will be using the same brush. Or if you want, you
can go and change it. We will go and add
some hearts and maybe some additional
sparkles or maybe elements that we want to add here to our background. Let me just go and very
quickly add them if you want. You can then go to your layers and change the
capacity of this lier. If you find these
elements too bright, find the capacity
that works for you. And when you're satisfied
with everything here we are done with our class. Thank you for watching
this class live review, if you liked it, and consider subscribing for more coy
videos in the future. Looking forward to
senior projects.
 Uni Corn, ⭐Kawaii Art Enthusiast⭐