Transcripts
1. Introduction: Hello everyone, I'm uni and into this class we'll draw a
couple of cute dinosaurs. These class doesn't require any prior experience
or fancy tools. We'll start from scratch
and we'll be using simple techniques
throughout the process. Everything you'll see will
be happening in Procreate. However, if you have other software or want to
try traditional materials, you are welcome to join if
you are ready to start, let's jump right into it.
2. Dino Scheme: Let's try this class
by deciding what kind of Canvas we are
going to be used them, you can see it is a very simple standard square
canvas because both pixel width and pixel
height Art 2048 big sets. If you would like
to use any other dimensions for your canvas, just go for it. S4 DPI, we are using 300
and S Watercolor profile. It is set as SRGB
with this low number. Well, that's all done.
Let's hit Done and it will be redirected to our new canvas. And now we need to
decide what kind of colors we're going to be using throughout the whole class. If you want to use
the same colors that you will see
throughout this class, you can go to the
project and rest herself and download all the materials. And when he did it, Let's
just go straight to our color palettes and we will check out what we have here. And here we have two options of how we can use our colors, the compact view and the cards. We will go to the cars because
here we have the names for our colors and it will be easier for us to
navigate through that. And I still here into
our color palettes. Let's select our
first color that we will use for our Sketch. It will be the color
with dark sea and blue. When we have this
color selected, we will go and select
our brush for this part, Let's just go to our
little icon with the brush and we will go
inside the brush library, will go to the sketches
folder and we will select any brush
that you have here. You can try it out
onto your Canvas. You can select one brush
if you don't like it, go back here and
select another brush. So find the browser
that works for you in 20 years
satisfied with it. You can play with the size. You can play with the opacity when you are done
playing with your brush, let just start by creating a very simple shape that we
will use for our Scheme. We will go and we will
start by creating a shape of the perfectly
rounded circle. Don't worry, it is very simple. We will need to go
to our Canvas and we will need to start
creating our sheep. We will do just with one line without lifting up
our Apple Pencil. So let just go and create
something like that. Hold your line and the ends, and you will see that you snap your sheep to a better one. But this time it looks more like an Alice and we will need
a perfectly round circle. So let's just hold
one of our fingers on the screen without lifting
up our Apple pencil. You will see that you snap your shapes a perfectly
round circle. And if you need to adjust the size or if you
want to rotate it, we can move our Apple Pencil
and achieve these goals. For now, let's lead
at something not too big and not too small,
something like that. And when you are
satisfied with it, we will lift up everything
that we are holding right now. Now when we have
this shape alleges go and find its
approximate center. We will do it very easily
just by creating two lines, one vertical and horizontal. So firstly, let's just
go above or a sheep and we will create a straight line going from top to the bottom, the same way as we have created our circle just with one line. We will create these sheep, hold it at the end and she will see that you snapped
it to a better shape. And you can move your Apple
pencil to edge as the angle. Let's make it straight
when you are done. And if you feel that maybe
your line is not in a center, we can go on the top
where it says line, and it'll be our editing mode. In the edited Modes, you can see that we have
two nodes on the airline. And that means that we can
go and adjust these nodes. So for example, either angle
of your life is not right. We can go to one of the nodes. We can hold our Apple pencil
there and we can adjust it as for moving are aligned more toward the sensor
only for sheep, we will need to go
to any blank space that you have onto your canvas. Hold your Apple pencil there. Just move it to the
place that you need. When you are done, when
you're lying in a center. Let just get away from our editing mode and
we will tap onto our Canvas just with one of our fingers or with
our Apple Pencil. When we have this
first-line ledgers go and create a horizontal
line in the same way. So I go into the
approximate center and we are creating a
straight horizontal line. Let's hold it at the end. And if you feel that you
need to adjust it even more, if you need to move it
more toward the center. Let's just go to our
editing Modes and adjusted. When you have these
first Scheme, we will use these
elements for the hats. We will need to create
another element for our body. So we will go and create the same shape and we will
do it by duplicating it. To do so, we will go
to our layers and you can see that we have
this layer number one, where we have our Scheme. We will need to
make a copy of it. To make it Colby,
we will need to go to this layer
and we will need to swipe it from right to
left and choose Duplicate. Now we have two similar layers and we will go to the top one. When it is selected, we are going to our arrow
key on the top-left, which is our transformed. So let just tap on it. You can see now we have the bounding box
around our objects. We can just go hold
our Apple pencil on some blank space and we can move this shape two
are needed place. For example, let's
just move it down and we will put it a little
bit toward the left side. These byte we will
use for the body. So when you have this
scheme like that, alleges tap once our arrow
key to deselect everything. Now, let us go again
to our layers. And when we have to
lease for our Scheme, we don't really need
to have two layers. We will need to merge
these two layers together. So later on it
will be easier for us to navigate
through our layers. Let's just go to this
layer on the top. We will tap on it and we
will choose merge down Now everything that we have onto our canvas is on one layer. You can check it
out by going into this little checkbox
and you can select it, you will see that
it disappeared. And that means that
everything is on one layer. Now, you can go and rename this layer and
rename this layer. You will need to tap on
it and choose Rename from the list Lynches
cool it Scheme. And when we have
renamed earlier, you can see that it
is quiet, too bright. So if we are gonna be
creating some other elements, it will be quite difficult
for us to see what we are creating because we have the full color
into these Scheme. Ledgers go and adjust the
opacity level of this layer. So later on it'll be easier for us to create our other elements. To do so, we will
need to go to the, an icon near the checkbox
and you can sit on the top. We have this slider opacity. We can grab it and we
can move it toward the left side until we still can see what's happening
onto this layer, but when it is not too bright. So find the opacity level
that works for you. And when you are down,
let just tap on our layer within Scheme one more
time to close this window. Now the last thing that we
will do for this scheme is putting it towards the
center of our Canvas. To do so, we will
need again to go to our heirarchy on the top-left, and we will go to the bottom panel and we
will select Snapping. When this little
window at Beard, we will go to the snapping
option and we will toggle it. When we did it, we will
go again to our Canvas. We will hold our Apple pencil on some blank space and
we will need to move our shape when we have two lines that you have
right now on this screen, they both are orange and one of them is vertical and the
second one is horizontal. When you have these two lines, that means that you
have your element right in the middle
of your canvas. So when you are
done, re-adjust and your elements on this canvas, Let's just go and
deselect everything by hitting our arrow
key one more time. So now we have this very
schematic illustration. We can use this scheme for
creating our first objects, but that is not what we need. We will need to create a little
bit more advanced Scheme. So firstly, let us go to
Aurelius and we will tap on the plus icon and we
will create another layer. You can go enter
a name this layer as Scheme two or
advanced Scheme. When we have this new layer, Let's just go to
this element that we have on the top and we
will recreate it firstly. So again, doing the
same thing as before, just going around this object
and we are recreating, adjust with one line and we are holding this line and yet, hold one of your fingers on the screen to snap it
to a better shape. If you need to adjust it, you overdid soap to the editing mode and
adjust your sheep. Now, when we have
this first elements, we will go and
adjust it even more. So we are going to our
arrow key again on the top-left and on the boards and we are doing under the warp. You can see that we still
have this bounding box, but we also have some intersection inside
this bounding box. That's exactly what we need. That means that we can go to probably any place that we have right here into our bounding
box and we can adjust it. What we do firstly, we are going over the top part. We are going to this knows
that we have on this side and we will drag these nodes
more toward the center. So we will adjust our shape. Firstly, let us go to our nodes. On the top right, we will hold our Apple
pencil there and we will drag this shape more
toward the center. You can clear out with
how far you want to go. But for now, let just leave
it at something like that. When you did it on
the first side. Let's move on to
the opposite one and let's do the
same thing here. We are going to our notes. We are holding it
with our Apple Pencil and we are dragging
it toward the center, trying to do this same thing that we have, owns the rights. So try to make them similar on both sides when you
are satisfied with it. So part we are you
into the bottom. And here we will do
the opposite thing. We will go to our
notes and we will drag them more toward the sides. So firstly, go into
our right side holding our Apple pencil
on the nodes and dragging it more toward the set. When you have
something like that, Let's do the same thing
on the opposite side, holding our nodes and dragging
it more toward the left to try to make it similar to
what you have on the right. When you have something
like that, we can squish, are shaped a little bit and we can make it a little
bit more interesting. So for example, let's firstly
go to work our top part. We will go right in the middle. We will hold our Apple pencil
on the line that we have on the bounding box and we will drag it more toward the center. You can play around
with the whole shape if you want to adjust it
even more, go for it. But the last thing
that we will do here is going to the bottom, again to the middle part, Holden our Apple
pencil there and dragging the whole
shape a little bit up. When you have the
sheep like that, we are ready to
move on and we are ready to work once or
the other elements. Let's deselect everything by heating our arrow
key on the top-left. And we will go and adjust
the shape even more. Because we don't want our little diner to look
right in front of us. We want it to sit a little
bit in three-quarters. So what we need
to do is to think a little bit about
the perspective. When we are talking
about perspective, we need to understand that our objects will be
a bit distorted. The objects that are closer to us will seem a
little bit bigger, and the objects that
are farther from us will be a little bit smaller That what we need to see here. So what we need to do is to
go again to our heirarchy on the top-left and we
will go under distort. You can see we have a very
simple bounding box here. But if you go to any
node that you have here, you will be distorting
your object. For example, alleges go and make this side that we have on the left a little
bit closer to us. So our dinosaur is sitting
on its right heap. What we need to do is to go to our unknowns that we have
in the middle on the right, and we will need to drag it
more toward the left side. So we add distorting our
elements in that way. Firstly, then we will go to our nodes that we
have on the left, the top 1.2, the boards and one, and we will drag them apart. So firstly, go into
the node that we have on the top and we
are dragging it up. And then we will
go to the node on the bottom and we will
drag it a little bit down. So you can see how we
distorted our elements. And Irish sheep
on the right is a little bit smaller than
our shape on the left. So the halves are not equal. If you want to
adjust it even more and maybe make it
more distorted, you are welcome to do it. Basically what we need to
do is to make our shape on the left bigger and re
shape on the right smaller. And so when you have
something like that, ledger, deselect everything by
heating our arrow key. And now you can see that our sheet is not
equal on both sides. And this line that we have for our approximate center
that is vertical, but probably the same
to our horizontal one. They are not going through
our approximate center, so we will need to
create another line. Let's firstly go to our vertical line and
we will adjust it. We will need to
create a curve here because we want our
sheep to be around it. What do we need
to do is to go to the approximate sands are going through the top of our shape. And then we will just create a line going near this
line that we have. Ones are first Scheme, it is now a curve. You can hold it and the ants, you can adjust its curvature. You will need to make sure
that you are going through the center with this
slide when you have it, if you need to adjust it, go over the top two Art
into our editing mode, you can adjust the curvature,
own this elements, and the more curvy you
want this line to be, the more rounded the
whole shape of your hat will be and you will need to
take it into the account. So in that way, Let's just leave it at
something like that. You can see that our
shape on the left are half on the left is bigger
than half on the right. That's exactly what we need. When you're satisfied with
the position on this slide, we are ready to move on
and we are ready to tap onto our screen to get away
from the editing mode. When we are done with this line legis move on to
our body elements. We will firstly go to one of the sides and we will
create a curve here. Let's start from the right. We have this intersection
between two shapes right here. And we can just use it
to create our curve. Let's just go and create a curvy line going
down in that way. And when you have
it on one side, we will need to go
to the opposite side and do something similar here. But again, take a look and
this line that you have in the approximate
center S for the hat, we will need to do the
same thing for the body. Are left side on the body will be bigger than
our right side. So let's just go to the left and we will create
another curve there. You can play around with the
curvature, own these lines. If you feel that maybe you want to adjust them in any way, you are welcome to do it. Basically, what we need to
do is to create the shape that we'll be looking
like a half of the Arabs. But on the bottom, it will have this straight line. If it's easier for you, you can start by creating
as simple ellipse, position it onto this element, and then cut the bottom
part and cut the top part. When you are done with it, ledgers get back to our shapes and let's just work
on them a little bit more. We want our corners on the
bottom to be very soft. So let just go and
create more curvy lines. When you are done
with it, ledgers, grab our eraser tool and we will erase all the lines
that we don't need. And when we have
something like that, we are ready with our Scheme. And that Scheme we will use into our next part where we will
create a decent Sketch
3. Pink Dino: Sketch: To start with this part, Let's just go to the
layers and we'll create one more layer above all the
layers that we already have. So let just tap on
the plus icon and let's rename this
layer as sketch one. Now we will get back
to our LEA with advanced scheme and we
will go to the icon, to the opacity slider. To adjust the opacity, we still need to see what's
happening onto this layer, but we don't need it to be very bright when you're
satisfied with the opacity level
ledgers tap onto our advanced skin layer one more time to
close this window. Now we are getting back to
our layer with this gauge. And whenever I still here
under our layers, if you want, you can go and hide
the layer with this scheme because actually
we don't need it anymore. Or if it's not bothering
you, you can leave it. Now, let just go and
for convenience, we will change the color
of our brush. Again. If it's not bothering you, you can keep the same color
that you have right now. But for convenience,
let's just go and select the color with
the name magenta. In that way, we
will more clearly see what's happening
onto our new layer. Now let us make sure that
we are on the right layer. It is earlier with
sketch number one. And we will go firstly, we will recreate the
shape of the hat. Again, if you are keeping the layer with this
scheme, you can keep it. If it's easier for you to see what you have on your screen, you can go and just for now, hide this layer
with this scheme. What we need to do is to
repeat this line that we have for the hats
ledgers go and do that. You don't need to be very precise because now
we are creating just a sketch and we can
adjust it in any moment. When you are done recreating
this shape layer, just work on the other elements. Firstly, we will go and start creating the spikes on
the top of the hat. So first the way I
go into this line that we have for
the middle part, we will stop a little
bit from it to the left, and we will create a
similar line like that. When you have this line, we will need to go along
the whole shape on the top. And we will need to create a few more guiding
lines that later on we will turn into the spikes. So firstly, let us
go to our left side. We will stop a bit from this line that we
have just created. We will create another
line like that. You can see how easily we
did it and we will need now to go or our right side
entry repeated on this side. And also we will
need to keep in mind that we are working in
a bit of perspective. So the distance from this line that we
will create right now on the right will
be a little bit smaller than the distance
that we have right here. So we can eat are alive by going to this line that we
have just created, that we have on the left. We can go underneath
it and we can create another guiding
line going through the whole shape on the
hat to the opposite side. And we will do it with a curve. So let us go and create
something like that. To make the right curve. You can look at the
side on the bottom and you can just repeat the
alignments on this slide. Basically what you
need to do is to make this line parallel to the line that you
have on the board. When you have this
new guide in line, we have the intersection
between it and between r hat. So when we have
this intersection, we will just go to it
and we will create another line that will be
later on turned into a spike. Let's just go and create
something like that. When we had this new line, let's just go again to
the left side and we will create one more guiding
line a little bit lower. So again, stepping from
this line that we have on the left and create an
another line like that. When you have it, we
will need to move it to the right side and
we will need to create another
guiding line here. So again, we will do the same
thing as we did on our top. We will start by going to this little line that
we have just created, and we will create
another guiding lines. So again, going through
the whole shape of r-hat and repeating the
curve that we have on the top and on the WhatsApp
tried to make this curve parallel to the curves that you have on the top
and on the bottom. You can do it manually or
if it's easier for you, you can just hold your line and the ends and if you need
to adjust it even more, you can go over the
top to Edit Shape. Now when we had this
new guys in line, we will go to the intersection
between it and the hat. We will create another
guiding line right here. So when we have
something like that, Let's just go and turn these guiding lines
into the spikes. Firstly, we, I go into
this line that we have in the middle and we will
create something like that. We are creating a
triangular shape. But instead of the
various treat lines we are creating the curves. You can play with
a curvature indie game play with the size
of these elements. Remember that we are working
inside a perspective. So the part on the
left will be a little bit bigger than
the part on the right. And when you have
the first spike, let just go alone. All of these little
guys in lines and we will turn them in
this similar shapes. Let's just go and try it
out on the left side. Firstly, go into our
next guy is in line and we will need to connect
it with the previous spikes. So let just start
from the right here. We will create our
shape like that, and then we will connect it with the hat by creating
an opposite curve. If you want, you can play around with the size of this elements. You can make them
similar to one another. Or if you want, you can
make them very different. When you have this
next spike ledgers go to the last element
that we have on our left. And let's create
something similar. If you want to work
more on the shapes, you are welcome to do it. And when you are done
with the left side, let's move on to the right and let's do the same thing here. Remember that on this side, our elements will be
a little bit smaller. And if you want to put them on the same line that you have your objects on the labs you can do and create another
guiding line like that, for example, to know
where you need to put your line when you have
this new guys in line, it will be easier for
you to create the spike. And the same thing you can
do to the bottom spike, you can just go to the
bottom part where you have this intersection
between the spike and the hat on the left. And from it just go
along the whole shape. All of your hat create
a guiding line, adjusted if you need to, and just know where you need
to put your new elements. Work more on the
shapes if you need to, if you need to
adjust some parents, just grab the eraser tool and erase the lines
that you don't need. When you are done
with the spikes, Let's just move
on to their body. Firstly, let us go to our
left side and we will recreate this line that
we have on to our scheme. If you want to adjust
it in any way, if you want to make the bottom part a
little bit more chubby, you are welcome to do it. Basically, what we need to
do is to repeat this line. And when you have It's Lynn, just move on to our right parts. Firstly, we can get
back to our layers and we can unhide earlier
with this scheme, because here on the right we have the lines that
we can recreate. Let's just go to this line
that we have right here that we have created on the layer
with the first scheme. So it is our line of the circle. And let just go and repeat it. When you have it. We
don't need that anymore. So we can get back to
our layers and we can go to our layer with this
scheme and we can hide it. Now let just go and
turn this line that we have on to our advanced
scheme into the leg. So we are just going
there and repeating the line that we have
here by going down. When you have the
line like that, we can work one to the
bottom part so we can connect this part on the
left with our little Tommy. What do I need to do is to create the curve
going in that way. Easily have the parts
that you need to erase, grab your eraser
tool and erase that. Now let us go and
work on the legs. You can see that we have
created this line on the right. We will need to firstly
define where our legs will. And so we can go a little bit lower than this line that
we have on the bottom. And we can create another curve that will repeat
the same direction. So let's just go and create
something like that. You can hold this line and
the ends and if you want to, you can go to the editing
mode and adjusted. Remember that this line will
represent where our legs, and you can move it a little bit higher to create very cute legs. Or if you want a longer legs, you are welcomed
to move it down. So for example, let's leave
it at somewhere here and we will tap onto the screen to get away from our editing mode. So now we will need to go to this line that we
have on the right. We will need to connect it with this line that we have
on the board, Sam. And we will need to work on
so the shape of the leg. So we will go to airline that we have
right here on the right, and we can connect it with the line that we
created on the bottom. So we are just repeating
the same shape. We are going a
little bit closer to the center and we will go down and create another line going up to connect
it with the Tammy. Let's create the opposite curve from what we have on the right. When we have
something like that, Let's just go and create
another front plaque. And to do it correctly, we will need to go to
this line that we have for our middle part
determination. And we will just go
and Ellen Gates it. So just go and create
the line going down. So our body is divided two. And now we will need to go
in accordance with this line and we will need to put
our leg on the left side. Now, let us go to our left side and let's
start creating our leg. Firstly, we will
stop a little bit from this line that we
have in the center. And we will need
to go somewhere a little bit lower than the
middle part of our body. So let just make a little
mark down like that. And from this mark we
will just go down and we will create a line
going in that way. And we will connect it with the line that we have
on the WhatsApp. When you have it, we
will need to go toward our left side and we will
need to finish up our leg. So firstly, let
just go and create a line that we have right
here on the bottom. So we are just repeating the same line that we have
for the guiding line. And when you have
the size that you have similar to the one
that you have on the right. We will just go up and we
will create another line that will be quite similar to the line that we have on
the right, right here. When you have
something like that, let's just grab our eraser
tool and we will erase this line that we have for
the bottom part of the body. Now when we have the front legs, Let's just go and work
on the bottom one. We will need to connect
this slack with our booty. So let's just go to this
line that we have on the left and we will create
a bigger curve like that. So we are creating
the similar curve, but we, I go into this line
that we have on the bottom. So Kim, the same curvature. And when you have reached
this line on the bottom, lead just curve it A little bit more and
we will connect it with the line that we have
for our front leg. When you have it, let just grab our eraser tool and we will erase this line
that we don't need. Now let us go to this leg
that we have just created and let us make the line that will
show us that it is a lag. We will need to go to this
line that we have on the left. And from it, we will create
the curve going in that way. We are creating a little crease. You can make it as big as you like or as small as you like, or if you don't
want to create it, you are welcome to
leave it as it eats. Now let just go to our layers and we will hide earlier
with advanced scheme, we will work more on to this element that we
have on the right. So we will need to make
more curvier Tammy. What we will do is to go to this line that we
have for the tummy. And we will just create
another curve like that. So we will connect it with the right parts when
you have the limelight that let's just grab
our eraser tool and we will erase this line
that we don't need. Now you have the
opportunity to look at your elements and if you
want to adjust some parts, you are welcome to do it. Now, let us get back to our
layers and if you want, we can go back to our advanced scheme
and we can unhide it. We can go and work on to
our little tail here. So what we need
to do is to go to our left side and we will need to turn this part that we have for our booty into
a little tail. So firstly, we will go to
this line that we have on the top and we will
just go alone it. And then we'll go
toward the left side and create another
curve like that. So we will need to
make it very balanced and we will need to
make it very smooth. So let's just go and create
something like that. You can play with this
size on this element. And when you are done
with this first curve, ledgers guilt and
connected with the body. We will just go to the
bottom and we will create another curve that will go to our little lag on the bottom. If you want, you can go to this little tip of the tail
and make it very rounded. Or if you want to create
a pointy elements, you are welcome to do it. If you need to erase some parts, go and do that. When you are done with a tail, we will grab our eraser
tool and we will erase this line that
we have for our leg. Now let us get back to our
layers and we will hide our advanced skin layer to check out whether we want
to adjust some parts. If you want to adjust anything, you are welcome to do it. If you are ready to move on, alleges go and start aiding
the facial features. Flight, just add them
on separate layers. So again, we will
go to r plus icon. And if you want to rename
this layer, you can do that. If you don't want to do that, we will leave it as it is
because later on we will merge these two layers together and everything will
be on one layer. Now, on the new layer, let just go to our
fees and we will start by creating
the first circle. We will go above this
central line that we have going through the middle part of our hat that is horizontal. We will go over our left side and we will start
creating our first shape. You can play around with
the size on this elements. You can play around
with its position. You can play around
the curvature of this elements when you have the first shape
that you like, we will need to go to
the opposite side to the right and we will need
to try to recreate it. So let's just go and
put this second eye. You can start by creating the similar size
and similar shape. And when you have
these two elements, we will just go inside them
and we will shade them. And when we have our ice sled, just grab the eraser tool. And with the eraser tool, we will go inside the ice and we will put our
little highlights. So firstly, let's just increase the size of our brush and we will go to this AI that we
have over the left side. We will go to the
top-left quarter and we will just
put one dot here. Then we will go to our right eye and we will do the
same thing here. We will try to put it
on the similar plates. So we are doing again to our top-left quarter and we are putting our
highlights there. If you want to add
more highlights, you are welcome to do so. For example, we can go and decrease the size of our brush. You're underneath
our first highlight and put a few more dots. Do the same on the opposite eye. And when you are
done with this task, let's get back to our
brush and let's work on the facial features
that are left. Firstly, we will go and create
a little mouth ledgers, go a little bit under our eyes, and we will repeat this curve that we have for
the middle part. You can make it as big
or as small as you like. And when you're satisfied
with this curve, let's just go and add
some little teeth. So we will go and
add four teeth. Let's firstly go over our
left side and let's create this shape like that when you
have it on the left side, let's move on to the right one and we will do the
same thing here. When we have two teeth, you will need to decide
whether you want to add more or if you want to
leave just these two 1s If you want to add more ledgers, go to the inside part on this mouth and let's
add two more tea. When you add down, let just
go and add little cheeks. We will go to the
ends of our mouth and we will create a
little shape like that. So I just go strictly underneath the eye and
to the ends of our map. Let's just do the same
on the other side. When you have
something like that, Let's just go and
grab our eraser tool. And we will erase all
these guiding lines that we don't meet. They all are on the
previous leader. So we will need to get back to our layers and we
will just need to increase the size of our eraser and erase this part insights. If you want, you can leave this line that is going
from top to the bottom, that is dividing
our parts by two. When you have
something like that, Let's just get back to
our layers and we will go to our LEA with
the facial features. We will need to adjust
them just a little bit so they will be in accordance
with our little perspective. So let just select this layer
with the facial features. We will get back to
our arrow key on the top-left and we will
do under distorts. We will do the
similar thing that we did for the hats are elements on the left should be a
little bit bigger and our elements on the right
should be a little bit smaller. Again, we're arguing
to our notes and we are adjusting our sheep. If you want to adjust the
position of your elements, you are welcome to do it. You can put them lower or
you can put them higher. It also very good to take a look at your illustration
from the distance. So in that way you have a more clear picture
of what you are doing. When you are done, adjusting
your facial features. Lead, just tap once our
heirarchy one more time. Let's take a look at the whole
illustration in general. And let's just go back to
our layers and we will merge these two layers together if
you are satisfied with that. So to do that, we will need
to go again to our top layer. We will need to tap on it and we will need to choose Merge Down. Now let's just take a look at our illustration one more time. And if you want to adjust
some parts or add something, this is the time when
you are doing it. So for example,
let's just work more once our sketch and
let's clean it up. We'll grab our
eraser tool and we will erase these lines
that we don't need. And now let just grab
our brush and we will go to the body and we will
add a little Tommy here. So what we need to do is to go straight to this
lag that we have on the left and we will go above it and create two
curves like that. And in that way we will create some kind of the heart here. When you have a shape like that, if you want to work
on it even more, you can go with your brush or if you want
to adjust some fires, grab your areas,
are to end areas, deposit shoes on heat. Than what we need to do next is to go and add
little nostrils. So for example, let's just
go strictly between the eyes and we will go and create a
little elements like that. When we have this
little nostrils, let just go to the lax and
we will add little clots. So what we need to do is
to go to the bottom and we will just create half
of the circles there. For the bottom lag,
we will create just one little nail here. Now, let us take a look at our illustration one more time. If you want to adjust it, ledgers go again to our
arrow key on the top-left, and we can go on the work. Here. We can play with the
whole shape in general. So for example,
you can squish it up a little bit and
make it even cuter. So if you want to
adjust your shape, just go to some places on your bounding box
and a jazz them. Take your time playing around and find what works for you. When you are done playing
with your sketch, let's just deselect
everything by hitting our arrow
key one more time. And now we are
ready to move on to the next part where we will
start aging our colors
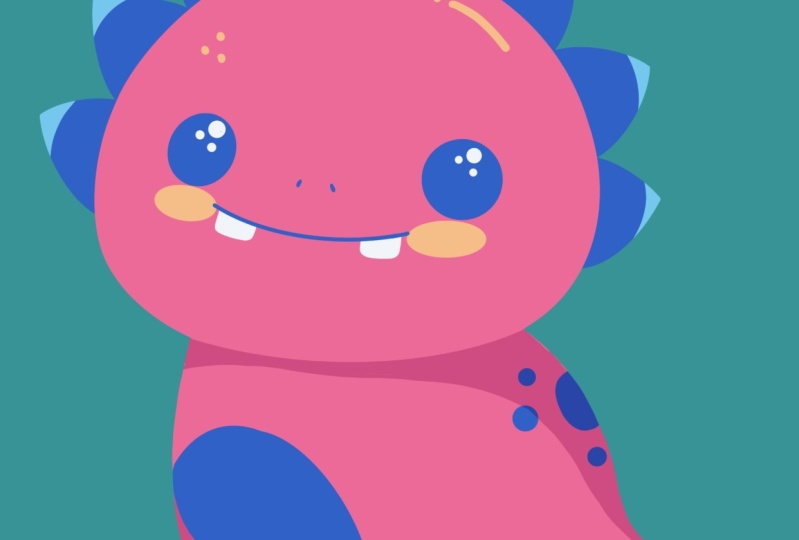
4. Pink Dino: Coloring: Let's tie this file by
going to the layers and we will need to create one
more layer for this part. So let just tap on the
plus icon and let's rename this layer
as being dinosaur. Now we will need
to drag this layer underneath our layer
with this case. So in that way we will
know where we need to put airlines Lynch's do it by going to earlier
with being dinosaur. We will hold it and we will drag it under our layer
with the sketch. Now we will go to our layer with the sketch and we will change
the color of the lines. So in that way, we will know again where we need
to put our lines. Let's just go and select this
layer sketch number one. We will go to our magic
one to own the top-left. We will go under hue,
saturation and brightness. You can see that we have some sliders on the bottom
and we can just go to the slider with you and we can adjust the color here
to something bright. So for example, something
blue will work for us when we are done LED just
tap once our magic one tool, one more time to deselect everything and we will
go back to our leaves. We are going to earlier with
this gauge where I go into an icon and we are
adjusting the opacity. When you are satisfied
with the opacity level, we are getting back to our
pink dinosaur and we argue into the color palettes to select the color
with the name pink. Now when we have our new color, we will need to go and
select a different brush. I go in again to
our brush library. I go into the
calligraphy folder and we are going to monoline brush. We will need our lines
to be very smooth. So we can go into week one
option of our monoline brush. Just tap on it and we will
go inside the brush studio. You can see on the left we
have the option stabilization, so let just tap
on it and we will go inside the
stabilization folder. On the top we have the options streamlined and it
has the slider amount when the amounts of
streamline is low if it goes to our drawing pad and
if we try to create our line, you can see that
it is quite jagged and it is full with our
natural flow of the hat. If it's okay for you, if you want your
lines to be natural, you can leave it as very low. If you want your lines
to be very smooth, you can go and increase
the amount of streamline. When you are at the higher
amount of streamline, you can go again to the drawing
pad and try it out here. You can see how
smooth your line is. And if it's too smooth for you, you can go to the
slider and you can adjust the amount and
find what works for you. When you find the amount
that works for you, let just go and he'd
done over our top-right. And now what we need to
do is to go and recreate this shape only had just
by repeating the outline. And we will need to make
this outline closed. The closed means that we don't have any gaps between our line. So this is not closed
and this is closed. So now let's just go and
adjust the size of our brush. We will go and repeat
the sheep of r hat. Remember that the
lines should be closed and it should
be very smooth. You don't need to
repeat everything just with one line tried out. It's very hardly, you
can just go and create parts on the line and then smoothly connect them
between each other. And also you can use all the
tools that we use before. You can hold your land
at the end and you can adjust it by going
into the editing mode. So now very quickly
let us go and recreate this line that
we have for the hat. When you add down
recreating this line, Let's just get
back to our layers and we will hide our layer with this gauge and we will check out whether our line is
closed and smooth. If you need to adjust
it in some areas, you are welcome to do it. All you need to pay
attention is to the outside part of your line. When you are satisfied
with your shape, ledgers go to our
top-right corner and we will drag and drop
the color in sight. Now we will get
back to our layers. We will unhide our layer with
this gauge and we will do and recreate the shape or the body the same way as before. Just go in there and
recreating the lights. Remember that you
will need to make them smooth and closed. You don't need to repeat
everything with 100% of similarity to what you
have on your sketch. If you want to
adjust some parts, you are welcome to do it. And when you are done
with the outlet, we will just get
back to our layers. We will hide early
with this gauge and we will check
out what we did. If you have some parts
that you need to adjust, go and adjust them. If you are satisfied with
your outline ledgers, go and drag and drop
the color in sight. Take a look at the outlines and the whole shape in
general one more time. If you need to
adjust them far as grab your eraser tool
and adjust that. And when you are down
ledgers get back to our list and we will unhide our
layer with the sketch. Now we will go and create
one more layer for this bias because we would want to
make them a different color. Let's just go and tap on the plus icon and we
will need to drag this layer underneath our layer with a pink dinosaur
with our body. So let's just hold
our layer and we will drag it under
our pink dinosaur. Let's rename it as spikes to make everything clean
into our layers late, just go and put all
the layers that belong to our pink dinosaur
inside that folder All we need to do is to go and select all these three layers, and we will just go and
put them in the group. One layer is already selected. We will go to the next layer, so it will be our pink
dinosaur and we will swap this layer from left to
right with our Apple pencil. You can see now that it's
selected and we will need to do the same
for our sketch. So again, go into this layer and we're swiping it
from left to right. Now when three
layers are selected, we are heating them
group and you can go and rename this group
as being a dinosaur. So now let us get back to early with the
spikes and we will go to the color palette and we will select
a different color. We will use the color
with the name c and blue. So let just tap on it and
we will go and repeat the shapes of our spikes
the same way as before. We are trying to make
them very smooth. So let's just go and do that. When you are done
recreating this lines, we will need to close the shape. So let just go back to
our layers and we will hide earlier with being
dinosaur or our body. So we are going to
this little chat box, We are tapping on it. And all we need to do
is to go to the bottom, all these shapes
and we will need to create a straight
line to connect them. When you are done, Let's just drag and drop the
color insights. If you need to
adjust your shade, grab your areas or
Tool and adjusted, try to make it very smooth. Now, let us get back to our
layers and let's unhide earlier with the body and hide
the layer with the sketch. Let's take a look at the
whole illustration right now. And if you want to
adjust some parts, go to the needed
layer and adjust it. If you are satisfied
with how it looks, ledgers get back earlier
with the sketch. Now let's just work. Once it is tiny area, we will go to our layer
with being designers were, and we will create one
more layer above it. So let's just go tap
on the plus icon and let's rename this layer
as Tommy to make sure that we are working only on the existing areas
that we have on our body and we are not creating any additional elements
outside the sheep. We will need to click this
layer to a previous one. So we will need to go
to early with Tommy. We will tap on it and we
will choose clipping mask. And now if we go to our Tommy and if we would like to
create something here, you can see that
we are not going beyond the frames of the body. So in that way, we will use the same color that
we use for this box. We will recreate the lines
and we will recolor them. Close this shape, drag
and drop the color. When you add Dan ledgers, go back to the
layers and we will hide our layer with the sketch. We will work onto the connection between the leg and
this tiny area. And if you have
something to erase, just grab the eraser
tool and erase it. When you are done. One more time, we are
getting back to our layers. We are unhide and early with this gauge and with the same
color on the same layer, Let's just grab a brush and we will recolor
our little nails. So again, the same
way as before. Just go in there and
creating the outlets, close the shape
and drag and drop the color insights with the same color we can
go and Ellen Gates, this line that we
have for our leg. So let's just go and repeat it. And we will repeat
this little crease that we have for the back leg. Let's recolor that. So nail to. When you are done, Let's just take a look at how
it looks without our layer, with the sketch and whether
we want to change something. If you want to erase some parts, if you want to adjust
the parts in any way, you are welcome to do it. If you are satisfied
with everything here, we will get back our layer
with this gauge and we will go and create one more layer
for our facial features. So let just tap on the
plus icon and let's rename this layer as facial features
with the same color. We will start by recreating
the shapes for the eyes. You can go and increase
the size of your brush. Or if you want, you can go and repeat this shape
manually by creating the outline and then
dragging and dropping the color insects whole
Julian and the end. If you are creating the outline, a jazz the shape, if you need to by going over
the top to edit and moats. When you are done, drag and
drop the color insights. And let's move on to
the opposite side and recreate the second eye. Now with the same color, Let's just go and recreate
this shape for the mouth. Just create a curve, hold it at the ends
and if you need to adjust it over the top
to edit and molds, you also can recreate this little nostrils
with the same color. Now when we are done
with the mouth ledgers, get back to our color
palettes and let's select the color
within the light gray. With this color, we will put
our highlights to the eyes. So again, let us go and
increase the size of our brush and we will recreate what we have One to our sketch. When you aren't done, lenders get back to our layers and we will need to
create one more layer, but we will need to put it underneath earlier
with facial features. So let's just go tap
on the plus icon. We will drag this layer underneath and if you
want to rename it, you are welcome to do it. If you don't want to rename it, you can leave it as
it is because later on we can merge these
two layers together. All that belongs to
our facial features. You can see when you
move this layer down, it clipped to our
previous layer. So we will need to tap on
it and we will need to choose clipping mask to make
it just a regular layer. Now when we have this layer, we will go and recreate
our little teeth. With the same color, that is our light gray. We will go along this
elements and we will recreate that on the same layer, we will get back to
our color palettes and we will select the color
within the orange. With this color, we will go
and recreate our cheeks. Now let us get
back to our layers and let's just hide our
layer with the sketch. Let's take a look at
our illustration. If you like how it looks, we are ready to go and add
some additional elements. So for example, with the same
color on the same layer, we can go and add some dots
to the body and to the hats. For example, ledgers
go over the top and let's add a few
dots like that. If you want to play
with the shapes, you are welcome to do it. You also can go to the body
and add some dots there too. When you are done
with this part, let us get back
to our layers and Lynches go and merge these
two layers together. So we go into our layer
with facial features. We are tapping on it and we
are choosing merge down. Or if you don't
want to merge them, you are welcome to
leave them as they are. One thing that we will do for
the beautification is going to the spikes and we will add a different color
to the top of them. Again, we will do it with
a different color and we will need to use this elements that we
have onto this layer. And we don't want to go
outside this elements. We can go and create
one more layer and clip it to the previous one, but also we can do these
on the same layer. So let's just go to the
layer with this bikes. We will tap on it and we
will choose alpha lock. You can see that we have the checkerboard
around our object, and that's exactly what we need. So we won't be going beyond the frames that we have
one-third this layer. Now let us get back to
our color palettes and we will select the color within
the light c and blue. With this color, we will
go to the top part of our spikes and we will
add the additional color. So for example, let's
do something like that. If you want to add some
additional elements, you are welcome to do it
when you are done with a1, the second color to this bikes, let just go and add a little
shadow onto our body. What we need to do is
to go to our body. We will go above earlier with the tummy and we will create
one more layer above. So again, let's just tap on the plus icon and let's
rename this layer as shadow. We want to clean this
layer to our bodies. So let just tap on it and let
just choose clipping mask. When we have cleats it, we will need to go and
change the blending modes. Blending modes are
different ways your layers can interact
with each other. You can add different
visual effects. And we will be using multiply blending mode to
create our shadow. Multiply blending mode will
darken the color underneath. So now let's just go to this little icon
near the checkbox, and we will choose multiply
from the least S4, the opacity for now, let's leave it at 100 per cent. We can always get back to this option and
we can adjust it. Now Let's just tap onto earlier with the shadow to
close this window. And we will go back
to our color palettes and we will select the
color within a magenta. Now what we need to
do is to go back to the layers and unhide
earlier with this gauge. So in that way we know
where our head ends. Let's just go to
this line that we have for the bottom
part on the hat, we will recreate it and we
will turn it into a shadow. So firstly, let us go and create the first outline,
a jazzy curvature. If you need to buy, go into the editing mode and when
you are satisfied with it, ledgers Gill and
thicken it up a little bit and we will make
a bigger curve. So what we are doing is going underneath the hat
and we are firstly recreate in this shape
that we have just created a jazz the curvature. If you need to, then manually go inside these two lines
and recolor that we can work once or the
line on the right so we can make it a
little bit less thick. For example, we can create
something like that. Just make a little
descending line. And when you have
something like that led just due to
the opposite side, and we will create
another shadow here. We will go to one third of the shadow that we already
have here on the left side. And we will continue by
creating a curve going down. Let's make it very smooth. And when you have it, we will just go and recolor it. When you aren't done. Land jazz go to them, Watson. And we will create a curve here to recolor this
area on the bottom, on the lek suggests
repeat the curve that you have here and then
recolor the bottom area. If you want, we can put the whole teal into
the shadow and we can do it by creating
a curve that will recreate the whole
shape of the body. Remember that we had
it on our sketch. So for example, we can go and
create something like that. Try to connect it very smoothly. Try to make that
transition between the two shapes very
nice and smooth. If you need to adjust it, just go and soften it. If you have something
that you need to adjust, your end, adjusted. And when you have this outline, Let's just go
increase the size of our brush and we will
recolor this area. We can also go to
this lag that we have on the right and fully
put it in the shadow. Don't worry, if you
are going a little bit beyond the frames to
this Tommy elements. You can leave it as it is. You can try to make a
very nice shadow here. Or if you don't
want it to be here, we will adjust it later on and now we will add
one more in shadow. We will go to this little crease and we will add the shadow here. So just create a little V-shape. We also can go to
our lag that we have on the left and we can create a little
shadow in that way. Now let's just go to our layers and we will hide our
layer with the sketch. We will take a look at
what we have right here. And if we need to
adjust some parts, maybe recolor them, we
will go and do that. If you want to leave this little shadow
on the summit area, just work on its curvature
and make it soft. If you don't want to leave it, we can do the following. We can get back to our layers. We can go to our
layer with Tommy. We will tap on it and
we will choose, Select. Now you can see
that only this area that belongs to the Tommy is selected and we can use
it by going to the layers, go into our layer
with this shadow, grab our eraser tool and just go along this part and erase it. When you are done live, just deselect everything by
hitting R S ribbon icon. And now let's just go and adjust the opacity of our shadow. So we are going
back to our layers. We are going to earlier
with the shadow and we go into our m icon, go into our opacity slider, and adjusting the
opacity to our liking. Something 40-50%
will work the best. And when you did it, We are done with our
first illustration. In the next part, we will start creating
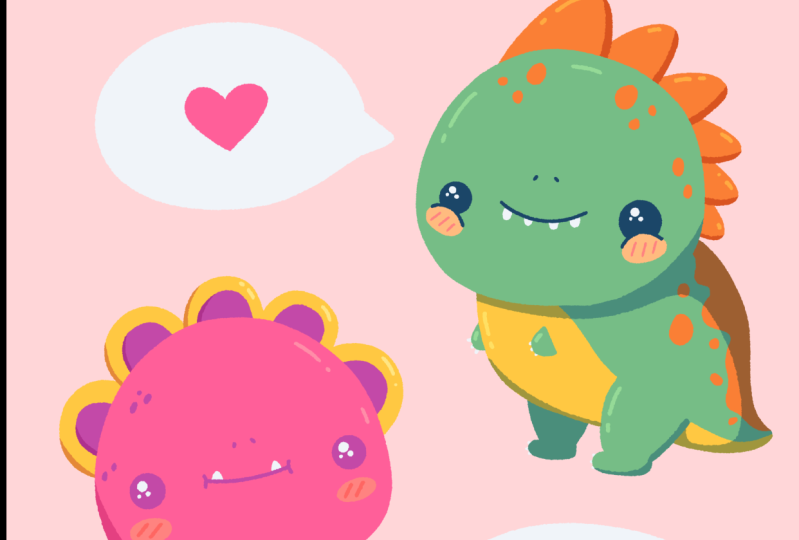
our second dinosaur.
5. Yellow Dino: Sketch: Let's take making our second
sketch firstly by going to Art Brush Library and selecting the same brush that
we used before for our first sketch in part. Let's just get back to our
sketches folder and select the needed brush when
you're done with this task, we will get back to our layers. Firstly, let's just clean
everything up here. We will go to our group with the naming dinosaur and
we will collapses groups. So it is easier for us to
navigate through the layers. Let's just go to this
little V icon near the checkbox on the group
and we will tablets. Now, everything looks fine
and let's just go and hide this group so we have the room for our second Sketch. So again, we're
arguing to this group. We are going to our
little chat box and we are tapping on it. When your canvas is blank, Let's just go and turn
on Arles with Scheme and advanced Scheme will be using them to create our
second Sketch. So when these two
layers are visible, ledgers go and tap on the
plus icon and we will create a new layer that we
will rename as Sketch Tea. And now we will do the same
thing as we did before. We will start by
creating their hats. So again, let's just go
and repeat the shape that we have on our layer
with advanced Scheme, if it's easier for you, you can go and hide the
layer with this scheme. Now when we have only
the advanced Scheme owns earlier ledgers, go and repeat the shape
of the hat if you want to select a contrast
brush for this part, you are welcome to do it
when you've repeating the shape only had
ledgers go and adjust it. So we will go again to
our heirarchy on the top-left and we will go
under the word length, just squish this shape. Eyelids will be done and make it a little
bit more rounded. So we will go to the top parts, to the middle, and we
will just move it down. We also will go to
the bottom part, again to the middle, and we will put it
a little bit up. If you want to play around
with the sheep on the head, you are welcome to do it
in whatever way you want. Basically, what we
want to end up with is a rounded shape on the top
and quite flat on the bottom. When you have the results, something similar
to what you see right now onto your screen, let just go and deselect everything by hitting
our arrow key. Now when we have our heads, let's just go and
work onto the body. So again, let's firstly
go to our layers and we will unhide earlier
with the basic scheme. We know that we have this very rounded
line on the bottom. So let's just go
enter, repeat it. We will create a
very long time it, when you have the
line like that, let just go to this
intersection that we have between our first Scheme and the second
Scheme on the right. And from this intersection we will go and create
another curve, go into the left side, that will go up that line, we will turn into a tail. So basically, again,
we will need to create a very
rounded shape here. And these shapes should
go up on the left. You can play around with the
curvature on this slide. And when you have
something like that, ledgers grab our
eraser tool and we will erase all the lines
that we don't need. Now we don't really need
our first Scheme anymore. So let's just go to
the list and we will hide our LEA we,
the first Scheme. Let's just work onto
the whole shape in general and let's turn
it into the body. So now when we have this
line on the bottom, ledgers go and connect it with our top that we
have on the left. So let's just go firstly, entropy in this line that
we have on to our Scheme. And again, if you want to make
it a little bit choppier, you are welcome to do it. Now when we have this back part ledgers go and finish
this whole shape with a tail. We will need to go
in a scene direction that we have our
live on the bottom. And who will need to make
a very smooth connection between our body and the tail. So let just go and firstly create the line
going in that way. So at the end we are creating
our little triangle. Then we will work onto their
connection to ledgers, go to this little triangle
that we have right here on, It's OK, and we will turn it
into a very smooth curve. When you have something
like that leg, just go and finish
up our teal again. You can play around with it. You can make it point
it, or if you want, you can make it very
rounded and very soft. And as always, you can
play with its size. When you have
something like that, Let's just grab our
eraser tool and we will erase everything
that we don't need. We can go to the bottom
line that we have on the body and we can work
on it a little bit more. We can make it softer
or we can smooth it up. Or if you want, we can work onto this shape on the left
and we can flatten it up. So what we need to do
is to go there and create a line going
a little bit higher. All we want to do is to
make a very soft belly. So if you want to
adjust some parts, go and adjust them. If you want to erase some
lines that you don't need, you grab the areas
that still and areas that when you have
the binary like that, ledgers go and continue by starting to work on to our legs. Before starting to do that, we will need to define
where we want to finish up our legs and the
same way as before. Once our first Sketch, let just go underneath
the belly and we will create a line going through
the whole shape of our body. This line will be horizontal and so you can play
with this position. You can put it lower, you can put it higher. It's all up to you. This line will
define wherever we will finish up our legs. And when you have this line, we will go strictly
to allright parts to this intersection between
the hats and our body From this intersection, we
will go down with the line. You can play around
with the slides. So for example, you can go
and create a straight line. You can play with the
angle on this line. Or maybe you want
to add a curve. So it's all up to you. Let us go and create
something for the slack. When you have this
line lectures go and finish up the whole
leg in general. So first, we will go and create
the curve on the bottom. We will reach this line that we have as a guiding
line on the bottom. And when you have the lack
of decides that she wants, we will go and finish up it by creating a little
curve on the left. Again, you can play around with a curvature on this element. If you want to make
this line straight, you are welcome to debt. Work on the whole
shape in general. And if you need to
erase some parts, go grab the eraser
to erase the lines. Now when we have our
first leg ledgers go to this line that we have for the middle part on
the whole body and we will elongate it the
same way as we did on our first sketch
when they have this guiding line ledgers go and work on to our second front leg. We will stop a little bit
from this center line. And again, we will start by
creating a curve going down. This time let's tilted a little
bit toward the left side. So basically we are
doing something parallel to the line that
we have on the right. When you have this
first-line ledgers go and create the
curve on the bottom and we will try to make it as a similar size that
we have on the right. When you hand the
curve on the bottom, ledgers go with this slide up and we will finish up
our lab in that way. If you need to adjust
your lines in any way, you are welcome to
go and do that. You can grab the eraser tool and erase all the lines
that you don't need. And also let just go to
the left side or this leg. And we will create a
little curve there to show that this leg has some
join somewhere in the by. So we will do
something like that. We will go to this line
on the left and we will create a curve instead of
this various treat Plant. So when you have
something like that, Let's continue and
create the back leg. We will need to make
a smooth connection between the sale and this leg. So firstly, let's
just go to RTL. And firstly, we will
mark down from where we want to start creating
our leg, leg. Just go summary to the
middle own detail. We will make our
little mark and we will do a little bit
to the right from this mark and we will start creating our very smooth curve. Again, we are trying to
make this line parallel to the lines that we
have for our other legs. When you have
something like that, let just go and finish
up this whole leg. We will go to the bottom and creates a little curve there. And then when we have our
little curve on the bottom, we will finish up our leg by creating another curve going up. And when you're done
with this task, let's just grab our
eraser tool and we will erase all the lines
that we don't neat. And now let us get back
to our layers and we will hide our layer
with advanced Scheme. We will take a look at our Sketch and if we want
to adjust some parts, we will go and adjust them. For example, you can
go and work onto this intersection
between the tummy and the leg on the right. And for example,
you can elongate this line and grid occur there. It's not looking that Steve, if you want to erase some parts, go and erase them. If you want to work more on to some other elements, again, you're welcome to go
and do that when you're satisfied with everything
that you see right now, alleges go to the hat and play, just work on the hats. So we will go and create
some little spikes, but this time they will
be in a sheep of circles. So what do we need
to do firstly, is to go to the top
and we will put their first olives on
the top of the hats. Let's just go to
the middle part and create a little bump like that. Hold it at the end and
created as big as you like. When you have it, we will
need to go and create a few more bumps going along
the top part of our hat. And if it's easier for you, you can go and firstly mark
down where you want to put your elements and do
the same on both sides. If it's easier for you, we can do the same thing as
we did with our first Sketch. So you can put the
little marks down on one side and then go through
the whole shape on the head and create a little line
that will help you to put your little mark down
on the opposite sides. In that way, you can go along the whole shape and
add a few more marks. When you hand this
little minds-on ledgers go and turn
them into the circuits. Remember that the shapes
on the left side will be a little bit bigger than the
shapes on the right side. And when you're
done with the hats, ledgers go to the
body and the tail, and we will add a few
more elements here. So again, you can start by
creating a little mark down on the body and the til later on
turn them into the circles. Play with this size,
own this elements. If you want to make them equal, go and do them equal if you want to play around
with the size, some of the elements might be smaller and some of them bigger. It's all up to you When you have this
little Scheme, alleges, grab our eraser tool and we will erase all the lines
that we don't need. Basically what we need
to do is to leave this little bumps on the
top and erase the lines. Insect ends. When you are done
with this fight, let just go and work on
to our facial features, like just firstly,
you and LM gate, this line that we have
for the middle parts. So just go in there
and create an, another curve going up. When you have it, we
will go and start by creating our eyes. Firstly. Firstly, leg, just go to our
lives and we will create one more layer if you want
to rename it, go for it. If you want to
leave it nameless, you are welcome to do it. Now, we will go
for our left side. Firstly, we will start by creating a circle
for the I here. Let just go and do that. You can play with this position. You can play with its size, with everything that
you want to play with. When you have the first eyelid, just move on to the
opposite side and let's create the
similar shape there. She them right away. And for now you can leave
them at similar size. And when you're done
with their eyes ledgers, grab our eraser tool and we
will put the highlights. So again, we will go to one of the sides and we will
just put the dot here, repeat it on the opposite eye. And when you are done, ledgers go and work
on to our mouth. We will go right under our eyes and we will create
a little mouth like that. When you have it, we will go to the sides from this little mouth
and we will create half of the circles like that. You can play around with
the size, own this element. You can play around
with this curvature, with everything that
she wants to play with. When you are done
with your mouth, let just go and add little
teeth these Time lead, just add two of them. When you are done, lynchers go to the sides
and we will add our cheeks. You can play with their size, so you can play with
their position. You can play with everything. When you are done, let just
go and adjust our elements. So again, I go into
our heirarchy on the top-left and we will
go under distort. We will need to make sure
that our elements on the left are a little bit bigger than our elements on the right. So we will do the same
thing as we did before. We will go to our left side and we will make it
a little bit bigger. If you want to find a different placement
for your elements, again, you're welcome to do it. All you need to do is to
find what works for you. When you earn down ledgers, go and deselect everything by hitting our arrow
key one more time. And now we will
get back to Arles and we will combine these
two layers together. We are going to,
earlier on the top, we are tapping on it and we
are choosing merge down. Now, if you want to play
with your sketch even more, if you want to adjust
it in any way, maybe squish it down or make it rounded or anything that
you want to do with it. We can go against our arrow key, we can go to our work method and we can play with our sketch. So let's just spend some time here and find what works for us. And when you're done
playing with your elements, lead to step onto our
Eric Yuan right time. Take a look at here Sketch and if you're satisfied with it, we are ready to move on to our next part where we will
start aging are colors
6. Yellow Dino: Coloring: Let's begin despite by going Art Brush Library and
changing their branch. So we will go to the
calligraphy folder. We will choose monoline brush. And if we need to adjust
our streamlined value, we know what you need to do. We will need to
tap on our brush, go under stabilization
and adjust the amount of streamline
when you're done with it, ledger SAP on Dan and we will go and change the
color off our brush. We'll go into our
color palette and selecting the color
within the yellow. When we have our new color, we will go back to our
layers and we will need to create one more
layer for our lens. So let's just go and
tap on the plus icon and let's rename this
layer as yellow dinosaur. Now we will need
to put this layer underneath earlier
with this case. So let just hold it and
let's drag it down. Now we also will need to go to our sketch layer and we will
need to adjust its opacity. So let's just go to this icon own earlier with this gauge. And we will adjust the
opacity to our ligand. When we aren't done,
we will go and put these two layers
inside the group. So let just select them both, and let's hit group
over the top-right. Let's rename the group
as yellow dinosaur. Now getting back
to our new layer, yellow dinosaur and
we will need to go along the lines that
we have on our Sketch. And we will need
to recreate that. We will need to make
everything very smooth and we don't need to have any gaps between the lines we need are aligned to be solid. So let just go and recreate
the whole shape of the body. You can recreate this
rounded parts on the job, either manually just
by creating a line or you can go and increase
the size of your brush, find the size that works for you and works for this
little elements. Jazz creates a little shapes
with the size of the French. When you are done
recreating the outline, Let's just go to our layers and hide our layer
with this gauge to check out whether everything is looking nice and close. If your line is closed, Let's just go and drag and
drop the color insight. When you have the color
for the whole sheet, legis take a look whether we
need to adjust some parts. Let's just go around some corners and we
will soften them. If you need to work more
on the shape the same way, just grab the eraser tool
and adjust some parts. Or if you need to
add some details, grab the brush and add them. When you're satisfied
with your shape layer, just get back to our
layers and we will unhide earlier with the Sketch. Now Lynch's go and
create one more layer above that we will use for
our additional elements. You can rename it as
additional elements. So now, when we have
our new layer, ledgers, get back to our color
palettes and we will select the color within the
dark sea and blue. With this color, we
will go to this little spikes that we
have once a r-hat, and we will create
the shapes inside. So let's just go and
find this size that will be a little bit
smaller than our spikes. And we will just put this little elements
inside our little spikes. Try to put them in a center
and adjust the size of your brush in accordance with besides all these little spikes. When you aren't done with it, one way Time we
are given back to our color palette and let's
select some contrasts colors. So for example, the color
with the name green. With this color,
we will decrease the size of our brush and we will go to this additional elements to the bottom of them. And we will put one more
adults in each of them. If you want to play
around with a design, all these little spikes, you are welcome to do it. And when you own Zan leg, just go to our layers
one more time. We will go to our LEA
with yellow dinosaur. And above it we will create
one more layer that will clip to a previous one
to add the details. Let's just tap on the plus icon. Let's rename this
layer as details, and let's clip it
by Clipping Mask. When we've clipped
earlier, ledgers, go and select the color we the
name rats with this color, we will go to our legs. Firstly, we will
add little nails. They're the same way as before as we did on our first dinosaur. Or if you want to
experiment a little bit, you are welcome to add
them in a different way. So for example, let just go
and create two nails with this pink color and one nail in the middle
with the green color. If you want to add
different colors, or if you want to
play around with the shapes of this little nails, you are welcome to did. And when we are done, we the nail Slit just go to the body and we will
add some sports, some little dots, some
pattern to the body. You can play around with different shapes, with
different colors. It's all up to you. For example, alleges
go to our body on the left and we will
add a few dots there. We can go again to our
color palettes and select the same color that we use
for the nails, the red one. And with this
color, we can go to some chest area and
add some dots here to just play around with these two colors and add
some additional elements. And when you are
done with this task, let us go back to
our layers and we will create one more layer
for our facial features Let's just go above early
with additional details. We will create one
more layer which will rename as facial features. When we have our new layer, we are going back to our
colored palettes and we are selecting the color within
the dark sea and blue. With this color, we will
go to the eyes and we will recreate them the
same way as before. We can go and
increase the size of our brush and put just two dots. For now, you can leave
them at one size and when you have them ledgers get back to our color palettes. Let's select the color
within the same light gray, and let's just go and
recreate our highlights. You can do the same thing
as we had on to our Sketch. Or if you want to
experiment a little bit and maybe play
with the highlights, add more of them. You are welcome to debt. When you're done with this task, one more time, we will get
back to our color palettes. We will select the color with
the name dark cyan blue, and we will recreate
the shape of the mouth. So let us go and do that. Where new habits we will need to go again to our Layers and create one more leaf underneath our LEA
with facial features. So then just tap on
the plus icon and let's drag this layer
under our facial features. Now when we have this new layer, if you want to rename it, you're welcome to do it. If you don't want to do that, you are welcome to
leave it as it is. Now, we will get back
to our color palettes. And again, we will select our color within the light gray. With this color, we will go and recreate our little teeth. And now, and the same
layer one more time, getting back to
our color palette, selecting the color
within them, rat. And with this color,
we will go and recreate our little
cheeks. Again. You can play with the shapes, you can play with their size. You can play with anything
that she wants to play with. When we're done with this task, we will go back to our
layers and we will combine these to liaise with our
facial features together. So we will go to our facial
features on the top, we'll tap on it and we
will choose merge down. If you want, you can go and add little nostrils by using the
color within the orange. Now, ledgers get
back to the Layers and let's hide our
layer with the sketch. We will need to go to this layer with our
facial features and we will need to put them in accordance with our perspective. We are selecting
this layer and we are go into our
arrow key on that. So plat, we are using the
option distort ledgers, go and make our elements on the left side a
little bit bigger, or our elements on the
right side a little bit smaller depending on what
you have once a year screen. And when you're satisfied
with your facial features, leg just go and deselect everything by hitting
our arrow key. Now the last thing that
we will need to do is to add our little shadows. It's alleges get
back to our layers. And firstly, we will unhide
our layer with the Sketch. In that way we will know where we need to put our shadows. Now, let us go to our layer
with yellow Dinosaur. We will select the layer
with details and above it, we will create one more layer that we will turn
into a shadow layer. So let's just step
on the plus icon. Let's rename this
layer as shadow. Let's clip this layer to a previous one so we
add tapping on it, choosing Clipping Mask, and then we will need to go and
change the Blending Modes. Again, we are doing
to our icon and we as elected multiply
blending mode for our shadow, for the opacity. For now, let's leave
it at 100 per cent. Later on we can get back to this option and
we can adjust it. Now when we are done
with the shadow layer, you select the brush and we
will go underneath our hat, just repeating this line that we have onto our sketch firstly, then we will thicken it up
just a little bit so we are going underneath it and we are recreating the line in that way. You can hold your line
at the end as always, and you can also straight away, go to the right side and make
it a little bit thinner. Basically, what we need to
do is something like that. When you have
something like that, let us go between these
two lines and menu. We will recover this area. If you want to work more
on to the right side, you can grab the eraser tool and make this curve a
little bit softer. Now let us go to our
right side and we will make these curves on the right
a little bit softer two. So we will go to this first spike that we
have on the body and we will create a very soft curve there and we will connect it
with our main shape. If you need to adjust
it in any way, just go and adjust it. Now, when we are
done with this task, let's just go and
work on to our legs. Firstly, we will go to this lag that we
have on the right, and we will fully put
it in the shadow. We will recreate this shape on the Tammy that we
have right here. And we will go menu entry
color the rest of the area. Now, let's decrease the size of our brush and we will go to this line that we
have for our leg on the left and we
will just repeat it. We will soften it out
by creating a curve, go into the right side. When you have the
curve like that. Let's just go to this leg
that we have on the left and we will separate them by
creating another shape. Let's just go and recreate
this line that we have for our leg on the left. We will just go and continue
creating the shade, go into the bottom
with another curve. And when we have
something like that, we will need to work
once our teal and the back leg first and
let just go to Art Tale. We will go a little bit lower than the center
of it and we will need to create the
curve that will recreate the outside outline, just going in that way. And when you have
this outline ledgers go and manually recolor
the bottom part. When you're done, let us
get back to our layers. Let's hide the layer
with this gauge and let just take a
look at our shadow. If when you to
adjust some parts, Let's just grab the eraser
tool and adjust them. And when you are done adjusting
your shadows ledgers get back to the layers and we will adjust the opacity
of our shadow. So I go into early
with the shadow. We are going to Arles L, M, I can own it. And we are playing with the opacity slider until
we find what works for us. And when you aren't done, lynchers go back
to the coal group. We will select it, we will collapse and by go
into this little V icon and we will turn on our
pink dinosaur group. Now when we have these two creatures
overlapping each other, leg, just go and find
the places for them. Firstly, when our yellow
dinosaur is selected, we will go to our arrow
key on the top-left, on the bottom panel, we will select uniform methods. We will just go and
drag these dinosaur down to the left when
we aren't done with it, ledgers go and deselect
everything by hitting our arrow key and just
get back to our list. Let's select the group
with being dinosaur. And let's do the
same thing here. So when the group is selected, we are going to our arrow key. We will go and drag
it to the top part. And let's just go and flip
these dinosaur horizontally. So we will go to
the bottom panel and we will tap Flip Horizontal. If you want to adjust
the size of it, you can go and adjusted
by going to the node, holding it and dragging it down, find the placement
for your Creature. And if you want to
adjust it in any way, if you want to add the
additional elements, you are welcome to do it when you're satisfied with
your little creatures. We are done with our class. Thicker for watching this class, leave a review if you liked it, and consider subscribing for more Kawaii videos
in the future, looking forward to
seeing your projects.
 Uni Corn, ⭐Kawaii Art Enthusiast⭐