Transcripts
1. Introduction: Hello everyone. I'm Uni. And into this class will
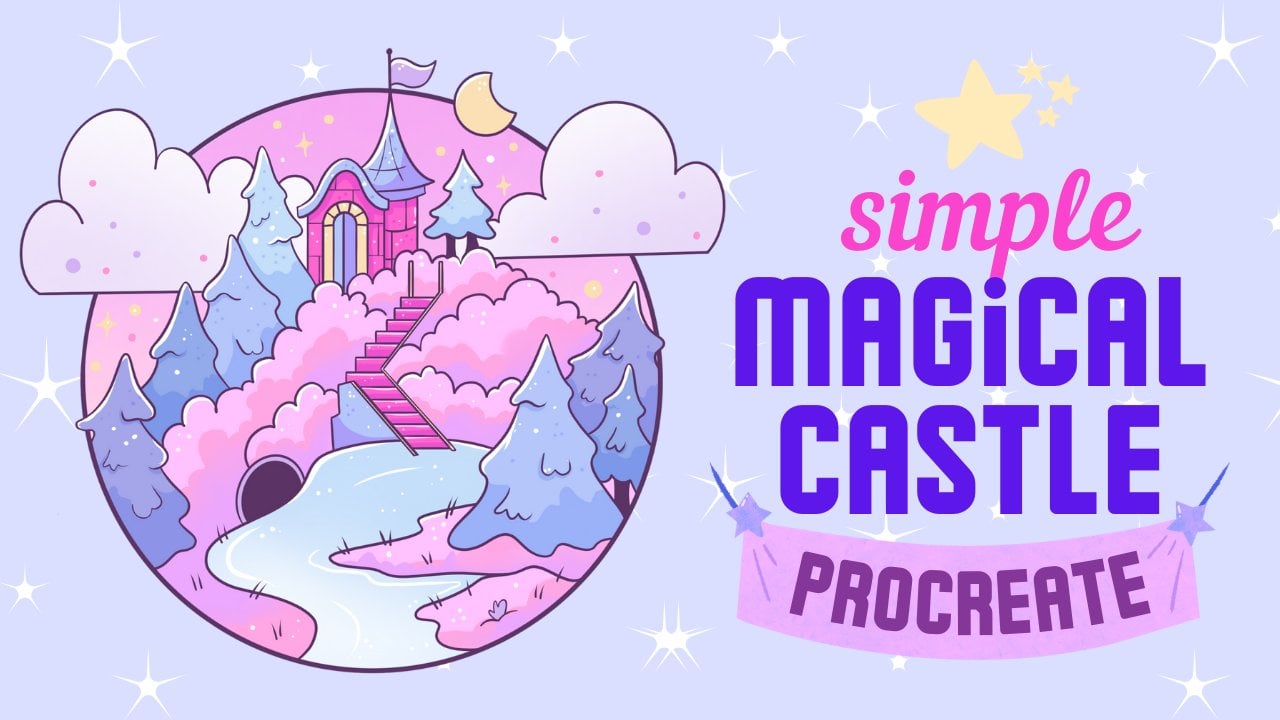
draw acute snow globe. This class doesn't require any prior experience
or fancy tools. We'll start from
scratch and we'll be using simple techniques
throughout the process. Everything you'll see will
be happening in Procrit. However, if you
have other software or want to start
traditional materials, you are welcome to join. If you're ready to start,
let's jump right inside.
2. Basic Scheme: Let's start our
class by deciding what kind of canvas we
are going to be using. You can see it is a very simple standard square canvas
that you can find. In procreate, both
pixel width and pixel height are
set at 2048 pixels. But of course, if you
would like to use any other dimensions for
you canvas, just go for it. As for DPI, we are using 300. And as for the color profile, it is set as SRGB
with this low number. When it's all done, let's just hit Done over our top right. It will be redirected
to our new canvas. Now we will need to decide
what kind of colors we are going to be using
throughout the whole class. Of course, you can go and
pick the colors yourself, but if you want to
follow along and use the same colors that you will
see throughout the class, please go to the
project aster stab and download all the materials
when you did it. Let's just go straightly to our color palettes and let's
check out what we have here. Here we have two options of
how we can use our colors. The first one is
the compact you, where we have our
little icons like that. Also we have cards.
Let's just go there. And we will see that we
have our colors names here. And it will be easier for
us to navigate through them and pick the
colors from our cards. Now, while we are still here
into our color palettes, let's select the first
color that we will use to create our first scheme. Let's just go to our
dark purple color, and we will tap on it to select when we have the color selected. What we need to do next is
to go to our brush library. And we will need to go and
select the sketching brush. Let's just go to the
sketching folder and select any brush that you
like from this folder. You can just go to your canvas, try out onto it, if you don't like
it, get back to the brush library and
select another brush. For example, let's just
select six B pencil. And when we have it, we will start creating our first scheme, that later on we will turn
into our full illustration. The first thing that
we will need to do is to go and create a line that will go through
the center of our canvas. This line should go
from top to the bottom. Let's just go very boldly. And we will start
from the top and we will start creating
our line. Going down the end of the line, we
will hold our apple pencil. And you can see that if we are moving our apple pencil
from side to side, we are changing the
angle on this line. What we need is a
very straight line. Try to make it straight.
And when you have it, let's just lift up
our apple pencil. Now we need to make
sure that this line is right in the
center of our canvas. What we need to do
is to go to our top. Let to our arrow key. We will tap on it.
On the bottom, we will select uniform method. Then you can see that on the bottom left we have
the option snapping. Let's just tap on it. And
when we have the settings on, let's just go to snapping and we will toggle it one more time. When we have our snapping on, we will get back to the canvas. We will hold our apple pencil at some blank space and we
will just go to the right until we have this orange
line that is going from top to the bottom when you
found this orange line. And when you put your
line to this orange one, we will lift up our
apple pencil and we will know that our line
is right in the center. Now when we are ready
with this line, let's just go and
deslect everything by hitting our arrow
key one more time. Now when we have our first line, let's just get back
to our layers. What we need to do is to
create one more layer. To create one more
element for our scheme, let's just go and tap
on the plus icon. And we will create one more
layer above our layer with the first line when we
are the second layer. Let's just get back to our
canvas and we will need to go and create a
perfectly round circle. Let's just go to our
canvas very boldly. One more time, and we will start creating our shape
just with one line, the same way as we did
with our first element. Let's just go and
created that big. And at the end of the line, we will hold our apple pencil. You can see that we snapped
our shape to an ellipse, and we will need to have
a perfectly round circle without lifting up
your apple pencil. Let's just hold one of your
fingers on the screen, and you will see
that you snapped your shape to a
perfectly round circle. If you need to make it bigger, you will not lift everything that you are
holding up right now. We will just move our
apple pencil to the side. And you will see
that we are changing the size of our element. Now let's just make it that big. And when you are done, we will again go
to our arrow key and we will need to find a
placement for this element. Again, tapping on our arrow key, We are using uniform method
and our snapping is on. When we are at our
transform tool, we will need to position our perfectly round circle
in the middle of our canvas on the horizontal axis. So what we need to do is to hold our apple pencil
and the screen. And now we are following this blue line that is going
from top to the bottom. We are not putting
our shape right in the middle of our canvas
on the vertical axis, because we will need to have
some space on the bottom. Let's position it in that way. When we have it in that way, let's just go to our
R key one more time to deselect everything. Now we will need to go to our
scheme and we will need to make a few marks down that Later on we will turn into
our illustration. They will help us to build it. The first thing that we
will need to do is to go to this line that
we have in the middle. We will need to go
to it and put a mark down that will represent
the center of our circle. Let's just go and
do it in that way. When we have this
first mark down, we will need to
go to the bottom. To this line, the same line
that we are using right now. And we will need to make
the little mark down that will have the same amount of distance that we
have on the top. Let's just go and
put it in that way. When we have this mark down, we will need to go to this part and we will need to
find its center. Let's just go and make
a markdown right here. Now when we have the
three marks done, we are done with our scheme. Now let's just go to our layers and let's
clean everything up here. We will go to the first layer, we will tap on it and we
will choose merge down. Now we have all of our scheme
elements on one layer. We will go to this new
layer that we have our scheme on and we will
rename it as scheme. To do so, we will need
to tap on the layer and we will need to choose
Rename from the list. Now when we have
this simple scheme, we are ready to move on to our next part where we'll
start creating our skitch.
3. Sketch: Let's tap our sketching part. Firstly, by changing
the capacity on the lines that we already
have onto our scheme. We need to do that
because we still want to see what's happening
onto this layer. Because we want to use
these guiding lines, but we don't want them to be
very bright and distorbant. What we need to do is
to go to our layers. We'll go to our layer with the
scheme and we will need to tap on the icon near our
chat box On the top, you can see we have
a slighter capacity. Let's just grab it
and let just drag it until we have the
result that we like. Find the capacity
that works for you. And when you are done,
let's just tap on our layer with the scheme
to close this window. Now when we have the skin
layer set in that way, let's just go and tap
on the plus icon to create a new layer that
will rename a sketch. Now let's just start making the shapes and create R sketch. So the first thing
that we will need to do is to go and create the shape of the circle
that we have on our scheme. We can make it exactly the same size as we have
it on the scheme, or we can adjust it
by making it a bit bigger or smaller, the
same way as before. With the same brush and
with the same color, we will just go and create the shape that we
have on R scheme. At the end of the line, we will hold it and we also will hold one of our fingers to snap it to a perfectly round circle. If you want to make the
shape bigger without lifting up everything that
you are holding right now. Move your apple
pencil from side to side when you have the
size that you like. We will go to our arrow
key on the top left. And we will go and put it right in the center
of our canvas. We are using uniform method
and we are using snapping. Now let's just hold
our apple pencil and let's just go and
find the right place. This time we are looking at this blue line that is going
from top to the bottom. Now when you have the
result like that, let's just go and
desalate everything by hitting our arrow
key one more time. Now let's just get back
to our layers and we will go and create
one more layer above our layer with this cage. This will be our auxiliary
layer that later on we will merge together with our main
layer with this sketch. For now, let's just keep
it without any need. When we have this layer, we will need to go and use one
option that procreate has. We would want to go
to the bosom part of our snow globe and we want to create a symmetrical
shape stair. Let's just go and
turn on the option that will allow us to
create symmetrical shapes. Let's just go to our range
icon over the top left. We'll go under canvas and we
will togal drawing guides. When you did it the first time, you will see that you
have the cells that are going through the whole
shape of your canvas. That's the option
that we don't need. So we will just need
to go and change it. We will need to go to
agent drawing guide. On the bottom, you
can see that we have a few options now we are using two D grid and we will need to change
it to symmetry. When we are changing
it to symmetry, you will see that you
have just one line that is going from
top to the bottom. And this line is going
through the center. Now when we have it
set in that way, let just go and tap
down over our top. Right. If you take a look
at your layers right now, you will see that this
layer that we have created for our auxiliary
lines is now assisted. That's exactly what we need. If we go to one of the sides
right now onto our canvas, we will be mirroring our
shape on the opposite side. Let just go and start creating the shapes that we
need on the bottom. We will go to this mark down
that we have on the bottom. From it, we will go to the sides and we will
start creating the curves. Going to the sides, we will need to go to
one of the sides. Doesn't matter which
one you choose, we will just need to
go and create a shape. Going in that way, we
are going a little bit beyond the frames of our
snow globe on the top. And you can see that when we are holding our line at the end, we will probably snap
it to a straight line. We will go to the top
to our editing mode. If we don't have the
option arc here, we will just go and try
it out one more time. Let's just go and create
it more in a curvy way. Now we have the option
Arc on the top. In our editing mode, we will just go there
and we will adjust it. What we need to do is to make a smooth connection between
two lines on our sides. Let's just go to
one of the nodes, for example, to this one
that we have in the middle. And we will drag it
more toward the left, and we will have a
smooth connection between these two lines. If you want to adjust the
size of the elements, go to the other node that
you have on your right, if you are creating these
elements on the right, on the left, if you're
creating it on the left. And let's just go and make
it just a little bit bigger. We are going beyond the frames, if you want to create
it in any other way, if you want to make it
matching to your snow globe, you can go and make it smaller. It's all up to you. All that
we need to do is to create a curvy shape on the bottom when you found the
size that you like, if you don't want to
change the curvature or let's just go and
tap on our screen. When we had the first element, let's just go over the top to the node that we
have in the middle. And we will go and create a quite parallel line to what we have on our bottom Again, let's just go to this node and let's just create another curve. Let's just try to make it curry. And then we will
go over the top to our editing mode and we
will adjust it again. What we need to do is to create a smooth connection
between these two shapes. If you want to change
the curvature, you can go to this
middle node and drag it up or down to adjust it. Also, we will just go to this node that we
have on our side and we will drag it to the shape that we have
for our snow globe. We are making it the
size of our snow globe. When we have the
result that we like, let's just tap on the screen and let's just go and
add more details. Firstly, we will go to this
line that we have on top and we will need to create a little line going
down in that way. Let's just go and create
a line going down. You can make it straight,
or if you want, you can make a little
curve when you have it. Let's just go and create another parallel line to
what we have on our top. The same way as before. Just go in there and create an R line. If you snapped it to a
perfectly straight line, go to the top and use the option arc when we have
this line in that way. Let's one more time go
to the site and we will go and create another line
going toward the site. In that way, when we
have it one more time, we'll go underneath and we will create another
curve going there. Adjust it through
your editing mode, make it parallel to the line
that you have on the top. And when you have it,
let's just tap on the screen and let's go
and create another curve. Going down, what
we need to do is to go to this line that
we have just created. And we will go down
with a bigger curve like that when we
have it in that way, if you want to adjust
it in any way, you are welcome to
go and do that. And then we will just go
to the side and we will create a snow pile
on this middle part. Let's firstly go to one of our sites where we are
creating all of our lines. And let's just go and create
something in that way. We are making some,
a peculiar ship. And all that we need
to do right here is to create something similar
to the pile of snow. And we will need to connect it with our ship on the bottom. Try to make it rounded. And in the end,
try to connect it with your ship in a
smooth and nice way. If it's not happening
from the first try, try out one more time and
find the ship that you like. If you need to erase some parts, grab an eraser two
and erase them. Now when we have the
result like that, let's just go to the middle
part that we have right here and we will add some
additional elements on this little part. Let's just go there and we will create a few
elements like that. Later on we will color
them differently and we will add some peculiar
elements to this shape. Let's just go and create
some ornamental elements. When we have the
result like that, we don't need our
symmetry tool anymore. Let just go again
to our range icon. We will go to our drawing guide option and
we will toggle it, but that's not enough. We will also need to
go to our list and we will need to go to
the layer number three. And we will need to
turn assisted manually. We will tap on the
layer and we will choose Drawing Assist
from the list. Now let's just take a look
at our illustration and we will see that probably
it's not very centered. Let's just go to our arrow
key on the top left. And we will go and try to put this shape according to our element that we
have on the top. We will need to follow the line that is going
from top to the bottom. If you want to adjust
this element in any way, make it bigger or smaller, let's just use our
transform tool to do that. Let's just go and make
it a little bit smaller. We will go to our node that
we have in the center, either on top or on the bottom. And we will drag it down. Try to connect it nicely
with your shape on the top. And when you have the
result that you like, let's just go and
desalect everything by hitting our arrow
key one more time. Now let's just go to our layers. We will go to our
layer with the sketch, where we have our first element. We will grab an eraser
tool and we will erase this bottom part that we
don't need when you are done, let's just get back
to our layers and we'll go to our
layer number three. And we also will grab our eraser tool and we'll erase the parts that
we don't need here. Now let's just take a look
at this illustration. And let's get back to our brush and add some
additional elements. We will go to the parts where
we have our snow elements, and let's just go and create
a peculiar line here. We will just need to
connect the shapes together with not a
very straight line. Let's just go and create a very wobbly line right here when you have
something like that. Let's just go to the
bottom and we will go and create another line
for the snow elements. Firstly, we will go to
this intersection between these two elements and we will start creating the
line going in that way. On the bottom, we are creating a very small line and we are trying to make a peculiar
shape for our snow. You just don't need to create very parallel lines
to one another. You are welcome to go and create something
interesting here. If you want to adjust
the elements on the sides and make them
known that symmetrical, you are welcome to
go and do that too. For example, on the bottom, we can go and create something
in that way and create some different layer of our snow that later on we
can color differently. Also, let's just go and add a few more
elements like that. We can go to the top or to
the bottom and just add additional lines when
we have something In that way we can also go to
our ornamental elements. We can go and add
additional lines there to close the ships. Now when we have
something like that, let's just go to our
lit and we will create one more layer above
our lay number three. Don't worry, keep it
without any name for now. Later on we will merge
them all together. Now what we need
to do is to start adding the details
to our snow globe. Let's just go to
the bottom part. First slip, and we
will go and find the middle part of this element that we have on the bottom. Let's just go between
these two nodes that we already have onto
our guiding line. Let's just make another mark down somewhere
in the middle. And we will just go and start creating the wobbly lines
for our snow elements. Again, let's just go and start
creating some wavy lines. When you have the first line, let's just go inside of it. And let's just go and add a
few more lines like that, or going on the
opposite direction. When you have the snow piles
in a way that you like them, let's just go above them and
let's create a little tree. What we need to do
is to go more toward the top part of our snow globe. And let's just make a
little mark down there. Let's just go to the top, and let's make it
somewhere here. When we have it, we will use this guiding line that
we have in the center. And we will start going to the sides and creating
a triangular shape. Let's firstly go
to our left side, and let's start
creating the lines. In that way, we are
creating a very soft tree, so pay attention to the
end lines of your tree. Let's just go down and let's
start creating our branches. When you reach the bottom, let's just move on
to the opposite side and let's create
something similar here. You can go and make
it symmetrical. Or if you want, you can
go and play around. Create a similar shapes, but make the branches on
the different places. Now when we have the
basic shape for our tree, let's just go and create
the lines inside. We will go more in a
diagonal way and we will start combining our
branches in that way. If you want to work
more on the ship and add more branches or as parts, you are welcome to
go and do that. Let's just go and add three or four layers
on these branches. When you have the
result like that, let's just go over our left side and let's create a
smaller tree here. Let's just go to
the branch that we have right here in the
middle of our tree. From it we will
just go and create another little tree
here when you have it. In that way, let's just
go and add more elements. For example, let's just go
to this part that we have right here and we will
add a little gift here. What we need to do, firstly, is to go to our layers and
create another layer on top. It will be easier
for us to go there later on and erase the
parts that we don't need. Now let's just go to
this part and we will start creating the guiding
lines. In that way, we will firstly go and create three lines going from
top to the bottom. Let's position them in that way. And when you have them, let's just go to the bottom. And let's create the
shapes going in that way. Let's connect these
parts together. And then on the top, we will do the same thing. Make the lines parallel to the lines that you already
have on the bottom. If it's hard for you
to navigate through these lines that you
have on your lier below, let's just go to our Lias. Find it and let just
go and hide it. Now let's just work
onto this little gift. When we have the
shape like that, we will go to the top and we will create a little bow here. What we need to do is to go on our box, and we will firstly go and create
a little element. In that way, we are creating a very rounded rectangle
like that when you have it, we will go to the
sides from it and we will create
triangular shapes there. The shape on the left
will be a little bit smaller than the
shape on the right. Let's just go and
create something in that way if it's easier for you. You can start by creating the shape of a
triangle and then turn the corners into the
rounded elements when you have it
on your left side. Let's do the same on our right when we have the
shape like that, let's just go to the
bottom part of it. And we will need to create
a shape going in that way. We will do it on both sides. Now we will go to the
middle part and we will add two more lines
going in that way. When you have it, let just
work more onto the top part. We will just go and create
the line going in that way. And we will make this shape parallel to what we have
on our line right here. Now when we have it, we will go to the bottom and
we will add some loose ends. We are going to this element
that we have in the middle. And from it we are
going firstly on our left side to create a
line going in that way. When you have it, we will go
and add some thickness to it by creating a parallel line
going down in the same way. On the bottom, we will connect these two shapes with little
curves going in that way. Now when we have
this first line, let's just go to the right. And let's create
something similar here. Let's just go again to this element that we
have in the middle. And let's create a line
going in that way. We will add some
thickness to it and we will connect these
two lines together with a little curve like that when we have
something in that way. Let's just grab our
eraser tool and we will erase all the lines
that we don't need. Take a look at your
illustration from the distance and decide whether you want
to adjust some parts or not. For example, we can go to
this bow and we can go to the size of it and we
can add little elements. In that way, we are
creating little dance. If you want to adjust
the shape in any way, we can use one option
that procreate has. We will go to our magic 12, it is our adjustments
In this list, we will find liquefied
two on the bottom. You can see we have
a lot of options. We will use the option push. If you need to adjust
the size of this brush, you are welcome to go and play around with it if you want, you can go and play around
with other sliders. All that we need to do is to use the option push and go to the areas that
we want to adjust. And we will just push that to create something
that we want. Spend some time here and create the bow in the
way that you like it, when you have the
result that you like. Let's just tap on our magic. One tool one more time
to close this window. Now let's just go to the top of the box and we will
end the lines. To close the box, what we need to do, firstly, is to go over our left and create a line going in that way. When we have it on our left,
we will go to the right. And again, we will go and close the shape with the line
going in that way. If you want to make the
box a little bit smaller, you can go and erase the
part on your right and make it just a little bit closer to the shape that you
have on your left. When you have
something in that way, just grab an eras or two and erase this part
that you don't need. When you're satisfied
with your box, let's just go inside
it and let's just add a few lines that later on we
will recolor differently. Let's just go and create
something in that way. Now when you have
something like that, let's just get back
to our lays and unhide the layer
that now is hidden. We will need to go and find the placement for the elements. To make it more interesting
into our illustration, when the layer is selected, we will go to our arrow key. We are using our uniform method, and let's just go and find
the placement for it. For example, let's just
put it a little bit closer to the middle line
that we have on our scheme. When you found the
position for this element, if you want, you can go and
make it bigger or smaller. It's all up to you when you found the
result that you like. Let's just go and
deselect everything by hitting our arrow
key one more time. Now let's just get
back to our lays and let's start erasing the
lines that we don't need. We will go to our
lier number four, where we have our snow
piles and also our tree. We will grab our
eraser two and we will go and erase the
lines that we don't need. If you want to, you can
play around with this line. So for example,
if you don't want to see the bottom
part of your box, you can just go and create
the line that we had before, that we use for our snow pile. So for example, we can go and create a little snow
pile right here. And then later on we will go
to our lie with the gift. If we don't want to adjust anything here, we
will just go there. We will grab our eraser tool and we will erase
this bottom part. And the same thing we can do with this corner on our right. So let's just get
back to our lis. Go into our li number four
where we have our snow piles. Let's just go to this line
that we have right here. And we will connect it with our snow pile
that we have in front. Let's just go and create
the ship In that way, we will overlap our gift with a very smooth line when
we have this line, if we need to erase some parts, let's just go and erase it. Then we will get
back to our liar, where we have our gifts and we will go and erase
this bottom part. Now let's just go to our gift. And we will go to the right
part, somewhere like here. And we will start adding
additional elements here too. Let's just go to the line that we have right here
on the bottom, and we will add two elements
of perfectly round circles. Let's just go and
create something in that way you can make all the options that
we used before. So for example, if you need to, you can hold your apple
pencil at the end of the line and snap it to
a perfectly round shape. When you have these
two elements, let's just grab our eraser two and we will erase the
lines that we don't need. For example, let's
just go and make this circle that we have
a smaller one in front. We will erase this part
that we have on the right. Also we will go to the bottom, ovid and we will erase
this line that we have overlapped by
our line on the snow. When we have
something like that, let's just go and adjust
our ship on the right too. We will go and erase the
lines that we don't need. Now we will need to go and
erase the lines on our snow. We are going again
to our Leon number four and we will just go and erase these parts that are overlapping when we have
something like that, let's just go and
work onto our tree. Firstly, let's just
take a look at our illustration from the
distance and decide whether we like all the parts or
not and whether we want to go and adjust them
with our liquefied tool. For example, we can go to our
liquefied tool and adjust the general shape of our tree. Make sure that you are on
the Lia with your tree and then just go to liquefy and adjust the tree
to your lichen, for example, let's just
go over our left side and let's just push it
more toward the center. Spend some time here and adjust
the tree to your lichen. When you are satisfied
with how everything looks, let's just go and
desalect everything by hitting our adjustments
to one more time. Then let's just go and add additional elements to our tree. We are going to go and
add some beautification. We can go and create
one more lia for it. Let's just go to our li. We are going to our
li number four, where we have our tree above it, we will create one more lia. Let's just get back to our brush and let's just go to some of these branches and let's
add the hanging stars. Firstly, we will go and create a little
element like that, and then when we have it, we will just go down and
create a little star. If you want to play rounds
with these elements, you are welcome to go and choose different
shapes and create a different element for your liking When you have
the first star, let's just go and create
a few more of them. Let's just go with five. When you have the five stars, let's just go more toward the bottom right where
we have our circles. We will just go there and create two more
hanging elements, and this time they will be
the shapes on the gift. Firstly, let's
just go and create a little element like
that when we have it. Let's just go and create a
box the same way as before. We are starting by creating
three lines like that. If you want, you can
go and make the lines on the sides looking
more toward the center. When you have
something like that. Let's just go to the bottom
and connect the ship. Let's just go to the top and
finish up the whole ship. When you have
something in that way, are ready to go to the top
and create a little ball. Now when you have
this first gift, let's just go a little
bit lower and we will create another
element the same way you can play around with its placement and with everything that you want
to play around with. If you want to add
some movement here, you are welcome to
go and edit too. If you want to go and add
more additional elements, you are welcome to
go and edit when we have these two little
gifts on our right. Let's just go over
the top of our tree, and let's add additional
elements here too. For example, you can go
with the star here or any top part of the tree that
you would like to add here. For example, let's just go make something similar to
what we have right here, but we will just go
and add three on the circles when we have
something like that. Let's one more time go to our
layers and we will create one more layer for the
additional elements that will add to our snow globe. Now let us take a look at
everything that we have here. If you want to adjust
some parts, for example, go and add more of snow piles, you are welcome to
go and do that. You can do it on this
layer, the new one, or you can just go to
the layer where you have these elements and
adjust it from here. It was our layer number four. Now let's just spend
some time here. Take a look at our illustration and maybe adjust some elements. You spend some time
with your snow piles. And when you turn the very
curvy lines that you have, the boring ones, into
some peculiar shapes, let's just get back
to this new layer that we have created. We will go along the side
of the element that we have on the top and we will start adding the
additional elements here. For example, let's just go and start by creating some elements. In that way, we will go to the snow pile that we
have on our right, and we will just go there and
create a little star here. Then we will go above and we will start
adding some petals, maybe some hearts,
maybe some snowflakes. Just go there and create
a few peculiar shapes when we have it. In that way, we will one more time
go to our layers. We will create one
more layer above, and then we will go and start adding the
actual snowflakes. What we need to do, firstly, is to go to our left parts, and let's just go
to this blank space that we have over the top. Firstly, we are going there and creating a line going down. In that way, we are
creating a very soft curve. When we have it, we will go and create a curve going
down in that way. When we have it, we will
go to this blank space, and one more time we
will create a shape like that now when we have
this very weird shape. We will just go to the
top of these lines and we will start creating a little
V shapes in that way. Now let's just go
over the top of all of these lines and let's
create these V shapes. Going to all of them. If you want to go and
add additional lines, you are welcome to go and do that when you are ready
with your first snowflake, let's just go and add
a few more of them. Let's just go and add three more inside this
little snow globe. You can adjust their size
and their placements. Now when we have these four
elements inside our globe, let's just go outside the shape. And let's add three more going in that way
if you want to play around with the shapes
of the snowflakes or if you want to go and
add more of these elements, you are welcome to
go and do that. Spend some time there and create something
that you will like. Now let's just go
along the edge of our snow globe where we have our snowflakes
outside of it. And let's just go and add
a few additional elements. Something scattered here, something like snow or
something in that way. Let's just go and add a few
more elements in that way. Now the final thing
that we will add for our snow globe will be a
little shape on the top. Let's just go straight to
the top part of our circle. We will go to this line
that we have in the middle. We will just go there and create a shape
going in that way. Hold it at the end. Create an Alp, try to make it straight in the
middle of the shape. Now let's just take
everything from the distance, and let's go to our list. And we will hide our
layer with the scheme. Now let's just take a look at everything without
these lines on the scheme and decide whether we want to adjust
some parts or not. If you want to
adjust some parts, find where you need to
go and adjust them. If you're satisfied with
how everything looks here, let's just go and merge all the layers that
belong to our skitch. What we need to do is
to go to our top layer, put one finger there, and also we will go to the bottom layer where
we have our name gauge. We will put another finger there and we will make
a pinch movement. Now everything that we have for our snow globe is on one layer, and we will just go and make the whole illustration
a little bit smaller. When the layer is selected, we will go to our arrow key. And then we will just go to the top node that we
have in the middle. And we will drag it down. Let's just make it that big. And when we have the
result in that way, let's just go and find
the center of our canvas. We are using snapping, so we are looking for these
two orange lines. When you have these two
orange lines on your canvas, you know that you are putting your illustration right
in the middle of it. Now lift up your apple pencil,
and when you are done, let's just go and
desalect everything by hitting our arrow
key One more time. One more time, taking a look at our illustration
from the distance. And if you like it, we are ready to move
on to our next part, where we will start
adding our basic colors.
4. Basic Colors: Let's start working
onto our basic colors by changing the color
of our backgrounds. We will go to the
layers and we will go to our background
color layer. Let's just select the color
with the name, background. When we did it, we will need
to go and change the brush. So we will be creating our illustration with
a different brush. Let's just go to
our brush library. We will go to the
calligraphy folder and we will choose
monoline brush. While we are still here, into our brush library, let's just go and adjust
one option of our brush. To do so, we will need to
tap on our monoline brush and we will go inside the
brush studio on the left, we will go under stabilization. Here on the top, you can see that we have the
option streamline. This option streamline
has a slighter amount. If this amount is set
at very low value, we can go to our drone path
and try out how it looks. If we create the line, you can see that we have
a lot of control over it, but our line is quite jagged. If we want everything
to be very smooth, we can just go to the option
amount and we can adjust it. For example, let's just
set it at maximum. And again, we will
go to our drone path and we will try it
out one more time. You can see that now
it's very smooth, but we have a little
bit less of control. Try out the other amount of the streamline
if you want to. If you don't want
to use this option, you are welcome not
to if you want to try it out now and if you
don't want to use it later, you can always get back to this option and
adjust it later on. Find the amount
that works for you. And let's just go over our top right and we
will hit it down. Now when we have our brush, we will just go to the
list and we will start creating the elements
of our illustration. Let's just go to the list and we will go underneath
our layer with, because we don't want to overlap everything with our new colors. We still want to see what's
happening onto our layer with this cache when we end the
layer with this scheme. From here, let's
just go and create one more layer that
will rename a circo. Now when we have this new layer, we will go to our
color palettes and we will select the color
with the name white. When we have the color selected, what we need to do is to go
to our canvas and we need to recreate this
element that we have on the top the same
way as before. Let's just go there
and create the line. We will hold it at the end, and if we need to adjust it, we will go over the top
to our editing mode. Now when you have this element
and when you edited it, let's just tap on the screen to get away from our editing mode. And then we will go again to our layers and we will
make a copy of this layer. To make a copy, we will need to go to our layer with the circle. And we will need
to swipe it from right to left and
choose Duplicate. Now we will go to the layer
that we have underneath. We will rename this
layer as glass. Onto this layer with the glass, we will grab our white color from our tool on the top right, and we will just drag
and drop it inside. For now, we don't
need this layer, we will just go and hide it and we will get
back to it later. Let's just go to our
little check mark. We will tap on it. We will go and continue creating
our elements here. Now let's just go and continue creating our elements and
we will go to the bottom. Let's just go again to our
layer with this scheme, and we will create
one more layer here. Let's rename it as Botta. For this part, let's
just get back to our color palettes and let's select some of this
pinkish color. You can decide whether you
want to select grayish, magenta, magenta,
or magenta pink. Select one of these colors
and let's just go and recreate this element that we
have on the bottom bottom, just the size of your brush. And as we have this element
of the snow on top, we'll be creating a
new layer for it, so you don't need to be very precise with your
line on the top. Let's just go and recreate the bottom line the same
way as it is on our Skage. We don't want to pay too
much attention on the top, so you can just between
the lines that you have for the snow and
create the line here. All that we need to do is to create a smooth
and closed lines. The closed lines means that we don't need to have any gaps, so we don't have any problems
later on when we are going to be aiding the colors
inside with our color drop, when you have the outline, drag and drop the color inside. And then we will go again to our layers and we will
create another layer here. Let's just go and create
the snow elements. We will go and create
one more layer. We will rename it
as Bottom Snow. When we have it, we will go
again to our color palettes. We will select the white color, and we will recreate
these elements the same way as before we are
creating the outline. And you don't need to repeat
everything with 100% of similarity to what you have
on your Lia with this cache. If you want to
adjust some parts, if you want to play around here, you are welcome to go and adjust the elements
to your liking. What we need to do here is to create the closed
and smooth lines. Again, when you
have the outline, just drag and drop
the color inside. When you have these elements, let's just go again
to our layers. We will go again to our
li with the bottom. And from here we will
create one more layer. We will rename it
as Middle Bottom. Again, we will select the same
color that we used before. For our bottom bottom to not
go to our color palettes, we can pick the color that we already have onto our canvas. To do so, we will need to
hold one of our fingers on the screen and we will
invoke this little tool. When we have the needed
color on the top, we will just lift it up and you will see that you
change the color on your tool that you have on your top right now
with this color, let me just go and recreate this element that we have
in the middle Botta, when we have the closed line, let me just go and drag
and drop the color inside. You can see that we will need
to put this element that we have for our snow globe
underneath our layer. With this element in the
middle of our botta, what we need to do is
to go to our layers. Find this layer with
circle and we will put it underneath our
layer with middle bottom. We will hold our lier and
we will drag it down. When we have the
result like that, let's just start aging, or elements inside
our snow globe. Firstly, let's just get
back to our layers and we will go again to our
layer with middle bottom. From here, we will create
one more layer about it. Let's rename it as snow. We want to end the elements only inside this part that we
have for our snow globe. So how can we do that? We will need to go to our layer with the glass which
is now hidden. We will need to
tap on this layer. And we will need to choose
select when it is selected, only the area that we have for the glass
element is selected. And that means that we are
not going beyond the frames. We will be aiding the details
only inside our shape. When it is selected,
we are getting back to our layers and we are again going to our layer
with the snow. When this layer is selected, we are going and selecting
our white color. And let's just go and start
creating these waves. For now, we will need to create only the outline
that we have on top. And then later on when we are going to be
adding the details, we will be creating the way elements that we
have inside the shape. Now create the basic outline, close up the shape, and add the color inside. When you are done, let
just go and deselect everything by hitting our
ribbon icon over the top left. You can see that this part is overlapping our bottom shape. We will just need to go and put it underneath our middle bottom. Let's just grab this
layer and let's just put it underneath
our middle bottom. Now let us go and add these additional
elements that we have inside our snow globe. This will be our little tree. Let's one more
time go and create one more layer that
we'll rename as tree. For now, let's just hide our layer with the snow
because we are going to be creating our tree with the same white color and it will be a little
bit disturbing. Now on the, on the tree, let's just go and recreate
the ship on the bottom. We will just close the ship with a line like
that and then we'll just drag and drop the color inside when we have
the result like that. Let's just go and start creating these
additional elements as our gift and our little shapes that
we have on our right. First starters, let's just
get back to our liers. Let's create one more lier. Let's rename it as
beautification when we have it. Let's just get back
to our color palettes and let's select this
greyish magenta color. With the grayish, magenta color, we will go and recreate
this shape that we have for our gift
dragon, drop the color. When you are done, let's just go over the top and let's
recreate the ball. Firstly, we will go to
our color palettes and we will select this pink
color with the pink color. Let's just go and recreate the main shape when we have
the main shape for our ball. Let's one more time go to our color palettes and select the color with
the name, Magenta pink. We will go to the
elements that we have on our right and we will recreate
them too, the same layer. Let's just go and recreate these additional elements
that we have on our tree. Let me just go
pick the color and we will add these
additional elements. You can go and try
out different colors. For example, you can
go with light orange. Or if you want to
keep the same colors, for example, the grayish, magenta, magenta, magenta, pink. You are welcome to go and use
them on these elements too. Let's just go and very quickly
recreate these elements. Also, we will just
go to the top of the tree and we will
add the color here to pick one of the
colors that you already use onto your additional
beautification elements. Now when you have the
result like that, let's just get back
to our lis and we will unhide our
layer with the snow. Now we will need to make sure that all of
our elements are set correctly and we will need to erase the parts
that we don't need. We can see that we have these bottom parts
on our gift and on our little elements on our right that we
need to go and erase. Let us go grab our
eraser tool and erase these parts when we have the result like
that, one more time, we are going to our layers
and we will start recreating these elements that
we have inside our globe that are above
our main elements. Let us go and create
one more layer. We will rename it
as miscellaneous. And firstly, let's
just go and create these little additional elements that are flying parts and so on. So firstly, let's
just get back to our color palettes and let's
start picking some colors. For example, let's just go with light grayish purple
And we will go to the soap and we will recreate these additional elements
over the top part. Select a different color for other elements that
you have on the soap, For example, let's just go and select this grayish
purple color. We will go over the soap and we will recreate these
flying parts. Now let's just go and recreate these star elements and also the element that
we have above it, that is our little heart. Let's just go and
pick some color from our color palettes and
let's recreate these parts. Now let's just go and recreate these elements that
are some round it. We will go pick some
colors and let's just go and add this
to our snow globe. If you want to add more details, you are welcome to go and do that when we have the
result like that. Let's just go and start
adding our snowflakes. We will go and do that
on the separate layer. Let's just go create
one more layer that will rename as snowflakes. We will go and grab the
white color and we will go and recreate all of
them with a thicker brush. And when we are done with
these elements one more time, let's just get back
to our layers and we'll create one more
layer that will rename as miscellaneous Two want to
this layer we will go above our snow globe and we will add these additional elements there
So you can use one color. Or if you want you can go
back to a color palette, select a few of the colors, and create these little
elements when you are done. The last thing that we
will need to add is this little element that we have on top of our snow globe. Firstly, let's just get
back to our layers. And let just find the
layer with our circle. And above it we will
create one more layer that will rename as additional
elements on the top. Now let us get back and
select the white color, and let's recreate
these elements. Drag and drop the color
inside when you are ready. Now let us go and check
out how everything looks. Without our lines on the skit, we can see clearly what we have. And if we need to
adjust some parts, we will go to our layers. We will find our layer with
the skit and we will hide it. Now let's just take a look
at everything that we have here and decide whether we need to adjust
some parts or not. If we need to adjust some parts, go to the needed layer and adjust these little parts
that you need to adjust. When you are done
adjusting the shapes, we are ready to move
on to our next part where we are going to be
aiding the beautification.
5. Shadows, Highlights & Beautification: Let's begin this part by
rearranging some of our layers. What we first need to do
is to go to our layers and we will go to Li with
circle and additional top, and we will merge them together. Let's just go to Arly
with additional top. We will tap on it and we
will choose merge down. Now we will need to grab
this new layer and we will need to put it underneath our layer with middle bottom. Let's just hold
it and let's just drag it up when we have it. In that way we will need to go and grab our lier
with the glass. If it's easier for you, you
can go and unhide it for now. And you will see that you are overlapping the bottom part too. We will need to
put it underneath our middle bottom part Also, we can just go and put it underneath our layer
with the circle, or we can keep it
as it is right now. And if we need to
adjust it later on, we can do it later on. Now let's just go and hide it, and we will start adding the
details to our elements. Firstly, let's just
work onto our bottom. We will go to the layer and we will start adding the
additional colors there. Let's just go and create
one more layer above. And we will rename
this layer as Details. We want to add the
details only on the existing areas that we
have on our previous layer. And that means that
we will need to clip this new layer
to our previous one. To do so, we will need
to tap on our layer with the details and we will need to choose clipping mask
from the least. Now everything that
we are going to be creating on
this layer will be seen only on the existing areas that we have on our
previous layer. Now let's just go and
select a different color. Let's just go and start
with magenta pink. When we have this color, we will need to go
and change our brush. Let's just go to
the brush slide. We will go under
air brushing and we will select
medium blend brush. Now very softly, we will go
to some of the areas that we have on our bottom part and we will start adding
additional color. You can see that
we are adding it only on the existing areas. You can go along
the whole part that we have here and add
this additional color. Pay more attention to the parts that you have
underneath the snow. When we have done it
with the first color, let's just go and
select one more color, and we will add it here too. Again, we're going to our
color palettes and we will select the color with
the name Gras magenta. And now we will go
to other areas. And again, the same
way, very softly, we will go and add this additional color when we
have something in that way, let's just go and add
light orange color. Let's firstly go and select it. And we will go more toward
the center on this part. And we will add it here
again, very softly. We will need to create smooth transitions between the colors. And we don't want to
create something patchy, we want to create a nice
and smooth gradient. Let's just go and
end this color. If you want to add
it somewhere else, you are welcome to
go and do that. If you want to add more colors like this or maybe other colors, you are again welcome
to go and do that. If you want to go and
try out this pin color, you can go near this
orange color and create a nice smooth transition
between these two colors, play around with these elements. And now to create a smoother transition
between the colors, we can go and use one
option that procreate has. We will go under
our magic one tool and we will go under
Gauchian blur. You can see on the top we have
the option Gaussian Bloor 0% And if we go to our screen
with our Apple pencil, if we hold it there and if
we move it toward the right, you will see that you are
creating some blur here. And it is making smooth
transitions between your colors. Find the amount of blur
that works for you. And when you are done,
let's just go and deslate everything by hitting our
magic one tool one more time. Now when we have
something like that, let's just go again to
our layers and we will create one more layer above
our layer with the details. You can rename it as details to or you can
keep it as it is, just clip it to a previous layer to clean the layer
one more time, you will need to tap
on this layer and choose clipping
mask from the list. Now let's just go to
our color palette. And let's select a light
grayish purple color. We will go to the bottom part of our bottom part and we will create a line going
through the whole shape. Let's just go firstly
to our brush library, calligraphy folder,
monoline brush, and let's just do
it with this brush. If you want, you can hold your line at the
end if you want. You can go to the editing
mode and adjust it. Try to make this line even going through the whole shape when you have
something like that. Also, let's just go to some
areas onto our bottom. And let's add a few elements
with this color again. For example, let's just go to this little dent that
we have over our left. And let's create some
triangular shape like that. Let's just go inside of
it and let's recolor it if you want to go and
add more details like that. Going through the bottom
part of your illustration, you are welcome to
go and do that. For example, you can go
and add some little dots, spend some time here, and create some beautifications. Now when we have
something like that, let's just go again
to our layers. We will go to this
layer where we have our additional elements and we will change the apacity of it. One more time. We are
going to our icon, go into our apastis slider, grabbing it and moving it toward the left until we have
a transparent result. Something 20-30%
will work perfectly. If you want to make
it more bright, you are welcome to go to the Apastis slider
and play with it. When you are satisfied
with your results, let's just go to our
layers one more time. And we will un, hide our
layer with the skitch. We have the additional
elements that we have on our skitch and we will just
need to go and recreate that. Let us go and find
our layer with middle bottom and we will create one more layer
above it again. Let's just rename this
layer as details. Let's clean this layer
to a previous one. Tap on it and selecting
clipping mask. Also let us go and change our
blending mode to multiply. When we are changing our
blending mode to multiply, we are going to be creating a transparent shadows
into this little parts. For now, let us go and keep
our capacity at maximum. We need to adjust it. Later on, we will get back to this
option and we will adjust it. Now let's just get back to our color palettes and
select this magenta color. If you want, you can go and
select any other color. But now let's just go
with this magenta. When we have it, we will
go to the areas that we have on the bottom and let's
just go and recreate it. Now let's just take a look at these parts without our
lines for this sage. So we are going
to our layers and hiding our layer with this sage. Then we will go to this
layer with the details and we will change the
opacity of this layer. Again, we are tapping
on our M icon, which is our multiply
blending mode. And we are going to
our apasti slider. Let's just go and change it. We will make it a
little bit transparent, find the amount of capacity
that works for you. Now let's just go and add the details on the top
of these elements. We will create some of the
shadows on the top parts. To make it happen, we will need to go to this layer
with details, we will need to tap on it, and we will need to
choose alpha lock. You will see that now you have the checkerboard
around these elements, and that's exactly what we need. Our alpha lock works similarly
to our clipping mask, but we are getting it
on the same layer. We can go to these
elements and we will be creating another element on
the inside these shapes. We are not going beyond the frames now when we
have it set in that way, let's just get back
to our color palette and let's select another color. For example, let's just
go with this pin color. When we have it, we will
go above these parts very accurately and we will start aiding our
additional color here. If you feel that maybe
this color is not enough, we can go to our color palettes and on the bottom we
will go under disc. You can see we have
the color wheel here, and also we have these colors
inside the color wheel, we will just go to
the peaking part and we will set the color
to a darker one. If you want to change
the hue of the color, go to the color wheel
and change it here. For example, let's just go with more purple color when you
have the color that you like. One more time, we are going
to the top of the elements. Let's just go and create the outlines here
when you are ready. One more time, let's
just get back to our layers and we will unhide
our layer with this skitch. We also have these elements
on the top of this part. Let's just go and
add them here too. One more time we
will go and create one more layer above our
layer with the details. If you want to rename it, go and rename it as details to what we need is
to clip this layer to our previous 11 more time typing on the layer and
selecting clipping mask. For now, let's just keep normal blending mode and we will go to our
color palettes. Or easier for you, you can go to the colors
that you have on the bottom. What we need to do is to
select the white color and go to this middle
part that we have on top. And let's just go and
recreate this element. Let's just go and
increase the size of our brush to make it just
with one line as always. Hold it at the end. And if you need to
adjust the line, go to the edited mode and adjust it from here
when you have it. Let's just tap on the screen. Let's just go and decrease
the size of our brush. And we will go to the top, top part of this element. And we will add
another line here. Let's just go there and
do the same thing here. We will hold it at
the end as always, and we will adjust it from our
edited mode if we need to. When you have the
result that you like, let's just tap on our screen. And let's just go back to our layers to hide our
layer with the skitch. Also, we will just go to this layer where we
have these two stripes. We will go to our icon and we will change the
opacity of this layer. Let's just find something
that works for us. And when you are satisfied
with the result, let's continue adding
the additional elements. What we need to do is
to add these gluey affects the same way as
we have it on the botta. Let us go and add the
additional colors to this part. Two. What we need
to do is to go and create one more layer above
this layer with the stripes. And if you want, you can
go and rename this layer as additional colors
the same way as before. Let's clean this layer
to a previous one. When we have it, we will go
again to our brush library. We'll go to the
airbrushing folder and we will select
medium blend brush. Now let us go and start
selecting different colors. If it's easier for you,
you can go under palettes and under cards select
the color that you like, and let's create
something similar to what we have on our botta. Very softly. Let just go and
add the additional colors. When you have the
result that you like, let just go and add the smoother transition
the same way as before. So we are going to
our magic one tool, Gaussian blur, and we are
adding some blur here. When you have the amount
of blur that you like, let just go and
deslect everything by hitting our magic one
tool one more time. Now we will just need
to go to our layers. And probably we will
just drag the lay underneath our layer with the details to have
a better result. You can see how it changed
and if you like it, we are ready to move on and add additional colors
to other places. Now let's just go
to our layer with the snow and we will start adding the
additional colors here. Let's just go and create one more layer above
the same way as before. Let's rename it as Details. Let's clean this layer
to a previous one. And then we will go to our icon. And we will change the
blending mode to multiply. For now, let's just
keep the opacity at 100% And when we
have this layer set, let's also go to our layer with the sage. And
let's unhide it. Getting back to arlier with the details on arlier
with the snow. And then we will get back
to our color palette. And let's select some
purplish color there that we will use as the shadow on
the bottom part of our snow. For example, let us go
with light grayish purple. And now let us go
with the same brush, so it is our medium blend to
the bottom part of our snow. And very easily, let us go and start adding
the additional color. There you can follow
the lines that you already have
onto your sketch, or you can just go
randomly and create the nice and smooth connection
between these two colors, add more color to
the bottom part, and try to make a smooth
transition between this color and the
white color the top. If you need to create
a smoother transition, you can always go to adjustments Gaussian bloor and
add some bloor here. Also, if you want, you can go and add multiple
colors to this part. When you are done with light
grayish purple, for example, you can go with
grayish magenta and add some dots to these elements. Just try to blend
the colors smoothly. If you need to
take a look at how it looks without the
lines on the skate, you are always welcome to
go to the layers and hide the layer with the skitch
if you overdid some parts. You are always welcome
to go to the Smh too, which is our second
two on the right. Grab it and smooth the colors. Or the same way as before. You can go to your adjustments. Guscin blur and try to add, blow even more when you have the smooth
colors on the bottom. Let's just go again
to our layers and we will unhide our
layer with this kitch. We will get back
to the layer with the details and we will
create one more layer above. We will clean this layer
to a previous one, and we will rename
this layer as shadows. Let's just go to our icon. And again, we will change
the blending mode to multiply as for the
capacity for now, let's just go with 50% And if we need to
adjust it even more, we will get back to it later. Now let's just get back
to our brush library. We'll go to the
calligraphy folder and we will choose our
monoline brush. We will go to our
color palettes then, and we will select light
grayish purple color. Let's just go to these parts where we have our little waves. And we will start adding the shadows underneath
these lines, add some thickness to them, and drag and drop
the color inside. Let's just go through all of these little lines and
let's just add our shadows. When you are mostly done, we can get back to our layers
and hide our layer with this cage to check out how
it looks without our lines. And if we need to
adjust some parts, let's just go and adjust them. You can go and create very smooth lines,
or if you want to, you can go and create some peculiar shapes
and in that way, add the texture to your illustration when you
have the result like that. Let's just go again
to our brush library. We will go to the
airbrushing folder, and again, we will select
our medium blend brush. When we have our brush set, we will go to our adjustments, hue, satration and brightness. And on the top where we
have this huge satration and brightness and a little
arrow on the bottom, we will just go and
tap on this arrow. And we will choose the option
pencil when we have it. We will go to some
of the places on these little shadows
and we will add a different color to the
parts again, very softly. Let just go and in
criticize of our brush and we will go and start
adding the additional color. Here you can see that you are changing the color
at some places. And when you have it, we will go to our
hue slider and we will find a color that
will look good here. For example, some purplish
color will work perfectly. If you want, you can go and play around with
the saturation and brightness and find
what works for you When you're satisfied
with this part. Let's just go and
desalect everything by hitting our magic
anto one more time. Now we will go and start adding the shadows
to other elements. Let's just get back to
our layers and we will go to our layer with
the tree one more time. We are creating one more layer above and we will
rename it as shadows. Let's clean this layer
to a previous one. Tapping, selecting,
clipping mask. And then we are
going to our icon to change the blending
mode to multiply. For now, let's just keep
it at 50% When we have it, we will go to our color
palettes and let's select one of these colors that
we have in the third row, grayish purple, CN blue
or grayish purple. Select one of these colors. And let's just go to the
bottom part of our trees. And let's just add
a nice gradient. Here we are using the
same branch that before, which is our medium blend. Make a nice transition
between the colors, and if you added the color
and you don't like it, after all, you are welcome to go to the adjustments
huetration and brightness, and play with the hue slider. Find what works for you.
And when you are done, let's just hit our magic onetol one more time to
close this window. When we have it, we will go
one more time to our lies. We will unhide our
li with this gage and we will go again to
our li with the shadows. We will create one more
li above to create the shadows underneath
our little tree branches. Let's just go create one
more layer if you want, you can rename it as
details or shadows two. And all that you need to do
is to clean this layer to a previous one and change the blended mode to
multiply for the opacity. Let's go with 50% for now
and when you have it, let's just get back to our brush library calligraphy
folder, monoline brush. We will use the color
that you used before or you can just go and select any other color that you like. For example, let's just
go with Gresh, Magenta. And we will go underneath these lines that we
have on our skitch, and we will start
adding something similar to what we
have on our snow. When you are mainly ready, let's just go and hide
our li, with this sketch. And let's just go and jaz this part the same
way as before. When you are ready
with the shadows, we can just go again
to our brush library. Airbrushing medium blend, and go to our adjustment
usetration and brightness. Use the pencil and add the additional color
to the elements. When we are done,
we will just tap on our magic one tool one more
time to close this window. Then let's just go and work onto the bottom
part of our trees. What we need is to cut these parts and
have the snow here. What we need to do is to go and find our layer
with the snow. Let's just make sure
that it is our layer. We will just go and select it. Tap on the layer
and choose. Select. When it is selected, we
will just get back to our lies and we will find
our li with the tree. When it is selected, we are
going back to our canvas and we are swiping with three of our fingers from
top to the bottom. When you have the
scoopi and paste menu, we will just hit Cut. Now we have our snow
above our tree. That's exactly what we need. Now let's just go and start working onto the
additional elements. Again, we are add our tree. Let's just go to our li, with the second shadows, we can just go underneath
these little stars. And we can add the shadows
underneath them too. We will just need to go and repeat the shapes
underneath that. Before doing that,
let just go to our brush library and we will choose our
calligraphy brush. That is our moonland brush. If you want to add a different
color to the shadows, you are welcome to do the
same thing as we did before. Select the air brush and
then go to the magic, an tool, ustration, brightness, and adjust it from here. Also, if you notice
that you have a little gap between
your two shapes, the snow and the tree. You can get back to your Lia either with the snow or
either with the tree. And go and add the color
here to this little gap. For example, let's
just go to our snow. Let's select this white color. And let's go over
this little gap. When you are ready
with this task, let's just get back
to our layers. Let's just go to our layer
with beautification. Firstly, we will just go and add additional elements to our
gift and also to our bow. Let's firstly go and create
one more layer above. We will rename it as details. Let's clean this layer
to a previous one. For now, we will use our
normal blending mode. Let's just go and
unhide our layer with this cage so we will
know what we need to do. Then we'll get back to
our li with the details. Firstly, let's just go to our gifts and we will
add the stripes here. Let's just go and use
the brighter color. Now very easily, let just go and recreate the stripes that
we have on our skitch. When you have the stripes, let's just take a look at them without our lines
for the skitch. If we need to adjust some parts, let's just go and adjust them when we have
something like that. One more time, let's
just get back to our list and we will unite
our li with the skit. Then we will go again to
our li with the details. And we will add a
different color to our bow when we are here. Let's just get back
to our color palettes and let's select
the brighter color, for example, grayish magenta, or any other color
that you like. Now when you have it,
let's just go over the top of our bow and
let's add a stripe here. We won't go in that way. And we will recreate
the shape of our bow. Also, we will do the same
thing on the opposite side. Let's take a look at it without
our lines for the sketch, and adjust it if we need to. Now, one more time, we are getting back
to our layers and we are unhiding our
layer with the skit. Now let us go and add
some additional elements. For example, let's just
go with some shadows. We will go and create
one more layer above our lay with the details and
let's rename it as shadows. Let's clean this layer
to a previous ones. Let us go and change
our blending mode to multiply 50% for the
capacity for now. Now let's just get back
to our color palettes and let's pink or magenta, pink color one of these two. And we will go to
this bottom part of our bow and we will
add the color here. We also will go to these elements that we
have on the sides of our bow and we will recreate them with our shadow color also. We will just go to the
bottom part and we will add a little color for these
parts that are hanging. We will just need to go and create the shadows
going in that way. Let's take a look at
it without the lines for our sketch and
adjust the parts. If we need to adjust something, if you want to add the
additional shadows, you are welcome to
go and do that. We also can go to the bottom part where
we have our shadows, to the sites where we
have our bow and we can grab our eraser two and erase these little
parts on the bottom. In that way we will see what's happening here and we won't have the shadow going through
the whole shape and merging with the lines that
we have on the bottom part. In the ends, we will
have something like that for the shadow on our bow. And also we can just
go to the sites where we have our little dance and
add the shadows here too. As we can just go
to the free ends on our bow and add the shadows
to one of the sites. When we have
something like that, we will need to go
underneath the ball and we will need to add the
shadow to our gift. Let's firstly go to
our color palette. We will select grayish, magenta, or magenta color, or any
other color that you like. And we can just go and create one more layer above this layer. Let's just clean this layer. If you want to rename
it as shadows two, you are welcome to
go and do that. We will need to go to our icon and change the blending
mode for multiply. Let's adjust the apacity. And we will go to the top part and we will add the shadow here. Now let just grab
our eraser tool and erase all the lines
that we don't need. If you want to use this layer to add more shadows to your bow, you are welcome to
go and do that. When you are ready
with this task, let's just go to one of
the sides for our gifts. And we will add the
shadow here too. So let's just put it
completely in the shadow. If you need to see where you
had the line on the sketch, you are welcome to go to your layer with the
keg and hide it. Now, one more time, let's
just get back to our layers. Hide the layer with the sketch. And let's just adjust
our lines if we need to. And then we will go and change the capacity of this layer. Let's just get back,
find this layer, go into our M icon. And let's just decrease
the amount of capacity. If you want to change the color of your shadow, you know
what you need to do. You will need to go to
your magic one tool, use satration and brightness
and adjust it from here. When you are done
with this tool, let's just go and
continue edging the shadows to our
elements on the right. Let's just go to our
layers and we will go to our layer with
the first shadow, we will go and grab some colors. For example, let's
just go with magenta. We will go to the bottom
right part and we will create a shadow going in
that way on our big element. And then we will go to our element that we
have on our left. Let's just go and end
the shadow here too. Don't forget that we are overlapping our
sheep on the right, the shadow in that way, if you want, you can go
and make it less bright. What we need to do is to
go to our ribbon icon. Use the freehand method and select the shadow that
we want to adjust. Look it around, select
only these elements. And then we can just go again to our adjustments,
satration and brightness. And adjust it from here,
find what works for you. And when you are
done, we will need to tap on the first tool
that we were using, it was our ribbon icon
to deselect everything. Now on the same layer, let's just go to the
beautification elements that we have on top of our tree. Let's just add some
shadows to them. Two, we are going to the bottom right
parts and we are adding little shadows
to these elements. When you are done, let's move
on to our next elements, and let's add the
shadows to them. Two, let's first go underneath our gifts and we will add a
little shadow here. What we need to do is to
go and find our layer for our shadows on the snow when
we are add a right layer. Let's just get back to our
color palette and let's select the color with the
name, Gresh, Magenta. We are using monoline brush
and we are just going underneath our gifts and we
are adding the shadow here. If you have a
different color right here between these two
colors for the shadow, you are welcome to go
and grab this much tool. Make a smooth transition
between these two colors. When you are satisfied with
your shape for the shadow, let just go and add the shadow
to our snow on the Botta. Firstly, we are going
to our liers and we are finding our layer
with the second snow. It is our layer
with bottom snow. We will select it
and above it we will create one more layer that
will already name as shadow. Let's clip it to a
previous layer and then we'll go and change the
blending mode to multiply. As for the opacity, we will go with 50% for now. If we will need to adjust it, we will go back to it and
we will adjust it later on. Now let's just get back
to our color palette. And let's select one
of these colors, light grayish purple, grayish
purple, or grayish magenta. With this color, we will
go to the bottom part of our snow and we will start
adding the shadow here. Let's just go through the whole
shape and add the shadow. If you want, you can go to
one of these dance that you have on the top and add a
little shadow there too. If you want to add additional
elements for the shadow, you are welcome to
go and do that. If you feel that maybe your
shadow is not too bright, you're always welcome to
go back to your lease. Go to your M icon and
adjust the apacity. From here, find the apacity
that works for you. And when you are done,
let just go and add little shadow to our
snow globe shape. What we need to do is
to go to our layers and we will need to find our
layer with the circle. Let's create one more layer above and let's
rename it as Shadow. As always, let's just clean
this layer to a previous one. And let just go and change the blending mode to
multiply as for the apacity, go in with 50% For now, let's just go back to
our color palettes and let's select
the purplish color, for example, grayish purple. When we have this color, we will get back to
our brush library. We'll go to the
airbrushing folder and we will select our
medium blend brush. Now very softly, we will go to the bottom of the shape and we will start adding our shadow. We are some merging our elements with
what we have inside. If you want to add
the second color, you are welcome to get back to your color palettes and select the color that you
would want to add. You can also go through
the whole shape of this element and add
different colors to it. Now when we have
something like that, let's just go and work onto our additional
elements that we have flowing around the
top of our tree. Let's just get back to
our layers and let's just find our layer with the
miscellaneous objects. When we are adding that layer, let's just go above it and
create one more layer above. So we will just go and clean this layer
to a previous one. And then we will go back to
our color palette and we will select a similar color to what we have for
our background. We can just go with
a background color. We can use dark purple
or blue purple. Select one of these colors. And then let's just use the same brush that
we were using before. This is our medium blend brush. And very softly we will
go to the bottom parts of these elements and we will add smooth transition
to this new color. We are some kind adding sun transparency
to these elements. If you can go to your magic
one tool, Gaussian blur, and add the bloor here, we will need to have
the smooth transition between the colors when you have the result
that you like. Let's just get back
to our layers and let's just go and find
our layer with the glass. When we add our layer
with the glass, let's just go and
change its color. First, let's just unhide it. We will overlap everything, and then we will get back
to our color palettes. And we will select the color
with the name CN blue. And we will just drag and
drop it to this area. Now we will get
back to our layers. We will go to our icon, and we will change the
blending mode to overlay. We will go to the
Apastislider and we will set it at 50% for now. And now we will go and start adjusting our colors
on this glass. What we need to do is to tap on our layer to go to this list. And we will turn on alpha lock. We will use the same brush
that we used before, It is our medium blend brush. And then we will go
to our color palettes and we will start adding
additional colors there. For example, let's just go and start with grayish, magenta. And very softly we will go over the top and we will start
adding this additional color. When you have this second color, let's just go and
select another one. For example, we can go with magenta or light grayish purple. We will just go over the top even more and we will
add the color here. When we have the
result like that, we will need to make
sure that it looks like a glass and it is transparent. We will get back to our
color palette and we will select either dark purple
or blue purple color. With this color, we
will go to the edges of our snow globe and we will
start adding it here. Let's just go through these
edges and very softly we will add this effect here when we have the
result like that, if you want to adjust
it or if you want to make the transition between
colors more smooth, you are welcome to
go to the adjustment Gaussian blur and
add the blower here. Also, if you want, you can go and play around with hue, striation,
and brightness. If you don't want to do that. Let's just go and start adding the glowing
effect to our tree. When you are done with
adjusting your snow globe, the whole glass here. Let's just get back
to our layers and we will go and find our
layer with the tree. When we are here, we will
need to make a copy of it. Let's just swipe our
layer from right to left, and we will choose duplicate. Now we have a copy of our tree. Let's just go to the layer
that we have on the bottom. Firstly, we will go and change the blending mode
to lighter color. Now when we have it, we will get back to
our color palette and we will select one of the colors that we want
to add the glue with. For example, let's just go
with magenta, pink, or pink. We will just select the color and then we'll drag and drop it to our trees to make sure
that we did everything right. We will go to our
list and we will see that we recolored
these ships. Now when we have this lier here, we will go again
to our adjustments and we'll go to Gaussian Bluer. We will just go and
add some blower here. Find the amount
that works for you, try to make a smooth transition. And when you have the
result that you like, let's just go again and
tap on our magic 12. We would want to make
this thing glowing. Let's just one more time,
go to the adjustments, and this time we
will use the option Bloom Bloom works similarly
to our Gaussian Bloer. We'll need to go to our screen, hold our apple pencil and go toward the right until we
have the result that we like. If you want to play around with the sliders on the bottom, you are welcome to
go and do that. You can make the burn even more so it will have a
more glowing effect. Or you can just go to
the transition color and see how it works. Find what works for you, Find the amount of bloom
that works for you to. When you're satisfied
with your result, let just tap on
our magic 121 More time you can go back
to your adjustments, hue stration and brightness. And play with the hue stration
and brightness sliders. Find the color and the amount of brightness
that works for you. When you are done,
let's just tap on our magic 121 more time. If you want to play
around even more, you can just go
back to your liers, go to this layer with the
tree with the glowing effect, and maybe go to the blending modes and
find something different. You can just go there, scroll, and maybe you will
find something different that you
will like even more. Now when you found the
result that you like, let's just go and start adding the glowing effect
to other elements. Firstly, let's just go
again to our layers. And we will go to our layer
with our little snowflakes. Let's just go and find it. And we will go and make one
more copy on this layer. Let's just wipe it from right to left and choose Duplicate. We will go to our
layer underneath. We will go and change the blending mode to lighter
color when we have it. Let's just go again to our
adjustments, Gaussian blur. And let's just go and add
some blur to these elements. If you want to go and
change the color, you are welcome to
go and do that. You can go and do that from
your layers, For example, we can go to our new
layer for our snowflakes, we can just tap on it. And we can use alpha look. We will use the same brush
that we used before, medium blend, and we can just go to these areas and
we can recolor them. For example, if you want
to add some pinkish color, you can just go to these
places and recolor them. If the colors that you have on your color palette
is not enough, you are welcome to go under disc and find the color
that you want to add here. When we are done with this part, let's just go and add some additional elements
inside our shapes. This time we will go and
add some highlights. We will go again
to our layers and we can just go above all
the layers that we have. Let's just go and create one more layer that will
rename as highlights. We will go to our icon
and we will change the blending mode either
to add or overlay. You can try out the
first one and if you don't like it later on we
can just go and change it. For example, let's
just start with overlay and we
will go and change the capacity to 70% We will
go to our colors if you want, you can go to a color palette
or use the disc option. What we need to do is to go and add the highlights to
some of our elements. For example, let's just go and
select this pinkish color, It is our grace magenta. We will go firstly and change
the brush to our mono line. We are again going to
a calligraphy folder. And choosing it from
here, you can go to the brush and you can go under stabilization and adjust
the amount of streaml
 Uni Corn, ⭐Kawaii Art Enthusiast⭐