Transcripts
1. Introduction: Hello everyone, I'm unit
and into this class we'll draw a few cute
blend illustrations. These class doesn't require any prior experience
or fancy suits. We'll start from scratch
and we'll be using simple techniques
throughout the process. Everything you'll see will
be happening in Procreate. However, if you have other software or wants to
try traditional materials, you are welcome to join
if you're ready to start, Let's jump right into it.
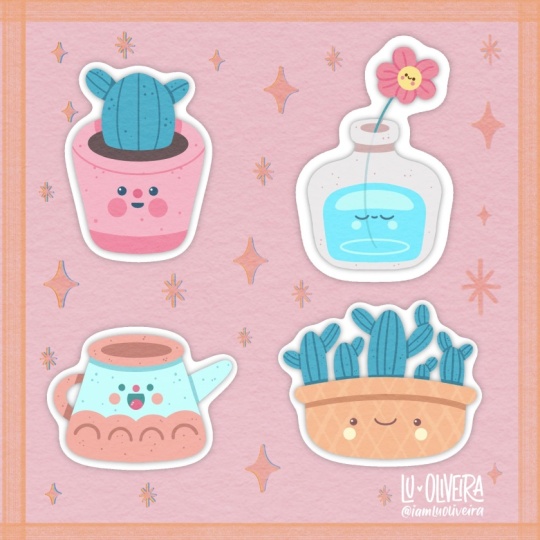
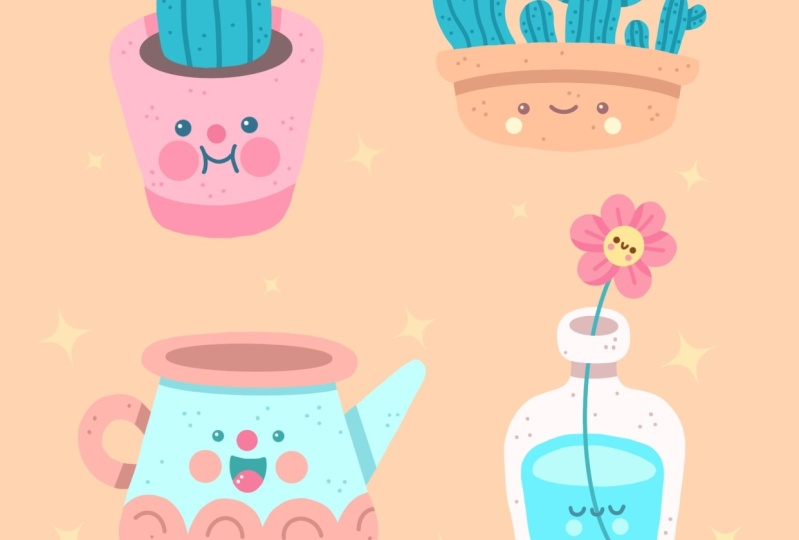
2. Single Cactus Sketch: Let's start our
class by deciding what kind of Canvas we
are going to be using. You can see there's a very
simple square canvas because both pixel width and pixel
height are 2048 pixels. Svd be either 300 and S
for the color profile, it is set as SRGB
with as low number. When it's all done,
we are heating Dan and we are at our Canvas. So now we need to decide
what kind of colors where I'm gonna be using
throughout the whole tutorial. You can go to the project
and restaurants app. You can download the
color palette and you can follow along
with this glass. When he did it, we
will go straight into our color palette and we will check out
what we have here. Here we have two options of
how we can use the colors, compact view and the cards. We will be using cards
because you can see that every color here has a name and it is ready for
you to be used. So our first task for today is to change the
background color. Let's go to our layers. Let's go to the
background color layer. And you can notice that you have your little color
palette on the bottom. Let's select the first
color in the first row. Let's tap on it. When you did it, you
will see that you have changed the
background color. And that means that
we are ready to start making our
first illustration. And our first
illustration will be a very simple single
characters in a pot. So firstly, before it starts
in our sketching part, we will need to select a brush. We will need to select
a color for our sketch. So firstly, go into
our brush library, go into this kitchen
folder and select in Procreate pencil if
you would like to use any other brush
for sketching part, you are welcome to do it
now with your new brush. Let's get back to our
color palettes and we will select the color with
the name sketch lines. And now we are ready
to start sketching. So firstly, let's zoom
in our Canvas and we will start by creating
two descendants, Slightly diagonal
lines on this side. So let's go and try to do that. When you have
something like that, Let's move on to the bottom. And we will connect these
two lines with a curve. So very easily Let's
go and try to do that. We are creating a very
cute illustration. So we need to pay attention to our corners and all
the street lights. We want to avoid them. We want everything to be
as round as possible. So if you have some corners
that are very straight, let's go and try to adjust them. Now when you have the
line on the bottom, Let's move on to the soap. And we will need to connect
these two lines that we have on the top
with another curve. So firstly, let's go and
create the curve like that, just going slightly
above our alliance. And when we have this curved
lead just go over our sites and we will connect these
lines with the curve, again, trying to make
everything as round as possible when we have
the shape like that, Let's move on to these parts. And we will be creating an inner part that we will
be using for this soil. So we will go to this
part and we will try to recreate the line
that we have right here, but we will be making
it in the inner parts. So let's try to do that. When you have this curve, Let's move on to the
bottom and we will recreate the same shape
that we have on the bottom. So let's just go and
try to create it. You can play with the openness
of these little shape. It's up to you. You can play
with this size as well. And when you have
these two curves, let just connect them
together with another Curves. If you feel like
you need to adjust some places, go for it. Let's just grab an
eraser to when we are ready and we will erase all
the lines that we don't need. Now when we are ready with erasing all the lines
that we don't need. Let's add our cactus so we won't go to this
place that we have for this soil and we will go above it and we will
create a shape like that. So when you have the
shape like that, ledgers Gill on the bottom and we will connect
the shapes together. So again, we are stepping
a little bit from this line and we are creating another line like
that to connect our cactus when we
have a closed shape, Let's go over one
of the sides of our cactus and we will create
a little cactus there too. So for example, let's go over the rights and we will
create a shape like that. Try to connect these
two shapes together. And when you are ready, let's grab an eraser
tool and we will erase the line that are
inside our cactus. When we are done, the
reason our lines, Let's get back to our
brush and we will go over our cactus and we will create
a few lines like that. So very easily just
recreating the shape of our cactus when we
have them on one part. Let's move on to
the riots and we will add one line there as well. If you want to add more details, you are welcome to do it. And when we have
something like that, the very base of our
cactus and the ports, let's move on to our port elements and
let's add the face here. So firstly, we will need to find the approximate
center of our shape. And we can do it by creating one vertical and one
horizontal line. So let just go and
try to do that. You don't need to
be very precise. Just try to put these two
lines somewhere in the center. When you have these two lines, Let's go over these
horizontal line that we have. And we will start by
creating the eyes. And for the eyes,
we are going to be using just simple circles. Firstly, let's go
over the left and we will put the first dot there. You can adjust the size
and adjust the placement. And when you have
the first dose, we will move on to
the right and we will try to recreate on
the right as well. So we will need to remain the same size and we will need to put it on the same line. And also we will need to
remain the same distance from the eye to this line that we have going
through the center. So let's just go
and try to do that. When we have these two
dots for the eyes, Let's move on right between these two eyes and a
little bit below it. And we will add a little nodes. So again, we are just
creating a shape of a circle. When you have these, Let's go underneath
our eyes and we will add two big
circles for the cheeks, so one on each side. And now when we have the cheeks, let's create a little mouth. So firstly, we will stop
a little bit aside from our cheeks and we will create two lines that will
be framing that. So let's just go
and try to do that. When you have one curve, Let's move on to their
rights and we will create another curve
on the other side. And when you have
these two lines, we will go to these cross
that we have for airlines, one vertical and horizontal. We will add a little smile here. So very easily just create
a slight curve there. The last thing that we will
add for this illustration is a little line that will go through the bottom
part of our ports. So again, just recreating
the line that we have here and we are done with
our first sketch. Now let's just grab it. Let's make it a
little bit bigger and let's position it
onto our canvas. So when we have this shape, we will go to our
heirarchy on the top-left. We will use uniform method
and we will drag one of the corners down or up
depending on the corner. So for example, alleges
go to the bottom right, and let's just drag
it a little bit down. When you found this
size that you like, Let's just drag it
to this side to find a perfect placement for it if you want to
adjust it even more. So for example, you
have one side's not looking the same
way as another side. You can go to the distort or you can go to
the word method. With a word method, you can go to these little
handles here and you can adjust them very
easily, very menu. So you can go and try to adjust
your shapes in that way. When you are done
adjusting your shape, ledger, deselect everything
by hitting our arrow key. And now we are ready to
move on to our next sketch, which we will do in
the next chapter.
3. Cacti in a Pot Sketch: For our second sketch, Let's create a very
Ellen Gates is rectangle and very
Ellen Gates its port. And we will put multiple
cacti inside of it. So firstly, let's go
and zoom in our Canvas. And again, as before, we will start by creating
two lines like that. When we have these two lines, we will go over the bottom
and we will create a curve. Now let's connect this curve
with two previous slides, and we will be doing it
by creating soft corners. So let's go and try to do that. Now when we have the
shape like that, we will go over this soap and we will first list
tap a little bit. Aside from these two points, we will be creating
another curve. Let's go and try to do that. When you have the first curve, Let's step a little bit on top and we will recreate
this same line. Let's go and try to do that. Now when you have
these two lines, we will need to go over these two sides and we will
need to connect these lines. And again, we are making
everything very soft, so we will need to create the
curves for our connections. Firstly, let's go over the
left and we will create half of the circle or half
of the ellipse there. Now when we did it on the left, Let's move on to the
rights and we will try to recreate the same thing. And now when we have the ports, let's go over the soap and we
will be creating our cacti. So firstly, let's go
to the middle part and we will create a
big one like that. And now it's time
for your creativity. You can vary the
sizes of your cacti. You can make as
many as you like. You can vary their curvature. It's all up to you. Let's just go and fill
this spot with cacti. When you are done with the base, Let's add a few
additional cacti, the same way as we have it here. Let's get to the big ones and let's create this side cacti. When you think you are
done with the basis, Let's go over our
middle parts and lead jazz create
the lines that we have on our previous octet. So firstly, let's go and
try to create these lines. You can create the
very straight lines or you can follow the
shape of your cacti. And when we are done
with this lines, Let's get back to our ports and we will
add the face here. So firstly, let's find the approximate center of our ports and we
know how to do that. We will need to create
one vertical line going through the
approximate center, and then we will need to
create one horizontal line. So let's go and try to do that. Now, let's go to our
horizontal line. And this line, we will put
two dots for our eyes. Firstly, let's go to the left, pulling their first daughter and then move on to the right, keeping the same size, keeping the same distance from the eye to this middle line. Also keeping it on the same
line, which is horizontal. Now let's go right
between the eyes and we will create a
little Smiley mouth. So we are adding it on
the same horizontal line. When you have these shapes, Let's go below our eyes and
we will put a little cheeks. So again, the same
way as before. We are creating
two circles there and we are done with
our second sketch. So let's move on to
the next chapter.
4. Flower Bottle Sketch: For our third sketch, Let's create a little
bottle with a flower. And again, we will start by creating an L. M
gets us rectangle, but this time it
will be vertical and we will be adding the
very soft corners. So firstly, let's
zoom in our canvas and let's create two
lines like that. When we have these two lines, Let's go to the bottom
and to the top. And we will create a
very slightly curves. And now when we have the shape, let us work on to our corners. We are creating
very soft corner, so let's go and try to do that. Now, when we have
the shape like that, we will need to find an approximate vertical
center of our bottle. Let's go and create a line
going from top to the bottom. Again, you don't need
to be very precise. Just create this line somewhere in the center
when you have it. Let's go over the
top to these parts. And we will create
two lines like that. Now we will need to go over
the top of them and we will need to create a very,
very soft rectangle. So let's start by creating
a curve on the bottom. Now when we have the
curve on the bottom, Let's go to the top and we will create the
opposite curves. And when we have
these two lines, Let's connect them together
with the curves on the sides. You can see it is
almost analogous, but still it reminds us
about the rectangle. So when we have it,
we will need to go to these two corners and we will need to solve in them as well. So we will be creating the
opposite of these curves. Now we have a great base for our boards cell and we can
add a few more details. So firstly, let's start
from our top elements, will go to the top part, all these elements and we will create a little ellipse there. You can vary the size of it. You can vary the placement. It's all up to you when
you are done with it, we will go to the body of our boards and we will
add a bit of liquids. So firstly, we will need to step aside from these
sites, Elizabeth, and we will need to
recreate the same shapes that we have for our main
shape of the bottle. So let's go and try to do that. For the top curve, we are recreating the curve
that we have on the top. As always, pay attention to the corners and make
them very soft. When you have the main
shape on the liquids, we will add a few more details. So we will go firstly to the bottom and we will
create an ellipse there. When you have it on the bottom, we will move on
to the top and we will create another
ellipse there. And now while we're still here, Let's add a lethal
phase for our boards. We already have the line that is going
through the center, so it will be easier for us
to start creating our face. This time we are not
creating just dots for our facial features will
create a very peaceful face. So let's firstly go to the left and we will create
a curve like that. When we have the
curve like that, Let's go to the rights and
we will try to recreate it. So we are keeping the
same distance from the middle line and we are
putting it on the same line. When we have it, let's create the same
shape for the mouth, but it will be a little
bit more shrank down. Now when you have the
main facial features, Let's go under our eyes and
we will create little cheeks. So as before, just creating
two circles for our cheeks, and now we are done with
the face for the board. So as I mentioned before, we are creating a
bottle with a flower. So now let's go over the top and let's
create this flower. For the flower, we will need
to start by creating S town. And we will go to this little allergies that we
have on to our board. And we will create a very
slightly curved like that. When you have the curve, Let's go over the top of it. And we will start by creating an ellipse or a
little circle there. Now when we have this circle, we will go to this side
of it and we will create a few lines going through the
whole shape of our ellipse. Now when we have
approximately six of these lines will go over them and we will
create the petals. For the petals we are using the same shape as we use
for one of our cacti. So let's just go and create
these little paddocks. And now when we have the flower, Let's add a little
face for it too. So we will go and firstly, we will put two dots like that. And we'll create a
little Smiley mouth right between these two dots. And as always, when
I go in underneath our eyes and we are
putting little cheeks. And now we are done
with our third sketch. Let's move on to the next one.
5. Watering Can Sketch: For our last sketch, Let's create a watering can. We will zoom in our Canvas
and we will start by creating to expand in
lines on the sides. Let's go and try to do that. When you have these two lines, we will go over the bottom and we will create a little curve. And as before, we are
paying attention to our corners and we are
creating very soft corners. Now when you have this shape, we'll go over the top and we will create a little
ellipse there. We will go a little bit beyond the frames of these two lines. When you have this ellipse, we will go inside
of it and we will add a little ellipse
there as well. We are recreating
this same shape, but we are making it
a little bit smaller. Now when we have these, let's move on to the left and we will add a little handle. For the handle, we are using half of this circle two times. Let's start from
the first curve. As always, you can
vary the size, you can vary the placement. It's up to you when you have the first curve will go inside and we will
try to recreate it, but making it a
little bit smaller. Now when we have the handle, Let's move on to
the right and we will create a little spout. So let's find the position. So for example, we can create
the first line like that, going in that direction. We will need to turn this line
into a very soft triangle. So let's go and try to do that. When we have
something like that, Let's add the decorations. So firstly, we will go
over the bottom and we will create a few
lines like that. We will go inside these lines
and we will create a few, have all the circles there. And now we are ready
to add the face. As always, we can go and create one vertical line going through the center and then
one horizontal. Let's go over our
horizontal line and we will start by creating two
dots for our eyes. Stars in from the left, creating the first dots, then moving on to the right
and trying to recreate the same size and the same
distance from the center. Now we will go right in between these two
eyes and we will create a bigger ellipse
for creating our nose. Now let's go underneath the eyes and we will
create the cheeks. And what is left is
our little mouth. So for the mouth, we will
go underneath our nose and we will start by recreating our horizontal line like that. When we have it, we
will go underneath it and we will create a big curve. Now, let's get to the
bottom and we will create the opposite from this
curve for the tongue. And we are done with our
little watering can. So now we can do
the same thing as we did with our
first illustration. We can position our
elements onto our canvas. So to do that, firstly, we will need to
separately select each of our elements and we
won't be doing it by going to this S ribbon shape. So let's tap on it and we will
choose free hands methods. With a freehand method, we will select our shape. So going around and
loop in our shape, you will see only this area that you selected more visible. And when you have it, we will need to go
to our arrow key. And again, by using
a uniform method, we will need to drag
it to the site. If you want to adjust your
little elements even more, go to the warp option. So play around, find
what works for you and when you are done with
your second illustration, Let's deselect
everything by hitting R S ribbon icon one more time. Now let's go to the next sketches and we
will do the same thing. So firstly, go into the S ribbon using the free hand method and select an Irish shape lipids around and then go
to the arrow key. Now uniform method to readjust your elements on the
canvas and make it bigger. And if you want to
make more adjustments, go to the warp methods, play around with the adjustments
and when you are done, Let's deselect everything
by hitting R S ribbon icon. Now let's do the same thing
for our last illustration. So firstly one more time, go into the S ribbon icon
and select in our sketch. Now go into this arrow icon
and adjusting our elements. When you are ready, let's deselect
everything by hitting this S ribbon icon
one more time, and we are done with our sketch. In the next part, we will be recoloring
our elements.
6. Single Cactus Coloring: Left art inspired
by deciding what is our plan for this illustrations and for the coloring part. In particular, we will be creating a new layer or a couple of layers for each illustration that we have onto our Canvas. And we will need to see what's happening onto our layer with the sketch because we have all these details that we
would want to recreate. And also what is
happening are in Yulia that we will create
for our coloring parts. And that means that we
will need to change the opacity level of our
layer with the sketch. By default, each layer comes
with a 100% of opacity. And that means that if we
have two layers with Kwanza and the layer on the top will overload the
layer on the bottom. And that's not what we need. We will need to see what's happening on both of our layers. Now let's go to our layers and we will go to our
layer with the sketch. We will need to tap on the
icon near the checkbox. When you did it. You will see we have a
list with some titles here and also here we have
an opacity slider, which we can grab and which
we can move to the left. You will see that now
your illustrations, your sketches are looking at a little bit more
transparent than before, and that's exactly what we need. We still can see what's
happening onto this layer, but it won't be
that traveling for us to create the
colors right now. Now let's tap onto
this layer one more time to get
away from this list, and we will need to
create one more layer. Let's tap on the plus icon. Now when we have this new layer, we will need to
put it underneath earlier with this sketch
while it is selected, we will need to hold it and
we will need to drag it down. Now we're almost ready to start adding the colors to
our first illustration. But before starting,
we will need to select a brush and we will need to
select a different color. So firstly, we are giving to the Brush Library where I go to the calligraphy folder and we are choosing mono line brush. When we did it, we are getting
back to our color palettes and we are selecting the
color with an important one. Let's tap on it to select, and let's zoom in our Canvas
to our first illustration. And our main goal right now is to create a closed outline. So we are recreating what we have on to our layer
with the sketch. But it doesn't mean
that we will need to recreate everything with
a 100% of similarity. If you think that something is working a little bit better when you are adjusting some
places, Go for it. So now let's very quickly go and recreate the shape of our pots. When we have the outline, let you check out whether
it is close or not. We will go to our layers
and just for 1 second, we will tap on the checkbox, on the layer with the sketch. We will hide this layer. If everything is alright, we will just get it back. Now we will get back to
our earlier with this new outlined and we will need
to put the color inside. I go into the
top-right and we are dragging and dropping
the color to this area. And now we have our
shape of the ports. Yes, we went a little
bit above our cacti, but now it doesn't matter. We will be creating our
character on a different layer. So we would want
to go and we would want to add details
to our portrait. Now, for example, we can go to the bottom and
we would want to create a different color to this element that we
have on the bottom. Firstly, let's go to our palettes and we will
select a different color. This time, it will
be put one Details. Let's select it. And if we'd go and start to create
these lines right here, we will go beyond the frames and we don't really
want to do that. We want to add our details only onto the shifts
that we already have. And we can do it by
going to our layers. And we will need to tap
onto this layer with the shape and we will need
to select Alpha Lock. If you see the little
checkerboard around your objects, you did everything right? So now let's just go with this Alpha Lock turned
on to the bottom, and we will create
the line right here. So start just by
creating a line. You can go a little bit
beyond the frames and you will see that you are not
going to be on the friends. You are adding the color only
onto the existing shapes. Now when you have this line, let's manually recolor
the rest of the places. Now, when we have this detail, let's add the cheeks with the
same color so we can go and increase the size of
our brush and we can put just two dots
for our cheeks. As I mentioned before, you don't really need to
recreate everything the same way you have it on to
your layer with the sketch. Now with the same color, we will go behind our cacti and we will add
a little shadow there. Very easily just go and
add the color like that. Now while we're still here, Let's add this soil. So firstly, we are going
to our color palettes and we are selecting the
color with the name soil. Let's decrease the size
of our brush and we will add the color to this area
that is supposed to be a soil. When you have the outlines manually recolor
the inner parts. When we added this soil, Let's add our facial features. So firstly, we will
one more time go to the color palettes and we
will select the color, put one face, Let's select it, and let's increase the
size of our brush. And we will put two
dots for our eyes. When you have these two dots, Let's decrease the size
of our brush and we will recreate the shape of the
mouth to create better lines. You can hold your Apple pencil
at the end of the line. Now when we have all these
lines for our facial features, let's one more time, go to the color palettes
and we will select the color port one nodes.
We will select it. We will increase the size of our brush and we
will put the nose. Now let's get back to our
color palettes and we will select the color
bottle and highlights. We will decrease the size of our brush and we
will do to our eyes. And we will put two
highlights in the eyes, one on each site. So firstly, let's
go over the left one and we will put
the first dots, will go over the
right one and we will try to recreate
the position. Now we can go to our layers and we will create
one more layer above. Let's tap on the plus icon. When we did it, we are going
back to our color palettes and we are selecting the
color within them cacti. With this color, we will go over our cacti and we will
recreate the shape. When you have the outlines, Let's drag and drop
the color insight. And now we can go and add these little lines that we have for the texture of the cacti, we will go back
to our layers and we will one more time tap on this layer and
select Alpha Lock. When it is done, we are going back to our color
palettes and we are selecting the color with
the name cacti shadows. So with this color,
we will go over the lines and we will
create them here. Also with this color, we can add a little
shadow between two parts of our cacti here, just going along the shape
and creating a little shadow. Now let's go to
our layers and we will hide our layer
with the sketch. Now, you can see that we have all the colors
that we need, but we can go and
create some details. For example, while we're still here on earlier with the cacti, Let's decrease the size
of our brush and we will go over the shapes and
we will add a few dots. Try not to overdo it. And when you are done, let's do the same
with the ports. So we will go to earliest and we will go to our layer
with the ports. We will go and select the color that we use for our
facial features. So it will be put details
and with this color, we will go and add a
few dots there as well. Try not to overdo it. And when you are ready, let's go to our list and we will combine these
two layers together. So our whole illustration
is on one layer. We will get to early on
the top with our cacti. We will tap on it and we
will choose merge down. And now everything
is on one layer. And that means that we can
get back our layer with the sketch and we are ready to move on to our next chapter. We will be creating
an illustration.
7. Cacti in a Pot Coloring: The same way as before. We are starting this
part by going to the layers and
creating a new layer. So let's tap on the plus icon. When we did it, we will go to our color palettes and we will
select a different color, and this time it
will be puts two. Let's tap on it to select. Let's zoom in our Canvas and
we will go over our shoes and we will try to recreate
the whole shape of our ports. Let's go and try to do that. When you have the outline, let's make sure
that it is closed. So we will go to our
layers and we will hide our layer with the sketch
just for one seconds. If everything is alright, we will get it back and we
will go back to our layer with the outline and we will drag
and drop the color in sight. Now we will need to add a little shadow
underneath the top part, and we know how to do that. We will give it to our
lives and we will tap onto this layer with our shape and
we will select Alpha Lock. When we did that, we are getting back to our
color palettes and we are selecting the color within
the imports to shadows. We will go underneath this
little part on the top and we will add just one
line for our shadow. Now when you have this line, let's get back to
our color palettes and we will select
a different color. This time, it will
be put to face. Let's select it, and let's go and add the facial features. So let's increase the size of our brush and we will go and put the first dose for our
eyes when we have them, Let's decrease the size of our brush and we will
add a little smile. As always, you can hold your Apple pencil at
the end of the line to create a better curve when
you have these lines, Let's go to our color
palettes and we will select a color within
the imports to details, we will select it
and with this color, we will add our cheeks. Let's increase the
size of our brush, and let's put these two dots. Now let's get back to our
color palettes and we will select the color with the
name bottle and highlights. And the same way as before, we will decrease the
size of our brush and we will put two highlights
for our eyes. One on each. Firstly, go into the left
and finding the position. And then I go into
the other side and trying to recreate
these positions, and we are done with the ports. Now, let's go back to our layers and we will
create one more layer, but this layer we will put underneath earlier
with the port. So let's hold it and let's
drag it down onto this layer. We will be creating our cacti. So let's get back to
our color palettes and let's select the color
with the name cacti. We will need to go over our shapes and we will
need to close them. So let's go and try to do that, make sure that your
shapes are closed. Then we will go over the top and we will put the
colors, insights. And when we have the basis, Let's go back to
our layers and we will be using alpha lock
for adding the details. So tap on the layer and choose
Alpha Lock from the list. Now going back to our
color palettes and selecting the color with
the name cacti shadows. With this color,
we will decrease the size of our
brush and we will go over our lines and we will
add the details as before, we can add little shadows
on our little cacti. So let's go and try to do that. Just go along the shape
and create a few lines. And now let's get back to
our layers and we will hide our layer with the
sketch with the same color. We will go over our places
and we will add some details. So let's start from the cacti. If you have some
places like that, you can just grab the same
color that you have for the base of the cacti and
erase this little parts. Don't use the eraser tool because while we are
using alpha log, you will be just erasing what
you have onto this layer. So let's just go back to
our color palettes and we will select the color
with a name tag side. We'll go over these
places and we will adjust them to quickly switch between the colors we can go
and use the eyedropper tool. To do that, we will
need to hold one of our fingers on the screen until
we have this little tool. We can move our finger and we can select the
different colors. Now, let's select the color
that we use for our shadows. And let's continue
adding the details. And now the same way as before, let's get back to our layer with our ports and we will add
the details here as well. So let's select the same color that we use for our shadow. And let's go and add the
details here as well. The last thing that we will
need to do is to go to the layers and combining
these two lists together. So go into this layer with our port tab and then it
unselected merge down, and now we are ready to move on. So let's get back our layer
with the sketch and we will continue by adding colors
to our next illustration.
8. Flower Bottle Coloring: Let's start our
third illustration by creating a new layer. So we will go to
the layers and we will tap on the plus icon. When we did it, we will go back to our color
palettes and we will start by selecting
the color with the name bottle and highlights. With this color, we
will zoom in our Canvas and we will go alone or
shape of the bottle. And we will try to recreate
it with an outline. We will need to make it closed. So let's go and try to do that. So when we have our outline, let's go back to our
layers and we will hide earlier with the sketch
just for one seconds. We will make sure that
our outline is closed. And when we did it, we will get back our layer with the sketch. Now let's get back
to our outline layer and we will drag and
drop the color insights. And when we have it, Let's go back to
our color palettes and we will select
a different color. This time, it will be water, will go over our sheep on the water and we
will recreate it. Now when we have the outline, we can manually recolor this part or we can try to
drag and drop the color. So let's go and try
to do the latter. We will go and we won't and hold our Apple Pencil because
we can have these results. You can see that on the top
we have color drop threshold. And if we didn't and
hold our Apple pencil, we can move it to the left until only the area that we want to
recolor will be recolored. So when you have only
this area recolored, let and hold our Apple Pencil, and now we are ready to move on. So let's get back to our
color palettes and we will select the color with the
name water highlights. We will go to these shapes on
the top and on the bottom, and we will create the
outlines for the bottom leg, just leave it as an outline. But for the top, we will go
and put the color inside. So let's go and firstly,
recreate the shape. Now when the outline
is completed, Let's go and drag
and drop the color the owns and hold your
Apple Pencil and adjust the threshold by moving
your Apple pencil to the side until only
this area is recolored. And now with the same color, Let's increase the size of our brush and we
will put our cheeks. So go over these places
and put two dots. And again, while
we're still here, ledgers go back to our
color palettes and we will select the color with
the name bottle face. With this color, we will
decrease the size of our brush and we will
add our facial features. We are done with the
base of our boards cell. And that means that
we are ready to add some details and we will
be adding some shadows. So firstly, let's go to our layers and let's
tap on this layer. We will select Alpha Lock. With this Alpha Lock turned on, we will go back to our
color palettes and we will select the color with
the name bottle shadows, where this color, we will go to these parts and we will
create the shadow here. So let's just go and separate these two shapes
with the shadow. When you have the first shadow, Let's go to this little
ellipse over the top and we will add the
shadow here as well. So start by creating
analyses and then just manually
recolor the inner parts. Now, when we have everything
that we need, ledgers, checkout whether
everything is very neat, we will get back to
our layers and we will hide our layer
with the sketch. Let's check out whether
you like how it looks. And we can just go
with the same color and add a few details
for our portal. So let's decrease the size of our brush and we
will add a few dots. When you've added the details, let's get back to
our layers and let's unhide our layer
with the sketch. We will create a new
layer for our flower. Let's tap on the plus icon. When the layer is done, we will go back to our
color palettes and we will select the color with
the name flower stem. Let's increase the size
of our brush just a little and we will go
and recreate our stem. You can hold your
Apple pencil at the end of the line to
create a better curve. And when you're
satisfied with it, let just on hold
our Apple Pencil. And now when we have our stamp, Let's go over the top and we
will be creating the petals. But before starting,
we will need to go back to our color
palettes and we will need to select
the color with the name flower
to lead selected. Let's go or our shapes
with the petals. And we will create the outline
when the outline is ready, ledgers drag and drop the
color insights manually. Let's recolor this little
piece of our stem. And when we are done with it, we are ready to go back to our color palettes and
select a different color. This time, it will
be petals, shadows. And with this color, we will go over our
lines right here and we will add this
little separations. And also by using
the same color, we can add the shadows
to our petals. But to make it very clean, we will need to get back
to our list and we will need to set this layer
as an Alpha Lock. When it's done, Let's
go over the sides of our petals and let's
add little shadows. When you have the shadows, Let's get back to our
color palettes and select the color with
the name flower one. With this color, we will
go to the middle part and we will recreate the
shape one more time. Start from the outline. At the end of the line. You can hold your Apple
pencil to snap it to a better shape and
then manually, let's recolor this inner part. Now let's decrease the size of our brush and we will get
back to our color palettes. We will select the color
with the name flower face. And with this color, we will put our eyes and our
little mouth for the cheeks. Let's select the same color
that we used for the petals. And we can do it one more time by using the eye dropper tool. Hold one of your fingers on the screen until you
see this little tool. And when you are
selecting the color, Let's just go to our cheeks and we will put the color here. Now let's get back
to our layers and we will hide our layer
with the sketch. Let's go over the
shapes and lead trick out whether
everything is alright. For example, we can go to this term right here
and we can erase this part where it overlaps
are a little bottle face. Let's go grab an eraser
tool and we will erase this little parts also
with the same eraser tool. We can go over the top and we can erase these parts because this part of the
bottle is a little bit thicker and probably
it won't be seen here. So let's grab our eraser tool. Let's increase its
size and let's very accurately go over this
part and erase it. And when we did it, we are ready to get back
to our layers and we are ready to combine these
two layers together. So let's go to the top
layer with our flower. Let's tap on it and
let's choose merge down. And now we are ready to move
on to our last illustration.
9. Watering Can Coloring + Final Details: Let's start our last
illustration by going to the layers and unhide our
layer with the sketch. And while we're still here, Let's just create
one more layer. So tap on the plus icon. When you did it. Let's get back to our
color palettes and lead, select the next color. And this time it will
be watering can. With this color, we
will go to the body and to the spout of our little can. And we will start by
creating an outline. When we have the outlines, Let's get back to our layers
and just for a second, we will hide our layer
with the sketch. Check out whether
everything here is closed. And if it is, we will get back
our layer with the sketch. Now we're getting back to our new layer with the outlines, and we will go and drag and
drop the color in sight. Now let's go over the top and we will add this
leads, so Alice. But firstly, we're going back to our color palettes and we are selecting the color with
the name watering can too. Let's go to our Canvas and we will recreate
these little ellipse. Start by creating an outline and then drag and
drop the color. Manually recolor this
little blue piece. When it's done, we can create one more layer for
the handle because we don't really want to deal with these lines that will
intersect each other. Let's go back to our layers and we will create
one more layer. So tap on the plus icon, we will put it underneath
our main layer. So let's tap on it, Let's hold it and
lead drag it down. Now onto this layer, Let's just go and
create our handle, close this shape, and then
drag and drop the color. Now for convenience,
we can get back to earliest and we can combine
these two layers together. To do so, we will
need to go over the top to our top layer. We will need to tap on it and we will need to choose merge down. And now everything is on one layer and it's
now add more details. Let's tap onto this layer. We will choose alpha lock with the same color that we use for that so part and for our handle, we will go to the bottom and
we will add these details. So let's go and try to do that. Let's close this
shape over the bottom and we will drag and
drop the color insight. And now with the same color, Let's just go increase
the size of our brush and we will put the
dots for our cheeks. Let's go to our color palettes and we will select
a different color. This time it will be can face. Let's select this
color and let's put two dots for our ice
with the same color. We will go over our mouth and
we will recreate the shape. Let's recolor this part, and then we will go back to our color palettes and we will
select a different color. This time, it will be
CAN, nose and tongue. So let's firstly
increase the size of our brush and let's put
the dot for the notes. And now very accurately, let's go inside our mouth and
let's add a little tongue. Let's recall the inner parts. And then we'll go back to our
color palettes and we will select the color with the
name bottle and highlights. With this color,
we will go and put a little highlights to our
eyes and a few to the tank. And now let's continue
by adding the shadows. So firstly, we will go back
to our color palettes and we will select the color with
the name can shadows, one. With this color. We will
go under our top part and we will add a little shadow
here with the same color. We'll go to the
spouse and we will add a little shadow
here as well. And with this same color, we'll go over the whole shape of our blue parts and we will
go and add a few details. Now let's get back to
our color palettes and we will select
the next color. This time it will
be can shadows. To end with this color, we will add the shadows
for our pink parts. Let's go firstly
over-the-top and we will add this inner part,
recolor it manually, and then let's move on to
the left and we will add little shadows to our handout
ends with the same color. We will go to our bottom
part and we will add these lines as a GitOps
ends with the same color. You can go over
this part and you can add a few details
here as well. Now let's get back to our
layers and let's hide our layer with the sketch layer checkout whether everything
here is alright, and if it is, we are done
with our illustrations. But firstly, let us go over
art soap and we will use the eyedropper tool to fix the places that we
would like to fix. When you've cleaned
up everything. Ledgers go to our layers and we will create
one final layer. We also will go to
our color palettes, and we will select the color
with the name sparkles. And if you go to the
Project and Resources tab, you can find a
special brush here. So let's just go and select it. With this brush. We will just go over some places and we will
put some sparkles. And when we did it, we are done with
our illustration. Thank you for
watching this class. Leave a review if you
liked it and consider subscribing for more Kawhi
videos in the future.
 Uni Corn, ⭐Kawaii Art Enthusiast⭐