Transcripts
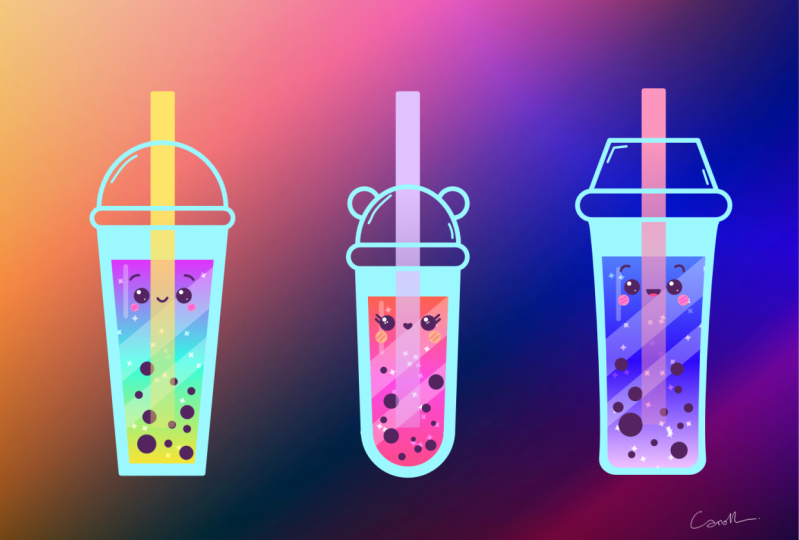
1. Introduction : Hello everyone, I am unit
and into this class, we'll draw a few cute, colorful bubble
tea illustrations. These class doesn't require any prior experience
or fancy tools. We'll start from scratch
and we'll be using simple techniques
throughout the process. Everything you'll see will
be happening in Procreate. However, if you have other software or wants to
try traditional materials, you are welcome to join if
you are ready to start, Let's jump right into it.
2. Preparing the Canvas: Let's start our class
from some preparations. And you can see that we are beginning by
creating the canvas. The width is at 2800 pixels, the height is a
2000s DPI or 300, and color profile is set as
SRGB with this loan number. When that's all done, let's
hit Create and we will be redirected to our new canvas. So now we need to decide
what kind of colors we are going to be using
for the whole class. You can go to the project and
the rest of this topic and download the color palette
and thick and follow along. So when he did it,
Let's go straight to our color palettes and we
will see what we have here. Here we have two options of
how we can use these colors, the compact view and the carts. We'll be using the cars because
they have all the colors, names and they are ready
for you to be used. While we're still here
in our color palettes. Let's select our first
color. It will be great. And perhaps Let's tap
on this to select. When we did it, we are
ready to select our brush. So let's go to the
Brush Library. Let's go to the
calligraphy folder. And who will choose
monoline brush. We will set this size
of this brush at 10%, and now we are ready
to prepare our Canvas. So what is our plan for today? Today we are creating a
more balanced speak truth. And that means
that we don't want our illustrations to
touch each other. We don't want them to touch
the edges of our canvas. We want them to be balanced and we want to have some space. And the best way to do
that is to create a grid. So this is our first
tip for today. Plan ahead and prepare a layout. So when we know it's
ledgers go to this range. I can overwrite top-left
and we will tap on it. We will go into Canvas and we
will select Drawing Guide. Now you can see that
you have some cells going through the whole
sheep or your Canvas. That's what we need. But we will need to adjust the just itself. So we will need to go
to Edit Drawing Guides. We will keep the 2D grid, but we will need to
change the grid size. Let's tap onto this little
window near the grid size, and we will write down 143 pixels when it's
ready, let's hit Done. And while we're still here, Let's also toggle
assisted drawing. Now when we are
ready to lead, yes, he'd done over our top and what we're gonna
be doing right now. Firstly, we will be
creating a frame. We will be going
alone our sides, and we will be
stopping to cells from them and creating vertical
and horizontal lines. So firstly, let's
go over our left. We will step two
cells from this side, from the top and
from the bottom, and we will create
a vertical line. You can see how
easily you can do it because we turned on
the assisted drawing. When you have the first line, let's repeat the same
step over r. Alright, so step into cells from top, from bottom and from the right, and creating a vertical line. Now when we have these
two vertical lines, let's connect them together
by creating horizontal lines. Going over the top step
into cells from the top, and creating a horizontal line. Now when we have it on the top, Let's move on to the bottom
and repeat the same step, SAP into cells from the bottom and creating
a horizontal line. Now we have a perfect frame
for our illustrations, but also we can create
a little grid for them. So what we're gonna be doing, we will go inside this frame. We will go to the left
and we will count for cells when we
reach the fourth cell. And we will just create their line going
from top to the bottom. Now we will leave
two cells blank, and we will create one
more vertical line. Now we are repeating it one more time for our
second illustration. So one more time counting for cells and creating
a vertical line, leaving two cells blink and creating the
last vertical line. And now we have the perfect
great for our illustration, but it is too bright. Let's just go and change the
opacity level of this layer. So let's go to the
layers and we will go to the icon onto this layer, you will see that we have
the opacity slider here, which we can grab and
which we can move to the left until we still see what's happening
onto earlier. But when it's not
that disturbing, when you are satisfied with how it looks. Let's do one more. I think we will need to turn off the assisted drawing
onto this layer. Let's tap on the layer and let's select Drawing Assist
from the list. And now we are ready
to move on and we are ready to create our
first illustration.
3. Interpolation Tip: A little tea before
starting this part, always draw the object the size you'd like to
see them in the end because scaling and adjusting them will worsen the quality. Let me show you what I mean. So for example, we
have two objects, they are similar to each other. And firstly, we will go to
the object on the left. We'll go to the move tool. We will make it smaller, then we will make
it bigger and we will do it a couple of times. And after a couple of rounds of scaling up and
down this object, you will see that
the quality of it is getting worse and it's
looking kind of nasty. The edges are jagged. There are not as crisp as
we have them on the right, and it's not what we need. We want everything to be
as crisp as possible. We need to follow this
rule to create the object, the size we want to
see them in the chat. Or at least if we can't leave without
adjusting our elements, without scaling down, without moving them across our canvas, we would need to
change one option. So let me show you
on the other object, we will go one more
time to the move tool. And here on the bottom
you can see that side. So nearest we will
need to tap on it and we will go into
the interpolation window. So here we will need
to select b cubic, and we will do the same
thing one more time. So we will scale it up
and down a few times. You can see that
with this feature, our edges are looking
a little bit better. There's still not crispy, but they are better than
we have them on the left. So that's what we need to do. At least if you are
changing your elements, if you're a scaling them, use these big cubic
interpolation option. Now, let's move on to our parts.
4. Tall Cup Base with Simple Shapes: Let's start by going
into our layers and we will lock this
layer with our greet. We don't want to add
any more details here. We don't want to accidentally
draw something here, so we will need to keep
everything as it is right now. Let's go to this layer
and we will swipe it from right to left.
We will choose lock. Now when we did it, so
let's hit the plus icon to create a new layer for our
first illustration and two, and we have this layer. Let's get back to our
color palettes and we will select the color
with the name cup. Now with our new color, Let's zoom in our Canvas for the first field that we
have created for our greed. And we will start
with very easy shape. It will be a shape
of the rectangle. It will be six by two cells. We will do it on the bottom of this little fields without
an holding our Apple Pencil. So let's go and try to do
that at the end of the line. Hold your Apple pencil, and then we will go over
the top to edit shape. Here we have a few options and we will need to
select rectangle. You can see that your shape
snaps to a perfect rectangle. And that means that we can go
and adjust, adjust Elliott. So you can notice that
we have some nodes here and we can tweak them
to create a different shape. So firstly, let's go over the
bottom and we will combine our lines only shape with the lines that we
have on our grid. So we will go to
this middle nodes and we will grab it
and move it down. When we do it, we
will go over the top and first we will go
to the right nodes. We will grab it and we will move it half cell to the right. And we will need to keep this line over the
top very straight. And as we have the grids, it will be very
easy for us to do. We just need to put
these nodes on the line. So when we have the
first node on the right, Let's move on over the labs and we will do the same thing. So we will grab it and we will move it half cell to the left, makes sure that the
line is straight and we have the perfect
shape for our cup. So let's just go away from this mode and we will continue. We will need to tap on the screen with one
of our fingers. Now let's go and make
sure that this shape is closed so we don't need to
have any gap on to the lines. So for example, we can go to the bottom and we can
check the line here. We can manually adjust it. And when you made sure
that everything is closed, we will go to our layers and
we will name this layer. So we will need to tap on it and we will need to choose rename. You can do it with your
keyboard or you can do it with scribble if you don't know what the Scribble is and
where you can find it. You will need to go to your adjustments
to your settings and to your Apple Pencil. Here you have the
scribble option that you can go with this option on. You can go to your layer and
you can just do this thing. You can just crop
everything here and you can manually write down the title that you would
like to have here. So for example, let's go
with the name toll cap. When we have this layer renamed, alleges create one more layer. So tapping on the plus icon and we will straight
away rename this layer, so tap on it and choose Rename. Let's crap what we have here and let us write down Leeds, Bolton. Once at this layer
we will be creating a very thin and Ellen Gates It's rectangle and we will
put it on the top of our cup to let us go there, let's zoom in our canvas and let's do it the
same way as before. So without and holding
our Apple pencil, we are going and creating this
thin, elongated rectangle. Step a little bit aside from your cup and create this shape. At the end of the line. Hold your Apple Pencil and we will go over the
top to edit shape. Here we have a few
options and again, we will need to
select the rectangle. Firstly, we will need to make sure that these lines that we have are parallel to each other and parallel to
the grid that we have. So we will move this
shape a little bit up to the line that we
have over our grid. And we will make sure that
these lines are straight. If they are not, you just putting the shape and you are adjusting your notes. If everything is alright, we are putting this
shape onto our cap and we will need to combine the bottom line on this shape, the top line of our cup. So I just go and try to do that. When we did it, lead, just tap on the screen
with one of our fingers. And now we need
to make sure that these new shape is right
in the center of our cup. And we can do it by
doing the following. We will need to go to this
arrow key or the top-right, and we will need to
turn on Snapping. So tap on the snapping and toggle it into this little menu. Now, if you grab your shape, you will see that sometimes you see the line going
through the center. It is blue right now. And when we see it, that means that you are doing everything right, right now. Your shape is right in the
middle of our previous shape. When you see it, ledgers
and hold our Apple pencil. And let's deselect everything
by hitting our arrow key. One more time. We want to make this shape or this soap a little
bit different. So we want to make
the corners and the sides a little
bit more rounded. So they should be completely
rounded, be honest. And as Procreate doesn't
have this option built in, we need to do that manually. So let's just go to our layers and we will create
one more layer above. We will be creating an ellipsis, two circles, and
we will be putting them on the edges of our sheep. So firstly, let us go to our color palettes and we
will select a contrast color. You can select any
color that you like. But it should be different from the color that we
have onto our cup. So for example, alleges get back to the color with
the name grids. And perhaps when we have it, we will zoom in our
Canvas and we will go to the edge of our shape here. So we will need to
create a circle. Ledgers go and try to do that. We need to make it
as big as our shape. And at the end of
the line, again, we are holding our Apple pencil. Now you can see that
it's snapped to an ellipse and we need a
perfectly round circle. So we will need to go to
our screen with one of our fingers and without an
holding our Apple pencil, we will hold our
finger on the screen. Now it is snap to a
perfectly round circle. And if you move your Apple
pencil from side to side, you can see that you are changing the size
of your elements. We will need to make it as
big as our previous shape. When you did, Let's
hold everything and we will go to this little arrow
key that we used before. We will need to put this
new shape over our edge. So we will need to combine
these two shapes together. Let's just go and
try to do that. So snap this shape. You will see that you have
the vertical blue line. And when you have
it, we will need to make a copy of this shape. We will need to put it on
another side. To make a copy. We will go to our
layers and we will swap this layer with this little
circle from right to left, we will choose duplicate. And now with this new layer, we will one more time
go to our arrow key and we will move this new
shape over the rights. We will need to
put this shape on the same line that we have
our previous shape on, and we can do it very easily. You just need to find
the three blue lines that are going through the
whole shape when you see them. That means that you
are at the same line. And also we need to snap this little shape
to our right side. You will see the vertical line. And when you have it, digest and hold
our Apple pencil. And let's get away
from this mode by tapping on the arrow
key one more time. Now, we will go to our
layers and we will merge these two layers with
our ellipses together. So go to the top one, tap on it and choose merge down. When we have these two shapes, we are ready to erase
the extra parts. Firstly, let's make sure that
we're on the correct layer. It should be this layer
with two ellipses. And onto this layer we
will grab an eraser tool and we will go inside the
shape and erase this line. When you did it on one side. Let's move on to another and let's do the
same thing here. When it's done, we are going
back to our layer with the lead bottom and we are erasing this little
triangular shapes. So one more time, getting
our areas are to go in alone the shapes and
erasing them very accurately. When we have
something like that, it's time to recolor our little ellipses and
we can do it very easily. We will get back to our layers. We will get back to this layer that we have for our ellipsis. We'll tap on it and we
will choose Alpha Lock. Alpha lock will help
us to draw inside the existing objects without
going beyond the frames. So that means that
when it is turned on, we can get back to our
color palettes and we can select the same
color that we used before. So it was kept with this color. We will go over these shapes and we will very easily
recolor them. And now we need to get
back to our leaves and we need to combine these
two layers together. So go into the top one, tapping on it and
choose merge down. And while we are still
here into our layers, and let's create
one more layer for the top part of our elite. So tapping on the plus
icon, once this layer, we will go over the
top and we will create an ellipse or a
circle if you would like. So we will go there and let's
just create this ellipse. Hold your Apple pencil at the end of the line and we
will need to adjust its size. It needs to be the same width as we have on to our
layer with the cup. So when you have it's ledgers
get away from this modes. We will go to Edit shape or the soap and we can
adjust the shape here. Or if you want, we can skip this part and we can go to this arrow
key over the top, and we can place our
elements in this way. So let's find the center
and let's combine our lines on the bottom
with our shape on the top. So when we have it, Let's deselect everything
by Keaton are heirarchy. One more time, let's grab an eraser tool and we will
erase the bottom parts. Now let's get back to our
layers and we can combine these two layers together or we can leave them as they are, but we will need to rename
this layer on the top. Let's tap on it. Let's choose Rename, and
let's write down Toeplitz. Now it's time to add the straw. We will go to the layer
with the tall cup, and here we will select it and we will tap on the plus icon. Let's name this layer straw. We will go to our
color palettes and we will select the color
with the name straw one. So we will go to our
shape and we will create a very thin,
elongated rectangle. It will be vertical the
same way as before. We are creating it
without an holding our Apple Pencil and
the end of the line, we are holding our Apple pencil to snap it to a better shape. And then we are going over
the top to edit shape. Here we are selecting Rectangle. Now we need to make
sure that it is straight and we can find
the placement for it. You can adjust the size
of these elements. You can adjust the thickness. It's all up to you. So when you are satisfied, Let's make sure that this
shape is in the center. We will firstly tap on the screen to get
away from this mode. And then we'll go to our
arrow key or the top. We will grab our
shape and we will find this line that is
going through the center. And when we are satisfied
with the result, let's just deselect
everything by Keaton, our arrow key one more time. The last thing that
we will do for now is aging the inner
part of our cap. So it will be some liquids. We will do it in that way. We will go back to our layers. We will go to the layer with the tall cup and we
will make a duplicate. So swiping this layer from right to left, choosing Duplicate. Let's rename this layer. So tapping on it and let's
name it inner parts. We will need to
make it smaller and we will need to
position it correctly. So with this layer selected, we will get back to
our heirarchy over the soap and we will
make this shape smaller. So we will need to use uniform methods and
we will need to go over one of the sides and we will need to
drag the corner. Now, let's position
it into the center. And if you think that
it's not enough, the size is too big. You can drag one of the
corners a little bit more, position it in the center. And when you are satisfied, let's just deselect everything
by hitting our arrow key. And we are done with this scheme of our
first illustration. In the next part, we will
be creating our second cup.
5. Rounded Cup Base with Simple Shapes: The first item or a
second illustration. Let's clean everything
up into our layers. We will go there and
we will need to select each layer that belongs to
our first illustration. You can see that the
first layer is already selected and we will need
to select the rest of them. So we will go to any layer
that you like right now, and we will swipe it
from left to right. You can see that now
it is tinted to, and we will need to do the
same thing three more times. So let's go and try to do that. And when all the
layers are selected, we are going to the top right
and we are heating group. Now we have the group
and we can rename it. Let's tap on it and
let's choose Rename. Let's call it tall cup. And now we are ready
to heat this plus icon to create a new layer for
our second illustration. And when we have it,
we are going back to our color palettes and we are selecting the color
with the name cup. Now when we have the color, Let's zoom in our Canvas and we will do the
same thing as before. We will be starting by
creating a rectangle. This time it will
be five by two. So let's go and try to do that again without an holding
our Apple pencil. At the end of the line, hold your Apple Pencil and we will go over the
top to Edit Shape. Now, we will be
adjusting this shape. So firstly, let's go or
the boards and we will combine the line that we have on the bottom
of this shape, the line that we have
ones that are agreed. So we will grab the central points and
we will move it up. Now we'll go over the top and we will adjust our notes there. So firstly, let's go
over the right one and we will move it a little
bit to the right. So even before we
were buccinator 1.5 of the cell to the right. This time let's make it one quarter and we will do the
same on the other side, try to make them
even on both sides. And we will go over the
bottom and we will move the nodes here a little
bit to the sides as well. So we will need
these vertical lines to be just a little
bit convergent. Try to make them
even on both sides. When you are satisfied
with the results, alleges heat our screen
with one of our fingers, and let's go over
our lines and let's make them closed very manually. Just go in and fill
in these gaps. When we have this shape, Let's adjust the
bottom of this cap. We will go firstly to our layers and we will create
one more layer above, and we will go and
create the ellipse on the bottom part's the same way as we did here with our elite. We will do the same
here onto the bottom. So let's go and try to do that. Make it this size of your cup. Hold your Apple pencil
at the end of the line, and let's tap and hold on our screen with
one of our fingers, we will snap to a
perfectly round circle. Let's adjust its size. We need to combine our edges together and when
we are satisfied, let us go and erase the
parts that we don't need. While we're still on to our
layer with this ellipse, we'll grab an eraser
tool and we will go over the top and we will
erase this top part. Now let's get back
to our layers and we will get back to
our first layer. Here we will grab an eraser tool and we will erase the
boards and parts. Now one more time, getting back to our
layers and we will combine these two
layers together. So go to the layer on the top, tap on it, and
choose merge down. Now let's tap onto this
layer and let's rename it. Let's call it around It's gap. When we have the cup, let's create one more
layer on its own. And straight away,
we will rename it. So tap on it and choose Rename. We will go with elites bottom
and wanted this layer. We will go over the top of our cap and we will create
the shape like here. The same way as before. We are going over the
top and we are creating a very elongated rectangle
at the end of the line. Hold your Apple Pencil and we'll go over the
top to aided shape. Here we are choosing
quadrillion, or if we don't have this option, we will do it manually. So firstly, we will
need to make sure that our lines are
parallel to the grid. Let's just move this shape over the top and let's check it. If everything is alright, we will go and check
the bottom part's the same way we can check
our vertical lines. We will need to move this
shape over our left or over our cell that we have on the grids and we will
adjust it there. You can play with the size of your shape and when
you're satisfied, let just put it on
top of our cup. We need to combine the lines, one on the bottom
of our top shape and one on the top
of our bottom shape. And when we're satisfied
with how it looks, Let's tap on our screen
with one of our fingers. Now we need to make
sure that this shape is positioned right in
the middle of our cup. So let's go to the arrow
key or the top-left, and we will use snapping. Now let's move it until we see the blue line going
through the center. And when we have it, let's just deselect
everything by hitting our arrow
key one more time. And you know what we are
going to be doing right now. We will be creating these
rounded shapes over our site. So we will do the
same way as before. We are going back to our layers. We are creating one
more layer above. We are going back to our color palettes and we are choosing the
contrast color, for example, a left select grid. And perhaps we will go to the sides and we will
create our circles there. So let's go and try to do that. Hold your Apple pencil
at the end of the line. Hold one of your fingers
on the screen to snap it to a perfect
rounded shape. And when you're satisfied, ledgers go to our
arrow key one more time and we will move
this shape to the site, snap it to the edge, and we will deselect
everything by hitting our arrow
key one more time. And now we need to create a duplicate of this shape
and move it to the right. So firstly, we are going
back to our layers. We are swiping this layer with this circle from right to left, and we are choosing duplicates. With this new layer, we are going back
to our arrow key and we are moving
it to the right. We need to follow these three lines and we will need to snap it to the site. When you have all
the lines together, ledgers, deselect everything by heating our Eric
you one more time. And now we will need to merge these two layers
with our circles. So going back to our layers, tapping on the layer on the
top, choosing Merge Down. And we will go and erase the
inner parts of our ellipsis. So grabbing our eraser tool
and erase in the inner parts. When you did it,
we will go back to our layers and we will go to the layer with the lead bottom. We will grab an eraser tool
one more time and we will very accurately arrays
these triangular shapes. Now let's get back to
our layers and let's get back to our earlier
with these circles, we will tap on it and we
will choose Alpha Lock. We will get back to
our color palettes and we will select the color
with the name cup. And now we'll go over these shapes and we
will recolor them, go into the Layers and merging
these two shapes together. So go into the top layer, tapping on it, and
choose merge down. Now when we have these, let's create the Toeplitz, so creating one
more layer above, Let's rename it straightaway. So go in there and naming it leads top and onto this layer we are going over
the top and we are creating an ellipse
here or a circle. It's all up to you. We will need to make it
this size of our cup. Hold your Apple pencil
at the end of the line. Adjust the size, go over
the top to edit shape. If you need to, you will need to adjust the lines
on the sides. You will need to
combine them together. If it's not working
into the edit mode, you can get back to your
heirarchy over the top and you will need to find
the position in the middle. So you will need to find
this orange line and we will go and deselect everything by hitting our heirarchy
one more time. When you have it, we will grab our eraser tool and we will erase everything
that we don't need. Now let's add a
little detail here. So we will go back
to our layers. We will create one more
layer that we will go over the top of our leads and
we will add a little ears. So we will start by
creating a very small Alps. Hold your Apple pencil snaps to a perfectly round
shaped by heating your screen and
holding your finger there and go over
the edit shape, adjust the shape,
adjust the position, and when you're
satisfied with it, Let's go and create a co-pay. So go into the Layers, swipe and delay from
right-to-left, choosing duplicate. These duplicate,
we will grab with our Move Tool and we will
move it to this site, follow the blue lines, and find the position
that works for you. Let's deselect everything by hitting our arrow
key one more time. Let's go over our layers and we will combine these
two layers together. So go into the top one, tapping on it, and
choose Merge Down. Now let's make sure that
our ears are on the center. So we are again going to
our arrow key and we are finding the center by following
the blue or orange line. So when we found it, let's just deselect everything
by hitting our arrow key and we will go and erase
the boards and parts. So grabbing an eraser
tool and erase that, Let's get back to our layers and let's combine these
two layers together. So go into the layer
with the ears, tapping on it and
choose merge down, and now we are ready
to create a straw. So firstly, one more time, go into the layers, tapping on the plus icon, going back to our color palettes and selecting the next scholar with the name straw to doing
the same thing as before. Go in there and creating a
very elongated rectangle. Hold your Apple pencil
at the end of the line, go to Edit shape over the
top and select rectangle, a jazz the shape if you need it. And let's go and check out
whether it is in the center. So firstly, tapping onto our screen with one
of our fingers to get away from this mode and
then go into our arrow key. Now finding these
blue or orange line and finding the position that
we like when it's ready, Let's deselect everything by hitting our arrow
key one more time. Let's get back to our layers. Let's name this layer. So tap on it, rename, and let's call it straw. The last thing that
we will do with this illustration is
aging the inner parts. So we are going into the surroundings cup layer
and we will need to make a duplicate swipe and then from right to left and
choosing Duplicate, Let's rename it right away. So tapping on it, choosing Rename and let's
call it inner parts. And now we will need to
make it smaller by going to our move tool and drag in
one of the corners down, let's find the position
in the center. And when we are done, Let's deselect everything by hitting our arrow
key one more time, and we are done with
this scheme of RS. Second illustration. In the next chapter, we will
finish up with a third one.
6. Rectangular-Lid Cup Base with Simple Shapes: Before starting, our
third illustration, allows get back to our
layers and we will need to select each layer that belongs to our
second illustration. So let's go and try to do that. When all the layers
are selected, we are heating group, we are getting into this
group and we are renaming it. So this time, let's call
it around this cup, and now we are ready to
create our new layer. Let's tap on the plus icon. When we have the layer, we are going back to our
color palettes and we are selecting the same color
as we used before, cup. Now let's zoom in our Canvas and one more time we are starting
by creating Eric tingle. This time you can play around
with the shapes and sizes. It's all up to you. So let's go and firstly, create this rectangle
at the end of the line. Hold your Apple pencil, go over the top to edit shape, select Rectangle, and ledgers
play around with the shape. So for example, we can make
it a little bit smaller. We can go and adjust our nodes on the top and find
what works for us. Tried to keep the lines straight if you need
to adjust them, just go over that soap, go to the grid line and adjust your notes when you have
the shape that you like. Let's just tap on our
screen with one of our fingers and we will
go and fill the gaps. Now we can go to
these two corners and we can make them around
it one more time, going back to our layers and we will need to
create a new layer. Onto this layer, we
will get back to our color palettes and we
will select a contrast color. So let's select Grids and
perhaps we will go to these corners and we will start by creating our circle there. So hold your Apple pencil
at the end of the line. Hold one of your fingers
on the screen to create a perfectly round circle. Let's adjust its
placement by going to Edit Shape and then
we will make a copy. So going back to our layers, swiping this layer from right to left, choosing Duplicate. Now go into our arrow key and moving this
shape to the right, follow the lines and
snap this shape to the edges when you have it
led deselect everything, and let's merge these
two layers together. So going back to our earliest, go into the top one, tapping on it and
choose Merge Down. Now grabbing our eraser tool and erase all the lines
that we don't need. This same with our LEA
for the cups are going there grabbing the Eraser tool
and erase and our corners. Now let's get back
to our layer with this half of the circles
and let's heat on it, and let's select Alpha Lock. We will go to our
color palettes. We will select the color cup, and we will go over
these shapes and we will recolor them
when we did it. Let's get back to our layers. Let's combine these
two layers together. So go into the top one, tapping on it and
choose merge down. And let's rename this layer. So again, tapping on it
and choosing Rename. Now let's create one more
layer by hitting R plus icon. And we will go over
it itself and we will create the shape like here. So one more time going
over there and create an, a very elongated shape. Hold your Apple pencil
at the end of the line. Go to the top to edit shape. Choose rectangle, make the
lines parallel to each other, so adjust the placement of them. And when you're
satisfied with the size, with the thickness
of this element, ledgers go and make sure
that it is in the center. So let's first, let's tap on the screen and then we'll go to the arrow key or the
top-left, find the position. And when we are done, Let's deselect everything
by hitting our arrow key. And now you probably know
what we're gonna be doing. We will be creating
this rounded edges. So one more time, we are
going back to our layers. We're at tapping on the plus
icon to create a new one, we'll go into our color palettes and selecting the
contrast color. And let's create
these two ellipses. Snap to a perfectly
round circle, go to Edit Shape and
move it to this site. Now let's make a copy. So going back to our layers, swiping this layer
from right-to-left, choosing Duplicate. Now going back to our arrow key and moving this
shape over the writes, follow the blue lines
and snap it to the edge, deselect everything by
hitting our arrow key. Let's go over our layers. Let's merge these
two layers together. So tapping on the top one, choose and merge down. Grabbing our eraser tool and
erase in the inner parts. Now let's get back
again to our layers. We will go to this layer that is supposed to be Arlene bottom. We will grab our eraser tool and we will erase the corners. Now getting back
to our layer with this circles and we will
need to turn on Alpha lock. So tapping on this layer, choose an Alpha Lock. Going back to our color palettes and selecting the color
with the name cup, Let's go over these two shapes
and let's recolor them. And when you did it, Let's get back and combine
these two layers together. So go into the top one, tapping on it, and
choose merge down. And let's rename this layer. So tap on this layer, go into rename and let's
call it a lead boughten. While we're still
here into our layers, let's create one more
layer for the Toeplitz. Tapping on the plus icon and straightaway, Let's rename it. So tap on it and choose Rename. Let's give it a name. Toeplitz onto this
layer will go over the top and we will create not an ellipse here,
but a rectangle. So again, the same way as
before going there and creating their example without a holding our Apple pencil, hold your Apple pencil. Go to Edit shape over the
top and select rectangle. Now, let's make sure that
our lines are straight and parallel to the cells
that we have onto our grid. If we need to adjust them, ledgers go and do that. Let's put this shape onto
our leads and we will go to the top nodes and we will
move them toward the center. It's up to you, how can a virgin this lines
are going to be, you can play with
the size of them. You can play with the
whole size of the shape. It's all up to you when you
are satisfied with the shape, Let's tap on the
screen with one of our fingers and let's make sure that the shape is right
in the middle of our cup. So go into our heirarchy
over the top-left, and let's find this line that
is going from the center. Now when you did it, Let's deselect everything
by hitting our arrow key, and let's go and
create this draw. So firstly, we are going
to the layers and we are going to the layer with
the name third cup. Here, we will
create a new layer. When you did it, Let's
rename it as a straw. And then we will go back
to our color palettes and we will select the color
with the name straw three. And again, the same
way as before. We are going to our
Canvas and we are creating a very elongated
rectangle here. Hold your Apple pencil and go
over the top to edit shape. Select Rectangle,
a jazz the shape, adjust the thickness
if you want, and when you are
satisfied with it, ledgers Gill and put it
right in the middle. So go into our
arrow key over the top and finding the line that is going
through the center. When you are done
with this task, let's deselect everything by hitting our arrow
key one more time. And the last thing
that we will add here will be the inner part. So we are going back to
our layers and we will need to make a copy of
our third cup layer. So go into this layer, selecting it and swiping it from right to left,
choosing Duplicate. Now let's rename this layer by tapping on it and
choosing Rename. We will call it either parts. And now with this
layer selected, we are getting back
to our arrow key and we are making
this shape smaller, position it right in the middle. And we are done with
our third illustration. So in the next part, we will be creating
our coloring.
7. Adding Base Liquid Color & Creating Gradients: Let's start this
part by going to our layers and we will need
to clean everything up here. So that means that we
will need to select each layer that belongs to
our third illustration, and we will need to put
them into the group. So let's go and select
them and then we'll hit Group or that's upright
when they have the group, Let's rename it, so tap on it and choose Rename for the name. Let's go with the
title third cup. And when we have the group, we are ready to start
recoloring our objects. So what we're gonna
be doing, firstly, we will go to our first
group with its own cup, and we will go to
this layer with an intro cup and we will be going and color
dropping the color to the main cup shape and
to the inner part. Let's just select this layer and we will get
back to our canvas. We can zoom it in or we can
leave it as it is right now. And we will need to
select the same color that we have for our lines. And we can do it in a
few different ways. The first one is to go back to our color palettes and
select it from here. But also you can
sample the colors from the already existing
colors onto your canvas. And to do so, you will need
to use the eyedropper tool. So you will need to hold
one of your fingers on the screen until you
see a little too. If you move your finger
to the new color, you can select it in that way. Now let's select this blue
color and we will go to our top-right corner and
we will drag and drop the color inside the
main shape of our cup. You can see that now
everything is recolored, but it's not true. We can go to our layers and we will see that our
inner partly isn't recolor it just for 1 second
ledgers height our layer with its own cup and we will go and add the color
into the inner parts. So selecting the layer
with the inner part, go into the top-right and dragging and dropping
the color insights. So now if you go to the layers, you will see that both of
these layers are recolored. So now we can get back our
layer with its own cup, and we will do the same thing
for our remaining cups. Go into our second group, go into the rounded cap layer, go into our top-right corner and dragging and dropping
the color inset. Now going back to the layers, go into the inner part. If it's easier for
you, you can hide this layer with a rounded
cap to know where you need to put the
color and putting the color to this
inner part area, get back this layer
with the rounded cap. And let's do the same
thing one more time. So go into the third cup, go into our top right corner and dragging and
dropping the color, doing the same to
the inner parts. Now you can see that everything is solid and it's quite boring. So we will be adding the
gradient to the inner part, and it will be easier for us to do it by using the
clipping mask. Clipping mask works the
same way as alpha lock. So you will be drawing
onto the areas you already have on
the previous layer. But clipping mask is
a different layer, so you can always edit it. You can create
more on this layer is to combine them together. And if you need it, you can start all over again. So firstly, let's go to our
first group with its own cup. We will select the
inner part layer and we will tap
on the plus icon. We have a new layer here. We can rename it if you want to, or you can leave it as layer
20 or LA or something. And we will need to
select this layer. We will need to tap on it, and we will need to
choose clipping mask. Now, everything that
you will draw onto this layer will be attached
to the previous one. You wanted to create
an any more shapes, you will be just drawing
inside the area. Now let's go back to our
color palettes and we will start by selecting the color
with the name dark magenta. Now we can increase the size of our brush and we will go over the soap bars and we will create the area like that when you
have something like that. So let's get back to
our color palettes and we will select the next
color, it will be C. And now we are going into the middle part and we are
adding the color here, and we will do the same
thing one more time. So going back to our
color palettes and selecting the color
with the light yellow, we will go there
to the bottom part and we will add the
color to the area, make sure that you
recover the whole area. And when you have
something like that, we will go to their gradients. So when you have your
colors boots on, Let's go to this magic one tool and we will go to Gaussian Blur. Now, you can see that we
have some menu omit soap. And what we need to do is
to move our Apple pencil to their right so you can see that we are adding
some gradient. And for the great
result, allege us, leave it as something
like 25 per cent. You can experiment while finding the colors
that works for you. And when you're satisfied, let just tap on this magic
one tool one more time. Now we will do the same to
our two remaining cups. Let's go firstly to our layers. Let's go to the second group. We will go to the
inner part layer and we will create
one more layer above. Now it's up on the group
and select clipping mask. Let's go to our color
palettes and we will start by selecting the
color with the name rats. We will go over the top and
we will add the color here. Now let's get back to our color palettes and
select the next color. It will be pink. We are adding this color
to the middle part. And when we are done
with this color, Let's get back to our
color palettes and we will select the color with
the name light magenta. So add the color to the bottom
and when you are ready, let's one more time. Go to the Gaussian blur
the same way as before. We will leave it at
twenty-five percent. Let's deselect
everything by hitting our magic one tool
one more time. And we will go to
our layers and we will go to the inner
part in the third cup. So selecting this layer, tapping on the plus
icon to create a, UM, tapping on this layer
and selecting Clipping Mask. Now let's go back to our
color palettes and we will start by using the
color with the name blue. We will add it to the top area when it's done where
I getting back to our color palettes and selecting the color with the
name dark purple, adding the color to
the middle parts. And when it's done, we
are getting back to our color palettes and adding the last color with
the name purple, Let's add this color
to the bottom. And when we have all
of these colors, we are one more time go
into our Gaussian blur. And again, we are setting
it at 25 per cent. Let's deselect
everything by hitting our magic one tool
one more time. And you can see that now we
have beautiful gradients. And that means that
in the next chapter, we will be adding the
additional details.
8. Recoloring & Adjusting the Straws + Adding Bubbles: Let's start this varied
by recoloring our straws. So firstly, we will
go back to our layers and we will go into
our first group. We'll select the
layer with the straw. When it's done, we will need to use the eyedropper tool to select the color that we
used for our outlines. When you have the color, Let's just go over our
top right corner and we will drag and drop the
color inside the straw. When we have recolored
our first row, we will need to do
this same thing with the two remaining ones. Let's go back to our layers and we will go inside
the second group. It will be the layer with a straw with the
eyedropper tool. Let's select the color and then we will drag and drop
it inside the area. You can see that in that case, we have our straw
overlap in the cup, and that means that it is
not on the needed place. So we will need to get
back to our layers. We will need to select
this layer with a straw and we will need to put
it under our lead water. So to do so, we
will need to hold this layer and we will
need to drag it down. Now you can see
that this layer is automatically snaps to a previous one and
it's not what we need. We want just a normal layer. So let's tap onto this layer and select clipping
mask from the list. Now, everything is
looking perfect and that means that we can go to our third cup group and we
will go to this Draw layer. When it is selected, we are selecting the color
with the eye dropper tool and we add dragging and
dropping the color insights. And now when we have all of
our restaurants recolored, let just add one
more detail to them. We will be going into the
boards and parts and we will be making it a little
bit more transparent. And to ease our life, we will need to
do the following. Now we are at our third straw, and we will do that. We will go and zoom
in our Canvas, and we will go to this S ribbon icon into the
little window on the bottom, we will select rectangle. Now with a rectangular
selection, we will go over the button
and we will select this area. In that way, we will
be sure that we are not going above
they needed area. So now we will need to grab an eraser tool and we will need to increase
the size of it. And we will need
to set the opacity of this brush to
twenty-five percent. And now just with one stroke, without an holding
our Apple pencil, we will go along the
selected area and we will make this a little
bit more transparent. Now let's deselect everything by hitting this S ribbon
icon one more time. And we will do this same
thing with X2 remains straws. So firstly, go into our Layers, go into the layer
with this true, go into the S ribbon icon, selected rectangular shape, and selecting this
area on the bottom. Now grabbing the eraser
tool and without an holding our Apple Pencil going alone the selected area and making
this drop more transparent. Now let's deselect
everything by heating the S ribbon icon one more time. And we will do the same thing
with our yellow strokes. So let's go to the layers. Let's go to this yellow straw. Let's go back to
our S ribbon icon and we will select this area. Now grab the eraser tool and make these straw a little
bit more transparent. And now let's deselect
everything by hitting R S ribbon
icon one more time. And now we are ready
to add some bubbles. So firstly, let's go back to our color palettes and we will
select the color bubbles. When we did it, we will get back to our layers and we will create a new layer after
layer with a gradient, so it will be above it. Let's select the layer
with a gradient. It will be the first one and
we will tap the plus icon. And we will need to set this
layer as a clipping mask just for the sake of
keeping everything clean. So tap on the layer and
select clipping mask. And now we will just go along this whole era with our gradient and we
will aid in bubbles. So you will need to keep
in mind the balance. You will need to change the size of the brush and the bubbles. You will need to
make a few big ones. You will need to add a few middle-sized and
a few small ones. So let just go and
try to do that. You can see that
if you're not very precise with your
bubbles, it smudges. And we can solve it
by going and making the perfect circles
with our brush. We will need to
do the following. We will need to go to
our brush library. We will need to tap onto
the brush that we are using and we will need
to change the spacing. You will see that the
line changes right now into our drone pads and
we will just hit Done. And now if we go to
the places where we would like to
put our battles, we will see that we are
not smudging anything. Now let us go over
the whole shape here, mostly on the bottom and
we will add a few bubbles. Try not to overdo it. And when you are ready
with your first cup, Let's move on to the next one. So firstly, we are going back to our layers
and we will need to create one more layer above
earlier with the gradient. So firstly select
the layer within gradients and tap
on the plus icon. And for convenience, ledger said this layer as
a clipping mask. So tapping on the
layer and selecting Clipping Mask from the list and doing the same thing here, adding the bubbles, keep
in mind the balance. When you are done
with these cap, Let's get back to our
layers and we will do the same thing
for our third cup. Go into our layer
with the gradients and creating one
more layer above. We will need to set this
layer as a clipping mask. And now doing the
same thing as before. I go into the boards and part of our cup and creating
the bubbles. And when you are
done with this task, we are ready with these parts. In the next part, we are going to be adding the highlights.
9. Adding Highlights: The first thing that we will
do into this part is go into our color palettes and selecting the color with the name whites. Now when we have the color, we will need to make the same appearance of the
brush that we had before. So let's go back to
our brush library. Let's go into the
mono line brush and we will need to
change the spacing. We will set it at 1520 per cent when we have it
ledgers he'd done. And we will go
back to our layers and we will go inside
our first folder. We will go to the top
layer and we will hit the plus icon here to
create a new layer, Let's name it highlights, and we will need to change the blending mode of this layer. Blending modes are
different ways your layers can interact with each other and they can add different visual effects. So to go into the changing
of our blending modes, we will need to tap on to this icon and we will select
screen blending mode. And also while we're still here, we will need to change the
opacity level of our earlier, so we will set it
at 30 per cent. You can grab the slider
and you can move it to the left until
you reach 30%. We can just write
down it right here. And now when I
earlier is prepared, we will be adding the highlights only onto the bottom era. So we would want to use this shape of our
cup as a reference. So what we're going to be due, we will need to go back to
our layer with its sole cup. We will tap on it and
we will choose, Select. Now you can see
that only this area is selected and
that's what we need. Now we need to get
back to our layers and we will need to go to our
layer with the highlights. So let's select it and
let's zoom in our canvas. Now we will go along this
shape and we will create diagonal lines with
different size of our brush to create
our highlights. You can hold your
Apple pencil at the end of the line to
create better lines. And you will need to go
and create a few of them. Tried to keep the same angle. When you are done with
the diagonal lines, Let's decrease the size of
our brush and we will go to the opposite side and we will create a vertical
highlight like that. If you want to add more details, you are welcome to do it. And when we're done with it, allegedly deselect everything by hitting the S ribbon
icon one more time. And now we will repeat the same thing with
our zoo Romanian cups. So firstly, we go into our layers and we go
into this second folder, node to the top layer, tapping the plus icon, we will rename it as highlights. Now when I go into the icon here and we are changing our
blending mode to screen. We are setting the
opacity level to 30%, and now we need to select
our boards and part. So go into the layer with
the name rounded cap, selecting it and tapping on it one more time to choose Select. Now we will need to go
back to our layer with the highlights and we will add the diagonal lines
for our highlights. Let's go and do that. When we are done with
the diagonal lines, Let's go to the opposite side and create a
vertical highlights. Add more details if you like. Let's deselect
everything by hitting R S ribbon shape one more time. And we will do this same
thing to our last cup. So go into our Layers, go into the top of our layers and creating
one more layer. Let's name it as highlights. Let's select this
green blending modes and set the opacity
to 30 per cent. Now going back to
our main shapes. So it is a third cup
selecting the layer, it's sapping and it's
n choose and select. Now going back to Arles, going back to our
highlights layer and add in the
diagonal highlights. When you are done with
the diagonal lines, go to the opposite side and
create a vertical highlights. Now let's deselect
everything by hitting R S ribbon icon one more time, and we are done with this part. In the next chapter, we are going to be
aid in their faces.
10. Adding Facial Features: Let's begin by going to our color palettes
and who will select the same color as we used for our bubbles when we have it, Let's get back to our layers. And firstly, we will go
inside the first group. We will go to the
highlights layer and we will create
one more layer above. So tapping on the plus
icon and straightaway, Let's rename it as
facial features. When we have this layer, Let's zoom in our Canvas
and we will go to the main shape of our
cup to its sub-parts. And here we will be aiding
our facial features. So now let's start with
something very simple. We will go grab our brush, we will increase its
size and we will put the first dot for our eyes. Let's start with the left side. When you have these dots, Let's make a copy of it. So we are going back to our
layers and we as wiping this layer with the
facial features from right to left,
choosing Duplicate. When we have the copy, we are going back to
our arrow key over the top-left and we are making sure that the snapping
is turned on. When you have the
snapping on legis, move this shape to
the right and we are following these
three blue lines, one on the top,
one on the bottom, and one in the middle. That means that
our second element is on one line with
the first one. So when you have
it's alleged, yes. And hold our Apple
Pencil and lead to deselect everything by
hitting our arrow key. Now let's get back to our layers and we will combine these
two layers together. Go into the top one tab
underneath and choose merge down. And now we need to make sure that our eyes are in the middle. We are selecting this layer
with facial features. And I go into the Arrow
key one more time. And now again, making sure that the snapping
is turned on. And we will need
to move our eyes until we see the blue line that is going
through the center. When we see it,
we are on holding our Apple Pencil and we are
going to deselect everything. Now, let's decrease the size
of our brush and we will go between our eyes and we will
add a little Smiley mouth. So go in there and creating
a shape like that, you can hold your Apple
pencil at the end of the line to make sure that it
snaps perfect shape. And when you're satisfied, you can just hold
your Apple pencil. Now when we have our
Smiley mouth ledgers go and add some eyebrows. So we are going
above our eyes and we are agents similar
shapes to our mouth. When you have these shapes, let's add the
highlights to our eyes. So we are going back to
our color palettes and we are selecting the color
with the name whites. Now let's increase the
size of our brush. And firstly, we will go
to our eye on the left. We will go over the top part of it and we will put the dot here. Now when we have this
highlights on our first i, let's move on to the next I end. We will try to put the
highlights on the same place. Let's go and try to do that. When we have these
two big highlights, Let's decrease the size
of our brush and we will go to the bottom and we will add a little
highlight there. So one-on-one I, and then
we are moving toward the right and we are aging
our highlight there too. Now when we have our
eyes ready, ledgers, get back to our color palettes and we will select
a different color. This time it will
be magenta, pink. Let's select it. Let's increase the size
of our brush and we will go under our eyes and
we will add the cheeks. So let's go and put two dots, one on each site. Now when we have the cheeks, let's get back to our
color palettes and we will select the color
with the name pink. With this color,
we will decrease the size of our
brush and we will go inside our cheeks and we
will add two lines like that. When you have them on one cheek, let's move on to
the other and we will try to recreate them there. And we are done with
our first face. So let's move on to the next cup and we will add the
face here as well. Firstly, let's go back
to our layers and we will go to our folder
with the rounded cap, will select the layer
with the highlights. And here we will create
one more layer above. So it's tapping on the
plus icon, streets away. Let's rename this layer
as facial features. Now when they have this layer, Let's get back to our
color palettes and we will select the same color
as before, bubbles. Now, let's zoom in our Canvas and we
will go to the top of our cup and we will start
agent our facial features. Now, it's your playtime. You can play with the
size of your eyes. You can play with their shapes. You can play with the mouth, highlights in the eyes position
or the facial features. It's all up to you if you would like to continue
following the class and create the same
facial features as you will see on your screen. Let's continue. So firstly, we, I go in
and increasing the size of our brush and we will go and put the first
dot for our eye. Let's go over the left. When you have the first dot, Let's create a copy of it. So we're going back to
our layers and we are swiping the layer with the facial features
from right to left. We are choosing duplicates. And now with this
layer selected, we are getting back to our
arrow key or the top-left, and we are moving our
second shade to the right. We are following our
three blue lights. When you're satisfied
with the result, let's deselect everything
by heating our arrow key. And we will go to
Arles and we will combine these two leaves with
facial features together. So go in order, that's OK, one tapping on it and
choose Merge Down. Now we need to make sure that our eyes are right
in the middle. So we will go again to our heirarchy one
more time and we will move the eyes until we see the blue or the orange line that
is going through the center. When you're satisfied
with the results, lead deselect everything by hitting our arrow
key one more time. Now let's decrease
the size of our brush and we will go and
add our little mouth. This time, it will be
a little kitty mouth. So we will just go right between our eyes and we will create
the sheep like that. You can play with its size and you can play
with its placemats. And when you are
done with the mouth, Let's add more
details for the eyes. We will go to the sides
and we will add eyelashes. Firstly, go in over the left and adding two or three
lines like that. When we are done over our left, Let's move on to the right and let's do the same thing here. So adding two or three
lights, if you want, you can go over your eyes and add the eyebrows if you don't. Let's continue by
agent our highlights. So firstly, go into
the color palettes and selecting the color
with the name whites. Let's increase the
size of our brush. And firstly, we will go over
our left eye and we will put the first highlight there when you have it on the left. Let's do the same on the right. So trying to put it
at the same line. Now let's decrease the size of our brush and we will add
a few more highlights. So let's go
underneath this first one and let's put
two dots like that. When we have them on the left, Let's do the same on the right. Now when we have our eyes, dan, let's get back to
our color palettes and let's select the
color for the cheeks. So this time, let's
select this orange color. Let's increase the size of
our brush and we will go underneath our eyes and we will put two dots for our cheeks, one on each side. When you have the cheeks, let's get back to
our color palettes and we will select
the different color. This time it will
be orange rats. We will decrease the
size of our brush and we will go inside our cheeks and we will add two lines there when you have
it on one cheek. Let's move on to the other one. And now we have this
second facial features. So let's move on over our last cap and we will
do the same thing here. So we go into our layers and we go into our third cup folder. When I go into the
highlights layer and we are hitting
the plus icon, we are renaming this
layer as facial features. Let's get back to our
color palettes and we will select the color
with the name Bubbles. Let's increase the
size of our brush. And again, we will start by creating the first
I over R left. When you have it, Let's go and make the copy. So going back to our layers, swipe in the layer
from right-to-left, choosing Duplicate, go into our heirarchy over the top-left and we
are moving this i2, the writes follow it
three blue lines. Let's deselect everything
by hitting our arrow key. And let's get back to our list to combine these two layers together to happen on the top layer and
choose merge down. When this is all merged, let's go and make sure that
it is right in the center. So selecting it and getting
back to our arrow key, finding these blue
or orange line. And when we see it, we are deselected everything by hitting our heirarchy
one more time. Now let's make the size of the brush just a
little bit smaller. And we will play with
the mouth shape. So we will go there and we will create a V-shape like that. Hold your Apple pencil at the end of the line
and adjust the shape. If you need to
adjust it even more, go to Edit shape over the top. Now let's tap on our
screen with one of our fingers and let's continue adding our
facial features. So we will decrease the size of our brush and we will
add the eyebrows. When you have the eyebrows, Let's go and add our highlights. We are going back to
our color palettes and selecting the color
with the name White, Let's decrease the
size of our brush, just Alito, and we will add
different highlights here. So firstly, go into
our first AI and creating a little cross like that when you have its own one. I, let's move on
towards our rights, and we will do the
same thing here. When you have it. Let's get back to
our color palettes and let's add our cheeks. So this time, you can select the color with the
name magenta pink. Let's increase the size of
our brush and let's put our cheeks underneath the ice
where you have the cheeks. Let's get back to
our color palettes. And again, we will select
the color within named Pink. We will decrease the
size of our brush and we will add our leads
aligns to the cheeks. And the very last thing
that we will add here will be a little chunk
inside our mouth. And to do so, we will need to go back to our
layers and we will tap onto the layer with our facial features and we
will choose alpha lock. So we will be
drawing only inside the areas that we already
have on our layer. Let's get back to our
color palettes and we will select the color with
a lighter orange red. Now we'll go to the bottom of our mouth and we will
add little tongue here. And we are done with
our facial features. In the next chapter, we will be finalizing
our picture.
11. Final Details: And the end, Let's get
back to our elites layers. And we will add a few
lines as highlights, but using the same color
as the main shapes. So firstly, going
back to our layers and go into our first folder, go into that soap late layer. Now let's select the same
color as we used before. And we will go over one of the sides and we will
add a little line here. So we will be trying to
recreate the highlight shape, but it will be with
the same color. If you want to add more details, you are welcome to do it when you're finished
with the first line. Let's get back to our layers and we will go to the next folder. So we are going to the rounded cap and we
are going to delete soap. And here we will
do the same thing. Play around with the position of this little highlights
and when you are ready, let's move on to the next one. So we are going back to our
layers and we are going to the thirds folder where I
go into the top lead layer. And here we will add
the highlights too. When we are done with this part, Let's add some sparkles. So firstly, we will
go to our layers. We will go to our first
folder and we will go to the first layer
that we have here, and we will create
one more layer. Let's tap on the plus icon. Let's rename it as sparkles. We will send this layer as
an overlay blending modes. So Gil into this an icon and choose an overlay from the list. Now we can get back
to our color palettes and we will select the
color with the name whites. And we will be using
a special brush. You can find it in the
Project and Resources tab. It will be Moon Star. And with this brush, we will go over our shape and we will add a few
highlights there. So very accurately, you can play with the size of the brush, go over your elements and
add this little sparkles. Now when we did it
with the first cup, Let's do the same
with the other ones. So going back to our earliest, go into the second folder, go into the job and
creating one more layer, tapping on the plus
icon and straight away, we are renaming it as sparkles, setting it as overlay
blending mode, and now going over our shape
and aid in the sparkles. If you need to erase
some elements, just grab the eraser tool and
do that when you are ready. Let's move on to our last gap. So one more time, going
back to the layers, go into our third cup folder, go into the top layer and
create one more layer above, renaming it as sparkles. And again, going over our sheep and aids in
this little sparkles. So when you are done with
adding the sparkles, Let's change our
background color. So we will need
to go back to our earliest and we will go
to the bottom of it, to the background color layer. Let's tap on it and let's select the first color in a row. When we have it, we can see that we have some little
places that we need to adjust with the sparkles so very easily and very quickly
ledgers go and adjust that. When we cleaned everything up, ledgers go back to
our list and we will hide our layer
with this scheme. So going back to this layer
one and we are hiding it. Now we can also go and
we can hide our grid. So we will need to get
back to our wrench icon. We will need to go
to the Canvas and we will need so-called
drawing guides. What we're gonna be
doing right now, we will create one more
layer on the bottom. So we are going above
our Aliyah one, which was our scheme. We will create one
more layer and we will select the
white color here. With this white color, we will get back to
our monoline brush and we will add some
wobbly shape right here. So we will put it
behind our cups. Let's go and try to do that. You can play with this shape and when you're
satisfied with it, ledgers drag and drop
the color insights. You can play with the shape even more and you can add
a few more details. For example, you can play with the size of your brush,
you can increase it. And so you can add a
few dots like that. So play around with the shape and find what works for you. And when you're done
with this task, we are at the end of our class. Thank you for
watching this class. Leave a review if you liked it, and consider subscribing for more Kawhi videos in the future.
 Uni Corn, ⭐Kawaii Art Enthusiast⭐