Transcripts
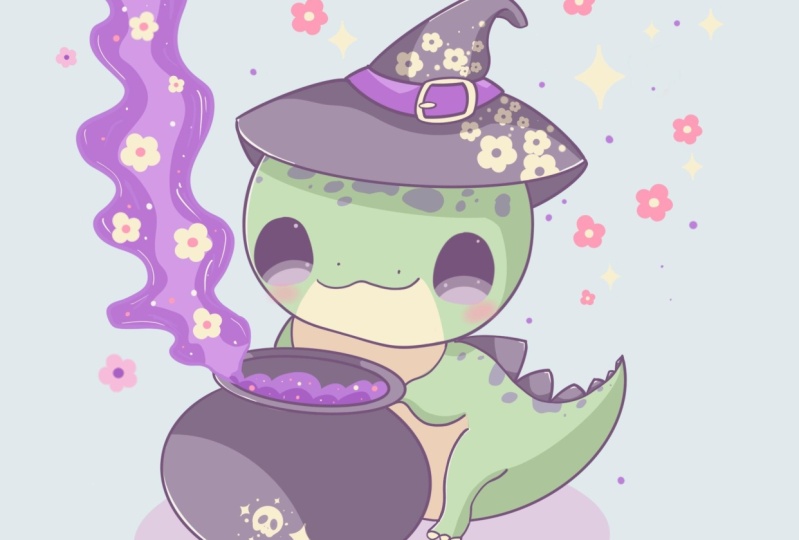
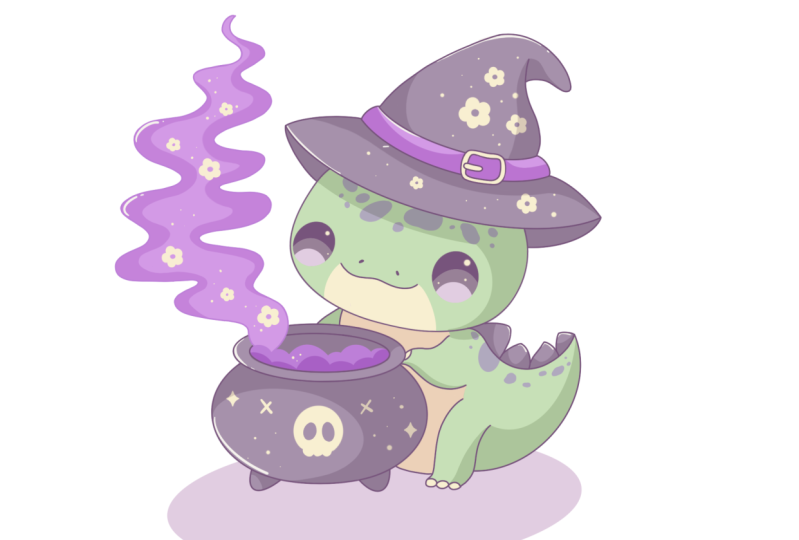
1. Introduction: Hello, everyone. I'm uni, and into this class. We are going to draw this
cute coy illustration of a Wizard diner in Procreate. During this class, you'll
get familiar with a lot of useful features like
recoloring with reference, clipping masks, and
blending modes, and learning the basics
of drawing in Procreate. By the end, you'll not only draw an adorable illustration
you'll be proud of, but also feel super
confident using procreate. And now let's spend
some time drawing.
2. Scheme: Let's begin by deciding what kind of canvas we
are going to be using. Today we're using a
standard square canvas that you can find in Procreate. Both our pixel width
and Pixel height as set at 2048 pixels. RDPI at 300 and R color profile is set as SRGB with
this low number. When it's all done heating done, getting redirected to RN Canvas, and now we need to decide
what kind of colors we're going to be using
throughout this whole class. If you want to use
your own colors, you are welcome to do it, but if you want to follow along, you can go under the
project and stab and download all the materials
mentioned in this class. Now when we've decided
on the colors, let's go to our color palette, we'll go on the cards, and we will go and select the color with the
name magenta lines. When we did it, we will
go to our brush library, we'll go to the sketching
folder and you can select any brush that
you prefer from here. You can try it out
onto the canvas, decide whether you
like it or not, get back to brush library
and select another brush. Will start by creating a
little scheme that will help us to build up our
whole illustration. Let's just go and start by going to our Canvas and very easily, we will just go
and with one line, we will create a
shape on the circle. Hold your line and the
end and when you did it. We can just move
our apple pencil from side to side to a the size, and when you are
satisfied with the size, let's just give it the size
of something like that. We will go over the soap and we will go to this
option editing mode. Can see we have this
option circle here, let's just tap on it, and we will create a perfectly
round circle. When we did it, let's move
the shape a little bit down, so we'll just hold
our Apple pencil at some b link space and we'll
move it somewhere right here. When you have this
going in that, we let just tap on the screen to get away from our editing mode. Now, when we did
it, let's just go and adjust our shape
just a little bit, so it will look like a head and not a perfectly
round circle. What we need to do firstly is to go and zoom in our canvas and we will go over the top from our shape that
we have just created, and we will create another
line that will be a guidinle. Let's just go and create a
curve going down in that way. Hold it at the end, you can see if you are holding
your apple pencil, you can move your sheet and adjust the direction
of this line. Let's just go and try to
position it somewhere in the center or a little bit
closer to our left part. The left part will be
a little bit smaller than the sheet that
we have on our right. When you have the
result like that, let's just lift up
our apple pencil. Let's zoom out our canvas, take a look at everything here. If you want, you can again go to the sin mode and adjust
the placement from here. You can see you have
these little nodes here, you can just go to
one of them or to all of them and
adjust the curvature, the size of this element. If you want to move it, you
can hold your apple pencil at some blank space and just move the shape to the place
you want to see it. When you are quite satisfied
with everything here, let's just tap on the screen
to get away from this mode, and then we will go to the sides from this little first
shape that we have created, and we will go and adjust it by adding a few
more additional ight. Firstly, let's just go
over our left side, we will go atle bit
higher than the center of our shap and we'll be going down with another curve
going in that way. Let us go and create
a sheap like that and we will connect it
with our main sheap. Again, hold your po pencil
at the end of the line. Let us go to our Edison
mode and we will position this line in a way that it
touches our previous sheap, but at the same time we
will connect it nicely on the bottom and make the bottom a little bit wider than the top. Now when we have something
going in that way, let's just tap on the screen and let's do the same on
the opposite side. Again, just going from
the top part and creating another curve and connecting it nicely with our main sheep. Again, going over our editing
mode and adjusting it, connecting it nicely on
the top and on the bottom, if you need to work with these little nodes that you
have here, go and do that. Again, as we are creating our illustration in a
bit of a perspective, we will just need to go and
make sure that our sheep on the right is a little bit bigger than our
sheep on the left. It's not quite even
on both sides. When we have the
sheep like that, let's just tap on the screen
and get away from this mode, and then we will go and find an approximate center
of our first sheep. Let's just go to this line
that we have right here. We will make a little
markdown on the middle part, and then from this middle part, we will go a little
bit lower and we will start creating two
guiding lines like that. We are going through
the whole sheep and we are creating a curve. Again, you can hold your
line at the end and if it's snapping to a
perfectly straight line, don't worry, we will just go to this editing mode and we
will have the option c here. So with this option arc, we can just go and adjust
the curate on this line, so just going and creating
something going in that way. Not going too crazy, just creating a nice
curve going in that way. Again, going a little
bit lower than our marked down that
we have just created. Now when we have something
going in that way, let just tap on the screen
to get away from this mode, and then we will go a
little bit lower and create a similar
parallel line there. The same way as before it, just holding our line and the end going again
to our ein mode. If we want to adjat it, going there, if we
want to move it, again going there
and adjac in it, just creating something
going in that way. This line that we are working
on now should be right in the middle of this little part that we have on the bottom. Just position it
in the middle of this whole shape
that you have on the bottom, and
when you are done, let's just make sure that
ir lines are parallel, so we are not having
something bigger on the left, than it is on the right. Rather we are making it a
little bit bigger on the right. Now when we have
something in that way, let's just tap on the screen. If you are a bit confused
with all of these lines, we can just go, grab our eraser and erase all the lines
that we don't need. We don't need this line that we have right here for our circle. Let's just go and very
quickly erase it. Now, when we have the
result like that, let's again get
back to our brush, and let me just go over
the top and we will start adding the shapes
for our future had here. Firstly, let's just
go a little bit higher than this middle part
that we have right here. Again, we will go and
create a line of the curve. Let's just go and create a
shape going in that way. Again, hold your
line and the ends, and you can see how we are creating it in a
different direction. Let's just go and create
it going in that way. Hold your line and the end. If you need to go
to the engine mode, let's just go there
and adjust shape. Let's just go with something
going in that way are going le bit beyond the frames
of our main shape. When we have it in that way, let's just step on the screen, and let's just go and
create another curve. Now when we have this
curve on the top, let's just go and create the additional curve that
will go on the bottom, and we will go and
create it in that way. Let just connect it with the first shape that
we have on the top, and we'll go to the 18 mode
and we will adjust it, just going in that way and
creating something like that. Now when we have the curve
positions in that way, let's just tap on the screen, and then we will go
right here on the right. If your lines are not
matching together, we will just go and
elongate them and connect them together
just manually. When we have these shapes
going in that way, let's just go to these steps that we have on the
top and we will go higher and create two lines going in that
way on both sides. You can do it manually
or if you want, you can hold your line at the end and make
a straight line. Now when we have it in that way, let's just go above
this sheet that we have right here and we'll
create another curve. Just go in there,
creating a curve, we will go again to our
eating mode and adjust it. Now we are creating a belt that we later on create on our head. When we have this line, let's just go and
tap on the screen, and then we'll go higher and create the similar line
that will be parallel. Again, if you need to adjust it, go and adjust it when you
already tap on the screen, and then we will go
on the top and we will create a sheap
of the triangle. Let's just tap a bit from this line that we
have right here, and we will just go and
create a shape like that. Again, either manually or with the help of your
quick shape tool, we will just go there and
create a sap of the triangle. Connected with this line that you have on the middle part, and when you have the
shape going in that way, let's just go to the
top part of our head, and we will go down with
another shape of the triangle. You can experiment
with the shape, you can experiment with
the size of this element. When you have something
going in that way, let's just go again
to the bottom, and we will be working onto
our shape of the body. So when we have the
result like that, let's just go to this line that we have
right here on the bottom. We are stepping a bit from our middle part if
you want to can just go and make a little mark down that will be more visible. From this mark down, we
will go firstly toward the left side and we will go and create a little line
going in that way. When you have this line, let's just go to
the opposite side and we can just go and create another guiding line like that from this intersection
with our heat. We will just go down with
a little sheap like that. When we have this line, let's just go more down with
another sheap like that. Just creating a straight
line going in that way. And we are creating a
massive triangle here. When we have this little line, we will go more
toward the last and we'll create another
line going down, that will create a triangle. When you have the
shape like that, let's just go to
the bottom and we will create a shape
going up in that. We suggest creating a curve. You can adjust the position
of it with this curve, we are creating a teal. Let's just hold our line, let's just tap on
our editing mode and go and adjust
it if we need to. When we have it in that way, let's just go to the tip
that we have right here, and we will create
another line that will create a little
triangle here. When we have the shape
going in that way, let's just go and create
a little arm here. We will go over the top
part of this triangle, and we will go and create another triangle
going in that way. Again, you can experiment
with the size of this element and with everything that you want to
experiment with. Now, when we have the
scheme going in that way, let's just move on
to the left and let's create the shapes
for our co drin. Let's just go to where we
have our little hand here, and we will be going and
creating a shape of the apse. Just creating a shape,
holding it at the end, trying to make it horizontal, if we need to adjust
it where are going over the top to
our editing mode. A J the size again, try to put these
element horizontally, so our little nodes
that we have on the left and on the right
should be on one line. If you want to make
your little shape right here little bit more open, you are welcome to go to this
node either on the top or on the bottom and create
something going in that way. Just keep a little
distance from the heat, and if you want to move it, you are welcome to
go and move it, just create something
going in that way. When you hand the
shape like that, let's just go more toward the bottom part and create
another shape of the leapse. Let's just go and create
a big shape like that. Again, holding it and the ends, and then we are going to our e mode and
adjusting it from here. Now we are creating
a little cold run. Let's just go and
work onto the shape. Try to position it
in the center of this first lips that
you have on the top, and when you are done with
the shape with the size, with the position of
it, let's just tap on the screen to get
away from this mote. Now when we have the
result like that, let's just go to the bottom. If you need to create a
guiding line in the center, just go and create
it very sadly. When you have it in that way, let's just go toward the
sides on the bottom, and let's create little very
soft triangles like that. Try to position it on the same
distance from the center. Now when we have the
shape like that, let's just go to the
top part on the dran. Literally, we are going to
be creating a little sheep that will be going from our
dron little bit of a fumes, and we will be just
going there on the path that we will
need to later on create. What we need to do firstly
is to go to this dron, we will go more toward the
left side from the center. We have this guiding
line in the center, let's just move a bit
from it to the left and we will first go and create
a line going in that way. Again, you can adjust
it to your liking. Now we just need to
create guiding lines. When you have this first line, let's just go more
inward and create another line going more
toward our dinosaur. When we have it, we will go
higher with another sheep. Again, going and creating
another line like that, and we are just starting
to make it a little bit smaller and going
inside in that way. You can create a
different path that later on you would
want to recreate. Just spend some
time here, create something going in that way. When we have this
scheme like that, let's just go and erase all the extra lines
that we don't need, so they are not distracting us. Let's just get back to
our eraser and let's just go and erase all the
lines that we don't need. We are going to be erasing
the lines that are overlapping and later on
will be confusing for us. Let's firstly go
to this line that we have on the top
and we will erase these lines that we have for our heads because we
don't need them here. Now after cleaning up
our little scheme. Let's just go again to
our brush and we will go and mark down where we are going to
be creating our yes. We have these two
guiding lines right here and we will go to them and we will start creating
our shapes here. Let's first go over our left
side and we will go right between these two
lines and we will be creating a shape of the ellipse. We can go and do just with
one line, create a shape, hold it at the end, and when you have
the shape like that, Just go over our etin
mode and adjust it. If it's too big, you are
welcome to go and adjust it, we will just move it more toward the side
that we have here. If you want to can go a
little bit beyond this line. When we have the shape
going in that way, let just tap on the screen
to get away from this mode, and then we will go
to the opposite side and create another shape here. Let's just keep the
distance from the center the same way as we
have it on our left. Again, start by creating a shape of the ellipse
and then go to the tin mode and adjust the
placement of this element. If you want to
adjust the rotation or the size of this element, again, you are welcome
to go and do that. If you want, you can move your eye that you
have on the right, a little bit closer to the line that you
have in the center. When you have the
position that you like, let's just tap on the screen
to get away from this mode, and then we will go toward this line that we have
right here on the bottom, and we will create a little
shape for the mouth. Let's just go zoom in our canvas and we will just go there and
create a shape like that. When we have it, if you feel that maybe it's
not in the center, it's okay we can
adjust it later on. If you want to
adjust it right now, you are welcome to try to
make the shape one more time. Let's just go and create
something going in that way. Just marking down where we are going to be
creating our mouth. When we have this sheep, let's just go ti
bit above it and let's create two little
nostrils like that. Now, when we have
everything in that way, let's just go and make
everything eli bit smaller. We will go to our
ar key firstly, we will go under uniform method, and when we are here, we will also go under
snapping and we will turn on snapping right
here into the settings. When we did all
the preparations, let's just go to
one of the nodes in a center either on the
top or on the bottom, and we will drag it down. You can see when we
are dragging it down, we are staying in the center and we are adjusting
it gradually. Adjusted to your liking, make it as big or as
small as you like. If you want to position
it right at the center, you can hold your apple
pencil at some blank space, and just go and look for
these two orange lines. That way, when you found them, you will know that
you are right at the center of your illustration. Now, when you are
done with this task, let's just stop on our R key, and let just go and start
creating our clean lines.
3. Clean Lines: Firstly, let's just go
to our layers and let's create one more layer by
tapping on the plus icon, and then we'll get back to
our previously and we will tap on this n icon
to adjust the pasts. Let's just grab this
little slider and move it more toward the left until we still can see
what's happening here, but when it's not that bright. When you're satisfied
with your result, let's just get back
to our new layer, and if you want,
we can just tap on it and we can
rename it as lines. When we did it, let's just go to our brush slide
rot and this time, we will go to the Iken folder. We will go and select
technical pen brush. And if you want your lines
to be smooth and soft, let's just tap on this brush and get inside the brush studio. In the Brush studio, we'll
go under stabilization, and we can play
with our amount of streamline and the
amount of stabilization. You can try it out
onto your drone pad, decide whether you want
to use this option or maybe you want to adjust
it in any other way. Remember that you can
always get back to this option if you need to
adjust something later. When you've played
enough and when you are satisfied with your lines, let's just hit done
over our top right and let just go and start
creating lines. Firstly, let's just go and
adjust the side to something maybe around 12% or around 10%. You can adjust it
to your liking. When you are satisfied with
the size of your lines, let's just go and
start creating R saps. Firstly, let's just go to the lines that
we have right here, and our main goal right now is to create the lines
that will be closed. We're just going there
and creating our shape. Again, we can use all the
options that we used before. You can hold your
line and the end, go to the tin mode and
adjust it from here. If you want to adjust
it in any way that is not like you have
it onto your sketch, you are welcome to
go and adjust it. Also, if you feel that maybe you want to
adjust it even more, when you have created your line, you can just tap on
the screen to get away firstly from
your editing mode, and then we can go to our adjustments and we
can go under liquefied. You can see we have this
little dent right here on the bottom and our sheep
is looking differently. We can just go to
this bottom panel. We can go under Option push, and we can adjust the
size of our brush. With this brush, we can
go to some of the areas and we can push them
to sculpt our sheep. We can just spend
some time here and sculpt your sheep just
by pushing your lens. You can adjust the size
of your brush to go to some areas precisely
and adjust them. Let's just spend
some time here and adjust the sheep to our lichen. When you are satisfied
with the ship, let's just tap on our
adjustments twice, and let's just go and continue
creating our details here. Again, we are getting back to our brush and let's just go to this line that we
have right here on the top and let's just
go and recreate it. Again, using the same
options that we used before, holding line and the end, going to our editing mode and adjusting ir line from here. When you're satisfied
with everything here, let's just get away from
this mode and very easily, let's just go to
these little lines that are our extra lines, and we will just go and
erase them with our eraser. When we have this done, let's just go again
to our brush, let just go underneath this line that we
have just created, and let's just go and add
the thickness to our hat. Again, we can hold
our line at the end, we can go to the Aten mode and adjust the curvature
of this line. Just try to create
something nice here. When you are done
with this side, move on to the opposite side
and create something similar here T. Try to make
this line even, so it's not just a line
that you are creating. Just think about creating this even line that will be connected with our
line on the left. Again, just hold your line at
the end, go to the 18 mode, adjust it from here, try to make everything
nice and connected. Remember that we don't need
to have any gaps here, so it will be easier for us to create the coloring
part later on. Now when we have these shapes, let's just go to the tips and let's create the lines going up. You can go and
experiment by creating maybe not the straight
lines, but the curves. Hold your lines at the ends, adjust them through
the editing mode, connect them nicely with
the previous shapes. When you have the
result that you like, let's just go to the
opposite side and create a similar shape
here. You are done. Let's just go to this line right here and again recreated. Let's just go a little bit
beyond the frames that we have right here for our little
bottom part of the hat. If you have some extra lines, let's just go and erase them. Then we will go to the top and again create a similar
line right here. Just go and repeat in the previous line
that we have here. Again, going elle bit beyond the frames of the lines
that we have on our sketch. Adjusted for your
editing mode if you need to to make this line parallel
to the previous one. When you have the
result that you like, let's just go to these
lines that we have right here on the sides and let's connect them with
little curves here. Connect them nicely, again, hold your lines and the
end do it on both sides. Take a look at
your creation from the distance to decide whether you want to
adjust some parts or not. Try to make these lines
even on both sides. When you have the
results like that, if you have some little
gaps or little extra parts, let's just go and
adjust them with our brush and with our eraser. When you are done, let's get
back to our brush and let's just go to the sides and let's create this
triangular sheet. Again, if you want to can
go with straight lines, but if you want to can try out by creating a little curve here. Just create a curve, go to the arc option on the top
adjusted to your liking. When you are done, let
just tap on the screen. Again, we will go and
connect everything nicely and ers all the
lines that we don't need. Then we will go to the top part, and we will be creating a pecular shape for
this little tip here. Let's just get back to our
brush and let just go to this little tip and we will turn it into the little
curve here too. Just go in to this line that we have on our sketch and just creating a little curve to connect it with our
previous sheep. Connect it nicely, go to
the 18 mode if you need to, try to create a nice connection and try to create
a nice curve here. When you are done, just tap on this screen and
let's just go to this extra line that we don't need and we will just
go and erase it. When you have it in that way, let's just get back to
our brush and let's just go to this tip that
we have right here, and we will be
going and creating another curvy shape here. Let's us go with a
peculiar shape like that. Connect it nicely, try
to make the even line. If you need to adjust
something manually, just go and do that. When you have it
set in that way, let just go to this line and
you can see that it is a little bit different from our shape that we
have on our sketch. We will need to work
with it in that way. Let's just go to
this little line that we have right
here as our belt, and let's just go and connect
it with our shape here. Just go a little bit higher than these little tip that
we have right here, and we'll be just
going there and creating a peculiar
shape like that. You can experiment with the sap. You can try out something
different if you want to. All the need to remember is
to create the lines that will be closed and smooth
and clean and nice. When you have the
result that you like, let's just go to other shapes and let's start adding the
additional elements here. When we have our hat done, let's just go to
the belt to finish up with our little
shape of our heat, and we can add a
little buckle here, but it will be easier for us
to go to the extra layer. Firstly, let's just go to
our list and create one more lay on top and onto
this little new layer, let's just go more
toward the right side to this belt and we'll be creating
a shape of the buckle. Let's just go and create
something very simple like that. We are just creating a shape of the very soft and
t rounded retina. Just go and create something
going in that way. Just follow the lines
that you have for your little belt here and just create the
shape going in that way. If you want to experiment and maybe create
something different. Again, you are welcome
to go and do that. If you need to adjust your sheep or erase some little
elements or details, you are welcome to
grab your eraser. If you are zooming
out and if you want to adjust the
sheep to your liking, you are welcome to get back to the adjustments, liquefy tool, use the option push to
scalp it to your liken. Spend some time here and adjust
your shape to your liken, just create something that
you would like to see here, when you're idee, let just
tap on our adjustments twice, and then we will go
inside the sheep and we will create a
similar sheap here. Let me just go and
repeat the sheep, just go a little bit inwards. Now, when you have
the lines like that, let just get back to
our previous layers. Going to our layers, going
to our lier with the lines, go grab in our eraser, and we will erase all
these extra lines that we have inside
that we don't need. Now, get back to your layers, go to the layer where
you have this buckle, and j the ship with
your brush and eraser. When you have it in that way, let's just go to our brush, and then we will go
to our left side on this buckle and we will create a little element like that. Let's just go and create
something going in that way. Try not to touch the line that you have
right here on the side. If it's not happening
from the first try, try it out one more time, try to make it even and when you have the
result like that, let's just grab our eraser and we will erase this
extra line here. When you have it in that way, it's time to get
back to our lays, go to the s lay that
we have full buckle, stop on it, and
choose merge down. Now, everything that we have on the top is on one lay and
that's exactly what we need. Now, let us go grab our brush and we will go and start
working onto our body. Firstly, let's just go
to this line right here and we'll be turning it into
the tail and the back part. Let us go to this line, and we will be going there and creating none
the straight lines, but a little curve
going in that way. You can do it just
with one line. You can try it out a few times, maybe create something
different here. If you want to maybe try
it out one more time, just go and do that, try to create something
very, very nice. If you want to maybe step
a bit from the lines that you have on your sketch and create something
different here, again, you're welcome
to go and do that. Now when we have something
going in that way, let's just go to this
bottom line and let's connect it with our line
that we have on the top. Again, if you need to go to
the 18 mode and adjust it, just go there and do what
you need to do here. When you hand the
result that you like, let just tap on the screen. If you zoom in and if
you see that you have some little elements
that you need to adjust or ate or maybe
connect together, you are welcome to go and
do what you need to do. When you hand the
result like that, let's just go to this
little cauldron that we have here and let's
start creating it. It will be easier
for us to work onto the details onto our
little dna liter. So now let's just go to this little top part and we
will just go and recreate it. Just go in there and creating
the shape of the ellipse, holding it at the end,
going into our ein mode, if we need to adjust it. If you want to make
it bigger or smaller, you are welcome to
go and do that. Again, try to create
it horizontally. When you have it, let's
just stop on the screen and this time if you
have some little lines, let's just go and
manual adjust them. Just connecting it nicely
creating an even line, and then when you are ready, let just go inside the shape and create a similar shape here. Again, just creating
a shape of the ps, trying to create
it horizontally. If we need to adjust it, we are going to our editing mode and adjusting it from here. Try to position it in a
center and when you are done, go away from the 18 mode, adjust the line if you
have some problems with the connection right
here on the top or where you were
creating this connection. When you have something
going in that way, let's just go to the
bottom and let's recreate the shape of the bottom
part of cauldron. Let's just go there and very
easily create this shape. Again, hold your
line and the end, go to the 18 mode and adjust it, spend some time here and
create something nice. When you already get
away from the 18 mode, and if you have
some lines that you need to connect or
on the contrary, as, you are welcome to go and work onto the connection
of these lines. When you are ready
with this task, let's just get back to
our brush and let's just go to the bottom and create
this little legs here. Let's just go on those sides
and recreate these elements. Again, take a look whether you
need to adjust some parts, maybe fill up some gaps. When you have the
results like that, let's just go to this little
line that we have right here and we will be creating a line going
down in that way. Let's just go not
with a straight line, but with a curve, and when you have it,
let's step a bit from it, and we'll be creating a line
going down in that way. When you have
everything in that way, let's just go to our right part, and let's create
another arm here. Firstly, let's just go to this little triangle that
we have on our scheme, and let's just go step
a bit from the head, and we'll be going there and creating a little curve
going in that way. When you have this curve, let's just go to the bottom. We will step a bit from this little intersection that we have right here on the left, and then we will go down with
a shape going in that way. You can experiment
with the thickness of the arm and with the curve
that you have right here. When you are satisfied
with everything here, we also can go to the top and create a little
element like that. Later on, we will
recover it differently. Spend some time here if
you want to adjust it, just go and adjust it. Now, when we have
our little arm, let's just go to the bottom
and create a little leg here. We will step from
this arm sheep, a little bit done, and we will make a little
markdown like that. From this markdown, we will go down with a curve like that. Go a little bit beyond this line that you have right
here and actually, let's just go grab our eraser and erase this line like that. Decide on the thickness
for this leg and just go and erase it to this area that you want to create the leg. When you have it done, let's just get
back to our brush, and let's just go and
continue creating our leg. We'll be just going to the right part and creating
another curve going down. Always take a look at
your illustration from the distance to make
sure that you are doing everything right and in the terms that you
would like to see here. When you have the line
going in that way, let's just go to the bottom
and let's connect it. Let's just go and create
peculiar shapes like that. We are just creating some
little fingers here. Connect the lines nicely, and then let's just
go to the top of these little intersections
that we have just created, and let's just go and
create the nails. We're just going
there and creating something going in that way. Work on the shap eth unity, and when you are done, let's move on to our
spine and the tail. We we just go in there
and creating some spikes. Let's just go with the
saps like that and try to move with the
saps along this line, so just tat them a little bit and create them in
accordance with this line. Now, when you have the
result that you like, let's just go to our fas
and let's recreate it. Let's first go to our lease and let's create one
more lay on top, so it will be easier for
us to adjust our sheeps. Let's go and recreate these
little elements of our ice. Again, just with one line, we are creating our sheep, adjusting it, positioning it. When we have the sheep, let's just go to this icon
on the top right, and we'll just drag and drop
the color right here inside? When we have our eye on the left j to the same
on the opposite side, so just going and
recreating our shape, holding it at the end. If we need to adjust it, go into our atten mode
and adjusting it, and then we will just drag
and drop the color inside. If you have some
miscolord places, just go and manually
adjust them. When you have the
results like that, let's just go and adjust
our eyes just a little bit. We will firstly go
to our adjustments, we will go under liquefy, and we will work onto
the shapes of our yes. We want to make them a little
bit wider on the bottom, so we can just go and adjust
the size of our push brush, go more toward the bottom
parts of our eyes, and just drag them more toward the sides to adjust the sheep. Basically what we need
to achieve here is creating the sheaps
of the little x here. When we have it on one side, let's just go to
the opposite side and create something
similar here. If you want to
experiment and maybe create different
sheats for the eyes, you are welcome to
go and do that. Now, let's just spend some
time here and adjust heaps. If you want to go over the top and maybe squish it right here, you are welcome to
go and do that. Again, take a look
at everything from the distance and when
you're satisfied, let's just tap twice
onto R adjustments, and then let's just go
grab our brush and work onto these little
sheats that we have for our mouth and
for our nostrils. Now, when we have the
results like that, let's just go to our lays and let's just hide our
lay with the scheme. We'll just need to go to
this little check mark right here and we'll
just need to tap on it. Let's just take a look at
everything from the distance and decide whether we want
to adjust spires or not. For example, we can just go
to the layer where we have our facial features and work
on them a little bit more. If you want to maybe
adjust the placement of the mouth or the nostrils
or something like that. And if you have a few elements onto your little
layer right here, we can just go to
our S ribbon icon. We can use the free hands
method and we can just go and select only the elements
that we would like to jest. Loom the shape around and
then go to the er key and the placement or anything that you
want to aches here. If you want to rat your shape, go to this green nodes, hold your apple pencil and
make irrotational movement. Take a look at everything
from the distance, if you want to maybe make this whole shape a
little bit smaller, go to one of the nodes and then work onto the placement on
this element one more time. When you are satisfied
with everything here, tap on the first
icon that you were using and it was
our S ribbon icon. Again, take a look at
everything from the distance. If you are satisfied
with everything here, let's just go to our layers and merge these two
layers together. Go into R on the top
and choose merge down. And now if you want
to adjust something, Let's again go to adjustments, liquefy two, push option, and Aj some parts from here. Let's just spend
some time here and adjust some elements
that we want to adjust. When you're satisfied
with everything here, let's just double tap
on our adjustments, and let's just do
one more thing. We will go to our ar key, we will go under free
form method and we will squeehe the whole
illustration a little bit, so it will look a
little bit nicer. Again, we're going to this node that we have in the middle on the top and just going
down with our little line. You can see we are
following this blue line, and that's exactly what we need. When you're satisfied
with everything here, let's just tap on our ar key, and let's just go to our layers, and we will start
creating our colors here.
4. Base Colors: When we are at our lease, let's create one
more lay on top. Let's hold this lay and drag it underneath our
with the lines and to use our lines
that we have right here and to use them
to create our colors. We will need to do
one more thing. We will just need to go
to our y with the lines, we'll need to tap on it, and we will need to
choose reference. When we did it, we can go to any other lay that we have right
here into our layers panel, and we can use these lines to recolor our elements
on separate layers. Let's just go to
this new layer and we will go to our
color palettes and let's just go and start by selecting the color
with the name green. With this color, we will
go to all of our parts of this little body that we have here and we will be
recoloring them. When we have it in that way, let's just go again
to our layers. Let's create a new layer on top. To this layer, we are going
again to our color palette, and then we will go and select the color
with the name gray. With this gray
color, we will go to our little hat and we
will recolor it too. Also the same color we can use for our little
spikes right here. Let's just go and drag
the color right here. You can just do it manually
like I'm doing it right now, or you can just go to continue feeling on the top
and just go to the places that you want to recolor with this color
and just tap on them. For example, with this color, we also can go to
our cauldron and recolor it two by tapping
on the needed areas. Now when we are done
with this task, we will need to go to the top to this little check mark on the top and tap on it
to apply the color. When we did it, let's just
go again to our lease. Let's create one
more lay on soap. We will go to our
color palette and select the color with
the name purple. With this purple
color, we will go to this belt and we
will recolor it too. When we have the belt recolor, lets just tap on this little
check mark on the top, and then we will go and start adding the
additional elements. Firstly, let's just go
and create one more layer again by going to our
layers and onto this layer, we will go and select
the color yellow. With this color, we will go and recolor these little
belt element here. If you want to recall some
other areas with this color, you are welcome to
go and do that. When you are done, let's go and start adding
additional colors. Firstly, we are
going to our layers. We can go to this layer, where we have our lines. We can tap on it
and we will turn off our reference by
selecting it from the list. When we did it, let's
just go to the bottom. So we are going to
our layer where we have our green skin, and we will create one
more layer on top. When we have a new layer, let's just tap on it, and we will select
clipping mask. You can see now we have a
little arrow near our layer, and that means that we
can add the new colors on this layer only on the ars that we have on the layer below. When we did it, let's just go
again to our color palette, and again, we will
select the yellow color, and with this yellow color, we will be going to
our mouth firstly, and from this mouth. We will just go to the bottom, and we will create
two curves like that. If you want, you can hold
your lines and the end, you can go to the agent mode and adjust the curvature of them, just create something
going in that way, and then go over
the top part right here and repeat the
shape of the mouth. We will just need to go
and close the shape. We will just be going to
the bottom and go into this little area
that we have right here and creating
the lines here. Loom the shape around and make sure that you don't have
any gaps right here, and then let just go and drag and drop the color to this area. Again, take a look at
everything from the distance, decide whether you maybe want to more work onto the lines. Adjusted to your liking, maybe work onto
these lines that you have right here on the mouth, on the bottom part of the face, adjusted for your tin mode, adjusted to your liking, when you are done,
let just go and create a few more
details with this color. Firstly, let's just go to this little tip right
here that we have. Also we will do the same to these little elements that we have as our nails on the bottom. Let's just go and add the color here manually just
with our brush. When we are done with this task, let's move on to the tummy and we will add the
same color here. Let us go right here, we will create a little line that will connect our sheeps, and then we will just go along the lines and we
will recreate them. That way, we will be able
to add the color inside. Again, try to make
no gaps inside this little line and then just drag and drop
the color inside. When you have it in that way, let's just go again
to our liers. Let's create one
more lay on top. We will tap on this and we will choose clipping
mask one more time. When we have this new layer, we will go to our color
palettes and we will just go and select the color
with the name skin details. When this color, we will
go to some of the eras. For example, let's
just go on the top, and we'll be adding some little spots here
with this color. Spend some time here and create a few elements of
different sizes, of different directions, create a few of them
over the top part. Also you can just go
to the shape that you have as a teal and
add them here too. Start by creating a few outlines and then drag and drop
the color inside of them. Take a look at everything
from the distance, decide whether you maybe
want to adjust some of the lines or maybe you want to add more of these little spots. You are welcome to go and experiment with these
little elements. It's your illustration. When you are done with adding
these additional elements, let's just go and start adding a little
shadow R shape here.
5. Shadows: Let's go to our less. Let's create one
more layer on top. We'll tap on this new layer and again create clipping mask. When we did it, we will
go to the slita and icon and we will go and select
multiply blending mode. When we did it, let's
just go and send the pasty to something
around 50% for now. Then if we need to
adjust it later on, we will just go and do it. When everything is
set in that way, let's just go to
our color palette and let's select the color
with the name green shadow. Win this color, let's just go on the top part where we
have our little hat here, and we'll be going and
edging the shadow here. Firstly, let's just go
and repeat the line that we are having right
here for the top part. If you need to adjust it, go and adjust it. When you have it
set in that way, let's just go over the top, loom the sheep around, and then we will just go and drag and drop the
color right here. Now, when you have
it in that way, let's just go and adjust
the size of our brush, and then we will just go to the bottom part right
here on our right, and we will be creating a
shadow going in that way. When we have it, we
will just go there and add the shadow around. We will be just going
and looping the shape around and dragging
the color inside. If you have some elements like that as you
have on the top, if you have some little
strong corners here, you are welcome to go and adjust them and create
soft corners here. When we have it
going in that way. Let's just go toward
the bottom part and we will be going there and adding the shadow here too. So firstly, let's just go right here onto our right part and pull create a little
shadow going in that way with this green color. And when we are done
with this task, let's just go to the slag that we have right here
on the bottom, and let's create a
shadow here too. Firstly, let's just go
to the s line right here and create it
going in that way, loom the shape around and
dragon drop the color inside. When you have it on the leg, let's just go to the tail
and we will be just going there from this first shadow
that we have on our leg, and we'll be going up and creating a shadow
going in that way. Again, you can hold
your line and the end, go to the ein mode
and adjust it. When you have the first outline, just loop the sheep around and drag and drop
the color inside. If it's not happening
from the first try, try it out one more time, just loop the sheep around. If you want to go to
some other areas, you are welcome to
go and do that. For example, we can add a little shadow right here
on the bottom of the arm. If you want to go maybe underneath the arm and
add a little shadow here, you are welcome to
go and do that. Create it nicely. If you have some little, not so pretty parts, you are welcome to
go and erase them. When you have something
going in that way, let's go to our
color palette and select the color with
the name yellow shadow. With the settle shadow color, we will go to these yellow areas that we have right
here on our tummy and actually will go
and completely put these whole areas
inside the shadow. Very easily, let's just go
there and add our outlines and let's just go and add the shadow to these
little places. Also, we can just get back to this previous color
that we were using, and we can add the shadow
right here onto our arm, and we can get back to this color very easily
just by going to our icon on the top and holding it until we have the
needed color here, and then just
manually go there and add this little
arm in the shadow. Now, when we have the
result like that, let's go again to our layers and let's
go to our next layer. Let's just go to our layer
where we have our hat. We will create one
more layer above it. We will tap on this lay and
we will choose clipping mask. When we did it,
let's just go and add a few details onto our hat. You can do it manually or you can just go to
the project and resor sap and download the
folder with the brushes. If you downloaded it,
let's just go and select the brush that we are going to be
using right here. Let just go and select
one of these flowers. For example, let us
go with flower three, and we will firstly go to our color palette and
select the yellow color. With this color, we will go
to some areas onto our hat, we'll be adjusting the size of our brush and we'll be just going there and putting a few on the flowers randomly here. When you are done, let's just go and end the color right
here in the middle. Let's go and add it to all of these flowers
that you've created. When you are done
with this task, let's just tap on this
little check mark, let's get back to
our previous brush. Let's get back to our
technical pan brush and let's go increase the size of it and maybe go and put a few dots with this brush. Let us go and add some
beautification parts to this little head
that we have here. When we have the
result that we like let just de criticize
of our brush, and then we will go again to our lease and create
one more lay on top. Let's tap on this lay, let's select clipping mask, let's tap on the icon and
select multiply lending mode, and then we will go and set the capacity to again
something around 50%. When we have it done, let's just get back to
our color palette, and select the color with
the name gray shadow. With this gray shadow
color, firstly, we will go to these
areas that we have on the bottom of our hat and we
will put them in the shadow. When we did it, let's go
to the top part and we will firstly go and add a little shadow right
here under the belt. Just repeating the line
that we have for our belt. If we need to adjust
it going into our edit mode and adjusting
this curvature on the line, and just go in there and
manually adding the color here. To soften up this shadow, we can just go to the corners
right here and continue creating a shadow
going in that way just by creating a
soft shadow here. We will do it on both sides. Just make a nice connection between these two
shapes of the shadows, and when you are done, let's just go over the top and let's create little
shadows here too. First, we'll go over
our left side and we will go and create a
shadow going in that way. Start by creating a first curve and then just loom the shape around and end the color inside. Let's just go to the
opposite side and create something similar here,
starting from the top, creating our shape like that, looping it around,
ending the color inside. When we have these, let's
just go over the top to this little tip
that we have here and create a shadow
going in that way. Again, loom the shape around and drag and drop
the color inside. If you think that maybe 50%
of opacity is too much, let's just get back
to our last tap on the icon on this lay and adjust the opacity of this little layer to
something around 35%. When we have the
results like that, let's just tap on the screen. Let's just get back to our little illustration
right here, and let's continue a R
shadows to our gray parts. When we have it in that way, let's just go to the
little spaks that we have on our little tail
and on our spine, and let's just go more
toward the bottom parts of them and let's add
little shadows here. When we did it, let's go to our cauldron and let's start
adding the shadow here. We would need to be very
consistent with our shadows. As we have our shadows on our little dna
on the right part, let's just go to
the right part of our cauldron and end the
shadow onto this side too. Let's first go to the body of our cauldron and create a
shadow going in that way. Hold your line and the end, go to the ten mode
and adjust it, adjust it to your liking. When you have it in that way, let's just go loop
this whole shape around very carefully
on the top, and then we'll just drag
and drop the color inside. A just this little shadow
right here onto your left, so smooth it up just by going and creating
another line here. Also, we'll just go to this
little leg that we have right here on our left and add
a little shadow here too. If you have some elements
that you need to erase, go and erase them, and then get back to your
brush and let just go to the top part of our dron let's just go to this
outer part right here, and we will start by going and creating a little
line going in that. Then we will just go to
the middle part and we will start by creating a
line going in that way. Go toward the soap
and continue by creating a line going
inward like that, and then let's
just go and lumina shape around and drag and
drop the color inside. Adjust the curse, if you need to just go
with your eraser, and when you have
everything set in that way. Let's just go and add
a few more details. Firstly, let's just go
again to our layers. Let's go back to
our previous layer where we have our
little flowers. We will go again to
our color palette and select the yellow color. With the yellow color,
let's just go to our cauldron and let's
create some pattern here. For example, let's just go to the middle part and create
a little skull here. Free the skull, let's just
go with the shap like that. Create in half of the
circle on the top. Hold your line and the ends, go to the anten mode if
you need to adjust it. When you have the
shap like that, let's just go to the bottom and let's create little
teeth is like that. Adjust the sheep,
if you need to with your eraser or menially
with your brush, and then just drag and drop
the color inside the sheep. Again, work on the sheep. If you need to, try to
make it nice and smooth. If you want to go and adjust
it with your liquefied tool, you are welcome to
go and do that. If you want to maybe
rata it, firstly, go to the S ribbon icon, use the free hands method. Select this element, go to
the error key uniform method, go to this green
node and adjust it. When you are done jestinate, go to this first
option that we used. It is our ribon icon, and then let's just grab
our eraser and let's just go to the top part of
our skull to the sides, and let's create the little cuts in the shape of the eyes. The same way as we
did with our brush, let's just go and create
the ellipses on both sides. Try to make them even, try to t them similarly, or if you want to create
something pecular, you are welcome to aja them in the way that you
would like to see them. You can also go to
the gen mode and adjust it the same way as
we did with our brush. Just go there, create
this little cut and then go inside and cut
these elements inside. If you want to add more details, you are welcome to
go and do that. For example, let's just
get back to our brush. Let's just go to the
sides from our skull, and let's go and create a
few details in that way. Just create something
that you would like to see here if you
would like to go and maybe add a few dot or if you would
like to go and get back to the stumps brushes and maybe add a
few flowers here. Again, you are welcome
to go and do that. When you are done
with this task, let's just get back to a previous brush if you are
using a different shape, and when you are done with it, let's move on to
drawing the films part.
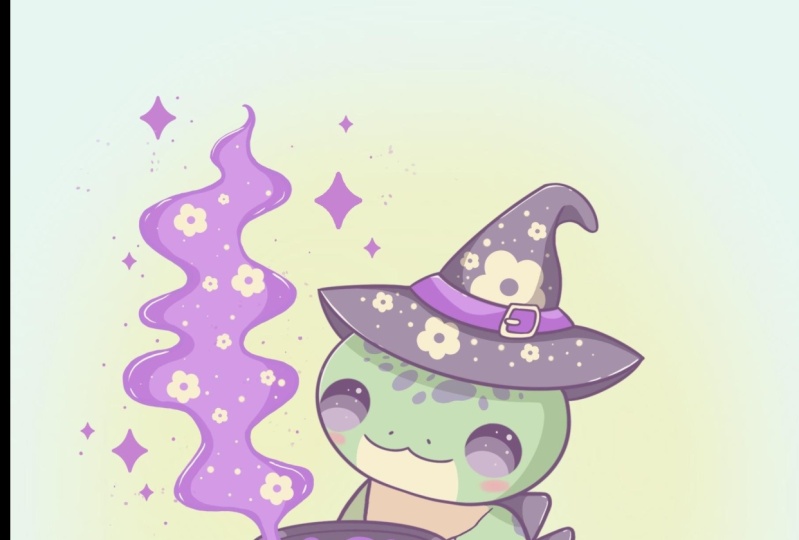
6. Fumes: Firstly, let's just
go to our lays and let's go and find our
layer with this scheme. Let's unhide it by tapping on this little check
mark right here. When we did it, let's just go above this layer that we have
right here as our shadow, and let's create one
more layer from here. We are not clipping it
to our previous layer. It is all free to go. When we have this layer 12, we will go to our color
palette and we will select the color with the name
bright purple lines. When this color is selected, we will firstly go to
our cauldron and we will start creating some
additional pattern here. Let's just go and start creating some little bubbles
going in that way. You can experiment
with the size of these elements with the
amount on these elements, loom the shape
around when you are ready and drag and
drop the color inside. If you went a little
bit beyond the frames, go grab an eraser and erase the parts
that you don't need. So now when we have
it in that way, let's just go to our
brush one more time. Let's just go and start creating this little
additional element here. Firstly, let's just go and start by creating little outlines. W this brush, let's just go and adjust the size to something
that we used before. It was around 12 or 11%, the same size that we use
for our outside parts, and let's just go and start
creating the outlines here. Either just with one
line or if you want, you can just go and
create a few lines, let's just go along this little additional
element that we have right here
as our guiding line, let's just go and create
these fumes like that. When you have it on one side, let's just go to
the opposite side and create something
similar here. We're just going
to our sap and we are just going along these
additional lines that we have and just creating this peculiar shape for
this little element here. Connect it nicely on the top. Just go in there and creating a little curve that
will close our sap. If you want to go and
maybe work onto this sap, you are welcome to go to the liquefied two and adjust
it with this two. Let just spend
some time here and adjust our lines to our liking, and also just pay attention
to these lines that you have as your guiding lines and create something
going in that way. In the end, we will need to
have something like that. If you want, you can try to
go to this little panel on the bottom and use one of
the option pinch or expand. You can go and maybe
use both of them. For example, when we
are using pinch option, we can go and pinch the
elements and shrink them down. On the contrary
with expand option, we can just go to some of these elements and just make
them a little bit bigger. Spend some time here adjust it, use the ph pinch and expand option and create
a nice shape like that. When you are done
with your sheep, double tap on the adjustments and let's just go to our layers. Let's just go to
our previous layer, where we have our shadows. Let's create one
more layer here, and we will get
back to our layer, where we have the lines. We'll tap on it and we
will choose reference. Now, get back to
the previous lier, go to the color palette and
select the purple color. Let's just drag it right here
on this little part here. Now, when you have
the result like that, let's just go to
our list and let's just hide Ali with the scheme. Let's just go to Ara where
we have now reference on. Let's just tap on it and let's turn off reference
from the list, and you can see that we have these intersections
right here. Let's just go to Ali
with the lines and we will recover these
lines that we have inside. Let's just go and do that. We will just need to tap
on our window lines. We will use our alpha
lock right here. You can see we have
this checkerboard right here on the top of everything that
we have right here. That's exactly what we need, and we will just need to go and use this color that
we have right here, and we just need to go above these lines and we will
need to recover that. Pink the color that we
already have onto our screen, we will just need to
go with one finger. We will need to invoke
this eye dropper to. You can see if we are moving it, our color on the
top is changing. Firstly, let's just go to the
color that we have in meda. When you have the color
on the top that you need lift up your finger
and very accurately, let's just go to these areas
that we need to recolor. Let's just go and recolor them. Then we will do the same with this color that
we have outside. Again, invoking our
eye dropper tool by holding one of our fingers, going into the
color that we need, lifting it up and
then very accurately going in there
coloring these lines. Now when we have the
result like that, let's just get back
to our layers. Let's go to this layer
where we have our fumes. Let's create one more
lay on top, tap on it, select clipping mask, go into our icon and selecting
multiply blending mode, selecting the opacity of
something around 50%, and going into our color palette to select purple shadow color. With this color selected, let's just go to
some of the areas, and we'll be just
going there and adding our little shadow here. Let's just go to the sides and create the shape like that, loop it around and drag
and drop the color inside. Let's just go to
the opposite side and create something
similar here too. When you have the
result like that, we can get back to our color
that we have right here. Our layer with these little additional elements
inside the dron. We can go and create
one more lay on top, tap on it, and again
select clipping mask. Go to our icon, select, multiply blending mode, set the pasit again
something around, 50%, and go to this line that we
have right here and maybe add additional color here to
create little shadow. Let's just go above
the bottom part and create a few
elements like that. Let's just loom this whole shape around and drag and
drop the color inside. If you want to go
and maybe adjust it by going and adding
some additional elements, you are welcome to
go and do that. Also, let's just go and add a few additional elements inside this little
shape right here. We will again go
above our layers. We'll go and create
one more layer above these two layers that we
have for this fume spart, and let's just go to our color palette and
select the yellow color. Again, let's just start by
going to our brush library, we'll go to our stems. We will select the same
little brush that we used for our little flowers
as additional parts, and let's just go
and add a few of them to these little parts. A just the size of it, just make it a little bit
bigger or a little bit smaller, add a few of these elements, and dragon drop the
color inside the sheeps. If some of these little
elements are too small to adjust the color just by
dragging and dropping it, go and manually adjust the shapes by adding
the color inside. When you're done adjusting
these little elements, let's just go and increase
the size of our brush, and let's just go and
put a few dots of different sizes to these
little fumes parts. When you are done, let's just take a look
at everything from the distance and decide whether we need to adjust
some parts or not. For example, if you zoom in, you will see that maybe you have some additional
elements that you need to erase or adjust, get back to the needed layer
and adjust them manually. If you think that maybe the opacity of this little
element is too much, we can just go again to our s, go to this layer where we
have our little places of the shadow and go to the icon and adj the
opacity of them. Spend some time here adjust some pis that you
need to adjust. And when you are done, let's
move on again to our s, let's just go above the layer that we have worked right now. We are going to our belt, we are creating one
more lay on top, taping it, selecting
clipping mask, going to our icon, selecting multiply
blending mode, setting the opacity to
something around 50%, going into our color palette and selecting purple
shadow color. Now let's us go to
the bottom part of our little belt here, and let us go and add
our little shadow here. Let's go, loom the sheep around, add the color inside, work on it if we want to with
our brush and with our sa. Try to make nice and smooth connection
between the sheeps, so just avoid the
very strong corners. When you have the
result like that, let's just get back to our
layers and let just go and create a little shadow that will be underneath
our illustration. Let's just go to the bottom
of our layers panel. We will go to our layer
where we have our scheme. Let's create one more
layer from here, and let's just go to
our color palette and select the color with
the name cast shadow. With this cast shadow color, let's just go underneath the whole illustration
that we have here, we will create a little
shape of the ellipse here. Hold it at the end, try to
position it horizontally. If you need to adjust it, go to the 18 mode, adjust it from here, make it as big or as small as you like. When you are done,
let's just tap on the screen and let's just drag
and drop the color inside. If you want to work more onto the apse when it
is already ready. We can just go to our irkey, use, for example,
free form method, and maybe go to the snow
that we have right here on the bottom and make it
a little bit less open. If you want to adjust
the placement, just follow the lines
that you already have onto your screen
as your guiding lines. When you are satisfied
with everything here, let's just tap on our ar key, and let go and work more
onto some of the areas.
7. Beautification: Firstly, let's just go to lis. Lets just go to the top
part of our as panel, and let just go
underneath our le with the lines and create
a new leaf from here. When we have it in that way, let's just go to our
color pallets and select the white color and
W the white color, we'll go to the
opposite sides from our shadows and we'll be
adding some highlights. Firstly, let's just start
with our little hat here. Adjust the size of your
brush and let's just go to the bottom part of the
bottom part of our hat, and let's just go and add little highlights just
with simple sheets. When we have it in that way, let's just go to our belt and create a highlight
here on the top. In this way, let's just go to the opposite sides
from our shadows, and let's just go and add
our little highlights. You can go with
some simple sheets of the little lines
or little dots, or if you want, you
can just go with some pecular sheats and add
your highlights in that way. Let's go to this side of our little elements of the heats and let's create
a highlight here too. When we have it here, let's move on to
some other places, for example, the leg, and we will just go there and repeat the sheap
that we have for our leg and add a few additional elements in
the shapes of the highlight. Let's just go to
some other areas, for example, the spikes. Let's move on then to our dron go to the opposite
side from our shadow, and add our highlight here. You can use all the options
that we used before, so you can just hold
your line at the end. You can just go to the Aten
mode to adjust the shapes. Try not to overdo this task, just add a few of the highlights to create
some nice effect here. When you are done with this, let's just go to
this films part, and let's just go to one of the sides and let's create
our highlight here too. When you are done
with the highlights, let's just go and
work on the ice. Firstly, let's just go to les, we will go to with the lines, we'll create one more on top, we will tap on the slee and
we will choose clipping mask. When we did it, we will go to our color palettes
and len just go to the bottom part of our color palette and
select ice gray color. With this color, we will go to the bottom parts of our eyes, and we will be just going there and creating the
shapes like that. You can just adjust them the
same way as we did before, loom the shape around and create the shape
going in that way. Try to make this sheep that you are creating
right now nice on the left because we have this additional line
as the outline. When you have the sheep, just drag and drop
the color inside. Try to make them
even on both sides. If you need to go and
adjust something, just go and menually adjust it. When you have the
results like that, let's again go to
our color palette and select the cut shadow color. With this color, we
will go again to the bottom part of
these elements, and we will add another
sheap right here. Lin just go and
menually recolor it just by making it ttle bit smaller than
the previous sheap. Again, let's just do
it on both sides. W the same color we
are using right now, let's just go and add a few
more additional sparkles or highlights just above the shape that we
have just created. Let's again do it on both sides. If you feel that maybe these
elements are too bright, we can go again to our list. We can just go to this leer
where we have these elements. Tap on the I can add
the opacity of them. Find what works for you
and when you are done, if you want to go
ttle bit extra, you can just go along
your illustration to the white areas that
you have here and add a few additional elements
in the shapes of the little flowers or some little sparkles or
something like that. For now, let's just
spend some time here and add a few of these elements. But before doing that, let just go underneath our eyes, and let's create little
cute checks here. Let's just go to our lays, create one more lay above all
the lays that we have here. Let's just go to our
color palette and select the color
with the name pink. When we have this color, let's just go to our brush library. Let's just go to the
airbrushing folder, select soft bland brush, and very easily, we'll just
go underneath our eyes. Firstly, adjusting the
size of our brush, and len just go and add
little checks like that. Again, if you think that
maybe it's too much, you are welcome to go to this on this and adjust the
capacity on this. If you've decided on adding the additional elements
outside your sheeps, you are welcome to go and
start adding them right now. Before doing that, just create a new lay and these
elements on this new layer. By changing the
size of the brush, add a few elements and
fill them with color. Change the color and add a few more elements
the same way. You can also use another
brush, for example, technical pan brush to add a few doors and particles
on the blink spaces, but try not to overdo it. And when you are
done with this task, we are done with
our illustration. Thank you for
watching this class, liver review, if you like it, and consider subscribing for more CI videos in the future. Looking forward to
senior project.
 Uni Corn, ⭐Kawaii Art Enthusiast⭐