Transcripts
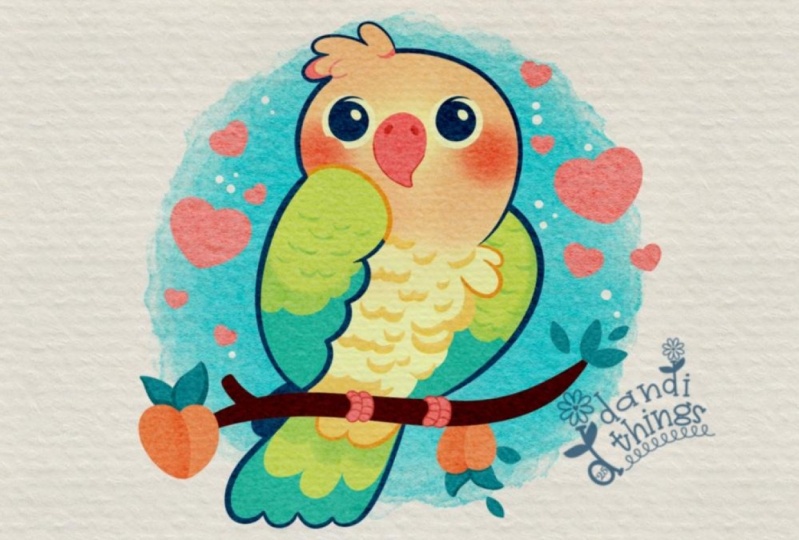
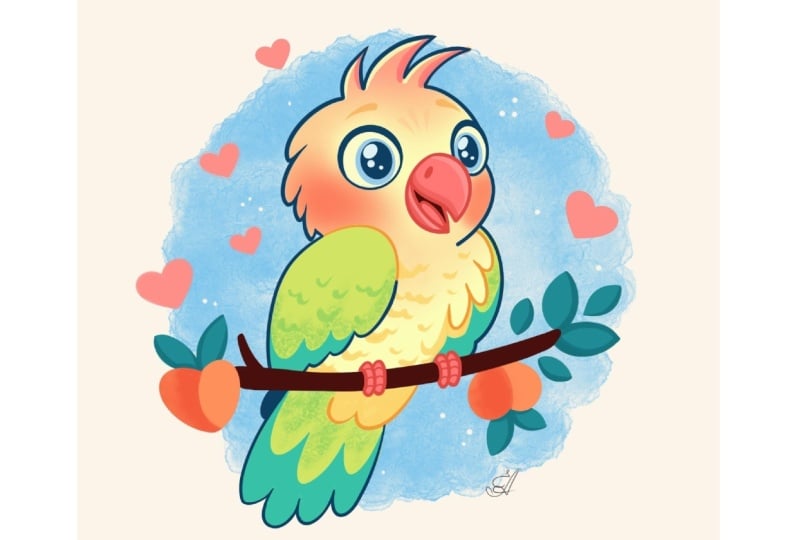
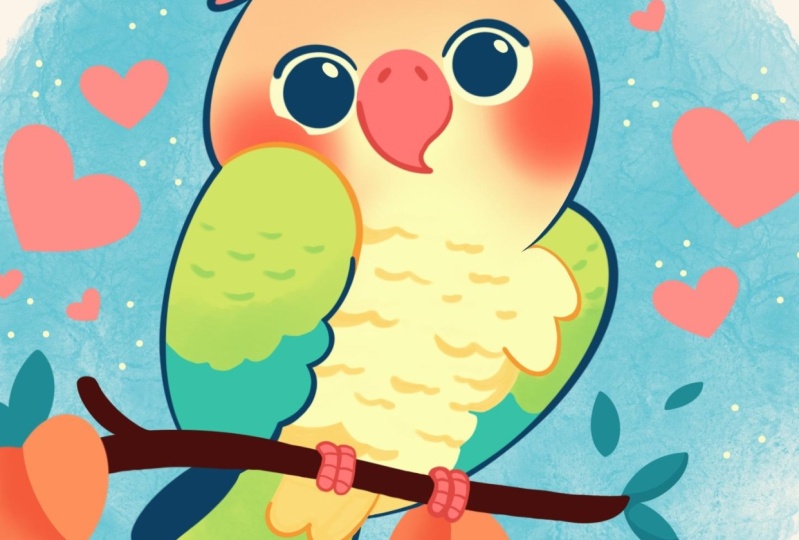
1. Introduction: Hello, everyone. I'm
Ginny, and in this class, we again to draw this
cute Kawhi illustration of an adorable
parrot in Procreate. During this class,
you'll get familiar with a lot of useful features
like quick shape tool, liquefied tool, recolored with
reference, clipping masks, and blending modes, and learn the basics of drawing infracret. By the end, you'll not only draw an adorable illustration
you'll be proud of, but also feel super
confident using procreate. And now let's spend
some time drawing.
2. Scheme: Begin our class
firstly by deciding what kind of canvas
we are getting BSM. They were using a
tendard square canvas from Procrite with our pixel width and pixel
height, the 2048 pixels. DPI at 300 and color profile is at SSRDB
with this low number. When it's all done,
let's heat down. Let's take a look
at our new Kendas and let's continue our
preparational part. Go and under the project
and so Stop and we will download everything that is
mentioned for this class. When you did it, let's first
go to our brush library, and we will select the
brush for this first part. We will select this Dell
flat pencil that you downloaded or if you want
to use any other brush, for example, from the
sketching folder, you are welcome to
go and select it. When we have the brush selected, let's go to our color palette. We'll go to the color
palette that you downloaded. We are going under
palette on the bottom and undercards on the top
to see the colors names, and let's go and select
some darkish colors. For example, let's go
with this dark red color. Now when this is done, let's
also go to our layers. We'll go to the
background color. Again, going into this color
palette that you downloaded, and we will select this
background main color. Now, when everything is set, let's go to our Canvas, and let's start by creating a circle right in the
middle of our canvas. W one line, let's go with
a big shape like that. Hold it at the end and hold one of your
fingers on the screen to make sure that
you are creating a perfectly rounded circle. When we have the
result like that, let's go and polition
it right at the center. Do that, we will go to
our Aoki on the top left. We will go under uniform
method and we will go under snapping and turn on
snapping into the settings. When we did it, let's
go back to our canvas. We will hold our Apple
pantil at some blank space, and we'll be looking for
these two orange lines, one vertical and one horizontal. When we have the
result like that, let's continue straightly
by going to our layers and then we'll create
one more layer on top of our layer
with our circle. We have the result like
that, let's continue by creating a straight line
going from top to the bottom. We are again holding it at the end with our
Apple pencil and holding one of our fingers on the screen to make sure
that it is straight. Then one more time we
will go to our ok on the top left and we'll be
looking for one orange line, which is our vertical
orange line. Let's position this
shape that we've created onto this line
and when we have it one more time go into
our lays and we will tap again on our plus icon to
create a new layer on top. This time we will go
on horizontal axis and create another straight line
the same way as before. Holding our Apple pencil, holding one of our
fingers on the screen, and then going to our Aoki to position this
line at the center. We are looking for
this line that is orange on the
horizontal axis, and when we have it in that way, let's go again to
our layers and we will merge all of these
three layers together. We'll put one of our fingers
on the layer on the top and another on the layer on the bottom and make a
pinch movement like that. When we have it, we will also go to our icon and we will go to the aposte slider and we will make the visibility a
little bit less visible. When we have the
result like that, let's tap onto the layer, and let's create one
more layer on top by again tapping
onto the plus ca. Now, when we have
this little scheme, let's go and create
one more little scheme that will now help us
to create our sketch. Firstly, let's define
the price that we will need to create
for our bird right here. Let's first go to our
lays one more time. We will make sure that we have the new layer on top
and when we have it, we will go with the same brush and with the same color
that we have right now. To the top, and we
will create a shape of the smaller shape
of the circle. Let's create the smaller shape like that, hold it at the end. If you need to adjust it, you can hold everything that
you are holding right now and then move your Apple
pencil from side to side. We will need to have a
bit of space on the top, and we will need to go not far beyond this line that
we have on the middle part. So let's go with a
shape like that, and if we need to adjust it, let's go to the circle
option on the top. This is our editing mode, and we will go and move the
shape so it is in a center. If you are not sure whether
you are in the center, if you want to make
sure that you are, let's first tap onto the
screen and go to our Aoki. Again, with uniformated
and with the snapping on, we can go and look for
this orange line that is vertical and position
our shape in that way. Now, when we are satisfied
with everything here, let's tap onto our ok to
get away from this mode, and this is the shape that we are going to be
using for the heat. So let's move on to the body. For the body, firstly, let's go towards the left side. We will go slightly lower than the shape that
we've created, and with one line, we will
create a shape of the ellips. The same way as before,
creating our shape, holding it, and the ends, and we will
need to adjust it slightly. Let's lift up our Apple pencil and let's go to this
agent option on the top. You can see we have
some notes right here when we are at
the editing mode, so we can go to them and we can adjust our sheet
that we've created. First, let's go and make
it a little bit less rounded and we will go and position it on a
different angle. We will need to go and
make it a little bit positioned on a diagonal axis like that and make
it in that way. You can spend some
time here and adjust it in anyway that you prefer. When we have the
results like that, let's tap on the
screen and let's go to the opposite side to create
the second part of our body. For this part, let's
go and one more time, create an ipe similar size wise to what we
have onto our left, the same way as
before, we are holding our Apple pencil at
the end of the line, and we will go to
our Editing tool over the top to adjust
the placement of this. So let's go first and make this thing that we've created a little
bit more around it, and we'll position it
in a way that it is a little bit higher than this first shape
that we've created. We also need to tilt
it and to tilt it, we can either grab
one of our nodes and drag it or we can go
right between the nodes, hold our Apple pencil there, and rotate it in a
way that we like. So let's spend
some time here and have the position
going in that way. And when we have it,
let's tap on the screen. And let's go over the bottom to create a little peculiar
shape right here. So for now, let's go and create the line that
will go in that way. We will start by going
from the left to the right through the middle of the
bottom part of the main circle. We can go and make
a little markdown and through this markdown, we will go from one side
and create a lingon in that we can go and create any wobbly line that you prefer. That's going to be a
little branch right here. So if you want to create it a couple of times, try it out, you are welcome to go and create everything that you want
to create right here. When we have this first line, let's go and add the
thickness to it by repeating the same line but moving it slightly
to the bottom. When we have it, let's go toward this part that we
have right here and we will create a little t. For the tail, we will go
slightly beyond the frames of our circle so let's go and create a little line
going in that way. You can go and create
it in that way, the straight line like
that and when we have it, let's go toward
this intersection that we have right
here in the middle and from it going slightly lower and starting to create a shape
going down in that way. Now, when we have it going
into the opposite side, I'm creating another
shape like that. So when we have the
result like that, we have everything that
we need for our bird. So let's move on
to our next part, where will create
a little sketch.
3. Sketch: For this sketch, let's
first go to our layers. We will tap onto our icon. We will go to this layer where
we have our weird scheme, we'll tap onto the N icon and adjust the opacity
of this layer. So let's go with
something around 25%, and when we have it,
let's tap on the layer, and let's create one
more layer on top. And when we have this new layer, let's also switch the
color of our brush, so it will be easier for us to define the lines that
we have right here. So let's go to the
color palette, and let's select
this dark CN color. And we will go toward
the top and we will start by creating
the shape for the head. Firstly, let's go and create the shape in that
way, go into the very, very top part of the head
that we have right here, and we will go slightly toward the side to create a bit of a
different shape right here. So we're creating some kind of a squeeze shape going a
little bit outside the shape, and creating something in that. Don't need to be very
precise with everything. We can create a couple of lines. We can go with our
eraser, make it smaller, and go and define what we
want to define right here. So if you created
a couple of lines, you can go and erase the
lines that you don't need. And when you are satisfied
with everything, let's go to the opposite side and create something
similar here too. So firstly, we are repeating the shape that we have
for the head on the top, and then we are going
slightly toward the side and starting to create a rounded
and squeeze shape like that. Now when we have
it, let's go and work a little bit
more on the top part. So for the top, we
will go towards this little part right here and we will create a little co. So let's go slightly from this line that we
have in the center. We will step a bit to the left. You can make a little mark down like that, and
when we have it, we will go to the side
and we will create a couple of lines
going in that way. You can go with a bigger
shape with a smaller shape, you can connect it in any
different way that you prefer. You can play around with the overall shape that
you created right here. If you need to go
with your erasa and erase the lines
that you don't need to, I welcome to go and do that. Get back to the
brush when you are ready with this
detail and let's go toward the body and let's start to create a little
wind cre here. So for the wing, firstly, we will go toward this line, we will repeat it completely. So go in that way, going toward the bottom part and starting to repeat the line that
we have right here. So go on like that,
and when we have it, we will go towards this part
towards the inside part of the ellipse and
we will start to create a little peculiar shape. So firstly, let's go and make the little markdown where we are going to be finishing
up our little wing. So we are going from
the center and we are going and creating a little markdown somewhere right here. So a little bit to the
left from our center. And when we have it, we will go slightly lower than
the shape that we have for lips that we have
as our guiding lines, and we will create a very
rounded curve like that. Now, when we have the shape, let's go and continue creating the shape going down in
that way and we will go slightly closer toward
the opposite side with our curves that we are
going to be creating and we will create the shape
for our little wing. Let's go like that, create a couple of these
bumps like that, and when we have it,
we will go toward the opposite side and we will recreate this line that
we have right here. Go along the shade that we
have for our ellips and continue creating the shape and connecting it with the shape
that we have onto the top. When we have the
shape like that, we also will go to this
intersection and we will continue to create
the line right here, along the whole shape
that we have on the top. Elongating this line
that we have on the top. Now, when we have
it, let's go and work a little bit on
the official features. Firstly, we will go toward
the middle parts of our head. We'll make a little
mark down right here, and then we will
go with one line and create a shape
of the ellips. Hood line in the
end and let's go to our editing tool to
adjust it slightly. We will squish it a little
bit and we will make it a little bit more rounded and position it
slightly differently. We will need to move it a little bit more toward the lad we will have the bigger
shape right here onto the lad than we
have one at direct. If you want to
rotate it slightly, you can grab one
of the nodes and drag it a little bit to
the side if you want to. So pay attention to what you
are creating right here. We want to have a bit of
the tilt into the head, so we are not positioning everything straightly
at the center. We have the result like that,
let's tap on our screen, and let's continue creating our beak by going toward
the left side like that. We are starting by
creating the line, going slightly
outside the shape, going like that, you can go with a bigger shape or smaller
shape, it's up to you. You can go a little bit beyond the frame like that,
and when we have it, we will go toward
the opposite side and we will go from
the side like that, going toward the bottom and create a little hook like that. Now, let's connect it nicely
with our shape on the left, and create something
going in that way. If you want to adjust
it in any way, you are welcome to go
and do it manually. Use your brush, use your eraser. You can go and erase this
line that we have in the center and this little
markdown that we've created. When we have something
in that way, let's go toward the top and let's create little
nostrils right here. So go very easily with a shape like that on both sides
and when we have it, let's go and create the eyes. For the ice, very easily, we'll go over one of the sides. Firstly, we are going closer
to the big that we've created and with one line creating the shape
of the circle. Holding one of our fingers on the screen to make it
perfectly rounded. And when we have
it going straight inside and creating the
similar shape right here, but smaller in size. Going like that, holding our Apple pencil if
we need to move it or adjust it slightly going toward our editing tool and
adjusting it in that way. Straightaway we can
go over the top and create a little
highlight like that, and again, straightaway,
we can go toward the top and make this
line little bit thicker. So we are creating some kind
of the distinctions right. Onto our eyes. When we have it, we will go to the opposite side and create something
similar here. Let's go and again, manually
create the shape of the circle similar in size to what we have
onto the opposite side. Holding our Apple pencil, holding our finger on the screen to make it
perfectly rounded. When we have it, if
you need to adjust it, go to the editing tool,
adjust it slightly. If you need to make sure
that the size is right, you can move the shape
to the opposite side and adjust it right
here by going between the nodes and making
the size smaller or bigger and move your Apple pencil while
you are holding it. You have the size right, get back this thing toward
the opposite side, try to position on the
same line that you have your first eye on
and onto the side, you can move this shape
slightly towards the big, so we will have a bit of
the overlap right here. When we have the
shape like that, let's tap on the
screen and again, let's go inside this thing and create another shape of the
perfect around the circle. Holding our Apple pencil, trying to make it similar to what we have on
the opposite side, and then going toward the top and creating a little
highlight like that. Go over the very top and trying to thicken
this line that we have right here and
creating a bit of the eyelash or
something like that. When we have it, let's
go and continue working onto our body and we will
go and do the following. Let's go toward
this little shape that we've created on
the side and we will go and create a couple of similar shapes to what we have
right here onto the comb. Let's go and create
something like that. We have a couple
of these details. You can go with
different sizes with different rotation
of these elements. It's up to when we have it, let's go and maybe work a
little bit more onto this line. We will go and elongate
it and we will go toward the bottom part and
finish up creating the shape by creating two
little shapes like that. Again, you can go
along this shape, create it in nice way. If you need to erase some parts, go grab your erasa and erase the parts that
you don't need. Now when we have the
results like that, let's get back to our brush, and let's go and work Wsarte. So for the tail, we will go and start by going toward
these little part, and from it, we will
go and start to create the shape going
outside in that way. We will go and create a
couple of feathers right here and we will go and probably let's go and create
four of them. So go on like that and starting to create them in that way, following the first
shape that we have on our little sketch. You can go and play rounds
with the overall shape. You can go slightly with a different position
of these elements, so you can spend some time here and maybe lift some of them higher or lower or create them in a more
rounded way if you want to. Spend some time here and adjust
these parts to your king. One more time for
now, we don't need to be very precise
with our shapes. We can fix everything
later on if we need to. And when we have the
result like that, let's also go toward this
little part and create a little part of
our tail here too. So when we have the
result like that, let's also go toward the
middle part and we will create the future
difference into our colors. So let's go and repeat what
we have onto the bottom, but now we will go and create
three of these elements. Go on like that
with a bigger shape onto the middle part and finishing it up by going to the opposite side and creating another little detail like that. So now when we have
the result like that, let's work onto our little
shape of the branch. So what we're going to
be doing firstly is repeating what we
have onto our skin. So creating our line,
going like that, creating a bit of the
thickness over this part. So going in that way and creating something
going like that. Finish up the line with a
little bit of the curvy shape. If you want to add
some details here, you're welcome to
go and do that. So, for example, you
can go and create maybe a little part of
the wood right here. We have it, let's also go and create a bit of the interest right here to this branch by creating some leaves
and maybe some pitches. First, let's go over this part. We will finish it up by
creating a curve element. If you need to erase some
parts, go and erase it, get back to the brush and let's go and create
the leaves right here. Let's go with very
simple shapes like that. Let's create two
leaves in that way. If you want, we can
go and maybe fill up the areas by creating the
little leaves going outside. When we have it,
let's also go toward the bottom part and start to create a little
pitch right here. For the peach, very easily, we will go with a very
soft shape like that, so creating a
couple of ellipses. And then when we have
them, let's go and create little leaves similar to what we have right
here onto the side. For example, let's go
with something like that, and also we can go towards the outside part and create a
bit of the leave here, too. Now, when we have it, let's
go to the opposite side and create the bigger shape
for the peach here too. So let's go and create something similar to what we have
onto the opposite side. Let's go with a shape
like that. Map it out. Don't need to be
perfect right now, going toward the top and starting to create
the leaves here too. Now when we have it, let's
also go towards the branch, and let's create the legs
that our parrot has. So let's go toward this little part right
here to the middle, and very easily we will go
with the shape like that. So we will need to create the elliptical shape that will look like a little
finger right here. You can go with two fingers
with three fingers. It's up to you how many you
want to add right here. As we are creating a
cartoona illustration, two will be quite enough. So when we have
this first shape, let's go toward
the outside part. So go onto this little
intersection where we have the pitch and where we
have this little wing. And let's create
something similar to what we have onto
the opposite side. So go on like that and
starting to create the similar shape and
similar size wise too. So let's go and
map it out first, and then we will grab our
eraser and we will erase all the lines that we don't need to see clearly what we
are doing right here. Decide on the size
if you need to go to the opposite side and first work with your eras
or go and do that. If some of the fingers right here are a little bit too
small or a little bit too big, go and adjust them to try to make everything similar
size wise to one another. When we have the
results like that, we also can
straightaway go toward these little fingers
that we've created and create the lines
going like that. Later on, we won't
forget to create them. Do the same onto the opposite side to creating
something like that. Now let's take a look
at everything and decide whether we want to
add some details here more. If we want, we can
go, for example, outside right here and
create some hearts. So mapping out again, our little shapes, so going,
for example, like that, creating smaller
elements, and going to the opposite side and creating similar things right here, too. So let's go with one big heart, going with a smaller one
right here and filling up the area with one little
detail onto the bottom. Now when we've mapped
out everything, let's go to our layers and let's hide our layer with
our little scheme. So these lines that
we have inside. Let's tap onto this check mark, and let's see what
we have right here. If he wants to adjust something, you can go either manually or we can use one option
that Procreate has to create the lines in a way that we prefer
without doing it manually. So when this layer is selected, we will go to our
magic one, two. This is our adjustments,
going under liquefy and going
under the option push. Have the size slider. This is our size of the brush that we are
going to be pushing with. So we can go to it and
we can adjust the size, and we can get back and
forth to this element and adjust it after we
created some details. So let's go and maybe play around with
something right here. So we can go with our brush
and squish some elements. We can rearrange
them if we want to. So let's spend some time here, and if you have some elements
that you want to adjust, let's go and adjust them. I decided to make the ice a
little bit bigger and play a bit with the curvature of the line that we have
right here for our branch. If you want to
adjust it even more, you are welcome to
go and do that. But when you are mostly satisfied with what
you have right here, let's tap OS adjustments twice to get away
from this mode. And if you have
some elements that you want to adjust
manually, for example, maybe this part or
any other parts, grab your brush and work a little bit once the parts
that you want to adjust. If you need to erase something, grab your eraser and adjust the parts that
you need to adjust. Now, when we have the
result like that, if you see that
maybe you want to go some other areas with your brush and manually
adjust something, you are welcome to
go and do that. For example, we can go and maybe make this thing a
little bit bigger, the pitch that we
have onto our side to balance out everything
that we have right here. If you want to
adjust some parts, even more, you're welcome
to go and do that. So you can spend some time here and adjust everything
to your king. And when you have the
result that you like, let's move on to
our next part where we are going to be
aiding the clean lights.
4. Lines: Begin this part. Firstly,
by going to our layers. We will tap onto our icon. We will go to the AN icon onto
the layer with our sketch, and we will adjust the apacity so we will see clearly
what we have right here, but it's not distracting
and disturbing. When we have the
result like that, let's tap OSR layer. Let's create one more layer on top by tapping on the plus icon. And let's go to
our brush library, and we will switch the brush. So we'll go to the
ink and folder and select technical Pan brush. And if we want all of
our lines to be smooth, we can tap OceR
Technical Pan brush, go inside the brush studio, go under stabilization
and play around with amount of streamline
and amount of stabilization. Set the settings the
same way as you see them right now onto
the screen or play around with these options.Thake a look at how it feels
onto your drawing pad. If you are satisfied
with everything, let's hit D, and let's start
working onto our lines. So firstly, let's go to
our slider with the size, and let's add it to
something around 20%. And then with the same color firstly with our
dark CN blue color. Let's go and start
recreating lines. So let's go over the top and start by creating
a line right here. We can play a bit with the
thickness of the line. So we can start very softly and then go toward
the bottom and add more pressure to our brush to create a nicer
looking line like that. So when we have this first line, let's go and start to create this little shape that
we have onto the top. You can hold your
line at the end to create a nicer shape. You can go to the editing
tool and adjust it from here, work with your brush, work with your eraser, create
nice connections, try to create very smooth
shapes right here, and connect everything
nicely and make sure that you don't have any
gaps into your lines. If you have the elements
like that when you have a bulkier element where
you have the connections, use your erasa and create a very nicely looking
element going in that way. So we will strive for this little triangular
shape going toward the opposite side and creating the similar shape here too, and again, working on the
connection right here. Now when we have it
getting back to our brush, going towards the opposite side and starting to create
the shape here too. You don't need to go with
the full line right here. You can go partially so you
can hold your line where you want and then go and work onto this line and continue
creating it later on. So let's work again
onto our connections. We can go with the
bigger size of the brush or with a
smaller size of the brush. If it's easier for you to go with a smaller
size of the brush, firstly, remember the size
that you are using right now. You can tap onto this little
handle onto your slider, and you will have a
little window like that. You will have a plus icon
right here where I have minus, and you can tap on
it, and you will have a little markdown onto
your little slider. So when you remember the size, go with a smaller size of the brush with a bigger
size of the brush, and adjust the elements to the level that you
prefer it here. So let's go like
that and start to add the connection
that will look good. Work with your brush,
work with your erasa. When you have it,
let's go get back to our previous size
of the brush of 20% or if you use
something different, go to that level and continue creating line,
go into the bottom. Create a little tip right here. Again, if you see that some of the lines are not
looking too good, go with your brush,
go with your eraser and try to make everything
very, very smooth. When we are done with the hat, let's go towards the little win right here on the right part, and let's recreate it here
too. We can go like that. We can create a full shape. You can hold your
line at the end, go to the 18 mode if you need to adjust the
curvature of the line, and we can go toward
the bottom part right here and continue
creating the line right here. Or we can keep it
like that and go into the opposite side and
create a little win here. Let's go in that
way, we will go and create the continuation
of the shape. So holding our line going toward this little part and
working on our connection. We for now won't go toward this little part
that we have inside. We will have a
different color here, but we will go toward
this little element and we will add the color here. Let's go a little bit lower than this line that we
have in the middle, and we will start by first
getting our brush and then going toward the bottom and starting to create these
little details here. Go like that, creating a
little tip and going toward the bottom to start recreating these details that we
have onto our sketch. Go like that, starting to
connect our shapes and filling up our area right
here onto the bottom and connecting everything
nicely onto this part. Let's work onto our lines. Again, working onto
the connections here, trying to make them pretty triangular and trying to
make the lines close. So that means that we don't
have any gaps into our lines. If you want to have
some little elements like that going
outside the shape, you can keep them, or
if you don't want them, you are welcome to go
and get rid of them. Now, when we have the
results like that, let's go toward the bottom part, and we will go and
create firstly the little additional
elements onto the side. Make a nice connection
right here, and then let's continue by going toward the tail and create it the same way as we have
all of our lines created. So let's go like that and start to create half of
the line right here. Creating a nice
connection on the top. Let's go toward the very, very top right here and
we will elongate our line and connect it with
the whole shade that we have onto the top. We will go toward
this little part and add the line right here
or eras, if you have it. And straightaway, we can
go and add the color to this little part because we
want it to be in a shadow. We can do it at this layer. We can go to our icon
with our color on the top right and dreg the color right here
onto this element. Then let's continue
by going toward the bottom and finishing up
creating our line right here. Grab the brush and go
toward this little part, create it right here, create a nice continuation of
the line right here. So we will need to work a little bit onto the line weight, work with your brush,
work with your erasa and continue creating the
details onto the bottom. You can hold your line
in the end to snap it to a better shape or you can go manually and create your
details in that way. Don't forget that we
will need to have nice connection
between the parts, so go in with these very
nicely looking tips and going toward the bottom and continuing to create
our details here too. Go with the pretty similar
line way right here. So it's not very different
when we are creating the line. If you have something like that, try it out one more time. Let's go toward the bottom and finish up creating our tail with a slightly rounder line that we have onto our sketch. Again, work onto
the connections. If you need to elongate
the line, go and do that, work with your brush, work with your eraser. You know the drill. When we have the
result like that, let's continue by going and
creating the facial features. So for the facial features, with this color that we
are using right now, we will first go to our
brush and go toward the inside parts
that we have for ouririses and we
will recreate them. To go on like that,
holding our Apple pencil, holding one of our
fingers on the screen, trying to match the size to
what we have onto our sketch, and then dragging and
dropping the color inside. If you have some
miscolred places, go manually and adjust it
to make the line smooth. Again, if you need to work with your eraser, go and do that too. When we have the nice shape, go to the opposite side and create something
similar here too. Start in the same way,
creating our shape, holding our Apple pencil, holding one of our fingers, adjusting the element
right here on the outside, and dragging and dropping
the color inside. Again, if we need to
erase some parts, go and erasing them too. What we have in getting back to a brush going with
slightly bigger size, and we will go toward the two part where we
have a thicker line, and we will recreate it. So we are starting with a very, very low amount of pressure, and then we are edding
it by going toward the opposite side.
Hold it at the end. If it's not looking good,
try it out one more time. We will need to have a
pretty rounded shape. So let's create it in that way. If you need to go
to the editing tool and maybe adjust the
curvature of the element, you are welcome to go and do that and create a nice
shape right here. When we have the
result like that, let's do the same onto
the opposite side. So again, we are starting
from the inside, starting with a very
low amount of pressure, holding our line at the end, and creating something
going like that. Try to make it similar to what you have onto
the opposite side. So if you need to adjust it, go to the editing tool, adjust it slightly, tap on the
screen when you are ready. If you see that you have some
difference into your line, you can go grab your eraser and work on your line manually. So now when we have
the result like that, let's go and change the
color of our brush. We are going to our
color palettes, and let's start with the
color with the title red. With this color, we
will go to our layers, and we will go underneath the layer from where
we are right now at, and we will create one
more layer like that. When we have it, let's
go to where the beak and we will recreate only
the bottom part firstly, go on with the same size that we use for all the
lines that we have, go slightly like that and starting to create the
shape with our line. So again, we are not recreating
everything right here. We are going only to
the bottom part to create a nicely looking beak. Work onto this connection here. If you need to erase something, go and erase it, create a nice
connection one more time. If you need to when we have
the results like that, let's go and create the
nostrils on the top. So again, go into our
brush and creating the shaves that will
look like nostrils. So we are probably going with the shaves or the
Apses right here. When we have the
shape that we like, let's go and again switch the color that we are
using for our brush. Go in again to our
brush library, and let's select
this orange color. With the orange color, we will first go toward this
little part that we have right here and we will create a closing
shape right here. Going like that and starting
to create our detail. Going to the opposite side, holding our Apple
pencil if we need to, go into our editing
tool if we need to. So trying to create the nicely
looking line right here. So this line should
look the same as if we are creating it
with this blue line. So it's going the
whole thing like that. When we have it
tapping on the screen, and we are checking out whether we need to go
and adjust some parts. So for example, we are going
right here to the bottom, trying to make a nice
connection right here. If we need to see onto the top, we will go and zoom in
our canvas and do that. And then one more time,
let's get back to our brush, and let's go to
these little parts, and we will add the
color here too. Let's make a very
nice connection with this sheet that
we have right here, the tip that we've
created and go like that and starting to
create the details here. If we need a couple of attempts, we will go and have as
many attempts as we need. If you need to rotate your canvas to create these details, here are welcome to
go and do that, too. And with the same color, we will go to where
the bottom part and track created, too. So let's go like that and
create the details in that. Again, if you need
to have a couple of attempts, go and do that. We don't need to repeat what we have right here
onto this cage. We can go and create
it in a bit of a smaller way if
you want to make sure that the lines
are looking fine and when you are satisfied
with everything here, we also need to go and erase this little part because
we don't need it. Let's get back to our list, go into this list where
we have our blue lines, grabbing our eraser
and very boldly going toward this little part
and erasing it completely. Now when we have the
result like that, we will go to our layers, and we will merge these
two layers together. So we know how to do that. We will need to make a
pinch movement like that, and when we have the
results like that, let's create one
more layer on top and change the
color to dark red. With this dark red color, we will go and create
our little stick. So let's go and start to do it the same way
as we did before. You can again, go
partially or you can go and create
the full way around. And when you have
the first line, go slightly lower and
create the thickness to this element by creating a similar line to what
you have on today. Again, you don't need to
go full shape right here. If you need to stop
at some point, go and do what you need to do. Again, you don't need to repeat the same things as you have
them onto your sketch. If you want to change something, you are welcome to
go and do that. When we have the
result that we like, let's take a look at
it from the distance. Let's go towards
the opposite side and close the shape here too. And then let's drag and drop the color
inside straightaway. Go into our icon
onto the top right, dragon and drop in the color. If we have some
elements, for example, this little part of the wood, we will go and recreate it here. Let's go like that, add the color when we are
ready with lines, and then we will take
a look at everything and decide whether we need
to adjust some parts or not. For example, we can go and maybe elongate this
part slightly, but we will go a
little bit thinner than we have it
onto our sketche. So for example, let's go
with something like that. And when we have the
result like that, we will go and add the little leg that
we have right here. So for the leg, let's
get back to our list and we will one more time create
one more layer on top. We will switch the color to red, and with this color, we will go and create these details
that we have right here. So we will need to make
sure that we are going toward this thing that
we have as our stick, and we will need to make sure that the fingers
are grabbing it. So going along the
stick with the curves. So create the lines when you have the result
that you like. Let's also go toward
the inside part. And if you remember, we
had some lines right here. So we will need to go and create the curse inside and we
will need to do it on both shapes that we have created for our fingers or as
many as you created. When we have it on one side, let's go to the opposite side and create something
similar here. So going from behind like that and starting to
create the shape. Going to the opposite side and creating the second
shape right here too. Going toward the inside
parts and eight lines that will create the texture for our little legs right here. When we have the
result like that, we also need to go to where this little line that
we have in blue color. So go into our layers, go into the layer where we
have our blue colored lines, selecting our dark
can blue color, and we will need to connect
it with our little stick. That way we will be able to add the color inside later on. When we have the
result like that, let's go to our layers, and we will combine
the layers with the stick and with
our part together. So we are keeping
our little legs right here onto the top
because we will need them later so let's go to where these two list and make
a pinch movement like that. When we have the
result like that, we are done with
our clean lines. So let's move on
to our next part where we'll start
to add the colors.
5. Colors: Begin this part firstly by going to our layers and we will hide our layers with the sage and our
scheme and everything. We are tapping on
our checkmarks right here and we have the
result like that. Now, to add the cars in set, we can use one
option that Procrit has that will help us to do
that on separate layers. Let's first tap onto the layer
where we have our lines, and we will use the
option reference. When you have it
like that, let's go underneath the layer with the lines and create
one more layer here. Now when we have the
result like that, let's one more time go
to our color palette, and let's start with
this body main color. We will drag and drop
the color toward the inside part and we will recolor everything that
we have right here. We can keep our little win with the separate color
if we want to right now and we can go to our layers, create one more
layer right here and go and change the
color to yellow green. With this yellow green color, we'll go to our wing and we will add the
color right here. Now when we have the
result like that, we have the basic colors on, so it's time to add the colors toward
the facial features. For the facial
features, firstly, let's get back to ours. We don't need reference
anymore onto this list, so we will go to this
layer, we tap on it. We will go and select
reference from the list. And then let's get back to our main layer where we
have the body color, and we will create one
more layer right here. Now, let's tap onto this layer, and let's use the
option clipping mask. That way we will stay inside
the shapes right here. Now, to make sure that we are recreating the
elements correctly, we will go and unhide our
layer with our sketch, so we are tapping
onto this checkmark. You don't see the details
right now because they are behind our shape
for our body color. So let's gram this layer. So select it firstly, and we will grab it and drag it above all the
layers that we have. Now, when we have the
position like that, let's get back to the
layer that we've created and the layer with this
little arrow right here. And we will go to
our color palette, and we will start to
select different colors. So firstly, let's go and select these beak
and leg colors, and we will go and recreate
the top part of our beak. So let's go with slightly
smaller size of the brush so it will be easier for us
to create these details. Going toward the line that
we have onto earlier with the sketche and continuing to create the shape right here. Going like that and then going toward the bottom
part and we will need to go the full road that we have right here
and close the shape. So that we'll be able to drag and drop the color
inside this thing. Now, when we have the
result like that, let's go and create the shape that we have right
here, for our eyes. So to do that, we will
first need to go to our color palette and change the color to the color
with the title eyes. Let's go toward
these parts that we have for our eyes onto our
skeue and let's recreate them. Hardly can see what's
happening here, but we will try to create
a nice shape right now, and when we have it, we will drag and drop
the color inside. When we have the
result like that, if you don't see
what's happening here, we can get back to
this little part later on, and for now, we can add the secondary
color right here to the shape that we
have for the head. Let's get back to our layers, and let's go again to
the layer that we have for our main color and we will create
one more layer here. It will be automatically
clipped and we will go to our color palette and change
the color into body orange. With this body orange color, we can go to our brush library, and we will go to the airbrush and folder to select
the soft bland brush. We will set the opacity of this brush to
something around 35%, and we can very nicely go with slightly smaller
size of the brush toward the elements that
we have right here, and we can adjust the
color right here. So we are creating a bit of the different color right here
and creating in that way. So we will keep a bit
of the color right here on the top of
our beak and going towards the main
shape that we have the middle part right here and adding the color
going like that. So straightaway,
we can see that we have this color for the
eye that we've created, and when we have the
result like that, let's go slightly lower
right here and maybe make a bit of the color right
here, very, very subtle. And when we have it, going
again to our layers, going to this layer where
we have our one eye, we are getting back to the
brush that we used before. Go again to our inking folders, selecting our
technical pan brush, getting back to our eye color, and recreating this eye that we have on
the opposite side. So let's go full
circle right here, hold our one finger
on the screen, try to make the side similar to what we have onto
the opposite side. When we have the
result like that, drag and drop the color
inside the shape. And if you have recolor
the beak right here, we can go with one of our
fingers that we have. We will go to our canvas. We will hold it at this color
that we have for our beak. When you have this little thing, the little eye drop it too, and the color on the top is
the color that you need, we will lift up our finger, and we will go to this part and we will add the
color right here. So now when we have
the result like that, we can get back to our list and hide our layer with our lines, the sketchy lines, and we will see that we have
the result like that. Now when we have the
result like that, let's also go back to our
brush library, again, go into the airbrush and folder, soft blend brush,
same opacity level. We'll go and select
the color with the title checks,
and with this color, we'll go again to our previous layer where we
have the darkish element, and from here we'll create
one more layer here. Now, with slightly bigger
size of the brush, we will go towards the
bottom parts of our eyes, and we will go and create
the checks right here. So very bright
elements right here, but we are trying to keep them only inside the
shape of the hat, so we are trying not to go
to the shape of the body. So you can add as much
of the color right here and go into the opposite side and creating something similar here too. So let's create it in that way. And when we have the
result like that, let's also make
this eye a little bit more pecuar and a
little bit more cute. By going to our layers, going to the layer
where we have this eye, we will grab our eraser and we will go toward the
bottom part right here, and we will erase the
bottom part slightly. So with a bigger
size of the brush, we will go and create a
little shape like that. Try to avoid creating
very strong corners. So if you created a
very pointy ones, go and soften them
up a little bit. And when you have the
result like that, we have some kind
of the cheek and we have a very cute
little shape right here. Now when we have
everything in that way, let's go and continue
working on our body. For our body, first, let's
go to our last, and again, we will create one more layer on top of every layer that
we have right here, and then we will switch
the color to body yellow. With this color, and by
going to our brush library, we will go and select the
brush that you downloaded. It is our brush with
the title Tipper. With this brush, we will go
toward the body right here, and we will add some kind
of the feather effect. So what we're going to
be doing is going toward the side towards
the bottom parts, and we are going to create these very peculiar
little shapes right here. To go like that and starting to create the rounded
elements in that. Go along this shape that
we have right here. Firstly, let's go toward this little part
that we have onto this side and we will try to create the peculiar little
details right here, like a continuation of
the chest elements. Go on like that and starting to create the details
go in that way. Go a little bit lower with this part, creating
something like that, going towards the eraser, if you need to work onto
the overall shape right here and create some kind of the elements
going in that way. Going along the whole thing
that we have right here, mostly going towards
the sides and starting to create thicker elements
going toward the middle part. Go on like that, starting
to add the details. If you want you can go
with different pattern right here with different
position of these elements, creating the elements
that will look nice. You can also go towards the canvas that you have
and go and zoom it out, zoom it in, and see what you
are creating right here. Go like that and start at a couple of details
going in that way to create the look of the
feathers right here. In the bottom, you
can go fully with this color and create
something going in that way. Again, going toward
this little part and completely putting
it into the shadow. If you overdid it slightly, grab your erasa and erase the
parts that you don't need. Take a look at everything from the distance to decide
whether you need to go and add more details
or maybe you want to go and erase the part
right here with the color. So we will have a nicer blending right here onto the bottom. We can do it very easily
by going to our lease, go into the layer where we
have these tinted elements, go into our erasa
and we will need to set the eraser to
the very soft brush. So let's go tap on
it and we can go to the airbrush and
folder again select our soft blend brush and with the bigger size of the brush
and with lower opacity, we can go from the bottom right and create a nicer
blending effect. So spend some time
here and create a nicer blending that
we have Osa the head. When you have the
result that you like, let's get back to
our normal eraser so you can select any brush
that you prefer for it. When we have our normal eraser, let's go and work Osa
our little wings. So for the wings, firstly, we will go and find the layer with our wing with
these green element. We'll go and select the green, yellow color, yellow green. We will go towards
our taper brush, and we will go to
this little part, and we will recolor this
part here with this color. So manually going
like that and adding the color to the whole area
that we have right here. If you already it, grab your eraser and erase the
parts that you don't need. Now when we have the result like that with the same color, let's go toward our little
tail and let's recolor it too. Let's go completely
with our color. We can go around
the shape like that and we can add the color inside. So going like that,
adding the color, and then we can work
with our eraser and add the color to this place. If you want to maybe
go straightly inside and manually add the color
like that, it's okay. You can go and do
it in that way. Let's recolor our little
tail by going toward the elements that we have right here and recoloring
everything that we need. Again, if you over did it or if you went a little
bit beyond the frames, you are welcome to go and
erase it with your eraser. And when we have the
result like that, let's go and continue
working on our little wings. Firstly, we'll go to our
last and we will create one more layer on top of our
main layer with the wings. We will tap on it and we will use the option
clipping mask. Now, go into our color palette to select this blue green color. And with this color, we will go again with the
same brush that we are using right now going towards these bottom
parts right here, and we will add the
secondary color. So probably it will be easier to go to these little parts. So we are starting from here and going toward the bottom and creating similar details to what we have as our main
shape of the wing. So going like that,
going around, trying to close the shape and dragon drop
the color inside. If you need to go manually to some of the places and recolor something or work on the
continuation of the lines, you are welcome to do it. So, when we have
something like that, we can work with our
brush and work with our eraser onto the overall pattern that
we have right here. Let's create a very
nicely looking element. So when we have the
result like that, let's go toward
the opposite side, and let's create
something similar here. So again, going toward
the bottom part firstly and adding the
secondary color right here. So we can go very
easily right here by creating only the
element like that. To go on like that,
starting to add the color inside when we are done
with the main shape. And when we are ready
with this task, we will go and start to
add some more details. Firstly, let's go
toward the bottom, and let's go and add this additional little detail that we had onto our sketch. So if you need it, you can
go to your list and hide the layer with your sketch to
recreate this detail here. Go to the layer
where we are adding the details to our
tail and to our wings, and let's go and recreate
this little partra here. So going like that, starting
to create our shape. If you don't like how
this brush behaves, you are welcome to get back to the brush that we've
created our lines with, so our technical pan when
we are selecting it, let's go to where
this little part, and let's recreate it. We can go around like that. So we will continue
creating this shape, go along the whole thing, and we will connect it right
here with our first line, and then we will drag
and drop the color inside this shape
that we've created. Now, when we have the
result like that, let's get back to our list, hide our layer with this gauge. Check out what we
have right here. If we don't like how it looks or if we have some elements
that we need to work on, let's go and add the color to these places or erase it with
our eraser if we need to. If you see that some of the
lines are not looking great, we can get back to our
previous layer where we have our color for the
main shape and we can get back to our yellow
green color and recolor some of the lines
that we have right here to have a nicer look. Now when we have the
result like that, let's get back to our layers, and let's go to this layer
where we have the steel color. Let's go and check out
whether we need to go with our erasa and erase
the parts right here. Again, work on the connections
between the parts. When we have the
result like that. Let's also go and add one more color toward
these greenish elements. Firstly, we will go
to our color palettes and we will switch
the color to green, and then we will go
toward our layers. We will go underneath this layer that we have for
the steel elements. Let's go to the
main layer where we have color for our wings, and let's create one
more layer here. Now we will go to
our brush library, and we will go to the folder
with the title painting. We will go to the
gouache right here, and with this color, we will go toward the
bottom parts right here, and we will add a bit of
the texture right here. So we will add the secondary
or the third color here, and we also will do the same
on the wind right here. So we are creating some
nice watercolor effect. If you want to go to
these little parts, you are welcome to go and
add the color here, too. And now we will get back to our brush with the title taper, and we will go and add
some feathers right here, too with the same let's
go right here and start to edit with slightly
bigger size of the brush. Basically, we are doing the same that we have right
here in the middle. So let's create a couple of details right here
with bigger size, with smaller size, create the nicely looking
elements right here. If you want to go to
the opposite side and try to create a couple
of details here too, if they will be seen,
go and do that. If it's not the case right here, you're welcome to keep it
plain as it was before. Now when we have the
result like that, we are mostly done with
everything right here. Let's go and work
a little bit onto these little shapes that
we have for our legs. For the leg first, let's
switch the color to our beak and legs and let's
go and create one more layer. We will need to go to the layer where we have the lines for the legs and we will go to
the bottom and from here, we'll create one more layer. The layer will be
underneath the line. Now, manually with a brush, either a tipper or
any other brush, technical pan or
decide on your own, going toward the inside parts and edging the color right here. When we are done
with the first side, going toward the opposite
side and creating the color inside these
little shapes here too. So let's go toward all of
the details right here. Let's make sure that
everything is recolred. When we have the
result like that, let's get back to our list and unhide our layer
with the sketch. Firstly, let's go and
work onto the back part. If you remember, we had a
little scheme at first, so we will go and unhide it. So where we have
this little circle. And when we have it, we will go underneath our layer where we have the main shape
for the middle part. We'll go and create one
more layer here and we will go and change the color
to the background blue. When we have it,
we also will go to our brush library going again
to the paint and folder. This time we will go and select
this Fresco little brush. With this brush with one line, without lifting
up anything here, we will go to word our
sheet that we have for our circle and we are going around and starting to
add the color like that. You can go a little
bit beyond the frames. We'll have a nicer looking result right here
if you do that. Go like that, again,
without lifting up your Apple pencil creating
one layer of paint like that. When we have it, let's go and hide our layer with
this little scheme. So when we have the
result like that, decide whether you like
the amount of color. If you want to add more
color to this part, you are welcome to go to this
layer that you've created, swipe it from right to left
and use the option duplicate. Then if it's too intense, you can go to the
N icon right here, to the apasity slider and adjust the amount to the
level that you prefer. For example, let's
go with something around 50% onto this layer. And when we have the
result like that, let's go toward the tube, and we will go and create our little pitch
elements right here. So we will need to go underneath our layer
with the lines. So to this tell layer, we will create one more
layer here and we will go firstly toward our color palette to switch the color to pitch. With this color, we will go again back to our brush library, go either to technical pan in the inking folder or any
other brush that you prefer. And let's go and re create
our little pitches. So going toward the
big one s it's left. Onto our left firstly, and starting to recreate
the detail here. So let's go like that,
go in with halves and starting to create the
elements going like that. Let's go with pretty
rounded shape. If you want to adjust
it in any way, you are welcome to
go and do that. If you need a
couple of attempts, go and create as many details and as many attempts as
you need right here. When you have the outline, drag and drop the color inside, add the color towards the parts
that are not colored yet, go toward the opposite side and create the similar
shape here too. Make sure that the
line is closed at the color inside when you have
the result that you like, decide whether you like the position of
this little sheet. If you want to move
it, for example, above our line that
we have right here for our stick, we can
do it very easily. We can go to our ribbon
icon or the top left. We will use the
free hand method. We will go toward this little
part that we've created. We will loop it
around like that, but only this
element is selected. We will use free fingers, we will swipe them from
top to the bottom, and we will have this
copy and paste window. Can use the option
cut and paste, and we will have these
elements on a separate layer. You can see it right
here onto your layers. You can see like we have
the from selection, something right here,
and we can grab this layer and drag it above
everything that we have. So we will have the elements above the layer with the stick. If you want to adjust the placement or if you want to adjust
something right here, the size maybe we
can go to our okey, go to the uniform method, go to one of the nodes if
you want to squish it, go to the green node if
you want to rotate it. So find the placement
for this element and adjust it to your
like so for example, let's go something like that, and when we have the
results like that, let's tap onto our ki on the top left and we will
deselect everything. Now, let's go and
deal with the leaves, go into our layers. So when we end this layer with the big
pitch onto the left, let's create one more layer
here and we will drag this layer underneath the
lay with the on the lay, we will go to our color palette. We will select the color with the tata leaves and we will go and create the
leaves right here. To go in the same way as we have them onto our sketch or if
you want to experiment, we will go and
experiment right here. So add the color inside when you are ready
with the lines. If you have something
in that way, that means you didn't
close the shape. So drag it the color when you
are already with the lines. Adjust the overall
shapes if you need to with your brush
and with your eraser, going in that way, starting to create the
nicely looking shapes, going towards the opposite side and starting to add
the details here. Now let's get back
to our layers, and let's go to this layer
where we have our pitch. We will create one
more layer here. We will drag this layer underneath the layer
with the pitch. If you have created the group,
try it out one more time. Holding our layer, dragging
the layer underneath, and if it clips to
the previous lay, we will need to tap on it, and we will need to use
the option clipping mask. Now, when everything is set in that way when
the layer is free, we will go toward
this little part where we have the
leaves for this peach, and we will go and
recreate them too. Let's go like that, add the
color inside straightaway. If you want to go
toward the side, create the second
leaf right here. When we have the
result like that, let's go toward this little
part and create it here too. So go in the same way as we
have it onto our sketch. Or, again, if you want to maybe play around
with something here, you're welcome to go and do what you need
to do right here. Again, if you drag
and drop the color, and if it's not happening, make sure that the
lines are closed. If you want to go and
maybe add more leaves, go and create it, repeat what you have onto your sketch or create
something different. For example, we can go right
here and we can create another little leaf that
will be slightly smaller. And when we have it, we can go toward this little
part, for example, or maybe a bit lower and create another
little leaf here too. If you want to add more leaves, you are welcome to
go and do that. When we have the
result like that, let's play a little bit with our pitches and
with our leaves, and we will add a bit of
the shadow right here. So what we're going to
be doing is firstly, go into our list and
we will hide earlier with our sketch lines so
we don't need it anymore. We will go to the layer
where we are right now at. This is our leaf
layer. That's okay. We can create one
more layer above it. We will tap on the layer and use the option
clipping masks. And also, we will
create some shadows, so we will need to switch
the blending mode. Let's tap onto the CA and
switch the blending mode to multiply and set the opacity to something around
maybe 40% or so. If we need to adjust it,
we will do it later on. Now when we have it
with the same color, but with the different brush. So let's go with
our taper brush. Let's go to where the leaves, and let's make some
separations right here. So, for example, go
on like that and starting to add the
details in that way. If you want to add more shadows, you are welcome to
go and do that. So, for example, we can
go underneath our pitch and create a bit of
the shadow right here. Going toward other leaves and starting to add the
details here too. If you want to go and maybe put some of the leaves
completely in the shadow, you are welcome to
go and do that, too. You are welcome to experiment a little bit and play around. When we have the
leaves here done, let's go to the next layer. We will go to the speech because we are still
here at the bottom. Let's create one
more layer here, tap onto this new
lay, clipping mask, going toward our color palette, and let's select this
peach darker color. With the speech darker color, let's go toward
this little peach, and let's put some part
of it in the shadow. Let's go, for
example, like that. Going toward the
half and creating the big shadow
going in that way. If you want to soften
it up slightly, we can do the folding. We can go grab our smudge too, and going on from the side
that we have on the left, right here at this little pitch, we can go and add a bit of the little bit resident
color right here. So going on like that and trying to make very nicely looking. When we have everything
in that way, let's go toward the top and we will start with this
layer that we have. Well, actually, let's
go to the pitch because we have our
color selected. Let's create one layer here, tap onto the layer, and use
the option clipping mask, with the same color and
with the same brush, going toward one
of the halves of our pitch and putting
it in a shadow. Go into our brush firstly and starting to add the color
to one of the sides. Go on like that to the
middle firstly and then dd in the color toward
the whole pitch. If you want to add this
resident color right here, go with your smudge tool
and edit in that way. Now, when we have the
results like that, we will need to
go to our leaves. So firstly, let's go
and switch the color to leaves and going
toward our leaves, go into the leaf
with the leaves, creating one more lay here, tapping on it, clipping mask, multiply blending
mode, something around 40% of opacity
for our leaves. Going toward them and adding
the secondary color here. So go and light that to the middle part, going
toward the pitch, adding the little
shadow right here, starting to create something
that will look nice. When we have the
results like that, let's check out whether we
need to add more details and finish up with our sheep for our little
parrot right here. Let's go and add the very cute little highlights
onto the ice. So let's go and switch
the color to ice. And with this color, we
will go toward the top. We'll create one
more leave here. We will change the brush
to our technical pam, and we'll go to the sides where we had the highlights
on the sketch. Let's go to them and add
the color right here. If you need to see where you've put these little
highlights onto your sketch, are welcome to go and unhide the layer and use it right here. But mainly what we
are doing is creating the ellipses onto
one of the sides and adding the highlights
onto the same level and onto the same
side on our eyes. When we have the
result like that, we also can go and
maybe exaggerate the little comport here by creating a bit of
the shadow here too. So you can see it's not
a very linear process. You can go back and
forth if you want to add more details.
That's okay. We can go and do
that. Let's work with our little comprate here to finish up with everything, and we will go toward Ala, where we have the main shape that we have for
our little parrots, and let's create one
more layer here. Let's drag it slightly above the layer that we have
for this tan element. Let's change the color
to beak and legs, and let's go to
our brush library and select our tip or brush. We will go toward this
little part right here, and we will start to add a
bit of the shadow right here. So go into the bottom part and starting to add a nice
looking element like that. You can go and maybe create
the little thing like that. So something similar
to what we have for our little feathers right here. And when we have it going toward the opposite side and creating a bit of the shadow here too. So you can spend some time
here, work with your brush, work with your eraser,
create a nice looking she. When we have the
results like that, let's finish up with
everything by adding these additional
little hearts that we had onto our sketch. So let's go to our
list, and again, go above all the lists
that we have right here, creating one more lay on top, changing the color to hearts, and let's go to this
folder that you downloaded with our
simple stem brushes. Let's select any heart that you like right here or you
can go with all of them. And let's go and start
to add them right here. If you need to see where you've put them onto your
layer with the sketch, go and hide this layer and put these little shapes toward these little shapes that
you had onto your sketch. Adjust the size of the
brush and tratt your canvas to put the elements in
a way that you want. On a diagonal axis, you will
need to ratch your canvas. Go toward all of these elements and put them onto this layer. Change the size of the brush. Firstly, you can go and put
the elements like that, and only then when you have
everything that you need, add the color inside. So let's go toward the
opposite side too. Let's add little heart onto
the top and onto the bottom. You can go and vary
the diagonal axis right here for these elements by rotating the
canvas one more time. If you notice that
some of the elements are miscolord when you
are putting these things, later on, we can get back to it. For now, let's focus
on our little heart. So when you have the outlines, Drag and drop the color
toward this part. So one by one, going
like that toward the heart and adding
the color inside. Let's also go toward our lays and hide our layer
with our sketch, and then we will go to the same layer where
we have our hearts on. We'll change the color
to background pin and we will change the brush to our
previous brush that we use. So either our tipr or
our technical pen brush, and with the color that we
picked and with this brush, let's go and put some
peculiar little dots towards these empty
spaces right here. Let's try not to overdo it. Add a bit of the
accent right here. If you want to go outside the shapes and maybe
to the bottom parts, add these details here, you
are welcome to do it too. And now let's check out whether
we recolored everything. So if you see that you colored some other places that you
don't need to be colored, get back to the needed layer and fix that you need to fix. Now, when you are
done with this task, let's take a look at
everything from the distance, and if you like how it looks, we are done with our class. Thank you for
watching this class. Let review if you
liked it and cant subscribing for Mirka Wi
videos in the future. Looking forward to
seeing your projects.
 Uni Corn, ⭐Kawaii Art Enthusiast⭐