Transcripts
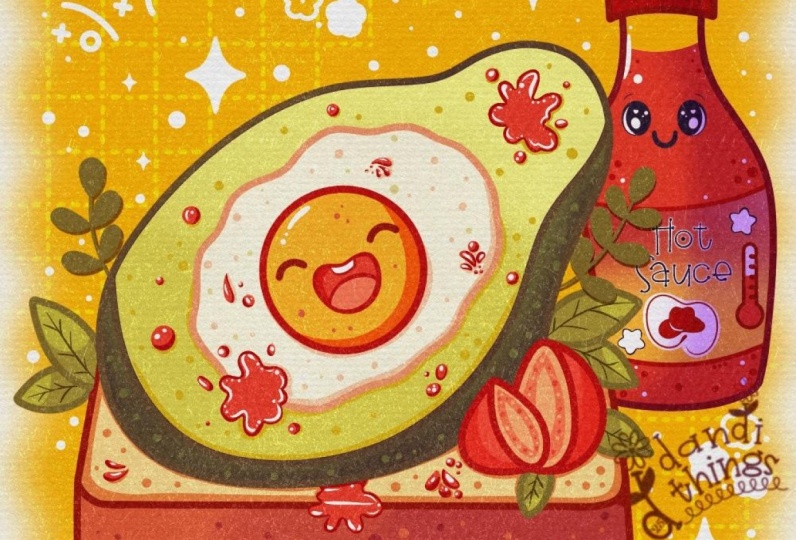
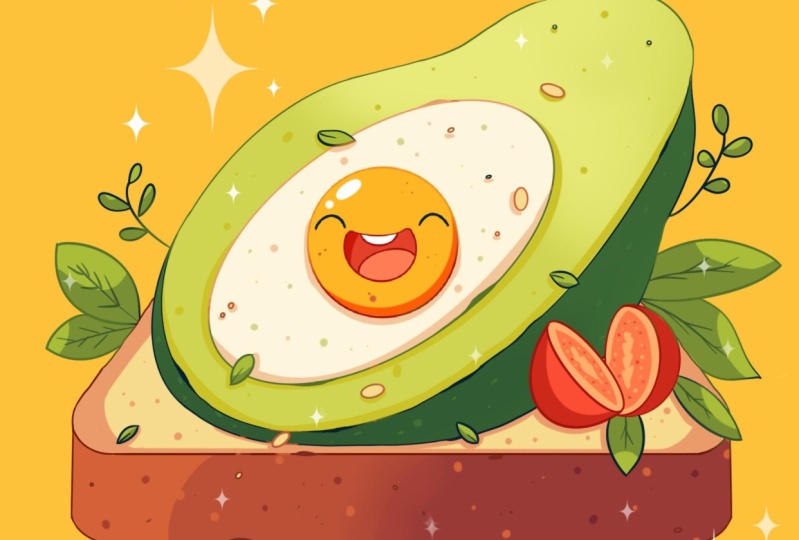
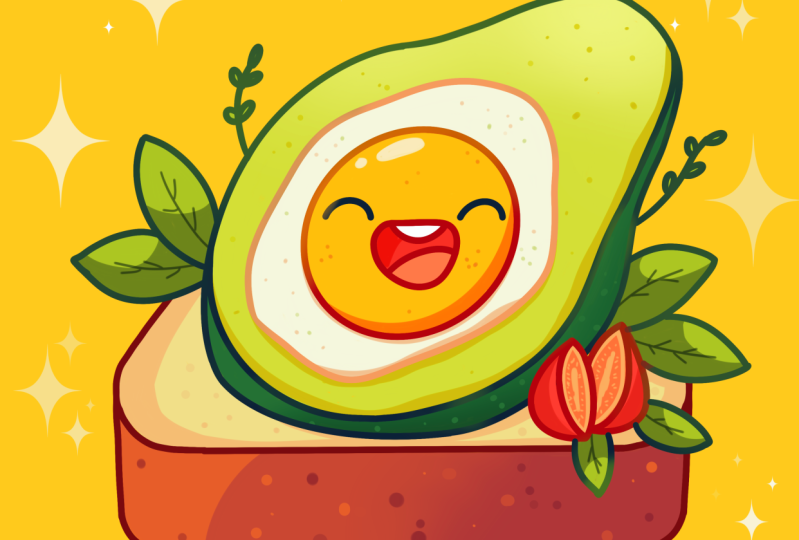
1. Introduction: Hello, everyone. I'm
Jenny, and in this class, we are going to draw this
cute Kawhi illustration of an adorable avocatd
toast in Procreate. During the class, you'll
get familiar with a lot of useful features like quick
shape tool, liquefied tool, recoloring with reference,
clipping masks, and blending modes, and learn the basics of drawing
in procreate. By the end, you'll not only draw an adorable illustration
you'll be proud of, but also feel super
confident using procreate. And now let's spend
some time drawing.
2. Sketch: Let's begin by
deciding what kind of canvas we're
going to be using. They were editing a standard square canvas from
Procreate with Pixel W and Pixel
heat the 2048 pixels. DPI R 300 and our color profile is at
SRGB with this loan number. When it's all done, hating done, go into our new canvas and then to continue with our
preparational parts. Please go under the
project rotab and download all the materials
mentioned for this class. And when you did it, let's go firstly to this color
palette that you downloaded. We will go to the pallets
on the bottom and to the cards on the top
to select our first. So for this sketch and for the scheme that we
are going to be creating, we will use this dark red
lines color. Let's pick it. And then let's go to
our brush library, and we will use the brush
that you downloaded with the title Doll flat pencil. Now, when we are all prepared, let's create a little scheme. So we will go and create
a shape of the rectangle. With one line, we will go to our canvas and we will
create a shape like that. At the end, we will
hold it and we also will hold one of our
fingers on the screen. Let's reduce this size slightly. So we are holding everything
that we are holding right now and we are moving our
shape a little bit inside. When we have the
result like that, let's make sure
that we are right at the center with our shape. So we will need to go to
our Aoki on the top let. We'll go under uniform. We'll go under snapping. We will toggle snapping
into these settings, and then we'll get
back to our canvas. Hold our Apple pencil
at some blank space, and we'll be looking for
these two orange lines, one vertical, one horizontal. When you found them,
let's tap on our yoke, and this is the
area where we are going to be putting
up our illustration. To continue with it, let's go and create
two more lines. So firstly, we'll
go slightly from the bottom line and we'll create another straight
line right here. So creating our line, holding our Apple pencil and holding one of our fingers on the
screen to make it straight. When we have it, we will go to this corner that
we have right here on our left and we will create a line
that will go in that way. Now when we have the
result like that, let's go to our s
and we will tap onto the icon on
this lay and reduce the opacity by moving
it to the level of something around
45 or 50 partisans. When we have it,
we will tap onto our lay and create one
more layer on top. Onto this layer, let's go and start working onto
our illustration. What we're going to be
doing is going firstly toward the bottom part
and we will do the phone. We will go towards the error right here toward the corner, and we will start to create
a rounded shape like that. So when we have it,
we will go toward the bottom and we will
create a line going down, and on the bottom to we will create a very soft
corner right here. So creating something going in that way doesn't
need to be perfect. When we have it, we will go toward this little
corner on the top, and we will create a line
that will go in that way. Now, when we have it, let's go toward the opposite side
and do the same thing here. So we can do it in that way. We will go to our
list. We will go to this layer that we
have our elements on. We will swipe it
from right to left and use the option duplicate. Now when we have
the second copy, we will go to our okey. We'll use the option
flip horizontal, and we will move it
toward the opposite side. Let's position it nicely so it will match
the opposite side. And when we have it,
we will get back to our layers and we'll merge
these two layers together. Putting one of our fingers on the layer on the top and
another on the bottom, and we are making a pinch
movement like that. Now, when we have
the bottom part, let's go and continue creating these two lines right here
to finish up with our bread. We can hold our line
and the ends to make the line straight
when we have this, we have our breath. Let's go and work on side the shapes that we will
use for our avocado. Firstly, let's go with one line and create a shape
of the ellipse, we'll hold it in the ends and we will go toward the top
option right here, Edit and we will go
and adjust the she. What we need to do
right here is to create a bit of a rounded shape, and we will need to
position it in a way that we have more space over the top, so we have the area right
here all covered with things, and we are not touching
the bottom parts with our bread with this little
thing that we are creating. And also, it will be
very good to go and position this shape strictly
in the middle of this line. So if you need to adjust it, go to the nodes and adjust the
placement of this element. So when we have the
result like that, let's tap onto our screen, and let's go and continue creating a couple
of more details. So first, we'll go over the top and we will create
a shape right here. So firstly, we are
creating some kind of a rounded shape that
will go in that way. And then we will go on the sides from this little thing
that we've created, and we will create the
rounded shapes right here. So going on like
that on one side, go in the same way onto the opposite side and creating something
going in that way. So for now, when we have
the result like that, you might think that maybe the top part is a
little bit too big. Doesn't matter
right now. We will fix everything later
on if we need to. We will go inside the shape
that we have the big one, and we will go toward it and we will create a similar
shape right here. So again, creating our ellips,
creating it in that way, trying to make the distance from the sides even everywhere. So if we need to
go and adjust it, we will go to our
18 tool on the top, and we will adjust the placement and the size of this alto, we need to have some
flash right here, and we will need to create
something going in that way. Now when we have it, we
will go one more time inside the ship and this time we will create around the ship. Again, with the same
thing as before, we are creating our ship with one line if we need to adjust
the placement or anything, we are going to our eating mode and adjusting it from here. For example, let's go
with a shape like that. Let's tap on the screen, and let's continue by going and adding some thickness
to this element. Firstly, we will go
toward the bottom, and we will start with a
bit of a flatter shape right here to create
some kind of the curve, not touching the
bread right here, but creating something
going in that way. And when we have it, we will go towards the left side firstly. We will go and start to
create some thickness with the curve right here with
the same curvature to what we have here as a
Minchi and we are trying to connect everything nicely with the shape that we've
created on the bottom. If you need to grab your eraser and maybe erase some lines
that you don't need, you are welcome to
go and do that to see more clearly what you
are doing right here. And when you have the
result like that, let's go towards
the opposite side and let's start to create
some curvature here too. We will first go over the top. We will create a little
curve going like that. Then we'll need to have a bit of the deep right here so you
can go and exaggerate it a little bit like that and then continue creating the
shape and connecting it with the bottom part of our overall element that we
are working on right now. Now, let's go toward this
part and make it a little bit more smooth to go in that way and starting to
add the details like that. Let's go along
every line that we have right here that we
worked on right now, and let's make it a little
bit cuter right here. For example, we can
maybe go right here onto the top and adjust
this part slightly. We will go and create
it right here. We also can go to this
part and maybe make it a little bit less
rounded right here. You can go and maybe create a line that
will go in that way. Take a look at everything
from the distance to decide whether you like
the result or not. For now, let's keep
it in that way. And when we have the
results like that, let's go inside the
shade that we have a yolk right here and we will
create the facial features. Let's go to where in
the middle and we will create the shape like that, half of the circle like that. We will soften up the top
a little bit and then we'll go underneath the slin that we've created on the top. So we'll create some kind
of the teeth right here. When we have it, we'll go to the bottom and create
a little tongue. And then when we have
the mouth like that, you again, can go and maybe
adjust the sheep slightly. Let's go to where the sides and let's create
the ice right here. Let's create very happy eyes and create something
going in that way. You can adjust the placement and the curature and the
size of the element. Again, it's not
permanent right now. Maybe later on, we want to
go and adjust something. So for now, for this sketch, just map out what you want to achieve right here to create. And when we have the
result like that, let's go and add a couple of more details to finish
up with our sketch. So first let's go
and add some leaves. So for example, let's
start by going to the corners right here and let's go and create
some guiding lights. So go like that, creating
these straight lines, going in that way, maybe a
little langon like that. First let's go toward
these big ones and we will create the list of some kind of basil or
something like that. Create a she another
little shape right here, can go with some pattern or you can go randomly
with the shapes. For example, on the top, we can create something different, for example, something good. In that way, when we have it, let's go to the opposite side and create something
similar here too. Firstly, let's go toward this corner that
we have the lack of elements at and we will
add a couple of details. First, let's go and create
some cherry tomatoes. We will go toward this part. We will start by creating
a shape like that, ps, but not a little bit
like two rounded abs. We will go toward
the top and we will create some kind of
the tips right here. And when we have it, we
will go toward the bottom, and we will create a
rounded shape like that. Now, when we have it, we will
go toward the right right, and we will start
again by creating a very interesting shape
of the lops right here. We will try to make it a
little bit tippy on the top. And then we'll go
toward the side right here or toward the
bottom part of this element, and we will add a bit of
thickness to this element. Try to add a bit
more thickness over the bottom part so it will
look a little bit more stable. If you want, you can grab your eraser and erase the
parts that you don't need, some overlapping elements to see clearly what you are doing. Adjust the parts by again taking a look at
it from the distance, whether you like the
position or not. Let's continue by going
to this side and let's again create a couple
of guiding lines that will turn into the leaves. For example, let's go
with something like that. Straightaway we can go
and add some lines to turn these little guiding
lines into the leaves. Let's go like that, create
something in that way. We can go and overlap the sheep over the toast
bit if we want to. Let's continue by going
right here underneath the little tomatoes that we've created and creating a couple
of leaves right here too. For example, one
here and maybe a little bit smaller right
here between these elements. Again, if we want to go and
maybe adjust some parts, erase the parts that we don't need, we will go and do that. So for the leaves,
let's continue by creating some guiding
lines right here. Let's take a look
at everything from the distance and maybe
let's add a bit of the grass or some kind of
the similar element to what we have onto the opposite
side onto this side too. For example, let's go with
something going in that way. Now when we have the
results like that, we also can go towards the overall sheape that
we have right here, and we can add some
extra elements in the shape of some leaves, maybe some seeds to go on like that and
add in a couple of details going along the whole shep that
we have right here. So go with the rounded sheps or the leafy shapes and add
some seasoning towards this little element
that we have as our avocator and some
little yolk right here. To finish up with everything, let's go and add a
couple of sparkles outside the shape
that later on we will add the different color too and we will finish up with
our illustration in that way. For example, let's go with
something in that way, maybe some dots and something. Let's take a look
at everything from the distance and also let's go toward our layers and hide
our layer with our scheme. We are tapping onto
this checkmark. Now, again, one more time, let's take a look at everything, and if we want to
adjust something, and we don't want
to do it manually, let's go toward our magic
quant tool over the top plat, we'll go under liquefy, and we'll use the option push. So we can go to the size slider
right here and we can go to some of the areas and we
can adjust them very easily. So, for example,
you want to go and maybe adjust the
curvature of some lines, you are welcome to go and
do that with this too. So let's spend some time
here and adjust some of the lines to achieve a
nicer look for our sketch. So I ended up with adjusting the middle part a little bit and making it
slightly bigger. And when you are too satisfied with everything that
you have right here, let's tap onto our
magic que tool twice, and let's move on
to our next part where we're going to be
aiding the clean lights.
3. Clean Lines: Start with our clean lines. Firstly, let's go to our layers. We will tap onto the icon
right here and we will adjust the opacity of this
layer with our sketch. Find the level that works
for you when you are done, tap on the layer and create
one more layer on top. Now, let's get back to our brush library
and we will switch the brush to technical pen
from the inking folder. And to make the line very, very smooth, we can
tap onto this brush, and we can go inside
the brush studio on the left you
under stabilization, and we will play with amount of streamline and amount
of stabilization. So you can tweak these
options the same way as you see them right
now onto your screen, or you can adjust
them to your liking, try out onto the drawn pads, decide whether you like
how it feels or not, find what feels good,
and when it is done, let's hit down or our top right. We'll use the same color that we were using for our sketch, and let's go over
the bottom part and start recreating
our breadth. So first let's set the size of the brush stamping around 7%. And then, again,
starting by creating these straight lines
that we have on the top and on the
bottom of the bread. We'll use the same options
that we used before. We can hold our Apple pencil
at the end of the line, and we'll go toward
the top the same way, holding our Apple pencil to create the straight
line right here, too. Now going toward these
little parts that we have onto our sketch and
starting to match everything with what we have
on the sketch and trying to create nice connections between the parts that we are
creating right now. We will need to remain
the same line weight to all the elements
that we are creating. If you see that some lines
are looking a bit jagged, you are welcome to use
your brush and use your erasa to achieve a
nice result right here. Let's continue and go over all of the lines that
we have right here. You don't need to
recreate everything with the same similarity to what
you have onto your sketch. If you want to
adjust some parts, you are welcome to
go and do that. Just create the closed lines. Again, you can use all the
options that we used before. If you are creating
straight lines, hold your Apple pencil, hold one of your
fingers on the screen, and create the lines in a
way that will look nice. Now, let's go toward
the corner right here. Let's create the connection. You can hold your
line at the end, you can go to the
Editing tool or the top to adjust the curvature and maybe the overall connection with the previous sheeps. So find what looks good. You can adjust the
curvature by moving towards this little notes
that you have right here. Adjust the extra
lines that you don't need with your eraser to
achieve a nice result. When we have the
first side done, let's spend some time here
and make it pretty perfect. When we have it done, let's go toward the opposite side
and recreate it here too. We can do it manually or we
can try one quick thing. We can go toward our lay, swipe the lay with
our lines from right to left and choos
the option duplicate. Let's go to our okey. Let's use the option
flip horizontal and move this thing
toward the opposite side. Let's match it with our sides that we have right
here on our sketch. If you are not satisfied
with it, try to match it, and then let's tap
onto our Er key, let's grab our eraser and let's erase the extra
lines that we don't need. Firstly, go onto
the side that we have onto our led to make sure that we get rid of all the lines that we are
not needing right here, and then we will go to
the previous layer and we will get rid of the lines that we have right here
on the bottom too. Trying to make nice connections and remain the same line with. And when we have the
results like that, let's go to our list, and let's match these
two layers together. So go into the layer on
the lay on the bottom, making a pinch movement, and continuing to add the details. Firstly, let's go again to our list and create
one more layer on top and switch the
color to dark blue lines. And let's go and recreate
the lines that we have outside for the
shape of our Avakia. Going like that partially, you don't need to create a line going along the
whole thing right here. You don't need to recreate
everything with one line. Go like that and start
to create the details partially and try to make nice connections
between the parts. Again, use all the options
that we used before to create the lines that you
would like to see right here. Work with your brush,
work with your eraser, adjust the connections so
everything looks perfect. Go toward the top and start
to add the details here too. Starting to create the lines. Again, hold your line at
the end if you want to, go along the whole shape
that you have right here. You can start to take a
look at your illustration from the distance to
adjust it if you need to, to see clearly what you are
doing and then continue ending the lines going along the whole thing that
you have right here. Let's go along the whole agator and let's recreate the lines
that we have right here. You can go to these
areas that you have right here and if you want, you can go and end
the lines here where you can go slightly
toward these shapes and toward the
inside part of them and not create the line
in the inside part. Let's continue by going and recreating the line that
we have on the bottom. When we have the
result like that, let's take a look at
everything from the distance. Now when we have
it, let's go and recreate the line that we have right here for our thickness. Go and repeat what we have
right here onto our skege. Again, if you need a
couple of attempts, go and do what you need to do to achieve the lines that
you like to see right here. If you already created
the lines and if you see that maybe you can
go and smooth them, you can go and go over
these lines and work with your brush and work
with your eraser to achieve a nicer result. Now, let's continue by
going and recreating these parts that we have
inside, the thickness part. Again, if you need to
create a couple of lines to create a
nice line right here, you are welcome to do this. Let's finish up by
going over the top, starting to create
our little lines right here, going
along the whole thing, and trying to make a
very nice connection between the parts
that we already have. For example, let's create
something going in that way. Probably this line could be
a little bit more rounded, let's try to create it a
little bit lower right here and then we will erase the parts that we don't
need with our eraser. One more time taking
a look at everything. This looks pretty good. Let's get back to our brush and let's continue
adding more details. Firstly, let's again go to
our color palettes and let's change the color to
the crust shallow, for example, and let's go and recreate this little part
that we have inside. Again, you don't need to go and create it in a
very circular way. This is our egg white, so you can go and maybe create
some more peculiar shape. You don't need to go with
the super rounded ship. You can go and create
something goon in that way. So it's a bit of a wobbly shape. But make sure that every line
that you are creating is connected so we don't have any gaps into our lines
because if we have, it will be a little bit hard for us later on when we are going
to be adding the colors. Now when we have the
thing like that, let's go back to our
color palette and let's select the
red lines color. With this color, we'll go and recreate this thing that
we have in the middle. Again, with one line,
creating the shape, if we need to adjust it, go into our editing mode, and adjust it from here. Now when we have the
results like that, let's go with the same color and recreate the thing that
we have for the mouth. For example, we can go and maybe adjust the shape slightly. Let's go with something
going in that way. Let's connect it nicely. Let's try to avoid creating
the very strong corners. If we need to go and
soften something up, we will go and do it with our
brush and with our eraser. Try to remain the same
line weight to be consistent with your lines
and do it on both sides. Now when we have the mouth, let's go towards the teeth right here and let's
create them in that way. You can again experiment with
the size of the elements. You can go bigger,
you can go smaller. When you have the
teeth, let's go toward the bottom and let's
create a tank like that. Can create it in a bit of a crooked way or
in a straight way. When you have the
results like that, let's go and get back to our dark red lines
color for the eyes, let's go slightly
bigger with the size. Firstly, remember that
we are using 7% of the size of the brush for all the lines that
we have right here. Then let's go, for example, to 12% and with this 12%, we will go and create
our eyes right here. For example, let's go a little
bit bigger with the shape. We can adjust the curature. When we have the first eye, let's go toward the
opposite side and try to create something similar to
what we have a the right. If you need to
adjust it, go to the 182 and adjust everything
that you have right here. When we hand the
result like that, let's tap on the screen, and let's get back to our
7% of size of the brush, and let's continue
recreating other elements. Firstly, let's go to our color palette to
select our red lines. And with this red lines, let's go and recreate our
little tomatoes right here. So starting with
these little things and starting to create
these elements like that. So again, trying to create little tips on the
sides right here and then going toward the
bottom and starting to create the continuation
of the shape. Trying to make a nice connection between the parts
and straightaway, we can go to this little
element that we have in different color and erase it
with our eraser seamlessly. Now, when we have
this first meter, let's go towards the second one and let's recreate it too. Let's go again with a little bit of a tip right
here onto the top. You can go halves right here
and create it in that way. For example, let's go with
something going like that, holding line in the end if
the tip is too straight, we can go and soften it
up manually by going like that and creating a line instead of this very
straight corner. Now when we have the
front part of it, let's create the back part or the thickness element and
creating it in that way. Holding our Apple
pencil at the end of the line and if
we need to adjust something going toward
our editing tool and adjusting it from here. If the adjusting process
is not going too good, you are welcome to undo it
and write out one more time. Now, if you see that you can go and manually adjust some parts, connect something nicely,
or do something else, you are welcome to
go and do that. Get rid of the differently
colored elements. And when we have the
results like that, let's go again to our previous
dark blue lines color, and let's finish up with
the leaves right here. Go on the outside firstly and starting to add
the lines right here. So the same as before, starting to add the
colors like that. And let's continue by going to the opposite
side right here to the second leaf that we have and starting to add
the details here too. Don't worry about
these connections. We can fix everything. Just get rid of all the lines
that you don't need. So for now, we cannot
erase these parts. That's because we have the bread on the separate
layer. That's okay. We can go later on and adjust the parts from the
separate layer. Now when we have
it, let's go and recreate this little
leaf right here, so creating something going
in that way and finishing up with another little leaf that will go right here
on this direction. Again, get rid of all the
lines that you don't need. And when we have the
result like that, let's get rid of the lines that we don't need
one more time. Going to our layer where
we have our bread, we are selecting our erasm and erasing the parts that we don't need very easily like that. Now when we don't have any
overlapping lines right here, let's get back to our leaves. We will go again
to this le where we have all the leaves
and everything. We'll go to the opposite
side right here. Let's go again and start
to create our leaves, starting by selecting
our brush firstly and going like that and starting to recreate these elements
on this side too. Trying to match it with
the overall shape that we have as our bread
and everything, creating the lines
going in that way. When we have the
result like that, let's also go towards
the lines that we have right here that
we created inside. Or we can finish up by creating these little additional
elements right here onto the side in
the shape of the leaves. So you can decide whether
you want to go with this firstly or whether you want to go inside and recreate
the elements right here. So let's go like that, and let's create a couple of leaves
right here, for example, turn this into the leaf tea, and let's go toward
the opposite side and do something
similar here too. To create a peculiar shape, make a nice connection with the overall shape that you have. Let's go right here and
create a couple of leaves. Let's go over the
top and maybe finish up with everything by creating another
little leaf like that. If you don't want to
have this little like, sprout right here, you are welcome to go and erase it with your eraser or try to create
a leaf in a more clean way. Now, when we have the
result like that, let's get back to our leaves and create one more leo on top. We can grab a brush and we'll recreate these little
details inside the avocator. Let's go first toward all the leafy elements that
we have right here and let's recreate them with
the same brush and with the same color that
we are using right now. You can add more
details if you want to, for example, like sesame seeds. Let's go over all of these elements and
let's recreate them. Maybe go and add a couple of more details on the bottom
or maybe even on the bread, if you want to some kind of
seeds or something like that. Go over the top two
and add a couple of smaller details here
if you want it to. Now when we have the
result like that, let's get back to our layers, and let's hide our
layer with this sketch. Now, let's take a look at everything that we
have right here and let's see whether we need to go and adjust
some parts or not. So for example, we
need to get rid of all the inside
parts right here, so let's find a layer where
we have these inside parts. We will go to them
with our eraser and we will erase the
lines that we don't need. So let's go through all of these little
elements and we will go and get rid of all the
lines that we don't need. When we have the
result like that, when we don't have any
lines that are overlapping, we will go to our layer
and we will merge every layer where we have
our little lines on. Again, making a pinch movement, making sure that everything
is on one layer by going to this little check mark and hiding and unhiding it. Now let's go to
some of the areas and let's add a bit
of the interest to the lines by going and maybe making thicker
elements here, maybe adding some
additional little parts. For example, we can go and start to create some
lines like that. Go over the lines and
start to add a bit of interest to them by adding
some peculiar little details. Let's go over the avocata
first and let's add a couple of the details
right here onto the line. If you want to go
some other areas, maybe to the bread or
to other elements, you are welcome to
go and do that too. Just pink the color
that you need that you have onside these
elements that you want to add the interest to and go with the same color
and add this interest. You can go to the
bread, for example, you can add some little cracks
or something like that, maybe some bubbles over the overall shape that
you have right here, maybe something going
on the bottom too. Spend some time here and add a bit of texture to your lines. In the same way this little
shape that we have for our E. Now when we have
the results like that, we are done with our line, so let's move on
to our next part. We we'll add the basic colors.
4. Base Colors: Start with our basic colors. Firstly, let's do the follow. We will go to our layers. We will find the layer
where we have our lines. We will tap ont, and we will
use the option reference. Then we will be able to use these lines and add the
colors on separate layers. So let's go to the
layer underneath our lines and create
one more layer here. And when we did it,
let's first go to our background color to add
the color to the background. Now, tapping on it and using the color with the title
background onto this. Getting back to our layers, making sure that we are in this new layer that we've created underneath
our layer with the lines and then going
into our color palette to start adding the
colors to the bread. Let's first go with the crust. We will select this
color and we will drag it right here
on the bottom. We can go to all
these little elements onto this layer or we can
go and edit later on. For example, let's
go manually to some smaller elements and let's add the color inside here. When we have it, we are
done with the crust, so let's go toward our layers. Let's create one more lay here, tapping on the color palettes and changing the color to bread. Let's recolor our
bread elements, so go into all of
the areas where we have our bread and adding
the color to them. When we have it,
go again to list, creating one more lay here, going again to our
color palettes and selecting the color
with the title Akira. Going toward this thickness part and eating the color here, make sure that you
recolored everything. If you've added some details, maybe some little
bubbles or something, go and recolor them too. When you have it,
go again to list, creating one more lay on going again to our color palettes and selecting the color
with the title AvakidaFlsh. Going toward the inside part and recoloring this
area right here. Now when we have it,
going again to our las, creating one more leave here, changing the color to off white, adding it right here
toward the egg. Going again to our layers, creating one more le here, and going with the
color of yolk. With this color going toward
the inside part right here, recoloring everything
that we have, going again to our les, creating one more lea here, going to our color
palette to select the color with the
title Tank firstly. Let's recolor the tank. Let's then go to
our color palette, recolor the mouth, so we
have the color of the mouth, dragging it toward the
inside part and selecting white color to the teeth and dragging it
toward the teeth. Now when we have
it, let's get back to our list, one
more lay on top, selecting the color with the
title Tamia and going toward the bottom parts right here of our tomatoes and
recoloring these parts. Going again to our list, 1 mole on top, changing the color
to Tamia flash and going toward
the inside parts and adding the color here. Now let's go and create
one more layer on top, and onto this layer,
we will recolor all the leaves and all the
seeds that we have right here. So firstly, go into our
color palettes and selecting the color with the leaves and starting to add
the color inside. You can go one by
one, or you can add the color to one of the elements and then go to this option, continue feeling over
the top and go to the elements that you want to
recolor and tap inside up. So let's go through all of the little leaves
and big leaves, and let's recolor everything
with this greenish color. When you are done
with the leaves, let's switch the color
to, for example, bread, and let's go to the seeds
that we have inside right here and start adding the
color to these big ones first. And then if you want to
switch the color right here, not bred one, but maybe
something different, you are welcome to go
and switch it or use the same color that
we have right here and add it to all
of the elements. For the smaller elements, let's first tap onto the
check mark on the tok, and maybe it will
be easier for us to go manually and add
the color in that way. Let's go and check out
whether we need to go to some other elements
to add the color to, and let's go and add
the color manual to all the small elements. When we have the
result like that, we are done with
our basic colors, so let's move on
to our next part where we'll add the shadows, highlights, and some
beautification.
5. Shadows, Highlights & Final Touches: Begin this part firstly
by going to our layers. We'll go to this
layer where we have our reference. We
will tap on it. We will have this
little list and we will turn off reference by
selecting it from the list. Now going from the bottom, we will start to
add our shadows. Go into this layer that we have for our crust,
firstly, selecting it, tapping on the plus icon
to create an Euler, tapping on this new layer and selecting the option
clipping mask. That way we will stay
inside the sheep. Then we also will go to this icon and we will change the blending
mode to multiply. For the opacity for now, let's go with something around 40 or 50% and when
we are done with it, let's go to our
color palette and let's select the color
of purple right here. With this purple color and with the bigger
size of the brush, let's go towards
the bottom part of our little brad and let's create a little
gon in that way. Then we will need to go
around the shape and make the line that
will have no gaps, and then we will dragon drop
the color inside the shep. Now when we have it, we will
go toward our lays one more time and create one more layer on top and do the
same thing here. Tapping on the, clipping mask, tapping on the icon, multiply blending mode, and something similar
for the opacity. And we will go slightly
toward the right and we will add a bit more of
the shadows right here. Again, the same
thing here, going around creating the
seamless line right here, adding the color inside, and to make a nice connection
between these two parts, we will grab our smudge tool, and we will go towards
this little part right here and we will make
the movement like that. So we will have a very smooth connection between the parts. Now when we have the
result like that, decide on the opacity level. So if you want to maybe
go to this layer on the top and make it
a little bit darker, you are welcome to
go and do that. Adjust the smoothness of
transition between the colors, and when you have the
result like that, we can go again to our list and create one
more layer on top. Tap on this layer clipping mask, and I can multiply
blending mode, something around 50% of opacity, and then we will go
to our color palettes and select this
dark magenta color. With this color, let's go and add a couple of
details right here. So we can go with even
bigger size or the brush, and we can go and start adding
some kind of pores right here or some bubbles and adding the interest to
our picture in that way. You can go with bigger
size with smaller size. If you want to overdo it,
you are welcome to do it. If you want to maybe add
a couple of more details, you are welcome to
do it here, too. So create something in that way, and later on when you are done with these
darkish elements, we can select our
erasa and we can go to some of the areas
where we have our shadow, and we can go and cut the parts. And of course, we will
need to get back to our previous layer where
we have our darkish parts, the two little elements
that we have right here, we can merge these
two layers together, so we will have the whole
shadow onset this layer. When we did it, we can go
to these little parts, and we can go and
add some interest to the picture by cutting some
little elements right here. Again, try to go
and add a couple of interest parts right here. And when we have
it, you can go with smaller sits over the
brush with bigger sides, you can create some pattern or randomly go to
some of the areas. When we have it, let's go and continue working on
se other elements. So first, let's
go into our lays. Let's go to the next layer, which is our toes right here, creating one more
layer on top, tapping, clipping mask, and then we will go with the
different colors. So we will use this
cross shadow color. We will select our brush, and we will go over the edge
that we have right here, and we will add the
secondary color right here. So let's go and create
something in that way, just repeating the
shape that we have for our lines on the top
part of the bread. Again, you don't need
to make it perfect. You just need to go along this whole thing and recreate the elements
that you have right here. Let's go with
something like that. Let's continue creating
the anyon in that way. With the same color, we can go toward these little parts
where we have a lot of elements and we
can go underneath them to create some kind
of the shadow right here. So go under the
cherries right here, going towards the bottom part of the avoca and adding a bit
of the shadow here too. We also can go underneath all these little details
that we have our leaves and some little seeds or something and add the
shadow to them tube. Go to one of the sides
from them and add the shadows underneath
this elements tube. Now, of course, if you want
to go to the main shape of the flesh of the
bread right here and add some dots and
some texture parts, you are welcome to
go and do that too. When we're at done
with it, let's continue by going
to our next layer. Go into our layers, go into this layer where we have our little thickness
part of the Avakia, creating one more layer on top, topping, clipping mask, multiply blending mode for
the blending mode, and adjusting the amount of
a acid stamping around 50%. Now let's go again to our color palette
and select firstly, this dark blue color, and we will switch
the brush by going to the airbrushing folder and
selecting soft blind brush. The opacity is around 35%, and we are going
towards this side that we have right here
and starting to add a bit of color right here. Let's go and create some kind of the gradient
right here, very, very soft, very, very nice connection between the
colors transition. And when we have it, let's
go to our eraser and let's go and start to add some texture
parts right here too. Going like that and starting
to erase some elements to create a nicely looking
shape of the vocata. To go on like that along the whole thing that
we have right here and starting to add the dots and maybe some lines or some
other textural elements. When we have decide
on the opacity, if you want to maybe change it, you are welcome to
go to your list and do it from here icon, opacity slider and
adjust it to your km. Now when we have it going
into our next layer, this time we will
create one more layer. We will tap on it. We will use the
auction clipping mask, we will tap on the N icon, and we will adjust the
blending mode to overlay. Now go into our color
palette and we will select the white color with the same brand that we
are using right now, soft blend, we will go from
the top and we will start to add a bit of the color
right here in this way. Starting to add the
color like that, go a little bit whiter right
here, a little bit softer. If you think that you
overdid it a little bit, if it's too bright,
you are welcome to adjust the opacity
of this layer. When we have the
results like that, we will get back to
the brush library and select our previous
technical pen brush. And let's go to
our color palette to select the dark
red lines color. With this color, we will go underneath this thing
that we have for our egg, and we will go and repeat it by adding some kind of
the shadow right here. Go on like that, go along the whole bottom part to
add the secondary color, the little shadow right here, and to make it a little
bit more interesting, we can go toward the
very bottom part right here and add some kind
of the shadow here too. So go right here, add a bit of a vob line right here
to add some interest to the picture and
create a bit of the difference between
the colors right here. If it's too much, if you overdid it a little
bit one more time, go to the layer and adjust the blending motrt here,
the opacity of it. When we are done
with the same color, we can go underneath all
these little elements that we have onto this
layer that are touching this layer and we can
go underneath them and add the little shadows
underneath it. Now when we are done with it, let's go to some other elements that we have right here
to some little species, and we can go again and add some texture parts right
here with the same color. So go like that, starting
to add some dot, something text right here, starting to create the
things that will look nice. And when we have the
results like that, let's go again to our layers to the next layer that
we have right here. So go into this whitish layer, creating a new layer right
here, tapping, clipping mask, and let's select our
multiply blending mode, setting the apasie something around 50% and
changing the color to, for example, cross shadow. With this color and with the same brush that we
are using right now, going towards the bottom
part right here and starting to add a bit
of the shadow here too. Again, go along this
bottom part and start to add this nice shadow right
here over the element. When we have it, we also will go underneath the
yoke right here, going along the sheep, starting to create
the similar shape to what we have for our yoke. If we need to go to our
editing tool on the top, we will go and adjust the curvature or the
placement of these elements. If we need to go manually and adjust something, connect
something nicely, go on with our brush, go on with our eraser and d in the
details in that way. Now, again, going underneath
all the elements that we have onto this lid
to add little shadows, going along all of these parts where we have these
little elements, starting to add the
shadows underneath them. And again, with the smaller size of the brush or with the
bigger size of the brush, go in and starting to add some texture elements
onto these little parts. You also can go and change the color to something
greenish, for example, leaves or something and
go again towards some of the blank spaces
right here and add a bit of the texture parts
with this color too. Now when we have the
results like that, let's get back to our layers, and go into the next layer, which is our yolk, creating one more layer here,
tapping, clipping mask, and going to our
color palettes to select the color with
the title yolk shadow. Going toward the bottom part and creating the
shadow right here. So let's go like that, not go too far to
the face right here. So if you need to
adjust something, go toward the editing
mode and adjust it, add the color to the
bottom manually and then let's go and add the highlight onto
the opposite side. For the highlight, let's go
and select the white color, and we will go toward
the opposite side from our shadow and create a
big higlet like that. You can go with simple
shapes, for example, something go in that way,
when we are ready with it, let's go and select
some turkish colors. For example, maybe
the crust color. With this color, we will go and add some details
toward the yolk tub. Again, going with
some little dots and something texture
agent right here. Now when we have the
result like that, let's continue by
going to our list, going to our next layer where
we have the mouth, tapping, clipping mask, tapping,
multiply blending mode, adjusting the opacity, changing the color to
something darkish. For example, mouth
and going toward this little part onto our mouth and adding a bit of
the shadow here. If you want to
adjust the opacity. If you want to go a bit darker, you are welcome to
go and do that. When we have the
results like that, let's continue by going
to our next layer, which is our bottom
part of the cherries. Let's create one more layer,
tap in, clipping mask, multiply blending mode,
something around 50% of opacity. We can use the same
color that we are using right now, the
mouth or if you want, we can go with tama color, going like that and starting to add the color on
the bottom part. Going toward the second
little shape right here and we can put this whole thing in a shadow right here. If the opacity is not enough, we will go and try to adjust it. For example, going a
little bit like that. If this color is too bright and maybe you want something
to bit darker right here, we can go to our color
palettes and try out different colors,
for example, red lines, and we can very easily go
toward these arrow elements and we can end the color in that way and of course,
adjust the opacity. Now when we have the
result like that, let's go to our next lay, which is the middle
part of the Tamas. Let's create one more lay
here and let's clip it. And then we'll go to
the color palette and select the color with
the title tame inside. So going first, let's toward
the edges right here and aging the similar elements to what we have as
our lines right here, got to both of them, starting to create the details
going in that way. Then going inside and
starting to create some shep that will look some kind of a flame
or something like that. So when we have it, going toward the opposite one and starting to create something
similar here too. You can switch the
size of the brush if you want to with
the same color, we can go to the sides and we can add some seeds like that. So go in that way, starting to add the details,
something like that. If you want, you can go
with a darker color. So for example, mouth color
here will work perfectly. We can go and add a couple
of details here too. So again, some little dots, some little lines like that, starting to add a few
details in that way. When we have the
results like that, let's continue by going to our next layer where
we have our leaves. Let's create one more layer
here, taping, clipping mask, multiply blending
mode, and again, setting the aposte
something around 50%. Changing the color to
dark blue and going towards all of the leaves
that we have right here and starting
to add our colors. Let's go along all of the bottom parts of our leaves and start
to add the colors. You can go manually or you can
create the line like that, close it, and then
add the color going toward the inside part with
your little two on the top. We also can go inside
the shapes and we can add a bit of the color toward this little
seasoning element. So go like that, starting
to add our little shadows. Then when we are done with it, let's decide whether we
like the amount of opacity. Let's probably reduce it
slightly to something around 25% or 30%. Take a look at it
from the distance, and let's go and create
one more lay on top again, tapping, selecting
clipping mask. Selecting multiply
blending mode, setting the opacity to
something around 50%, the same color going
toward the inside part of the leaves and starting to add some kind of the
veins right here. So with the smaller
size of the brush, let's go and create the
elements like that. Going alone all of the
shapes that we have for our leaves and adding peculiar
little details right here. Going through all
of the elements of the leaves and
adding the details. When we are done with it, let's go and add a bit of the different colors
toward our lines. So firstly, going
toward our lays, going toward the
layer where we have our lines and cretin
one more lay on top. Let's tap on the lay and use
the option clipping mask, and then we will go
to our brush library again go into the
airbrushing folder, soft blend brush,
and starting to add some difference in
color to our lines. So let's start by going
to our color palettes. Let's select this
green lines color, and we will go to
some of the areas to the leaves and to our vocata and start to add the different color towards some of the elements right here. We can go toward the some parts, make nice transitions
right here, or completely recolor the
elements in that way. So for example, we can go toward these little parts inside at a different color right here, going toward some other lines. So for example, we can
go to our color palettes and select the color
with the title. Well, again, green lines. We can go toward
this little part that we have right here for our bottom part of the avocata right here or to the
top part of our yolk, our little ac right here, and add a bit of the color right here to make some
difference in colors. If you want to recolor
some other elements, you are welcome to go
to your color palettes, browse through the colors
that we have right here and add the
difference right here. For example, we can soften up a little yolk right here by
selecting orange lines color, yo over the top and making a very nice and
smooth transition between the colors that
we have onto our lines. Now when we have the
result like that, let's finish up everything
by going and adding the sparkles that we had on
our layer with this sketch. We will go to our list. We will create one
more layer on top. We'll go to this folder that you download it with
simple stem brushes, and we will use sparkle
thin full brush. Adjust the color to white, and let's go over these
places that we had before. You can go and unhide the layer with your sketch to
see where you've put this little sparkles and let's go all over
the outside parts with different sizes of our sparkles and let's go and add this
additional elements here. If you want to go with your
sparkles inside these shapes, it's probably better to create one more layer and do
it on the separately. So for example, we can
add some sparkles, go inside the shapes, inside these little parts. We can go with this
brush or if you want to go and maybe switch it to the previous brush
that we used before. So the very rounded elements, you are welcome to
go and do that, too. Add a couple of details like that, little sparklesh parts. For example, go in with
our technical pan brush and starting to add a
couple of rounded elements. We also can go and change
the color of the seeds, so we can get back to the layer where we've
recolored our lines. And for example, select
the crust color. Go over these little lines and finish up your
illustration in that way. To very carefully recolor
the lines where you have the continuation of
the different shapes. So for example, right here
where we have the crust, if this color right
here is not matching with what you have
on the actual crust, you are welcome to select
some darkish color. So for example,
first, let's go over the top and recolor
these little parts, so go along everything
that we have. Recoloring this part and going toward these little element and selecting the darker color. So for example, let's go with dark red lines and
recolor this little part. Now, let's take a
look at Arifin from the distance and if
we like the result, we are done with
our illustration. Thank you for
watching this class. Let review if you
liked it and continue subscribing for Markowi
videos in the future. Looking forward to
senior project.
 Uni Corn, ⭐Kawaii Art Enthusiast⭐