Transcripts
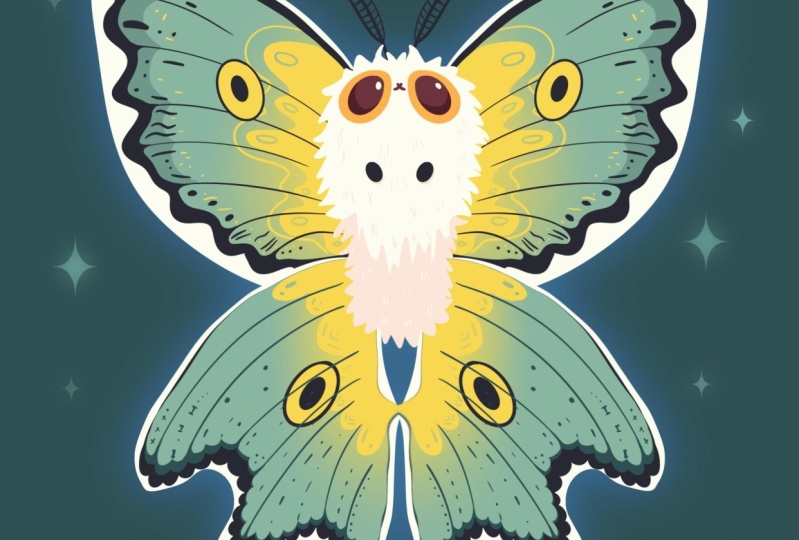
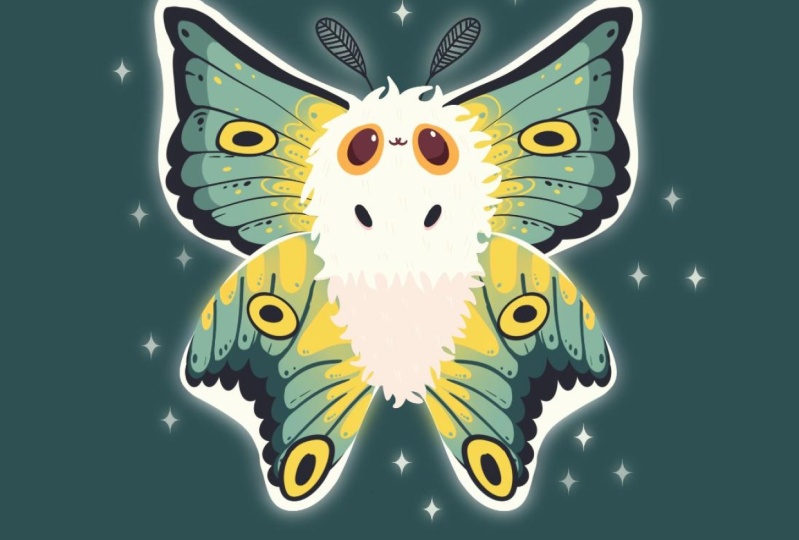
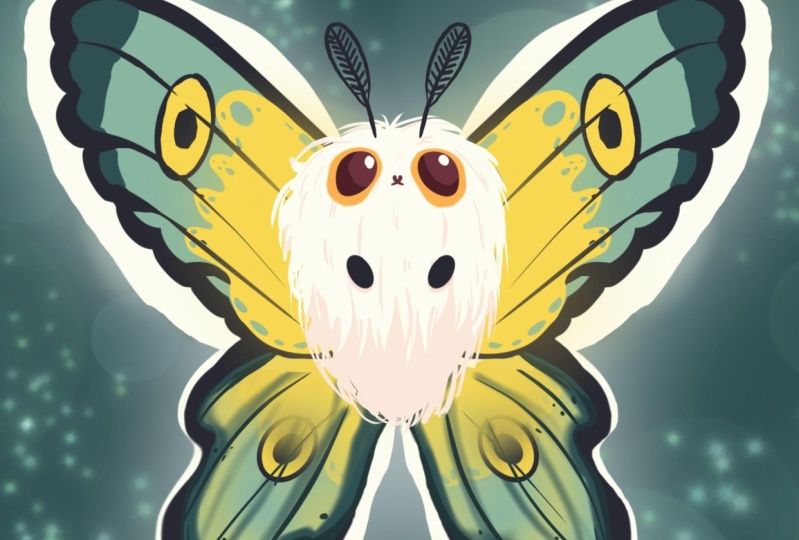
1. Introduction: Hello, everyone. I'm Ginny. And in this class,
we are going to draw this cute Kay illustration of an adorable
moth in procreate. During the class, you'll
get familiar with a lot of useful features
like quick shape tool, liquefied tool, bloom
effect, clipping masks, and blending modes, and learn the basics of drawing
in procreate. By the end, you'll not only draw an adorable illustration
you'll be proud of, but also feel super
confident using procreate. And now let's spend
some time drawing.
2. Basic Shapes: Begin our class firstly by deciding what kind of canvas
we are going to be using. Today we are using a standard square canvas from
Procreate with Pixel weeds and Pixel
heights the 2048 pixels. DPI at 300 and color profile is set as
SRGB with this loan number. When it's all done,
we will hit done. We will get to our Canvas, and we'll continue with our preparation of
parts by going under the project Raso
stop and downloading all the materials
mentioned for this class. You did it, let's first
deal with a background. We are going to the layers. We'll go to the
background color. We are going to the sclor
palette that you downloaded. We are going and the palettes on the bottom and the
cards on the top, and we will pick some color. As we are creating some
nocternal little creature, let's go with the darker color. For example, let's select
this dark CN color. When we're done with it, let's go to our brush library to pick the brush that we are
going to be working with. Go into the brush library, go into the inking folder and we will select
technical pen brush. We want all of our lines to be very smooth and
easy to work with. Let's tap onto this brush. Go inside the brush to go under stabilization on the left, and we'll be playing
with amount of streamline and amount
of stabilization. You can go to the drawing pad
and test it out right here. If you don't like how it feels, you are welcome to go and tweak these options
or if you want, you can set them the same way as you see them right
now onto your screen. When you are done
adjusting these things, let's hit down over
our top pract. Now when we are almost done
with our preparations, we will go to our
color palettes and we will select this light
grayish, yellow, green color. When it's all done,
let's set the size all the brush to something not
too big, not too small, something around
12%, and finally, we are ready to start
working on our illustration. Let's go toward the
middle and with one line, we'll create a shape
of the circle. We'll hold our Apple pencil and we will hold one
of our fingers on the screen to make sure that it is a perfectly
rounded circle. You can adjust the
size by moving your Apple pencil
from side to side. For example, again,
let's go with not something too big
or not too small. Let's go with
something like that. And we will need to position the sap straightly
at the center. So we are going to our
Ake on the top left. We are going under
uniform method, and we are going under snapping to turn on snapping
into the settings. Now holding our Apple pencil
and we are looking for this orange line that is
going from top to the bottom. That way we will position this thing straightly
at a center. If you have the
second orange line that is horizontal
axis, it's okay. You can position it
in that way too. But mostly we'll
need to focus onto this line that we have
on the vertical axis. We have the result like that, let's go to our key
on the top plat. We'll tap on it, and we
will go back to our canvas. So now we have the
shape for the body. Let's go toward our layers. We will create one
more layer on top, and let's work onto our wings. So firstly, we want to work on both sides
at the same time, so we need to do one more thing. When this new layer is selected, we will go to our ring
icon over the top plat. We'll go under canvas, and we will toggle
drawing guide. Now we will need to go
under eight drone guides, and on the bottom, we will
use the option symmetry. We have this line. It's
a little bit too dark, so we can go toward
the slider on the top and set it to something
a little bit lighter. We are not touching
anything here. We are hitting done, and if you now will go
toward the least, you will see that
your lay is assisted. That's exactly what
we need. So we can go very easily and start to
create our wings right here. So let's go with a
simple shape of the ps. We will create it with
one line and we will hold it in the
end. So create it. When you have it, you
can adjust the size and the rotation of it while holding it and moving
your Apple pencil. And then let's lift up our Apple pencil and let's go to this option, died on the top. Now when we in this option, we can go to the nodes
and we can adjust the size and the rotation
and everything right here. So you can spend some time and adjust the overall
look of the wings. For example, let's go with something very simple like that, and when we have the
results like that, let's tap on the screen, and let's create the
bottom wings too. Firstly, going
again to our list, creating one more lay by
tapping on the plus icon. We will again need to tap onto this lay and use
the option drawing assist to create the
symmetrical thing. When we have it,
we will go toward the bottom and the same
way we will create the elliptical shape like so hold your Apple pencil
at the end of the line, adjust the rotation
if you need to go toward the editing tool if you need to adjust it even more. So for example, let's
go maybe a little bit more inside and make the shape a little bit
more open like that. Spend some time here adjusting the overall shape when you're satisfied tab onside the screen, and we have the
base for our mouth. So let's go and start
working on the overall saps. Firstly, we'll go to our layers, and we will need to rearrange
our layers a little bit. We will go to the slay
that we have for the body. So the circular one, holding it and dragging it above everything
that we have right here. Now let's start from the top, go into the late that we
have for our top wings, selecting it and we will go and make the shapes a
little bit different. We will use the option
that Procrit has, we will sculpt it a little bit, going toward our magic tool over the top left and
selecting liquefied tool. When we are in the
liquefied tool, we will go under push option and we will be playing
with the side slater. Let's go with a bigger
size of the brush, and we will go towards the sides first and we will adjust
the shape a little bit. We will have a flatter shape
right here onto the side, and when we have it, we can go with a smaller
size of our brush, and we will go toward
this part that we have for our wings
right here on the top, and we'll make everything
a little bit more rounded. Spend a bit of time right here if you want to go with a bit of a different shape maybe with some crazy chap
if you want to. You're welcome to go and do
that. It's your illustration. Create something that will
look nice right here. As we are creating
acute illustration, pay attention to
the lines and pay attention to the roundness of them and smoothness of them. When you are satisfied
with everything here, let's go straightly to our layers and we will select the bottom layer right here. When it is selected, we
are doing the same thing. We are going to our Magic Q two, going under liquefy push option, and let's go and play around
with these wings here too. You can go with any
shape that you prefer. So for example, let's go maybe
with something like that. You can go with a bigger size of your brush or with a
smaller size of the brush, adjust it slightly, go
again back to your brush, adjust the overall size of it. Play runs with the wings, create something peculiar here. For example, you like that, try to make it nice and
rounded and pretty peculiar. So for example, let's go
with something like that, maybe a little bit more of
the element right here, the rounded element
between these parts. When you are quite satisfied
with everything here, let's go and work
on the middle part. We are again going straight
away towards our lays. We are going to our
circle that we have, and we again will need to
have the assisted drone. So let's tap on the lay and
use the option drone assist. Now, going back to our
liquefied tool, again, our push option, and let's go and elongate this
thing slightly. So we will create some
kind of the egg shape. You can play around
with the overlook. You can make it look a bit
thinner if you prefer. And when you have the
result that you like, the overlook is looking good. We will go and tap on
our magic one, two. So when we have the
result like that, let's prepare everything
for our next part by going to all the elements that we have right here and
adding the color to them. We'll go with the same color
that we have right now. Firstly, we are at this layer
with our central elements. Let's go and drag and drop
the color inside this thing. Now going back to our list, go to the next layer, adding the color inside. So let me try one more time. When we have it, we will
go again to our layers, going to our last layer and adding the color
to this part too. Now we can go and zoom
in our canvas and maybe if we see that we have some elements
that we don't like, maybe some of the lines
are not looking great. You can go over them and adjust the parts that
we need to adjust. Make sure that you are
at the right layer, and when you are done with
adjusting everything, we will go to our next part where we'll start to
add the color inside.
3. Bottom Wings: Begin this part firstly
by going to our layers, and we will go and select every lead that
we have right here. So when the first
one is selected, we are going to the
next one, swiping it from left to right, and
doing it one more time. So when all of
them are selected, we are going to our Aoki
uniform method and we will position the whole butterfly or mouth right here.
In the center. So we'll be looking
for two orange lines, one vertical, one horizontal. When we did it, we are
going again to our layers, and let's start from this layer that we
have for the middle. For now, let's go to
these check marks right here onto our wing layers, and we will hide them. Now, when we have the
results like that, let's create one
more layer on top and onto this layer,
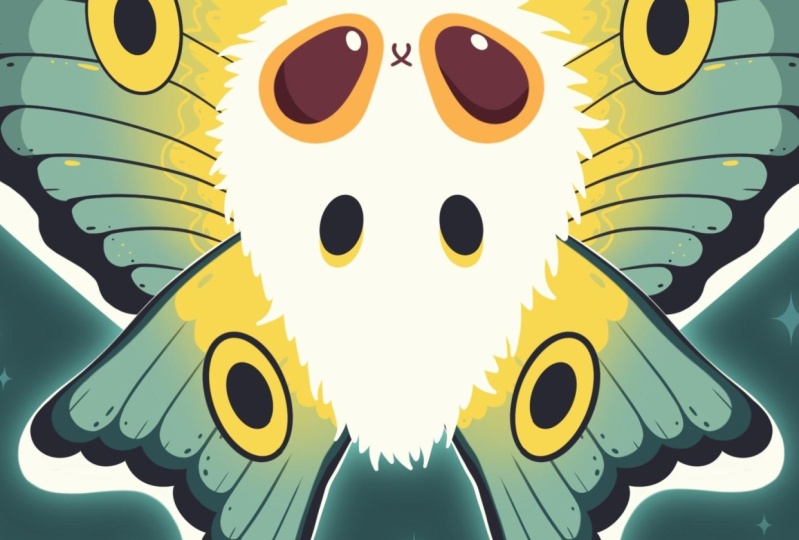
we'll create the eyes. Again, let's tap
onto this new layer, and let's select the
option drone as to be able to work on both
sides at the same time. Now with the same brush, we will go to our color palettes and we will select
the orange color, and we will go toward
the top part right here and create the
ellip shape like that. You can go with a different size if you want to
different rotation, adjust it if you need to. So firstly, hold your apple pentil at the end of the line, go to the editing tool if
you need to adjust it. Let's make it a
little bit more open. Maybe position it
slightly differently. When we are done with it,
let's tap on the screen. And let's go again
to our magic one to liquefy and we will
adjust the sheep slightly. So for example, let's make the bottom part a
little bit more open and the top part a little bit more like an
egg shape right here. So spend some time here, create the shape that you like, maybe go from the bottom like that and
adjust it slightly. When we have it, we will drag
and drop the color inside, and then we will go again to our lays and create
one more lay on top. Again, tapping on the lay and using the
option draw assist, switching the color to
dark pink create and again going toward
the middle part and creating the
iris right here. So again, the same way as before creating the first
shape firstly, holding it at the
end, going toward our editing tool and
adjusting the placement, the rotation, the
size, the everything. When we are satisfied with
the placement and everything, let's tap on the screen and let's add the color
inside straightaway. If you see that you have some
gaps or some miscdd places, go and adjust them manually. Also let's get back
to our liquefied to adjust these Irises
part a little bit. Again, we can go and
do the same thing as we did with the bottom elements, so you can go and adjust
it in the same way. When we have the
result like that, let's again go to our lays. Let's create one
more layer on top. And onto this layer,
we will go and create the middle part right here of our mouth and a little
nose right here. We will again tap on
the layer and use the option drawing assist
and then very easily, go into the middle
part right here. We will create a little
element like that. You can hold your
line at the end and adjust it by going
to the Hen tool to. So play a little bit around with this element and adjust
it to your lichen. When you're satisfied with it, tap on the screen, when you're a satisfied
with everything here, we can go back to
our list and we can merge these two
layers together, the brown one, tapping on the layer on the top and
using the option merge down. And we also can go and tap
on the plus icon to create annul and add a little
highlights onto the ice. Let's go and switch the color to light grayish, yellow, green, and we are going towards
the, for example, top right parts
and we will go and create the rounded
elements right here. So let's create one of them, Let's go to the opposite side and create the similar
thing right here, trying to put it
on the same level, trying to make the size similar. If we need to adjust something going into our editing tool, maybe adjusting the rotation of this element or the
placement of it, you undo what we need
to do right here. If you have some elements inside that you need to
fill in with color, go and do the same thing
care that we need to do. To finish up with our eyes, let's go and add a
bit of the shadows toward these brown
elements and we will do it by going to
our list and finding this layer where we have
these brown elements firstly, creating one more layer on top, tapping on this lay and using
the option clipping mask. Now let's tap on the N icon and change the blending
mode to multiply and set the opacity on the slider with opacity to
something around 50%. We also will go back
to our color palettes and change the color
to dark pink cred, and we will go toward
the bottom part of our elements and we will
add a bit of the shadow. So repeat the overall curve
that you have right here, go over one on the sides and add the color
to the bottom part. Do the same onto the
opposite side too, the same way as we did
with our highlight, so going to the same side, going with the same or the similar size of this element and adding
the color in that way. Now when we have the
result like that, let's get back to our lays, and let's select every layer
that belongs to our eyes. So when the first one is selected, we will
go to the next one, swiping from left to right, doing it three more times. When everything is selected, we will hit the option group. So that way, we
will know that we have everything
inside the group, and if we need to adjust sing, we will just go to this group. Now when we have it, let's go and start working on our wings. For example, let's go
to the bottom ones. We will unhide them firstly. We will select it, and when we have it, we will go and make a copy
all these layers. Swapping the layer
from right to left and choosing the
option duplicate. Now when we have two layers, let's select them both and let's again put
them in the group. Now, working with the layer
that we have on the top, let's go to our color palette and let's change the
color to dark blue. Let's dragon drop the
color toward this part, and let's go and
adjust it slightly. So as we have our a assisted, we can go, again, liquefied tool under
the adjustments using the option push with a
bigger size of the brush, and we are starting to sculpt
this thing right here. We are going a little
bit from the side. We will need to have a bit
of the space on the side. So we will go and
make the overall shep slightly smaller
and you can go and maybe play with the overall size and the overall look
of it if you want to. But generally, what we need
to do is to make it nice and make it small and make it similar to what
we have outside. When you have the
results like that, let's get back to our brush
and we will go and add a bit of the interest toward the bottom by creating some
of the segments right here. So very easily, we
are going along the bottom part and we are starting to add the
details like that. You can go and hold
your line and the ends, you can go to the editing
tool if you want to. You can go and create some
pattern right here or randomly go toward the bottom
and create the segments. So going like that
and starting to add the interest towards
our bottom part. Now when we have
it, we will go and start to add the color
toward the bottom part. You can go one by one or use the option continue
filling on the top and go toward these places and tap on them to add
the color inside. Have some smaller elements, go manually and end
the color in that way. Take a look at everything
from the distance to decide whether you like how
everything looks or not. If you want to go
with your eraser and adjust some parts with it, you are welcome to do it. So for example, let's cut
this little part right here, and I have the eraser set to the same brush that we are using for our main brush. And to do that, we can first select the brush right here and then go to our icon with the eraser and
hold it right here. And you can tap on
it, and you will see that your brush is now the similar technical pen to what you have as
your main brush. So continue erasing these parts. Go and work on them
if you want to go on the opposite side if you
see it more clearly there, go and start to create a nice element right
here on the bottom. Now when we have the result like that when we quite like it, let's go again to our as and make the copy of this dark leon. So again, swiping it
from right to left, using the option duplicate, go into our color palettes and changing the
color to dark can. Dragon drop it to the wings. And when we have it like that, let's again do the same thing. We are going to our
adjustments liquefied tool, and again, we are making these
things slightly smaller. So we are dragging it a little
bit more toward the top. If you want, you can
go and move it from the side to to have
a bit of the color, the darker color on the side. If you don't want to do
that, you are welcome to keep only the
bottom part like that, spend some time and adjust
this thing to your liking. When you have it, let's
again go to our list, again, making a
copy of this layer, selecting duplicates, changing
the color to blue green, adding the color right here. And again, going toward our liquefied tool to adjust
the placement of this. So for this task, let's go a little bit from the inside part and we will have some kind of the
shadow right here. So we are mostly going
toward the inside and we are starting to leave
this thing up in that way. So the opposite side will have a very little of these elements. So we are mostly working
with the inside part. If you need to go from the
side right here to adjust it, go and do what you need to do. So for example, we
can go right here and maybe move it slightly
toward the inside. We have this darker
line on this side. And when we have the
results like that, let's get back to our reism just selecting it from
where we were before. And when we have it,
we will go toward these parts that we've created
these segments and we will start to go inside
and we will start to erase the parts right here and create the actual
segments right here. You can go with some peculiar
parts or you can go with a nice looking elements,
very random elements, going like that and
starting not to go too randomly going alone
the overall shape, so we are repeating the shape and starting to add
the details like that. When we have the separations, we will go toward
the bottom parts right here and we will start to work from the middle to create a very rounded
elements right here. We are cutting the parts
and working mostly on the roundness of everything
that we have right here. Let's go to all these parts and let's start to cut
these middle elements. If you want to work
more on some of the parts maybe cut something
more than it's needed, you're welcome to
go and do that too. Basically what we need to
achieve right here is to create a very nice
pattern for our wings, and it should be pretty rounded. Let's go through all
of these elements and create the nice
effect on our wings. Now let's take a look at
everything from the distance, and with the same eraser and
with the same technique, we can go to some
of the elements and make some kind of
a pattern right here. So we can go and maybe create
some little cuts like that, some little lines,
some little dots. So spend some time here and
try to add some interest to these elements that we
are working right now by creating some little
details like that. Try not to overdo it, but try to add enough of these things to create some
kind of a pattern with them. So for example, let's go
with something like that, and when we have the
results like that, let's continue by finishing up working on our bottom wings. So firstly, we will
go towards our leas. We will create one
more lay on top. We'll tap on this lay and use
the option clipping mask. When we have it,
we will go toward our color palette and use the color with the title yellow, and then we'll switch
the brush by going to the airbrushing folder and
selecting soft blend brush. We will set the opacity of this brush
something around 35%. We will go with a big
size of the brush, and we will go from
the middle part and we will start to add
the additional color here. To make it on both sides, we will get back to our list, tap on this layer, and use
the option drawing assist. Now, let's go and start to
add this additional color. We are trying to create a very nice transition
between the colors, so we are trying to create a very blended
effect right here. When we have the
result that we like, let's get back to our layer and create one more layer on top. Again, tapping on this layer, using the option clipping mask, tapping on the layer, using
the option drawing assist. Going back to the previous
brush that we used, it was our inking folder and it was our technical pan brush. With the same color
that we have right now, let's go toward the two
parts that we have right here and we will add
another layer of color. Let's go and start to create
something in that way. So again, we can go
and make everything nice by following the direction that we have for our segments. So you can go and create
something like that, loop it around and
add the color inside. And then you can
go with your brush and with your erasa and start to add some details and
maybe adjust in some parts. So for example, we can
go and cut something, make it a little bit nicer right here with our brush
and with our erasa. So let's spend some
time right here and work on these elements. If you want to adjust something, you are welcome to get back to the liquefied tool
push option and maybe move these things slightly
toward the inside part. Now when we have the
results like that, we can get back to our eraser. We can go and create some cuts inside these things
to create some pattern. For example, let's go
with some dots with some smaller dots going toward these parts and starting to add some pattern with the cut. Try not to overdo it when
you are done with this task. Let's go and do one more thing. We will go to our list. We will create one
more on the top. We'll tap on it, clip
in mask, tap on it, use the option drone assist, and then we will change the
color to this dark blue. With this color and with
our technical pan brush, we will go towards
the middle part right here and we will create
another irrot here. You can go with a
different shape, you can go with a
different pattern. You are welcome to create the different element if you don't want to create
an irred here. For example, let's create
the detail like that. When we have it
tap on the screen, let's go inside this shape right here and let's
create an yurt here. When we have it, drag and drop
the color inside and then let's also change the color to yellow and add the
color inside here too. Now, you can decide
whether you want your little cut to
affect this thing. So if you want, you can
keep it as it is right now. If you don't want, you can go to the le and you can unclip it by tapping on it and using the ocean clipping
mask from the list. Decide whether you
like the result like that or as it was before. And when we have the
result like that, we are done with
our bottom wings, and we are ready to
work onto the top one.
4. Top Wings: Let's go and find our layer with the top wings and we
will go and unhide it. Now, when we have it, let's
create one more layer on top. When we have two layers, we again can select them both
and use the option group, go into this top
layer, taping on it, and using the option
drawing assist. We have it, we will go to our color palettes and let's
select this dark blue color. We will go toward the
top and we will first start to recreate the oral
shape that we have right here. We are going on this
curvature that we have going closer to the end that we
have right here on the side, and then going
down with a bit of the jagged line or wavy line or something like
pattern line like that. Looping this whole thing around so we will be able to
add the color inside. If you see that you can go manually to some
of the places and adjust the curvature or adjust the jagget lines or
the look of the lines, you are welcome to go
and adjust it manually. When we have the results
like that one more time, if you don't like how
it looks or if it's a little bit too big
or something else, we can go again to
our liquefied tool and maybe adjust it slightly. For example, we can push it
a little bit from the top, so we will have an equal or
almost equal size right here, the white element on the edges. And when we have it, let's go to our layers one more time, and we will create one
more layer on top. Now, go into our color palettes and select our blue green color, and we will start again by going toward the top and starting
to add these segments. Let's make sure that we will put them on both sides
at the same time. So we will need to tap
on the lay and use the option drone assist
and then we will go towards the middle
part firstly right here, stepping a bit from the
edge and starting to create the similar curve to
what we have on the top. Let's go and start to
create this segment part, go on like that and go along the whole thing to
create our elements. You don't need to create
them with one line, you are welcome to
create it in segment, going in that way
and starting to create these elements
going down in that way. When we have it, let's go
and loom the shape around so it is closed and then we'll drag and drop
the color inside. Now, one more time, decide whether you want to
adjust it in any way, go to the liquefied tool, maybe move it a little bit
more toward the inside, so we will have this nice dark looking element right here. When we have the
result like that, let's get back to our brush, and let's maybe go and adjust the amount
of these elements, so it won't be very hard for us to create this little
segmented part. For example, we can go and maybe work onto
the bottom parts, make this element
slightly bigger. And when we have the
result like that, when we are satisfied
with amount of segments, let's get back to
our eraser and let's start to do the same thing as we did right here onto the bottom. Again, going from the
sides and starting to add the lines going
more toward the inside. Going along the sheet
that we have right here, so not with straight lines, but more like the curves
and going on the sheet. If it's easier to go from the center and start to create
the details in that way, you can go and start to
create them in that way. When we have the result
like that, again, going towards these
little intersections and starting to cut
the parts right here. So go in and starting to create the rounded elements
between the parts. So again, working
with our eraser and starting to
create these details. Again, remember that
we will need to have a pretty rounded
elements right here. So go and do it with your
brush and with your eraser. If you overdid something, go grab your brush and get the elements that you
need to get back back. When you are done
with this task, take a look at everything
from the distance, decide whether you want to
maybe adjust some parts, or maybe you want to go and add these additional little
details in the shape of some dots and maybe some
lines or something. Go and add some
pattern and create the peculiar little pattern onto your little
wings or something. Go with the lines, go with little dots and create some
interest to the picture. When we have the
result like that, let's go toward our
lays one more time. We will create one
more lay on top of this leave with our wings, the whiter parts,
little lighter parts. Let's tap on it, and let's use the
option clipping mask. Let's tap on it one more time, and let's use the
option drawing assist. Now, going back to
our color palettes and selecting the darker colors. So this dark CNO. We will go towards the edges right here and we will
add a bit of the shadows. So go like that and starting to add the rounded chips
along the edge. We are not going to all of them. We are going only
to the top one. So for example, something
going in that way. Let's go around and
let's loop this thing. So we are going in
that way and we are having no gaps
inside this sheep. We will drag and drop
the color inside this part if we need to go with our brush or with
our erasa and adjust the parts that we don't need.
We will go and do that. And when we have the
result like that, let's get back to our layers, tap onto the adjust the
opacite so it's not the dark. So for example, something
around 30% looks good, and when we have the
result like that, one more time, go
into our layers, creating one more layer on top. We will need to use
our assisted draws. We will tap on the layer. We will use the option
drawing assist and also to stay inside the
shape that we have before, let's again tap on the lay and use the option
clipping mask. Now, changing the color
to this yellow one, go into the airbrush
and folders, selecting soft blend brush and starting from
the inside part to add this blended element
right here onto our wings. When we are satisfied
with the results, let's get back to
our brush library, going again to the
previous brush, our technical pan, going
again to our list, creating one more leaf on top, tapping, clipping mask, tapping, drawing assist, going
with the same color and adding the same pattern that
we have on the bottom wings. So for example, let's go and start to create
something in that way. You can go with maybe some kind of a peculiar little pattern, create something like that, loop the shape around at
the color inside. Maybe if you want,
you can go and create another little line right here or some of the
different pattern. If you prefer, you can go along the whole shape of the wings and add more of these elements. You can go grab your eraser and start to erase some
parts right here, with a bigger size,
or the eraser, with a smaller size, or
the erasers up to you. Create some pattern, create
some interest right here. When you are ready, let's go and add more details to our wings. So for example, for the
pattern right here, let's go with
something like that, and then let's again get back to our brush and let's go outside
the shapes right here. And let's again add a bit of the pattern right here
onto our segments. Go like that with the dots
with maybe some little lines, creating some interest and adding a bit of this
interest toward our wings. And when we have the
result like that, let's get back to our layers. And let's go create one
more layer right here. Again, tapping on it using
the option drone assist. Go into our color palettes to
select the dark blue color, and we will add the
similar pattern right here onto our
little wings on the top. So go on with another
little eyred here. So, holding our Apple pencil
at the end of the line. If we need to go and maybe work on the overall line right here, we will go and do that
with our brush and with our erasa trying to make everything very
smooth, very nice. When we have it going inside
to create the iris part. So go in and creating the
similar sheep right here. If we need to adjust
the placement of it going and doing
it, when we have it, adding the color inside, changing the color to yellow and adding the color toward the
inside part of this eye. Now, when we have the
result like that, we are done with our wings. So let's go and work on the
little body part right here.
5. Body: Start with our body. Let's first go to our
color palette and select the slight grayish,
yellow, green color. We will go and find our
layer with the body. When we have it, we will create
one more layer on top and we will go alone this whole shape and we
will make it fluffy. What we're going to
be doing is going with our brush that we
are using right now and starting to create some peculiar little round triangular details. Go on like that, connecting
them all together, so we will be able to add
the color inside this part. Go on like that and
starting to create the very pecular little
fluffy elements. Go along the whole shape, you can go with different
directions right here, starting to create the
elements like that, you can rotate your
canvas to make it more easy for you to create
these flowy elements. Go along the whole shape, create the peculiar pattern
with these fluffy elements, and let's then add
the color inside. When you have the
whole shape fluffy, let's go and add the
color in that way. Make sure that you have no gaps into your line
to make sure you can go and hide your previous
layer with the overall shape. Go along the lines that
you have right here, zoom in your canvas to check out whether
you have some gaps. If you have them, go and close the overall shape right here and try it
out one more time. Now when we have it,
you can get back your previous shape
if you want to. And then let's go and make these things a little
bit more peculiar. We can go and maybe work
more onto the thickness of these elements or onto the
difference between the parts. You can go maybe create
a more fluffy shapes, connect them nicely to
spend some time here and create a very peculiar
spikes of fur. When you are satisfied with the oral shape that
you have for the fur, let's go to our lays, create one more lay on top, tap on the lay and use
the option clipping mask. Now, we will go and switch
the color to this red one, which is actually the pink one, and we will go toward the bottom to add the shadow right here. So we are going the same way that we've created our
little fluffy part. So going not with
a straight line, you like that and
starting to create some peculiar pattern
peculiar little details, the fur effect right here, go on like that and
starting to add some spikes of the fur. Making sure that everything
that we've created is closed, go on alone this whole
shape like that, and then we will add
the color inside. Make sure that the
ship is closed. If you don't see whether
it's closed or not, you can go back to your list, tap on the lay, release
the clipping mask, go like that, at the line
right here where you need it. Go along all the lines to maybe make them a
little bit thicker, so it will be easier to
add the color inside. And when you are sure that it is closed and it
is not too thin, you can try to add
the color inside. If it's going like that, you can hold your Apple pencil when you are adding the color, and when you are adding it, you can see on the top we
have the option threshold. You can move the Apple
pencil toward the left until you have the color
only where you need it. And when you have it like that, lift up your Apple pencil
and get back to the layers, tap onto this layer
and use the option clipping mask again to clip
it to a previous layer. Now, if you see that you have
some details on the bottom, you can go and hide
this layer that we used for the mint shape, and we will go again
to our last and we will tap onto this
icon on the pin clear. Use the option multiply
and we will adjust the opacity of this layer to
something around 40% or so. And we also can go towards the sheep that we've
created right here and work more on it with
our brush and with our eraser to create a more
believable fur effect. So let's spend some time
here and create a bit more of these spikes that
we have for the fur. And also with the same color, we can go inside the
body right here, and we can go and add some lines to emphasize on the
effect right here. So going like that, starting to create a couple of
details like that, going along the bottom parts, starting to add some
little fur effect. If you want to go on the top, go and add these
details here, too. If you see that some of the elements are
not fully colored, you can get back to the layer where you have the main color, go select this light, grayish, yellow,
green color and add the color toward the places where you need this color to be. Also to add more
of the fur effect, we can get back to
the pinkish leaf. We can grab our eraser and we can go to the
bottom right here and cut some parts to again
emphasize onto this fur. So go and adding the
similar effect to what we have on the top toward
the bottom with our eraser. Now when we have the
result like that, let's finish up with our middle part right here by
adding some cute elements. For example, firstly,
let's get back to our color palte and select
this dark blue color, and we will create one
more layer on top and go toward this middle part and create some kind of
pause right here. I know that the moths and the butterflies
don't have pause, but we are creating
a cute illustration and we can allow it to be. Let's get back to
this new layer. We will tap on it and use the option drawn
at least one more time to add the pause on
both sides and very easily, let's go and create the
details going in that way. So very simple shape
of the ellipse. You can go and adjust it
with the editing tool, maybe make it bigger
or maybe round it it's a little bit when you are satisfied with the shaped
tab on the screen, add the color inside, adjust it if you need to if
you have some gaps or so let's also add the color underneath it to
create some kind of a shadow. We'll go to our last. We will make a
copy of this list, wiping it from right to
left, choosing duplicate. Go onto the bottom layer
and we will add color, the same one, the red
one, the pink one. Going like that,
adding the color. You don't see it right now because we have the
layer on the top, but if you go to the last,
you will see it here. Let's go to our Aoki and we will move this layer toward
the bottom slightly. When we have it, we
also will need to go back to the layer
top on the end, I can adjust the
multiply blending mode and adjust the opacity to to
the level that we prefer. Now, when we have the pause, let's go and create some kind of the antennas right
here onto the top. We will go to our layers, and we will need to put them underneath the layer that
we have for the body. So let's go toward this layer that we have that hidden one, and we will create one
more layer right here. And tapping on the layer using the option drone assays
to work on both sides and getting back to our
dark blue color to create the peculiar
details right here. Let's go firstly towards the middle part and we will start by creating the
langon in that way. You can go with the
size that you prefer. You can go with the
big one, for example. Then let's go and create the
rounded shape right here, to go along the shape, creating some kind of
the shape like that. Let's go and be consistent with the line weight
that we have. If we have some thin in lines, we will go and adjust it. Let's elongate this line right here onto the top and
let's go to the sides and let's start to create the peculiar little lines
go to the middle part. To go like that and
starting to add some pattern towards
these little antennas. Let's go to the opposite side and create the
similar thing here, going along the whole shape and starting to
add these details. If you want to create
some other pattern, you are welcome to
go and do that. And when we have the
result like that, we are done with the main
part of our illustration. But let's make it
a little bit more interesting by adding the glowing effect
to the back part.
6. Final Touches: Do that, what we need to do? We will go to our layers
and we will need to find the layers where we
have the main details. So we will go towards this part that we have right here and we will make a copy of this layer. Let's swipe the
layer from right to left and choose the
option duplicate. Now, we will grab this layer and we will need to drag
it to the bottom, using our hands, moving the
shape toward the bottom. When we have it, we will go and make a copy of this layer. So again, swiping the
layer from right to left, duplicate, moving
it from the group, holding this layer from
the bottom and dragging it underneath the layer that
we've created on the bottom, the copy of the middle part. And we will need to find the bottom wings and do
the same thing here. Swiping the lay,
using duplicate, grabbing one of these lays and dragging it
toward the bottom. When we have all
these three layers, we will merge them together, so we can put one of our
fingers on the layer on the top and another on the layer on the bottom and make a
pinch movement like that, and we have the copy of the main shape that we have for our butterfly
or in the mouth. So what we are going
to be doing next, we will go and
change the color of this element by going
to our color palette, and we will select
this blue green color. Let's drag it toward this part. We can fix it right here,
we can see it right here. When we have it, we will do
the glowing effect right now. When we have this layer, we
will go to our magic one, two, and we will use the
Option Gaussian blue. We will go and move our Apple pencil while holding it a little bit
towards the right. You will see that we have this
glowing effect right now. When you are satisfied
with the amount of blur, let's tap onto our magic one
to go away from this mode, and let's enhance it ls a bit and make it even more glowing. We will go again
to our magic one, two, and we will use
the option bloom. For the bloom, the same way
as with Gaussian bloom will hold our Apple pencil and we will move it
towards the right. You can see we have a bit
more of the effect right now, so it is really glowing. You can play around with
the sliders on the bottom, or you can set them
the same way as you see them right
now onto your screen. I just the amount of
bloom to your liking. And when we have the
results like that, we also can play a little bit with the color
that we have right here. So for example, we can go
again toward our adjustment. We can go to hue
saturation and brightness, and we can go to the slightest that we have on the bottom, and we can play with them. So find the color that
you like right here. You can go to the hue
saturation brightness, adjust it slightly. So you will find what
you are looking for. When you are satisfied
with everything here, tap on your Magic one, two, and let's all and adjust
the blending mode of this. We'll tap onto the icon, and we will find the
vivid light color. Again, go into the
opacity slider and adjusting the opacity
to something around maybe 35% or so or if you want to go a little bit
brighter with the color, you are welcome to set it to
the level that you prefer. When you are satisfied with it, let's also go and
maybe add a couple of sparkles outside the sheep. We will again, create
one more layer. You can go to the
Project and Resource app and download the folder
with the brushes. We will go and start to add
some sparkles right here. So let's go to these
simple stem brushes, and we will use the sparkle
thin full brush and go lone the whole ship and starting to add
some sparkles here. You can vary the
size of the brush. You can go with a lot of
the sparkles with a couple of them and add a nice
effect to your illustration. Let's add a couple of
these details right here. Let's add a couple of sparkles
along the whole shape. And when we have it with them, we will do the same
thing as we did with our background elements, so we will add a bit
of the bloom to them. So let's first go and change the blending
mode on this layer. Tapping on the layer and
using the option Ed, we will go and straightaway
adjust the opacity. And with this layer, we can go straightaway to
our bloom option under the adjustment and add the
bloom to these elements. Again, if you want to play around with the
amount of opacity, go and do what you need to do. If you want to go back to this layer that we
have on the back, you are welcome to go and
maybe play around with the hue of the glowing
effect right here, so it matches the overall color that we have for
our illustration. You can play around, you
can spend some time here, adjust the saturation
brightness, hue, whatever you want
to adjust right here. When you are ready, the very
last thing will be to go and get rid of this line
that we have in the middle. We are going back
to our ranch icon. We are going anti Canvas and we are totaling
drawing guide. And when we did it, we are
done with our illustration. Thank you for
watching this class. Le review if you
liked it and continue subscribing for more KAI
videos in the future. Looking forward to
see your projects.
 Uni Corn, ⭐Kawaii Art Enthusiast⭐