Transcripts
1. Introduction: Hello, everyone. I'm uni,
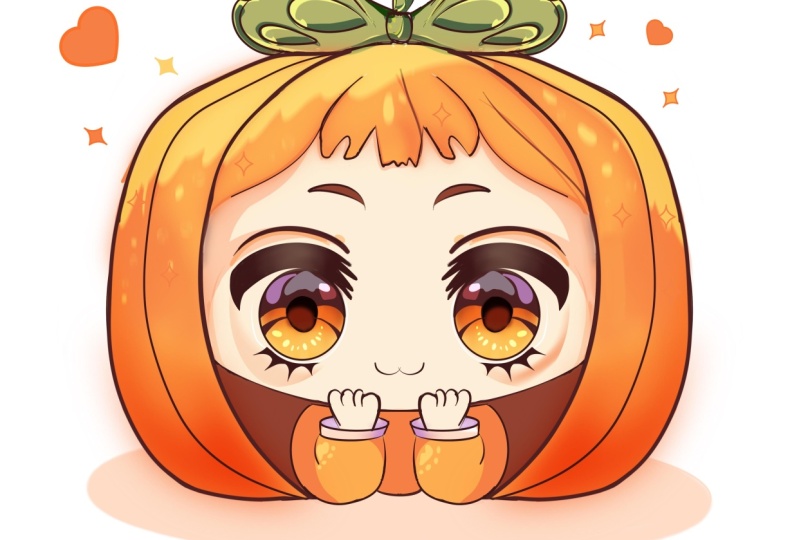
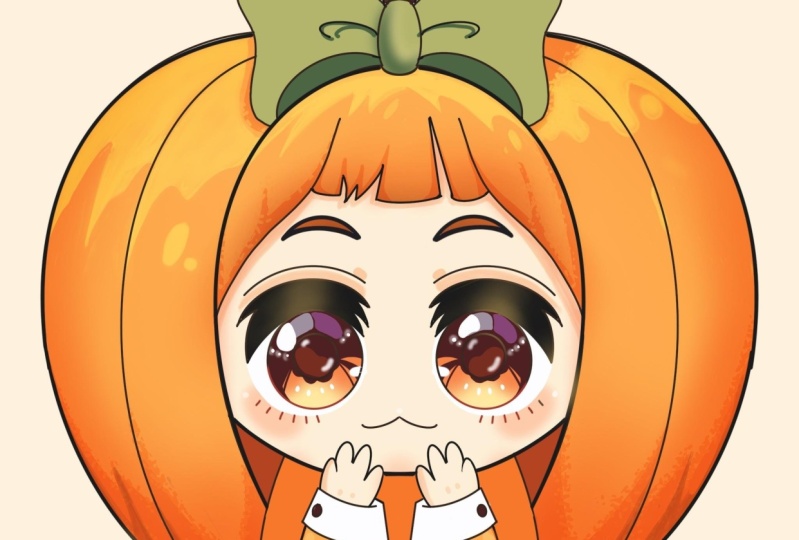
and into this class. We are going to draw this
cute cow Y illustration of an adorable pumpkin
girl in Procrate. During this class,
you'll get familiar with a lot of useful features
like symmetry tool, recoloring with reference,
clipping masks, and blending modes, and learn the basics of
drawing in Procrate. By the end, you'll not only draw an adorable illustration
you'll be proud of, but also feel super
confident using procrate. And now let's spend
some time drawing.
2. Sketch: Begin by deciding what kind of canvas we are going
to be M. Today we're using a standard
square canvas that you can find in Procreate, both of our pixel
width and pixel height a set at 2048 pixels. DPI at 300 and our color profile is set as
SRGB with this low number. When it's all done,
heating done, getting redirected to RN Canvas, zooming it out just a little
bit to see the whole canvas, and then we will
need to download all the materials
that we're going to be using throughout
this whole class. Just go under the
project dresser tab and download everything
that is mentioned today. When you did it, let's
firstly go to our lease. Let's just go to the
background color. Let's just go on the cards and select the color with
the title background. When we did it, we will go to our color palette and now let's
select some bright color. For example, we can go with
leaps color or blah lines. When we did it, let's just
go to our brush library, sketching folder, and you can pick any brush from
here that you like. When you did it, let's
just go and prepare a little scheme that will help us to build up our illustration. Now we will go to the
top and we will create a straight line right
here going horizontally. Hold your line at the end and also hold one
of your fingers on the screen to snap this
line to a straight one. When you have it, let's
just lift up everything, and let's move on to the bottom and do
the same thing here. Just create line,
holding it at the end, holding one of our
fingers on the screen, creating a straight line. When we have it, we will go to the middle and create
another line here. Doing the same thing,
holding our line, holding one of our fingers. If you see that you are not quite at a center on this sheep, we can lift up everything
that we have right now. We will go to this line
option on the top. This is our editing mode. Here, we can just
hold our Apple pencil at some link space and just go and move this line
that we are working on now. Right at the center
of this sheep. Find the center, tap on the
screen when you are ready, and let's just go to the top firstly and create one more line in the center right here. The same way as before, holding our line, holding our finger. If we need to go
to our 18 mode and move this line elle bit
more toward the center, we are going and doing it. When we have the
result like that, going away from our eight mode and doing the same
thing on the bottom. Again, going right at the
center, creating our line, holding everything
that we need to hold, going to our 18 mode to adjust
the position of this line, to position it right
at the center. When we do with
our little scheme, let's just go to all of
the lines and we will name them so we won't
be confused later on. Let's just go to the first line and we will write down head. The next line will
be our fringe. The line underneath
will be our ie top. The next line is our chin start, and the very last
line is our bottom. Now, when we have
this little scheme, let's just go and
continue creating other elements to help us build our first
sketch right here. Let's go to our list and
let's create one more lie on top and we will go and change the color to
something different. For example, we can just go with the color with
name back hair. When we did it, we will go and create an ese going in that way. Go into this line that
we have on the top, stepping a bit from it and just creating a shape
going in that way. Hold your line in the end, so we are creating
our j with one line. If you are wanting to
create a smaller shape, when you are holding
your line in the end, you can just go and move it from side to side to adjust it. For now, let's just keep
it as something like that, and then we'll go to our 18
mode and we will adjust it. Let's just go to this node
that we have on the top, and we will rotate it
just a little bit, so it's not that diagonal, and we will also go to
one of the nodes on the sides and we will
open up this whole shape. When we position our
elements in that way, let's just tap on the screen, and let's just go to
the opposite side and create something
similar here. Again, just going in
there and creating a shape on the ellipse, holding it on the end, rotating it if we
want right now, and then we'll go to our
ellipse and we will position this shape differently
and adjust it overall. Let's go and strike
to position in the same way as we
have our first shape, going a little bit underneath this line that we
have on the top. Go and position in the same way as we have our
sheep on the left. If we want, we can
just go and move it just a little bit
toward the center and also work on the whole sheep of
rotation of this element. When we have the
result that we like, let's just tap on this screen
to get away from this mode. Then again, we will go to our list and we will
go to this layer, where we have these two sheeps, we will tap on the end icon, and we will go to
this apaste slaer and we will drag it a little bit toward the left until
we still can see what's happening here but
when it's not that bright. When we have the
result like that, we also can do the same thing
with our previous layer. We can just go again to the previous layer,
we can select it. We can go to this N icon N Aj the pacity
just a little bit. We see the lines, but
they are not very bright. When we have the
result like that, let's just go to the layer
that we have on the top, and let's create one
more layer above it. When we did it, let's just
select this layer and then we will go to
our range icon, we will go under Canvas and we will toggle drawing guides. Now we can see we
have the cells, but it's not the
option that we need. We'll just need to go under
engine drawing guide, and on the bottom, we
will go under symmetry. Now we can see we have this line that is going from
top to the bottom. That's exactly what we need. We are not touching
anything here. We are just keeping everything
as it is right now, and we'll just go to this
option down on the top, and we will hit it. Now when this is done, let's
just go into our layers. You can see that this
layer is now assisted. That's exactly what we need. Now let's just go to
our brush library. If you want to change the brush, you are welcome to
go and do that. For example, we can go with
technical pencil brush. When we did it, we also can go to our color palette
and for example, change the color to
something darker, maybe dark red color
or something else, and now we will start
creating our sketch. Firstly, let's begin by going and zooming in our
canvas and we will be going along this
line that we have for our little lips on the left, and we'll be creating
a line here. We will go to the top and
we will start by going along this sap and going
down continuing the line. Hold your line at the end, and we will just need to go to our 18 mode and we will
need to adjust it. You can see when we are
using our symmetry to, everything that we
are creating on one side is mirrored on
the opposite side to. Let's just go to
the top and we will position this line right
here onto our guidenlne, and we can just go to all of these notes that we have right here and we can play with them. Basically what we need is to
create a shape like that. So spend some time here
and create the shape, similar to what you see
right now onto your screen. When you are done
adjusting your line, let just tap on the screen, and you can see that
we are not quite matching the line that we
have right here on our right. Basically, we are
going to be more working on the line
that we have on the left and it will be mirrored equally on our
opposite side too. Now when we have the
result like that, let's just go and start
adding additional elements. Firstly, we are going
a little bit from this side where we have this
perfectly matching line, and we will go a
little bit inwards and we will create a little
mark down like that. When we have it, we will
go over the top and we will be starting to create a
line going down in that way. Let's just go and create
something going in that. We hold your line and the end, go to the 18 mode and adjust the curvature on this line
to something like that. We are connecting our
shap and the bottom, and when we have
the shap like that, let's just go over the
top and we will be starting to create a
little fringe here. We have this line fringe, and we will be going to
this line and we will be creating a little element
right in the middle. Let's first go and create
a flat line like that, and then we will
go from this line. We will go up and create little lines going
up in that way. Just creating something
going in that way, and when we have the
result like that, let's just go to
the space that we have right here in the middle, and we will be going down with
a curve going in that way. So for now, let's just stop
at something like that. Later on, we will adjust it without our
lines of symmetry. Just for now, let's keep
it as something like that. Also, we will just go
to these lines that we've created on the
side and we will continue going up and finishing up this whole
shape of the heat. Either manually or just by
holding your line at the end, let's just go to the top and we will create a flatter
shape right here. You can just spend some
time here and maybe work onto the overall curvature
of this line that you have right here in a
middle part and just connect it nicely with the shape that you have at the bottom. If you need to erase something, just grab an eraser and erase all the lines
that you don't need. Just spend some time
here and create a nice shape for
your fringe here. Mostly paying attention
to this area that we have on the top and create
a bit of a flatter shape. Now, when we have something
going in that way, let's just get back
to a brush and let's just work onto the top
part of our head here. We will just go to this line of symmetry and we will go up from our fringe elements and we'll create a very soft
rectangle like that. When you have it done, let's just go to the sides and let's create a little bow here. Again going over one
of the sides and firstly going from this
little central element, going up with a curve like that. You can experiment
with the size, you can create something
different here. You can go with a little
bit of a curveir line. It's all up to you. When you
have the result like that, let's just go to the bottom, and we will be going with a little shape
going in that way. Just creating a little
element like that, and then going down again
with another shape. Again, you can create it
in a bigger way or in a smaller way and just
create a nicer shape here. You can even go and overlap the shape of the hat with
the bow on the bottom. Take a look at your sheep
from the distance and decide whether you want to
adjust your sheep or nodes. Maybe you want to go and create a more angular sap on
the top of the bow. If you need to erase some parts, grab an eraser and erase the things that
she don't like here. When you have the
result like that, we are almost ready with
our little bow here. You can just go along the lines and maybe adjust
them to your liking. When you have the
result like that, let's just go to the sides from this little central part and we'll be going
there and creating a little element like that. When you have the
result like that, you also can go to
the bottom and erase these lines that you have right here as the lines of the head, and then go to the
bottom part and create a little line with
your brush like that. When you have the result
going in that way, if you want, you can go and adjust it a
little bit later on. For now, let's just
keep it as it is, and we will continue by going to the bottom and starting
to create our feet. So we are going to this line
that is named chin Start. From this line, we will just
go to this intersection that we have with this line that we have right
here in the middle. From this line, we
will be just going toward the center with a
little curve like that. Let's connect it
nicely in a middle and just create a line
going in that way. If you need to erase some
lines that you don't need, you are welcome to grab a eraser and erase everything that
you don't need here. Let's just work on to the
cleanness on this line. And when we have the
result like that, take a look at it
from the distance, decide whether you
like it or not. If you want to go and
adjust it a little bit, you are welcome to
go and do that. For example, you can go
with a less flat shape. So for example, we can just go with a little bit
of a curve here. When you have the
result, one more time, take a look at it
from the distance and decide whether you need to adjust some parts or
not or erase some elements. When you are quite satisfied
with everything here, let just grab a
brush one more time. Then we will go to the
sides right here between our little chin and our little hair part right
here on the left. And we will go and create a
little lane gone in that way. So we will be connecting
it nicely with our ship and the bottom and just creating
a ship like that. So we are just going down
with a little curve. Don't worry if it looks
not quite good right now, we can just grub in a razor and erase some pis
that we don't need. Just spend some time here and create a line going in that way. When you have the
result like that, let's just go a little bit
lower from this intersection between our little
shape that we've created right now and our here, and who will just go inwards with a little shape like that? When we have something
going in that way, you can work on the
size of this element. Now we are creating
little arms here. If you need to erase some parts, you are welcome to
go and erase them, and then we will go
right here at the chin, where we have the
intersectional lines, and we will go from here and we will be creating a
little pause here. Well, actually it's a girl, so it's not pause, it's
some of the hands here. Let's just go and create our
hands going in that way. We won't be just going to this line that we have right here and Len just go and create
four fingers like that. We are creating four
fingers just for cuteness. If you want to
create five fingers, you are welcome to
go and do that. For now, let's just
map out our sheep, we will create something
going in that way, and then we will go
down with another line going in that way and we will erase all the lines
that we don't need. For now, let's just
spend some time here and create something
going in that way. If you want, you can
go to the sides and maybe create not a
straight line but a curve. Don't worry if your lines are not looking all right right now, we can fix everything later on. Now we are just mapping out everything that we
need to do here. When we have these little
arms here, our little hands, let's just go
underneath them and let's start creating our
little sweater here. Just going to the bottom part of our little arms here and
creating a line like that, and then we will go
underneath it and create another line that will
match the first one. When we have it, we will
go to the sides and we will create two lines
going in that way, and then we will go to the
top and we will finish up the sheep just by creating
another two lines right here. When we have everything
set in that way, let's just go to the sides
to the inward sides. We will step a bit
from this little line, and we will go down and connect it with our sheep that
we have at the bottom. Now we can work more on our
little shape right here, and also we will
just need to go to the opposite side and create a little line going
down in that way. Now, let just spend some time
here and adjust our shape, so we can just go and
clean up our lines, maybe make them a little
bit more rounded. If you want to go, maybe with a little bit
of a bigger sheap, you are welcome to
go and do that. Now, let's just spend
some time here and also erase all the lines
that we don't need. When we have the
result like that, let's just get back to
our brush and we will just go right between
our little arms here and we will go and try to create a line that
will go in that way. We are creating a continuation of this line that we have
right here for our hair. When we have the
result like that, let's just go and start
working on our face. Firstly, let's just go
to this line that we have for our eye top
and from this line, we will go and create a
little shape of the ellipse. Let's just go and create
something going in that way. Hold your line and
the ends and we will need to go
to our dine mode, if it's not happening
from the first tr tr out one more time, just create a shape like that. Hold it and the end,
go to the Dsin mode. Now, lench just go and make it just a little bit
smaller and also let just work onto the whole
shape in that way like that. We will just need to go and create the shape
going in that way. Just position it in
a more vertical way. And going a little
bit higher than this line that we have
for R G. If you want, you can go a little bit
smaller with the shape, so you don't need
it to be too open. When you have your shape
going in that way, let just tap on the screen, and then we will go
inside the shape and we will create another
shape of the apse. Just going somewhere
to the middle, creating our shape,
holding it at the end, going to our mode, and adjusting the placement and maybe the position and ratation, and everything that
we want to play around with here
of these elements. When you're satisfied
with everything here, let's just tap on our screen, and then we will
go to the top and we will start creating
our lashes here. Firstly, let's just go and start doing something
going in that way. We will go a little bit above this line that we have
right here in the Meda, and we will be going with
a curve going in that way. Hold your line in the
end and let's go to our ing mode to adjust the
curvature of this element. L et just go with
a line like that, and then we will tap on the screen and we
will continue working on our S. We will need to go and make it a
little bit more round it. Manually let's just go and create the line
going in that way. We will go a little
bit lower than the middle part of this little I that we have in the middle. Just go and creating a
rounder shape like that. Then we will need
to go over the top and we will need to repeat
the line right here. Let's just go a little bit
higher than this first line. Firstly, we will
just go and start to repeat the line that
we have right here. Very softly, just manually go in there and creating
something going in that way. And then we will need to go to the side and make it a
little bit more thick. Let's just go and create
something going in that way, and then we will create a
little tip going in that way, and the rest thing that we have on the bottom will
go down in that way. Now spend some time here
and adjust your shape. You can go a little
bit more inwards with this shape that you
have on the bottom. If you need to go and grab your eraser and
erase some parts, maybe work onto the shap, even more, you are welcome
to go and do that. Take a look at everything
from the distance, decide whether you want to
adjust some parts or not. If you are quite satisfied
with everything here, let's just go toward the opposite side and continue
creating our shapes here. Firstly, let's just go to this tip that we
have on the top, and let's create three
little elements like that. If you need to adjust
the size of your brush, you are welcome to
go and do that. Basically, what we are
doing is going along this curve and creating
some lashes in that way. Now, let's just go and make the size of our brush
a little bit bigger, and we can just go to this
area that we have right here on the little lashes
that we are working on now, and we can just go and
create the shading here. We will know that we are
doing everything right. Let's just spend some
time here and add this little shading
inside this shape. Now, when we see more clearly what we are
doing right now, we can continue going to our little lashes right
here and work more on them. We can just go a little bit more inward and make this line
a little bit thicker. Just going in there,
spending some time here and creating the lashes
going in that way. When you are satisfied
with everything here, we will go a little bit higher than the lashes
that we have here, and we will create a little line like that that will
represent a lite. Again, very accurately,
if you need to create something on top or if you need to
erase some parts, you are welcome to
go and do that. Just repeat the creature on this line that you
have as your lashes. Then let's just get back to our brush and we will
go to the bottom of our little eye
here and we will add a bit of lashes here too. We're not going to crazy, we are just going
with some lines just to show that we will
have the lashes here. You can just go and
create a little line in that way and basically what we need is
something like that. When we have the
result like that, let's just go to the top
part from our little eyes. We will go more close to this line that we
have for our fringe, and we will just go
there and create little lines for our
little eyebrows here. Let's just go with
the shapes like that. We will go with the
first curve like that, and then we'll just
go underneath and create a little shape
going in that way. Our little shape is
a little bit more white right here in the
middle and it is going very, very tippy right
here at the end. Now, when we have the
result like that, let's just go and
create a little mouth. We will be going
to this line that we have for our chin
and from this line, we will go a little bit higher, and we will just go there to this line of symmetry that we have right here and create
a little mouth like that. Now, when we have the
results like that, let's just go to our
layers and we will hide our layer with
these two ellipses. We'll just need to
go to this layer to this little check
mark right here. We will tap on it, we will
get fed on this layer, and we also will go
and work more on DTs. Let's firstly go to
this layer where we have our skage,
we will tap on it, and we will turn
off our assisted drawn from the list
just by taping on it, and when we did it, let's just go and work on our fringe here. So let's just go and start adding additional elements here. For example, we can go and start creating some little
elements on the bottom, so just creating some
little triangles, erasing the parts
that we don't need, going to the sides and maybe creating something
different here. Just going there and creating
something like that. You can do everything
similar on both sides, or you can just spend some time here and create
something different. Work onto the sheets, go with your eraser and erase the parts that
you don't need. When you are satisfied
with everything here, let's just take a look at
everything one more time and decide whether we want
to adjust some parts or not. Firstly, we will
also need to go to this little sheet that we have right here on the
top on our bow, and we will be just
going there and creating a little
line like that. Go up with the curve
and then go to the opposite side and create a little stem element like that. When you have the
result like that, let's just take a look
at everything and decide whether we want to
adjust some parts or not. Firstly, let's just go to these areas that we
have for our hair, and we will go more toward
the center of them. When you found the center, you can just go and
make a mark down. Both sides we are going
to be using here. We will just go a little bit
closer to this little shape outside and we will just go to create another line
going in that way. When you have it on one side, we will do the same thing
on the opposite side too. Again, just holding our
lines and the end and if we need to go to the 18 mode and adjust our shape from here, we will just go and do that. Now, when we have the
result like that, if you want, we can go
and adjust it even more. Firstly, let's just go to
our lays and we will go to this layer that we have
with our little sketch, we tap on this layer and we
will choose drawing assist. Now, when this
layer is assisted, we will go to our
magic one tool, we go under liquefy, and we will use the option
push right here at the bottom. We can just go to
our slider with the size and adjust
the size of our brush, and we will be just
going to some areas and adjusting our shap to
create something nice here. You can see we are
adjusting our sheap on one side and it is adjusting
on the opposite side too. You can just go
and evenly adjust your shape to create
something interesting here. For example, we can
just go and create a better shape for our
pumpkin right here and work more onto
the top part and make it more like a
pumpkin right here. Spend some time here and adjust your shape to your liking, work onto some areas, spend some time here and create something that you
would like to see here. If you want to go to
some other lines, for example, maybe the fringe, or if you want to go
and adjust the bow, you are welcome to go and
create something here. So spend some time here and adjust your sheep
to your lichen. When you are satisfied
with your sheeps, let's just go and
deselect everything by heating our
adjustments twice. One more time, let's just take
a look at everything here. Make sure that we
like everything. If you are satisfied
with everything here, let's move on to our next part where we are going to be
creating the clean lines.
3. Clean Lines: Let's begin our part
with the clean lines, firstly by going to our
layers, going into this layer, where we have our Skage
going into this icon and adjusting the
capacity to something that we can still
see onto our canvas, but when it's not that bright. Let's just go with
something around 60% or so, and then we will go and
create one more layer on top. Let's again tap on this lay
and let's select drawing AC, so we'll be able to create our elements on both
sides at one moment. When we have it set in that way, let's just go to
our brush library, and let's just go to
the inking folder. Into the Ink and folder will
select technical pen brush, and if we want all of our
lines to be very smooth, we can just tap on the brush, go inside the brush studio, go under stabilization right
here on the left and play around with the amount of streamline and amount
of stabilization. You can try out onto drone pads, play around with these options. Remember that you can
always get back to this option later on if we
need to adjust something. When you are satisfied with everything here,
let just it done. Let us go and adjust the size of our brush to something
around ten or 12%. Set it to your liking,
try it out onto canvas, and when you have the size
of the brush that you like, what we need to start with is going to some of
the areas that we have right here on
one side and we will just need to go
and recreate them. We will just be using the same options
that we used before, going into our lines, recreate everything
that we have here, holding our line and the end
to create a better sheep. If we need to go to
our editing mode and adjust R shape from here, you are welcome to
go and do that. Also, you don't need to
repeat everything with 100% of similarity to what
you see on your sketch. If you see that maybe you
want to adjust some parts, you are welcome to
go and do that. Basically what we need to create our lines and go with the
lines that will be closed. Now, Linda spend
some time here and recreate the lines that
we have on our sketch. When you are done
adding your lines with the help of the
symmetry tool and you need to continue creating
your lines on the top and on the fringe and
maybe on some other areas. Let us go to our list. Let us go to the s la where
we are creating our lines, we'll tap on it, and we will turn off our assisted drawing. Then let's continue and go
and recreate the shape for our fringe and every little piece that we will need to create here with
our clean lines. Now, when we are done with
recreating the lines, let's just go to our
layers and hide our layer with our sketch just by going to this little
check mark right here. Also, we can just go
to our lines that we have for our additional
elements right here, our guiding lines,
we can hide it to to see what we have right
here as our illustration. Now, let's just
decide whether we want to adjust some
parts or note. Just by taking a look at everything that we
have right here. If we have some little gaps or something in our lines
that we need to adjust, let's just go and adjust them. All of our lines that are
outside should be closed. Also at the same stage, let's just go to the
places where we have our eye lashes and let's just
drag and drop the color, T them to recolor them. Now, in just spend
some time here and adjust our little shapes. If we have some miscolred
places or if we have some little elements
that we need to adjust or maybe erase, we will just go and
do everything that we need to do to create
our clean lines. Also, when we are
done with this task, we can just go and make
some of the lines a little bit thicker to
make a nice effect here. For example, let's just go and adjust the size of our brush, and we will just go
to some of the lines. For example, the lines
that we have outside as our little pumpkin hair here, and also the lines that we
have right here as our fs, we will just go and make
them a little bit thicker. Again, to make them evenly, you can just go to your lis, tap on the lis, select our drone assist and work
on some of the lines. Try to make them nice. Try not to overdo it and just
add a few of these lines. When you are satisfied
with your results, let's move on to our next part where we are going to
be adding our colors.
4. Base Colors: Let's begin this part firstly
by going to our layers. We will go to the layer where we have our assisted drawing. This is our layer with our
clean lines. We'll tap on it. We will choose drawing assist from the lease because
we don't need it here. If you want, we
can go and tap on the lay and rename it as lines, and then we will just get back to our little layers panel. We will tap on the slay and
we will choose reference. When we did it, we will be
able to use these lines to add the color using these
lines on separate layers. We will just go to
our layer underneath our lay with the lines and
we'll create a new layer here. Let's just go to our color
palette and let's just start adding our colors
to some of the areas. Firstly, let's just
go with the hair. Let's select the color
with the name here, and let's just go to all of the elements that we
need to recolor as hair, and let's recolor them. Just go in there and drag
and drop in the color, and when you are
done with this task, let's also go to the
slit el elements for our eyebrows and let's add
the color to them too. When we did it, let's
again go to our layers, Let's create one more on top. We will go to our color palette, and we will select the color
with the name back hair. With the back hair,
we will just go to these two areas right here
and we will recolor them. When we did it, we
will go to our layers, we will create one more on top. We will go to our color palette, and let's just go and find
the color with the name skin. With this color,
we'll go to all of the skin elements and
we will recolor them. When you did it, let's
just go again to our les. Let's create one more le on top. Let's just go to
our color palette, and let's select the color
with the name ice yellow. With this color,
we will just go to these color places that we need to recolor right here
and we'll recolor them. When we did it, let's
again go to As, create one more L, go
into our color palette, and select dark red color. We will then go to our rises
and we will recolor them. Then one more time,
going back to our les, creating one more li on top, and let's just go entry color our sweater and our little bull. For the sweater, we will go to our color palette and use the same color that
we use for the hair, and we'll just go their entry color everything
that we have here, except these little
places right here. For these little places, let's just go with
the white color, so select it and just drag and drop the color to these areas. When you did it either
on the same layer or just by going to your lease and creating one
more layer on top, let's just go to our
color palette and select this green color
that we have right here. We will just go to our bow
and we will recolor it too. Now when we did it,
let's just go and add the white color
right here for our eyes. Firstly, going back
to our layers, going to our layer with our skin from here
creating one more layer. Also, we don't
need our reference right here on our lines. Let's just go to the tap on the s li and select
reference from the list, and then we'll get back
to this new layer. We will then go to our
color palette and select the white color and also to
make it evenly on both sides, let's just tap on this lie
and let's select drawn a ss. When we did it, let's just go and add the white
color right here. Creating our outlines,
dragging and dropping the color when we
are ready to these areas. Let's just go to the
opposite side to and just create a bit of the white
color right here too. Go in there and adding the color to the
rest of the areas. Now, take a look at
everything here, make sure that you've
recolored everything, and when you are ready, we are ready to move on and start adding additional colors.
5. Hair & Face: Firstly, let's just
go to our layers, and let's just start by going
to our layer with our hair. Let's create one
more layer on soap. Let's top on this y and
let's select clipping mask. When we've created
our clipping mask, we'll be able to
add new colors only on the areas that we have
on our previous layer. When we did it, let's just go to our N icon and select
multiply blending mode. When we did it, let's select
the opacity of something around 65% for
this little layer. When we did it, let's just go to our color palettes and let's select the color with
name hair shadow. With the hair shadow color, let's go to our brush slide. We will go to the
ear brush and folder and we will select
soft blend brush. When this brush, we
will firstly go and increase size over it to
something around maybe 20%, and the opacity of this
brush again around 20%. We will be going more
toward the bottom parts of our little illustration and we'll be adding the
additional color here. We will add more color to
the bottom and we will try to make nice transitions
between the colors, so we can't actually see that transition
between the colors. They are very, very smooth. So mostly going to the bottoms, and we are also
going more toward the right part of the whole illustration that
we have right here, all the part that we have right here as our little
pumpkin or the hair here, and going over the whole sheep over the right part and
adding this color here too. When we hand the
results like that, we also can go a little bit to the bottom part
of the fringe, just a touch with this
color right here. When we are done, let's
again go to our layers, and let's create one
more layer on top. Doing the same thing,
tapping on the lay, selecting our clipping mask, going to our icon, and selecting multiply
blending mode. As for the opacity, let's go for 40% right now. When we did it with
the same color, but with a different brush. Let's just go to
our brush library. We will go again to
our inking folder. We will select our
technical pen brush. With the same color and
with this new brush, we will be going to the bottom
parts and we'll be adding some interest to the picture just by creating
some shadows here. Let's first go over
our left side. We will go to this little
section right here, and F here, we'll be just going to
the bottom and starting to create some little
lines going in that. Just creating some curves, just creating some
little lines going in the shapes of the
tel shadows here. When you have this first shape, let's just go loom this
whole shape around and we will be just dragging and dropping the color
to these areas. Trying to create
nice shapes here, if you have some elements
that you need to erase and connect the nicely with the shapes that
you already have, you are welcome to go grab and eraser and erase the parts
that you don't need. When we have this first
element right here, let's move on to
the next section and we'll be creating
another shadow here too, just doing the same things here. Lubna shape around and drag
and drop the color inside. When we have it on one side, let's move on to the
opposite side and start to create something
similar here too. If you want to go and
maybe work onto the saps, in a different way, you are
welcome to go and do that. You, for example,
can go and create some peculiar sheaps with
your little shadows here. If you want to do that,
you are welcome to do it, just go and create the shapes
and fill them with color. For this side, let's go
with bigger shadows. For example, when you are done
with this little segment, let's just go to the last one and create a shadow
going in that way. Again, loom this whole shape around and drag and
drop the color inside. Take a look at everything
from the distance, decide whether you
maybe want to work more onto the shapes and create
something different here. Maybe go with some
peculiar lines going up or create something
different here. You are welcome to
experiment and create an illustration of your
preference of your liking. When you are overall
done with this task, let's just go to the fringe and we'll be eating a little
shadows here too. Mostly going to the
bottom parts and creating a little shapes
going in that way. Going manually and creating
some little lines here, and maybe creating some
additional elements with our little sheeps, experiment a little bit and
create something nice here. Again, pay more attention to the right part and create
bigger shadows here. When you are done with it, let's just go underneath the bow and let's create little
shadows here too. Just repeating the sheep on the bow right here on our left. If you want to go
and maybe create a little shadow right here just to make sure that you have some difference between these
little segments right here, you are welcome to
go and do that. Also, let's just go to our right part and create
a bigger shadow here too. And now if you want
to add more interest, we can just go and do it by
using a different brush. For example, we can just
go to a brush library. Let's just go to the
vintage folder and let's select the brush
with the title M tal. With this brush, we
can go to some of these little places
right here and add a bit of dots like that. Just to create
some texture here. You can go with this brush and
add these little elements. If you don't want to add them, you are welcome to skim
this part, and also, you can just get back
to color palette and select the original
color, the hair color, and go to some of the
places and maybe add the little sheets with
this brush right here. When you are satisfied
with everything here, let's just go again
to our brush library, Let's just get back again to our inking folder,
technical pen brush, and then we will go again to our lays and create
one more lay on top, typing on the lay and
selecting clipping mask, going to our icon and selecting
multiply blending mode. For the opacity, let's go
with something around 45%, and then we will go to our color palette and select the color with the name leaps, and with this color, we will go to the bottom
and we will be adding the color right here as
a second shadow here. Let's just go and either
repeat the same things as we had before or just go there and create some
other elements here. For example, just
go and creating little picky sheaps like that and adding the
color inside again. And doing the same little
shadow right here, Ota R right and onto R left too. Just go in there and
adding a few more of additional shadows
with this color. Now, take a look at everything
from the distance and decide whether you like
this color or not. If you want to change
it, for example, you can just go to
this magic one to, you can go under hue
saturation and brightness, and you can play with
the sliders here. For example, you can
go to the hue slider and maybe make it a
little bit more brownish. If you want to go for the
brightness and saturation, you can just spend
some time here and play around with these
little tools here. And you're satisfied
with everything here, let's just tap on
our magic one tool to get away from this mode, and then we will just go to our list and who will
create one more on top. Again, we'll tap on it
and we will clip it. This time, who will go
to this end icon and who will select
overly blending mode. As for the capacity, let's go
with something around 50%. When we did it, we will
go to our color palette and we will select the color
with the name highlights. With this color, we will go
more toward the top part of our hair and we'll be adding the peculiar shapes for
the highlights here. Let's firstly go to
the segment that we have right here in
the middle onto our left and we'll be
just going there and creating some peculiar
shapes going in that way. Try not to go to the shapes
where you have your shadows, just overlap the shape and drag and drop
the color inside. Then when we have
these first elements, let's just go to the
next segment and let's create a little
peculiar shape here too. Just go in there trying to avoid going to these
little shadows that we have on the top and just looping the shape around and dragging and dropping the color inside. If you have some areas that
you need to adjust manually, you are welcome to
go and do that. Just go there and work onto
the shapes to your lichen. If you want, you can go with maybe some
little lines going along the whole shape right here and end them with this color. Also, you can just
go and maybe add some peculiar shapes as little ellipses or
something like that, just go along the shape too. When we have the
highlights on one side, let's just go to the fringe, and let's just go and start eating the highlight here too. Just go in there and creating
some pecular sheaps, looping them around,
and dragging and dropping the color inside. If it's not happening,
try to make the whole sheap close and then drag and drop
the color inside. If it's not happening,
try it out one more time. If you want to go with
some peculiar shapes, you are welcome to
go and do that, go along the fringe and continue
adding your highlights. If you overdid some parts, you are welcome to grab
an eraser and work with the eraser to create the shapes that you
would like to see here. When you are done
with the fringe, let's just go to
the opposite side, and we will just go to this little place right
here to our second segment, that one that is
closer to our face. Let's just go and add
a few little elements like that without going and creating
big shapes for the highlights as we have
right here onto our left. Also, let me just go to the
segment that we have on our right and let's create a little highlight on the edge, that will be some
over reflection here. Now, take a look at
everything from the distance, decide whether you maybe
want to go and add a few more dots or a few more sparkles with
this high light color. If you want to do that,
you are welcome to go and end this
additional element. When you are satisfied
with everything here, let's continue by
going to our layers, and we will go to our lay
where we have our face. Let's create one more lay above, let's tap on it and let's
select clipping mask. We'll keep the normal
blending mode, and also we will go
to our brush library, we'll go to the
airbrush and folder and we'll select
solid blend brush. When we did it, we will go to our color palette and we will select the color with name
blush and skin shadow. With this color, we will get
back to our lias firstly, and we will tap on this lee and we will choose drawing AC, so we will be starting by creating little cheeks
underneath the eyes, and we want to do it
evenly on both sides. So let us go and adjust
the size of our brush, and let us go
underneath the ice and let's start adding
little checks here. Spend some time here and create
the sheep to your liking. If you overdid it, try
out one more time, maybe try to go
with a bigger size of the brush or with a
smaller size of the brush, create a little blushy
cheeks like that. When you did it, let's just
go again to our layers, and let's just go and create one more lay
on top of this layer. We will tap on it, and we
will choose clipping mask, and we will go firstly, back to this layer, where
we have our cheeks, and we will go
very, very softly. Alone the edges where we have our fringe and also
our little here, and we'll add a bit of
color with this color. Just a little bit
of a blush here, very transparent,
something like that. When you have it,
let's just get back to our list to this new
layer that we've created, and we will go to our
color palette and select the color with
name blush lines. Then let's just go to
our brush library, one more time, going in
to the inking folder, technical pen brush, going back to our lays,
going to the layer, where were going to be creating
our little blush lines. Let's just tap on the
end icon and let's set the opacity of this layer to
something around 20 or 25%. When you did it, let's just
get back to our Canvas, and let's just go to
the areas where we have our cheeks and very very softly with a smaller
size of the brush. We'll be just going
there and adding the lines that will be
representing some blushing. Let's just try to
make them parallel, and let's just go and
do it on both sides. When we have the
result that we like, let's just get back
to our layers, and let's just go
to our next layer, which will be our layer for
our little shadows here. Let's create one more
layer, let's tap on it. Let's select clipping mask, go to the end icon and select
multiply blending mode. As for the capacity, let's go with
something around 75%. And again, we will go back
to our color palette and we will select the blush
and skin shadow color, and we will go along the
edges firstly underneath our fringe and we
will be just going and repeating the shapes
that we have here. Let's just go with
something go in that way. Let's firstly go with
the outlines and then we will add the color
to the rest of the area. As for the sides, len just go again
firstly with the curves and we'll be just going down with something
going in that way. When we have the outline, you can either go and
increase the size of your brush and recolor
the rest of the area manually or just loom
the sheep around and end the color in the same
way as we did before. Let's continue
edging the shadows, going into these areas
where we have the leads, and we will be creating
our shadow and connecting it with
the shadow that we have right here onto our sides. Just go there and start
creating your shadow, moving to the inner
part of our eye. And then we'll go a
little bit higher and create a little
element like that. Just creating a little
something going in that way. If you want to work
more on the shape, you are welcome to
go and do that, basically what we need is some
kind of a drop shape here. When you have it on one side, let's just do the same on the opposite side
two, or firstly, just continue creating a shadow going right here on the side, and then move on to
the opposite side two. When you have it in that way, let's just go right
here to our arms and we will create a little shadow right
here on the chin. If you want to go to the arms and add little shadows here two, you are welcome to
go and do that, go to one of the sides and
create a little shadow here. If you want to go to some
other areas, for example, you would like to continue
creating a shadow right here right near your hairline, you are welcome to go and
add little shadows here too. If you already did something, you are welcome to go and grab the eraser and work
onto the lines, or just go with your brush
and adjust them manually. When you have the
result like that, let's continue by
going to our layers. Let's create one more layer
on top of this layer. Let's tap on it and let's
select clipping mask. Let's keep our normal
blending mode for now, and then we will go
to our color palette and we will select
the white color. With the white color, we will go and create a
little nose here. We will be just going
a little bit above this lit cell mouth that
we have right here, and we will just go there and create a little
element like that. Also, we will just go
to the opposite side. From our eyes and
we'll be just going there and creating little
elements like that. Just little highlights
going in that way. When we have it set in that way, let's continue by
going to our layers, and now we are moving to
the most interesting parts, we are going to be
working onto our eyes.
6. Eyes, Sweater & Bow: Let's just go to this layer where we have this yellow color, and we will create one
more layer on top of it. We will tap on this layer and we will choose clipping mask. Now, let's firstly go
to our brush library. We'll go to the air brush and
folder, soft blend brush, and we will go to
our color palette, and let's just go and select the color with the
name hair shadow. With this color, we will go mostly to the bottom
parts of our eyes, and to do it one more time
on both eyes at one time. Let's just go back to this er, we will tap on it and we
will choose drawing ***. We will go to these bottom parts and we'll be adding
additional color here. Let's just go and
adjust the size of our brush and we will do
something going in that way. Just keeping this little tip on the bottom and creating the
additional color right here. If you want to go and
select the color, for example, as highlights, we can just go to this little
tip right here and the end, and we can just add
this color right here. When we have the
result like that, let's just go more
toward the top. If you want, we can
just go and start adding a little bit of
gradient right here on the top by going and selecting the color with
name hair bottom shadow. Let's just go above this color and we will
be adding it right here, just creating something
going in that way. Now it's looking a little
bit scary. Don't worry. We will fix it later on. Let's just go to our list and let's create one
more lay on top. Let's tap on this lay and
let's select clipping mask. Let us go to our brush library. We will go again to
our inking folder. We'll select our
technical pen brush. Let's make sure that
this lay is assisted. If it's not let's
just tap on it, let's select drawing assist. Let's just go to
our color palette, and let's start working
with our dark red color. Let's just go to the
top and we will be starting to add some
little pattern here. Let's just go and start
doing something in that way. We will go a little bit lower than the center of
the eye and we'll be just going there and creating some elements for our eye. We will be just going there and creating something
go in that way. Let's just go more toward the right part and we will continue creating our line here, you can just go and create
the line going like that. Hold it at the end, go to the in mode and create something
going in that way. If you have this very
strong corner right here, let's just go and get
rid of it just by creating a curve that
will be very, very soft, and then we can just
go over the top and we can add the color just by dragging and
dropping it right here. If you have some little
peculiar shapes, you are welcome to go and
recolor them manually. If you want to go and maybe erase some parts with your risa, you are welcome to go
and do that t. Now, when we have
something like that, we can tap on our layer. We can just go to this little icon right
here into our list, and we can choose Alpha log. You can see now we have
this checkerboard. We can just go to our brush
library, air brush folder. We can select sv bland brush. We can go to our
color palette and select some color that will
be a little bit lighter. For example, let's just go with dark red color, and
we will go very, very softly, and we'll be adding additional color right
here at the bottom. Again, trying to make it very softly without the
blow chin effect. We are creating a very
smooth transition here when we have the
result like that. Let's continue by going
back to our brush library. We'll get back to our inking
folder technical pen brush, and we can go to the same layer, and we can just go and start adding additional colors here. Or we can just go
and start going to the next layer and creating additional elements
onto this layer. Let's just go to this new
layer where we have our rises. We will get back to
our color palette, we will select the
same dark red color, and we will go outside the
shade that we have right here and we'll be creating some peculiar shapes right here. You can just go to some of
these lines that you have on your previously and you
can make them more visible, just by creating
some outside shapes. When you have the
shapes like that, let's just go again to our lease and let's create one
more lay on top. We'll tap on this lay and we
will select clipping mask, and we will then go to
our color palette and select some color that will
be a little bit lighter. For example, let's
just go either with dark red orange or
hair bottom shadow, and we also will need to set this layer as our
drawing assist. Every layer that we are working on our eyes on will be assisted. When we have this layer, let's just go to
the bottom part of our rises and let's add
additional element here too. We can just go with
some blobby sheep, drag and drop the color inside. If you want to work more onto
the sheep with your brush, and with your eraser, you are welcome to
go and do that. If you think that maybe
this is too much, you are welcome to go
back to your list, tap on this icon on this lee and adjust the capacity to some level that you
would like to see. For example, something
like 40% looks good. When you're satisfied with this, let's just go and create
one morely on top and let's just start working onto
the top area of our ice. Firstly, let's just go
to our color palette and let's select the color
with the name ice. W this color, we will go to the top area and we'll be eating the blobby
shape like that. A just the size
of your brush and let's just go with a
shape going in that. Can experiment and create
something different here. When you have this first shape, dragon drove the color inside, and let's just go with
the same color to the opposite side and create
something similar here. You don't need to repeat it
with 100% of similarity. You can try out
something different, dragon drove the color
when you are ready. When you have the
result like that, let's just go to our
color palette and let's select the color with
the name ice magenta. With this color, we will go
close to this first shape that we've created and we'll be adding additional
shadow here. Just go there in the color
when you are ready with your blobby shape and do the same on the opposite side too. If you need to adjust
your sheeps in any way you are welcome
to go and do that. Have a little bit of the room right here
between your sheeps. When you are ready
with this task, let's just get back to
our color palette and let's select the color
with the name white. When this color, we
will firstly go to the bottom parts of
our eyes where we have this yellow color and we'll
be just going there and adding the bigger
ellipses with this color. Let's just go adjust the
size of our brush and let's just go and create a few
little dots like that. Repeating it on
the opposite side too when you are ready
with the first one. If you want you can go
with some peculiar shapes, not just simple
shapes like that. When you have something
going in that way, let's just go over the
soap and let's create big big highlights right
here onto the left side. Firstly going over
one of the sides and creating something
going in that way and just repeating the shape on the opposite side when you
are ready with the first one. If you are dragging and dropping the color and
if it's not happening, you are welcome to go and
manually adjust the shape, so just fill the color manually. When you have this
first shape right here, let's move on to
the opposite side and create something
similar here too. Now, with the same color, let's just go and add a few more little highlights
going along the top part. Just a few of them,
two or maybe three, just going alone and create a few of them over the top area. Then we will go to the
slider that we have on the bottom underneath our
slider with the size, our pacity slider, and we will go and set it to
something around 50%. With this opacity that
we have right now, let's just go to
some other areas, and let's just go and add a few more highlights
with this pacity. You can adjust the size
to your liking and just go and create something that you
would like to see here. When you have the
results like that, let's just get back our 100%
of opacity of this brush, and let's continue by
going to our layers and going to our layer
where we have our lines. Where we are at our lines, let's create one
more layer above, and let's just go and work onto the lines that we have
right here at the bottom. Let's just tap on this new
layer and let's clipping mask, and then we will go
to our color palette and we will select
some reddish color. For example, let's
just go either with dark red or maybe
back hair color. We will go to the brush
library air brushing folder, soft blend brush and we will go over the bottom
part of our eyes, where we have this
very seen highlight and we'll be adding
additional color here. If you want, you can create
the first color like that and then maybe go and select a different color,
maybe the lighter one. For example, hair shadow, and just add a bit of this
color at the very bottom. When we are done with this task, let's just get back
to our brush library, we will get back again
to our inking folder, our technical pen brush, we will go to our
create one more on top, and we will go and
select our white color. With this white color, we
will just go to the edges, and we will be edging little
highlights right here. For example, let's
just go first over our left side and let's create
a big highlight like that. We are connecting it with our shape of this
white area onto our e, and when we did it,
let's just go to the opposite side and create
something similar here. Now, when we are
done with this task, let's just get back to our lips, let's just get back
to the layer where we change the color of
our eyes right here, and we will be going and adding additional
elements on the top. Firstly, while we are still using our technical pen brush, let's just go to the
color palette and select the color
with the name lips. We will be just going over these lines that we have
right here for our lips, and very easily, we will just
go and recolor our lips. When we did it, let's get
back to our y brush library. Air brush and folder,
so blend brush. Let's just get back
to our color palette, and firstly select
the dark red color. With dark red color, let's just go over
these lines that we have here for our
eyebrows firstly. And then we will be going and adjusting
the size of our brush. We will be going to
our color palette, and we will select
either ice yellow color or the color of the hair. So when you selected the color either ice yellow or hair color, we will be just going
to the middle parts on the ice right here and we'll be adding additional color here. Just going in there and adding a bit of the color right here. If you overdid it, you can
just go to your smudge tool and maybe try to smudge it
a little bit right here. If you don't like the result, you can try it out
one more time. If you want to try out maybe different color here, you
are welcome to go and do. For example, when you already
have the result like that, let's just get back
to our color palette and try out the hair color. We will go more
toward the center of this little shape that you've created right here
and let's just go there and add additional
color right here. Also, we will just
go to the tips right here and we will
add the color here too. If you want to again experiment and maybe add a
different color here, you are welcome to
go and maybe try out here bottom shadow color, or if you want to go
with a softer color, you are welcome to select
something different here. Spend some time here and create something that you
would like to see here. When you have the
results like that, let's just go again
to our layers. Let's just go to this
layer where we have our highlights into the ys. Let's just get back
to our brush library. Let's just get
back to our inking folder, technical pen brush. Let's just go to our
color palettes and select the color with
the name ice yellow. With this color, we will
go and firstly decrease the opacity of brush to
something around 30%, and we will go to the areas on the highlights
on our eyelashes. We will be just going
there and adding a bit of the dot right here or
maybe some little lines, so just creating something
that will look nice here. If you feel that maybe
this pacity is not enough, you are welcome to try
out something brighter. It's all up to you. When you have the
result like that, let's continue firstly by going and increasing the
opacity of our brush, and we will go
back to our lease, we will go to our y, where
we have our sweater. We will create one more lay
on top, tap on the lease, select clipping mask, go to the end icon and select
multiply blending mode. For the pacity, let's go
with something around 60%. When we did it, let's
just get back to color palette and let's
select the hair shadow color. We will go and start recoloring the area that we have
right here in a Meda, very accurately, let's just go and put it completely
in a shadow. When we did it, let's also go to the shoulders and we will
put them in a shadow too. When you are done
with this task, let's just go to the opposite
side and let's start creating little shadows here on the pecular shapes
if you want to. Just go there, start by
creating the first outline and then manually add the
color to the rest of the area. If you want to experiment a little bit and create
something different, you are welcome to
go and do that. Just try to make
your line smooth. When you are done
with the first side, do the same on the opposite side and create your
little shadows here. When you are done
with this task, let's just get back to
our color palette and select the color with
name white shadow. With this color, we will go to our white
areas that we have inside and we will put them completely in the
shadows on both sides, and then we will move on to our little elements
on the bottom, and we will add the
shadows to them too. Firstly, let's just
go over this left one and we will create a
shadow going in that way, and then we'll move on
to the opposite side and do the same on both sides. When we hand the
results like that, let's just get vector R lease. Let's create one more on top, tap on the lease,
select clipping mass, got R N icon and select
overly blending mode. For the opacity, let's go
with something around 45%. Then we are going back to our color palette and
selecting our highlight color, going to the opposite sides from our little shadows on
our little sweater. Let's just go and add a bit
of highlights here too. Just go with some
peculiar shapes, or if you want to
go a little bit more traditionally
with some lines, you are welcome to
go and do that too. Try not to overdo this task
and when you are ready, let's just go again
to our layers, and let's move on to our Bo. When we are at the bow, let's create one
more lay on top. Let's tap on this layer. Let's select clipping mask. Let's go to our icon, select multiply blend in mode, and let's go to our color palette and select
this bow shadow color. We will go and start edging
the shadows onto our bow. Let's just go to the stem firstly and create a
shadow going in that way. Create the first outline and put the rest of the
area in the shadow. L et's just go to these
little places that we have in the middle and let just
add the shadow here too. We also will go to the
bottom parts and we will add the shadows to these
little elements here too. If you want to go to this
little fold right here, again, you are welcome to go and do that just add the color here. We will also go to
the opposite side and do the same thing here. When you are ready
decide whether you like the amount of opacity
for these elements, if you don't like it,
you are welcome to go to the M icon and play
around with the opacity. Maybe something around 90 or
maybe 95% will work better. When you are done, let just create one morely
on top tap on it, select clipping mask, go to our icon and select
overly blending mode. Capacity, we will set at
something around 55%. When we are done with it, let's just get back to
our color palette, let's elect the color
with name highlights, and let's just go to the
opposite sides from our shadows, and we will add our
highlight here too. First, let's just go
to the tips right here and maybe then
we will go inside the sheep and add a bit of
the texture parts right here with some little dots
or something like that. Then we'll move on to our stem and add a highlight here too. If you want to go
to some other areas and add little highlights there, you are welcome to
go and do that. Again, try not to overdo it and when you are
done with this bow, we are almost done
with our illustration. Now we just need to create some additional
peculiar elements.
7. Beautification: Firstly, let's just
go to our layers, and let's work onto
our lines here. Let's just get back to this
layer where we have recolred y lines and either on this
layer or by creating an ule. Let's just go and work
onto the outside lines. Let's actually go and create one more layer on top.
We'll tap on the layer. We'll choose clipping mask,
normal blending mode, go and firstly to
our color palette, and let's just go with
some reddish color. For example, let us go
with dark red firstly. We will go back to
our brush library, we'll go to the air
brush and folder, soft ble brush, and we will
go to some of the eras. Mostly, we'll be going
inside the shapes and we'll be going there and recoloring
our little lines here. Let's go and start
working on lines here and just going along
them and recoloring them. If you at some points decide
your little color right now is not enough
and you want to go maybe a little bit lighter
or a little bit darker, you are always welcome to go to your color palette
and change the color. You also can create some
gradients with this color. Just go and creating
the outlines in a different way if you want to try something
different here. Just go to the little
lines that you have inside and
recolor some of them. We also will go to the bow with the color with
the name green. Again, we will go more toward the inside parts and we will recolor these
little lines here. If you overdid some parts, if you recolor it some lines that she don't need to recall, just grab an eraser and erase the parts
that she don't need. When you are done
with your lines, when you are satisfied
with everything here, let's just get back
to our brush library. Let's just go again
to our inking folder. Let's select our
technical pen brush. Let's just go back to our s.
Let's just go to the bottom, and we will go to our La
where we have our skitch. From here, we'll
create one more Lia. We will go to our color
palette and we will select the color with the name
blush plus skin shadow. With this color, we
will go on the bottom and we'll create a little
shadow underneath. Let's just create a
shape on the alepse. We'll hold it at the end. We will go to our eten mode
if we want to adjust it, let's try to position
it horizontally. To position it horizontally, we'll just need to pay attention to the nodes that we have right here on the sides and we'll just need to put them on one line. When you have the
shade that you like, let's just stop
on the screen and let just drag and drop
the color inside. When we did it,
let's just go and add a few more
additional elements. Either on this layer
or if you want to can create another layer
for this keys, we will just go to
the folder that you downloaded with the
simple stem brushes, and we will find some
of the hard brush here. You can try a different of them. Let's just go maybe
with hard one. We will go to our
color palette and let's select the color
with name hair shadow. Let us go and adjust
the size of our brush. We can tit our canvas
to match the ration of our canvas and put our little elements in a direction that we
would like to see them. We can just go and put
a few of the hearts. For example, let us go with different sizes on
different sides, and we will just
go and continue by going again to our little
folder with the stem brushes, and we will select
Sparkle one brush. With the same color,
let's just go and again adjust the
size of our brush, and let's just go and add a few of these elements
outside our sheet. You can again go and adjus
the size of your elements. You can rater Canvas just by adding a few of
these elements. Let's then go and add
the color inside just by dragging and dropping the color
to these little elements. And when you did
it, let's firstly go to our color
palette, and again, we will select either
our ice yellow color or the color of the hair, and we will put a few more little sparkles with this color. Let's just go with
the bigger sides, and let's go to the
opposite sides and create these little elements
with this little color. When we did it, let drag
and drove the color inside, and also let a drag
the same color to these elements
with our hearts. Or if you want to experiment, you are welcome to go and
maybe select some other color, maybe the here color, and add
them to this little heart. And when you are
done with this task, we are done with
our illustration. Thank you for
watching this class, L e review, if you like it, and can do subscribing for more Clive videos in the future. Looking forward to
senior projects.
 Uni Corn, ⭐Kawaii Art Enthusiast⭐