Transcripts
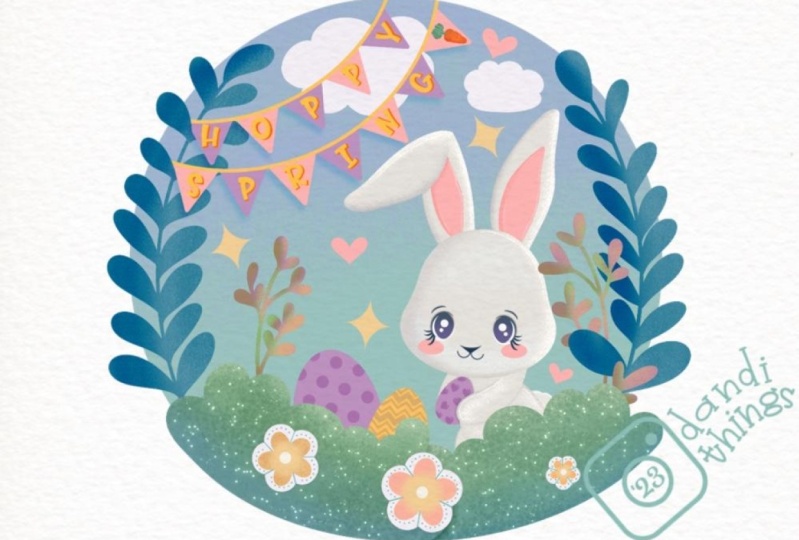
1. Introduction : Hello everyone, I am uni. And into this class, we'll draw a simple Easter
Bunny illustration. This class doesn't require any prior experience
or fancy tools. We'll start from scratch
and we'll be using simple techniques
throughout the process. Everything you'll see will
be happening in Procreate. However, if you
have other software or wants to try
traditional materials, you are welcome to join if
you are ready to start, Let's jump right into it.
2. Bunny Sketch: Let's start our
class by deciding what kind of Canvas we
are gonna be using. You can see it has a very simple standard square canvas because both pixel width and pixel
height are 2048 pixels. If you would like to use any other dimensions for
your canvas, just go for it. S for GPI, we are using 300
and S for the color profile. It is set as SRGB
with this low number. When it's all done, let's
hit Done and it will be read directly
to our new canvas. And now, if you would like
to use the same colors and the same brushes that you will see throughout the whole class. Please go to the Project
and Resources tab and download all the materials. When you have your color scheme, Let's just go and check
out what we have here. We have two options of how
we can use the colors, the comeback to
you, and the cards. We will go to the cars because here we can see the colors, names, and it will be easier for us to
navigate through that. When I still here into
our color palettes, Let's select our first
color and it will be the color with the name
dark sea and blue. We will use it for
creating our sketch. So I just tap on this color lips selected and when we have it, we will go and pick up some
brush as we are starting with this sketch ledgers go to this kitchen folder and let's check out
what we have here. You can select any
brush that you like. You can try it out
onto your Canvas, find what works for you. You can play around with
the size of the brush. You can play around with
the opacity on the brush. And basically you
can play around with the brush that
you want to use. So find what works for you and when you have
selected the brush, Let's just get back to our
Canvas and we will start very easily just by creating a
shape or the perfect circle. To do so, we will need to go to our Canvas and very easily
just with one line, without an holding
our Apple pencil, we will need to create a sheep. So let's just go and create this circle in the
size of our canvas. Hold your line and the end, and you will see that you snap your shape to a better one. But now it looks
like an ellipse. And we will need to have a perfectly round circle without an holding our
Apple pencil lead. Just hold one of our fingers
on the screen and you will see that you snap your shape
to a perfectly round circle. That's exactly what we need. If we want to make it bigger, we will move our Apple
pencil from side-to-side. If we want to adjust
it even more, we will unfold everything
and we will go over the top to this option that popped
up within the circle. This is our editor mode. When we are at the editing mode, we can see that we
have some nodes here and we can adjust them
to our liking. So e.g. we can squeeze our shape, we can make it bigger,
we can make it smaller. We can adjust the
shape in any way. And also here we can move our
shape and we can rotate it. Let's firstly go and
let just try to put our shape straight in the
middle of our Canvas. To do so, we will need to go to a blank space that we
have onto our canvas. We will need to hold
our Apple pencil there and we will just move
this shape to the needed. Please find what works for you. And when you are done with
positioning your elements, if you want to make it bigger or if you want
to make it smaller, you will need to go right
between your notes. You need to hold your
Apple pencil there and she will need to move
it from side to side. So when you are done, when you have
adjusted your shape, when it is something like that that you see
on your screen. Ledgers get away from
our editing mode. And to do so, we will need
to tap once on our screen, either with our Apple pencil
or with one of our fingers. If you overdo it a little bit, or if you miss the
opportunity to go inside the editing
mode, if you e.g. didn't have this option, we can adjust our shape in a different way by
using a transform to. Our Transform tool is the
arrow key on the top-left. And let's just go
and use this tool to make our shape a
little bit smaller. And also we will position our
shape right in the middle. What we need to do is to
tap on to our arrow key and we will use uniform
method on that bottom panel. You can see we have the bounding
box around our objects. And to adjust our shapes and
make it bigger or smaller, we will need to go to any node and we will need
to tweak it, e.g. to make our shapes smaller, we will go to the top
nodes and we will drag them a little
bit down. So e.g. ledgers go to our
unknowns that we have on the top-left and we
won't drag it down. You can see when we are
making our shapes smaller, we are attaching it
to the opposite. Note that we are tweaking. So we will need to position our element right in the middle, and we will do it in this way. We will go to our bottom panel and we will go into snapping. When you have this
little window, we will toggle
snapping here too. Now, if we go back
to our canvas and if we hold our Apple pencil
on some blank space, you will see that we
have some lines here. We will need to find one line that is going
from top to the bottom, which is orange, and
one line that is going from this side
to another side. And that way we will
know that we are putting our ship strictly in the center. When you have it, we will go and tap on our
heirarchy one more time and we will
continue by going to the layers and
renaming this layer. Let's just tap onto earlier. We will choose Rename and we will rename this
layer as Scheme. Also, let's make
these little elements a little bit less transparent. We will need it to
make sure that we are not distorted
by these elements. And that will be
easier for us later on when we're are going to be
creating other details. So we will need to change the opacity level on this layer. We will go to this icon near
the checkbox on earlier. And she can see that we have
this option opacity here. We have this slider which we can grab and which we can move toward the left side and make
the shape more transparent. So find what works for you, find what level of
opacity is best for you. When you are done, we will
tap once earlier with a scheme to close this
window when you have it, we will tap once a day plus icon and we will
create one more layer. This layer, Let's
rename as sketch. Now, let's just start by
creating our little bunny. We will start again by creating a very simple shape of
the perfect circles. We will go just inside
this shape that we have created and we will
create a little circle. So again, just with one line by holding our Apple
pencil at the end, we will create the shape. Hold your line and hold
one of your fingers on the screen to create a
perfectly round circle. Let's make it that big. If you want to adjust it, we can go to our editing mode. Or if it's easier for you, we can go to the Transform tool, position this element a
little bit differently. So let's just go to
the Transform tool and we will do the following. Firstly, we will
tap onto our arrow key and on the boards and
Google select uniform methods. We will need to position the shape a little
bit differently. So e.g. when we are
snapping is turned on, we don't want to put our shapes, treat it to the center. We don't want to position it right onto this
line that we have. We want to move it more
toward the right side. So in that way, we are
creating a better composition. We don't want everything
that we will be creating today
strictly symmetrical. We want to create a little
bit different composition. So e.g. let's position
it in that way and we will go and adjust
our shape a little bit more. You can see that on
the bottom panel we have the option work late, just tap on it and you will see that we still have
this bounding box, but it looks differently. We have some intersection
in the middle parts and we can go and adjust our
shape in a different way. So e.g. what we
need to do is to go firstly to the nodes
that we have on its own, and we will drag them
toward the center. So we will do the following. Firstly, let us go to our node that we have
on the top-right. We'll hold our Apple
pencil there and we will just move it slightly
towards the center. When you have
something like that, Let's do the same on
the opposite side. So again, we are holding our Apple pencil on
the nodes and we will try to do the similar thing that we had on our right side. Try to make it equal
on both sides. When you have this shape, we will go to the bottom nodes and we will do a similar thing. But this time we will drag our
nodes closer to the sites. We are doing the opposite thing. So firstly, the ledgers go to our node that we have on
their boards and rights. We will hold it and we will drag it more toward the right. We will do the same thing
on the opposite side. So let just hold
our node and just drag it closer to our left side. Try to keep the same distance and try to keep the
same curvature. If you want to play around with your sheep even more so e.g. squish it a little bit. We can go to our top part. We can go to the
middle into this line. We will hold our Apple pencil there and we will drag it down. If you want to play with
your shape even more, you are welcome to do it. Now we are creating a hat. So play around, find what works for you and
when you're done, Let's deselect everything by hitting our arrow
key one more time. When we have the
shape of the hat, we will need to
work on the body. So firstly, let us go to our
layers and we will create one more layer
because in that way it will be easier
for us to work. They just add on the plus icon. And if you want to
rename this layer, you are welcome to do it. If you want to
leave it as it is, you are welcome to this too, because later on we will merge all the layers together and
actually it doesn't matter. So when we have our new layer, we will go underneath
the shape of our heads and we will create another shape
on the ellipse. Let's just go and do it the
same way as we did before, just with one line and we will
hold this line at the end. When you hand the shape, we will go to the top to Alice and we will enter
the editing mode. What we need to do here is
to make an illusion that our rabbit is sitting and
it is sitting on its side. So we will need to take
a look at the back of our rabbits and also we
need to see some France. Let's just work onto this sheet. Firstly, we will go to this
node that we have only soap and we will drag it
a little bit down so our rabbit is
not that Chubby. When you have
something like that, you can position your elements a little bit lower or
a little bit higher. It's all up to you. When you have
something like that, Let's just go and
tap on the screen to get away from
our editing mode. Let's continue working on to our sheet and we will
do it in that way. We will go to the
left side and we will make this curve into
a more straight line. So what we need
to do is to go to this intersection between
the hat and our Alice. And we will create a line
like that going down. You can make it very
street or if you want, you can keep this slide
curve. It's up to you. When you have
something like that, we will grab our eraser
tool and we will erase this line that we don't meet when you have
something like that. We also can erase this
line over the top when we are overlapping
our shape with the hat. And when you are done, we are done with our body. Let's just go to our layers and let's merge these
two layers together. To do so, we will need
to go to the top layer. We will need to tap on it. And from this list we will
need to select Merge Down. Now we have everything
on one layer and let's just go and continue
creating our shapes. What we need to do
next is to go to our body elements to the left side and we will need
to create some Tammy here. So firstly, let's
just go and find an approximate center on the whole shape
that we have here. What we need to do is to create a line that will go
from top to the bottom. And that will go for the
approximate center of our shape. Let's just take a look at
our heads and we need to understand that we are creating a rabbit that is
sitting on its side. So our approximate center won't be right straight
into the center. It will be tilted a
little bit to the side. So in that way, when we are
creating our middle line, we will go more toward the left and we will create
something like that. Also, we will not
create our line, all this center with
a straight line. We will create a slight curve. So what we need is
something like that. At the end on this curve, we can hold it and
we can go to Word are editing mode and
adjusted even more. We will need to
keep our right side a little bit bigger
than our left side. When you have
something like that, Let's just tap on the screen to get away from our editing mode. And let's just go to the body. And we will create
this tammy part in accordance with this
line for the timing, we can go with a
simple shape of half of the ellipse or
half on this circle. Or we can create
something different. So e.g. we can work with
the shape of the heart. Let us go to this line
that we have just created and we will use
it as a middle line. So firstly, we are
going right to this line and we are
going to the left side, we are creating a
little curve like that. You can play with
the distance from the hat and you can play with the distance
from the bottom. It's all up to you. When you have
something like that, we will do to the
opposite side and we will need to create
something similar. But this time this shape
will be a little bit bigger. So let's just go and create
something like that. When you have it, we will
go to the bottom and we will need to connect the
shape with smooth lines. So let's start from
our right side and we will go and create
a curve going down. You can make it manually
or if you want, you can hold your line
at the end and snap it to a better shape with
a quick shape tool. When you have
something like that, we are done with our
Tommy and we will go and continue creating our shapes
on the top of the hat. Let's start by
creating the ears. We have this line of symmetry and we will
go above our hats. And who will create
two straight lines going in the same direction. You can select the
direction that you like. But e.g. alleges grade
something like that. When you have these
straight lines, we will need to turn them into the curves and we will
create our ears here. For the ears, we will be having the shapes of very
elongated ellipses. Let us go above our first line
that we have on the left, and we will create two
more straight lines. We will need to connect these firstline that we
are creating on top of it with the shape of our hats and just elongate
the line like that. And then we will go under it and we will create
another straight line. You can play with this
size on the ears. You can play with the direction, You can play with everything. When you have your first slides, ledgers, you're on top of them. And let's connect these
two lines with a curve. When you have
something like that, you can play more
with this shape. And when we have the
first shape of our ear, ledgers go underneath
it and let's create a similar shape going
down the same way. We already have this first
line that is straight. We will go to the bottom and we will create another
straight line. Try to keep this size on this ears similar
to the first one. And when you have
the second line, ledgers go toward
the top part and we will connect it with
a little curve. Play around with your ears. If you want, you can make
them a little bit softer. Or if you want to play around
with the shapes even more, you are welcome to do it. Try to make a smooth connection between the shape of
the hat and your ear. And when you are done, ledgers grab the
eraser and let's erase all the lines
that we don't meet. When you are done with
this part lectures, you're inside the shapes of
our ears and we will add this inner parts that later on we will recolor
it differently. So basically we will need
to go inside the shape and we will need to repeat
the shapes of the ears, but we will need to
make them smaller. So ledgers go and do that. And when you hand the
shapes for your ears, we are ready to go to the hat and we are ready to
work on it even more. So what we need to do firstly, we have this line that is
going from top to the bottom, and that is defining
our approximate center. We will go and
create another line, but this time it
will be horizontal. And again, we don't want to create it with
a straight line. We will need to create
a slight curve. Let's just go and find an approximate center by
creating our zone Markdown. And we will go across the whole shape and we will
create a horizontal curve. Hold it on the ends, a jazz the angle tried to
make it even on both sides. If you need to adjust it, we will go to the
editing mode and we will play around with our curve. When you have
something like that, Let's just tap on
the screen and we will get away from
our editing modes. Now what we will do, we will go to our left side and we will create
a little dance. These terms will
help us to show that our rabbit is
sitting on its side. Basically what we need to do, we will go to this
intersection that we have between the
ear and our hats. And from it, we will go down and create the
dance-like that. We are separating Irish shape. We are creating the
top part of the head and the bottom part that
will represent the cheek. You can play around
with this dance. You can make it more prominent, or if you want, you can
make it less prominent. It's all up to you. When you are done,
we will just grab our eraser tool and we will erase everything
that we don't meet. Remember to make a
very smooth connection between all the shapes. If you need to adjust some
parts with the brush, you are welcome to do it. Now when we have made this little gentle edges go and work onto the
facial features, we already have our
little cross that is showing us where's
the center only shape. And we will go to this line that we have on the horizontal axis. And we will start by
creating little ice. Get started by creating
the shape of the circle. Let's go over one of
the sides and we will create this shape here
the same way as before. We are holding our
line and the ends. And if you want to create
a perfectly round circle, hold one of your
fingers on the screen. A jazz decides, and if you
need to adjust the placement of this element ledgers go
over the top to editing mode. If you want to make
this shape smaller, just zoom in your Canvas and
you'll between the nodes, hold your Apple pencil
there and adjust the shape. So e.g. let's leave it
at something like that. And when you are done, Let's just tap on the
screen and we will get away from our editing mode. When we hand the first
shape for our eye, Let's just go to
the opposite side and we will create
another eye here. And as we are working a little bit into
their perspective. So we have our left side a little bit smaller
than our right side. We will need to do the
same with the eyes. The distance between our eyes will be different
from the center. So our eye that is
on the left will be closer to airline that
is on the center. And our right eye
will be a little bit farther from it and it will
be a little bit bigger. So firstly, let's just
go and create our shape. We will create it
just with one line. Who will hold our
line at the end? We will hold one of our fingers and we will go to
the editing mode. Let's just move this new
shape to our first shape, and let's make it
slightly bigger. When you have it, We will
move this shape back and we will keep the distance from the center a little
bit bigger too. When you have it, we will just go and tap on the screen and we will get
away from our editing mode. Now, let us go inside the
shapes of our eyes and we will shade them so very easily just by
grabbing our brush, going inside the shape and
we are adding the tint here. Now let's work more
once our eyes. Firstly, we will grab
our eraser tool. And with the eraser tool, we will go and add
some highlights here. First of all, we'll go to our
eye on the left and we will go to this quarter that
we have on the top-left. We will create a little
shape like that. So we will just go with
a straight line going down and then we'll
create a little cross. If you want to keep up this shape, you are
welcome to do it. If you want to play around with the shape you are
welcome to do to e.g. you can add some dots or e.g. you can add some little
sparkles or anything that you come up with when you
have your first highlights. Let us move on to
the opposite eye and we will do the
same thing here. We will need to put the
highlights on this similar place. Again, grabbing our eraser and doing the same
thing as we did before. As we have this eye
a little bit bigger. Let's make the highlight
a little bit bigger too. When we have our highlights
ledgers get back to our brush and we will go and continue agent or
facial features. So we will go between our eyes and we will start by
creating a little nodes. We will create a nose in
a shape on the triangle. And we can create a triangle in the same way as we have
created our previous shapes, just with one line. And we can do just by going
to any place that is blank. And we can create our shape
here, hold your sheep, and the ends and ledgers go to the editing mode and
we will adjust it. If you have the option
triangle selected. If you don't have it, you can
work with any other sheep. Now when we hand the
triangle alleges, move it right between the eyes. And let's just
work on the shape. Let's try to make this
line on the top street. And if you want to play
around with the size of it, or if you want to play
around with other nodes, you are welcome to do it. Also, you can play around with
the position of your nose. You can put it higher or
you can put it lower. So e.g. let's just put it straight on this line that
we have in the center. And when you hand the
shade that you like, Let's just tap on the screen
to get away from this mode. We will go inside the shape
and we will shade it. And also we will
work on this site. We will make the corners that
we have on our triangle. Note that street. We will turn them
into the curves. We can do it with our brush
or with our areas are. So let just go across our little corners and
we will soften that. And again, we will
need to work in accordance with our line
that we have in a center. So our sheet on the
right side will be a little bit bigger than
our shape on the left. And when you have the nose, we will go underneath it and we will create a little
Smiley mouth. So firstly, let us go
over our left side. We will go strictly underneath the nose and we will
create a curve, go into the left, play around with its size, play around with its
curvature, with its position. It's all up to you
if you want to adjust it due to
the editing mode. When you hand the
shape that you like, Let's just tap on the
screen and let's go to the opposite side and we
will do the same thing here. But remember that these
shapes should be a little bit bigger than
our shape on the left. When you aren't down
link just go underneath the eyes and we will
add little cheeks here. Firstly, going over
our left side, going strictly
underneath the eye, go with Alice will be
toward the left side and creating a
little ellipse here. You can play with this size. You can play with the
position, you can play with, everything that you want to play with when you have the
shape that you like. If you need to adjust it, go to the editing mode, and when you have it, we will go to the opposite side and we will do the
same thing here. But remember, each should
be a little bit bigger. Try to find a similar
placement if you need to adjust this size
and if you need to make sure that it is
a little bit bigger, you can move your shape
in the editing mode to your previous shape and
find out if it's working. When you are done, we
will just move it to the opposite side
and we will try to find the placement for it. When you are satisfied with
the position of the cheek, we will just tap on
the screen and we will get away from
our editing mode. Now Linda, zoom out our canvas and let's take a look
at our array bits. If we want to adjust
it in any way. E.g. we can make this shape
a little bit smaller. And also we can work
on to some elements. We will go against our
arrow key on the top-left. If you want to make it smaller, we will go to our uniform method and we will make it smaller. So e.g. let's just go
to one node that we have on the top and
we will drag it down. Let's find the placement
that works for us. If you want, you can move it
more toward the left side, more toward the right side. Just find the position that is not strictly in the center. If you want to work
more on the sheet, we will go to the warp
option and we can play with our whole body of our bunny
from this Warp option, if you want, you can make it a little bit chubby
or if you want, you can just play around
with the position of the facial features or with
the position of the body. It's all up to you. Just spend some time here
and find what works for you to play with some
elements separately. E.g. you want to make your facial features a
little bit differently, or if you want to make
them bigger or smaller. If you want to
position them a little bit higher or a
little bit lower, we will need to do these things. Firstly, we will go to our S ribbon icon that
is near our arrow key. This is our selection tool. On the bottom panel, we will select
freehand methods, e.g. if we want to work with
our facial features, we will deal with
this freehand method and we will select
these elements. We will need to learn
this shape around. And when only this
area is selected, we will get back
to our arrow key and we will work only
with the selected area. So e.g. if we want to position our facial features a
little bit differently, we'll get back to
our uniform methods. And if we want to put it a little bit lower or
a little bit higher, we will just go and do that. So play around and find
what works for you. And when you are done, Let's deselect
everything by going to our little elements
on the top-left. And we will select our heirarchy one more time to
deselect everything. Now, let us take a
look at our bunny one more time and if
you're satisfied with it, we are ready to move
on to the next part. We will add our
additional elements.
3. Surroundings Sketch: Let's try this byte by going
to our layers and we will create one more
layer on which we will be making our graphs. Let's just add on the plus icon. And if you want to
rename this layer, you are welcome to do it. If you want to
leave it nameless. Again, you're welcome to do it. Now, when we have our new layer, we will go to the bottom
part of our illustration and we will start creating
this transforming graphs. We want everything to be
very cute and very rounded. So instead of creating very
pointed strands of grass, we will be creating
some loops in a shape of half of the circle
or half of the ellipse. We can play around with the
position of these elements. We can play around
with their size, we can play around
with their direction. We can play around with everything that we want
to play around with. But what we need to
remember right now is that we want our
composition to be balanced. So let's just go firstly
over our right side. And on this bottom part will
be creating a lower graphs. So let just start
creating some loops and we will create our
grass in that way. Play with the direction, play with the size,
overlap your bunny. And when you reach the
side on the right, when you are doing beyond
the frames that you have, we will just go and create
a few more strands. And when you reach the bottom, we will go and create a very
simple shape of our curve. Let's just go and close
this shape in that way. So basically we
are full when the direction of our scheme
and when you have these ledgers go
over our left side and we will continue
creating our graphs. On the left side, we would want our grass to
be a little bit higher. So we will create some
balance onto our composition. When we are creating
our composition, we don't want everything
to be symmetrical, but we want to keep the weight, the visual weight
that we have on our illustration
equal on both sides. So we will be creating
different objects and we will try to balance everything out with this different objects. Now, let us go over
our left side and let's just go and create
some taller grass. Again. You can play around
with the direction. You can play around with the
amount of these elements. You can play around
with everything that she wants to
play around with. When you've reached the boards. I'm ledgers go and
create the curve. And we will combine
these two parts of the graphs together
with a curve. Now take a look at your grass. If you want to adjust
some elements. If you want to add something
on one side or another side, you are welcome to
do it if you want to go to the Transform tool
to the warp option, if you want to play around
with your little dots here, you are welcome to
do it's too late. Just spend some time here
by adjusting our graphs. And when you're satisfied
with your grass, let's just deselect everything. If you were using work method, we will go again to
our layers and we will create another layer
for our next elements. So let's just tap on the plus icon and if you
want to rename this layer, you can call it leaves. Now let's just give
it to our new layer. And what we need to do is
to get back to our Canvas. And we will start very easily
by going to our left side. Firstly, we will go a
little bit closer to the middle part and we will
create a curve like that. As always, you can play
around with its size. You can play around with its curvature, with
this position, with everything that she
wants to play around, with, all you need to remember is that we will need to
create a composition. And everything that
we are creating on the left side should be somehow similar to
everything that we have on our right
side, weight whites. So when we have our
first line like that, we will need to go and balance
it out on our right side. So we will go a little bit
behind our bunny and we will make another curve similar
to this one but mirrored. And it should be a little bit smaller to let us go and
create something like that. When you have these
two branches, we will go and add some leaves. So what we're gonna
be doing is going to the both sides of
our little line. And we will be
creating the shapes of the drops, something like that. As always, you can play
around with their size, so you can play around
with their position, with everything that you
want to play around with. If he wants to create different
shapes of your leaves. Again, you are welcome to do it. When you're done with
your first branch. Let's move on to our right side and let's add the
leaves here too. When we have these branches, ledgers go again to our layers and we will
create one more layer. Onto this layer, we will
create bigger leaves. So if you want to rename
this layer as bigger leaves, again, you're welcome to do it. When we have this
new layer ledgers, get back to our Canvas. We will go closer
to the edges of our scheme and we will
create bigger leaves here. So again, we are starting
by creating some curve. This time you can create
some peculiar shape. So e.g. not just a very
straight curve like that, but you can go and create
some pattern with it. So e.g. the line like that, that is going toward the
center will go, well, when you have the first
line on the left leg, just go over our right side and let's create
something similar here. You can repeat this
same shape on the line. Or if you want to play around and find
something different, again, you're welcome to do it. And again, to keep
everything balanced, we can go with the
bigger shapes on our left side and with smaller
shapes on our right side. When we have these two lines
of direction of our stamps. Just go and create
bigger leaves. Again, if you want to play around with the
shapes of the leaves, you are welcome to do it. If you want to go with
something classical, you are welcome to do. So e.g. let's just go and
create bigger leaves like that. And to make the leaves a little bit more interested in ledgers go inside of them and we
will add some cuts there. So you can play around
with the shapes or you can go just with simple
shapes of the ellipses. As always, you can play
with their amounts. You can play with their shapes. You can play with everything that she wanted to
play around with. If you don't want to
add this little cards, You are welcome not to add them. When you are done
with the left side, let's move on to the right and let's do something similar here. Aging beliefs. And when you are done with the basic shapes on the leaves, ledgers go inside of them. And if you were eating your little elements of
cards on the left side, let us go to the right side, and let's do the
same thing here. When you're done with
the second stem, ledgers go to the bottom of these two elements and we will add a few more grass strands. So let's just first look,
you're over our left sides and we will add a
few lines like that. You can play around with
their size on this elements, you can play around with their thickness and
with everything, you can overlap the objects. Just find what works
for you and add a few more strands on the grass. When you have it
on the left leg, just go to the right and
we will do the same thing. Basically what we
want to do is to go to this intersections between our main grass and
these two stamps and make this transition
a little bit better. When you are done with
adding these little strands, all the grass ledgers
go and create one more layer on which we will add some miscellaneous objects. So again, let's just
go back to our layers. Let's just tap on the plus icon. If you want to rename this
layer as miscellaneous, you are welcome to do it. Firstly, let us go to the top. And between these two stems, between these two elements, we will create a little
clouds very easily. We will do it by
creating two ellipses, one vertical and one horizontal. So firstly, let's
just go and create one sheet that will be vertical
the same way as before. We can hold it at the end. If you want to adjust it, go over the top to
edit and modes. You can play around
with this size. You can play around
with everything. You can find the
placement for your clouds the way that it's not
overlapped by the leaks. So e.g. let's leave
at summary here. We will type on our screen to get away from the editing mode. And now we will go and
create another ellipse, but this time it will be aligned horizontally the
same way as before, just creates an Irish shape
holding it at the end, we will adjust it by going
over the top to edit in modes, play around with
the thickness of this shape layer
and with its size, find the position that you like. You can make it
very symmetrical, or you can leave it
as it is right now. You can play around
with the position of these elements and when
you're satisfied with it, let just tap on the screen. We will grab our
eraser tool and we will erase all the
lines, insights. And when we have
our little clouds, let's again get back
to our brush ledgers, go and feel some areas that are blank right now with
other objects, e.g. firstly, let us go
to our grass on the bottom and we can
add some flowers, maybe butterflies, maybe
some stars or sparkles. Everything that she
wants to add here. Let's just go and
add three objects. When you have your
additional elements, let just go to this very
blank space in the middle. And we can add
some hearts there, or some doors or some sparkles. Everything that you
want to add here, try not to overdo it and let just add three more elements. When you are done
with this part, we can go and add some x. So e.g. we are creating the composition of
the Easter Bunny. We should have some x there. So e.g. let's just go to this part where
we have our leaf, where we have our grass and we will add our little egg here. For the app, you
can start by going again to the layers and
create one more layer. And you can start by creating
the shape of the ellipse. And if you want to
adjust it and make it more of a shape of the egg, we will go back to
our Transform tool. We will go to our work methods, and we will go to
the top and we will drag our little nodes insights. When he did it on the top, we will need to go
to the bottom and we will need to widen
these bottom parts. So that way we will
do the opposite. We will give it to our
nodes on the bottom and we will drag them
outside of our shape. If you want to play around
with your shape even more, you can go and do that
when you are ready, you can just get back
to your transform tool, use uniform methods and find
the position of the act. But before starting, let
just make one more copy. Or if you want to
add more copies, if you want to add more
acts to your composition, you are welcome to
create multiple qubits. To make a copy, we will need
to get back to our layers. We will go to our
layer with the app. We will swipe it from right to left and we will
choose Duplicate. Again. We will go back to
our Transform tool and we will find the position
for these elements. If you want to add
some other elements, if you want to play around, you are welcome to do it. The very last thing
that we will add here, we will go again to our layers. We will create one more layer, and we will go to the site, to the top part of
our composition, right behind our leafs
that we have on the top. And we will create some wobbly shapes that later on we will color it differently and
it will be very nice. Let us go firstly,
our left side, we will go to the top-left and we will create a
wobbly shaped like that. We will overlap the
shape of our leaves. You can play around with
the size of these elements. You can play around
with its position. If you don't like how
it looks right now, when we have only one
object right now, we can just go back to
our Transform tool. Uniform methods play
around with the shape, make it bigger, make it
smaller, adjust the placement. If you want to rotate
it, rotate it. If you don't want to
add this element, again, you are welcome
not to do that. When you find a
placement that you like. Let's just deselect
everything and we will go to the opposite side and we will
add something similar here. This time we can go with a
different shape and we can make it a little bit smaller
if you want to adjust it, we will firstly need to
go to our selection tool, which is our S ribbon icon. We will need to use
free hands method. We will just select this object. When only this
object is selected, we will get back to our
Transform tool, uniform methods. We will drag it to the place
that we want it to be. And when you are done, let's just deselect
everything by going to our S ribbon icon. And now we need
to take a look at our illustration and decide whether we want to
change some parts. Very conveniently, we have all of our objects on
different layers. So we can go to the needed
layer and we can adjust it. So e.g. we can go to
hourly within grasp. We can select it, we can go to our Transform to
uniform method and e.g. we can drag it a
little bit dark. So find what works for you. If you want to adjust the
placement of some elements, go and play with them. If you want to adjust
the position of them. If you want to add
some elements, again, you're welcome to do it. Remember that we will need
to keep some balance and we will need to have our elements
on the left width-wise, similar to the elements
that we have on the right. Now, let's just take a
look at art illustration. And if we want to
adjust some pirates, let just go and adjust them. If you want to clean
up this sketch and if you don't want to have
some overlapping elements, you can go to the needed layer, grab the eraser tool and
erase the overlapping parts. If you are satisfied without
error, friend looks, we can go and merge all of our layers with this
sketch together. And you need to do that only when you are
satisfied with how your sketch looks and when you don't want to change anything. So when you are satisfied
with your sketch layer, just go and merge all
the layers together. To do so, we can go
to our top layer, we can tap on it. We can choose merge down. You can see that in
that way we are merging only two leaves together and
we don't want to do that. We want to merge all of our leaves with a
sketch together. To do so, we will need
to go to our top layer. We will need to put
one finger there, and the second finger
we will put owns our bottom layer that
belongs to our sketch. So if you want to include
this scheme lines here too, you will put your
finger on the scheme. If you don't want to do that, you will go and put your
finger on the sketch. And when he did it,
we will just go and make the pinch movements. And now everything that we have for our sketch is on one layer. And the very last thing
for our sketch will be to go and adjust
it to our Canvas. We will need to put it
right in the middle. So again, we're arguments
are transformed, so we will go to Snap and
if it's not turned on, we will turn snapping. By using uniform method. We will go and position our whole illustration just
in the middle of our Canvas. We will need to follow
these two orange lights when you're satisfied with it. If you don't want to do
anything else for your sketch, we are welcome to
continue by going to the next chapter where we are going to be
aiding our colors. If you want to play
around with your sketch, if you want to go
to work methods and maybe find different shapes, you are welcome to
do it if you want to make your illustration
smaller or bigger. Again, you are welcome to do it when you're done
with your sketch, ledgers, jump into the next part where we will add our colors.
4. Adding Basic Colors: Let's begin this part
by going to our layers, and we will create
one more layer. We will name this
layer as backgrounds. For the background,
we would want to go to our back and we would want to create the shape of this circle that we have
in the backgrounds. But before doing that, we will need firstly to
go to our color palettes and select the color that
is called backgrounds. When they had this new color, we will need to go
and change the brush. So let's go to our
brush library. We will go to the
calligraphy folder and we will choose monoline brush. When we have selected our brush, we will need to tweak
just one option over it. We want our lives
to be very soft, very smooth, not very giant. So we will go and adjust
the smoothness of our line. Let's just tap on this brush and we will go to
the brush studio. On the left, we will go
under stabilization. And you can see on the top we
have the value streamline. If they're amounts of
streamline is low, our line will be very natural. It will follow the direction
of our natural floor, so it will be pretty jagged. If we go to our drawing pad, we can try it out and we can see how our line will look if we want to adjust it and if we want to create a
very smooth lines, we can go to this
option amounts, we can adjust it e.g. to maximum and we can go
against our drawing pad and you can see how
smooth this line is. So you can play around with
the amount of streamline. If you want to keep the
natural flow of the hand, you are welcome to do it if you want to create
more smooth lines. Again, you are welcome to
play around with this amount. You can always get back to this option and
adjust it even more. So when you are done
with this option, like just hit Done. Well, I'll go back to our
Canvas and we will go and recreate the
shape of the circle. Let's just go and
do that whole July and end the ends and
try to make it similar to the shape that you had on the sketch if you
need so you can hold one of your fingers on the screen and if you need
to adjust it even more, we can go over the
top to circle. So try to make it similar
to what you had before. Try to position it
on the same place. And as you can see, now, we don't see our sketch because our new layer is overlapping it. So we can go and change it by
going to the layers and by moving our background layer underneath our layer
with this scheme. To do so, we will need to go to our layer with backgrounds. We will need to hold
it and we will need to drag it under our layer
with this scheme. Now you can see everything
very clear and we will go and just drag and drop the color inside the shape. Firstly, we will need to make sure that our shape is closed. When our shape is closed, we don't have any gaps
between our lives. So let's just zoom
it in ledgers, checkout whether it's closed. If it's not close, you won't be able to add the color inside. It will leak out. So now when you are
satisfied with it, when you know that you
don't have any gaps. Just go over our
top-right corner. We will hold our Apple
pencil there and we will drag it to
the inside parts. Now we have our backgrounds. So now let us get back
to our layers and we will be creating a new
layer for each element. So just imagine that we are
creating something from the paper and we will need
to layer everything up. So when we have our
background layer, ledgers go tap on the plus icon and let's rename
this layer as bunny. Now when we have
our boundary layer, we are going back to
our color palettes. And let's select the color
with the name cream. With this color,
we will go around the shape of our bunny and
we will create the outline. So let's just go and do that. We will need to keep
all of our lines very smooth, clean and closed. Just go and create this outline. If you feel that your layer
with the sketch is too bright and you don't see
what's happening once a year earlier when you
are creating the lines, we can go and adjust the opacity of our
layer with the sketch. So when we are changing
the opacity level, we will be making our elements on this layer more transparent. To do so, we will need to
go back to our layers. We will need to go
to our skin layer. And you can see that we have a little icon near the chat box. We will tap on it
and you can see that we have our slider with opacity. We can grab it and we
can drag it towards the left side until we still see what's happening
onto this layer. But when it's not that
bright and that disturb it, when you're satisfied
with the opacity, we will tap on our skin
layer one more time. We'll get back to our
layer with the bunny and we will continue
creating our outline. You can use all the tools
that we use before. So e.g. if it's
easier for you to create the line and
hold it at the end. You can do that
and you can go to the editing mode and
adjust your line. And you don't need to create a smooth line just by going
along the whole shape. You can go and
create some parts on the line and then smoothly
connect them together. And also you don't need to
repeat everything that you have on your sketch with
100 per cent of similarity. If you want to
adjust some parts, if you feel that maybe
you want to create smoother curves or maybe
more curvier curves. You are welcome to do it. Now when you have the
outline lynchings, go and check out
whether it's closed. And we can do it by going
to our layers and we can hide our layer with this
scheme just for a second. We will need to go to
this little checkbox on earlier with this scheme. We will tap on it and we will hide earlier with this scheme. Let's just go and
check out our outline. We will try to make
it close so we don't need to have any
gaps between airlines. And also we will go and try
to create smooth outlines. So if you have some elements, if you have some places
that you need to adjust. You are welcome to grab the
eraser tool and adjust them. For now you will need
to pay attention only on the outside part
of your lines. And when you are done with
your outline one more time, let's just go over our
top-right corner and we will drag and drop
the color insight. We will get back to
our layers and we will unhide our layer
with this scheme, and we will go and add
additional elements. So e.g. we can go and create one more layer for our
additional elements such as belly that we have
on our Bonnie for the inner parts of the ears
and for the facial features. So first I would just go
and create one more layer. We can rename it as detects. And also while we're still
here into our layers to make everything clean and to make everything logical
into our layers. Let's just go to this
layer with details. We will tap on it and we
will choose clipping mask. We are attaching this new
lead to a previous one. And that means that when we
are eating the details on this new layer will
be a1 them only on the places that we have
on the previous layer. Let me show you
what it means, e.g. we will go to our
color palettes and we will select the color
with the name yellow. We will go to this part of the chest and we will try
to create something here. You will see if you're
arguing beyond the frames, you are not creating
some elements. You are working only on the existing pairs that you
have on the previous layer. So now with this color, Let's just go and recreate
this part for the belly. You can make the closed shapes to just drag and drop
the color inside. Or you can go manually and create the color
inside this part. When you add Zan ledgers, get back to our layers. We will hide our layer with this scheme just for
1 s to check out whether we need to adjust some parts owns
early with details. If you want to adjust
some parts here, if you want to smooth
your little lines, if you want to make
them more curvy, or if you want to adjust
the lines in any way, welcome to grab the
eraser to you're welcome to grab the
brush and adjust them. Try to make everything
very smooth. When you are done, let
us get back earlier with this scheme and we will
go to our color palettes. We will select the color
with the name pink. And when this color, we
will go to the inner part of the ears and we will
recreate the shapes, drag and drop the color inside this inner
part on the ears. And when you are ready, ledgers get back to the layers. We will hide our layer with
this scheme and we will check out whether we need
to age as this inner parts. If you want to adjust
them in any way, you are welcome to do it. When you are done one more time, we are getting back to
our layers and we will unhide our layer with
this scheme one, this same layer,
we will go and add a little line between
our hats and the body. And also we will
separate our ears. We will go again and select the color with the name yellow. And as we already have
it onto our canvas, Let's just go and select the
color in a different way. We will go to this color
that we need, yellow, one that we have on the chest
and we will hold one of our fingers there until
we have this little tool. This tool is called
the eyedropper tool. With this tool, we
can move our finger and find the color that
we want to select. So in that case, we are
giving to the yellow color. And when we have these two, recolor it on the top, on the color that we need. We will just on hold our
finger and we will go to the parts that we need to adjust and we will create
our lines here. So now let's just go and
decrease the size of our brush. And we will go and repeat this line that we have
between our hats. We don't want to create a solid line going
across the whole shape. We will just go and create
a few lines. So e.g. then just tap a little bit from our left side and we will go
and create our curve there, hold it and the hands
adjusted ledgers go somewhere to the
middle part of the body. And when you are done, we will go and create the
doted lines later on. So let's just go and create some dots and some little lines. When you have
something like that, we will do something
similar to the ears. We will go right in between them to this line that we
have on this gauge, and we will create
a dotted line too. So again, if you want, you can start from
some middle part or just going closer
to their hats. It's up to you where
you are starting your line and when
you are ending it. So create some lines to separate
two shapes and ledgers. Get back to the
layers we will go to earlier with a scheme to
this little checkbox. We will hide this layer and we will check
out how it looks. If you want to adjust
it in any way, you are welcome to do it if
you're satisfied with it. Let's continue again by going to the layers and unhide in
earlier with this scheme, we will go and create one more layer for
our facial features. So again, the same
way as before, just going above earlier
with the details, we are tapping on the plus icon. Let's rename this layer
as facial features. Let's clean this
layer to our bodies. So we are tapping on our layer
and select clipping mask. When we are done with it, we are going back to our color palettes and we
will select the color with the name dark sea
and blue LED gels go firstly and start by creating
the shape on the nose. So we are just giving their
entropies in the sheep. And the color inside adjust
the shape if you need to. And when you're done
with the no-slip, just go underneath
it and we will add our little
mouth if you want, you can play around with
the size of your brush. And when you are done, Let's just go and
increase the size of our brush and we will
put the dots for the eyes if you see that the amounts on this size
is not working for you. So your maximum
size of the brush isn't enough for putting
the dots to the eye. We can do the follow-up. We can go back to
our brush library. We can go to our monoline brush. We will go inside the brush studio and we
will go into Properties. You can see on the bottom we have the option brush behavior. Here. We can adjust the maximum size. So e.g. just put it at 100 per
cent and when you're done, you will go and you will see that now your size of the brush is adjusted and you can
create a bigger brush size. So now let's just put our eyes. Remember that our
eye on the left is a little bit smaller than
our eye on the right. So let just go and
do the justice for the eyes and just put
them when you are done, Lynch's get back to the
smaller size of the brush, and we will go back to
our color palettes and select the color with
the name pink or red. With this color, we will
go and add our cheeks. You decide what
color you prefer. Repeat the outlines
on the cheeks and then just drag and
drop the color insights. And now lenders get back and work more ones
that our eyes. Firstly, we will go and
change the brush so we will be adding some
little eyelashes. Let's just get back
to our brush library. We will see at the
calligraphy folder, but we will select the
brush with the name script. With this brush, we
will go and select the same color that we had
for our facial features. So let's just use
our eyedropper tool. Hold your finger on the
color and when you are done, we will go to the outside parts, all the i's and we will
add our little eyelashes. These new brands that we
have selected is very responsive to the pressure that we are putting
to create this slide. So when we are pressing normally or when we
are present to match, our line will be pretty sick. And when we are
releasing our pressure, we will be creating
a very thin line. And in that way we can help
ourselves with our eyelashes. So we will start normally and then we will
release some pressure. And in that way we will
create our curves. Firstly, let us go to our eye
that we have on our rights. And we will go a little bit below the middle
part on the right. And from it, we will
start creating our curve. Let's just go and try it out. And you can play around
with the pressure. You can play around with
the size of this element. You can play around
with the curvature, with anything that you
want to play around with. All you need to do is to create a few lines to represent
our eyelashes. And you can play
with their amount. If it's not happening
from the first try, just write out one more time. When you have the
eyelashes that you like. Let's just go to the
opposite side and let's add the
eyelashes there too. Let's just go and
try to do that. If it's hard for you to create the lines going in the
opposite direction. Maybe you are used to
create the lines just go into the right side
or to the left side. We can do the following. We can go to our wrench
icon or the top-left. We can go under canvas. Here we have the option
flip horizontal. And this option
might help you to create the lines in the
familiar direction. And it's when
you're done editing your eyelashes so
you can get back to the wrench icon and flip
the canvas back again. And now let's just finish up our binding by aiding the
highlights to the eyes. Firstly, we will go to our brush library and we will
find this branch that we have downloaded from
our Project and Resources tab, the
sparkle brush. When you have it,
we will go back to our layers and just
for convenience, let just go and
create one more layer which will run them
as highlights. Now when we have our new layer, we can go and clip
it to our bunny. So let just tap on the layer
and choose clipping mask. And when we did it, we will get back to our color
palettes and we will select this white color with the name of light
grayish orange. When we have this color, Let's just go and put just one word with
our little brush. You can go to some place that is convenient, that is colorful. And when you have the sparkle, we will go to our Transform
tool and we will grab it and we will move these
sparkle to the eye. We will adjust its placement, we will adjust its rotation. We will just go to
the place where we have our little
highlights on our sketch. We will try to put
it somewhere here. If you want to make it bigger, you are welcome to do it. If you want to make it smaller. Again, you are welcome to do it. Now Let's just go and deselect everything by hitting
our arrow key. And we will go back to the
layers we will hide earlier with the scheme
and we will check out how our highlight folks, probably it is not too bright, so we can go and create a copy
on this highlights layer, and we can merge
them together to make this highlights a
little bit brighter. So let's just go to earlier
with highlights ledger, swipe it from right to
left and choose Duplicate. Now I can see that
it looks better. So let's just go back
to our layer with highlights that we
have created just now. There could be one. We'll tap on it and we
will choose merge down. Now we will need
to create a copy all these elements
and we will need to drag it to the opposite side. So again, we will go to
early with highlights. We will swipe it from right to left and we will
choose duplicates. Now when we have
this second layer, we will get back to our
arrow key on the top-left, and we will just drag these
elements to the opposite eye. Let's try to put it
on a similar place. Ethan, you to adjust
it in any way, make it bigger, maybe
adjust the rotation. You are welcome to do it. When you're done,
we will just go and deselect everything by
heating our arrow key. Now we will get back to
our layers and we will combine these two leaves
with highlights together. We will go to the top one, we will tap on it and we
will choose merge down. Now we have our
highlights and we are ready to get back to our
layer with this scheme. We are ready to
unhide it and we are ready to start adding
other elements. So again, ledgers go and
create one more layer and we will rename
this layer as grass. Now let's get back to
our monoline brush, which is in our
calligraphy folder. And we will go back to the
color palettes and we will start by selecting the color
within the blue-green. When this color, we will
go to our right side and we will recreate this
right part of our graphs. Let's just go and start
by creating the outline. Let's make the clothes
outline and we will go and check it out by Haydn
earlier with this scheme, we will make it
smooth as we can. If we need to adjust some parts, we will just go and adjust them. When you are a plant
is smooth and close. Let's just go and drag and
drop the color insights. When you are ready, we will
get back to our layers. We will unhide early with the
scheme and we will create one more layer for the
left part of them crafts. So let's just go and tap
on the plus icon and let's rename this layer
as grass to Nao Lynn, just drag this layer underneath our layer
with the first grass. So we will hold this
and we will drag it down when we have it
on the needed, please. You might notice
that it cleaves to a previously and we will need
to turn it off manually. So we will tap on this
layer with grass tube and we will go and select
clipping mask from the list. Now we have a simple layer
and we will get back to our color palettes and we will select the color
with the name green. We won't do the same
thing as we did before, just going across our little LMS on this gauge and we will
create a closed outline. To me, the nice connection between these
little parts on the top and on the bottom that are overlapped by our
first grass elements. We can get back to our layers, we can hide for a second
these grass number one, connect this part
just with a line. Now makes sure that
your outline is closed and drag and drop
the color insights. Now let us get back
to our layers. Let's unhide earlier with
the grass number one, we will go and hide the layer with this scheme
and we will work onto the connection between
two elements of the grass. If we want to adjust some parts, if we want to smooth
and something up, or if we want to make a nicer connection between
these two elements, we will go and do that when you are satisfied
with your result. Let's get back to
our layers and we will unhide our layer
with this scheme, we will continue by aging
our leafs elements and we will need to put them underneath earlier
with the graphs. So let's just go to earlier
with highlights and from it, we will create one more layer. We will rename this
layer as leafs. Now let us get back to our
color palettes and we will select the color with the
name dark sea and blue. We will go and increase the
size of our brush and we will recreate our leaves that we have on this kitsch very easily, just with thick lines. And we will create this
leaves just manually. You can play with the
thickness of your stem. You can adjust your
elements to your vision. If you don't want to
repeat everything that you have on your
layer with this case, you are welcome to
adjust your elements. You can need to
adjust some pairs, grab your eraser
tool and adjust them when you are ready with your
lease on the first side, Let's move on to
the opposite one, and let's recreate
the lease here, too. When you aren't down. Let's one more time, get back to our layers and let's work on our next elements. And these elements will be these big stamps
with our big leaps. So again, let's just go
and create one more layer. And now you can decide which objects will be
overlapped by other objects. So e.g. we can put this new lease underneath the leaves that we
have just created. We can create the new
layer above this layer. So you decide where
you want to put them. And let's just go and
create one more layer. Rename the lead to beak leaves. And let's just go
with the same color. We will go and repeat
our objects again. You can play around with
the thickness of this term. So you can play around with they're all elements
that you have here. Let's just go and
recreate our objects. For now. Let's just go and create
the solid leaves. When you are ready with your style and the
lease on the one side, Let's move on to
the opposite side and do the same thing here. When you are done
with this task, if he wants to repeat
this same pattern that you have on the
leaves, on this gauge. The cats. We will need to go
and do the following. We will need to get back to
our scheme layer and we will need to change the color
of our skin lights. So that way we will see where
we had our little cuts. To decide we will need to go to this layer with this scheme. We will need to go to
our magic one to own our top-left and we won't go under hue saturation
and brightness. Here you can see on
the bottom we have some sliders and if
we go to the view, we will be changing
the color of airlines. And in that way, when
we find the color that is opposite to what we have
right now on to our alliance, we can find where our cats work. You can also play with the
brightness and you will see more clearly what you
have on to your sketch. So find what works for you. And when you are done,
ledgers deselect everything by hitting our magic one tool one more time and just get back to our layer
with big leaves. We will grab our eraser and we will go and erase
this little parts. You can do it with
irregular areas or we can assign a peculiar brush to it. And now let us go
and add our cuts. Now Lynch's go to our
layers and let's take a look at how it looks
without our skin layers. So we are going to
our little checkbox on the scheme and we
will hide our layer. If we want to adjust
some parts on the cards, we are ready to go and do that. And when you are
done one more time, getting back to our layers and Haydn earlier with
this hi team and click just go and
continue creating our elements laid just firstly, go underneath these big leaves and we will create our
grass elements here. So again, let's just go
and create one more layer. If you want to rename it
as grass number three, you are welcome to do
it with the same color. Let's just go and
repeat these fires that we have on to
our sketch ends. When you are done, if you want to check it out, you can go and hydrolase with this scheme if you need
to adjust some parts, go and adjust them. If you want to add
some elements, again, go and add them. When all of our main
elements are done, let us get back to
our list and we will unhide earlier
with this scheme. Now we can start agent or
a miscellaneous objects. And for our
miscellaneous objects we will need to liters one that will be underneath some objects and one
that will be above that. So e.g. some of our elements on the grass
we will need to put on the top and our elements that we have above
some little hearts, maybe our little
elements on the top. Maybe our little x we would want to put
underneath the graph. So we will start with them. Ledgers go to our
layer with the leafs, and we will create
one more layer. We will tap on the plus icon and we will rename this layer
as miscellaneous one. Now let us go back to our color palettes and we will start by creating our little x. You can play around
with the colors e.g. we can go and select the
color with the name pink. With this color. Let's just
go and recreate the shapes of the x and the color inside. And when you are done, LED gels go and add some
pattern to this x, e.g. we will go and create some
zigzag lines on that. We will go to our layers. We will go to this layer
miscellaneous one, and we will need to
add alpha lock to it. So that will mean that we
are adding the details only on the areas that we
already have owns earlier. It is similar to
the clipping mask, but we are working
on the same layer. To do so, we will need to go to our layer miscellaneous one. We will tap on it and we
will choose alpha lock. You can see that you
have a chessboard around your objects and that's
exactly what you need. Now, let us get back to our
color palettes and let's select some contrast color
or some different color. Let's just go e.g. and select the color
within them, gray. And with this color, we will go and add some pattern to our x. And when you are done, we are ready to get
back to our layers. And let's just go
against our layer miscellaneous one and we will
turn off our alpha lock. So in that way we can
add other objects to this layer and just tap on it and we will choose Alpha
Lock from the least. Now on the same layer, Let's just go and add our little elements that we
have in the middle part, and also we will add
our little clouds. Let's just go and firstly, select the color with the
named light grayish orange, which is our wild color. And we will go and recreate
the shape of the clouds. When you have the outline, drag and drop the
color inside so you can look at it
without the scheme lines. If you need to
adjust some parts, if you need to
soften some corners, you are welcome to do it when you're satisfied
with your Cloud. Like just get back earlier with this scheme and we will go and continue in our little
elements on the same layer. Let's first go and select a different color
for our hearts. It will be pink or red
and twist this color, we will go and recreate
these objects. Check them out without
the skin layer, adjust them if you need to. And when you add Dan ledgers, go to our color palettes and select the color with
the name yellow. With this color, we will go and recreate our little sparkle adjusted if you need to take a look at it without
the scheme lines. And when you are done, we will go and create
one more layer. So let's just go to our layers. We will unhide early with this scheme and we can
go to the top part of our elements and we can recreate our little clouds
near the stamps. We will do it with
some different colors. And we can do it on
the same layer with miscellaneous objects where
we can create another one. So later on it will
be easier for us to recolor them in a specific way. Let's just go and
create one more layer. You can rename it
as miscellaneous to or if you want to rename
them in a different way, you are welcome to do it. Laying, just go and
rename this layer. Now we have our yellow color. So let's just go to one of
these clouds on the top and we will recolor this one
cloud with a yellow color. So e.g. let's just go over our right side and let's
recreate our lines here. When you have the
outline ledger and drag and drop the color inside, you can see that these
elements overlap, are elites, elites, we will
need to get back to our layers and we will need
to put it underneath it. So let's just go to early
and miscellaneous two, we will hold it and we will
drag it under big leaves. It might clip to our bunny. So we will need to
go to this layer. We will need to tap on
it and we will need to choose clipping
mask from the list. When you iron down
ledgers go again to the same layer
miscellaneous tube, we will select our pink
color or a red color. Just select the
color that you like. And we will go to the
opposite side and we will recreate this
second object. Drag and drop the color
inside and take a look at these two objects
without the scheme lights. If you need to
adjust some parts, grab your eraser tool
and adjust them. If you want to position
your elements differently, you are welcome to go
and select this layer, go to the transform to use uniform method and adjust the
placement to your liking. When you are satisfied
with their placements, all these elements lead, just deselect everything by hitting our arrow
key one more time. One more time. Let us
get back to our layers. Let's unhide our layer
with this scheme. And we will go and recreate these objects that we
have gone to our graphs. We will need to go to early
within grass and above it, we will create one more layer for the miscellaneous objects. Let's rename the layer, and let's just go and select the yellow color with
this yellow color, Let's just go and recreate
the shape of our little star. If you want to change the
placement of these elements, you are welcome to do it. You can create the whole
shape just with one line, hold it and the hands and then
go over the top to editing mode and adjust your star
with this little notes. When you have the
shape that you like, ledgers drag and drop
the color inside and ledgers go and
recreate other elements. So e.g. let's just go
to our color palettes. Let's select some color
for our butterfly, maybe a red or pink. And ledgers go and recreate it. If you want to add some dots or maybe
additional elements, you are welcome to do it. And now let's just go
grab our white color, which is our light
grayish orange, and we will go and recreate
the shape of our flower. When you have the outline, drag and drop the color inside. Let's select our yellow
color in Greece, the size of our brush, and we will put the dot inside our flower to
the middle parts. Now let's take a look at our whole illustration
without the scheme lines. If you want to
adjust some parts, you are welcome to do that. So play around and
when you are done, let us move on to the next part and we will add some
beautification.
5. Beautification: For this part, let's
firstly go and change. Our brush, will go to the Brush Library and we will go to the airbrushing folder. We will select Medium blends. We will go with this brush to our color palettes and
we will select the color with the name of
light grayish purple when we have our brush and
when we have our color, we are going back to the
layers and we are going to the bottom and finding
our background layer. When we have it, we will go and create one more layer above it
and we will clip it. We will rename this
layer as gradient. Now when we have this new layer, we will increase the size of our airbrush and we will go to the top parts and we will add
the color here in that way. Now you can see that we have two colors and we would
want to blend them nicely together and
we don't want to have this harsh middle parts. So we will go to the
magic wand to own the top-left and we will
find Gaussian Blur. You can see on the top we have
the option Gaussian blur, zero per cent, and who will need to increase the amount of blur? Let's just go to our Canvas. We will hold our Apple
pencil there and we will need to move it by
holding to the right. We are increasing the amount of bluer and you will need to move to the right until you have a nice blends in
the middle part. When you are satisfied
with the results, Let's just go and
deselect everything by hitting our magic one
tool one more time. Now I have the nice gradient
forth and backgrounds and leg just go and add some
color to our leaves. So firstly, we will
go to our big leaves and we will go and turn
on the Alpha Lock. So in that way we can go and add a different
color to some parts. Let's just tap on the layer
and let's let alpha lock. When we have it,
we will get back to our color
palettes and we will select the color either green, blue-green,
or backgrounds. You decide when the same
brush medium blends, we will go to this
leaves that we have closer to the center
of our composition. We will add the color to them. You can play around with the amount on this
different color. You can also go to the opposite side and
do the same thing here. You can play around with
the opacity of the brush. You will need to go to the
bottom slider and adjusted. So you can create a pretty hard transition
between two colors, or you can go very
slightly and add just a hint of a new color
when you add down on one side, Let's move on to
the opposite side and we will do the
same thing here. If you want to add
another color, you are welcome to do it. Now when we are ready
with our beak leaves, let us go to the next layer, which are grass three, and we will do the
same thing here. So firstly, we will need
to turn on Alpha lock. So again, we're at tapping on the layer and select
an alpha log. We will select the color that
we want and we will go with the same brush to this elements and we will
add our second color. Also. In that way, you can add some texture if
you have some texture brush. And now when you are
ready within grass, if you want to add the second
color to the small leaves, you are welcome to do it if you want to leave them as
they are right now, you are welcome to
leave them as they are. And now let's just go and do the same thing for our
little clouds on the top. Let us find this layer and we will go and turn
on Alpha lock. So tapping on the layer
and choose an Alpha Lock. And we will go to our
little class there. We will select the
opposite color from what we have on one side
and on the other side. And we will add this
beautiful gradient. So let's firstly go
to our left one. We will go to our color
palettes and we will select the color rats with this color
and with the same brush, we will go to one of the
sides and we will add the gradient here
to make it smooth. And when you have
it on one side, Let's just go to
the opposite side and we will do the
same thing here. For the yellow cloud. You can go with the same
pink color or you can go again to the color palettes and select some
different colors. So maybe this time it will
be just pink, not red. So find the color that
works for you and go to one of the sides and
add a little gradient. When you are done
with this task, we will get back to
our layers and we will work a little bit
owns our graphs. Let's firstly go to
our grass number one. We will select this
li and we will create one more layer above it. Let's clean this layer to a previous one so we
are tapping on it. We are choosing clipping
mask and we will do entry name this
layer as shadow. For the shadow, we will go and change the blending
mode of this layer. We will be using the
multiply blending modes. And in general,
blending modes are different ways your layers
can interact with each other. So let's just go to
this layer shadow. We will tap on the icon and from the list we will select
multiply blending modes. As for the opacity for now, let's leave it at 100 per
cent and we will go to our color palettes and we will select the color
with the name green. With this color, we will go to the bottom part of our grass
and with the same brush, we will go and slightly
add a little shadow here. You can see how we
are adding a bit of shadow and it is creating
some volume here. If you think that
maybe it's too much, we can go to the layers
and we can go to earlier with the shadow
and adjust our opacity. So we will need to go to the
icon to our opacity slider and adjusted to our liking when you are satisfied
with the result, we will do the same to
our grass number two, let's just go to this layer. We will create one
more layer above. We will rename it
and flip it firstly. Now let's go to our icon and we will change
the blending mode to multiply for the opacity a little bit at 100
per cent for now, and we will get back to
it later and adjust it. So now let's just go
again to the bottom part of our grass and we will
add our shadow here. Also, we can go to this
intersection between two parts of our grass and we can add the
shadow here too. So you can go underneath these graphs that we
have on the right, and you can add the shadow here. And in that way you will add a little bit of the
paper cut effect. Now, if you feel that you want to end the color underneath your little elements such as
flour and little butterfly, you are welcome to do it if you want to leave them as
they are right now, you are welcome to
leave them as they are. So find what works for you
and when you are done with the shadow on the left
part of the grass, Let's just get back to
our earliest ledgers, go to our shadow layer and we will adjust the opacity of it we are doing to our icon and we are playing with
the opacity slider. Find what works for you
and when you are done, we are almost ready with
our whole illustration. But the very last
things that we will add will be some sparkles
and some dots. So firstly, let us get
back to our layers. We will go to our Lee
and miscellaneous three, and above it we will
create one more layer. Let me just rename this
layer as sparkles. On this layer ledgers go
back to our brush library and let's select the
brush that we had before, which is our sparkle brush. This brush, we will go to some blank spaces and we
will add our sparkles. You can go with white color or if you want to go
above the objects, you can select the
color that is near to the place where you wants
to put the highlights. You are welcome to add little sparkles with
a similar color. So e.g. let's just go and
select this white color. And we will go to
the middle part and we will add some
sparkles here too. Now, let's just go above
our objects and we will go to this little clouds that
are colorful on the top. And we will select the color that we have on the top part. And above them we will
add a few sparkles. And when you are done with
this little sparkles, Let's just go and select the brush with the
name glowing dots. With this brush, we
will go to our grass on the bottom and we
will add some dots. So e.g. we can start with a yellow color at a few thoughts
with this yellow color. And then let's just go back to our color palettes and let's
select this whitish color, light grayish orange
with the scholar, we will add a few more dots. If you want to add the
door to some middle part, you are welcome to do it. And when you are
done with the dots, we are done with our class. But if you want to
know how to change the colors and the atmosphere
of your illustration, easily hop into the
next bonus parts.
6. Bonus: Easy Way of Changing Colors: Into this little part, Let's just go and
change our colors. Firstly, we will need to copy every object that we
have once it our Canvas, and we will need to
put it on one layer. And to do so firstly, we will need to go to our layers and we will go to our boards and off Arab Layers
panel and we will turn off our background color. When you have only
your illustration, we will go to our Canvas. We will swipe three fingers
from top to the bottom, and we'll invoke our
copy and paste menu. When you have the
copy and paste menu, we will go and select Copy. When you did it one more time, we're as wiping three fingers
from top to the bottom, invoking our copy
and paste menu, we are choosing paste. Now, if we go to our layers, we will see that we have our whole illustration
just on one layer. So all the layers that we had
before our merge right now. And we can go and adjust this illustration in
any way that we like. So firstly, let us get back
to our layers and we will go and turn on our background
layer one more time. So go into the
background color layer, go into our little checkbox and you can see that
nothing changed. But now we have the
second illustration. We have all of our
object on one layer. Now let's just go to this
layer inserted image. We will go to our icon. We will go and select
multiply blending modes. You can see that we already
changed our illustration, but we will go and change
the colors even drastically. We would want to make our
bunny sitting at night. So let's just go and do that. When you turn your
multiply blending mode, we will go back to our magic 12 and we will
find gradient map. You can see that you
have gradient library. You have some colors right here that are going with procreate. So you can go through
them and maybe you will find something
here that you like. But also we can go and create one more gradient that
will be our own gradient. So e.g. let's just go and
tap on the plus icon. And you can see that we have
this gradient map slider. We have two colors here. One is black on the left and
one is white on the right. And we can go and add more colors and we can
change these colors. So firstly, ledgers go to our left side to
this black color. We will tap on it and we can see that we have our
color palette here. We can go and we can select our first color when we
are at our left side, we want to end the color
to our darker polices. So all the colors that
we have right here on our canvas that are on
dark range of colors. They will be recolored
with this color. Let's just go to this
black color and we will select our color
that is dark purple. You can also go to the
cards and you can find the names of these elements that we are changing right now. So we will go and we will select the color with the
name dark purple. Now, we will need
to go and we will add the color to the middle
parts of our elements. Let's just go somewhere
to the middle and we will tap on our little
rage with the color, with our Apple Pencil. You will see that you have added another color and we will
go and change it to select, just tap on this little window and we will select
the second color, which is our magenta color. You can see already that
our illustration changed. And if you want to
find out how it works, if you want to create
your own gradients, you can go to this disk once the colors and you can go and find the color that
will work for you. So you can go through the disk, you can find a different color. You can play around
with the position of these elements and you can find the gradient that
will work for you. So e.g. something like that
works or if you want to go and select the colors that you have onto
your color palettes. Just go back to
your magenta color. We will do for our last
color that is white. Let's just go and tap on
it and we will select our last color that we have
owns our color palettes. And again, you can go
to this gradient map. You can go to all these windows that you have on
the color range, and you can go and
play with them. So if you are moving
toward the left side, you will be making
your illustration. I was a little bit lighter. If you're arguing
to the right side, you are dark in an app. So find what works for you. And when you are done, we are done with eight
and our gradient map. And we can go and adjust the
opacity of this layer, e.g. we can go back to our layers. We can go to our m icon and we can play with
the opacity slider. You can adjust the amount
on this gradient and you can have various options
with your illustration. So in that way, very easily, you can adjust your
illustration and you can create different
color schemes, and you can create
different atmospheres. And when you find
what works for you, we are done with our class. Thank you for
watching this class. Leave a review if you liked it, and consider subscribing for more Kawhi videos in the future, looking forward to
seeing your projects.
 Uni Corn, ⭐Kawaii Art Enthusiast⭐