Transcripts
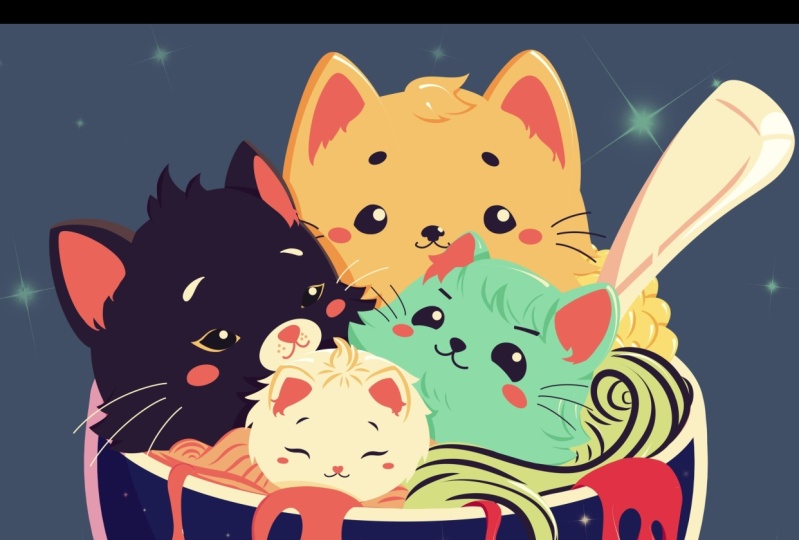
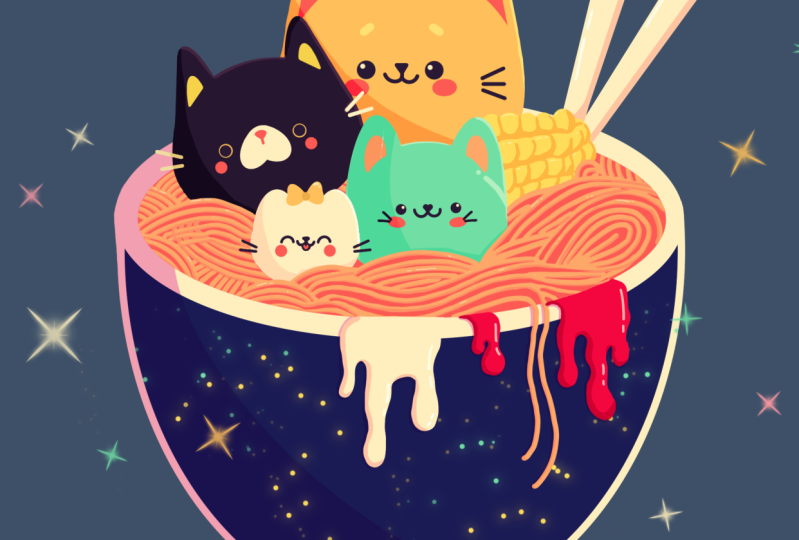
1. Introduction: Hello everyone, I
am uni and into this class we'll draw
a cute cat soup. These class doesn't require any prior experience
or fancy tools. We'll start from scratch
and we'll be using simple techniques
throughout the process. Everything you'll see will
be happening in Procreate. However, if you
have other software or wants to try
traditional materials, you are welcome to join if
you are ready to start, Let's jump right into it.
2. Basic Scheme: Let's start our
class by deciding what kind of Canvas we
are going to be using. You can see it is a very simple square standard canvas because both pixel width and pixel
height are 2048-bit cells. If you would like to use
any other dimensions for your illustration
and Fourier Canvas, you are welcome to do it. S for DPI, we are using 300
and escalate color profile. It is set as SRGB
with this low number. When it's all done,
let's hit Done and it will be redirected
to our new canvas. Now, if you would want to use the same colors that you will see throughout
the whole class. Please go to the project
and resources tab and download them materials. When you are done
with this task, let just go strictly to our color palettes and we will check out what we have here. Here we have two options of
how we can use the colors. They come back to you and
the cards let just go strictly to the cars because
here we have all the colors, names, and it will
be easier for us to navigate through our colors. Now while I still here
under our color palettes, Let's select our first
color that we will use for creating
a little scheme. You can select any
color that will be seen on your canvas. So e.g. let's select the color
with the name dark purple. When you have your first color. Let's just go and select
our brush for this part, we are going to
the Brush Library and we will go to
this kitchen folder. In the sketching folder, you can select any brush
that you like here. You can try it out
onto your Canvas. If it's not working for you, just go back to
your brush library and try out another brush. So when you have selected the brush where
this part leg just go to our Canvas and we will adjust our brush
just a little bit. We will go and make it
a little bit smaller. And if you want to play with
the opacity of the brush, you will need to go to the bottom slider and
adjust it from here. When we have selected our color, when we adjusted our brush, Let's start by creating elite cell shape that will help us to create
our composition. Today we are starting by
creating a little ellipse. We will go strictly
to our Canvas and we will create
the shape just with one line without lifting up our Apple pencil lasers
go and try it out. Hold your line and the
hands and you will snap it to a better
shape if you need to adjust the size
of your element and just move your Apple
pencil from side-to-side. If you want to
adjust it even more, we will and hold it and we
will get over this up to age it here when we are
in the editing part, we can see that we
have these blue dots. That means that we can go
to them and we can adjust these dots and adjust our
scheme in general, e.g. firstly, let's just make our lives a little bit
wider on the sites. We will go to one of the nodes
that we have on this side. We will hold our Apple
pencil there and we will just move it
toward the site. When you're satisfied with
the openness of your shape, ledgers put it strictly
to the center. You can move your shape
in the editing mode. So you will need to go to any blank space that you
have on your Canvas. You will need to hold
your Apple pencil there. And you will need to move your Apple pencil
while holding it on the screen to the place that you want to put your elements on. Or if you accidentally close your editing mode or if
you never gotten there, you can do it in
a different way. We will need to get
back to our Canvas. We will need to go
to our arrow key on the top-left, will tap on it. On the bottom, we will
select uniform methods. Now you can see that we have a bounding box around
your elements, and that's exactly what we need. We will do the same thing as
we did in the editing mode. We will go to any blank space that we have onto our canvas. We will hold our Apple
Pencil and we will move our shape to the
place that we need. If we want to adjust
the shape even more, if you want to make it bigger, or if we want to
make it smaller, we can go to any node
that we have across this bounding box and we can tweak it to the
place that we need. So e.g. if we want to
make our ship bigger, we will go to one of the nodes
that we have on the top, and we will hold
our Apple pencil there and drag it diagonally up. So let's just play
around with the shape. Let's find the position
that works for us. And when you are satisfied
with everything here, we will deselect everything by hitting our arrow
key one more time. And now when we have
our first shape, we will go and work more
on the middle part. We will firstly go and find
the approximate center by creating a vertical line going through the whole sheet. Ledgers go above this shade
that we have, our ellipse. We will go and create the line going from
top to the bottom. Start creating the line. Hold it at the end and adjust the angle by moving your
Apple pencil on the bottom. Try to make it
strictly vertical. If it's not going
through the center, we will unfold our
Apple Pencil and we will go over the
top to edit again. Here we have two nodes. If you need to adjust
the angle even more, go to one of them and move it. If you want to move the
whole line in general, go to one of the blank spaces or into your Canvas and move
it towards the center. When you're satisfied,
just tap on the screen to get away
from this editing mode. Now when we know where
our vertical center is, ledgers go to somewhere
in the middle of our sheep and we will
create another ellipse, but this time it will be
aligned horizontally. So let's just go to
one on this side. And from there we
will start creating our sheep of the ellipse the
same way as we did before. Just manually creating the shape and holding it at the yet. If you need to adjust it, you can just move
your Apple pencil to find the angle that you like. Try to make it straight. If you need to adjust the size, move your Apple pencil
from site to site. If you need to
adjust it even more, we will unfold our Apple Pencil and we will go over
the top to edit. Now, we will need
to combine our dots on this side with the
element that we had before. So let us move our new
ellipse a little bit higher and we will try
to combine our edges. These sheets that we
are creating right now will represent the
top part on the ball. So this sheep on the
bottom will be our ball. We can play around
with its size. We can play around with the
openness of this new shape. So you can just
go over the soap. Note that you have
onto this shape and make this shape a
little bit more open. We need this part to be quite open because
we are going to be putting our affiliate
elements here are cats, are sued, everything. So we will need to see
what's happening here. You can play around and
find what works for you. And when you are done, like just tap on the screen
and who will continue creating our scheme when you're satisfied with
everything here, we will go to the
bottom part and we will go and create
a little part, what our bot will send on. We will just go there to this element on the
bottom and we will create another curve that will recreate the same curve that we have right
here on the top. So let's just go and create it. We can do the same
way as always. We can just go create a line, hold it at the end, and then go over the top and adjust it. Try to make it even
on both sides, you can play around
with how big you want the shape to be if you
need to adjust it, you or the top to edit. When you have the little
shape that you like, ledgers get away from
the editing mode. And we will go to
the sides and we will combine these
sites with our bu. Firstly, we are going over
the left side and we will just create another line
going in that direction. We are creating a curve
and we are creating a smooth connection
with our bowl. You can play around with
the angle as always, you can just go over the top to edit shape if you need to, when you have this first
connection over the left side, let's move on to the right side and do the same thing here. Again, try to make it
even on both sides. If you need to adjust it, just go over the
top and adjusted. And now we are done with
our scheme for the ball. We can go and do one
more thing, e.g. we can add some thickness
to these parts. We can go and create
another ellipse and we can put it right in the middle of this Arabs that we already have. So then just go and
try to do that. So we are starting a little
bit from this side and we are creating the same shape
that we have around it. I just go and create
this ellipse. Hold it and the answer, snap it to a better shape. And when you did it, we will go and try to make these shapes similar to the
shape that we have outside. So we will need to make all the lines parallel
to one another. Ledgers go and try to do that. We will need to go and play with these blue dots and make all the lines parallel
to one another. So they are just repeating the same pattern
when you did it, when you have the similar shape to the one that
you already have. Ledgers get away from
the edited modes. Now we are almost done. All we need to do
here onto the stage is to find the placement
for our little cats. Today we are creating for cats. If you want to change
the amount of cats, if you want not to create cats, maybe different shapes,
maybe different animals. You are welcome to
do it as always. Now we will just go over
the top part and we will start by creating a simple
shape of the circle. Ledgers go to the middle
part or did soap. And we will start by
creating a big circle. We are doing it the
same way as before, just with one line
holding it at the end. And to snap it to a
perfectly round circle, we will need to hold
one of our fingers on the screen if you
need to adjust it or if you need to position
it differently and hold everything and the
over-the-top to circle, Find the position
that works for you. We are mostly working inside this shape
that we have created. But if you feel that you
want to make it bigger, if you want to go a little
bit beyond the frames, you are always welcome to do it. If you want to make this shape bigger when you are
in the editing mode, you will need to go right
between the dots that you have. And you will just need to hold your Apple pencil there
and move it to this site. Find this size that
works for you. And when you add Dan leg, just tap on the screen and let's go and create another cat. So this time let's move on over our left side and we will
create another ellipse. To go in there and creating a circle a
little bit smaller, the same way as before, just creating the shape, holding it at the end. If you want to use the Ellipse
instead of the circle, you are welcome to do it. If you want to use this circle, hold your Apple pencil at the end of this Ls and hold one of your
fingers on the screen. Let's overlap the shape
with the previous one. If you want to adjust
the placement, if you want to adjust
anything here, Let's go over the
top to edit modes. Play around with the shape, find what works for you. And when you are done, Let's just tap on the
screen and let's create another ellipse for
our little kitten. So now let just go under our first shape and we will
create another circle there. Style. Let's make it
a little bit smaller. Again, hold the
shape at the end. And if you want to find a different placement
or play with the size, you are welcome to go
to the editing mode. This time, let's make
it smaller and let's put it a little bit more
toward the right side. It's always good to overlap shapes and not make
something like that. So you don't really want to touch two shapes
because it will create some tension and
you don't want to put the viewer's eyes
onto these, please. Find the position
that works for you. Find this size that
works for you. And when you're satisfied
leg just tap on the screen, get away from the editing mode, and we will create
one more kitten. This time it will be
even smaller and we will put it onto
this little area. So again, let's just go and create our shape of the circle. Hold it and the hands. If you want to adjust it, hold one of your fingers
on the screen to snap to a perfectly round circle if you want to
adjust it even more, go over the top to
edit and modes. So for now, let's just
leave it somewhere here. Let's tap on our screen and we will take a look at the
whole scheme that we have. You can see that we have something not very
balanced because we have a great visual mass over the left side and we don't have anything onto
our right side, so it makes it unbalanced. Let us go to this blank area that we have or are right part. And let's add something here. So e.g. let's create a spoon ledgers go firstly
and we will create a little line that will show the direction where
we are going to be creating this book ledgers go and create the
curve like that. You can hold your land and the hands and create
a straight line, or you can create a curve. It's all up to you. When you have the direction that you want to put
your little spoon. Let's just go and turn
it interdiscipline. So e.g. we will go
a little bit above this line and we will create a peculiarly
shaped like that. Firstly, we will go to this side from this
line that we have created and we will make the lines that
are going diagonally. When you have
something like that, we will go over the
top and we will create a curve and we will
close the shape, hold it and the Yan's, if you want to adjust it, your over-the-top to edit modes. Now we are done with our scheme, and in the next part, we will make our sketch.
3. Making a Sketch of Big Cats: Let's start our sketch and
fired by going to the layers. And we will create one more
layer for this kitchen part. Let's just tap on the plus icon and straight away when
we have a new layer, Let's go entry Nimitz. We will need to tap on the layer and choose Rename from the list. Let's call this layer sketch. And now when we have
this layer, rename it, Let's just get back
to our layer with this scheme and we will
rename it to select, just tap on it and let's choose Rename and
call it scheme. While we are still here into
our Layers panel alleges go to this layer with
this scheme and we will make it less bright. We will change the opacity
level on this layer. We will still need to see what's happening
onto this layer, but we don't need it to be very bright and very disturbing. So let's just go to this icon onto earlier with this scheme, we will see that we have
the opacity slider here. We can grab it and we can
move it toward the left side. You can see that now it's
starting to look less bright when you find the opacity level
that works for you. Ledgers go back to our
layer with the sketch. And now to see what we
are doing more clearly, ledgers go to our
color palettes and we will select another color
for this kitchen part. Let's select something contrast. Let's go and choose our
color way, the name rats. With this color, we
will go over the top of our circles and we will start
by creating the first cats. Let's just go and increase
the size of our brush. And we will go over the shade
that we have created for our cats are circle and
we will try to repeat it. So let just go very boldly
and we will do this thing. Just do the same thing
as we did before, called your line and the end. Hold one of your fingers
on the screen to snap to a perfectly
round circle. If you need to adjust
the placement, if you need to adjust
something here, go over the top to edit sheet. So find what works for you. And we will go and adjust
the shape even more. We don't want our kids
to be these round. We will want to create
a different shape. So when we have this layer and when we have this shape created, we will go back to
our Transform tool, which is our heirarchy
on the top-left. And we will not use
the uniform methods, but we will go and
choose the option work. When you are selecting
the warp tool, you have this
bounding box again, but you also have the
intersection inside. So that means that you can
go to any place inside this bounding box and you can
adjust it to your liking. So e.g. let's just go to the bottom nodes for
the one on the right. Firstly, we will hold our Apple pencil there and we will drag it to where direct. You can see that we are
adjusting our sheep. When you're satisfied with it, we will go over
the opposite side and we will do the
same thing here. We will go to the left nodes and we will move
it toward the last until it's something similar to what we have on to our rights. When we have this
peculiar shape, Let's move on to the top. We will drag these nodes on
this side toward the center. Firstly, go into our right one, holding our Apple pencil there and moving it toward the center. When you have the
ship like that, we will go to our left side
and do the same thing. Hold your Apple pencil on the nodes and move it
toward the center. If you want to adjust the
shape even more, e.g. maybe squish it a little bit. Ledgers go over the top part and let's go to the middle
of it and drag it down. Play a little bit
with the shape, find what works for you. When you are done,
we will go and deselect everything by
heating our arrow key. Now when we have this
shape for the head, let's move on
adding our details. Firstly, very conveniently, we have this line that
is going from top to the bottom and that represent
the center of our ship. But we will need to create
another line that this time we'll go horizontally again through the approximate center. We know what we need to do. We will need to go
through our new shape and create this line going
through whole shape. Very easily ledgers go
and create this line, hold it at the end. If you need to adjust
the angle, adjusted. If you need to put it
on the different place, you can go to the editing mode, tried to put it
somewhere in the center. You don't need to
be very precise. When you're done tap on this screen and when
you have this slide, we will firstly go
over our left side. We will start creating the ear. We will stop a little bit from this line that we
have just created. And we will go and create
a little triangle. So let's just do
something like that. You can play around with
the size of this element. You can play around
with how big it is. You can play around with
the position with anything. If you want to make
these shapes smoother, you can go enter in these very straight
lines into the curves. E.g. alleges go to these corner that we have here and we
will turn it into the curve. So just going over the left
side and going over the top and creating the curve instead of this
very street corner. If you want to work on to
this side, elements, again, you can go and turn them into not straight lines,
but the curves. When you're satisfied with
the sheep here, ledgers, grab our eraser tool and
erase this part over the top. Also tried to pay attention to the connections
between the shapes. So e.g. here you can
see that we have a little dance that we
can very easily fixed. We can go and create a smooth connection
between these two shapes. Ledgers go and create the solid line going
through these parts. And when you are done
editing this part, ledgers go over the next side and we will do the
same thing here. We will need to know where
we need to put our ear. And we can do it very
easily by creating the horizontal lines from this
year that we already have. Let's just go and create the first horizontal line on the intersection that
we have right here, where one shape is
moving to another shape. From this intersection we will go and create another line, tried to make it parallel to the line that you
have on the bottom. And when you have it, we will go over that. So up to this
intersection and from it, we will go to the opposite side and create another
horizontal line. When you reach the intersection, you will know where we
need to put our ear. First dot is right
here on the top. The second dot right here. Again, we can start by
creating a little triangle. Let's try to repeat
the same thing that we have on our left side. And also to make
it the same size, we can go to the top
of our ear and we can create another horizontal line
going to the opposite sex. Now you have everything you need to create your second year. Try to make this
year is similar to the ear that you have
on the left side. And now when you have two ears, ledgers go inside
the shapes and we will repeat them to create
the inner parts of the ears. Step a little bit from this
line, entropy the sheep. If you want to play
around with the shape and don't want to
repeat that outer part. You are welcome to do it when
you have it on one side. Let's move on to the
opposite one and let's add the inner
part here too. And when you have it, we are done with the ears so we can move on to the
facial features, land just due to the left side. Firstly, we will go to this line that we have right here
for our middle parts, we will start by creating
the ice ledgers, go to the left side,
as mentioned before, and we will start by creating
the first circle here. You can play around
with the position. You can play around with the
distance from the center, with the size, with anything. Ledgers go and create
our first Zoom what? You can do it manually or you can do the same thing
as we did before, just with one line. Hold it at the end, hold one of your fingers
and create these sheep. Find the position
that works for you. If you want, you can move your shape a little bit
closer to the bottom. That will make it a
little bit cuter. But remember that we have the overlap and sheep
or the left side, it will be another cat and
it might overlap our eyes, so we will need
to think about it to find the position
that works for you. When you're done,
tap on the screen, and let's move on to
the opposite side and let's create another I lead. Just repeat the same
distance from the center. Let's repeat the same size. We will try to put it
on the similar place to make sure that your
eyes are the same size. We will hold our Apple
Pencil and the end, we will hold one
of our fingers on the screen and we will go
over the top to circle. We will move these
AI that we have over the right side to the eye
that we have on the left. If we need to adjust the
size here, we will see it. If we need to adjust it. Ledgers go and adjust it. When you're satisfied
with the size, when it's similar
to the one that we have over the left side leg. Just get this. I back try to keep
the same distance, try to put it on the same line. When you are done ledger
step on the screen and ledgers go inside these eyes
and we will shade them. Now when we have the ice, Let's move on and
add our Alito knows, we will go right between
the eyes and we will start by creating a
very soft triangle. Let's just go and create
something like that. As always, you can play
around with the size, you can play around
with the placement. If you feel that maybe
it's not what you want, but you already
created the sheep. We can move it easily by
going to our selection tool. Firstly, Selection Tool is our S ribbon icon
over the top-left so we can tap on it and
we will need to select freehand method over
the bottom part. When you have selected
the free hands method, we will go over
this shape that we want to adjust and
we will select it. Just look the shape around until only this area that you
want to adjust is selected. And when it is selected, we will go to our Transform tool and we will move the shape. Now we are using word method, but we will need to
switch to a uniform. When you did it, ledgers, grab our little nose and let's find the placement
that will work for us. Play around, try to put
it right in the center. And when you are done, Let's deselect
everything by hitting R S ribbon icon one more time. When you have it, we
will go underneath the nose and we will create
a little Smiley mouth. We will firstly go and create a line going down like that. And when we hand
this little line, we will go to the side, e.g. to the left one. Firstly, we will need to create the bottom part on the circle or the bottom
part of the ellipse. Let's just go and
create this shape. You can play around
with its size. As always, you can
hold it at the end. You can play around
with this position by going over the
top to aided LPS. So find what works for you. And when you're done, tap on the screen
and let's move on to the opposite side and
do the same thing here, just given to the
side and creating this bottom part on the
ellipse or this circle. Try to make it similar to the shape that you
have or the left. If you need to adjust it, hold your line, go over
the top to age it. When you're satisfied with it, tap on the screen
and let's move on and add little cheeks
underneath the ice. Firstly, going
over the left one, going underneath the
eye and we are creating the shape on the ellipse
or of this circle. And again, you can play around
with the position and you can play around with the
size of these elements. When you are done with the
shape over the left side, let's move on to
the opposite side and let's do the
same thing here. Again. If you need to adjust it, if you need to make
sure that it has the same size and
the same openness. You can hold your
land and the ants go order to up to Edit Shape, move this shape to the previous shape and
adjust it from here. When you are ready, let's move on and let's get back the shape to
the needed, please. When you are done, tap
on the screen and let's continue by creating
little whiskers. So we won't go to this site. And we will start by creating two or three lines over there. They will be quiet diagonal. As always, you can
play with their size, so you can play with
their position. You can play with the angle
and with everything that you wanted to play with when
you have them on one side, we can go over the left side. But you can see that here we
have the overlap and shape. So maybe we don't need
to put the whiskers on these sites when we
have our first Keaton, Let's continue by going to our layers and we will
create another layer here. Let's just tap on R plus icon. And if you want to
rename this layer, you are welcome to do it. If you want to leave
it as it is right now, you can leave it as it is, because later on we
will combine all of our sketch layers together
and it won't matter. So now when we have
this next layer, ledgers go to our next
shape and we will start by creating this similar shape
as we have onto our scheme. So we are starting by creating
a shape on the circle. Recreate the shape. Hold your land and the end. Hold your finger to snap
it to a better shape. If you want to adjust it
in any way, go over it. It's up to circle. If you want to find a
different placements, you are welcome to do it. If you want to play
with the size, you are welcome to do it too. When you have the
perfect circle, we will need to go
and adjust the shape the similar way that we did
with our first sketch layer. Just go to our arrow key
and we will go into work. When we have our work turns on, we will go to the sides
and we will try to create the same shape that we had
for our first illustration. Firstly, let us go to
the bottom and we will drag our corners
towards the sides. If you want, you can create the similar shape that you
have for the first sketch. If you want to play around even more and find
something different, you are welcome to do it. When you are done
with this sheep led just rotated a little bit. We will need to get back
to our uniform methods and we will go to this
green node or the soap. We will hold our Apple
pencil there and we will move it in a
circular direction. When you're satisfied with the placement and with rotation, ledgers continue by, agents are aligned that will go
from top to the bottom. That line will represent
the center of our sketch. Let's rotate our canvas so it is convenient for us
to create this slide. Let's go over the top and
we will start by creating the line going from top to
the bottom edge as the angle. If you need to put it
more to the center and hold it and go up to Edit, drag it to the center. And when you're done, tap on the screen
and let's create another line, this
time horizontal. So again, going over
one of the sides and creating this slight hold
it at the end edges, the angle, if you need
to put it to the center, go over the top to edit. When you have it,
let just go and create the ears the
same way as before. Again, you can play
around with the position. You can play around with the
shapes, with everything. Let's just go and start by
creating the triangles. This time let's make the
ears a little bit bigger. Turn the corner on the
soap into the curve. And when you hand
the first year, let's move on to
the opposite side and let's do the
same thing here. You can start by creating the guiding lines that will help you to find the position. So let's just go and create another horizontal line where
we have the intersection, hold it and the end. And we will make a little mark down where we have our
first intersection. Now let us go over the top and we will create another
horizontal line. And when we hand the
second intersection, we will go over the
top and we will create another horizontal
line that will show us where we need
to finish our ear. When you have all
the guides in lines, alleges go and create the triangle that we
will use for our ear. If it's hard for you to see the difference between
these two sketches, we can do the following. We can go to our magic one
tool over the top-left, we can do to few
saturation and brightness. And we will go to the
slider with Hugh. Ledgers, adjust the color here, find some contrast color. And when you are done, ledger, deselect everything by hitting our magic one tool
one more time. When you have this
sketch that you have, Let's just go and create
our little facial features. Firstly, we will go again to the intersection that
we have in the middle. And from this intersection
we will go to this side and we will
start creating our eyes. If you want to play around
with the shapes of the eyes, you are welcome to do it. But maybe they sound
like just go and create the similar shapes that we
have for our first sketch, we will go and create the
shapes on the circuits. Firstly, going
over our left side and creating the first eye. You can play around
with the position. You can play around
with the size. You can play around
with everything. Also, if you want to use the same color that you
selected for this gauge, you can go and invoke
the eyedropper tool. To do so, you will need to
hold one of your fingers on the screen until you
have this little too. If you move your finger, you will see that you are
selecting different colors. And when you have selected
the color that you need, you will see it on the
top on it so you can unfold your finger and
you will have this color. When you are done with
the color selected, Let's just go and start
creating our eye. We will firstly go over the left side and
we will start by creating the same shape that we had on to our first sketch. We will start by creating
a little ellipse. Hold one of your fingers on the screen to snap it
to a perfect circle. If you want to
adjust the position, if you want to adjust the size, your over-the-top to edit shape, Find the placement
that works for you and when you are
satisfied with it, Let's just tap on the screen and let's create another element. We will need to repeat
this same placement. We will need to
repeat the same size and the same distance
from the center. So let's just go
over our right side and create a similar shape. Hold it and the end. Hold one of your fingers, go over the top to circle. Now let's make sure that
it has the same size. So we are just
moving it toward our first I need to adjust it. We are going and adjusting it. When you're done, Let's get
it back to the needed place. When you are done
with positioning, let's go inside the shape
and let's shade it. Now when we have the eyes, let's go and work on to
our little snout area. Firstly, we will go right
between the eyes and we will create a heart
shape onto this area. So we can go and
create it in that way. Firstly, we will go
over our left side. We will go to this intersection that we have in the center, and we will create an
ellipse like that. Hold it at the end to snap it to a better
ellipse if you want. If you need to adjust it, you overdid soap to
edit shape, e.g. we can move it more
close to our eyes. When you have this shape, we can go and create another
shape on the opposite side. So we will need to
create the same sheet, but we will need to mirror it. Ledgers go and create
another ellipse. Again, hold it and the Yan's, when you are done, we can go over that. So up to Edit Shape, position it the similar way
that we have on the left. When you are done, we
will just go and erase the lines that we don't eat lunch and grab our eraser tool. We will go to the
middle parts and we will erase everything
that we don't need here. Also, we won't go over the
soap bars and we will create the curve here to connect two shapes together
in a smooth way. Again, grab the eraser tool and erase everything
that you don't need. And now when you have
the area like that, Let's you're already sold and we will create our little notes. We will start by creating
a very soft triangle here. Again, play around
with the size, play around with the placement. When you are done,
you can go and repeat the same math
that we have right here. Or if you want, we can just end up with a little
line like that. When we are done, Let's move on under the ice and we will add our
little cheeks there. You can go and repeat
the shapes that we had on to our first
illustration. Or this time maybe you want
to add little circles. When you are done, Let's move on to the
sides and let's add the whiskers again similarly
to their first sketch, you can go and create the same shapes that you have
on the first illustration. You can add the same amount, or maybe this time, let us
go and create two whiskers. And when you are
done with this task, let just go and work on
this area because here we have a nested intersection that we would want to change. Now, we will get
back to our layers. We will select our layer
that we have on the top, and we will go to our
arrow key on the top-left. And we will move
this shape a little bit to the left or to the right. If you want to adjust
the shape in any way, maybe rats eat it or find
a different placements. You are welcome to do it. And when you are
done with this task, we are ready to move on
and create another sketch. So let's just go and
create another key tip.
4. Making a Sketch of Little Cats: One return. Let's continue creating
our next scared by going to our layers and
create one more layer. Let's just tap on the plus icon. And if you want to rename
this layer, go for it. When we have our
new layer, ledgers, get back to our color
palettes and we will select another color, e.g. this time let's select the
color with the name dark blue with this color
and with our brush, we will go to this
shape that we have in the middle and we will
turn it into our cat. So again, similarly
to all the time. So we did it before,
ledgers guilt and repeat our circle here, doing it just with
one line without lifting up our Apple
Pencil. Hello Julian. And the answer, if you need hold one of your
fingers on the screen, adjust the size if you want to. And if you need to
adjust it even more, find the different
placement or anything. Let's go over the top to circle. Find what works for you here. If you want to make
it bigger or smaller, you are welcome to do it. If you want to find a
different placement. Again, go for it. When you are done
with this shape, allege as guilt and adjusted
even more by going into our arrow key on the top-left and we will
go to the warp option. Now, let's play with
the shape of the hat. You can repeat the
same thing that you did with the two
previous shapes. Or here you can play around
and find something different. Let us go and play
with the sheep. Try to make it even
on both sides. And when you are satisfied
with the whole shape, ledgers go and
deselect everything by hitting our arrow
key one more time. Now, when we have our shape, Let's just go and find
an approximate center. We will start by
creating a vertical line and then we'll go and
create a horizontal one. So let's just go and do that very easily the
same way as before, just creating one line
coordinate at the end, a jazz and our angle, if we need to put it more to the center or
adjusted even more, we are doing over
the top two lines, find the position
that works for you. When you're done, tap
on the screen and continue by creating
a horizontal line. When you are done with finding
the approximate center, let us go and create our ears. So firstly, we are going over one side and we are starting by creating little triangles
the same way as before. Firstly, let just go and find the position where we want
to start creating our ear. We will stop a little
bit from this line that we have in the center,
which is horizontal. And we will make a little
mark down when we have it, we will go over the
top and we will find the position of
the ear here too. So let's just go and add a
little mark down on the top. When we have it, we will
turn it into a triangle. As always, you can play
around with the size, you can play around with the
placement, with everything. If you want to make it more triangular with
straight lines, you are welcome to do it. If you want to make
the lines very soft. Again, you are welcome to do it when you have the first year. Let's move on to the
opposite side and we will need to put
another copy here. Again, we will need to find the placement of
the ear and we will need to make it similar to the one that we have
over the left side. Pledges gives you
this little mark down that we have already left and we will create
a horizontal line going across the whole shape, try to make it straight. And when you have this intersection right
here or the right side, let's put a little mark down. We will do the same
thing over the top. So we are going to
the intersection that we have between the
ear and the hat. And from this
intersection we will go and create another
horizontal line. When you have it, we know
where we need to put our ear, but we will also
need to find where we need to put the
top of the ear. So let's just give
it to the top and we will create another
horizontal line. And now we have
everything that we need. Ledgers, connect the dots
and create our second year. Work onto the connection
between the year and they had tried to
make them very smooth. If you want to add the
inner parts on the ears, you are welcome to do it. You don't really need to repeat the sheet that you have
for the actual ear. If you want to play around
and find something different, you are always
welcome to do that. When you have your main shape with the ears and with the head. Let's move on to the
facial features. And again, we already know
where we need to put them. So let's just go and play around with our facial features. If you want, you can repeat this same phases that you have on your previous
illustrations. If you want to play around
and find something different, you are welcome to do it. Firstly, let us go
and create our eyes. Again. If you want
to play around and find different
shapes for your eyes, you are welcome to do it. Let's just go over
our left side and we will start by creating
a little ellipse. When you found a position and when you find the
size that you like. Let's move on to
the opposite side and let's repeat this shape. So again, I go into
the similar place, we are going to the same line
and we are trying to keep the distance from the center similar to what we
have on the left. Let's just go and create
this little sheep. When you have it, you can hold
your line and the answer, you can hold one of
your fingers to snap it to a perfectly round circle. And if you want to
make sure that you are remaining the same size, we will just add hold everything and we will go over
the top to circle. We will move our circle from
the right to the left side. We will combine them
together and we will see whether we
need to adjust it. If everything is alright, we will just get it back. If we need to adjust some parts, we will just go and adjust that. And now let's just put it on the similar distance from the center that we have
already left side. And when you are done, Let's
just tap on the screen and we will go inside the
shape and we will shade it. When you have the isolette, just move on to the nose. This and let's try
something different and we will create
another triangle, but a little heart
instead of the nodes. So firstly, we will
go over the left side and we will create a
little ellipse like that. It will be tilted
toward the left side. When you have this
little ellipse. Let's move on to
the opposite side and we will try to recreate it, but this time we
will mirror it so it will be tilted
toward the right side. So basically we are doing similar thing that
we had right here, but it will be quite smaller and we will play around
with it when it's ready by going to our selection
tool and we will find a different placement for it and maybe we will make it
smaller or bigger. So when you have the
sheet that you like, Let's just go to
the S ribbon icon. We will go to the
free hands methods. We will select these nodes
that we have created. When only this area is selected, we will go to our
Transform tool, which is our arrow
key on the top plot, you can go back to the
uniform method and play around with the
size and position. Or if you want to adjust
the shape even more, go back to work, play around and find
what works for you. It's always good to zoom out your Canvas to see at your illustration
from the distance. Because now if you are looking
at it from the distance, you see the whole picture
more clearly and it will help you to adjust your elements in accordance with your vision. So play around, zoom in, zoom out, find what
works for you. Position this nose
and when you're satisfied ledgers
move on to the mouth. Let's deselect everything by
hitting R, S ribbon icon. And when you have
your nose lead, just go underneath it. And we will create
a similar model that we have right here. So we will go to this
site and we will create half of the circles or half
of the ellipses there. Play around with the shape. If you need to just hold
your Apple pencil at the end and do to adjust your sheep
or the top to edit modes. When you are done
with the mouth, Let's move on under the eyes and we will add our
little cheeks there. Again, play around
with the shape. If you want to make a circle, just hold your line and
hold one of your fingers. If you want to
create an ellipse, just hold your life at the ends. Find the position
that works for you. Try to make the shapes
even on both sides. So when you are creating
the second one, go over the top to Edit Mode, move these shapes are where the first one adjusted if it needed, and then move it back
to the needed place. When you are done, Let's move
on and add some whiskers. Again. We can go and repeat
something similar to what we had on to our first illustration
or onto our second one. Or if you want, we can go right to our little
cheeks and from them, we can create the whiskers, play with the amounts and
play with their sites. When you are done, Let's
move on to our last K1. So again, we're going
back to our layers. We will create one more
layer and we will select some contrast color if you don't have it here into
the color palettes, if you want to select
some other color, you are welcome to go into disk. And here you can select
the color very easily. Find the color that
you don't already have into your canvas selected. And let's move on to create an array next, Katie, and again, we are starting by creating a simple circle
ledgers guilt entropy, the shape that we
have on our scheme. Hold your line and the ends. Hold one of your fingers
on the screen to snap to a perfectly round
circle if you want to adjust it or if you want to
find a different placements, let's go over the top to circle. When you are done finding the placement and
adjusting your size on this Elements
tab on this screen and let's go and
adjust it even more. I get him back to
our Transform tool, which is the arrow
key on the top-left, and we are going under work. Let's play around and find
the shape of the hats. When you find the
shape that you like, but you want to move it. Ledgers, go back to the uniform method and
adjust the placement, rotation and everything
that we want to adjust. Remember that it's always good
to overlap one shape over the other shape rather than just touching them in that way. When you find the
position that you like, Let's deselect everything
by hitting our arrow key. And now we will go inside the shape and we will find
an approximate center. So again, you know
what we need to do. We will adjust our screen
and we will go and create one line which is
going vertically and one line which is
going horizontally. When you are done finding
an approximate center, Let's go and add our ears
the same way as before us. Firstly, starting by finding out where we need to
start creating our ear. Go and over one of the sides
making a little markdown, going over the top
and create an, another monk done when you have the place ledgers go
and create the ear. You can play around with
the shape as always, if you want to make
the pointy ears, you are welcome to do it. If you want to make
the small ears, again, you are welcome to do it. Find what works for you when
you have the first year. Let's move on to
the opposite side and we will repeat it here, but we will mirror it again starting by going to
this little mark down that we have over
the left side and creating the line going
across the whole shape, make it parallel to the
line that you have in the middle and add a little
mark down on the set. When you have it, Let's go and do the same over the top part, go into our intersection creates an airline go into
the opposite side, making a little mark down, going over the top on the ear and create
an, another line. And when we have all
the guiding lines, Let's just go and add
our little ear work onto the connections between
the ears and the head. And when you're done
creating your ears, Let's move on to the
facial features. Firstly, we will go
over our left side and we will create another
shape of the eye. So this time led just make a very Smiley cats and we will
create an I of this shape. When you have the first shape, Let's move on to
the opposite side and let's repeated here. Try to put it on
the same line and try to keep the distance
from the center. And when you have
it's ledgers go and add our nose
and a little mouth. Firstly, starting from the nose. And again, you can decide what type of the nose
you want to add. If you want to work
with a triangle, you are welcome to do it. If you want to add a
little heart, again, you are welcome to play with the size and play
with the placement. If you need to adjust it, go and select this
shape by using your S ribbon, icon
and freehand methods. When you have selected it, go to the Transform tool, go to the uniform method
and play with the position. When you are done, deselect
everything by heating your S ribbon icon when you
have the nose that you like, Let's move on and add
our little mouth. Let's just go and repeat the shape that we
have right here. But maybe we will
add some details. So firstly, let just
go to the sides and we will add our little
Smiley mouth here. Try not to connect these
shape of the mouth with your I tried to
keep a little distance. When you are done with one side, move on to the opposite side
and add the same thing. If you want, you can
play around and maybe add a little tongue here
over the mouth area. So e.g. we will go there on the bottom and we will create
another shape like that. If you want to leave
it as it is right now, you are welcome to do it. If you want to add a little line that will divide our tank, you are welcome to edit two. Now when we have these shapes, we are ready to go and
add our little cheeks. So again, we are moving
underneath our eyes and we are selecting the shape that we want to use for our cheeks, a circle or an ellipse. Find this size and
the position that works for you when you
have the first cheek. Let's move on to
the opposite side and do the same thing here. When you are done
with the cheeks, move on to the sides
and add the whiskers. If you want to add some
additional elements to your cats, maybe some beautification,
some browse, or maybe some
additional accessories. You are welcome to do it. And when you are
done with your cats, we are ready to move on to our additional
elements of the soup.
5. Making a Soup Sketch : Let's start making
our suit by going to the layers and we will
create one more layer. So tap on the plus icon. If you want to
rename this layer, you are welcome to do it
when you have a new layer. Let just go back to our
colors and let's select some contrast color
that we don't really have onto our
Canvas right now. You can go to the disk and
select the color from here. Or if you want to try it out
onto the color palettes, you are welcomed to
find something here. So select the color
that is contrast. And when you have it, we will need to
create the noodles. We will go inside the
ball and we will fill all the blank areas that we have intelligible
with the new dose. We can keep it very simple. We can just go and create
some kind of these pattern. So we are just
repeating the lines and they are just
parallel to one another. Or if you want to create
something more creative, you can go and find out a different pattern
that will work for you. You are welcome to
create anything here. But you need to remember
that the noodles, they have some volume. So the number of lines that you need to create the
noodle width is two. The number should be even
ledgers go inside of our bot and let's find some pattern that will
work for our new doubts. Also be brief and overlap
some parts, only cats, we will need to make an
illusion that there is not only the head of our cats, there are some bodies
inside the ball. So we will just need to create some pattern with the noodles
to make this illusion, ledgers go and
create our noodles. You can go with one
direction or you can play around and create the noodles
in different directions. When you have your
noodles on one side, we are welcomed to move
on to the opposite side, and we are welcome to
create integrals here too. So again, if you want play
around with some patterns, find what works for you. If you want to add
additional elements, e.g. some corn, maybe some
on in or the egg. You are welcome to do it. You are welcome to
play around with this soup and to make
something that you would like. So e.g. let's move on to
this little part that we have over the right side
and we will add some corn. We will be creating
it in that way. So we are creating a very
soft rectangle and we will be doing above it and we will overlap the shapes in that way. When you are done playing
with the new dose, Lynch's due to this
area right here. And we will add one noodle going above the
shape of our bull. Let's just go and create
something like that. So just take one noodle that
you have onto this area and elongated by going
out from the shape. If you need to grab
an eraser tool and erase some additional lines, you are welcome to do it. When you have the noodles sled, just move on and we will
add our little spoon. So again, we are going
firstly to our layers. We will create one
more layer and we will go and select
some contrast colors. So e.g. we can get back to
our color with dark blue, we have this shape
for our spoon, but if you want to
play around with it and maybe find a
different placement, different position,
different angle. You are welcome to do it. So e.g. let's just go to
this area where we have our spoon on the scheme and we will make it a little
bit different this time. We will go and create a curve instead of this
very street light. And we will change our
angle just a little bit. We are making it just to make everything a little
bit more playful. Let's start with
something like that. And when you have
this guiding line, let just turn it into the spoon. So basically we
are just repeating what we had on to our scheme, but we are following
our new guides in line. So let just tap to the side and we will
repeat this guiding line. You can make it as thick
or as thin as you like. Or e.g. if you don't
want to add this spoon, you can end up with
creating some sticks. When you have the
shape that you like, we can go to our
Transform tool and maybe play around with the
position of these elements. We will go to the
uniform methods. We can rotate it, we can place it differently. We can just drag it
to a different place. It's all up to you play around and find what works
for your illustration. If you want to adjust it, go to warp and play with
it from warp option. When you're done playing
with your spoon, Let's deselect everything
by heating our arrow key. And let's add one more elements. We will go strictly to art board and we will add some
dripping parts. We will basically go to
this area and from it, we will go down
and we will create something similar
to what we have for our little noodle here that
is going outside of our bowl. But this time we will need to go with the direction of the ball. So let us go to this
line that we have right here for the
edge of our ball. And we will go and create a few lines that are
going strictly vertical. Ledgers go and create
something like that. You can play around
with their size. You can play around
with the pattern. You can play around with the amount on this
little dripping parts. You are welcome to
do what you want. If you want to skip this part, you are welcome to do it too. E.g. we will end up with
a pattern like that. Ledgers go and turn
them into the drips. So we will need to
do the following. We will need to thicken this line so we can
go over this side. We can create another
line like that. And on the bottom we will add
a little half circle there. So we are creating something
like a dripping drop. When we have it, we will go alone all of these
slides and we will add some thickness and we will make a soft ending to that. Land. Just go and very
quickly do that. Make it a part of
our composition and not some weird lines. Ledgers go to these
parts and we will need to connect two drops
with a little curve. So this time let's
just go between these two drops and we will
create a curve like that. You can hold the line and
the answer you can play around with how you
want to make it, make the smooth
connections between this little curve and
the dripping lights. So when you have the first one, ledgers go and connect all of our little shapes
with these curves. You can play around with
the angle of this line, so you can play around
with their height. You are welcome to do
what you need to do. And now we can grab our eraser tool and we
can erase these lines. Also, we can go to the top of this dripping lines and
we can just move them to the composition and we can
just create a landslide that so this part is
going from the ball. We can just end up with
something like that. And we will go to
the opposite side and we will do the
same thing here. So we're just connecting our
draping parts with the ball. You also can go over
the top and you can create a little line to
connect this whole shape. And when you are
done with this part, we are ready to get
back to our layers and we are ready to combine
all the layers together. Now take a look at your
illustration and if you don't want to
adjust some parts, we are ready to merge them. If you want to adjust
them in any way, find different placement
for your elements. If you want to maybe adjust
the position of them, you are welcome to do trade now before we merge
everything together, if you're satisfied, let
us go to our layers and we will put one of our fingers
on the layer on the top. And the second finger we
will put one to earlier with the first element on the layer
that now is called Sketch. So when we put our
two fingers, 12, these two layers, we will
make a pinch movements. And now we have the whole
sketch on one layer. And that means that we are ready to move on to our next part, where we will start
adding the colors.
6. Adding Base colors to Big Cats & Bowl: Let's start our Keller inspired
by going to the layers. And firstly, we will go to the background color
layer and we will change the color of the background just to
add onto this layer. And we will go under
palettes on the bottom. And we will also like the color with the name backgrounds. Now when we have our
background color, we can get back to our list. And if you want, we can go to our
layer with this gauge and we can change the
opacity on this layer. We will need to go
to our N. I can go into our opacity
slider and moving this slider toward the
left side until we are satisfied with how it
looks when you are done. And if you don't
see some details, you are welcome to go
to the magic one tool. Go to the hue, saturation
and brightness and adjust the
values right here. You can play with
a few so you can easily see what's happening
onto your canvas. Or you can play with the
brightness and saturation. So e.g. that might work for you if you don't want
to use this values, if you are okay with how it works before
you are welcome to continue in that
manner if you are satisfied with what you
have right now under hue, saturation and brightness, you can go again to the
magic one tool, tap on it and
deselect everything. So now when we have our
sketch, prepare it, we can go again to our opacity slider if
you want it adjusted, go for this slider, adjusted. When we are done with
adjusting our sketch, we will need to start by
creating one more layer. I just tap on the plus
icon and straight away, we will rename it as ball and just tap on
it and choose Rename. We will need to grab this
layer and we will need to drag it under our
layer with the sketch. So that way we will
know where we need to put our details to do so, we will need to
go to our layers. We will need to go to
early with the ball. When it is selected, we will hold our Apple Pencil and we will just move it down. When you are done
with this task, we will go to our color
palettes and we will select the color with the
main light, yellow, orange. When we have this color, we will need to go
and change our brush. We are again go into
our brush library. This time we are going under calligraphy folder and we
will choose monoline brush. If you want to make
your brush more smooth, we can go and adjust one
setting where just tap on the brush and on the
left in the brush studio, we will go under stabilization. On the top you can see that
we have the value streamline. And when the amount
of streamline is low, our land will follow our
natural movements of the hands and airline will
be a little bit jagged. So you can see you
have all the control in the world under this line, but it is not that smooth. If you want to adjust it. If you want to create the
smoothest line possible, you can go to the value amount
and you can increase it. Now let's just do it again to the drawing paths
and try it out. You can see that you lost
some control over the line. It's not moving that fast, but your line is very smooth. So if you want to use
this option, go for it. If you want to adjust
it to your liking, maybe change the
amounts not to maximum, but maybe to 50 per
cent or something. You are welcome to do it too. When you're satisfied with the amount of
streamline lead just hit Done and we will go
and start recreating that. So part of our
book ledgers, Gil, increase the size
of our brush and just with one line the
same way as before, we will go and create
this top ellipse layer. Just go and do that. Hello Julian, and the
ends a jazz the size, adjust the placement if you
need to adjust it even more, undo or the top
two aided ellipse. Try to repeat the lines that
you have on to your sketch. And when you're done, ledgers tap on the screen to
get away from these modes. For now, we will leave this inside part blank and we will move on
to the bottom part. So with the same color, we will get entropy, the land that we have for
the bottom part of the ball, the same way as before. Just go in there and
just with one line, we will recreate the sheep, hold your land and the
ends and try to make this smooth connections between the top part and
the bottom part. If you need to
adjust it and hold your Apple pencil and go
over the top to age it. End-to-end your
iodine, adjusting your ball ledger step on the screen to get away
from the editing mode. And we will go inside the shape of the ball and
we will add the color here. So firstly, let us get back to our color palettes
and we will select the color with the
name dark blue. When we have this color
onto our top-right corner, we will just hold it there and we will drag it to
the needed, please. We are adding the color on the same layer where
we have our lines. Now when you are done, ledgers get back to our
layers and we will create one more layer and we will
tap on the plus icon. When you have this layer, we will drag it under our bowl. We will need to recreate this little part that
we have on the bottom. So let's just rename this
layer as bold button. Now when we have our new layer, let us get back to our
color palettes and we will select the color
with the name rats. When you have this color, Let's increase the
size of our brush and we will just go there
and width one line. We will repeat what we
have for this little part. So just go there
and create a curve. Hold it at the end, a jazz the angle. It just everything that
you want to adjust. If you need to
adjust it even more and go over the top
to editing mode. If you like how it
looks right now, you can leave it as it is. If you want to make the
bottom part street, you can grab an eraser tool
and cut this little part. When you are done
with this part, Let's just move on
again to our layers. We will go to
earlier with a bull, and we will combine these
two layers together. I go into the layer
with the ball. When it is selected, we will tap on it and we
will choose Merge Down. Now, everything that we have for our ball is on one layer. When you are done
with this task, ledgers go and create
one more layer. We will tap on the
plus icon and we will rename this layer
as inside parts. Let's just tap on it
and choose Rename. When we have created
a new layer, we won't be able to go and drag the color
to the needed place. We will need to do one more. I think we will
need to go back to our layer with the ball button. We will tap on it and we
will choose reference. When we have our layer
set as a reference, we can use the lines that
we have onto this layer and we can adjust the color
on the separate layer. So e.g. I. Just go to our layer
which is inside bow. We will grab the same
color that we have right now and we will drag
it to the middle part. And you can see we have added the color on the separate layer, but we are using these shapes that we have 12
earlier with the bull. That's exactly what we need. Now, we will get back
to our bull boats and we'll tap on it and we
will turn off reference. When we are done with the ball, Let's continue by
creating our first cat. We again go into the Layers and above all the
layers with our ball, we will create one more layer. Let's just tap on the plus icon and let's rename
it as yellow cat. Now when we have this new layer, we are going back to our
color palettes and we will select the color
within the orange. When you did it, we will
go to our cat on the top and we will just go along the lines that
we have on this gauge. And we will repeat that. Ledgers go and very
quickly do that, adjust the size of your brush and when you have the
size that you like, go along the lines, use all the methods
that we use before. You can just go and hold
your land and the hands, you can go over the
top to adjust it. You don't need to repeat everything with
100% of similarity. All you need to do is to create the clothesline ledgers,
go and do that. If you need to
adjust some Perez, just grab an eraser
tool and adjust them. Paying more attention to the
outside look of your line. When you have your lines
ledgers go to our layers and we will hide our layer with this gauge just for one seconds. We will go alone
airlines and we will check out whether
everything is looking fine. If you want to
adjust some parts, go and do that. When you are done
working on the lines, work a little bit more on the inside part of
the ears because here we will add
a different color when you are satisfied
with your lines, let just go to our
top-right corner. And firstly, we will drag these same color to the
middle part of our hat. So just go in there and
dragging the color. When you are done
with this part, let's move on back to
our color palettes and we will select the
color with the name rats. Or if you want, you can go to this part that
you have for this soup. Invoke your eyedropper
tool by holding one of your fingers on your screen
when you have a new color, just on hold your
finger and move to the inside part of the ears
and drag it to these places. If you want to adjust
some parts here, if you think that maybe you
want to soften some lines, go select the color which you want to add, adjust the parts. When you are done
with this task, we are getting back to
our layers and we will unhide our layer
with the sketch. We will go and create
one more layer for the facial features
of the yellow cat. So let's just go and tap on the plus icon and we will rename this layer
as facial features. And now to make everything
very clean into our layers, we can either go and create a new group for
each of our cats, or we can go to our facial
features that we have for this yellow cats and we can click this layer
to a previous one. So you will know
that we are creating facial features of this
yellow cat onto this layer. Clean middle ear to
the previous one. We will need to tap
on the layer with facial features and we will
need to choose Clipping Mask. You will see a little arrow that is go into your previous layer. So now let's just go to this layer with our
facial features. We will go back to our
color palettes and we will select the color with
the name dark purple. With this color, we will go and repeat our facial features. So basically we are
starting from our eyes. Let's just go and increase
the size of our brush. And we will put two
dots for the eyes. If the size of the
brush is not enough to put the doors of the size
that you have on this gauge. We can do the following. We will go against
our brush library. We will tap onto
our monoline brush. We will go under properties. Here you can see we have Brush behavior and we have
this slider maximum sites. You can adjust it to
maximum and you will adjust the size of your maximum
size of the brush. When you're done with this, just tap on Dan and continue creating
your facial features. And the same way as before, you can use all the tools
that we use before. You can create the shape
e.g. overtraining. Hold it at the end if
you need to adjust it even more ago or
editing to the top, if you have the
option triangle here, you can select it. If you don't have
the option triangle, you still can choose one
of the options that you have over the top and
adjust your sheep. When you are done with
the main facial features, Let's just go and add the whiskers so we will
increase the size of our brush and we will go and put our little lines
for the whiskers. If you are moved your shape
of the cat on the left and if you still feel that maybe you need to add the whisker
is on the opposite side. You are welcome to
go and do that. When you are done
with the whiskers, let's go and add
our little cheeks. So we will go back to the color palettes and we
will change the color. Again. We are using the
color with the name rats. If it's too intense for you, you can get back to the disk and you can adjust the
color from the disk. Let us go and repeat what
we have onto our sketch. When we have our outlines lead, just drag and drop the
color inside these objects. And now when we are mostly
done with our facial features, Let's just go and add little
highlights to the eyes. We will go and select
the same color that we have for
this white outline. So let just invoke our eyedropper Tzu by holding one of our
fingers on the screen. And when we have the color that we need on the top of the zoo, we will unfold our finger and we will do increase the
size of our brush. We will go to the top quarter on either sides and we will
put just one, do it. E.g. let just start
from the left. We will put the doors to
the top-left quarter. If the size is not enough, you can go and adjust it even more and try it
out one more time. And when you have
the first highlight, we will go to the opposite
eye and we will try to put another highlight
on this similar place. Let's just go to the
top-left quarter and we will try to
put our highlights. When we add down,
we can get back to our layers and we can hide early with this gauge just for 1 s to check out whether
everything is okay. If you like how it looks, we are ready to move on and
create our next key tip. If you want to
adjust some parts, go to the needed layer
and adjust that. So e.g. let's get back to our LEA with the main
shape on the cats. And we will go to the
left side and a jazz, this laser connection between the ear and the main
shape of the hats. We will invoke our eyedropper
to select the color that we need and just go there to this side and make it smooth. And when you are satisfied
with everything here, we will get back to our leaves. We will unhide our layer
with this gauge and we will go to earlier with facial
features and above it, we will create another layer. Let's just tap on
the plus icon and let's rename this
layer as black kitty. So let us get back
to our colors. And if you are under disk, let's get back to our color
palettes on the board, Sam, and we will select the color
with the name dark purple. We will start the same
way as before we are doing to our sheep on the
hat and width one line, we will try to
recreate the shape, try to make it smooth, and try to make the closed line. When you have the main shape, move on to the ears and
create a shape for them. When you have everything
you need, ledgers. Get back to our
layers we will hide earlier with this
gauge and also we can do to earlier with yellow
cats and we can hide it do to see more clearly
what we are doing it. Now let's work on our line. Let's make it very
smooth and very soft. If you need to adjust
some connections, grab the eraser
tool and erase it. Work more on the outside
parts of your sheep. When you are done, ledger, drag and drop the color
to all these places. Take a look at it one more time. If you need to
adjust some places, go and adjust them. When you are done, we are getting back
to our layers and we will unhide our layer
with the sketch. And when we did it,
let us go and create one more layer where we will
add our facial features. So one more time tapping on the plus icon above earlier
with the black cats, and let's rename it as
facial features again. So we are tapping on the
layer and choose and rename. Let's clip this leads
to a previous one, so tap on it and choosing clipping mask when you
have this new layer, we are going back to
the color palettes and let's start from the light
yellow, orange color. When you selected this color, we will go to this
little snout elements and we will recreate it. So again, just grab your
brush and create the outline, making nice and smooth outline. And when you are ready, just drag and drop
the color insights if you need to check it out
without the sketch lines, go back to your layers, hide your LEA with this kitsch. If he wants to adjust
it in any way, grab your eraser
tool and adjust it. Now let's get back
to our layers and we will unhide our layer
with this gauge. And when we have it, we will go back to
our color palettes and select the color
within the orange. When we have the color, we are going back to our
slider on the top left, we will adjust the size of
the brush so it is similar to the size of the eyes that
we have on this sketch. We will go to these
places and we will put our adults when you did it, Let's make it less creepy. And we will add the inner
part of the eyes by using the same color that
we have for the main sheep. So let's just go to this color. We will hold one of
our fingers there to invoke our eyedropper tool, we will select the same
dark purple color. And when we have it, we will get back to
our slider on the top-left and we will
decrease the size of a, just a little bit. When we did it, we
will go inside of our yellow eyes and we
will put another dot here. Tried to put it right in the center when you did
it with their first I let's move on to the opposite side and we
will do the same thing here. When you are done, Let's select the color that
we have for this soup. So again, we are invoking our eye dropper tool by holding
one of our fingers there. When we have the needed color, we will go to the
nose area and we will recreate what we
have on to our sketch. When you are done with the nose, let's increase the
size of our brush and we will put the dots
for our little cheeks. When you have the
cheeks one more time, we are going with
our eyedropper tool to select this white color, and we will go and create
our little whiskers. So again, decrease the
size of your brush. Go to the sides and
recreate the lights. If you try to end the whiskers, you will see that
you are not going beyond the frames of your cat. That's because we are
using the clipping mask. If you want to use
the clipping mask, you are welcome to do it
and you are welcome to go inside the shape of your head
and add the whiskers here. Or if he wants to end
the whiskers going outside the borders that you
have for your main shape, you can either go
back to your layers and unclip the layer
with facial features, or get back to your layer
with black cats hats, and onto this layer,
add the whiskers. When you are done, let's
get back to our layers. We will hide our layer
with the sketch just for 1 s to check out whether
everything is looking fine. If you want to
adjust some parts, you are welcome to do it. When you are ready. Let's get back to our
layers and we will unhide our layer
with yellow cats. Taking a look at your
picture, if you like, how ARAF and looks, we are ready to move
on to our next cats.
7. Adding Base Colors to Little Cats: So let's just go
back to our layer with the sketch and
we will unhide it. We will go to early with the second facial features and above it we will
create another layer. Let's just tap on
the plus icon and let's rename it as green kitty. Now one more time we
are going back to our color palettes and we will select the color
with blue, green. With this color, we
will go to our cat in the middle and we
will do the same thing. We are starting by creating
the outline for the hat. Make the lines smooth and close. When you have the line
for your main shape, move on to the ears
and add the lines here to make smooth connections
between the shapes. Try it out without the
lines on this gauge. Take a look at it. If you need to
adjust some parts, you are welcome to
go and adjust them. If you want to add some different color for
the inner part of the ears, you are welcome to do it. Or if you want to add the same
color to the whole shape, again, you are
welcome to do it too. When you are ready to
add the color ledgers go to our top-right corner and we will drag
and drop the color. Work on the shape even
more if you need to try to make everything
smooth and soft. When you are done, we are
going back to our layers. We will unhide our layer with the sketch and above
our green cat, Leah, we will create
one more layer to add our facial features. Lead just tap on the plus
icon to rename the LEA as facial features and clip
it to the previous layer. Now one more time, going back to our
color palettes, selecting the color
with dark purple color. And we are going to, are places that we
need to recreate onto our sketch and we are
aging our facial features. You can create this little
heart for the nose. In this way, you can go and increase the
size of your brush. And with the big brush, we will go to this place. We will create the line going down in that way
and straight away, going up, hold it and the hands and you will
create the heart shape. If you need to adjust it, you're already up to triangle. Play around with the nodes, play around with the
position if you'd like to. And when you are done, just tap on the screen and continue a1 your
facial features. If you find this size on the brush that is
working for you and you want to create consistent lines
with the same size. Always, you can go to your slider that you
have on the top-left, find this size, go to
this little mark down on, say, your slider, tap on it. And when it is showing
you this little window, you can tap on the plus icon. You will see that you have a little mark on to your slider. And if we go and change
the size of your brush, you can always go to this
little mark that you've made, tap on it and you
will get back to the size that you
need if you want to get rid of this little mark
down sampling it one more time and go to this little
window or the top right, you will see the
little icon minus. When you are done with
the main facial features, ledgers go and add
the little highlights the same way as we did
on to our big kitty. We will go and select the color that we had for this
white elements, invoking our Eyedropper Tool, selecting the color
and go into one of the quarters on the top
and put in our highlights. When you are done with these, Let's move on to our next Katie. But before that, let's
just go and check out how it looks without
the sketch lines. If you don't want to
adjust anything here, Let's move on and
create one more layer. We will rename it
as white kitty. Let's get back earlier
with this gage, we already have the
color that we need. So let just go to
our last cats and let's recreate the lines that
we have onto our sketch. When you have the main shape
and the lines for the ears, take a look at your shapes
without the sketch lines. So go back to your LEA is hide
the layer with the sketch. If you need to adjust some pads, grab your eraser tool
and adjust them. Way more attention to the
outside parts of your lights. When you are done, just drag and drop the color
to all these inside parts. If you want to recolor the inner part of the ears
with a different color, you are welcome to
do it one more time. Taking a look at your outlines and the whole shape in general, if you want to
adjust some parts, go and adjust that. If you are satisfied
with the whole shape, let's get back to our
layers and we will unhide our layer
with the sketch. We will go again to
early with white cats and above it we will create another layer with
facial features. So let's just tap
on the plus icon. Let's rename this layer and let's clip it to
a previous layer. Now we will go and select the same color that we used
for our previous cats. So we can go to our
cats, which is black. Hold one of our fingers, invoke our eyedropper tool, select the color
that we need and recreate what we have
for our facial features. If you want to end the
whiskers outside the shape, you can go back to your LEA with white cats the base and
add the whiskers here. Or you can get back to your facial features
and unclip this layer. When you are done, let's
get back to our layers. Let's hide earlier
with this cage and check out how it looks
without these lines. Easier, satisfied with
how everything looks, we are ready to move on
to our next chapter. We will add our Soup elements.
8. Adding Soup Elements: Let's start working
on our Soup elements. Beg you into the layers and, and hygiene or layer
with the sketch first. So tap on this little checkbox and in that way we will
know what we need to do. Now let's just go to
earlier with insight bot. And above it we will
create one more layer. Let's just tap on the plus icon. And we will start by creating this little spoon that we
have on the right side. Let's rename this
layer as spoon. And now let us get back
to our color palettes. We will select the same
color that we used for our whitish elements,
like yellow, orange. And with this color, we will
go and recreate the shape of our spoon suggests with one line going there and
creating the outline. And then we will
just drag and drop the color in site very quickly. Let us go and do that. When you have the
shape that you like. Let's just get back
to our layers. We will hide our layout
with this case just for 1 s to check out if
everything is looking fine. If you want to grab
your eraser tool or if you want to get back to your
brush and adjust your shape, go and do that. Try to make everything
very smooth. When you are done, let's
get back to our layers. We will unhide earlier
with this gauge. And when the spoon is radially just go and create one
more Lee and we will recreate are lethal
dose that we have for the cord above
earlier with a spoon, we will tap on the plus icon and we will rename and
Yulia as corn. Now, we will go back to
our color palettes and we will select the color
within them, light yellow. When you have a new color, we can go and increase
the size of our brush. And with this color and
with this big brush, we can go or this elements
that we have onto our sketch. And we can recreate
that very easily. Ledgers go and create
these objects. You can see that some of the objects are on
the right place. But if we want to go and e.g. overlap our corn above R
allele with the first cats, we will need to
do the following. Firstly, let us go to the
layers and we will hide our layer with the
sketch just for 1 s to check out how it looks. So go into our layer with the sketch tab in on
this little checkbox. We are trying to figure
out whether we want to change something on
earlier with the corn. If we don't have
anything to adjust, we will get back to earlier
with the corn and we will drag it up above
earlier with the cats. So let's just go to this
layer with the corn. We will hold it and
we will drag it up above our facial features
of this yellow cat. Now you can see what happens. This layer clips to our yellow
cat and we don't need it. We will need to go and
unclip it manually. Select, just tap on the
layer with the corn, and we will choose clipping
mask from the list. Now, everything is looking fine. We only have our cat on the top overlaps and we have this area where we have
the spoon overlaps too. That's exactly what we need. Now, we can continue by
recreating our new dots. So firstly, let us go back
to earlier with this sketch. We will unhide it. And when you have this gauge, we will need to try to
recreate what we have one set. So firstly, let us go to our color palettes and we will select the color
with the name peach. With this color, we will go
over the left side firstly, and we will try to
recreate our noodles here. Let's just go and
create one more layer. We will start by creating a layer above earlier
with the corn, but it's not the position
that we will need later on. We would want to make an
illusion that our cats, not only the floating hats, they have some bodies. And we will just need to overlap our noodles and
make this illusion. When we have this
layer selected sled, just go and create
one more layer, tap on the plus icon and
let's rename it as noodles. When you have this
new layer, ledgers, drag it up above all the layers that
we have for our cats. Selecting this layer, holding
it and dragging it up. Now we will go to our size on the brush slider and
we will adjust it. We will need to make
it similarly to the size of the noodles
that we have, our sketch. So you will need to
go and try it out. When you move this layer, makes sure that
it's not clipped. If it is, you will need to
go back to your layers, tap on the layer and choose
clipping mask from the least. So play around with the
size of your brush. And let's just go
above this layer is, and we will create our noodles. All we need to do
is not to create a great mass which will
be indistinguishable, we will need to create
singular noodles. And these color that
we have underneath will represent some kind of distance between
this noodles. So we won't be creating
the lines for the new dose that will some kind of separate one noodle
from the other noodle. We will use this color that we have underneath
for that purpose. So now let's just go to
our Canvas and we will try to recreate what we have on our layer with the sketch. For now, don't worry about going beyond the
frames of your bowl. We can fix it easily later on. What do we need to do
right now is to go inside our bowl and
create our lines. We can repeat what we
have onto our sketch. Or if you want to
experiment a little bit, just do what you need to do. Keep in mind that you will need to keep the distance between your singular noodles and
create some patterns, play around and try to
create something nice. When you have
something like that, when you have created the
noodles over the left side, Lynch's due to our
layers and who will hide our layer with the sketch
to see how it looks. You can see that we have
some areas that are overlapping the cats where we don't want them to overlap them. So we will need to go
and adjust these parts. Firstly, let's just
go and play with this noodles that we have on
the top of our white cat. We can go to our
eraser tool and we can erase these parts manually, but it is time-consuming so we can do it in a different way. E.g. ledger started
from this white cat. We will go to the
layer with white cat. We will tap on it and
we will choose, Select. You can see that
now this area is selected only the area where
we have our white cat. And that's exactly what we need. We will go to our
layers one more time. We go to earlier
with the new dose, we will grab an eraser
to and who will go over the top areas where we have
the parts that we don't need. We will grab our eraser
tool and erase them. When you are done,
let just deselect everything by hitting
R S ribbon icon. You can see now we have a
very nice connection between these two shapes
and we will do the same with the other shapes, e.g. let's continue by erasing the
parts onto our black cats. We will go to the
layer with black cats. We will select it,
we will tap on it and we will choose
select from the list. When only this area is selected, we are getting back
to our layers. We are going back to our
layer within noodles. We are selecting
our eraser tool and going over these areas that
we would like to erase. When this is done, let us get back to our S ribbon icon to
deselect everything. And we will do the same
thing with our green cats. So again, going
back to the layers, go into our green cat layer, tapping on it and select it, select from the list. Now when only our
green cat is selected, we are getting back
to the layers. We go into our layer
within noodles, selecting our eraser
tool and going over the areas that we
would like to erase. When you are done
with this task, let's deselect everything
by hitting R S ribbon icon. And now we will go and
continue edit noodles, but now with a different color. Again, we're going
back to earlier with the noodles
are going back to our color palettes
and let's select the color within
them, yellow, green. With this color, we will go
to the right part and we will recreate the noodles
here the same way as before. We are just going
back to the layers. We are unhygienic earlier
with this gauge and we are trying to recreate what
we have on to our sketch, but with a different color. Let's just go and do that. If you find this area in
the middle quite tricky, you can go and create
one more layer for the noodles and put it underneath the noodles
that we already have. In that way, it will be easier for you to recreate the noodles. And later on, you can just go and merge these two
layers together. Just pay attention. If this layer then you
want that you just put down is clipped
to a previous layer. So you will need to go
tap on it and choose clipping mask to manually go to this layer and
create new details. So let's just go to this
new layer and we will recreate the noodles
in this middle parts. When you have the main
mass over the noodles, alleges go to this
middle part and we will stick one or two noodles
outside the pool. So let just go to this
little part that we have in the middle
and we will just continue creating the noodles. If you want to create
another noodle, just go there and try to repeat something similar to
what you just did. Now, let us go back
to our layers. We will hide our
layer with the sketch and we will check out
how everything looks. If you're satisfied
with your noodles, If you don't need to
adjust some parts, we can go to these two
layers that we have for the noodles and we can
combine them together. If you want to take
a little bit of time and play around
with the noodles, maybe a jazz some parts. Go grab an eraser to go
grab your brush and a jazz. The parts that you
need to adjust just spent a little bit of
time on these parts. When you're satisfied with
how everything looks like, just get back to our layers. We will go to the layer with the noodles that
are peach color. We will tap on it and we
will choose merge down. And now everything that we have for our noodles is on one layer. When you do this,
we will need to go and clean this part on the ball where we have gone a little bit
beyond the frames. So what we need to do, firstly, we will go to our layer
with insight bowl. We will select it,
we will tap on it and we will select
from the list. When we did it, we
will need to go to the bottom part onto
our little panel here, and we will need
to choose Invert. Now, everything except this part in the middle is selected, and that's exactly what
we need when we did it. We will get back to our layers. We will go to earlier
with the noodles. We will grab our little
eraser tool and we will go above this part that we want to erase and
we will erase that. And when you did it, lead just go and
deselect everything by hitting R S ribbon icon. Now you can see
everything looks quite clean and we can go
and do one more thing. We will get back to this layer that we have for
the inside ball. We will select it and we will change the color
on the right part. And to do it very easily, we can use the alpha lock. When we use an Alpha lock, we are working only on the areas that we already have
wanted this layer. So we are not going beyond the elements that we
have on this layer. We are not creating
something new. We are working only
inside this shape. So let just go to this
layer inside bow. We will tap on it and we
will choose alpha lock. You can see that we have a little checkerboard
around your object. And that will mean that
we are allowed to work only on this shape that
we have on to this layer. When we have this set, we will get back to
our color palettes and who will select the
color with a nice dark purple if you want to
use any other color that will match this part
where we have green noodles. You are welcome to
go and select it. Otherwise, let just select
this dark purple color. We will go back to our brush
monoline and we will go to this area where we have our green noodles and
we will recolor it. When you have
something like that, we can do one more thing. You can see that we
still can see what's happening on the bottom
parts of our cats hats. And we can go and
add some soup here. So it's not just floating hats. They are the part
of the composition. This little issue, let us
go back to our layers. We will go to our layer
underneath the noodles, so facial features and from it we will create
one more layer. You can rename this layer or you can leave it as it is right now, we will go to these
areas where we have this soup and where we
have our cats hats. And we will create a
little lines here. So e.g. we will go
over our right side. Firstly, we will go
to the bottom of the cat with the same color
that we use for the soup. And we will create a
little wavy line here. So we are recoloring the areas
where we have the noodles. If you want, you can try it
out and maybe go a little bit higher where you have the cat hat or if you
don't want to do that, we will go and continue on the left side by
adding this red color. So let just go invoke our
eyedropper tool on this area where we have our red color
and we will go entry color, these parts where we
have our cats hats. When you are done with
this part one more time, let just take a look at the whole illustration
as it is right now. If you see some parts that
you would like to adjust, go to the needed layer
and adjust them. E.g. we can go to this
left area where we have the noodles and they are
weirdly connected with our cat. We can go back to the leaves, we can go to the layer
with our noodles, grab our eraser tool and
fix this little parts. So spend some time checking
out whether you want to change some parts and
a jazz this little parts. When you are done adjusting your noodles and everything
that you have on it. So let us get back to our layers and who will unhide our
layer with the sketch, we will see that we have this dripping parts on our board. So let's just go
and recreate that. Firstly, we will go to our layer underneath earlier with the
noodles and the soup part. So it will be facial
features of the white cats. And above it we will
create one more layer. So let's just tap
on the plus icon and we will rename this
layer as dripping. Now when we have this new layer, we are ready to go to our color palettes and
to pick some color. You can go and match this color with the
color of the Boolean. So it might be the red color, or if you want to experiment a little bit and try
something different, you are welcome to do it. So e.g. let's select some color that will be
seen on to our bowl. And we can go and
select the color with the name a light,
yellow, orange, e.g. when you have your new color, Let's just go and start
recreating these dripping parts. We can do it manually or
we can use one option that Procreate hats because we want to make these parts very street. We can go and use assistant
drew it to do so. Firstly, we will need to go to our wrench icon
over the top-left. We will go under Canvas and we will toggle drawing guides. When you did it, you
will see that you have some cells going through the
whole shape of your Canvas. That's the option that we need, but we will need to
adjust it a little bit. So when you toggle
drawing guide, we will need to go under
edit drawing guide. And on the bottom we have
the option assisted draw it. Let's toggle it. And when you have it, we
will hit done over the top. Now we won't go to this
price that we have. We will adjust the size
of our brush and we will very easily go and
create this drip in parts. You can see how
easily you can do that because you
are dealing only with the direction of the cells that you have as
a drawing guides. So let's just go above all these dripping parts
and we will recreate that. Let's add this white color over the left side and we will change the color by going over direct. So when you are done
with the white color, Let's get back to our
color palettes and we will select the color with
the name dark pink, red. With this color, we will go over our area and we will recreate this dripping
parents from here. And when you are
done with this part, we will need to recreate this little connections
between the drops. So we don't really need this
assisted drawing anymore. So let's just go and turn it off again where I go in to arrange
icon over the top-left, we are toggling drawing
guide from this list. But that's not enough. If we just get back
to our canvas, you will see that we are still
creating straight lines. So we will need to
go to our layers. We will need to go to
earlier with drooping. And you can see that we have this option Assisted
underneath the title. We will need to manually
go and adjust it. So let's just tap
on this layer with dripping and we will select
Drawing Assist from the list. When you did it, we can
get back to our Canvas and we can easily recreate
this connection parts, make this smooth connections
between these little lines. And when you are done, ledgers get back
to our layers and we will hide our layer
with this gauge, the checkout, how it looks. If you want to
adjust some parts, you are welcome to
go and do that. If you feel that maybe you want this part to be above
earlier within noodles, you are welcome to do it too. So e.g. if you would
want to move this layer, go to the Layers, go to this layer with dripping, hold it and drag it up above
the layer with the new dose. Adjust the connections between the ball and is dripping parts. And when you are
done with this part, we are finally
ready to move on to the next part where
we are going to be adding the highlights
and shadows.
9. Adding Shadows & Highlights: Let's turn our lights
and shades part firstly, by deciding what is
our light source. Light source could
be assigned or some lamp or anything
that radiates light. And depending on the
light source position, some parts of our
illustration will be exposed to the light and some of
them will be in the shadow. And to be consistent with
our lights in sheets, we can help ourselves by drawing a little arrow that will show the direction
on the lights. In accordance with this arrow, the elements that are closer
to it will be lighter and the elements
that are farther from it will be in the shadow. So let's just go to our layers and we can create
one more layer. Above all the layers, we can select some
bright color that we will see onto our canvas. We will go to the top part, either to the left or to
the right. You decide. And we will create our
little arrow here. And when we hand
this little arrow, we are ready to move on to aid in our shadows and highlights. Let's start by going to our dripping parts and we will create the shadows firstly, for the shadows and highlights, we will be using blending modes. Blending modes are
different ways your layers can interact
with each other. So you can add different
visual effects with different blending modes. Let's firstly go to our layers. We will go to earlier
with dripping, we will select this and we will create one more layer above. Just tap on the plus icon. Let's rename this layer as shadow and clip it to
the previous layer. For the shadow, we will be
using multiply blending mode. Multiply blending
mode multiplies the colors of the blending
layer and the base layer, and it resulted in
a darker color. So it is very useful
for coloring shadows. To change the blending mode, we will need to go to our icon, the same list where we
had our opacity slider. From this list, we will need to select multiply blending modes. As for the opacity, for now, we can leave it at
100 per cent and we always can get back to
the slider and adjust it. So now when we have our
LEA with shadows sets, Let's get back to our
color palettes and we will start by selecting the color
with the name dark magenta. With this color, we will
go to our red part, we will go to the
bottom parts of this driven part in accordance with our
little arrow on the top. And we will add the shadow here. So basically we are just go into the bottom part and we
are repeating the shape. Ledgers go and do that. If you are not quite sure where you need to
put your shadow, always look at your
little arrow on the top. It will help you to
put your shadows. Now, if you take a look
at your illustration, you will see that
maybe this opacity is not enough or maybe
it's too dark for you. If it's too dark, you
arguing back to your shadow, you are go into
the opacity slider and adjusting it from here. If the shadow is not enough, It's not that bright
as you want it to be. You can go to the magic
one tool over the left. You can go to hue,
saturation and brightness. And you can play with
this little sliders on the bottom, e.g. to make it darker, you will need to go to
the brightness slider and move it toward
the left side. If you want to adjust
the hue on the shadow, you are go into the hue slider and adjusting it from here. So find what works for you. And when you are done, we will deselect
everything by hitting our magic one tool
one more time. Now when we are done with adding the shadow to our red parts, Let's move on to
this white parts. We will want more time. Go to our color palettes and we will select the color
with the name pink. With this color, we
will do the same thing. We are looking at
our arrow and I go into the bottom part
of our dripping part, we are adding the shadow
here the same way as before when you're
done with this part. And if you think that maybe
these shadow is too bright, we can do the following. We can go to our S ribbon icon. We can select this area, and then we will go back to our magic one tool to hue
saturation and brightness. And we will adjust the brightness
of this selected area. So find the shadow
that works for you. And when you're done, Let's deselect
everything by hitting our magic one tool,
one more time. When you are done, we will go and add
our highlights. We will do it again by
going to our layers, and we will create
one more layer above this shadow layer. Let's just tap on the plus icon. Let's clean this layer
to a previous one and let's name it highlights. Now one more time we will go and choose a different
blending modes. These site we will
be using the screen blending modes and
screen blending mode inverts the base colors and multiplies with the colors
of the blending layer. This creates the opposite
effect of the multiply mode, and the resulting colors will be brighter than the
original color. So let's just go again to the n icon and we will
select Screen again. We can leave the opacity at maximum for now
and we can always get back to this slider and we can adjust the
opacity later on. We can select the same color
that we are using right now. Or we can go back to
our color palette and select some
bright color, e.g. let's end up with
light yellow, orange. And we will do to
the opposite from our shadow side and we will
add little highlights there. Let's just go and do that. You can create some solid lines, or you can just go
with the flow and add maybe some little dots or
some additional elements. And again, if you
think that maybe these white color is too
bright on the red elements. We can go and change
our highlights intensity in the layers by
going to our opacity slider, but it has effect onto
our white elements too. So we can go and adjust
our opacity from here. If it's working for you, you are welcome to
do it from here. If it's not working
for you, we are again, go into our selection, which is our S ribbon icon. We are selecting the area
that we want to change. And when we have only
this area selected, we are going back to
our magic one tool. We are going to hue
saturation and brightness. And from here, we will adjust the intensity of our highlights. If you want to adjust the color, just go to the hue slider
and adjust it from here. So when your ads and
adjusting your highlights, just tab on the ribbon icon
to deselect everything. And when you are ready, we will move on to
the next elements. And three, we'll add
highlights and shadows on it. Let's continue by adding
shadows to our noodles. Firstly, we are going
back to our layers, we're arguing to
earlier within noodles and we are creating
one more layer above, let's call it shadows, and let's clip it to
a previous layer. Now one more time we're
arguing to our N icon. And firstly, we will
select multiply blending mode for the opacity. You can leave it at
100 per cent for now, if you want to
change it later on, you can always get
back to this option. So now when we
have earlier said, Let's just get back to
our color palettes and we will start by adding the
shadows to our left side, we will use the color
with the name magenta. And now the same way as
with our dripping parts, we will need to take a look at our error on the job and we will need to decide
what parts we would want to put
our shadows on. We will need to go to
the bottom part of every noodle and we will
add the shadow here. So very quickly at
ledgers Gill and z, That's all you need to do
is to repeat the shape. When you're done with
those on the left, let's get back to our
color palettes and we will select the color with
blue-green color. With this color, we will go to our green noodles and we
will do the same thing here. Take a look at your
arrow and go to the bottom part of your every
noodle and add the shadow. Just repeat this shape. And when you are done with adding the shadows
to your noodles, Let's just get back
to our layers. We will go to our layer
with the shadow for the noodles and we will
adjust the opacity from here. Let's just tap on the icon. We will go to the
opacity slider and we will move it
toward the left side. Find what works for you. If you see that maybe
100% was working for you, you can leave it as it is. If you want to add
the less of opacity, you are welcome to
do it too when you have the option that
is working for you. Let's just go back to earlier with the shadow and above it, we will create one more layer, which will be our layer
for the highlights. Let's just tap on the plus icon. Let's rename this layer
as highlights and we will clip it to the
layer with our noodles. Now going back to our icon, we are selecting screen blending mode from the lease for now, leaving it at 100% of opacity. And we will go back
to our color palettes and select some
very bright color, e.g. light yellow, orange. Now we will go to the
opposite side from our shadow and we will
add the highlights layer. Just go and do that. You can go to every noodle
or you can just figure out where you want to put the highlights and put
them on these places. Try not to overdo it. Now, if you want to go and change the opacity
of your highlights, you are welcome to do it if it's working for
you in that way. Let's move on to
our next elements. We can go and add our shadows to our little spoon
and to the corn. Firstly, let's just go to the list and find
the needed clear. Let's start from this spoon. Let's select the layer. Let's create one layer above
and we will call it shadows. Let's clean this lead
to a previous one. So tapping on it and
choosing clipping mask, going back to the N, I can go into our
multiply blending modes. And for now let's
leave it at 100%. We will get back to
our color palettes and we will select
the same color that we use for our whites
elements on the dripping part. So we are selecting the
color within named Pink. Now we will go to the
bottom part of our spoon, and this time we will go
to the right side because we have our little
arrow above this point. So basically what we need to create here is
something like that. You can start by
creating a simple line, by showing where you
want to put your shadow. And when you're done
with this elements, you are ready to go and
increase the size of your brush and manually
recolor the bottom parts. When you are ready, ledgers get back to our layers. We will go to early
away the shadow and we will change the opacity
level of it. So e.g. something like 45,
40 per cent will work best when you are
done with this part, if you want, you can go and create one more layer
for the highlights. And you can put this highlights
on the top of the splint, use screen blending mode and use the same white
color that you have for the main shape
of your spoon. Adjust the opacity
if you want to, and when you are
done with this part, Let's move on to
our next element. And our next elements will
be this little corn batch. So firstly, let us go to the needed layer where
we have our little corn. We will create one
more layer above. So let just tap
on the plus icon. Let's rename this
layer as shadow, and let's clip it to
a previous layer. Let's go to the icon and let's select multiply
blending modes. For now, let's leave
it at 100 per cent. We will get back to our
color palettes and we will select the color
with the name peach. We will go to the bottom part of every corn seeds and we will
need to add the shadow here. If you remember, we had
our seeds onto this gauge. So you can go to the
sketch layer and hide it, and go over this list of elements and recreate
the shadows. So let's just go and do that. Again. We're looking at our
little arrow and we are adding the shadow
in accordance with it. When you have the basic
shape for your shadow, Let's just get back
to our layers and we will hide earlier
with the sketch. We will get back to
hourly away the shadow for the corn and
we will adjust it. When you are done cleaning
up your little shadow. Let's get back to our layers and let's change the opacity
level or the shadow. Again, go into the m Eigen
and adjusting the opacity by moving this slider
toward the left side until we are satisfied
with the results. Try to make it a
little bit darker than you have the color
on your first cats, so it is not merging together when you add
them, adjusting it, we can go and create
one more layer above, and we can add our
highlights there. Let's just tap on
the plus icon and let's rename this
layer as highlights, and let's clip it to
a previous layer. One more time, go into our n, I can unselect in
screen blending mode. If you want to adjust the
opacity straightaway, you are welcome to do it. If you want to leave
it for the leader, you are welcome to do it too. Now let's just go back
to our color palette and let's select the color within
the light yellow, orange. We will go to the
opposite side from our shadow to the areas that
are closer to our arrow. And we will put some dots, some highlights
over these areas. If you want to go and change the opacity of your highlights, you are welcome to do it. When you are done with
the soup elements. Let's move on to our cats. So firstly, we will
again go to our layers and we will find our layer
with the first cats. We will get abandon
the facial features and we'll create one more layer. So let's just go and
tap on the plus icon. Let's rename this layer both
shadows and highlights. We will use a different
blending mode for that. So let just go tap on the
layer and choose Rename. Now let's clean this
layer to a previous one so we will tap on it and we
will choose clipping mask. For this layer, we will use blending mode that
is called overlay. Overlay blending mode
behaves like screen mode on bright areas and click
multiply mode in darker areas. With this modem,
bright areas will look lighter and the dark
areas will look darker. Let's just tap onto our icon and let's find orally
blending modes. For now, let's leave it at 100%. We will go back to our color palettes and we will start by creating the shadow. Let's select this color with
the name dark being correct, we will go to the bottom
left area and we will create big shadow going through the whole shape of
our hat on this cat. Let's just go and
create the first curve. You can hold your curve at the ends to adjust the
position on the line. You can go over that soap to
edit mode to play with it. And when you're satisfied
with this curve, ledgers go to the bottom
part and manually recolor this area when you are done with this part and if you don't
want to adjust anything, we are ready to move
on to the highlights. If you want to adjust your land, grab your eraser tool
and make it smooth. And when you're done
with the shadow, we will just go and change
the color of our brush. So going back to
our color palette, and let's select this color
with light yellow, orange. With this color, we will go to the top areas and we
will add the color here. So let's just go to the top parts and we will
create our highlights. If you want to add some
additional elements, you are welcome to do it. So e.g. we can go and increase
the size of our brush. We can go over our eyes on this cat and we can add
some little eyebrows here. Now, if you want
to go and change the opacity level on this layer, you are welcome to do it. We will need to go
back to our layers. We are go into our shadows
and highlights layer, where I go into the icon and we will go to
the opacity slider, find what works for you and when you are done
with these cats, Let's move on to the next one. It will be our black cats. We are doing to the
facial features. And one more time we will go
and create one more layer. Let's rename this layer as
shadows and highlights. We are clipping this
layer to a previous one, so let just tap on it and let's choose
clipping mask when I go into an icon and we are choosing overlay blending modes. Now we will start by creating our shadows so we can go back to our color palettes and select the color with the
name dark purple. With this color, we will go
to our bottom left area, and the same way as
on our first cat, we will create our
first curve that will represent the starting
of our shadow layer. Just go and do that. Play around with the
curvature if you want. And when you have
your first curve, ledgers go and manually
recolor that bottom area. If you want to go and
add more shadows, e.g. you think that
maybe this noodles are overlapping and
casting the shadow. You are welcome to go entropy
the shape of the noodle. If you want to add the shadow
to one of the ears, e.g. the right one you
are welcome to do is to add the shadows
to all the areas that you think will
be in the shadow in accordance with our
little arrow on the top, when you have all the
shadows that you need, alleged us get back to
our color palettes and we will select this light
yellow, orange color. We will go to the
opposite sides from our shadows and we will
add our highlights. When you are done with this cat, Let's move on to the next one. So again, I go back
to our layers. We are going to the next cat, which is our green cats, will also add the facial
features on this cat. And above this layer we
will create one more layer. Let's just tap on the plus icon. Let's rename this layer as
shadows and highlights. Let's clean this layer
to a previous one. So tapping, choosing a
clipping mask and again typing on our n Eigen to select
overlay blending modes. Let's get back to
our color palettes. And this time we will select the color with the
name backgrounds. With this color, we will go to our left bottom area and
we will add the shadow. If you feel that that color maybe not enough for the shadow, you can always go to your
adjustments to hue saturation and brightness and play with hue saturation and brightness. When you find what
works for you, lead, just tap on our magic
one tool one more time and let just go and select
this whitish color way, this color, we will go to
the opposite side from our shadow and we will
add our highlights. If you want to add some
additional elements, e.g. the highlights underneath
this little ear, you are welcome to do it. If you feel that maybe
you need to get back to your previous color and
add another shadow. You can go to your icon with
the color on the top right. You can hold your
Apple pencil there until you have the
previous color. When you are done, Let's
move on to our last KT. So again, I go into our layers, we go into our white cat layer, we are doing above, it's
to facial features. And from here we will
create one more layer. Let's rename this
layer as shadows. Let's clip it to previous one. So tap into using clipping mask. And this time we will use
the multiply blend mode. Let's hit R and I can let select multiply blending
mode from the list. And we will use the
same color that we use for all of our
white elements. Again, go into our
color palettes and selecting the color
with the name pink, again, going over
our left bottom area and creating this shadow. Adjust the intensity of your shadow by going
to your Layers. You into this layer
with a shadow, go into the MI, can play
in with opacity slider. If you want to adjust the
color of your shadow, if you think that maybe it
looks a little bit off, you can go back to
your magic wand Xu, go into hue saturation and brightness and play
with the sliders. And when you are done, LED just tap on to
our magic wand icon and we will go and create one more layer for
the highlights. So again, going above early with the shadow tapping
on the plus icon, renaming the LEA as highlights. Let's clean this lead
to a previous one so it's happy and choosing
clipping mask go into the n. I can unselect an
overlay blending mode. We will select
this whitish color and we will go to the opposite from our shadow sides and we will add our
little highlights. When you are done with
adding the shadows and highlights to your
elements over the top, Let's move on to our bowl and we will add a little
shadow here to, firstly, going
back to our layers and finding the
layer with our book. Let's go and select it, and we will create one
more layer above it. Let's just tap on the plus icon and let's rename this
layer as shadow. Let's clear this layer
to previous ones. So it's happened in a
choosing clipping mask. And then we are going
to our icon and select and multiply blending
modes for the opacity. Let's leave it at 100% for now, and then we'll go back
to our color palette. And this time you
decide what color you would want to use
for your shadow, e.g. we can pick the color with
the name dark magenta, and we will go again
to our boards and left side in accordance with our little arrow that
we have on the top. And we will start by
creating a little curve going through the whole
shape of our bow. On the bottom left, we will create a curve and
we will hold it at the end. Play around with the
curvature if you want. And when you are done, ledgers go increase the size of our brush and manually we
will recolor these parts. Now we will go
underneath is dripping parts and we will add the
shadows underneath that. Again in accordance with our
little arrow on the top, we will go underneath these elements and
we will repeat that. When you are done,
lenders go back to our shadow layer and we
will adjust the opacity. If you want to play around
with the shadow color, you are always welcome to go
to the adjustments to hue, saturation and
brightness and play with the sliders ends when
you aren't done. Ledgers tap onto our magic
one tool one more time. Let's take a look at
our illustration. We will figure out whether we
want to change some parts. If we are done with it, we are done with this part. And in the next chapter, we will add some beautification.
10. Final Touches: Let's start this part by eating the shadow underneath our ball. So firstly, we will go to
our color palettes and we will select the color
with the name dark purple. When we hand this
gallery selected, we are going back to the
layers and we will need to go underneath earlier
with the bowl bottom. Let's select earlier
with this scheme. And from it, we will
create one more layer. Let's rename this
layer as main shadow. Now, we won't go underneath
the ball and we will create a shape of the ellipse
ledgers go and do that. We know how to do that. We will need to go
and create the shape just with one line holding it at the end and then go into the tub and adjusting
it if it's needed. Try to make it straight. And when you're
satisfied with its lead, just tap on the screen and
let's add the color insight. If you want, you can go and play around with the position
on this element. If you need to, you
will need to go to the arrow key
on the top-left, use uniform methods
and play with it here. If you wanted to go and
change the opacity level, all this layer, you know
what you need to do, you will need to get
back to your Layers, go to the main channel layer and play with the
opacity slider. When you are done with
adding the shadow layer, just go and add some additional
elements to their bull. We will go again to our layer with the shadow on the
ball and above it, we will create one more layer. Ledgers, tap on the plus icon and let's click this
layer to a previous one. If you want to
rename this layer, you can call it glitter. And now we will go and select the brush with the
name glowing dots. You can find this brush in a
project and wrestlers SAP. With this brush,
we will go back to our color palettes and we can
select some bright color. You can select any color
that you like, e.g. magenta with a magenta color, we will go to the shape of our bot and we will
add some glitter. You can play around with
the size, all these doors. You can play around
with their amounts. You are welcome to do
what you want to do. If you want, you can go back
to your color palettes and select a different color and
edit to the opposite sex. If you want to go outside
this whole composition, and if you want to
add these glitter going through the whole
shape of your Canvas, you are welcome to do it. Just go back to your layers and create one more layer above. I use a normal blending mode. If you want to
rename this layer, you are welcome to do it. You can go and create some additional elements here
with this glow and brush. If you want to skip this part, you are welcome to do it. The very last thing
that we will add, and again, it is optional. We can go and select
a different brush. It will be glitter brush. With this brush, we can go above all the layers and we can
create one more layer here. We can select the color with the name light, yellow, orange. And we can go to our elements where we have the
highlights and we can create a different shape on the highlights so they
will be glittered. E.g. let's try it out onto
our cat, which is black. With this brush, you can go to some highlighted areas
and add this texture. If you don't want to do that, you are welcome to
skip this part. If you want to go and change
the intensity on this brush, you are welcome to do it
by going to the layers, go into the icon and adjusting
the opacity level here. If you want to change the
color on this brush, again, you are welcome to go to
the magic one tool, hue, saturation and brightness
and play with the sliders. And when you're done playing
with your glitter brush, we are done with our class. Thank you for
watching this class. Leave a review if you
liked it and consider subscribing for more Kawhi
videos in the future, looking forward to
seeing your projects.
 Uni Corn, ⭐Kawaii Art Enthusiast⭐