Transcripts
1. Introduction: Hello everyone. My
name is senior and I'm an illustrator
and graphic designer. Today we'll draw a
few illustrations of fantasy homes based
on the wedges. We're gonna make all the
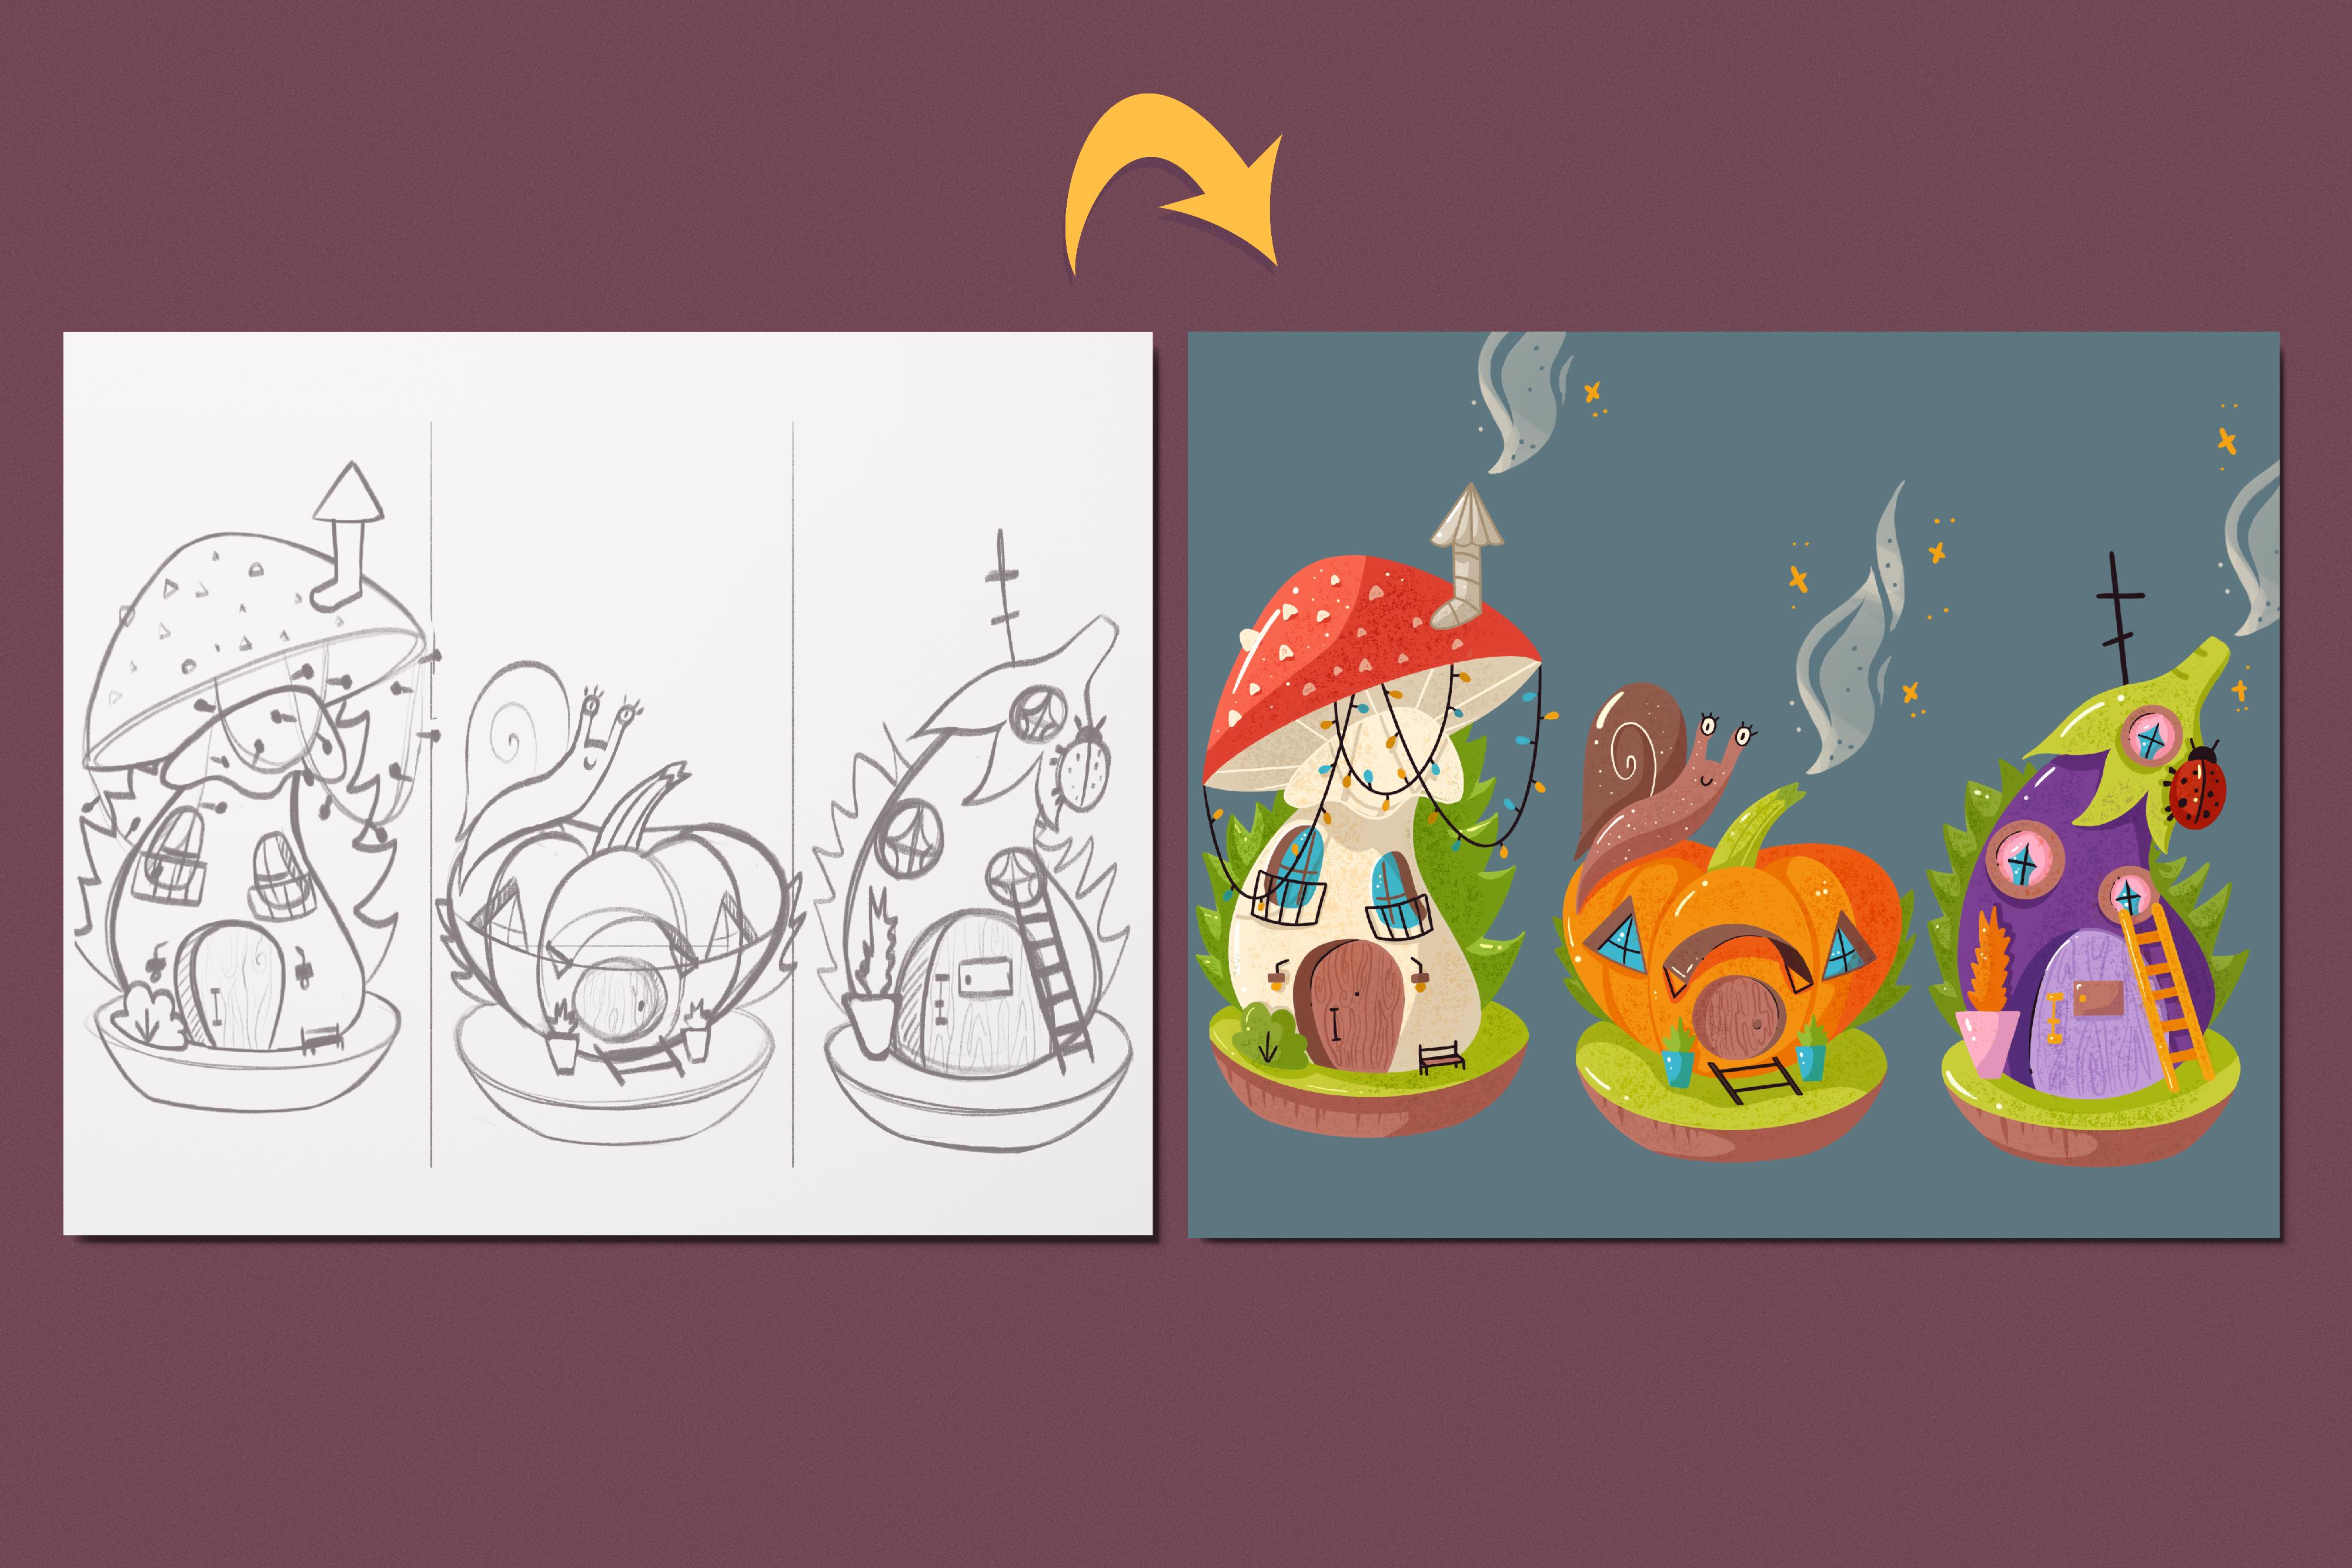
pictures from scratch, starting from the sketches. And as a result, you'll have three full
colored illustrations. During the class, we will be working with reference pictures, colors, layers, blending
modes, and so on. You can use the final picture is a single stickers Sticker Pack, put them on the postcard, make a pattern from them, turn them into some
digital products and use them in whatever
way you want. These class is for everyone. So don't worry, if you
have no prior experience. All the drawings I
made in Procreate, but it doesn't mean
that you cannot use any other graphic software or
even traditional materials. So with that said, if you're really launch your
software and let's begin.
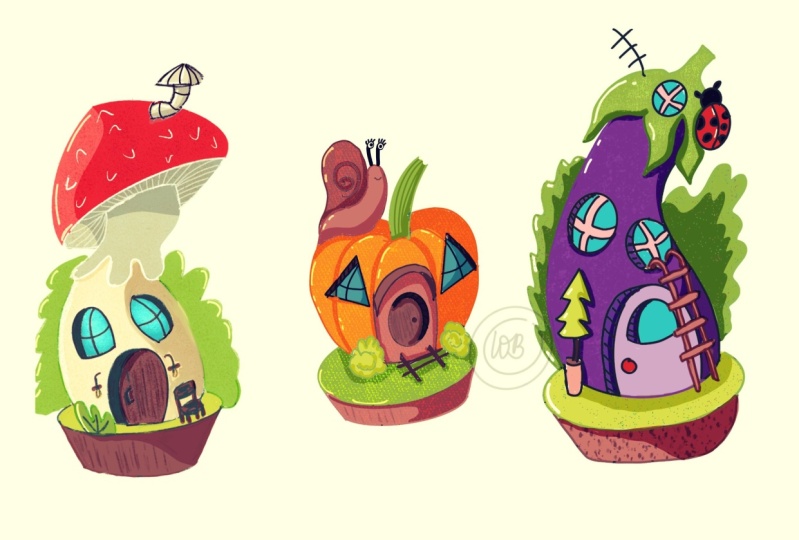
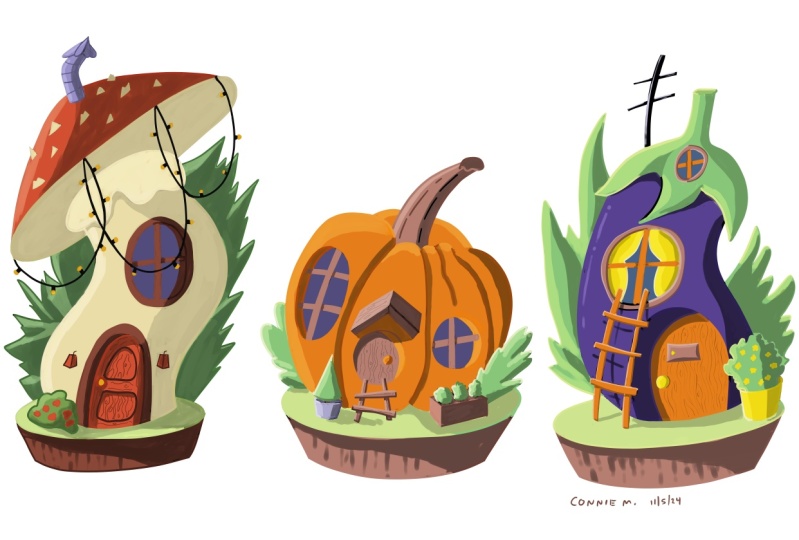
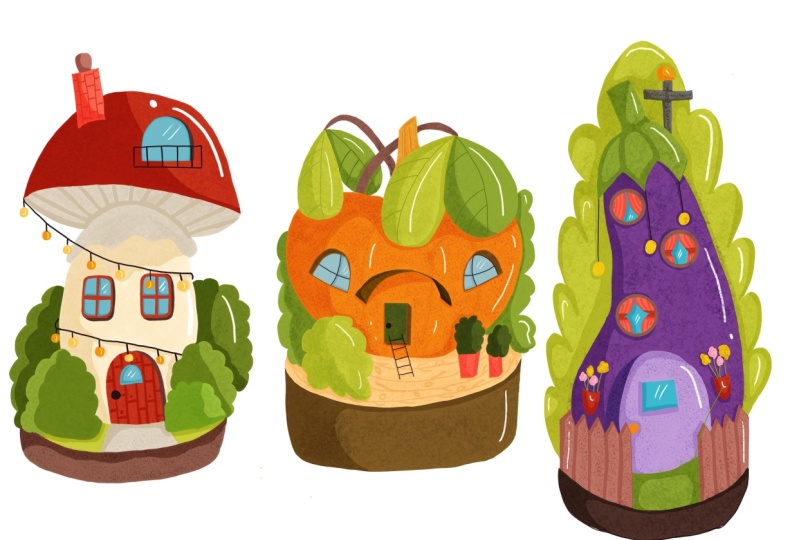
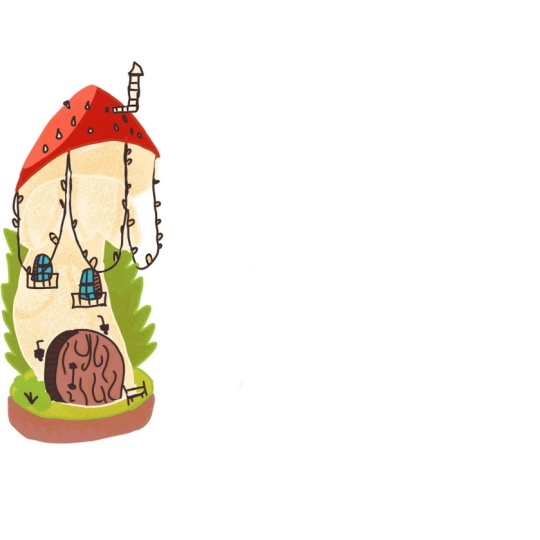
2. Theme, References & Mushroom House Sketch: Today we're drawing fantasy hopes and this
class will be more creative and she
will have a lot of opportunities to
express yourself. But it doesn't mean that we
are not going to be drawing. We will be drawing a lot, I'm sure and you will
probably agree that houses can tell us a lot about the owners through
their exterior. And to support these thoughts, let me show you a
few examples of pop cultural movies and
especially the cartoons. The first thing that I
have here is SRX swap. And you can see that
I especially took their favorite movie
over the first one because it tells us more
about their new life. And it really differs from what we saw in
the first movement, really speaks to us, right? The next thing that I
have here is Shire. And again, these buildings
cell has a lots about the owners and they depict The Hobbit live in the best way. The next thing that I have ease the Borough from the
Harry Potter movies. And again, it tells us
a story of Whistler, his family and how lack
of monitoring into these. But again, it still looks
kind of homie, right? The last thing that I have
is that bikini bottom. And we can see the three houses of three main characters here. So the first one is very simple. The second one is
kinda quirky and RC, and the last one
is pretty weird. So what I wanted
to show you with all these examples is that houses can tell us a lot about the personalities
of their owners. And that's our
main course today, during the class, we will
create three different houses. And as it's still a full season, let's just limit ourselves by creating them
over the veggies. During the class, we will be working with reference pictures. We will create the sketch, and we will be working with clean lines and
of course colors. And after completing this task, I really invite you
to go and create your own home that will depict your personality
or its exterior. Just imagine that you walk
in up at some fantasy worlds and you have all the magic
and all their labor forces and all the resources of
this realm to just create a house you're on
middle limit here will be to create
it over the edges. Of course, if you hate veggies, you can pick another theme and tried to recreate
something from it. With that said, legis, go to our Canvas and
start with our class. So firstly, we will need to grab some brush and grab some color. And we will need to divide
our Canvas by three pieces. We will go to the actions and we will toggle
drawing guides. When we did it, we will go
to Edit Drawing Guide here. We need to pick
two degrees and we need to toggle assisted draw it. When it's done, it will go to the top right corner and
we will tap on that. Now we can divide our
Canvas by three pieces. So let's just go and try
to make the equal pieces. When it's done, we
will again go to the actions and we will toggle
Drawing Guide right here. Also, we will go to the layers and we will see that
the lady that we are using for our sketch is now called assisted and
it's not what we need. We need to tap on it
and we need to choose Drawing Assist from
this drop-down menu. Now I can freely go
and create our sketch. But firstly, as I said before, today, we are working
with reference pictures. So let's just go and bring the reference window
to our procreate. We will go to the
actions and we will toggle reference by default, you can see that each shows the canvas and we need
to go to the image, tag, all the images that I'm going to be
using during this class. You can find in a project
and resources tab, you can download
them and use them into your illustrations as well. So let's just step
on the input image. And firstly, we will be
working on these mushroom. Let's go and grab this reference
window and put it aside, make it a little bit smaller. And also we will work on the
size of the image itself. So let's just make it
smaller and put it aside. So when we have our
reference picture ledger start working on our first. I like how this mushroom look, but what I wanted
to do is to add some dynamics into
the illustration. So firstly, let's just go and let's create the guides
in line that will represents the position of their style of the marshmallow. So for example, I will go and
create the curve like that. When we have this curve, Let's go to the bottom
part and we will add some elements that our
mushroom home we'll see. So for example, we can go with the simple ellipse like that. You can always get
back to this elements. And so you can
always get back to all the elements that you have gone through your sketch and
adjust them just for now, go and create something that hour element will sit on when
we have the bottom part. Let's move on to that so parts, and here we will
need to start by creating that bottom part
of the Marshall hats. So for example, we can go with the shape of the ellipse
that we created before. You can tilt it as you like or you can go with a
straightforward view. So for example, I will go and create an ellipse like that. So I decided to tilt it and
I decided to make it closed. When it's done, Let's move
to the top and we will create this dome shape
for our top elements. So create a curve
like that and create another curve on the other side. Try to make them
even on both sides. If you want to adjust the shape. Anyway that you like, you can go for it and
you are welcome to do. So when you are satisfied
with your shape, Let's move on to the middle part and we will add the site. So all we need to do here is to try to put it in the center of the cap and we need to go and repeat this curve
that we already have. So I decided to make
it a bit chunkier on the boards and ends when you are satisfied with the shapes, Let's go and grab
the eraser tool and let's erase everything
that we don't need. That will be this line here. That will be the line
that we used for our direction and the
line on the bottom. So when you have
everything that you need, Let's go and connect
these parts together. So we will just go
with a curve like that and try to
make the corners. So after that we will
go to the bottom part. And again we will connect the parts together
by agent the curve, work on the corners and try
to make themselves as well. Now, if you take a look
at the reference picture, you will see that the
mushroom has some kind of a skirt underneath
this soap elements. So let's just try
to recreate it. We will go and we
will start from this part and we will
create the curvy lines like that when it's
then let's grab an eraser to erase everything
that we don't need. Now we are almost
done with our base. The last thing that
we will add here is a little volume to these
elements on the bottom. So you can go and
adjust that in any way. Tried to make it bigger or tried to make it closer,
it's up to you. And when you are
done with finding what size of this
element works for you, Let's add some volume to it. So we will repeat this curve
that we have right here, and we will try to recreate
it on the board side. When exam, we will go to the sides and we will
create the tilted lines like that to connect the elements with the
soft corners as well. So when it's done, our base is ready. If you want to adjust anything, you are welcome to do it and
she can do it in that way. We will go to the selection, so we will choose the
free hands methods. We will select our
object and we will go to that transform tool into
the Transform tool menu. You have a few
options of how you can interact with your sketch. So for example, I will
go and I will shrink it down and then so be it
ends with the word method. I will play around and try to make what I want
it to look like. So play little bit with your sketch and
when you're ready, just deselect everything
by going to the top panel. So when our base is ready, let's start adding some
building elements. And we will start
by agent that door. And for the door he can go
with any shape that you like. But probably, I will think
that this mushroom is a bit tall and the person who is leaving into this house
might be true as well. So you can go with any
shape that you like. So for example, go with
something simple like that, go with something
peculiar, maybe like that. Choose any shape that you like. I will probably go
and I will repeat the curves that we
have on the sites. If you overdid it a
little bit, again, you can go to the selection
so you can select these elements and she can transform it with
the transform tool. So for example, for this door, I will select it and I will
make it a little bit smaller. So when we have the door, let's add some attributes to it. Firstly, we will go
with some drawing nope, or with door handle. Again, it's up to you what
shape you will choose. I would probably go with
something simple like that. And let's now add some
volume to the door. We will need it to be not glutes to the
surface of this house. We need to put it a
little bit in depth. So let's go to one of
the sides and we will repeat the curve
that we have here. You can adjust it with an eraser tool to
make it even ends. You can also shade
it right away. So now you can see that it
is not glued to the surface, it is in depth. You can add some
elements to the door. So for example, I would like
to add some texture here, and I would like to
add the wooden sexual. And to end this wooden texture, I will go just with very
subtle lines like that. I will add some knobs and
something in that way, and I will just try to recreate
the texture of the woods. Remember that now
we are creating just a sketch and
all that you create right here will be red's on later with a clean lines
and with all the color. When you are satisfied with
your elements of the door, Let's move on to the windows. And for the windows, again, you can go with any
shape that you like. I will probably
again go and repeat the curves that we have
right here on the sides. And I will put two windows open. So this surface, when
you have the windows, we will need to add this
part to them as well. So S for the window on the left, we will repeat the
same volume here from the same side as
we had on that door. So let just try to repeat
this curve and again, you can shade it right away. As for the Windsor on the right, we will need to go with
a different sites. So let's go to the right side and repeat the curve right here. Again, shade it right away and we are done with the depths. So now we need to add the
window frames for the Windows. And if we take a look
strictly to the window, the frame will look
kinda like that. But as we have the
curve right here, we will need to shift this frame a little
bit to the side. So for the window on the left, we will need to shift
it to the right. And for the window
own the rights, we will need to shift
it to the left. So let's just try to do it. Also, you can show that
it is curvy by creating these lines that are horizontal a little
bit in a curvy manner, not in a straight one. So when we are done
with these frames, Let's add some minor
elements to our builds up. So for example, I will go and add some balcony right here. And I will do it
in a simple way. So let's just go and create
a rectangle like that. And we will add some
Rails right here, and we will repeat it
on the other sides. So when it's done, we can add even more details
to our buildup. So for example, we can
go and add some lights. Let's create the line like that. Let's add some rectangle
and above like that, and we will repeat it
on the other side. We also can work with
the elements right here. So for example, we can go
and add some bush here. For the bush, we'll go with
a simple shapes like that, connects the parts together, erase everything inside
and add some branches. For the other side, I will go and create the bench. So for the bench, we will need to
create one line like that and we will need to
repeat it on the other side. We need something to sit on. So let's create a
horizontal line like here. We will need to create one more horizontal line to connect these two
parts together. And we will need to add two
more legs for the batch. So here you can connect
it with a line that is stilted and connects it
with a line like that. So when you have the bench, Let's move on to the
top part and we will add some beautification
here as well. So for example, we can go and create this dots on
them mushroom cap. So let's just go
and say very simply create some training
goes or the shapes that are resembling training
goals or any kind of dots that you can see on
the reference picture as we have the house here. Let's go and create the chimney. So for the chimney, go to one of the sides
of the mushroom cap. And let's just create
something like that. You can go and create two lines in that way
they are reversed L, and we will need to repeat
them to add some thickness. Let's connect them
together with a curve. And we will go to
the top part and add some triangle on the top. Now let's grab an
eraser tool and erase all this lines
that we don't need. The bottom parts looks
a little bit sad. So let's add some bushes
on the background. Go just with a simple lines like that and we will repeat
it on the other sites. I think that's, we can
add a little bit more of the personality to this house by eight and some strings
of lines to the cap. So let's just go and create
a few lines, a few curves. In that way. You can
connect them together or you can just make
the separate lines. It's up to you. And when we have the strings, we can go and create some bulbs. So for the bulb, we will use just that line like that ends a little
L clips on it. So let's just go all over these places and we will
add some bulbs right here. And when we're done
with these elements, our sketch is ready. If you want to adjust anything, you are welcome to do it. Again, go to the selection, so select your elements, transform it in any
way that you like, because it's always good to do all these adjustments at
this stage of the sketch. Because every time you are
adjusting your sketch, every time you are
adjusting your picture, you are making the quality
a little bit worse. So let's just work on our
sketch one more time, adjusted in any way
that we like it. And we will move on
to the next part where we are going to be
creating the clean lights.
3. Mushroom House: Making the Clean Lines: So I guess now you
are ready with your sketch and we can
move on to the clean lats. Let's go to the layers and we will go to this layer
with our sketch. We will need to turn the
opacity a little bit down. So let's tap on the icon and we will move this slider
a little bit to the left. We still need to see what's
going on onto the canvas, but we don't really
need to bother us. Now once again, while
we're still on the layers, Let's slide our layer with the sketch from
right to left and we will choose lock that will prevent us from working on
the wrong layer. Now let's create a new
layer for the clean lights. Our main goal while working with a clean lines is to
create the closed lines. And to do so, we will need
to bring another brush. I will choose the
technical pen also. I will tap on it and
I will go and play a little bit with the
amount of streamline. You can see how it will work here in the drawing pads
and when you are satisfied, let just go to the
top corner and he done so with
its technical Pam, what we are going to be doing, we will go all over the places and we will create
the closed lines. We will need to do it because
we will use that color and methods that's supposed
to have the closed lines. So we are going to be colored, dropping our colors to the places and they
need to be closed. Let's just quickly go through
all the places and we will create a closed lines
ends outline every fit. If you want to change
some elements, if you don't want to repeat
everything that you have on a sketch with a 100
percent of similarity, you are welcome to do it. So let's just quickly outline everything and we will
meet a little bit later. So when we're ready
with our aligning part, Let's go to our layers and we will hide the layer
with the sketch. Now we will go for all the shapes that we
have here and we will try to find the places that
we need to fix and fix them. Remember that you need to have the closed lights and when
you are done with this part, we can move on to
the coloring parts.
4. Mushroom House: Adding Base Colors, Shadows & Highlights: For the coloring part, we will need to create
one more layer. So let's just go to the
layers and do this. We will need to put it under
the layer with our alliance. And while we're still
here into the layers, we will go to our layer with the lines and we will
tabulate and we will choose reference
that will help us to work with the same lines
that we have here, but only different layer. So now let's get back to the
layer that we just creates it and we will start agent
the colors to our elements. You can find this color
scheme that I'm going to be using into this class in the
project and restaurants app. You can download it and use
it into your illustrations. So what we are going
to be doing here, we will pick some color and
we will color drop with x2. The places that we need, we will go for all the
sheep's in that way. So let's just quickly recolor everything that we have here. If you need to recolor
some minor places, you can go with just the brush, go to the Brush Library,
peak the brush. And if you need to
adjust it and go to adjust the streamline value. When you have
recolored everything, we can move on to add in
some shadows and highlights. Let's start with the shadows. We will go to the layers
and we will create one more layer above the
layer without coloring, we will tap on it and we will
choose the clipping mask. With a clipping mask, we are working just
with the content that we have
underneath this layer. Now, also we will need to
go and tap on to this icon. We will need to
choose the different blending mode for the shadows. Let's use the
multiply blend mode. For now, we will leave the
capacity at the maximum, but if we need to change it, we will get back to this layer and we will change it later. So now we will go and we will
pick some color and we will go through the places and start agent the
shadows own sub m. So for the shadow, you can pick one color for all the elements
that you have here, or you can pick different
colors for any new objects. So let's just start from the top and I will show you what
we are going to be doing. I will go and grab
this dark red color. I will grab some brush. I will increase its size, and I will go to the right side and I will add the
shadow in that way. You can see that I'm
not going beyond the frames because of
the clipping mask. So now I will go and I will create the
shadow in that way. So when this main
shadow is done, you can work on a cheap
and you can see that it is dark to our mushroom itself. So let's again go to our layers. Let's go to this icon and
we will adjust the opacity. So for example, 40 something
percent will work perfectly. And in that way, we will go for all the places and we will add the
shadows to make the believable shadows try to understand where your
light source is. So for example, as a created
the shadow on that side, I will go and I will create
all the other shadows on the same side and my light
source will go from the sides. So let's just quickly go and
we will add our shadows. And now you can see that I added the shadow onto the body of the mushroom and it doesn't look as bright as the
shadow on the top. And we can adjust
it in that way. We will go to our
layers and we will go to our layer with the lines. We will tap on it
and we will choose a reference one more time
to get rid of these modes, we'll go to our layer
with the shadows and we will go to the selection
tool with the selection. So we will choose the
automatic selection and we will tap on the places that we need to change the capacity
or the color. So for example, I chose these shadows that we have
on the body of the Marshall. Now we will go to the
adjustments and we will go to hue saturation and brightness
can go to the bottom. And you can change the opacity, you can change the
brightness, hue, and saturation of
these selected areas. So let's just try
out these methods. So when you're
done playing here, Let's go to the adjustments, Let's tap on it. Let's go to the selection,
deselect everything, and continue agent
our shadows to go and pick the same color that we used right here that we changed. We can go against our layers. We can go to this icon. We can set the capacitor as maximum weekend go to the
normal blending mode because the color and get
back to that multiply blending modes and that
capacity that is reduced. Also with the shadows, you can add some details. So for example, like here on the islands and
here on the door. And so when you
are done with A1, them massive shadows, Let's move on and add some highlights. So again, we will go to the
layers and we will create one more layer above
our layer with shadows. We will set it as
a clipping mask. And this time for
the highlights, we will use the different
color modes. We can use. A few of them, go in from the ads to soft
light or overlay. You can try out every
one of them and find what works best
with your illustration. I will probably
go and big there. I will go and grab
another color. So probably it's going
to be this white one. And I will go to the different parts that
we created the shadow on, and I will add the
highlights right here. So for example, here on the top, I will go and add these
bolts highlights. In that way, I will
go for all the shapes and add a little highlights
on them as well. If the white color is too bold, you can pick another one. Try not to overdo graphene
and when you're ready, we can move on to the
beautification parts.
5. Mushroom House: Beautification: For the beautification part, we will go and
change the color of the lines and we will
do it in that way. Let's go to the layers
and we will create one more layer above the
layer with the lens. We will tap on it and we
will choose clipping mask. Again. You know how the
clipping masks work. And we will go through the
shapes and we will recolor the lines in the same way
as we added the shadows. So let me show you what
we are going to be doing. I will go and I will
pick the same color that we have for the main
color of the cap. I will go along the line
and I will just recolor it. I will pick another color for these part that
is in the shadow, and I will recover the line in accordance
with the shadow. By using this method, I will go for all the
shapes and I will recolor all the lights when he
recovered all the lines. Let's finish up our illustration
by agents some texture. And again, we will go and
create the new layer. We can put it above
all the layers, or we can attach it
to our main colorant. So let's firstly try
with the colorant. We will need to adjust
that blending mode. So for example, let's
go and select Multiply. We will also go and adjust the opacity right away and
we will pick another color. So for example, let's
start with this type and we will go with some
yellow color right here. Let's go and grab some brush that will be
nice for the texture. Have some brush that you like to add the texture you
can use it or you can find a brush
that I'm going to be using in the project
and resources tab. So with this brush, we will just go
through our Canvas, through our elements and
we will add some noise. I pick different colors
for different elements. And at the ends, Let's just go and adjust
the capacitor rights away. So we will find what works
without illustration. You can select the
amount that you like. And when you're done
with this part, we are done with our
first illustration. Let's move on to the second one.
6. Pumpkin House: The Sketch: For our second illustration, Let's create a house
based on the pump cap. We will go to our
layer with the sketch. We will unhide it and we will
unlock it onto this layer. We will need to use
the same brush and the same color that we
used for the first sketch. Just a quick note about
reference picture. If you need to change it, you can heat it and you
can go to the Inputs tab. You can change your picture
here and you can use it. Or if you don't need
the reference picture, you can just go and hide it. So let's move on and let's
start creating our pumpkin by creating two ellipses that will be tilted
toward the center. Let's connect them together on the boards them
with a smooth line. Let's move on to that
soap bars and we will get rid of these depth. We will go and connect
these two shapes together again with
a smooth line. If you want to
adjust your sheep, let's go to the selection. So we will choose the
free hands methods. We will select our object and we will adjust it by using
that transform tool. When you have the shape that you like, Let's deselect everything. Now when we have the back
part of the pumpkin, we need to think about the
front part of the pumpkin, and we need to show that
it has some segments. So let's go along the shape and we will create a few ellipsis. When you're done with this task, let's grab the eraser tool and erase everything
that we don't need. When we have the base
for our pumpkin. Let's create this step. We will go to this dense
and we will need to find the direction where
the stem will look at. So for example, let's
create the line like that. When you have this line, we need to create another one and we need to connect
them together. But let's make it's not
parallel to one another, but make it wider on the bottom and a little bit
narrower on the top. So when we have these two lines, Let's connect them together on the top part by creating
some peculiar shape. So for example, I will go and create the zigzag
shape like that. Let's connect the lines
on the bottom part and we will erase the line that
is inside our stem. If you want to add some
segments to the stem, you are welcome to do it. When we have the whole base. Let's move on to the bottom. And we will create
this little islands where the whole
sheep will sit on. So we will start by creating
an ellipse like that. When you're satisfied
with the shape, Let's create one more
line beneath it to connect these two shapes
and to add some thickness, go to the site and
create the tilted lines. Don't forget that we need to
create the smooth corners. So now our pumpkin is ready, and let's move on to
agents some homie details. Let's start again
with aging the dwarf. For this illustration, I
think it will look nice if we added some kind
of that circular door. So let's go and try to create
the circle right here. So when it's done, Let's add
some thickness by going to one of the sides and to repeat
in the curve of our door. So for this illustration, and we'll go to the
different sites that we used for our
first illustration. We can shade it right
away and we can move on to adding some Jesus
to the exact door. So for these door, I will add that door knob. And also I will go
along the shape of the door and I will add
some texture of the woods. You can see that I put this door a little bit
higher than the door before, and I decided that we can
add some letter here. So we will create a letter
in a very simple way. Let's go to the
bottom and we will create two lines like that. They will be parallel
to one another. And when we have them, we will connect them together by creating one or two
horizontal lines. So the letter is ready and we can move on to
adding more details. Let's move on and
let's add the sheds. Firstly, we will go
and we will create an auxiliary line that will go through the center
of our pumpkin. When we have this line, Let's go and create two
tilted lines on both sides. When we have these two lines, we need to connect them
together by creating the curves and we need to
do it in a special way, so forth deadline that
we have on the left, we have two dots and we need
to connect these two dots with one dots on the right's
legis tried to do it. You can see that we have a little intersection
right here, and we need to connect
this intersection with the last dog that
we have on the right. Our shed is ready and
we have these parts in the shadow and this part
will be at the light part. When they have the shared,
we can add some details. So for example, I will go and add the tilted rails like that. When we're done with this part, Let's move on to aid
in their windows. Firstly, we will go
and we will create the exit will rely on going
through the whole shape. As we have the curve
for the sheep, we will need to make this
line curve and this land will represent the bottom
part of our windows. So when you have this line, we are ready to add our windows. I think that for this shape, it will be fun to add the windows of the
triangular shape. So let's go and try
that. Have the windows. Let's add some thickness to that because we don't want them
to be glued to the surface. For the window on the right, we will need to add
this line just on the same side that we
have here for our door. So let's just go and do
that shaded right away. And let's move on to the
second window for this site, we will go with the second site. Now when we have this thickness, Let's add the window frames. Remember that we need to tell them a little bit to the side. As for the window on the left, we will need to shift
it to the right. As for the window on the right, we will need to shift
it to the left. When we're ready
with our Windows. Let's move on and add
some additional elements. So for example, let's
go to the bottom and we will create some
ports with that plants. I will deal with a
simple shape like that. And I will go with the
peculiar shape for the plants, and I will repeat it
on the other side. Let's take the eraser tool
and erase these lines. Now we can go and we can add these bushes behind
the building. I think that the bottom
part looks nice, but we need to add
some details upfront. So let's go and add
a little smile. I will go with these sites. So for this nail, firstly, we need to create the Slack. We will need to repeat the shape of our pumpkin right here. Start with a curve like that and then create the curve in
a different direction. When it's done, we will connect
it together and the ends, you need to have some
shape of the drop, but a little bit peculiar
when you have it. Let's add the ice. So for the eyes, we will
go to both sides of this slab and we'll create
the shapes like that. If it's hard for you to
go and create this lines, these eyes from scratch. You can go and create
two lines like that and create a little ball on the top and then
connect them together. So when we have this iss, we will go and create
the actual eyeballs. You can add the iris if you
want and if you want to, you can add some eyelashes. I will also go to the body and
I will add a little mouth. So when we have this slack, Let's create the shelf. We will go and create
the shape like that. Start from the ellipse and then connected with a little
triangle on the bottom. Now let's create the texture of the shelf by creating
the curve in that way. Then we will go
and grab an eraser to erase everything
that we don't need. Now we have everything
that we need. And if you don't want
to adjust anything, we are ready to go and
create the clean lines.
7. Pumpkin House: Making the Clean Lines: For our line in part, Let's go to the layer
with the lines. Let me remind you what we're
going to be doing here. We will change our brush to some brush that has no texture. We will grab another
color if you are using, not the one that we used
for the first illustration. And we are going to be going along the
shapes and we will be repeating what we have on this gauge with
the closed lines. That is our main goal. So let's just go quickly through all the elements and in them. When you are done
with the lines, let's go and hide our
layer with the sketch. Let's check out whether we need to fix any effect watching you to do is to close the lines
and make everything neat. And when you're done, Let's
move on to the coloring part.
8. Pumpkin House: Adding Base Colors, Shadows & Highlights: For the coloring part, we need to send this layer
with the lines as a reference. So let's go and
subnets and we will choose reference from
the drop-down menu. Now, we can go to our layer with the coloring and
we can start agent the colors to needed
areas the same way as we did with the
first illustration. So we will go to
our color palettes. We will grab the
color and we will drag it to the place
that we need to recover. And we will do it
with all the objects that we have on to
our illustration. When you are done
with the base colors, let's move on to the shadows. So let's go to the
needed a layer. Again, I'm reminding
you that you can use one color for all
the shadows or you can pick any other color for any other element that you
have on your illustration. So for example, let's
start from the pumpkin. I will go and I will use
this dark orange color. Firstly, we need to establish
where our light source is. So let's just go the same way as we did with our
first illustration. We will go from the top left, and that means that
we need to add the shadows to all
the right parts. So let's go and do this. If you want to change the
colors of your shadows, you can go to the
adjustments and used a few saturation
brightness option. So for example, I
would like to change the colors here behind the stem. I will go to this top menu
and I will choose pencil. I will go with a pencil and I will select these areas here. When you selected this areas, you can go to the
sliders underneath and you can move
them to decide to find what's used
your illustration when you are done
recoloring your shadows. Let's get back to our cameras and let's start adding
some highlights. So let's go to the needed layer. I will go and grab that
whites or this yellow color. And I will go along all the shapes and I will
add some highlights. Try not to overdo it. And when you are ready, we can move on to the
beautification parts.
9. Pumpkin House: Beautification: Let's start our
beautification part by recoloring the lights. We have the layer for it. So let's go for it. And we will need to go and along the lines and recolor
them with a nearby color. So let's quickly go and do that. When you recolored
all the lines, we will need to
add that texture. So let's go to the needed layer. Let's go and grab
our brush. Again. I'm reminding you that you can find it in a project and
the restaurant step. Or if you have the brush that
you like for the texture, you can use it here as well. Now let's grab some
color and let's go alone the shapes
and add the texture. And when we added the texture, we are done with our
second illustration.
10. Eggplant House: The Sketch: For our last illustration, Let's create a house
based on the egg plant. Again, if you need to
change the picture onto this reference
era, we will tap on it. We will go to Import
and we will employ the picture that we can
use for this illustration. If you don't need this window, if you want to create their
house from your head, you can just hide this window. So now let's go to our
layer with the sketch. We will unhide it. We will grab the same brush and the same color that we used
for the previous sketches. And let's start by creating
the guiding light. So for this illustration, we will need to create
the curved like that. When you have the curve, we will need to create
to helping ellipsis. One on the bottom that will
be a little bit bigger and one on the top that will
be a little bit smaller. When we have this shapes, Let's connect them together. We will go to the left
side and we will create the curve in that way
S for the right side, we will need to create a
little dent right here. So let's just go and connect these two parts
together in that way. Work on the sheep,
connect these two parts together and then erase
everything that you don't need. If you want to adjust
the shape even more, let's go to the selection. So we will use the
free hands method and we will select the sheet. Now we will go to
the Transform tool. And by using this method, we will adjust our
shape in a way that we like when you're
satisfied with the shape, Let's deselect everything
and we will go to the top part and add the
leaves and the stem. Let's start by
creating the leaves. We will step aside from these lines and little bits
and we will repeat them. When we have these two lines, we need to create
the actual leaves. So let's go and create that
weird train goes like that. So when we have the leaves, Let's create the stem and we will connect
it with the leaves. So for the stem,
just go and create a rectangle like that
connected with the leafs. Now work on the sheeps and erase everything
that you don't need. When we have our egg plants, Let's move on to the
bosom and create this little island
that it will sit on. So we will start by creating
an ellipse like that. When you're satisfied
with this ellipse, Let's move on to
the bottom part and create the same line
that we have right here, but stepping a little
asides and let's connect that soap figure with
our lines on the bottom. When we have everything
that we need, we can move on and add
the house features. And again, let's start
by creating the door. So for this illustration, I will go and create the
huge door like that. I will add some volume
by repeating this line, I will shoot it right away and I will add some features
for the door. So for example, it's going
to be that handle like that. And also I will add a little window right
here for the posts. And while we're still here, Let's add a few
fibers to the door to represent the wooden texture. The door is ready. So let's move on to the windows. For this illustration, I will go with simple rounds windows. I will add two on the body
of the elements and 12, the ads are working
the windows by aiding the frames and
it's a bit of thickness. I also decided to
add some curtains. Now we can move on to add
some additional elements. Let's start by creating
these bushes behind. When we're done with the bushes, I will go and add a little
bored with their flower. So creating the rectangle for the ports and creating some peculiar shape
for the flower. I want to end the letter
right here because this part seems a little
bit to play ends. I will go and create two
parallel lines like that. And I will add the
horizontal rails. Also, I will go to the top and I will add the
receiver or adhere. And also I would like to add a little feature
on the right side, and this feature
will be a lady buck. So for the lady bug, I will go and create
the ellipse like that. I will go to the top
of this shape and I will create a half of
the circle right here. I will add two antennas. I will go to the eraser tool. I will erase everything
that we have here. I will divide this body by
two pieces and add some dots. When it's done, I will add a few Lex and our sketches ready if you don't want to
change anything with that selection and
transform tools, we are ready to go and
create a clean lines.
11. Eggplant House: Making the Clean Lines: Let me remind you what we
are going to be doing. Once at this stage, we will go firstly
and change our brush. I will go and speak
that technical bad. Also, I will go and adjust
the streamline value. Now we will need
to go to our layer with Z lines and we need to go for all the shapes
and we need to connect them together
with a closed slides. So what we need to do is
to create a closed lines. Let's just quickly go and do it. When you're done, Let's
hide the layer with the sketch and checkout whether
we need to fix anything. Whenever Finn looks fine, Let's move on to
the coloring part.
12. Eggplant House: Adding Base Colors, Shadows & Highlights: Let me remind you
what we are going to be doing for the coloring part. We will go to our layers
and we will check out if our layer with the lines
is set as a reference. If not, we will tap
on it and we will choose reference from
this drop-down menu. Now we will go to our
layer with colorant. We will start picking our colors from the color
scheme that you have here. And we will go through all
the places and we will color drop the colors
to the needed places. So let's just quickly
go and do this. When we're done with our base, Let's move on to the next layer and we will add
the shadows again. Remember where your
light source ease and create the shadows
according to this information. Use one color for
all these shadows or use different colors
for each element. If you want to change the
color of your shadows, you can do it in
two different ways. The first one is to
go to the layers and go to the layer with our lines, we will need to get rid
of the reference here. Now we can go to our shadows, we can go to the selection. So use the automatic
selection to select the shadows that we
need to change the color of. When we selected our shadows, we will need to go to the View
saturation and brightness. Here you can tweak
the sliders and find the color that will work
with your illustration. Another way to
change the colors, ease to go to the hue
saturation and brightness, and to use the pencil
methods with the pencil go over the place that you want to change and again, select it. When you select it, go to the sliders and adjust the color when you're
satisfied with your shadows. Let's move on to our canvas. Let's go to the layer
with the highlights, go over the places and
create this highlights. So I will pick the
brighter color and I will try not to
overdo this stage. When the highlights are done, we can move on to the
beautification parts.
13. Eggplant House: Beautification: Let's start our
beautification part by recoloring the lines. Let's go to the needed layer. Now we will grab the brush, we will pick the
nearby color and we will go alone all the lines. When you're done
recoloring your lines, Let's add this extra. We will go to our layer
with its texture. We will grab our brush that you can find in a project
and restaurants up. And we will go along
the shapes with some color and we will add
this extra in that way. And when you added that texture, we are done with our
last illustration.
14. Final Polishing: When we have all of our
three illustrations, Let's do the final polish. For example, if you zoom
in your illustrations, you will see some nice
colored places or weirdly colored places
and we need to fix them. So let's go to our layers
and we will create one more layer above all
the layers that we have. Once it is layer, we will go
through our illustrations. We will pick the
colors that will suit displays to recolor it, and we will recover it. When you're done
with the fixings, you can take a look
at your picture in general and maybe add
some additional elements. So for example, I will go and add some smoke from
the chimneys and maybe some sparkles to make the smoke a little
bit more transparent. We can go over it
with the eraser tool, but we need to go and change the opacity of the Eraser tool. So when you are done with
your little adjustments, we are done with our class. I hope you found this class
helpful and if you liked it, please check out
the other classes, give a follow and
leave your review, and thanks for watching.
 Xenia Sorokina, Illustrator & Graphic designer