Transcripts
1. Introduction: Hello everyone. My
name is Ten and I'm an illustrator
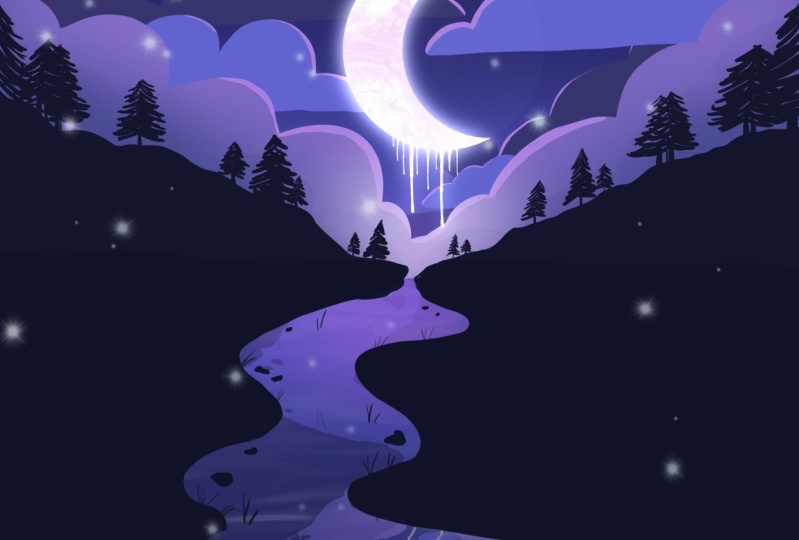
and graphic designer. Today, we'll create a simple
night moon landscape. During the class,
we will work with simple shapes and simple tools. Procrit has to create
a stylized picture. We will work with layers, alpha log clipping, masks,
and blending modes. As a result, you'll get an image that you can
use as a sticker, postcard, some digital
product or whatever you want. This class is for everyone, so don't worry if you
have no prior experience. Mostly it is suitable
for a digital drawing because everything you'll see
will be made in procrete. However, it absolutely doesn't mean that you won't
be able to repeat it with some other
graphic software or even with the
traditional materials. So with that said,
if you are ready, launch your software
and let's begin.
2. Background: Let's start by clicking
on the plus icon in the gallery and choosing a
square four, our new canvas. First we'll go to Colors and select the second color
in the first row. When that's ready, we'll
hold down the color on the color icon in
the top right corner and drag and drop
it onto the canvas. When we have the main color, we need to start
adding the gradient. Let's go back to the
layers and click on the plus icon to
create a new layer. Then we'll go to
the brush library, airbrushing, and choose
the solved blend brush. The apacity of the brush is 35% and the size is about
10% You can change it, make it bigger or
smaller as you like. Let's go back to the colors and select the first color
in the first row. Once that's done, let's start
working on the gradient by going to the top of the canvas
and making broad strokes. Starting with a
very intense color, move closer to the center, reducing the pressure
on the apple pencil, and that's the
intensity of the color. When the top is ready, we'll do the same
thing at the bottom. Starting with the intense color, moving to where the center, reducing the intensity
of the color. In the end, we will get
something like this, Make the gradient smoother. Let's go to the magic 12
and choose Gaussian blur. Hold either a finger
or apple pencil on the screen and move
it to the right side. Around 50% of blur will stop. If we want to add more bluer, we can go further
to the right if we want to less smooth
transition between colors, we will move to the left
when we like the result. We click on the magic 12 again and start working
on the islands.
3. Shores & Trees: First, let's go and
change the brush. We will go to the brush library, calligraphy folder and
select script brush. Go back to layers and add a new layer by clicking
on the plus icon. Return to the colors and select the first color
in the second row. Let's make the brush smaller, about 10% And start by going to the center of the
screen on the left side. And we'll draw a line
going toward the center, make it very wobbly. And when the line is
ready at the bottom, go to the top and start making
a soft triangular shape. We'll wrap the line
around creating a closed shape and then drag
and drop the color inside. When we have the
island on the left, we'll do the same
thing on the right. Again, start with the
line at the bottom. Take it all the way to the end. Go to the top and start
adding the wobbly line. When the ship is ready,
drop the color in. Now we will work on the existing ships and make
them more island like. Let's go on top of the ships and make a more interesting
natural ship. If we want to remove something
or cut out some parts, we can take an eraser. First, we will set
the same brush as we are using now to
paint as an eraser. When we have a brush selected, we will hold an eraser icon. We can check it by going
into the eraser menu. And now you can see it
is set as script brush. Now we can go over the islands. We can remove something
with an eraser, or we can add something
with the brush. Let's work on this now
and make a nice siluette. When we have the islands, we'll go to the layers again. Click on the plas
icon and create a new layer using
the same brush. Let's go into colors and choose the second color
in the second row. Now let's go under the
finished islands again, starting from the left side, go on top of the previous ship. Go to where the center with our wobbly line From the center. Go down and start creating an abstract ship off the shore, move down and create
a wobbly ship. And when the ship is done, drag and drop the color in. When we've made the
ship on the left, we will do the same
thing on the right, draw a line on top, Go on top of our island, and then again go to the right side and
create a similar ship, drop a color inside
when the ship is done. Now we are going to work on the ships at the bottom in
the same way as before. We are going to start aiding
and removing some elements. Let's use the brush and razor to create some beautiful and
interesting natural ships. When the basic shape is ready, let's go back to the brush and start adding some
additional elements. We can go to the right
side and add some pebbles and extra elements to add
some interest to the picture. We can also go over
the shores and start adding little lines
that will look like grass. If it's hard to use light
pressure on the brush, we can resize it to
a very tiny one. Let's go over all the shores
and add grass elements. We can even go into the water and add the
same elements here. The most important thing at this stage is to not overdo
it with small elements. Everything should
look very balanced. In the end, when
the grass is ready, let's go back to the layers. Go back to the layer with the islands and
start working here, adding extra elements
in the form of trees. Let's go back to the
canvas and we will pick the color that we
used for the islands. Let's press one finger on the screen and activate the eye. Drop it to when we've
chosen the color we want. Let's go on the finger and we'll go and add
the new elements. Let's make the brush bigger, about 10% and start adding
the trees on the right side. Start adding strokes,
moving diagonally down, starting from the
narrow part and extending the fir
tree to the bottom. When the top is ready, we'll add the trunk. We can even make a double trunk as if we have two fir trees, one overlapping the other. Next, let's start creating more of the tree like elements. We can make them
bigger or smaller, moving to the sides and
creating fir trees like this. When we have these
two fir trees, we'll go closer to the edge and start creating
elements like this. We can even overlap one
element on top of the other. When we are done with that, we are going to move
closer to the center. And we are going to slowly make the elements
smaller because we are moving closer to the horizon and the trees
will appear smaller. Add trees in the center, and then add more fir
trees on the right side. Once again, in the center, the elements will be smaller. When we have added fir
trees on the right side, we move to the left
in the same way and start adding
fir trees there. We can repeat what we have on the right side so
we can mirror it. Or if we want a more
interesting picture, we will add fir trees on
the side a bit randomly to make the silouette
more readable and move to the left side
Adding more fir trees, we'll add three more fir trees, two full sized ones and one like the one
on the right side, which goes off the screen. We can also work with an eraser. If we want to fix or
delete something, use the same method as
with the main islands. Work on the silhouette
with a brush and eraser. When everything is ready, we'll look at the picture from far to see if we like it or not. Do we want to add or
fix something or not? If we're happy with everything, we'll move all the elements
of the landscape down. We will have more room to
add elements on the top. To do that, let's
go back to layers. And when the layer with
the islands is selected, we need to select the next
layer with the bottom part. To do that, let's go to the layer and swipe it
from left to right. When these two
layers are selected, we'll go to the
arrow on the top, left, and the bottom
of the penel. We'll select Uniform methods. We also need to
turn on snapping. We'll click on the snapping, and in the Settings
again, choose snapping. Now we are going to press Apple Pencil and start
moving the pencil down. If you find the orange line in the middle that
goes horizontally, that means that
you've put all of your selections right in
the center of the canvas. But for our illustration, we can go lower. The main thing right now is to move the elements
vertically and follow these orange lines when you have placed the
objects in that way, you can desalate
them by clicking on the arrow at the
top left again. Now let's go and start creating
the clouds on the top.
4. Clouds: Are going to go back to the brush library
calligraphy folder and we are going to
select Monoline brush. After we go back to
layers and go to the layer number two where we have our gradient from here, we will create a new
layer by clicking on the plus icon on the new layer. Go back to the colors and
choose a color that is lighter. For example, the fifth
color in the first row. Let's make the brush bigger
and capacity is set at 100% Let's start
on the right side. Aging shapes like this
go into the center. We will add rounded
shapes and we can wrap the line around to be able
to use the color drop. Next we are going to go to the left and do the same thing. Here we go on the top of the forest and add
similar elements, wrap the line around,
and add color. Now we are going to
work more on the shape, which means we are going to make the size of the brush
somewhere bigger, somewhere smaller,
and we are going to start creating
extra elements. Let's add more variability to the clouds to make them
look more natural. Some parts more distinguished, some parts less distinguished. Again, if you overdid it, you can always go
to the eraser and remove some places
here at the bottom. Let's make this cloud
a little bit smaller. Let's try to make the
clouds more rounded. So go back to the
brush if necessary, and make nice rounded shapes. Also, let's try to avoid
making unpainted areas. When we have such a shape, we need to add a
different color in the middle that this color is not the same as the main one. Which means we will
add gradients again. First we go to brush
library air brush and folder soft, blend brush. Reduce the capacity to
20% When we've done that, we need a new color to
appear only on the clouds. Let's go to the layers. Click on the fifth layer
and select Alpha Lock. When we use Alpha lock, we will only add
the new color to the existing shapes
on that layer. Go back to colors and
choose a lighter color. The third color from the
end in the first row, we'll make a bigger
brush and go from the center to add a
very smooth gradient. Add more of the extra
color in the middle, and the edges will
remain the same color. When we've done that, we can see that we have places
that can be fixed. We can always take razor and
fix what we need to fix. When we have the
basic clouds ready, we can start adding extra color as if it were a
texture or shadow. We go to the layers again, and when we are on
the fifth layer, we'll create a new layer. Above this layer needs
to be clipped to the previous layer to use
something like an alpha log. But on a different layer, we click on the sixth layer
and choose Clipping Mask. Now go back to the brush
library calligraphy folder and select Monoline Brush. Return to Colors and
choose a darker color, the fourth color
in the first row. Let's make the brush bigger and go over the bottom
with these shapes. Now we will make
the new forms in this way and add an extra color. Do the same thing on the left
side and add the shapes. We can try to create
something more interesting and go with
one shape over another. Now we will look at
the picture from the distance and we will check out whether we like it or not. Now we will make the new
shapes less prominent. Go back to the layers. Go to the sixth layer. Click on the end icon. Here we have an opacity slider. Let's grab it and move
the slider to the left. If the U shapes are
still too pronounced, we can take the
riser and make it a soft blend brush from
the airbrushing folder. Change the size of the brush, and with very light strokes, go on top of the shapes
and start removing parts on the shapes from
the top very carefully. Make a transparent transition. When we are done, let's
start adding more clouds. Go back to the layers and go under the layer with
the main clouds. Select the layer number two, where we have the gradient. Add a new layer from here
and go back to the colors. To choose a darker color, we can use the same
color we used before, the fourth color
in the first row. Let's go to the brush library
and choose script brush. And let's start adding more
clouds on the right side. Again, we will start
with the round shapes, loop the line around, and add the color insight. Do the same on the left side. We can repeat and
mirror the shape, or we can try to modify it, add the color inside. Then we'll go on top
of everything we have, starting from the left, and we'll add a wobbly shape, making a more cloudy atmosphere. We can do the same thing
on the right side, add color, add some soft shapes, and add additional elements. If we need to fix something, we go and fix it with the brush
and with the Erasor tool. Now we have our Erasor
set as soft blends. We need to go back to
the calligraphy and choose either script or
monoline for erasar. If we want to fix something, let's go and fix it. Just like with the
shapes at the bottom, add some extra elements and
more interesting shapes. Now let's get back to our brush and go to
the left side where we have the cloud and start making a shape
more interesting. We'll draw a line
from the bottom. And then we'll go over and start adding these
interesting ships. Drop the color
insight if we want, we can go to the right side
to do something similar. For instance, we can add
some extra elements on top. When we have all
the clouds ready, let's go back into layers and create a new layer on
top of this layer. Let's go back to colors
and take a lighter color, the sixth color
in the first row. And again, in the same way, go and create more of these
ships for the clouds. We go from the left side and create a line
from the botta. And then we go on top and create a cloud shape after
dropping the color insight. Work on the overall shape, make everything a little
bit more rounded. And then we'll also
go to the right side and create the same light
colored cloud here. We'll start with the
line at the bottom, create some rounded
shape at the top. Continue the line, close it, and then drop the
color in the middle. Add things if something
needs to be added, Remove things if something
needs to be taken away. Now we are working on
the shape of our cloud, and we will try to fix all
the unpainted parts too. If you want, you can
go down here and add another small cloud
with the same color. When we have this result, we can start adding additional
elements to the clouds. In the middle omni picture, we will have the
Moon and we need to add highlights going
from it to the clouds. Let's start with the clouds
that are currently selected. Let's go back to Layers. Click on layer number eight
and set it to alpha log. When we have alpha log, go back to colors and take the third color from
the end of the first. Go to the right side and start adding an extra color on top. We'll add a color from the top. And somewhere in the
middle of our cloud, we'll stop adding it. If we overdone it, we can't use a razor on this
layer, because if we do, we are going to erase the
main shapes of the clouds, to remove some parts
that we don't like, and to fix something
we need again, activate the eye dropper
to choose a color. And then go from the top as if we were removing
an unnecessary color. To get back to the
previous color, we can go to the color
icon on the top right, Hold it and return to the
color we used before. Now let's go down and
also start adding the spin color to the top of
the cloud on its left side. In the same way, let's go to the light cloud
on the left side. And in this case,
let start adding highlights to the top
of the right side. Now we are going to do the same thing with the
rest of the clouds. Go back to layers, go to the previous layer number seven and do the same thing. Click on it and select Alpha Lock with the
same color we go. And again, similarly start from the right side and add an
extra color to the top left. We can go to all
of these clouds, or we can skip some of them and add the extra color randomly. If we found some elements
that shouldn't be there, we'll take an eraser
and remove them. Now let's just work on our ship when we have the
clouds on the right side ready. Let's do the same
on the left side. In this case, let's add the extra color to
the opposite side. Let's go back to the
layers and go to the layer number five where
we have the main clouds. Do the same thing again. Go and start adding the
light color from the center. Let's go over all
of the clouds that we have that are
close to the center. When we've added
the extra color, we can start drawing the moon.
5. Moon & Sky: We will return to layers and go on top of all the
layers that we have. Which means we will go to
the layer number four. From here, we will
create a new layer. Return to the brush library, and again go to the
calligraphy folder. Choose monoline brush. When we have the
monoline brush selected, we'll go to the colors
and choose white, which means the third
color in the second row. Let's make the brush smaller, about 10% and go to the middle
on the picture at the top, and make a circle by hand. Let's draw a circle. And at the end, we will hold the apple pencil to
make a proper circle. We also will hold one
finger on the screen. If we want to make
the element larger, we move the apple pencil to the side and find the
size that we like. Let's add the color inside. If we have any tiny elements on the line that we need to fix, we will use our brush or eraser and we will
fix them manually. Now let's make sure that our moon is right in the
center of the picture. When we have it selected, we go to the arrow
on the soap left, choose uniform
method and snapping, and move the moon until
you find the center. The middle will be marked
with this orange line. We'll find the position
to our liking. And then we'll deslate it by
clicking on the arrow again. Now we need to make
several copies of this moon to make the
picture more interesting. First, let's go to the layers. And go to the layer
with our moon. Swipe it from right to
left, choose duplicates. And we'll do the same
thing one more time. Now we have three
copies of the Moon. Let's go to the layer at the very top and
change its color. Let's get back to colors and
choose a very pin color, the very last one
in the first row, dragon drop its to the Moon. Now we need to make
it so that we can use this element to remove a
part from the main moon. Let's go back to the layers. Go to the layer with the
moon at the very bottom. We'll hide it for now by clicking on the
little check mark, Returning to the pink moon. And again go into the
arrow on the top left. Uniform method and
snapping are turned on. Let's make the pink moon smaller and move
it to the right. The white part on the
left will be what you would like the moon to look
like in the final image. You can make it big or
small, whichever you like. When you like this moon, we'll remove the selection. Now let's go to the layers. Go to the layer
with our pink moon. Click on it and choose Select. Now that we have this selection, we go back into layers again and go to the layer
with the white moon. When we are on that layer, we are going to swipe the
screen down with three fingers. And in this new book, we will need to select cuts. Now you can notice that we don't have this piece in
the layers anymore. Let's hide the layer with our pink moon and our main
moon will look like this. Now let's go and add some
extra elements to the moon. First, let's make a new layer on top of the moon and
choose a white color. Then let's add a
texture to the moon. Return into the brush library and go into the water folder. Let's select water drip. Let's go to the
bottom of our moon and start making these
kind of dripping details. You can go and
create some drips. Make the brush
bigger or smaller. Create some
interesting siluettes. Try not to go overboard. If we have some beyond the moon elements on
top, that's okay. We can continue to add our driplets when
everything is ready. Let's go on top and
remove the unwanted fix. We need to make
the dripping parts not to look like
separate elements, but parts of the moon like
it's actually dripping. Let's go back to
the brush and go to the calligraphy folder
and select script brush. Let's go to the dripping
parts here and do roundings on the sides of the dripping parts
connecting them to the moon. Also with the same script brush, we can go and add
some extra drips, Not allots, one or
two here and there. And now we are going to
go back to the layers and merge these two layers of the moon and the dripping parts. Click on the layer with the
drip and choose merge down. Now let's make a little
glow around the moon. Select the layer with the moon. Swipe the layer from right to
left and select Duplicate. Go to the layer below, select it, and then
add Gaussian bluer. Click on the magic
one tool first and choose Gaussian
Bluer from the list. Add as much blur as you like. About 10% will look
great when it's done, click on the magic
onantul again. And if we want we can
go to the layers. Go to this layer where
we have the blur. Go to the icon and play
with the blending modes. For example, Ed looks really good and gives this nice glue. You can also go and change the opacity so the
glue isn't so fleshy. When we are ready
with this element, we go again to the layer
with our round moon. We make it visible. Click on the end
icon and also change the apacity that we have
a very slight halo. And again, we can
choose, for example, add blending mode and
play with apacity. Or we can choose overly, all we need is a nice
semi transparent halo. When we have everything ready, we can start adding some glowing elements around
everything we have on top. To do that, we are
going to go on top of all the layers first. If everything is good, if we don't want
to fix anything, we can remove the layer
with the pink moon so it doesn't get in a
way to delete a layer. Swipe it from right to
left and select delete. Now let's create a
new layer on top. Once we have a new layer, we need to go and
choose a new brush. The brush you are
about to see can be downloaded from the
Reser's tab originally, it is the brush from the
luminous folder called glimmer, but slightly modified
with a white color. And with a big brush, we'll go and start adding
elements like this. We can go with a brush
and make strokes. We can also make
it smaller and add some finer details on the moon. Let's go inside and add
some glowing lights here. We can choose
different brush sizes and add some elements. If we don't like some parts, we can delete them. And on the contrary, if we want to add some more
elements, we can do that. We are just looking at
how we like it better. You can also go to the islands and add glowing
elements over here. As always, try not to
overdo it and do not add too many elements when we like
the way everything looks, we'll add some extra color and texture to the moon to do this. First let's go and change the brush head to the
brush library materials. Select the black wood brush. When you've selected
it, return to layers. Go to the layer
with the main moon and add a new layer on top. Attach it to a previous layer
through the clipping mask. Next we go to colors and
take this very pin color. Now let's go on top of the moon and add some
chaotic strokes. Add some additional elements and extra texture to the moon. Make the brush
bigger or smaller. If we don't like something,
we can erase it. If the color seems too bright, we can go back to layers and press an icon and
decrease the opacity. When we like the result, we need to make a
nice reflection on the moon and everything we
have on top in the water. To do this, let's go and select all the layers we have
for these elements. Which means when we have
the first layer selected, the layer number 13, go to the layer below it and start swiping it
from left to right. And do this with
all the layers that belong to the elements
of our landscape. When all this is done, go to the top right
and click Group. When we have the group, click on it and change
the name to top. Now that we have this group, we need to Duplicate it
with the group selected, Swipe from right to left. And select Duplicate. We can collapse the group. Then click on Duplicate and select Flatten from the Least. And now we have
everything on one layer.
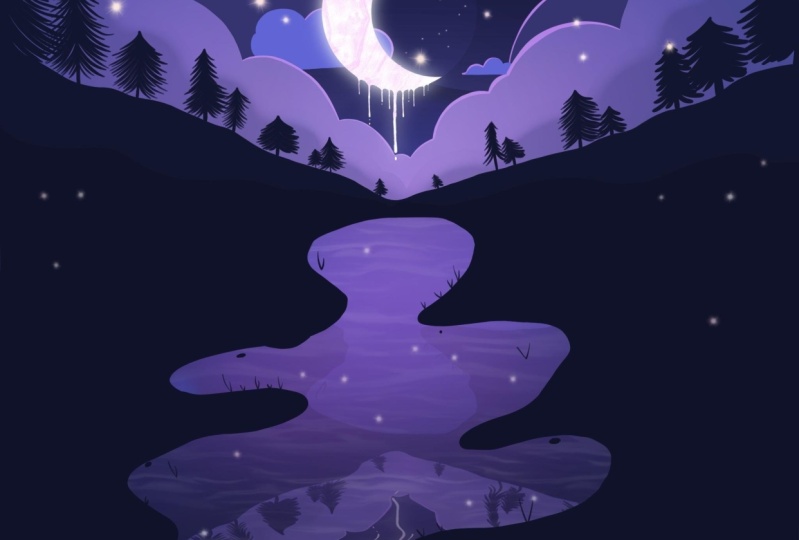
6. Reflection & Water: Now let's make a reflection
with this layer selected, Let's click on the
arrow on the top left and choose flip
vertical in our panel. At the bottom we've got
snapping turned on and now we are going
to move everything down and find the orange lines. We don't have to move it
straight in the middle. We can make the moon still
visible in our water. When we've got the reflection
showing as we like it, let's go and click
on the arrow again. Let's return to layers, and we will go to
this flip layer. Click on the icon and start
changing the capacity. When we have the
capacity that we like, we'll click on the
layer one more time. Now we need to move this
layer down under our group. We'll select the group, click Collapse, and move
layer number seven down. Now we need to add
the water effects. We can notice that we have alpha log enabled on this layer, so we will need to turn it off. Go to the layer number seven, click on it and choose
Alpha Log from the menu. Now we are going to add
ripples to the water. Let's go to Adjustments
and choose Liquefy. We need to choose Option Push. And then make the
brush size small. About 10% 15% we are not touching other layers
except the size one. And then we go to our canvas
and start adding ripples. Moving from edge to the
edge of our canvas, right across the
whole bottom space. As always, try not to overdo it. And when we've got a
result that we like, we'll click on the magic
one tool one more time. Now let's go and add some extra beautification
to the water. First we go to our brush library elements
folder and select Ocean. Again, we go to the layers. Add you layer on top
on this layer below. Go back to colors and choose
white with the white color. We start to go from
the bottom with horizontal strokes and
end the water surface. We can press very hard
or we can press lightly. When we have the
result that we like, we go back to the layers. Click on the icon and
change the capacity to about 25% When that's done, we need to go and add some
shiny elements to the water. Again, we go back to
layer 12 and choose the modified brush from the luminous folder,
Glimmer brush. Once again, we are going to add a tiny bit on these
elements on the water. Try not to overdo it. The very last thing we
are going to do is adding some tiny glowy elements on the water and on
the mean clouds. First we are going to go
back to the brush library. Go to the air brushing
and choose soft blend. Let's go back to the layers. Go to the top group. Go to the in cloud. This time we'll
take white color. And very gently in the middle, we'll start adding some glue. Now we are going to add
some glow to the water. Go back to the layers. Go to the layer number seven. Pick up, for example, a super pin color. Make the brush smaller, and add some color here in
the middle of the water. If we want, we can
add white color too. And in general, play with the water surface by
adding more colors. If we look closely
at the picture, we can see that we have a
little reflection at the top. We can go and remove
it in our layers. Let's go to the layer
with the reflection. Take the riser tool
and erase this part, So our picture looks great. At the very end, we'll take a look at the picture again very closely and we can see that we have a small cloud
silhouette over the moon. Let's go and remove it. Go back to layers. Go to the layer number seven, where we have these clouds. Take the riser tool, enlarge the picture, and
remove unnecessary particles. At the end, we get this result and that's
the end of the class. I hope you found
this class helpful. And if you liked it, please
check out the other classes, Give a follow and leave your review. And
thanks for watching.
 Xenia Sorokina, Illustrator & Graphic designer