Transcripts
1. Introduction: Hello everyone. My name is senior and I'm an illustrator and graphic designer. Today we'll create a few illustrations based on the Halloween theme. We're going to make all the pictures from scratch, starting from the sketches. And as a result, you have a bunch of full colored illustrations. You can use the final pictures as single stickers or Sticker Pack, put them on the postcard, make a pattern from them, turn them into some digital products and to use them in whatever way you once this class is for everyone. So don't worry if you have no prior experience, all the drawings are made in Procreate, but it doesn't mean that you cannot use any other graphic software or even traditional materials. So with that said, if you're ready to launch your software and let's begin.
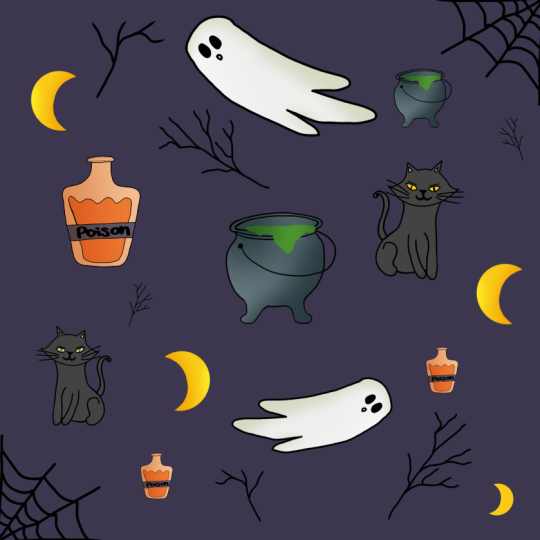
2. Sketching a Cat: Today we'll create a few illustrations with magical witchy, a little bit of a Halloween theme. So let's just jump on our canvas and start sketching out. The first object that we will create is going to be the cat. So firstly, let's just go and create a circle. You can edit the shape and create like an actual circle or go with the ellipse, doesn't really matter when you have the shape. Let's find its center and create a line like that. So when you have this line, Let's find that even distance on both sides. And we will be using it to create a little bit different shape. So we will go and create the curve like that on one side and the same shape on the other side. So just connect these dots that you create it with the curve and connected with the Alps. And on the bottom we will create just one line like that. You can see that we have a nice shape and it is the shape that we are going to be using for the hats. It's not even enough and you want to adjust it a little bit. You can go to the transform tool. You can choose distort option or work option and adjusted in a way that you need. So for example, I will make it a little bit bigger on the right side when you are ready, just deselect everything and let's continue creating other features of the face. So first of all, let's create one vertical line going through the center of the shape. We can use it as a guideline to create the ears, the eyes, and everything like that. So let's start by creating the ears to put them on the event distance from the center line. You can just go from the center and creates the lines like that. Use them to create the ears or just a little bit further, it's up to you just try to make these lines at the same distance. So I will be using that middle ground between these two lines that I created, tried to make the same ear on the other side, you can go and create the smoother corners or make them pointy. It's up to you when you are done with the ears, let's create the eyes. For the eyes, we will need to create the shape of some kind of a lemon, a little bit elongated lemon, something like that on both sides. So let's just repeat this shape onto the face of the cat. I will go and just create the sheep. Don't really think and about its placement because we can fix it a little bit later. So just creating the shape, I will grab the eraser and erase a little bit the inside parts to make sure that everything is looking fine. And when you are satisfied with this eye, we can make a copy of it. So let's go to the selection tool. Let's select the free hands method, and let's just select these shapes. With three fingers. We will slide down and we will choose copy it. Again with three fingers, we will slide down and we will choose peace. Now you can see that we have a copy of this I, but we need to flip it. So let's go to this bottom panel and we will choose flip horizontal. Now move it to the other side and rats eat it. Put the second eye on the same distance from the center as we have for the first time, I will probably adjust these isolates or bits and I will put these islets are a bit further and I will adjust the second eye as well. But firstly, let's go to the layers and we will see that we have a new layer with this inserted image. And we don't really need to have few layers for our sketches. So let just tap on the layer that is above. And we will choose merge down into the drop-down menu. Now everything is on one layer and I will go again to the selection tool. I will select the first i, I will go to the Transform tool and I will move it a little bit aside. Maybe I will write say to those of it. So when we are satisfied with the eyes, Let's add that irises. So for the irises, we will just go with the simple shapes like that and the same on the other. I just did if you needed to use the eraser tool, just make erythrocytes. Remember that we are just creating the sketch so we don't really need to be very accurate, very needs. We just need to map out what we are doing. So when we have the eyes, Let's create a little nose. And for the notes, we will use just the shape of the triangle. I will put it right on the same line that we used for finding the center of our shape. And I will create just a little triangle like that. Now, under the nose we need to put a little mouth. So for the mouth you can go with any shape you like. So for example, you can go with a traditional sheep for the cat's mouth like that. Or you can just create some expression if you want. I will go just with the simple shapes like that. Just a simple smile, maybe a little smirk. And I will use this middle line that we created to find the center as this dividing line between the nose and the mouth. I will adjust the mouth a little bit to make it even on both sides. And let's add some whiskers. So for the whiskers, we will just go with two or three lines like that. And when we are ready with these parts, let's just move on to the body. So for the body, we will need to create a little sheep of the beam. But firstly, let's create the guides in life. So I will start from the line that we had for our center. And I will create the line like that. Now by following this line, we will need to create a little shape of the egg plant or B. So let just start and create a shape like that. So when we have the shape of the body, we will need to add the feet. So for the feet, we will need to create the shapes like that. So one is going to be looking at one side and the other is looking towards another one. So let's find some kind of a shoulders of this cat. And from here we will start and creates the shapes like that. So starting right here, making the poll, you can just start by creating these shape and then we will adjust it ends an actual poll. So let's just create these two shapes. The one on the other side, we can adjust them rights away or we can leave it for the next part of the class. But to create the poor, you will need to create a little ellipse right here and connect the shape with the curve. So let's just try out. I will erase the lines that we don't really need. So this line that we created for the body and this line as well. And let's create the pose. So we will create the ellipse here, LPS here, and we will need to adjust the line with a curve, erase the lines that you don't need. And let's continue with the back feet. For the back feet, we will need to create firstly, the circle like that and the ellipse underneath it. Then we will connect them together with the curve like that. So let's make this bottom part's a little bit bigger. So we will create the ellipse. Firstly, it like that. And here we will create a lid. So a lek connect these two parts together, connects the body with the new leg that we added, a raised erythema that you don't need. Also here we can overlap the leg that we have in France and arrays the slide. So I will erase the line here just not to mess up with it. And when we have this shape, Let's create that sale also. I would like to adjust this line a little bit more. Maybe make the curve which will be curvier. So just try to make everything look nice, experimental little bit, make a Ruffin looking cute. So when we have the shape that we are some kind of satisfied with, let's create it saved. So for the sale, we will go from the middle of the back leg. You can just mark this out if you need. And we will need to create the curve like that, add some volume to that sale. So repeat the line that you created. You can go with any shape of the tail that you like. So you can make it curvy, you can make something like that. You can change the direction of the tail just again, experimental little bit with the shape of the cat and experimental little bit with the shape of that sale, I will make it a little bit tinier maybe, and I will erase the line right here. When you're satisfied with your cats. We can move on to the next illustration.
3. Sketching a Cauldron: So for the next illustration, we can create maybe a cauldron. So for the cauldron, let just start by creating the circle. You can use the quick shape tool or you can make it menu. It's up to you. Let's find the center of it by creating the vertical line. And we will need to create a tiny lacks like that. So try to make them on the same distance from one another and from the center line. So it is just the shape of the triangle, but it is rounded on that bottom parts. So when we have this shape, Let's create the ellipse on the top. It's going to be Ellen Gates, it like this. Try to put it on the center. So if you create it analogies and if you are not satisfied with its placement, let just select it with the selection. So let's go to the Transform tool and move it a little bit. If you need to rotate it, you are welcome to do it. So when you are satisfied, Let's just connect these two parts together. But firstly, we will need to add a little bit of volume to this top part. So let's repeat the line on the bottom, and also we will add the volume to that back parts. So repeat the line that we have on the top but created inside the sheep. Now we will connect these two parts together. So from this sides and from the sides, and it's now when we have the volume and when we have everything that we need, Let's connect these two shapes together. So we will need to go and connect them with the curve and the same on the other side. You can add a handle. So for example, let's create a little nail or right here, and we will add hands-on go in there. Only the one side will be seen. So connects the line of the hands-on with the line of the cold drunk. If you don't like the shape, you can again go to the selection tool, you can select it, you can go to the Transform tool, distorted work-based, find what works with your illustration. Let's just move it a little bit to the side. Maybe make it smaller or bigger or place it in a different direction. It's up to you. Now we're not focusing on the placements, we are just doodling. So when we have the second illustration, Let's move on and create another one.
4. Sketching a Tombstone: So now let's create the headstone or the tombstone. So for this illustration, we will need to create some kind of the shape. It is a rectangle, but it is a little bit wider on top and a little bit narrower on the Watson. When we have this shape, I will erase this line here to make it even on both sides. I will find the center of it by creating the line that is going from the center up. And we will need to create a little sheep right here. So it is that so part of the ellipse, you can go with the narrow or the whites ellipse if you like. So when they have the shape, Let's erase everything that we don't need. We don't need this line. We can leave this line for now. We can make the corners rounded or leave them as they are right now. It's up to you. Experiment a little bit with the Lucan of this tombstone. And let's create some lines right here to show that it is some kind of engraving. And let's add some beautification for this tombstone. So for example, let's create the skull with some bones here. So for the Skoll, we will go and create a circle or analogies like that, and we will add the little shape like that. So it is the same shape as we have here, but it is the bottom part of the Alps. So we will erase this part. So you connect these two shapes together. We will need to add the nose. So for the nodes we will go with the sheep like that. It is some kind of that reversed heart shape. So let's just add it here. So when I have the nose, let's create the eyes. You can go with any shape you like. So for example, you can add just excess like that. You can go with the shape of the lips and tilted a little bit to the side. You can go just with the circles. So for example, I will go just with the plain circles in here. You can just create a line, maybe add some lines like that. And when you're satisfied with the shape, Let's add some boats. So first of all, let's start by mapping out their placements. So let's create one line here, one line crossing it. We will need to add a little bit of volume here ends adds the shapes on the sides of this box. So we can go with two ellipses like that and connect them with the line the same on the other side. Now we can go to the Selection tool. We can select these elements and maybe place it a little bit higher. You can make it a little bit bigger or smaller. It's up to you. Retweet it if you need, do whatever you feel is working for your illustration. We can add some lines like that, so it will show that there is some engraving or something like that. If you are not satisfied, you can go and select it and transform it, worth it, do whatever you feel is working. So I will go to the work ends, I will adjust the size here. Also, I will use the free form method to shrink it a little bit down. So let's place it somewhere, maybe make it smaller. I will go and select this cats and I will put it to free some speeds. I will put it right here.
5. Sketching a Dead Tree & a Ghost: Now let's continue and we will create a little dead tree with the ghost. So for the dead tree, we will need again to start by mapping out the direction of this tree. So I just start by creating the line like that. We will add some branches and we will need to add the volume to this tree so it is narrower on the top ends. It is wider on the bottom. You can make some smaller shapes. You can make some smaller lines, like jagged lines or something. You can add some branches. So for example, like that, just connect them with the shape of the tree. So play with, albeit with the shape of the branches, make them pointy on the soap. And they will need to be a little bit wider where they are connected with the shape of that tree. Try not to overdo it and add just enough branches for the tree as it needed. So when we are some kind of satisfied with the shape of the tree, Let's just do the following. We will go and select it. So use the selection tool and we will go to the adjustments and we will use that feature that is called Liquify. Here you can see that we can push a little bit. So if we select the push here, we can just go and change the shape of the tree by pushing it to the size. Also, we can twirl it a little bit. It will be just go and like that. So play a little bit with this options if you want. And we will move on to the next step when we are ready. When you are satisfied with your tree, Let's deselect everything just by tapping on the icon on top. And let's continue by adding a little spooky ghost. I will move this tree a little bit to the sides to have the space. And when we need it, let just go and create a little ghost so you can go and create the shape of that, some kind of a drop. So you can just creates something like that. Or we can go and create a little comment shape. Just remember that it is floating, so we will need to add a little bit of action right here. So not just go in straight with this direction, we will need to repeats the direction of the flow 10. So let's just go and create the common shape. For example, I'm overlapping the tree, but it doesn't matter because I am kind of pursuing this. If you don't want to overlap your objects, you can just make them separately and worked with them in that way. Or if you are not afraid, so overlapping the themes, just be brave and do what you need to do. So you can see that I also repeat it, the sheep of their movements onto here. So I'm going with this direction and I will probably make it even more seen right here. So let's erase everything that we don't need. Let's just go with and the razor in sinus shape. And let's add a little face to our ghost. So let's go and create the ice. They will be just the circles. You can see them right away. And let's create a little expression on the face of the goods. So you can go with any mouth that you like. You can go with some mouth like that or just the little Smiley face. I will go with something like that. I will shade it right away. And that is our ghost and the dead tree. You can go and create a few branches along the sides just with those spooky branches. And let's move on to the next illustration.
6. Sketching a Hat: So for the next illustration, Let's create a little hat. And we will go by creating the wavy shape on the boards and just create any shape that you like. So it was obese, bloated shape or it was a wavy shape, just any shape that you like. And we will need to create the training go like that. And we will need to connect these two parts together. So firstly, we will add the line like that and we will connect the shapes. You can make these hats very pointy, very long like that. Or you can create a little foal trait here. So to create the fault, we will need to go and create a shape like that. And we will need to create one more parts right here going to the site. So it's up to you what kind of the hat you will be created. You can add little beautification right here on the hats. But now we are creating just a sketch. I'm reminding you, we don't really need to add a lot of details because we are going to be working with the colors later and it will be nicer looking a little bit further along. So when you are satisfied with this shape, Let's just maybe selects its may be rotates, it's a little beads or adjusted in accordance with your vision. You can again go to adjustments and use the Liquify. So push it pink sheets to wireless if you like. It's just adjust the shape and make it in accordance with your vision. So now, when we have a few elements, let's add some tiny or elements. And for now let's just go and create a few bottles with poison that is cooking right here.
7. Sketching Poison Bottles: So you didn't create any shape of the bottle that you like, any peculiar shape, any crazy shape that she wants. But let's just start by creating some very simple bottles. So I'm creating the shape that we used right here for the tombstone. And I will just add the lines like that and the line like that. So I will add a little bit of volume to that bottom part. And I will connect these shapes together by creating the little shoulders with the smooth lines. Let's erase everything that we don't need. Let's add the work. So just going like this, creating the work. You can add a little ellipse on top to make it look like it is circular. And let's add some poison right here so you can go with the shapes like that and create some volume. Or if you don't like it, if you want a little bit more of the flood design, Let's just adds the liquid's going like that. So let's repeat the sheet that we have for our bottle. And let's add some liquid like that. We can add a little label here, so let's create it. We will erase the lines that we don't need. We can add something here. So again, just maybe it's o scowl. If you want, you can just create the scholar right here without the label. Let's add maybe one more bottle. If you don't want to create any more objects. If you don't want to change the shape of it, we can just copy it. So we will select it three fingers down, copy three fingers down. Let's flip it horizontally. Let's put it somewhere near. I will make it smaller, I will rotate it, those will be its ends. I will change the sign here. So let's erase it and maybe add some hearts or any other element that she would like to add right here.
8. Sketching additional elements: When we have the bottles, let just go and create a few more smaller elements. So for example, just the bone like that. We already know how to create the bone. So just add into our ellipses on the sides, connecting them with the line and creates in the bone here, Let's add a list, so candlestick. And we will go with some peculiar shape. So for example, let's just go and create a line like that, that is vertical creed, the line like that that is horizontal and create two more lines. Here, we will add a little pleats or something that it is sitting on, on the bottom. And we will go by using these lines with the curves like that and the same shape on the other sides. For this type blood jazz go and create some sheep like that's maybe or any shape that you like. And we'll need to put it a little bit more in a center. So let's go to the top and create a few more shapes right here. And so we will add a little platters here, just even ends. We will add a few candles. So for the candle's just go with the rectangular shapes, try to make them even. I will move the shape a little bit, maybe make it smaller so it's not touching any other shape. Let's add some fire. So for the fire you can just go with the shape like that. So creating just one line and repeated it. You can add some melting parts just like that, some peculiar shapes. And when you're satisfied with this, Let's add a few more elements. So for example, let's add a little kind of jar that contains the scout. So let's just go with the circle. Let's add a little thing that it Could rests on. And I will add a little bit of volume here until it's little bit more of a peculiar shape. Maybe we'll add some things here, some beautiful locations. So into this jar, or maybe it is a crystal ball. Let's just create a little scout. So for the Skoll, which again we'll go with a circle and we will add just three lines like that. So create a few teeth under the circle and adds some nice face features on the scout. So again, we can go just with the circles and let's add a little nose. We don't really have more space. So let just go alone the canvas and add a few sticks and just make it a little bit spooky. Maybe add some kind of valves or any other attributes that you'd like to add to these illustrations. So if you want to create a VAP, start by creating the outline like that and then connect them with the curves. If you want to add some sparkles, go for, it, just creates some sparkles. Maybe you want to add some stars or moons or anything in between. Just go and create some QTS elements for this illustration. And when you're satisfied with your illustrations, Let's move on to the next part of the class where we are going to be recoloring all of our objects.
9. Adding Colors: So firstly, we will go and if we have a few layers for our sketch, we will merge them together. So tap on the layer that is above, choose merge down from the drop-down menu. And let's do one more thing. We will tap on the little icon n, and we will adjust the opacity of this layer. So let just move this slider to the left ends. Let's leave it on there, 50 or 60 percent. We still need to see Going on onto the canvas, but we don't really need it to bother us. If you want to readjust your elements, move something, or it's eight sounds when you are welcome to do it right now, because it's always good to do so onto the layer with the sketch. Because every time you are adjusting your elements, rotating them, moving them, the quality of the lines will be worse. So let's just take a look at our illustrations and quickly read receipts or adjust anything that we want to adjust. So if you are satisfied with the placement of your objects, Let's lock this layer so we will be sure that we are not working on the wrong layer. Swipe from right to left and choose lock here. Now let's create one more layer and we will put it under the layer with the sketch. So we won't be working with a clean lines. We will be creating the colors right away. So let's go and grab some brush. I will be working with the technical pen because I want to use the color drop a little bit leader. And if we are working with, it's actually pans. It will be a little bit harder for us to use the color drop. So if you want to use the texture brush, you might need to recolor your objects menu later on. So if you want to use the color drop, choose some smooth brush. I will go to the technical pen. I will adjust the streamline. If you don't know how the streamline works, it is creates the smoother lines, but you are losing a little bit of control over that. So you can adjust it right here and see how it works onto this little drawing pads on the right. So when you are satisfied with the value, let just hit Done and let's move on and start recoloring our objects. First of all, I will go entry color, the background of the whole canvas. Let's go to the layers. Let's go to the background color. You can see that we can choose it from that disk or we can use our little pallets. This palette that I create for this illustration, you can find in a project and restaurants app downloaded. It is both on swatches and with a JPEG file. So if you're using any other graphics software, you can use the same colors as well. So let's select the color from this little pellets. I will be using this purple one. So just tap on it into your background will be recolored. Now let's pick another color and I will show you how we are going to be working with recoloring our elements. So for example, as we started with the cats, Let's continue by creating the cat. Let's get back to the layer that we created for our coloring. Let's go and grab some color. So for the cat, I will be using this dark blue, almost black. So what we will need to do is to create the outlines and then colored drop the color to the area inside. So let me show you on the cats, I'm going along the shape and when we are working with the coloring, it doesn't mean that we need to repeat everything that we have on the layer with our sketch with a 100 percent of similarity. So you can just go and adjust the shapes. All you need to remember here is that you need to create the closed lines if you are working with their color drop. So let's just go create the outline. I will erase a raffinate item needs. We will grab the color and we will put it here. Now let's continue by adding the ears again, the same method just go in and creating the outlines, color dropping. It's the same on the other side. Let's do the same with the body. So again, creating the outline and then color, dropping the color. I will go just with the basic shape and then I will add the details with a different color. So when we have everything that we need, just color drop in agent that sale. Always check out how you are doing by going to the layers and hydrogen the layer with the sketch. You can see that here you can adjust some places, some miscalled places, or you can connect a refund nicely, for example, here with that sale and the body, and just check out how everything is looking in general. When you're done with adjusted Erath in here, just go to the layers and unhide the layer with the sketch and continue agent other outlines right here. So for the eyes, I will go with this yellow color. I will just go right here, create the outlines for the eyes. We can manually recolor everything that we have here. Or if we use the color drop, it might work. It might not work. Buds. Probably it will have a little outline here and you will need to recolor it manual in any way. So just recolor it. Let's add the iris. I will go with the same color that we used for the whole shape of the cats will create the iris. Maybe we'll adjust the shape, as you can see, recolor everything here and do the same on the other side. You can always get back to the Brush Library and adjust the streamline in accordance with what you are doing right now. So if you are recovering some objects, you might need. That smaller value, if you are creating the outlines, you will need to go a little bit higher. So let's go and create the nose. So for the nodes, I will go with this color. I will recolor it. I will grip white color for the mouth and for this little middle parts, I will add white whiskers. So just go and like that. You might need to add some details. So for example, if you want to add the color, we can do the following. We can go to the layers and we can tap on it, and we can choose Alpha Lock. When we are choosing Alpha lock, we are working only with the contents that we already have on to this layer. Let me show what does it mean. So for example, I would like to create a color here, and I will choose this orange color to do so. Now, if I go and creates the line here, you will see that I'm not going beyond the frames that I already have for the body of the cat. So I will probably make it a little bit more accurately. So by using this method with the alpha lock, Let's just go and create the outlines for our cats. Lex, I will use the same color that I used for the nose. I will go to the technical pen one more time and I will increase the streamline here. I'm just creating these outlines. If you already did something and if you want to change the color, for example, if you want to erase this line, don't use the eraser because you will be a raise in ARAF and that you have onto this layer, just select the same color as you need and just go for this place and adjusted. But of course, if you want to erase something, use the eraser. When you are ready to continue edge in different colors to your illustrations, go to the layers and SAP minutes and choose alpha log one more time. So get rid of it. This is how you are going to be aged and older colors for these illustrations. So let me remind you one more time what we are going to be doing. And then you can recolor the rest of the objects by yourself. So for example, let's go to these hats. We will go and grab another color. For example, these Swan. We will go and create the outline. Again, I'm reminding you that you can change things. You are not supposed to repeat every fan just how it is on your sketch. You can always experiment. I will go and create the full outline for these hat. Now when the outline is creates it, we are going to the colors and we are colored dropping our color to the area insights. When everything is done here, we will need to add some details. We will go to the layers, we will tap on the layer without coloring. We will choose alpha lock, we will choose different color, and we will add this different color right here. You can start by a10 colors to all the objects. And then we will go and add some beautification a little bit later on. So let just speed up this part a little bit and we will meet each other in the next part when everything here is recovered.
10. Beautification: When everything is recolored, Let's hide the layer with the sketch and we will adjust everything that we need. So for example, we will feel this parts and we will fix everything that we need to fix. Just go on every shape and find the places that you need to fix where there is no places to fix anymore. Let's do one more thing. We will go to some places and add a few details. For example, we can go to the cat and add some strokes that will represent the fur. Let's go to the layer and let's tap on it and choose Alpha Lock. So we will know that we won't go beyond the phrase. I will go and pick some gray color, and I will go and add some strokes. Now we are agents, some beautification to make a little bit more interested in work. If you want to make the bottles a little bit more transparent, you can do it in that way. We can go to the eraser tool and tweaking go to this little sidebar and we need to decrease the opacity of the brush. So for example, let's say that 30 something percent will work for us. We will have very accurately go through this shape and we will just erase it if it's too much, decrease the capacity one more time. Take the bigger brush and go erase some places right here. If you went to add some details outside the frames, you can go again to the layers and you can select Alpha Lock one more time to get rid of it. So for example, I will go and grab some white color here and add an outline for these little jar. Let's erase the lines that we don't need. Let's recolor these parts. And when you're satisfied with the placement of your illustrations with everything with color and we are done with our class. I hope you found this class helpful. And if you liked this bleach aka the other classes, give a follow and leave your review, and thanks for watching.
 Xenia Sorokina, Illustrator & Graphic designer