Transcripts
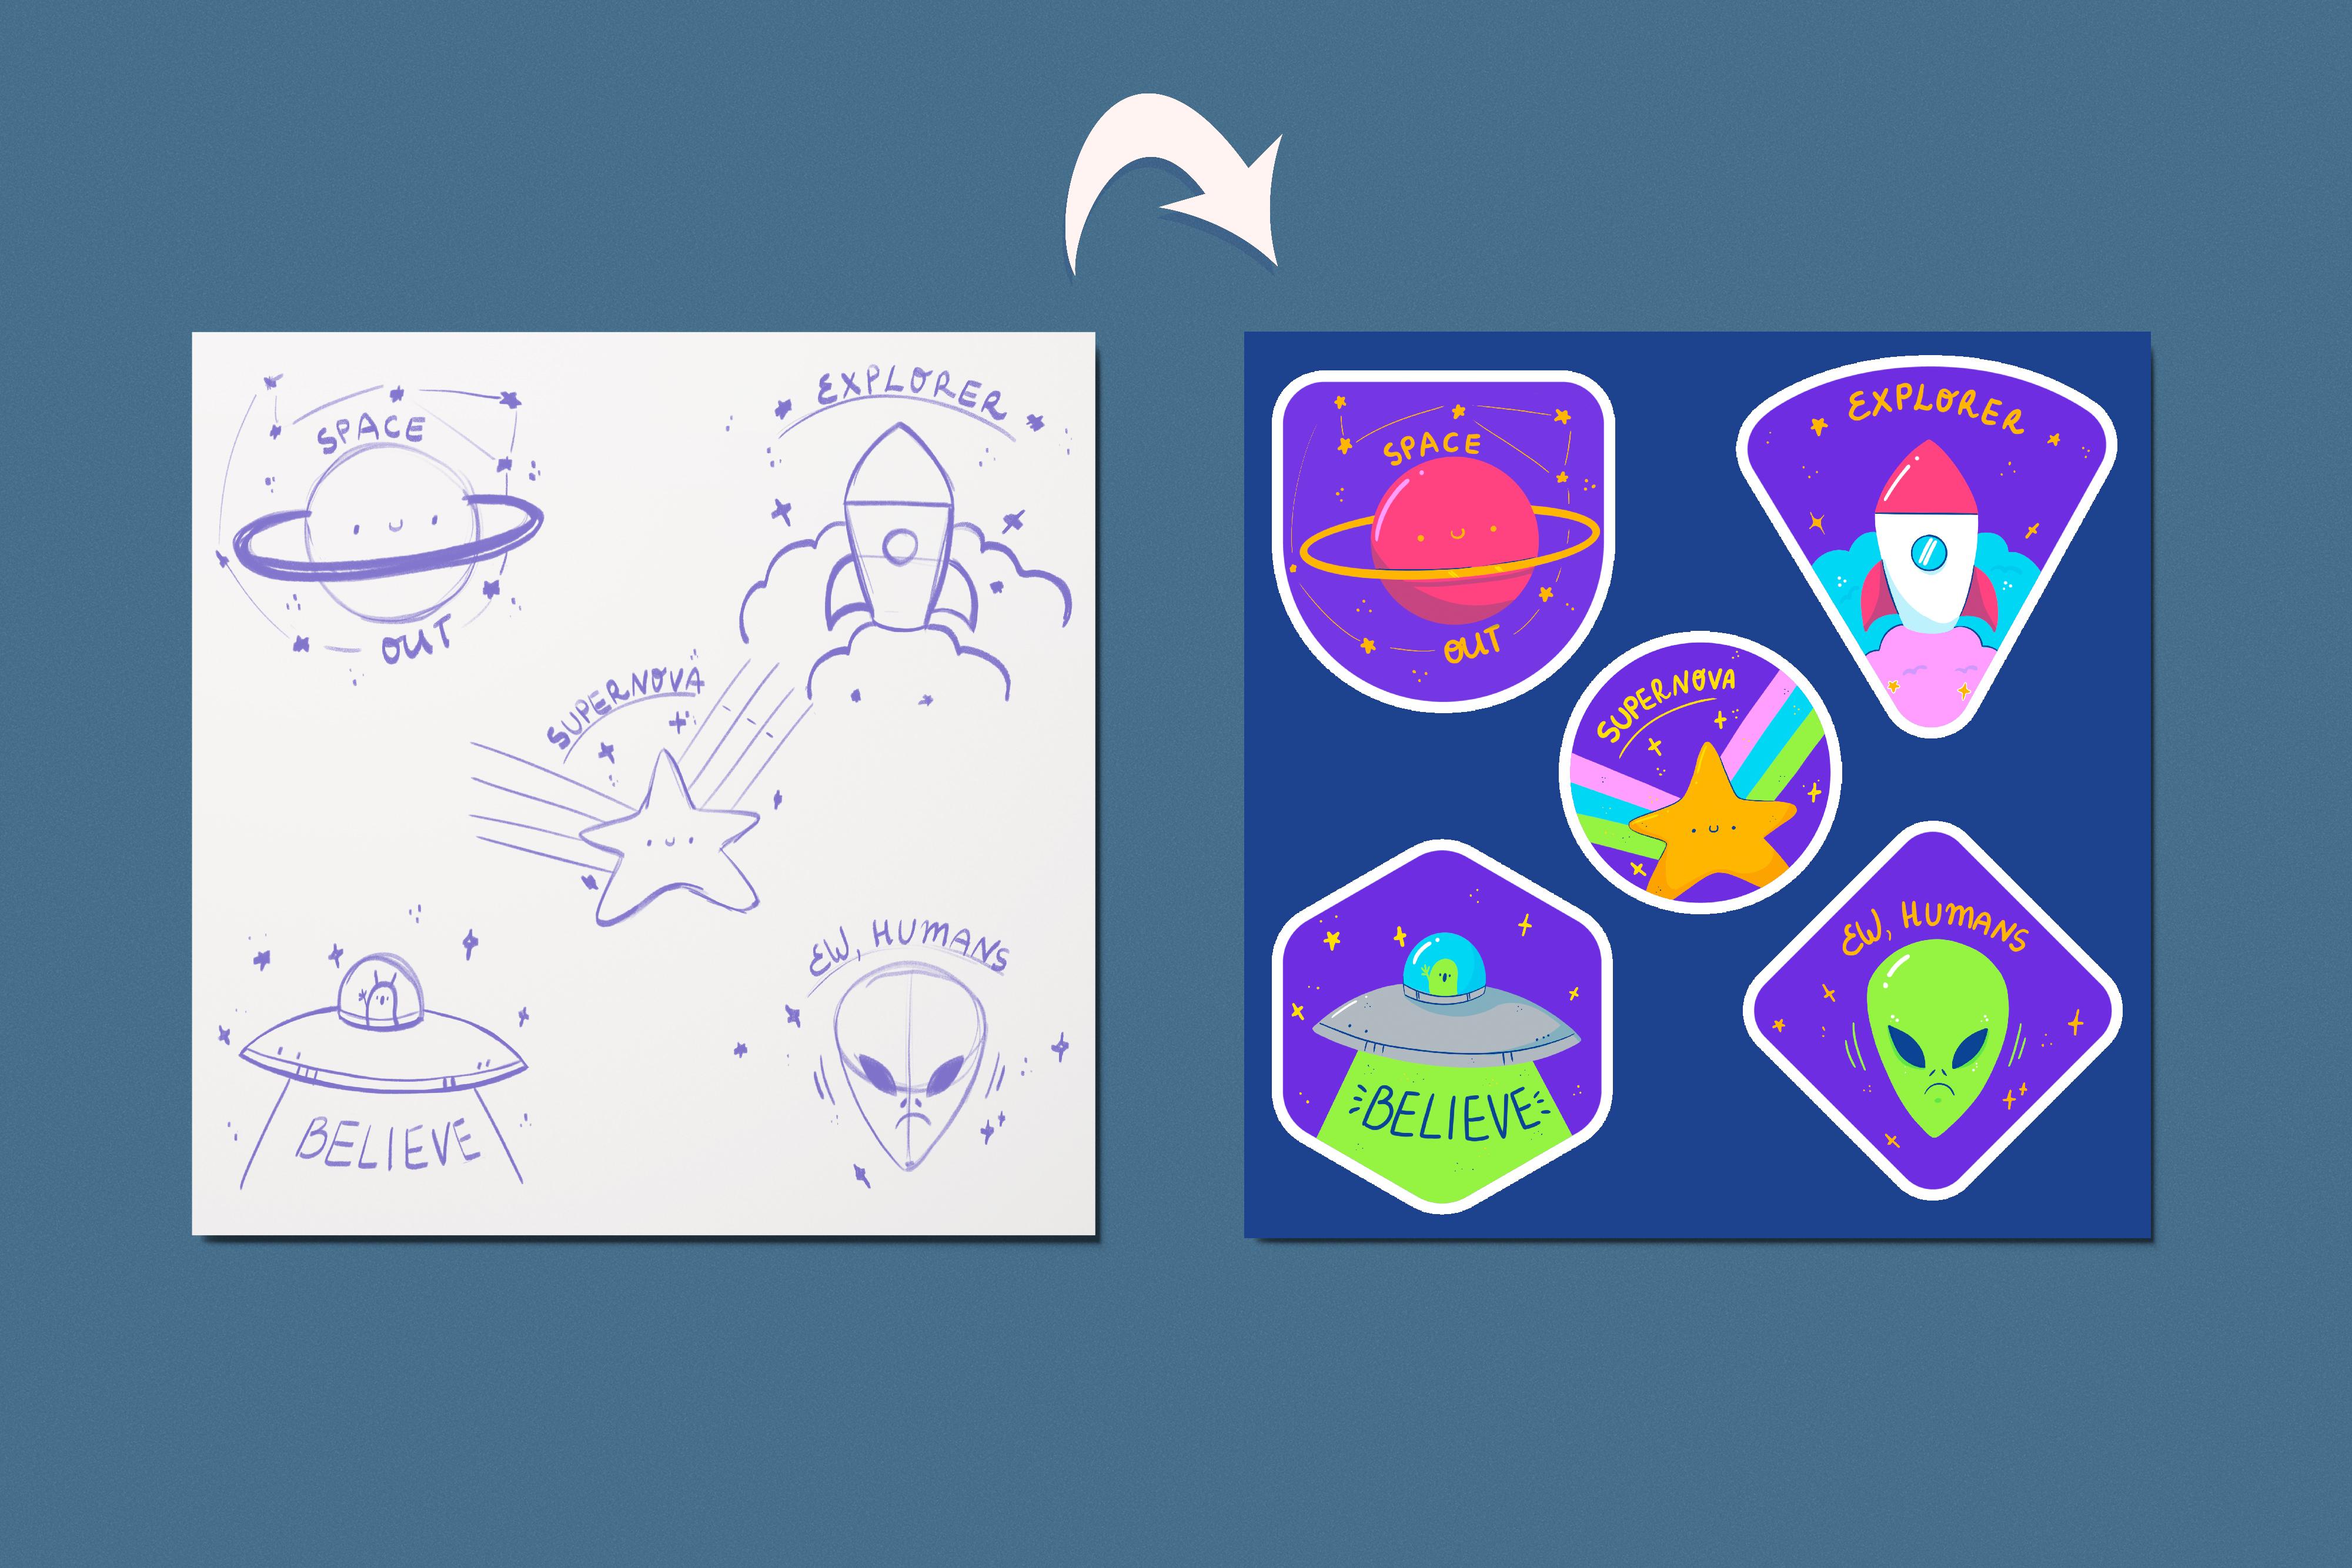
1. Introduction : Hello everyone. My name is Cynthia and I'm an illustrator and graphic designer. Today we'll draw a few simple space secrets. We're gonna make all the pictures from scratch, starting from the sketches. And as a result, you'll have five full colored illustrations. During the class, we will be working with colors, layers, blending modes, and we will learn how to create this white outline for this seekers. Use the final pictures as single stickers or Sticker Pack, put them on the postcard, turn them into some digital products and use them in whatever way you want. These class is for everyone. So don't worry, if you have no prior experience, all the drawings are made in Procreate, but it doesn't mean that you cannot use any other graphic software or even traditional materials. So with that said, if you are ready, launch your software at, let's begin.
2. Preparing the Canvas and Making the First Sketch: Today we'll create a few stickers based on the space theme. They will be pretty vivid. They will be very easy to x2 and without anymore blebbing ledgers go to our Canvas and start sketching. So the first thing that we will do is go into the layers and changing the background color. So let just tap on the background layer. We will see that we have a new palette. You can find this ballots in a project and resources tab. And here we can choose the color. So for the background, for this whole set of illustrations, I'm going to be using these blue ones. So just tap on it and go into the cameras. The next step that we will do is adding some shapes to create our stickers. So this time we won't be working just with the shapes that Procreate has. I prepared a set of brushes that you can find in a project and restaurants up uploaded into your procreate and to use to create the stickers during this class and maybe in the future. So let's just take a look at these brushes. You can see that we have a few shapes and we will be using them for creating our stickers. So let's just go to our pellet. Let just select the color. So for example, for the background elements, I'm going to be using this purple one. I will go again to the Brush Library and we will start by selecting the sheep and just tapping on the screen one side. So let's just start by selecting maybe the batch. I will adjust the size. You can adjust it in any way you like. You can make it bigger, you can make it smaller. It's up to you just experimental Soviets and find what works with your style. So just tapping on the screen ones and we have a perfect place for our sticker. Let just select a few more brushes, the same weights up on the screen and creates these places. For example, I will go with rounded triangle next time and just tap on the screen. You can put them on one line. You can put them chaotically. You can vary the size of these objects. Just go along your canvas and create a few of these elements. So for example, for this class, I'm going to be using five shapes like that. Also, if you like, you can combine them together. So I will quickly create three more shapes. If you want to change the placement of your elements, you can select them one by one. You can select them all. You can go to the Transform tool and move them in accordance with your vision. So when you are satisfied with the placements, let's create one more layer and start sketching. Go into the Layers tab. And on this plus icon, I will choose the different color for the sketching part. And for this kitchen, I will use just these yellow color. Also. I will go and I will choose a different brush. So I will be using the textured version. You are welcome to choose any brush that you like. So now let's just go to our first illustration and start creating this sketch for it. So for the first one, let just go and maybe creates a planet. So the first thing that we will need to do is to create the circle. You can use the quick shape tool, or for this case, you can use it manually. It's up to you. So when we have this circle, Let's just create an ellipse like that. We will add a bit of thickness to this line. If you want, you can adjust the size of your planets. So for example, I will go a little bit bigger and I will erase the line right here, and I will add a little bit more thickness to this line. So when you have the planet and when they have this halo leg, just add a little facial expression to that body of the planets. So for example, you can go very simply just by creating the dots like that and creating a little mouth. You can go with any expression that you like. When you are ready with this, let's just add some additional elements to our sticker. So for example, we can go and create a few stars like that. And we can connect them together by creating the lines. If you want to change the placement or if you want to change the appearance of your illustration right here, you can go to the selection tool. You can select everything that you have here. You can go to the Transform tool, use the free or uniform methods, and replace and do whatever you want with this sticker. Maybe you want to rats eat it. Maybe you want to distort or warpage. Just do what you need to do right here when you're satisfied with the placement and everything ledgers go to the top panel and we will heat that selection so we will deselect everything. We can adjust the placement of our elements in accordance with what we changed. And also we can add some right into our illustration. So for example, I will go along the shape and I will write down space out. Maybe I will erase this line ends here, I will just write down out. You can add some additional details to feel the areas or if you are ready to move on, let's just move on to the next illustration.
3. Making the Second Sketch: And the sun with this shape, we will create a little rocket go in up to the space. So for the rockets, or let just go and create the shape of the rectangle like that. So it is a little bit wider on the top ends, a little bit narrower on the water. So when you have this shape, Let's create the top part. And the top part will be the shape of the zone. So let's just go and create one side like that, one side like that. And we will connect this shape with the shape on the bottom. When you're satisfied with these two shapes, let just creates a little window on the body of the rocket. So for the window, we will just go with a little circle like that. If you want, you can soften the corners of the body of the rocket by creating the curves and not the straight lines, make them even on both sides. And when you are satisfied, Let's just go and create that flips. So we will need to create the shape like that. So it is some kind of very weird triangle. Let's just start a little bit below the center line. And we will need to create the shape like that. You can make the shape as big as you like. And so we need to repeat it on the other side. So let's just find out where we need to put it. I will create the additional line and I will try to repeat the same shape on the other side. If you want, you can Ellen Gates little bit the bottom parts. I will make the curvy line here as well. I will erase everything that I don't need. And also we can go to that transform and selection tools and do the same things that we did already with the first illustration. So let's firstly go to the selection tool will select our illustration. We will go to the Transform tool, use the uniform or free-form methods to resize your illustration. Maybe put it a little bit up or down, distort Antwerp, do whatever you want with these parts when you're satisfied with your rocket. Let's again go to the top toolbar and tap on the Selection tool. Now let's add some additional elements. So let's firstly create the clouds. Go in from the bottom part of the rockets. We will go just from the corners of our rockets and we will create a few lines like that. If you want, you can create the second layer of this class. Just go a little bit on top. When you are satisfied with every fan here, we can add some details the same way as we did with the first illustration. So I will add some sparkles. You can go even to the clouds and add some stars here. It's up to you what you will add here. And also, I will again go to the selection, so I will move it a little bit down and I will write down something here as well. So for example, let's just go and create that axillary line like that. You know that we are go in on the curve and we will write down Explorer can add some stars here or dogs or anything that you like. And when you're ready, let's move on to the next one.
4. Making the Third Sketch: So let's work for now onto this Lizzo sticker that we have in a center. So for example, let's create a little start with the rainbows beneath it. So let's just go and start by creating this star. You can start by creating it in that way, or you can just create a menu like that. I won't go with the whole body of the star onto the sticker. I will just focus on the top part. So let just read the star. You can add some facial expression as always. So for example, I again, we'll go with the simple one, just two dots until, until mouth right here. If you want, you can adjust them in any way you like. And also let just creates some rainbow here. I will go and create four lines like that to have three spaces right here. And also, I will add the same on the other side. Let's add some details. Maybe you want to write something down. So for example, I will again create the axillary line like here. And I will write down supernova. I will continue by adding a few more sparkles. If you want, you can again go to the selection tool. You can adjust it in any way you like. So let just selected, let's go to the Transform tool, free form or uniform methods, just adjusted, distorted warpage. Work on your little illustration. When you're satisfied, tap on the icon on the top and let's move on to sketching another illustration.
5. Making the Fourth Sketch: So this time, let's create the UFO with the little green human or not. So human onsets. So we will start by creates an, an ellipse like that. And we will create an ellipse go and horizontally. We don't need this site parts to be very rounded. We need to sharpen them a little bit and create the shapes of the lemons or something like that. And also we will need to put them a little bit behind these elements that we created. So just adjusted, erase everything that you don't need and continue by creating the same shape on the other sites. You can work a little bit more onto the bottom parts. So just create the curve and we will need to repeat this line that we created on the book side. So just go a little bit further and create the same line. Now let's work on this cabin and we will need to create the curve on the bottom. Let's erase the line right here, and we will repeat this line also above it. You can add some details right here. Maybe add some dots or something like that. And let's put this little note, so human inside the cabinet. So I will go just with this shape like that. I will add some tennis, I will add some facial expression, something like that. Maybe add some other elements. So arm, so it's like waving or something. And let's add the lighting going from these UFO. So we will just go and creates the lines like that. And you can add some beautification as always. So some sparkles, stars, anything that you like. And maybe we will write down something on the lights. So for example, I will go and I will create a little box like that to creates the right-hand insights. I will go and I will write down belief. I will get rid of this box. Maybe I will add a little bit more sparkles. Let's go to the selection tool. Let's select our objects, let's transform it, move it, rotates it, make it nice. And when you're ready, let's move on to our last sketch.
6. Making the Fifth Sketch: So for the last sketch, let's create just the face of the lm. Let's go and start by creating the circle like that. You can find the center of it by drawing the line down. And we will need to connect this circle on the top with the curves like that. So repeat them on both sides. Tried to make it, even as always, tried to make it very pointy on the bottom. And when we have the hats, Let's just create the ice. So the ice we will need to create a little lemon shapes, a little bit tilted and place them right on the face. So let's create the first one. I will shoot it right away and let's repeat it on the other side. If you don't want to create a second I menu, you can go to the selection tool, you can select it. You can swipe with three fingers down. You can choose Copy. You can swap again with three fingers down and choose Paste. Now incidents menu on the bottom left, just heat flip horizontal and let's move this, I sue the other sides. So now let's go to the layers and combine these two layers together. When we created the second I, the copy of it, we created the new layer. So let's tap on the layer above and choose merge down into this drop-down menu. Now everything is on one layer. So when we have the eyes, Let's create a little nose. So we will repeat the same ellipses that we created, but they will be tilted differently. And also you can add some mouth if you want. I will go with this set expression. Now let's add some sparkles and additional details. I will make the whole face a little bit bigger. So I will go to the selection, to our selected and I will make it bigger. I will continue agents some details and I will write down something on this illustration as well. So firstly, I will create the help in line and then we'll write down something funny. Now let's take a look at all of our illustrations. And if you want to change anything, go and change it, It's always good to do it onto the layer with the sketch because every time you are distorting or somehow adjusting your illustrations, the quality of the lines worsened, ends when you're done with this stage. Let's move on to the next part of the class.
7. Adding Colors to the First Illustration: Now we will create one more layer and we'll put it under the layer with the sketch wanted this layer, we are not going to be creating the clean lines. We will be working just with colors. So what we are going to be doing, we will go and we will grab some color. So for example, for the planets, I will go with these bolts beam. I will go and I will choose the different brush for the coloring. I will use some smooth brush because I would like to use the color drop. And if you are using some textured brushes, you might need to recolor everything manually because color drop might not work. So for example, I will go and I will choose technical pen. I will tap on it and I will change the streamline value. So for example, to create the clean lines and to create smooth lines, I will go with something like 50 percent. You can check out how it works onto this drawing pads and if you're satisfied, let just tap done. Now what we need to do is to create the outline, and we will need to do it just by going onto the sheep and creating this outline. Here we can use the quick shape tool as well. So hold down your Apple pencil at the end of the line to create the perfect shape. Also, you can see that we have a little finger on the top that is called Edit Shape. And if it's happening, we can choose from ellipse or circle. For the planet, I will go with a circle. You can adjust it in any way. You can move it. You can play little bit with the sheep. When you're satisfied, just go and tap on the Canvas and we will use these color. We'll drag it and we will recover our objects. Also, one thing that we can do with the sketch layer is go into it and SAP on this icon, we will adjust the opacity so it won't bother us, but we still will see what's going on onto our canvas. So just move this slider to the left and set it as 50 or something percent. The last thing that we will do with this Lear is go into it, swiping from right to left. And we will choose lock that will prevent us from working on the wrong layer. Now let's go back to the layer with our color it, and we will continue recoloring our objects. I will go and I will grab the same yellow color that I used for the sketching and repeats this slide when you are creating the clean lines, you are not restricted to repeat everything that you have onto your sketch. You can adjust things, you can erase things, you can just not draw what you have on to the sketch. Your goal here is to create a nice outlines. So for example, I would like to go and I would like to create the whole ellipse right here, but I don't want it to be overlapping the shape of the planet. Let's go and create one more layer and we will put it under the layer with the main color. Once at least layer I will just go and create the whole ellipse. You can, again hold down your Apple pencil at the end of the line. You can go to edit the shape. You can make it less open. You can adjust it. And when you are satisfied, logistics up on the screen and creates a little bit of thickness to this line by making one more ellipse insights, let's edit the shape. Now let's do the following. We will go to the layer with the pink shape. We will tap on the letter M. We will adjust the opacity a little bit just to see what's going on behind it. Also, we can hide the layer with the sketch just to focus on what we need to adjust here, we will go to the layer with our hello. We will grab the eraser tool and we will very accurately erase everything that we don't need. We don't need the back part, but we need the parts in front. So ledgers go again to our layers. Let's get back our full opacity of the layer with the blankets. We will go and we will move this layer with hallow above. And also we will just merge these two layers together. So tap on the layer above and merge down. Now let's get back our layer with Sketch, and let's add all the details that we need here. To see the final result alleges go and hide the layer with the sketch and check out how it looks. When you're satisfied with your colors, with everything that you have. For the first illustration, Let's move on to the next one ends. We will be using the same method to create the colors on the second illustration.
8. Adding Colors to the Rest of the Illustrations: So firstly, we are going to earlier with sketches and we are unhide it now we will go and grab another color. So for the rocket, let just start by picking this white color for the budget. Again, we are go into the body and we are creating the outline. The main goal here, if you're working with smooth lines and if you want to use the color drop to go and create the closed lines, when you are ready with the outline, just drag the color and color drop it. Let's add this window. For the window, I will use this blue color. Again, I will use the quick shape tool and here, probably manually I will recolor a Ruffin Insights. Now let's go to the top part and we will use the same pink color that we used for the planet on the previous picture. So again, just creating the outlines and connecting two shapes together. Now let's move on to the bottom and we will create the clouds firstly. So for the clouds, for the first layer of the clouds, I will use this pink color. So just go to the bottom, create this lines. We will need to add the lines right here to make the closed shapes. You can go a little bit beyond the frames. It's okay. Let's drag the color here and let's create the next layer of our clouds. For the next level, I will go and use the same blue color. Again, remember that you need to create the closed lines. When does then let's create the outlines for these fields. I will go and grab the same pink color that we used for the top part ends. Just repeat the lines here. Now let's move on to the sparkles. So again, using one of the yellow colors and agent that additional details. Now let's check out if we did everything right or if we need to fix anything, we will go and hide the layer with the sketch. Now go through all the shapes and fix that. Connect the shapes nicely together. When you're satisfied with everything that you have here, Let's move on to the next illustration. So for the rest of the images, we will be using the same technique. So let's just quickly recolor these objects. Now when we have all the needed colors, let's move on to the next part of the class.
9. Adding Details and White Outline: So into this part, we will add some details, maybe we will add some shadows and so on. So firstly, you can see that here I added a few lines to separate the parts from one another. And let's do this for the start as well. So I will go and grab that dark blue color, and I will just add the line right here, and I will repeat it on the other sides. You can add some separations lines all over your pictures. You can add some additional elements, maybe with this dark line as well. So for example, I will add some dots, I will add some details in that way. I will move to this illustration. I will add some dots here to maybe I will go and grab another color and add some dots here. It's not seen very much. So maybe I will move on to this dark color as well. So now we are just adding some details. I will add the white color right here as a highlights. We can also go all over the places and add some highlights with this white color as well. For example, for this star, you can go with that less yellow color and add some highlights in that way. Can go here at some separations lines. Just go all over your illustrations and find the places where you want to add these additional lights. Now when you're satisfied with everything that you have here, let's just go and get rid of the extra parts that we create it. So we will go to the layer with our badges. We will go to the selection, so, and we will select the automatic selection. With the automatic selection, we will just tap on the screen and we will select everything except these badges. So you can see that that is the exact way our illustrations should look. So with the selection, we will go to the layer with our coloring. We will grab the eraser tool and we will erase everything that we don't need. When you're ready, just deselect everything by going to the top panel. Now our stickers almost ready. And the last thing that we will do is adding a little white outline near these illustrations. So what we need to do to achieve it, we will go to the layers and we will go to the layer with our badges. We will make the copy of this layer. So let just swipe from right to left and choose Duplicate. Now we will go to the layer that is underneath it. We will tap on it and we will choose, Select, we will select everything that we have on to this layer. We will go to our colors and we will choose the white outline. Now, you can use the color field to feel these illustrations with colors. You can see that we recovered everything or you can do it manually just by dragging the color to the places like that. When we have this layer as solid white, we will do the following. We will go to the adjustments and we will choose Gaussian blur. With the Gaussian Blur, we will, with one finger swipe through our Canvas and you will see that we have a little white blurry outline. So let's just stop at something like 9%. And if it's not enough, we will do it one more time to achieve a nicer result. So when we have these, we will do one more thing we will do to the selection. So ends with automatic selection. We will go and tap on our illustrations to select them. If you chose the color field before, you will need to set it off for now. So go to our illustrations and separate them. You will see that you have a nice outline. Go and be on the frames. And if you need to adjust it, just go with the Apple pencil for your Canvas and find what works for your illustrations. So when we have these outlines, we can again go and to use color field. So let's just tap on it and she will see that we have nice outlines for our illustrations. If you zoom in, you will see that they might have a little bit of a jagged edges. And if you don't like it, if you want to get rid of it, you will go with the eraser tool or you will go just with the brush ends. You can just move them up if you are satisfied with the flat view of your illustrations, That's probably eat if you want to add some shadows, I will show you the method that you can use to add the shadows.
10. Adding Shadows: So for example, we can go to the layer with our coloring and we will create one more layer. We will set this layer as a clipping masks. To do so, we need to tap on it and we need to choose clipping mask on this layer. When we are choosing clipping mask, we are working only with the content that we have underneath. Now, let's again go to this layer that we just created. We will tap on this letter M and into this drop-down menu, we will choose the other blending mode that is called Multiply. You can adjust the opacity right away if you know what you're doing. If not, you just add some colors and then get back to this layer and you can adjust the opacity in anytime that you want. For now, let's just leave it as a 100 percent and we will add a few shadows to our illustrations. We will go to the colors and we will choose the color. You can adjust the color for any illustration that you have here, or you can just be one color that you are going to be created the shadows with. So for example, I will go and I will select this blue color. I will grab some brush. So for example, again, I will be working with the technical band, but I will tap on it and I will adjust the streamline. When it's done, we will go through our illustrations at the shadows. So for example, I'm aging the shadow here. I will erase it from the hello. I will add a little shadow underneath the hallow, and she can add the shadows where you think the shadows will work for your illustration. Also, you can see that when we are working with that clipping mask, if we are going a little bit beyond the frames of the illustration that you already have. You are not creating the new lines. I think that this shadow is a little bit too dark, so I will go to the layers. I will tap on this icon right here, and I will adjust the opacity. So 35 percent work for me. You can go through all the illustrations and add the shadows in that way. If you want to change the color of the shadows, you can go to the adjustments and use the hue saturation and brightness, both with the Lear and pencil option. So if you're using that layer option, you can go and adjust all the shadows that you have on to this layer. So tweak the slider and you will see that you are changing the color. If you're working just with a pencil option, you can select the shadow that you have manually by using your pencil and adjust them in that way. So when you are satisfied with all your illustrations, That's the end of the class. I hope you found this class helpful and if you'd like to, It's bleach ago, the other classes given follow and leave your review and thanks for watching.
 Xenia Sorokina, Illustrator & Graphic designer