Transcripts
1. Trailer: In this beginning figure drawing class, we're going to cover one of the more fun areas to draw an S facial expressions. This is an area that can give a lot of personality to our portrait you'll work, but it's also an area we can mess up pretty easily. So we're going to go into the hood and start looking at the internal mechanics. We're going to look at the underlying anatomy and work out how it will articulates. After that, we'll do some demonstrations of different types of facial expressions and we'll finish it off with, I taught drawing exercise as always. So if you're looking to add some additional personality to your characters, then let's get drawing.
2. Relating Expressions To Our Theme: Facial expressions is really where the fun begins with figure drawing because we can start to adding an extra layer of personality, theme, and story into the sketches we're making. A large portion of this figure drawing lessons have been dedicated to slowly building up an understanding of how to construct L figures from imagination. Facial expressions is really where we start to add that little bit of extra Ganesh to those concepts. That little bit of extra detail to push out financing characters into something that will not only add further interests to our sketches, but hopefully solidify it to the audience. What's happening emotionally? Whether it's a victorious and joyous moment of action. All right, Somebody moment of defeat. The facial expression L fig is Mike's can really help to submit the mood and attitude. We had tried to combine our image because we are so used to seeing faces and subsequently exposed to how those faces react emotionally. We are naturally drawn to this area, the figure first. In fact, no matter what position now figure is in the vast majority of the time, we'll automatically seeking out the subject medical device. What often ends up happening when we start drawing the figure is that even if we get to the stage where we can compose the figure from imagination, we have a tendency to ignore what's happening within the device itself. Most of the time we leave the face in a purely neutral position, devoid of emotion. If we don't think about how AlphaGo is emotional expression relates to the theme of our composition. Then we run the risk of that expression conflicting with our theme. It, this big scary monster, he is looking very menacing, et al girl, but a goal isn't reacting accordingly. Then it indicates to the audience that the monster isn't that big of a threat in the first place. The scene is supposed to be terrifying, then we really want outgo here to help convey that threat. If our character's expression is not in line with our theme, we not only restoring unwanted attention to this misalignment, we potentially weaken arrow ID. And the same goes for character design, whether it's a tough as nails rogue warrior, or a dismissive, high-class noble woman. The lookout character gives helps to reinforce the type of person we are trying to portray them as. Now, unlike previous lessons, which to focus mostly on identify the easiest shapes and forms, this lesson is going to have to dive into a little bit of anatomy. This is because it's not much good for us to simply talk about andrew, all different types of facial expressions. We have to actually cover the mechanics of how the face of moats at a structural level in order to take full control entirely expressions to our needs. One, cover this in earlier lessons you might be asking yourself, Well, we needed to spend a good part of our learning going over and repeating the core principles of figure drawing, gesture construction, proportion, laws of light, et cetera. Really getting that into our mind first in order for us to have a firm foundation to add this final layer of complexity. Essentially, we've been creating for ourselves a hierarchy in our learning and anatomy is the final level of that hierarchy. We thought into anatomy first, we would have learned a lot of technical information, but not necessarily know how to use that information artistically. We need anatomy to relate to our artwork, not be the focus of it. At the end of the day, we are artists, we're not doctors. We're not looking to simply draw medical imagery. So we want anatomy to work for us, not the other way around, which is why we leave it to last. But before we do that, let's briefly start looking at some simpler audience first.
3. Simplifying Expressions: Let's start an easy place first before working our way up to the more anatomical work. Generally speaking, there are approximately 79 types of facial expressions. Happy, sad, angry, disgust, fear, surprise, and contempt. Now, you're probably saying to yourself there's dozens of ways the facial muscles can move. What's the point in categorizing anything? Well, even though we can really do all sorts of crazy things with facial features, the truth is, It's going to make our lives a lot easier if we can draw upon a database of emotions first that we can then later on manipulate Tuan needs. Now, one of the main issues many of us begin artists have when we start drawing facial expressions is we have a tendency to overdraw things. We think that we have to put in all sorts of creases and folds into the skin to convey the emotion that we want. Screaming, laughing, yawning, anger. These are usually the types of poses we overdraw, but even something as simple as a small can result in many of us doing a lot of unnecessary work. The reality is we don't actually need to go too crazy when detailing facial expressions. In fact, simpler is often better. For example, if we want to draw a really angry and intense set of eyes, it's really easy to get caught up putting in way too many frown lines. We do this because we think it won't make things look even more intense, but lock in the same way. We don't want to put in every strand of hair on the head. We don't want to put in every skinfold and muscle compression that happens in the face, we are much better off doing on the, a couple of indications of compressed skin and muscle than drawing in every conceivable lump and bump. We not only risk making things look too distracting for the audience, but we also risk making our face look far older than intended. This is especially true with an expression that has raised eyebrows. Too often we are quick to put in a bunch of forehead creases only to then look at our character and see someone who has suddenly age 20 years. Instead, we need just enough information present to help convey the emotion we want our figure to have. In fact, we don't need to put much information down at all. As we said earlier, because we have been exposed to faces from the diarrhea born, we have a very good mental library as to which expression conveys which emotion. In fact, elemental library is so good that we don't even need to have an actual face in front of us. If we look at these examples here, we're able to decipher, even in an overly simplistic state, what emotion is being displayed? So we don't actually have to put in as much work or as much detail into our fingers expressions as we often think we need to, or we need to do is draw it enough information and let the audience fill in the blanks themselves. The simpler, the better. In fact, these little simplified sketches are often a great little shortcut that we can put down to help remind us of what type of motion we're aiming for and how they are meant to be constructed. So that's the breakdown of how to simplify expressions. Let's move on to the facial mechanics.
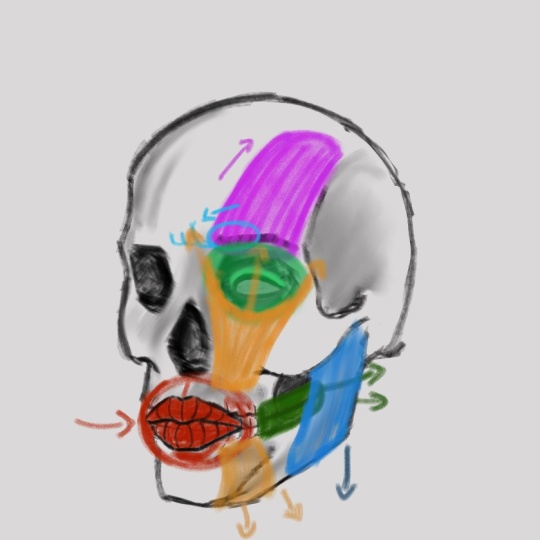
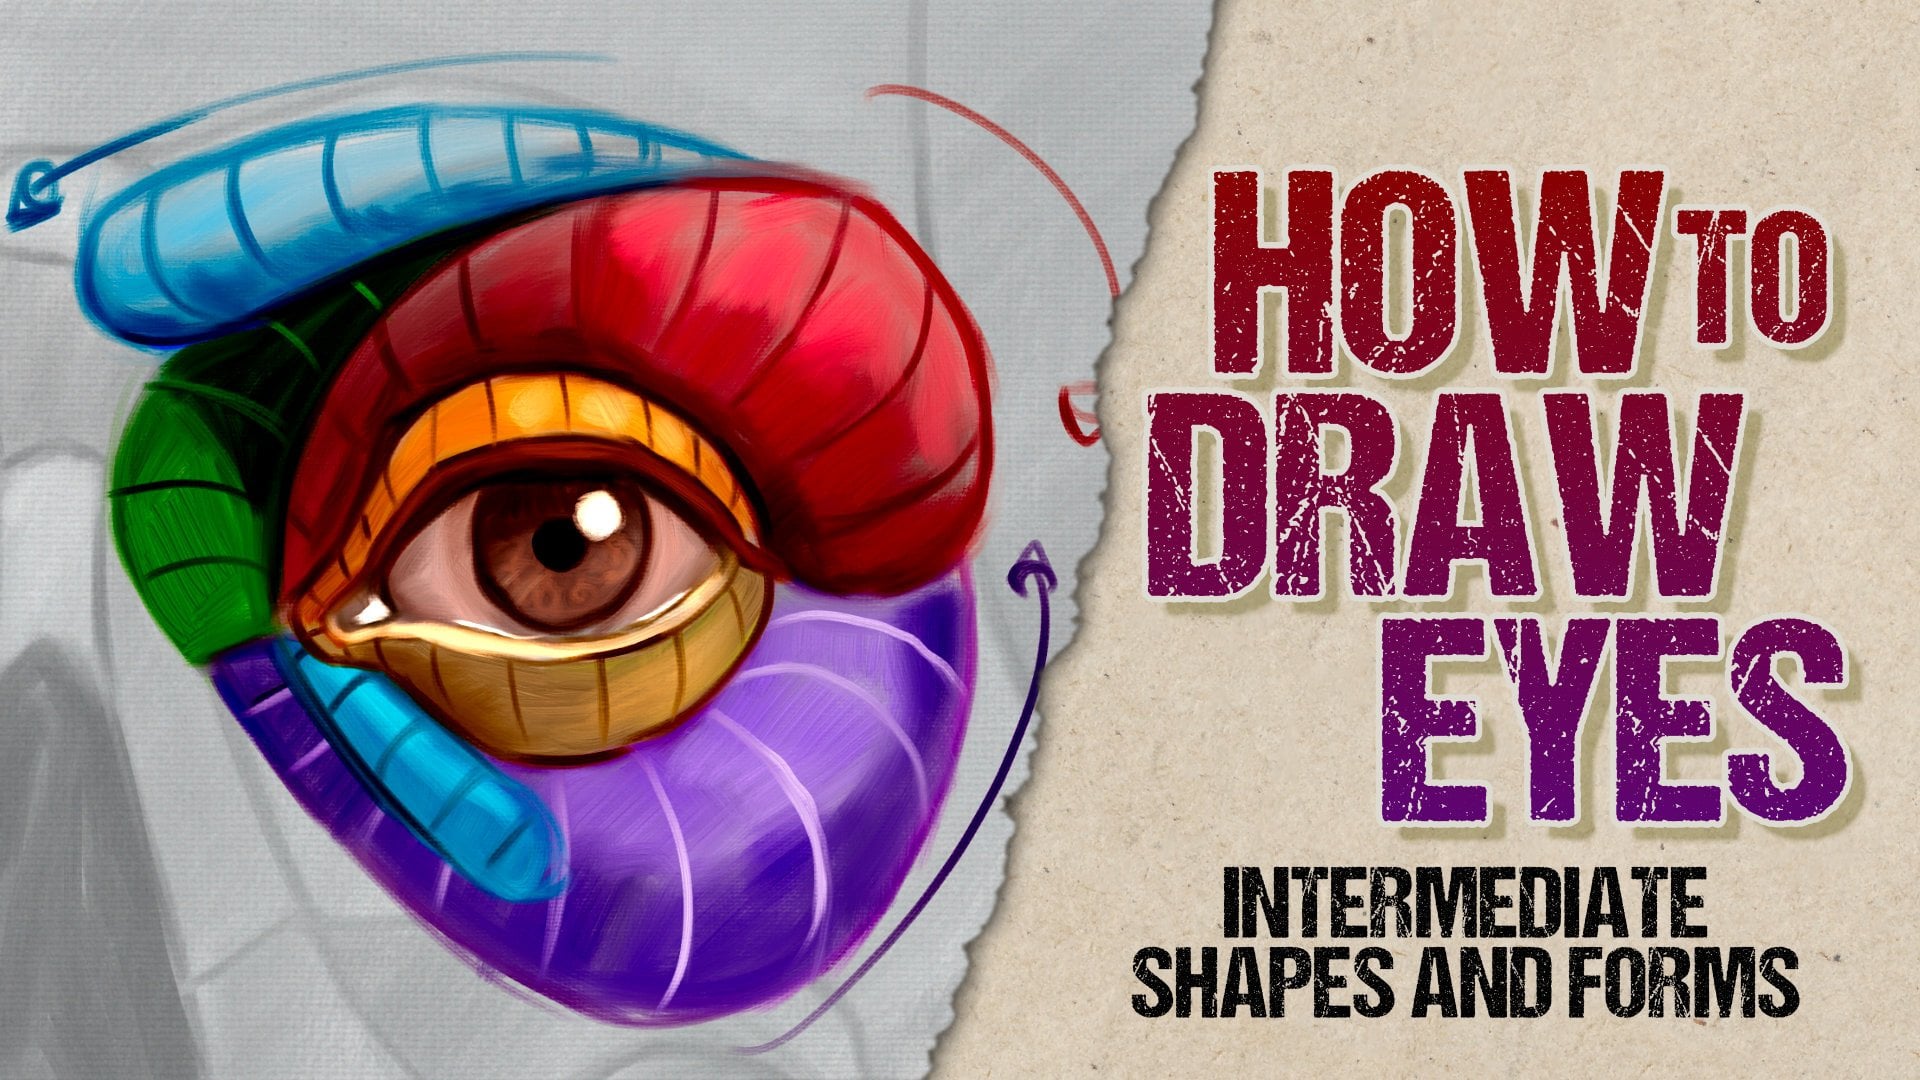
4. Forehead, Brow and Eye Articulation: Okay, Todd, to move on to the facial mechanics. As was mentioned earlier, unlike previous lessons, we're going to have to delve into some of the anatomical features in order to understand the inner workings. By understanding these internal engineering, the leverage points, the pistons and gaze as it were, the how's and the why's. In other words, we're getting greater control over what we can and can't do with the face. We don't need to know every bone and muscle in this instance, but we do need to know about the key areas of facial movement, what their role is, how they relate to each other and how exactly they articulate. The good news is, even though it looks like there's a lot going on under the surface, we didn't actually have all that much we need to remember which lays more time for drawing. So let's get into it. So I've got my skulls in place. A boast about a little bit of the NIC 2. We're not really going to concern ourselves with that area for this lesson though. So let's just go over the major bone areas first. We've got to AWS sockets where our eyes will go into. We've got the nasal cavity. We've got the upper teeth housed below the nasal cavity, and the mandible, which hosts the bottom row of teeth and the jaw. We have three main areas of movement in our face, the eyes, the mouth, and the jaw. The jaw has a different function to the other two, which we'll go over shortly. But let's first start from the top and then work our way down. The first muscle we're going to focus on is called the from tell us. These are two very thin muscles that run up and away from the eye sockets, terminating roughly about where the Halon begins. As you might be able to guess, these control the eyebrows in an up and down motion. Some of us can control these independently of each other and able to lift up 10 eyebrow. Many of us can't. These muscles wrapped themselves over the eyebrows which allows them to be pulled up and slightly away from the brow. A bit like a pulley system. So the frontalis muscles controls the vertical movement of our eye expressions. Or to be more specific, I need a vertical movement. They actually push a little diagonally away more than they do push vertically upwards. Moving down from there is what we have cold the car gate is this is what I like to refer to as the frowning muscles. All the muscles we see when we get angry. They sit on the inner corner of the brow ridge and other muscles that give us those distinct folds increases when we scrunch up, eyes up in anger or distrust. Control the lateral movement for our eyebrows. They generally don't push out too much away from the face other than when we express surprise. Mostly the primary function is to control the inner movement towards the nose. This is where we have a tendency to sketch in way too many lines. We do want the zigzagging compression folds in the skin, but again, we don't need to go overboard with that either. These are called the conjugate is because the shape they make when they compress inwards resembles a corrugated effect. Think of this area as being almost like a piece of fabric that winds up as it pushes together, or simply like corrugated roof on a tin shed. All of this is covered by what's called the macula, which is basically just a round disc that lays on top of these other two layers. This controls the eyelid movement. Although to be more specific, it's the upper eyelid that's doing most of the work. He the lower eyelid does move a little bit, but not much. The majority of our blinking and closing of ours is being done by this top lid. So avoid lifting up the eyelid from the bottom unnecessarily and let the top, ah, they do its job. And that's really all there is for the expressions around the eyes, a vertical and horizontal movement controlling the eyebrows, and one directional movement that controls the eye lids. Let's move on to the low and mechanics.
5. Jaw, Mouth and Lips Articulation: All right, We've got, I bid more of a sophisticated engineering system in place for the math compared to the eyes. So we'll get to that in a moment. But first we'll start with what's happening in and around the mandible. What we have here is what's called the Macedon, all the chewing muscle. This is the only muscle on the face that serves a completely different purpose to the others. Every other muscle on alpha ice is for communication to show others what emotions we are going through. The message, on the other hand, is purely full jaw articulation. Only nothing more than nice straight up mechanical muscle designed to allow the male to open wide or clench together. This comes down my Slightly diagonal direction and wraps around to the other side of the face, to the edge of that jewel. This is protruding bone on the side he had called the zygomatic bone way this muscle attaches itself to. You can occasionally see this muscle on a really well-defined athletic person. Now, if we start to move ourselves across to the middle, what we're going to find is that there are a series of muscles here that will give us the ability to move the mouth in a radial direction. Whereas we're pretty limited with the direction we can move our eyebrows. The muscles attached to the math, uh, pretty much going to give us full 360 degrees movement. There are several small Athena strap like muscles at work. He both above and below the mouth. But it's going to be much easier for us to group them together because of how they are laid in with everything else. They're going to be overlapped by the mouth muscles, which we'll get to in a moment. So we're never actually going to see any of their definition at plight. So we only really need to focus on the rough shapes that they make together and how they move. So if we focus on the areas above first, what we're going to have is a series of four strap like muscles in a triangular shape running from the corner of the eye sockets down to the teeth. The bottom of the teeth is going to see some similar strap like muscles only pushing in the opposite direction. A series of muscles that form a kind of M shape when put together. Our top set is going to really allow the orbital area of the mouth to move in an upwards direction towards the eyes. Almost as if it's a snarling top of expression. And the bottom ones are going to allow us to go down and outwards towards the chin. Almost like what you'd see in a type of fee full expression. Now, as you can see, we've got almost 360 degrees movement. He, but we have one area lift that controls the lateral movement of the mouth. These are the smoking oldest smiling muscles. In other words, these are two sets of muscles that sit quite close to each other and are roughly shaped in a rectangular formation when put together. And they are positioned a lot Depot behind both the mess into as well as these up and down police systems in the front of the face. If you ever see a skull and notice that hollow space between the teeth and the jaw. This is where those muscles slot into. When we smile. These are the cables that are pulling the small outwards. And finally, of course is the bold, the mouth that lies on top of all of these, or the orbicularis, oris is, it's also cold. In simple terms, these are the lip muscles they might purposes to control the inner lateral movement of the mouth. So basically the kissing muscles combined with these other pulleys that connect to it, we get all sorts of directions that we can pull out a mouth in. And that's really all there is to know about the inner workings of the face to create facial expressions. Once we start to understand these architecture and more importantly, how these areas articulate facial expression starts to become a lot easier to manage and a lot more fun to draw. So just to reiterate, up top, we've got the frontalis, which controls the vertical or nay vertical movements of the eyebrows. We've got the car gate is controlling the lateral movements of the eyebrows and the orbicularis oculi, which lies on top of both working the eyelids. Below this we have the message is controlling the opening, closing of the jaw. We've got a series of strap like muscles acting like police that move the mouth up and down and diagonally. And we've got the muscles around the orbital area and the deep underlying muscles, Trump's controlling the lateral movements of the mouth. So with that out of the way, let's move on to the fun and start doing some demonstrations.
6. Demonstration 1 - Big Smile: Alright, let's get started with these demonstrations now, I've got a little bit of a foundation he sketched in and that's just going to save a little bit of time. Because what we're going to find is that facial expressions are probably going to require a little bit more analysis than other areas of the body. We not only have to figure out where exactly the head is positioned in this instance, but we also have to worry about all these expressions and oldest puppet hearing and figure out how it relates to that position. So I've got a nice big small in this pose. So what that means is that we're going to have a lot of actions that a pulling away from the middle of the face. Now, a failed to mention this in the lecture pot, but muscles only have one function and that is to contract. So these areas are going to be pulling up and a y and fighting gravity as they do it. So I'm just getting in the structures here at the moment and go a little bit of squinting that's happening here because of those strap like muscles, those triangular shapes that we saw in the lecture, how they pulling up towards the corner of the eyes. This is going to cause the cheeks to puff and round a lot more. If this was more of a neutral position for the face, then those shapes would be a lot flatter in comparison. So that one's simple directional pull upwards is already manipulating a lot of the shapes of the face. Now, the truth is we don't actually have a lot of muscular volume in the face. A large portion of what we see is actually bind. But what little volume of muscle we do have, he has enough movement and has enough flexibility to really start the throw off the construction of our head. If we're used to drawing the head with specific shapes in mind, then these facial expressions can really start to warp the shapes and how perception as well. And we've already talked a little bit about how the cheeks can start to puff up. And let's talk a little bit about that, uh, be kilo oculi area that DO NOT shaped muscle that controls the blinking. Now, as we said during a lecture, it's mostly the top eyelid that's doing most of the wood key in very limited instances. Does that bottom eyelid actually move? If we're really squinting, it can move up slightly. But the vast majority of the time, it's the top eyelid That's going to be doing most of the work heat. So when you're drawing into a really intense or really angry eyes, make sure that the eyelid that is doing all the work is coming from the top. In most cases, you can kinda leave that bottom one on its sign. So moving on to the small now, and I'm really thinking about pulling the sheiks up and a white into the corner of the eyes. He, so if they're really think about these muscles, straps which are pulling this mouth wide and acting almost like rubber bands or strings on a puppet. Even though I've got a lot of bony architecture underneath, we have to really think of the faces being something that is very fluid, some developing the chain. And one thing we're going to have to watch out for these new lumps and bumps in the cheek area that start to form, we call it risk making these a little bit to snow may unlock if we're not careful. We still want those nice clean gestures and connection lines throughout. But we can also get a little bit too subtle with this area too. So we're going to have to figure out a little bit of a balanced between the expressions we're going for and how it relates to the mechanics underneath. At the end of the day, we want to have portraiture work that looks good and facial expressions, if not done right or if not done carefully enough, can really start to make our subject matter look very unappealing. So there's going to be a lot of trial and error and practice heat. So I'm just constructing the mouth now and all the time. I'm thinking to myself about the roundness of this area. We saw in the lecture, how we've got that orbital area of the mouth, which is pretty much just a rounded bowl shape. So I'm thinking to myself as I'm putting this area together, how this bowl-shaped is stretching out to the side. I have to get my construction and my overlapping to really adhere to this shape. Now, one problem many of us are going to fall and when we draw the math is that we draw the top part of the mouth very straight across like this. In actuality, we've got a little bit of a curve which goes from the center all the way into the corner. So it's going to be tricky in some instances, getting this right, the mouth is probably going to be the area that gives us the most trouble because we're going to say a lot of changes he more so than we do in the eyebrows. Okay, let's move on to a new demonstration.
7. Demonstration 2 - Inquisitive: All right, image number 2 again got some rough foundations in place just to save a little bit of time. So we had a lot of outward and upward movements happening in the last image, that big smiley image, this one, I've got far more of an inquisitive lukou, more of a concern looks somewhere in between those two, where we've got a lot of inward movements happening now. So we've got these core guide is where the eyebrows are really coming into effect here, really compressing inwards. Now the other thing of note is we have to pay attention to the position of the Hadean, this image. We had a pretty straight and standard three-quarter pose and the last one. But here we've got the head tilting up a little away from us. So again, I don't have to take into account that underlying plane of the eye sockets and the underlying plane of the nose is we put all this together. So just working on getting these eye sockets structures in placing, getting these foundations right. And of course we've got the car guys as well, which are compressing inwards now these corrugated is it going to be anchored onto the inner corners of the eyebrows that going to warm it up or they're going to compress together inwards and a very fabric like structure. So another way to think of this as being similar to a shell couldn't type of effect, or of course, a corrugated roof top of effect, hence the name corrugated as their primary function is the inner lateral movements of the eyebrows DO got a little bit in the opposite direction, ever so slightly, but that's usually only when we have expressions of surprise. The frontalis is caught doing most of the work in that instance, however. So I'm kind of happy with these foundations for the car guide is at the moment. So just got to put in some of the eye socket structures, his stuff, finishing this off my development a little bit more later on and I'll stuck coming down onto the nose now. Now we really haven't talked about the nose itself all that much. This can move a little bit, but that's mostly due to the muscles that surround it. When we have that big small like we had in the last image, the nose is going to expand slightly. And in this instance, because the mouth is coming a little bit closer together, a little bit more penalty. The nose is going to come inwards as well. So we do have a little bit of movement that's going to happen in and around the nose. But all we have to do then is playing to the logic that we have set for ourselves. We want to consider this whole area is being very flexible and rubbery way. We're pushing the mouth inwards like this, then the nose is simply going to have to react accordingly. Now this area of the mouth, this orbital area is more or less just a regular bowl-shaped in a neutral position. But because we've got the mouth coming together inwards now almost as if we are squeezing it in a way. We can also think of this as being something that is being stretched out sue, in a sort of an egg shape, stretching that bull along its vertical axises. So again, thinking of this as being a very fluid and flexible area. Now because the mouth is now coming together in a lot more, it's going to be a lot more round than what we're used to seeing in a neutral position. So we need to ensure that whatever is happening around this orbital base underneath whatever shape it is now forming that l lips structures are conforming to that shape. In the previous image, we saw that we had a very stretched out area for the lips to wrap around. Here we've got something that is far more narrow. So whatever shape that orbital area becomes, the lips have to act accordingly. Now the other thing we have to consider when we compress the lips together like this is that they are going to be a little bit closer towards the view up. Think about how you push ellipse at, in a kissing expression, the mall that orbital area compresses inwards the more the lips and going to push out towards the viewer. So let's just go back to the car guide is for a little bit and talk about where we go wrong. He net usually what happens when we start to draw IN, OUT really intensive eyes are really angry facial expressions. We go overboard. We really do want those nice, cool zigzaggy patents that get phone tea. We have a tendency to just do a little bit too much when we start to put this down, it's going to be super tempting to really go crazy in this area, putting in all sorts of folds increases and really exaggerating the lines he had to get the point across that our character is really angry or intense. So we're going to have to restrain ourselves a little bit and put some trust into the audience because they're actually going to do some of the work for us. Too many lines is simply going to cause chaos. So it really avoid putting an oldest extra lawn work, all these extra lumps and bumps because in most cases it's not actually going to help. All right, Let's finish this one up here and move on to the next image.
8. Demonstration 3 - Unimpressed: Okay, a bit more of an unimpressed expression here, which is probably closer to my face usually looks like. So the frontalis muscles are doing the job. He grabbing hold of those eyebrows and really pulling them up towards the Braille line. These are very, very thin strips of muscle that's on the forehead. So I'll start putting it on a little bit of the forehead architecture gauges to give us a better idea as to what's going on. Now, these are more or less controlling the vertical movements of our eyebrows. The thing we're going to have to be careful with he without portraits is when the eyebrows and this forehead area starts to become more active. You can see in the reference image and modal has some very subtle forehead wrinkles that are reacting to the upwards movement of the eyebrows. We really don't want to draw too much attention to these by making these creases and folds all that obvious. In most instances, our best bet is to really play down these wrinkles or in some cases ignore them entirely of all the areas of facial expression that can give us issues with inadvertent, aging or bad characters. This is the one that can really screw us up the most. So we're going to have to be very careful and very subtle in this area when we're younger as skin and muscles and volumetric. So we're not going to get as many creases and folds into the skin at a younger age compared to what we do when we start to h, we get more of those crows feet around the eyes, more about underlying skeleton starts to show through and be more pronounced. We start to lose a lot of that fullness and elasticity and advice. Even if we see some of these folds increases appear in someone younger, our best bet is always going to be to minimize this effect. Another area where we can really start to screw up is under the eyes. Puffiness onto the eyes is going to vary from person to person. But again, too much construction and definition onto this area can really start to AGM model and give that area unwanted attention. The other thing that can happen as we get older, as our nose gets bigger. So we've got a few areas where we can accidentally overdraw things and add 20 to 30 years to a modal. If we do feel as if they needs to be a bit more construction done to that younger facial expression to really capture the emotion. Then we really want to be very careful and choose u with which skin folds we draw. It's going to be more important to capture and attractive pose then a literal one. So pick and choose your battles. He, so speaking of the nozzle, start to add in a bit more of this structure in place before I start to work my way down through the mouth. Now, we've got a very relaxed and open jewel in this instance. Not a great deal of tension at all is happening in and around the mouth and the jaw. So I'll start to work in these foundations in a moment. Again, like in previous images, I'm starting to think about that underlying bowl structure foundation, but a very relaxed and oval-shaped ball in this instance, I like to equate the flexibility of this orbital area as being very similar to bread dough. You can push and pull bread dough very easily, move it in any direction you want and shape it however you want. So that underlying bowl shape, it has the same type of flexibility going on. But as always, we have to ensure that the lips are adhering to that shape. So again, in a more neutral position, the orbital area's going to be very rounded with the jaw dropping. In this instance, we're going to get far more of an egg shape. Now because the mouth is pretty relaxed here, we're not going to get those inward movements that we saw in the last demonstration. What can get tricky with the mouth is when it starts to open, is that top lip as it approaches the corner of the mouth, can start to look as if it's twisting and up. Think of this as being a bit like a piece of fabric or a strip of paper that's getting twisted. So just be mindful of what's happening with that top lip as it can start to look as if it's twisting and overlapping itself depending on the position and the expression. We're also going to get a little bit of indentation right at the corners of the mouth, a little dent that appears as a result of how the lips embed themselves into the surrounding face. Another area to remember about, this is the valley below the nose, the fulcrum. This is very easy for oddest stock overlook the shape of the valley is going to be affected by both a bowl shape underneath as well as how it's being stretched or compressed. So keep that in mind too as you practice. All right, let's move on to the next demonstration.
9. Demonstration 4 - Shocked: Okay, last image, I'm going to focus specifically on the math with this shocked expression because we've got a lot of new information that we're going to have to deal with. We've got that big gaping hole and we've got the chin now in a completely different position to what we used to. First things first though, to make life easier, we're going to put it in an egg structure Foundation along with a vertical and horizontal axis line to help us out. This is going to give us better foundations to guide us around to the key Conal landmarks of the mouth. Now in this instance, the math is pretty symmetrical all the way around giving us some nice clean corner points to work with. So I'm going to start to work in one side of this top lip and start to work in this pillow area in the middle first and then move on to that slightly twisting action in place around to this corner. And then I can start to think about the other side really wrapping around to get to that other corner point. This is where we really have to think about the overlapping that occurs in the lips. In lesson 7, where we discussed facial features, we basically broke the lips down into five separate shapes. This wasn't only from making the construction of the lips easy. It was also about preparing us for, when we get to this stage, where the shapes are going to start overlapping and merging into each other in very different and very unique ways. The real challenge is going to be when half of their mouth is really active. In the other half is far more relaxed. Things of that sort of snarling grin look, Elvis Presley was able to do on one side of his mouth. Adding to that the jaw articulation that can open really wide and even moves slightly side to side. And we can start to see the difficulties he we're going to face. So learning about those shape foundations of both the ball of the mouth and the shape of the lips. Getting used to that construction is really going to help offset those tricky expressions we are likely to come across. So I've got those lip foundations in place, really wrapping around that big cavity. And I'll put a little bit of shading he just to give it a bit more form, we've got a bit more exposure of that bottom lip in this expression than what we normally would. A little bit more of that interior. I'll just work on this a little bit more before moving onto the chin and its position. This is going to be another challenging area that we're going to face when the chin starts to drop open. A lot of the positioning of the shapes that we used to drawing, in some cases going to change quite drastically. And it's going to be made all the more challenging if the head is tilted towards or away from the viewer in a stream wipe. If we go back to Lesson 6 on head positioning, we know how difficult it already is to draw the head from below, looking up and getting all those facial features positioned correctly. So what does this mean when we start to open the mouth wide, thinking about that is just enough to frustrate us and give us headaches. But all we need to do is to simply break things up piece by piece and think of it in a very logical matter, if we look at the mouth and the chin as being simple ball shapes. And if we know the chin drops down and backwards towards the neck, the wider the mouth opens up. We can then start to say that in an expression like this, the bowl of the math is going to be overlapping more of the chain then what it would be if the mouth was closed. So again, when in doubt the keys to go back to basics and simplify. This is why we've developed the hierarchy now learning gesture construction, overlapping dynamic forms, proportion, lightened, shadow, body construction, composing, and now anatomy. This is our pathway to not just drawing the figure, but it's also our pathway to problem-solving. If we look at this series of lessons as a drawing process, we can look over this list when we've screwed up and work out exactly where in this process we've gone wrong. So if you get to this advanced stage in something isn't quite right, analyze and take a step back to a point in this process where you felt you had more control. So stop, finish this demo up. Up next is going to be the time drawing session. Now they're going to be two images for each five-minute period. So pick and choose which image you want to spend the five minutes on. Now, unlike previous lessons, I'm not expecting you to worry all that much about the clock in this instance because drawing facial expressions is going to require a lot more analysis than other areas of the figure. So take as much time as you need and pause the clock if you need to. So I'll leave you to your facial expression sketches for the next 20 minutes or so. And then I'll come back and I'll do my demonstration.
10. Timed Exercise Session: Okay. Hi. Okay. Hi. Hi. Hi. Okay. Hi. Right? Hi. Hi. Hi. Oh. Let's see. Hi. Hi.
11. Time Drawing Demonstration: All right. Time for my exercises. So as I said before, this five minutes isn't a great deal of time for drawing expressions. So hopefully you've got enough down in the fog minutes or if you pause the video to do a little bit more work on whichever expression you chose. That's perfectly fine too. In fact, we're much better off spending a little bit of extra time on facial expressions, probably more than any other area of the body because a look kinda go wrong. Withdrawing facial expressions because of just how fluid things are. Just working up the eyebrows and the eye area here first to get those corrugated as in and to really bring their main nice and close. So it's not always going to be angry and intense expressions. He wear those corrugated, they're going to come into play. Well, so notice how we don't actually have too many compressed areas of skin folding up. He said We have to be careful, which goes back to what I was just saying the way that we can kind of create some very unflattering images of faces. Sometimes if we go a little bit overboard with the amount of compression and folding that can happen skin, its very nature is very similar to drapery. So if you've watched the drapery clause, it's actually a good reference point to learn a bit more about how skin actually works. But we're going to have to really come up with some type of balance. He has to not go overboard with all this fluidity that happens within the face because we have to remember that we still, for the most part want characters, whatever fig is to actually look good. And if we put in to any of those folds increases. Not only can we increase the age avail of our subject matter, but we can also create portraits that Rava, unflattering. So we have to be a little bit careful with their choices. And this comes back to what we've done in previous lessons, but mostly he analyzing is going to be very importance. We need to think a bit more like pulpitis almost in this area of the figure, more so than others. You can think of those areas that we talked about during the lecture as being almost pinpoints that we can eye pieces of string two and pull them to our needs. So a little bit more like puppets hearing is how I like to think of constructing faeces or facial expressions. I'm sorry. Really trying to capture the look of fee here in the AWS, really trying to bring these eyes open a little bit more. Now as always, we're always better off leaning onto the more dynamic side of things then being too conservative. So making us a little bit bigger and making those eyebrows compress a little bit more and maybe even push up a little bit more, is going to be the bid at choice. But we're going to have to balance this, morph, the underlying mechanics than other areas. But again, as we've said in previous lessons, we still want to stick to the odd year of simple structures that representing all these pots. See, even though we've looked a lot more at the anatomical side of things, we still want to envision a lot of these move fluid shapes nail in this simplified forms, especially an area like the cheek, how that can kind of bowl up a lot more. If the character is smiling and those muscles around the cheeks dot to push upwards. It's to want to consider that as sort of a simplified egg shape or a simplified bowl shape. But a bowl shape that is going to be very flexible, very rubbery. One that can stretch out and compressed together quite a lot. Just putting in some of the structure here of the, the cheek. And sometimes it's good. Actually it's put in a really solid foundation first before you actually worry about the facial features. Especially if we're starting out's, I'm sort of taking a little bit of a shortcut here. Probably should put proper foundations down first, but after a while you start to develop a feel full roughly way the structure should be laid out. Just comes with practice and time. That if you're going to take you time with one particular area, this is definitely the one you want to lot more careful with. No, Just in terms of regular portraiture work, but character design stuff as well. All right, we'll finish this one up here. We'll move on to our next image. All right, I'm going to go for the really intense angry expression on the right. He. And we're going to have the neck play a little bit of a pot. And this one too, some real tension that's appearing there in the tendons of the NIC. So we haven't talked about the neck and relation to all this for this lesson. We'll look at that in the future. But you can really feel the tension. Here in this image. So it's going to be really important to try to capture that without going overboard. We want those. So the zigzaggy patents that are going to happen with the compression in the, in the car gate is and the intensity of the mouth. We really want to get that down. But this is definitely one of the expressions way we can go very overboard. Stop putting in all sorts of creases and folds. Trying to capture that tension, which is really what's going on in our minds. We think if we put more of those lines down, then it's really good to convey to the audience that this is really aggressive. But even though I've only got at least some foundations, you can already start to see that aggressiveness in the eyes. I haven't even worry too much about developing those corrugated is too much already. Just a few simple strokes. He already starts to feel that tension in that aggressiveness within the AWS. So again, just a subtle thing sometimes is all we need, the audience is more than happy to play along with the trick that we're playing on them. Because essentially we are a little bit like magicians and a y, a way of sort of fooling the audience into thinking that what they're saying has three dimensions to it. So this is just an extension of that. Now, the noise has got a little bit more compression happening than what we've seen in other images so far. And this is mostly due to those triangular straps which are now pushing upwards. It's not only affecting the area around the eyes, but it's also a crumpling up the nose a little bit too. So just a couple of lines there to help to indicate that. And the math in this one is going to be a little bit tricky because we've got some overlapping that's happening with the lips and the teeth. The lips that are closest towards this wrapping around to the back of those teeth. And the teeth and they not going to be overlapping the far side of the mouth. So we have to pay attention to exactly what's overlapping in these instances. Now we've got the fortunate situation, of course way we can have expressions that up pretty symmetrical on either side. So that gives us the advantage of being able to roughly guess way things should be positioned and what should be overlapping, what? So the teeth, I'm just doing those slight indication he take can actually be quite a tricky thing. In fact, in most instances, it's probably best to avoid doing any magic detailing to it because we can accidentally make our characters and L portraits look caught a goofy if we try to draw or in each individual tooth. So our best bet is to really just do subtle indications of there being multiple teeth. They we don't just want a strike flat plane like I've currently got. He'd want to develop it a little bit more. But we don't really want to draw in every single tooth, Eric, and kinda look a bit funny if we do it. So I've probably been a bit too conservative with this expression. Definitely feels like applied it a little bit to Syfy. One thing we can do is to actually use ourselves. In fact, most instances with facial expressions we are often out Erebus modal because we can copy the pose, copy the expression that we're trying to do he, and really get a sense selves how it feels. We can feel, how our eyebrows pushing inwards when we scrunch them down. How L mouth moves as we grew out teeth like she's doing here in this image. And then trying to translate that feeling of tension into our pencil strokes. So probably more so than any other area of the figure. We up our best modals. He in fact, classical to the animators. Like Disney animators, a Warner Brothers. Animators would often use themselves as the reference for the character's expression. So we don't necessarily need a mirror in front of us, just something reflective enough that we can look back on and see how the skin moves on our own face, how it winds up, how it stretches out, and try to apply it to our sketches. And raw image number 3. Going to go for the left image here, the sort of surprise or exasperated look. So again, the car gate is really compressing in would see for this one. We've also got some movement happening with those frontalis muscles this slightly pulling up those eyebrows as well. And mouth nice and wide here, the bowl shape of the mouth being stretched dog and so got a lot going on. With this type of expression, sort of a shocked look on its side. All the time still thinking about just the basics that we've covered in previous lessons, the position of things and how one thing is relating to the other. If we have any instance of these facial expressions that stopped to go counter to the position I've role of the head. Then it's really going to make our character look quite unappealing. So this is the type of expression where I'd probably want to spend a lot more time on than what the fog minutes allows. This sort of racing through this as best As best I cane. We've got a lot of work going on here, especially in those eyebrows. And we're going to have a real challenge with a pose like this around the mouth. Because because the mouth being that open in the job being that low is really going to stop the throw our perception of things off if we're used to. I'm only drawing the mouth and very neutral poses, or the very least, the mouth being closed or wise. And all of a sudden we've got this gaping hole now that starts to play havoc with a lot of the shapes that we'll use to bold the math is not only compressing inwards, It's getting a lot flatter as well. So that overall shape that we used to using is no longer relevant in this instance. And the same with the cheek as well. Those nice round bowl shapes or egg shapes that we might have. Those nice puffy cheeks, a suddenly stretched out along mole. You can see it in comparison heat to that image on the right. Just how much bowl-shaped and puffy of those cheeks up. This image here, it's a lot more stretched out. It's going to change over time with age. Skin becomes thinner as we age, so we don't get these puffy areas as much. So just working on the opening of the mouth and I've got that little God did to get the corn is in place so I can get this opening right. So the mouth is probably going to give most of us the biggest headaches. Well, just because there's pulley systems in place, can move the mouth in pretty much 360 degree white. But we've also got the jaw which will be stretching out the mouth as well, which is altering the shape of things. So I'm going to have to pay more attention to where things are positioned in this instance and how things are overlapping as well, because It's not just a case of the math. Now being opened, the chin itself, its position has shifted backwards ever so slightly and the joel drops down. You can test this on yourself now, when the George drops down, the chin moves backwards towards the neck a little bit more. And that's only going to become more complicated. The head is an eye, more dynamic pose. So not just a case of having to remember way the chin now should be because the mouth is open, but also remembering how that relates overall to the position the head is narrowing. So all well and good if we're doing a simple three-quarter pose That's pretty straight up like this. But what happens when we tilt that head forward or tilted away from us? How does that affect things? So as you can see, you can start to get a lot more complicated with the mouth. Once we start moving the head around itself. The eyebrows and the eyes themselves out. Generally too difficult because they've pretty much just got an up and down and lateral movement to them. But the shoe number of ways we can position the mouth means that we start shifting the whole head around. We've got a lot more to think about. And so that's why it's very important when we get to those more tricky poses to really just slow down a lot more, really start to think about, well, how exactly do all these pots relate to each other? And a lot of it's just going to come down to strike up practices. Well, if we only have to do the Hadean one position, we're only going to get used to drawing the facial features in that position. So we have to really challenge ourselves. We're onto our last image here. I'm going to do the one on the right's going to no ice asymmetrical facial expression. He is sort of a cheeky wink almost that I'm only going to focus on the area of the Matthys. Spend my full five minutes. Just on this level pot. Good idea, sometimes just a practice on one particular area, especially if you are having difficulty with certain expressions, is the type of expressions I tend to have a little bit of trouble with sometimes because all that noise symmetry that we used to seeing. Is suddenly no longer really applying here. We've caught it, got the math, doing one thing on one side and going in the opposite direction on the other side with the eyes too. I'm not going to worry about the eyes in this instance, but we can see how one eyebrows slightly more rise and the other sort of wavy patent that gets formed there. So just worrying entirely about these upper lip foundations. See the side closest to us is rising more than the fossil out of the lips. So that corner transition from the top to the bottom lips are going to be in a diagonal direction from each other in this instance. So if we're used to doing things in a very symmetrical why this is really going to really kind of start to throw us off, all of a sudden those easy to follow landmarks hiring completely different locations. So these are the ones that have gone to challenge us, but we also have to confront these challenges too. Especially if we wanted to do really cool dynamic characters as well. If we want a sort of cheeky fun character like this facial expression is, then we have to really tackle these asymmetric and dynamic poses. He. So we'll go to do thighs, nice symmetrical smiles, but we get a lot more character if we do something a bit more dynamic like this. So these ones where our landmarks a little bit all over the place. Now, if they're really give these a shot too, because at the end of the day a week kinda what facial expressions to really be a bit of fun for us. They, along with hair, tend to be some of the most enjoyable aspects of, of figure drawing because we can add a real sense of personality to the character that we drawing. And it can really add to the overall theme that would trying to get into our composition as well. So if we want to really get the point across that this scene, this character is happy and joyous. Really helps to go the extra mile here and not just putting just a simple small, because it doesn't necessarily capture the full personality of the character. So this sort of cheeky type of green, like we see in this reference image xi. Now, that says a little bit more about who this character is, then just a small, There's nothing wrong with smalls. Of course. I brighten up the world that this just says a little bit more about who this, who this person is, who this character is. So challenge yourself with these more dynamic poses and use yourself as reference, as was mentioned earlier. Haven't quite got the pose that you want looking around on law and full reference images then, as, as he said, We're always our best modal here. All we need is some type of reflection. Doesn't even need to be a mirror. Just something that we can look at and try to get that facial expression down onto the page. So again, probably being a little bit too conservative. He, I don't think I quite got the action of the mathy quite rights. So a bit more practice needed, I think. So as we start to want things done, I hope this has been informative enough and hopefully gives you the right tools to stop putting in your facial expressions on you'll fig is really practice up the movement in the articulations, these different muscle areas, mike, because it's it's really going to make our life a lot easier than just copying what it is we are seeing. We're much better off in this instance learning those underlying mechanics. In order to properly poverty this area of the figure. Then just simply guessing. So get used to how those underlying structures move and how they relate to each other. And then really start to apply that to your thinking. When you're drawing, you'll facial references. So it really practice up the full spectrum of emotions, happiness, sadness, fear, anger, et cetera. Practice all this up, get used to those mechanics. It, I'll see you in the next lesson.
 JW Learning, Drawing the Body, Head and Hands