Transcripts
1. Trailer: in less than 14 of our beginner figure drawing Siri's, we are finally moving onto the legs. Constructing the lakes isn't too dissimilar from the arms, however. They've got their own unique shape, articulation and function that we have to consider throughout the lesson. We will cover up the structures of both the upper and lower leg, talk about gesture and balance to a series of demonstrations. And, as always, at the end of the lesson will be a time drawing exercise for you to complete. This is the loss area, the figure we've yet to cover in detail, So let's complete the list.
2. Similarities to Arms: We've had a look at some rough ideas and concepts for constructing the legs in previous lessons, but until now we've never really looked at how they connect to the torso, what their range of articulation is and how there will. Refined shapes and forms are constructed from a foundational perspective. Legs have a very similar construction to our arms. The biggest difference, though, is how the lakes connect to the torso. We made mention in Listen 13 when discussing arms, how those limbs are essentially floating off the roof cage. The legs, however, are very much attached to the pelvis in comparison, meaning they don't have the same type of movement or gestural rhythms as our arms. The other main difference between the two sets of lives is the general shape and forms. Arms have ain't natural C shaped structure throughout most of that poses. Whilst the shape of legs can vary wildly, depending on the position they are in, things get even trickier when al figure stock crouching or kneeling down. So even though this commonality with the arms and a foundational level, our approach has to be different. The other thing about legs is that they are key to ensuring our figures look balanced. If Alex opposition correctly in relation to the rest of the body, then we run the risk off drawing figures that look like they're about to fall over. We need to ensure that the legs that we are putting down on paper look as if they are correctly carrying the weight off the structures there. Supporting this not only goes for realistic drawings but any style of art that is working with figures, whether it's cartoons, animation, COIT, books, sculptures, the legs are the structural supports that hope toe anchor the figure and provide stability . So let's stop breaking old this down now.
3. Gestures and Basic Shapes: We went over a little bit of this in less than three when we first looked at the body parts . So let's just do a little bit of a recap off what we learnt there before we start expanding upon these ideas in that listen, we said, the front inside view of the legs are going to essentially produce two types of foundational shapes. From the front. The basic foundations of our structures look like a V shape, and from the profile, the foundations look more like An s shape. The foundations for the back are going to be the same as the front, but only reversed. This is an overly simplistic concept, but it's an extraordinarily useful one, especially if we're just starting out. What's drawing simple cylinders for both positions is a pretty reasonable starting point. The truth is there not really characteristic enough for our purpose, we've said in previous lessons we are always looking for the shapes that are easy to draw, yet recognizable to the body parts. So expanding these simple cylinders into more refined be in s shapes is going to be a much better foundation toe work from the other thing. We need to look at is the gesture of the legs, with one big difference between the legs and the arms. With gesture is that it's going to be extremely rare for us to come across supposed with legs where only one gestural foundation will be needed. Certain arm positions lend themselves well to one big gestures shape. But because the legs shift between that bean as shape means most of the time, it's going to be made up of two gestures. Now you might be asking yourself if we've just spent the last 13 lessons talking about simplifying things, then surely we can get away with one big gesture for the lakes. And whilst there's nothing about this approach that is inherently wrong, what will most likely happen if we approach L legs this way is that will start to lose the subtleties off the fine carve shapes we've stated with not only looking for simplicity but for foundations that a characteristic off the body parts as well those being s shaped foundations on their front and profile that helped to define the leg shape really don't lend themselves well to further simplification. So the best approach is to treat the legs is having to gestures. Now. This is great from the front beckoned profile. But what happens when we need to start moving things around to a 3/4 or a more dynamic view ? Well, in that instance, we simply have to lean towards which ever shaped best. Suits that pose some posters will be difficult to judge, which is the more dominant shape. So just make your best judgment in that instance as to which is going to be the best option . We've defined gesture in the past as being the longest sustained, curving out figure. So when in doubt, look for the biggest curved lines for each position.
4. Connecting the Leg and Pelvis: Okay, let's get into some more specifics. The first thing we have to do is just briefly touch upon the pelvis as things are going to be slightly different, depending on the six of the figure, which they didn't previous lessons, that men have a boxy structure for their pelvis and women have a more rounded and wider structures. For this, the pelvis also tilts forward for both sexes. But that tilt is a lot more pronounced on women, and it is on men. It's far more noticeable on the profile than it is the front. If we move around to the back side, we'll sit up. Women's gluteal muscles tend to be a lot low up and a little bit more rounded in shape than the men. These are all just generalities, of course, but as a starting point, this is a good place to begin. So we've got some slight differences with sex is in terms of pelvis shape. But other than that, the same ideas for how the legs start connecting into them is more or less going to be the same. Now, the question you might be asking yourself is, where exactly do I start attaching the lakes to the pelvis. Some techniques with the lake suggest breaking the lakes off entirely from the pelvis and beginning their construction at the bottom, separating them in a similar way to what you might do with the arms in the rib cage. Well, there's nothing inherently wrong with this approach and is question to being a literal translation of where the lakes begin in real life. What ends up happening is if we separate these two areas apart from each other is we run the risk of making things look too disconnected and to disproportion. If that connection isn't there, it's relatively easy for us to start accidentally stretching the legs out further than where they should be, creating a situation where, But we've lost the structural integrity of the whole area. No, only that. But it more than likely means we're going to have to come back later on and start connecting things. Many. We've just made more work for ourselves. We have much better off keeping these two areas connected together to know only help with the transition from the pelvis to the legs, feel more natural but also make less work for ourselves. So as a starting point. Where exactly do we begin then? If we got out pelvis shape in place, a good place to start is roughly about halfway up that Covas shape. If we start here and swing out way down, we get this nice clean connection between the pelvis in the thigh, then go all the way down to our needs. This starting point becomes a lot more obvious where we start bending the leg and is going to remain true for most poses, the figure is in. The only time this is really going to change is if the poses in a very upright and straight position, maybe some type of God of the tension or some type of character like that. That type of pose actually means we can start a little bit higher. In fact, we could go all the way to the top of the pelvis and start swinging out, laid down. So we've got a little bit of wiggle room he between these two areas. But starting roughly halfway up the pelvis is a good safe bet for most positions the Lakers in. So now that we've got our starting point covered, let's move on to the link structures
5. Upper Leg Structures : All right, let's start talking So more refined shapes for our thighs. The basic idea for a thigh is a simple tapering cylinder from the front and back. The inside of that cylinder shape is going to be a lot flatter than the outside four women that outside of the cylinder is going to bulge out a lot mawr, producing a far more noticeable curve that helps to give that defined hourglass figure. Now, even though the front and back are more or less the same shape only reversed, there is a noticeable structural difference on the front on the front of the thought we have. This noticeable triangular connection, which starts at around the same halfway point, is the outside of that leg and curves all the way down to the name, creating a little bit of a dent on the inside of Al fire. This muscle structure is seen a bit more clearly on a very athletic person. So if we want to think about more fun construction shapes throughout thigh, this is the shape that we have to keep in mind Now. If we move on to the profile, the shape is moral. This a bulging cylinder this side of the thigh tends to be a lot flatter than the front. Although this starts to changes, we start connecting the thigh to the pelvis from the top of l pelvis shape. We have a series of muscles creating a C shaped structure. This shape curves around the front meeting way that triangular shaped connects and down and around to the back, creating out glue deals and backside that shape courses a little bit of a crater to appear in the middle of this area. How well defined that crater is will depend a little on how athletic the person is, as well as the position their body is in. It is far more noticeable on some poses than it is on others, but knowing it's there can help to be a very useful landmark in our construction if we start getting lost. But where do we actually start connecting things from this perspective? Well, start of Alec doesn't actually connect directly to the outside edge of al pelvis shape. What many begin artists tend to do is we stick the lakes right on the edge of this pelvis. This is not only structurally incorrect, it ends up making up figures look very flat. Instead, our construction work here needs to begin a little way in from the edge. We have to remember that the legs are overlapping the pelvis from this perspective. And as we said earlier, the pelvis tilts forward. So we need to make sure out tilted pelvis is showing through from the profile view. If you're looking to make a career, this is a mistake that professionals will look for in your portfolio, so we have to not. I really remember to connect l legs a little away from the age of our pelvis. We have to ensure that pelvis shape is visible and tilting forward again, that Children's dying to meet more pronounced on women than it is on men. Now, going into a other connection point at the back, we got to see a pretty clear corner connection here. Between the blue, it's in the back of the thigh when the legs starts. Moving, though, is where things will start changing. When the leg starts lifting that nice, clean corner Marca starts to become less obvious because the muscles are starting to stretch out. If the legs really stretched out, these two areas can look as if they're almost merged together into one big shape. So what we do, if this happens well, we're best off doing when that starts happening is we need to approach things from a boxy of perspective. We need to alter the roundness off the back side to have strata corners and then start L a connection from one of these corner markets, essentially chiseling out Selves out a connection point. If we try to do one big gesture, there's a good chance will stop losing that feeling of transition from one buddy pot to the next. So we have better of chiseling out that area, defining the structures and connections and then rounding everything off afterwards. Now, if we move around to the back, the basic tapering cylinder shaped from the front is going to remain the same. The obvious difference from this perspective, of course, is going to be the backside or the gluteal muscles, which sit on top of the thighs. Now the glutes third just end straight across with a hard edge. They curve around and snake their way into the thighs. What's great about them is that they are often the best positional Marco for the legs. We start moving the lakes forward or backwards because they're sitting on top of the thighs . They're going to adhere to the position and the shape that the thought is that red. So if you ever run into trouble and I'm not 100% sure what position the legs that rain, take a look at where the backside creases are moving because this is more often than not going to give you the correct positional answer. It acts almost like a natural cross contour line for us, so that covers the upper part of the leg. Let's now move on to the law part.
6. Lower Leg Structures: Okay, let's cover the need because we've got a bit of a unique situation happening here with their gestures compared to other jointed areas. When the legs starts to bended the knee weaken, maintain a clear connection between the upper and lower gestures right up until the knee reaches 90 degrees. Once the name moves beyond 90 degrees, though, that connection starts to break because the knee has a very natural box like shape beyond 90 degrees, and he produces two corners. We've talked a lot about flowing, gestural rhythms and the importance of keeping nice, curved lines throughout all of their lessons. But this is one of the few times we're going to have to break out rules simply because the structure calls for it. So the ruling the tap for ourselves in this instance, is that beyond 90 degrees, we need to have a straight line connecting out to gestures the knee shape. It's silken, very a little bit. But as we said, it's a very books like structure. Naturally, ah, good shape to use as a base, though, is something that's close to a Pentagon shaped. But anything with a box like quality is also good to use now. If we start moving down the leg, we're going to get another tapering cylinder shape for our foundations. We want our starting point in this instance to come from the outside name and swing down the outer calf muscles to the ankle on the inside. What we're better off doing in this instance is ignoring the bulgy in a part of the calf muscle and using al Shinbone as a guide to do our initial construction. Because we don't have a lot of muscles overlapping. This area, ashen bone is pronounced enough. That gives us a nice, clean construction line that follows alongside out, out it Just jump when we have that foundation in places when we can, coming over the top with the egg shaped structures for out in a part of the calf muscle, it has to be remembered that calf muscle on the outside has a longer, flatter curve, and the inside is shorter. And Bolkiah, if we turn our attention to the profile, the shinbone again is going to give us a nice long tapering cylinder foundation toe work. With that, we can then extend all the way into the foot and again like the front perspective, All we have to do is adding our egg shaped cough muscle structures on top. The same idea is going to ring true also for the back view long tapering cylinder with egg shaped structures crafted over the top to create out cough muscles. The other approach we can take from this perspective is to consider this whole era of our coughed to the hell as being one big stretched hourglass shape. So choose whichever approach best works for you. Much like the forearm of the basic idea we have to remember for ourselves is we've got a bulky up round instead of structures as we approach the neat in a more narrow and flatter set of structures as we approach the ankle. So that's the construction process for the legs. Now the only thing left we have to touch on is their connection to the feet. What we got to notice throughout the leg is a series of implied diagonal movements. Down this movement continues until we reach the ankles. We're suddenly that movement shifts in the opposite direction, so always remember that the ankles are higher on the inside than they are on the outside when connecting the leg into the foot. So with the lecture out of the white, let's now move on to doing some demonstrations.
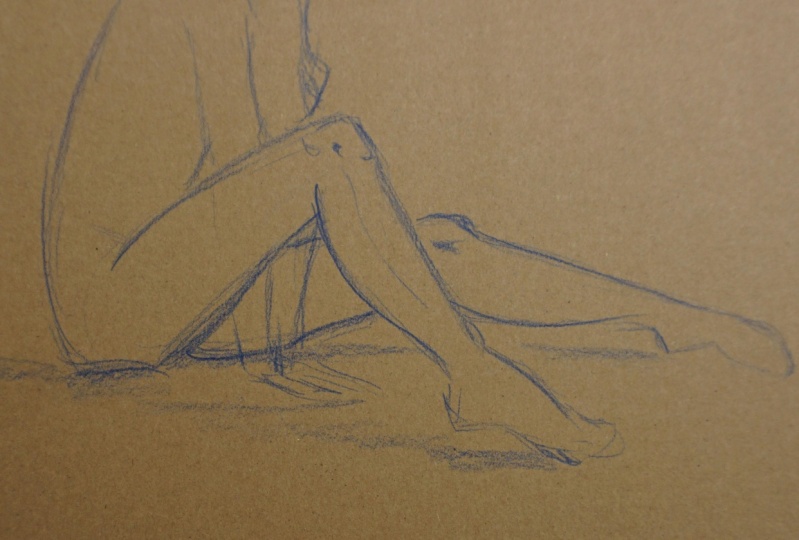
7. Demonstration - Front: Okay, let's get going with some demonstrations and we'll stop putting you now. Pelvis shape, sort of around a box shape for this won't get that in place. The pelvis is really the root over torso, its way the torso articulates from, and it's important to get some semblance of this structure. And before we start putting out legs in so sort of reasonably happy with how this is looking and start swinging down, adjust your foundations. We wanna really start from the outside from this perspective to get that nice, big curved rhythm. The inside of your leg is just far too straight. As I've said in previous lessons, we're always looking for big, gestural curves and rhythms for our structures to get that nice flown and movement within out poses recently happy with have got that first thing. So stopping this second leg and now and I really just keeping things quite simple, just simple cell into shapes, and that's all we really need. At this point in time. We got ah, lot of lumps and bumps that happen in the legs, but it's really important that we just get these fundamentals right first before we start worrying about that. It's getting these positions correct and these rough shapes in. And once we do have that in place, I can now stop thinking about the's secondary structures. We've got that triangular shape, that group of muscles we talked about in the lecture that attaches itself to that pelvis that's coming down, making that dent on the inside of a leg and moving its way down into the name. If we focus on those lumpy areas first, we're just going to end up making more work for ourselves. So keeping things simple at this stage, with just simple cylinders or even boxier structures is going to be the way to go. So I'm moving on to the calf and again, looking to that outside of the leg as the place for a gesture to start. Now, what we don't want to worry about here is the bulging part of the inner cough. We want to follow our shin all the way down, following that gestural rhythm. This is a much more natural starting point for all level leg that we can then build on top of afterwards, putting it out ankles, remembering that the inside of angles are sitting high up than outside. There's a lot of implied directions happening within the leg that run counter to this and always very easy to see, and they're not totally defined. We got a little bit of it in the upper part without triangular shape. But for the most part, we've got a lot of implied directional movements that are pointing downwards that are running counter to where there's ankle sit. So if you ever lose track of where the ankles are supposed to be, always remember that they are in the opposite position toe where these employed directional movements are happening throughout the rest of the leg. Okay, let's just finish this one up here and we'll move around toe another image that is more front on. And we'll start talking a little bit more about more specific shapes and ideas that can help us with the construction of things, because one of the things we're going to find with the legs sometimes is that it's a little bit easy to get lost with where things are supposed to start now. We made mention of some things during the lecture that can help us figure out a starting point, but Another thing that we can actually look to is the belly button is a little bit of a guide. The belly button, if we create a little bit of a diamond shape here, actually gives us a reasonable starting point that sort of shaped like an M for where l legs can actually begin. If we actually look at how underwear sits on people, that's usually the same place. We look at the corners off that diamond shape. They start roughly in the middle of L pelvis structure. And, as you said in a lecture, that is like pretty good place to start for our construction of the legs. Now this perspective, this front on view, is actually a good example of what we also talked about in the lecture. How we can start the position of the legs a little bit high up now that's going to be a more true foundation for the right leg than the left. Because the left is slightly raised, we can see the little dimple mark that that left leg is making shows. It's roughly about halfway up that pelvis. We've got a less clean connection there, so it makes a little bit more sense to start higher on the right hand side than it is on the left. We can start all the way at the top of that pelvis and swing our way down, getting a nice, big gestural rhythm in a nice clean connection between the torso in the legs. So again got these basic structures in place, and I can start thinking about these additional muscles and bony protrusions. His lumpy and bumpy areas is a little bit more subtlety involved with legs. So we have to be a little bit more careful without design our structure and our gesture here because it's actually quite easy to you, start getting overwhelmed just just with the amount of the amount of shapes that are happening here. If we just keep things nice and simple, and then just slowly start to build things on top of it starts become a little bit less daunting. Let's move on to another demonstration
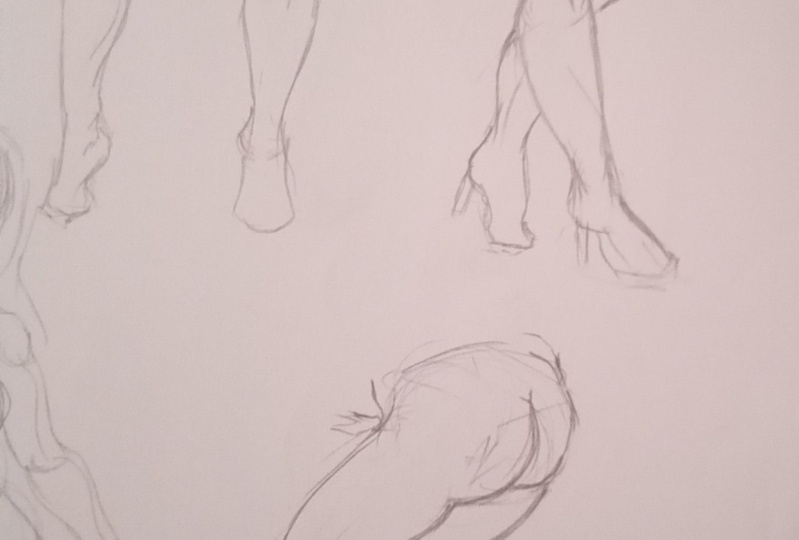
8. Demonstration - Profile: image number two. So I've got more of a profile of you with this one. Which means legs are where I'll let closest to us is going to resemble that s shape that we talked about in the lecture. Lost of images. Well, more of that. The shape, of course. And this one's Morven. Isha. It's an overly simplistic I d if you think about it, but it's a very useful one as well, because sort of gives us a very rough blueprint that we could sort of having the back of their minds before we even start drawing. If we know that the image is more of a profile, then there's a very good chance that it's gonna be more of a shape. Frail legs, then will be from other perspectives says you might be able to say it started with the outside leg for a gesture again and now building up the part of L Leg trying to get this construction right, really feeling my way over trying to get that cylinder shape. Although, as we said in the lecture, it's more of a flattened shape here that's happening on the pro fall compared to the front where It's a little bit more rounded, so it's not quite. Assume the shape perfect cylinder. It's a little bit flatter. It's going to depend, of course, on just how muscular the person is, How big there quadriceps are as well. You see, it is that shadow that's forming as the quarter sips on the models like here. Turnover. So it's not entirely flat, but it's a little bit Freddo compared to the front of the leg. Okay, so I'm moving on to Al low leg getting that just urine following that shinbone down because it's that nice, clean connection. Now we started on the outside leg with the upper five, but there's no reason that we can't also if we so choose to start out gestures from the inside as well. We've really got this nice big curve that's flowing down into the knee, which is then flowing into our shinbone gesture as well, so he could say this is just a number one and this is just a number two and noticed. We've got that sort of the shape rhythm that's being forward with these two gestures then, so we're not bound to the outside as a starting point It's ultimately going to be about what position the leg is in and what's really going. Teoh. Give us the best results as well. We need to ensure that gesture is present throughout design. We don't want things looking to constructed and two mechanical, so it's ultimately going to be about which is going to produce the better results. So we're going to have some choice in the matter. Legs are really going to give us a little bit more difficulty than other areas just because of the nature of the shape. So if it means that we have to break a few rules here and there to get the right results, then that's what we need to do. Okay, well, let's consider this one done and we'll move on to the next image.
9. Demonstration - Back: right authored demonstration. We've got one from the back is usually a little bit more challenging, then other perspectives because we got a lot of overlapping. That's generally happening from this perspective. We've got this new challenge here that we've got to contend with. You've got the the back side of the gluteal muscles. He that we have to start putting it with the structures as well. They've got their own set of forms and their own gestures that we have to contend with to serve a little bit more work. Got that dent that we talked about in electric going on here, sort of a cluster of muscles that are forming a sort of see shape. That's our king. It's away from the front, all the way to the gluteal muscles. Back sought. He It's not always super visible. Sort of depends on how athletic the person is and also what position their legs a rain. This type of position is a lot of straining going on with leg muscles here, so it's a little bit obvious, but it's not so obvious or sometimes it's just very subtle in other leg positions. But knowing it's there is is helpful because it ends up being a bit of a useful landmark for us to start getting a little bit lost, and we know that dead is there could sort of provide a little bit of an aid with their construction. I'm reasonably happy of how these thighs also start moving on to the lower leg. Something we forgot to mention during the lecture is we've actually got some opposing actions happening with the forms and shapes of the thighs and the cough muscles, their thighs. The front of the thighs tend to be a lot bulky up in the back of our thighs, which are a lot straight up and cough bosses. It's the opposite. The back of the cobs is a lot bulkier than the front. Maybe I'll see here in this image here. The calf muscles is a lot flatter on the front here than what's happening on the back is I'm going down into the foot. So another couple of simplified ideas for us. We talked earlier about the being s shaped foundations. We talked a little bit about the diamond shape as well. These type of ideas helped to simplify the process for us and also help us to understand the overall structure of the legs, the more we start to understand these shapes and forms and how they move in. Articulate that unless we're going to rely on the reference pose or the model, we can then start to manipulate the limbs in any way we want to. We come across suppose where we're not 100% happy with how that arm will have that leg is positioned. If we have an idea off, how those things that constructed, then we can make the necessary changes to get it to out locking. So I'm getting onto this back leg now, getting these structures in place and gain just keeping things simple with these cylinder shapes and trying to ensure there's a real stability here. We have to make sure that when we're constructing the legs that we don't feel as if our figure is about to fall over. And one of the biggest mistakes that begin artist tend to make when they're doing standing figures is they don't get the balance right with lakes. The legs served two purposes. They move in, articulate the body, but they're also carrying the white of the structures on top of them. So we need to ensure that when we draw legs, especially in a full standing pose, that we're not drawing them in a way where it looks as if they are running counter to where the white is being distributed. The triangle is the most stable shape, and in most instances of the body, standing with legs will take on some type of triangular position. You can kind of say that a little bit here in this sketch was so good a triangular wedge. It's sort of forming here in the legs. So whenever we're doing standing poses, always remember that the legs have to carry that white above it. Like I said, let's finish this one up he and we'll do one final demonstration.
10. Demonstration - Bent Knee: lost image. Now we're gonna rise Lake. Now, this one is a very good example of what happens to L leg and in particular at gestures when l legs being bent beyond 90 degrees. When we've got out leg at that 90 degree limit, we can kind of connect those two gestures between the upper and lower leg, as we saw in one of the earlier demonstrations. But once we get to this point in our articulation, those two connections don't really meet anymore. We've got this very noticeable breaking that rhythm. It's really going to be one of the few times in the whole body where we're gonna have a noticeable straight line that we're going to have to connect our gestures with. So it's a little bit of a break in their rhythms, but it's not something that we can't come back over with later on and start to smooth at a lot more. So I just got these foundations in place, he and just trying to work in where that corner is starting now, and we can start to see just how much this kills the flow of things. We've got this real problem when we start adding straight lines in to our figures, where the gestural rhythms and the fluidity off opposed starts to become listened. So this is why we want to avoid straight lines as much as we can. There are going to be times like in this instance, where it's just simply unavoidable. The shape of the knee structures sometimes just really don't lend themselves. Aled that well, Teoh adhering to the gestural ideas that we really want to head for our drawings. Sometimes straight lines just sort of creeping in there, drawing process. So this is going to pretty much do it for the lecture and demonstration up. Next. We've got the time drawing session for this session. We are going to have a Siri's off three minute poses in a couple of five minute poses, so a little bit extra time it for the last couple of images. Don't focus too much on trying to get everything down, although I will say I try to get some portion of the torso in with your sketches. We really want to get used to the idea of connecting the legs to the torso on having a little bit of that structure. There is certainly going to help, so I'll leave you with that nail to practice and then I'll come back and do my demonstration.
11. Timed Drawing Session: you. Yeah. Okay. No. - Yeah . Do you? - Yeah . - Really ? - Yeah . Oh, no. Oh, - you more way , - way , - way .
12. Timed Drawing Demonstration: what guys announce, Martin, that start with this pose here. We're living on a little bit of a stick. You, too. So our balance is actually not entirely on the legs with this image. So it's sharing a little bit with Load he this stick. But we still got this triangular shape that sort of happening here, though not just within the legs, but stick itself makes its way after the head and with this diagonal line that goes down to the feet, which is also creating this triangular shape, too. So it balances and be super important for are standing poses. If we get that wrong, then our figures are always going to look like they're they're about to full iva. It's really on the the standing poses where that's the issue, the characters jumping, of course, and we really don't have that problem, too. Toe worry about just getting this. It's sort of the leg down here, getting the structures in place and trying to just feel my way and get these gestures for the slow leg in. And I never rambled on about this for the best part of 14 lessons, but bears repeating that we're working with to mine i ds for drawing process. He is construction, which is the individual parts, the figure, the fires, the car muscles, the torso and feet and the gesture, which is really the the glue which is holding everything together. Justus usually something which is a little bit vague. Sometimes, depending on the type of our tutorial, you do all the art class to go to. In many instances, it's very ill defined. In some cases, it's completely abstract. And for people who are just starting out, we're picking up pencils for the first time, deciding that I want to give drawing human figure a red hot go. It's something that is a very foreign concept and is not always a very easy concept to to truly understand. And so hopefully throughout this series of 14 lessons now we've been able to define it in a way which makes it a little bit more tangible. We can easily point to what thighs what a cough muscle Liswood torso is. Well, new structure is looking doing Hey, but when we start talking about things like the gesture, it if we don't have some type of definition that is easy to understand it's very easy for someone who's just starting out to start getting lost with water. It'll means it sort of means in action. It sort of means some type of rhythm, some type of motion that could be open to a little bit of interpretation. So hopefully we've defined it in a way over this. Siri's that makes a little bit easy for newcomers to dodge ist during could be very intimidating for someone who wants to try it for the first time. So so it was good to try Teoh. Make things is manageable for newcomers as possible. Try to make things is defined as they can be. Let's move on to the next image. We got no shadowy image here, some nice moving legs thinking we could see that Dent That's sort of forming here, those muscles, those C shape muscles. With this perspective in this position, as we said in the demonstration, not always gonna be super visible but quite clear here. That's a pretty strong looking legs on this model. In fact, the the legs in that pelvis area are actually the strong is part of the entire body. We've got a lot of power that happens with the structures we can with double surprising amount of white with these legs. So they've got the biggest structures, the most power. They are the biggest muscles and putting in a little bit of that shadow just a little bit earlier than when I normally would just to define that plane of the front. Their shadows helped to define different changes in direction. It's a good corner market for us getting in this far leg here. That leg is slightly coming towards it. So said to be mournful of that, as we're putting in these structures in, we could see we've got these nice, big, just your connections here have to worry about the knee breaking it up on us in this pose. He's sort of fun ones. I first you like doing here because God knows nice rhythms and nice movements that are going on here. Nice clean connections as well. Now the model is on her tiptoes, so that's going to change shape of the muscles. He going to get a lot more definition being formed specially the calf area here because the muscles are working a lot harder than what they would if a feat would just simply flat on the floor. So we went over a lot of basic ideas, some basic blueprints for ourselves over this lesson, but is always going to be things that change. We kind of subtle rotations, which going to I mean, we have to adjust their approach and things like standing on tiptoes, which is going to affect the muscles in the cars and other areas, too. It's gonna change the shape of things. So always consider those initial I DS that we've talked to Bear in the lecture. It's just being the starting point. We got to make adjustments as we go along here getting this back. So I didn't now trying to feel my weight down. He got a lot of lumps and bumps in a being caused he. This is where we have to start thinking about our secondary structures and looking at the shadowy areas and the the lighter areas as well to help you define where these secondary structures actually starting and what shape they making got a lot of T drop sort of shaped without muscles, except that perfectly fine as well get even box things up a swell if we need to get a little bit more accurate. Let's finish this one up here and we'll move on to the next. Okay, We've got image from behind now. It got really two approaches. We can go here with a gesture. An initial gesture. We can. Either guy from a the front where the legs bending the pelvis so we can come from behind the backside is so a couple of options here, always looking for the longest sustained curve for our gestures. Starting point here. These two areas are about roughly equidistant. So I'm gonna start with the front one just for just with this pose and start to try to work my way and find trying to find that corner here for this his glute muscle. Because, as we saw in the lecture, we've got a pretty defined corner mark A when things arm or wrist, the leg isn't as raised, but as soon as we start raising that leg up that clearly defined corner marca with a crease in the back side is in many cases, just completely flattens out. And so we lose that connection and it's sometimes a bit difficult trying to find that connection point because we really don't want that whole area to just feel as if it's one big sort of candy cane hook shape. You really do. You want to feel as if there's that transition from the backside to the back of the thighs ? Stop putting in this other leg Now, speaking off that, would you increase? We've got the leg coming towards us. That back leg and that gluteal fold is actually wrapping itself around in the same direction is where this leg is coming from. So got some cross conto alliance. See that crease acts almost like a natural cross going to line for a so say very good positional Marca. In fact, probably the best positional Marca only in Tile Lake, because it really does give a sense off. What position and what perspective things that rent. So if you ever feeling like you lost, especially from from this angle, the mortal that definitely look to that fold, there is a god some tutorials suggests, as we said in the lecture, to break the legs off, similar to what you would with the arms and just sort of have them floating there. But no, the biggest fan of that approach, because really does start to lose the connective ity between the torso in the legs. So even though the approach itself is not inherently wrong, separating the legs entirely from the torso, just drawing them on their own, it's not an approach. It personally works for me, but tried it yourself if you want to trust separating legs and their own shapes and see how it works for you. Okay, so we're out of time for this one. Let's move on to our next image already another one from the back. And this one's a little bit more complicated because we've got a lot of overlapping elements going on here. In fact, he's a poses and positions that I'm notable that phone over 500% honest because there's a lot to think about. We've got the pelvis, which is overlapping. The thigh also got the thought. It's overlapping the the lower leg as well, so I've got a lot of things going on and of course, the feet as well are overlapping lower league, too. So it got a lot of things happening. He that ah very much different to what we used to. We generally don't see the legs from behind is often what we do. The front, and we certainly don't see them too often from this perspective, either. So call these overlapping elements here. I'm just trying to take my time. He thinking is I'm drawing these cross contour lines in. I don't think about the direction these legs are sitting in. It's usually after this part where things start getting a little bit tricky. A phony got these initial foundations in these overlapping elements. At the bottom is, or anything to screw up a little bit because it's not just the legs, the price instructions here that's being affected. It's the secondary structures to it's all the lumpy and bumpy A areas which now changing as well, getting compressed the pressing outwards so we can develop a mental image of sorts of what the legs are. But all of a sudden proposed like this, those being s shapes don't really come in as handy as they wouldn't a standing or even a normal sitting pose. But these are the ones you have to challenge yourself with this. No point is drawing legs that a standing or sitting down, we have to do the crouching ones. We have to do the ones where they sort of twisting around each other in contorting in ways that we're not used to helps us to develop a better mental library. The truth is that we're not going to be able to have a huge mental, are very of poses in their mind. We can usually get a certain number, but we're never going to. I know exactly how every poses constructed. No matter how much we end up developing an understanding of construction and articulation full for your legs. Don't be afraid to search out image references. It's asking too much of yourself to try to know how every pose is constructed. So foundations for this could be a little bit better. But why not the time to fix this one up here? And luckily, this one is just about over. So we'll finish this web and we'll move on to the first of about five minute poses now. Okay, so into the first they are five minutes. You know, a leg here is moving beyond the naughty, so we're going to have that pesky corner to deal with this raised leg. So that battles straight line is gonna interrupt our floor. They've got another straight line, straight ish line. I should say Backside is where our glute side because the figures sitting down its flattening and compressing that whole area off. So this is an instance where something foreign that's affecting the shape of the figure that's gonna happen occasionally because human figures quite soft. And so it's going to change its shape, dipping on what it comes into contact with. Just getting in this glued you'll area now I'm gonna do is I'm actually going to use that annoying straight line in our knee to my advantage of control, straight through to it. So I've got a kind of implied connection point that's happening. He got corner landmark that we can draw straight through to all the way from your backside to the knee. And I'm doing this because I just want to get this upper thigh sort of sorted first, and what I can do now is I can come down from that corner, that bottom corner of that knee to get my gesture in and then got to the top that top corner and stop building in the rest of this cough so I've used that to my advantage. That straight line. In most cases, it becomes a little bit of an annoyance. But in this instance, we can actually use it to our advantage, especially when the money starts moving beyond the 90 degrees. Because similar to what happens with the back pose that we saw before, things start compressing when the the moves beyond 90 degrees, the car muscle start compressing into the back of the thigh and all of a sudden this shape start changing again. Get this Siris of overlapping. It's dust developing, which could start to throw everything off. So again, another little trick that we can have a past sleeves. When we start getting these weird shapes being formed in thes overlapping conditions happening, we can use that straight edge there, really to our advantage. So start building in a little bit more this muscle structure and defining this a little bit more really trying to fuel my way through. This is I'm doing this. Got some form shadow happening at the back here, so I'll start putting a little bit of the scene shows. Ah, great way of figuring out positions of things. They are useful Marcus first, Because shadows indicate a change of direction, they wrap themselves over the forms. So I always looked he the shadows and see what shape they are making cause more often than not going to help tell you what position things, a rain so moving on to this file leg. Now we're gonna have a great deal of time, too. Work on this one that's coming towards us ever so slightly. Just have to keep that in mind. Probably haven't quite got the position off the raised leg quite right in the reference image. It's coming towards us ever so slightly in. I've flatten it off a little bit too much here, too much of a profile image that I've got down. We have a tendency to flatten their images off either to the side to the profile or to be more front on, because this is simply what we're used to seeing more often. It's a subconscious thing, and so be aware that we're doing this so we can stop doing it. And it's surprisingly easy to not see it until well, after you've moved on to something else, you you'll find that when you drawing or painting that the more you work on something, the less you see the mistakes that you're making. So it's always good to take a little bit of a break, sometimes to either moving to a different area or just stop entirely for a couple of minutes. Let your eyes rest and then come back to the image that working on two to get a fresh pair of eyes. And you'd be surprised how often you can start to see the mistakes that you're making just by giving your eyes a little bit of arrest, focusing on something else for couple of minutes, even if you're doing some time drawings like this perfectly fine to just give your eyes a break for 10 15 seconds. Just give them a little bit of arrest and then come back to it and see where exactly you may have gone wrong. We're gonna make mistakes. No getting around that, unfortunately. So finish up with this image here and we'll move on to our last five minute exercise. Okay, Lucky Lost got quite a bit of overlapping happening here. It wasn't super successful with positioning of the leg and the last image, so I'm just going to focus a lot of my time on this like that's coming towards us here, trying to really think about the position that these parts are in and how they're overlapping with each other. So we're going Teoh. So they take a time here and carefully measure with they all pencil figuring out which angle these things. Aaron trying to get that round this in here as well got more than torso in your foundation . See? And that's just going toe. Hopefully, hope. Get these positionings correct for these legs. Sometimes we need to add in a little bit more structure around our environment, toe help with the initial construction process, trying to feel my white down. This should nail again, ignoring the cough muscles. And just on my way down mission, we can see where the the shadow is, where that shinbone goes all the way up. As we said earlier on, it's just a really nice, clean construction part for us. We can always come back over the top without curvy muscles, he for the carbs. Get them to you really stick onto that foundation to those shin bones spend is actually quite Streit. It generally gives off the illusion that it's curved. They're simply due to how the muscles are attached to it. But it's a lot straighter than in the bone. And a Ruppel leg, which actually curves in woods, got that same diagonal movement that we talked about earlier. And looking to what I'm doing here is looking to the shapes. I'm sorry, the shadows that are being formed here around the need to you also help with the position in perspective things trying to develop the forms. He it seems just feeling a little bit better in terms of structure and position compared with last image. I have spent best part of half the time allotted to us just this one area. And if that's all that we do in this five minutes and that's perfectly fine, probably won't even get much time for the the other leg looking to the shadow again to help with the form and the structure here, the shadows in secondary structures are really what's going to stop bringing the legs toe life. They have to adhere to those initial foundations, though the legs and a certain position structures that we put on top have toe also adhere to the position to. So if you've got a leg coming towards us like this one here is to make sure those muscles secondary ships that were attaching to create the muscles and briny areas are also following along with it. If we start putting down any shapes and gestures down that run counter to those positions, then we run the risk of breaking the three dimensional illusion that we're trying to achieve here. So we're working on a flat two D surface, and their ultimate goal is to try Teoh, make it look as if that leg is coming towards us a little bit of the foot structure. And here we went over the foot in previous lesson. So not a bad idea to watch that lesson in conjunction with this 11 after each other. I have to follow the order of the lessons as they presented, because we start to finish up now. This is the last major area, of course, of the body that we're covering. It's going to be more advanced concepts in the future, but I'm really hoping this series of lessons has can of root benefit, especially if you're just starting out with with figure drawing or art in general, this is really just sort of phase one of the journeys, a never ending process. But this is really just the beginning of it. So if you've made it through all 14 lessons, staging because there's always something new to learn got things like Anatomy and Fabricant drapery, those top of advanced concepts. But hopefully this Siri's has proved beneficial to you, and hopefully it hope. Start your journey into art or painting or illustration cartooning, comic books, whatever it is you're aiming to do, so until next time K practicing hard and I'll see you in the next listen.
 JW Learning, Drawing the Body, Head and Hands