Transcripts
1. Introduction: Hello everyone. My
name is Christina and I'm an illustrator
and graphic designer. Today we're getting familiar withdrawing simple
female portraits. During the class,
we will discuss the basic facial proportions
from three main angles, their front view, side view, and the three-quarter view, as well as we will complete three exercises by using
a reference pictures. It is not an anatomy
class here we are creating a simplified and
a bit stylized pictures. Upon completion, you
will know how to position facial
features according to the proportions of
the face to make a simple, unbelievable
female portrait. And of course, you will know how to use the reference pictures to help you with translating their resemblance in
your illustrations. All that you can
use for creating fictional characters or drawing a real-life people
of your choice. This class might require the basic understanding
of human facial features. However, it will be
helpful for anyone who is interested in drawing
simple portraits. Everything you will see
will be done in Procreate. But of course, it
doesn't mean that you are not able
to recreate it in other graphics software or even with traditional materials. So with that said, if you're ready to launch your
software and let's begin.
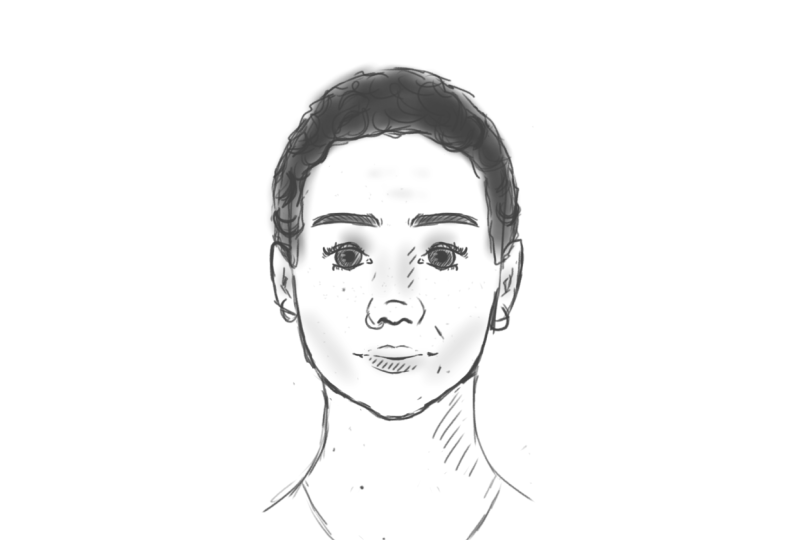
2. The Front View Basics: Let's start with a
basic front view. First, we'll need
to make a circle, and then we'll draw a
vertical line going through the center from
top to the bottom. The next step is to find the horizontal center
and make a line. When we have divided
the circle in that way, we will need to find one more thought that will
be on the board sank. The actual phase will consist
of three equal parts. Let's mark down these thirds. When it's done, we can
continue building the face. Let's find the intersections on the horizontal
line going through the center of this
circle and the circle itself on both sides. Firstly, we will go down
from these points with a straight line and
then we'll make a curve that will
represent the July, which we will end
up with the chin. Let's repeat this same
line on the other sides. Now let's take a look at these horizontal lines
and what they represents. The lemon is going
through the center of the circle is the brow line. The line that intersects the bottom of the circle
is the nose line. The line on the bottom
is the chin line. Now let's add a few more lines to know where to
put other elements. Firstly, we will
go to the top of our ellipse a bit above
the center of this part. And we will create
the line there that will represent
the hairline. Now let us go down our circle center line and
draw the eye line there below the nose line will create one more horizontal line that
will represent the mouth. It will be almost
in the center or a bit above the center
of this piece. Now it's time to add the ears. The ears eyes can be different, but the position of the ears will be either
between the brow and nose line or more often it's between the eye line
and the nose line. Here we'll add your shapes on both sides for now between the eye line and the nose line. When we have the
base of the phase, we need to figure out the
face elements position. And we'll start from the eyes. We need to understand that
the length of the eyes and the area between the eyes are pretty much the same size-wise. We can mark down three
same-size segments, starting from the center, making little segments which the center line will divide
into two equal parts. And now making the
same size segments on both sides from the
center line segments. These two segments on the sides will represent the
area for the eyes. Now let's move on to the nose. If we draw two lines down from the inner corners of the eyes
and stop at the nose line. This is where we will
put the tip of the nose. If we go down to the mouth line with
the same dotted lines, we will find the area where
we need to put the mouth, but the size of the
mouth can vary. And that means that you can
widen the area for the mouth. You can make a few more
guiding lines to make sure that the mouth is
centered on the face. These guiding lines
could be going from the center on the eyes or be puts a little closer to the
inner corners of the eyes. Let's mark down the brows. We haven't needed line and we need to know that the brows are a little bit longer than the area that we
use for the eyes. When we have figured out
everything that we need to know about the face elements and
their position on the face. Let's quickly go and
create these elements. Starting from the brows, drawing two curves on both sides and adding
some thickness. The inner part of the
brow will be thicker than it's steep and the curvature
of the broad might vary. The next step is
creating the eyes. We are creating a very generic, stylized, simplified
example portrait. And if you need some
help with the shapes, you can use references. Start drawing the eyes from
a circle or from two curves, one on the top and
one on the board soon after that
adds another curve, repeating that soap curve
of the eye a bit above, which will represent the leads, draw the iris and the lashes at a little curve on the bottom that will represent
the bottom leads. Now drawing the second eye
in the same way or copying the one that we already have and putting it on the other sites. When it's done, moving
down for the notes, drawing the tip of the nose with a little curve
looking down. I didn't nostrils with a smaller curves looking
in the opposite direction, adding two vertical curves, stepping aside from
the horizontal ones, they will represent the
sides of the nose trained to make the nose equal on
both sides for the mouth, create a curved line
in the center and add to subtle lines to
represent the lips. Now we'll repeat the lines
for the gene jaws and ears. When we have reached
it's up of the ears, will need to think more
of the shape of the head. We need to show the
back part of the heads. To do that, we'll step aside
from that samples from both sides and we'll create
a new half of a circle. Now we can add the
hairline and maybe adjust the face elements by putting
them just a bit down. You can skip this
step if you are generally satisfied
with a sketch or if you pursue a more
natural notecards soon look is for the
stylized picture. If you put the face
elements down, you'd get a cuter and
sometimes a younger Luke when all the
adjustments are done, let's add two curves
for the neck. We can achieve a more
finished look of the sketch by putting
down some shadows. The face isn't flat
and has planes. It has convex and
concave parts and we can show them
with simple shadows. First of that sample areas, these parts are
pretty flat as if they were carved
out from this fear. We can show it by adding
the shadows there. You can even help yourself make the shadows by
adding the axillary, an ellipsis on this side, going from the hairline to
the bottom tip of the ear. Then we need to show the
jaws very simply will draw the diagonal lines
going from the top of the ears towards
the chin area. The nose too has planes. Let's simply go through them. There is a trapezius shape between the brows and the eyes. This is called the breach. If we draw the horizontal line going through the
center of the eyes, this line is going
to be the bridges bought them from these
boards and we can draw the Allen Gates is
rectangle which ends up with other trapezius for the tip
of the nose or the app. Next, if you draw the diagonal
lines from the bottom or the top trapezius to the corners of the
boards and trapezius, You have two more planes, the wings of the nose. We can also add the shadow to the top lip and under
the bottom lip, now we have everything. So only different layer
we can add shadows to all the needed parts as we are creating a very simple portrait. Let's think that the light
strikes from that soap center. So we'll end the
shadows to that samples eye socket areas on either
side of the bridge, the wings of the nose, the bottom leads the tip of the nose and a bit
underneath it. So clip just a bit to the inner parts of the
ears and on the neck. Subtle shadows on
the top part of the eyeballs as well to show
that they are not flats. And we are done with
our front view. In the next part,
we'll check out the different shapes
of the heads.
3. Face Shapes: When we figured out the basic
proportions of the face, let's take a look
at different shapes that the face can have. Every head is unique, but very roughly we can divide the face shapes into
four different types. And of course, with
each of these types, the proportions of
the face may vary. Firstly, let's take a look
at these photographs. The first phase
has an oval shape. The second one is more rounded, the third one is triangular
and the fourth one is square. Now let us go through all
these portraits and mark down the basic lines to see how the phases vary from
one to another. We will mark down the axillary
lines for the eyebrows, nose gene and folded
soap of the head. In the first photograph, you can see that
these thirds that we just created are not equal. The forehead part
of the hat is quite bigger than each of
two-thirds on the WhatsApp. Let's also mark down the line for the eyes
and for the mouth. Right here you can see that the line for the
mouth is shifted towards the nose line and it's not in the center
of these parts. Let's do the same with three other portraits and see
how the lines behave there. Generally speaking, all these lines behave
in a similar way, but from one
photograph to another, from one phase to another, the distance between
these lines is different and that's what
makes the face look unique. Every time you are
creating a portrait, you will need to pay attention to these lines and
you will need to pay attention to the proportions of the elements on the face. That's why it's
always good to use references for all
your illustrations. Let's take a look at
how the phase that we created at the
beginning of the class will behave if we use the proportions and shapes
we just discovered, we will try to adjust our generic phase
in accordance with the schemes by using just
transform and liquefy tools, I will make four copies
over the basic phase, and I will put
these schemes from the portraits above
them now one by one by using the
axillary lines and by using the liquefy
and transform tools, I will try to adjust the phases in accordance
with the schemes. And this has just
one generic face could look in four
different variations. You can see that all
these phases are different even though they
were made from one base. When you know how to
create the basic phase, when you know all the
general proportions, you won't have any
trouble with recreating the other shapes even if they seem quite different
from what you use. Don't forget that
you can always use reference pictures and
don't forget that you can always make some kind of measurement scheme
that will help you to record the photographs
in a more correct way. And of course, don't
hesitate to use Transform EMF liquefy tools. Now we can move on to the
first exercise where we'll be creating a portrait by using
a reference peak track.
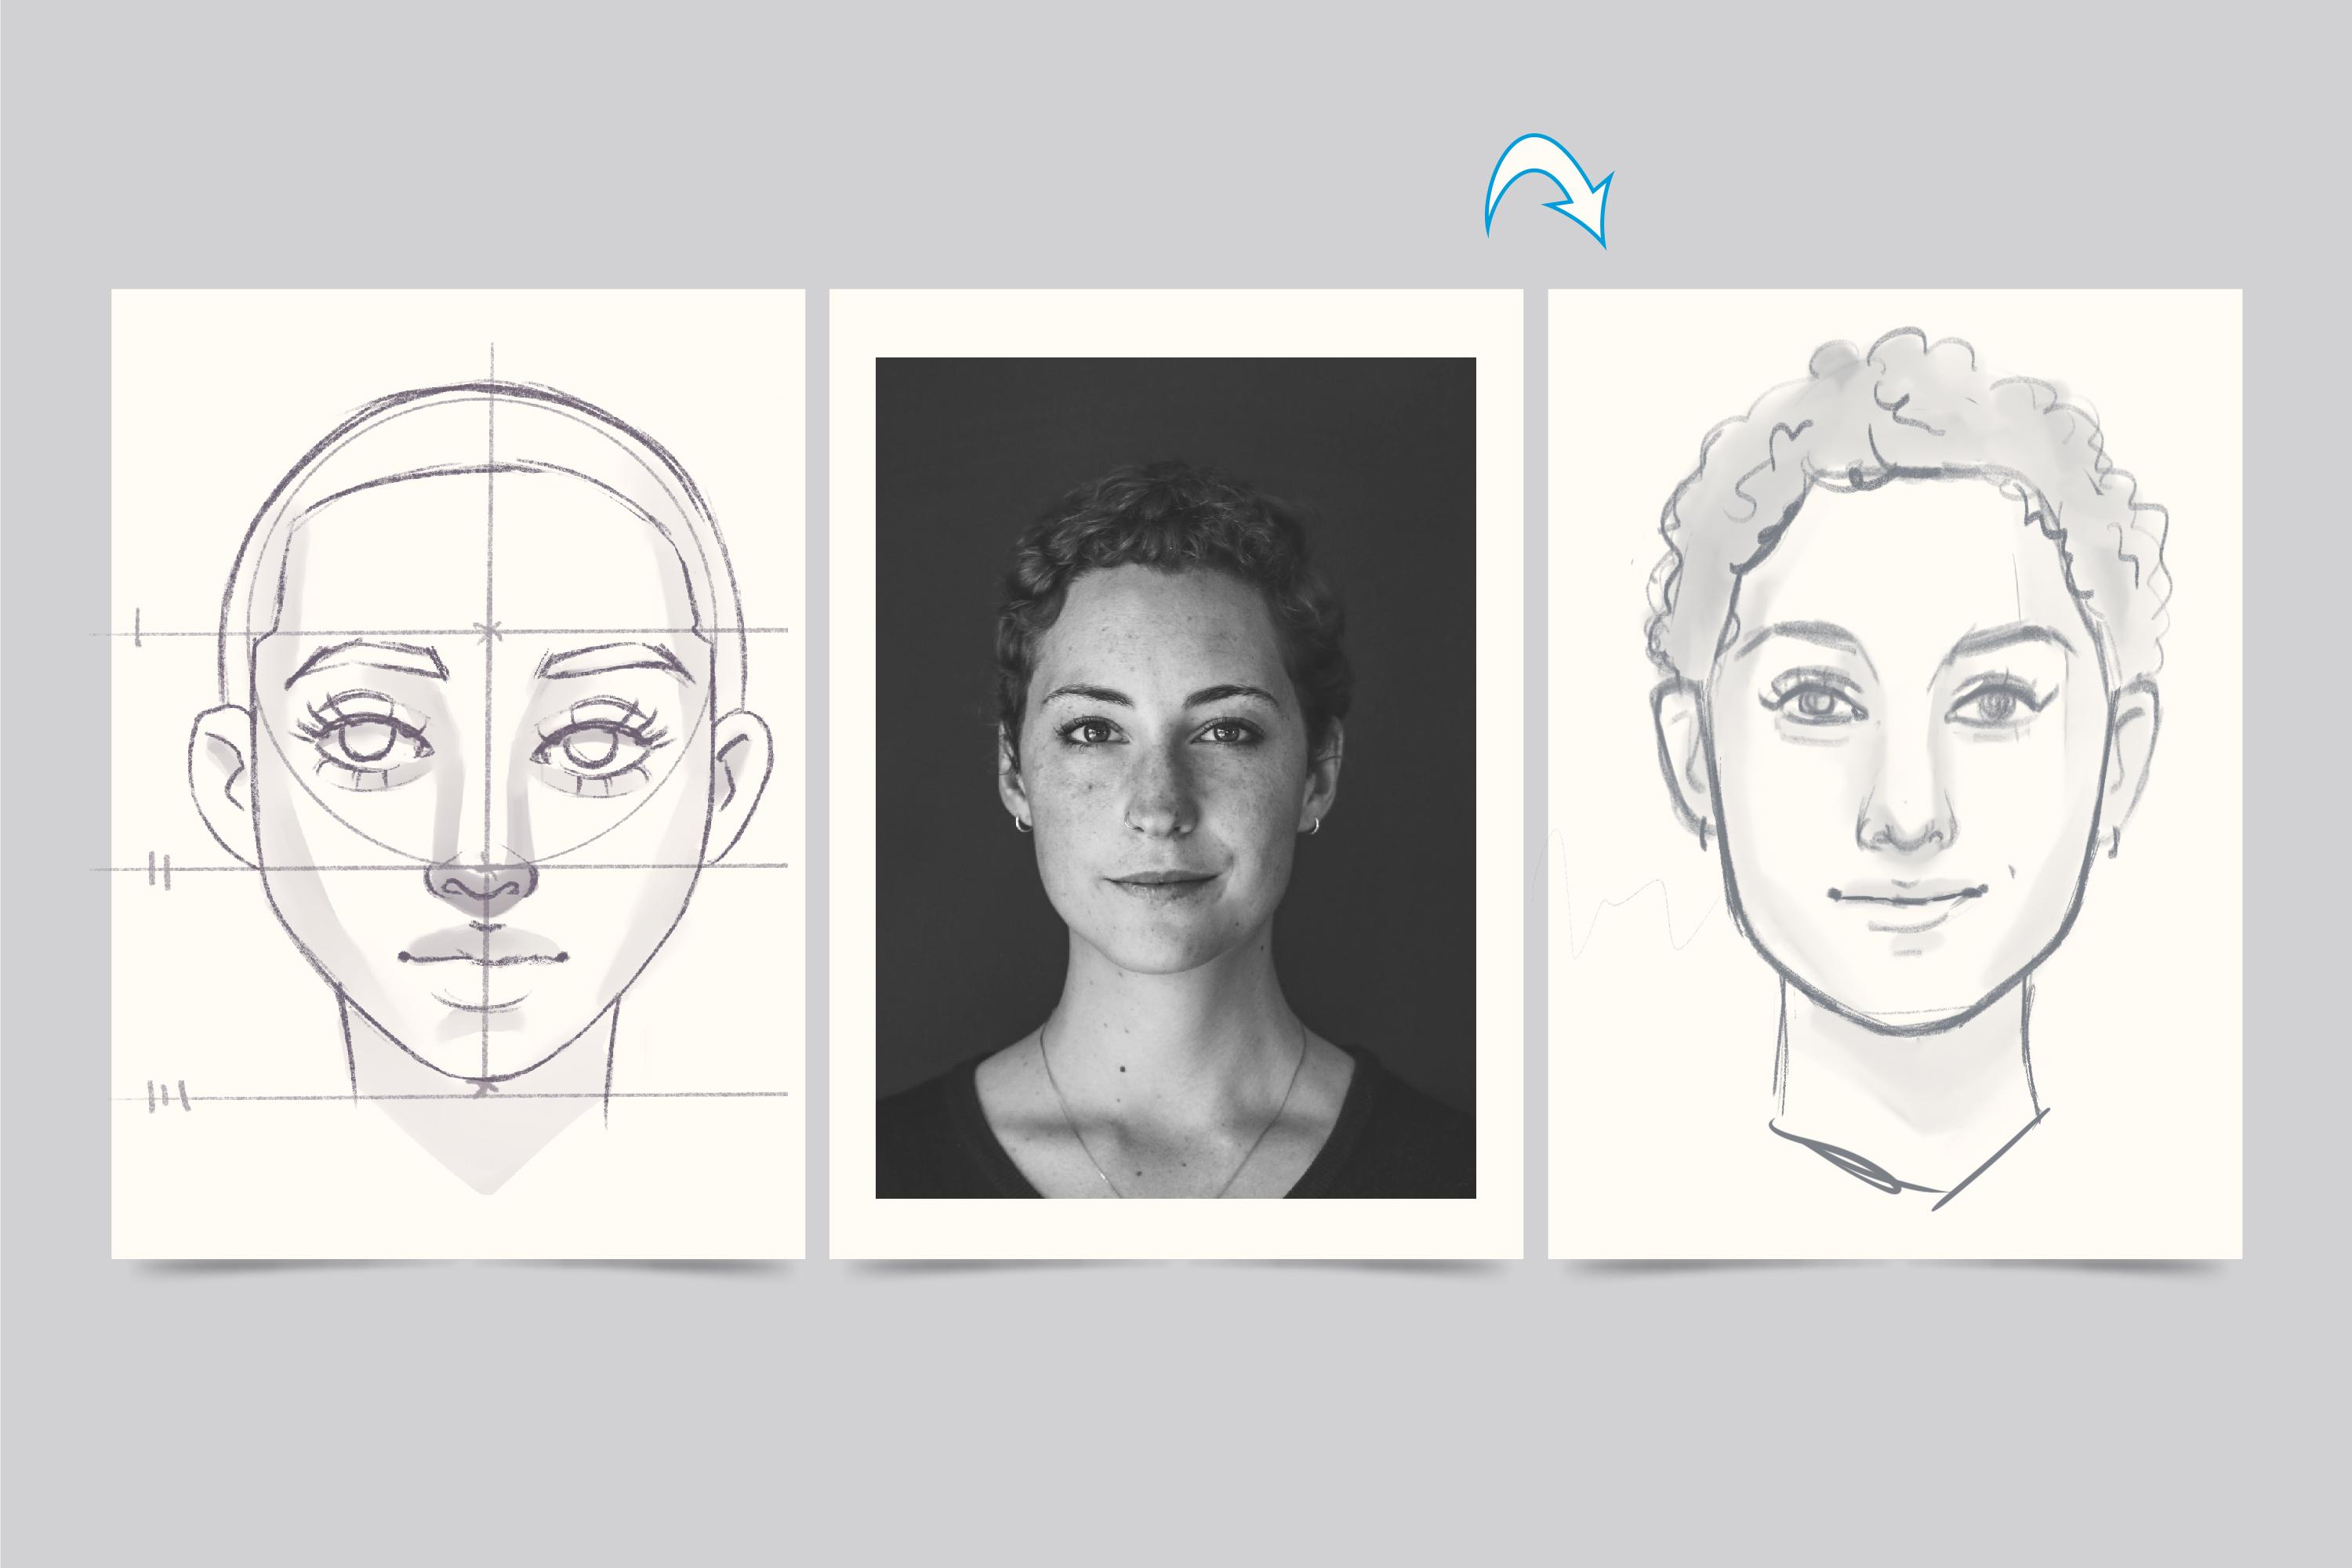
4. The Front View Exercise : Let's apply everything
you've learned so far in practice into this
part of the class, we'll create a simple
stylized portrait by using the
reference photograph. If you want to use
the same photograph that I'm using
during this class, you can find them in the
project and resource SAP. Let's start by creating a circle for the top part of the head. And then we will
draw a line going down through the
center of the face. Now markdown the axillary
horizontal lines that will define the browse, the nose and the chin. Draw the lines for the
eyes and for the mouth. You can also mark down the size of the eyes and the
distance between them, as well as you can mark down the node size and
the mouth size, make a copy of the scheme
and move it to the right. We will go through all the
axillary lines and we will try to recreate what we see on
our reference peak chair. If it's easier for you, you can turn on the
drawing guides with the grids that will help
you to see the sizes and distances easier
and you will know how to translate the
measurements of the face on your blank canvas starts from the oval of the
face and the neck, the ears, the back part of
the heads and the hairline start aging. They simplify
details on the face, at the inner parts of the ears and the simple
shapes for the eyes. Draw the brows, draw the nose, and finish up with the mouth. You can start with very
simple shapes, for example, for the eyes, you can draw just two curves as we
used to do it before. You can always get
back to it and you can adjust it with
transform tool with liquefied soil or even redraw some details if you like, how it looks, you can
refine it later on. Now we're just mapping out
everything that we need to put on the face for the nose. If it's easier, you can
add a little ellipse in the center of the nose area
and work out from that. And the nostrils and andesite parts of the
nose that will represent the winks at SASA
lines for the mouth and pay more attention to
the corners of the lips. Add some fluffy
lines for the hair. Refine the sketch a little and then create one
more layer above and add some shadows on the places that should
have shadows on them, just reminding you that we
are using generic lighting. We are adding shadows
for that sample parts of the heads to the
jaws on both sides, from bridge of the nose
to the wings of the nose, to the tip of the nose
and a little below it. Also, we can shade
that soap leap and mark down the neck
area if you'd like, you can add a bit of
a tint for the hair. If you see that
liquefied tool can help you with recreating
facial features. You can use it here as well. The main goal for
us is to create a stylized portrait
that will show the similarity with the
reference peak track. And we're done with
our first exercise. In the next part, we'll see how to draw a face in profile.
5. The Side View Basics: When we've learned about
the front view of the face, it's time to get familiar with this site view or the
profile view of the face. Let's go back to our front
view picture and we will elongate the axillary lines to the right part of the canvas. This time, we will need to
create a bigger ellipse. We will position it
between the slope of the head point and
the mouth line. Now, drawing two lines going through the
center of the ellipse, one horizontal and one vertical go into one of the
sides of the ellipse. In my case, I chose
the left one. We will find the intersection
between the brow line and the ellipse and we'll draw a line going down till the chin. And these points, we need to
understand that the head has temples and we need to find the place where we
can put the ear. So let's find the area between the hairline
and the nose line. And into this area, we will create another circle. We can shift it a bit to the right and we need
to find its center by creating the vertical line from the center point
on this ellipse, we can go down and we will
create the shape for the ear. Now we will go
further and we will create the jaw line starting from the ear bottom part and creating the tilted
line going down. You can vary the size
only jaw, but for now, let's limit ourselves
by the mouth line now creating an Allen gated curve from the mouth land to the chin. When we're done with this part, we can move on to
the top part and we will start
creating the profile, finding the intersection of the hairline with this circle. From these dots, we will need to go in a specific direction. Firstly, the line
slides down externally, then we will need to
make room for the eyes. So we will move the lines
towards the back of the skull and create a dance for
eye sockets in that way. Then we need some
space for the nose. We are again going externally
with the line and in the end we are moving down
internally to meet the chin. Now let's follow the lines
and create the face features. Stepping a bit aside
from the vertical line that we made before
to create a better, not so flat profile. Adding the lines for the back of their heads and creating
the neck lines. Aging the eye,
brow and hairline. Grabbing the liquefied x2 and adjusting the
profile by shifting the chin and the lips area a bit toward the back
side of the head. Refining the sketch
and the final stages we can add a few
shadows, samples, Jolla and opera leap
under the nose, nose, wings, and the
inner part of the eye. Adjusting the shapes even
more if it's needed. And we are done getting familiar with this site look
and are ready for the second exercise where
we're gonna be creating a profile view portrait by
using a reference picture.
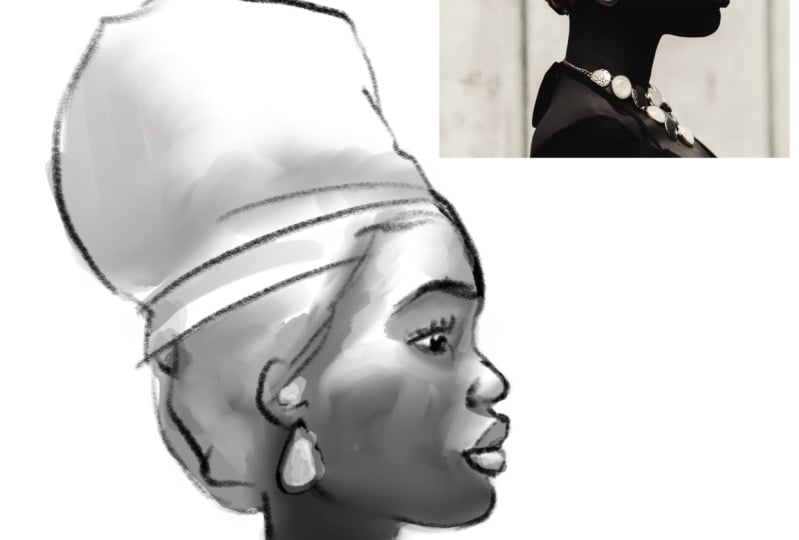
6. The Side View Exercise : When we have discovered the basics of building
the face from this side, we can move on to an exercise where will we use an array
reference peak chart? And as before, we will start by creating an ellipse
where the head, the face, and the
reference picture is looking slightly up. And that means that
we will need to draw the sideline
in a tilted way. Let's quickly find all
the lines that we need. We will start by marking down
the lines for the brows, nose, and Chief also we will
mark down the hairline. When we're done with this, let's mark down the lines for
the eyes and for them off. Find the center of
our ellipse and draw the vertical line going down between the hairline
and the nose line, we will need to create
an ellipse that will define that samples of the head. We will shift it a bit
towards the backside of the heads and we will find its center with a
vertical line as well. For a convenience, you can write down all the lines names. When you are done
with this scheme, you can make a copy and
move it to the right. That's where we're going
to be creating our sketch. And as with the example, we will start by
defining the ear. The ear is gonna be
near the center of this little blue ellipse and it will mark down for the tempo, continue with jawline and make
a curve go into the chin. You can always take a look at your reference picture and mark the distance between
the lines and the actual element that
you are drawing right now. Plus, don't forget that you
can use the drawing guides to make the grid when you're
done with the bottom part, let's move on to that
soap and we will start by creating the Ferhat step, a Beta set from this circle and
vertical line and start going down and
recreating the profile you see on the reference
to help yourself with recreates in the leap and
the whole under nose area, you can draw an
auxiliary line on the reference picture
that will be useful to get familiar with
the angle that you will need to recreate
onto your sketch, repeating the same line onto the sketch and continue
with the profile. Draw the lines for the
chin and for the neck. Then continue by aging the face elements such
as brows and the eye. For the eye, you can start with a simple circle onto the area where the I shouldn't
be and then erase the parts that
you don't need. Finish up by adding the
hairline and the hair in general and then end the
backside of the neck. Refine your sketch
if you need to, and then on a different
layer and the shading, Use the liquefied x2
if you need to adjust something and to make it more similar to the
reference picture. And now we're done with
our second exercise. Now let's move on to the
three-quarter face view.
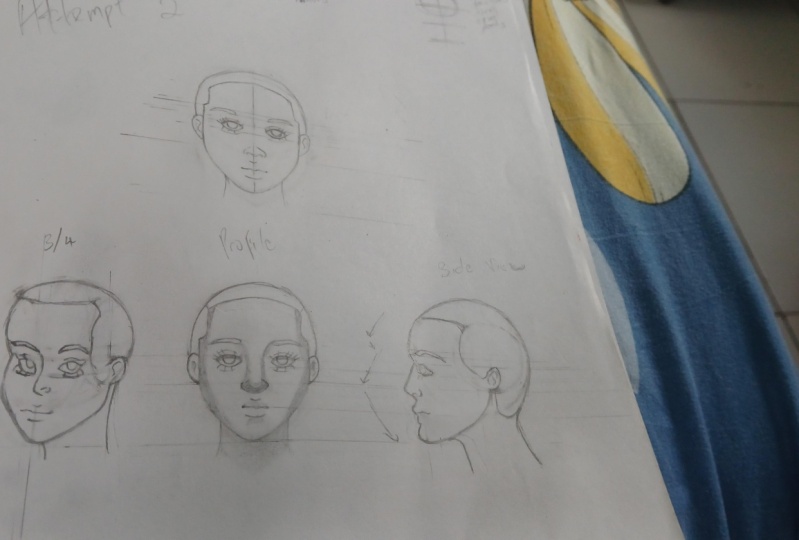
7. The 3/4 View Basics: Finally, let's find out how to create a face in
three-quarter view. Once again, let's make it in comparison with the
basic front view. So we will elongate the
lines that we had there. Let's start with the same
size circle that will go from the top of the head and
ends up in the nose area. While we are drawing the face
in a three-quarter view, we need to understand
that we are working with the 3D shape, that this isn't flat and we need to show it onto our sketch, the axillary lines
that we're gonna be drawing here to help us with building the face are not
gonna be straight and to correctly create the curves that we'll go
through this sphere, we will need to make the full
ellipses in perspective. Let's start with the vertical
one and then we will add three more LLCs that
will be horizontal. The three horizontal curves
will represent the hairline, they browse line
and the nose line. Even if we're creating
the ellipses and curves, we need to follow
this scheme lines. When we are done with creating the axillary LLCs for
the hair, the brow, and the nodes, we
will need to create a vertical line that will
touch the brow line. When it's done,
it's time to start creating the areas
for the samples. As the head isn't
strangely circular, we need to show this part on
both sides of our circle. So making narrow ellipses going from the
hairline to the notes, starting by creating
just one and then copying it on
the other sets. Now we need to find the center of the right ellipse by drawing a vertical line starting from these lines intersection
with the eyeline, we can find the
ear position also, this line will show you wearing it to start creating the jaw. At first it goes with a
straight line to the nose line and then creates a curve to
show the jaw and the chin. Now let's move on
to the left and start recreating
the profile relief. And again, we are gonna
be moving down by following this
specific directions, starting from going
down from the hairline and then making room
for the eye socket. So firstly, the line is going inwards and then the line
is going externally. And after all making slope line to connect
the cheek with the chin. Agent a bit of space for
the backside of the heads by stepping aside from the ellipse and
recreating the curve, aging the line for the neck on the right simply
by L AND gates in the back of the heads
line and making a smooth S shape agent, another line for the neck, stepping a little
aside from the chin. Aging the hairline by repeating the lines that we
have on this scheme. And then moving on
to adding the eyes. For the eyes, we're creating simple circles to define
where they're gonna be. Remember that we are
working with perspective. So the eye that is nearer to
us will be a bit bigger and the eye that is in
the background will be smaller and kinds
of tilde sets. Now refining the eyes by agent deletes eyelashes
and Iris says, if it's not looking good
from the first trial, it's okay to redraw things. When the eyes are done. We are continuing by
aiding the brows, marking down the
bridge of the nose by creating the trapezius
between the eyes. For the tip of the nose, we will need to find
this center line first and then draw a circle. But we need to shift it a bit towards the opposite
side of the nearest I, as the nose is a
protruding part. We will need to show it
on our sketch when we are done finding out where the tip of the nose is gonna be, we will need to
connect them breach part with the tip of the nose. And we will do it by drawing as smooth s-curve going from
the top to the bottom. It's gonna be drawn almost in a same way as we used to
do it in the profile. Look. When the base
of the nose is done, we need to add the nostril on the side of the nearest i and then add a vertical curve that will indicate the nostril sides. Adding a little sign on the second nostril on the
other side of the nose tip. At this stage, we can refine the eyes by aiding the corners. Remember that we are working
in the perspective and the corners of the eyes won't be looking the same on both sides. The eye that is near to us, we'll have a full corner, but the eye that is
in the background, we'll have a very smooth, almost round connection
between the leads. Now let's move on to the mouth. Once again, remember that we are working in a perspective, and this time the lip area in the background will be
a bit shrunken down and won't be similar to what we
have on the nearest to us site when we have all the
main elements on their face. Let's move on entry, find the sketch here. We can redraw some parts, add some volume to the places, erase and parts if it's needed. This stage we can play with transform and liquefy
tools to achieve similarity to the
picture we have on the left for our front view. When the adjustment
part is done, it's time to create one more
layer and add the shading. As always, we need to add some darker teens
for that samples, for the jaw, for the top lip, a bit underneath the bottom lip, adding shadows to both
sides of the breach parts, to the tip of the nose and a bit underneath it to the
wing of the nose, into the neck and
inner part of the ear. If it's needed, we can adjust
the parts one more time. Now we are done exploring our three-quarter view
and we are ready for the last exercise where
we're gonna be creating a three-quarter portrait by
using a reference peak chair.
8. The 3/4 View Exercise : One more time, a land grab
the reference picture, put it on the Canvas and
we will start by making this scheme and it
will help us to create a portrait from scratch. Let's make a circle
adjusted and add two more ellipses that will show the volume of this sphere, one vertical and one horizontal. The first horizontal ellipse will represent the brow line. To continue making
the guidelines, we can go and create one more
ellipse or just a curve. We will put it underneath the first horizontal ellipse to show where the
eyes are gonna be. These curves should be
parallel to the first one. When it's done, we can create
a vertical line going down. The center here will
be represented by the intersection of the
first vertical ellipse and the first horizontal one, this line that we just
created should touch the intersection of
these two ellipses. When this is done, we can mark down our
basic measurements, the nose area, the hairline, that gene, and the brow line. Now we can move on to adding
this side ellipses that will represent the samples from the
hairline to the nose line. We will create the first
vertical ellipse on the right. Now we can make a copy and put the second ellipse
to the other sides. When the basic scheme is done, let's make a copy of it
and let's move it to the right Here we're going to
start creating our sketch. The first thing that we will
do is find the center of this ellipse that we have on the right and draw
a vertical line. When it's done, we can
start by aging the ear onto the intersection of
the nose line and the central line of
the small ellipse. This vertical line will
show you where you need to start adding the jaw
line near the ear. It will go straight
and then it will tilt, making the curve for the
jaw line in the mouth area, it will curve smoothly
to meet the gene. Always take a look at the
reference picture to know what kind of lines and
curves you need to make. Try to make them similar to what you see on the photograph. If it's not going right from
the first try, That's okay. Focus on direct shot. You can always fix it later when you see the
full peak track. Also, always look at the scheme that you
have in a photograph. If you've noticed that something is not right on your sketch, according to the scheme, you can always go to select
and transform tools and adjust these parts when
the right part is done, Let's move on to the
left and we will be recreating the other
sites starts from the intersection of the left small ellipse
and the hairline goes smoothly to the eye area and make room for
the eye socket, then go down by creating
a slope to meet the chin. Move on to the neck area
and add two curves on both sides to recreate what
you see on the reference. When you're done with this, let's move on to the
facial features. And to begin with, we
will start with the nose. For the nose, we
will need to create a little ellipse
for the TPP that will be shifted from
the center line to the opposite side
over the nearest ie. Very roughly mark down where the eyes and the bridge
of the nose are gonna be. Add the curves for the brows. When the Land brow is ready, we can create the nose starts from the curve
for the breach part and go with an almost
straight but tilted line till the tip of the notes. Repeat the contour
of the ellipse for the tip of the nose and
the nostrils parts. Now, moving on to the eyes, start by creating two Alan gated horizontally
aligned ellipses. You can start to
refine the shapes by adding details for the leads, irises and eyelashes work
on the corners of the eyes. You can start with just one eye or work on both
at the same time. Now it's time to add the browse. And let's move on to the lips. Remember that we are
working in perspective. So the left side will be shrunk down a bit and won't
be looking the same as the right parts work more on the horizontal center
line of the lips and the corners at
subtle lines to show the lip shapes both
on top and bottom. If you've drawn
something and feel like you need to rotate
it or adjusted, don't hesitate to use the
select and transform tools. Start adding the hairline
and the hair in general, repeat the lines that you
see on the reference. Erase everything
that you don't need, and use the liquefied tool
if you need to adjust some parts to achieve better similarity with the
reference speak Czech, and the shadows on a
different layer, as always, FMT into the hair, define the jawline ended sample. Add shadows to both sides
from the bridge of the nose, the wing of the nose, the tip of the nose and it's
a bit underneath it and the shadows to that soap flip the area under knew
the bottom lip, the leads and the neck. And we are done with
our last exercise. And that means that we are
at the end of our class. I hope you found this class
helpful and if you liked it, please check out the
other classes given follow and leave your view
and thanks for watching.
 Xenia Sorokina, Illustrator & Graphic designer