Transcripts
1. Introduction: Hello everyone. My name is Sine and I'm an illustrator and graphic designer
today will create a simple winter landscape. During the class,
we will work with simple shapes and simple tools. Procrit has to create
a stylized picture. We will work with layers, clipping masks, and alpha lock. As a result, you'll get an image that you can use as
a sticker postcard, some digital product
or whatever you want. This class is for
everyone, so don't worry. If you have no prior experience, it is mostly suitable for
digital drawing because everything you'll see will
be made in procreate. But it absolutely doesn't mean that you won't be
able to repeat it in some other graphic software or even with the
traditional materials. So with that said,
if you are ready, launch your software
and let's begin.
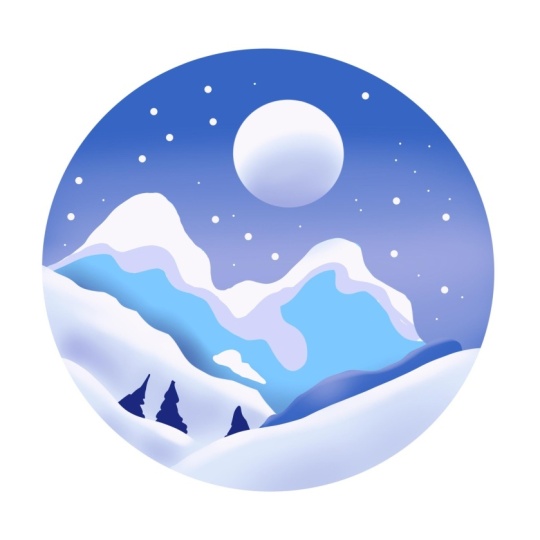
2. Background: Let's start by clicking on the plus icon in the
gallery to create a new canvas in the box that
pops up, choose square. Once we have a new canvas, the very first thing
that we need to do is to go to our
brush library. We are going to go to
the calligraphy folder, and we are going to
select monoline brush. Once we have the brush, we'll go to colors, and we will pick the first
color in the first row. When we've done all of that, we're going to go
to our canvas and we are going to start
drawing a circle. We're going to start by setting our brush size to about
10% and we're going to set our capacity to 100%
Let's start making our line. Drawing the circle by hand, and at the end hold
our pencil to make our shape and ellipse to
make a proper circle. We hold up one of our
fingers on the screen. If you want to make the
circle bigger or smaller, move your apple pencil
from side to side. When the size of the
circle is about this size, we stop and go to the top left. And select an arrow
icon to place our circle right in the
middle of the canvas. We are going to use the
uniform method to do this. And also we'll need
to turn on snapping. Let's click on snapping, go to the settings, and turn
on snapping in this window. When everything is set up, we go back to the canvas, hold up our pencil, and we need to find these two orange lines
right here in the middle. When we found them,
we are ready to click on the arrow again to
exit transform mode. Now that the circle is in
the middle of the canvas, we are going to go to our
color icon on the top right, and we are going to drop a
color inside the circle. Once that's done, the next
step is to add a gradient. First we are going to go
back to the brush library. Go to the air brush and folder
and select solved blends. Once we have the brush, let's check the opacity. It's set at 35% The brush size is about 30% If you
want a bigger brush, you can increase the size. Next, we need to go back to layers and click
on the plus icon, thus making a new layer on top of the layer
we already have, We want to add our
objects only on the areas that we have on the previous layer
with the circle. To do this we'll clip on the layer number two and in the least select
clipping mask. Now everything we
do on this layer will be reflected
only in our circle. When we've done all the steps, we go to our colors and
choose the last color, this purple, the fourth
color in the second row. When that's all done,
we go to the middle of the circle and start
aiding the gradient. At the beginning, we add
a pretty intense color. And moving toward the edges, we start making lighter strokes. Once we have the extra color, we need to make a
smooth gradient. And to do that we
are going to go to the magic one tool
and we are going to select Gaussian
blur from the list. When we are in this window, we need to tap and
hold our screen either with our finger or
with the apple pencil. And we are going to move it
to the right side and create very smooth gradients
around 50% we can stop. If we want to try to make a
smoother and blurer gradient, we can go further to the right. If we want a sharper
transition between colors, we can keep the
blur around 30% So now we are looking for the
amount of blur that suits us. When we've done that, we press our magic one tool one more
time to get out of this moot.
3. Snow Piles: Next we are going to create
our snow drifts from below. First, we are going
to go back to our brush library and go back
to the calligraphy folder. This time we are going
to select script brush. Let's go back to our layers. Click on the plus
icon and create a new layer on top of
our gradient layer. Again, click on the layer
and choose Clipping Mask. Because we want to add new elements only
inside our circle. Once we have a new layer, let's go back to the colors and choose the third color
in the second row. First, let's go
back to our canvas. Go a little below the
center on the left side, and we are going to create
this kind of shape going down. So we are going to create a wobbly hill loop around your line to
create a closed shape, and then just drag and
drop the color inside. If we want to change something, we go and add some elements right on the top of
what we already have. If we want to remove something, we can first set the eraser
to the same brush that we use for the main elements so that everything
looks very organic. Once our main brush is selected, we go to our eraser and
we hold the icon down. Now we can go into it
and make sure that the brush is set the same
way as our main brush. Now if we want to
remove something, we can go right on
top of our heels and create some refined
way, wobbly line. When that's done, we
go back to our brush, go back to layers and create
another layer for the snow. Again, we click
on the plus icon. Click on the layer
one more time and choose Clipping Mask
for convenience. We'll go to the previous
layer and hide it by clicking on this little
checkbox next to the icon. Now we are going to go
to the left side again and make another
pile of snow Again, we'll loom the shape round, close it, and add color inside. If we want to change
something again, we go with the brush or eraser and add or
remove some elements. Now returning to layers and
creating another layer. Click the plus icon, click on the layer, clip
it to the main layer. This time we are going to go to the right side and create
another snowdrift. Again, for convenience, let's go to the previous
layer and hide it. We are going to go
to the right side and create a pile like this. Loop it around, and then drag and drop the color
inside the pile. Fix it if you need
to fix anything. If everything is fine, we go back to the
layers and we'll add another color to each
layer with our snow. First, we are going
to go and bring back all of our layers by
clicking on Checkboxes. And then we are going to start
with layer number three, which is our first
layer with the snow. We want to add some additional
color to our snow drifts, and we want to add it to the
areas that we already have. Let's go to layer number three. Click on it and
select Alpha Lock. When alpha lock is on, there will be a checkerboard around the elements
on the layer. Now go to the brush
library and again choose soft blend in
airbrushing folder. The settings are the C, let's choose the fourth color in the second row
in the color panel. Let's make the brush
a little bigger and very gently go
over the bottom of our very first snow drift and start adding a
gradient right away. We can see how we are starting
to get the front layers. If you overdid it slightly, you can always go to magic 12, Gaochen Bluer and smooth out
the gradient a little bit. When everything is ready, we click again on magic 12. If we use it and do the
same thing two more times, let's go back to our layers. Go to the next
layer, click on it, select Alphalog, and
do the same thing. Let's go to the bottom
and add our gradient. When we've added the gradient, we go to the next
layer, click on it, choose alpha log, and go to the bottom of our shape
and add a little gradient. If we want to add a
lighter tone on top, we can always go back to the layers and choose
a white color, that is the fifth color
in the first row. Make the brush a little
smaller and very, very lightly go over the
top of your objects. You can do it either
with a single layer or with all the layers
that we have for the snow. When we've dealt with the snow, we are ready to
create the mountains.
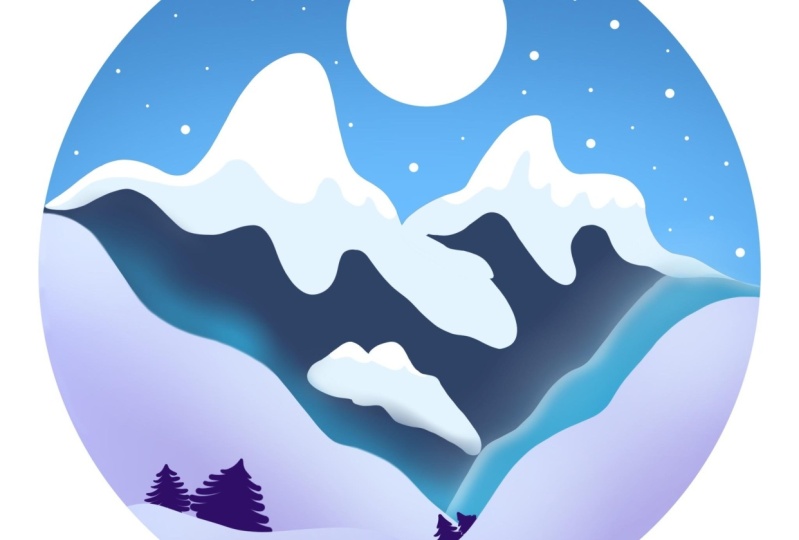
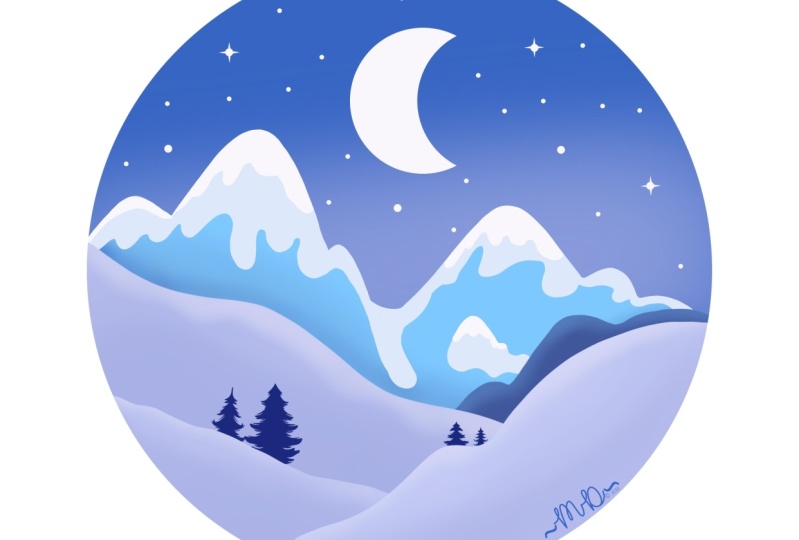
4. Mountains : First, let's go back
to the brush library. Go to the calligraphy folder
and choose script brush. One more time, let's go back to the layers and go to the layer where we
have the gradient. We'll select layer number two. And from here we'll
create a new layer. It will automatically
clip to our main layer. And when we've made a new layer, we'll go back to colors and choose the second color
in the first row. Let's make the brush
a little smaller, then go to the left side on
the canvas and we are going to create some interesting
loose shapes for our mountain. We'll go up and start
creating the ship, take it down and
then we'll close our ship after dragon drop
the color into our mountain. In the same way, let's go to the right side and add
a mountain here too. Let's go to the
middle of our circle. And from here we'll start
making a slightly smaller hill. Draw a wobbly, slightly
wavy line again, loop it around, and
drop the color inside. If we want to change
something or add something, we can always go and do that. For example, we can go to
this mountain that we have on the left side and make this
peak a little bit bigger. And we can also go to all the mountains that we have to smooth out
the corners a bit. If we want or if you want
to remove something. You can always
take an razor tool and remove parts
that you don't like. Now let's work on the
silhouette of the mountains. When we have the
mountains ready, we can move them down
a bit so that we have more space on
top to do this. When our mountain
layer is selected, we are going to go
to the arrow on the top left that
we used earlier. Uniform method, snapping,
everything is on, we'll just move the
mountains down. And when everything is good, we'll click on the
arrow to select it. Now we are going to go
back into layers and we are going to add
additional elements on top. We are going to start by adding snowy peaks on top
of the mountains. We'll do it on a new layer, but we also don't want to go beyond the shape
of the mountains. To do this, we'll click
on the Layer with the mountains and choose Select
from the drop down list. Now we can see that
only our mountains are selected and that
is just what we want. Let's go back to the
layers and create a new layer on top of
our mountains layer. Now that we have a new layer, let's go back to
colors and select the fourth color
in the first row. Next, let's go back
to the tops of our mountains and create wobbly
lines for the snow tops. You can even go a little
inward into the middle of the mountain ship and continue making the
ship here as well. As always, we wrap
the line around and then drop a color
on the completed ship. We do the same thing with
the mountain on the right. As always, we work
on the silhouette, which means we go and correct some parts
that we don't like. We can make some of
these elements bigger, some smaller, and we are trying to not make very sharp corners. If we want, we can
take an razor, adjust the silhouette slightly, and add more interesting lines. Also, if we want, we can add some
additional elements. For example, we can return
to our brush and go here between the two mountains and add some sheep
that will go down. It will be as if we have
a small mountain here. Then again, we close
the shape and then very carefully go inside and color
everything with a brush. If we want to work on the shape, we take the eraser and
then work on the ship. Looking at the picture
from a distance and deciding if there is
anything we want to fix. Let's spend a moment here and fix the parts we want to fix. When we are generally
happy with the result, we'll go back to our
colors and choose white, which is our fifth
color in the first row. And similarly, we'll
go to the snowy topes of our mountains and add
additional elements. Also with woblylines, We will create new shapes and
color them with our brush. When we are done with
the first mountain, we go back to the
second one and do the same thing if we want. We can also go to a small mountain and very
carefully with a brush, add the color to the top. When we have a result like this, we will add a gradient to
the bottom of our mountains. For this, we will first
deslate everything by clicking on the
ribbon icon at the top. After that, we'll go back
to our brush library. Go to the airbrushing folder
and choose Soft Blend. Go back to the layers and go to the layer
with the mountains. Click on the layer and choose
Now we are going to go back to our colors and choose a contrast color
to our mountains. Meaning we can go and choose either the first color in the first row or the first
color in the second row. We'll make a bigger
brush and very gently go from the bottom side of our mountains and
add that gradient. Also, we can take an
additional color. For example, if we took the color that we have
in the second row, we can go to the first row, take the first color and add
it at some places as well. When we have this result, we'll go back to
the brush library and select script brush again. Now we are going to go and add another mountain
on the right side. Let's go back to the
layers and go to the layer with the
tops of the mountains. From here we will
create a new layer, then go back into
colors and select the first color in the second row in the
same way as before, We'll go to the empty space on the right and create a mountain. We can go slightly above the blue mountain or
we can go below it. Let's create a ship first
and then move it around, drop a color to the ship. If we want to move the sheep, we select the arrow on the top left and move the mountain
to where we want it to go. When we are happy, we click on the arrow again to
remove the selection. If there are places
that are not painted, we will carefully color
them with a brush. Now we will be adding an extra
color to the new mountain. Go back to the brush library, Ear Brush and
Folder Soft, Blend. Go back to Layers. Select the layer with
the new mountain. Click on it and choose
Alpha Lock Again, go back into colors and select the second color
in the first row, the same color we use
for our main mountains. Make the brush proportional
to the new mountain. And very gently go on top
and add a blend like this. When everything is ready, go back to the brush library. Go to the calligraphy folder, and again, select script brush. Now we're going to
add the fir trees.
5. Trees: Let's go to the layers. And we need to select
a layer the way that the snow will
overlap the trees. Let's go to the
layer number three. And from here we will
create a new layer. It automatically gets
clipped to the main layer. Next, we'll go to colors and
choose the dark blue color, the second one in
the second row. Let's start creating the trees. We make the brush
a little bigger. And starting from the top, we make the strokes go into the side and release
the brush at the end. In the beginning, we press
on the pencil quite hard. Now just move diagonally toward the bottom and create
a silouette of a tree. You can make a fluffy fir tree, or you can make a
more subtle fir tree. If we want to remove something, we always go back
to our eraser too. Try to make the
silouette more readable. Go back to the brush. If you need to fix
something, fix it. If the tree is a little bit off, we can always go back to
our arrow on the top left. When we are at the
transform tool, we have this green slider
on top that we can hold down with our apple pencil and tra tate it to the desired site. If we want to change the
position of the tree, we can always press the apple pencil when we
are at our transform mode. And we can move it
wherever we wanted to go when our tree is ready and
when we like the position, we click on the arrow. Let's add some more trees. We'll go to the left side from the existing tree and create
a slightly smaller fir tree. If we want, we can change
the size of our brush, make it a slightly
smaller size so it will be easier to
create the smaller trees. Now, in the same way as
we did our first tree, we will make the second one. Again. If we want to
work on the silhouette, we select our eraser and
change the parts we want. When the second
tree is complete, we'll go and create
another tree on the right. When it's ready, we'll add another tiny tree
next to the one on the right once all of
our trees are finished, once we like the result, the last thing that we
will work on is the sky.
6. Sky: First we are going to go back to our brush library and
select the monoline brush. After that, we'll
go back to layers. Go to the layer number five. And from here we'll create
a new layer On a new layer, we'll go back into
colors and choose white. The fifth color
in the first row, we are going to make the
brush slightly smaller, about 7% And we are
going to go between the two mountains and create a circle in the same way as
we did in the beginning. We create a line, hold it at the end, and keep one finger
on the screen, make it the size you like. And if you need to move the
shape, go to the arrow. Uniform methods, move it
to whenever you want. If we want to make the
size bigger or smaller, we can do that too with the
handles in the corners. Now we'll look for the
placement that we like. And when it's ready, we go to the arrow and
deselect everything. Let's add the color
inside the moon. Once we've done that,
let's add some stars. Let's go back to
our brush library. Mono line brush. We are going to change the brush
settings a bit. We have the brush selected
now we are going to click on it one more time and
go into the brush studio. Select Stroke path
on the left panel. Set the space into maximum. And our brush will
now look like this. You can check how it
looks on the drawing pad. And when it's done,
click down at the top. Now let's go and make the brush slightly
bigger, around 13, 15% Let's start making dose for the stars on
the top of our picture. When we have plenty
of big stars, we'll go and make our
brush slightly smaller, around 7% And we'll add a few more on the same elements
to the empty spaces. If you want to make a
bigger or smaller brush, please go and change the size. We'll add a few more stars.
7. Final Fixes: Now at the very end, let's look at the picture
from a distance and we will search for places
we'd like to change. For example, we can go and
make these mountains a tad bit smoother and fix the
under coolored elements. First we go back to
the brush slide. Go to the calligraphy folder. Take our script brush. Go to the layers and look for the layers that have
elements to be fixed. Going back to the layer
with the mountains, first we can click on the checkmark and
make sure that we are at the right layer as in
need to fill in this place. Here we go back to the
spot and grab the color by holding our finger on the screen painting over
the node colored place. And then we will go
through the canvas and check the other places if
we want to fix something, if we want to make
some line smoother, we go and do that. If we need to
change some things, we can always go to the riser two and tidy up some
places that we don't like. Now we'll just work on
the silhouettes and fix the flows if we want to correct something
more fundamental. For example, if we want to make the mountains a bit
smoother up here, we can always go
back to the layers. Go to the layer
with the mountains, take the ser two and
correct that imperfections. If we need to fix something
on another layer, like the white layer, we can always go back to the correct layer and
adjust it from here. We always take a look at
the picture from afar. And if we want to fix something, we can go back and make
adjustments to other elements. For example, we can go to the spruce trees and
make them smoother. We can go to our layers. Go to the layer with the trees. Take our eraser tool, fix some aspects
that we want to fix. For example, work on the silhouettes and
make them smoother. And when we are happy
with our image and when we don't have any more
places we want to fix, we are done with
our illustration. And that wraps up our class. I really hope you
found it useful. And if you enjoyed it, don't forget to explore
the other classes. Hit the follow button and share your thoughts
with the review. Thanks a bunch for tuning in.
 Xenia Sorokina, Illustrator & Graphic designer