Transcripts
1. Introduction : Hello everyone. My name is senior and I'm an illustrator and graphic designer. They were talking about the first steps in procreate will create a few simple illustrations and end the same time. We'll go through all the options and tools that are needed to get familiar with the app and start drawing there. During the class, we'll discuss the basic gestures, explore the interface, will work with selection and transform tools. We'll check out the different ways of coloring, as well as blending modes, layer masks, and much more. After completing this class, you'll be familiar with the functionality of Procreate and we'll be able to create nice do those and illustrations. You can use the final pictures of this glass as seekers, both cars bothers some digital products or whatever you want. These class is for everyone. So don't worry if you have no prior experience. So if you're ready to launch your software and let's begin.
2. Getting familiar with the App: Canvas: So the first thing that you will see while opening Procreate for the first time is the gallery. Here you have all the images that were made before. For now, let's start by creating a new canvas. If you tap on the plus icon in the right corner, you'll see a new canvas menu. Here we can use the prepared template or create your own custom canvas with your dimensions to create a custom canvas, It's up on the little icon in the top-right corner and you'll be redirected to the custom canvas wins out. Here, you can write down your values for the width, height, and DPI, choose from millimeters, centimeters, inches, and pixels. Also, while you're still here, you can select the color profile depending on your intentions. Choose from RGB and CMYK. Rgb works for screens and CMYK is better for prints. And when everything's done here, step create, or if he chose to go with a pre-made canvas's, choose one from the least. I'll choose the square one with the RGB color profile. So just tap on it, and here's our new canvas.
3. Getting familiar with the App: Basic Gestures & Interface: When we have the new Canvas, Let's take a look at the tools we have and figure out some gestures. Their first gesture that you need to know is zooming the Canvas, beach two fingers together to zoom out, being shipped parts to zoom in. Now let's take a look at its operands and you will see that we have a few icons here. The first one is the brush. Here we can find a lot of default brushes that you can use in your drawings. The second one is much, it allows you to mix and blend the colors. The next one is an eraser. Then we have the layers and they help you to manage elements a just and edit them separately. The last icon is Scholars. Firstly, let's take a look at the colors. You can choose how you want to pick your colors from the disk in a classic way with the color picker and hue saturation brightness sliders, you have harmonies, you have values, and you have palettes. For now, let's just use the disk, choose any color you like, and we're going to be using it for this sketch. Choose some neutral color not to bail and not too dark. When we're done with beaking the color, we need to select the brush. So let's tap on the brush icon and we'll get into the Brush Library. In Procreate, brushes are organized by themes, categories. You are free to choose any brush you like. Go for the brushes and maybe try out a few for this gauge. Probably, it's good to use some pencil or of a textured brush. I'll take the Procreate pencil and you take any brush you want. And let's get back to the canvas. So seven, some blink space. On the left, you have SIMnet x2 bar. The top slider will adjust the brush size. Drag the slider up to increase the size and down to decrease the bottom slider will adjust the brush capacity, drag the slider up to increase capacity and make the brush more solids and down to decrease and make the brush more transparence. And on the bottom we have redo undo button. To undo the action. You can save the upper arrow if you indeed the action and change your minds. Said the bosom arrow to redo the latest action. But it's not that super convenience. We can use the gestures to undo and redo the actions set with two fingers to undo the latest action, set with three fingers to redo the latest action, you have enzyme to clear the layer. You can make a scrap movements with three fingers.
4. First sketch, QuickShape, Selection and Transform tools: Now we can start making this gauge for the first fruits. We already grab the brush. So let's increase the opacity to 100 percent, increase the brush size. And let's begin. We'll start by creating a lemon, and we'll do it by using two simple shapes. First. Then we'll go to the canvas and draw analogies as much crooked or a neat as you can at the end of the line when you are connecting the starting points with the end points, hold on your Apple pencil. By doing that, you activate the quick shape tool and it will help you to create the perfect shape. If you move the pencil diagonally up, it will make your sheep bigger. If you move it diagonal, it's out. It will decrease the size of your sheep. On the top you'll have the title Edit Shape. And if you tap on it, you'll be able to adjust your shape even more, drag the anchor points and resize the shape here if you need it. When you're done just happened some blank space and you turn the editing option of now let's add the second ellipse to finish the lemon shape. This time it will be more thin and elongated. One, draw an ellipse inside, somewhere near the center. Cool down depends on n the end to make a perfect shape and then get into the edit mode to adjust it even more and make it smaller or wider and adjust its placement when you're done, tap and some blank space. And now we have the sheep of the lemma. The next thing that we need to check out is selection and transform tools. We need selections to isolate some parts of the drawing in order to age it and transform them. So go to the left top toolbar and second, the third icon with the letter S, you have a new panel on the bottom where you can choose how you are going to be selecting the areas. Let's start with the free hands. Here we are creating a selection by drawing any shape you want, use your finger or an Apple pencil. Also, we can use the rectangle as a selection tool. You can see that now the Add button is activated and that means that we are aging the areas to the selection. If you have trouble seeing the difference between selected areas and not selected, you can fix it by doing the following. Go to the Actions, is the range icon on the top left, then go to the preferences and send a selection mask visibility. So we use the rectangle and let's check out the ellipse as a selection. So if you activate the Remove option, you'll be excluding the areas of your selection. If you choose Invert, you will select everything except your selection. For now, let's remove everything except the lemon shape and move on to the Transform tool. Go to the top-left toolbar and select the last icon in a row with an arrow, the selection will appear in a bounding box with a dashed lines. The blue handles our transformation nodes, or in other words, the things that you can drag. And again, here we have a few options of how we can transform the elements. Most of the times you're going to be using free form and uniform math apps. Let's start from uniform. It preserves the original ratio, which means if you distort it horizontally, it will automatically growths all are the free form method works a bit differently. It allows you to edit the ship freely without maintaining their original ratio. You can drag it vertically and horizontally it will stay the same or vice versa, drag any blue node to transform your contents. The image will anchor at the opposite note for the quickest result, drag a corner notes. This will transform your image both horizontally and vertically and the same time, when you're satisfied with the transformed result, go to the top-left toolbar and set the selection icon. Now let's add some beautification for the lemon. For example, MBA stand with the leaf and the face elements such as ice, mouth, and cheeks. Don't worry if your lines are imperfect, it's justice cage and we can fix a refund leader. And when we have the first sketch, Let's move on and make a few more fruits to accompany the lemon.
5. Continuing with the sketch: Now let's create an ERPO. Start by drawing a circle and then adjust the shape with aged modes. Draw a wavy line on soap to make some kind of a cut and to show the apple shape and the stem and leaf, add some additional elements if you want and finish up by drawing a face. If it's needed, use this selection and transform tools to adjust the appearance of the face or other elements. When you add then create a new fruits, you can draw your own fruits, any kind you like, or you can repeat the fruits that you'll see later in this class. Just try to find the simple shapes and then turn them into an illustration. I'll draw a strawberry next. Start by creating a triangle. Pull down the Apple pencil at the end of the last slide to make a perfect shape. Aging the shape into the agent modes. Create a curve on top to make this part around there. Again, you can hold down your Apple pencil at the end of the line. It's a mic, a perfect sheep soften this side parts of the strawberry by using the same method with the curves. Let's add the stem, draw a five-point star with curves and straight lines, more like a starfish in the face and use different expression if you want. Let's move on to another fruit. And this time it's going to be a peer, draw one circle on the bottom, it a smaller circle on the top, and then connect them together with the curves on the sides. It doesn't matter if your fruits are not symmetrical. We can work on them more a bit later or leave them as they are continuous, as in the details in the face. Move on to the next fruit when you're ready. Let's make a banana, draw an L AND gate it shape with the stem. Separate the boards and part by coloring these parts and the details on this Kin Lee with a face expressions and use different shapes for the eyes and the mouth. Let's move on to the next fruit. And this time we will draw the chair is they are going to have the heart shape. But with this move, corners, draw one cherry and let's learn how to make a copy. Select the shape with the selection. So then slight three fingers down the canvas to get into copy and paste menu, Insert menu, select Copy. Now once again, slight three fingers down and choose Paste. Now go to the layers and you will see that we have a new layer with the COVID chariot. Make sure that the new layer is selected. Now it seemed that transform icon and move the copy charity to the site. If you hold down the green nodes and going to be moving your hands, you'll be rats eat and your selected sheep. If you are inside the bounding box and holding and moving your pencil from side to side, you're going to be scaling your elements. If you are outside the bounds in books, you may just moving it. So a jazzy sheep rats it and scale it the way you like it. Now, as you can remember, we have the second chair on a different layer and we don't really need it to be that way. So let's go to the layers and merge two layers together. To do so, we need to step on the inserted image layer and select the merge down from the drop-down menu. And now we have everything on one layer. If you want to pick an eraser and erase the parts you don't need. You are welcome to do it. You can set any brush you like for an eraser. Just tap on it and get into the brush library. Draw the stems with leaves and add the faces. Let's move on and draw a pineapple. Start by creating an ellipse and editing it into the edit mode. Change the bottom part by making it wider. Now let's add the stems. We will create a few bigger triangles, all connected with a soft curve on the board, Sam. And now let's add some details for this scheme. Make a few diagonal lines going from left to right and a few more going from right to left, thereby creating some kind of a net. After that, the face elements. Let's move on and draw the last fruit, and it's going to be the peach for the beach, we will make two ellipses and intersect them. Agent the shapes if it's needed, soften that so parts by creating a new curve, erase one of the lines inside the beach in the stem with the leaf and draw the fees elements. And we're done with this sketch. Now let's position the elements on the canvas more wisely. Maybe resize some of them, move, rats eat, and so on. I'd suggest you to do that kind of manipulation on the sketch stage. Because every time you're scaling your selection, the quality of the lines gets worse. And if you don't want to have the poor and fuzzy lines, oldest scaling, end position in the urine. This sketch, while you're moving entrants eight in your elements, you can adjust them with the transform tool as well. Find what looks best. When you position your elements. We can move on to the next part, which is going to be the line in parts.
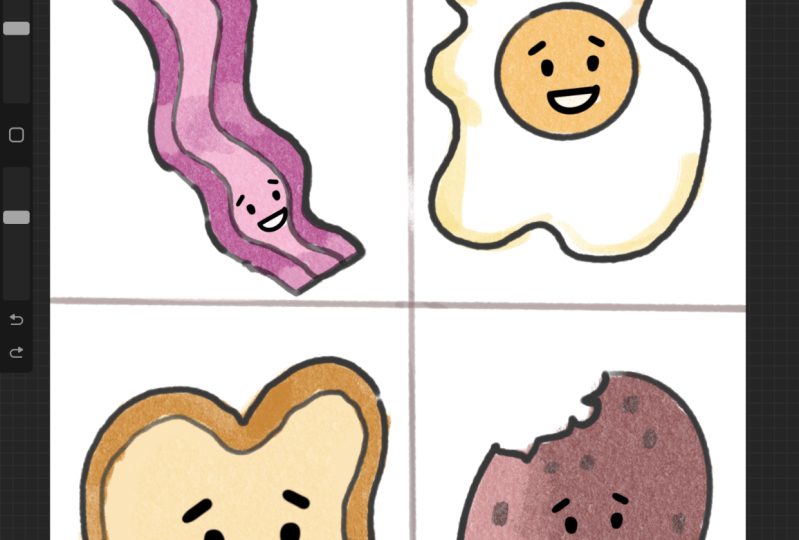
6. Lining part: Let's go to the layers and do the following. Firstly, we will change the opacity of the sketch layer. That means that will decrease the visibility of the layer and make it less solids. That will help us with creating the clean lines. We still will see this gauge, but it won't get in the way. So tap on the icon on the layer and move the capacity slider handle to the left. For now, let's set it as 50, 55 percent. Now let's rename the layer. So tap on it and select Rename into drop-down menu. And by using the keyboard, just type sketch to make sure we won't make some the layers and won't add the clean lines on the wrong layer. Let's lock the sketch layer, swipe the layer in the layers panel from right to left and choose lock. A little lock should appear near the layer's name, and when it's activated, you won't be able to add anything on this layer until you unlock it. When we have the sketch layer all set, Let's get back to the Layers panel and create one more layer, said the plus icon on the top right, we have a new layer. So let's rename it right away, is going to be the clean lives. And we can start tracing the sketch and making the clean lines pick any color you like. I'll pick the darker color, not black, but a dark purple or dark pink, depending on the final result you want to get, you can create the lines with its extra brush or with a smooth in GIN one. But be aware that if you are using that textured brush for the lines, you won't be able to feel the areas inside with a color drop. You'll need to add the colors manually ends with the inking brushes. We won't have such problems. So decide for yourself what lines type you want to make and what method of coloring is more yours for the inking, I'm going to be using the technical pen and I'll change one option of this brush, which is called streamline. Streamline helps you to make smoother lines. Tap on the brush in the brush library to get into the brush studio. Here we can change the settings of the brushes. So to make the learning process smoother, we will increase the streamline. You can check out how the line behaves on the drawing pad on the right. When the streamline value is low, we can freely create the line. It's more natural with all the flows. When we increase the value, the life starting to be smoother, but you are losing a bit of control. So depending on what you want to achieve with the lines, play with the streamline value, make them more traditional with all the flaws, or make them super smooth. When you're done, just tap on the Done button on the top, and let's start making our lines. Set the brush size and find the thickness of the lines that works for you. And what you need to achieve on this stage is closed lines. It's not necessary to make the lines a 100 percent similar to the sketch. You can change things. You can create the lines by using the sheets as we did on this gauge. Or you can trace the sketch lines. You can make the lines as smooth or as natural as you want. Use the eraser to fix the lines when it's needed. If you're using the Apple pencil on its wise with one finger and you'll switch to the areas are if you need increase the streamline even more. If you want, you can add some features such as notes. Move on to the other fruits that clean lines. If you don't want to deal with a reason, small details like here with the cheeks, mouth, you can do the following. Create one more layer. Above that layer. Get back to the main layer with the lines intersecting parts and then merge the two layers together, making the clean lines. When you are done with the lines, Let's hide the sketch layer. You can do it by tapping on the Chatbox near the layers name, check out your lines and do some minor fix things. If you have some places you need to fix, maybe you didn't clean up the line so well or you have some gaps in the lines that you need so close. So just take a look at the lines and fix all the needed places. It's some details or it's extra if you want. Make sure all the lines are closed if you're playing in. So use the color drop as the coloring methods. And let's move on to the coloring.
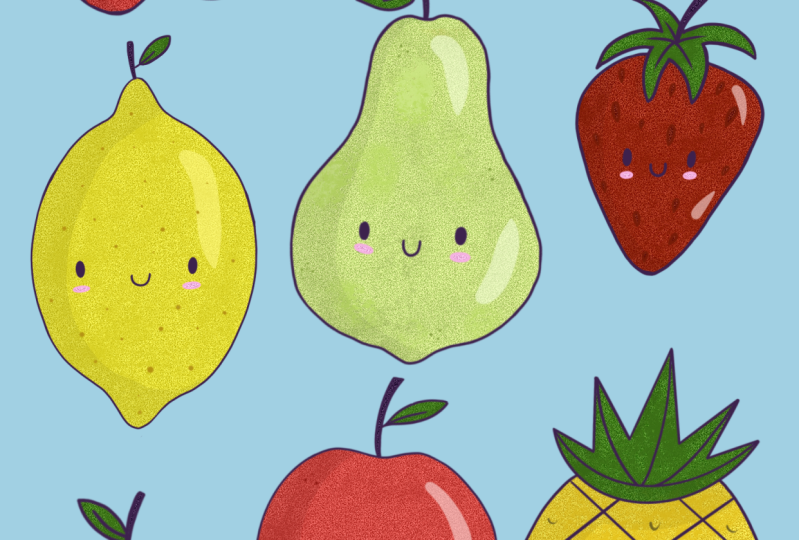
7. Coloring part: We have a few ways of coloring the objects. The first one is just work on the same layer with the lines and use the color dropped here. But the con of using this method is that you won't be allowed to change the color of the lines if you'd want, because you'd have just one solid objects. So this option isn't very useful. Another method is creating the copy on the lines layer and 18 the colors there. We will have one more original lines as a backup. And in case we want to change the line scholars to make a copy, go to the Layers, swipe the layer from right to left and tap, Duplicate, and to end the colors, just use the color drop. This method is a bit better but not ideal. One more option, mostly for those who used a textured brush for the lines is eight and the colors manually, in more traditional way, you can create one more layer, put it under the layer with the lines entry color your own objects in that way. But the best way is using the reference option. It helps to separate into layers from few layers, which means if you layer is set as reference, you can color drop feel on to a new layer in the fields will behave as though they're flowing into the line work on the reference layer to send a layer as a reference unit to tap on the layer. In that case, it's the layer with the lines and choose reference from the drop-down menu. Now, if we go to the new layer that we made for the colors and start using the color drop. We will be able to do it with no travel. You can hide the layer with the lines to see that it works perfectly. So that's the method that we are going to be using. Let's start recoloring the fruits, beaks, some colors that you find suitable for your illustration and color drop them if you beat some color and already colored dropped it, but you kind of don't like it. You can go to the adjustments Is the second icon on the top left with the magic ones. Choose hue, saturation, and brightness from the list and adjust the color here. For now, use the layer option to week the handles on the sliders and find the color that suits your needs. When you're done with hue saturation and brightness, just step on the adjustments icon once again and move onto recoloring other objects. If you have more than one color on the canvas and she wanted to change one of them. You can again go to the hue, saturation and brightness, but use the pencil option a this time paint over the area you want to recolor, for example, the cheeks. And once again, to wing the handles on the sliders to adjust the color. Move on and recolor the other fruits by using the same methods, select a different color and color, drop it to the needed area. Use the selection tool to select a separate object and adjust the colors only inside the selected area. Use hue saturation and brightness when necessary, when you're done and you want to deselect the area, just tap on the Selection icon on the top. If you want to select the color that you already had on the previous object, you can get me or the color you want to be. And by holding down one finger, you'll get the eyedropper tool that will help you too big the needed color. I need to recolor some smaller elements. Don't hesitate to use just the brush. Also, you need to recolor the white elements such as teeth, because now they are transparent. And if we change the background color, these areas will be recolored as well as the background. Let's take a look at your finished colors and decide if you want to change any fan, make the fixes rights away. And when we're done, we can move on. We'll meet in the next part where we are going to be exploring a few more useful tools and options that will help us to create better illustrations.
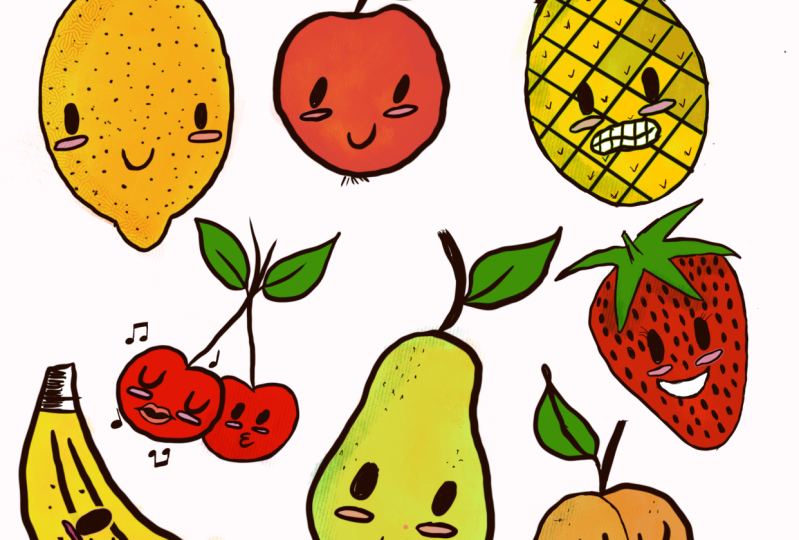
8. Blending modes & Layer masks & Noise: When we're done with color in their fruits, we need to turn off the reference. So tap on the layer and select the reference one more time. So let's move on to some beautification. For example, you'd like to end a texture to your objects. How can you do it? We can go to the layer with the colors and we can turn on the Alpha Lock that will lock the transparency of the layer, which means you'll be able to paint over the areas you already have on this layer. Let you get on the example, set the layer and select Alpha Lock, grab some textured brush, select a different color and maybe adjust the opacity of the brush. Get back to one of your fruits and start painting over and thereby agent that texture. You can see that all this happening inside the shape without going beyond the lines. Try it out on some fruits if you like the result, leave it. If you don't undo the actions, the corn with alpha lock is debt is pretty radical. You are recoloring your object and don't leave the original coloring to get back to. But we can use another option that will have the same effect, but won't be that permanent. Create one more layer and put it above the layer with the color sap on it and choose clipping mask from the list. It works the same way as an alpha lock, but it doesn't affect the layer. It's attached to. Every change you make, you make on the new layer and you can delete it if you don't like the result and get back to the original colors, dry out, agent the texture with a clipping mask, grab the brush and paint over some areas. If some color variations browse different brushes, use the smudge tool to blend the colors. If you don't like what you've made, grab the eraser and erase what you want. Also with clipping masks, we can add shadows and highlights. So let's create one more layer above the layer with the colors. If you added some texture layers, put a new layer above it, said The new layer as a clipping mask, name the layers or leave them as they are, it's up to you. And essential part of the layers are the blending modes. By default, contents on one layer covers up the contents of layers underneath it. But there are other ways the objects and colors on Sue layers can interact, ends blends. If you'd send the N symbol on the layer you have, you'll see a new menu here. You can select the capacity level and choose from a variety of blending modes to make the shadows, Let's use the blending mode that is called multiplied and we will decrease the opacity right away. Beaks some color similar to the object's color, but a bit darker or the opposite to that object's color. Maybe use the harmonies and complimentary colors, and let's add the shadow for the first fruits, you can make the shadows with its extra brushes or with the Incan ones. All depends on the results you want to achieve. Continue agent the shadows on the other fruits. If you want to change the opacity of the shadows, get back to the Layers panel and play with the capacity slider. If you want, check out the different blending modes and find one that works best for you, but probably for the shadows, the best blending mode is multiply. If you want to change the colors of the shadows, you can again go to the hue saturation and brightness, and play with the sliders until you find what works for you. Do it one by one by using the selection tool or the pencil mode, or change all the colors of the layer at once. Let's add the highlights in the same way. We'll create one more layer, put it above, and set it as a clipping mask for the highlights, we can use the overlay mode or the soft lights. Let's try out the overlay first and decrease the capacity rights away overly applies darkness or lightness FX based on the luminance values. If you are using the darker color, it will darken the area. If you are using the lighter color, it will lighten it. So this mode is breeds a universe out. It'll be working in accordance with the color you are choosing and blending it with the color that you are applying it to. So you can go through all the fruits with a lighter color and end the highlights on the opposite side from the shadows. Also let you go to recolor in the lines. It again will require the clipping mask, create one more layer above the layer with the lines and set it as a clipping mask. Let's check out how it works. Only cheeks, select the same color with the eye dropper tool and start recoloring the lines. If you want to leave the lines without recovering them, you are welcome to do it. You can recolor the dots that we added for this extra, in that way, pick a lighter color and spades or were they needed areas. One more thing to check out is the noise. It adds, the green affects, weakens it on the layer with the color, or we can flatten everything, merge all the layers together, apply the noise FX in that way. Let Chicago the latter option first, we need to make a copy of everything that we have on our Canvas. So swipe down with three fingers and choose Copy. All swipe down with three fingers once again and choose Paste. You will see that we have a new layer with cowpeas. Everything we can move it to the top, gets rid of the Clipping Mask feature. If it's activated and try out the noise, go to the adjustments and select the noise to apply an effect. Cool down one finger or a pencil and move it from left to right to increase the effect and from right to left to decrease, find the amount of noise that you like. Also, you can notice there are a few options on the boards, a menu that you can switch through, their free styles, cloud-like, bills like and reaches like from workhorse to more details. The sliders are scale, which is the size of the noise, octaves, which are complexity and details and turbulence, which are twists and works in the noise. Or if you want to add the noise only to the colored areas, you can hide this flattened layer, go to the coloring layer and apply the noise here. In the same way it will be applied just for the objects, not the whole picture. Last thing here is changing the color of the background. Just go to the background layer and choose the color you like. And that's the end of the class. I hope you found this class helpful and if you liked it, please check out the other classes, give a follow and leave your review, and thanks for watching.
 Xenia Sorokina, Illustrator & Graphic designer