Transcripts
1. Introduction: Hello everyone. My
name is Ene and I'm an illustrator
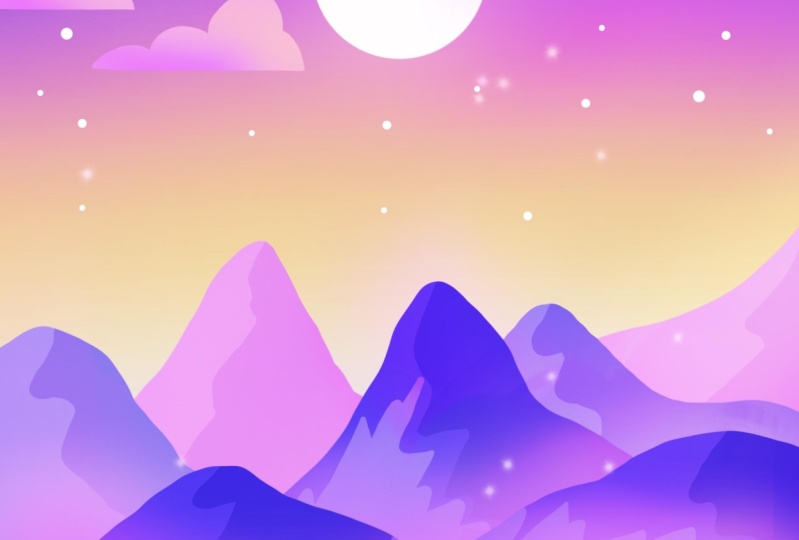
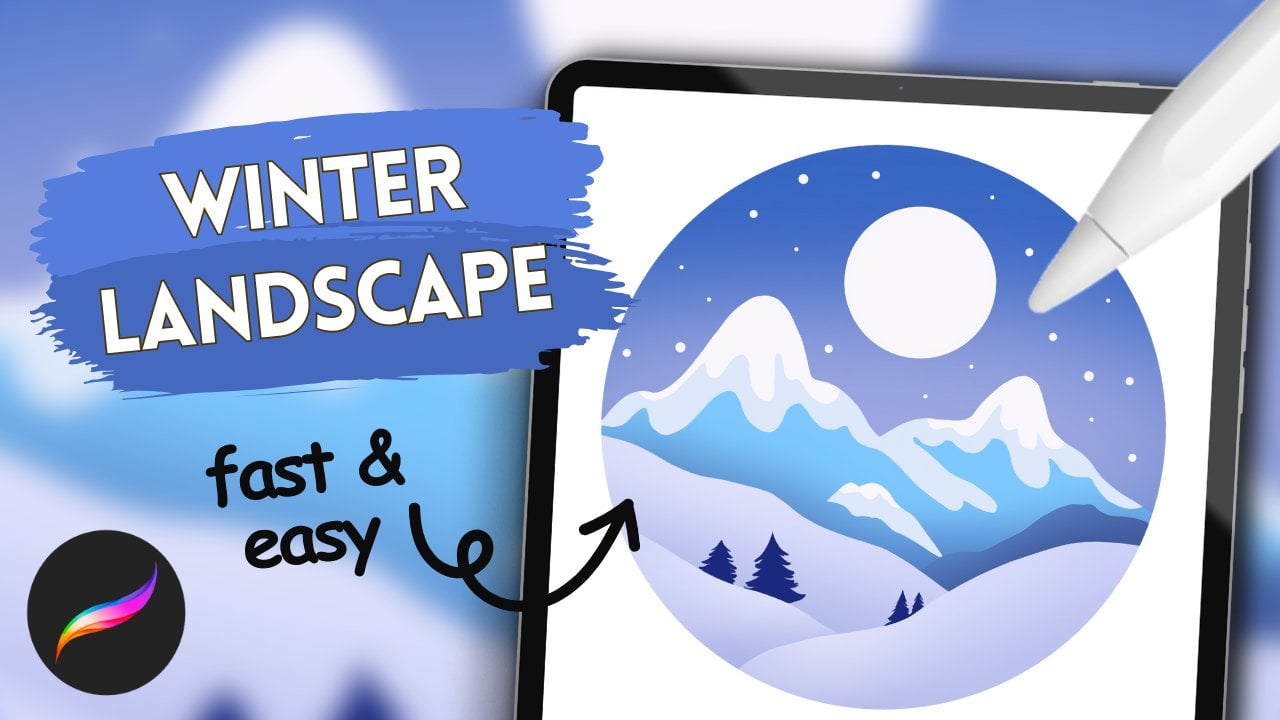
and graphic designer. Today we'll create a simple
mountain Don landscape. During the class, we will
work with simple shapes and simple procreate tools to
create a stylized picture. We will work with gradients, alphaog, clipping masks,
and blending modes. As a result, you'll get an image that you can use as
a sticker postcard, some digital product
or whatever you want. This class is for everyone, so don't worry if you
have no prior experience. Mostly it is suitable
for digital drawing because everything you'll see
will be made in procreate. However, it absolutely doesn't mean that you won't be able to recreate it with some
other graphic software or with the
traditional materials. So with that set,
if you are ready, launch your software
and let's begin.
2. Background: Let's start by clicking on the plus icon in the gallery
and selecting a new, a four size canvas. Now that we have our new canvas, let's go to colors and select the first color
in the first row. When that's ready, let's
drag and drop the color onto the canvas to get a
background of dark blue. Next, we need to start
making the gradient. First, we'll go to
layers and create a new layer by clicking on the plus icon on the top right. When we have a new layer, let's go to the brush
library airbrushing folder. And here we'll choose
the soft blend brush. The capacity of this brush is 35% and we can start with
the size of about 25, 30% Now let's go to colors and choose the second
color in the first row. When we've done
that, we go back to the canvas and starting
slightly away from the top, we make a stroke
with a new color. We can make it
bigger or smaller. We also can make a semi transparent transition
between the colors. When this color is ready, we go back to the
colors and pick up the third color
in the first row. We can make the brush
a little smaller, about 20% And in the same way, we will go to the bottom of the new color and we will add
a new stroke of the color. Again, we can make a semi transparent
transition between colors, or we can just make a
simple solid stroke. When we have this color ready, we go back to colors and pick up the next color in
the first stroke. The fourth color, the pinquan. Again, we go to the bottom of the previous color and
add another color. You can add a broad stroke
with the color if you want. When we are done with the pink, we go again to the colors. Choose the next color
in the first row, the fifth color, this yellow. And again, we go to the
bottom and add this color. If we see that we have some uncolored parts
between the colors, we can always go back to the colors and choose
the previous color, in this case pink, and correct it up here. Let's go back to colors and
select the next yellow color, the sixth in the first row, adding it to the bottom and trying to make a
nice transition. Now we go back to the colors
and pick up the white color, the seventh color
in the first row. And in the same way we
add it to the bottom. When we have all
the colors we need, we are going to make
a smooth gradient. For this, let's go to Magic an tule and choose
Gaussian bluer. Now you need to hold
either your finger or a pencil on the screen and
move it to the right side, thus adding the bluer. We will stop at about 45, 50% We are looking at the transition
between the colors and deciding whether
we like it or not. Which means that if we
want to make it very, very blurry, we can go
more to the right side. If we want a more harsh
transition between the colors, we can stop at about 30% 35% And when we like
everything here, we'll click on the magic
one tool one more time. Now if we look at the gradient, we can say it's pretty simple
and not very colorful. In order to fix that, let's go and change it a little bit. Let's go back to magic 12 and go to hue saturation
and brightness. Here at the bottom we
have three sliders. Let's go to the
saturation slider. Let's zoom out our canvas to look at the
picture from afar. And let's add a little bit of saturation to make the
colors more vibrant. Try not to overdo it. About 60% will look great. And of course, if we want
more saturation, we do more. If we want less, we do less. When we have found what we like, we click back on the magic 12. Now we are going to move the
gradient a little bit up. To do that, we need to go
and click on the arrow on the top left here in
the panel down here, we are going to click
on Uniform Methods. And we also need to
select snapping. We click on snapping
to begin with, and in the Settings
in this list, we also select snapping. Go back to the canvas and when
we have this bounding box, hold down your apple pencil and follow the orange lines upwards. When we move along
the orange lines, we know we are not moving the gradient
horizontally anywhere. Let's find the position we like. And when we've done
that, we click on the arrow again to
exit this menu. When we are done
with the gradient, let's go and start
creating the sun.
3. Sky: First, let's change the brush. Go to the brush library and
go to the calligraphy folder, where we select monoline brush. The capacity is set at
100% and brush size is around 10% We'll use the
same color we have now, which is our white color. First, let's go to
Layers and click on the plus icon to
create a new layer. Now on this new layer, we'll go to the pink part. And here with one line, we'll start creating the sun
by drawing a circle by hemt. When we have created
the basic shape, hold the pencil in place
and also hold one of your fingers on the screen so that the shape becomes
a perfect circle. If we want to make the
size of the object bigger, we move the pencil to the side, finding the size that we like. When we like the size, we let go of everything
we are holding right now. And when we have that outline, drop the color inside. Now let's put the sun in
the middle of our canvas. And to do that again, we'll go to the
arrow uniform method and snapping all turned on. And again, hold the apple
pencil on the screen, searching for the orange line in the middle of the canvas. When we found the
position that we like, we can go to one
of the blue nodes, either top of the middle
or bottom of the middle. And hold down the pencil and
move it to resize the shape. When we are happy with the
position and size of the sun, we click on the arrow
to leave this menu. Now let's add a touch
of extra color on top of the sun as if to make
a little fog effect. To do this first, go back to the brush library and go to the air
brushing folder. Choose soft blend brush again, and all the brush settings
are the same as before. Next we go back to the layers and go to the layer
with the sun. Click on it and
select Alpha log. A checkerboard appears
around our object, and that's what we need. We will only add elements to the shape that is on this layer. Now that we've done that, let's go back to colors. And again, we'll select the fourth color
in the first row. Then we'll make the brush
size a tad bit bigger. About 30% 32% And very, very carefully, we'll add
an extra color on top. When we've done that,
we'll go back to the brush library and go
to the calligraphy folder. This time we'll
choose script brush. Go back to Layers. Click on the plus icon
and create a new layer. Now let's go back to colors and choose the first color
in the second row. Once that's done, let's start
creating the clouds first. Let's zoom in the canvas, and we are going to go from the left side to this pink area, or a little bit higher. We'll start drawing a line that will go to the center
of our canvas. If we want, we can make
the brush size smaller, about 5% With the capacity at 100% just draw a line towards the sun and
hold it at the end. And also hold one finger on
the screen so that the line becomes straight when the length of this line is right for you. Let it go. Now let's go from the top and add the
shape of the clouds. First we'll go to the left side and
create rounded shapes. We need to make
these shapes closed. When we have the shapes closed, we can drop a color insight. If something needs
to be corrected, we'll go and add it by hand and then just
drop a color insight. Now let's work on
the shape a bit. But first we have
to set the eraser as the same brush that we
are using as the main brush. When we have the brush selected, we go to the eraser icon and
hold it with the pencil. Now we can check it by
clicking on the eraser and see that it is now the same
brush as our main brush. Now with the eraser, we are going to work
a bit on the ship. Which means if we have some places like here
that aren't very neat, we'll fix them manually. We go to the eraser and
remove some elements. If we need to add something, we go back to the brush
and add some elements. Now we're just going
to work on the slit. When we are happy
with the clouds, we can go back to the brush and add another cloud a bit lower. Let's go lower than the first cloud and in
the same way as before, start by creating a line that goes horizontally
towards the sun. This time, make it a bit smaller and also
hold it at the end. Hold one of your fingers on the screen so that
the line is straight. Then in the same way as before, we add the same round
shapes on the top after we are dropping the color inside and making
the shape cleaner. When we have the
second cloud again, we go back to the
brush and go even lower and create
another extra cloud. This time, we are not going to go from the edge of our screen, but we will go slightly
aside, draw a line, go into the sun,
hold it at the end, hold one finger on the screen, and create a line of the
length that you like. Now go on top of it and
add rounded shapes. Let's make the shape and
then end the color inside. In the same way as before. We'll take the eraser and
work on the overall shape. When the clouds on the
left side are ready, let's go back to
the brush and go to the right side to
add another cloud. Let's go to the area
between the clouds on the left side and start creating a line going to the
edge from the middle, holding it at the
end and keep one of your fingers on the screen
when the line is ready. In the same way as before, we add another cloud and
drop a color inside. If we need to work
on the silhouette, we'll go and work on it. When the clouds are ready, let's add a bit of
extra color to them. Let's go back to
the brush library. Go to the air brushing folder, and again choose Soft Blend. Now let's go back to Layers. Click on the layer number four and choose Alpha Log once again. Then we go to Colors and choose the fourth color
in the first row. Make the brush bigger
or smaller as you like. And going from the edges, let's start softly
adding an extra color. If you overdid it a little bit, you can always undo it
and start over just very, very gently, add your extra
color from the edges. If we want, we can grab
a yellow color and add it to the opposite sides of where we just added
the pin color. Let's go back to the colors. Pick a yellow color, any of these two that we
have in the first row. And again, very gently go to the other side and add an
extra color to the clouds. If we don't like it, we can always undo it and
not use the extra color. When we have everything ready, we are going to work
on the mountains.
4. Mountains: First way, go back to
the brush library. Go to the calligraphy folder, and again, select Script Brush. Now let's click on Script
Brush one more time. And go to the Brush Studio, Select Stabilization
on the left. Now let's look at streamline. And here we can
vary the amount of streamline so that
the lines are smooth. We can set it to maximum or
to some high percentage. Or we can choose
the amount we like. We can test it right here
on the drawing path. When we are ready with
it, we click Done. Let's go back to Layers. Click on plus icon, and we are going to start
from the background First, we go back into colors and choose the first color
in the second row. Now when that's ready, we go near the yellow area and start with the
line for the mountain, which will go like this. We start on the left
side and we are going with a wobly line
to the right side. And we are going to create an additional mountain
on the right side. When we have the line closed, just drop a color at
the bottom of the ship. Now let's work on
the silhouettes. We will take an eraser, we will take the brush and we will add some
additional elements that will look like mountains or on the contrary,
remove something. For example, let's go
back to the brush, Make the size a bit bigger. On the left side, we will add additional elements like steps. We try not to make super
straight ships on the opposite, try to make the
ships more natural. Let's work on the right side. Take a brush, take an eraser. And work the same way,
aiding some elements. Or on the opposite,
removing something, which means that now we are just working on the silhouette
on the mountain. When we like the
mountain in general, we will move the shape higher
because now we can see the blue color of the background in the same way as before. Click on the arrow at the top. Snapping and uniform method. Everything is still on. Hold the pencil
and move it along the orange lines cover the unpainted part
with the mountain. When we like the position, we click on the
arrow one more time. At this point we can see that we have a blue background
color at the bottom. Just pick up a
color from the icon on the top right
and drop it below. Now that the first
mountains are ready, let's start creating the
next group of mountains. And to do that, we'll
first go into layers. Create a new layer on top
of the first mountains, and then go back into colors and pick the third color
in the second row. Now let's go to the
left side where we have an empty space to
add a new mountain. In the same way as before, we'll create the shape
of the mountain. Let's go to the right side. And here too, we will
add a wobbly shape, drop a color inside, and work on the
silhouette as well. When we like the mountain, again, we go to the layers. Click on the plus icon and create the next
group of mountains. Now let's go back into
colors and choose the blue, the seventh color
in the second row. With this color,
we'll go between the existing mountains
and create one big hill. We start on the left side again, go with the wobbly line and
create a top like this, when that's a color inside
and work on the siluettes. When we have this
mountain ready, we again go into layers. Continue adding
more mountains with the same blue color that
we are using right now. But to see what's going
on on our layers, let's go to the layer with the blue mountain and make
it a bit more transparent. We'll see what's on this layer, but it won't be
blocking everything. In order to do this, we need to click on an icon on this layer. We see that we have
an opacity slider. Hold the pencil on the
slider and move it to the left side so that we can see the silhouette
of the mountain. But so that it doesn't
distract us much, we'll bring it all back later. We just need to
make sure that we can see what we are
doing. Right now. When the opacity is right, click on the layer and again create a new layer on
top of this layer. Use the same color and
use the same brush. Now let's go to the right side and create another
mountain from here. Let's start on the
left side and draw a line like this and
create a hill here. Now drop a color below. And again, go back to layers. Go to this new layer and
lower the opacity as well. When we've done that,
we go back to layers. Click on the plus
icon one more time, and now we'll go to a new layer again on the left side
and create another heel. We'll start on the left side and we'll create an
interesting silhouette. Again, if we want to
work on the silhouette, we can pick up a brush
and add something. Or we can pick up an razor
and remove something. Let's spend a bit
of time here and work on the silhouette
of this mountain. When we have this
mountain ready, we are going to go back
to the brush first. And then we are going to go
to the layers and click on the end icon on the layer and make this layer a
bit more transparent. From here, we will
create a new layer, draw a new mountain. And again we go to the
opposite right side, go to the bottom
edge, and again, create a slide again, if we don't like something, we can undo the
action and create something new, make
some interest. And silhouette again, if we want to remove something,
we will remove it. When we worked onto
this silhouette, go back to layers. Go to the end icon, again, make the
capacity a bit lower. Go back to the layer number ten, and from here,
create a new layer. On this layer, we go to
the left side and create the last mountain which will be visible on our bottom
part of the picture. As always, we make an
interesting silhouette. When the silhouette is ready, drop a color inside. And then continue working on the silhouette so that it
looks more like a mountain. When this mountain is ready, we go back to layers and create another layer on
top of this layer. We don't have to use
capacity now because we can pretty much see what we're going to create on
the right side. Just create a layer by
clicking on the plus icon. Go back to the brush,
go to the bottom, to the right side, and create
another little mountain. Close the shape and
drop a color insight. Now we need to start adding extra colors to the mountains. But first, let's
go to the layers. And all the layers
that we have in blue, where we have our
lowered opacity level, Let's return them to
their original form. Let's go first to the
layer number ten. Click on the icon and
return the opacity to 100% Let's go through
all the layers we have below and do the same thing When we've returned opacity to
all of our mountains, we'll start adding extra colors, starting with the
mountains in the back. Let's return to layer number five and create a
new layer from here. This layer will need to attach to the previous
one so that we can add extra colors and not go beyond the object on
the previous layer. When we have this layer 13 on top of the pink
mountain layer, let's click on it and
choose Clipping Mask. When we've done
that, let's go to the icon and choose
different blending modes. Since we'll be adding shadows, we'll need to use multiply blending modes for the capacity. We'll choose 50% for now, and if it's too bright, we can always go back
and change this option. Let's go back to colors and pick up the second color
in the second row. Now we are going to go to the right side on the
slide we have on the left. And we are going to create
some interesting shapes. We go slightly diagonally down and create the natural
shapes of the mountain. And we are also going to
loop this line around. If we now go to the layers
and turn off clipping mask, we can see that the
line is closed, we can just drop a color inside. And in the same way go back into layers and clip
the layer back on. Now let's work on
the new silette of the shadow so the mountain
looks more natural, which means make more
interesting lines and create a texture
of the mountain. We can also use the Iser
tool and do some work with that when we have a
result that we like. Let's go to the mountain on the right side and do
something similar here. Again, we go to the right
side and add some elements, making sure that we
don't break the line. We also loop the line around and then drop
a color inside. If we need to, we
can take an eraser, work on the silhouette, make something more intranstent. If it seems to us that the current opacity
level is too high, we can always go
back to the layers. Go to the needed layer
with the shadow. Click on the M icon and
make the capacity lower. For example, about 25, 30% When you are done with that. On top of the shadow layer, we'll create another
layer and we also will attach it
with the clipping mask. After that, choose a brush and go back to airbrushing
soft blend. Go back to colors and
choose a brighter color. For example, we
can choose white, which is the very last
color in the first row, We'll make the brush big. About 35% 40% And
on the bottom side, we will add an extra
color like a fork. Let's make a very gentle blend and we will do the same
thing on the right side. When you like the result. Go back to the brush library. Go to the calligraphy folder
and choose script brush. Go back to layers and do the same thing with all
the layers that we have. Let's go to layer number six, where we have the blue
mountains over here. First we are going to
change the color of the mountain that we
have on the right side. To do that, we are firstly
going to click on the layer, choose Alpha log, and then go to Colors and choose
the fourth color. In a second row, we can use
the brush that we are using. Now, just make it a bit bigger. We'll just go over
the mountain that we have on the right side
and we will paint over it when we already have some
arrangement of mountains. And if we want to fix something, we can always do that. For example, we
can make the slide that we've painted now
a little bit higher. And we can cover
the area that we have between the
two pink mountains. To begin with, we are going
to go back to the layers. Click on the layer number six because it's now
set as alpha lock. And we are going to
remove this alpha lock. We are going to use the same
brush and the same color. Just make the brush a little
bit smaller and again, work on the siluette. When we have that finished, we are going to go
back to layers. Again, create a new layer on top of the blue and
purple mountains layer. Click on it. Clip it
with the clipping mask. Go to the icon, choose Multiply Blending Modes. Again, we can start with 50% of opacity or you can
choose 30 for example. However you like when we've made a new layer and when
everything is set up, we are going to go
back to the colors. And first we are
going to be working with our slide that
we have on our left. So for the shadow on it, we will choose the fourth
color in a second row. In the same way as with
the previous mountain. We will add the same
or similar texture. We start on the right side
and add the silhouette. Run the line around, and drop a color inside. Again, if we need to, let's work on the silhouette. And if we don't want
to, let's move on. Now, let's go to the
next mountain first, let's go back to the colors and choose the fifth color
in the second row. In the same way, we will
go to the right side of our slide and we will create an extra element
to make a shadow. We can be repetitive or we can make some
interesting new shapes. If we want, we can add
some additional elements, maybe some small stones
or other things. We can always work
on the silhouette. After we already have
the basic sheep, we use a brush and
we use an ser. It's always good to look at
the picture from a far to see if we like what we are doing or if we want to
improve something. We also try to avoid
any unpainted elements. We always go and
finish painting over everything we need to make
the picture look neat. When the shadow on
this slide is ready, we'll do the same thing we
did with the previous slides. First we go back to
the brush library. Go to airbrushing and
choose solved, Blend. All the settings are the same. Go back to layers and create a new layer on top of the
layer with the shadows. Again, click on it,
choose Clipping Mask. Go back to colors and choose a color that is a
little bit brighter. We can start with the white. We'll make a bigger brush. And in the same way we'll go to the bottom side and
add a little glue. Let's do the same
on the right side, if you want, you can add an
extra color, For example, on the right side, we can go
back to colors and select the fourth color
in the first row and start adding
some extra color. Now let's go back to layers. Go to the layer with
our main mountain. And on the top of that, again, we'll create a new layer. Click on it, choose
Clipping Mask. Go to the icon and choose
Multiply Blending Modes. Again, we can start with 50%
of opacity, or if we want, we can make the opacity set
at 25, 30% straightaway. Then go back to
the brush library, calligraphy folder,
script brush. Go back to colors and choose the last color in
the second row. Now again, we are going to
go to the right side and create a silhouette on our
slide to make it look nice. Wrapping the line around
and then dropping a color in working on the
silhouette of the shadow. When we are ready
with this mountain, we go back to the brush library. Airbrushing solved blend, and we'll create a new
layer on top of it. Click on it, choose
Clipping Mask. And then go to Colors. And choose the fourth
color in the first row. We'll make a bigger brush, then go to the bottom side
and add an extra glue, make it very intense. If we want, we can even
add an extra color. For example, go back to
the colors and choose the fourth color
in the third row and very carefully add it here. We can also start adding
extra colors to the slides. Let's go back to the layers and go to the layer number 17. From here we will create
a new layer and it will automatically be attached
to the previous layer. Now let's go back to the
brush library and we'll once again go to the calligraphy
folder Script brush, and we'll use a
more quantrasclor to create additional elements. Let's go back to colors and take the first color
in the second and use it to start adding extra elements in the same way as we did with the shadows. Just creating
additional silhouettes, mounting texture, and again, wrapping the line around
and dropping the color in. If we want to add
some more elements, let's just go and add them. Then wrap the line around
and drop a color in. If we want to work
on the silhouette, we work with our eraser
and with our brush. When that's done, we
can go into layers. Click on the end icon and set
the capacity a bit lower, like 35% Again, if we want to work on the
silhouette even more, we can go back and do that. If we see some
elements that overlap, we can take the S and
work on the spart. We try not to overlap with pin color on the color that
we have on the shadow, especially on the top. When we are done
with this color, if we want we can go to
the previous layer where we have this shadow and remove
some places that overlap. To do this, we'll
go to the layers, go back to the layer number 17, grab eraser, and remove some elements if we
don't want to do that. If we are happy with the
way everything is now, we can leave it as it is. Again, we take a look at
the picture from afar. And if we want to fix something, we go back to layers and select the layer on which we want
to make some changes, add something, change something, do everything you need
to get a pretty picture. When we have the
extra elements ready, we can start adding more colors. Let's go back to layers. Go to layer number 19, Click on it and
select alpha log. Now go back to
colors, select white. And we are going to use
airbrushing Soft Blend. We'll go on top and add some extra color
on these elements. If we think that this pin at
the bottom is too intense, we can always go
back to the layers. Go to the pin clear, and here, for example, add a bit of white color to dilute a picture. When we have this slide ready, we'll go back to
the brush library, select calligraphy folder, script brush, and
go to the layers. To select the next layer, you can click on the checkmark
to see what layer it is. If we want to, we can always go and move some
elements around. Like for example, this mountain. Let's select this layer
and move the mountain down a bit to reveal
our previous mountain. We'll select the
arrow on the top left with the same brush. Let's go back to layers, create a new layer on
top of layer eight, click on it, choose
clipping mask. Go to the icon and choose
Multiply Blending mode. Again, we'll set
the capacity to 30, 35% choose the color we
need for the shadow. The last color in
the second throw. And in the same way as before, we'll go to the right side, we'll create a silhouette. We'll run the line around
and drop a color insight. Then we'll go back to layers and create a new layer on top. We are going to clip it down. Grab soft blend from
our brush library, air brush and folder. We'll go back to colors. Pick a pin color, make the brush bigger, and add the bottom again. We're going to add
an extra color to see what we've
got going on here. In general, we are going to add a bit more color down here. We can also go back
into the colors. Pick a white color or some blue color like the
third color in the third row, and add it down here as well. If you get the color
that's two intense, we can always go into layers. Go to the icon and set
the capacity lower. We can also go to the previous layer and
add more elements, just like we did on
the previous mountain. When we are on this layer, create a new layer from here and it will be
automatically attached. Let's go back to
the brush library, calligraphy folder,
script brush, and with the same
color we used before, the third color in the third
row add some extra elements. We can also see that on the
previous mountain we have an unpainted and not
the most pretty area because we moved an element. We'll deal with it after we finish the mountain
we are working on. Now in the same way as before, let's go to the left
side and create the shapes that will add
texture to the mountain. Again, looping the line around and dropping
a color inside. Now let's grab an Erzor
and work on our ship. After we go back to layers, we click on the icon
and make the capacity lower when we have added the
color as mentioned earlier. Let's go back to the
layer number 19. Go back to the colors. Choose the first color in the second row and color the area that needs
to be filled in. You can notice that we
can't do that right now because we have this
layer selected as alpha log. First, let's click
on the layer in the layers panel and select
alpha log from the list. Let's go back to the canvas
and fix the shape below. Again, let's look at the
whole shape from afar. If we want to change something, we'll go and change
it or add to it. Let's just work on
the silhouettes. When we are ready with that fix, let's go and start creating
extra mountain elements.
5. Final Touches: Same screen brush is selected. Now let's go back to Layers. Go to the next
mountain and click on the check mark to
know which mountain we are going to work on. Next, we have a
mountain in the middle. Click on the icon again,
click on the new layer. Select Clipping Mask. Go to the icon. Select Multiply Blending mode. Set the capacity to 30, 35% Go back to colors. Choose the last color in the second row and in
the same way as before, go and create the shadow
on the mountain loop, the line around,
throw a color inside. If we want, we can grab an
eraser and remove some parts. For example, here, let's
remove this piece, then we'll add an extra
color at the bottom. Go back to layers At a new
layer with the plus icon, Click on it, choose
Clipping Mask. Now go back to colors and
choose one of these colors. First color in the second row or the first color
in the third row. In the same way as with
our main big mountain, we'll go to the left side and create some additional elements. Loop the line around a color, and then we can also
go to the spit that we cut from the shadow and
add a color here as well. Now let's get back
to layers and make the capacity of this new
layer a little bit lower. About 20:20 5% After that, let's work on the silute of
the additional elements. We also try to avoid
overlapping shadows and light. Let's remove some parts if
we need to remove something. When we are done with this part, let's go back to layers. Click on the plus icon. Attach Layer through
Clipping Mask. Go back to the brush library,
Airbrushing soft Blend. Go back to Colors and choose again the fourth color
in the first row. Make the brush bigger and go to the bottom and add
an extra color. If we want, we can add an additional color in
the same way as before. Go back to colors, Take a more intense color, the fourth color in the last
row added from the bottom. If we want a more
delicate color, we can either grab
the first color in the second row
or the white color and go on top of the pink and add it to some areas
of our mountain. Also, if we want, we can go back to
the layers and, for example, move this mountain
that we are working on. Now to do this, we will need to select all the layers that
belong to this mountain. When the layer 25 is selected, let's go under it and
select the next layer, swiping from left to right. In the same way, we will select four layers that belong
to this mountain. Then we'll go to the arrow on the top left uniform
method and snapping, everything is on and we can move the mountain to some
side or up and down. Let's find a more
appealing position. If we have some elements
that we don't want to see, we can always go back to the needed layer
and fix it later. For example, let's put
the mountain in this way. And when everything
is ready again, we will click on the arrow. Let's go to the next layer with the mountain
and work on it. So again, we go to layers. Select the next layer. This is our mountain
on the right. If we want, we can
move it up a little bit like this or
even make it bigger. We can hold the pencil
on the blue note and make the mountain bigger to
cover the part at the bottom. When it's done, we will
click on the arrow. If we have some parts
that we need to add, we'll go and do that. But firstly, we will need to select the same color
that we used here, in this case blue. To select this color, we don't need to go
into our color panel. We can just hold down one finger on the
screen until we get the eye drop it tool
where the color that we want appears at the top. When it shows up,
release your finger, go back to the brush
library, calligraphy folder, script brush, and end the
missing piece on the top, and then just throw the
color on the bottom. Now we go back to
layers and we will add one more layer on top of the layer we have
right now selected. We attach it through
clipping mask. We select multiply
blending mode, and we set the capacity to about 30% Choose the last
color in the second row, go to the right side and
add additional elements. For example, here we can go
down and with this way line, add a shadow wrap
around the line that we drew for the shadow and
drop the color to the buta. And when the shadow
silhouette is ready, we can go back to layers. Create a new layer on top. Attach it. Take the
soft blend brush, take the pin color, go underneath, and
add an extra glow. When you are ready with
this mountain again, let's go back to layers. Go to the next layer. This is the mountain
on the left side. Add a new layer on top. Clip it down, choose an icon, choose multiply blending mode. Set the capacity to 30% Go
back to the brush library, calligraphy folder,
script brush, choose the last
color in the second. And again go to the right
side and add a shadow, wrab the line around, and draw the color inside. When we are ready with
this mountain as well, we go back into layers. Create another layer on top. Click on the clipping mask, go back into colors, pick the fourth color
in the first row. And let's go and add extra light elements
on the left side, the same way we did before. Add a wobbly shape and drop the color in work on the sleet. We can even go down and add some additional
small shapes here. Now let's get back to layers. Go to the icon here and let's make the
capacity a bit lower. Let's see how it
looks in general, whether we need to
fix anything or not. On the left side, we'll
remove the overlapping parts. We'll take an Azor
and we'll remove this little particle
that we have over here. If it doesn't bother us
at all, we can keep it. When everything is ready, we go back to the brush library. Airbrushing soft blends. Let's go to the layers. Click on the plus
icon, clip the layer, and take the same color, which is our fourth
color in the first row. Let's make the brush bigger
and right on the left side, we start to add an extra color. When we've done that, we go
back to the brush library, calligraphy folder,
script brush. Now go to the layers. This is our last 12th layer. Add a new layer on top. Click and choose Clipping Mask. Now go back to colors
and choose the color for the shadow with this brush
that we have chosen. Now we'll go and
create a shadow. For example, we'll do
something like this. And then we'll go
again, if necessary, and change the blending
mode to multiply. Also set the capacity
a little bit lower to something like 35%
On top of that, we'll create a new layer. We will attach it through
a clipping mask and add a little bit of extra
color to the layer. First, go back to brush library, air brush and soft blend. Choose a color a bit brighter. For example, the third
color in the last straw. And let's go over our
mountain a bit from the top. Now let's look at the
picture from afar and decide whether we need to add something or
remove something. Maybe we need to add more glue somewhere or reduce the
intensity of the glue. First, let's go to
the mountain on the left side which
we have moved. First we'll go to the
layers and find it. It was the mountain on
the lier number nine. Let's go to the lier number
25 that's attached to it and we are going to add a
little glow at the bottom. Again, we are going to
use a lighter color. We can use the same color
that we are using now, which is the third color
in the last straw. And we are going to add an
extra color at the bottom. Also, if we want, we can go and work
with blending modes. For example, we can
go to the icon on layer 25 and choose a
different blending mode. We can go through the list and
choose something suitable, for example, for a glow. You can choose vivid light, hard light, soft light. You can adjust the
intensity of opacity. You can experiment. And if you don't want to
change blending modes, you can keep the normal
and work with that. Now we'll just look
at the layers and add additional
elements and colors. For example, on the same layer, let's go and add a slightly more intense color
to the bottom. Let's see how it
looks from a far. If we want, we can add a
slightly lighter color. Also, if we want, we can work with opacity, decrease the intensity,
or increase it. Let's go to this mountain here, which is our main mountain
on the layer number seven. Let's move on to
the layer number 18 that is attached to it, which is the layer that
is responsible for the pin glow with the white color or with
the soft pin color. We'll go underneath and we
will add an extra color. Now we are going to spend
a bit of time doing this. We are going to
go layer by layer and we are going to
add some extra colors. Right now, we're just going to go through all the
layers that we have a glowing pink element on and we are going to
add an extra color. When we are ready with this, we'll go back to
the brush library, go to the calligraphy folder and choose monoline
brush once again. Now we'll click on
the monoline brush. And here in the brush
studio on the left side, we'll select Stroke Path. And we'll set the
space into maximum. We'll have a brush
made up of dots. When we've done that,
we'll go back to layers. Go to the top of all the
layers that we have, create a new layer. Use white color, make the
brush a little bit smaller, and work on the sky. While doing so, vary the size of the brush
and add some stars. And when that's done, let's choose the
updated glimmer brush. This brush can be
downloaded from the restory stab
with that brush, we'll just add a
few glowing stars. We can even go to the mountains and add
them here as well. At the very end, let's look
at the picture from afar. Then let's go back to
the brush library. Go back to the airbrushing
folder, Solve blends, go back to layers and create a new layer on top of all
the layers that we have. Let's go to the icon and
choose Overlay Blending modes. Next, we'll go back to colors
and take the pin color, the last one in the third row, make the brush bigger. And you can also make the
opacity of the brush lower, about 20% And you can go and add additional
colors to the picture. You can go over some specific
elements and add pin color. We can even go over the sun. We can also choose
a different color, more saturated or
less saturated. For example, blue. The fourth color
in the second row. Go over the mountains. On the places you
want to change, add a few more differently
colored elements. We can also choose
another color, yellow. For example, go over the existing yellow places and over the top
of the mountains. If you don't want to do that, you can keep the
picture as it is, but this additional
overlay layer will work really well and will add some nice effect
to the mountains. You can experiment,
go back to the layers and make the capacity of
this layer a bit lower. You can see how the picture changes with the overly layer, what it was originally
without it, and how it changed with it. If you want, you can play
with the blending modes. Maybe find something
more fitting, change the capacity if you want. For example, color
burn looks good too. You just need to find something
that suits your needs. In the end, let's
look at the picture first from the
distance. Then zoom in. Check if you want
to change anything. If we are happy with everything, our picture is ready and
that's the end of the class. I hope you found
this class helpful. And if you liked it, please
check out the other classes. Give a follow and leave your review. And
thanks for watching.
 Xenia Sorokina, Illustrator & Graphic designer