Transcripts
1. Welcome to Flower Angles: Today, we're going to talk
about something that makes a huge difference in
your watercolor florals, and that's what direction
your flower heads are facing. Most beginners paint
every flower straight on, like they're all posing
for a yearbook photo. Perfectly centered, perfectly
round looking right at you. But that's not how
real flowers live. Some are turning
towards the sun, some are drooping,
some are half turned, shy or leaning into the wind. When every bloom faces forward, your painting can
start to feel flat, a little stiff,
maybe even posed. Today, we're going
to loosen that up. We're going to paint
daisies that face well, towards you, but also sideways, slightly tilted
and even downward. I want you to notice
just how changing an angle instantly adds
movement and life. When you vary the direction
of your flower heads, your painting starts to breathe. It starts to feel natural, more effortless,
maybe even alive. If you took the exploring
yellow class earlier this week, this is where that practice
really starts to show up. As flowers turn, the
light shifts and those warmer and cooler
yellows make more sense. If you have, maybe you'll notice how much
easier this feels. That's growth happening
and I'm so proud of you.
2. Studying Real Flowers and Natural Angles: Before we even get out our paints and practice
with painting anything, I actually want to take a look
at what flowers look like. Now, these are
just fake flowers, but they are fairly
realistic looking. I really want to dive
in and show you what I mean by a flower that is
facing different directions. So here you can see
this flower is facing, as if you were looking
straight at it. Like if you went like this, you're looking
straight down on it, which is great and beautiful and an easy way
to paint a daisy. But very few times do you actually look straight
down on a flower? More frequently,
you are going to be looking at a
flower on its side. So this one, of course, is more of a cone shaped flower instead of this
particular flower, but you understand
what I'm saying is that you're looking at
the flower on the side. Here's another one.
You're looking at this flower on its side or maybe tilted slightly like that. This one, as you can see here, this one has smaller petals on this side and then longer
petals on that side. Probably the stem is coming from here because this is the
area that is closest to you. When I turn this flower slightly towards me,
this one is angled, you see that these petals on the backside are
longer and come out further than these petals
that are closer to me because these are shorter
because of the angle. As you are painting, if you are trying to
create direction, remember these tips that
in this particular angle, these petals are longer and then these are
shorter and that makes this direction of
the flower heading that direction where this
one is straight down. So we're going to look at
a couple other flowers and talk about the same thing. Here's another one.
This is a yellow one. If I was going to look
straight at the flower, I would create a center and then some petals that branch all the way
around like a sunshine. But if I wanted to
create it on an angle, you have these petals back
here and here and you can see how that angle
shifts slightly. So lots of different
things to think about. You can even tart it almost
completely on its side, and these petals almost
disappear completely. They almost become
a straight line where these petals out here have a little bit
more definition. Now, here's a little rose. These are little spray
rows or garden rose. Same thing, looking
straight down at it versus on the side. And little buds and see how different little buds are.
Move that out of the way. These buds and then
remember that these flowers often have little greeneries
that are around the base. Sometimes these bases of the flowers right
where it connects from the base of the flower to the
stem are little triangles. Also take note that when you
are looking at a flower, let's say this is what you're painting and you paint
something that looks just like this with a bud
and another flower in the background and then this flower here and it
looks just like that. You can see that you cannot
see the base of the flower. You can't see that part where
it's attached when it's angled like this so it's a flower it's just
a stem coming down. But on this one, you can
see that little base. Those are some things that
you might want to keep in mind when you are
painting flowers. Even your berries
are going to look different if you're
looking straight at them, straight down on them or angled. Even the berry is
going to need to have some direction added to it. On your berries, you can see
how it has a whole bunch of little tiny connectors to
create the little cluster. And then extems down to
one stem that comes down. Then also notice how my
stems are going to be really jagged and flowing and going in all
different directions. We're not going to be making a straight line like a lollipop. There's going to be a
little bit of movement to the stem and movement
to the leaves. We've talked about the
different flowers. We are going to talk about how to paint those specifically. I'm going to be using
these two as my example so that we can take a look
at those as we dive deep in. This is my favorite
brush, probably. This is a Princeton heritage. I think this is a size eight. Yeah. This is a
size eight brush. It's just a round brush. I think that's probably
what I'm going to be using while we do this
study on these flowers.
3. How Direction Changes Your Florals: So I am wetting down my palette here of all my paints and
just spraying it with a spray bottle like
this so that it's all fresh and ready to
go. I have my water. I even have a rag here in case I need to dab off any extra paint. So we're going to be painting these flowers and
using my palette, probably staying in these reds and yellows and
greens for today. Wetting my paint brush down, taking a look at this flower, one of the first
things I want to do is just paint
it going straight, looking straight on it. So I'm going to grab some of my yellow to create this center, and you can see that it has
little tiny dots in there. And so I'm going to
be reproducing that by creating a bunch of
little dots dot dot, dot, dot, dot, in kind of a circle shape because we're going to do
it straight down. I'm going to rinse
off my paint brush. I have two containers
of water here. And then I'm going to be using
my purple or pink color, and you can see how
even that yellow kind of gets pulled out
into the petals. So I'm going to be okay.
If that's what happens. I'm going to use this nice
beautiful fuchsia color, lots of water, just a
little bit of paint. And then I'm going to be
pulling out my petals right out kind of
like a long um, pulling out my petal
from my paint brush, putting the paint brush
down, the tip down, and then pulling it out
slightly, and then lifting up, going and tapping back into
my paint whenever I need to. You can move your
paper around so that it's more comfortable for you, which I probably should do, but I really don't want to mess this up for you for your visual. So that is just a flower
looking straight down on it. Then we're going to paint one where it is kind of on an angle. More like these here where the petals that you are facing you are a
little bit shorter, and then the ones
that are behind are just a little bit
on the longer side. So I'm going to go
ahead and start with my little fuchsia color. We're going to just stay
in that same color way and just kind of bring
out some petals that are longer on that
half of the flower, and then maybe some
shorter ones over here. Something more like
that. What do we think? And then how about we
add in a little bit of yellow into the center? Okay. Can you see how
that one is now showing that the bloom is
facing away from you. I dripped a little bit of
water there. It's okay. We're just going to pick
that up because this is just our sample
paper. Not a problem. So on this one, if I needed
to add a leaf and a stem, I would probably choose
to bring my stem, just like you can see here, I'm going to choose
to bring my stem over this direction and
down this way. There was maybe a
little thicker top, just like you can see a little thicker top at the top here. But on this one, when you
are facing it straight down, you can't see that stem. So I'm just going to
leave that stem there. Maybe there's a stem, but we don't really know
where that comes from, and it's just kind
of really sketchy. I can also do one that is
more facing this direction. And if I were to do that, maybe I start out with a top kind of like that cone like what we
were looking at before. And then I bring
those petals down. Now we're looking at
the side of a flower. But then on the edges, I'm probably going to make
these little petals very small 'cause it's
kind of like that's behind the flower.
See how that works. Just make another
one small over here? Maybe just the illusion of
some petals back there. Then if I wanted to
bring a stem down, I can bring a stem down here. Also notice that I
don't need to have my stems touching the flower. It's just there's the illusion that it's going up into there, so they don't actually
have to connect. Another way to look at a
flower is sometimes they bend. Sometimes they're bending and they're more shaped like that. So let's see if we can paint
something that direction. I put something over here. And then I add in because
it's facing like this, I probably will have the
longer petals out towards the top and then the shorter
petals up near on this side. What I mean by
that is like this. I really touch the yellow
a lot there. It's okay. I can fix that. So longer
petals on that side. Then I'm just going to get
shorter petals onto this side. Pick some of that up. And so
then if I add my stem again, and then I'm coming off of
this way and down and around. Maybe it's thicker at the top. So that's what I mean by making your petals and your flowers
facing different directions depending on which
way it is facing your petal length is going to be different for
each of your flowers. If you happen to
have a real flower, maybe out in your garden or you have some fake
flowers like this, it would be really
good for you to just take a flower
and study that. Look at the different
features of a flower. Look at how it has the
different layers of petals. Look at how the center is made and how the
base of the flower is to study them and to see how the centers
of the flowers are, how they're interconnected, what different leaves look like. So even I have these kinds
of leaves laying here, so it just kind of gives
me an idea of what different things look like in real life when I am painting. So go ahead and practice
your flower heads, have them coming from
different directions, and see what you can
create and see if you can figure out where
the stems should go, where the shorter
petals should go, and where the longer
petals should go. Come on back to the next
class and we're going to put this all together
into our class project.
4. Painting Daisies from Multiple Angles: Okay, so we've talked about the daisy and the
different directions, and so now I have made
this little sample up. I have my piece of paper here. This is cotton paper, and I have divided
it in half with a piece of tape so that
I can create one here. And then I might even go ahead and make a
second one there. I'm not sure yet, depends
on how well I like this. Again, we're going to be making one that kind of comes
off to the side. And so these petals are going
to be longer on that side, they're longer
over there because they're going to be
shorter and closer. Closer to the observer. These are going to be more on the shorter side with
a little center, and then I'll put one at the top and then I'm going to
be adding a little bud. I'm going to keep this
nearby in case I need it for inspiration and to remind
myself what I am doing. Hopefully you join
right along with me. I'm going to use the same colors because I feel like
those really show up well for on camera. So earlier this week we
were talking about yellow, and the yellow that I'm using in here is the warmer yellow to go along with this really
pretty fuchsia color. I really like yellow
and I might even add in a second shade of
yellow into that. This one is going to be my largest and it's going
to be my lowest. I'm going to put it in
this general vicinity and I'm going to be
putting my petal, my largest petal, and then
another one next to it. And one over here. And then I'm going to start to slowly making them smaller as I come around to the front because these are the petals
that are closest to me. I think we're going to stop with that and let that dry for a second before I
drop in my centers. Then let's see move
this out of the way. I'm going to be putting
in this one right here, but I think I'm going to
angle it slightly and put in my little daisies. Petals. Remember that as you come
around to the backside, they can get a little
bit smaller because you're getting the illusion that those little petals are behind where you can't
really see them anymore. And now I'm going
to get my yellow, a lot of paint and just
a little bit of water. If you go to put
in too much paint, if it's really dripping here, that's going to really
bleed really far. I'm trying to make it a
little bit thicker so that my paint is just a little
bit on the thicker side. And I'm going to be careful. I want it to touch in eventually into the petals so
that it bleeds, but I don't want it to
touch for the whole thing. So I'm going to just
be careful with that. Because I am working
with my cotton, that is going to keep these
petals on the wetter side. Using a fairly dry brush, I'm just going to
pick up some of this that bled a little bit
more than I wanted it to. Just pick up a little
bit of that ink, I mean, not ink, but paint. So, add a little bud. Sometimes I add in all of my stems first
before I add in a bud, but I think I can just probably just put in a little bud here. It's just a little tiny one saying that it's about ready to open up and show
us what's inside. So maybe some of
them are starting to open something along that line. And then I think I'm going to switch to my smaller paintbrush, this is a size six,
and I'm going to get my greens going,
warmer green color. And I'm going to add
that little V shape that shows that one. And then this one, I'm going to have this
stem coming over here, it's fine if I skip
the lines here. Just make them kind of jagged. I have my stems coming
down and this one, the stem is going to come
from this direction. Be a little thicker at the top. The thicker again at the bottom. I'll be adding in some leaves in a minute as well with my green. Again, I'm going to
use lots of water on this one for the leaves and
just a little bit of paint so that I can really get those leaves to
show some movement. I put a little tiny stem, then I'm going to lay
my paint brush down on the side and squig it like this and lift it up
I put one there. I can bring one over here. Maybe one over here, different sizes,
different shapes. Really fun little leaves. So this is kind of like just
a little cluster of flowers. I don't want to add
too many leaves. When you add too many leaves, you have the quick possibility that it gets too
heavy with leaves. So I think I'm just
going to leave it with 55 little leaves and
some three stems. Okay. I'm gonna let that
go ahead and dry. Okay, so then with that, this is mostly dry. I do want to add
a little bit more yellow or a little
bit darker color. So I have a kind of
like a brown yellow that I'm going to add in
just a few little dots, just to add in a little
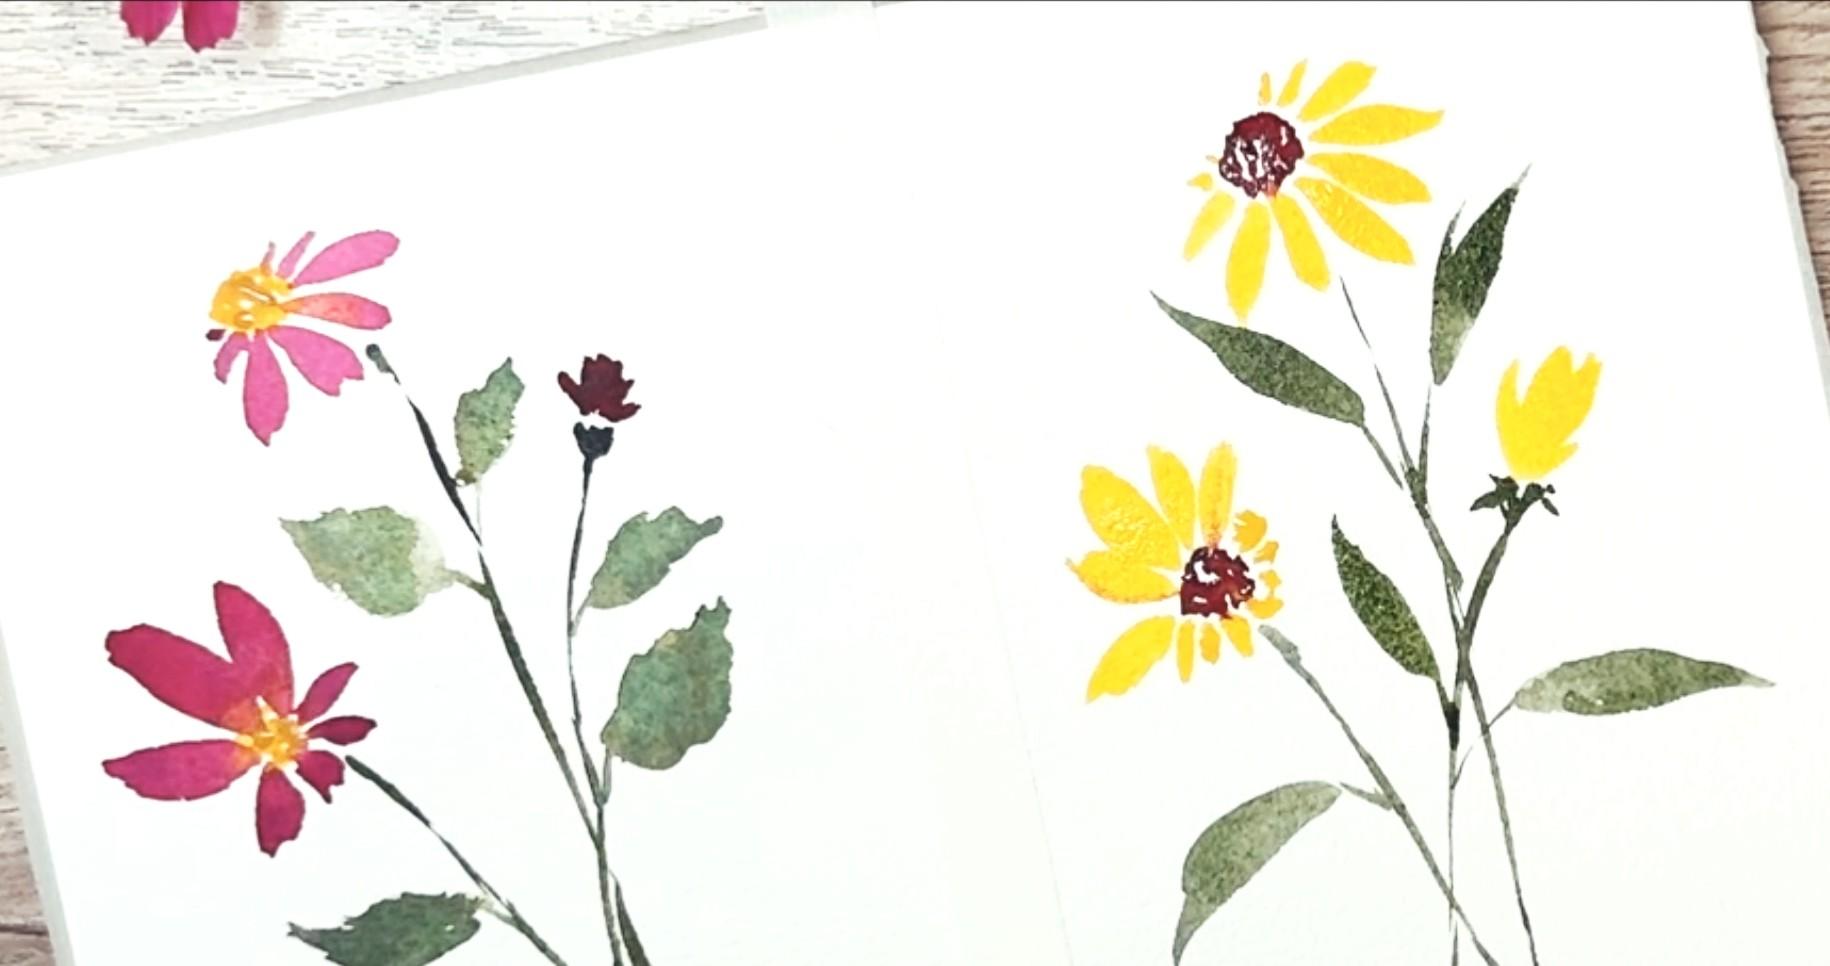
bit of dimension. And we'll let those dry as well. So there is your quick
little study on flowers. Here, this one, you can see
that that one is facing this direction where you
are seeing these petals, but then these in the
back are almost not visible because you're looking
at it from that angle. Then on this one, you can see that the flower is almost
facing towards you, but it's on a little bit of an angle where the
ones in the back are the furthest and so that you get to
see those the most. But then in the front,
they're the shortest because you're looking straight down on the petals,
if that makes sense. How about we try it
again over here? This time we make the centers purple and the petals yellow. That would be a
really fun way to experiment with this and
practice it another time. Let's see, why don't we just go ahead and
do it the same way? Just way we can really do a study on it
being exactly the same. Really poker dot. Do
another one up here. Just speckle, leave
lots of white space. You want to have
that white space to create some highlight. We'll do that, clean off my paint brush
because I'm going to now dip into my yellow and
I want to make sure that my yellow doesn't pick
up any of that purple. And we're going to
bring down because this one is facing at us. Oh, that's really
pretty with the yellow. Again, I'm just going
to make these a little bit smaller as I go
around to the backside. Maybe that's it. That's all you can
see of that one. The back of that flower
is really hidden by the front and then but on this one is facing
the other direction. I'm going to see lots of
petal here on this side. With just a little bit of petal from this going
all the way around. Because you're almost
looking at it straight down. I can even make these facing a little
different direction. And then I'm going to make
a bloom, a little bud. It's just starting here. Get that green going again using a smaller paint brush
size six. Let's see. We start this one here
using that little V. Maybe even branch off
some of the small stems. There's one Two. Let's see, we're going
to do this one here. I like to have my stems
crisscross when I can. Then we're going to make these leaves a little
different on this side. We're going to make these
a little bit longer. Maybe you'll choose to make your leaves a different shape. What shape do you like
your leaves to be? Because we're painting
in a loose style, we're not painting an
exact flower that you can necessarily recognize
that you're going to find out
in your garden, so it doesn't have to be exact. Maybe these aren't the right
leaves for your flower, but they're perfectly
fine for mine. So you choose your leaves
and that will be great. I put one up here through the middle just a little bit
on the smaller side. There. See what I mean by practicing it over and over and over again, B you pick up different things, you learn different
things as you go about. Maybe you choose
different colors or a different angle or
a different shape. What fun. That is really pretty. I like both of
them. I'm going to dry this and then I'm
going to show you what they look like matted and maybe even see if
they look good, if this yellow one is going to look good with the
other one I did from a couple of days
ago that I showed you when we were doing
our study on yellow. Come on back to the next lesson and let's
take a look at this.
5. Bringing Movement into Your Florals: Okay, that was a
really fun study on shapes of flowers and which direction they're
facing and how we can determine that by the
length of the petals. And we had a really
great time doing this, but I do want to take a
look at this yellow one. If I remove this piece of tape, I'm going to be able to use this square mat that I have
and lay it down on top of this to see if
that's what's going to look really good inside
of a frame that I have. So I kind of like that. I
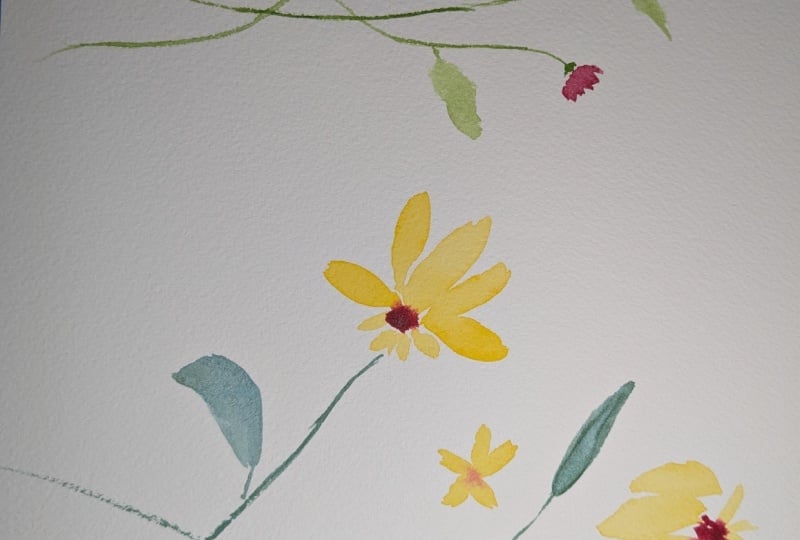
think that's pretty cool. The other thing I want to
show you is that off camera, I went ahead and put in a
second color of yellow. It was just a little
bit of a golden yellow, and I just added a little bit of detail here and there on top as a second layer just to finish this off and give
a little bit more dimension. So that is something
else that you could do. So here I wanted to show
you that I added in that second color
into the centers, which adds a really
nice little definition and little detail that I think is important to be able to add in when you are
making a second layer. But what a beautiful little
painting so simple, so sweet. That is absolutely delightful. So I could add that into my little collection
that I'm doing for my study on yellow
this week. Really love it. If you miss the study on
yellow from our last class, make sure you go back
over there where we talk about yellow
and how we can mix yellows together and adding
just a little bit of blue to our yellow trades these
really fun greens and you can make orange
by adding in red. So make sure you go back over to that class and do a little
deep dive into yellow. This class is about
20 minutes long, so the whole class is
something that you can easily do in one
little quick setting, similar to this
class where this is just a quick little
study and you can learn something
really new and fun and exciting and put it
right into practice. The next class that I'm going
to be doing is going to be putting all of these ideas
together using yellow, mixing it with blue
or different color, and then putting down into
a beautiful little bouquet, having your petals
and your leaves and everything facing in different directions to show movement. Can't wait to see you
in that next class. If you haven't done so already, please take a picture
of your artwork. Upload it into this class. Your fellow students really want to see what you have
been able to achieve. Want to be able to
celebrate with you and I absolutely want to
be able to see that and give you some comments
and some feedback. I'm so proud of
what you've done. This is a safe space where you're going to be able
to post what you've done, and we are going to celebrate
whatever level you are at. I cannot wait to see
what you've done. Give me a review,
follow my account so that you get the first alert
when I post something. I'm trying to do
a whole bunch of little small classes
like what we just did today so that you
can constantly be painting. That there's always a new
class where you can do 15 to 20 minutes worth of
painting and really dive in. If you have been able to paint 15 to 20 minutes
several times a week, you are going to advance so
quickly in your art skills. And I will be so excited
to follow along with you and to see your
achievements from week to week. Can't wait to see that and see what happens with
your art studies. Join me in the next class
where we dive back into yellow and flowers facing
different directions, and we pull everything
that we learned together into one
beautiful piece.
 Brenda Jones, Watercolor Artist & Teacher