Transcripts
1. Welcome to Exploring Yellow: Welcome to class. We are going to talk about yellow today. I love yellow. Do
you love yellow? I just think that yellow is one of the happiest colors there is. And there's so many things
to learn about yellow, how to mix your yellow, what shades go together, why you would use
cool or warm yellows, how you can get other
colors to mix in and change that color from yellow
to green or to orange. And then we're
going to be making this flower in our
class project. I can't wait for you to upload your class project so that we can all celebrate
along with you. Join me in the next class. We were going to dive in
and talk about yellow. How often do you use
yellow in your artwork? Is it something that
you use all the time? To me, I find yellow to be
something I gravitate to. I might be making an
entire painting that is all with reds and
pinks and blues. But, gosh, I cannot
finish a painting unless I have added just
a little bit of yellow. It brings in so much
happiness and joy for me, and your eye often
gravitates to it. So if I'm looking to
create some flow, I often add a little
bit of yellow because it helps bring your eye
over towards that color. Oh, it's such a great color. I can't wait to show you
all the different things, and we're going to dive
right in right away. This is a little mini lesson so that you can learn about
colors and you can get practicing and do a
quick little study on this color so that you can practice almost
every single day. Which is going to really
help you get advanced in your watercolor study
and in your technique. Working on watercolor
about ten to 20 minutes a day is absolutely the way that
you are going to advance. So make sure you check out all of my little small lessons, my quick lessons so
that you can also start to advance and discover different things and skills.
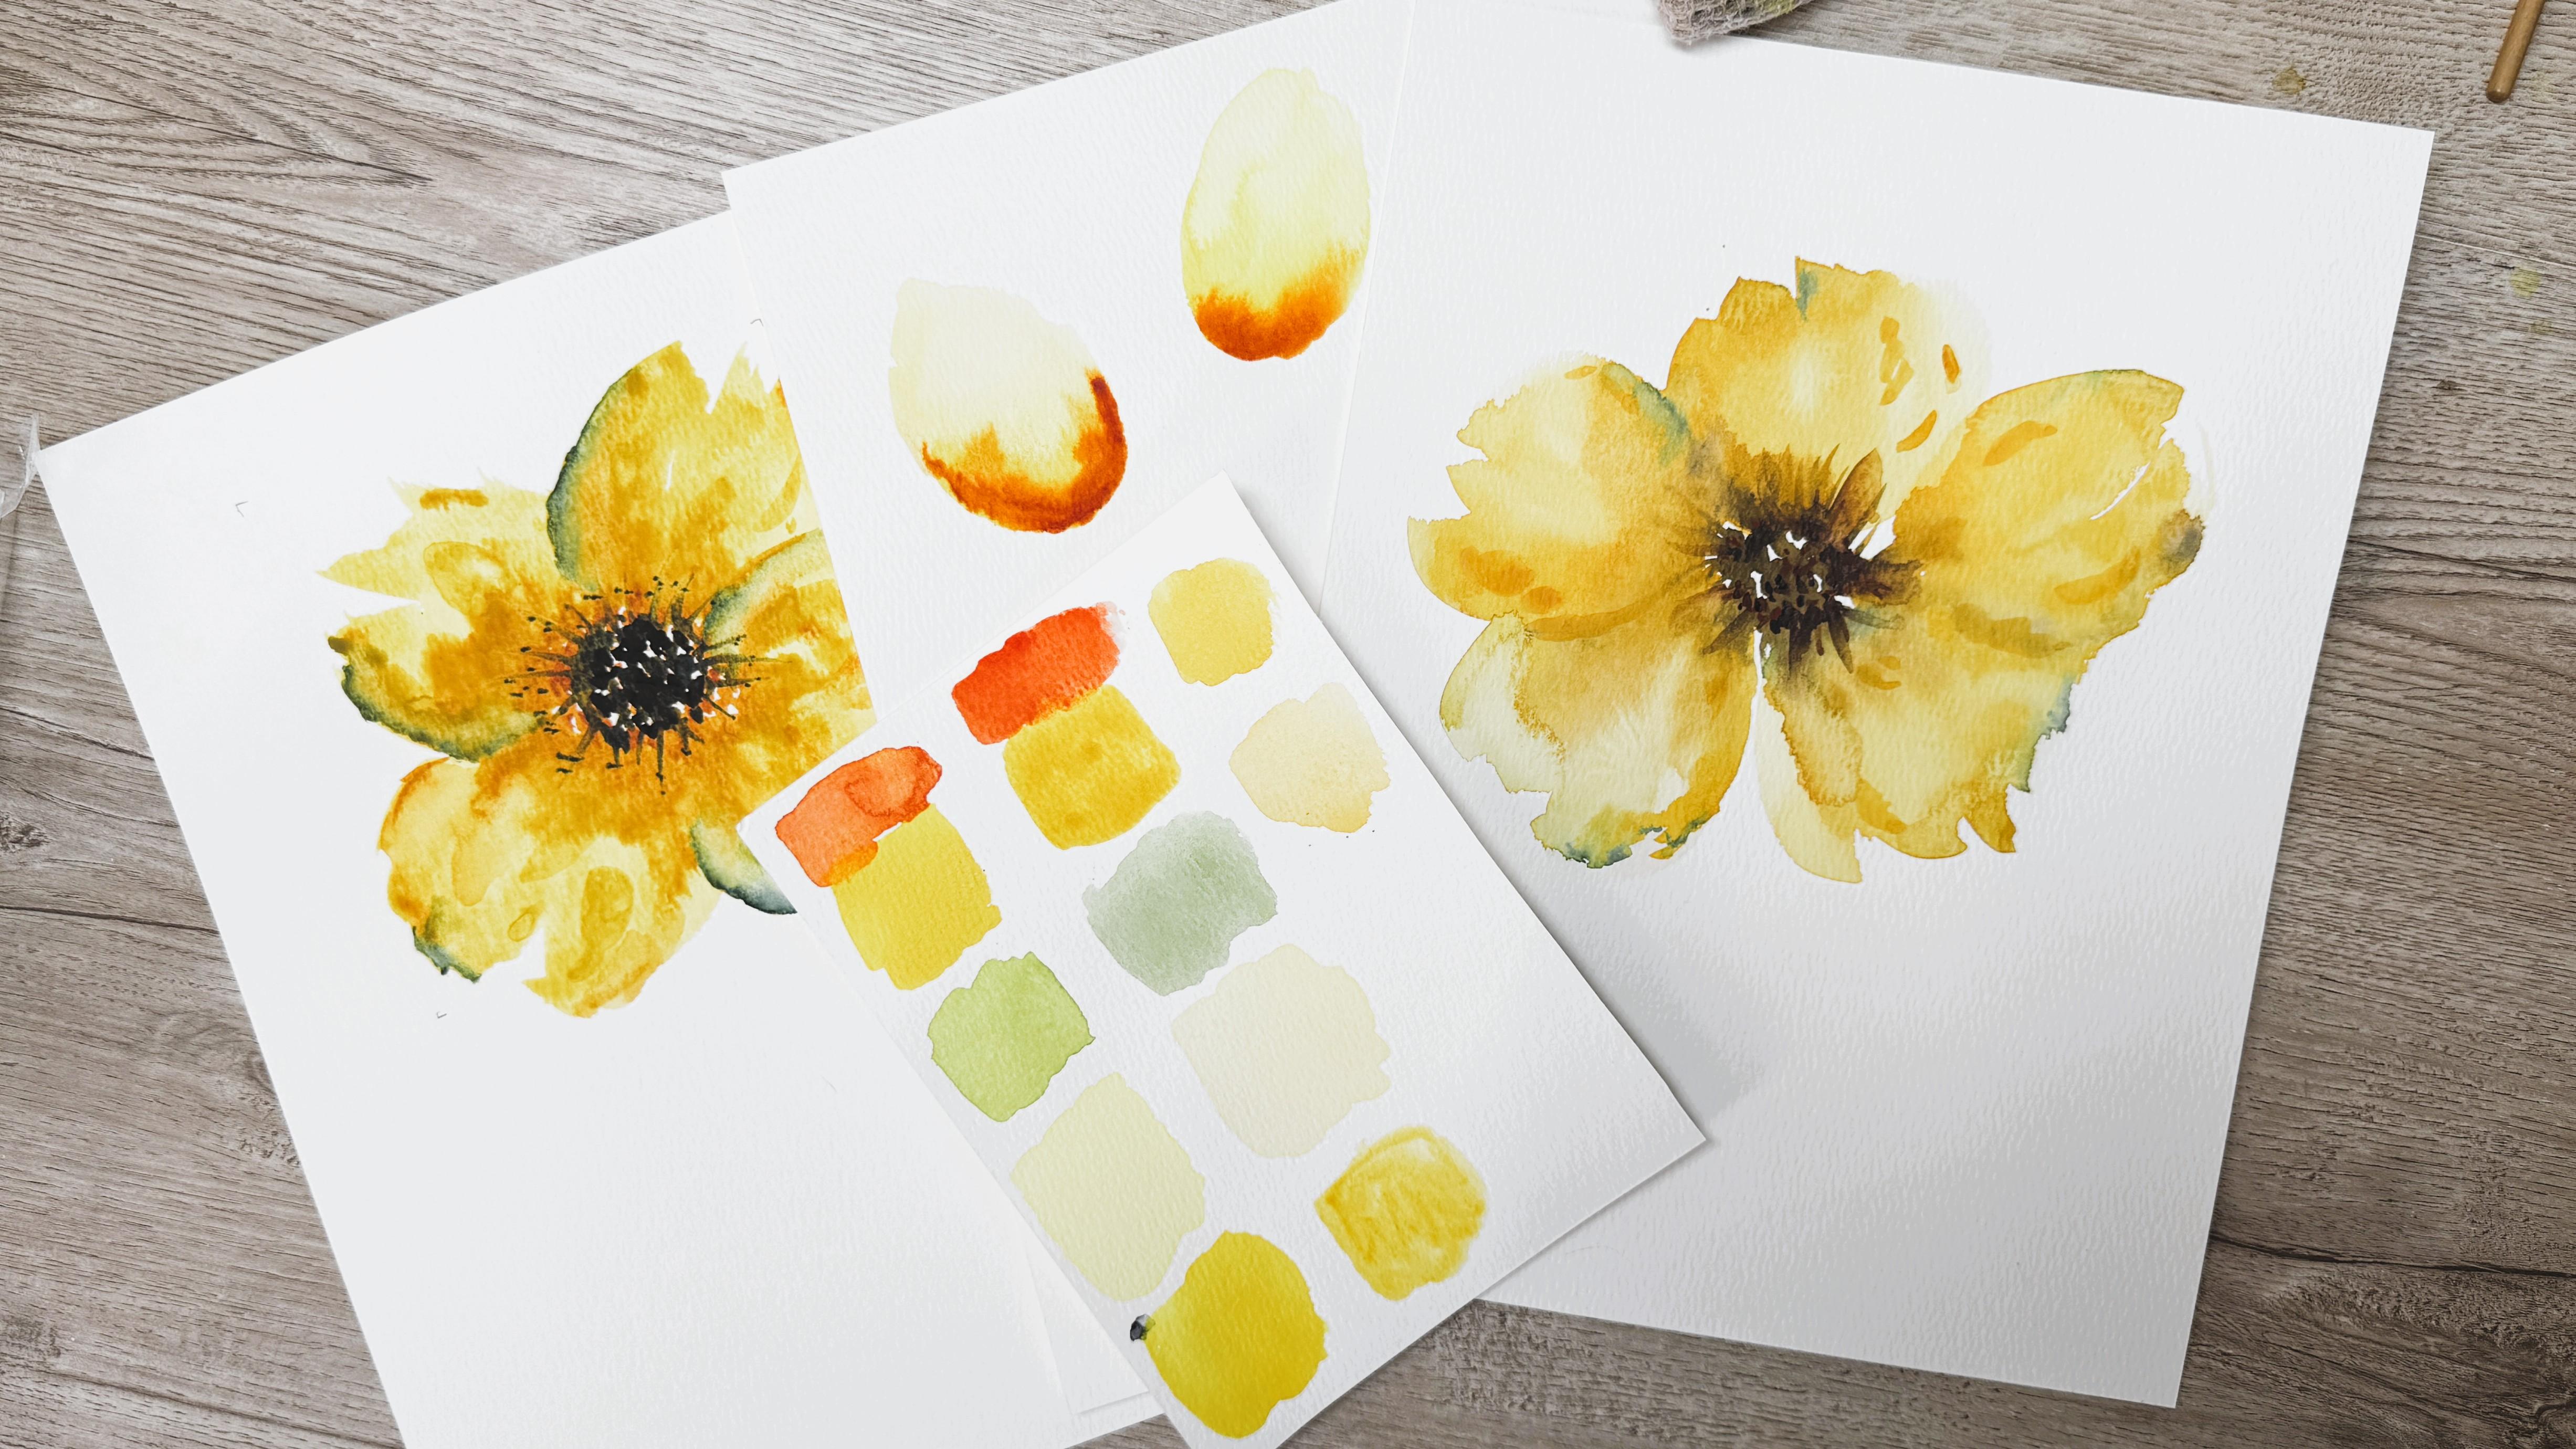
2. Color Exploration Lesson Understanding Yellow: Warm, Cool, and Value: Do just a real quick
study on the color yellow because that is
the concept for today. I want to just talk about a couple of different
things regarding yellow. First of all, when you
are working with yellow, I have these two here. One is a cool yellow and the other one is what I
would call a warmer yellow. We're just going to look at
the two different yellows so that we can see
what that looks like. This one is going to
be our cooler yellow, which is going to tend to shift slightly more green as you
take a look at that one, I'm going to let that one dry. And then this one here
is a little bit warmer. Maybe we're going to call
it maybe a little bit, a little bit more orange. You can see here how much
this one's more like a lemon and this one has just a little bit
more warmth to it. It just shades
slightly more towards a warm color or an orange color. Those are your two different
kinds of yellow and they're both really great
and it depends on what you're looking for as to why you might choose
one or the other. If I was going to go
with my cooler yellow and then add in just a
little bit of a blue, and I'm just going to take the tiniest little
touch of blue here. And just add some in to here. You know that your yellow and blue are going
to make green. When you add that, you can see that it is a nice bright spring green because I added it
with that brighter yellow. Then if I use this yellow, which is my warmer
yellow and add some of that in here and then use
just the exact same blue, not going to change it
using the same blue. And just a touch of
it and add that in. We'll take a look to see
what color that creates, you can see that green, that same blue and
my warmer yellow, create a more muted green instead of this really
bright spring green. That's why I like to
have both a cool and a warm yellow so that when
I am mixing my colors, I can really create two completely different
shades of green. Next thing I want to show
you is regarding dilution. If I have my yellow
in here and I add in a lot of water to that
I put it on my paper. I can get it to be really, really soft, see how soft
and transparent that is. Then if I add it in a
little bit more pigment, I'll just do it underneath it, how much bolder it is. Depending on how dark or light you want
that yellow to be. Then the same thing
goes for the warmer. Here is going to be something that has a lot of water in it. Look at how transparent that is. That is so faint. You can hardly even see it, but here in person, I
can definitely see that. That would make a
great background. Whereas if I was going to put it right on just like
this one up here, you can get that to
be much bolder and darker with less
water, more paint. So that's a little
bit of fun for that. Depending on how
you're going to mix it and depending on how
much water you add, your yellows can really
look very different. The other thing I
wanted to look at regarding yellow is if we let's just create a
shape here with water. I'm just going to
create this little leaf warmer yellow and
just drop it in. I get that. Beautiful.
Let that blend around. If we can tilt the paper even
get that to really flow. Just kind of like a leaf
shape or a teardrop. And then I'm going to use
my cooler and drop that in. Let that spread.
Again, pick it up and let it run down to the end. The nice thing when you're using this wet on wet technique is the paint will not run any further than what the
paper is that's wet. So that's really
a great thing to remember as long as it's
just wet in that area, that's as far as that
paint is going to run. Orange color or a red, and you can drop that in
here at the base as well. And let's watch what
happens with that. Same color. But we're just going to let that bleed because
this is very nice and wet. Again, I can pick up my
paper just slightly. You don't want to
run it completely, but just slightly, let
it bleed a little bit. All right. I'm going to let that dry and show you
what it looks like. Okay, so here you can
see that I let that dry. This is dried completely, and here is the warmer yellow
versus the cooler yellow. I use the same like amber color, whatever orangy color that I dropped in the bottom.
It's the same way. And you can see what
the differences are there, and that's
really pretty. I definitely recommend you play around with
this dropping in different colors into a
wet and wet technique and see what you can create. And then join me in
the next lesson where we go right into
creating our project.
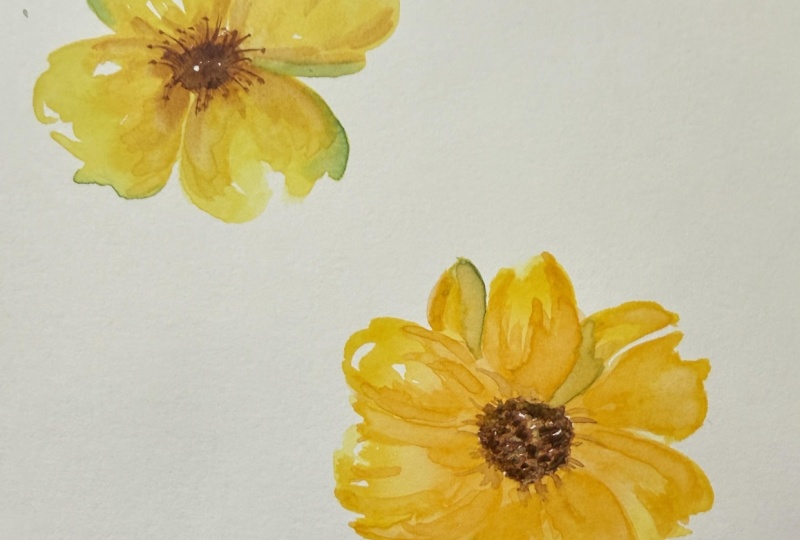
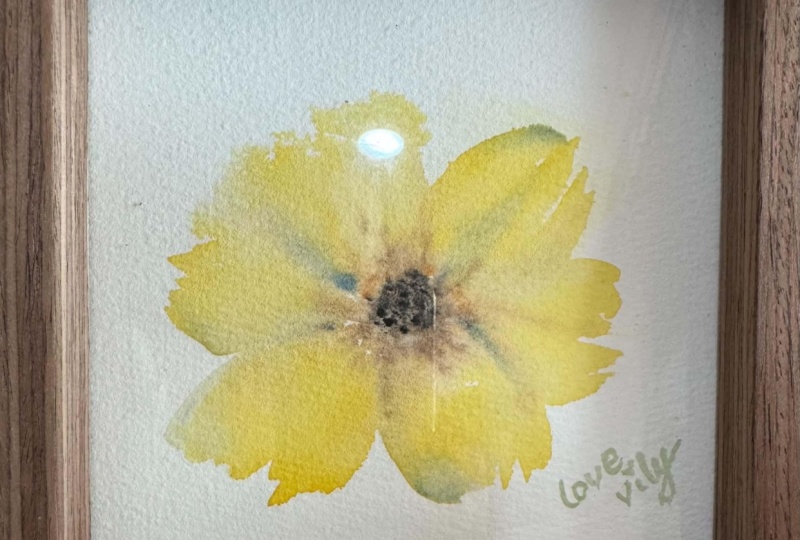
3. Class Project Lesson Painting a Loose Yellow Flower Study: Thanks for rejoining
me in the next lesson. I'm going to be using
this mat because I'm going to be reproducing a
flower that's similar to that. But I want to be able
to make it fit within or maybe just outside
of that frame. I am going to just put
this down and mark the corners so that I have an idea as to how big
to make this flower. I'm okay with it going
outside of the corners, but I want to make
sure that I am painting within it,
because for otherwise, if you look at this, I painted this other
one just a little too big and you really lose
track of all the edges, and I really like these edges. So I want to just paint
it a little bit smaller for this next one so that I
can frame it for my bathroom. Because I really like
to color yellow, especially with spring coming. I really want to be able to do more with yellow in my bathroom. My waters not too bad.
I'm just going to keep going because I'm just going
to be working with yellow. With this one, I do want to work in more of the warmer
colors of yellow. I'm going to be using
this yellow that I have here you can see that. I'm going to stay here
with that yellow. But I'm definitely going to be adding in some other
things just like we dropped in with our sample that we did
from our last lesson. I dropped in some oranges. In this one, I'm
going to be dropping in some brown tones. But then I also want to drop in just a
little bit of blue. Of course, when you mix
your yellow with your blue, you are going to
get a little green. But I like the way that this one has just little tips
of a little green. I'm going to add some of
that blue while this is still wet so that it mixes
and turns into green. For this particular painting, because I'm going to be creating this really large flower, I am going to be
using a larger brush. The brush that I'm
going to use is this, it's a grabby size four. It's like a quill size
brush or quill style, which is a nice fat, floppy. It comes in a set of
ten different sizes, and this is a medium size brush. I really like it when I'm going to be making
something really big. Because if I'm trying to use just a smaller brush like this, which is going to be
my standard brush, I just get a lot
more brush strokes versus when I use
something larger. If you don't have a great
big brush like this, you can just make your
painting smaller or you can use this paint brush and just make more
brush strokes, which is also going to be
fine and is going to work. I'm going to go ahead and get lots of water in
here so that I'm mixing up a nice amount
of paint that's ready. If you have something like this and you want to be
able to make a lot of that, you can just go ahead and
wet this down and then lift that color right out and
put it onto your paper, or you can create a big puddle. I like to have a
great big puddle of it and you could use a
separate little dish, whether you have something
like this, little sauce dish or a plate or something, and you would be able to
make a little puddle there. I like to be able to fill it
up so much that I am able to lay my paintbrush right down into that paint so that
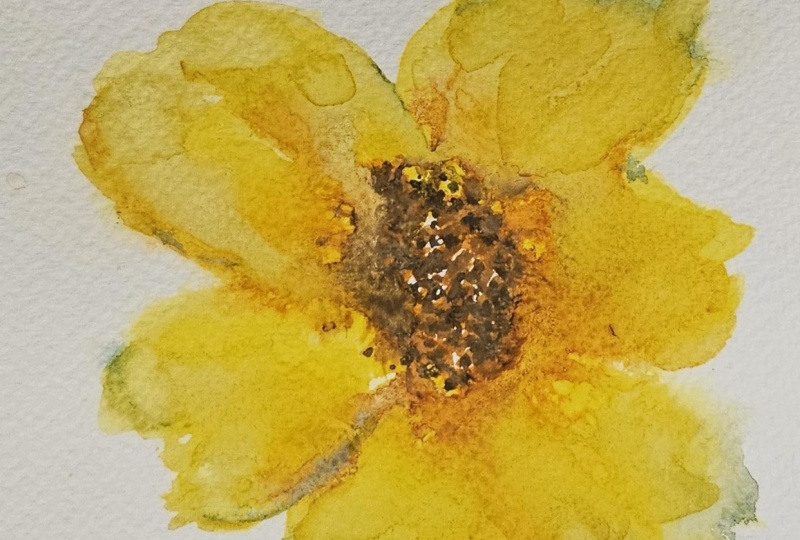
it's completely full. I want to keep the center
open, and it has one, two, three, four,
five, five ban petals. You could do five, six, four, however many petals
you want to do. Then you can see each
petal is the shape that we had done earlier,
this teardrop shape. But I'd like to keep my edges really, really loose, jagged. How I'm going to do that, I'm going to keep my center open, so I'm going to remember not to paint there
in the middle, and then I'm going to
push my paint brush out and lift it up and then
do another one here, you fill in and then put
another paint swash like that, we're going to call
that my first petal. I'm going to dip back in. Instead of going right
to the next one, I'm going to actually come
across and do one over here. I'm just laying my
paintbrush down and pushing. Then I can reform it and add extra little
bits on the ends. The reason I didn't
go right next to it right away is I'm
going to just let that little edge dry just
slightly before I go in and add another petal
right next to it. It doesn't have to
dry completely. In fact, I don't want it to dry completely because
I still want to be able to add in
these other colors like the blue and the brown. So now that I gave it
just a second to dry, I'm remembering to
keep my center open, and I'm going to go
ahead and create another petal there and maybe
another one here. It doesn't really matter.
You can make it a seven petal flower if you want
to. Whatever works. You need to rotate it
though. Another one here. Then while this is still wet, I'm going to come
in and just add a little bit more
pigment into the center. Really keeping
that nice and wet. Okay. Rinse off my brush. And then using just
a touch of brown, I can now add in a little bit of brown into the center
where it's still wet. Even draw some of it out. This is where it's just
fun to just play around. There are no rules
here in watercolor, at least not in my class. I like you to just be flowing
and experiment and playing, dropping color in, and maybe you end up you don't like
it, that's okay. Go ahead and redo it. Sometimes I make a
painting several times until I actually
really like it. As I'm coming into the
center to make that center, I'm also tipping onto the edges of the wet part
so that it bleeds in. A little bit of
both. Really allows that paint to really
flow together. I might outline and maybe show
that that's a petal there. Maybe over here. I love to use yellow in my colors
and everything I do. There's always a reason to add just a little
touch of yellow. Now, this has some
blue on the end. This I just dipped
right into blue, but I would like to
make just a little bit of I love these little edges. So I'm gonna get
something going on here. Not much, just a little bit
here and a little bit there. And I'll come back through and move that paint
around a little bit. I'm just getting it
started putting it in. Don't do too much, but, you know, just enough. I'm going to rinse off my brush. And now I'm going to
come back over here and using my tip of my brush, just kind of moving it around. This is just like a highlight. Right up to the edge. You can use your rag, your paper towel, dry it off. Just just using the tip. Again, there's no
right or wrong. Just go with the flow. See what you like. If
you don't like this one, go ahead and redo
it. Make it again. I literally sometimes
make one painting four or five times until
I decide if I like it. I'm really diluting
my paint edge here. Just coming right along the edge and letting
that just dilute with water and moving it with the paint
that's already there. Letting it turn into that green really
particular with that. I am not going to be a teacher
that's going to really force a specific rule
because first of all, I'm not much of a rule follower. And second of all, I figure it's art and art is of
your own making, so you go ahead and make
art however you want to. And if it doesn't follow the
right rules, that's fine. That's the way it
is. That's good. You go ahead and
make it your way. I'm just making little dots
in here of that darker color. I'm going to add just
a little dark dots in here as well for the
center of my flower. Right around the
edge of the center. I'm going to just
draw out some of this color that we just added in to add in the centers of the
flower, the little stamens. Just draw out some of
those out into the petals. Some shorter, some longer. Maybe I might even add
little dots out here. You know how they
have that little tip. I was going to add some of that. Then I think I'm going to use my larger paintbrush and
smooth out some of these. Although it was already dry, when you re wet it, you can smooth it
out a little bit. I'm just going to fix some of those spots that I'm
not sure that I loved. So this one is almost dry, but I have my little mat here. I'm going to show you what
that's going to look like. And I can just lay this on top. And yes, it does go behind, but that was kind of the point. I wanted it to be large enough, but also that it could kind
of go behind a little bit. I like that. I think
that's really cool. I might even do a little
study of yellow and hang three in a row in my pantry
or in my powder room, where I can have this
yellow flower and then maybe another
different yellow flower and a third yellow flower. A really, really large. I think that's going
to look pretty cool. I'll see you in the next lesson where we wrap up
everything about yellow and I give you some instructions
for the next class.
4. Outro What You Learned About Yellow: Thanks for joining me today. I'm so glad we got a
chance to talk about yellow and all the different
things regarding yellow. It was a really
fun class for me. I hope you learned something and picked up a few little tips. In the next video
class that I do, I'm going to be
talking about yellow, but specifically regarding when we make daisies and how we face them in
different directions. And so we want to talk about
all the different shapes of facing flowers and what that means and how
you can achieve it. So I can't wait to see you
in the next class where we dive right into the next skill level
that you need to learn. If you've enjoyed talking
about yellow and this video, please give me a review. Upload your picture. I would love to see if
you want to send me this. That would be great. If you want to send me a flower
that you made, maybe your flower is
completely different. Maybe you chose to go
with the cooler yellow. Send me something, upload it into the class
so that we can all celebrate I love to see when the rest of the class
also gives feedback. So many times in my class, I see that one student is
encouraging the next student, and I think that is fantastic. We're all here to have
fun and just to have a good time with painting and to explore and see what happens. What happens when you
mix yellow and blue? What happens when you
mix yellow and orange? What happens if you put in too much water too
much or more paint? Maybe it's not too much, but it's more water or more paint. See what happens. Play. Take 10 minutes
a day to just play. You will be so
surprised at how more advanced you get in a very
short amount of time. I'm going to be doing
several classes a week to help you because
I know that the way that you are going to grow as an
artist is if you study and do small tiny classes
multiple times a week. So that is what
I'm here for is to get you going and doing
multiple classes. Follow me, and I cannot wait to see you
in the next class. We talk about daisies and the different directions
that they can face.
 Brenda Jones, Watercolor Artist & Teacher