Transcripts
1. Welcome to Relaxing Monochrome Watercolor Florals: Welcome to my watercolor class where we're going
to be talking about monochromatic work
and different flowers that you can make that create
beautiful little designs. This is a great way
to do some warm up. This is also a great way to not feel so overwhelmed
by choosing colors, but you get to just play with one color and see
how when you use more water or less water how it changes within
your painting itself. It's such a fun way
to paint and so relaxing and an easy way
to explore your paints, your water, your brushes, and your paper
without feeling so overwhelmed by making so many other decisions regarding color. So we're going to be designing three different
styles of flowers, and then we're going to
be practicing them in different colors and seeing how they all change and adjust. Whether you're new to watercolor or you've been watercoloring
for a long time, sometimes it's really good to have something that
is very simple. I call them like your
starter or practice piece, something that gets
you going again. Like, for example, you may be able to hear that
I've been sick. I have a little
bit of congestion, and I have not been able to
paint for about three weeks, and I have just been so
sick and not feeling. But I really needed
to get my paints out again and see what I
was going to be doing. You lose a lot of confidence
when weeks have gone by, sometimes months or even
years between painting. And when you want to be
able to pick that up again and see how
you're going to do, sometimes you need a class, something like this. So
I'm glad you're here. We're going to be doing
confident building and some practice work, something that you
could pick up and do in just a couple minutes
without a lot of pressure and without
a lot of stress, something that's very relaxing by choosing just
one single color. So join me in the
next lesson when we go and figure out which
colors we're going to use, what paints and paper and all the supplies that
you're going to need. Can't wait to see you
in the next lesson.
2. Supplies and Paint Choices for Monochrome Florals: Welcome back. We're
going to be doing some monochromatic painting
in watercolor today. Of course, I'm going to
have my water right here. I use mason jars. I always like to have
two different ones in case one gets
exceptionally dirty. Sometimes I'll keep one for
one particular tone of color. Like all my pinks will go in here and all my greens
will go in here. But other times I use
it as my primary wash, and then I rinse my
brush off again. I my paintbrush is
exceptionally muddy or dirty, I'll wash it in here,
and then I'll do a second rinse over in this one to make sure my paintbrush
is nice and clean. Anytime your water
gets too dirty, please take the time to
pause your painting, go rinse them out, start
over with freshwater. You don't want your final
pieces to start to look muddy because your water
is not clean enough. The next thing we're
going to look at are the paints themselves. I am going to be using this. This is my absolute favorite. I actually have two
different ones of these. This is a beautiful
12 by 12 palette. It is made out of ceramic. I love this. If you're
interested in this, you can check out my bio and
find this one. I love this. I keep all of my paints in here. The paints that I put in
here come from tubes, so I find the right color and I put it right in here. These dry. This is all dry in here, and you can't use this yet
because it's completely dry. I will take a spray bottle, something like this or use a dropper like
something like this, and I'll drop water on it. But personally, I find a
spray bottle works best, and all I have to do is to reactivate this paint
is spray it down, something like that, and now they are all sprayed
and ready to go. The paint will activate over the next 2 minutes
while we're talking, and then it's going
to be ready to paint. This area in the center
is my mixing area, and I like to sometimes
mix my colors together. If I want to start over with a fresh area that's
not been dirty, I can always grab
a paper towel or something after that has been wet down and I can clean this area up and
start over fresh. Okay, so then to talk a little
bit more about the paints, in this palette that I have, these are all van go paints. So my Vang paints that
I chose specifically to go in this palette are
more granulating paints. They're not all granulating, but a lot of them are and I love to work in a
granulating paint. I love the texture that it gives because I am not
somebody who's going to be my art style is not a precision and with
precise colors, I'm more of a loose
watercolor artist. And so I kind of really
like when there's some things that happen
that are not predictable. And so I prefer a
granulating color. If you're not sure
what granulating paint means, let me show you. This here is considered
a granulating paint. Do you see how there's,
like, yellow and green, and it's all kind
of mixed in there, and it really shows a lot
of texture and color depth. That would be a
granulating paint where these two are
not granulating. These are just solid colors. Just a solid beautiful yellow and a kind of like a teal color. Here, again, I'll show you these here is a
granulating paint, where you can see it has blacks and greens mixed in together. I really like that look where
these are not granulating. You can really see
the difference there between granulating
and not granulating. You don't need to have
a granulating paint to do these classes. I'm just going to be showing you the difference here
so that you are aware these would not be
considered granulating. But all of these paints
came from this palette, and they're all from
these little tubes here. And what's great about
it is that you can put a little bit
of paint in here, let it dry, and then
keep reusing it. And then I just store
these in a jar. Um, or a box and then when
I need to refill them. And I just refilled this, but it's probably been a
year since I refilled it. The paints go a long way. You can just pick up some tubes. You don't have to have
as many as I have, but if you choose the tubes, you can always just refill. And so although these
tubes are not inexpensive, they range from
anywhere $6-12 a tube. But these are going
to last me years and years because the paint
can just stay in here, be refreshed with water
and be ready to go, and then I just do a
little quick refill. So I just finished doing that, so I thought I would
show you my little pile of granulating paints
from Van Gogh. I do have a second palette
that I like to use, which is made by the colors that I use in that one
are all Daniel Smith. Daniel Smith is my ultimate all time favorite paint brand. So that would be another
brand that you might want to look at if
you're into tubes. But I don't want
this to stop you. I don't want this to be
overwhelming to you. You might own a palette, something similar to these. So your palettes
might be in a box, something like this, with a whole bunch of colors on here, or I have this one here. And then all of my
colors are in here. So this might be what
you have to use, and this is absolutely perfect. These are a great
way to get started. You have so many different
colors without having to put your investment into this and then an investment
into buying a palette. So I think this is a
great way to get started. And maybe while we're
doing this class, I will switch over
and use some of these just so that you
can see how I do that. Again, these are all dry
and to activate them, you can just use
your spray bottle and activate those
right like that. And then in another
minute or two, these will be ready to paint. I always have some kind of a rag or a paper towel nearby so that I can dab off if I need to dab off
some of the paint. I am going to be using two
different paint brushes today. I'm going to be using this one. This is a grabby.
It's a size four. This is a scroll style brush or a quill and it's nice
and long and floppy. And I really like this for really loose watercolor painting where you're not looking
for refined specific, you know, really detailed work. I like to be limited to
something like this. So this is the paintbrush
that I'll be using today. But if you have if you have a round paint
brush like this one, let's take a look at
the difference here. If all you have is a round
paint brush like this, this is going to
work just fine too. I would just recommend that
you find a larger size. This is a size eight round. So this is a size four brush for a squirrel style brush
or a quill brush. And so I like that for what I'm going
to be working on today. If you have a round brush, try to get an eight
or above in size. The larger the brush, the
better for today's work. Then I love this script brush. It's also called a liner
brush or a rigor brush. It's a really great brush. It's floppy, kind of unpredictable where it's
going to go, and I like that. We'll be discussing this
brush a little bit more. If you do not have
that brush at home, you might have something
similar to this, where it's just a detail brush. It might be shorter,
but it's nice and thin. Look for something like
that in your collection, and this might work just fine for what we're going
to be using today. Then of course, we need
to have some paper. Today we're going to be using the Academy Watercolor paper. This comes on a pad that's
sclued down on offwear sides. There's an opening
here at the top that you can use to peel it off once it is dry after this is completely finished and you've finished
painting everything, and it's completely dry. You can use a knife a blade like this and you go down
into the center and then you slide it around the
edge to peel it out. Of course can use whatever paper you happen to have on hand. This paper that I painted on
yesterday when I was doing my practice and my warm up this is actually just
all purpose paper. It's not watercolor paper. It didn't work like
watercolor paper, so I'm not sure that
I would recommend it. But if that's what you have is just some all purpose paper, this will also work.
So use what you have. This is supposed
to be stress free, and I don't want you to be
feeling like you can't move ahead if you don't have the
exact right watercolor paper. I believe that's all but we're
going to be using today. Join me in the next
class, and we're going to get started
on discussing monochromatic and why
we're going to be using monochromatic in this
work in this class, and choosing the
different colors that we're going
to be focusing on. Can't wait to see you
in the next class.
3. Understanding Granulating Paint and Added Details: So yesterday when I
wasn't feeling great, but I wanted to get started
and doing some painting, I decided to work in
monochromatic colors. Monochromatic basically
just means one color. And although you see lots
of different colors here, you'll notice that each
design was done in one color. And within that, you will also notice that there are
different depths of color. So you'll have a darker area
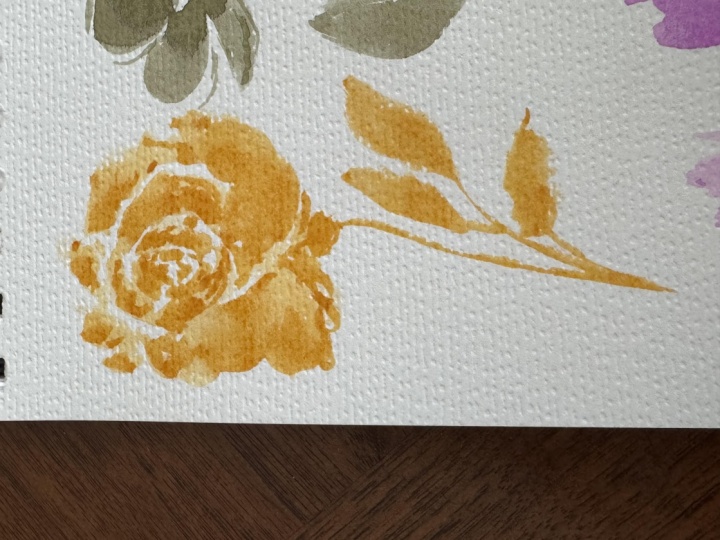
and then a lighter area. Even over here on
these little roses, you'll see that
there's lighter areas and then darker areas. And so that is what I decided I needed to do because I
wasn't feeling great, but yet, I really wanted
to get painting again. And so sometimes when I need
to do a little warm up, I find it really helpful
to just work in one color. And because I had just refilled
all my paints over here, I was kind of playing around
with the different colors, and I just had fun choosing one color and going around
in a circle and choosing all these different colors
to play with just as a way of exploring color and exploring how the paint
works with water. And that's what we are going
to be working on today. So today, we're going to start. We have three different lessons. We're going to work on
this class on this flower. We're going to be doing
a rose in one color, and then we're going
to be finishing it up with working on
something like this. You can see that this
is three different paintings, three
different styles. This is not intended to be one. I'm just using this as my scrap paper to play around
with the different colors. If you have some scrap paper
and you want to play with it that way before moving over
onto your cotton paper, this would be a great way to practice what we're going
to be doing and then go ahead and rewatch this class and do it again on
your better paper. If you've been taking
my class for a while, you've probably heard me talk
about this watercolor pad. Now, this is not
high quality paper, but it is watercolor paper. It's a watercolor pad. It's spiral bound, and I absolutely love it
because you get to just explore and play around with different things
on your paper. It's spiral bound. It is perforated so that you can play and then also rip them out if you need
to pull them out. I have played so much
in all of these. I probably have 20 of
these things done. What I would do if I
was you if you have a spiral bound watercolor paper like this is do one or two. You could even turn it sideways
and do one here and one here and make your
different designs on here as you practice, and then watch this class
again and do it over on your final paper so that you have something
that you can frame. Okay, so as I had said, we're going to be working in this watercolor paper
that is cotton. I do really like this paper. This is probably one
of my favorites due to the value of the cost of it, and then also the
way that it works. I like the tooth, the texture that is in here. I'm going to use
some masking tape. This is just artist's tape. I'm going to separate it so that I remember that
I'm just going to stay confined on this side or on that side for this class. If you were going to be
doing this and you wanted to have it as a finished piece, and you wanted to
be able to mat it, you would probably want
to decide where to contain it within
so that you had a finished piece that
you could mat and frame. But I'm not planning on
matting and framing right now, although I absolutely could. I see that that would actually fit there, which would be great. So we'll see how it all works
out at the end of the day. So I like to have some
artist tape that I use. So I am going to go ahead. I've already pre sprayed
and wet down this. I'm just going to
do it one more time because we've been
chatting for a while. I want to make sure that
my paint is nice and wet. And then we're going to
be choosing a color. I like to choose something
that is bold enough, but that's really a fun color. There's no right or wrong
in choosing your color. You could choose I
have a black over here that I might
choose at some point. I have a beautiful
purple, some greens. I think you're going
to be interested in this granulating paint style. I think I'm going to
choose a granulating paint and see what you guys
think of that one? Here I just have
some scrap paper that I've used in the past. You can always
just dab in there, and then let's just take a look, see how it goes on
and it's really dark. Now, if you wait
and watch that dry, it's going to start to
separate and pull into the tooth of the paper
and you're going to get a really interesting
granulating color. Here's another one that's
really interesting. I think this one's
called Davy's gray, and it looks like it's
black when it first starts. But as it separates because
of that granulation, you're going to be starting to see that it's going to separate into grays and also greens,
which is really fun. Are you seeing how
that is separating? Let's just watch
that for a second. I might it's best
to let this dry naturally instead of
using a heat tool or a hair dryer because
that doesn't allow for that separation to
really happen if you force it to dry unnaturally. But so fun to watch that dry
and see how it's separating. You really see the yellows and the greens coming
out in this one. And in here, I'm starting
to see some green. I'm not sure if you can see
that on camera yet or not. This one's Davy's gray. This one is called it's
angos dusk yellow. If you're interested
in something that's really dark
but very moody, almost like a moss color
with some darker areas, that one is called dusk
yellow from Van go. This one I know is Davy's gray. Those are two really fun ones. So I think what
I'm going to do is use those two to start out, and then we'll choose some other colors to
see how those go. So we're going to start with this style. And what I want you
to think about when you're painting these is you're almost looking at the flower
straight on, not down at it, not looking up at it, but most like you're like a buddy rabbit
and you're just short and you're just
looking straight at the flower as it's
growing straight on. Versus something like this
where you are looking almost down on the flower like it's on the countertop and you're
looking down at it. And so when you're
looking straight on, you're going to see the sides of the flowers and
you're going to see where the stem meets
the base of the flower. And sometimes you're going
to get a chance to see just a top in that center area. You're going to get
a chance to see just a touch of
that center area. But mainly it's the edges. And on this flower arrangement, I'm going to be adding in some little extra details
as we go through. So let's get started in this flower in these two colors
in a monochromatic style.
4. Project 1: Simple Monochrome Flowers with Soft Outlines: My paint brush. I
want it to be really wet because we are
working in a loose style. I am going to be
creating something here. We're going to be creating one on this side and
one on this side. Because of the way paint dries, I'm going to start over here. I am right handed, so I want to have a spot where I
can rest my hand. I always like to
start left to right. If you are left handed, you would probably want to
do it the other direction. I'm not going to draw on here. I'm not going to create exactly
where it's going to be. I am going to think about it
though and feel like, Well, I want to have my tallest
flower up in this area, and then a second
one maybe facing that direction and then
a third one over here. I visually map it out. But I don't personally like to draw where it's going to all go. If it makes you feel better
to do that, go right ahead. Just use your pencil very lightly so it's something
that you can erase. EEasing after the paint has dried is going to
be very difficult. Make sure any lines
that you draw on here are very, very faint. You can maybe even go ahead and erase it a little bit first. This is my Davy's gray, and I'm going to be adding a
little bit of water to it. I'm going to be putting
it here in the center. Where I can play around with it and really get it
to the right texture. I want it to be something that is flexible and moves around. It's not thick, it's not watery. So that is the texture
that I am looking for. I am filling up my entire brush. I had wet it down, so it's
nice and wet and I am pushing my belly of the
brush all the way down and filling it completely. I'm not just dabbing it in, I'm making sure that the
entire paintbrush bristles are completely full of paint. Then I'm going to start
with this top flower. I'm going to look at that. I'm going to say, here's
a petal, a second petal, a third petal, a fourth petal, then this petal is
coming downwards. As you look at these flowers, and you want to get
this shape going. This is just a very
simple petals. All of them are very simple
and are not detailed. But what I am noticing is that I left a center area that is completely open instead of filling that in and
touching all the petals, I'm leaving a little
bit of space. I also am noticing that in order to make it look like
you're looking at it, the center of it
just a little bit, but still on an angle, I allow this petal to
come outwards and you're almost looking at
the edge of this petal and the edge
of this petal, and then the front of these. I'm going to be mimicking
that when I paint here. So starting at the top, I'm going to be laying my
paint brush all the way down, kind of swishing it around a little bit to create
that first petal here. Then I'm going to be
making a second one. Because I have filled this
paint brush up so much, I don't actually
have to dip it back into my paint very often. Whenever you feel
like you need to, you go right ahead and
add more paint to it. But because mine
is nice and full, I'm just going to allow
that to keep on painting. I'm leaving that center. I'm going to add another little
paint, little petal here. Then I'm going to be adding because they're never
going to be the same, so you have to use your own common sense as to how
you want to do that. I'm going to be adding
another one over there. Dipping back into my paint, I am going to come in and
just add a little bit extra to the center to make that center area a
little bit darker. I'm going to allow
that to start to dry, but I'm already seeing the granulation happening and the separation of the
gray with the green. Grabbing a little
bit more paint, I'm going to go ahead
and make this one. I'm going to put it down
here a little bit further. This one, we're just
seeing the edge of it. I'm just going to make
a couple. See how because we're using this
nice big fat brush, I don't have to work real hard. I can just make a little swish here and I'm
going to just make this edge here for
this other flower, I'm going to put a little
extra down in there. And now we're going
to work on this one. And again, it's just simply
adding some little flowers, petals, in a circle or in whatever shape
you want it to go. I think maybe I'll just leave it there and let it be
very, very organic. That is all I want to do for
the flower heads themselves. Because I'm working in
a monochromatic style, I don't need to rinse this off. This is just going
to be the same color when I go back to use it again. I'm just going to lay that down. You can rinse it off,
but you don't need to. I'm going to be moving over to my rigor or my detail brush, wetting that down and completely filling that brush up so
that it's not dripping, but it's completely full. If it is dripping, you
can always just drop it off onto your paper towel
or cloth that's next to it. Remembering that this
is where that center of the flower is coming from, I'm going to make
that area just a little bit fatter, a
little bit thicker. Then I'm going to just draw this stem down and bring it down. Don't make it
straight, make sure it has some angle and
some movement to it. I always like to have
my base of my flower just a little bit fatter
than the top of my flower. Just adds a little bit of
stability to that flower. Then I'm going to be
adding another one here, I'm going to be saying, this one's just going to
come down like that. Then this one has the
This one has the base. Sometimes those bases
when you really see them on the angle like
that are much fatter. I'm going to go
ahead and make that an added thickness there. Then I'm just going
to bring this one, arch that all the way over here, and draw that back up. Lots nice depth. Look at how that granulation
is happening and how you can see that green
and the gray separating. Isn't that fun? I
absolutely love that. Now that it's had a little
bit of time to dry, I'm going to come in with
a little bit thicker paint and add just a touch
more here at the base, maybe putting some little
extra extra little bits at the top here where it's
going to get a chance to thicken and show a little bit more contrast
show a little bit extra. I don't know, thicken that area. This is just intuitive. You can just have fun with
this. Whatever works for you. This is where your
artistic dimension and your artistic flair
can really come out. If you don't feel
like adding more, then you don't have to. But if you would like to add a little bit extra, you
can add more there. As this is going to
go ahead and dry, I'm going to go ahead
and add in some of these details again
using my rigor brush, getting a little
bit thicker paint directly from the well so
this is not as liquidy. I'm going to add
this little outline. When I add the outline, I'm not actually trying
to outline it exactly. You can see where
I went outside of the lines here and I'm going to go ahead and add those pieces for my artwork
just because I like that. See how I go outside the
line and then come back in. I'm going to do it
again over here, just adding in some of that
depth. Adds some more here. Doesn't have to go
around the entire piece, but wherever you
feel like adding it, pick up more paint whenever
you feel like you need it. This is a really fun way because it's all
in monochromatic. It just adds this
exact same color and detail in the same exact color instead of being in something
that's contrasting. It also adds a little bit of
motion and movement to it. I'm going to go ahead
and add a little bit down some of these
stems as well. I'm going to let this
dry a little bit, and then I'm going to
go ahead and add in the little center of that
flour into this one. But I think I'm going to
leave the rest of it alone. And just look it over and decide if it needs
anything else. Is it helpful to
add in a little bit of grasses down at the
bottom? It's up to you. If you want to add leaves,
go ahead and add leaves. Go ahead and get that
really thick paint again, hardly without any water, just really nice and
thick and add in just some some um pieces in here to indicate
that it's the center, maybe add in a few
little dots too. The more this dries,
you're going to be able to add in a little
bit more detail. If you want to wait until that dried a little
bit more, you could. Now that this has dried
a little bit more, I'm going to go ahead and pick up some more of that
really thick paint. I want to add in some of
these outlines that are around each of the petals just so that it shows up
a little bit more. I'm going to just go
ahead and add those in where I feel it's really
going to be beneficial. It does not need to go onto every single
one of the petals, where you really feel
like that's going to be beneficial for the art piece. I'm going to go
ahead and do that. Then technically, I think we
could call this one done, and then we could move on
to a whole different piece, doing the exact same thing, but in a different color. In a similar way, I'm going to create this one here where you can't
really see the centers, but I'm going to
create one petal here, and then a second petal. And a third petal, maybe a fourth one over here, something along those lines. Just let that dry naturally. Go back into my paint. Now I'm going to add
another couple here. This is where it gets really
fun for you because you get to just practice the same
thing over and over again, but not get bogged down by
what colors you're choosing because you just chose one and now you're going to
practice it and do another one. I'm going to add
this flower here. Just very organically
adding in a couple petals, not really having a lot of precision on what
those petals look like. They're just little swishes, letting that belly of the brush go completely down
onto the paper. Now that I have those done, I'm going to go ahead and
switch over to my rigor brush, getting a little thicker paint, creating that base,
kind of like a triangle where it's really nice and thick and then bringing my paint
brush all the way down. If you need to dip back in and go back over it,
go right ahead and do that. Go to do the same
thing over here. Bring that down one more time. I'll bring this one over here. Then as it starts to dry, I'm going to do the
exact same thing and add just some little movement by going outside of my painting, but in the exact same color. Really is a great way to add
movement to your painting without trying to
decide how to do that. As this dries, I'll
even be able to add in that extra detail into the center to create
the individual petals. Maybe even a few. I feel like
this is looking into it. Something like that. As this dries, you can
always add another layer coming in and using that
thicker paint with less water, and you can add in just a little bit more detail
a little bit more color. These are granulating. These are not granulating. The paint colors that I selected from Van Gogh are a lot they're
darker, they're moodier. Your paints might be brighter
and bolder, totally fine. It's just for the paints
that you happen to have or the mood that you're in or the style that you
feel like painting in. So it's completely up to you. You might have chosen purple or orange and that would have
been just as beautiful. Don't get bogged down
in the exact paints. I just wanted to show you what granulating paints
looked like in here. So now I'm going to
go ahead and separate this because I'm not sure that everyone has a
palette knife at home, I'm going to quickly take
off this piece of tape. I'm just going to
show you what I mean. So I'm just going
to use my knife. I'm going to just carefully, carefully wiggle this
around the edge. Going nice and slow. If you had a palette knife, it works probably a
little bit better, but a butterknife
works perfectly fine. If you did not have a piece
of paper that's laid flat like this on a pad, that's fine. You can either tape it down
to your tablet tape it down to your desk or because we weren't using
a whole lot of water, it probably would
have been fine to just let it just sit
on your desk as well. So I wanted to show
this to you up close before we close out
this class so that you can really see the granulation and what I'm referring
to in that granulation. So two different colors. This one being Davy's gray, and this one being dusk yellow. Both are in the Van
Gogh artist paint. Really pretty fun.
Really adds a lot to add that little extra movement
on the outlining. So have fun with this, and thanks for joining
me in class one. I can't wait to see you in the next lesson where we pick up a different flower and choose some different colors to
paint in a monochromatic way.
5. Project 2: Painting Playful Roses in One Color: Welcome back. We're going to be working on the next project. So this time we're
going to be working on roses in a monochromatic color. And on this one, I did choose some brighter colors from what we did in the other lesson. So I think I'm going
to do something similar for today when I move over onto my cotton
from my practice paper. So I did go ahead and
just reuse that piece of tape and separated it so that I can do two
different colors, and we're going to
be practicing roses. Now, when you paint a
rose in watercolor, I personally like to
start in the center, and I like to do a little
bit of a darker color, which would mean that you'd be using more paint and less water, more concentrated paint
here in the center. It starts out as a rose
starts out very tight and darker in the
center, typically, and then it gets
looser and lighter and more whimsical or loose as we move out
towards the outside, which is going to be
meaning that we're going to be adding more water, less paint, more water. And then of course, we'll add some stems and a
couple of leaves. To do this, we're going to
move on from our moody colors, and we're going to be
painting some roses, two different ones,
two different colors. Going to be using this
grabby size four, which is a quill brush or scroll style brush for all of this and possibly
even the stem. I might even just skip this one because I want to show
you that even though this brush is really large compared to what you
might be used to using, you can really create almost
anything using this brush. I really like it. Using this red color to get
I added my water to it, my paint brush is nice and wet, and that is going to
be really pretty. But maybe it's a
little too water down a little bit too much water and not enough paint
because I really want that center to be dark. I'm going to take my same
paint brush that's full of paint because I've been
playing around with it here. But I'm going to
dip this right back into the center where
my paint is really concentrated and fill
that up the tip of it with really concentrated so that I can create the centers. To create the center of my rose, I am going to just create these little C shapes and just add another one and then maybe add another one that's
just a little bit bigger. I'm just adding some little
Cs that go around in a circle and creating
just a center of my rose. As I work my way out, I'm going to start dipping my
paint brush into my water. Not going to rinse
it out completely, but I'm going to be
putting it in here and swishing it and then
dabbing it off on the edge. I know that a lot of paint is going in here, but
I'm okay with that. You can tell I have used very little paint,
so it's not a waste. But now my paint brush is full of water with a
little bit of paint, but you're going
to be surprised at how much paint is still in here. Because look at this as I create a bigger petal, it
has more water. But it is lighter and
it is not as dark. I'm just going to create some petals that go
around the outside edge here and create these
little petals to my rows. As I do it, I might wash it off again and add another
one out here. I'm really going to
create these to be just very organic and soft and flexible
moving them around. And then maybe I want
some petals that come down like that. I really feel like the
rose is opening up. I like these to be a
little bit more jagged. So something along those lines. There's bringing them
up here a little bit. A very loose rose, very organic feeling, and then dipping
back into my paint. I'm going to create
a stem comes down. I'm going to be adding in a rose leaf and the
rose leaf usually comes off and then it often has several different petals
and leaves that come off. You might have one leaf here, and then you might have a
second one that's up here because roses often have
multiple leaves off of one stem. Now, as it starts to dry, I am going to dip back
in and grab a little bit more of my paint and just add a little bit more here and
a little bit more there and just kind of dip it in just to create some
beautiful texture. Keeping that center
nice and dark. If I have to go back in
and add more, I can. While it's still wet,
you can really add in your colors and add
in that depth again. Once it's dry, you're going to be painting a second layer. While it's still wet, you're doing a wet on wet technique, which is allowing
that paint to bloom and flow and add a little
bit more texture and depth. See how you're really
getting a spider web feel, which I'm okay with because I am working in a loose paint style. I actually like that. Adds a lot of texture. As it dries, I'm
just looking for areas that I can add in
a little bit more depth. I did this one, but most of this petal or this leaf was dry, so I'm not loving the fact that that's going to just dry there. I'm going to go ahead and clean off my brush as much as I can. It's damp, but it's not soaking. I'm going to just move that
paint around a little bit. Allow that to just flow, re wetting that area so
that the paint that I add there can really spread more. I'll just fix that
up a little bit. Let's do Let's see. Actually, we're going to
do this purple color. This is a fun one. This is something I haven't
worked in recently. So it's a lavender color. Again, being very
intentional to make sure that my center is the smallest and the darkest and just adding in
a little tiny bit. See how that starts to
look like a flower. Then just rinsing off some of it so that I
have more water on my paintbrush and coming in and adding just
a little bit more. I won't make this one as
big as I made the last one. Just adding in these
little tiny petals around the outside edge. Maybe this one's a little closed up a little bit
more than this one. This one is more
like a garden flower where it really opened up wide. This one, we're just
going to open up a little bit by adding these lower
petals to open that up. I'm going to dip back into my thicker paint using this exact same paintbrush
just to prove to you what you can do and
creating that base of the flower and then we're
going to add a stem, very, very wobbly and adding some extra little
flowers leaves here. I just move my paintbrush to
make it a little squiggly. It is we're going to
add another one here. Maybe facing downward. Maybe we'll put
another one over here. And another one. Maybe one more. Just a small one. I like that. Sometimes I like to
have little roses have these little petals that
come off the bottom of the stem too of the
base of the flower. Now while this is drying. I'm going to dip back into my thicker paint with less water and go to make
sure that that center stays nice and dark and start
adding in little touches of this darker paint to
again just really allow those textures to
flow before it dries. But again, if it dries too fast, you can always rewet it
and add in more Very fun. You never really know
what you're going to get when you do
this because you're never really sure what areas
are going to stay wet and what areas are not
going to be wet enough. We're going to go like
that, my brush off. This area got a little too dry, so I'm just going to smooth
that out a little bit. Don't like that jagged edge. Okay. Same thing over here. Just kind of smooth out some
of this as it's drying. So here they are dry and
I've taken away the tape, and we could cut this down, and I could have one painting
here and another one there. I could make these
into cards or into a painting that you could
hang on your wall or into a powder room or something. That would be really pretty. You can make them into a series if you kept all three of these in the same color in one
monochromatic color. So if you did all of these
paintings that you're working on in,
like, the lavender, that would be really
pretty for, like, a powder room or a baby's room or into a laundry room,
it'd be really nice. So when you are working
in monochromatic, it is very important
that you allow for lighter shades and darker shades you
have this variation. Otherwise, it could start to
look a little too stampy, a little too rigid,
a little too, you know, exact and not
enough of a watercolor feel. Because you're
working in one color, we want to make sure that you have that different variation in colors from the lighter
shade to the darker shades. And so when you are
practicing that, make sure that you
are using more water and less water so that you
can achieve that look. One of the fun things and
what I really like to work in monochromatic is that
you can just keep doing this over and over again. And you're practicing
two different things. You're practicing your
water and paint technique where you have more
or less water, and so you're playing
around with that. You're also playing around
with the style of painting and the technique of painting
arose and you get to practice it multiple different
times in different ways. But you're not feeling
like you're just doing this exact same
painting over and over and over again
because when you're done, you have all these
different paintings that look completely
different because you've used different colors. And so it's just
such a fun technique to work in monochromatic
because of that, where you get to paint it over
and over again over again, but you don't feel
like you're doing it like the exact same thing because you're
using a new color. So I really encourage you to go ahead and practice
this as many times as you need to to find which one you like best and maybe you'll like one
because of the color. Maybe you'll like one because
you feel like you did the style correctly or the shape or the direction
that the painting was going. On this one, I'm
going to show you with my little palette knife. This is just a little
simple palette knife, and I can just pull this around and separate this
right out like that. Again, being very careful. I'm not rushing
this. Take your time when you cut out your papers. And now I have this. I would be able to
cut this down using a I either have a blade like a paper
cutter that I would use. You have this mat
that I can show you. Look at that. I could
cut this out and I could map that and then that could go inside of a frame and look
how beautiful that is. All it needs is for
me to sign this and then that is ready
to hang on the wall, or I could do this one here, and I could map this one. So even your paintings that are practices could
actually become artwork for you if we go back and look at the ones
that I did in the last class. Look how pretty that is. These are really fun. And if you don't feel
like making them into something to
hang on your wall, you could cut these
and use them as a card or as a postcard, and you could mail them
in, like, an envelope. And that's just such
a beautiful gift. So now that we have
done class number two, we have done these
first two classes, and now we're going to move
on to class number three. So come join me back
in the next lesson, and we're going to be
putting this together and seeing what colors
we're going to choose. I can't wait to decide what colors we're going
to do for this one.
6. Project 3: Expressive Florals with Leaves and Movement: So this last class is really a fine one
where we get to add in some extra leaves and really add in a little extra
squiggles at the top here. Look how jagged these
leaves these petals are. This is just a really
fun way of painting loose flowers that are more organic and you're
looking down on them a little bit more see how you can see the centers
of the flowers. Where on this one,
we worked more on looking at the
edges of the flowers, and these could have
been the same flower. You could technically be
the same style of flower. But here we're looking
more straight on the flower and here we're looking more down at the flower. So we're going to be working on this and we're going to
choose some new colors, and we're going to
actually add in a couple more leaves as well. So so far, we did our brighter
colors in our roses and our moodier colors
on the first one in a granulating paint. And so I think right
now we're going to do a beautiful brown color. I absolutely love this one. I love this color, and it's really
just a simple color that could work into
anybody's home. But I think I'm going to do
that and then also a blue. On this last class that we're
going to be working on, we're going to be talking
about keeping things nice and jagged on your petals so
that they're not so perfect. You can see the
different here where this is just a rounded petal. And these have more of
the little jagged edges. We're going to be working
on that in this class. So welcome back, and I can't wait to see
what we can do here. I am going to stay with this
exact same paint brush, this quill style from
Grabis a size four, and we're going to use this
blue that I had decided on, which is just such a
beautiful, almost like a navy. So my paintbrush
is nice and wet. I've completely
dipped it into water. I added it to my paint brush, my paint over here that
has been activated, and that is nice and thick but really perfectly done with just the
right amount of water. My quill brush is
completely full. I am not just dabbing in, I am actually swiping it and trying to pick
up as much paint as I can possibly get into here
without it dripping off. If it was dripping, I would
either say that there was too much water or maybe your paint brush isn't quite working the
same way as mine is. Then if it is dripping, you can always just
take your cloth and take off that little
drip that's here. Going ahead and making my
little jagged edged flowers, I want to show you how
I'm doing that here. Starting, we're
going to make one at the top and then a second one and a third one
like we did that last time. But I'm going to be making my jagged flour and see how I didn't pick
it up all the way. I didn't push it all
down and then pick up. I just picked it up randomly and then I'm going to
be adding a second one. And then I'm going
to maybe add in a little swoosh and then
I'm going to come around and I'm going to be adding in the same thing
where that pickup is very jagged and then maybe adding in another
little line there. Leaving the center because I do want to have a center
for that flower, I'm just going to make
these little jagged edges where it's not perfect. Maybe add another one there and then add another
one over on this side. They're all just
really jagged and uncertain and not a
finished rounded edge. So let's go ahead and do another one,
but before I do that, I do want to add in that
darker color into the center here so that that can really start to bleed out before that dries
too quickly for me. I'm going to make
another flower here, kind of looking at it again. But again, it's just kind of really jagged and
bringing that petal up, maybe adding an extra
little petal there. And See, I'm just kind of quickly swishing and allowing
that jagged edge to be. And then I'm gonna
put another one here. I don't want over here. Just really quickly
moving that paint around instead of
making it solid. Now, I do like having
some white space, but I think I want to add one more little line in
here into the middle. I think I'm going to
add one more flower over onto this side, but I think ran out of
space a little bit. I think maybe we're
going to make this one just coming up a
little bit more and maybe I'm looking at the
center a little bit less. Something like that. See how I just I'm making
these edges just very jagged. Now I need to decide
where the leaves are going to go and the stems. I'm gonna start it here. I'm not gonna touch into the center. I'm just going to start
it there and move my my paint brush down. This one I'm going to bring
over at this drection. This one, I think I'm
going to actually go here, go close to it, jump
over it, pick it up. Pick it up here
and bring it down. Add in a little bit more depth, while it's still wet, finding the wet spots and dripping in a
little bit more paint. Before it dries, you can see that I smudged it
a little bit right here. I can either ignore it. I
could put a leaf there, or I can use as clean
a water as I can, fill up my paint brush with that water and just lay water
right there on top of that. Let that soak up a little bit. Just gently scrubbing
it with my paint brush. No real hard, gentle
little scrub. Let that soak for just
a couple seconds here. Coming in with a
brand new paper towel completely clean and
just dabbing it up. The sooner you see that happen, the easier it'll
be to clean it up. You can keep coming in
as often as you need to and you're going to be
able to lift most of that up. What I'll probably end up
doing now is adding in some leaves and masking it a little bit
because I always go with there are no
mistakes in watercolor. It's just the way things go. Is it is what it is. Apparently, I needed
to have a leaf there. You can always add in
some darker before these dry completely because you want your leaves to have
definition as well. This is fairly dry dry enough. I'm going to use my
raker brush again, to be able to put in
these centers so I can get some more defined lines. Like adding in these
centers to a flower, even adding little dots. You add little dots into the
petals into the centers. This one we're just
barely seeing the center, but it still deserves
a little bit. I some dots. We're
going to let that dry. We're going to move on over
here to work on the brown. And we're going to add these jagged petals again
so we get a second chance. See how the jagged
we can make them. Really use this as
your opportunity to see how loose you can paint, how jagged add back in those darker spots that
you want to have added, but make sure you do that
while this paint is still wet. If you wait too long, it does make it more difficult. I definitely had a
little bit harder time on this piece because
I waited too long. I'm going to add those in now. I'm going to add another
really jagged edge. Another one over here. Add in my darker parts and
I'm dipping right into the center right into the really thick paint
so that I can add in the darker color
in different places. I really helps. Because we definitely want to
show that definition between the lighter areas
and the darker areas. If you're just going
to use one color, then that color needs to have different value where
it's lighter and darker. You can already see over
here where this is paint has dried or you have
your lighter value and your darker value and
how important how important that is in creating definition
in your painting, since you're not going to
be using multiple colors, you do need to have
multiple values. So as that dries, we're going
to be doing more of that. I'm going to go ahead
with my rigor brush, fill that up and add in a stem and another stem over here. And then maybe we'll get some little spots for my
leaves are going to go. Again, just really loose a leaf just kind of looks
something like that. And adding these centers. Make sure we get that value
added into these leaves. This is going to be really
pretty when that's done. Okay, let that try. If you have enjoyed
these classes, what would be really incredibly helpful to me is if you were to follow my um follow my
class, follow my profile. And to do that, you
just go and find my name and near it,
it says, follow. And so if you could
follow Brenda Jones, that would be really helpful. I need to have enough followers
to be able to get paid. And the more followers I
get, the better it will be, and it's more encouraging for me to be able to
paint more with you. So I would love for
you to go ahead and follow me if
you're so inclined. So thank you ahead
of time for that. The other thing I want to
ask for is any reviews. If you would like to just do a quick little review,
something like I loved it. It was fun, love the
different colors. Any review would
be really helpful. If you have questions, go to the discussion board
and ask your questions. If you want me to tell you exactly which mustard
color this was, I can look it up and
figure that out for you and I'll respond
to you right away. I'm very prompt
with my responses. So go ahead and ask
me any questions you have if you would be willing
to share your artwork. Other students who
take our classes really like to see
other people's artwork. So go ahead and
take a minute and take photos of what
you've worked on and upload them to the class so that I can see them
and I can make comments, or other students who take my class can see what
other people are baking. It's just so encouraging
and it's so good for you to feel like others have had a
chance to see your artwork. Go ahead and upload
your artwork. I hope that you have had fun. Come back to the next lesson
where we wrap this all up.
7. Final Thoughts and Follow Me for More Classes: Another tool that you can
use is a boning knife, which I've had this forever. You can pick these up anywhere. And if you have one
of these kinds of pads that are glued on
several different sides, you just have to
find that location where you can stick
something in. I showed you with
other knives and the putty knife or the blades. And so you can just
use a boning knife, which also works really
well to remove this paper. So just take your time
and use whatever tool you happen to have around
in order to do that. So I wanted to show you
these finished projects that you've probably worked on. If you take your mat, you can also create these into pictures. You know, I showed
you the other ones, but I didn't get a chance to
show you this finished one. So that or this blue one. So so fun in order to
you were working on it. You've done a warm up class. Maybe this is a
beginner class for you and you've been working
in this monochromatic. And now all you have to do
is cut that down to size, and that would work
so nicely in a frame, and it would look so pretty. So go ahead and do that. Get your stuff framed. You're going to be
so happy you did. I really hope you
enjoyed working in a monochromatic way where you're just using one color but doing the same piece over and
over and over again. Maybe you did the roses
five different colors in five different ways because roses are more difficult.
That would be great. But you're not going to feel like you've just
had to reproduce the exact same thing
because you've chosen five different colors
to paint that rose in. And that's just such
a fun thing to do. Or maybe you did this one
where this is the one that was facing down and out towards you where you
could see the center. But over on this one, this is the one that was facing you, and these other ones
were straight on. It's so fun to practice
the same thing over and over again when you're working in
a monochromatic. Thank you so much for joining. Please upload your
photos of your projects. Take pictures of
your favorite ones. Take pictures of
the one that you like the least and
say, what did I do? How could I do this differently? Go ahead and start a discussion
where I can help you. I'm here to help. I would love to have a
conversation with you. Give me a review, and please follow my account. It would be helping
me incredibly if you go ahead and just hit that follow button
that is going to really help me out so
that I can get paid, and I would appreciate that. So go ahead and hit that
follow button for me. That would be really helpful. So I hope you
enjoyed if you have any suggestions on what would
make this better for you. I am very open to hearing
about those things as well. Go ahead and leave a review
for me so that I can improve. It's always something
that I am looking to do. Thank you for bearing
with me during my cold. I know that I didn't
sound quite normal today. It was a little bit of
a difficulty for me, so I hope that it was
something that you could hear well enough
and follow along. And hopefully I get better in the next week and I
can start to produce them on a several a
month basis again, like I had been during the fall. So I'm so glad you've been here. I can't wait to see
what you upload. I cannot wait to celebrate
your work with you. And whether you've used this as a beginner lesson or as a way to reintroduce
yourself to watercolor, maybe you've been out of it for a couple of weeks or
months or even years. I'm so glad you have
picked it up again using Monochromatic and
have a wonderful day, and we'll see you again
in the next class.
 Brenda Jones, Watercolor Artist & Teacher