Transcripts
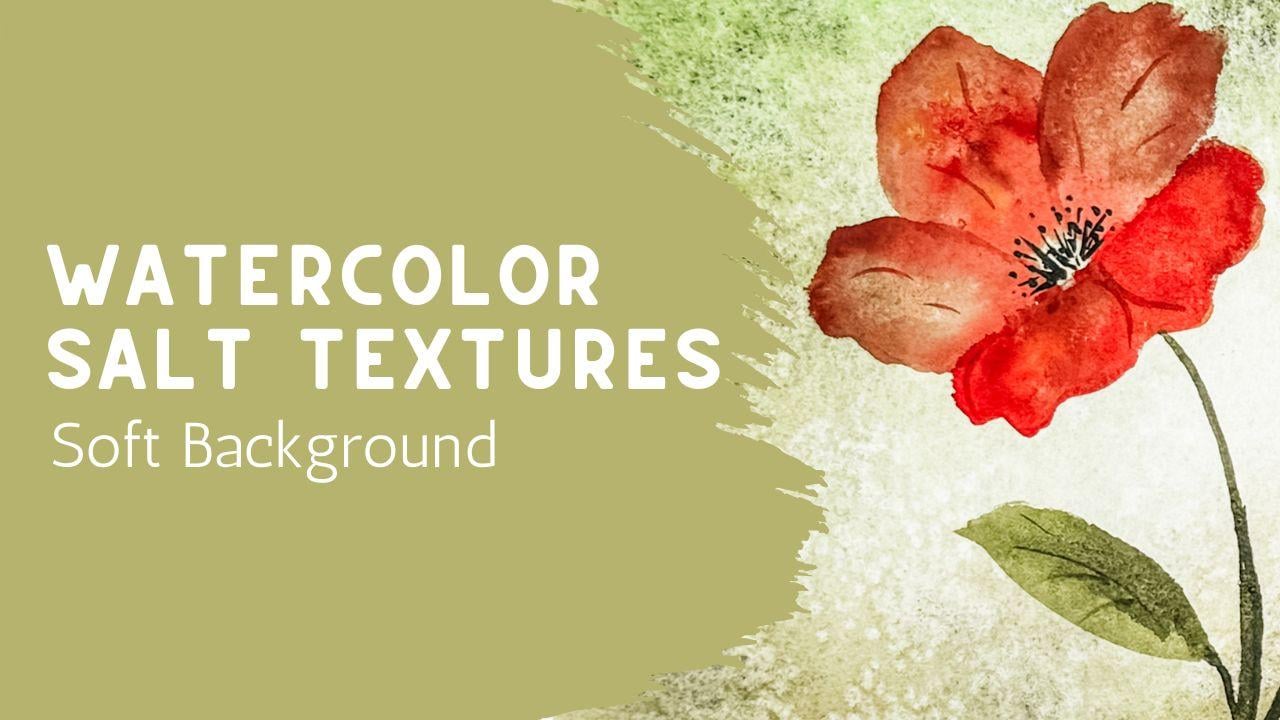
1. A Gentle Introduction to Salt Texture: Today we're going
to create a soft, beautiful floral
watercolor painting with a textured background using
a very simple technique. Salt. This is one
of those techniques that feels a little bit like magic the first time you try it. You place the salt onto a wet paint and then it
dries and it creates these natural organic textures that you really can't
force with a brush. What I love about this method is that it allows the paint
to do the work for you. While you still get to have control over the final
look of your piece. In this class, we're going to keep things simple
and approachable. We'll start by playing with the salt technique
on a simple piece of scrap paper so you
can see how it behaves and how quickly
the effect can change. Then we'll move on to our final project where you'll be painting
a soft background. Add in the salt texture and
once everything is dry, layer in loose simple
flowers on top. I'll show you how to use
this technique lightly and intentionally so
that your texture adds interest without
taking over your painting. This class is perfect. If you're just getting
started with watercolor, or if you're looking for
a more relaxed way to loosen up your style and try something a
little different, take a breath, grab
your supplies, and let's get started. If you enjoy this process, I have more classes where we explore different
ways to loosen up your florals and let that
paint move in a natural way.
2. Simple Supplies to Get Started: Let's talk about some simple
supplies for today's class. Of course, you're going to
need some watercolor paper. I would recommend that
your watercolor paper is either attached on a
board like this one, where it is attached all the way around on all four sides, or if you just have
a piece of paper that's loose leaf like this, then I really suggest
that you tape it down to some other
form of a board. Get out your artist tape and tape it down to
something maybe it's a clipboard or a particle board like this or a piece
of Plexiglass, something else
because we're going to be needing to
pick it up off of the table and moving our paper around to
let the water flow. You don't necessarily want
it to be locked down to your tabletop because you're not going to be able to pick
it up and move it around. So if you don't have a
piece of paper that is on a board that is glued
down on all four sides, then definitely attach
it to something else. So of course, you're
going to need some water, have a couple paint brushes. I recommend a couple
of different sizes. You can have something, a normal size six
or eight or ten. But then if you have
a larger brush, something like this,
or a flat brush, something that's going to allow
you to get a lot of water and paint onto your
canvas quickly. So, you know, eyeglasses
if you're like me. Paint, watercolor paint,
whichever kind you have. If you have a big palette
like that, that's fine. If you have something
simple like this, this is also fine, whatever you happen to have on hand
will work perfectly. I like to have a spray bottle. I like to spray down my watercolor paint regardless of which kind of paint I have. I like to spray down
my paint and I'm also going to need it
to spray down my paper. One of the things that is key
for today's class is salt. We're going to play with the texture of salt
in our watercolor. This is just a pink salt, just my table salt, but I like to put it
in a little container. I have a little lid, and I
can store it here on my desk, and that way I have it
whenever I want it. You don't need much, a little
bit will go a long way. I will probably only
use a couple pinches. Your salt can be
any salt you have. If you only have
kosher salt and it's the larger granulars,
that's fine. If you have thinner
salt or smoother salt, if your salt is just
your regular umbrella, that brand, salt,
that will also work. Whatever you have is
going to be fine, it will create
different textures depending on your
coarseness of your salt, but whatever you have will work. So I think and then if you
want to, you can print out. I'm going to have this
in the attachment of your class project. A drawing like this. This is just something from the computer
that I printed out. And I have that saved for you so that
you can print it out. You can print it out smaller or larger depending on what
you're going to want to do. I'm going to be making this
painting landscape this time, so it's going to fit on it here. If I wanted to make
it go this direction, it does still fit, but, um, it might be better if
you had trunk this down. So you can change the size on
your printer settings to be a different size of
painting a printing, but you also can just free hand this or just paint
your own flower. You don't have to get this
particular. That's up to you. And I just want to mention that my watercolor paint
paper that I'm using today is this
12 by eight size. So I'm going to be painting
inside of that for my piece, and I'll be doing it landscape. Okay, I think that's about it. So come back to the next lesson, and we're going to
get right into it.
3. Practicing the Salt Technique: We're going to play
around with our salt first before we dive
into our class project. It's important for you
to test your salt and to make sure that you
understand how much water, how much paint, how much dry it is or how
wet it needs to be. Practice in a couple
of different ways. I'm going to do that here to show you what I have in mind. I'm just going to
use a pretty blue and we're going to just
dive right into it. So if I do it here and I add that and that's a
lot of water on top. You can see it kind
of moving around. And if I go and sprinkle
this in right away, that's going to
dissolve my salt. There's so much water in there
that that's just going to get completely dissolved and we're going to lose
that effect completely. So I would have needed to
have waited for that paint to have dried more before
I did that effect. So using my same paint brush, I'm just going to move it
over here and do another one. And I'm going to do
another one here because we're going to let that one
dry a little bit longer. You can see that
they're very, very wet. They're not soaking. This
one was soaking wet, so that's just not
going to work at all. But here, I'm going to add
some salt to this one. And you can see that that
pulls all that pigment, all the paint gets pulled
right up into that salt. Add a little bit more here. And then on this one over here, I'll add a little bit more
because that's drier. So it's very wet. Almost too wet, possibly
the right wetness. And we're going to
try another one over here. We'll do it again. We're going to let this one get a little on the drier side. So the other thing you can
practice when you're doing that is what happens if you
sprinkle it from up high? You know, if you just sprinkle a little bit here and a little
bit there, it spreads out. If you put it down near it
and you put a little pile, that's what's going
to happen there. You know, here's another
little pile of the salt. This one's almost dry. It's still shiny,
but it's really dry. So we're going to sprinkle
some on that, too. And then we'll do another one. I need to get a
little bit of paint. So we're gonna let that
just dry even more. So that we can really show the effect of if
it gets too dry, what is going to happen. So it's going from my
wettest down to my driest. I have to wait for
that one because that's too wet right now. That's more like the
wetness of this one here. We're going to let that
one dry a little bit, but we can come back up
here and take a look. You can see that this one
is not going to work out. It's way too wet.
This one is okay. It created a really
interesting effect, but because it was really wet, it made much larger effect that there's a lot
larger white spots. This is a pretty cool effect. This one's going to be
interesting when dry. I like this one a lot. Okay, we're going to
try this one now. You can see that it's still wet. There's some moisture
in it still, but it's almost completely dry. So I'm going to go ahead and sprinkle some salt
on top of that, and we will see
what happens there. It's got salt all the way
out to the outside edges. It will find the wet
areas and soak that in. So we will still get an effect
here because it's almost better to go on the drier
side than on the wetter side. So now what we do
is we let this sit. If you go and dry it off
with a heat gun too soon, you've lost an opportunity
because the longer the salt sits and
dries with the paint, the more of a response and a reaction you're
going to receive. So if you just did a
long time lapse of this, you would see that these have
changed so much from when you first sprinkled it on till now when it's
almost dried on its own, it's really best
to just let this dry almost completely
by itself before you use a heat gun on it
so that it can naturally pull that paint and pull itself pull that
paint towards itself. So I'm going to give it just
another couple seconds, and then I will
use the heat gun. But I want you to practice this. I want you to try this.
I want you to see it for yourself how wet your paint has to be in order
to use the salt. Okay, so here, these
are completely dry now, and you can see this top
one that was really wet. You can see that it
kind of made a run because I think that
salt dissolved and just actually ran
in the pigment, which is kind of cool, but not really the effect
I was going for. This one's going to
be really cool, too. You can brush this salt off and you're going
to be able to see these great big texture pieces. You know, they're all different, so it really kind depends
on what you're looking for. And here is our driest, and you can see it has the
least amount of texture. Now, all of these, you should not try to brush off this salt unless your
painting is 100% dry. If it is not 100% dry, it will smear when you
go and rub that off. So that's really important
that that is dry. You can use your
finger like that, or you can use a paper towel and just gently rub it
with your paper towel. You just have to know
that you can brush off the paint if you're
not extra extra careful. So just make sure
you're doing it extra gentle, extra careful. When it's extra
wet like this one, it's really embedded into the paint and a lot
harder to get off. I'm gonna clean up my desk. Don't need all that
salt on it. Okay. So there you go. There's
your different levels of wet and how the texture changes depending
on how wet your paper is. So please go do this project and come back to the next
lesson where we're going to actually put this salt on an art project so that we
can get some textures, which is going to be
really fun and beautiful. And I think you're going
to have a lot of fun doing it. So you're
in the next lesson.
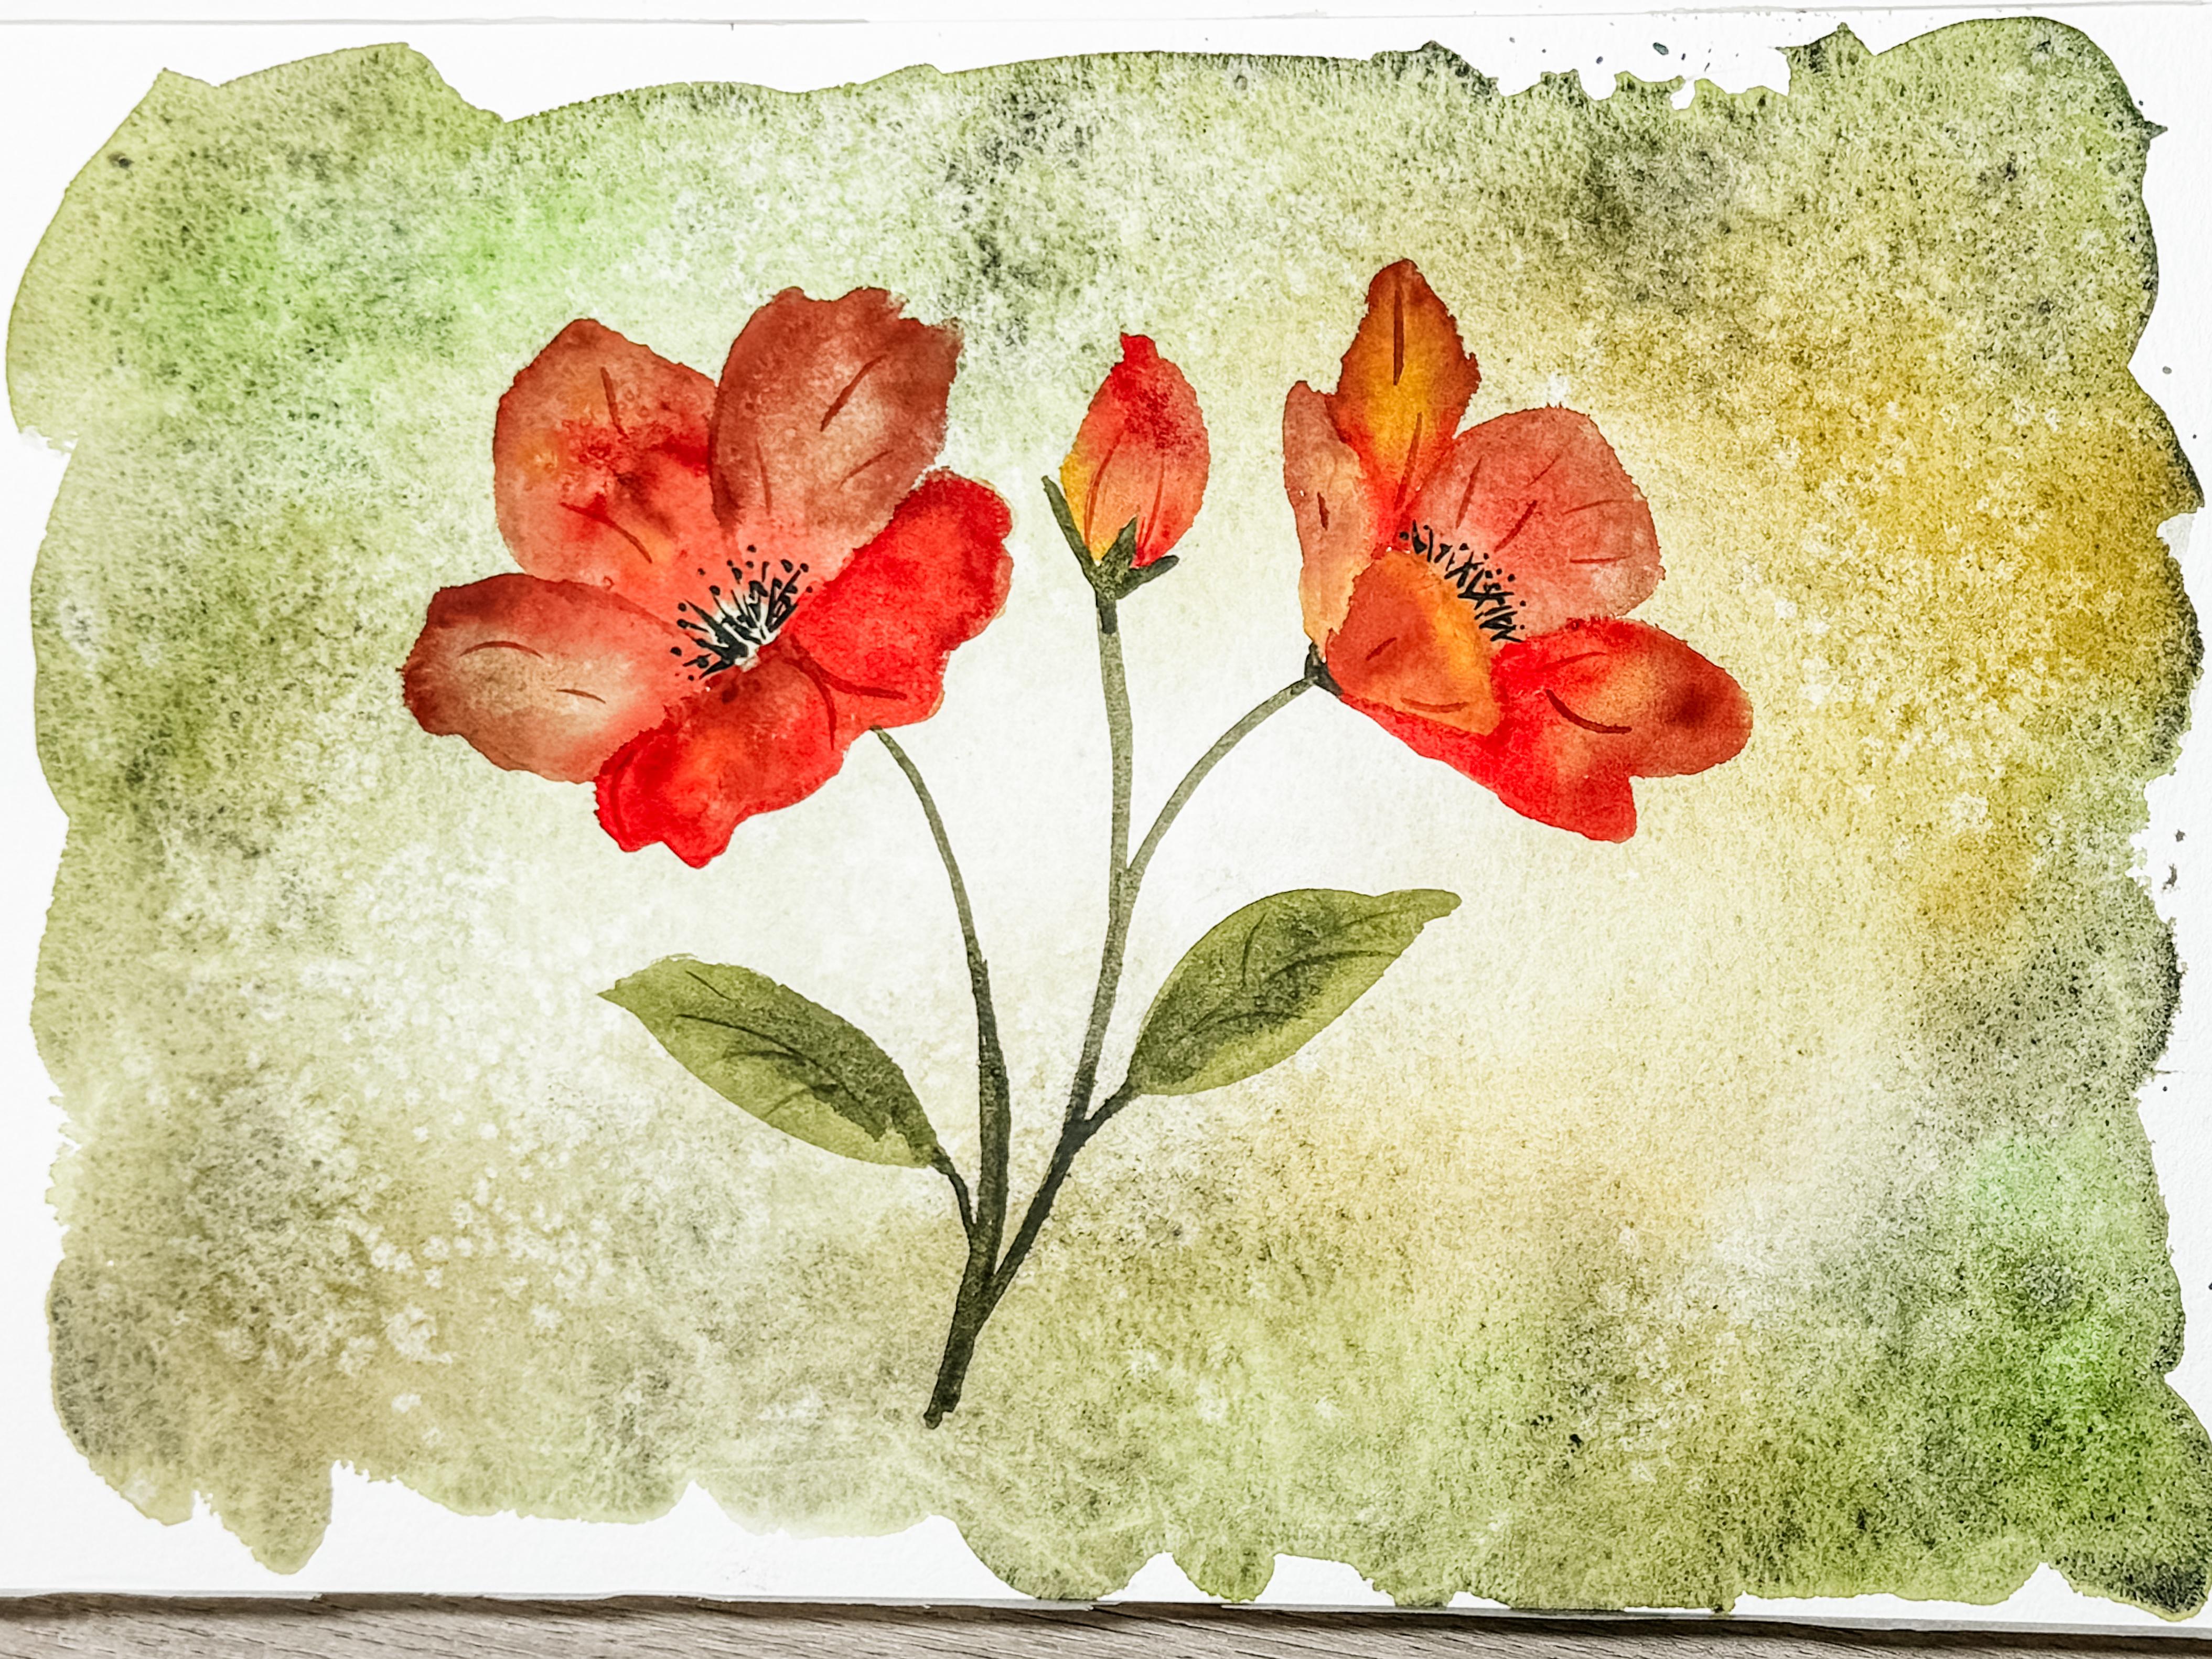
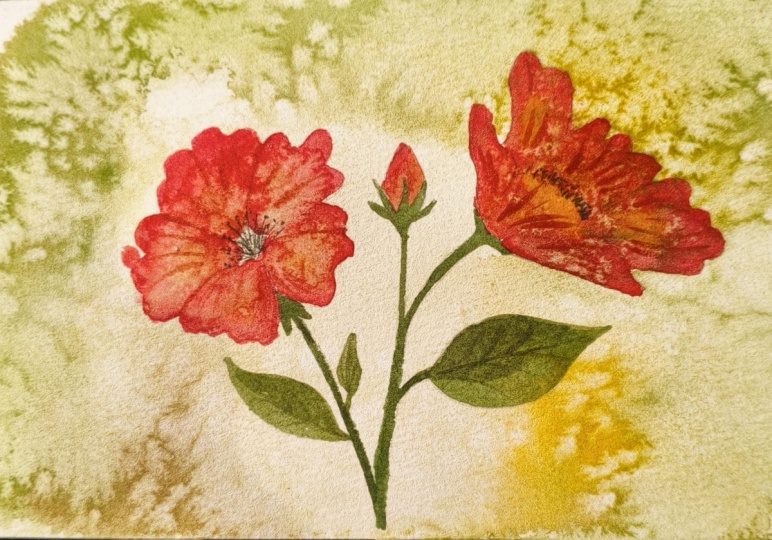
4. Painting a Soft Background Wash: Welcome back. We're gonna
get started right away. This is going to be such
a fun class learning to work with salt
in a watercolor. So I'm just going to do I got this all sprayed
down and wet, so I'm just going to do a
quick little cleanup of my palette. Sometimes
I clean it up. Sometimes I just let it be messy and use those
extra colors. So I think for today, I'll just do a quick little cleanup, get rid of some of that old
paint color combinations so I don't get too muddy. So what we're going to be
doing is we're going to be making a very fun background that has lots of
beautiful texture. And the way we're going
to do that is get started is just spray this
down with some water. We're not going to get
it completely soaked, kind of spraying a little
bit of water down on there. Let me pick this
up so you can see that if you can
catch that glimmer. It has water on
it. It's sprayed. It's not perfectly spread out or anything,
but it is on there. That's going to help with allowing this water to
flow for the background. When we practiced our salt in the last class, last lesson, we knew that if you
have too much water, you have to wait
quite a long time before you can add your salt. On the other hand,
if you are too dry, then this salt technique
will not work. It is a little bit of a balance. I'm going to show you what
we're going to do here for the background and get
started right away. I know that my flower
that I'm going to paint when this is completely dry is going to go
into the center. I want to keep all of my darkest color and darkest value out towards
the outside corners, and I'm going to allow some of it to bleed into the center. Using my larger brush, this is a synthetic quill brush, so it's nice and fat and floppy. It holds so much water.
It's really great. I'm going to be
adding some greens and this is a really
dark green color, almost mossy, adding in
water when I need to. Maybe even pick up
a different color green, all different shades. We're just going to
drop some of that in here and smear that around. This is such a fun way to paint. I'm not worried about
going edge to edge here. That's I need a little
bit more water over here. Not too worried about
an edge to edge look. I'm just going to let it flow
and see what happens now. Remember, we're just painting around the edge because
we're going to be adding in some water and
letting this all flow together and creating
a beautiful look. Now, some of the paint that I'm using is
granulating paint. And you may or may not have granulating paint,
and that's okay. I just wanted to
mention it up front that as you start to see
some of my paint dry, you might notice that some of it dries in a unique
way, which is cool. It's great because it's
going to really settle in. Maybe you can see if
I can zoom in there. You're going to see some of
that starting to settle. Now that I have
the outside edge, remember I'm
protecting my inside. Some of the darkest colors. Washing out my paintbrush. I'm just going to
drop some water along the top and this paint brush, holding the paper up, letting that just flow. I can let it flow this way too, adding more water,
just letting it flow. I'm trying to get it
to go into the middle. Remember, watercolor only flows to where the paper is wet. If my paper hasn't gotten wet in the center, it's not
going to flow there. I might have to help it out a little bit by getting it wet. But you can see that I'm keeping my darkest edges and my
lighter spots in the middle. Okay. So now that I
have that going on, I'm going to add a little bit of brown and a little
bit of yellow. I think that's gonna be
a really fun addition. Maybe I'll add a little
splashes of yellow over here. Again, picking this up
and letting it flow. Oh, it's so fun to just watch to see what's
going to happen. So we're just going to
allow that to move around. You can pick it up, really
let it flow across. I like the fact that I don't
have a structured edge. It's just going to
be very organic, letting my yellows and
my greens mix together. The center is still
the lightest. Remember, when watercolor dries, it dries lighter than
what you see here. So that will be a good just
add in green some brown, excuse me, maybe
even some stripies. Maybe these are some
organic pieces. Let that flow. Add a little
more water if you want to. So you're going to have to do yours listening
to your painting. If your painting is saying, Oh, no, I don't need any brown, then don't add any brown. If yours doesn't
need more water, then don't add more water
just because I did. You have to listen
to your painting. I'm just going to let
that flow across. I'm liking the way
that's looking. I hope you can see how
shiny it is. It's very wet. It is pooling. You can
see the water running, but it's not puddles. You can see that I have
some puddles down here at the edge because I've allowed all this water
to just coast down here. But that's about it. That's running across. Okay. So I kind of like that. I think that having
these flowers here in the center is
going to be really cool. I don't think I need more, but I am noticing that
when I lay my paper down, I'm getting a little wave in the paper and then some
puddles that are forming here. I'm just going to
use a paper towel. You could use a cloth
just just lightly, just ever so lightly dabbing up little spots that maybe have puddles of water
that I don't need. I'm just going to I didn't pick up very much,
just a little bit. I'm gonna let that flow again. Make sure I don't
have too much water. Because, again, we want to
be able to add in our salt. But not if it has
too much water. I won't I won't take
the effect well. So looking this over, I'm feeling like it might
be ready for some salt. When we add in our salt, we are not putting salt
over the whole thing. We're going to be strategic. I think when I add in my flour, I might also want to add
some salt to my flowers. So I don't want to be putting
salt over the whole thing, which means I also
want to make sure I'm not putting
salt in the center, so I want to leave
that for my flowers. I'm going to come in here.
I can see that this is starting to It's shiny, but it's a little
dull in some areas, so I'm just going to sprinkle
a little bit on here. I really zoomed in on the camera so that you're
going to be able to see this. When I drop the
salt down in here, do you see how it's just attracting that
paint right away? I can't put it here because
this is way too wet there, but I could put some over
here in this corner, maybe some over here. Maybe some around
the outside edge. This is going to just
create a great effect. That's about it. I'm not going to go any further. I'm going to let
that go and see how that looks. Now,
here's the thing. It's really important that
you not mess with this, that you let this just dry. I'm gonna soak up
this little spot. It's a little too wet. I didn't put salt in this area because I knew it was too wet. Okay, so I'm going
to just let this dry for a couple minutes, and then I'm going to use my heat gun to finish drying it. And then we will see how it
looks and rub off that salt. Okay, so now I'm back to
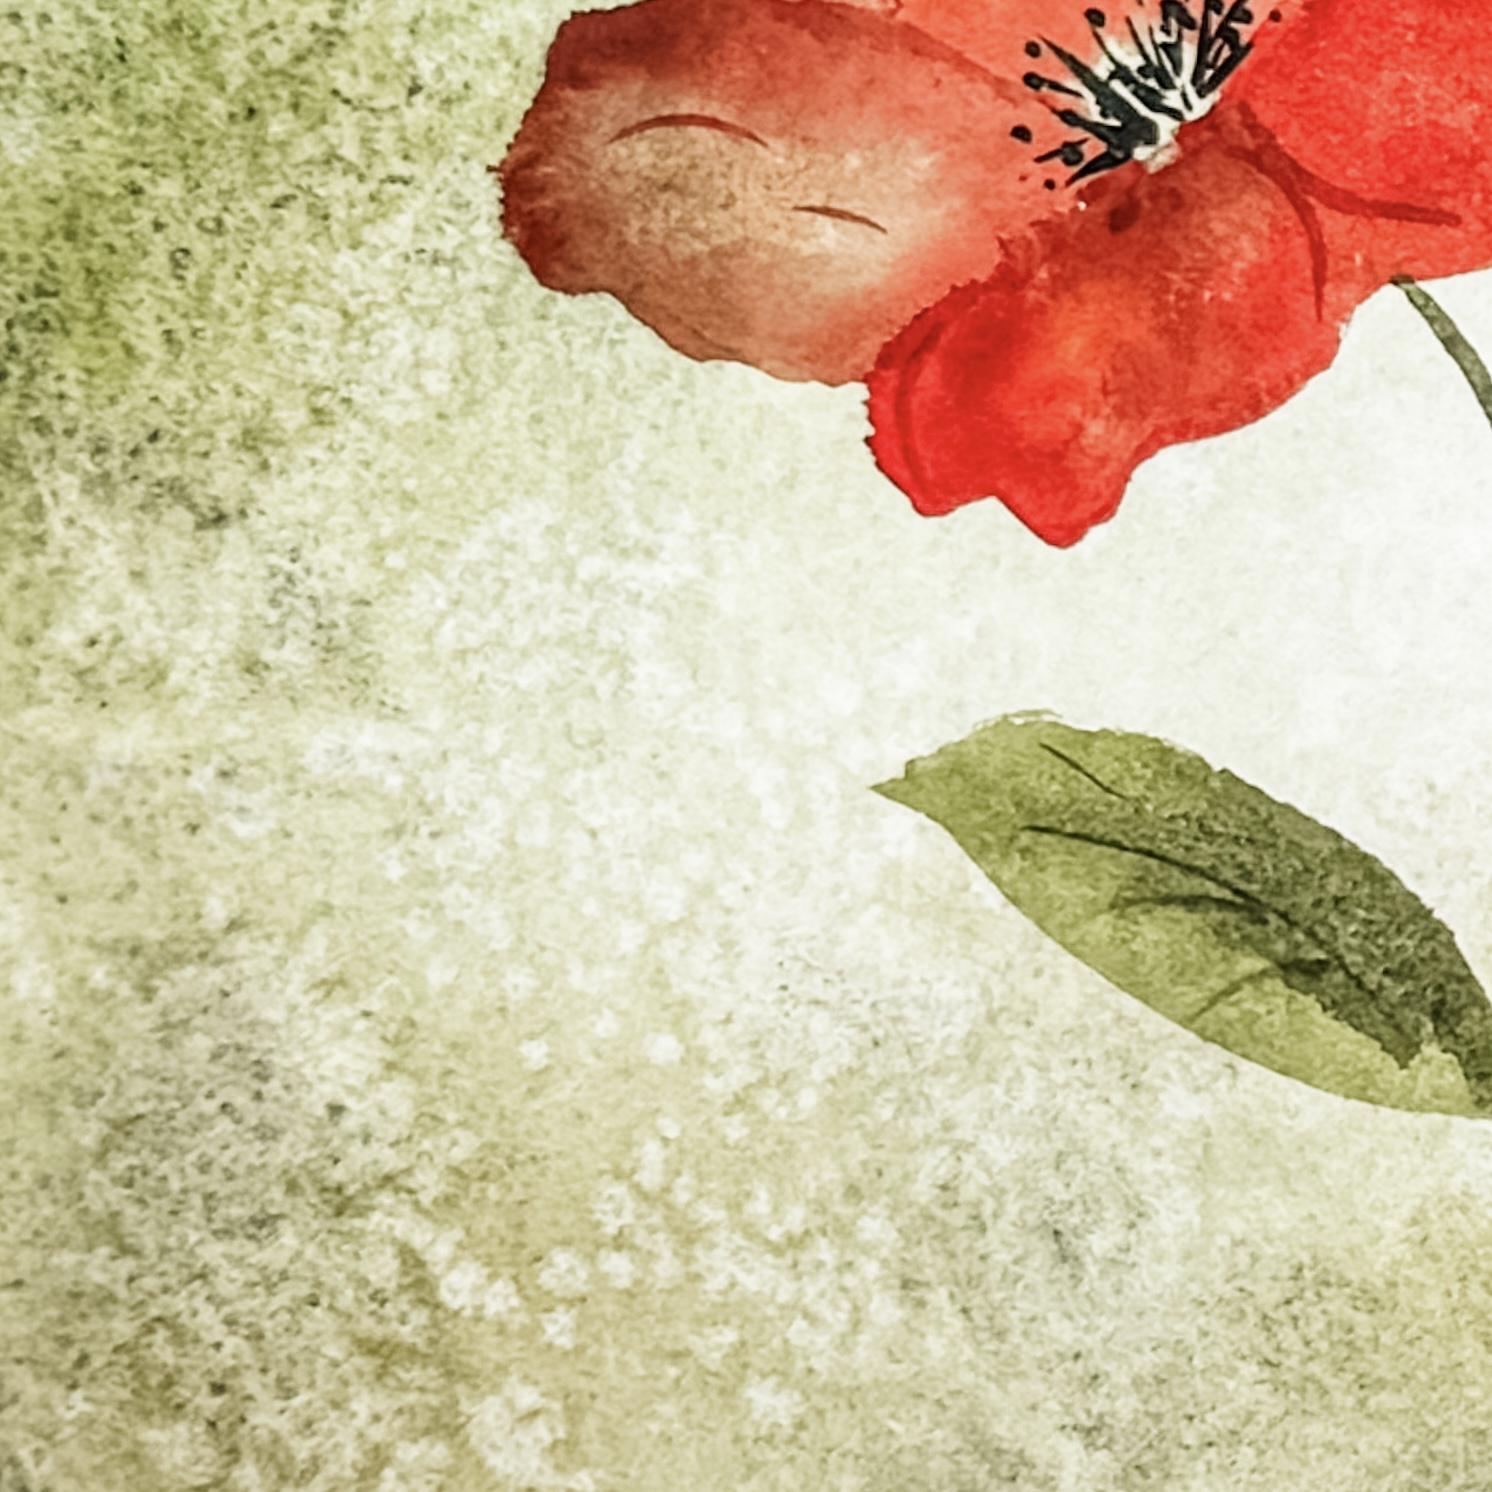
show you this texture. Look at that amazing texture. So I have not brushed
this off yet. This still has salt all over it, but you can see that
really cool effect. See where you can even
see a single salt piece there and the white
all the way around it. Isn't that so cool? Look at all this
effect right here, where I had sprinkled
in white, some salt, and it just pulled the
pigment in towards itself, leaving that little white space. So we're going to see
it more down in here. So now what I'm going to do is actually brush this off with some paper towel or a
rag or to use my hand, whatever you want to do. You know, you can just kind
of brush it and just very gently move it away
and loosen it up. You can also use a
rag or a paper towel, and you can just gently, very gently because
you don't want to ruin the paper or get the paint off. You're not trying to rub it, you know, vigorously,
just very, very gently. I feel like that's pretty good. I like to clean up my
table because I don't want that salt to get on anything in the future if I
didn't want it to. You only want to use
salt intentionally. Make sure your table work
surface is always clean. So that's pretty cool. There it is. You see that. Okay. So now what we're going to do is the
second half. That was it. That was so easy to create this beautiful background
with so much texture, adding lots of different
layers of colors, using several different greens
and some darker colors and some lighter colors and then just letting it
pour into the middle. I gave this natural highlight
area here in the center, which I think is going
to be really awesome. So now with my little
flower that I want to make, I'm going to use
my carbon paper. And if you've joined it in my classes in the past,
you know how this works. There's a shiny
side, a darker side, that's going to go
down onto my painting. The duller side, the
grayer side goes faces up, and then I position
this where I want it. Then using a pencil, I just do a very light outline. I don't need to outline
both sides of the stem. I can tell that the stem is
going to go kind like this. I put a bud there. You know, I don't have to put in the exact leaves because
I can just paint those. But I think I might
add in, you know, a flower here because
I might just go ahead and paint these flowers
exactly as they are. I think they're so pretty. But again, I'm just painting it, drawing it on
lightly and loosely. I don't have to do all
the little details. If you want to do
all the details, you go right ahead. That's why I have
it here for you so that you can do this at
whatever level you are at. If you want to trace this
exactly, you go right ahead. If you don't want to trace it
at all and you want to put a butterfly here in the
center instead or a bird, that would also be beautiful. Whatever is going
to work for you. I'm not going to bother
with the leaves. I'm gonna just double check, make sure that I can
see these things. I was very, very faint, but maybe just a
little too faint. Okay, now I can see it. All right. So I don't
need this anymore.
5. Adding Loose Florals on Top: So now I think what I'm
going to do is go ahead. I'm going to use my
size eight brush. I'm gonna grab some
of that green. I really like this
dark dark dark green. I think that's pretty
cool. Almost almost like a black green. So I'm just gonna add
my stem right here. I'm gonna add this one. I know I'm gonna branch off. And then I know that I want to put a leaf here and a
leaf over here somewhere. So I'll just leave those
sitting there for now. Just thicken that up a
little bit more at the base. Maybe I know that I'm going to have that
top of that flower. We'll do that. I think I want to add a little
bit of this green. This is a really
pretty mossy green. If you don't have these colors, you can mix those colors. You can make them yourself. Just going to add the flour
leaf here, add another one. Just a very simple leaf. Then I think I want to add a little bit of that
darker color in here at spots. Add a little depth. Okay. And now, you know
what I'm gonna do? I'm just going to sprinkle. Before this dries the tiniest
amount into these leaves. Okay. Now, what color am I
going to make these flowers? Mm. Kind of like the. Let's take a look at that color. It's kind of like a earthy
I kind of like that. I think that's gonna look
really neat with this. So I'm going to go ahead and
just get started on one of these back petals because I
actually traced my petals on, I'm going to go ahead
and do a wet on wet where I'm going to
wet down that back petal. And then I'm going
to add in some of that really
nice earthy color, maybe even add in
just a little bit of pink that redder
color that we had. I'm going to let that
one dry a little bit. Maybe add just a
little bit of yellow. Just some drops of
yellow in there. That's too wet for salt, and it's also too wet
to do the other petals. But I can see I can
get this petal done. So if you're not going to do a wet on wet like
this and you just want to do a loose flower
and just be a little bit more organic with your
flowers, you go right ahead. You wouldn't need to do all
of this, what I'm doing here. You could just go
ahead and paint your flowers however
you want to. Just mixing in that yellow
with that other color. Give me a little
bit of a border. That's going to take
a second to dry, so I'm going to
leave that one alone and gum over here to this one. I think I'll just do
this one over here. I ding down just a
little bit of water. I'll use that darker
red in the center. And then some of that, it's such a pretty color around the outside edge of this petal. Drying off my paint brush
because I'm going to bring it in here and see if I can't get that to just flow
without getting too dark. Okay. So I think these three are actually ready
for a little bit of salt. So I'm just going
to sprinkle it. I'm not going to do
much, just a little bit. Blowing off the little extra. I go to skip that middle one. Come over here. Add a little
bit of water. This one. Just letting that flow. I don't want it to get too dark. I want it to be
fairly transparent. Lifting up any extra water. I do think I want
to have that pink or redder color down
here in the center. Along this edge. Okay But before I can move on, because this one's touching
this one and here, and this is touching these
side ones, and same over here. These three are being
touched by these. I have to dry this,
which is fine. I'm just going to go
ahead and dry it. I'm not going to
brush off the salt. I just need to get it dry enough so that I can move on
to the next petals. Okay. So that was easy. I'm going to go ahead and wet down this big flour
petal in the front. You can see that
I'm not soaking it. I'm just getting it lightly wet. Just enough so that when I put my next color on it can
flow around a little bit. I like mixing my different
colors in my flower petals. I feel like it makes
it feel a little bit more organic and real. You see how much
lighter it dries from where you started and so much darker when
you first start. And then it dries into this really beautiful color.
That's what we're going for. In a little yellow. Okay Like, maybe this one needs
a little yellow, too. Now, I'm making that center area of the flower a little darker, so I'm putting in that
red into that center. I'm gonna let that just
blend together a little bit. I do want this to
kind of separate. That's okay. I'll do this one. And I am covering over
the graphite paper, the carbon paper, that ink that I put down transferred on. I'm covering over that
with some water so that I make sure that
when I put my paint down, it's going to
actually cover that. Putting this on the
outside. Let that flow. I feel like this needs to move
around a little bit more. And then add some of this
red into the middle again. Well, because we dried this one, it's not blending
over into that side. That's why we take our
time to make sure that we get the petals that are
next to each other, dried off because then
it won't flow that way. Okay, I'm going to
add a little bit to the center of that flour. Might have been too dry, but that's okay. We'll
see what happens. Come over here and do this one. I don't need to do that center. So if we look at
the flower again, the centerpiece is going
to be done differently. I'm just avoiding that middle. If your paintbrush is too wet, just have your rag next to
you that you can dab it off. Grabbing some yellow,
dropping some yellow in. Learn to keep your
paint brush at just the right wetness by
keeping this rag next to you. Dropping a little bit of salt. I didn't put salt on all of
them, just on some of them. I think that one is ready now. Because this is a front petal and we really can't see the inside
of this flower at all, I have to treat this one
a little bit different. Either has to be
lighter or it has to be darker so that
it looks like a different gives you
the right dimension. I think I'm going to
go with it just being a little bit more
on the darker side. I think I'm going to put
some yellow up there in the center at the
top of that flower. Petal. I want it to be kind of
a creamy yellow texture so that it kind of
stays put there. Right along the edge. Gives a little definition between one petal and the other.
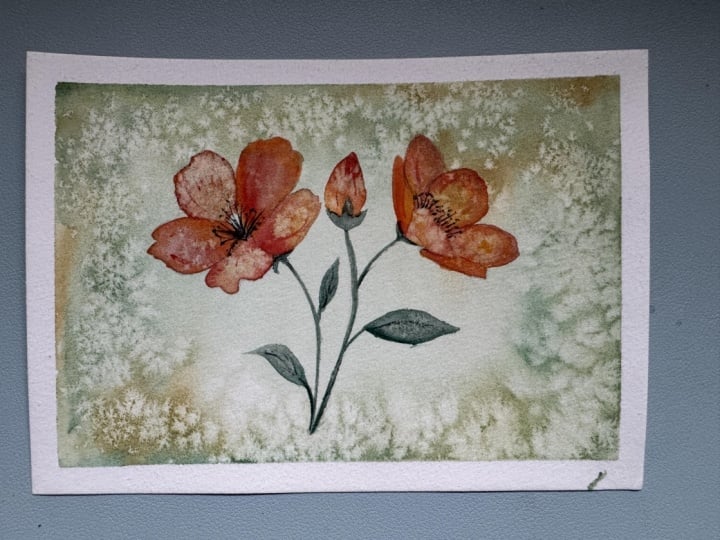
6. Removing the Salt and Revealing Texture: Now I'm going to this is dry. I'm going to brush off
very gently brush off all the salt that
were on the petals. You do not want to brush this
off if it is not 100% dry. Your painting will smear. So you need to make
sure that it is completely dry before you
try to brush off that salt. You can test it. You can
try it in one spot or something and see if it smears, but you want to make sure
it's completely dry. This is looking really cool.
Okay. So now what I'm going to do spin this around. I'm going to use a
smaller paint brush. This is more like a
um a detail brush. Because I want to put in the
center little spiky things. If we come back over here, you can see that this has the little lines that come up from here and that there's some
in there. I want to do them. I'm using this gray. You could use whatever
color you wanted to. I'm going to use this dark dark dark dark color and see
how I just push it away, push it away, different sizes. Some of them are shorter,
some of them are longer. Some of them are connected.
Some of them aren't. Come over and do the same
thing, different angles. Makes it look more
organic and real. And then I want to add
in some little dots. I'm just going to same thing, adding in little dots. Sometimes they come up
into the flower head. Sometimes they're down in low, not in any pattern. Something like that. Okay.
That's fun. What fun. Just going to add in
maybe little veins, little things that
you see in flowers, using the same colors. Not tons of them, little
bits here and there. Just shows a little bit more
movement in your flowers. We want to be able
to make sure that that salt shines through. Okay. I think that's good. It's hard to start. Stop. I think I'm going to do
some in the leaves as well. Using still my same one, just loosening up some of that, adding a little vein. If you're going to
do the side ones, I recommend three as a
max because otherwise, you can just look
really, really busy. Okay. So I'm gonna let
this finish drying and then come back
to the next lesson where we wrap this up. I hope you had fun doing that.
7. Finishing Touches and Next Steps: You just finished your piece, and I hope you can
already start to see how much interest that simple salt can really
add to your painting. This is one of
those methods that really adds reward
with a light touch. The more you work with
it, the more you'll start to understand
how the timing, the amount of water, and even just a few grains of salt can completely
change the outcome. If your results look different than mine, that's
completely normal. This technique is naturally unpredictable and that's part
of what makes this so fun. Every piece is going to have its own texture and
its own personality. If you have a few minutes, I'd really encourage
you to try this again on another
small piece of paper. Maybe adjust the
amount of water or use a little bit more or less salt
and just see what happens. That simple repetition
is where you really start to build confidence
for your class project. I would love for you to upload your final floral painting. You can always include your practice piece
if you'd like to show how your
texture developed. It's always helpful for
other students to see that process and it's a great way to track
your own process too. I spend time almost every day going through that art gallery. I truly enjoy seeing
what you've created. Even a simple version is
absolutely worth sharing. If you enjoyed this class, I'd love for you to follow
me here on Skillshare. I have more classes where we can explore different
flowers, techniques, and ways to create loose, natural watercolor pieces
without feeling overwhelmed. If you found this class helpful, leaving a quick review always
does make a difference. It helps other students
find the class and lets me know what you're enjoying and what you'd like
to see more of. Most importantly,
just keep painting. The more you show and
let that paint move. The more comfortable and natural
this will start to feel.
 Brenda Jones, Watercolor Artist & Teacher