Transcripts
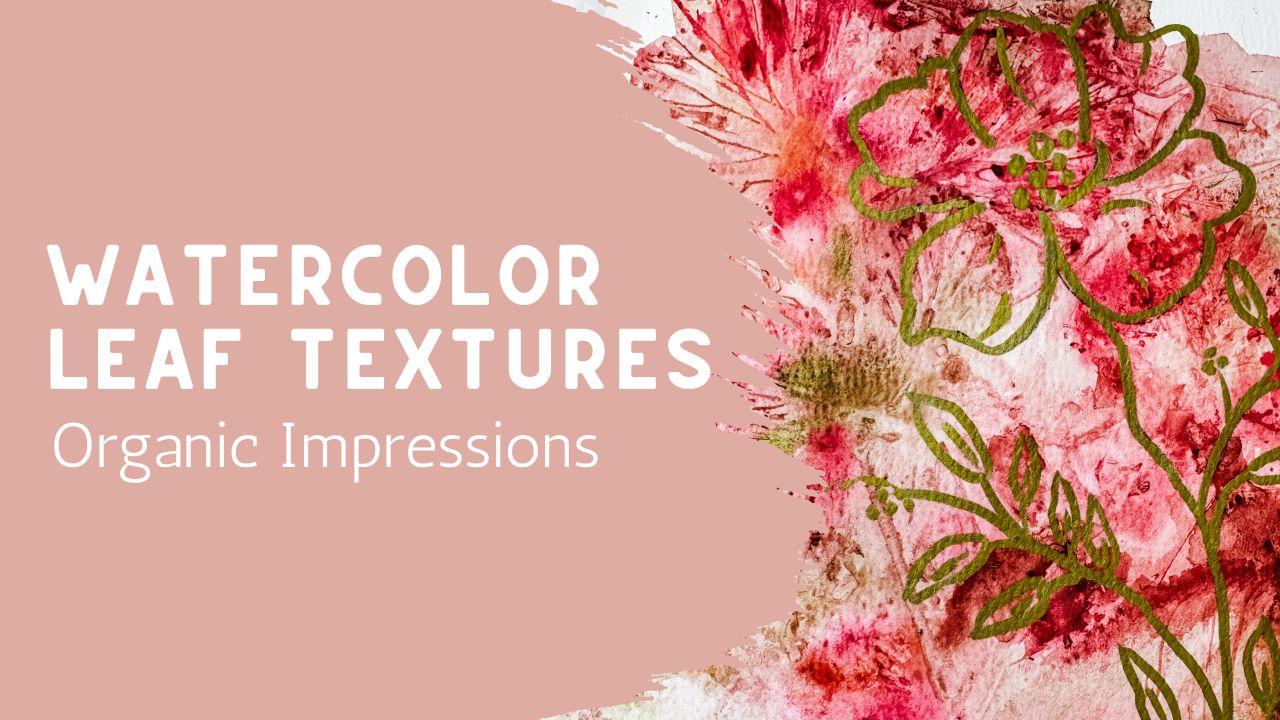
1. Organic Watercolor Leaf Textures and Leaf Stamping Overview: In today's class,
we're going to create soft organic watercolor
backgrounds using real ferns and leaves
and then bringing it to life with simple gold
line work on top. This is a really fun and
relaxing way to let go of control a little and allow the materials to do some
of the work for you. Instead of trying to force the paint into a specific shape, we're going to use
natural textures to create something
unexpected and beautiful. I'll show you how to
place your leaves, how to work with
your watercolors so you get those
soft impressions, and how timing plays a role
in how everything turns out. No two pieces will
ever look the same, and that's what makes
this so special. Once your background is dry, we'll go in and add
gold acrylic marker and add a simple botanical
design right on top. This step adds just
enough structure and definition to turn your piece into something that feels finished and
ready to display. So gather a few leaves, ferns, and your watercolor supplies,
and let's get started.
2. Simple Supplies for Leaf Stamping and Watercolor Textures: I am so excited about
today's project. This is going to be a
lot of just playing and experimenting and
seeing what happens. You know, a lot of
times with watercolor, what I have found is
a really great way to advance your skill is
to just have fun with it, not have any really plan or care or specific need that you have to have
something be perfect. We're just here to have fun and experiment with watercolor. See how the colors blend, see how the water moves
across the paper. With today's class, we're going to be creating
something like this. Now, I did this as a quick little sample just
to make sure I had a clue as to how to
get this achieved for you so they could
teach you how to make it. I just think it's so beautiful, the different colors
that are in it, the way that the
different leaves are showing up with the veins inside and the little spots for the ferns that I had picked. So just a fun little project. You can do yours
however you want to. You might even choose
to just do one color. I think it would be phenomenal if you chose a single color, maybe like a soft,
mossy green color. And then just laid
your one single fern across the whole page. First of all, I
wanted to talk about all the different supplies
that you're going to need. First of all, I do highly recommend that you
have watercolor paper. I am using a cotton paper just because I know that this
is going to use a lot of water and I need
it to be able to be absorbent and to
absorb that color. So if you have cotton paper, this would be one
of those times that you can try getting that out. If you don't want to use your good watercolor
paper that's cotton, just any cotton paper, any pulp paper will be
fine to use as well. So I'm going to use two
different paint brushes. I have a so this is a quill
brush that I really like. It's nice and fat and fluffy and it's going to hold
a lot of water because we're going
to be putting down a whole lot of water.
That's why I want that. You could also use
something like a wide 1 " flat brush if you don't have
something like this. So whichever you have,
it's just something that's large that you're
going to be able to apply a lot of
water at one time, using something like this, which is a nice size, this is like a size
eight round brush, but that would take a long time to put all the water
down on your paper. So a larger brush
is really good. To keep things really
simple and basic, I'm going to use this
limited palette. This is my grabby
landscape palette, and it's actually brand new, but I really like the colors. I just felt really
neutral and earthy. I thought maybe this might be a really great time to try out this palette for this project. I am going to try
some plastic wrap that I will be putting
down on top of it. This is going to be a
long drying process. So wherever you put this, you're going to want to
be able to leave it to dry for probably several hours. So I would highly recommend that if you don't
want to tape it right down to your desk
because you have a plan to continue your painting, go ahead and put it onto
some kind of a board or, you know, some kind
of thing that you can transport it and move
that to another location. I do recommend that
you have some kind of a paper towel nearby because we will be
using a lot of water. And then, most importantly, this is just such a
beautiful time of year. All the spring flowers and all the leaves are
starting to come out. So I went out into my backyard and I just picked all
different kinds of things. For my sample, all I did
was I picked a fern, and then I got these little, I don't know, maybe
they're called Lamb's ear. They're just these little
soft little leaves, and that's what this is here. And then these are just two little ferns
that were coming up. So I went ahead and picked some more of those
little soft ones. I love all these lines, the veins that are in there. That's going to be really cool. But then I also found
some other flowers that were just starting leaves that were just
starting to come out. So I picked some of those. And then I got several different
kinds of ferns in here, as well as my lilacs. Now, my little boomerang lilacs were just starting to come out. You can see they're
not even fully open. I'm not even sure
what that's going to look like in this process. So like I said, I might
actually end up making two different ones just so that I can
experiment and play. But I did go ahead
and then I just went and put them into a pitcher filled with water so
the stems were down inside the water to keep it fresh while I'm
getting ready. So go ahead and
get your supplies together because this is going to be important that you
have everything together. I will be here right
ready to help you out and to get started
on this project. Decide how you want your
finished project to look. Do you want it to have lots of different colors like this? Then if you do, choose, I would say two to three. You get too many colors
and it might start to get muddy. Choose two to three. I think I had a
green and purple, and then I also had a yellow. When I mixed my
yellow and my purple, I got this really cool color
in here that's peachy. Oh, and then I had my blue, which was more of a teal blue that I added up on the top half. So choose a couple colors that you know are going
to blend nicely together that aren't going
to get muddy and or decide that you want to do it like monotone and monochromatic, excuse me, monochromatic
and just choose one color. So you could choose
and just say, let's say your bedroom is blue. You could do an entire page of just shades of blue that
blend nicely together, and then put a couple
of flowers on here, let it dry and oh, it's just gonna be beautiful. So gather up your things, decide what colors
you want to use, and then come back to the next lesson and we're
going to dive right into this project and experiment
and see what happens.
3. Preparing Your Paper and Placing Leaves for Stamping: So two things that I forgot
to mention in the last lesson that I want to just point out is one is I did gather
up some moss, just from I live in the woods, and so I was able to just go
out and gather up some moss. I think I'm going to try that as well down in this area,
down at the bottom. And then the other thing is, is to have something
that's heavy. So, like, it could be a book. It could be these are
just marker kits. Like they're just
sets of markers. So that's probably what
I'm going to end up using is some sets of markers. It could just be, you know, stacks of newspaper or something magazines,
whatever you have. It doesn't have to
be crazy heavy, heavy enough to kind of hold everything down while it dries. Went ahead and sprayed down my watercolor just
to get it activated. I like to have a spray bottle nearby that I can
spray that down, give that a couple minutes
to really activate. It softens up the pigment. And then when you go
to use your brush, it's just going to
be so much more, like, ready to be used. And I have my water back here. I have a couple different
containers of water that I'll be using to keep my
water nice and fresh. I like to get my paint
brushes nice and wet. I'd like to have a towel nearby, a washcloth or something. I could just use a paper towel, but I like to use some kind of a cloth
that I can then just throw into the
laundry when I'm ready. Okay, the first thing I did was, I went and I found
these different things, and I think I'm going to do a multicolor using some
of these colors that are in here and I'm going to put two different like tall flowers. I might add some moss
down at the bottom. I might use some of these
smaller leaves branching off. I don't want to add too many. I mean, you could
fill the whole thing. You could take
your little leaves off and just use
one leaf at a time. Like this, you could
just say, I need a leaf and you could just
position one leaf in one spot. That's also something that would work for your composition. However you want it to look. Now, I'm looking at this and I think that
it's fairly flat, but I do notice that there's some things
that are sticking up. I'm going to just remove that little piece
it's not really needed and might just
make it more messy. Now, your leaves are
probably going to have more of a pattern
on the back side. If you can look at that
side versus this side, yes, there is a pattern here, but it's almost like a relief, it's inset, where on this side, the ridges are on
this side here. This is going to
be the side that I actually want to lay
down against my paper. Same with this when I look at these little lamb's ear or I actually don't
know the name of them. They look like I think
that's what they're called. This side is soft and fuzzy and this side has much more defined
veins running through it. I really want those veins to be the texture to
be on my painting. I will be playing them down that way so that this
is against my paper. Okay. Now, basically, I'm
just deciding on my composition loosely because I still have to put down my water and my paint
onto the paper. So don't get too exact
and particular here, just getting some ideas of
what you want it to look like. I think once that
gets squashed down, that might look really cool. I could also cross the stems. I love when stems get crossed. Maybe I'll do
something like that, add in some moss and maybe some smaller little
leaves over here to the side. Okay. What we're going to do is we're going to
wet down this paper. I'm just going to
add some water down. That one had a little
bit of color in it, that's okay. Not a problem. We're just rolling with it. There's no right or wrong here. Then in here, I am going to
choose some of my pigment. I'm just going to put that
and see how it's flowing. Lots and lots of water. We're just going to be doing
some flowing of some color. Maybe you get some of this
other pink color going in here too here and there,
rinse that off. Using this great big
thirsty brush so that it really is picking
up a lot of the paint. I'm going to try some yellow. Putting it in some spots because that's going
to be really pretty. Blends in with that
pink and makes that cory color very
bright and beautiful. Maybe I want a
little bit of brown and then maybe even a
little bit of green, little splashes of it here and there. Doesn't
have to be a lot. And maybe a little green. Let's try some of this earthy
green. Wow, that's pretty. I don't want to
make it dirt muddy, so I'm just being careful with
where I'm positioning it. A little bit here and there. The thing is we don't actually know what this is
going to turn out like because yours is going to be completely
different than mine. You're going to have
different leaves, different flowers, different
colors, a different size. You're going to have put
it down in different ways. So we're not trying to
make it look like mine. We're trying to make
yours look like yours. So now that this is very wet, I want you to see that
there's puddles here, puddles, there's puddles there. There's lots and lots
of puddles of water. Um and that's important
for this process. I'm going to lay
down my first one. I'm going to lay
down my second one. I want to make sure that
it stays up in there where the watercolor is on the page. Then maybe I'll add in
something just peeking up here. Maybe I want to go underneath the stem. Put that under there. Maybe a little moss. I'm going to flip my moss over so that the mossy
side is on that side. I don't know. Maybe I'm
going to regret that moss. I'm not really sure.
I think it's cool. But it's just an experiment. If we don't love this one, we
can always make a new one, a little bit more over here. Okay. Now, what I'm going to do is we actually are going to be putting down another
layer of paint. I'm going to just let
this smash down in but I'm going to be putting down just a little bit more pigment right on the edges of this, it's okay if it goes over in different colors from what
you have on your paper. Just put some extra down
right on the edges. I'm going to use the same colors just so I don't get it muddy, but I don't have to worry about what's already down on here. This is very much a see what
happens an art project. Just adding a little bit more. Doesn't have to be
on the whole thing, doesn't have to be
over the whole page. Get a little extra water. So as you see here on this one, I had my underneath color, and then I had my edges
that made the outside edge. This is what we're
working on right now. Is this outside edge. I'm not really trying
to outline it. I'm just adding more paint around so that's maybe
just a little bit more pigmented around the leaf or the flower that you're doing. Just smash some paint in there. At some more green. Okay. I think that's
probably pretty good. Just gonna drop some more color, maybe even some yellow. Write down on top of these. You know, it looks
messy, and it is. But that's what's
fun about this. We're just playing.
Creating texture. Okay, so now what I'm going
to do now that I've created that I'm going to grab
out my saran wrap, plastic wrap,
whatever you call it, and pull off a sheet of it. I'm gonna lay that
down right on top. Doesn't have to be perfect, 'cause it's gonna create
a texture all on its own. See how it's creating,
like, the little ripples and kind of smush it in there. Okay. So now that
I have that in, I'm going to grab my thing
that's heavy like this. And I'm just going
to lay this right on top. Smush it down. And I'm going to leave this alone and not pick it up until, I don't know, a couple hours. Um, at least that's what
I think I'm going to do. I'll come back and give you an update on
what I decided to do.
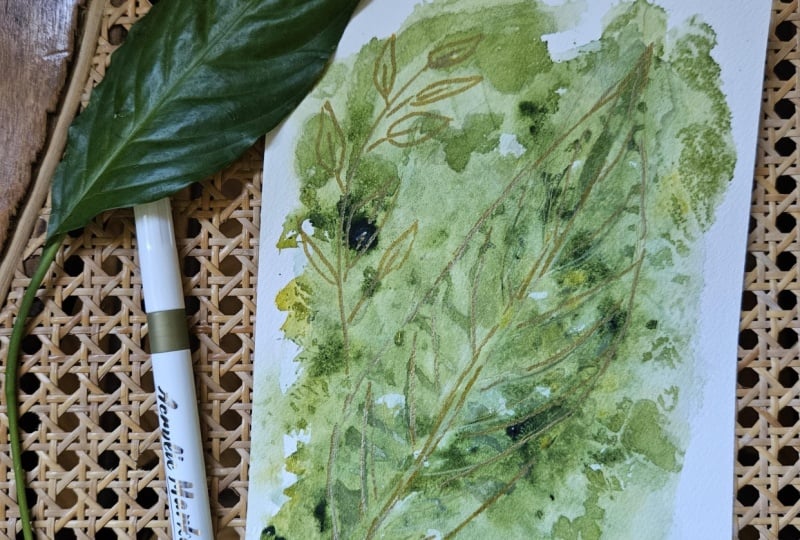
4. Creating Soft Color and Leaf Impressions: Okay, what I actually
decided to do was go ahead and make that
second one because I think I'd really like to have a fern that's all green in
that earthy green color. As I was painting
that, I was just really in love with these
greens that are in this kit. So I'm going to use those greens and make something very similar, but just with a single fern and let's see how
that one turns out. I want to make sure that
you are taping this down. You're going to be
using so much water. You need to make sure
that your paper is laying flat and
that it dries flat. So make sure that
it's taped down. If you want to put
it onto a board that you can move
that board around, maybe you have a plexiglass
piece or something, something to keep it
secure onto your table. Then you can always move it if you're needing to use
that space if you've already taped it down
to some other piece like a piece of
plexiglass or board. So I'm going to go ahead
and get my paper wet. I know that I'm
going to use one of my ferns and I'm going
to use some of my green. I'm just using my water and I am splashing
that water around. I am not going edge to edge. I'm just putting it down on
the paper in a random way. Now I'm going to
hand select one of these ferns and see
which one I like. When I was outside, I
picked the fern and then I stripped down the extra leaves so that I would have a stem. I actually really like this one. It fits the space really well. Um, so maybe I'm just
going to go with that I feel like that's
going to go there nicely. Um, so I'm going to go
ahead and add in some of the screen to my paper. And maybe even this
other green mossy. It's okay if you're using
something small like this and your paint brush touches into the yellow that's next to it
or the pink, that's okay. It's just going to add a
little different color, but that's not a problem. We just roll with
things like that. That's never something that
we get concerned about. You just roll with
it and you say, Well, I guess that's the way it was
supposed to have been. I like this color
combination with this mossy green and the
brighter leaf green. See I'm just letting
it just fit up on top. I'm not trying to make
a shape or anything. I'm just adding some color down. I'll do that. I
even try a little yellow just to brighten
it up a little bit. I'm holding my paint brush really high so I
don't have a lot of control and just dabbing
it in here and there, dancing across the page, not going edge to edge, just letting it flow. You can always add more water if you feel like
it's getting dry, dip in and add a
little bit extra water because your paper
does need to have puddles of paint on for this
technique for it to work. I'm not going to use this green here that's really bright. I think this one if
I put that in here, you can see how much brighter
it is than everything else. I don't think that's the
direction that we want to go. I'm going to just wash that away and cover it up
with another green. Add a little bit more water, make sure it's nice and wet. I like that yellow in there too. Just add a little
bit more yellow. Lots and lots of pigment. Oh, got a little red. Just move it around. Okay. We like that's probably enough. Again, I'm going to say
that the backside is the more detailed edges. So I want it on an angle here. I carefully lay it
down and press it in. My fingers just gently. Maybe I need a little bit more
paint up here. Or the tip. Okay. That'll be good. Now I'm going to
go ahead and add in kind of right on top, almost painting it down. It's not going to stay down, but I'm just adding more paint. Those three colors, the yellow, that green, and then that mossy, get it wet on the top side too. Move those stems around. Really my intent is
just to get this as wet on the top as possible, just to hold them
down and create. I want to have a
little definition, so I'm going to
pull this one back. Have it go there, have
that one go there. This is just such a fun little project because you're going to end up with such a
pretty finished project. And yes, you're painting, it's more like an art project like a craft project
than an art project. Oops, got a little too
much red in there. Okay. Make sure it's nice and bold. Nice and bold. You're not seeing anything
being accomplished here. You're just putting the color down and trusting the process. Okay. I don't call that done. Again, I'm going to
get out my Kling wrap. These are always so
hard to get started. I'm just going to lay
that down on top. Now, the Kling wrap is also going to be
creating a texture, but it's also holding it down. It's a two for one deal and getting some texture
from the Kling wrap, but it's also just
mushing that fern down. And I'm going to use, again, just a container
full of markers, laying that down,
folding it down. I might lay something
else heavier on top. That's pretty good. It doesn't
have to be crazy heavy. That's actually, I
think it's good enough. Okay, so I'm not exactly sure how long I'm
going to let this sit, but probably for about
20 minutes or something, and then I'll come back
and check on these things, and I'll give you the next
instructions. See you soon.
5. Controlling Water for Better Leaf Stamping Texture: In 15, 20 minutes, so we're going to
just take a peek at this and see what
we are looking at. It has the plastic
wrap on the top of it, and I can just carefully
peel this back a little bit and maybe I can see it's
still wet. That's fine. I don't mind that
it's still wet, but I can peek underneath. Oh, yeah, look at
that. I can see the veins and the outline. That's definitely working. Just peek at the other side. Maybe something.
Oh, that's really going to be pretty.
Yeah, look at that. You can really see
all the details. I think what I can do, I'm going to check
on the other one, but I think I can
peel back part of the saran wrap and start
drying it with my heat tool. But let's just take another look over here at the second one. On this one, it is still wet, but look how nice and
flat that's laying. Just even after 15, 20 minutes, it's
laying really flat. Let's see if I can carefully
pick something up. Yeah, I can see
that that's going to have a definition
underneath it. Again, maybe what we'll do is work on the
other one first. Let this one just sit and be nice and anchored
for a little bit. I'm going to start by using my heat gun and
just peeling back one section at a time and just slowly blow drying that
until it's mostly dry. I don't want to peel off
the whole thing because I'm afraid it just might
blow everything away, and I'm actually trying to
get it to dry where it's at. So I'm going to turn down the volume so you don't
have to hear my heat gun, and I'll probably
speed this process up for you so that you can
see what I'm doing. Okay. So as you can see, this left a beautiful
pattern all over it. You can see the
different leaves. You can even see
the little flowers here, the little buds. I love the fact that I added in some greens and some browns and outlined these areas
so that they really shine. The moss, maybe not. That's not as impressive. It did add a nice
little soft area here, so I'm not mad about it. I just maybe it's not worth it. So really kind of fun. It's really neat to see the different ones and how they're so different and vastly
different from one another. So now let's take a look at
the other one that we did. I think I'm going to
do the same thing. I will just do it slowly
and pull this back and just slowly dry off the areas before I remove
the whole plastic. I am keeping my
heat gun away from the plastic because it will melt that and make
it more difficult. I'm also trying to keep
it up higher so that it's not blowing the
actual leaves around. So be careful when you're
using your heat gun that you're not getting real close
that you keep it up higher. I think what I'm going to do is now that the plastic
wrap is off, I'm just going to let this
sit and dry naturally for a little bit of time
to see if I can't get that imprint to get really nice and strong
underneath there. I'm going to push those
back down and wait and see if I can get that to dry naturally. Be
back in a little bit.
6. Letting the Paint Move for Natural Organic Effects: Okay. I'm going to go ahead and dry this a little bit more and then I'm
going to actually peel this up and reveal
what we have created. Now, technically,
probably should wait until this is 100% dry. I'm an impatient person. I am really struggling with
being able to do that. I'm going to see how
it looks and you may or may not depend on decide to do
something differently after you see how
this works out. So like we said, we never
know how it's going to look, so I don't know, but we're going to pull
it up very carefully. Memory of the veal what we made. Okay. That's cool. So it's still wet. If I'm
just going to let it be, This is just creating
a little pattern. I'm going to go ahead and
dry this a little bit more so we can see
the finished look. Okay, so here are finished natural prints of ferns
and flowers and leaves, and I think they're really
looking pretty cool. I love the fact that
once this got dry, the leaf design really started
to show through so much better as a dried piece than when it was wet,
which is really cool. So this one, I think, had a little bit more definition because I had a lighter
color background first, and then I put a darker
color on the top, and that really showed
a nice contrast. So that's something to keep in mind when you're doing yours. But I also wanted to
mention that if you have markers like silver
or gold or actually, any color wouldn't
have to be metallic. You could add some
little details to this. You could actually use this as your background and then paint something or draw
something on top of it. This is almost like your
foundation of your art, and then you put
something on top. So come on back to
the next lesson, and we're going to do that next.
7. Adding Gold Line Work for Structure and Contrast: That these are dry, I think what I'm going to do
and have you do if you would like to is add
some details on top. I'm thinking that on
this one over here, I'm going to draw some a
leaf design and over here, I'm going to add
some flower design. The way I'm going to do that
is I have some markers. You could use acrylic
markers that are metallic. These have a really
nice brush tip. So I have that I can use. This also has a
little thinner point. You could use any of
your other markers. So I have this kit full
of different markers. You could do different colors, whatever, you can use white. Black, whatever works for you. You could also use a paint
brush and actually use, like, a script brush like this
and use either gold paint or a black paint or something
to create the same look. So just kind of depends on
what you're looking to do. I think I'm going
to go with gold because I kind of
like that idea. Now, I did add these two
pieces into your art class. So going back over, if you look in the description about
the class projects, you're going to find
these two printouts. You don't have to use
these just like they are. You could create your own, you could draw your own, you
don't have to trace them. These are just for your ideas. But if you needed some
idea or some guidance, you could use something like
these and print them out. And if you have let's
see if I have it down. So if you have
some tracing paper like this, this is just, you know, carbon copy, you could lay this down
and say, you know, this is where I want to make sure that this
lands and you could actually trace this on with a pencil and then trace
over it with your gold. I might do that for one of them. I might free hand one of them
just to show you both ways. So I'm ready to get
started on these, and I just can't wait to see what yours is
going to end up looking like because we're all going to have it
look differently. Maybe you're going to decide
not to do this piece, and that's totally fine.
That is up to you. Whatever you want to do, I'm just doing it to add just a little bit more color and to get a little
depth of pattern here. So when you print these out, you can size it to
whatever size you want to. In your printer settings, if you didn't do
a great big sheet and you want to print it out and have it cut in a
smaller printed out piece, you just resize it on your printer options and
choose a different size. This is printed
at the full size, but at fit to scale. That's what this
is. I'm thinking that I'm going to I like the fact that this
is coming up here. I like a shape like that. You know what I mean? It's just arching the same direction. But I think I'm going
to draw it freehand. I think maybe this one I'm going to trace and use my carbon copy, but this one I'm
going to freehand. What I'm going to do is just
I think I'm going to be bold and I'm just
going to go in with my gold because why not? If I mess it up,
it's just paint. I could do it again
another time. But I think I'm just
going to create a nice soft arching stem and then off of that create
these little leaves. Wish me luck. I'm
going to start down in here and then just
create a nice soft arch. Go to practice it. Make
sure I know what I'm doing. Yeah. Something like that. What I'm gonna do this top
one? Well, you know what? I think I want to use
the other end, though. This is the like the brush tip. Something like that. Maybe add a little smaller one
off to the side. I'm leaving this here because I really like what
this one looks like. Then that way I can look over at it and say,
now, where did I put those? How did I do that? I'm using it as a model for myself to
remind myself what to do. But this is very simple. It's just a line,
a little arched, almost like an almond or an eye, and then you can draw some
little details out through it. I really like this
gold on this screen. It's just so natural
and not too harsh. I think that's cool. Just a very light touch. They don't have to come
off these are offset. So the branches don't have
to branch at the same spot. Very simple, very easy. Make that one come out
a little bit further. Maybe what you draw
is a flower on top of your fern one instead
of the way I did it. You're going to just do
it however you see fit. Be creative, be original. Maybe you're doing a real fern. You can fill in and put some
extras in if you want to. I want to have one
more down here. That's pretty cool. I like that. Because I didn't use this tip, I used that thinner tip. I'm going to come
back through and use this thicker tip for the stem. Maybe one more
small one in here. Cool. That's pretty cool. I like that a lot. And then over on this one, I think. Partly because I'm not as confident about being
able to do this one, and partly because
I want to show you what I mean by
using the carbon copy. I'm going to position
this one like offset. I feel like this is
really heavy over here, and so I'm going to just offset it over here on this half, on the right hand side. When you're using carbon copy, you can get a whole
stack of these, but you can reuse them over
and over and over again. So you don't really
need very many. Put the shiny side,
the darker side against the area that you
want to transfer the paper, the carbon to and
so you lay it here, and then this one's
going to go on top. The dw side is facing up. And I'm just going to hold onto it so that
I don't move it, but just very gently
because you can transfer. I'm just going to look to
see where I want this. I'm going to ankle it a little bit where I want
that positioned. Make sure that it's on. Page. Okay. Using a pencil, you could use a regular number two pencil like this or you could use a mechanical pencil, whatever you have
in hand, outline what you want to outline. You don't have to go
into all this detail. You could make your
own. You don't feel like you have
to use this one. It's just what I'm offering you. So very lightly, I'm going
to be just very gently. Going to be outlining
it on here. Be of how dark that
background is, that didn't show up very well, so I'm going to use a little bit darker, little heavier hand. Plus I know I'm going
to be going over it. I'm not going to go
into all these details. I can hand do that. Outline where this
flower is going to be. Then I'll outline
it in the gold. Again, I'm not gonna put
in all these details. I can figure that out. Um, when I'm actually doing it. Just putting down Yeah,
it's good enough. Okay, so I'm going to let
this sit next to me again. Put that aside so that I can remember what
it is, and I can see it. It's here, it's faint. And again, I'm going
to use my brush tip, and I'm going to do
the flower head. I'm just going to be putting
in a beautiful flower head. Again, in this gold, I really like this acrylic gold. The thing with acrylic gold
is that it really covers over what you had. So if you had, you
know, a different color or this black from this
work that I'm doing, it covers it really nicely. All right, that's good
enough for the basis. Then I'm going to
add in the stem. And then add in some branches. Because I'm free
handing this part, I can specifically choose
where I want them. But I do like how that one comes
all the way up. I think I'm going to do that. If you need to
remove the tape and be able to move your paper
around, please do that. This is now dry so you
could remove your tape. Sometimes it's easier to
be able to move the paper. Maybe even put some little
dots that's kind of cool. All right, we'll do
a little center. Maybe adding extra little limes. Fun. Fun, fun. Okay. So I think for now,
I can always come in and add more if I
feel like I need more. But I think for now,
I'm going to call that done. There's a sign. I'm going to come
back and remove the tape and see what
they look like matted. Join me in the next video.
8. Refining Details and Finishing Your Piece: Okay, now is a really fun part, so we get to take off this tape and put it with a mat.
You can just carefully. What I'd like to do
when I'm removing my tape is put it kind
of at this angle. See how I'm pulling
it back at an angle. That helps release this tape and helps it from not
pulling the paper. The other trick is
that if you're pulling it and you start realizing
that it's having a hard time, get out your heat
gun or hot air, like a hair dryer and
warm up your tape. That warms up this adhesive and lets this tape
come off easier. So those are just
a couple tricks to help you remove the
tape when it's time. This tape and paper work
really nicely together, so I don't have to worry
about it very often. But if that's ever a problem,
something easy to do. So I will remove
all of this tape. I love getting a nice crest
bedge It's always wonderful. Everything always looks so
much nicer once you have removed the tape and you
actually put a mat with it. You can buy mats
like this on Amazon. So if you ever want to
just get a couple mats, it's so nice to have because once you put
your mat on there, look at how elevated that is. And then once you
put that in a frame, you're going to be like, Wow, that is so cool. Because look at the texture that's back here
from your plants that you dried and created a beautiful texture
for your background, and then you added in this
extra layer of gold on top. And over here, this
one, the same thing. It's just so organic
and beautiful. I love it. I think these are
both so, so stunning. So that is just
really, really cool. And I can't wait to see yours. Make sure you get yours take a photo of
whatever one you do. If you make multiples, you can upload several
different images into the class gallery. So if you've made several, show them all to me. I
want to see them all. I'd like to comment
back and let you know any feedback or if you have any questions,
you can ask them there. It's something else that you
could do if you wanted to, and I'm just going to
quickly show this to you. Is using the same brush. Let's just pretend I
don't have another one, that's like this
so I can't do it. But this is just a sample of something else
that I had worked on that I can do because it's
just a simple background. So if you wanted, you could draw and I'm just
going to do this quickly. You could draw your simple
leaf like I did on the fern. Or you could draw your flower, and then you could paint inside the lines on some of these
leaves with watercolor, just to add another depth of color and texture on
top of everything. So I'm just going to
do that real quick just to show you what
I'm talking about. And then using just to paint. I'm going to move these other pieces out
of the way because I don't want them
to get damaged. Using my paint, again, maybe I'll just choose,
you know, this green. Using a smaller paint brush, I can actually come in
here and paint inside these leaves and create just
a little bit more texture. You could even choose
a few to paint. You could say, Well, I'm not going to paint
inside all of them. I'm just going to
paint inside some of them and leave
some of them blank. I just adds such a
interesting added. I'm just putting in a little
bit of that moss color. So depending on what yours
looks like, your background, and how much definition
you're getting from your gold drawing on
top of your background, you might want to add
in another layer. When I am working on a project
and I get an idea, like, it's just I don't
always go into all of my projects with a complete concept as to what I want to do. Sometimes things
come to me and I go, Oh, I wonder what
that would be like. Oh, I wonder if I
should do that. And so then what I do is I find another
scrap piece of paper. Maybe it's something that I
have painted like a year ago. You know, it's just
scrap paper that I have laying around where I
was practicing something. And I put my idea on that
scrap piece of paper, and I test it out and I go, do I like that? I can see that these
colors are very similar between what I did today versus what I did
several months ago. But I could see that
the colors are similar. I might actually
really like to do that on top of this
because these are so it's very monochromatic where it's not
popping very much. It's very, very subtle. This gold leaf thing on top
of this textured paint. It might actually elevate this to paint this green
inside of here. I always like to practice
it on something else. Now, on this one, I feel
like it really pops better. The contrast between
that gold and the pink really just shines through and
shows really nicely. So you have to play
around with it, but don't be afraid to
test something out. Come on back to the last lesson and we're going to
wrap this up and talk about what we
learned here and what we're going to look forward
to in the next class
9. Final Thoughts and Continuing Your Practice: Now that you've
finished your piece, take a moment and really
look at what you created. Each one of these turns out very different and that's the part that makes this
technique so special. The textures, the movement, even the unexpected areas, they all come together in a really natural
and organic way. If your piece didn't turn out
exactly how you imagined, I want you to be encouraged. Try it again, changing
your leaves, your colors, or even the amount of water that gives you a completely
different result. If you'd like to take
it a step further, you can experiment by adding more detail inside your linework or even laying extra elements on top once everything is dry. I would love to see
what you created, feel free to share your
piece in the art gallery. Even a simple version is
absolutely worth sharing. If you'd like to
keep going, I have more classes where
we explore texture, loose florals, and
in different ways to let paint move and create
something beautiful. Thanks for painting
with me today. Consider following me and
leave a review for the class. That'll help other
students find my class. I hope you learned
something new, had fun, and just relaxed a
little bit and let nature and watercolor
flow across your page. I can't wait to see
you in the next class.
 Brenda Jones, Watercolor Artist & Teacher