Transcripts
1. Welcome and Class Overview: Welcome to class. Today we'll be bringing everything
together to create a complete atmospheric
floral composition using soft foliage, flowing stems, and a
loose expressive flower. This project is designed to
feel calm, approachable, and hopefully enjoyable,
and you don't need to worry about painting
every detail perfectly. Throughout this class, we'll be focusing on creating
movement, balance, and composition, and allowing some areas to remain
soft and undefined. Those lost edges and quiet
passages are often what give atmospheric watercolor
its beautiful sense of depth and softness. You've already
painted along with my atmospheric foliage class and the atmospheric
flower class, you'll recognize many of the same techniques that
we'll be using here. If you're joining me here for the first time, don't worry, I'll guide you through
the process step by step so you can create a finished
painting with confidence. We'll combine gentle
layers, soft transitions, and plenty of white space to create that
perfect piece that feels expressive and relaxed
without becoming overworked. Gather your supplies and
let's enjoy the process as we create a beautiful atmospheric floral
composition together.
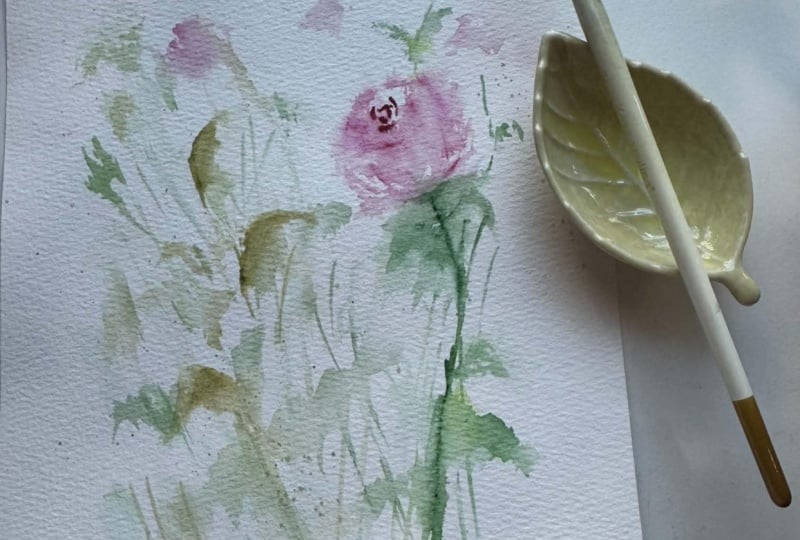
2. Building the Main Floral Composition: So this week we have
been talking about atmospheric painting where the background and the foreground, that there's not a lot of definition between that
background and the foreground. You may remember and
hopefully you've taken those other classes
where we talked about doing greenery where that
background is just back there, and then we put
some greens up on top that have a little
bit more definition, but not real definition, just like almost
just a misty feel. And then we worked on a
rose and we made it again just so that the petals just blended off
into the background. Same with all of our greenery, how it just has that
misty atmospheric look. Today, after we've learned
those last two lessons, today, what we're going to do is pull those two things together
and we're going to make one little almost like a bud of a rose a
little bit tighter. This other class that we did, we made that flower fully
open where these petals were almost turning backwards on themselves because
it was fully open. Today, when we're going
to pull it all together, I need a little bit more room. We're going to be putting a
little rosebud here that has a little center
that's darker with the atmospheric petals
around the outside edge, and then some of the green
leaves out around the outside, very similar to
that other class. I just wanted to explain to you what we're doing and
where we're heading, what we're going to do
is we're going to start. I have a nice clean,
brand new water. And I'm going to be using
my size eight paintbrush. I'm going to start
with a background, just like we did
for the other ones, I'm going to start by
just splashing some water so that we have water
droplets all over this page. I'm not going to use my
paintbrush and paint it with wet. I don't want to make
the whole thing wet. That is not what
I'm trying to do. I'm actually going
to be doing a wet on dry but with water
droplets all over, which is going to really help
with that atmospheric look. Now that I have some
water and hopefully you can see that catch
the reflection. Lots of water droplets all over. I'm going to come
in with some of my green and I've got lots of greenery here and I'm just going to holding my pink
brush nice and high. I know I'm going to be having some stems that are
going to come up high and then we'll probably have a rose stem that
comes over there, pick up a couple other colors. Remember, we like to use lots of different colors of
green, not just one. Several different
colors of green and I'm just going to be putting
in some little stripes here and see how
it's just picking up and it's just
touching into some of the little water droplets and letting it expand
and move and flow. We're going to grab a little
darker green color and add some of that in putting
that into different areas, it's okay if it
touches into some of the spots that
are already done. We'll bring up some over here. I'm just creating a little
spots for those greenery. I can even take some of
my paint that's already on my paint brush and just
splash it down on here, drip into that water again, just drop that green
paint all over the place. I can even come in and
just make some squiggles. Now, remember we're
making leaves, but our leaves don't have to
actually look like leaves. They're just little blobs. If you remember that I use
all kinds of words that don't necessarily make sense because I don't really know how to
describe what we're doing. What we're doing
is just creating little blobs here and
there that does not. If you just looked
at this right here, and you said, I made a leaf. Everybody would be like, No,
you didn't. You made a blob. That's what we're doing.
We're just making blobs. Then I'm going to grab some of that yellow and I'm
going to bring some of that yellow green in because I like some of that
being mixed in with it. Make a little blob here, make a little blob there, add in some water to it. Those are your leaves. It's the start of
all the leaves. I got to bring in some more
maybe bring one up in here. See how it's a leaf,
but not really. That's where it's
really adds more water. Just let it drop in
there and be full. Full and full of water. Lots and lots. Maybe
these are too bold. Maybe I need to grab
some of that teal again. I do like we've added
teal in that other class. I think I'm going to add
some of that in here too. There's little touches
of it here and there. I do like to add in three
different colors at least at the minimum three
different colors of green. Add so much variety and
texture to our leaves. I'm leaving this spice. You may have noticed
that this is empty. That's because that's where
that rose is going to go. That rose head is going
to go right here. I'm leaving that area open because I know that that's
what's coming in over there. I think that some of
these brighter greens are just a little too bright
for what I'm working on. I'm just going to add in just another green I can just touch it right
into it and see how that totally muted
everything down. I would come in here
and put some more. If you looked at any one
of these spots and I said, Oh, yeah, we're making
leaves, you'd say, what? What are you making? Okay. That's because this is a very, very loose atmospheric style. Almost abstract. Now I can come in and I'm
going to be making this. When we make our roses, I like to start with
a nice dark center. I'm going to start with
that. Oval shaped. It's going to touch into some of those bubbles of beads of water. And I can rinse off
my paint brush, and we're going to just
add in a couple more, grab some of that peach. Now, I'm going to
create this petal. I'm going to make a
fairly large petal here because this is the
front part of my flower. If you remember when
you're looking it, this is a peony, but we're going to use
this as an example. When you look at the front side, you get this big
petal right here. That's what we're
going to be doing. I'm making a rose. You can make whatever
flower you want to, but I'm going to be
creating this front petal. It's almost like an oval shape. You can leave some
white spaces in there. It's always nice to
leave a little bit of white little highlight, long oval triangle, whatever
shape you want to call this. This is the front of it. Pick up some more pink
coming over here. We're just creating where
this flour is going to be. Maybe they're starting
to open up a little bit. See how I created a little petal that's coming off and opening
up just a little bit. Maybe we're going
to make another one that comes over here, it's just going to
open up a little bit, add more water. It's all jagged. Open spaces of white, didn't fill in the whole thing. Use some brighter
pink if you want to. I want to work on this backside. I don't want to have too
much paint on my brush. I want lots and lots of white. Lots of water and lots of
white being left on the paper. I think I want to allow this to kind of just
come over here. I was really looking pretty. Add another petal. See I can just kind of let those
edges blend together. I've added several
different reds. I have some darker burgundy. I've got some brighter. You see how watery it
is, see how it flows? You can pick it up and move it around and let all
those colors mingle. If you feel like you have
too much white spots, that's when you can
always start filling in those white spots. Okay. I'm going to let that
go for a second, and I'm going to add in my stem. I want the stem to be coming in about here and coming down. Maybe let's see. It gets more green going on. Maybe I want it to come
actually over this way. Okay. So my water got really crazy. I'm going to use a paper towel. I'm just gonna lift that up.
Just gonna pick that up. I got a little too
much too much water going on. It's okay. We don't worry
about those things. We just roll with it. So I can just come back in and add a little bit
more green back into it. I've got a petal leaf
coming over here. Can put another leaf over there. I like the fact that
that green kind of came up into my flower. That's really pretty. If I feel like it's
a little too much, I can use my little paper towel, a little spot, just kind of lift up some of that
paint and water. I feel like it's just
puddling a little too much. Come in
and lift it up. I feel like I'm kneading something else
over on this side. Maybe create a little leaf. Let me grab a little brown. Make a little branch. If you hold your paint
brush up really high, you can make it
jagged and crooked. Okay. Maybe I want to have
another little bud up here. Just add in a second
little flower. It doesn't even have to
be a complete flower. It can just be
like a little bud. Helps draw your eye across. I think I want to add in just
a little bit more whimsy. I'm going to splash some more. I've got that pink
in my paint brush. I'm just going to splash a
little bit more up in here. See how that adds just so much
interest? You don't know. Is that a flower?
Is it just paint? It doesn't matter.
Just splash it around. If you feel like
you have too much, can always just drip
it pick it back up. But drop some over here. When I start these projects, I don't necessarily have
a complete plan in mind. I have the formatted. I knew I wanted to
put a bud here. I knew I wanted to have
light greens here, loose greens, background greens. But I didn't know I wanted
to have a bud here. I didn't know I was going
to put splatter here. I didn't know that I was going
to splash this water here. I'm just listening
to my painting, and I'm just going
with the flow. It's something that you
really need to start practicing is not necessarily copying and doing
everything that the artist you're following along with, whoever
the teacher is. Is allowing yourself to discover your own painting
and what it needs, what it's asking for. I'm going to actually come
in here and get a little bit even lighter and just add a little bit more of
a background atmosphere where this can just almost
become part of the background. See how I added in that water
and just let it flow out. I love to have a
paper towel with me so that I can pick up some. But this is still very
flowy, it's still wet. I love these little
droplets right here. Those I'm going to let sit. I'm not going to
pick up that paint. I'm going to let that has a lot of bubbles of water there. I'm just going to let
that be. Maybe let some of the screen flow down in. Some of this green is flowing
because I pick it up. It's really pretty. I'm going
to splash a little green. I got paint on my brush. I dipped it into water
to make it extra wet. I'm just going to splash
a little green over here. I want you to notice that
the green splashed and it came over here into the pink, and I'm not
upset about that. I'm just going to
use my clean brush and just kind of move it around. This is all wet, so I can just move it
around a little bit. Make it go away. Okay. You need to be done when you feel like your painting is done. If you're not finished
with yours, keep going. If you were finished 7
minutes ago, that's fine. You don't need to keep
painting just because I am. I think I want to put
some kind of a stem up here just to connect this one. But it's not going to
be a big long stem. It's just going to be
the idea of a stem. See how it's all
jagged and broken? Maybe come in, add a little bit more water just to make it a little
bit more atmospheric. Maybe add a little
bit more water over here just to blend it. I'm not sure where
that yellow came from. Interesting. Okay. I think I'm going to
be done. I'm going to dry this or allow it to dry. I think I'll probably
use my heat gun and dry this off and then see if anything
needs another layer. See if the center area
needs anything else to, um, draw any more attention to this rose that's over here. Because everything's so
atmospheric and gentle, sometimes you lose some
definition because you don't have anything
that is primary. So I'll take a look
at that once it's dry and see if it needs
anything else. Be right back.
3. Adding Depth and Delicate Details: Okay. This is mostly dry. It's still a little damp. I didn't dry it off
completely because I do want to add in just a
little bit more details. I'm going to pick up some
of my greens and I just want to add in just a
little bit more definition to this stem here just
so that I feel like that stem has a little
bit more prominence. Then I'm also going to just
put a couple little leaves that just maybe a little bit
more defined up on top here. Let's see. Where
do we want them? Maybe I'll put a
leaf up on here, pick up some other color greens. Let's see how we have the
background and then we have some just a little bit more defined leaves up on top. I'm going to be using
all the different greens again because I
don't want to have anything that's just one color. Just going to add another
little leaf over here. Even just that in itself, you can see how that really helped make a little
bit of definition here for these greeneries. Putting another one here, stem So some of these spots
are maybe just a little too washed out, needs just to get a little bit
of something going on with it. Not a lot. I'm not filling this
thing with leaves and branches that you can see, I just adding a little bit. Again, remember we're
not making exact leaves. We're just putting the illusion
of a leaf here and there. Maybe I'll put something
up in this area. Just right up on top. Okay. It's nice to add that
extra maybe it two yellow. Pick that up. Then I'm going
to come over with my pinks, just a little bit
more center color. Maybe create just a little
bit of an edge. That petal. Remember when we made
that defined petal, same with this one it's
coming out here a little bit. Remember, these are going
to dry much lighter. Watercolor when it's wet is darkest and then when it
dries, it gets lighter. I'd just like to add
just a little bit of detail here and there, just so you see a little
definition of some petals. Oh, so soft. Not much. Okay. Gonna let that dry. I probably call that done. I don't want this
to be that dark, I'm gonna diff some of that up. Just want a little bit. Okay. Good. Great. This is really pretty. Hope you're enjoying yours. If yours looks
different from mine, that is to be expected. I would not be able to repaint mine exactly like
this ever again. So there's no way that
you're going to be able to paint yours and have
it look like mine. You need to paint yours and
have it look like yours. So just don't ever feel
like you're not painting well enough just because yours doesn't look like
somebody else's. Yours is always going
to look like yours. Add just a little bit of brown
to that stem just to give a little little highlight. All righty. Again,
stop all your head. It's easier to stop before you overdo it because it's very easy
to overdo things. If you feel like after
it's completely dry, you need to come back in
and add something else. That is a whole
lot easier to add something later than to
try to take it away. So put your paintbrush
down, walk away from it, check it out, decide
what you think, and then you can always come back in later and add something. I give you that advice, not that I do it
because you're going to see that I'm going to
come in here and I'm just going to get rid
of some of that white. Just felt like it
was just a little too much white there
in the center. I didn't pick This
is just water. It's just that I know that this has a little bit of paint on it. So it's not my paintbrush, but the paint that's
on my flower itself, I could just fill in
some of that white. Okay, just be done. Walk away from it. It's
the hardest thing to do. Practice that because
that's really important. And then you can
always come back and fix it later after it's dry. I'll meet you in the next class.
4. Final Thoughts and Project Gallery: We've reached the end of our atmospheric
floral composition, and I hope you're feeling proud
of what you just created. One of the things
I love most about this style is that
it reminds us that we don't have to
paint every detail to create something beautiful. Soft edges, gentle layers, and even the areas that
we chose to leave alone all contribute to the feeling
of that finished piece. If your painting looks
different from mine, I hope you embrace that. Watercolor has a wonderful way of creating unexpected beauty. Those little surprises
are often what makes paintings feel alive
and uniquely yours. I would love to see
your finished project, so please consider uploading
it into the class gallery. Whether you follow along closely or made your
own creative choices. I always enjoy seeing
the variety and personality that each student
brings to their work. If you'd like a little
bit more practice with the individual elements that we used in this painting today, I invite you to explore my
atmospheric floral class, where we focus on
creating soft layers of greens and beautiful
soft edges and also my atmospheric floral
class where we slow down and explore how to create loose expressive petals
without overworking them. Those two classes pair beautifully with
this composition and offer additional opportunity to build confidence with
this relaxed approach. As you continue painting, you'll find that these
atmospheric techniques become more natural over time. You'll begin trusting the
water, simplifying shapes, and discovering that some of
the most beautiful parts of painting are often the ones
that don't fully explain. Thank you so much for
painting with me today. I hope this class
leaves you feeling inspired to continue
experimenting, enjoying the process,
and creating beautiful paintings
in your own style. Take care, and I'll see you
again in the next class.
 Brenda Jones, Watercolor Artist & Teacher