Transcripts
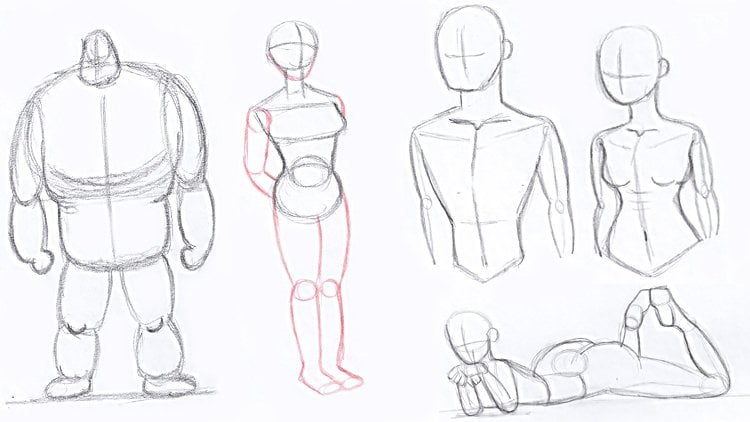
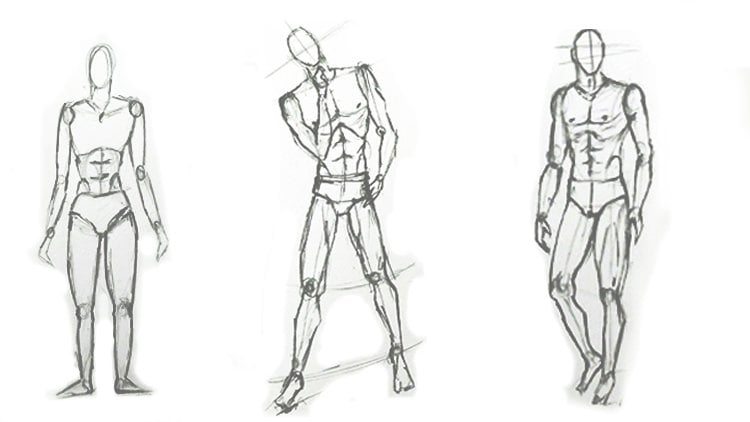
1. Introduction: Hello friends, welcome to the simple human body anatomy
is scattering course. One of the most basic
pencil drawing skills is learning to draw the
human body anatomy in a principled way. In this course, I have
taught different types of anatomy of male
and female bodies in different styles and
positions and also in different ages in a very
basic and easy way. In this course, my focus is on a sketching the anatomy
of the human body. For this reason, I
have avoided going into the details of
the head and face. In this course. I have taught you a variety of simple styles step-by-step. I hope this course is useful
for you and have fun.
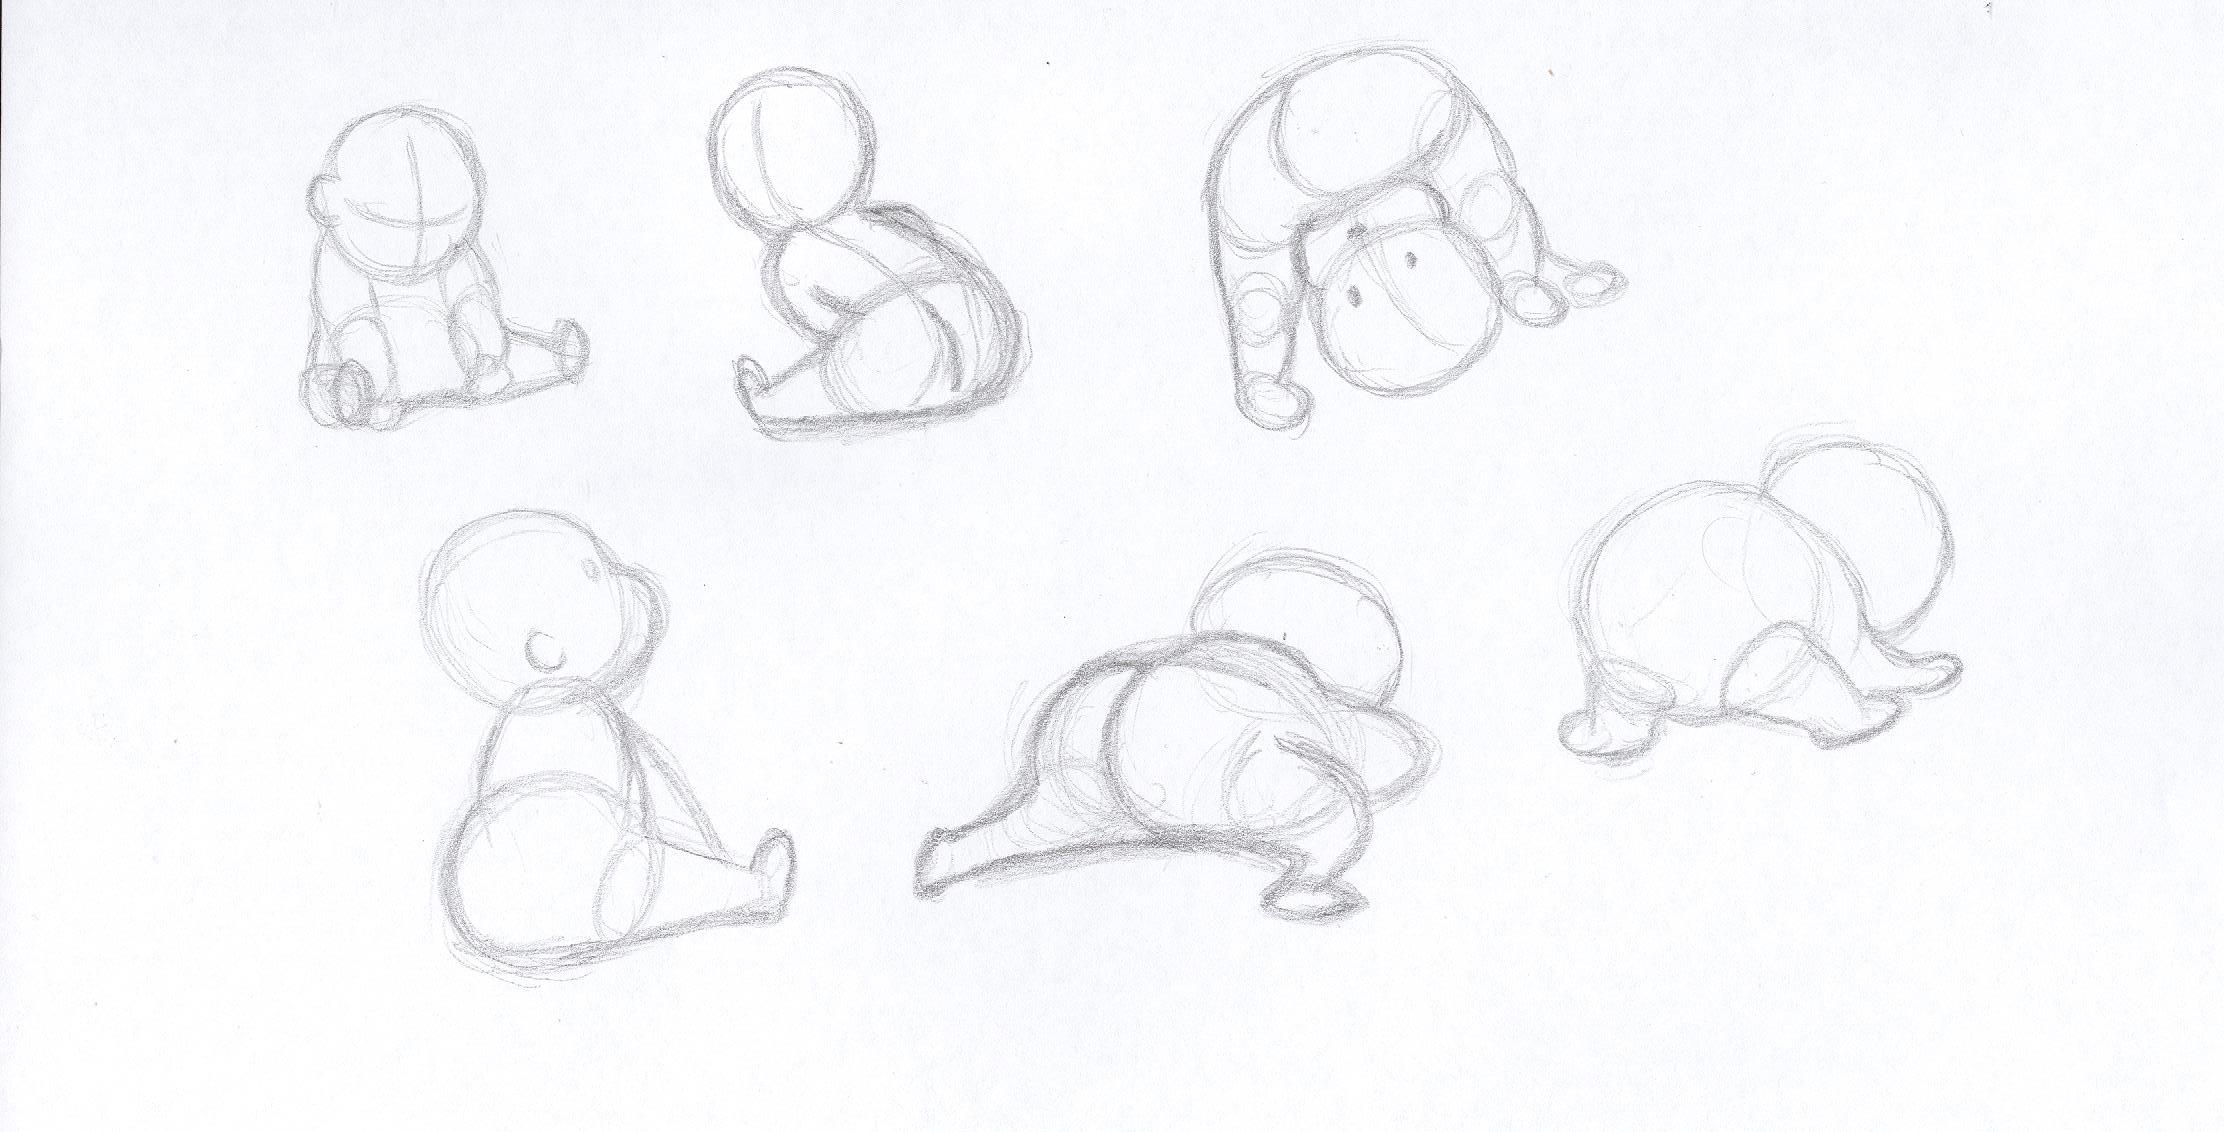
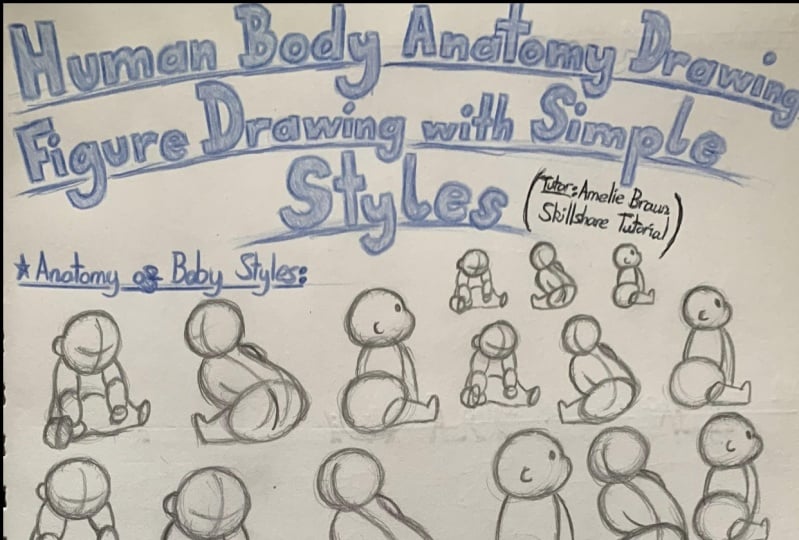
2. Anatomy of baby styles: Hello to all of my
dearest friends. We are back again with another tutorial
session for you here. And in this session, we are going to
create some styles of infants and kids
together, right? First of all, we
should be careful that as much as our
kids age is lower, I mean, as much as
our kid is younger. It's shorter and it's smaller, but it has bigger hit. So I'm going to start
with some simple shapes. So we would know how we
can do this practically. Well, infants or kids can, babies in general can do so many funny things
and we can use them in order to
create our baby. For example, if our
baby is sitting, we would want to know
how we can create them. First of all, I'll start with creating my babies
character's head. And I'll create it in this way. Now. For our baby's body, the most oval includes the head. I mean, the biggest part
of the body is the head. And we can note even create
a job for our character. Therefore, our character
would look funnier in cuter. Considering that will determine the placement of
my characters ear. And after that, I will, I won't consider my characters
neck because for babies, we would not create next at all. Because if we create some
neck for our character, it will age the character. So we would not do that
for babies or infants. And if you can see, I've brought this our baby's
head a little bit forward. If it was looking up, the direction of the
head would be different. So I will consider the shoulders from behind
the head because the baby is bringing the head down. Right. Now, Dad, we've determined
the placement of the arms. I'm going to complete
the shape of the arm and create
the rest of it. The wrist and the palm, which is very, very small, will be created for our infants character,
fries, baby character. Basically the shapes that
we are considering for our babies character
are very, very small. It's cute. Our character is
sitting on the ground. Therefore, I am
going to consider my pelvis over here for my character would just
behind the whole body. And actually the arms
will cover this area. The arms are covering
the upper body parts, so we can not see it completely. Now we can add the hands
to this part of our leg. We can connect these two
parts together so it can show the legs over here based
on the angle of our view. And so I will create
defeat as well. And for this area, I'm going to create
the rest of the body. Alright? Now this is our baby's anatomy
right now, over here. As you can see, everything is small yet
cute, except ahead. Now I'm going to create another position of our babies so you wouldn't
know how it's done. If our baby is sitting from behind and we want
to create it from the behind, from its back. You'd want to see how it's done. First of all, it will determine the placement of the
head. Obviously. So for my babies character, I will consider the
volume of the head. And because we are creating
our character from the back, we can create an actual line for our character in this way. And then we can add
the body to it. All right, from here, we come and we create the upper body part for
our character like this. Then for this area, I will create my
characters pelvis. Dividing a babies or infants character is going
through three parts. Actually. We can create the upper body part
and then we can add the pelvis or the buttocks area because our character's
body is very, very short, so it would not have three separate
parts or divisions. It's better not to do too
much divisions for it because as much as we want to create
a body taller or longer, the age of our character
will be increased. Then I'm going to determine my character's
hand from here. Because you can not see the other arm or the other
hand or even the other leg. And for this area, I'm going to
determine that we're watching a character
from its back. I'll create the
leg in this shape. Therefore, I can
show my character is looking that way or it's
sitting toward down. Anyway. It'll be like this. Now this is the upper body part. And this is my character's head, which we are watching
behind the body, the back of the body. Now I can consider
shaped like this. So we can show we have another arm on the
other side of the body, but unfortunately,
it's not in our site. So this is the back position of our baby or
infants character. Now, if we want our character's
head to be seen more, can we do then? Well, actually we are going to create our character
into three phases view. And we're going to consider our character's head
again as a circle, but then we are going
to add a volume like this to it so we can
show that our face, he's almost in a
three phases view. And this would be the
placement of the eyes. This is the front
part of the face. We can also consider the ear. Over here. It would show we can see a part
of our character's face. Then we can create the
upper body part like this. And then I will add to
Pell this area here. Then obviously I can create
the leg in this shape. And after that, I can add defeat and even
the toes to my character. I can create the arms of my
character in this shape. This is if you want your
character to be seen more. Especially when we want to front part of our
body to be seen more. We can create the
body in this shape. Three phases view.
3. Continuation of Anatomy of baby styles: Hello everyone. My dear friends. I'm back again with another
tutorial session for you. In this session,
we're going to create some more different
positions which would be more complex for
our baby or infant. So sometimes babies will bring their heads from
beneath their body. They will show their heads. This is actually a very
cute position and act, but it is going to be complex
when we want to sketch it, we want to see how we
are going to do that. To bring our baby's
body above its head. First, we would create the
head on this lower area. And then we will consider a very small part and
small area for digital. Then we will add the
skull to it like this. Actually upside down. So our head is now placed
in an upside down position. So it looks like this. Then what are we going to do? Obviously, we're only seeing
the back part of the body. Therefore, here we will
create the shape and the volume of the pelvis
actually below our head. This would be the pelvis, the shape of the pelvis,
the buttocks area. And then from both sides
we are going to add the legs in this shape and in
this position coming down. Then we would add the knees. Then, just like that, we will add the feet from other side would
also do the same thing. So you can see the
legs just like that. Then we can consider this leg
a little bit up in the air or we can place both
legs on the ground. And then on this
side of the leg we can see a little bit of our arm. And then just like that, we can complete our
baby or infant, which is bringing the legs down to decide of its
head from both sides, then I can determine
the placement of the eyes and a mouth. So our character would
be a little bit more clear that what's he
doing or wants to doing and what position
our baby is n. We can also consider a volume
like this for the pelvis, for the buttocks area. And with that, we are
basically showing more than our character is
doing something especial. We can show the position and the action of
our character very easily without
changing the position of the arms or the legs. Now, if you want to
create our character in a crawling position on its
ors, or basically crawling. Because start from our
characters back and then we will add a bit of
our head to this body. You can see we have some
angles of view over here, which are new to us. And with that, we can show the actions and the movements
of a baby or an infant. This is actually the
back of my character, the body of my character. Then I will add the legs. Because my babies crawling, I wanted to show it
in that position. I'm going to create
the leg like this. Then I will add the
foot in this way. Then after that, I'll create this other leg and this
side of my pelvis. And I can create the other leg a little
bit bend from the knee. So I can show that
my character is actually moving and crawling. If you want to be more specific. So this is the volume
of my characters leg, and then I would add
my characters arm. In this shape. Then F, They're done. I'm going to create a
part of the head that can be seen in this
position from a back view. Just like that, I can complete my character from behind
and in a position that it is crawling in order to show the
movement even more. And because we are creating
our characters back, we can also create a line
for this buttocks area. To show it better. Have a curved line and the
pelvis show the buttocks area. I want to emphasize
on our characters back onto emphasize on the angle and the position
of the character. Alright, so this is when we want to create our
character from behind, from the bag and
crawling in movement. Now, if this character wants
to squeeze the legs a little and I want to move up how
we can create it first. So all we will
consider the pelvis in a shape which is so
similar to circle. This way. This is our characters pelvis. Because, well, our pelvis is
not on the ground anymore. As you can see on
our previous model, our pelvis is very, very wide because
it's on the ground. But as it gets distant
from the ground, gets higher, it will be more
to a circle then an oval. Then because our leg has
started from this part, we can only create
a shape like this, which is our character's foot. The leg has started from here, which actually would
be behind our pelvis, in front of it actually, on the other side, it's better to say, then we can create the other leg and the other foods in
this shape so we can show our character
is going to stand, it's actually trying to stand. Then I can also create
a part of my characters are in this shape, probably placing
on the ground so I can express my movement
more and better. Then here, I would add
my character's head. Obviously a part of it, not completely because
the rest of it is actually behind the body and on the other side and we can note, see it. Alright, that's it. This is our baby crawling yet in another way with more
squeezed or bent legs. These are the movements
and positions that we can create for our baby
or our infant. It works for both of them.
4. Anatomy of a child throwing a ball: Hello John, I love
my dearest friends. I'm back again with another
tutorial session for you. Well, in this session, we want to see if you want to create kits in different styles, how we can do that? I mean in different
positions and styles. Alright. I would just start with
creating an action for a boy. And I want them to hold
a ball behind his head. Later here, he's going to throw this ball to another direction. First of all, I
start my work with creating an action
line for the body. Then I will consider the
upper body part a little bit sideways because our body is going to be stretched back in order to
throw something. Therefore, I'm going
to create it sideways. Then. I will continue one of the legs which is staying still. And then I'll consider my
head above my action line. Looking like this. So only with a circle, I will determine the
placement of the head. Alright. Now I'm going to create a general
shape for the body. And because the
arms are coming up, we will not consider the neck. So in this way, we will bring that will bring the arms from the
side of our face. And because this part of our arm has been
bent toward inside, we will not see this area. Also this other hand, which would have
considered in this shape. And it actually turns backwards. Because we want to show where
these arms has been placed. We are going to
create the volume of the ball over here like this. Just the point that
you should consider is that the ball is
being continued, but it's behind the head. So in order to show this
position to our viewer, we would also
create this part of our boys hands beneath the wall. So we can show this ball is
actually in our boy's hand. Will determine the direction
line for the face. Then after that, I
am going to work on my boy's body with
a shape like this. I will create the rest
of my body from the arm down towards the
chest and the back. And I will also create a twist and turn to this
part of my body. And then four here, I will consider a circular
shape for the pelvis. And then I will determine
the placement of the legs. Alright. We'll consider one of the legs
straight and coming down. And the other one would
come a little toward back. Why would we do that? Because when we are
throwing something, one of our legs are still
an underground and we can actually pick
up the other leg. So we could give the feeling of throwing something
more to our viewer. Alright, then I will consider
the knees for the legs. Then I'll create the rest of
the leg downward like that. After that, I will create
the ankles and align in order to make sure these legs are in
level with each other. Because they shouldn't
be shorter or longer. They are just in
different positions. So we would want to create
this foot on the air, up in the air. And then we would consider
this one in this shape. Alright, that's it. This is my character's legs
that I can have it like this. Okay, now for our character, we can add some details. How can we do that? Well, for our character, we can create some
volumes for the clothes, some shapes for our characters
clothes in this way. And I would add the volume
of the clothes over here, sleeves as a T-shirt
and I can add a color. And then I can even work on my character's face
a little bit more. I can even determine the
placement of the eyes like that with two circles
and several lines. I can just give some small details to my
character's face like that. And then I would
work on the hands. Just like this. I would do exactly the same for the other hand in this shape. And then I can work on the waist area and then finished my clouds
with only one line. Then after that, I can create some shorts
for my character. Looking like that. Then I could also create
the other leg with the other part of the
short shorts like this. Alright. This is a general shape of the character that wants to
throw something likable. So in this way we can
actually proceed our work, this is the shape
of a character. Throwing. Another thing, like a ball can also give some more shape
to the feet and legs. And also for this front part
of our character's head, we can create a general
shape of the hair. So we would want to show that our character is a boy, baby.
5. Anatomy of a child playing basketball: Hello to all of my
dearest friends. I'm back again with another
tutorial session for you. In this session,
we want to create our boy with doing
something else. Weird is bull. For example, want to consider a
basketball action? That boy is actually
hitting the ball next to himself on the ground and he
wants to move forward. This is almost very
complex action, but we'd making it simpler, we will move this action
more forward step-by-step. First of all, I'm
going to start with my action line of my body. So I would consider the shape
of the upper body part, which would be sideways and
it wouldn't be straight. Then I will work on
my characters leg, which is supposed to
show the movement. This leg that I'm creating
the action line for it is actually the leg which is
being created like this. Now, if we want to create the action line
for our other leg, from here, we can come down
to create the other leg. Alright, on my action line, I'll create my body. And I will dive
into the details. Then. I will consider
the head's position on my action line because
my character has actually bends the body toward
one direction in order to hit the ball and bounce
the ball on the ground. Therefore, I will consider
the head sideways, tilt it like this. Just like that. I will
create my character's head. After I would create
my directions. Direction line for the face, you would know how
my face is placed. Now, I'll create the upper
body part of my character. The head has came forward, therefore, the body will
be created without a nick. And we would not create the neck because
you can not see it. Because you want to show
the position of our body. Now, I'm going to
create a volume like that for the chest area. And then I'll created a little for the body,
medial body part. And then I will add the
pelvis like that over here. Now I would create art from this side of the body
going down like that. Then after that, in this
area I'll create the wrist and the hand and fingers
with a shape like this. So generally we
don't want to work on the fingers detailed now. Now next to the leg, I will create the ball beneath
my hand on the ground. So you would understand that we are balancing
something on the ground. Then with this
position of the hand, we can show it more easily. That is bouncing the ball
on the ground like that. I would want to work
on the other arm. And then later I can come
back at some more details. Right now we're only creating
the anatomy general shapes, so you would see how
they're done. Okay. Now I will also create
the other arm as well. Again in a general shape. Then after that, I would
move on to create and legs. Because the legs have been
bent down from the knee. We would create our work
from inside of the pelvis. Pelvis shapes of course. Then we will shaped in knee and then we've been to
Dover here, return it. And then we will move
towards the ankle. Know obviously after that, the foot will be
created in this shape. Alright. Now I would also work
on the other leg as well in this position. Bringing it down. Then just like that. Bring the leg a little
bit more backwards. Therefore, the front part, actually the top part of our
foot can be seen shorter and this area above the
ankle can be seen longer. Then I will create the
wrist and the toes. Obviously the foot like this. Therefore, we can show that
this leg is more behind, comparing to this slag
which is more in front. Okay. This is a general shape of our boys body that
we've created together. Now, I might add some
details to this work, so we might complete
this a little bit more. I'm going to work with
at it because I want to add some delicacy
to the work. You can use your
normal unusual pencil. No worries. Then I'm going to work on my character's face and then I would add the ears like that. And now I can create
a general shape for my character's eyes with two points and also
two lines for the eyebrows, then maybe even a
part for the mouth. We can also create a general shape here
for our boys hair. So general, because we want to show
that character is a boy. We want to make it more
obvious and emphasizes donut. Now, I'm going to bring down
this arm next to the body. Then I will shape
it as the sleeve. And I will create some more shapes for
my character's body. And obviously
because our body has bent down and it's sideways, has noticed standing
is straight. We can also create some
curved lines over here in order to show the
wrinkles on the clothes. The T-shirt here. We will bring down the
other part as well. Just like our other arm. Then it gets to the armpit, comes down from the
chest or the waste. And it would be
ending over here. We will consider this side more stretched because this side of our body has been
bent and we would have the wrinkles over here. So the other side will
be stretched out. So we could actually
emphasize on the position of the body which has been
tinged down to one side. Bending over to one side. Again, I will create
short swarm on character. Then I would do it
for the other leg as well to make my shirts complete. Actually, I'm adding a
volume on top of my leg. Then I will shape the link
more from beneath the shorts. And then I would work on
the foot. This shape. I'm just going to do exactly
the same for the other leg. As you can see. Just like this. And then for
the ending part of our foot, we will create the toes. In this shape. I will complete our work. Alright. Now I'm going to
create the rest of the hands, the arms and the hands, of course, below the elbow. Then we'd go towards the wrist
and the hand themselves. As you can see, I'm
just considering the shape of the
hands very generally. I'm not creating the
fingers one-by-one. I would also create the
other hand like this. And shape it here. After dad, we are going
to create the ball which is bouncing on the ground. So one of the easiest
things to do, and just like that, we can
complete our work here. Alright? As you can see, because our character is
in action and is moving, we will actually want to
show this stability with this leg more because we want to show his
walking or he's moving. So we would want one
of the legs to be more stable and fixed. So this is another position of your character
that you can create. Like he's playing with a ball and bouncing
it off the ground.
6. The second anatomy of a child playing basketball: Hello too, I love
my dearest friends. We are here again with another
tutorial session for you. And in this session, we just want to create another position of our
boy, moving and inaction. Alright? If you want to consider
our character and almost no three phases
view and we would want to place the ball in
front of his feet in a way that it's like he is going to play
with the ball. So we would want to see
how we can create that. Obviously, first of all, I start with creating
the general action line for my body and then I can create everything
else on top of it. So first of all, this would be the direction
line for my body. Coming down. This way, this angular way. Then I'll consider
the other leg in this position going
down sideways. Yet not bend. So we can actually keep
the balance of our body. Determine the
placement of the head, which would be here at
the top of the line. So I would just determine the general position
of the head. And over here, I will
create my characters jaw. Then I could also, I could also at the ears and then the direction
lines for the face. Then after that, I
would be able to create the lines for the arms
and even maybe the neck. I will consider them coming out actually from
behind over the head. Then I'll create my arm. This would be the elbow and this would be the wrist
and the hand itself. The hand area. Alright. The other arm is actually
in front of everybody and I want to consider the ball in
front of the body as well. I would want to create the
chest area in this shape. Then I would go down
to create the waist. And then after that, in this area, I would
have the pelvis. But if you pay attention, our body is a little
bit bent backwards. So we will consider the pelvis
as the shape of an oval. So it can show a part of it is placed more backwards
and behind. This way, we can show the
whole position of the body. Then I will connect
the leg to the pelvis. Then in here I
would have the knee then to turn and twist of
the leg in this shape. Alright. Then I would have the
ankle in this area. And then the foot will
be created at last. Then I would also create the other leg toward
this direction. And in this position, again, I said this leg would
be more straight, I mean, from the knee. So our body could
keep it balanced. I bring it down
towards the ankle. And then I might even determine the ending part of the other foot so I can
create the other foot, this foot in the same
level because well, he's a standing on
solid ground on the same ground and both
feet should be leveled. Then I will determined
the end of my work. Then I would want to
work on this other arm, which is supposed to place in front of our body and holding
the ball in their hand. Then I will create
my character's hand. Then I will create a general
shape of my ball. Over here. It's like he's playing with the ball right here
in front of his body. Then I will add the
details to my sketch. I'm going to do
it with an edited because I want to add
delicate details. You can do it with
your normal pencil. There is no necessity here. Then I will create a general shape also for
my character's hair. Two dots for the eyes, two lines for the eyebrows, nose, and a mouth. Just very generally. Very, very simple. Then I could add some
clouds to the character. Then I would create this
shape of my clothes. In this shape, the sleeve coming down towards
the chest and waist. Again, as you can see, because our body is a bend, is bent forward a little
toward this side. We could create
some curved lines on the right side of the clouds in order to shape their wrinkles and show the position of
the body even better. And I will consider this arm
coming forward sideways. Then I will create some
fingers for the hand. Therefore, I can
show that again. He's bouncing the
ball with the hand. Then I'll create
the other leg for my character from
behind the body. Then I'll create the knee. And then the lower part
of the leg. Coming down. Here we would have the ankle
and this would be the foot. I will complete my
leg in no time. I would want to create the other arm in this position and shape inside of our
clothes, the sleeve. Then I will create the fingers again
with a general shape. Nodes, very detail,
but I just create several lines in order
to show they exist here. And he's actually
having this hand very stretched out in order to stop anyone
to get closer to him. And then I will create
some shorts for him. Then I would add
the leg over here, the knee, the ankle,
and the foot. Then I can create
the bowl like this. Okay. This is our boy in
another position. And if he wants to play with the ball
in different position.
7. Anatomy of a girl sitting: Hello to all of my
dearest friends. We are back again with another tutorial
session for you here. And in this session, together we are going to create several positions for a girl, it child, which is a girl. We want to see how
we can do them. Alright? First of all, I want
to create a girl which is sitting on the ground and she is stretching one leg and holding another
one toward her body. First of all, I started with
my actual line for the body. So for the upper body part, I will consider a
line like this. Here would be my pelvis,
my characters pelvis, and then I'll create this leg into continuous
of this line. Alright. Now I'm going to determine
the placement of the head. Something that you
should pay attention to is that I want to head to be turned to the right side a little and I want to create it in
a three phases view. Therefore, the direction line of the face would
be toward this way. Alright. Now because the
character that we're creating is actually a
girl, a little girl. We are going to create a
very small drill for her. And then I will create a direction line in this
way, in this shape. Alright? Because we are creating
a little girl, we can add some hair to her. That later on, I'm going
to do this over here. Now if I want to consider the upper body part
of my character, because our character
is sitting. The body would be
much more, you know, squeezed because the pelvis
would be on the ground. So we would not consider too much pressure
for the upper body part. And we will create the
pelvis in the shape of an oval like this that
I'm creating over here. Because we want to show that our character is
sitting on the ground. Alright. Now I'm going to create this leg which is supposed
to be stretched out. So I will create the knee and
then I'll create this area, back of the leg and then I'll create the front part
of the knee, the ankle. And the rest. I'll consider the ending part of my foot looking like this. Alright. This is our first leg
and then we're going to create the other leg bent
over here toward the body. And because this leg is
actually bend over, it's bent. We are going to
create the knee as the shape of an oval over here. And then from here, we will create the
rest of the leg and we bring it
toward the other leg. This is our second leg. I'm going to create the
arms for my character. I want them to create. Actually, I want
to create them in the direction of her
face because I want my character to show
something with her hands. So I'm going to
create the arms in this position over here in front of the
body and the face. Then I just spent
my hand upward. And then with creating The volume of the
hands and the fingers. I will consider the shape
of them in this way. I mean, I will shake
my hand like this, like it's showing something
with the index finger. Then I'm going to
place the other arm next to the pelvis and the
side of the buzzy underground. It's like she's tilting back and throwing her
weight on her hand. Alright. I might even add some details to my work to make
it more complete. Even as an anatomy. I started from my
characters had, um, because I want to show
that the character that I'm creating right
now is a little girl. I can actually create some hair for her after
creating the ear. And then I can create a
ponytail for her like this. So I can emphasize on the fact
that she is a little girl. Although I've also emphasized
on her upper body part, which would be delicate. When we consider the upper
body part and the arms. Much more delicately. We are actually to
emphasize and going into effect of the gender of the character and
also the age as well. Then I will create
a color and I'll add her clothes,
t-shirt over here. Then. I would also create the
other arm in this shape. And then from behind the arm, I come down toward the waste. From the front area. I'll do the same. I create the chest and I moved
down to grade the waist. And then even with the
shape of my clothes, I can show the position, I can actually emphasize on
the position of my character. So you could see that our character is
sitting on the ground. So our clothes, our
t-shirt would be wrinkled over here because she's
sitting this way. I can also add the pants for the
character or even shorts. That depends on you. And now I am
completing the lake. And in here, I could also consider two lines for the knee. And then at the other
ligand this shape and in this position with
a line like this. So I will also create the second part of the
shorts and then I will complete delaying
the lower part of it and also the foot area. They should all be complete. Alright. This is our cute
little character which is sitting underground. One leg is stretched and
the other one is bent. On there. Her leg, which has been banned, should be created more volume because we want to show that the pressure which is actually
being applied on this leg. And we can show this
pressure better. These are the only
points that you've needed to know for creating a character in this
position and in this tile.
8. Anatomy of a girl when tying a shoelace: I love my dearest
friends and I'm here again with another
tutorial session for you. Well, in this session, we are going to create a
little girl together which is sitting and she's
tying her shoe laces. Alright. Obviously as usual, I start
with creating a general line, general actual line for my body. As you can see, I'm creating this line corner
arrays and sideways because the body should be bent forward in
order to get to defeat and can tie
their shoe laces. Surely, if she would want to be able to tie her shoelaces, she should bend forward. We'll create the leg which
is placed on the ground. And then I bend it like this towards the
inside of the body. If this is our main
action line of our body, we are going to add
the details in it. And first of all, we are going to start with
our character's head. Basically, this would be the first thing which
should be determined. And again, I say
we should consider that a little bit forward. So we can show this movement and motion and position
in the best way. Then I will determine the
direction line for the face. This way. I can also determine
the placement of the ear. Again, I say because I'm going
to create a little girl. I can easily add some hair to my character so I can show it
better and emphasize on it. Now we're watching
and we're seeing this character from a
side view this time. So almost from a
side view as you can consider by the
direction of the face. For, I'm going to consider a
general shape for my body. Then I would determine the placement of
the arm over here. The next thing that
I'm going to do is that in here I will add
the language should come up. If we consider this area, our pelvis and our
buttocks area. We can have the leg over here and we can bring it
toward inside of the body. In this way. Then we're actually
going to continue the leg close to our face. And then this would be
the tip of our knee. Then we will continue the rest
of the leg down over here. And then in here we
would create the ankle. And then we will have the
volume of our foot. There. We've created leg and
the foot completely. We are going to continue
the rest of our arm and then we will bring
it toward the foot. And even in here, we can create the shape
of our hand in this show because she's tying shoe laces. Their arm can also be
seen from this side. Just a little of that would be seen above the knee and
a little below the knee. I'm going to create my other leg which is
placed on the ground. So basically I just have it from the pelvis and then I will
shape it in this way. As I said before, she's sitting on the ground and she's tying her shoelaces. So this leg should be placed on the ground in this position. So I bought it can
hold the balance. And also you can clearly see the position
of the character. Alright, now I will add
the details to my work. Here we go. And I'm
going to continue here. Then I'll start from
my character's head. I'm going to work with at it. You can also do it with
your normal unusual pencil. Okay. I'm going to add some
hair to my character, it just in order to give it
some personality in shape. Now here, for example, we are having a braided ponytail because I just wanted to be different from
the previous one. So this time I've just
braided her ponytail. And then here I will
create some more shapes. So I can show the
hair in this area. Alright. Now I would want to add some more details to the
character like the clothes. Very easily, I can
create a sleeve for her. Short sleeve, as you can see. Like she's wearing a t-shirt. Then I move down over here on the back until we had the waist. And then I will ring declared spring
the t-shirt up to here, up to the part that
my leg is going up. Then here, I would have
changed a placement. I mean, I would have to
change the placement of my work and then I'm going
to work on the legs. I could also consider shorts for my little girl and then
with a curved line like this, I would also show some wrinkles over here
in order to show that our little girl is sitting
and her leg is on the ground. Then we could also create
some more curved lines over here and show the
wrinkles onto clubs in order to emphasize on the
fact that our character is venting forward in order
to tie a shoe laces. First, I'm going to complete
this leg over here, just closer to me as well. And then like that, I'll work all the way
down toward the foot, ankle and foot. Then. I would want to work on
the other leg as well. From here I'm going to turn it, make a curve and go down
until I hit the foot. And this one is
complete as well. Now after that, I'm going
to complete the arm area. And I bring the arm
down all the way down until I hit the rest. I'll complete the
shapes like that. And then I would want
to work on the fingers. And I would create domino ways. So you could see she is
tying her shoelaces. I can also get
some more shape to the face and other stuff. Depends on you. So this is our little
girl character which is sitting on the
ground and tying a shoe lace. And now I think it's
enough for the detail of the schedule of her
anatomy will be enough. Maybe just some more wrinkles on their shorts to emphasize on the fact that she's sitting
on the ground and that's it. This is our outcome.
9. The girl is crying: Hello to all of my
dearest friends. I'm back again with another
tutorial session for you. Well, in this session, we are going to create little
girl, which is crying. And she is placing one of
her hands on her eyes. And you want to see
how this can be done. Well, now we are creating her nose shape
that she's crying. But if you want your character
to be eating something, you can create your hand a little bit more
above or below. So because our character
is standing straight, we do not need an action
line for the body. But still if it's hard for you. After you've created
your character's head, you can create an action
line for your body. It can start from the top of the head and bring it through
the center and the middle of the head and then continue downward completely
straight there. That will be your action line. Now what I'm going to do, well, obviously I'm going to determine a direction
line for the face. Then this could all
are they also being considered as our
faces direction? Now, I want to turn
the waist a little to the side because my
character is crying. Her head is actually
a little bit forward. So we're going to start
the neck from here. We don't actually
consider an egg for her, so we will start
her body from here. And then because I know one
of the hands are going to be placed on the body, on the face. Actually. I'm going to
create it in this shape. Because our hand is coming
back up toward the face. On the eyes we can not see the upper part of the
arm or the shoulder. So this would be actually
from elbow down. This would be our wrist. There it goes, the hand
placing on the eye. We've actually turned and
bent down the fingers. So we will create the hand like this because we want
it to be more clear. We would also create a
general shape for our face. Therefore, you would
know our character is crying and she's holding one
of her hands up on the eye. Then we can also
add the shape of the hair in order to make
it more interesting. And also from here, from the side, we can add
to our character's hair. Therefore, we can emphasize on the fact that our
character is a girl. Also very cute,
tiny ear for her. And another one on this side. So it would be more obvious. Then. I can also at the mouth
over here to the face so I can give the feeling
of remorse and sadness and crying
more to the viewer. Now for the upper body
part of our character, we're going to consider
is shaped like this, a volume like this. And I want the body to be
turned a little from the waist. As I said. I could also take the other arm of my character to the
back of the body, behind the body and on her back. We could also create silver
or a curved lines like this in order to show the
wrinkles on the clothes. So we can emphasize
on the fact that our character is bending
forward a little. She's placing one
hand on the eye, the other hand will
go on the back, on her back basically. Then I would also consider
the legs a little bit bent over toward the opposite
side because again, our body is turned
from the waist, so they would go on the opposite way of
the waste, the legs. I mean, I haven't actually determine the
pelvis and then after that, the legs from the tub, I've created the
surface of my body. So you would know, even if you want, you can create your
work like this. But you should do it when you know this part is the chest, the lower part would
be the mid part and parts below that would
be the pelvis and so on. If you know the
placement of things and you can just create
them without any mistakes. You can just create the surface of your
body from the first. As I did over here. No more extra lines or
no more guidelines. Then I will create
the rest of the leg. The knee over here and
lower part of the leg. Just remember not to
get your body to match turned or too much
sideways because we have to keep the
balance of our body. If you pay attention. As we came down, we've turned the body just a little in order to show the turn and twist
and the waist area. But actually the legs are keeping the balance
of the whole body. So it should be very careful
to make them balance. Because our body
is a bit turned, we should have some turn and
twist in the legs as well. Then I will create the ankles and the
lowest part of the legs, which would be the feet. And this is our baby
girl character which is crying that they've
completed it together.
10. Three styles with simple anatomy: Hello to all of my
dearest friends. I'm back again with another
tutorial session for you. And in this session, we want to see how we can create a character in different
positions and styles. And how we can actually create a body in different types and positions or even in motion. Well, first I start with
a character that if you want to create and we
want to make it simpler, we can start with a circle. As my character's head. Again, I emphasize that
we are making it simpler. Then after that I
can create the body in the way that I want to. So for example, I want
to create the body and ashamed that she is or he
is stretching one leg up, hanging in the air. And then the character
is holding it, holding one of the
legs with one arm. So we need an action
line in order to see how the body is
going to be placed. This leg has been lift up
and also a little bit toward inside of the body
because we want to show that the leg is being
held by the hand. And the other leg will go
down toward the ground. Because basically
we should place the other leg underground
to keep the balance. Now, I'm going to
start with creating a general shape for the body
because as you can see, the style of our body is actually complex and
confusing as much as it is. So we would not want to create too many different
parts for the body in order to make it harder
or more complex. We just create one part
for the whole body. I mean, we are not
actually dividing the chest from the
pelvis and so on. We just move on with creating a no wall with
the shape of our body. And it's a bit
curved inside so we can learn different shapes
and positions of the bodies. Can learn them easier. Then very simply,
I'm going to create my arm like this toward
the leg, of course. And I would also
create delayed very, very simply because we just want to focus on the shape
and the position of the body. And you would not get
distracted because of details in the anatomy. If you want to bring
it into the details. Well, learning the process of this motion creation would
be a little bit hard. Therefore, we are using a very simple anatomy because
our whole point here, our whole goal here is
to create everything. Very simple. In this way. This other leg would
go on the ground. All right, We would also determine the direction
line for our phase, which if you want to create, would look like this. Our face is looking
toward this side and then your body has been
bent forward in order to keep the leg up in the air. So this is one of
the positions of the body which would be very easy and you would
see how it's done. Now, I'm going to
create another shape. The shape that I want to create, a position that I want
to create next is that it's actually
taking the hands up in the air and holding them up in the same
position as the body. And then the legs are bent. You can use it for
different positions. And with practicing
over and over again, you can even create
very new positions that you would like to do. You can just test them
on different anatomies. So first of all, I will determine the
direction of the head. Then an action line. I will determine the
direction of the body. And then there goes the
direction of the arms. One of the arms should
just be a straight. The other arm will go
behind the head like this. And it gets out of
this side of the head, actually goes through the back of the head and it comes
from the other side, comes out from the other side, and the other arm is
straight as you can see. Now, I'm going to determine the shape and the
position of the legs. I want one of them to come
down sideways and coronary raise a little downward
to the ground. And then the other one will be actually bent toward
the other leg, which we first created. Alright, for this
upper body part, I'm going to create a very, very general shape
looking like this. And if you want, if you'd like, you can use two
circles in order to show the pelvis and chest area. I mean, if you want
to know what would be the direction of your buzzy and which way it's
going to be bent. You can actually use
your geometrical shapes and your guidelines in order to make it easier for yourself. Both for this one and the
previous one that we've had. Now, I'm going to complete
the arms in this way. Then I would add the other one. Over here. After that, I'm going
to complete the legs. The other one would also
be created over here. The foot is coming
toward the left side. Now, these are two positions
that our body can have. We can have so many
different models and positions that our body
can actually perform. It can create so many
different positions with our characters bodies. In the next one, I want to create the
arms going around and then create von leg up
and the other one down. Actually I'm creating
my characters in the positions of
some kind of dance or maybe even some sports. Because these could be some complex positions
and shapes for your body. So obviously I start
from the head with the lines for showing the
direction of the face. Then I'm going to create
my character's body. Alright? Then I can create the
action line of the body. Because this leg is
placed on the ground and is supposed to keep the
balance of the body. You can actually
consider this leg as a tool that is determining the direction
line of our body. The other leg would
come from here, then it comes down like that. Alright, now, for the arms, I'm going to create
one of them up. And the other one would go toward this side,
toward this direction. And in this position. Now I'm going to
create the parts of the body and I'm going to
shape them completely. So this would be the
shape of my body. Because the body is turned and tilted toward this
side a little too much. And it's actually
holding the leg up. So this part of
our body will have a curve toward inside and
this side on the right would be a little bit
is stretched because the body is going toward the left side and is
holding the left leg up. If the body was turned or
tilted to the opposite side, this would obviously be
the indel opposite side. The left side would
be a stretch. But right now, it's
not like that. I can even show the shape
of hands in this way because we liked want
to emphasize the body. This body and this character is dancing or is
doing some sports. Just to give some personality
to our character. Don't forget all that we're creating here are
different characters. Now I can bring this other
leg a little bit more above in order to show that
it's bent from the knee. And this area is shorter
because it goes into perspective and it
would look shorter. And we can see most
part of the foot, not the upper part of
the leg because it's actually bending
forward, up and forward. Then I would create the
other leg in this shape. Because as I said before, this is the language
is holding and keeping all the weight
and balance of our body. And we would have to
foot of it like that. Alright, dislike is
placed on the ground. Also. From this one, this
leg is on the ground. And from our first character, this leg is on the ground. These are three
different characters in three different
shapes and positions, which we can also say. They are simple.
11. Acrobatic style with simple anatomy: Hello to all of my
dearest friends. I'm back again with another
tutorial session for you. And in this session we are going to create the rest
of this tiles, which are a little
bit more complex, are going to work on them
and teach them to you. Now I'm going to
create a character which is carrying something, is holding some things. There's some stuff
with both hands. There are some dishes
on the head and even maybe is holding or carrying something
with the leg as well. Obviously as usual,
we will start our character with creating the shape of the
head with a circle. Then I will determine the
direction of the head. Upward. Would also want to create some dishes above her head
and two on top of her head. So this character might
actually look up to see them. Then I will consider a very
thin neck for the character. And then I would consider
an oval shape for the body. Because one of the legs is
supposed to be bend upward. I will shape the body
this way a little bit. Again, as you can
see, a little bit, a body is turned backwards, actually bent backwards,
especially on the pelvis area. And then I will create jobs. And as I said before, we will have to
create some stuff, maybe some dishes on both hands. Alright. This leg is supposed
to keep our balance. Therefore, I'm going to
create it like this. And this would be the foot. So again, I say this
leg is supposed to keep the balance of our body and it's been placed a straight
lay on the ground. If both legs are up, obviously, our character can
not have any balance and it's not actually realistic
and it would fall down. I will create this other
leg a little bit bent. Then I bring it up. For here, I will
create the foot. It's like characters
running or walking. Now that the general shape of my character's body
has been determined, I would also create
this action line. Therefore, you would
know the body came down from here and is
actually facing us. And on the waist down, it's been turned
and twisted because the pelvis has also
been turned and twisted and it goes backwards a little because of the other leg which
has been holdup, which has been held
up in the air. You could also create some
circle for the chest. Therefore, after you
create your action line, you would know the body is
not completely facing us. On the top, yes. Obviously it's facing us, but as it comes down, it's been turned into is that. Now we're just going to create a general shape for the
dishes on top of the head. And we do not want to get
into the details at all. We just want to show
that this character is holding some stuff and is carrying some stuff on both
hands and even on the head. We just wanted to
show the position and the shape of the
body in this situation. Therefore, you would
know how it's done. I'm just going to create
several shapes over here as a representative
of several dishes. And I would also creates some of them on the
other hand as well. First, I'll create the palm, the hand actually
then like that, I will create several shapes as dishes or even some other
stuff in my character's hands. Then I would also. Create and general shape of
the bone model on its foot. It's going to be so fun. And as you can see, it's
a unique character, is carrying so many things
all at the same time. This is a character
in a position that is carrying so many stuff. Some dishes on both hands, a bottle on the foot, and some of them, some dishes on top of the head. Now I'm going to create another position
of the character which can be a little bit more complex if you want to show our body is actually
been placed upside down and is holding the balance
by one hand or one arm. Obviously, as usual, I create my character's head
with a circle. We will actually create and start all the
characters from the head. Because actually, in fact, the head is our main source for measuring the
rest of the body. And a big things is smaller things and even
the length of the body. That's why we will always start with creating the head
of our character. And you can also determine the direction of your whole
body based on your head. This would be our
character's head. Now I'm going to create
the rest of the body. And the only thing
keeping the balance of our character's body is one arm and one hand which is
being placed on the ground. Therefore, the body
should be turned upside down and it
should be turned upward. I will just create a
general shape here. It's something between the
novel and the bean shape. And in here, I'm going to
create circle as the pelvis. Because we would
want to know how our legs are going to be created when they are
not on the ground. For this front part of the body, I'm going to create the
action line of the body. Body is toward this side. And then after that, I'm going to create the
placement of the arms and legs. This arm is actually being
placed on the ground and is keeping the balance of our body. This hand will be
placed on the ground. So I'm going to create some shades over here in
order to show the ground. And then what I'm
going to do next. I am going to create the
other arm as well on the alphas side of it and on
the other side of the body. It's just that this
arm is actually been banned because I want to connect one of the legs to this arm. This part of our arm
can be seen very, very small because of the perspective that is being created in the
anatomy of our body. This arm and this hand
can be seen lesson short. This would be the
palm of my hand. This would be basically my hand. And again, I say
because I arm is bent, it goes into perspective. Then I bring one of the legs up. And then I can even
continue at higher or I can bend it a little tour inside and
that will be our foot. So this is one of the legs which has been coming
toward inside of the body. As you can see, it has a curve. Then I will actually bring this other leg toward inside of the body completely
and toward the face. Actually. Here we
will bend the knee. And over here we
would have our foot. This would be the
foot and the toes. You see how it's done. It's very, very easy. And with this shape that
you've created your body, you can also create
different positions. This is actually spores or a dance exercise
for your character because your character is keeping the balance
on only one hand. Alright, now I'm going to also create another shape for you. These were two different, more complex, a little bit
more complex positions. So practice these to add. I'm going to create a third
one for you in next session.
12. Continuation of Acrobatic style with simple anatomy: Hello. To allow my dearest friends, we are going to continue
complex anatomies together. Now, we want to work on a third style and
a third position. We want to see
this time how he's going to be our anatomy. Now, I want to create an
anatomy which has been bent. The arms, both arms
from the elbow. One of the arms would be placed on the ground in an L-shape. Antibody is turned upward. And again, we are
doing sport action. I'm going to start with creating the head
and step-by-step, we will actually create
the body together. Don't worry about it. I'll explain every step for you. This is the shape of the head. And I will create the
direction line for the head because our head is facing down so we can not see
too much of our face. Then F their debt. We are going to create
the shape of the body. And generally it's going up. Because our body is
going to be upside down and our character is
doing your hand is stand, standing on its, hence. Then I'll create
the pelvis in order to create the legs easier later. This part that we are looking at here is basically the
back of our body. So we can show it
this shape like this. Just to emphasize
on the fact that this would be the
back of our body. Then I'm going to
create the arm which is keeping the balance
of our whole body. Then I will place it
like this in an L shape. On the ground. This would be the continuous of the
arm and the hand. As you can see, this arm
is placed on the ground. Again, I say in an L shape. We can just see a little part of the other arm and the other hand so we can create it as well. And we just bring the other
hand on the ground too. Now, I'm going to create
the legs for our character. I want to create one
of them over here, bent upward in this shape. And then at last, I can create the foot. As you can see, this
leg is bent up. It's in the air and it's
bent as well as you can see. It can take the leg to the
pelvis and then we bring it up from the knee. Then we would have
the foot over here. Okay. And as you can see, our foot is also a
little bit curved. Then I'll create
the other leg in this direction and
in this position. As you can see, I'm creating this
other leg stretched out straight in order to
keep our bodies balanced. Because in this way, you can see that
your character can hold the balance very easily. Alright? As you can see, our body is up in the air by the use of the hands which
is placing on the grounds. Both hands are on the grounds and it's keeping the balance by the hands upside
down, as you can see. Alright, now I want to add
even another example for you over here from this
collection that we have here, which might be a little
difficult for you. I'll say difficult
and more complexed. Now, I want to create a body on their hands,
which is spinning. Actually. You can have this
kind of act in gymnasts. And this is a complete
sports action. So you can have
this if you want to create a character
who is a gymnast. Therefore first, so all we're going to create
a step like this. Alright, Any place
can be a step, stair or anything that you want. Now I want to create the
anatomy which is a standing on this step with the
hands upside down. So I wanted to
create a character, hand this standing
on this object. So the body would
be upside down. Oh, created in this shape. Then I'll create the
direction line for the face. And then I will bring the
arms down on this object. Therefore, the arms would
be placed on this object and the body should
be turned upward. As you can see. This is the shape
of the body which has turned up and it's
basically upside down. Then like that, we will create
the waste and come down. This area is our
characters pelvis. Alright. Now I'm going to create the shape of the
arms and the hands. You should create the arms a little bit
bend from the elbow. Because we want to actually
emphasize on the fact that our character is trying
to keep balance in the air. Therefore, we are going
to create the arms a little bit bend or sideways. So we can show our
characters trying to keep the balance of
its body in the air, just by two hands. Alright. Now I would want to
create the legs. The legs would go out from here, from the pelvis outward. And then I can also bend it
like this from the knee. And then at last I
completed with the foot. Then I would create the
other leg which comes out. This part. It's been moved over here. And then from the knee goes down and it goes toward
the head of our character. So you can see one of
the legs aren't getting really close to the head
in this shape, again, as you can see, the
foot is curved and stretched as well
in a point stretch. And again, I say
pay attention to create the arms a
little bit bent over or sideways in order to show the feeling of
your character as well. Because you want to show that your character is trying
to keep the balance. This is the shape
of our character. And it can use all
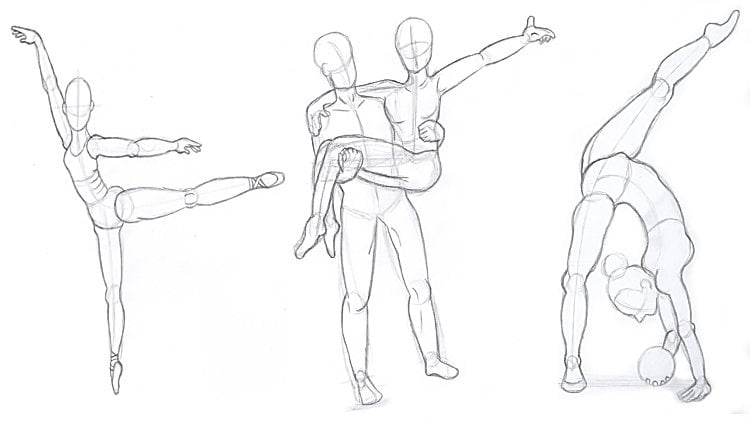
of these positions for sports actions are dancing.
13. Styles with another example of simple anatomy: Hello to all of my
dearest friends. I'm here again with another
tutorial session for you. Well, in this session, we are going to create styles and positions
which are very, very simple. Well, we are going to create
a body in this shape. I'm going to give
you an example. And then we are going
to create the bodies of our character in different
positions and styles. But I just wanted to show
you how we can simply create the anatomy so we
can work with it. This is actually a sample of the anatomy that we're going to create in different positions. This would be the chest
area of our character. And then with a shape
almost like an oval, we would add the stomach
area to it, or the waist. And then for our
characters pelvis, we would create a
shape like this. It's kinda looks
like an upside down triangle with rounded
corners and angles. Then we would create
the legs in this shape. And the other one would
be created like this. So we would have
both legs over here. And then I would work on
the lower part of the leg. You can have shapes like this. And then we would have
to create the fleet. And I'm just giving
you an example very, very simply of how
you can create feet. So this is a general shape of the anatomy that we're going to create in
different positions. We are going to work
with this body. And then I'm going to
create different shapes, different styles, and
positions with this anatomy, which is very, very simple. I mean, we've created a simple. So you could actually see
the difference, differences, and the variety in the anatomy when you're creating it in
different positions, right? First of all, I'm
going to create a person whose
body is being bent down toward one side and is like throwing something forward. If you want to create
an SME like that, we should have a
shape of the body. In this way. This actually can be our action line for the body. So we would know those erection and general shape of the body. Alright. First of all, I'll create my character's head on the
top of our action line. And our character's head
cannot be seen too much because when we want to throw something from back forward, their hands will actually, the arms would actually
cover the face, but we're just going to create
a shape for it for now. Then we're going to add the
chest area to the head. Then as I said before, I'll create the stomach area
or better say to waste. And then after that, it's time to create the
pelvis or the buttocks area. Which one you're more
comfortable with. You see, I've just came down on this line that I've
created at first, I've actually turned or twist my body on this
very specific line because as I said before, our body should has
a shape like this. And this line is actually
our main guideline. I will bend one of the legs towards the
inside of the body. And if it is bent, the upper part of the leg
will have more volume. Because this leg is being
banned from the knee upward and backward actually. And with this
increase in volume, we can show the
pressure and we can actually emphasize
on our position more than I'll create
the other leg. Because obviously,
our body should keep its balance with putting
one bag on the ground. It wouldn't fall for
keeping the balance. I'm going to create and place
this leg on the ground. So therefore, our body is
sideways and curved and turn so much it's
not going to fall because it has one
leg on the ground. Therefore, we can keep this
shape as you can see it. Now for this leg which
has been bent backwards, I'm also going to create a
part of the toes over here. I mean, I can see a
small part of the foot. And just to show that our leg is not certainly
cut off and it's been bent. So I have to create
a little part of the foot or the toes at the end. Then I'm going to create the arms which are throwing
something in this shape. From here, we will start the
arm getting to the elbow, then the lower part of the arm, which has been ventilator. And then I'll create
the other arm from this side or bring it out. Then again, I bend it too. It's like this character is
throwing something forward. And as I said, part of the face has been
covered up by the arms. This is the anatomy of a person who is throwing something. And we've considered
the simplest way for the body in order to shape this a style and
position correctly. If they have been creating a very complex anatomy
in this position, it might get really hard for
you or difficult for you. But as I said before, I'm going to work with
simple anatomies. Therefore, we can have more complex actions
and positions. Can easily do that. Alright? We're going to create so many
different models together, but right now, I just want to create another model for you. Therefore, you get more familiar with this
style of our work. This time I want to create an anatomy which is
sitting on the ground. What am I going to do? First of all, again, as the previous one, I will create an action
line for the body, which I actually determines the general shape and
direction for my body. This would be my
character's head, upper body part, and a part
of the lower body part. Then I'm going to start
creating my character's head. On the top of this line. I want to work this character from the
side view and in profile, and also in a sitting position. After the head. I'll create the chest. Then here we would have
the stomach and waist. And then I would at last at
the pelvis to my character. But as you can see, I'm actually bringing
the pelvis a little bit forward in this shape with
this curve and this angle. Now I'm going to create one
of the legs stretched out on the ground and the other one
bend and then on the ground. So I'll start from the pelvis. And first of all, I wanted to create this
leg of my character, which is being bent
from the knee down and then it gets bent on the ground. Also create a straight line to show the anatomy of the body. Actually to confirm it. So I can create the
foot like this. So my character is
basically flexing his feet, his foot and is placing one foot on the
heel on the ground. So again, I say it's bent
from the knee downward. And the other leg will be
created in this shape, stretched out on the ground. Then we would add the foot. This leg which is a stretched
out is behind our bent leg. And then I can place
one of the hands, one of the arms behind
the body on the ground. As you can see, I'm bringing
one of the arms backwards. And then I can place the hand
over here on the ground. And the other arm
can come forward. In this shape. Can have different positions depending on what you
like to do with them. There are solid
would be obviously behind the legs so
it cannot be seen. This is the anatomy of a person who is
sitting on the ground and keeping one leg up and the
other one's stretched out.
14. Continuation of styles with another example of simple anatomy: Hello, My dearest friends. As you can see, we are going to continue our tutorial on simple, easiest styles together and different and various positions. So we can have more complex positions and
styles with a simple Anatomy. Alright, now I'm going to create a character which
is sitting on the knees. And she is, or he is holding one hand toward the face and the other hand would be
placed on one of the legs. Well, obviously it's
still the anatomy in a shape which our body is being squeezed and it's
not too stretched. So first of all, as usual, I'm going to consider an
action line for my character. My character would have
a shape like this. Again, I say because
the body is going to be squeezed and the legs
will be added from here. Now I will start with creating my character's
head in this area. Then I would actually create the characters
chest in this way. Then I would create the middle
body part or the mid body, stomach and the waist area. Then after that, I will
add the pelvis area. Just like that. Alright, as you can see, our body is placed on this line. Now. One of the legs, which is toward us
and is closer to us, can be seen more. And obviously, we would consider more volume for the
shape of this leg. As you can see after
creating the pelvis, you should create this leg. And because it's closer to
us and it's more in front, it would be shaped like that. This is actually the
upper part of our leg. And the rest of the
leg is actually bend beneath this area
and we cannot see it. So we will create the foot and the toes
from this part down. Therefore, we can show
this leg is bent and is sitting on the foot or on the knees and we can not see
the lower part of the body. But when we want to
create the other leg, because this leg
is more in front, this leg would take a side view. So first we create
the upper part of the leg and then we
will bend this part downward toward the ground so we can have the
lower part of the leg. And then at last we will create the foot on this line which I've considered
for the ground. And this way you would
be sure to add your feet and your legs are
leveled as well. So that's it. That's the other leg. Now, what are we going
to do for the arms? As I said before, we will create one of
them in this position. And then in this area, we are going to bring one of
the arms towards the leg. This shape. And then after NAD, we can even put their
hand over here. Dan, what are we going
to do for the next arm? Well, obviously we will
bring it down first. And then from here, we will come up toward the face, as I said in the
beginning of our work. And now, you can also create a palm of your hand wherever
you would like to do. And you might even connected to any part of
the face that you want. It doesn't matter. The more important
thing is to create, is for you to learn
how to create the anatomy of the
body in this position. So now you would know how
you can create a body. Which has been squeezed
and is sitting like this. Now I'm going to work on another style and another
position of the body. I want to create a
position in which my body is lying
down underground and is keeping the legs
up in the air. Now how can we do that? We can start to work
easily by creating our bodies action line in a way that I will
consider a line like that. And based on your body that
how much is bend forward, you can actually turn
and twist this line. If you want your body
to look like this, and then the legs would go
up. It would be like this. If you want the angle
to be less, well, you can make this
line less angular. And we will actually get
closer to our horizontal line. And if you want it
to be vertical, we go toward this side. I'm going to create it for you and I will explain
it to you again. If you wanted to create
other positions, you would know how you can
move your work forward. Of course. I will
create my work. With creating the head. We're going to create the head as the shape
of an oval this time because we can not see all of the head and we can only
see the top of the head. Therefore, it would
be created like this. Then I'm going to create
two chest over here. And then what I'm going to do, because our body is
lying down underground. Basically we cannot see the stomach and the
middle body part. So right after the chest, I will create the pelvis area
that I've created. The pelvis area. I will bring the legs upward
like that in this shape. And then I'll continue
the leg in this way. Well, I could also create some
of the other leg as well. And I can actually bend it a little den for the
lower part of the leg. It can get closer to
our right leg again. Then I can bring both arms
from both sides on the ground. It's like the
character is relaxing. And the other arm will come out of the other
side of the body. So we can only see
this part of it. We can not see the rest of it because it goes behind the hit. And then with this
general shape, I can have the arms as well. Now, if you want the body
to turn toward this side, we can actually create our
line toward this side too. We can turn it or twist it. If you want it to
be more angular, you can turn it and twist
it this way and vice versa. So it depends on
you whenever and wherever you want to
turn your character. And wherever you want to
create your character, you can change it with
your action line. And then after that, you can create your
body parts and your anatomy on top
of that action line. So you would know how you can
improve your work and shape your character without
getting the character out of its main and original
and basic style. So this is another model of a simple anatomy in a
different position.
15. End styles with another example of simple anatomy: Hello everyone. I'm back again with another
tutorial session for you. In this session, well, we are going to create a
style together very easily. And we want to use our simple anatomy in another different or
various position. This time, our
character is standing with one leg on a step or stage. We want to see how our
character can do that. Well, I'll explain
it more later. First of all, as usual, I will use my action line of
the body so I would know if my character is actually
holding one leg up, high, w would be bent. So I will consider this line
for the body in this shape. Now, I'm going to
create my head a little bit more in
front of the line that we've created because
even the head is going to be even more
forward comparing to the body so we can create
it like this. Alright? Now I will start with
creating the chest, the upper body part. Of course, that will be
the first thing to create. According to my action line. I said because our character
is holding one leg up, the body is going
to be bent forward. So I should consider
that while creating the action line and
creating the body parts. After that, I will
create a stomach, which would be the
stomach of my character and also the back-end
waste of my character. I'm going to create the pelvis. And because our character
is bent forward and little, you can see that in
the upper body part, our body parts are
squeezed a little. So I will start my
pelvis from inside of the stomach area in order to show that our
body is been bent forward. Now I'm going to create
my characters leg. Well, over here. I am creating an oval
sideways to create the leg. Because this is the leg
which is used to be bent, which is supposed to be banned from Danny and would
be placed like this. And as you can see, it's bent from the knee. It's placed over here. And like that, I will
complete the foot. Now, this is a step
or stage which is beneath our characters leg. Can consider in this shape. And then I will consider the other leg completely
straight and a stretched. According to our action line. The other leg should go a little bit backwards,
not too much, just a little in order to
keep the balance of our body and based on the position of our pelvis and our action line. So this leg should
keep the balance. Therefore, it would be
stretched a little bit toward back. That's it. Then after creating
the whole leg, I will create the foot as well. Now, based on the line that
we have for the ground, you can actually check the
position of your parts. Now, I'm going to bring one of the arms backwards and the other one forward toward the leg
which is up on this step. Maybe even like our
character is doing some sport and it's
actually in sport action. So I would bring one
of the arms forward. This next to the legs
and the other one. The other arm could actually
be bent backwards like this. From the elbow, it will bend. Alright. This is the character which we can create
in this position. That is, a stepping on a step, can be a stair-step
stage, anything. So our character is a
stepping on something. One leg is up and the other
is placed on the ground. Now, I'm going to create a character that is
sitting on a chair. Wanted to see how
that can be done. Alright? We wanted to see how we can simply create
this character. First of all, we
should consider that our character is going
to sit on a surface. Therefore, the legs are
going to come down. So as usual, I'm going to create an action line for the
body downward at first, and then I can give
it an L shape in this area in order to show the place where
the body is setting. And then I would work on the
legs from here downward. Okay. I started with creating my character's
head, obviously. And then we can actually
bring the body a bit more backward or forward on this chair which
is sitting on depends on you. Which one you're more
comfortable with it. You should do that. Alright, I'll start with
my character's head and then I would work on the chest area
looking like this. Then we would work on the
stomach and the waist area. And then after that, I will create a pelvis and this shape. Okay. This is the anatomy of
our character sitting and I've just brought it a
little bit backwards. So it would be sitting
completely on the chair. If you wanted to bring
in more forward, you can create your
anatomy exactly on the action line that
I've created here for you. So it doesn't make any
difference is it depends on your own taste and how you
want to create your character. My character is completely
sitting on the chair, so it's been created a
little bit backwards. Now, I'm going to create
the characters legs. And something that you
should consider while creating a character from a side view is that when you want to create a character
into front view, you will have the chest area, the stomach area,
and the pelvis area. A little bit more volumes
and bigger. Bas van. Our character is
on the side view. If you're paying attention, you can see that of the body
parts are being created longer and more
stretched in order to show that position
of the body, the angle of the view, which is actually the side
view or the three faces view. Unless the body has
been stretched out. Even in front view. If the body is a stretch
out more than usual, you can consider your
shapes like this. This is something
that you should pay attention to while
doing your work. For example, in here that the body is a stretch
and the arms are going up. You can see we've created
the body parts thinner, longer and more stretched. But if the arms down, we're not getting up or the
body was not as stretched. We would consider the
body parts even more. And all of these
are because we want to obey and respect
our perspective. And I will create the other
leg on the other side of the body based on the one
which is closer to us. Then I can create the
leg area straight. I can keep it up in the air. For example, if the legs of your character are short and they cannot
reach the ground, you can just place them
up high in the air. Now, I will create this
arm that can be seen here. In this way. You can also create
the other arm as well. We can just create a little
bit of the other arms so our work would not look
just like one-dimensional. And you can show that
we have another arm on the other side of
the body. Alright? This is our sitting character. On any surface, it
can be a chair, it can be a bit. Any surface that you want. If you want to create your character
in a sitting position, it would look like this.
16. Anatomy of physique style of man athlete: I love my dearest
friends and we are here again with another
tutorial session for you. In this session we are
going to work on the styles which are a little more
closer to the real anatomy. You want to do that. We want to see how it's done to create more realistic anatomy. First of all, we are going
to work on the male styles. Wanted to see how they
are going to be done. Alright, really does start
with our head of the anatomy, therefore, create a skull
with the shape of a circle. Then I will draw this as skull. Then I'll be using a
guide line like that. Then I will add the
face from both sides. I will bring the jaw down, and then I will create a chin. We're not going to get into the details of our
character's head. We don't want to create too
many details for the face. Because we are working on the anatomy of the body and we want to make
that more realistic. We can just create several
lines with some angles in order to show the direction and everything
on the face would go. And then I'll create two
years on both sides, and that will be enough. Now. The first is that I
want my character to have is to place one hand on the waist and then Ting
one of the other legs. Therefore, the action line of our body is almost
going to be straight. It's something imbalance. We can actually turn our body a little in order to make our character a
bit more interesting. So I'll create the neck. And then for my
characters chest, I would consider an oval shape. Now, if our character
is supposed to place one of the
hands on the waist, we can consider the waste a
little bit turned or twisted. Therefore. We can also take the shoulders
toward this side a little. I mean, we can create
the shoulders, our corner ways like that. Because our waste is
going to be turned. This area would be the chest. Then after that,
from the shoulders, I'll be adding the volume
and the shape of the arms. I can create a circle for
this upper part of the arms. Why am I going to do that? Because I want the
person that I'm creating to be muscular, masculine. This way we can work on the
arms better and better. Right now, I just
created a general shape. And then later, I'm going to add more details
to the character. Well, the general shape would be that creating and working
on the hand like this. Because this arm is going
to be placed on the waist. We will make some distance from the body at first for the
upper part of the arm. And then you will
get to the elbow. And from the elbow down, I will bring the arm
again toward the body so we can put the hand
on the waist. Alright. Now I'm going to create the volume for the middle body
part from the chest down. And it would be like
this, this shape. And after that, I would create the pelvis for the
character. This shape. Alright, this is it. This is the general shape
for our upper body part. The other arm is
placed right next to the body in a very simple shape. And it's being created
very, very easily. And it comes down easily. Very simple. Now I'm going to
work on the legs. Well, for the legs, I set it to one of them is
supposed to come down a straight and the other one is supposed to be
considered sideways. So I'm just going to create this shape of
the legs in this way. And the other leg will go a little bit
further from the body, going toward this side. And then for the knee, I will create another
shape, a circle. Every shape almost a circle
to show the joint here. Then I will continue the
rest of the legs this way. Alright. Then I would create the
other leg going out a little for the ankle and for the fingers, which would be the toes. I'll create this shape
to complete my foot. Then I would complete the other leg as
well in this shape. Because this leg and this
foot is in the front view, I will create this other one, almost in the side view. This is a general
shape for our body. And now I'm going to work
on the details a little. So I would actually add
some details to it. Well, from the upper body part, I would create some
lines, several lines. And I will actually shape
the arms better and better. Over here. We can have
several lines for the arm. And just like that, we could add the
fingers and the hand. But because our body
is turned part of our arm and our hand is placed behind the body and
we can not see it. Dan, I would add some more volume to the arms
to the muscles over here. Then after Dad, I'll create
the muscles like this. So we can show a
shape like that. With the elbow. Then we would complete
our work like that. And after that, I will connect to hand to the pelvis area
because as I said before, we are supposed to
place their hand on the waist and then I can
actually create the fingers. We're just now creating
a general shape. Don't worry. For this part which is connecting
to the chest, I will shape this
area with some lines. Now for the chest area, I can create these two lines in order to separate the
chest from the neck. That will be the ending
part of the neck. Then I can actually use some other lines to show
the volume of the breasts, of the chest or the press. Because we are looking
at we are looking at. And athletic person
and athletic man. And he has lots of muscles. We can just create the shape
of the breasts and trust. Just like that. It's more of a chest. Then below the chest. I can also add some
lines to show that our body is very fit and
has lots of muscles. Alright? So we can
create several lines and a can be connected to the waist. We can actually do the same from the other side,
from the trust, we should come down
toward the waste, coming out a little and be
connected to the waist. Alright, now we can create several lines for
the stomach as well. In order to emphasize on
the muscles of the body with several lines
that we can create. From the top down. As I'm doing right now. With several lines, we
can actually create a six pack for our
athletic character. And this line in the middle of the body would be
created like this. Then. We can also consider an area for the belly button
and show it with a spot. And just with several lines
in the correct position, we could show the whole
volume of this body. So this is the upper body part. And now I am going to
move on to deluxe. Well, for the legs, I bring the lines down to shave the upper part of the leg. Then would create
the tip of the knee, the front part of
the knee like that. And then for the back of my leg, I would go down a straight. We bring the other leg
down as well. Same way. From below the arms, wherever we can see. We're going to bring it down. And then for the knee, I will add some volume like
this going down this way. Then I would have
the lower part of the leg toward the ankle. And then we can have the foot. Now, I'm going to
shape the foot area, which is actually the
last part of the body. Do not rush through anything. You can create a perfect anatomy for your character part
by parts, step-by-step. You can also create several
bones for the foot, for the feet in general. But I've just created the
placement of the toes. We don't only want curved
line at the tip of the foot. Now I would work on the other
foot as well. All right. This is it. This is the anatomy that we can create with more
details for our character. And it would just get out
of that very simple shapes so we can create a
complete character here. Now this is a perfect anatomy of a character which is
way more realistic. And you can also, with this line, separate
the legs from the pelvis. This is our anatomy and now
you can create this anatomy, the realistic one, indifferent
positions and styles. And can also create some more volumes and shapes
over here on the legs. Some lines for the
knees and above them. So we can emphasize on
the muscles of the body. Don't try to overdo it, keep it balanced and normal.
17. Anatomy of a boxer man: Hello to all of my
dearest friends. Again, we're another
tutorial session. I'm here for you. In this session. Well, basically we are going
to create this style and the anatomy of a person
who is doing box. It's like, for example, his boxing and he
is doing an action, maybe hitting something
with his arms. Alright? If you wanted to show boxing, our body should be
something between a three-phase says View
and side view I bought it should be in this
angle in order to show the motion of the
arms and the hands better. This way we can do that easier. First of all, we should
create the head a little bit more forward
comparing to the body. So I would just start
with my character's head. It's something between a
circle and an oval like this. Then after that, I
would add the jaw to my character in this way. So I would have a whole
character's head here. After that, I might even determine the direction
line for the face. And this way I can even find a placement of the
ear like this. Then from behind the head, from the back of the head. I would actually add the neck. Alright. Now I will create the front part
of the neck as well. And you should consider that our body is doing something special with the
arms and the hands. So you would have to show
this motion of the arms completely for one of the hands which is going to stay up and hitting with a fist. All you will start from here. This would be actually the
shoulder of my character. I would have a circle here. And I would also consider another circle for
this shoulder, but this time it gets Elizabeth
further from the neck. And then for the chest, I am going to have an
oval in this shape. Actually against something
between an oval and a circle. Now it's complete
of any of them. Now for the middle body part, I would add also
add another part. When we are hitting
something with our hands. We will actually drag the body a little bit
backwards in this shape. Actually, if you pay attention, our body has a special
angle and curve. Then I will add the pelvis area. Looking like this. Now we're just creating the
general shapes over here. And then later,
I'll come back and then add some more details. Now for computing the legs, for creating the legs, sorry. We are going to bring
one of the legs down and the other one should
be a little bit bend. Mean. It's better
this way because he's actually boxing
and hitting something. One of the legs should be straight and the other
one should be bent. Now, from pelvis down
this part of our body, I mean the legs. And again I say from the
pelvis down to body would be straight with come down
a straight bud venue. Look at pelvis up to the head. You can see the curve on
the angle in our body. We should consider this as well. You want to work
on your character? All right. Then I'll consider
a circle for the knee. After Dad, I will add the
lower part of the leg. Then there would be the ankle. And after that at last, create a general
shape for the foot with the heel and the toes. Now, I'm going to shape the
other leg again right now. Just generally am
going to shape it. And as I said before, this leg is supposed to be banned from the knee, of course. So the lower part of
the leg cannot be seen completely because
it's turned IT spend and it's moving
towards our first leg. So you cannot see the ankle or the foot
over here completely. It's been placed behind our first leg and we can only see a little
part of the foot. Now, I'm going to work
on the arms which are supposed to show our
emotion and our action. Basically, this is the most
important part of your work. So just like that, I'll create the arm from the elbow to our
wrist and our hand. We should have some
turns and twists. So first of all, we're going to show
a little part, arm below the elbow. And then this part would be
our fist that we can only see the fingers because
our arm is been turned forward from elbow down. You can only see a short part for the lower part of the arm. And then you can see
a fist that you can show with several lines as
represented all the fingers. Now, this is a general shape
for our hand and our arm. We can also create this r outer or more insight
and closer to the body. It totally depends on you and how you want to
create your position. I would also create this
other arm bent like this. And again, because our
characters boxing, this should also
be ready and maybe even going to hit anything, going to hit some thing, sorry. So I'll also create another
fist for this other arm. Now for creating the
details on our body. First, so we should
take a quick look. For example, I can say that our head can be a
little bit more straight depending
on the volumes and the shapes that we've
created afterwards. So we can bring the head back a little bit and
making it more straight. They can consider it this way. And just like that, you would complete
the work here. Alright. Now I'm going to work
on my arms muscles. And I'm going to show
them so proudly. And perfect. Okay. In this area we can
actually have some curves, some ups and downs for
our arm or our hand. Now I'm going to work
on the chest area. And I'll consider
it in this shape. So I can have this central
line for my buddy over here. And then from both sides, I can create the chest. So basically I can
show the volume with only one line. Then. I'm going to create the
shoulder like this with the lines which are
connected to each other. So I can show that our
arm has so many muscles. And just so easily we
can show its shape. Alright. Now for this other arm, we can even bring it upward a little bit more in order to
complete the anatomy better. So we can show this other fist. And because the fingers are actually going toward your
palm and inside of your hand, we can not see them, so we can know how
to create them. We would not create them. Just be careful about the
angle of your whole body. I mean, you should
pay attention that your body is in a
three phases view. So you should just pay attention to your position
and angle point of view. So I complete the muscles in the arm going all the
way back to the shoulder and now I can create the pelvis
area, the buttocks area. And I will connect
it to the legs. And I'll do the same from
the front part of the body. Basically, I can come down with these shapes that have
to use this for us. It can show this stomach area. It can actually separate
the stomach area and it can also show
the muscles that we have in different
parts of the body here is specifically
the stomach. Then I would have to
complete the legs this way. And then from the knee down, I will bring the rest of the
leg down toward the ankle. Alright. And then
just like that, I come all the way
down toward the ankle. Then there goes the hill
and duress of the foot. Alright. This is our first leg. And now we're going to work
on the other leg is bent. I'm going to work
on it the same way. Then for the back of our leg. From the point that we can see the leg and it's visible for us. We will create some lines
to complete our legs. And just with two small lines, I can show the placement
of the bones in my legs. That's it. This is our whole
anatomy and the whole body, which is boxing and
probably is hitting something with his hands
in the fist shape. Alright. This is a complete
shape and complete form of the anatomy for
our boxer character. And as you can see, it's another different position and his style that we can use for our character in
motion and inaction.
18. Anatomy of a woman sitting on the ground: Hello to all of my
dearest friends. And I'm here again with another
tutorial session for you. Well, in this session
we are going to create a female character
together which is sitting. And it's actually got the
legs inside of the arms. I would want to show
you how it's done. First of all, we
are going to create a line as our ground line here. Because our character
is sitting, Therefore, we should know where our shape should go and where it
should turn or twist. You want to show a sit in
character on the ground. Alright, now, with
almost a curved shape, I will determine the
general position of my body and I'll create my body's action
line here. Okay. This is the pelvis area. And as you can see, from the upper body part, which is the head, we will create our
line until the pelvis. Then I can determine
lines for the legs. Legs can be placed in
this position and angle. Alright. Now this is
the shape of our line, which can be in this way. And we can, if you want to create the leg more
bent and squeezed, you can bring the line more toward the action
line of the body. And if you want to make it
more open, more stretched, you can bring it further, depends on you and
how much difference you want to make in
this body shape. I'm going to determine the
placement of the head, which is our first step for
creating the whole character, would be the placement
of our character's head. Alright. Now I would add the
jaw area over here. Because our character
is a female. I can create the whole
work more delicately. Now. Can we turned
this way sideways? And this would be the placement and the direction of
our head is standing. It also determine the
placement of the ear as well. And then I can create
the rest of the body. Alright. First, I'll start my work with creating the neck. Budge. When we brought the face down. We cannot see the
front part of the neck because the head is
tilted down and forward. So just like that, we will start the general
placement of our arm. We're going to create that. Then from this part of the neck, we will come down. And it will create
the back of our body. Again, very generally,
not with so many details. I mean, then I continue this line down until we
hit the pelvis area which is placed on the ground
in the direction of my action line for the body should go in
the same direction. Now, the back part, it's been stretched and now the front part of our body has actually
been squeezed in. As the contrary of our bag
which has been stretched. So if this is the
volume of our chest, we are going to
shape it like this. And we're going to create several parts are
layers for the body in order to show that is
squeezed shape for our body. And then I will start
creating the leg. Just like that. I will bring the legs
from both sides up. And just like that. And here I will determine. Denise area. Create any and then I create
the list of their leg, the rest of the leg down. Alright. Now we can create the shape
of our leg like this, a little bit more forward and a little bit
further from the body. Both ways can be done
and they can be created. It just depends on how
much you are going to squeeze your legs toward your body or stretch them
out further from it. So that totally depends on you. Now I'm going to create a
general shape for the hand. I'm going to place
the hand on the leg. So I will come down
easily like that. And in here, arm is going to be turned toward
the opposite side. If it's the right arm, it's going to go toward
the opposite side. Then. The other arm can
be seen like this. We can have a little of its
fingers over here just to show the base of the hand
which is placed on our leg. Now because we want to show
the body and how it's placed, the position of the
body completely. I'll start the other leg
from behind of the body. This is a knee for
this leg and I'll create the other leg into place. Where is between the
arm and this first leg? You can create a second leg, more stretched or more
band and vice versa. That totally depends on how you would like
to do it and how much you want your body to
be squeezed or stretch. That totally depends on you. Alright. Then I bring this leg
down just like this. And then I will create
it in this shape. Alright? Now what I'm going to do, well basically, I'm going to move forward with my character
with some more details. If I start from our
character's head, I can shape the skull and the job better,
more cohesively. And the chin is actually
placed on the arm, which I'm going to create
with a line from here down. And we bring the
arm towards the leg and we actually put it
and place it on the leg. And as we move toward
further point, it will be thinner as
it comes toward us. It will be thicker. I mean, about the arm. The volume of the
arm would be seen more as it's closer
to us and it's, would be seen less
as it moves further away toward the other side of
the body and the other leg. Right? Now. And I'm going to do I'm going to create a part
of this arm like that. And then from the other side, I can create the other arm
in a very, very simple way. Obviously with
creating the shape of the fingers like
that on the knee. Okay. Now this is it. Then I'm going to consider
the knee in this shape. Now for the chest, for the chest of my character, I'm going to show some
more volumes like that. Then. I would want to
work on the curves, the ups and downs on the
belly and a stomach. Just to create some
layers in order to express on the way
it's squeezed. Then for the back, we could also create
some ups and downs. So I can show the shape and the volume of my
body more correctly. And then I'll move on to ground
and shaped body this way. Turn it upward. And then I come down to
complete the leg over here. And from here, I am going to bring the leg down
toward the ankle. As you can see, I'm extending the foot
little and as you can see, I am bringing the leg
towards the right. I'm getting it
closer to the body. Like this. Just in order to
make a difference and be more interesting. Then the other leg can be
created from behind this one. And it comes down, make a curve. And then we can
create the foot area. Alright. Now, even for this
leg, for this food, I can create another curved line in order to show the ankle. This is it, This is our
body shape which is sitting and is holding the both legs inside
of the both arms, which you have created
a step-by-step.
19. Anatomy of a lady style with open hand next to the body: Hello to all of my
dearest friends. I'm here again with another
tutorial session for you. Well, in this session, we are going to create a female character
together in a position that she is actually dropping something or
throwing something. You want to see how it's done. And the arms will be
aside from the body. I mean, they would be on
this side of the body. Okay. I'll start with my
character's head and I want to create
it in a front view. Alright, obviously,
first of all, I'll determine the placement of the head using a circle
as my skull area. Then I will add the jaw to the skull to have a whole
head, whole complete head. Now, because the character that we're creating right now
is a female character, we would definitely create
the head more delicately. What am I going to do? I'm going to consider a
general shape for the body. And then later on, I will add some details to it. Because we want
one of the arms to go toward left stretched out. Our body should be turned toward this side a little and actually going a
little up as well. Alright. So from the
neck we will create a sideway line on the
right it would be lower and on the left
it would be higher. So we can show the position
of the hands correctly. Then I will create the
chest area in this shape. Again, as I said, our body will be slightly
turned toward one side. Then I will add the
middle part to the body. Alright. Now after the
stomach and waist, I'll add the pelvis. This is a general shape of a female body character that
is sending very normally. Now we are supposed
to bring one arm up and stretched
out towards left. We should make some changes
throughout our body, as I said before. Just to make it
clear, first of all, I'm going to create
the arm this way. And this would be
the females hand, which includes the
finger and the Paul. And just created very, very generally
without any details. Alright. Now, what
are we going to do? We are going to
work on the armpit, bringing down
toward the breasts. And then I bring it
even more down toward inside toward the waste, and going out again
to create the pelvis. Because when our moved a little bit upward and
toward this side, the body should come a little toward inside and toward right. Basically. Specially if we want to keep something
away from our body, which is in our hands, so we can actually create our
body more toward this side. So it can show it. Alright. Now I will determine the placement
of this other hand. And then I can work
on the rest of the body and create
them as well. Alright, Here it is. Now I'm going to complete
the pelvis area so that afterwards I can add the legs just like that
for the pelvis area. I will determine the placement
of the legs over here. And I'll actually shaped
them a little. That's it. This is our second leg. Then afterwards I will
add the knee here. And also the lower part of
the leg will be continued. Now, we should consider that the character that we're
creating is a female character. Therefore, we would not create very muscular legs for her except the character that we're creating
is athletics. So then we can add some more muscles to
our female's body. Other than that, we're
going to create normal, a bit more delicate than
usual because we want to emphasize on the
gender of our character. So if you'd actually
create the feet completely as well with just separating some
areas for the toes. You can say the basis of your character is
being completed. Now, I want to make it a
little bit more interesting. I want to shape it in
a better way and add just a little bit of details
to make it more complete. To start from the head, we can place the ears on
both sides of the face. So our head would
look more complete. Or you might not do that. Doesn't matter that much. Now for my characters neck, I'm going to create the shape
of the arm in this way. Therefore, we can
show that the arm of our character is being stretched out and created in this shape. All right, Then I'll
be working like this. And when I get to the
wrist and the hand area, I can create the
fingers in this way. Surely I can consider
them this way. Then after that, I can
also create the thumb. And I would add them to
the rest of the fingers. As I said before, here we are only considering a general shape because we are only creating the
anatomy of this person. And we're not going to
work on the details. Okay? Because our body
is turned this way, we will create some more
curved lines over here and we'll make them more
prominent on the right side. Now, I'm also going to consider
several curves over here. Bring it down until
we get to the legs. For this part of the
neck and the shoulders. We do not need to create the shapes which we've
created on the left side because here the arm is hanging
down in a usual position, so we just straight
leg go down without any extra ups and downs until we hit the
wrist and fingers. But if you pay attention
for the other arm, we've created some
more shapes in order to show the muscles
which are keeping the arm up straight and
a stretched actually. Okay. Then we will create the
fingers in this way. Again, generally. Now I want to complete
the last part of my work, which is the legs. So I would come down from here. And in this part I will show
the bones of the knee joint. Then I move up from here. And in this area, we can create another
small curved line to show the knee better and
emphasize on it actually. Then we create the
lower part of the leg. We move toward the ankle and the foot will do the exact
same thing for this other leg. Because the procedure is
the same for creating legs. In the same woman. You can actually add some more lines over
here to show the ankle. So it can create some bumps or some curved lines
to show the ankles. And then we can move
toward the rest of the foot and the toes. Right? As I said, this leg is no
difference from the first one. The procedure is
completely the same because they are the same
legs from one single woman. Then I bring it to the knee, creates some curved lines to emphasize on the
joint of the knee. And so on. From the other side. Just the same way we can actually have this
shape for the ankle. We create the lower
part of the leg, we move to the ankle
and then we will create the foot for
this side as well. We can even see a
little bit of the hill. So you would actually
show our work is not only one-dimensional
and it's a 3D. For this front part of the leg. We can basically
show this area here, contains some toes and so on. We are going to create
it a little bit more shaped with curves on it. Just to show that there
are tos in this area can also create the heel for
this left leg as well. This is the general
shape of the body that we can create
in this shape. And you want to see how you can create a character
which is holding one hand up and stretched out.
20. Anatomy of a lady in yoga style: All of my dearest friends. We are here again with another
tutorial session for you. Well, in this session, we are going to create
several you go actions. So we would see how they are
done and how you can create a character in Sports
actions or emotions. Doing some activities. Sports activities. Start with several simple
shapes and actions, and then we move forward to
create more complex ones. So if you want to bend
the legs a little and we want the body to move down. We want to see how
we can create it. First. So I'm going to create my
character in a front view. And then because I
want to show how you should bend the legs, this is the best
view for creating. Alright. So I'm going to create an overall in general as a representative of
my character's head. As you can see, I
didn't divide it into two parts of
the skull and draw just graded one simple
oval as the whole head. Then I'll add the
rest of the body. So I start from the neck. I can bring one line down completely straight from
the center of my body. Because this guideline
will actually help you to keep your
body is straight and do not bring it sideways without
any reasonable reason. And then I can create the
upper body part in this shape. I can create one of the arms
toward inside of the body. So I would first
create the chest area. And then after that, I would work on different parts, like the stomach and waist. This is a male body part. And then at last, I would add the pelvis or the buttocks area and
can have them this way. Now I will determine the
placement of the arms like that very easily from the
shoulders will bring them down. Now, you should pay attention. If the character that you're
creating is athletic. We should create wide
shoulders for her or him. Later when I want to work on
the details of this anatomy, I would work on this area more. Don't worry. Right now we're just
creating a primary shape and the basis of Deanna to me. So DRM would come
down from here, from the elbow down it will
be turned toward the body. Alright? And like that, we will create the hand in
this general shape as well. Okay. Now, I want to create the other arm going
toward other side of the body and up a little. Then I'll stretch the arm
out towards right side. As you can see. She's keeping her hand and
her arm up in the air. I can even bring the
thumb toward the palm. So actually the legs are supposed to bring
the body down a little. And it's supposed to show
that actually inaction. Therefore, we should create the legs in this position and in this way because we
should bend the legs down in order to drag the
whole body down with it. If you want to show this motion. Then I will consider the
lower part of the leg, this side and then
this position. And in this shape,
as I said before, I'm just creating
very general shapes. And then later when
we want to work on the details on the work, I'll make it more complete. I mean, not that kind
of details, you know, I would just shape the body better and making
it more cohesive. And I'll do the same exactly. For the other leg. I'll bring it up to
here and from here, it will actually the
lower part of the leg will go toward the other leg. Actually move toward the
other leg and I create a foot behind the other foot. Now as you can see, our body has been dragged
down and knees are bent. Now, I want to shave my
character a little bit better to make it more cohesive and add some more details
to this body. Well, basically if you want
to start from the head, we can have the ears. Can add the ears here. And then for the neck, we can have lines like this. And then we would
have the neck and the shoulders area in
this very athletic way. So we would consider
wide shoulders for her to show
an athletic body. You can also create
several lines over here to show the bones coming out on top of the chest. Then for our character, we can create a sports clothes in this way. Alright, now, in order to show the chest and the breadth of our character better and more. We will create two
curves on the sides. And because this arm
is stretched out, this side of the
body is not formed. And it's not coming out. Too much, doesn't change
too much basically. Then with two more lines, we can emphasize
the breasts on her. And then for the arms. We cannot get too much
into the details, but we can make it look
better and more cohesive. So we would create
the lower part of the arms until we
get to the wrist. And then the hands. And the hands, we can just add the placement and the shape of the fingers easily
with several lines. And then we can create our
other arm the very same way. Here we go. We get to the wrist, fingers, and even the thumb. And we would come back
toward this part of the arm. Okay. Now I'm going to shape the
waist area very easily. I will consider a
thin waist for her. And I would do it
for both sides. And then I can finish clothes and my lines over
here in pelvis area. I can complete my work
for the legs as well. Just like that. I will turn the knee area and then I would
work on the ankles, the toes and whole foot over here. Heel. And then I would go back up again toward the top of the leg. And in this area, I'm going to turn the leg, make it a very, very deep curve. So we would show our leg
is bent from the knee. And even in this area, I can bring some
lines toward inside. And we can just create these kind of curves lines in
order to show that there is some pressure on the leg and the muscles are showing
more than usual. All right. Then after creating the knee, I will go to the back of the
leg and I just bring it up. For this part. Again. We can create a line like this. Better to say some
lines like this. And we can see a little part of the other foot behind
our first foot and leg. So this is one of the
actions and emotions support motions that if you
want to bend the legs, you can create your
character all in this shape.
21. Anatomy of a lady in bridge style: Hello to all of my
dearest friends. I'm here again with another
tutorial session for you. Well, in this
session we are going to create another sports action. So we would see how it's done. Alright, well,
together we want to create a more complex
action or emotion. And you would see if our character wants to
do a special action. How she can do that. Alright, first of all, I will create an action
line from top to bottom, from the legs toward the head. And then would turn I bring it down to
the other side, as you can guess, it's shaped like a use. So it's the bridge
action from the yoga. Actually we will have
an upside down U shape. Alright, now, on this action
line that I've created here, I will execute my body. Because this time the action
is a bit more complex. I will start with the legs, because the legs
are underground. And from here, the head
is not on the ground and actually the arms
are placed underground. Therefore, we start from apart, which is more stable, and underground,
which are the legs. Alright, I'll start with creating the parts in which
legs are on the ground on. I'll start with the leg
which is closer to us. So first I'd be
creating the foot. And I will create it easily. And then I will create the lower part of
the leg and shape. Alright. Now in this area, I will create the knee. So first we will create this leg completely until we
hit the pelvis area, and then we will add the
other leg next to it. Now, because our body has lots of flexibility and
it's in this shape. It's so flexible. We are going to show it like
that and we're going to actually turn it
toward this area. Therefore in here, I
will add the pelvis. And because we are creating
the body in the side view, we can actually use circles and ovals because we are
going to show the body is stretched and
it's also turned. Alright. This is the waste and
the stomach area. That's because they are turned and they are
in this position, there are going to be considered completely
stretched out. This is the chest area. Then after that, I will
create the arms from this part and I will shape them in this way. And then in here, I bring it completely
straight down. Then I will continue
that leg so I can know where
would be the hint. I mean, where should I
place the hand over here? It should be on the
same level as the legs. Alright, now that my body is a stable with the legs on the ground and the
arms from this side, I'm going to create a head, which is going to be somewhere
about here, actually. Almost from the part
that our armies starts, we would have our head and it's almost at the same
level as our knees. You can just measure it with
each one of these parts. Alright. The head would be
placed over here. And because the rest of
it is behind the hand, it can not see it clearly. Now we are going to create
the other arm behind this. It's, it cannot be
seen completely because we are looking
at our body from the side view and most of it is covered by the hand and
the arm in front of us. But we will consider
it over here. And because it's further, obviously it should
be a little shorter. So we can have a
correct perspective. Then we create a
straight line from the hand toward left side. So we can create the
other leg as well. And here it would be the foot would be the
end of this other foot. A little bit of the toes can be seen from this area as well. Alright? Because we've
created this shape, we are actually
going to consider the legs a little
bit more curved and bend so that we can show
our body's position better. Therefore, I am going
to create the knee like this and a little bit bend forward more than
our primary sketch. Then I turn it on, go up to reach the pelvis. Forward of ****,
this I would have the buttocks area over here
behind our body on the back. And then we will complete
the leg like this. It's connected to the
pelvis and buttocks area. Then for the front of the body, I'll just do the same. I create all these parts
completely stretch toward the chest because our body has been stretched and it
has a good flexibility. I can even create some
prominent part over here in order to show the
chest and the breasts. At the same time. I'm Dan, I am going to
complete the back her back completely toward inside
and then outside again. And in this area, I can create my
characters clothes. Okay? Now I will consider
different parts of my body. With more muscles,
especially on the arms. I will create more muscles because I want to show
that there are so much, there are some, not so much, but there are some pressure
on the muscles of the arms and it would be good
to shape them more. Then I will reach the
wrist and the hand, and I will create some
fingers over here. Actually, not that hard
when you do a step-by-step. It can actually be easy
and enjoyable for you. Then I will consider
a general shape for the fingers of the other
hand and go up for it. It's arm. Forward ahead. Basically, I can create
some shapes like this in order to show
our characters hit. So we can add the ear over here. Maybe even we can create
some hair for our character, determine the
placement of the eyes. And actually we can bring some of the hair
down, hanging down. So we can show that
the hair are being pulled down toward the ground because of the
position of our body. This way you can make your
positions more realistic. This is another action that
you can use when you are creating people who
are doing a sports. This is our complete
bridge action. And over here we can also create some lines to show
the ankles. Actually. Here we go. This way, some
curved lines to show the ankles and maybe even add some more
details to our work. That's it. This is our whole character in bridge shape
or upside down U.
 Amelie Braun, Artist & Cartoonist