Transcripts
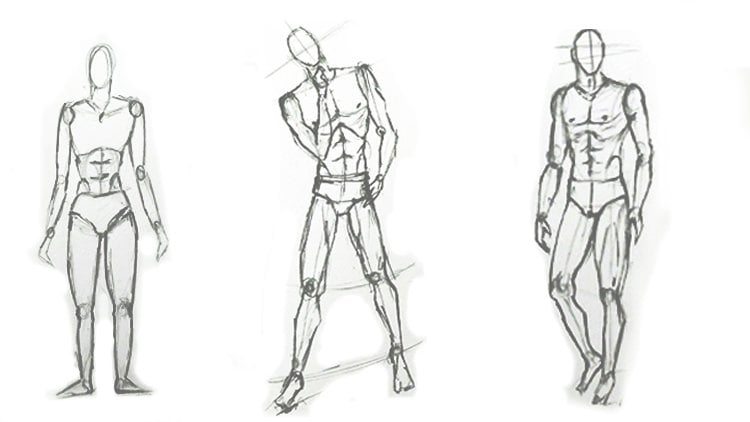
1. Introduction: Hello everyone, Welcome to elementary human bodies
anatomy is sketching course. One of the most important
skills of sketching the human body is learning the anatomy of the
body methodically. This course, I have taught you different types and models of male and female anatomies in various ages and positions a very methodical, yet easy way. In this course, my goal and
focus is on human anatomy. Therefore, I avoided creating
any details for the head, face, or the body. One of the main advantages of this course is a tutorial of basic and primary sketching of the anatomy with
geometrical shapes. And then some general
anatomical details will be added to the primary
sketch to make it complete. I hope this course will be
helpful and useful for you. And you would enjoy it the most.
2. Equipment: Hello to all of my
dearest friends. As you can see, we
are back again with another tutorial course for you. In the beginning as usual, we're going to review
the necessary equipments for this course and then we
can learn them together. First of all, we
start with B pencil, which is actually the base
of all of our tutorials. I will use B0 and B2 pencils, which are actually our
fundamental equipments. And I want you to use these because in the beginning of our work we have to
create very light lines. And in order to do that, we should use lighter pencils. Therefore, B0 and B2 are
the best options for us. And then later, if you wanted to make your lines
darker or bolder, you can use other pencils. We can also use an exit
for here for our work. For example, if we
wanted to create very fine and delicate lines, we should use eta. It's because it has a very, very sharp and thin tip. So we can do this easily. We can create very
thin lines with it. Then for using it, we also need elite over here. And just one thing that you
should pay attention about it is that when you
are using your edit, you should really
pay attention that your lead will
match your edited. If it's 0.5, your edges
should also be 0.5. Also have 0.7. And then even your
lead can be B2. Therefore, you can create very lighter lines
out of your work. After the pencils, we
also need erasers. Obviously, the
most useful eraser for us is dirty eraser
that we've got here. Because it can change into any shape that we wanted to be. At the same time as we
are erasing a surface. It doesn't give us any trash and any extra
ports of the eraser. So if we would not
drag our hand, all of our work and basically our work would be much cleaner. So this is really
necessary and I always advise you to require it. Then we have our edit eraser, which is also not useful for us because it has a very
sharp tip, thin tip. And it's usually used for
places and spaces which are small and they can no spirit
really erased with Doris or, or other kinds of erasers. It has two kinds. Actually, it has so many kinds. I have two of them. One of them is like this
that has a very sharp tip, and another one which
looks like this. It has a triangle tip. Therefore, you can use each
corner of this triangle, use it's sharp edge, sharp tip. And you can erase the
parts which are so delicate or you want to erase
apart just point by point. But any kind of them that you
get it will make your work. Do. We have another kind of
erasers like this that it has a brush at
the other end of it. Therefore, we can actually
blow off the extra ports of the trash and eraser
parts of our work. But these are actually very
rigid and stiff erasers. They have very rigid tip. So be careful, you should pay attention wherever
you want to erase, somewhere which you
need more softness, you should use edit
eraser or eraser. But if you want to
erase anywhere, heart and your
line got too dark, you can use more rigid erasers. I always suggest you to get
a sharp narrow like this, which has apart for
containing the trash. It will save your time. Basically. I would also advise you to require a pencil holder because as you sharpen your pencil
and it will be smaller, this pencil holder will
actually help you a lot. Therefore, bend your pencil
is very small like this. You can put it in here. Put it in pencil holder, and it can grab your pencil
for you just pay attention. A part of it is very small for smaller pencil and the other end of it is bigger
for bigger pencil. Then with this grip, you can make it loose or tight. It will be of a
great help for you. We also need a paper. Obviously, you can either use
a four or a three papers. You'll also need a
board underneath your paper and therefore you
can fix your paper on it. And these are all
the requirements that we need for this course, for this tutorial course. And you can just equipped them.
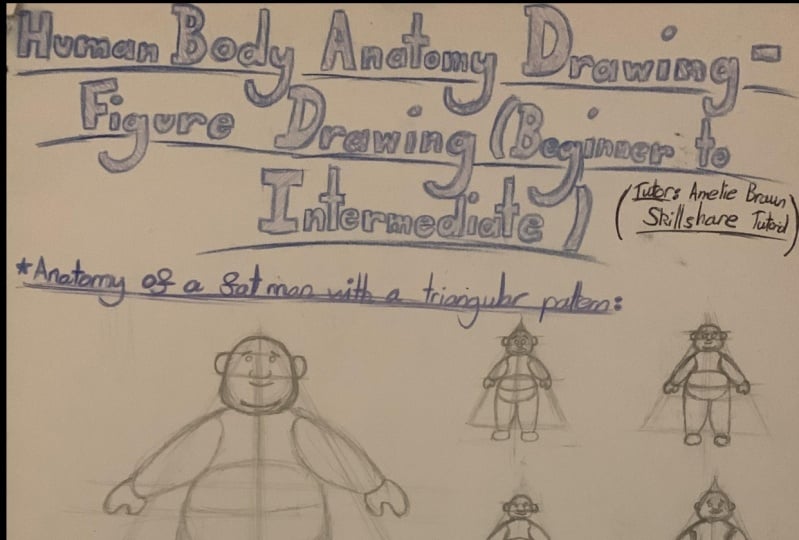
3. Anatomy of a fat man with a triangular pattern: Hello again to all
of my friends. We are starting our first
session of our anatomic course. This session we are going
to start out work with the simplest anatomies of all. For starters, I'm going to
create a guideline. Obviously. I can actually start my work. And I will create it in order to make our
anatomy symmetrical. Both sides will look the same. All right. I'm going to use the simplest shaved and I'm going
to use for my anatomy. I'm going to start my work
with a triangle shape. Therefore, I'll create a
horizontal line like this. Then after that, I will connect both ends of this line
to this top point. I would have my triangle would do the same from
the other side as well. Just go up like this. Dan, I'm going to create
my anatomy inside of this triangle, this shape. That first of all, we are going to create our head inside of the
tip of our triangle. Exactly here as I'm showing you. We have chosen this
side for our triangle. Because we want our
character to be a fat or better to say an
overweight character. Right now I don't want
to consider face for it. Any neck because I want to show that this
character is over rate. I just move on to
create the body. Right after creating the head. You are creating your
body in your head. You should definitely compare
it to your guideline, refer to it so he would
see everything and it's right placement
and in its stride size, this would be the chest, this would be the
middle body, mid body. Obviously. I am going to create
the buttocks area. Alright? Now I'm going to add my
character's legs like this. And if you pay attention, you can see that we are
creating an overweight person. Overwrite character. Therefore from here down, div volume of our character's
body will just be considered more as we have
done in our triangle. As you can see,
I'm just creating very general shapes just in order to show the
fat of our character. I don't want to add
any details right now. Then I will add these
lines over here. Feet at last. We should create everything
simple because we are just creating a general
anatomy and structure. And we do not get into
the details at all. Just like that. We can create our anatomy. Now I'm going to work on
the character's arms. And again, as you can see, I'm creating big hands and
arms for our character. This would be the arm
and the hand completely. Then, with the use
of a guideline, I'm going to create
the other hand with the same size and
in the same shape. Now I would also create the other hand and
arm all in one shape. The best thing that
you can do is to use guidelines for the
things which you want to do on the other side of
the body, whatever it is. Because in this way, your work will actually
be more symmetrical. Both sides are more
likely to look alike. And I will complete
hand as well. All right, Now
that we've created our base and general anatomy, we can work on the volume
of the face a little. We can actually make
it more complete. But again, I insist we do
not get into the details and we're just grating general
parts of our work. Our sketch. This showing that the
character that I've created is over race or fat because I create this curved line in
order to show some fats here. I can also create
my characters ears. Considering my guideline,
I'll create it on both sides. Again, I say this
curved line is to show some fats beneath chin
and on the throat. Just like that I've
completed my anatomy. I can also determine some general shapes for
my character's face. Just as much as I want to show. My character has some
face parts That's, that will be enough. No details. Very, very generally. As you can see here. That's it.
4. Athlete Male Anatomy with Triangle Pattern: Hello again, my dear friends. We are back again with another
tutorial session for you. This time we are going to
use our triangle again, but this time we want to
create a masculine character. Therefore, we are going to place our triangle upside down. So I create my horizontal
line on the top. Then, where the guideline, I'll just divide this
line into two parts. Actually dividing it. Then I will connect these two corners
and two ends of my line down to this point. I would also do the same
from the other side. I'm going to complete
my triangle downward. Alright? I'm going to determine
the placement of the head over here onto horizontal,
horizontal line. Because again, I'm going to say character is a
masculine character. So it should have
very thin waist. For our character's
face on its head. We're going to create
also much thinner shape. Because we want to show that
the character that we are creating is actually
the character of a very masculine person. We almost consider several, actually one oval for
our character's head. Then we will consider
a neck for it, because this time it's
going to be masculine. And then after that, I will consider shoulders
for my character. Because it is more
athletic character. It should have big upper body
comparing the lower body, or in a mid body from
both sides, I come down. You should consider
that as we are coming down toward the base
of our character, character should get
thinner and thinner. We will just follow the shape of the triangle in all aspects. In all parts. This is my characters waste. Then I'll consider a very, very thin and small bottom
area for our character. Again, because we are
creating a character with lots of muscles,
more athletic. You are going to consider very thin legs also
for our character. For the same reasons, obviously. Going to create these
legs in two parts. Exactly. The contrary of our previous character
that we've created its hands and legs all
in one same shape. This time. The legs should
actually show their muscles. Therefore, I'm going to
create them in two parts. As you can see. From Denise, leg will come down. And it's really created
more with more muscles. Then for the ankle. Then for the foot
or better say feet. I'm going to create
a shape like this. As you can see, I'm creating it completely thin. Therefore, it will be actually adaptive to
the rest of my body. I'm going to go back and
create my character's arms. Again, I say you should consider
that this is an athlete. Therefore, you should
create DRs with very big muscles and you
should show them completely. One would be here and
again from the elbow. Separate our arm into parts. Both of them are
Megan masculine. Because I want to show that
my character is an athlete. I would also create
its hand like this, very small and tight. I'm going to use a guideline because I want to
create the other arm on the other side of the body and its correct placement
and it's correct size. I will also creates
our little lines here as my guidelines so I can complete this side of the body as well as I
did the other side. I would also separate
this arm into 1.5 above elbow and the
other one below it. I would complete
all my arm parts. I created hand again, exactly the same way that
we did for the other hand. Created a squeezed and small actually show more muscles
on our character's body. Show the trait of that person. Going to determine
the placement of the ears as well on the head. Looking like this. Then after that,
I can even create a very general shape of the
face parts for my character. Just enough to show, okay, this person has eyes and nose
and mouth and everything. That's it. That's our
second athletic anatomy that we've created like this.
5. Anatomy of a fat woman and an athlete woman with a triangular pattern: And large on love
my dearest friends and back again with another
tutorial session for you. In this session, we
are going to use very simple shapes to create a general shape for
our female characters. Wanted to see how different they are comparing to the others. All right, I'll start
with creating a triangle. Obviously at first triangle facing upward, normal triangle. I might say. Just like that, I will
create my triangle. Then for creating
the triangle easier, you can create it like this, or you should consider
this lower line. Or if you want to create
it upside down upper part. Basically you should create your horizontal
line and then you create a guideline in the medulla of that
horizontal line, just to divide it
in half, go up, and then connect the two
ends to the top point. This way you can easily get
to your triangle to work. From this top part, I will determine my
character's heads place. And then I would
come down because we are creating an
overweight character. Therefore, this would be my character's head and then I'll come down to create
the overweight body. Determine the placement of my
head over here on the top. Because I want my
work to be easier and I don't want my work
to be symmetrical. Inside of the line. I won't just create a guideline here for making
your work easier. Then with a circle, I will determine the placement
of the head over here. Then I can easily create jaw to it. Then I would also determine
the placement of the ears. Done exactly the same way
for male characters as well. With shaping them in triangles, ovals, rectangles, and etc. Now we are doing it for our
female characters because my character is
fat or overweight, I do not add any neck for her. Then I will create my
characters breast, which looks like this. Then I will determine the volume of the
hands from both ways. Looking like this. Because our character
is overweight. We will use one simple line. Then. The volume, all of the
fingers and the hand itself. Then I'm going to use a
guideline in order to move straight to create the same arm on the other side with the
same size and the same level. I'll create the arm
and a line over here. Come down, I am shaping the arm. This would be kind of a
you can say my wrist. I would also get help from a
guideline over here as well. Guideline is basically an
imaginary line that we only use it to create our shapes in
their appropriate place, in their correct
position and size. We would have to use it. In order for us to work
on our characters. Stomach waste and buttocks area. We come down from this mid
part from the chest down. Over here, we'll
consider an oval shape. As you can see, I'm
doing great here. Then. I will determine the placement
of the legs over here. I will create them downward. I bring them downward actually. Then I'll do the same
for the other leg. Now I'm having both
legs over here. It's very easy and simple. Should just be careful a little. Now because our
character is overweight. We should bring these
lines down so we can show that our legs are
also fat and bake. All right. Then we create defeat as well. This is our character
that we have created with a triangle
that v have here. I'm going to create an
upside down triangle in order to show a woman
with more and more cells. Exactly On the
contrary of this 1. First of all, I create the horizontal line
for my triangle. And then as I told you before, I create an imaginary line
or a guideline into misery, love my horizontal line. And then I connect
the two ends of my line to this
point on the bottom. Now because my triangle
is upside down, I will create my head
here on the top. And then we will use this
triangle to create its body. And we want to show that
this female is masculine. It has more muscles. She has more muscles. Because we don't want
our character to be corner raise or dissembled. I will use this guideline to create my character
in a straight shape. Then I'll create a
circle for the skull. Then later I can add the
jaw to the character. Otherwise, we can create
our head in one shape. Just be careful because we are creating a character
with muscles. We have to create Nick
for our character. This would be the
placement of the ears. Then I'm going to determine
my characters neck. I'll shape it like this. Again, I emphasize we do
not create any neck for a fat or an overweight person for a person who is
athletic and in shape. And when muscles, we are
going to create the neck. Then I would create the
shoulders for my character. And as you can see, I'm creating two
wide shoulders for our character
because you want to show that she is athletic. Didn't do that for our
overweight person. And as you can see, we've just created the arms
right from the beginning. These are the differences
between a person who is athletic or a person who
is overweight a little. All right. Now I'm going to create
the chest over here. Then. We will create a waste
very, very thin. As you can see, our triangle is guiding
goals to create the waste thin and not as
wide as the upper apart. So we would have
waste like this. Then we create the buttocks
area a little bit bigger. Looking like this. Then I would also
create the arms. Because we are creating
an authentic person. I'm going to create
the arms into parts. I will actually complete
it in two parts. Alright, now I'm going to use a guideline and I'll determine
the other arm as well. Where should it be placed? I would work on this
other arm as well. And then after that, I will work on this
lower part of the arm, the elbow, and the rest of it. Then I will create
the wrist in this shapes so I can show my
character has more strength, more muscles even in this area. Looking like that. All right, now for the legs also, I'm going to create
completely masculine legs. There should be completely
filled with muscles. And again, we are going to
work two shapes for our legs. One for the upper
part of the leg and the other one for the
lower part of it. We also create the
lower part of the leg a little bit thinner
comparing to the upper one. Just you should consider that we can start
this area from here. You can show the
muscles, perfect SLI. This is really important. Then. I'm going to work on the feet
as well as simple as this, the procedure is basically the same that we've used for our
male characters just sat, it's different in
the breast area. We can also use guidelines to
make sure that our legs and our arms are in their
correct placements. So this is our athletic woman. Female, and the other one
is an overweight female. That's it.
6. Anatomy of a man with a rectangular and oval shape: Hello to all of my
dearest friends. I'm back as usual with another
tutorial session for you. And as you can see
in this session, we are going to work on the other geometrical
and simple shapes and we're going to use them
to create our anatomies. This time, I'm going to use a vertical rectangle like this for creating
my next anatomy. Because I want to
create a thin person. Therefore, create a very
thin vertical rectangle. Alright? I will place my body
inside of this rectangle. And because I want
you to work easier, I would say we can create a guideline exactly in the
middle of our rectangle. Then we would place the head as the shape of an oval on the top
of our rectangle. Very easily. In this way. I will add my head to my work. I'm going to create the
rest of the body parts. According to the head
that I've created here. Consider a very
thin neck as well. And then I will create
the upper body part, the shoulders, and chest and stomach until I get to the waist area with a
very general shape. Then I will add
the arms this way. Then I'll create the
rest of the arm. From elbows down. We can use our
guidelines in order to create both parts of our bodies similar and in
their correct position. Therefore, we would have
a symmetrical anatomy. It's always good for you
to use the guidelines so you can check your work or
create them in the beginning. Then I would want to
create my hands over here, one on this side and another
one on the other side. As you can see, we are just creating
the shapes in a general way and we do not
go into the details at all. Now I'm going to add
the buttocks area. Then I will move on to
my character's legs. Looking like that. You can consider the height of your character short or tall. Right now because we're just creating a general
shape in order to show that how you can create an
anatomy inside of a rectangle. We don't want to use too
much variations here. We are just creating a
sample here for you. Otherwise, you can create
so many different shapes inside of the simple
rectangle over here. Therefore, if you'd like, you can create short
tie it or told one. This is a general shape of
our anatomy, of our body. Then we can create a
general shape for the head. We would create the
general shape of the head, the face parts like this, like the eyes, nose,
mouth, and etc. We can just create
them in a linear way. This is the shape of
our thin anatomy. And now we can create a thin person that
it's middle body part. It's a little bit
over rate than this. It's a little bit
bigger than this, but it doesn't mean that
this is a fat person. Therefore, I can create an
oval to create my anatomy inside of it like this. Then after that, I'm going to start from
the middle of my oval. I create a guideline in the
central via welcoming down. Create it. But if you know that what are
you doing exactly? You can actually
met creating it. But if you don't know and it's your first time
doing stuff like that, It's better to create
your guidelines. Therefore, your work
would be a symmetrical. I'll consider this as my head, then I will add the neck. As you can see, I've considered the neck a
little bit thicker. We would not consider
it as narrow and sin as the other one. Because if you want to show that a person is a
little bit more over rate, but not too much. We will consider our neck
comparing to our body. I mean, considering
our body, therefore, our body wouldn't know
speed disorganized. And as you can see, I'm using an oval
for this upper part. My character per body
part of my character. Because in here, we want our character to be a
little bit more overweight. We can add the arms over here right next to
our body coming down. Why am I doing this? Because we want to
show that the volume of the stomach is more and the arms are actually a little bit behind a dead body. We do that. And then we will create
a buttocks area. We will add it at obviously
to the rest of our body. Therefore, because we want our character to
be moreover raid, we don't want to show it's
as thin as our previous one. We've used this tricks and
we've used this shapes to show our concept C. And then I will create
the legs in a way that they are not
too thin or too fat. Basically they look like this. Then I'm going to create the
wrists and hands after that. All right. This is it. This is our anatomies shape
that I've created here. And at last I am going to create the ankles and defeat
to my character. I'll actually add them
outlast to my character. Then we can come over
here and determine the placement of the ears and we would complete
our head even more. You can even not place the
face parts on our work. We wanted to show that we are specifically working
on the anatomy. Therefore, it's going to be that this is the body of a person who is a
little overweight.
7. Anatomy of a woman with a rectangular and oval shape: Hello to all of my
dearest friends. I'm back again here with another tutorial
session for you. And in this session, we are going to continue
creating geometrical shapes. And within them we're
going to create new anatomies
together. All right? This time I want to use a
rectangle and inside of it, we want to create a
thin female character. We've already created a male
character in this shape. Now we want to work
on a female one. Alright. I will create a tall and narrow rectangle. Sorry. I would place my
character inside of it. Now, I'm going to
start with creating one line exactly in the
middle of my rectangle. As you can see, I've divided my rectangle
into half, therefore, I can use it and I can place
my anatomy in my shape. Now, I'm going to start creating an overall for
my character's head. Here we go. Then I would actually start creating the ears in their placement. Then, because my character
is supposed to be thin, I will consider a thin
neck for my character. And also it should
be a tall neck because it's thin and tall. The anatomy must go together. Then for the upper body part, I will create an oval
looking like this. Then I will consider the
chest beneath this oval. I mean, the lower part of this
overall would be my chest. Then from a little
bit more inside, I will continue
my work to create the stomach and the waste. Now before I continue more, I'm going to determine the
placement of the arms as well, and I'm going to create
them in two parts. I would also consider
the volume of my arms much more less. Again, I say because
we are creating, creating a thin
character, therefore, we cannot have a very big
arms for our character. Or our character doesn't seem. All right, doesn't seem okay. Okay. I will add another shape to this one that I've
already created. And I will shape my
characters back. Dan, I would be creating
buttocks area to my anatomy. You should be careful that the waste of our
thing characters should be the thinnest part
of all parts of the body. Then again, for this area based on women and add to me on
female and had tummies. Buttocks area will be
thicker and wider. Then I will create
two old walls like this in order to place
the legs over here. And I will continue the arms as well until here, until I get to this part. And I'll create two
tall stretched ovals for the lower part of
the hand, elbow down. Then I will use two smaller ovals to show the ending
part of the hands. I'm going to add
the legs over here. Because the character
that we're creating here. It's almost a thin character. I mean, it's completely
a thin character. We are going to create all
the shapes and volumes. According to the anatomy
that we've created here. We would not create big anatomy is for this
kind of character. When the rest of
the body is thin, you can create the
arms or the legs very big unless you want to create
an unnormal character. You can use exaggerations
in all parts of your work. Other than that, you should use body parts which should go, which actually go together. And you won't have to make any exaggerations, right? This is it. This is the female character that we've created over here. We can create the face
parts also very generally. Or we can just skip it. That depends on you completely. If you want to can do this, you don't you can skip it. As I said, it depends on you. You can just make it a
stop when you're finished with the whole anatomy
and a head and the ears. Or you can create also face
parts as well because we are working on the anatomy and
body is structure right now. No details. Now I want to create my second character
inside of an oval shape. Therefore, first of all, I'm going to create my oval. The character which is going to be placed inside of this oval, is a character that has almost a bigger mid
part, mid body. The rest of the parts
are usually normal. Basically, we want to create big stomach for our character, big belly for our character. First of all, I'm going
to divide my oval into half with my guideline
completely in the middle. Then I will start creating
my character's head. We would not create our
character's head not too fat and not too thin. Just a normal average head. Because the body
that we're creating is neither fat nor thin. It's normal. Just with a bit more of a stomach area will create. And neck which is not too
thin and not too thick. Again, as you can see comparing
to the thin character, it's a little bit more, but it's not too much more. Because we are actually creating almost a normal
character. Alright? Now I will add the
shoulders to my character. Then after that, I will go
to create the chest area. I will consider an oval
shape for my chest. For her purchase. The actually, then I will create my
characters breasts. Then I will create the arms
right Next from my body, right next to my body, and from the sides, I bring the arms down. Why? Because we
want to show that this character has almost
a wide body is structure. And if you create your arms
way away from the body, you cannot show it. I bring the arms down right
from the sides of the body. Then I will create my
characters stomach over here, which is supposed to be bigger. From both sides. We can come down and we can consider a share
between an oval and a circle. It's a combination of
an oval and a circle. This would be my
characters of stomach came from top to the bottom and
added the volume to it. Then again. For
the buttocks area. We will make the volume less. Because characters,
stomach and belly is big. It's actually affecting the
rest of the body parts. We can, actually,
we should create the hands and the
arms like this. Actually you can see a part
of the arts because the rest of it would be behind the
stomach, behind the body. Then these would be the
hands and the fingers, just generally added to my work. And then I will create the legs for my
character in this area. I will continue this downward. As you can see, the legs comparing to the arms are almost in the
same size and level. Actually created the legs according to the shoulders
and the upper body part. And it's only more
fat and bigger and wider in the mid
part of the body, in the middle part of
the body, or mid body. Now, you can also create
the legs in two parts. One part above the knee
and one part below it. You can just bring it down with only one simple line to
basically for each leg. Because character has
almost normal usual legs, you can just apply
both ways on it. Then at last I will create
the feet like this. That's it. These are the two characters. Are female characters basically in rectangles and an oval. Thin and normal. You can also create the face parts like the
previous character. I don't do it for this one. So you can see the difference.
8. Anatomy with an hourglass pattern: Hannah, I loved my dearest
friends. And back. We'd continuous of our work on different anatomies with
using geometrical shapes. This time, we are going
to create an anatomy inside of a shape
which is actually a combination of two triangles. Basically it's an hour glass. I create one triangle from
the top to the bottom, upside down, as you can see. And then this sharp part of the sharp tip of the
triangle is facing down. And then, right exactly from this point I create my
normal triangle over here. Looking like this. Then I will create my
anatomy inside of this. Why am I doing this? Because I want to create
a character which has very, very thin waist. It's exactly as the positive of the character
that we've already made. First, I will determine the placement of
the head like that. Then I can create a
guideline. Over here. My work would be symmetrical and I just don't go out
of the line too much. And I can move down
on my triangle. Alright? I would also consider
a neck for my head. Then I will create
the upper body part. Looking like this. It can either create
upper body part thin and you come down or you
can create an even wider. But in this part, we usually create the
upper body part in the shape of the triangle that
we've already considered. Now that we come to the waist, I will consider it
very thin and narrow. It will fit down or glass. We can also consider the height of our character,
shorter or taller. The important part
is that we will consider the mid part
of our character. More thinner. The mid body should be
thinner completely. Now that we've created a thin and narrow waist
for our character, we will get to the mid body. And we will work on that. This kind of anisogamy
is more suitable for female characters because it
has a very, very thin waist. We are considering that
for our character. Therefore, I can say it's
more useful for females.
9. Simple male anatomy in three sizes: Hello, my dear friends, I am back here for you at
another tutorial session. Obviously. In this session, we are going to create a person which is tall and the other one which
is medium height, and the third one, which is a short person. We want to create them
all next to each other. So we can also compare
them and find out their differences and how we can actually create them
according to each other, then I'm going to create
a horizontal align. Therefore, all
these three can be placed on this line
next to each other. Now, I will start
for my tall person. I can create to hide
as much as I want. We only want the heights
compared to each other. You can create it. Shorter or taller. Depends on you, based on character that
you are going to create. Now I would consider a circle as my character's head
looking like this. Then I will create a line from the center and
the middle of my circle, going down as my main guideline. That later our body
would not be disordered. It would go down straight. Then we can have the division
of our face like this. I will add the neck
to my character. Then. I will connect the
neck to the shoulders. And I will consider a general
shape of anatomy because we only want to compare the
heights with each other. Now I will create the
legs in this shape, only one plane shape. And then I bring
it down like this. Now we are just creating several general shapes in order to create
the sizes, right? I just bring the
hands and the arms in one simple way, simple
shape downward. We just create
everything very simply. And generally, if this
is our tall person, we are going to start our
medium-high person right now. What are we going to do? Well, basically, we will create our medium height person
according to our tall person. From this line, which divides the upper part of the face and the lower part of the
face of our tall person. I'll create a horizontal line, and this would be
actually the top of our medium height person. The top of the head of
our medium height person. And from the chest
of our tall person, we will create another
line which determines the bottom part of my medium
height person's head. Like this. Then I will create a line from the middle
of the head downward. As my main guideline. This would be my
main guidelines. So I would make sure that
my body stands a straight. Then I'll add the neck. I will create the shoulders. And then very normally I bring
the upper body part down. We can even check it
with our tall guy. So we would know this
would be the end of our upper body
part and we would know up to where
we should go down. And these would be
our character's legs. Our second guy has
a medium height. Then we will create the arms right next to our body
and we bring them down. This shape. This is our
medium height person. This is what we actually
can use for our medium guy. For here, I can use that this is our average person which
has medium height. Now I'm going to create
my short character here. I will consider my short
character be placed over here. The head of our character
will start from here, which would be our sick
and characters neck. So basically Nick, all of our medium height person
or average person, and the chest of our
tall person would be the same for the
top of the head, all of our short person, for the bottom all of its head. We are going to
create a line from the bottom part of our
average guy's hands and arms. In this area. I'll create my short
character's head like this. And then I would create
another main guideline. From the middle, it's head. Then I will divide the
face and the head as well. I will add my characters neck. After that there
would be shoulders. And then I will create the upper body part
looking like this. I can also created according to my average
person or my tall person that depends on you
can easily create it. Then. I would create the
legs like this. This is it. Then we would also create the hands
in very general shapes. And I can create
them in this shape. Right next to the body. This is our short
character over here. You've got tall,
average or medium height and short
characters which are created based on the
divisions that they've made. You can practically see
the differences here.
10. Anatomy of the torso of a man and a woman with a medium physique: Hello everyone. And banking in here with another tutorial
session for you. In this session, I am going to create the upper body part
of a male and a female. And I actually want to compare them with
each other so you would see what differences
they can have with each other. Well, I'm going to create a
circle for the man's head. This would be the head. And after that, I will divide
the face into four parts. In order to create
the face parts later. I will connect the neck
to the head like this. Now what I'm going to do, well, basically I'm adding the neck
to my characters shoulders. We should pay attention
that the general shape of the male character for its body is in the shape
that I've created here. I mean, this part would be more, it will come down and we will have a short and actually
a thin area like this. This would be a
general shape for a male character's body. Her body, of course. Now I'm going to do
exactly like that. For this upper part
as we come down. It's really thinner. The males waste will
be created like this. If you want to consider the bonus structure would be placed like this
in this direction. With this width. According to these lines. Then in this part, we will have our
characters, the stomach. And it would be finished. If we wanted to
consider this area, it would be the
placement of our arms. It can be the arms. And then later we can
complete this shape more and more in a way that we
start to face from here. And we will complete it
more with these angles. This would be the
place of my ear. Then in this area, we would have the structure
of the head completely. I will complete
it with the neck. I will come down and
continue to the shoulders. I can even make the shoulders
a little bit more wide. Going to widen this area. Then I can create the arms
with a little bit of muscle. This would be the line for the neck which is
showing goes That's the end of the neck and the beginning of the
chest or the breaths. Then again, we'll do the same for this side
of the body as well. We come from the shoulders
down and we don't have the arm completely because our body
is in a three phases view. Therefore, we cannot see
one of the arms completely. Then this would be from
the waist going up. This is our male anatomy. For the upper body parts, I will create the female's
anatomy on this side as well. Well, considering that we want to create a
female character, the head can be created way
more delicate and fine. I will create an oval for
the face, for the head. Then I will determine the
direction of the face. And I will divide it into
four parts for the body, for the face parts. Then we will also consider the neck thinner as you can see. Then I will connect
to net the shoulders. As easy as this. Now if I want to
create a general shape for women's and female
are per body part. I can consider shape like this. Again, you see it's more
like an hour glass. This is a basic shape
for a female's body. This would be the waste. It will be narrow and thin and as it goes down again
to the buttocks area, it will become wider. Here we have the buttocks
and stomach at the end. Just do the same for the upper body part
of females character. Come down from the
shoulders to create chest. Basically. As you can see, even in the general shapes, the female's body is more
delicate and smaller, thinner, not too wide. Comparing to death, male's body, which is more rigid and white. If I consider the
waste over here, as you can see, we will bring the lines
out toward again. Just like that, I've created two bodies right
next to each other. Therefore, you can just
compare them more clearly. Now I can create the
hands like that. And I can place it
right next to my body. All right. Now, I will want to add a
bit more of details to it. For our female
character reshoot, consider that we have
to create a very soft, soft face and the soft head exactly on decant under
contrary of our male character, which was with so
much angles and sharp angles are females face would be
created very smooth. Then we create the neck enough there that there
would be the shoulders. And again, as you can see, I'm considering the
arms even thinner. Then I'll do exactly the
same for the other arm. Just like that. Because the body is in
the three faces viewed, this arm can not be
saying completely. All right, What am
I going to do here? For the female's body
in the chest area, I'm going to create the
volume of the breasts. I will create two curved
lines and two shapes over here to show the breasts
of my female character. Then from here, I will make the lines
more smooth and more around to show the vase
and I'll complete it more. That's it would be
shaped like this. Now, as you can see, everything for our
female character is softer and more delicate. And for the male
character is more rigid and angular and
it's also bigger. It's a while. Our female character is more
smaller in the body parts. You can later add the details to these anatomy's so you can show these differences more and more if you want to compare them with each
other completely. Basically, these are
the basic differences of female and male anatomy. If you want to
create a character, you should create them
according to these.
11. Anatomy of fat and short woman: Hello to all of my dear friends. I'm back again with
another tutorial for you. In this tutorial, we
are going to create different shapes
and different types of a character altogether. For example, we are
going to create a short and fat character and also a thin and
tall character. Well, we will create
different types of Ed. And now we want to create
our short character first. If you want to create
it in a front view. This would be just
typical because we've worked on the
front view a lot. So I'm going to
create my character in a three faces view this time. You can see different
angles of it as well. I will create a guideline, which is basically
my direction line. I want to show that this is a three phases view for
my character's body. Then I will determine the
general placement of the head, which would be here
on top of this line. And then I will create
the draw for her. I will create the neck
for my character. Now I will create a general shape for
the upper body part. Looking like this. To character that I'm
creating right now, is actually character
over female, but you can use it for
a male person as well. I will also create a
short male character. Therefore, you can just compare them and then you can
work on both of them. Now, I'm going to work on the stomach and
the buttocks area. You see all the shapes
that we are creating, our oval or circles. And they are actually
short ovals, more stretched
ones on the sides. And then later I'll create
a tall one for you. Therefore, you can compare it. So you wouldn't know
where are the changes. For the legs. We are going to create two shapes like this. Too chubby shapes for two legs. Because our character is in three phases view
and we've created this guideline for
its three faces view, we would consider that this
side of the body should be definitely see more
comparing to the other side. This side which is closer to us, is being seen more. Then I'm going to
create the arms, but I'm not going to create them exactly next to the body. I want to create this
arm on the waist. It's looking like she's
standing in this position which is putting her arm
on hair waste. Then I would also want to create the other arm from the
other side of the body, which actually is
behind the body and we cannot see it completely. We can only see
this outer part of the arm which has
been come from here. The part which is starts from the shoulders
can not be seen. It's not visible for us. Now. The general shape of
my body is determined. I will complete defeat as well. Looking like this. Then, I will complete different parts of the body
from the top to the bottom. The way that these would be
their placement of our ears. The other ear cannot be seen because it's on the
other side of the body. And it's behind our
face because of the angle and direction
of our character. Just like that. Then I will complete
the neck area more. We will bring it down. Then we will come down from the front
of the body this way. Then we create the legs
and this foot over here. We'll complete it and then
I will bring this part up. We will consider the waste
of our character here. Then I'll create this leg
on this area over here. All right. Now I'm going to create
the arms. First. I work on this arm which is
on this side of the body. You can also shaped the fingers from the inside of the hand going like
this on the waist. This would be the elbow
going up to the shoulder. And then we can complete our
characters arm and the hand. And we will do exactly the same. For the other arm. The procedure is
completely the same. Again here I'm going to create
several fingers for her. Just as a sample,
not completely. Then I will create this line in order to show that this
is her palm showing. I've just created a curved line. This is the anatomy
of a character which is short and overweight.
12. Anatomy of fat and short man: Hello my friends. I'm back to continuous
of our work. As I said before. Now I'm going to create a male, short and fat character for you. Therefore, you can
spot the differences. I would also create the male character in
three phases view. I'll start with my
direction line. Then. I will create the head. Over here. You can create the
head all in one shape, or you can just divide
it into two parts. First the skull, then the jaw. Or you can just
created all at once. And you can create it
altogether like this. But I prefer to create
two parts for my head. Then you can also determine
the placement of the ear. Then he should continue
moving on the body. First you will create
the upper body part. And then as we did before, you can create an oval
for our body part, upper body part, Of course. Then you can determine the
placement of the arms. Over here. As you can see, the male character has
basically more volume. It's bigger. And why is that? Because basically I'm generally the anatomy of male
characters are bigger. Comparing to a female one. If you're paying attention. We've created an overweight
and short body shape and anatomy for our
female character, boss. Even considering that, when we are going to
create the same size, male character, I mean, short and overweight
male character. We're going to create a
bigger because that's the basic and natural anatomy. Old demand characters, which are bigger from women,
bigger than women. They would have more volume
for this arm because our character is in a three-phase his view we
can only see a part of it, so we only create the
parts of it that we see. This would be the wrist and the hand would be
placed over here. Then we will complete
the other arm, which can be seen
more completely like this because it's
our perspective and we can see it completely. Then for the wrist
and the fingers, I'll create a general shape. And then I will actually
shaped the fingers a little. Again, generally. I would want to work
on the mid body, which is the middle body parts. I will create it again as
well with a Nobel shame. The basics of the
anatomy or the same. The structure is almost
the same as the procedure. Then I will determine the legs because this
side can be seen more. I will consider this
leg bigger and wider. We use this area for creating the language
is closer to us. Well, in this type of anatomy, we are actually showing
all the parts with ovals, circles and o is again. Why is that? Well, because in this kind of
anatomy is sketching. We can use geometrical shapes very easily and we can
get help from them. They can be really
helpful for us. We would also create
different kinds of anatomies together, which you will see in the continuous all the
course I'm next courses. But this time we are
just going to use geometrical shapes to make
them way more simpler. Then we will complete
fingers like this. B have just squeeze our hand. Created like that. This is the anatomy of
our male character, which is short and
overweight at the same time. Now, you can consider
it to actually you can compare it with the
female character and the differences are obvious.
13. Anatomy of a slender, tall, and short man: Hello Joe, love my
dearest friends. I'm back again for you. We add another tutorial session. In this session, we
are going to create a tall and thin
character together. For creating a thin character, we have to create all the
things that we want to work on. Thinner. As we say it's tall and thin. Start with my character's head. For r. So all I'll
create the skull. And then I will create the jaw. I will actually add
the draw to it. As you can see, it's
stretched yet thin. I'm going to create my character in a three-phase says view. Therefore, we will create the head in three
phases view direction. Let me just create this
guideline for you so you would know exactly
how it's done. I will create a line in order not to make my body
look disordered. I want my buddy to be
straight and symmetrical. So I'll create this line downward because it's
a tall character. I need this guideline in
order to stay in line. Now I'm going to add
the neck to the body. We should consider that because the character we want
to create is thin, we should create the body parts. Again, I say completely
thin and narrow. As you can see, I've
created a very thin neck. This would be my characters
up her body part. This would be my characters
waste the same way. And then I will create the
placement of the arms as well. Just determine them. And obviously I'm going
to create the arms, as you can see again, they arms are thin too. Then I'm going to create
the next part of the arms. Wrists and hands would
be placed like this. I'm going to create
the other arm, which came from the
other side of the body. We can only see part of it and we only create
a part of It's arm. Involved the elbow. Dan, we create the lower
part and the hand. This shape, the risks
and the fingers. All right. We are
going to consider that we have our upper
body part like this. Now we want to assert
the lower body part. This would be our
characters buttocks area. You will add it right here. And then I'm going to
determine the placement of the legs on this area. Again. Thin, Thin, Thin
everybody part is thin. Just like that. I will create the legs downward, which bring them down. Then I will separate
the knee area and I will add the
lower part of the leg as well just to make
it more complete. Now we have our
character's body. Then obviously the
ankle and defeat. Last. I'll create one leg toward myself and the other fit. The other foot actually
is facing to the right. Because again, I say our body is in a three
phases view. So. And we can just make
some variations zone the foot can see all
parts of the body. This is a general shape of a character which
is tall and thin. Now, we can also create a character which is
shorter yet it's thin. How are we going to do that? This time is short, but thin character is
going to be created. As usual. We start with the skull and jaw. As you can see, it's shorter comparing to the previous one. Just so you know, all the characters that
we are creating right now are in three phases view. Therefore, I'm not going
to repeat it again. Then we will add the ear. Then I'm going to add a line. I'll create a line
straight down in order to keep my body this
a straight line and it would be straight. I can create my work easier. Otherwise, I might just
lose the shape of my lines. Especially because the body
is in a three-phase his view. So I'm going to create also a line to determine
the direction of the face. That's it. I've created
the neck after that. This would be the chest
or the upper body part. Completely. Then I will create two buttocks area and I
will add it with an oval. Actually, I'm going to create this Olaf more
similar to a circle. Then I will create it over here. And for the upper
part of the body, we will consider more
of a vertical oval. This one, the second one, is more similar to a circle. Then I will determine
the placement of the legs right from here. I'll come down and then
do the same on this lake. Because our bodies and the three phases view and
it's shaped like this. We will see this leg less than the one which is closer to us. Then we are going to create the part which is
below the knee. Bring it down towards the ankle. Then daily thing that will
be left will be the foot. Obviously, the language
is closer to us, is also be seen longer, taller. Now I'm going to
determine the placement of the arms as well. This way. We can create hand and our
arm on our waist. Then we can work on that. I will create this other hand, this other arm from
behind the body, and we can even bring it out. Then. We can create the wrist, the hand itself,
including the fingers. As you can see, this is our short
yet thin character. And it's shaped
completely. Well. This is our whole
complete character. We have 1 12th in character, and one short thing character. We've created them altogether. You can consider the thin of
your character like this, or you can make it
realist skinny, like the one that
we've created first, both of these characters
are considered thin, but if you can see one of
them is a slim and thin and this other one is more
toward a skinny, thin. It depends on you
on how much you want your character to be. Same.
14. Male and female anatomy with clothes: Hello, dear friends. As you can see, I'm back with
another session for you. In this tutorial. We are going to create more different shapes
of anatomy together. Going to have lots of varieties. Well, first of all, I'm going to start with creating a circle shape for the
head of my character. Obviously. I can start my work with
one general circle. Then from inside of it
we can bring out or add the volume of the jaw to my head or you can just create it in two parts as
we've done before. Dan, I'm going to add the
placement of the ears. And if I want, I can easily and Lynne are recreate the volume
of the hair as well. I can show the hair very
simply with simple lines. The character that we
are creating right now is basically a woman which is a little overweight and she has short height, shoes,
relatively short. Then I'll create a line for
the direction of the face, for the volume of the body. Because I want to consider
and overweight character, I will not create the neck. Will just attach to
body to the head. If the character di wanted to create was a thin character, I would obviously
determine the neck first. But because the character
that I'm creating right now here is overrated and fat I will not
create and neck for her. I'll create the
rest of the body. These are actually her breasts. So I've considered a
volume for her breasts. And then with a curved line, we will make it more complete
in order to show that she has two breasts over here. They are showing the
volume of the body. Then I'm going to create another line over
here from inside, coming out, from
inside of the breast, actually coming out, not
from the edge of it. And then I will bring it down as a representative of
her stomach and belly. And also from this
side I'm going to come down with a straight line. Then I will connect these two parts together
with a very simple line. This would be actually
my characters, a skirt. Bought for its bonus structure. I will create an oval over here. Then. I will bring it down to create the volume of the legs for her. You might not see it, but you can create
it very lightly. Then later you can
erase it because our bodies into three phases view we will consider this side, which is closer to
us more and bigger. The other side would be
thinner and shorter. Because I'm going to
work on the skirt. I don't know. Let's give that
much attention to the legs. But we will create them as
much as we can see them. The NSA would be complete
and I just create the feet and the legs very
simply like that. And at last I'm going to
add the arms over here. Like this. Oh, and also
the arms very simply. Again, very simple. Here we would have the
wrist and the hand. Well, our main goal
here is to have this simple anatomy for
creating a character. And we would not want to make it very complex or confusing. I'm just going to create it very simple because that's
exactly our goal here. Now for this character, I would also want to
consider volume of clots. Just like that. I move
on to body and I will create these designs and
shapes to make the dress. You can create an apron, creating very simple lines. Scared that you've
already created. As you can see,
I've created very, very simple lines, but in
a very, very useful way. This is a whole volume and the whole shape
of our character. Now on the contrary, I want to create a very tall and thin
character in the same way. Very simple lines and shapes. First of all, for the volume of our character that
we wanted to create. Consider a circle,
usually as the skull. Then I will add a
jaw to this circle. That will be our whole head. This would be the
placement of the ear. And as I'm creating
my character, you can find out that it's
in a three-phase says view. While I'm creating it. For the volume of the hair, I can use several curved lines to create a simple shape
and style for the hair. Just as easy as
this piece of cake. Now, I can even very simply
create a nose for her, coming out of her
face, his face. And then very simply, I can create glasses
for my character. You didn't need to
get into the details. Really don't need that *******. Just as much as it shows our
character would be enough. Now, as we've
created a day ahead, it's obvious that our character
has a very thin body. Considered a very, very thin shape for the upper body part. Then I'll create a
very simple shape and volume for arms of my character. And I bring it all the way down in this shape,
very, very thin. As you can see, I'm creating my
work very simple. Little bit of an exaggeration on the thin aspect of my character. Then I can create
this line all the way down to create the legs. Then I can separate
them with this line. And obviously the language is closer to us, should be bigger. The other one which is
further, is thinner. It should come down. And then you can create
defeat of your character. In this way, you see character
has very, very long legs. He's very tall and thin. We've created the legs exactly as we've finished
the upper body part. I'm going to create the other arm because
we can not see it. Whereas simply you can
come down from here, creates a very thin shape and add the hand
like this to it. As you've seen, with very
simple shapes and lines, we have created two characters. One of them is
shortened overrate, the other one is thin and tool. For here we can also create another line and create
a belt over here. Again. Very simple. Everything depends on your choice and you can
use very primary shapes.
15. Anatomy of a child and a muscular man: Hello, My dearest friends. I'm back again with continuous of the characters
that we were creating. And this time we're going
to create tried together. I want to see how we can create different
shapes of a giant. Now, for a child's
character, first of all, we should create a head
which is a little bit bigger for her or him. Because Children
characters always have bigger heads comparing to the normal and adult characters. Therefore, consider the
head a little bit bigger. Dan, you can use
very simple lines. In order to create the
shape of the hair. Then we can decide whether our character should be front
view or three phases via I want this to be into
three phases view. We can determine the rest of the parts very easily
and work in this way. Now I'm going to consider a very thin neck for my den. I will create the
whole body shape shape looking like an oval. Then again, very simply I
work on the legs like this. Then I can create
defeat this shape. Then I can even add
the arms over here. This shape create DRAMs actually going through each
other in front of his chest. All right. We work on
serveral lines very, very simply and we do not
get into details at all because we are just showing the piano to miss
in a general way. And then general shapes. We can even consider two eyes, eyebrows and a nose
for our child. Just like that. We can show what kind of
anatomy we are creating, what character we are creating. Then with the same shape. I'm going to create actually a big, muscular character here. Well, obviously, first of all, consider an oval for
my character's head. Then I will use several lines in order to show the
volume of my character. Then I can determine
the placement of the eyes with a line
and a nose beneath it. I denote get into
the details at all. And we are actually
creating everything with general lines
in general shapes. Because this kind of anatomy
that we're creating right now is not in a way that we
can work on the details. We should just work
onto generals. Because I am creating a very
big and muscular character. I do not consider
a neck for him. Then I'll create very
wide and big shoulders. Then from inside of these lines, I'm going to create the
volume of the arms. Then, because my character
is an a three phases view, I'll create my characters chest again with samples,
simple lines. And then a little
bit from inside, I'll create the shape
of the stomach. Then I will create the arms
coming down from here. This line that we've created. We can basically
show it like this. And then we can show this
is our characters close. And then we can bring
the arms out of this shape and out of this
volume, looking like this. Now we are working with
complete simple shapes. We denote gets into the
details of our work at all. Just like that. We are going to work on
this arm as well. Same way. Then. I will add the legs
to this part over here with some completely simple lines. Just as you can see that
I will consider it. This way. This is
our second leg foot. Obviously. This is a very big, muscular character
that we've created. A very simple lines and very simple shapes
for you right now. That's it.
16. Anatomy of a short fat man with clothes: Hello, all of my
dearest friends, I'm back with another
tutorial session for you. In this session, we are going to create several
characters together again with different anatomies and we want to see
how they are done. First of all, I'm
going to create a very straight line for
my background's line. And I actually want to place all of my characters on this line. All right, I want to create short and overrate
male character in a very, very simple way. Therefore, I'll
start with creating a circle for my character's
head for the beginning, of course, because
should have a head. Again, I say because
I'm considering the height of my
character very short. Therefore, I would place my character's head over here
according to my background, which should be the
placement of the feet. If fever going to create
a taller character, we should have
considered the head a little bit more above this. Because I wanted to be sure. I will consider my
head over here. And as you can see, I've even concerned or more circularity and chubby or head
for our character. Create the jaw. Then from my character's head, I will create neck, which is basically
the rest of the body. And then with the same line, I bring it all the
way to the arms. I'll do the same from
this side as well. Then for this area, which is our characters stomach, I will connect all
these lines together. We didn't oval. Then for my characters
buttocks area. I should consider a very
small part in this way. And then obviously
I will consider short legs for my character. Very short ones. Like this. As you can see, I've
created the legs. Very simple, linear. Because as I said before, I insist that we
are only creating general anatomy is and we're not getting into any details. So this would be our sleeve. And then we can bring our
arms out to the slave. Very simple lines. And then we will create the arm with those
simple lines again. Then, because our character has a big stomach
and a big belly, the other hand would come
down from behind the stomach. And if you level it with the
hand which is on this side, you should endure other arm, another hand over there. Okay. Now for my characters clothes, I will consider a
very simple color. Also from the site. And with the shape of the color, I just come down to the
bottom of my clips. You can also create
a very small part of the sleep on the other
side of the body. And then for this area, at the bottom of the shirt, we will create another
curved line in order to place our
belt over here. Then we can just
several simple lines. We can also work on the
face a little, for example, we can create
placement of the ears. Then we'd several more lines. We can create volume of
some kind of a hair. Hairstyle. Can also create two lines as the placement of
the eyebrows and eyes. Just with very simple lines. We would create
our character and we will give more
characteristics to it. We'd only several lines we can improve outward like this and we can basically
complete it. All right, This is
our first character that we've created on this line. Here we go.
17. Anatomy of a man of medium height with clothes: Hello to all on my dearest
friends, I'm back. As you can see with the
continuous of our characters. This time right next to it, I want to create
a character which is taller than my first. Therefore, as an amount
of a head and the neck, we come more above. Because we want
this to be taller. I want to create this character in this side view
and into profile. I will determine it from
the beginning of my work. All right. This would be my
characters ahead. Then I will add the draw to it. In this way. I want my character
to have a thick neck. I consider it and
then after that, I can create the
rest of the body. I am also considering that my character is supposed
to be in the side view. As easy as this for
this upper body part. I'm going to create these lines. Then for the legs. Start from me hind, and I'll come down
to create the legs. I can also show a
little of that leg too, which is on the other side. Therefore, my character
would be incomplete balance. Because if you create both legs in one line
and one simple line, it would look like that
character has only one leg. I can get this leg from here. And one which is coming from behind would be going
in one direction. My work would still
be in balance. After that, I have
to add the arms, which I'm easily adding here. You see several lines. I'm going to determine the replacement of the arms
and create their shape. You can even use some of the
fingers of the other hand. Showing on this side. It's so right that
our character is supposed to be from side view. But if you have some
points to show that your character has
dimension, has another side. You can use that
opportunity to show that. Then I will consider
this for my character. Like that. I will also create
pockets for my character. I can't even show the other side's coal are
a little bit on this side. Again, I say because
I want to show that my character has mentioned and it's not only one dimensional
character, several lines. Then let's several lines. I can create my
character's hair very simply because my
character is inside view. Obviously, we can see its nose. I can even create glasses for my character just to
make it a more unique. But as you can see, I'm just creating
everything very simple. Primaries and general because we are working on the anatomy
more than everything else. We're not working on the face. Just as much as our character gets some characteristics
and personalities. We can work on
different body parts, very simply, linearly. Alright. This is it. This is our character
that as you can see, if you just want to place several different
characters in one line, you can make them more different from the previous one or
the next one therefore, can create some changes in sizes and shapes.
As you can see. For example, our second
character is Elizabeth, taller than our first one. And it's completely different in the order of shapes
from our first character. All right, that's it.
18. Three models of the muscular male anatomy: Hello, My dearest friends. We are back with another
tutorial session for you. In this session,
I'm going to share you a person who is muscular. And we want to show
that how we can create it with very
simple shapes. First of all, I'm
going to start with creating an oval shape. Instead of my character's head. Like this. Then I will actually bring dynamic of my character downside from the
sides and the edges. We can also create
several lines over here in order to show
there are some face parts. Now for this area, would almost creates
something between a rectangle and a square for my
characters are per body part. And then from the
sides of this shapes, I am creating several ovals like that for creating my
character's hands, which I'll be complete. Then for the other side, I will do the same. I can use my
guidelines to create these volumes exactly on
the other side as well. Therefore, I would have symmetrical shapes on both
sides of my character. Therefore, I will just compare two volumes
and shapes together in the order that I can get
two very similar shapes. All right. You can always get a good
use out of your guidelines. These are two arms
of my characters. I will create a central line
for here in the middle of my rectangle or a
square in order to show this area as its chest. With this curved line. From inside of this rectangle. I bring two lines down. Then I will connect
them together. I'll bring the two
legs from the size of my work downward. I would create the other
one in the same way. Then I will continue
my work over here until I get to defeat. Then again, I can
use my guidelines in order to create the both sides. The same way. I might just use this
guidelines here. All right. This is it. This is my character's
legs, actually, these are my character's
legs and feet. And as you can see, this is a person who has. A bigger upper body part
and is very masculine. I'm going to create another
type of character for you. So you would see the
differences and you would see how many different types of muscular characters
you can create. The bases are the same, but they have differences. First of all, I create the
head and then the jaw. As you can see, even up to now, it's different comparing to the character we've
already created. All right. Now this time I would not consider neck
for my character anymore. I'm going to use the
volume behind my head. And I will create an oval far my characters upper
body part like this. Then for the arms, I'm going to create two ovals
on the sides of the body. We can create this
oval completely in order to know how
it's done better. But we do not need this area which is going
inside of the body. It's just this outer part
that we need to have, which is coming actually out
of the side of the body. The rest of it is placed behind the body and
we cannot see it, so don't worry about it. Then. For the mid body, medulla of the body. From the side of our arms. I come down and toured
inside a little. Then I will consider another
volume and another shape. For my characters buttocks area. I can use this central line
and the line of the chest. To show my work more. I can actually use these
lines as the guidelines. So I would know my
work is in balance, is in a complete proportion. I'm also creating
the hands this way. I can create it
exactly the same way that I did for my
previous character. Alright. I'll do the same for
this other hand as well. First the arm and then
terrorist and the hand. Well, I've created a hand like this for my muscular
guy because, well, they have an
athletic body, therefore, we are going to fist the hands so we can
show that even more. That's why generally in muscular characters and
in athletic characters, you can see the shapes of
hands and arms like this. I would also create this
lower apart as legs. Because I've concert,
all the parts vary. Big and thick and
volume and wide. I should also consider
the legs and feet. In the same way. Complete this area
with the feet. That should be created for
my character. This way. With two ovals. I will actually complete defeat. All right. This is it. This is our second
muscular character that we've created
together for here, for the legs, we can also
create some curved lines. You don't dare to show the
knee and other joints. This is another time and another model of
muscular person. We can also create another type. Which character? Has an upper body parts
looking like this. You see, I was started
from the body. Because I want to show
you that if you want, you can start with the
upper body part and then later you can create
the head on top of it. Then you can actually create your head according
to your body. Then add it over here. Just like what I did this time. There would be no
problems at all. Like this. All right. Now we're going
to continue our work. Coming down from the sides. Then. I can create
the arms over here. I can add them to my work. Just as easy as you can see it. Now, I'm going to
create the risks of the arm until I reach the hands. Which again, I said it will
be created in this shape for most muscular characters
because they look so athletic. Wanted to emphasize on
that aspect of them. Then I am going to create
a volume for an a waste. Like this. You see, you can use some
exaggerations here and then suddenly you will consider a very thin waste for
this very wide character. It's a big, muscular, athletic, wide character and then
it has a very thin waist. Then you would add
the legs like this. Well, if you can see, we will have exaggeration
completely in all the body parts
of our character. It has very thin
legs on our body. On this big body. That's it. These are three different
masculine characters that we have over here.
19. Three simple models of male and female anatomy: Hello to all of my
dearest friends. I'm back again with another
tutorial session for you. Well, in this session, we are going to create the anatomy of the body
with very simple shapes. How are we going to do that? Well, first of all, we are going to create a square. Then with the help of that, we can get a general
shape of the body. Now that we've created a square, then we can use a circle in the middle of this square
to create the head. Then with two ovals, we can add the arms
here like this. Then for the hand. We can also use two
simple and small ovals. Will determine the
placement of the legs with two square shapes, actually two smaller
square shapes. Almost something between
a rectangle and a square. Then we are going to create the shape of the
feet with two ovals. We are actually
creating the feet. This is very, very
simple and we've created the shape of the
body very generally. Then you can even
divide the face with several lines in
order to show that it has a volume and we have
face parts over here. Then we can work
on the other end. Smes for example. You see this is a short
overweight person. Now we can also create
muscular tall person. These characters that
I'm creating for you here are actually
male characters. Can use a triangle
with a rounded corners to use it for the body of our muscular person,
muscular character. So you see I've
created an upside down triangle with rounded corners. Then even if you want, you can consider this in
a three-phase says view. Therefore, you would place
the head above the neck. So first of all, you should add the
neck with two lines. And then you can consider a thin oval is stretched
oval as its head. Why am I doing this? Because our guy, our character, is a muscular character, so it's an athlete and we should create a head
according to the body. That's why I've created a stretched oval to
show a thin face. Because we are considering this character and the
three phases view. We can show the
hands and the arms, first of all, with
these two circles. And then very simply, we will create an
oval for the arm and another one for
below the elbow. And then that will be the hand. I will use a very simple
circle to create a hint. It shouldn't be the same
for the other arm as well. But just because we don't see the upper part of
the arm completely, create the part that we see. Alright. Now for the waste
and stomach area, I will create two lines
closer to each other. Create them as
straight downward. And then for the buttocks area, I'll create a half
circle, a semicircle. Actually it's an upside try
upside down triangle again, but again, with a little
bit rounded corners. We too simple lines, we add our legs. And we would also
consider that this leg, which is closer to us, should definitely be a little bit more bigger
than the other one. Not too much later, but it should definitely
happen there. Just like that. We can complete the legs without any trouble
or any problems. This is actually almost a tall and
muscular person character that we can create with very simple shapes
and very easily. Now I'm going to also
create a female character. Therefore, you would know
how we can have that. All right, I'm going to use very simple shape,
like a circle. I want to create the
female character in a three-phase
his view as well. Therefore, I will show the direction of the face
with this line here. And then I'll add a very
small part to her head. As a representative of the jaw. When you can see that we are creating everything
very simply because right now we are only working on the CNS and this is
our main goal here. To work on the anatomy
notion, the details. Then I'll create the NIC. And for this upper body part, I'm going to just consider a
very simple, simple shape. Then. I am going to
create the breast, actually adding her
breast to her anatomy. And then I will create a very, very thin waist for her. Very tiny one. Then I will create the
buttocks area would which would be bigger again,
comparing to debased. Almost the same as
the upper body part. Create the shapes
very simple again, I insist because we are actually
working on the anatomy. Very simple. Very simply. Again, I'm going to
use two volumes, two ovals to a stretched
ovals to create the legs, and two other ones
for the lower part of the legs. All right. Then I will add defeat as well. Too stretched ovals on top, too stretched ovals
on the bottom, and then they would
have the feet. As you can see, it goes very simple. All right, That's it. Now for the arms, I'm going to create these ovals. Very, very thin because
she's a female. Then our character is a female. I tried to create my work
more delicate and finer. So again, we'd too stretched
ovals, but thin ones. I will create the arms and
then at last the hand. Because of this arm, we can only see a part of it. We will create the
part that we can see. Not more than that. Just like this. As you can see, very, very simple shapes. We have created three different
anatomies into genders.
20. Three-dimensional anatomy: Hello to all of my
dearest friends. As usual, I'm back with
another tutorial for you. And in this tutorial, well, I'm going to create a male and a female character for you. But this time, I
want to create them with volumes and
some other shapes. Therefore, you would
know how you can create your character in a
three-dimension way. In a 3D way. For that, we have to create
our shapes in volumes. I mean, we denote create
them as surfaces anymore. I'm going to create
some examples for you. Therefore, you'd know
how you can do this. I'll start with
creating square shape. Then. I will actually turn it into a cube with the
use of perspective. Actually change
it into a volume. I mean, this is actually
the face of our character. This would be the
side of our face. Also created as well. Then I will create my characters neck as
the shape of a circle. Actually, a part of
it would be inside of the volume that I've
created at first. Then for the upper body
part of my character, that my character is, I'm obviously a male, as I said before. I would create the
upper body part as the shape of almost
a big circle. Almost. Then for the arms. I'm going to create two
more circles over here. This would be the arms. Then again with volume, I will continue my arms. I want to create the arms in different position
than its normal, which is the side of the body. I want to make some
differences. Over here. As you can see, I'm creating everything with some volume and I bring
things into perspective. And the beginning of my work and the end of it can be seen. Now if I want to show
this arm in front view, I would have to create
another volume, a little bit more below. And then for the wrist, I would complete my shape here. First I create the beginning of the surface of my
work and then next, I will add the
volumes that I want. This is my character's hand. Now I'm going to
create the other arms. So you would see how
this one was placed. This one that I'm creating is the same arm
with the same hand, the same shapes, but it's just turned toward a different way, toward a different direction. I'll shape it like
this as a cylinder. And then I will determine this joint in the middle of the arm, which is actually our elbow. And then I create an oval and then I will add
a cylinder to it. Then after that, I would
want to create the hand. This would be the
wrist and the fingers, which I will be placed, which I will be actually
create life this surface. And then. I'm going to add volume
and dimension to it. As I said. High as you can see, we are creating a
3D character here. First we get help from a surface and a
two-dimensional shape, and then we give some volume
to it and make it 3D. I come lower and for the waste, I also consider an oval. I will create the legs again
in the shape of a cylinder. As you can see, the beginning and
the end of the works will be created with ovals. Then I will continue my work. Cylinder. For the foot. I'm going to again create some volume dust as you can see. Okay. I want to bend the other leg a
little toward inside. Therefore, I will
create it like this. I want to show like his
running or walking. And as you can see, we will create the tip of the
work as an oval and then we bend the leg toward
inside like this. The leg is bent from the knee. Then I can create
the foot over here. I can complete it with this
volume that I have here. All right, This is it. This is a male
character that we have created in a 3D way. Now I'm going to create a
female characters the same way. I mean, a 3D female character. As you can see, we've created the face of our male character
and the head of it as a square, a cube. Because basically
male characters have more angular face and rigid. But for a female character, we can create the
face and the head as a circle and we continue
our work like that. Dan, I would also create the neck for my
female character. This way. Then for the arms
and for the chest, I would also create
several circles here. Then I would continue the arms
as a shape of a cylinder. This way. You see we have actually separated
the volumes from each other. Therefore, we would show
these are not actually one, a surface and we
want to show that these volumes can actually turn on each other
because of the drawings. That's why we're doing this. We would also create. The other hand. As you can see in everywhere reviews
cylinder is here. Then for this area, I'm going to add the waste. Obviously she will
have a thinner waist. Then for her buttocks area. I will consider a circle volume. Then I will add the
legs to this area. Now for all parts,
as you can see, we are adding volumes
notionally surfaces. We have to create all
the shapes in a 3D way. In here, we would have
cylinders again for the legs. And in disjoint parts, which are actually
on each other, we would create some
distance and we will create two walls as a
representative of the joints. Then I want to complete defeat. Because our character is
a female and we should keep the delicacy and
elegance in our character. As you can see in
our male character, we've created more angular and more rigid
shapes and volumes. But for females it's
not normally like that. Unless you want to create
a tough character, a twelv woman character. These are two 3D characters
that I've showed you.
21. Anatomy of a relatively fat man: Hello, my dear friends. Back again with another
tutorial session for you. And in this session we
are going to create several different anatomies in different shapes and positions. We want to create
some normal anatomies for our normal
characters this time, and we wanted to see
how we can do that. First of all, we
are going to create a male character which is
almost a little overweight, is he is in a
three-phase says view. Therefore, all
start with creating a circle for my
character's head. And then inside of this circle, I will create direction
line for my head. So you would know where would our
character's face would be. Then I would also determine the placement of the ear and then I will
add the jaw to my head. This way. Now what
am I going to do? Obviously, I'm going to add
the neck to my head this way. Then with one line. I will actually
connect the beginning and the end of the
neck together. As you can see I've done here. All right, Now I want to use two colors because we want to, actually, I want to show the arms and the legs
with another color. Therefore, you can defer the body parts from each
other better and better. For the chest. I'm
still working with the same black color and then
I wanted to add the arms. I will bring my red
color into the work. Well, we would see this part more and this left
part would be seen less because we are creating a three-phase
is V0 character. And these are the
principles and rules. As I said, I want my normal character to
be a little overweight. Therefore, I will show the
stomach and the buttocks area. Like this. I'm going to use a
circle to show them. I can add my volumes
over here now. I'm going to use my red color
for the arms and the legs. I'm going to show the arms and we would not see the
other arm actually very well because we can
only see a part of it because our character is
in a three-phase his view, therefore, first of all, we are going to create
the arm that we can see completely and
is closer to us. And then we will create the other arm as much
as we can see it. Then from the side
of the body I'll bring the arm down in this way. And now for the hand, I'm going to create just an oval because right
now we're just creating and general anatomy for this
other arm because we have an overweight character and
it has biggest stomach. We can only see parts of this
other arm and other hand. So we would just
create a guideline. Therefore, we can level
the hands and we can show, we can see a little part
of this other hand. We are going to add
the legs over here, obviously again
because our bodies in a three-phase his view, we can see this leg more
than the other one. I'll create a novel
and I'll continue my leg downward like this. Then I'll bring the other leg down as much as I did
for the other one. From the side of the other hand, I actually bring this leg down. And then with a circle as
the joint and the knee, I'll connect it to the
lower part of the leg. It's actually something
between a circle and an oval that is showing the
knee for us or knees that, or to say, then I will continue the rest of the leg downward. Now for the ankles, I'll create a leg and
then I will add the foot. Because this leg
is closer to us. We can create this one as
a front view like this. We can create the other one. Not so in the front
in three phases you, and as you can see, this leg and this
food will be bigger comparing to this one
which is on the left. I will add this front
part of the foot as well. So this is our character. A point is that for the
jaw of our character, we can also use the red color. Just because we want to
show that this area, the skull area, is
separated from the jaw. We want to show that these are two different parts
connected to each other. This is how we've
created this character. The red that I've used is 321. This is our film. Male normal character, which
is a little overweight.
22. Anatomy of a relatively tall man: Hello again to my dear friends. I'm back again with continuous of our tutorial and this time I'm going to create
another male character which is thin and a little tool, basically taller than
my first character. And even that character
is in three phases view to start with the placement
of my character's head. Well, first of all, I start with creating an oval to determine the
placement of the head. Like this. Then where the guideline
I will determined the direction of the face and the head as I did
for my previous one. Now what I'm going to do, I'm going to add a
jaw to my character. As you can see, the face of this character is more stretched down and it's thinner because our whole
characters than there. Then I will create the ears. Actually, we can only
see one of them. So basically I've created
a hit Santa Ana stretch. As you can see, the head
that we've created for our previous character is more around it and
it's choppier. But for this one, because our whole
character is thin. The face is also thin. Denial create the neck
and with a line simply, I connect the beginning and
the end of the neck together. Well, we should be careful
that for this character, the height should be told and
the weight should be less. I'll create the chest
area up to here. Then for the stomach. I get the lines toward
inside and down a little. Again, I say because there are characters thin and
as you can see, you should reduce the
volume of your lines. You should actually bring your lines toward the
inside of the body, not to the outside. Then for the buttocks
area or for the pelvis. I'm going to consider
a small circle. You should consider
that all the parts, all the body parts should go together and
they should be the, actually the proportionate
should be a right portions. I'm going to use my red
color to emphasize on my character's job
because I just wanted to show the difference between
the skull and draw. As I said before. Now I will determine the
placement of the arms. And as you can see, our character is a
three-phase says view. We can see this arm more
comparing to the other one, which is on the other
side of the body. Therefore, we will continue this arm up to almost the waist. Bring it down almost
to the waist. And then we create the rest
of the arm below the elbow, right on the side of the body. Then we get to the hands, the wrist and the
hand and the fingers. But we are going to actually create an oval for
the whole hand. And we do not get into the
details at all because our main goal here is only
and only the anatomy, basic structure of the body. We are only creating
general shapes. I can only see a part of the other arm right
next to the shoulder. So we only create that area and then we level it
without other arm, we create the elbow. And again, for creating
the hand again, I would level it with my
previous one, the right one. Now from here, from the pelvis, I come down and I
will create the legs. You should just
consider that because the character you are
creating is tall, it would not sketched out
of balance and you will not create the legs in different
positions or direction. So you should be really careful that the lines
that you're creating downwards for the
legs are straight and in their correct
direction and position. As you can see, my character
is tall, therefore, I have to consider long
legs for my character. Then I will create circles for
the knee joint, both legs. Then I will continue this
line to complete my legs. As you can see. Because my character's
thin and slim. All the parts should
be stretched and thin. Then after that, I'm going to create the legs short myself. Then I'll do the other one. I'll create the other
foot little bit toward, out, toward left basically. Because our character is in
a three-phase says view. This leg should go towards
that way a little. Basically. We can create this other one, the right one toward ourselves. I mean, in the front view, it depends which one
do you want to use. But the direction of the legs and foot and feet should
definitely go with the direction of your whole body because your character would
not get out of balance. So this is our second
male character, which is tall and thin. We've created it
together step by step.
23. Medium child anatomy: Hello, my dear friends. I'm back again with another
tutorial session for you. In this session,
basically we are going to create the character of a child. Actually on the boy. Something that I wanted to
tell you in the beginning of our work is that if we want to create a child character next to an adult character, where should we start our work? Therefore, we can actually compare its height with
our adult character. Something that I can tell you is that if you want
your character to match your adult character
and you would know where you should start the
head of your child character. You should start your
work in this way. That from the waste of
your adult character, you should create the top of your baby's head or
your child's head. It means that from here, I will start creating
this circle for the head. So that would be, I shouldn't waste of
my adult character is the top of my child's character. This is my child's head. Now what I'm going to do, I'm going to create my child character's body exactly on the opposite side
that I've created my adults. I mean, the three faces view would be toward this
side, towards right. This is my character's
head and face. And you can consider that you actually can measure the
other parts as well. In comparing to your
adult character. I mean, you can create
the other body parts with comparing it to your adult character so you can measure
them correctly. You should be very careful
that while you are creating the other body
hearts of a child, it should be really
careful not to get out of the line and not to exaggerate anything you should remember. To create all parts. Smaller. It would go with
the whole body and your proportions with
knowledge go wrong. I want to create my child's
upper body part and I'm going to continue it
up to my adults knee. The waste of my child would
be up to the adults knee. I come down from both
sides and I consider this area as waste. Then I will add the
pelvis like this, as you can see. For the pelvis area
and for stomach, we are using circles. For the upper body part. We've almost is an
oval. All right. I'm going to use another
color to add the arms and legs GMI, tribes character. For our character's head. We haven't added the job because our character
as a child, therefore, we are going to create a very small
jaw to our character. Well, in fact, it's inside the character's head because
we have a child over here. So you should pay
attention not to create your character's head
various stretched. Because as much as
you stretch the face, your character will get older. As you can see in
previous character, we've stretched the face
bought in children. We should not do this at all. We should be really careful
not to stretch the face. We see this arm more and we see the
other arm less because this one is on this
side of the body and the other one is not
seeing completely. Just like that. I will create the arm. And then I'm going to add my character's legs
from the pelvis. And I should be really
careful to create all the lines straight. Therefore, my body, actually, the child's body would
not get out of balance. If you feel like your body will, might get out of balance and
it would not be straight. You can just create a
guideline from the top of the head to the bottom
of your character. Therefore, you can check
the balance of the body. Then I would also
create Denise and then create the lower
part of the legs. Until I reach the ankles. For this area, I would
have to create the feet, one on this side and another on here. Just like this, I've
finished my work. I mean, I finished the
base of my character. Do not see the other arm, but we can show it very, very slightly on the
side of our body. Just as very thin line
right next to the body. Because we've brought this arm toward behind of the body
and toward the back, we can just do the same
for this right arm. It's already placed
behind the body. And as you can see, our trials character is on
the same floor as our adult. It's on the same
horizontal line. And if you wanted, we could actually take the child's hand to
grab the adult's hand. You can create two characters together next to each
other like this. And we'd good
measurements when you compare it with the adult. That's it.
24. Old man Anatomy: Hello to all of my
dearest friends. I'm back with another
tutorial session for you. And in this session, we are going to create an old
man's character together, which is standing in
a three phases view. We will create our old
man's three phases view in the same direction as, as we've created our
child's character. Anatomy of our old man's
character is created in a way that the upper body parts of our character is
bent toward forward. Then the legs are bent
toward down as well. Because we are creating
an old person. So we should show
that actually in the anatomy that
we are creating. So I'm going to create the
head is straight at first. Then I will use a circle
to show the head area. Then with a line, I'll determine the
direction of the face and determine the
angle of the face. Then after that, I'm going to create the neck for my character toward back, as you can see, it would look like this. We have not brought
down the neck straight down because we are
creating an old character. Therefore, we should
consider that in our anatomy that the old people
have bend down bodies. I'm creating it like this. His back is bent. I am going to connect the
neck to the shoulders. Then I will create the
chest coming down. Then after that, I will create a waste in this
shape toward inside. As we have this
three phases view, we go toward insight
from this side. If ever creating our character
in the opposite direction, we would do it in
the opposite way because we wanted to show
that the back is bent. Therefore, we are actually creating a character
in a crescent shape. Therefore, I will have the pelvis and I'll
create it as a circle. On one side, it will be
attached to the waist. And on the inside and
the right side it will be a little bit out
of the waist area. I'm going to continue my work with the other color
and with my red color, I'm actually going to determine the placement of the
arms and the legs. First of all, I'm going to use a circle to create
the shoulders. And then with two ovals, I will continue the arm
until I get to the elbow. And I will bring down
this arm from the sides. Then in here, I want
to give my character a came because I want to emphasize on the point
that my character is old. Therefore, in this way
I can show it more. That my character is old. And he is walking with a cane. I bring my arm out toward out. And then I'll add the wrist. Then I'll bring the cane
straight down toward the ground. I actually created a cane
with two thin lines, narrow lines next to each other. And I will create the curved part of the
cane on the top like this. I can actually bring the hand on the cane so I can
show he's holding it. I'll complete this
other arm as well. And then after we've
created the legs, we can determine the
ending part of arcane. So I'll continue
bringing my arms down. Then. I'll create an oval
for the head that's less. Well. The legs are going to be bent toward down and forward LA tilde because this
is an old character and it cannot stand straight. Therefore, we are going to
bend the knees and the legs. This leg which is toward
us, basically seeing more. The other one can be seen less. Now, after we've
determined the knee area. We would also bring these lower parts of
the legs toward back. Little, not too much. I don't want to exaggerate
so much here. Then. I would want to
work on the feet. And just like that, I will complete the feet. This way that we
came down is only used for old characters because we want to
emphasize on the age and the disorder in the anatomy. Want to show that completely. As you can see. I will finish my cane
on the same level as our legs and feet because the measurements
should be the same. We would also add the jaw
to the skull on the face. This is our old character
that we've created. In this way. It's a little bent down and the anatomy is a
little bit disordered. Should just be
careful about that.
25. Physical man Anatomy: Hello to all of my
dearest friends. We are continuing our work
with another tutorial session. In this session, well, we are going to create a male character which
has wide shoulders, maybe an athletic one. We want to show you
how you can create a big wide character. Well, obviously I'll be starting with creating
my character's head. This time as the
shape of an oval. I'll determine the
placement of the head. Then. Determine the
directional my face. That which way I want my
head to be created in. Now. Because I want my
character to be big and athletic and I wanted
to have wide shoulders. From the slides of our head. We should go outside
toward out like that. From here. We would go out as well. Then after that, I'd want to connect the beginning part and the
ending part of the neck, which would be the two
parts of my shoulders, two sides of the shoulders. Then from here, I
will move down. Then creating the
characters chest. I would like to move
toward insight like this. Then after that, I will add the waist area. Just like that, would also create the pelvis
as the shape of a circle. And I'll place it
just below the waist. Add it to my character. Then. I'll determine the
lines for the chest. Then with another color, I will add the
legs and the arms. For the head area. I will add the jaw with
another color which is red. For me. You can also use any other
different color that you want. No necessity. For the arms. I start from the shoulders and I will share them with ovalis because the
other hand is on the other side of the body and it's actually behind the body. We can only see small part
of it that we create. As you can see. For our big character, which has wide shoulders, came out from both
sides more than usual because we want to show the shoulders are very wide. If you didn't want that. We could actually bring these
lines down from the neck. We could have had a normal guy. But when we want our
characters shoulders to be wide and we want to show
a big upper body part. We just have to bring
the lines out as much as we can to
keep the proportions. And that would be it. Now I'm going to create
the arms like this. Then after that, I'll create
the lower part of the arms. Then I will show the
fingers with a simple oval. Create the other arm
as much as we can see it and in the same
level as our right arm. And then like this, we would determine the
placement of the wrist and the fingers generally has
an oval for the whole hand. For the pelvis, I'm
going to add the legs. And because our character
is in a three phases view, definitely this leg can be seen more and it
will be seen bigger. And I come down until
I get to the knee, which I'm going to show
the circle or an oval, actually something between them. And I'll bring the other leg down from the side
of the body as well. Just like that, as easy as that. Then I'm going to create
the rest of the leg downward until I get to the ankles and then
I can create defeat. I create the lower
part of the legs below the knee, like that. And we are actually considering that because
our body is stretched, it will not get out of balance. So you should be
really careful with the balance of your body
as you are creating it. Don't exaggerate too much fat, you get it out of balance. That's last, I will add defeat. My wide shoulder character, which has a big upper body part. And I'll create this other
foot forward toward ourselves. That's it. This is our whole character. It was very easy. You just have to be
careful a little.
26. Anatomy of a tall fat man: Hello everyone. We are here again with another
tutorial session for you. And this tutorial,
we are going to create the anatomy of
an overweight person. This is actually
a male character, which is overweight and is
in a three-phase says View. Start with creating
the skull of my head. This way. Then. I will determined line for my
faces direction like that. Then I will add the
neck to my character, which would look like this. Then after that, I
will add the jaw to this area because we are going to create an overrate character. Right now. I'm only creating this
area, believe it. And then later because
my characters over rate, I will add it with
another color. We are actually going to basically add some
shoulders to my character. Then for the arms I'm going
to use another color. Therefore, I'm not going to
complete them right now. Now I more focused on the chest, the upper body part, stomach, and then later I
will add it to them. Because the person that we are creating is actually
an overweight person. We are going to use a circle for the stomach area
and also the pelvis. Just like that. Then with another color. I'm going to add the
parts to the face, which are going to show that our character is
really overweight. And somewhat can
say a base or fat. As you can see,
I've added the jaw. And now the whole face
of my character is for F fat person because we've added a really big job for our
person, for our character. Now I'm going to add the arms. This arm would be obviously
seen more and the other arm, which is on the right
side, can be seen. Little just a little
part of it can be seen. I'm going to consider
the arms, again. Big fat. Because the person that we are creating is actually
an overweight person. And we can also show
it very easily. The volume of the
arms and the hands. I can only see a little a
bit of this other arm on the top and a little
below the stomach. Again, when we get to the legs, would also consider
the legs very big. Because of our whole character. Why we're doing that, we should consider that this
leg can also be seen more comparing to the other
one because it goes in perspective and
it's closer to us, as we've always said. Alright, forward the knees. I'm going to create a
horizontal stretched oval. Almost the big one. Comparing to delay
that I've created. It should be proportionate. That if you can see
for our thin person, for a thing character, we've considered the joints
and the knee as a circle. But as you can see here, if you want your character to, you seen overweight or fat, you should consider lots of
parts with lots of volume. And very big sometimes. I also create the lower part
of the legs, big as well. Then between the legs, we will consider space distance. Because our character is big, we are going to create
this leg smaller. As we come down, we create the legs thinner. I mean, we reduced their
volumes as we come toward the feet because it's right that we are
creating a fat character, but still it should obey
the rules of human anatomy. At last, we will add the feet to our character and then again, defeat are also bigger
and more volume to comparing to a normal
person and a same person. Again, as I said, this leg would be smaller comparing to the one
which is closer to us. This is DNS. To me, all the thoughts or
obese person has overweight. And if you want to do that, you should start
from the beginning, from the top, which is
our character's face. And you should consider a
bigger until we get to defeat. Everything should be bigger
and every Xing should hold its proportions comparing
to the whole body parts. If you want, you can also
created with more overweight, but this is almost normal.
27. Athlete male Anatomy: Hello, my dear friends. As you can see,
I'm back again for a you with another
tutorial session. And in this one, we are going to create a thin, tall character, yet
with wide shoulders. Wanted to see how it's done. And we want to see
how we can combine all these features together
and have them all at once. For the beginners,
we're going to create our male character in
a three faces view. Therefore, we start creating
the skull of the character. With creating a circle. I would have started my work. Then. With the guidelines, we are going to determine
the position of the head. I mean, where it's
going to face. Dan. I will add the neck. Then I will add to draw to the skull later for creating a character
with wide shoulders. Obviously, when we get
to the end of the neck, we continue the lines for the shoulders and
we actually bring them out toward two
different sides of the body, to the right and to the left. And very wanted to
start the arms. We will actually finish our shoulders like this and
then we bring the body down. But for people who are not supposed to have wide shoulders, we are going to actually
bring the lines very smooth and round down. But because we want to show that this person has wide shoulders, we bring these lines down very
sharply with rigid angles. This is basically the
difference between someone who doesn't have wide
shoulders and someone who has. Just be careful. Because we want to show
that our characters thin. We bring the chest and
the ways toward inside of the body and we are
actually reducing its volume and make it thinner. As you can see, because they are characters in three phases view. We are also paying attention
to the parts that can be seen More or less. Then I'm going to add
the waste over here. Then I will create
my characters. Wastes like this. Well, the thing that I'm creating right here
now is actually being considered thinner because
I want my character to have some differences with
our first character that we've created
that was normal. This one is thin as you can see, but they both have wide shoulders and
big upper body part. Alright, now I'm going
to add the Georgia, my character with my red pencil. And as you can see, I will consider my
character's face completely thin with the lines that we've brought down from the
side of the skull. Dan, for creating the arms. I started from the part
that can be seen more. We are really careful
about the arms. That's because we are
creating a very thin person. We should not give too
much volume to the arms. And I want to place the
arms behind of my waist, basically on the back. For the other arm, we can create only
the part that can be seen in this angle of the body. We actually bend the
arm from the elbow and bring it to the
character's back. Alright, now I'm going
to add the legs. Actually, I'm going
to add the legs according to my body downward. Because you would not character to just slip out of balance. But because you know, the character is
a thin character, you can basically create
the legs very close to each other because we have a
tall character as well. We will consider this upper
part of the leg more. We'll do the same for the
lower part of the legs. If you wanted our
character to be short, we would definitely measure
these parts smaller. We want it to be tall, therefore, I will consider
these parts more. I actually consider these
parts longer and bigger. We would basically place
the legs next to each other and then defeat next
to each other as well. Then completely
according to the legs. We will consider the
feed small, thin, and narrow because our whole
character is thin and tall, yet with wide shoulders, these are the things
that you should pay attention while you are creating the body
as one. That's it.
28. Anatomy of a skinny teenage boy: Hello, My dearest friends and bank again with another
tutorial session for you. And in this session, we are going to
create a thin child. We would want to see
how we can create a child and a thin character. Put them in one. Well, we are going to create our character in
the three faces view. Something we can consider, is that something we can consider is that based
on our thin person, we are going to create
the child together. Well, we're not basically
creating a kid here, it's more almost a teenager. Therefore, a little bit below
our characters shoulders, we will create a
line that would be the tip and the top of
our teenagers heads. So this time, instead
of creating a child, we are almost creating
a teenager's. So the top of its head
would be a little bit below our tall girl
characters shoulders. So you should consider
that in this way, you can actually measure
your work easier. So if you want to
create two characters, they sue each other. You can just do
it really easily. Because we are
creating a teenager. We can create a small jaw for it or we can not
create it at all. We can just create a
circle for the whole head. I'm going to add the
neck to my character. Then I would create some lines
to go for the shoulders. And just like that, I will come down. I bring my lines
toward each other to make the chest smaller. At the bottom. Well, the teenager that we are creating is a thin teenager. Therefore, we'll
consider that as well. All right. I would
also want to work on the pelvis. Then. I'm going to create
the red parts, which are the arms and the legs. As you can see, I've created two circles
as the shoulders. And because our characters thin, I'm going to consider the
arms very thin as well. Then I will bring the arms going to or the back of my body, behind of my body, which is actually the
character's back. I would do the same for
the other arm as well. Basically, they are behind
the legs on the back. Then I will be adding
the legs over here. Again, I say, because we are
creating a thin character, everything should be thinner
comparing to normal. On our teenager. Now, I'm going to create
the knees with two circles. Then. I'll create the lower part of
the leg, bringing it down. I can bend this leg a
little bit toward down. Then it would look like this. Here we are. If you want, you can
create them straight or you can bend them and later that's when you see
your own decision. I've just wanted to
make a difference. So I've done that. Did that actually. Then at last, I'm going to
create defeat just like that. Very easily and very simple. This is it. This is our teenage
character which is thin. And you can complete
it this way now, because our previous
character is tall, have considered it
a tall character. It wasn't normal. Therefore, you can
see that our teenager would look a little bit shorter comparing to our previous one. But because if the previous
character was normal, they would be on the same
level with each other. On the bottom. I mean, they would standing
on the same ground. But because our previous
character was taller, therefore now our teenager
looks a little short, but it's really not. And fortunes are completely
correct for a normal person.
29. Anatomy of a tall, thin woman: Hello everyone. I'm back. I met another session
for you today. Well, I'm going to teach
you how to create a female which is tall and
thin and we want to see how it's done. Alright? We should consider
that generally and basically should
create female characters more delicate and fancier than male characters
more delicate, you can say, therefore, for the skull that
we are creating, we are considering an oval. Because as usual we
start with the head. We should have this delicacy in all of our body and we are just going to start
it on the head. So first of all, I'm going to consider
to head and then I'll just create some
lines in order to show the direction of the head, which is in three phases
view toward this site. Then I will add the
neck, again, thin. For her shoulders. I will consider the
shoulders very small because the character that
we are creating is a female. At the same time. She's thin. Pay attention to these details while we are creating
the anatomy. Then I create the chest area. Then after that, from the
back of my character, I go toward the waste. And as I do that, I will make my character
thinner towards the waist with the use of the lines that I'm
bringing toward each other, toward inside of the body. Because I want to thin waist. Then for here, for the pelvis. Link character, I will add some more volume
like this simple circle. Then I'm going to
create the legs and arms with another color in
order to show the difference. Then, first of all, I will add the jaw to the
skull that I've created. But I will create the jaw very, very elegantly and delicately because my character's
face is very thin, stretched and round,
snow freely angular. Then I would also consider the chin and jaw thin
and the stretch. Then after that, I would want
to move on and create very, very thin arms for my character. Because first of all, our character is a female
and sick and dual. Basically it's a thin character. Therefore. I'm going to create very
thin hands for her as well. Thin arms and thin hands. Because we can see the other
arm less than this one. Just like that. We bring it down from
the side of the body. I just check to make sure it's leveled with the other
arm. The other hand. As you see, the arms and legs are
considered very, very thin. The arms right now. The point is that you should
be a little careful because this hand is closer to us
comparing to the other one. Therefore, the
other one which is further from us will be end. We'll end and we'll be
considered a little bit above the one which
is closer to us. Especially because I want my character actually I want to show my
character is walking. Because if she was
standing still, didn't have that
much difference, but because she's moving
more important right now, therefore, I am going
to first create the languages closer
to me and is bigger. It has been seen
more and bigger. Then I will create the other languages on
the other side of the body and is seen less. You should consider that
we do not see this line coming behind of the
other leg, but it exists. We just don't see it. But we should just
create it very lightly. Therefore, you would not
miss any part of the piano. To me. Then I will create the rest of the leg after creating the knees
with two circles. Again, pay attention
that you should create all the body
parts very thin. And this area, we would have the ankle and foot. Then I would want to do the same for the other leg
and the other foot, which is created like this. This is our female thin, tall character that
they've created together. And as you can see,
she's walking. So we've considered
the legs moving. One leg is more forward and the other one is a
little bit more behind. Would just look like that. Next, I'm going to do
some touch ups over here. We would do not see
this area of the foot, which is behind the first one. But we can just create
a little bit of the tip of the toes so
you would know it exists.
30. Anatomy of a short fat woman: Hello to all of my
dear friends again, I'm back with another
tutorial session for you. Well, in this session, we are going to create An
overweight female character, which is also an
almost short as well, and we want to see
how it's done. So again, I say, I'm going to create a short, overweight female
character and I'm going to create it in a
three phases view. And I start my work with
creating a circle as the head. And obviously because
my character is going to be overweight or fat, I will create a
circle as the skull. Well, if the person that you're
going to create is thin, you would have to create
your skull as the shape of an oval and vice versa. As I've said. This is fat
or overweight character. Then I will add to the
neck, to the skull. I will create to draw
with another color. I will add the shoulders. Then because the person that we're creating is overweight. I will bring the shoulders a little bit more toured outside. For the chest. I'm going to bring the lines
out a little like this. Then because our
character is female, we will show the volume of the breasts creating
two circles. These are actually her breasts. And one of them can come
outside of the body. I mean, we should
show that they are coming out to the body. Now. For the waste
and stomach area. I'm also going to create
another circle for here. Just as this. Then I'm going to connect
to waste to the stomach. Now, I'm going to use the red color to add
the arms and the legs. But before even doing that, I'm going to add the draw of my character to its
skull, her skull. So as you can see, I've added a big job
because I want to show overweight
or fat character. Therefore, we'll
consider the volume of the jaw more and more. But again, we do that
considering the gender of our character because if it's a female as we
have here right now, we should consider it
more round and smoother. And because this arm
can be seen less, we actually consider that. Basically the only part
that we see is over here because both the
stomach and the breasts are, the breasts are covering it. Then I'll bring
the arm from here toward behind of the body
to the females bank. Because our character
is overweight, we will consider
this arm very big. As you can see. It has lots of volumes. Now I want to place the
arm on the waist actually, I want to connect it
to the waist area. Then an oval for the whole hand. Because again, I say we
denote get into the details and we're just making
everything in general. All right. Now I
will add the legs to the character. Again. Because our character
is overweight. The legs are going to
be fat and big as well. Because our character
is also short. We didn't note consider
the legs very long. Actually consider
them short as well. Just like that. I will add the knees as
horizontal stretched ovals. Then.
31. Anatomy of a hunchbacked woman: Hello everyone. I'm back again, my
dear friends with another tutorial
session for you. Well, in this session we are
going to create a person together which is bend forward and is actually
a hunch backed. He or she will have a hunchback. And I want to show
you how you can create an anatomy like this, how we can proceed. Alright? First of all, I start with
creating the oval for my character's head because I want to create
a thin character. And of course, it's also
in a three-phase his view. For soul. I start with creating the heads
of my character. This way. Then I will create direction line for
my character's face. Alright. Now, I'm going to create
denature like this. What do I mean? I mean that I will bend the neck and then bring it
back to the back and vary your head was
you will bring the neck curved toward the opposite side because the head is on
this side right now, for our character,
we denote sketch the neck straight down from
the body toward the body. Actually, basically
I curved line for the neck and I bring it toward the opposite side of the head. For the chest and
the upper body part, which includes the
back of my character. I will consider an
oval because again, I say, this is a
hunchback person. We want to show that
hunchback over here. We should have this curve as the hunchback for the character
that we are creating. Right? Now. I'm going to connect
it back to this oval. I mean, actually I'm going
to connect the waste to this overall that
I've created over here. Then I will add the pelvis. Because the character that
we are creating is a female. We should also create some
breasts for her like that. Then I'm going to use another line to create
the arms and legs. Well, first of all, I'm going to add
the jaw to the face because I wanted to character that I'm creating a thin person. Therefore, I'm going to create
a stretched thin jaw for my character because I want my whole
character to be thin. So it's not unusual. Now this was about the head. Now I want to place
the arms in front. I want to put them on each
other and bend them as well. So I start with creating
parts of the arms. Because our body is
actually bends down. We see this hand, see this arm completely. Our character is thin. Therefore, we will
bring this arm down VD, as thin as you can
see it over here. I will create the wrist and
the hand looking like that. Then there is another arm on
the other side of the body, which we can not see completely, but we can bring it down
from the side of the breast. I bent it. I move toward this
other hand and I'll place both of hands
right next to each other. Almost. Just like that. We actually place the
arms on each other. Now, I want to add the legs. You should be
really careful that because he had a hunch
backed person over here, the legs should also
be a little bit of stretched and bent as well. But you should be very
careful not to lose the balance of your
character at the same time. Therefore, first of all, I'm going to create the
leg which is closer to us. And as you can see, I'm also creating the legs very thin because the
character is very thin. Then I'm going to create this
leg right next to this one. I will determine the
knees for my legs. And I would also create
this area below the knee. If you pay attention, I've brought the
legs toward this and then this direction. Just do the same for
the other leg as well. It's really easy. Bring both of them down. And then basically I'm
going to create the ankle and defeat one after the other. I'm also creating the fingers
in a whole general shape. Then I've placed this
one right next to it. This is a hunch backed person that we've
created together and we can actually show its anatomy like that as I've
shown you right now. And if you want, you can also create a
cane beneath the hands. Or if you don't want it, you can just keep it this way.
32. Baby girl anatomy: Hello to all of my
dearest friends. I'm back again for you in
another tutorial session. In this session, we are
going to create a girl, actually a child, which is a girl and we want to
see how it's done now. Well, first of all, as usual, I start with creating my
characters, the skull. I'm going to create it this way. Well, I'm creating the head for my child's character,
which is a girl. So I'm probably going
to call her a sheet. We should just consider
that in children, the head is bigger comparing to their bodies and
little, not too much. Then I will determine the
direction of the face, which is in this way. And it's definitely in
a three faces view. Then after that, I'm
going to add the neck. All right? Because we are creating a child. I'm going to create very, very narrow shoulders for her. Basically, we come
down real quick. We don't have any wide
shoulders for our child. Basically for all our
children characters. Then I would have the
chest area, the waste. Then after that, I'm going to create this area
which is a pelvis. And we create the pelvis
as the shape of a circle. Then for this area
which is the chest, we can actually start our work with just
several simple lines. Now, I'm also going to
determine the placement of the arms and legs for
my character's head. I'm going to create a very, very small jaw just to
create some chin for her. As emotional as that, because our character
is a child, we wouldn't know how to create a big draw for our character. Then. I'm going to work on
the arms like this. Then because the
character that we are creating is actually
a thin character, we are going to create
some arms for her which are adequate to the body. I want to create the
arms on the side of the body and I'll bring it
toward inside of the body. I mean, I'll bring them forward because I want to put the
hands next to each other. And for the other arm as well, we will create as much
as we can see it. And then I'll bring
it toward inside, toward front of the body. And then I put the
arms right next to each other and we put the
hands on top of each other. So that's how we can place
the hands on each other. Now, I'm going to add
the legs over here. And as you can see, the height of our character, because she's a child, is completely short at all. The measurements will be
considered shorter and smaller comparing to what
we've been doing for adults. For the knee, I'm also going
to create two circles. And then I will create the lower parts of
the legs beneath Denise. Going down. In this shape. I basically do the same for
this other leg as well. I come down, then I
determine the ankles. And last I'm going
to create defeat. So I'm going to create defeats very generally
in this way. I just created this shape at the tip of the
feet in order to show that it contains some fingers. Well, you should also consider that the language
is closer to us, is always a little
bit bigger and longer because of
the perspective that we put our
character inside of it. Because our character is
in three phases view. This is our child character, which is a girl. All right, that's it.
33. Anatomy of another male athlete: Hello everyone. We're back again here with another tutorial
session for you. Well, in this session, we are going to create
an athlete together. Athletic, male character. Wanted to see how it's
done now. All right. First of all, I wanted to start with creating my
character's head. And I want to place it in a
three faces view position. Now with creating my
characters skull of the head. Starting my work which is a shape between a
circle and an oval. Consider it this way. Then. I'll determine
the direction of the face with just
these two lines. Then after that, I will
add my characters neck. Just as you can see it. Done that, I move on to create the shoulders
of my character. Now. Bring down these lines. Now, I connect these
two parts together for my characters chest
because I want to show that he's an athlete. I will create his
chest like that. I will actually emphasize on the breasts a little
because he's an athlete. And if you can see
even male athletes, you can see the breasts. So I'm going to make
them a little bit more prominent and I'm going
to emphasize them a little. Even for above them, I'll create two curved lines as a representative of the
muscles here. Then. From the lease, a chest, from below their breasts. I'll create two lines. And then I will consider
the waist very thin. Obviously because the person that we're creating
is an athlete. Therefore, it has lots of muscles in all
parts of his body. All right. Now for
my characters, pelvis, I will consider a circle in this
shape. Just like that. I dragged the lines
down very, very easily. Now I'm going to use my red color in order to add the legs
and the arms over here. Well, first of all, I start with the face and I will add the draw
to my character. That's it. Well, after that, I am going to work on their arms because the character that
we're creating is athletic. Basically, we are going to
create the arms in this way. As we go toward the elbow. We are going to make
it thinner like that. And yet again from here, add some more volume. Again. You can show the prominent parts of the muscles as
much as you can. The simple anatomy. Then I move to create a wrist and I will create
a handout last. Alright. Then after that
I'm going to create the other arm from behind
the chest and the breast. I bring it down. And then again from here, I will show the muscular
part of the arm, the hand. Then there would
be the wrist and the fingers in a
one general way. Now I'm going to add the
legs are to my character. How am I going to do that? Well, first of all, I create one of them
toward this side and another one will be
created like this. One of the legs are
a little bit towards the back and another
one is a little bit forward because
I want to give more athletic aspect to
my character over here. I will add the knee area. Then after that I'll
create the parts below it. I would work on it like this. Now I'm also going to create
the other leg as well. From here. I would create
a shape like this. Again, I will create a
circle for the knee. Then obviously, this lower part of the
leg will be created here. And we bring it down. Because I want to show that
our character is athletic. I would definitely bring this
part of the leg a little bit out and then
I'll bring it down. And then I would
work on the ankles. And then I will add tos. I mean, I'm actually showing this shape as the placement of the toes because you're not
working on the details. So I don't literally mean that. All right, Here we go. This is our athlete character, which was a man.
34. Anatomy of a woman with a slim waist: Hello to allow my
dearest friends, I'm back again with another
tutorial session for you. In the county ideas of the character that
we were creating. We want to create a
female character which is thin with kind of
a curved shape. What does it mean? It means
that we're going to create very thin waist for her yet a big pelvis or a
big buttocks area. How am I going to do that? Obviously, I'm
going to start with my character's heads like that. Then I will determine this line for the
direction on my face. Then I will add the neck. Later on we will add this jaw to the skull
with another color. Don't worry about it right now. Basically, this is a neck and then I can move on to
create the shoulders, which I'm going to add here. Therefore, just as easy as this. I am creating the chest area
which contains the breasts. Alright. Now I'm going to
continue my work like this. Then. I will added the waist area just like
that to my character. And as I've said before, we are going to have
a very thin waist for her would create with
a shape of a circle. And then we connect
it to this part. Alright. Now for
this pelvis area, I am going to consider
a circle. This shape. Then. Just like that, I
will create my work. I proceeded until I complete it. And as you can see, waist area is very, very thin. We've also considered a big pelvis or a big
buttocks area for her. Now, I'm going to
change my color. Basically. The parts which are missing. For example, for the beginnings, I'm going to add my characters
draw over to the head. Then later. I would want to
work on the arms. Therefore, I would also add
them to my character's body. I could also get the hands going toward the behind of the body, actually going to be
placed on the back. Now I can continue my work. Now we can also do the
same for the other arm, which we can see
to let the love. We can create just
the upper part of the arm over here next to the breast and the
rest of it will be placed behind our
body on the back. Now from here, I'm going to
start creating the legs. Because our character is placed in a three faces view position, this can be seen more and this right one can be seen less. Will be seamless. Actually, because it
goes in perspective. Then I will add two
circles as the toonies. Then I'm going to create
the part below the knees. Then last I'm going to
create the rest of the foot, which are called the ankles. The very last, the very last. I am going to finally
create the whole feet, creating ovals on tip of it to show the
placement of the toes. That's it. This is a female character which has a very thin waist and you can create
it just like that. We are actually creating
different positions and different models of
the characters bodies. And this is another
type of anatomy. Models that you can use.
35. Anatomy of another fat woman: Hello everyone. As you can see, I'm
back again with another tutorial
session for all of you. And today we are basically going to create
a female character again, which is a little
bit overweight. You can say she's fat
and then you would know how we can do
this literally. I'll start my work with
creating my character's head. Should consider that
whenever we want to create a character which is chubby
or fat or overweight, you should consider the head bigger than usual or
normal characters, because based on our
character's head, we will create the body. Therefore, the head is one
of the most important parts for our whole work and we
will consider it bigger. And shrub year comparing
to the head of a person who is fit or has
a normal body or even thin, small, rounded and its maker. I'm going to add the
neck to my character. And because we are creating
an overweight person, we do not create very long
neck for that person. All of these small
details into works, better to say all of
these small hints in the work will actually help us to execute our work
better and more. After I've supposedly
created the shoulders, I'm going to create the chest
like that upper body part, the breast and stuff like that. You should just consider
that all the parts in our body should be
considered with volume. Because here we want to show that our character
is overweight. Now I'm going to actually combine the stomach and
the pelvis together. On the contrary of our very
athletic girl athlete, which was a girl that
we've completely separated the stomach
from the pelvis. In our fat character are
overweight character, we just create a
very weak circle, very generally for the stomach and the pelvis at the same time. Now I'm going to choose
my red color and I want to complete my work over here for creating
our characters jaw. We can actually come down
from both sides of the head. Then we can connect
these two parts together with considering
a shape like this. Actually chin. So we would show that our
character is overweight and he has some kind of extra meat
and skin beneath the chin. Below the chin could have
different coins of them. Now I'm just giving you
the basics and debase anatomy for anything that
you'd like to create. I mean, for anyone in any position that you
would like to create. Now you are going to
create the arms very more profound and they are going to be
created a lot bigger, especially comparing
to a normal or a thin person that
we had before. We can also place the
hand on the belly, stomach, both the same. This time the female
is touching the belly. And we would see
the other arm very, very little because it's
behind of the body. But we can just create it
as much as we can see it. Therefore, because
character is overweight, you can only see a very, very thin and narrow part
of the arm or the hand. The rest of the hand and the
arm will be placed behind the stomach and we
can not see him. That's it. And now I'm going to create the legs according to
my characters pelvis. But you should
definitely consider that because our
character is very fat, it has very big legs. We would create the other leg
just like that very easily. Worry about this at all. Just remember this
language is closer to us, would definitely be bigger. Just a bit longer and taller because it definitely
goes into perspective. So have you counted the languages closer
to us would be bigger. Then I'll add two circles
over here as the knee joints and then I'll create
the lower part of the knees like that, getting thinner as they go down. Just like normal human anatomy. Then for the ankles. Basically, I'm going
to create defeat. We just easily add
two feet over here. And I'm just going to follow the same procedure and
do exact same thing. And that would be my
results and outcome. Here we go. According to this leg. I would create the other
leg and foot as well. This is our overweight
female character that we can have here.
36. Anatomy of a person leaning on a wall: I love my dearest friends. I'm back with another
tutorial session for you. In this session, we
are going to create a character together that
is leaning on a wall. First of all, we create
straight line in order to have our wall because we want our
body to lean on this wall. All right. I'm going to start creating
my body's anatomy. And I'll start with
my character's head. I will create a circle
as the head. This way. Then I'm going to create a
direction line for the face, which would be here in this way. Now what am I going to do next? I will start creating the
body a little bit more behind because our head
is coming forward. Then we want to create the body from this
inner side of the head. We started about it from
this inner side of the head. It's showing that the head is, are actually more in
front of the body. They're not on one
straight line. I will create this area. I will create the upper
body part with an oval. And then I will connect the upper part with the lower parts of the
body with a curved line. This would be my
pelvis in here and close to the wall because our body is supposed
to lean on the wall. Then I will connect
this waist line. So I can connect to parts
of my body together. The upper part and
the lower part, which contains the pelvis. I'm going to create the hands. Well, I will create one
of these arms over here, hanging down to body like this. Then we will lean
the other hand on the wall like this. Then after that, I'm
going to add the legs. Again. We just lean one of
the legs to the wall. Then I bring it down and
then I move it to this side. And this would be
the back of the leg. Will do the same. And we will bend
it into knee area. This is actually a part of that. We have our knee joint. Leg is bent. Right. Now what I'm going to do, I'm going to complete the leg. Even believed in me. Then I'll create
the foot for him. I'll put toes on the
ground and maybe even keep the heels a little
bit above the ground. And then after that, I'm going to create
the other leg in this way until I get to Denise and I will create the other leg, this position. All right. I'm going to create this other leg a little
toward this way. Because our body is
leaning on the wall. I'll create this
leg, this shape. And we want to create our character
in a leaning position. We can clearly show it with
the position of the legs. This way. Basically, this
is the anatomy of a person, of a character which
is leaning on a wall. We can also create another way to show a person leaning on
the wall in another position. I mean, how am I
going to do that? First of all, as I said before, I'm going to consider
and I'm going to create an imaginary wall. But this time, you see this
area is the wall completely. This is actually the
surface of the wall, but it's not only a
line of the wall. Then I will stick to
head to the wall. Then I will create the
direction line for the face. Like this. I will create a direction
line for my body. You would see how I want to
create the body in this way. Then for this upper body
part of my character, I will create a shape like this, something like an oval. And then I'll create
a pelvis like this. Leaning on the wall. Then, based on the shapes
that I've created, I will add the line to
represent the waist here. Then I will create this arm
going down, bring it down. Still on the body. Front of the body
as you can see. The other hand, sorry, the other arm will be just going down on
this side of the body. Without bringing forward. Our body is a little bit bend, so we will add this leg
over here in this shape. As you can see, the leg is stuck to the wall. Still my character is leaning. The other leg should be
a little bit more in the back this way. So basically the
procedures are the same. I'm just creating this leg a
little bit more to the back. This is our second leg
which looks like this. If this is the side of the wall, the bottom part of the
wall, just like that, our character is
leaning on the wall. This is the surface
of our wall and this is the body which
is leaning on it. As you can see, I've
created two characters leaning on the wall
and dare anatomies. That's it. That says another way.
37. Anatomy of a man with a curved style: Hello to all of my
dearest friends. I'm back again with another
tutorial session for you. In this session, well, together we are going to create different positions
with our bodies anatomies. And we want to see
how it is possible, how we can create them. If you want to create a
person that is holding their hand on the wall,
is leaning forward. Actually, this person
is putting the hand on the wall and is
leaning forward. First of all, we create a line as a representative of the wall. We will create our body
proportions that we want. Basically, first of all, we should determine the
placement of our head. So we will consider a
circle as the head. Then we will create
the body in the continuous the head
going downward. Then from the front
part of our head. We will continue our body. This bar that I've
created as the shape of an oval is actually
our upper body part. And this part which is leaned down is my characters pelvis. That as you can see, the waste has a good
flexibility and it's completely leaning forward. Therefore, we can
consider the legs, one of them bend forward and the other one line for the waste we come
down from here. We will create the
beginning part of the leg, the front part of the leg, the beginning part of it. I would also want
to Denise downward. This way. Then I will create the rest of
the leg and at last, I'll create the foot
or feet basically. For this leg, we're going
to bend our knee forward and we bring the lower part
of the leg to dip back. The balance of our character
would not be affected. These are the placement
of our character's legs. Now, we can get some one of the hands
leaning on the wall. Just like this. As you can see, one of my arms and hands
are put on the wall. The other arm can be
placed on one of the legs. The other arm or the other hand. Difference, they're the same. Then from this top area, we start bringing the
arm down to the leg. And I can place my arm
and my hand on the leg. This is our arm. And as you can see, for the other arm, the rest of the arm is
actually placed behind the head and we cannot see it. So it does is start
from the shoulders. This is the anatomy of
the character which is putting one hand on wall and which is leaning
on the wall. And if you want, you can actually change the place of the
arms and the hands, put them in different
shapes, doesn't matter. It just that you should
be able to create the arms on the
leg or on the wall or in any positions
that you want. And at the same time
you should be careful to keep the balance
of your character. Now, this is usually used
for some characters which are sleepy or they have some problems that
they cannot stand. It straight. So they need the wall
to help them standing. Alright. I'll create
the head on the wall. I will create a direction
line for the face. Then I'll start creating
the body parts. This way that with some curves I bring the lines down and then from
the front part, I will create upper body part, this general shape of an oval. Then after that I will add
the pelvis with a circle. Then I will create a line
to create a stomach here. I mean, I create a curved line
to show the stomach here. Now we can also create the arms because I want the arms
to be dangling down. Just like that. We bring them down. I want to bring both arms down, hanging grabbing
anything or anywhere. Bring them down just like this. Be careful that because this arm is a little
bit more above, because it's on this side, it's on our side. The other arm, which
is closer to the wall, is a little bit lower. I'll create this arm. Bring this one down again until I get to the
hand and the fingers, but I'm not going to
create the fingers. I'm just going to
create a hand very generally in the
shape of an oval. As I said before, this arm is basically going to be placed lower
than our first one. Then I'm going to
create the legs. Over here. This leg is placed a
little bit more behind. The other one is a
little bit forward. It's basically a straight, but it's a little bit bend
downward and forward. The other languages on the
other side of the body. Languages closer to us
is murder in behind. We complete the legs. As before. Then we can create the other leg a little bit, as I said, more behind the back. In this position, this would
be the back of the leg. And at last we will create
the foot on this leg as well. This is our knee, which looks like this. I can also create the
other foot in this shape. The way that only our toes are placed on the ground
and the hill is not. We can actually
show the feeling of dizziness with this
position of the body with hands actually hanging down and with legs which are
not really straight. So these are two characters that we can create
leaning on the wall. And you're not really
conscious and straight.
38. Anatomy of a man bent over and touching the wall: Hello to all of my
dearest friends. I'm back again with another
tutorial session for you. Now. I want to create
another model of a body leaning on the wall
just with the difference that this time I'm going
to use an action line. So you would see you
can actually do, do this with your
body's direction line. You can actually use it itself. It can use an action
line for that. This time I want the
body to be a lot lower and put one hand, place one hand on the wall. The other hand would
be hanging down. What am I going to do? First of all, I
create a body with a line in this position
and in this shape. Then for the lines of the legs, you can create each leg that is holding the
weight of the body. Continue with our action lines. So basically I'm going
to say it again. I create a line for my body as a model for our body's
position and shape. And then in the
continuous of that line, I create one line for one leg, which is holding the weight of the body as actually
holding the body, then I will create my head over here as the shape of a
circle near to the wall. And then with the use of
this line that I've created, I will follow my body here. In this way. I will create this upper body part
for my whole character. Then I'm going to add the
pelvis to my character here. It's going to be in this shape. Then after that, I'm going to add the waist area and the
stomach, just like that. All right. Now I'm going
to create the arms. Well, this arm is supposed
to be placed on the wall. So putting one hand on
the wall over here. And the other one is
supposed to be hanging down toward the ground. Look like a very sad character. This is it. Now I can also determine the
direction line for the face. Therefore, we can show it more. Basically, we can determine the general placement
of the ear as well. After we've created
direction line for the face. Now I want to complete my
character's legs. All right? As I said before, this line can be for the
leg which is straight on the ground and it's
basically holding the body altogether
and standing. I'm going to complete
it in this way. This area is actually our legs knee. That's the foot. Now. I'm going to create the
other leg going behind. Like this. I'll create a knee
area again over here. Then. I will create the rest of
the leg in this shape. I mean that this leg
is bent from the knee and then I will place
the foot over here, just the toes on the ground. And the front part of the foot. We have both legs and feet here. We have our whole character
leaning on the wall. This is another way in another position of a
character leaning on the wall. That as you could see, we've created it with the action line hour or the
direction line of our body. You can either created
this way or you can use previous kinds that were
without any actual light. Well, basically, I advise
you to try both of them. Therefore, you could
see which one is more comfortable for you and which
one you can guess better. This was another position which is actually bending
down, venting over. It's either like that. Our characters
picking up something from the ground or exercising, or as I said before, it's very, very sad. Well, you can basically creates so many actions and motions with these different positions
of the anatomy. That's it.
39. Anatomy of a sitting lady: Hello, my dear friends. We are back again with another
tutorial session for you. Well, in this session, we are going to create
an anatomy together, which is sitting on the knees. And we want to see
how it's done. Dns I made and I'm
going to create is actually a female
and add to me. So I'm going to start
with creating the head. And we can create our character's
head in a front view. Or maybe because we
want our to be better, we will create our work and our character in a
three faces view. Therefore, we can make
it more interesting. I'll start with creating
a circle for the head. Then I will determine the
direction line for my face, for her face actually. And then I will add the draw. Because the character
that we are creating is a female character face that we are creating for
her should be a very, very delicate face, which
was very round and smooth. It's very specific angles. I will add a neck to my head this way and then I will move
on to create the shoulders. Then obviously the
rest of the body. From here I come down
to shape the shoulders. As you can see, it's a little bit more
round on this side. With connecting these
two lines together. I'm actually shaping the
chest area in this way. Now for our body, we can create a
direction line or an action line like this. Then because the legs are going to be placed
behind the body, it's enough if we create
our line up to here. At the end of this line, we can work on our legs. Just, we create this
line in order to know how our upper body
part will be placed. After that, I will add my
characters waste over here. Now we're only creating
general shapes later, I will come back and work
a little on some parts. Now for the pelvis, I'm going to create a circle
for her buttocks area. This shame. The most important
thing for character, which is sitting on the knees, is the point that you should
get the legs completely? Correct? This person is sitting on its legs on the
knees and actually the upper part of our leg is
having the most pressure. Therefore, we should
create the upper part of the leg bit more bigger and wider and it's getting a little bit
out of that oval shape. In this area, We
have more pressure. Then I can create the knee where the circle in this shape. I can have the shape of my leg. Now. I'm going to create the other
leg as well. Like this. I will connect the pelvis
to the upper part of the leg and then I will
create a ni over here. Circle as the knee. Because our body isn't a
three-phase says view almost. We will create this leg because we can see a part of it which is on this
side of the body, therefore, right
next to the knee. We bring this leg
toward the hairline, the body, and then this
would be my ankle over here. After that, I can even create the foot part of
it that I can see. Then I will create the toes
in a general shape as well. This side of our
leg is not seen, but I can just shape
this leg a little bit more to emphasize on the way that she is
sitting on her knees. From Denise. I just move a little bit toward
behind there for we would just show we have a volume of the leg
over here as well. Now, I can bring the arms behind the body or I can put it
in front of the body. Therefore, I'll bring
the arms behind my body. It's like she's putting
her hands on her back. Because I want to show my
anatomy in more different ways. Now I will complete my anatomy
from the top of my body. Here we would have her breasts. And here I go down until I get to the
legs and from this side, from down we go up, shaped the waste a little bit more and then
toward her breasts. This way I can complete
my whole body. Again, I say the most
important part Is delay legs in this
position because we want to show that our legs
are placed on their knees, actually shoes sitting
on their knees. So we would have
some pressure here. Therefore, this part would
be wider than usual. It's the most important thing
to be created correctly. In this position
of the character. I can also create a line Beneath the legs so I
can show that these are on the ground and it's sitting because our character is
sitting in a three phases view. It's like that. If she was sitting from the front view
or in the front view, both legs would be
placed on one line. This is the anatomy of a female which is sitting on her knees. That's how we do it.
40. Another anatomy of a woman sitting on the ground: Henna, to love my
dearest friends. I'm back again with another
tutorial session for you. Well, in this session, I am going to teach you how you can create a character which is squeezed the legs
inside of her stomach. And she's basically setting
kind of yoga position. First of all, I can create
the action line for my work in a way that I bring one line down from the top to the waist. And then I can create
one of the legs, which can be seen more. I will add it to my
action line like this. Therefore, I would know
what is the direction of my body being placed
and I would not just get out of that
line and direction. Well, I started with creating my character's head. Over here. I will consider my character's
head in three phases view. Then I will also create the
direction line for my face. We can even generally
determine the placement of the ear as well
or it can not do. It, doesn't matter that much. Now I will start with
creating the neck. The character that I'm
creating here is a female. Again. I'll move on
my work like this. First of all, I will create my characters
shoulders after the neck, and then I bring the lines
toward each other to shape the chest and the waste. Waste basically. I will add the waste over here after finishing
with the chest. Then for the pelvis area because our character is sitting
on both her legs, we have some pressure
on the pelvis. Therefore, we will consider the pelvis as a
shape of an oval, not a circle this time
because actually the pressure of the body's rate and bodies volume is on our pelvis
in this position. Therefore, we will use an oval instead of
a circle this time. Because of the position
that she's sitting. Now, I'm going to
create the legs. So I will create the
legs, this shape. I will consider
the leg like this. I will use the most
part of the leg. And because our body is placed almost in a
three-phase says view, we would see this leg more because it's closer to us
and it can be seen more. Because of that, I'm going to
create this leg like this. I will create the
upper part of the leg, then I will have dinner. And we should consider that
leg is placed on the ground. I'm going to create
the other leg as well. This shape obviously. Then I will bring this
leg inside of this one. And this general shape. Basically this is
the name of our leg. Alright? I would also consider that
this leg is starts from here and this one will
be start like this. So it is shaped
like this as well. Then I am going to create this inner part of
the leg looking like this. Just like that, I would
also create the foot. And the toes in just
one general shape. Will not want to go to
the details right now. The other leg should come
toward inside as well. Then I'll create the lower part of the leg looking like this. And then I will bring
the leg inside. Now. I can bring my character's hands and arms toward
inside of my body. Like this that
you're seeing now? From both sides. I bring them down and to
the front of the body. This way. Also from this
inner part of the body, I can show my arms
with these lines. Actually, I can
separate the arms from the chest with this
line and this shape. Then I'll create the
other arm as well with the same procedure coming down. Then from here. Just like that, I can bring my hand toward inside like it's a little
bit bent as well. Dan, I'm going to work on the wrist and fingers like that. But because we're only creating
the anatomy right now, we just consider a general shape and we do not get
into the details. We can create this arm
on top of the other. This hand on top of
the other like that. Alright. Then I will complete the
chest width, the breasts. And then also I would want to work on the legs and the
pelvis a little bit more. This is the anatomy of a person which is
sitting like this, in this position,
obviously on the ground. And you can have
it just like that. You can bring the legs inside of each other
even more than that, or you can make them more
distance from each other. Everything depends on how
you create the pelvis and the lower part of the body generally and the
legs, of course. If you want to tighten the legs, you should bring the
legs toward this side. More. Therefore, the line will
go towards the inside. More than this. Be careful that the pressure on the
pelvis would be more. And here we will
have more volume. Or if you wanted to make
the legs more open, you should bring this line more toward down and
be more straight. You can create any positions and any models that you
want over here. And really it doesn't matter that how you want
to place your legs, you can just try different ways to see
which one looks better. In your view, new
European Union.
41. Anatomy of a woman lying on the ground: Hello to all of my
dearest friends and back again with another
tutorial session for you. And this time, well, we are going to work
on DNS for me of a person which is lying
down on the ground. We wanted to show
that this person is lying on his or her back. First of all, we will create the action line for our body, basically our bodies
direction line. And we started from the place
that we have our head and then bring it toward
inside of the body. Then we will continue our
line on our bodies surface. Then from this leg, which is closer to us, we go up and towards
the back of the leg. Because I want to bring
the legs toward inside. This is the action
line for my body. I'm going to show the general
shape of my character here. Alright? I start from my
character's head. I will create it. First of all, I consider
here as a circle. Then work on the jaw. And I will add it to my
work just in this way. Alright, character
that we're creating here is actually a
female character. And just like that, I would also determine the
direction line for my face, which would be in this way. Now I want to create the general
shape of the chest here. This is the general
shape for the chest. And then I will add the waste
over here to this area. Then after that, because the body will
turn toward the pelvis, I am going to create a
stomach area in this shape. Then. For the pelvis. Just like that, I
will create a circle. I will consider a circle. Then because our bodies
placed on the ground, this side will come down
like this and it will be connected to the leg. This would be the pill, this area or the buttocks
area will be connected to the ways like this
from behind our body. Because our body
has a dimension. We will move like this. Because we want to
show the pelvis is connected to the robotics area. So this would be the
back of our body. As you can see, it's
very clear and from here we will connect it
to the rest of the leg. And in here, I'll actually
create a ni over here. Then. This would be the
lower part of the leg. Going up to reach the
ankle and the foot. Heels and toes. We will see actually are hills. The most because we
brought our legs up. So you can see the
legs in this way. Totally. Then we will add it like this at the whole
foot like this. I'm going to create
the other leg as well. We only see the lower
part of the leg because it's on the opposite
side of the body. It's not really seen here. Then I can create the ankle. I'll add the foot in this shape. Then I can make it go
closer to the other foot. All right. This is a basic shape
for my body that it's been placed like
this on the ground. Now, I will also add the hands, the arms, and the hands. Well, I want the hands to go on the ground and under my chin. Therefore, I will consider the general shape of
the arm like this. Then I will create this part of the arm
that can be seen more below the elbow. And then I'll have the
wrist and the hand itself, including the
fingers, which I just create very generally
liked that. I should also create the
other arm the same way. The other arm will also
be placed under the chin. With this oval that
I created over here. These are the arms basically. That's our place like this. This is a general shape
of my female's anatomy. Now I'm going to work on some parts a little bit
more and therefore, my work would be more complete. First of all, I add
my characters neck, connects the head to the
shoulders with the neck. Then I will complete
this area with the arms. The elbow over here. Just give them a more
comprehensive look. You can see a little bit
of the breasts and chest. Basically. They'll
all create this one. Then it's several lines and can show several fingers are here. Then we create the
other hand like this with general shapes
of the fingers again. This is the line of the stomach. Then over here on the legs. Then I turn the leg going
up toward the ankle. Then here I'll reach the foot. This is the back of
the leg as well. We will create all of these smooth lines because we should also consider that
this is a female character. Didn't we move to the heel? To the foot? Basically. These would be the
placement of the toes. Just make a curve here
to show it better. The other foot is Dawn the same. We can actually shaped
them the same way. The procedures are the same. We are just going to show you some examples and you can create your character in other
different positions as well. This is her buttocks area. And that's basically the
anatomy over female character, which is lying down on a
ground on her stomach. This is the general shape that
we wanted to create here.
 Amelie Braun, Artist & Cartoonist