Transcription
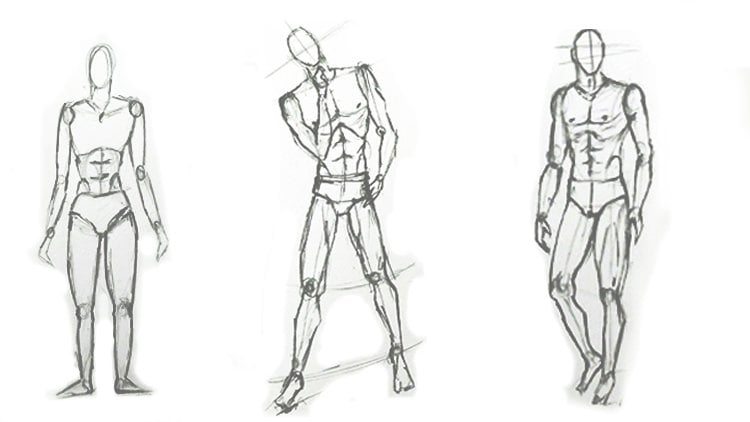
1. Introduction: Bonjour les amis,
bienvenue au cours d'esquisse d'
anatomie de style sport et danse
humaine. une des compétences les plus élémentaires en dessin au
crayon consiste à
apprendre à dessiner l'anatomie
du corps
humain manière fondée sur des principes. Dans ce cours, j'ai
enseigné différents types d' anatomies de corps masculin
et féminin dans différents sports et danses, styles et positions de manière
très simple. Dans ce cours, je me
concentre sur un dessin de Deanna, pour moi du corps humain dans positions sportives et de
danse
complexes. Pour cette raison, j'
ai évité d'
entrer dans les détails de
la tête et du visage. Dans ces partitions, des
meurtres inhabituels qui ne se produisent que dans le sport. Des activités sont enseignées pour
renforcer votre habileté à esquisser ces étirements et
courbures de l'anatomie corporelle. J'espère que c'est utile
pour vous et amusez-vous bien.
2. OUTILS: Bonjour à tous mes amis les
plus chers. Comme vous pouvez le constater, nous
sommes de retour avec un autre cours didactique pour vous. Et au début, comme d'habitude, nous allons passer en revue
les équipements nécessaires à ce cours et ensuite nous
pourrons les apprendre ensemble. Tout d'abord, nous
commençons par le crayon B, qui est en fait la base
de tous nos tutoriels. J'utiliserai B et B, deux crayons, qui sont en fait nos équipements
fondamentaux. Et je veux que vous les utilisiez car au début de notre code, nous devons
créer des lignes très légères. Et pour ce faire,
nous devrions utiliser des crayons plus légers. Par conséquent, B0 et B2 sont
les meilleures options pour nous. Et plus tard, si vous
voulez que vos lignes deviennent plus
sombres ou plus audacieuses, vous pouvez utiliser d'autres crayons. Nous pouvons également utiliser une sortie ici
pour notre travail. Par exemple, si
vous voulez créer des lignes
très fines et délicates, nous devrions utiliser des étiquettes
car elle a une pointe très, très pointue et fine. Nous pouvons donc le faire facilement. Nous pouvons créer des lignes très
fines avec elle. Ensuite, pour l'utiliser, nous avons également besoin d'une piste ici. Et juste une chose à laquelle vous
devriez faire attention à propos Edwards, c'est que lorsque
vous utilisez votre édition, vous devez vraiment faire
attention au fait que votre piste correspondra à
vos moyens édités. Il est 0,5, votre bord, il devrait également être
0,5, également avoir 0,7. Et même votre
avance peut être B2. Par conséquent, vous pouvez créer des lignes
très légères
à partir de votre travail. OK ? Après les crayons, nous avons
également besoin de gommes à effacer. Évidemment, la gomme la
plus utile pour nous est la double gomme
que nous avons ici. Parce qu'il peut se transformer dans n'importe quelle forme que nous voulions être. Et en même temps que
nous effacons une surface, elle ne nous donne pas déchets
ni de
parties supplémentaires de la gomme. Nous ne tenions donc pas la main notre travail et notre
travail serait essentiellement beaucoup plus propre. C'est donc vraiment
nécessaire et je vous
conseille toujours d'en avoir besoin. Ensuite, nous avons notre gomme à modifier, qui nous est également utile car elle a une pointe très
pointue, une pointe fine. Et il est généralement utilisé pour les endroits et
les espaces petits et ils ne
peuvent pas vraiment effacer l'esprit avec une gomme ou d'autres
types de gommes à effacer. Il existe deux types. En fait, il y a tellement de types. J'en ai deux. L'un d'eux est comme celui-ci
qui a une pointe très pointue, et une autre qui
ressemble à ceci. Il a une pointe triangulaire. Par conséquent, vous pouvez utiliser chaque
coin de ce triangle, utiliser son bord tranchant, sa pointe pointue. Et vous pouvez effacer les
pièces si délicates ou vous voulez effacer
une pièce point par point. Mais n'importe quel type d'
entre eux que vous obtiendrez, cela fera votre travail. À faire. Nous avons un autre type de
gommes comme celle-ci,
c'est-à-dire qu' il y a un pinceau à
l'autre bout. Par conséquent, nous pouvons en fait
souffler les parties supplémentaires de la poubelle et de la gomme
de notre travail. Mais ce sont en fait des gommes très
rigides et rigides. Ils ont une pointe très rigide. Soyez donc prudent, vous devez faire
attention partout où
vous voulez effacer, quelque part où vous avez
besoin de plus de douceur. Vous devez utiliser une gomme à
effacer ou une gomme à effacer. Mais si vous voulez
effacer n'importe où, cœur et votre ligne deviennent trop sombres, vous pouvez utiliser des gommes plus rigides. Je vous suggère toujours
d'obtenir un étroit comme celui-ci, qui a une part pour
contenir la poubelle. Cela vous fera gagner du temps. Essentiellement. Je vous conseillerais également d'avoir besoin d'un porte-crayon
car lorsque vous taillez votre crayon
et qu'il sera plus petit, ce porte-crayon vous aidera beaucoup. Par conséquent, pliez votre crayon
est très petit comme ça. Vous pouvez le mettre ici. Mettez-le dans un porte-crayon, et il peut saisir votre crayon
pour vous faire attention. Une partie est très
petite pour un crayon plus petit, et l'autre extrémité est
plus grande pour un crayon plus grand. Ensuite, avec cette prise, vous pouvez le lâcher ou le serrer. Il vous sera d'une
grande aide. Nous avons également besoin d'un papier. De toute évidence, vous pouvez
utiliser un format A4 ou trois papiers. Vous aurez également besoin d'un carton
sous votre papier, ce qui vous permet de
fixer votre papier dessus. Et voilà toutes
les exigences dont nous avons besoin pour ce cours, pour ce didacticiel. Et vous pouvez simplement les équiper.
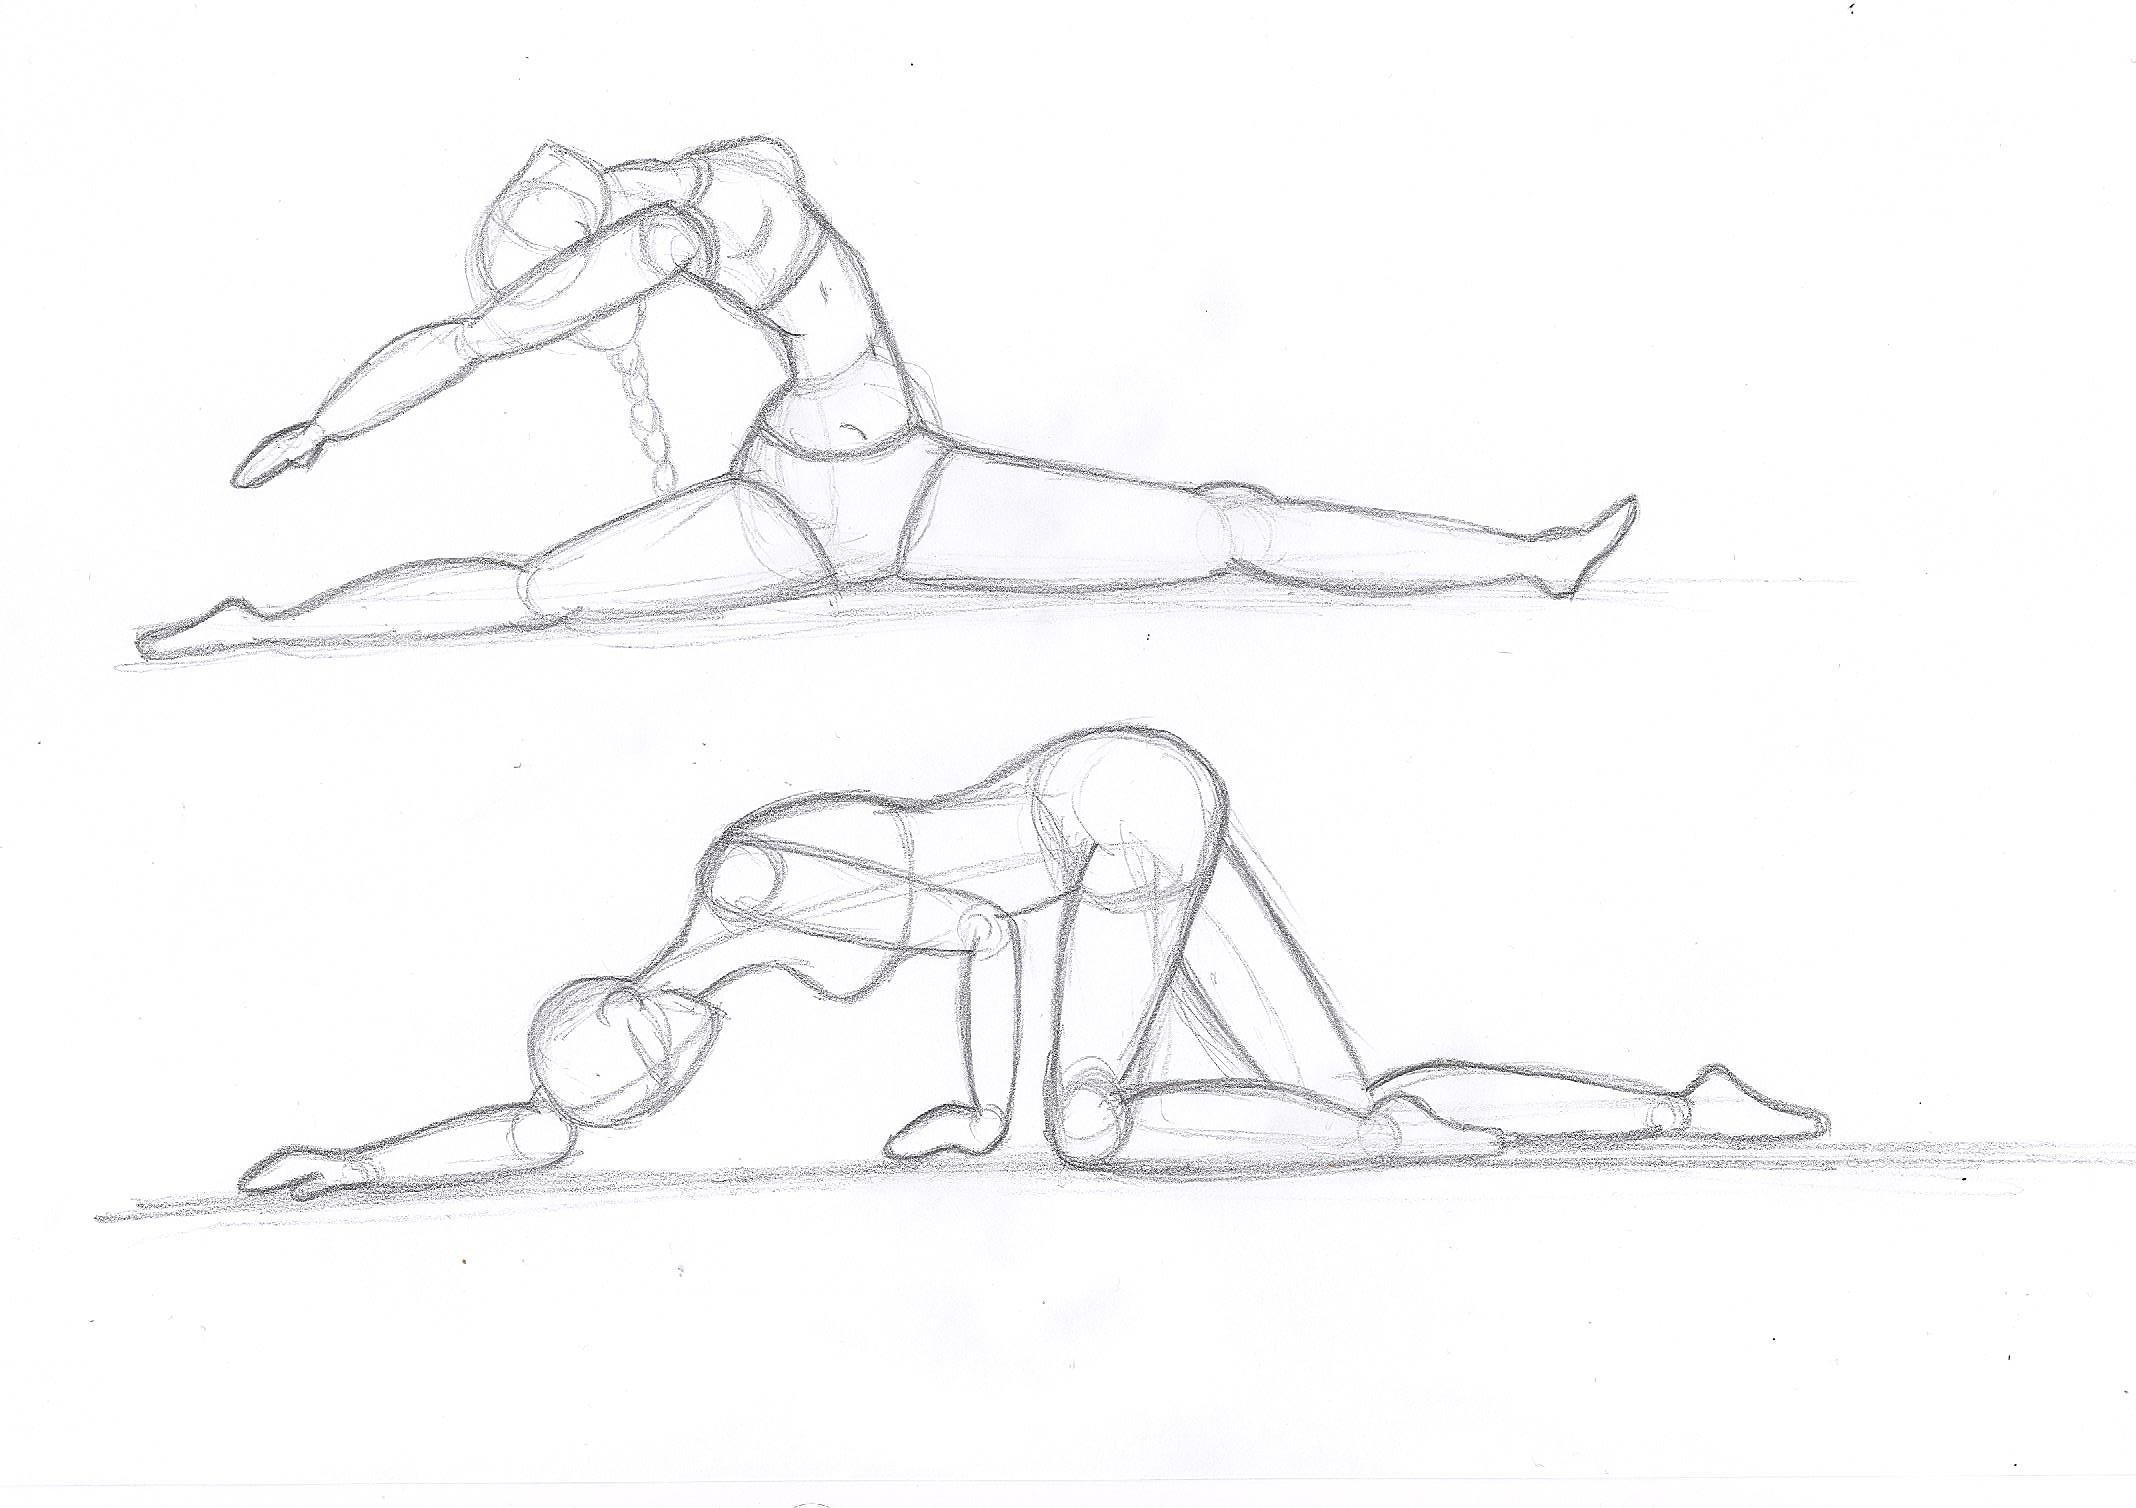
3. Style de flexibilité d'athlète féminin: Bonjour à tous mes amis les
plus chers. Je suis de retour avec une autre session de
tutoriel pour vous. Eh bien, dans cette session,
nous allons
créer un copain dans une
autre action sportive. Encore une fois, cela pourrait être
un peu plus complexe
que les précédents que nous avons déjà créés. Maintenant, nous allons
créer un corps couché sur le sol et
lever les bras. Et il tient en fait une
des jambes entre les mains. Et l'autre jambe est
pliée en tenant un ballon de sport. Très bien. Tout d'abord, j'ai commencé avec
ma ligne d'action pour le corps. Et pourquoi est-ce que je fais ça ? Parce que nous créions ça. Vous pouvez facilement savoir comment se déroule votre corps et connaître la
forme du corps. Et la distance entre notre
tête et nos jambes ne devrait pas être trop importante car la jambe
doit être en fait pliée. Les bras peuvent le
tenir et le corps a tellement de pression et il est pressé dans l'estomac
et le bassin. Je vais donc créer la
ligne d'action pour les jambes comme celle-ci. Et pour savoir à quoi ressemble
l'autre jambe,
comment pourrait ressembler l'autre jambe. Je vais également créer avec
une autre ligne de cette forme. Très bien ? Je vais maintenant créer
la forme générale. Nous saurions donc comment notre
corps va être créé. Tout d'abord, je vais
créer le placement
de la tête ici. Ce serait la tête. Et de toute évidence, comme vous pouvez le constater, notre corps est dans la vue latérale. Nous allons le profiler, créer le crâne sous la forme d'un cercle. Ensuite, j'ajouterai la mâchoire. Et je vais également déterminer la
position de l'oreille. Mais eh bien, vous devriez
considérer que
parce que notre bras se
lève de ce côté, nous ne pouvons pas voir complètement le
visage. Vous devriez donc également considérer
cela pendant que nous travaillons. Maintenant que vous le créez,
il est bon pour vous de
déterminer toutes les pièces. Mais lorsque nous
terminons la forme. Ainsi, toutes les parties peuvent être recouvertes
par les bras. Par ici. J'aurais un coffre à mes
personnages, puis je créerai le gaspillage de
mes personnages. Mais nous devrions considérer
qu'ici encore, comme je l'ai dit, nous avons une certaine pression. Nous avons pressé le corps ici parce que les jambes
arrivent vers la tête. Ainsi, le corps est complètement
plié, plié. Ensuite, je créerai le bassin, puis je créerai une ligne comme ligne de sol pour montrer que le corps est
placé sur le sol. Ensuite, je vais
créer cette jambe qui est plus proche de nous et qui est
pliée en fait. Ce serait donc le genou
et ce serait le tibia, la partie inférieure de la jambe. Ensuite, je crée une forme très
générale pour le pied, les orteils, le talon
et le pied entier. Et puis je crée
un ballon ici. Très bien. Je vais maintenant
créer l'autre jambe, qui se trouve de l'autre
côté du corps et qui est
maintenue par les mains. Mais avant cela, je
devrais créer les bras pour ne pas savoir où ce personnage
tient la jambe. Tout d'abord,
nous avons besoin des armes. Ensuite, nous
aurons le coude. Et en ce moment, je ne fais que
créer un façonnage général. C'est juste que je crée la base
de l'anatomie de cette façon. Maintenant. Je vais
aussi créer la jambe afin que je puisse enfin ajouter les mains
sur la jambe, placer les mains sur la jambe. Maintenant. De là, cette jambe
est courbée et courbée. Je vais commencer à le créer. Et ici, je
vais le terminer. Vous devriez plier
la jambe d'ici, du genou parce que
c'est évident. Très bien. Ici, j'aurai la cheville et ensuite je continuerai
à créer un pied def. Très bien. Je répète que c'
est la forme générale. Je vais maintenant ajouter plus
de détails plus tard. Ici. Il y aurait le poignet
et l'autre bras se
lèverait de ce côté. Je ne fais que créer des
barreaux qui peuvent être vus parce que
l'autre bras
montera la même manière de la même manière que le bras qui
est plus proche de nous. Ensuite, je créerai la main, qui se trouve de l'autre
côté du corps. La main du bras,
qui est plus proche de nous, est en fait sous elle. Nous ne pouvons pas le voir. C'est donc la
forme générale du personnage. Maintenant, je veux travailler un peu plus sur les
détails
afin d' avoir une anatomie plus cohérente
et plus complète. Très bien, je peux commencer
par la tête. Encore une fois, parce que
mon personnage est dans la vue latérale et
tient les bras en l'air, vous n'en verrez peut-être pas beaucoup. Mais parce que nous voulons
qu'il soit plus visible, je vais créer des
cheveux pour mon personnage. Et peut-être même un bouton. Juste pour montrer encore plus le visage et
la zone de la tête. Peut même déterminer le
placement de certaines parties faciales. Ensuite, je relierai
le cou au tirage au sort. Et à partir de là, je
créerais le bras. Je vais en parler, ce qui le rendra plus complet. Nous allons maintenant
montrer quelques muscles sur
les bras parce que c'est une
position que nous créons. L'action que nous
créons est sportive. Je veux dire, il le fait ou
elle est désolée, elle fait une action sportive. Et en même temps, dans cette position et dans cette action, les
bras sont tendus. Et aussi, si nous
voulions montrer la souplesse, mais nous devons aussi montrer
les muscles
parce que tout ici
est bien étiré. J'ajouterais même
d'autres muscles à l'autre bras. Pour cette partie avant du corps, je vais compléter la zone thoracique
en créant les seins. Et puis je
descends de l'arrière et je peux le
relier ici avec une ligne. Puis, de l'arrière, je me dirige vers le bassin et la zone
des fesses. Et puis je pourrais juste remonter
pour mieux façonner les jambes. Ce serait l'
avant de ma jambe. Cette zone se trouve derrière le genou et se trouve
à l'arrière des jambes. Nous montrerions donc le virage, la courbe comme celle-ci. Ensuite, ici, nous continuerons
cette ligne. Et nous pouvons créer juste une zone proéminente
pour le bout du genou. On peut même ajouter une petite ligne
courbée ici ou même plusieurs lignes ici pour mettre l'accent sur le
bout du genou. Très bien. Après cela, je vais créer la cheville pour guérir
et aller jusqu'aux orteils
, puis revenir façonner complètement
le pied. Maintenant, l'autre main, que l'on peut voir de l'
autre côté du corps, peut avoir quelques doigts que
je peux créer très facilement, créant
simplement quelques lignes. Maintenant, je vais créer mon ventre et mon ventre de
personnages. Encore une fois, j'arrive à l'
avant du bassin et nous atteindrons cette jambe
qui est plus proche de nous. Nous allons également le
terminer. Je monte. Cette jambe
sera pliée dans cette forme. Ensuite, nous avons honte de la partie
inférieure de la jambe. Et je créerais aussi
l'arrière de la jambe. Derrière la jambe. En fait. Je vais alors envisager un bal ici, comme je l'ai déjà dit. Je vais créer
le reste de la jambe. Nous arrivons donc à la cheville guérissons et les orteils ainsi que pour l'autre pied. Ici, nous allons également
compléter ce pied. C'est ça. C'est la
forme de notre travail. C'est une position
qui peut avoir, qui peut exister réellement
dans notre personnage. Si elle le fait ou s'il
fait de l'action sportive. Ce serait donc complet.
4. Flexibilité de Lady Gymnastic: Bonjour à tous mes amis les
plus chers. Eh bien, je suis de retour avec une autre
session de tutoriel pour vous. Et dans cette session, nous allons créer un style et une position qui
sont à nouveau liés au sport. Nous voulons donc créer à nouveau des actions
sportives. Très bien ? Celui que
je vais créer pour vous aujourd'hui, c'est que mon personnage place une de ses jambes vers le bas et a pris l'autre jambe vers le haut
et le corps est deux ou vers le bas. Et à l'intérieur d'une de ses
mains, vous pouvez voir un bol. Vous verrez jusqu'à présent. Je vais commencer par créer la ligne d'action pour mon corps. Et comme les bras
sont sur le sol, on peut commencer par créer les jambes. Donc, si nous commençons notre personnage en fonction de la
langue sur le terrain, nous pouvons créer notre ligne d'action. Je vais donc commencer à créer une ligne à partir de la ligne de
sol vers le haut. Ensuite, avec une courbe. Et nous avons fait un angle. Je remonte la file, je prends la ligne vers le haut. C'est donc la position des
jambes de notre personnage qui sont placées. Maintenant, d'une partie d'ici, c'est presque au milieu
de cette ligne. À partir d'ici. Je peux créer une forme
pour la partie supérieure du corps. En fait, je vais créer
une ligne de direction pour
pouvoir montrer la direction de la partie supérieure du corps de mes
personnages. Et ce serait en fait la tête de
notre personnage. En fait, c'est le genou d'un
personnage et cette partie peut être la tête de
notre personnage. En fait, ils
vont être sur une ligne au même niveau. Donc, si vous créez
un personnage dans lequel vous pouvez remarquer,
commencez par la tête de votre personnage. Vous pouvez commencer par les
jambes, puis vous pouvez vous rendre à la partie supérieure du corps et à l'avance. Encore une fois, je dis que si c'
était notre genou, ce serait notre tête du
côté droit. Maintenant, je vais créer
le reste du corps. Donc, à partir de là, je peux commencer
le bassin ou à partir d'un, je peux partir de cette jambe
qui est placée sur le sol. Ça n'a pas d'importance. Quoi qu'il en soit, nous
devons créer toutes les pièces. Je voulais juste commencer
par le bassin cette fois. Vous saurez donc
comment créer votre personnage. En commençant par ça. Considérez le bassin
sous cette forme, car ici, je
veux ajouter ma jambe. Ce serait la cuisse. Et je crée la partie supérieure de la jambe. Du genou vers le bas. Je vais créer le reste de
la jambe devrait être le tibia. Et je vais tout faire descendre de cette façon. Et puis j'arrive à la cheville. Et après cela, je
vais créer le talon,
les orteils et
Whole Foods dans l'ensemble. Maintenant, je vais créer
ma ligne de sol ici. Comme vous pouvez le voir, nos personnages placent
une jambe sous terre et une jambe haut dans les airs. Très bien, c'est notre tête. Permettez-moi de le rendre plus
complet pour vous. Lieu. Créez une direction pour la face. Vous pouvez montrer comment
la tête est placée. Je peux aussi créer des
oreilles ici. Parce que notre action et notre
émotion sont un peu complexes. Je peux aussi créer un peu
les cheveux de mon personnage. La position de notre
personnage peut donc être plus claire. Il s'agit en fait d'une
bombe en haut de la tête. Nous avons donc créé qu'elle peut faire ses actions à sa
guise. Ensuite, du menton de mon personnage, je viendrai
écrire une lettre. Je prends une certaine distance, puis
je commence à créer le corps. Maintenant, à côté du cou. En fait, je vais
créer le bras, l'épaule et le bras. Et je vais
descendre de cette façon. Je peux alors considérer que mon
bras va de côté. Je veux dire, je ne veux pas que ça
descende directement. Ensuite, je peux créer la main comme ça
sur le sol. Et puis pour l'autre bras, que je veux tenir
une balle avec, je commencerai à partir d'ici. Je crée le bras
à partir du coude vers le bas. Je vais plier un
peu le coude et je
le tourne un peu vers la jambe. Ensuite, je peux montrer une balle
à l'intérieur de sa main. J'ai donc d'abord créé le double. Et puis je commencerai
les doigts. Par ici. En fait, j'ai apporté les doigts
de derrière le ballon pour qu' on puisse montrer que notre personnage
tient le ballon dans ses mains. Fondamentalement, notre main
est derrière le ballon, mais nous ne pouvons pas la voir. Par conséquent, nous ne pouvons pas compléter
notre forme de main. Maintenant, dans la continuité
du bras, je vais créer la poitrine de
mes personnages. Et puis notre corps
est à l'envers. Je vais donc créer la partie centrale du
corps sous cette forme. Ensuite, nous allons
le relier à notre bassin. Fondamentalement, si vous pouvez
voir que notre corps est dans une position qui est la
plus tendue. Et nous devrions le montrer et
insister là-dessus en étirant la partie médiane étirant la partie médiane
de notre corps comme je l'ai fait ici. Maintenant, je vais
créer l'autre jambe. Et je commencerai par
cette partie de notre bassin. Et nous allons créer la forme de l'autre jambe qui
se lève dans les airs. Ensuite, ici, je vais créer le genou et évidemment
le reste de la jambe. Donc, cette jambe remonte. Et puis je
créerai les chevilles,
les talons, les orteils et le pied entier comme
d'habitude pour
les personnages précédents et
aussi pour le pied précédent. Comme vous pouvez le voir quand le pied est pointé et qu'il est également
complètement étiré. Maintenant que nous avons créé une forme globale
pour notre personnage, nous pouvons venir ici et ajouter d'
autres détails à l'anatomie de
nos personnages. Afin de transformer une anatomie de base en anatomie avancée
et cohésive, vous voulez créer quelques muscles afin de
montrer où nous pouvons avoir plus de pression
et où nous ne le faisons pas. Ok, ici, nous pouvons
créer des hauts et des bas, des pièces proéminentes et des
pièces courbes. Parce que la
pression est la plus élevée sur cette jambe. Et la raison en est
qu' elle maintient l'équilibre
de notre corps entier. Par conséquent, la plus grande partie de la
pression serait ici et la plupart des muscles se
manifesteraient à partir d'ici. Par ici. Nous devrions vraiment montrer la
zone proéminente du genou. Juste pour montrer qu'il y a
beaucoup de pression ici. Ensuite, je créerai la
cheville sous cette forme. Ensuite, nous sortons un peu les
os et ensuite nous considérerons
ces parties pour les orteils. Et de ce côté droit encore, nous allons
créer les os de la jambe et nous remonterons, je dis pour
montrer qu'il y a une certaine pression sur le lac. D'accord. C'est la forme de cette jambe qui a été
posée au sol. Maintenant, je vais aussi faire
la même chose pour les armes. Comment vais-je faire cela ? Bien évidemment, j'ai recommencé
à partir des épaules parce que ce bras garde le reste
du corps est équilibré. Nous voulons montrer cette épaule et ce bras
est également sous pression. Par conséquent, nous devons créer d'
autres muscles pour ce
bras et cette épaule. Encore une fois, je le répète parce qu'il y a de la pression là-bas et qu'elle maintient l'équilibre de
notre corps en partie. Ensuite, nous créons les
doigts pour les mains et nous les avançons très facilement
. On s'en occupe donc. Nous poursuivons notre travail, puis nous faisons une belle courbe
pour l'aisselle. Après la mort. Nous allons
sortir un peu
, puis revenir à nouveau pour
façonner les seins afin qu'ils puissent montrer plus parfaitement
les courbes du corps. D'accord. Je
créerais aussi des hauts et des bas
ici pour montrer
la pression plus que
ce qu'elle montre actuellement. Puis, de l'arrière,
je suis venu jusqu'au cou. Vers le cou, en fait, on peut voir que notre tête
est un peu tirée à l'intérieur de notre corps
parce que dans cette zone, les épaules, la région du cou, notre corps
subit beaucoup de pression. Nous allons donc créer la
tête dans ce spectacle. Nous allons créer un menton et savons même qui ressemblerait à ceci. Ensuite, nous allons
créer l'autre bras de l'
autre côté du corps. Nous allons créer cette
ligne parce que nous voulons montrer que ce bras est
courbé par le coude. Donc, afin de montrer ce
sentiment et cette position, nous créons cette ligne courbe. Puis créer notre
balle et évidemment plusieurs doigts
sortant de derrière le ballon pour montrer
les doigts et
montrer que le personnage
tient le ballon dans ses mains. Je vais donc effacer cette ligne
qui est entrée dans le ballon parce que nous voulons montrer que notre main et le reste de
notre bras sont derrière le ballon. Ce n'est pas transparent. De cette façon, c'est tout simplement plus logique. Maintenant, je vais également terminer
l'autre étape. Ensuite, nous pourrons terminer notre travail. Pour l'autre jambe
qui est montée. Tout d'abord, nous terminerions
notre bassin. Ensuite, nous pourrons
commencer l'autre jambe. Cette jambe qui remonte d'ici jusqu'à ce que nous atteignions le genou. Nous créons donc une ligne comme celle-ci afin de montrer que
la jambe est complètement tendue et remontée de la partie inférieure du
bassin ou de la zone des fesses. Essentiellement. Je vais
créer ces pièces un peu plus
sous pression,
juste un peu, pas
trop, car de toute façon ont été étirées pour que
les muscles se manifestent. Ensuite, je passe même par le genou. J'arrive au tibia, à la partie inférieure de la jambe, puis j'
aurais la cheville, les
talons, les orteils et tout le pied. C'est comme ça que je finis
mon travail ici. Il s'agit donc d'
une autre action sportive que si vous voulez placer une jambe sur le sol et prendre l'
autre en hausse. Vous pouvez réellement
utiliser cette action et nous ne faisons que créer
une ligne d'action et continuer les lignes principales. Avec quelle facilité vous pouvez créer
cette position complexe.
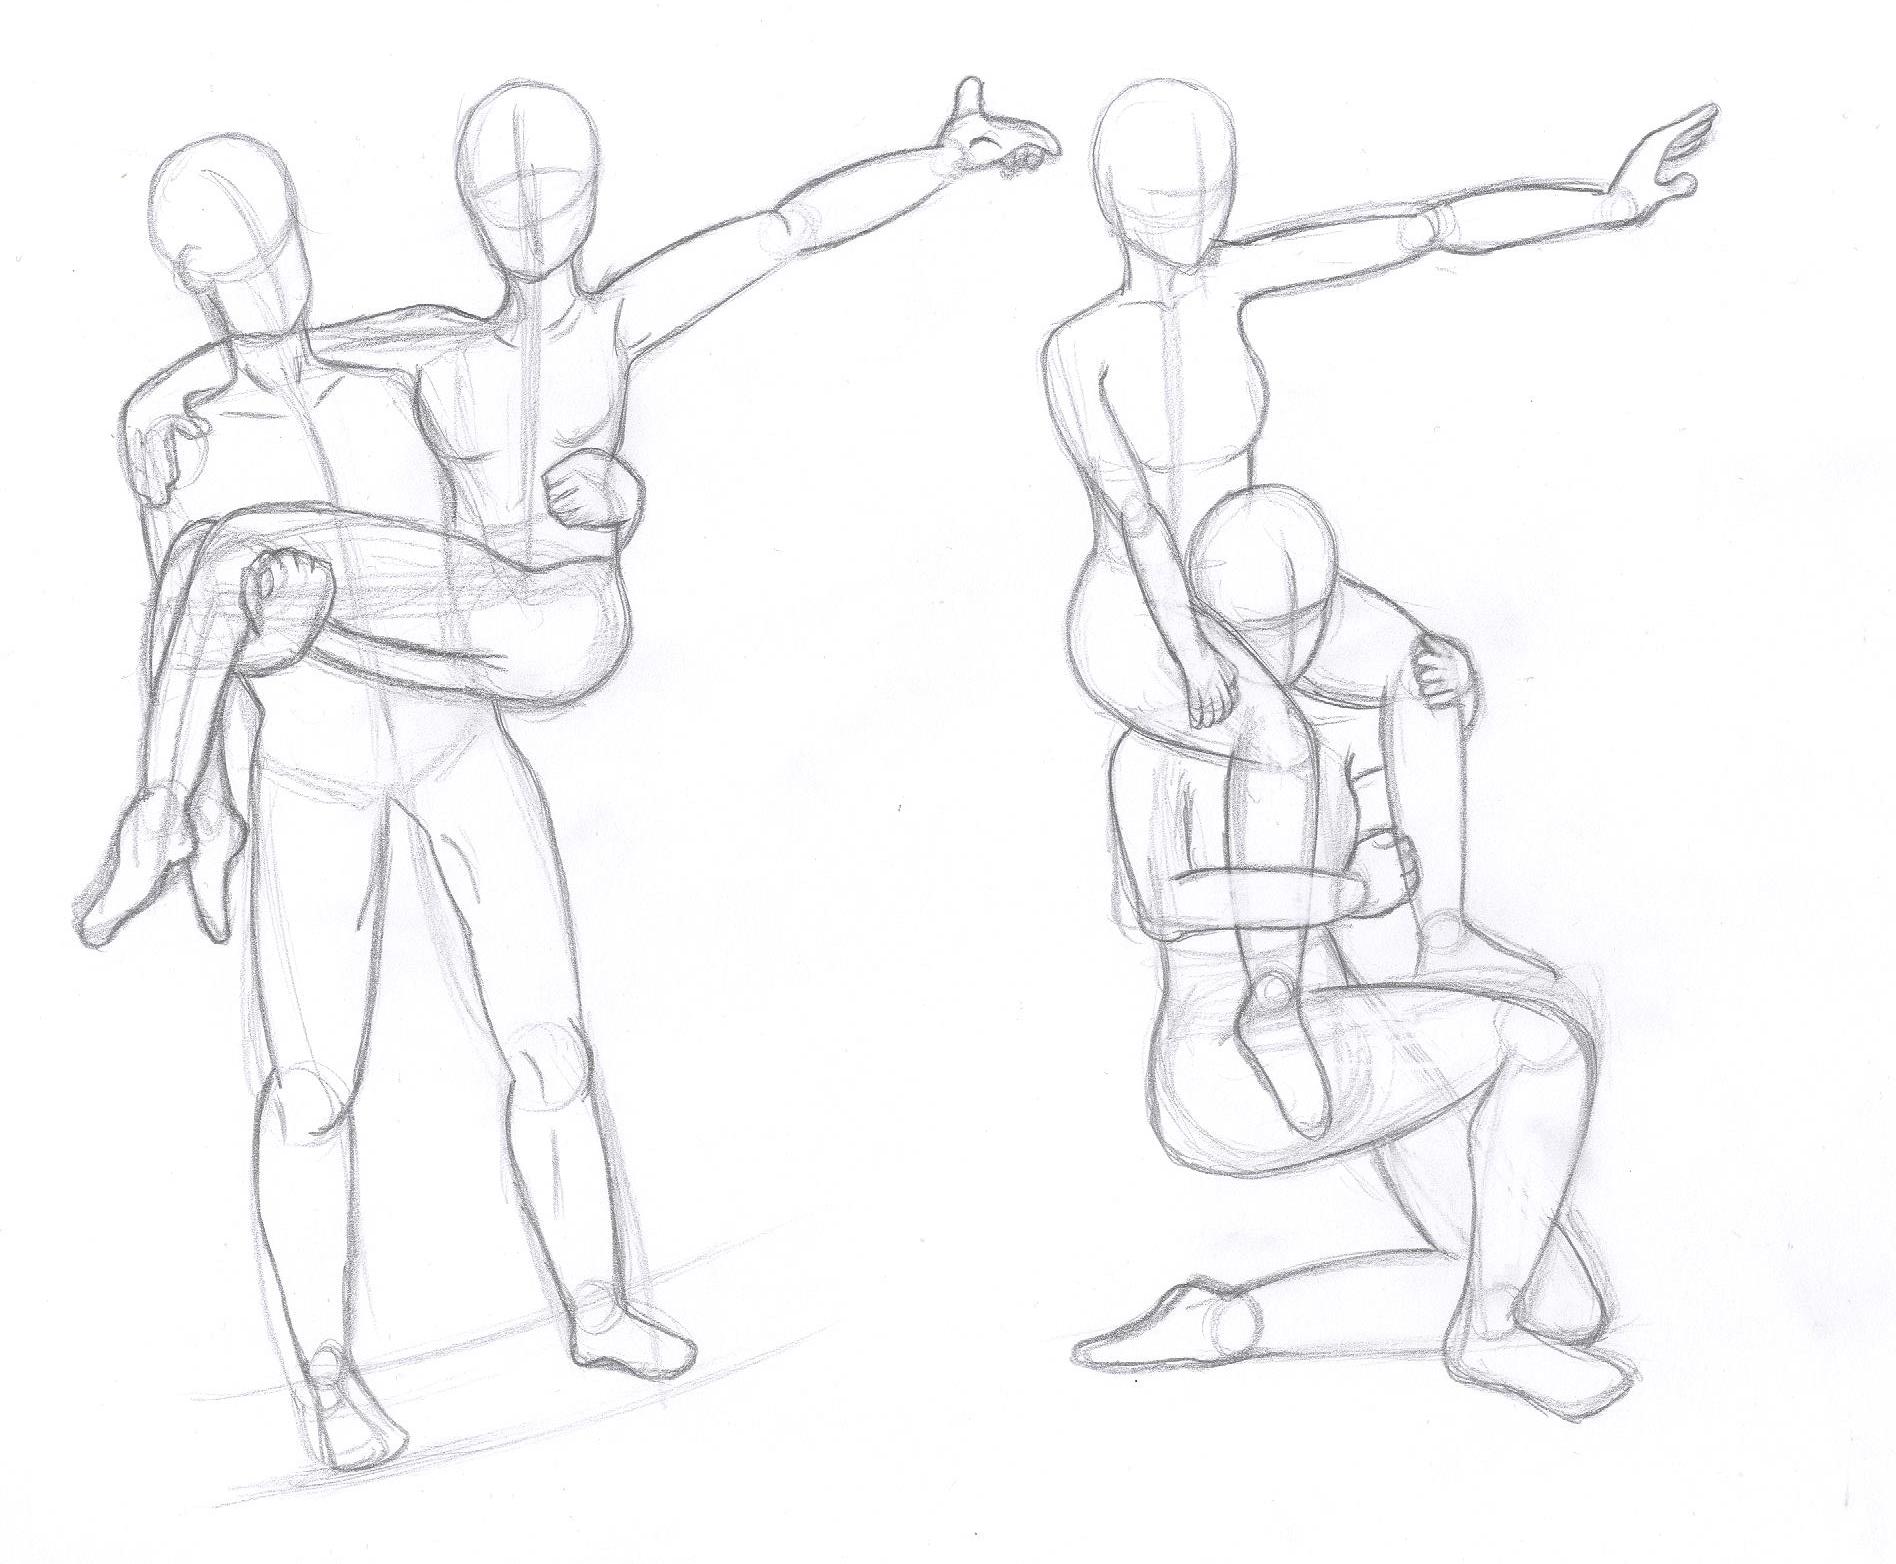
5. Flexibilité Lady 180 degrés: Bonjour à tous mes amis les
plus chers. Bonsoir à tous. Je suis de nouveau ici avec une autre session de
tutoriel pour vous. Et au cours de cette session, nous allons créer une autre position d'asile
pour notre personnage. Je veux voir cette fois comment l'action va
être créée. Très bien ? Si vous voulez créer notre personnage dans une position
qui fait cette division, nous voulons voir comment
nous pouvons créer cela. Cette fois-ci, nous allons
créer un personnage féminin
qui fait une scission. Maintenant, nous pouvons considérer une ligne comme ligne
de sol au
début. Par exemple. Comme cela,
serait considéré comme la ligne de sol car
nos deux jambes sont censées être placées sur le sol en
forme de fente, puis nous pouvons créer notre corps droit ou un
peu. plié vers l'arrière. Mais en fait, nous nous
concentrons principalement sur la surface du sol, qui est la fente des jambes. Tout d'abord, j'ai commencé par créer
ma ligne d'action. Donc, si je veux que mon corps
recule un peu, je le créerai comme ça. Si je veux que le corps
soit droit, je peux créer que cette ligne
soit droite ou même si je voulais être en avant, je crée la ligne vers l'avant. OK ? Je vais
continuer ma ligne d'action car elle devrait aller dans les deux sens. L'un vers ici et
l'autre a fait une tournée ici. Nous pouvons donc
créer nos lignes sont des lignes
d'action comme celle-ci. Je vais maintenant déterminer la position des différentes
parties du corps. Maintenant, si je les ramène si
je reprends le corps, je devrais le
considérer comme une tête vers le haut. C'est comme si mon
personnage regardait le
haut afin de maintenir l'
équilibre du corps. Une fois encore. Je vais créer un crâne puis
ajouter pour dessiner de cette façon. Ensuite, avec plusieurs lignes, je peux déterminer la position des parties de mon visage
qui sont orientées vers le haut. Maintenant, je vais
créer le cou. Et je devrais aussi
considérer que si les bras
vont aussi reculer, l'
un des bras
couvrira en fait une partie du cou et une partie de notre visage afin que nous
ne puissions pas les voir complètement secs. Maintenant, je ne fais que créer les
bases de l'ANA pour moi. Ensuite, j'y travaillerai plus tard. Maintenant, je crée cette partie pour la poitrine et je veux
voir comment ça se passe maintenant. Pour la poitrine. Je déterminerais également l'emplacement de
la poitrine ici. Même le sein. Ensuite, cette partie
doit être étirée. La partie avant
du corps serait étirée et le
dos serait un peu serré parce
qu'elle se penche vers l'
arrière cette fois. Je vais donc créer le bassin de mes
personnages. De cette façon. nous allons créer
une zone plus grande du bassin ou Cette fois-ci, nous allons créer
une zone plus grande du bassin ou des
fesses, car
dans cette partie de notre corps, nous aurions beaucoup de pression. Et comme les pattes sont
placées sur le sol, elles devraient également être créées
plus volumineuses et plus grandes. Nous pouvons donc réellement transférer
le sentiment que notre corps est placé sur le sol et subit une pression sur notre spectateur. Je vais déterminer la
position des bras. Je vais reprendre ce bras, ramener ce bras. En fait. De cette façon. Ensuite,
je vais déterminer la position des jambes et cette position
et dans cette forme. Donc, une jambe allait vers la gauche, se trouve essentiellement derrière
le corps, en arrière. Je vais continuer la jambe jusqu'à
ce que j'atteigne la cheville. Et puis ce
serait les aliments créés. Comme je l'ai dit, cette jambe
a reculé vers l'
arrière du corps. Dans ce cas, je devrais considérer
la deuxième jambe, qui se trouve de l'autre
côté du corps, s'étire vers l'avant, se
dirige vers l'avant du corps. Eh bien, je suis en train
de créer ça. Vous savez donc comment
créer des jambes en position divisée. Qu'ils se déplacent à l'avant ou à l'
arrière de votre corps. Ensuite, comme ça, je vais créer une zone de pied, peut-être
les orteils, et
un pied entier ici. OK. C'est la
forme de notre corps dans laquelle l'autre bras
se trouve également derrière notre corps. En fait, ce n'est pas comme ça. Notre personnage n'a qu'un seul bras. De toute évidence, l'autre bras
se trouve de l'autre côté du corps. Et ils avaient définitivement ramené ce bras en arrière aussi. Parce que notre corps
est plié vers l'arrière, nous ne pouvons pas
placer les bras ailleurs parce qu'ils
ne seraient ni beaux ni beaux. En fait, je vais créer
cette organisation, créer quelque chose de cohérent
entre toutes les parties de notre corps. Il peut donc aussi créer des
cheveux pour notre personnage. Juste pour souligner
la position de notre corps
qui se penche vers l'arrière. OK ? Je vais compléter les parties de mon corps
encore plus que ça. Et évidemment, je pars de la tête de
mon personnage cette fois. De cette façon. Eh bien, je peux juste venir ici et créer un peu d'oreille de
mes personnages, ou je peux simplement la laisser parce qu'
il est évident que notre tête est à l'envers. Ensuite, je vais créer le cou. Et je peux créer un peu
plus cool pour mon personnage. Il mettra donc l' accent sur la
position du corps qui
se déplace vers le haut et vers l'arrière. Je peux donc facilement créer d'
autres volumes, même pour les seins, avec des
lignes et des formes simples. Je pourrais également montrer le volume
des nuages de mes personnages. Et puis, à partir de là, crée une manche courte pour cette
zone, pour le bras. Mais en fait, notre
travail est un costume de sport, donc il n'a peut-être
même pas dormi. Mais nous pouvons aussi créer
quelques instants de l'aisselle. Je vais séparer
le bras du corps. Je l'amène vers le coude. Et puis, de cette façon, je pourrai continuer ce travail. Je compléterais également
la forme générale
du bras comme celle-ci. Très bien ? Comme je l'ai dit, nous n'allons pas trop
travailler sur les détails. Nous allons simplement
montrer les volumes
autant que vous savez comment
les créer. Et je ne suis entré dans
les détails d'aucune partie. Maintenant, je vais prendre le
dos un peu vers l'intérieur. Je vais créer une courbe très
parfaite sur son dos. Et puis, pour le bassin, lorsque nous atteindrons le bassin, je vais le faire ressortir à nouveau. C'est vrai ? Ensuite, je
commencerai la deuxième étape. Et quatre ici. En fait, vous pouvez créer une forme et un volume
pour la zone des jambes. Et il peut créer d'autres
formes ici pour avoir un court. Ou vous pouvez vraiment y réfléchir. Plus long ou plus court, peu importe car notre objectif n'
est pas de créer de nuages, c'est de créer l'anatomie de notre personnage de manière correcte. Alors créez une jambe. Je me mets à genoux. Je ferai de même pour ici. Et juste comme ça, je vais créer le pied. Et je vais juste faire exactement
les mêmes choses sur cette jambe qui arrive
devant, qui va se manifester. Parce que cette autre jambe
s'avance, nous avons en fait envisagé
ce pied, encore une fois pointé vers le haut. Nous pourrions donc avoir les deux types
et nous pourrions les montrer ici. Comme vous pouvez le voir, cette jambe et ce pied sont fléchis et
l'autre est pointue. Comme vous avez pu le constater, nous avons créé un corps en position
divisée et en action. Et vous avez appris
comment créer une étape par étape. Pour notre corps. Nous pouvons même appliquer des lignes plus
courbes
afin de mieux montrer la direction et le
volume de notre corps. Et nous pouvons réellement montrer
la pression exercée sur différentes parties du corps en
créant ces lignes. Si vous voulez. Vous pouvez également
les créer. Et nous pouvons en fait rendre la main un peu plus complète. Pas trop, mais une
piste sur ce plateau.
6. Style de chute de femme: Bonjour à tous mes amis les
plus chers, quand je suis de retour ici avec une autre session de tutoriel
pour vous, mes chers brins. Et dans cette séance,
nous allons créer ensemble
un personnage qui est sur le terrain et qui essaie de
se lever
ou de se remettre à un
endroit donné et de demander de l'aide. Maintenant, si vous vouliez
créer un personnage qui est au sol et qui
ne se sent pas bien d'abord, nous pouvons créer notre ligne de terrain car nous allons avoir
notre personnage à la
surface de le sol. Par conséquent, nous aurions besoin de
cette ligne de sol. Maintenant que nous aurons
considéré cette ligne comme notre base pour notre corps, je vais créer ma ligne d'action. Parce que notre corps va
être placé sur le sol. Nous allons créer la ligne d'action de
notre corps. Dans cette forme. Cette zone est le bassin. Nous allons créer la jambe qui descend
l'un d'eux vers ce côté. Et l'autre peut être créé un peu plus
en avant devant la première étape. OK. Je vais maintenant déterminer
la position de la tête. Ensuite, je vais
examiner les bras. Comme vous pouvez le deviner, notre tête est orientée vers le bas, mais elle n'est pas complètement
souterraine. Il est donc amer de
considérer une distance entre tête de
notre personnage et le sol. Parce que nous ne voulons pas que la tête soit
placée par terre. Mais même si vous voulez le faire, vous devriez l'amener plus en bas et la
partie
initiale doit être
créée sur le terrain. Mais maintenant, notre objectif n'
est pas de le faire. Voulez-vous une certaine
distance entre surface du
sous-grade de la tête de
notre personnage ? Donc, si c'est la
tête de
notre personnage et que nous voulons montrer la direction du
visage avec ces lignes. Ici. Nous pouvons également avoir
notre oreille afin de mieux
montrer la position de la
tête. Ensuite, je vais ajouter le cou à mon
personnage, à la tête. Et nous devrions considérer
que, dans l'ensemble, notre corps est orienté vers le bas. Donc, toutes les parties de notre corps devraient descendre en fonction
de la gravité. Très bien ? Si vous voulez considérer
cette zone pour la poitrine, nous devrions remplir cette
zone à l'arrière afin que nous
puissions montrer cette traction le
bas des parties du corps
vers le sol. Donc derrière, derrière
le corps à l'arrière du corps, arrière du cou, vous allez créer des formes plus
angulaires. Je vais créer l'un des
bras vers le bas comme ça. Et puis, juste comme ça, j'ai créé sur le sol, je veux dire, je plie le bras du
coude vers le sol,
puis j'ai placé la main complètement sous terre parce que
notre personnage essaie pour aller de
l'avant en obtenant de l'aide de ses mains et de tout ce
qu'elle peut. OK. Ensuite, je peux aussi amener l'autre bras vers l'avant et placer sur la
surface du sol comme cela. Nous pouvons donc avoir les deux mains de notre personnage qui essaient
d'aller de l'avant. Et elle se
traîne sur
le sol pour atteindre quelque chose
ou pour se sauver. Le reste du bras, la partie supérieure
du bras ne peut être vue car elle a été
complètement placée. l'autre côté du corps. Ensuite, je relierai l'
estomac à la poitrine. Une fois encore. Une partie se trouve derrière notre bras et le bras le
couvre essentiellement. Ensuite, j'ajouterai le
bassin sous cette forme. Ensuite, je
ramènerai l'une des jambes vers
l'avant et l'
autre jambe vers l'arrière. Je vais donc considérer l'
une des jambes ici, qui est plus en avant. Ce serait le genou au sol et
le genou sera
en fait placé sur le sol qui est également plié
et le reste de la jambe, le tibia est au sol. Ensuite, je vais
créer la zone de la cheville et du pied avec une bonne courbe. Je vais créer le pied. Maintenant. Je vais
créer l'autre jambe, qui se trouve à l'arrière. Et je vais
créer l'autre jambe un peu plus en
arrière afin maintenir la direction de notre
corps en mouvement et en mouvement. Parce que si vous vouliez créer vos personnages,
ce
n'est pas si important,
mais parce que nous
essayons de montrer notre personnage essaie d'aller de
l'avant et c'est traînant son corps. Cette jambe doit être placée vers l'
arrière et l'une des jambes, qui est plus proche de nous, va être placée vers l'avant. Ensuite, je créerai la cheville
ici, puis le pied. Il s'agirait donc de la
partie
terminale du pied. Très bien. C'est ça. C'est notre autre jambe
que nous avons créée. Je vais rendre mon
personnage encore plus complet et je vais
finir mon travail. Je vais donc montrer cette ligne de
sol un peu plus parce que le personnage se connecte au sol en
plusieurs parties différentes. Je fais donc en sorte que ma
ligne de sol montre plus. Vous pouvez considérer la tête dans
la vue latérale et le profil, ou vous pouvez la créer en trois phases
via qui dépend vous de la façon dont vous le souhaitez. Puis je descends à la
poitrine et aux seins. Ensuite, du cou, je peux y retourner. Ensuite, j'atteindrai
le bras par ici. On dirait ça. Ensuite, nous pourrons
compléter notre bras. Et nous pouvons créer la zone des mains. Très généralement, ne pas trop insister
sur les doigts. Parce que nous ne faisons que
créer Deanna ventre et nous n'entrons pas
dans les détails. Nous pouvons quitter notre travail de cette façon. Ne vous inquiétez pas,
car notre objectif principal est de créer une anatomie de base correcte dans différentes positions, puis faire
progresser un peu pour la
rendre plus cohérente. Donc, à l'arrière, je
relierai
la poitrine, l'estomac et le bassin. Ensuite, j'atteindrai la jambe. Je descends, je me retourne et je
crée une jambe entière ici. Ensuite, nous arrivons au genou, puis à la
partie inférieure de la jambe. Très bien ? Et F leur dette, nous allons terminer
cette étape étrange, exactement de la même façon. OK. C'est donc l'anatomie du corps
qui est placée sur le sol et qui essaie d'
atteindre quelque part se lever
ou d'obtenir de l'aide
ou des choses semblables. Par conséquent, nous avons créé
les bras d'avant en arrière afin de montrer l'action et le
mouvement de notre personnage.
7. Lady Amazing Jumping: À tous mes amis les plus chers, je suis de retour avec une autre session de
tutoriel pour vous. Et dans cette session, nous allons créer ensemble
un personnage
qui n'est pas clandestin. Et par exemple, saute, fait une autre action sportive. Nous voulons donc voir cette
fois comment nous pouvons le façonner. Lisez comment relier
notre personnage ou le corps
de notre personnage au sol et comment nous pouvons
le créer correctement. Tout d'abord, comme d'habitude, je commence par créer la ligne
d'action pour mon corps. Par conséquent, nous verrions comment notre corps est
façonné dans l'air. Je vais donc envisager quelque chose comme un spectacle
ici pour mon personnage. Et cette forme que je
crée ici est en fait, et essentiellement la façon
dont la jambe de mon personnage se déplace au milieu
de cette ligne. Nous pouvons avoir notre bassin. Ensuite. J'ajouterai cette partie
supérieure du corps à mon personnage
à l'aide de cette ligne d'action, puis je comprendrai également la
direction de celle-ci. Ensuite, j'aurais
la tête de cette façon. Ensuite, je peux aussi envisager
le placement des bras. Ainsi, lorsque notre corps est placé de
cette façon, dans cette position, nous pouvons créer les bras de
cette façon très facilement. Ainsi, le bras qui est le plus
proche de nous peut remonter de deux du visage, devant le visage. Il peut monter. Et nous
pouvons créer la tête, créer le reste du corps, puis créer les bras. Ou après avoir créé la tête, vous pouvez créer des DR
puis vous diriger vers le
reste du corps. Encore une fois, cela
dépend, vous savez, que le mouvement général de notre corps est déterminé. Nous allons compléter
différentes parties de notre corps. Si c'est la
tête de notre personnage et qu'il est face vers le haut, travail serait plus acceptable. Ce bras est donc devant le visage, donc nous ne pouvons pas trop
voir le visage
parce que ce bras, qui est plus proche de nous, couvre en fait
certaines parties du visage. Par conséquent, nous pouvons
le constater complètement. À partir de là, je vais
déterminer le volume de la forme
armée du bras. Ensuite, je crée un bras
et une main complètement tendus pour mon personnage. Très bien. Ensuite, je pourrai ajouter les détails
à mon personnage. Et l'autre bras qui
a reculé peut être créé de cette façon. D'accord ? Ce bras est en fait
placé derrière notre jambe. Par conséquent, nous
pouvons d'abord créer la jambe
, puis nous sommes venus compléter cette
autre main, l'autre jambe. Mais je viens de créer une forme très générale
pour la main en ce moment, pour ce bras en ce moment. Et ensuite, nous allons placer la jambe sur le
dessus pour couvrir ça. D'accord. Je vais d'abord
créer la poitrine parce que notre corps a été
étiré et que nous ne pouvons pas voir
le cou aussi. Donc, comme ça, je vais considérer
cette zone comme la poitrine. Et puis je créerai ici la partie
centrale du corps, l'estomac et la taille. Ensuite, je
terminerai la zone du bassin. Dans cette forme. Et je vais vraiment créer
cette jambe qui a été
montée avec ces formes très simples. Ovale étiré parce que tout
le corps, particulier les jambes,
est étiré. Très bien. Comme vous pouvez le constater, j'ai
créé la partie avant et la partie arrière de la jambe. La zone située près de
la tête est en fait
l'arrière de la jambe. Et vous pouvez le
montrer en créant le genou ou en créant la partie inférieure ou la partie
supérieure de la jambe. La forme d'eux
et les muscles. Vous verriez. Où serait la
dernière partie de notre jambe. Maintenant, nous avons déterminé la forme
générale de la jambe. Et maintenant, nous allons passer
à la création de l'autre, l'autre jambe également. Et nous pouvons avoir
toute notre jambe et notre pied. En fait, la procédure
de création des jambes et des pieds est la même. Il n'y a pas beaucoup de différence. Juste
leur position est différente. Maintenant, cette action que nous
faisons peut être
soulignée de cette façon. Et c'est une autre action sportive. Et c'est un peu complexe. Mais lorsque vous effectuez une étape par étape, ce serait facile pour vous. Je peux même lui créer
des cheveux, une partie de l'oreille
afin de mieux montrer la direction du
visage et de la tête. Maintenant, je vais commencer mes
détails depuis le bras, ce qui rend mon
personnage plus cohérent. Je vais commencer par la
partie inférieure du bras de cette façon. Et puis, du haut
du bras, je veux dire, je me dirige vers le haut
du bras jusqu'à ce que j'arrive à la main. On y va. Maintenant, je peux ajouter les
doigts à mon personnage. Et c'est essentiellement
la forme de la main. Donc, si vous souhaitez que vos détails
soient plus délicats, il est préférable d'
utiliser une modification ou vous pouvez affûter la pointe de votre crayon afin de
ne pas rencontrer de problèmes. Assurez-vous donc d'aiguiser votre crayon et de
continuer votre travail. Très bien, comme vous pouvez le constater, où que nous ayons besoin de montrer
les volumes et les formes, nous allons le faire. Ne vous inquiétez pas du tout. C'est ça. Ce
bras est complet. Et pour l'autre bras, on
ne peut voir que le bout de la main, à l'exception de la partie
supérieure du bras. Nous ne pouvons voir que le
bout de la main et quelques doigts
venant de derrière le pied. Ensuite, je créerai les
seins pour elle. Dans cette forme. Je vais créer et compléter
toutes les formes de mon corps. Parce que notre corps est
complètement tendu. Nous devrions montrer ce volume et montrer cette forme de la meilleure façon. Nous devrions donc montrer cet étirement dans chaque
partie de notre corps. Ici. Je peux même déterminer
le nombril ici. Nous pouvons donc créer la forme de notre corps d'une meilleure
manière, plus correctement. Ensuite, même avec quelques lignes, nous pouvons montrer davantage le volume
de notre corps. Nous pouvons mieux créer les formes, peut-être même créer
des muscles. Cette jambe s'est levée comme ça. Nous allons juste en parler. Prenez-le. La
partie inférieure de la jambe, du genou et de la partie
supérieure de la jambe. Tous peuvent être
créés de cette façon. Ensuite, je peux aussi dans
la partie inférieure de la jambe, comme ça. Je regarde en ce moment. Je vais enfin
créer le pied. Et comme vous pouvez le voir, la jambe est complètement
tendue et pointue. La meilleure chose à faire
est d'effacer cette zone. Nous pouvons donc montrer que cette
main se trouve derrière notre note de bas de page
devant elle. Même si nous entrons pas dans les détails, ces choses sont
nécessaires
pour rendre notre anatomie
plus complète. Maintenant, après avoir créé
la première jambe, je vais compléter la
forme du bassin et créer ma deuxième jambe de ce
côté qui descend. Nous créons donc très facilement l'avant et l'
arrière de la jambe. Encore une fois, je dis que les crises de naissance
sont fondamentalement les mêmes. Ce n'est qu'une question d'
attention et de pratique pour que vous puissiez créer différents personnages dans
différentes positions. Ensuite, nous passons par le genou
et nous créons ici
encore un pied avec les
orteils et le talon. Très bien, c'est tout. Il s'agit en fait d'une action qui montre
une femme qui saute. Donc, si vous voulez créer un personnage qui
saute, commencez par
créer votre ligne d'action pour
le corps, commencez par
créer votre ligne d'action pour puis le
reste des étapes vous
sera beaucoup plus
facile. C'est ça.
8. Style de saut gymnastique: Bonjour à tous mes amis les
plus chers. Je suis de nouveau ici avec une autre session de
tutoriel pour vous. Très bien ? Dans cette
session, mes amis, nous voulons voir
comment créer un personnage. Si nous voulons qu'elle saute
d'un objet, a sauté d'un objet
et est également athlétique. Nous voulons voir comment créer cette action et cette motion. Par exemple, il y a ici une
scène ou un objet que notre personnage
est en train de sauter. Comme d'habitude. Je vais commencer par créer la ligne d'action
pour mon personnage. Et donc, le
placement des jambes, du corps et de la tête
serait déterminé de cette façon. Je vais donc créer la zone du
bassin au milieu, presque au milieu de la
ligne que j'ai créée. Ensuite, je vais créer la
partie supérieure du corps pour mon personnage. Ici, vers le haut. Je veux créer ma ligne de cette façon parce que je
veux que la partie supérieure du corps partie
supérieure du corps soient
un peu en avant. Et en fait, ce sont les
bras ouverts
et la
partie supérieure du corps ainsi que le bras et le pluriel des bras se
manifestent. Bon, je vais commencer par
créer le placement de ma tête sur le corps. Je peux également considérer un
corps dans une vue à trois visages. Donc, si c'était
le volume de ma tête, ce serait la mâchoire. Et la tête est un
peu vers l'avant,
en avant. Et c'est un
peu tourné aussi. Maintenant, pour le cou parce que nous avons
fait baisser la tête, nous ne pouvons pas voir le cou. Je commence donc directement à partir des épaules de mes personnages, puis je créerai la zone de la poitrine. Ensuite, je vais créer
la partie médiane du corps. Et je vais
le relier au bassin que j'ai créé au
début de mon travail. Maintenant que notre corps se présente et que nous allons également
faire avancer les bras. Nous devrions commencer les jambes à partir
du bas du bassin. Cela signifie donc que le bout des orteils
doit être orienté vers le haut, doit être tourné vers le haut. Et vous regardez le corps sous un angle inférieur. Sseuda, étape par étape d'abord,
je vais créer les bras. Si vous le faites étape par étape, vous saurez comment réellement votre action est exécutée. Je vais donc baisser
les bras comme ça. Et je ferais de même
pour l'autre bras. Faites-le tomber aussi. Encore une fois, j'arrive au coude, la partie inférieure du coude. La partie inférieure des
bras et les mains. Comme vous pouvez le voir, j'ai fait
pencher ce bras un peu vers l'intérieur du corps. Très bien. Ensuite, je peux facilement créer les
jambes à partir de cette zone du bassin. C'est très facile. Ce serait le genou et ce serait la
partie inférieure des jambes. Et là, je ferais respirer
la forme du pied
et des orteils. Maintenant, tout le pied ici. D'accord. Maintenant, ce que je vais
faire, en gros, je dois créer
l'autre jambe dans cette même procédure
et dans la même position. Comme vous pouvez le constater, je crée
tout simplement en général. Il suffit de créer
les bases de l'anatomie. Et plus tard, nous
travaillerons sur les détails. C'est donc ça. Comme je l'ai dit, les jambes sont créées les unes comme les autres. Maintenant, parce que nous considérons
réellement le corps et la vue en trois
phases derrière ce bras, nous pouvons voir une partie du dos. On peut voir une partie du dos. Parce que encore une fois, je dis que notre corps n'est presque pas en
trois phases. Nous avons donc la capacité de
voir le dos et peu. Pas trop, mais on peut en voir un
peu. Maintenant, je vais rendre mon
corps et cela plus
avancé pour moi et le
rendre plus cohérent. Je vais le faire avec
mon montage si nous partons de la tête, évidemment en premier. Donc, tout ce que nous pouvons ajouter des
cheveux à notre personnage, surtout derrière la
tête, à l'arrière de la tête. Ensuite, ici, on
peut ajouter l'oreille. Et nous aurions aussi un volume et la forme
avant de la chevelure. Il peut donc montrer que la tête est inclinée vers le bas de cette façon. Très bien. C'est ça. C'est le volume de notre tête. Maintenant, je vais commencer par
le haut de mon corps. Ce sera donc les épaules. Et dans la continuité d'eux, je devrais d'abord créer la
forme des bras, ce r. et je vais l'
amener
jusqu'au poignet. Et puis je créerai aussi
les doigts sur la main. Je pourrais donc simplement créer les
doigts dans cette forme. Et ensuite, je
créerai le reste de cette façon. Très bien
, maintenant je
vais travailler sur l'autre bras comme je l'ai déjà dit, gros, toute
la procédure entre les deux côtés du
corps est la même. Peut-être juste un peu plus de
hauts et de bas, de courbes, etc. Donc, des épaules,
je descends, je descends mon bras parce que je veux que mon bras soit tourné
et tordu un peu. En gros, je peux créer
le coude sous cette forme. Je peux insister
là-dessus pour montrer qu'à la
main et mon bras
est un peu plié. Ensuite, je prendrais la main. Essayez de créer plusieurs doigts. Et ce serait ça. Et comme vous pouvez le voir, même la main elle-même est
pliée des doigts. Maintenant, je vais compléter la zone thoracique avec les seins. Et maintenant, je montre
la forme de mon corps. Il serait donc
évident que mon personnage est essentiellement athlétique. Ensuite. Derrière notre main, derrière notre bras. Je fais tomber le
dos de mon personnage et ensuite j'atteindrai le premier, aussi facile que ça. Ensuite. Je façonnerais aussi
le pied et les orteils. Ce serait très facile, car il
vous suffit d'être un peu plus prudent et
de faire un peu plus attention. Ainsi, nous pouvons
voir et le pied comparant
encore plus les
situations et positions habituelles. Et puis complétez également
cette partie inférieure de la
partie arrière de la jambe, qui se connecte au bas
du bassin ou à la zone des fesses. Maintenant, nous allons faire exactement la même chose
sur la deuxième étape. Nous allons le compléter
avec plus de lignes pour montrer plus de
muscles et ainsi de suite. Rendez cette zone du genou bien plus visible que la partie
inférieure de la jambe. La cheville et le pied. Enfin. Le pied ressemblerait à ça. On y va. Maintenant,
toute notre jambe est terminée. C'est donc notre personnage dans
une position qui saute. Et elle
saute d'un objet. Elle saute d'un
objet ou d'une scène. Et en même
temps,
elle fait simultanément est fendue et
ouvre ses jambes grandes ouvertes. Puis avec deux lignes courbes. Nous pouvons également montrer la pression sur cette zone thoracique comme celle-ci. Très bien, c'est notre personnage.
9. Style de ballet: Bonjour à tous mes amis les
plus chers, je suis ici avec un autre
tutoriel pour vous. Eh bien, dans cette session, nous allons créer ensemble un
ballet c'est style. Nous voulions donc créer
une danseuse de ballet. Et nous voulons voir
comment créer ce mouvement élégant
dans notre personnage. Commencez par créer la tête de
notre personnage. Et nous le faisons en créant
un ovale ici. En gros, j'ajouterai
le tirage à mon personnage. D'accord ? Quelque chose que je peux vous
dire sur le ballet est généralement
fait par des femmes. Par conséquent, nous allons
créer
ici un personnage féminin qui danse le ballet. Et nous voulons montrer un
de ses mouvements pour vous. Dans cette anatomie. Je déterminerais aussi de
manière générale l'emplacement des parties faciales. J'utiliserai plusieurs
lignes pour montrer
la direction du
visage, puis je
déterminerai la
position des oreilles. Ensuite, je
vais ajouter le cou à mon personnage de cette façon. Très bien, maintenant, la
forme de notre corps va ressembler à la façon dont je vais
créer une ligne. En ce moment. Nous voulons que notre corps fasse un
petit tour du bon côté. Nous voulions donc aller de
côté vers l'écriture. Cette jambe serait là et
l'autre jambe
descendait pour être placée sur le sol pour maintenir l'
équilibre du corps. Et à propos des bras. L'un d'eux se dirigeait vers la jambe et l'
autre
montait pour créer une belle pose pour
ce ballet. D'accord ? Maintenant que j'ai créé chaque ligne d'action pour
chaque partie de mon corps, nous allons créer l'
anatomie de ces parties. Je vais ajouter
les parties du corps ici. Jusqu'à présent, nous allons
examiner le volume. Parce que dans cette zone, le bras s'est levé. Cette partie de notre corps
devrait être étirée nous
puissions montrer que ce bras
remonte complètement. Très bien. Nous façonnons donc la poitrine avec les
seins à l'intérieur. Ensuite, nous créerons
cette partie médiane de notre corps sous cette forme. Et après cela, nous allons créer
le bassin, évidemment. Et maintenant, je vais créer les jambes des deux côtés et je vais juste les
faire tomber. Ensuite, je vais aussi créer
le genou ici. Cette jambe devrait
simplement descendre et
latéralement et tout farouchement parce que nous sommes en train de créer
un mouvement de ballet, notre nourriture devrait être
complètement sur les orteils. Donc notre personnage s'
étend essentiellement sur ses orteils. Donc elle pointe son pied et elle est debout sur
ses orteils Totalement. Et ensuite, notre pied de ligand
sera complété. Très bien. Maintenant, je vais aussi travailler sur
l'autre jambe. Parce que cette jambe est face à nous. Pour le début de notre jambe, nous pouvons envisager un
cercle ici. Ensuite, des deux
côtés de notre cercle, nous
pouvons créer la forme et nous
déplacer vers le genou. Et ensuite, comme cela, nous pouvons nous diriger vers la cheville, le tibia et la cheville. Cette jambe serait
en fait ce pied et cette jambe serait
également tendue. Encore une fois,
elle pointe aussi son autre pied. Donc, à partir du risque, nous aurons cette forme, qui est un poste nommé. Nous commençons donc notre travail
avec des lignes étroites, puis nous l'élargissons. Et encore une fois aux orteils, nous serons à nouveau étroits. Plus tard, lorsque nous
voulons ajouter les détails, vous pouvez même créer une chaussure de
ballet sur votre pied. Vous verriez donc comment vous
pouvez le faire également. C'est assez facile. Maintenant, je vais
créer les bras. Je vais commencer par leurs formes
générales. Et plus tard, à l'étape suivante, je travaillerais un peu sur les
détails. De cette façon. Après cela, je vais
juste terminer. Ils le sont. Et enfin, la main
avec nous a créé très, très élégamment ici. Très bien. Maintenant, je vais créer l'
autre R qui monte. Je vais aussi travailler
là-dessus. Au-dessus de l'oreille, je continuerai le bras
et je le soulèverai, le
prendrai pour que
le bras soit complet. Ensuite, je vais créer le poignet et la forme
générale de la main. Il le ferait ici. Très bien. Donc, elle pose comme ça. Très bien. Ballet. Les doigts sont de la
manière la plus tendue possible. Et les jambes sont
aussi tendues que
possible. En danse de ballet, toutes les parties du
corps jusqu'aux jambes, pieds, aux mains et aux bras sont complètement
étirées. Donc, si vous voulez l'
améliorer davantage, nous pouvons nous concentrer davantage
ici. Ainsi, en fonction de l'action
que vous créez, vous pouvez travailler sur vos détails ou travailler sur certaines parties de votre travail. Et notre besoin d'être travaillé. Par exemple, les muscles. Maintenant, je préfère utiliser mon édité pour travailler sur des lignes plus fines,
des lignes
élégantes, plus faciles et plus rapides. Je peux aussi aiguiser la pointe de mon
crayon, puis l'utiliser. Mais c'est tout simplement plus facile
à utiliser et c'est tout. J'ai donc créé la tête. Ensuite, je vais travailler sur
le cou sous cette forme. Par conséquent, je peux
créer des pièces qui
sortent davantage. OK. Le bras ne peut pas être vu. Je veux dire, on peut aussi voir l'épaule de l'
autre bras. Il sort donc derrière les
seins et la poitrine. Nous allons donc continuer
la ligne mammaire jusqu'à la poitrine. L'estomac jusqu'au bassin. Très bien. Maintenant, je peux même créer une
robe de ballet pour mon personnage. Je vais juste créer une robe
très, très simple
pour montrer comment vous pouvez le faire. Très bien ? Vous saurez donc ce que vous
pouvez faire si vous voulez appliquer des vêtements très simples
sur le corps de votre personnage. Maintenant, ici parce qu'il y a une partie pressée et une certaine
pression peut être observée ici. Nous allons
créer plusieurs lignes, lignes
courbes pour les rides
et les couches
du corps ici. Et comme cette jambe s'est levée, nous allons
montrer le volume de la zone des fesses avec
cette ligne courbée. Ensuite, je vais
tourner cette ligne. Et je veux montrer que ma
robe est finie ici. Encore une fois, j'aurais
un autre terme ici. D'accord, à partir d'ici, je vais créer
le reste de la jambe. Cette jambe est un peu latérale des notes à,
à poser droit. Par conséquent, je vais façonner le genou comme ça,
en le rendant proéminent. Ensuite, je créerai le tibia, la partie
inférieure de la jambe et la rendant plus mince
et plus étroite, nous descendrons. Très bien. Ensuite, j'
abaisse la jambe jusqu'à ce que j'atteigne le pied et que je crée aussi. OK. Comme je l'ai déjà dit, je vais créer une chaussure de
ballet pour vous. Vous sauriez donc comment cela se passe. Tout d'abord, nous créons la partie
inférieure de la chaussure. Puis je me dirige vers le
bout de leurs doigts. Et puis quatre ici, je vais créer les lacets de
chaussures de la chaussure de ballet. Ensuite, pour une autre partie, nous pouvons simplement l'amener vers le haut. Et avec ces lignes très,
très simples, vous pouvez simplement créer
des ballerines pour les montrer avec
l'ensemble du costume. Maintenant, je vais également terminer
l'autre étape. Ensuite, nous allons diviser un peu
ces formes les unes
des autres. Ensuite, je vais envisager
plusieurs lignes pour le genou pour mieux le montrer. Ensuite, nous nous dirigeons
vers le pied. Et nous allons façonner le pied. Pour ce pied, si nous voulons
créer une autre chaussure de ballet. Nous en aurions donc une paire. Nous devrions commencer à créer
une ligne courbe à partir d'ici, qui est près du bout
du pied et des orteils. Et ensuite, au poignet, nous pouvons créer plusieurs lignes
croisées afin de montrer notre chaussure. Et créez des
lacets de chaussures d'une certaine manière, ce qui signifie que notre personnage varie en chaussures de ballet et
qu'elles peuvent être plus visibles. Bon, plusieurs
lignes simples, nous pourrions facilement créer nos personnages. chaussures de ballet. Maintenant, je vais
terminer les bras. Et de là, l'aisselle, sortez-la vers le coude, puis la partie inférieure du bras. Juste comme ça. OK. Maintenant, nous allons également
créer les doigts de manière
tendue. On peut même plier un peu
les doigts, ceux qui sont derrière. Et comme cela, nous allons compléter la
forme de notre main. Maintenant, je travaillerais aussi sur ce bras qui
monte aussi. Par exemple, dans ce domaine, je vais créer des éléments
importants pour cela et en parler. Alors, comme ça, je plierai le bras
un
peu vers le poignet
et nous continuerons la main et nous le créerons de la même manière qu'
au début. C'est donc ça. Très bien, comme vous pouvez le
constater, étape par étape, nous avons commencé avec
des formes très simples maintenant pour créer cette anatomie complexe
dans ce personnage, danseur de ballet. Je ne fais que compléter
les doigts et j' ajoute deux doigts derrière cette zone. D'accord ? C'est notre
résultat final pour nos personnages. Et pour moi,
encore une fois, c'est tout.
10. Style de ballet Lady avec robe: Bonjour à tous mes amis les
plus chers. Je suis ici avec une autre session de
tutoriel pour vous. Et au cours de cette session,
nous allons
créer une autre position
de ballet à rassembler. Je veux voir comment cela
peut être fait, très bien, pour créer l'action et la position de
notre danseur de ballet. Tout d'abord, je vais vous dire
comment nous pouvons créer les bases de notre
anatomie pour ce poste. Tout d'abord, je vais commencer par
créer la ligne d'action. Pour l'anatomie de mon corps. Je voulais commencer par
la tête et la partie supérieure du corps
descendant avec une belle courbe. Et puis je montrerai ici
le mouvement de la jambe. L'une d'elles, l'une des jambes va être placée en l'air et l'autre doit être
complètement placée sur le sol. Par conséquent, il peut réellement nous
aider à maintenir
l'équilibre de l'ensemble du corps. Il est donc préférable de
déterminer cette ligne qui descend avec une ligne droite. Nous pouvons donc créer notre jambe directement
vers le sol. Maintenant, parce que je veux donner à
mes bras une position spécifique. C'est juste de les créer, mais je vais
déterminer le positionnement de
la tête dès le début. Et puis j'ajouterai les
bras à mon personnage de trou. D'accord ? Je veux que la
tête de mon personnage soit tournée vers le haut. Par conséquent, je
vais créer la tête un peu inclinée
vers ce côté. Ensuite, nous allons créer
le cercle de la tête. Ce serait le crâne. Et puis on peut ajouter une petite
partie comme tirage au sort ici. Comme je l'ai dit, je veux que la tête
soit un peu bouleversée. Je veux dire, notre phase
devrait être tournée vers le haut. Je veux que mes cheveux soient
placés dans cette position. Et je peux également ajouter
quelques lignes supplémentaires à l'intérieur du visage pour montrer
la direction du visage. Et enfin, je déterminerai
le placement des oreilles. Par conséquent, le placement de la tête de mon personnage
serait tout à fait clair ici. Je peux même ajouter des
cheveux à mon personnage. Par conséquent, on peut le voir mieux et de plus en plus et vous le
sauriez mieux. C'est là que nous
pouvons avoir la tête. Maintenant, je vais commencer par
créer mes personnages Nick. Ensuite, je créerai
sa poitrine ici. Et dans les
positions de ballet, en fait, dans toutes les positions et
actions de ballet , vous pouvez voir que le corps
est complètement étiré. Par conséquent, vous devez créer toutes les parties de votre corps
avec plus d'étirements. Cela signifie que vous devez
tous les créer est
étiré afin de créer
une position correcte. Maintenant, je vais déterminer
les bras ici. Et je peux aussi faire monter
l'autre bras de l'autre côté
du corps. Ce sont les
lignes d'action pour nos bras. Maintenant, je vais les
compléter davantage. D'abord. Je vais
créer le bras ici. Et je vais l'ajouter à mon travail. Ensuite, j'arrive au coude, la partie inférieure du bras, puis je
créerai le poignet et la main de manière très générale. Ensuite, j'ajouterai aussi les
doigts. D'accord. Je créerais également
l'autre bras de notre personnage sous cette forme. Ici, nous allons faire monter
le coude. Ce qui se trouve essentiellement
sous le coude. Et ici, nous arrivons au poignet
et à l'autre main. Très bien, c'est tout. Non, je vais recréer le reste du corps,
étiré. Voici la
partie médiane de notre corps. Et puis, enfin, j'aurais cette
forme pour le bassin ici. Comme ça. Maintenant, nous devrions apporter
une des jambes. En fait, nous devrions prendre l'
une des jambes vers l'arrière et l'autre
descendre pour garder l'équilibre. La jambe qui est plus proche de nous va reculer. Ensuite, avec un cercle ou
mieux pour dire avec un ovale, nous allons façonner cette jambe, qui est
tendue vers l'arrière. Et c'est ainsi que nous allons déterminer toute
la forme des jambes. Ensuite, par ici. Je vais aussi montrer que sa jambe et son pied
sont en forme de point. Elle étire donc aussi
cette partie du pied. Comme vous pouvez le voir sur la
cheville, c'est plus étroit. Il devient de plus en plus épais et plus large. Et alors que nous nous dirigeons
vers les orteils, encore une fois, il sera plus étroit car notre pied est
en position ponctuelle. Et en gros, nous voyons toute la jambe à travers le pied
étirée complètement. D'accord. Deal autre jambe
sera créée ici. Mais parce que je veux
apporter des nuages sur mon personnage, je n'aurais pas besoin de trop
travailler dessus. Je vais donc créer
la jambe ici. Mais si vous voulez, comme je le fais, vous pouvez le
couvrir avec votre jupe. Et si vous le souhaitez, si vous pensez que
vous êtes assez
avancé, vous ne pouvez pas
créer les pièces qui vont se trouver
sous la jupe. C'est donc ça. Je vais
les créer pour vous. Et enfin, je vais créer le pied. Maintenant, dans les détails, je vais aussi
ajouter des chaussures de ballet, en fait, une paire
de ballerines. La langue est au sol, est dans la vue latérale et
la jambe qui est haute, est dans la vue de face. Maintenant, je vais ajouter les
détails et ensuite j'
ajouterai deux nuages et une jupe
ballets. Vous verriez donc
comment vous pouvez habiller votre personnage et
comment vous pouvez créer réellement une jupe pour une personne
qui est dans cette position et l'une de ses jambes est haute. Je vais commencer par créer les cheveux afin mieux montrer que mon
personnage est de ce côté. Et en fait, il regarde vers le haut. Le visage est en train de regarder. Je vais compléter les
formes un peu plus. Je vais rendre mon
anatomie plus avancée. Et la meilleure chose que
je puisse faire ici, c'est ajouter la robe d'
ici à mon personnage. Et ensuite, je peux
avancer dans mon travail, avancer dans mon travail. Ensuite, je créerais aussi l'
aisselle pour mon personnage. Ensuite, je monte vers
le coude et même plus haut jusqu'à ce que je puisse
atteindre le poignet. Et donc, attention,
vous ne devriez pas créer très gros bras pour votre
personnage, car en fait, danse de
ballet est très, très délicate et élégante, nous devrions considérer que pendant que
nous créons notre travail. Et les danseurs de ballet sont
généralement très minces, minces, mieux vaut dire. Ajustement. Je vais créer la
main sous cette forme. Peut-être même créer plusieurs
lignes pour les doigts. Et je peux même créer des doigts tendus
pour mon personnage. Et puis pour cet autre bras. Je peux juste commencer par l'arrière. Je veux dire, de l'endroit
par derrière et par le cou. Je vais créer l'autre
bras de l'autre côté
du corps dans une telle forme. Très bien. Ce serait ça. Maintenant, comme vous pouvez le voir, les doigts sont également tendus. Et nous allons
leur montrer comme ça. Très bien. Maintenant, nous pouvons également créer les doigts dans
différentes positions. Maintenant, pour la zone thoracique, je vais ajouter les seins en
descendant vers l'estomac. De l'arrière. Ali est également descendu. Et à partir de là, c'est le
gaspillage que je vais créer. Mes personnages ont peur
et je vais le façonner. Commencez à le façonner à partir d'ici. Je devrais donc
créer une forme pour mes
personnages, une jupe. Je vais le faire descendre, jusqu'ici. Et puis je peux aussi créer cette partie un
peu plus gonflée. Et puis, avec quelques
virages et rebondissements, je peux façonner l'ensemble de la peur pour rendre plus intéressante
et plus réaliste. Et tout comme cela, nous devons
redescendre pour montrer que notre volume n'est pas
une surface unidimensionnelle, c'est une chose et
qu'il a un volume. Cela se trouverait donc
à l'intérieur de notre jupe et nous allons les faire tomber. Nous pouvons donc montrer que R carré a un volume et va
à l'intérieur et à l'extérieur. Très bien. Maintenant, je vais créer la jambe à partir de la
partie que l'on peut voir. Je continuerai donc la
forme de la jambe, la partie inférieure de la jambe, allant vers la cheville
et la zone du pied. Je vais le façonner de cette
façon un peu plus. Et maintenant, je peux aussi créer une chaussure de
ballet sur ce pied, rend plus cohérente
avec l'ensemble du personnage. Très bien, c'est tout. C'est la chaussure de cette
jambe et de ce pied. Maintenant, nous allons faire exactement la même chose
sur la deuxième étape. Où que l'on puisse voir,
la jambe commence. Nous commencerons à partir de
là et créerons notre jambe plus détaillée, plus avancée en
termes d'anatomie. Avec quelques lignes. J'envisagerais également
un volume pour le genou. Ensuite, à partir de là, j'
aurai la cheville descendre vers les orteils
pour créer un pied entier. Et parce que notre personnage porte réellement une chaussure de ballet, nous allons montrer la forme
du pied de cette façon. Ensuite, les lacets de chaussures
pour la chaussure de ballet. Et tout comme ça, tout
notre personnage est complet en position de ballet. D'accord. Il s'agit d'un autre personnage en position de
ballet ou en mouvement.
11. Style de patinage pour femme: Bonjour, mes amis, et nous
sommes de nouveau là avec une autre session de
tutoriel pour vous. Dans cette session, nous allons
créer une action en
patinage artistique. Et nous voulons voir
comment ça se passe, peut-être quand il danse sur la glace. Très bien, je vais commencer par créer la
ligne d'action pour mon corps. que je
veux faire ici, en
fait dans cette action, ce que nous
voyons le plus, ce sont les bras et les jambes
du personnage. Par conséquent, nous examinerons
la direction des bras et des jambes de cette façon. Ensuite, je créerai aussi les formes
et les volumes des jambes. Mais tout d'abord, je
vais déterminer la position du
bassin ici parce que l'une des
jambes monterait et l'autre
se
dirigerait et l'autre
se
dirigerait vers le sol
pour garder notre corps équilibre de cette façon. Et maintenant, je vais
ajouter les autres parties du
corps à notre personnage. Nous devrions créer, ajouter la tête de
personnage dans cette zone située entre le bras et la jambe de
notre personnage. Pourquoi ? Eh bien, parce que lorsque les
bras sont placés ici, ce serait la tête de notre
personnage, quelque part entre les deux bras. Et parce que notre corps est
plié vers l'avant et vers le bas, nous pouvons déterminer
le positionnement de la tête de cette façon. Très bien. Je vais maintenant
créer le
coffre de mes personnages avec ce
volume de cette forme. Ensuite, je vais créer le placement pour les bras de mon
personnage. Très bien ? Je vais créer des mains et des
bras
très, très délicats et
élégants pour notre personnage
car c'est une femme. En même temps, elle fait
un sport très élégant. Par conséquent, nous
allons la créer très élégamment et
juste dans certaines parties, nous allons montrer
certains muscles afin que nous puissions montrer que nos
personnages sont aussi athlétiques. Maintenant, nous allons
créer le volume général pour les bras, pour notre personnage. Et puis je vais aussi ajouter
l'autre bras. Mais celui-ci
serait de ce côté. Et puis je
travaillerai sur le poignet. Et une forme générale
pour la main. Très bien. Maintenant, depuis le bassin, je vais créer cette
jambe vers le bas, vers le bas. est aussi facile que ça. Et vous devez savoir que
cette jambe est plus en avant et qu'elle est plus proche nous est dans
la perspective. Ensuite, je ferai la partie inférieure de la jambe, puis
je créerai le pied. Et plus tard, je peux également ajouter les chaussures de patinage à glace plus tard
dans la phase de détails. Maintenant, nous allons également
travailler sur cette autre jambe de cette façon. Nous aurions donc le genou. Et juste comme ça, cette autre étape
se poursuivra. Je vais rendre les muscles
un peu plus clairs car notre personnage est évidemment
athlétique. Il faut donc montrer quelques muscles. Ensuite, nous arrivons au point d'ancrage et la fin de notre travail. Plus tard, j'
ajouterai une chaussure de patinage. J'ai tellement de chaussures de patinage
à mon personnage. Il s'agit donc d'une forme
générale du corps d'un personnage, qui fait des
gars, cette porte. Je vais ajouter d'autres
détails à ce personnage. Je vais commencer par le visage de mon
personnage. Ensuite, je peux même façonner un peu plus
la tête de mon personnage. Je peux déterminer la position
des cheveux ici. Ensuite, j'aurai mes
lignes pour déterminer la direction
du visage. Très bien. Maintenant, pour la
zone de poitrine de mon personnage, je vais créer les seins de mes
personnages. Et puis, à partir de l'aisselle, j'avance pour créer
les bras et les compléter. De ce côté aussi, je vais créer
les épaules. Et puis, juste de cette façon, j'arrive au coude. Et ensuite, je continuerai mon bras. Et dans ce domaine, je peux aussi créer une ligne en tant que représentant de mon bras
un peu plié. Ensuite, je travaillerai sur le
poignet et plus tard sur les doigts. C'est juste comme
ça. On y va. Ensuite, je vais créer une
ligne entre les doigts que nous sachions comment la tête de notre
personnage est façonnée. À partir d'ici encore, je vais étirer
les bras vers le haut. Et puis je créerai le
coude qui remonte à nouveau. Je peux simplement créer
une ligne afin montrer le positionnement des coudes, ce qui le rend plus clair. Ensuite, je peux continuer à créer les doigts de mon
personnage dans cette forme. Très bien. Maintenant, je peux créer
plusieurs doigts. Et ensuite, je pourrai finir mon
travail sur les bras aussi. D'accord. Alors Atlas, je vais
créer le pouce et je reprendrai leur poignet. Je vais rendre
cela plus complet. Je vais travailler
sur la jambe qui est plus en fronde et
au sol. Ensuite, je créerais aussi
une autre ligne pour le genou. Ensuite, le tibia, la
partie inférieure de la jambe sera créée pour cette zone. Et maintenant, je peux créer
une chaussure de patinage à glace. Je commence par ici parce que la chaussure
commencerait à partir d'ici. Ensuite, je l'ai fait tomber. Et ici, nous aurons un talon
très petit et
proéminent. Ensuite, nous avons une courbe et
nous nous dirigeons vers les orteils. Très bien, c'est tout. partie la plus importante
est l'endroit qui se trouve en fait sous
la chaussure et sur la glace. Je peux facilement créer une
forme comme
celle-ci avec une forme rectangulaire,
que celle-ci avec une forme rectangulaire, je peux considérer pour
cette zone sous la jambe, sous le pied, en fait. Maintenant, je vais également terminer
l'autre étape. Et puis j'y ajouterai la jupe de mes
personnages plus tard. Ensuite, pour cette jambe, les procédures sont
essentiellement les
mêmes que sur l'autre jambe que nous allons
faire sur cette jambe. Une chose à laquelle nous
devrions prêter attention, c'est que nous pouvons voir l'
arrière de cette jambe, pas la partie avant de celle-ci. Nous ne créerions donc aucune ligne pour créer la pointe du genou. Nous pouvons simplement ombrer
cette zone pour créer une ombre
afin de montrer cette zone sous forme de courbe et
qu'elle se trouve derrière le genou. Très bien. Maintenant, nous allons également créer une chaussure de patinage sur
glace pour
ce pied. Nous allons créer cette
petite grêle proéminente, puis une courbe puis encore une zone
plus proéminente pour
les orteils
afin de montrer la chaussure. Ensuite, nous créerons un rectangle qui va
être placé sur la glace. En fait, comme vous pouvez le constater, c'est un long rectangle horizontal. Très bien, c'est tout. La partie avant de
la chaussure
ira en fait à l'arrière de la chaussure
et elle ne peut pas être vue, elle
peut en fait l'assombrir pour la montrer davantage. Maintenant, je voudrais aussi créer une jupe pour mon personnage. Pour ce faire, je peux créer la jupe
avec quelques rides. Si je veux que mon travail soit mieux
vu et plus clair, je vais créer plusieurs lignes reliées
au bassin de mes personnages. De cette façon, il peut créer des rides sur la jupe et
lui donner une forme gonflée. Une de ces parties
sortira et, à côté de
cela, elle entrera. Comme vous pouvez le constater, nous avons des hauts et des bas
juste à côté de l'autre. Arcs et courbes, si vous le souhaitez. Très bien. Maintenant, pour cette première partie,
je vais également créer des
lignes pour mes personnages. robe. Cool OR, et ici, je vais finir la robe
juste là. Sous le sein. Ensuite, je peux créer une forme
générale pour affronter. Juste comme ça. Très bien. C'est notre personnage qui
fait du patinage sur glace. Et je
ressemblerais vraiment à ça. Elle est en position de
balayage de l'EI. Je peux ensuite
créer plusieurs lignes sous le pied
afin de représenter la glace. Nous pouvons donc faire avancer encore
plus notre travail de cette façon. Très bien, c'est tout.
12. Style de chute d'homme 1: Bonjour à tous mes amis les
plus chers. Je suis de nouveau ici avec une autre session de
tutoriel pour vous. Eh bien, dans cette session, nous allons créer ensemble
différents styles, qu'un personnage peut avoir lorsqu'il tombe de
différents endroits. Par exemple, s'il tombe d'un grand jeu comme un bâtiment, ou s'il tombe d'un pas, nous aurions
différents en fait, nous pouvons avoir différents
types de positions, mais nous allons simplement créez-en
plusieurs pour vous ici. Par conséquent, nous ne
saurions pas comment y parvenir. Très bien, je suis en retard pour
commencer par le modèle, qui est le
plus simple d'entre eux. Ensuite, nous créerons des positions
et des mouvements
plus complexes. Quand un personnage saute de
quelque part ou tombe
de quelque part. façon la plus courante et la
position la plus courante est que
l'un des bras va vers le sol et l'
autre monte. Et en gros, les pieds
sont en l'air. Tout d'abord, je crée ma ligne d'action pour mes personnages, mes
corps et mes PME. Ensuite, je crée différentes
parties de mon corps. Donc, si vous voulez
montrer la direction de notre mouvement à partir d'ici, nous commencerons par notre bras. Nous allons chercher le corps. Enfin, nous avons encore les
jambes en l'air. On peut avoir une des jambes
en fait penchée. Je vais maintenant
créer différentes parties de mon corps sur cette ligne d'action. De toute évidence, je devrais
considérer la tête vers le bas parce que nous venons
de haut en bas, de haut en bas. Je vais donc presque
considérer ma tête ici pour
créer le crâne. Puis après papa,
évidemment à Joel. Très bien. Maintenant, ici, je peux aussi
considérer l'oreille ici. Et de cette façon, nous
connaîtrions notre visage, notre tête est orientée vers le bas. Ensuite, je vais créer
la zone du cou. Et ensuite, pour la partie
supérieure du corps, je vais créer un coffre ici. Et défendre notre personnage, qui peut être masculin ou féminin. Vous pouvez ajouter les seins
ou les éliminer. En ce moment, j'envisage un CV de
mon personnage. Je vais donc créer autant la partie
supérieure du corps et
sans seins. Maintenant, je vais travailler sur la partie
centrale du corps comme ça. Et ensuite, je vais examiner
le bassin ici. Le lac qui est plus proche de nous peut être plié latéralement, bien
sûr pas droit, et peut-être un peu vers la gauche. Ainsi, vous pouvez également créer que
les deux jambes sont droites, mais je veux juste vous montrer différentes formes que vous pouvez
créer votre corps. Par conséquent, il est préférable de créer
cette jambe qui se penche vers arrière et
surtout vers la gauche. Et nous allons créer l'
autre jambe à partir d'ici, de la zone du bassin vers le haut,
droite, presque droite. Ici, nous aurions le genou et je
montais encore pour frapper le pied. Atteignez le pied, en fait. C'est ça. Vous pouvez donc créer
votre personnage dans de nombreuses autres positions
différentes, mais c'est le plus basique. Ensuite, je vais créer
un pied ici. Ce ne serait donc pas
complètement droit. Je vais simplement créer la partie finale de mon
pied, également latéralement. Et puis, en créant
ce deuxième bras, qui est également plus proche de nous, je peux donner au spectateur le sentiment qu'il est
en train de tomber. Donc, afin de mettre l'accent
sur cette motion, je vais considérer ce
bras en l'air. Et même pour l'améliorer, je peux créer une main
dans cette forme, que ma
main est ouverte. Et il y a des espaces
entre les doigts. Afin de montrer que ce
personnage est en train de tomber, c'est essayer d'atteindre
quelque chose mais il ne peut pas. Je vais créer le pouce et
je reviens au poignet. Et je peux aussi créer
plusieurs autres doigts. Je peux donc montrer que la paume
est tendue et qu'il
y a des espaces entre
ces doigts. Juste pour insister sur
le fait que notre
personnage est en train de tomber. Ensuite, je vais
créer l'autre bras, qui va être
placé sur le sol. Une partie était évidemment
derrière la tête. Par conséquent, je crée presque
mon bras à partir du coude vers le bas. Ensuite, nous
aurions leur poignet. Et vous allez créer la main qui
touche essentiellement le sol. De cette façon. Encore une fois, cette main sera
également créée complètement ouverte et étirée pour
montrer qu'il tombe. Très bien. Je vais travailler un peu
plus sur différentes parties de mon
personnage , juste pour que ce soit un
peu plus avancé. Pas trop. Vous ne voulez pas rendre les choses
trop compliquées. Mais parce qu'il s'agit d'un mouvement
très simple, c'est une position très simple. Je peux créer plus de détails à ce sujet. Donc, parce que notre corps
est en train de tomber, vous pouvez insister sur ces
lignes un peu plus que d'habitude. Vous pouvez incliner certaines
lignes ici parce que notre corps est face au sol et il est également
un peu penché vers l'avant. Nous pouvons donc le montrer avec des
lignes très simples sur tout le corps. C'est la
façon la plus simple qu'un personnage puisse tomber que l'on puisse avoir. On dirait ça. Et complètement en créant la position des
bras et des jambes, nous pouvons montrer notre personnage dans
une position qui tombe. Vous voyez à quel point nous pouvons facilement
créer différents mouvements, différentes positions pour nos personnages dans
différentes situations. Et maintenant, nous pouvons même mettre l'accent sur les doigts qui
sont placés derrière, plus derrière et nous
pouvons les ombrer. Nous pouvons donc montrer qu'ils
sont en perspective, qu'ils sont en retard et
qu'ils sont plus loin. C'est donc la première
fois que nous
créons tous les
personnages qui tombent. Et la position la plus simple, c'est presque une anatomie de base.
13. Style de chute d'homme 2: Bonjour à tous mes amis les
plus chers. Je suis de nouveau ici avec une autre session de
tutoriel pour vous. Eh bien, dans cette session, nous
allons créer
ensemble un personnage qui s'est emparé quelque part et
maintenant il est en train de tomber. Donc, fondamentalement, nous créons un personnage
tombant d'une hauteur. Maintenant. Nous voulons créer les parties du corps suspendues à l'air
et dans les airs. Par conséquent, dans cette
position, au milieu, notre partie du corps peut également être
considérée comme droite. Je vais créer ma ligne
d'action pour vous. Par conséquent, vous
sauriez mieux que comment le créer. C'est bon ? Si c'est
notre partie centrale du corps, nous créerons l'une
des jambes de cette façon et l'autre de cette façon. Et je créerais aussi des DRAM. Créons l'autre ligne d'action des
bras car nous ne pouvons en voir qu' une partie et le reste ne peut pas
être complètement visible. Maintenant, si je veux placer
mon corps ici, si c'est le bras ici, ce serait notre tête. Parce que notre corps est pressé. En fait. Pensez également à notre
point de vue. Nous allons donc créer les angles de cette façon parce qu'ils
tombent de cette façon, et ainsi de suite. Nous pouvons voir la tête
dans cette direction. Je vais généralement considérer un ovale pour toute la partie
supérieure du corps. Et je suis en train de
créer un domaine DNS la manière la plus simple car l'action et cette
position sont assez complexes. Par conséquent, nous ne voudrions pas
rendre notre travail encore plus
complexe en créant anatomie
plus détaillée ou plus complexe car l'action est
suffisamment complexe. Très bien, alors je vais
créer un bassin avec un cercle. Avec un cercle. Alors sachez
que notre corps est dans cette forme et qu'il
a quelques volumes. Par conséquent, vous sauriez que ces deux parties seront
connectées l'une à l'autre. D'accord ? Je vais également créer des formes générales
pour les jambes. On monte de cette façon. À côté du bassin, ils montaient, puis
ils atteignaient le genou. Et la partie inférieure du tibia de la jambe ne peut pas le
recréer de cette façon. Très bien. Maintenant, nous pouvons voir cette partie
finale du pied et aussi
son côté. Maintenant, je vais aussi travailler sur
l'autre jambe. Je vais le créer à partir de
cette partie du bassin. Et cette autre jambe. Si nous pouvions le
créer de manière courbée, ce serait bien mieux. Donc, si nous créons cette jambe
montrant qu'elle est pliée, serait bien mieux parce qu'
elle peut réellement nous montrer la position de chute
plus que cela. D'accord ? Maintenant, à partir d'ici, nous pouvons également
avoir notre pied. Très bien. Maintenant, plus tard, je peux travailler
sur quelques petits détails. Ensuite, je créerai
ce bras qui est plus proche de nous et qui est
plus proche de la tête. Façonnez-le de
l'épaule jusqu'au coude. Alors, comme ça, je peux montrer le mouvement, la
position et cette action
avec les doigts encore plus. Donc, parfois,
vous pouvez mieux montrer l'émotion et votre action
même avec vos doigts. D'accord. Maintenant, je voudrais travailler sur
cet autre bras à partir d'ici. Nous créerions une tournée
décidée et sous cette forme. Bon, enfin, après ça, je compléterai cette zone pour que je puisse le créer
complètement étiré. Et le bras et la main seront créés
un étirement de ce côté. Maintenant en position de chute, les doigts peuvent
nous aider beaucoup
afin de montrer que notre personnage
est en train de tomber. Commençons donc par la tête en complétant
différentes parties du corps. Et en fait, je peux plier
cette jambe un peu plus vers l'avant pour montrer la sensation de
chute un peu plus. Et ce travail peut
être
mieux montré si vos jambes sont un
peu, penchez-vous vers l'avant. D'accord. Vous pouvez donc vous entraîner sur différents
types de chutes. Et ce qui nous a été le
plus utile, nous pouvons le faire. D'accord. Je vais maintenant créer la partie supérieure du corps
sous cette forme. Et ensuite, les mains
et les bras
seront créés comme ça facilement. D'accord ? Maintenant, je crée l'
œuvre de la manière la plus simple. Encore une fois, je l'ai dit, parce que
vous comprendriez la position et le
mouvement de votre personnage. De cette façon, je vais
créer les doigts. Ceux-ci peuvent en fait nous
montrer et
nous aider à créer une meilleure forme. Maintenant, ici, entre le majeur et
l'index, nous pouvons avoir plus de
distance pour
montrer que notre personnage
est en train de tomber. Ensuite, à partir d'ici, je vais aussi créer
le pouce. Vous voyez ? Dans cette partie,
la création des doigts
aidera réellement à le faire. D'accord ? Maintenant, je vais créer l'
autre main de cette façon. Et puis je
terminerai la main. Ensuite, je vais créer un doigt d'une manière
que nous voulons montrer. Ce personnage se
regroupait quelque part, mais maintenant ses mains sont
lâches et il tombe. Très bien, c'est tout. Maintenant, je vais
travailler sur les jambes. Et maintenant, je vais
plier un peu les jambes
à partir des genoux. Et je vais créer l'arrière
de ma jambe comme ça. Ensuite, je vais considérer le pied et je créerai l'
autre jambe dans cette forme. Je continuerai cette jambe de
nouveau depuis la région du bassin. Et encore une fois, je vais le
faire plier vers le pied. Dans cette forme. Ce serait la partie finale
du pied que nous pouvons réellement
créer avec une courbe. Ce sont donc les
bases générales de notre forme, que notre personnage tombe, que les jambes sont pliées. La forme des doigts
et tout ce qui se trouve dans ce personnage
dit en fait qu'il tombe. D'accord ? Je vais donc également effacer
quelques lignes supplémentaires pour
que vous puissiez voir encore mieux la jambe et la
position de celle-ci. C'est notre
personnage tombant avec une anatomie simple et
basique, à la fois dans une position
complexe et un mouvement.
14. Style de chute d'homme 3: Bonjour à tous mes amis les
plus chers. Bonsoir à tous. Je suis de nouveau ici avec une autre session de
tutoriel pour vous. Eh bien, cette session, nous
allons créer
ensemble un personnage qui
saute de quelque chose. Par exemple, qui
saute d' un hélicoptère ou d'un avion. Il saute donc d'une
très, très haute pensée. Ce n'est pas comme un
bâtiment normal, c'est comme le parachutisme. Nous voulons donc montrer un
personnage, un personnage masculin, qui saute de
quelque chose de très haut ou de haut. Donc, tout d'abord, je vais créer la ligne
d'action pour mon corps ,
puis j'ajouterai
les jambes et les bras. Si cela est considéré comme la ligne d'action de
notre corps, je déterminerai
la tête ici. De cette façon. Ensuite. Je vais créer
la partie supérieure du corps, qui serait la poitrine. Maintenant, nous regardons le corps de notre
personnage par derrière. Par conséquent, nous ne pouvons
voir que son dos. Vous devriez donc
considérer que parce que votre personnage a sauté, vous pouvez voir son sac et ensuite les bras
remonteraient par derrière. Très bien. Donc parce qu'
il a sauté de toute évidence, et parce qu'il a
sauté volontiers, évidemment, la partie avant du corps sera orientée vers le bas. Maintenant, pour cette
partie médiane du corps, j'envisagerais aussi une forme. Et puis je
créerai un volume et une
forme pour le bassin. Très bien ? Maintenant, en me basant sur ce que notre corps devrait
être un peu incliné, je vais créer mon corps latéralement, ne serais pas complètement
droit sur ma ligne d'action. Ensuite, je vais créer le
volume des jambes. Et je vais créer les jambes droites
jusqu'au genou. Et puis du genou vers le bas, je vais les plier. Donc, à partir du genou vers le bas, nous considérerons
la jambe vers le haut. Juste comme ça. Ensuite, je
créerais aussi la jambe arrière, l'autre jambe pour cela aussi. Maintenant, cette jambe est terminée. Celui qui est proche
de nous est terminé. Maintenant, je créerais
l'autre jambe, encore une fois, partant du bassin
et en avançant. Dans cette forme. On peut le voir un
peu plus comme ça. Ensuite, j' ajouterai le genou et ramènerai le reste de la
jambe vers Deir. En gros, vers le haut. D'accord. Le voilà. Et on peut facilement créer le pied
qui monte comme ça. Il s'agissait des jambes. Maintenant, je vais aussi
ajouter les bras
parce que le personnage a
aussi besoin d'armes. Et nous allons créer une partie de ce bras qui est plus proche de nous. Je vais donc créer ce
bras qui est plus proche de moi. Ensuite, à partir du coude, je l'amène plus vers le haut. Ensuite. Je vais venir ici
et créer la forme de la main dans une forme très
générale. C'est juste que je
créerais aussi l'autre bras de l'autre côté du
corps sous cette forme. Encore une fois,
en le soulevant du coude, en le faisant monter sur le côté. Afin de placer plus correctement
la position
du corps. Ensuite, je créerai le poignet et les doigts comme ça. D'accord ? Maintenant, c'est notre corps, qui est en fait notre personnage, qui saute
d'un endroit très, très haut ou haut. D'accord, puis je
finirai mon travail. Nous allons maintenant utiliser des formes très
simples car, encore une fois, comme la précédente, l'action que nous
montrons et la position que nous
montrons sont suffisamment complexes. Nous ne voulons donc pas créer une anatomie
très complexe, c'est anatomie
très avancée pour
rendre les choses difficiles pour nous-mêmes. Comme l'action et la
position sont assez complexes, nous allons utiliser des formes très
simples pour créer une robe MSME très basique afin de se
positionner correctement. Maintenant, je vais créer
les bras de cette façon. Maintenant, je vais aussi créer
les mains. Et je vais en fait
créer les doigts et séparer les
uns des autres
afin de montrer que nous allons descendre. Très bien. Je vais créer l'autre
bras de la même façon. Et D d'autre part, en fait. Je veux donc considérer tous
ces éléments de base de la même manière. J'aurais aussi
plusieurs doigts
ici en étant un peu séparés. D'accord. Maintenant, nous pouvons considérer cette main et ce virage un peu plus. Et ce bras a
également été courbé depuis le coude. Et nous pouvons aussi
créer
un petit courbure des doigts afin de
faire notre personnage, garder notre personnage de manière
plus cohérente. D'accord ? Donc, si vous créez
un personnage qui saute volontiers
d'une partie haute, je place, vous pouvez simplement le
créer sous cette forme. Et nous n'allons pas
trop
travailler sur les détails car nous sommes créer une anatomie générale et
nous l'avons parfaitement
complétée. C'est donc notre personnage qui
a sauté de quelque chose.
15. Le premier style de levage d'une dame par un gentleman: Bonjour à tous mes amis les
plus chers. Je suis de nouveau ici avec une autre session de
tutoriel pour vous. Et dans cette session, nous allons créer des styles
pour deux personnes cette fois-ci. Comment allons-nous faire cela ? Eh bien, nous allons
créer un personnage masculin et féminin faisant peut-être même un
mouvement de danse ensemble, ou nous allons vraiment les
créer tous les deux en faisant
une seule action ensemble, d'accord ? Maintenant, notre
personnage masculin est
censé soulever notre personnage féminin. OK ? Je vais
les créer en partie pour voir comment ils
vont être créés. Maintenant, pour le
personnage masculin,
je vais évidemment envisager
une ligne d'action. Et je vais créer le personnage masculin en
trois phases. Très bien. C'est le crâne
et la mâchoire
sera évidemment ajoutée à cela. Comme ça. Ensuite, je
créerais également une ligne de direction pour le visage et je peux même déterminer la position
de l'oreille. Très bien. Maintenant, je vais ajouter mon cou de
personnages ici de cette façon. Ensuite, je vais créer nouveau
la partie supérieure du corps avec une forme et un volume généraux. Je ne veux pas trop travailler sur les
détails maintenant. Donc, juste comme ça, je vais créer mon
personnage très simplement. Parce que c'est ainsi que
nous créons pour deux personnes que nous ne
travaillerons pas trop sur l'anatomie, c'est trop ou trop
sur les détails. Enfin, ce ne serait pas trop
déroutant. OK. Ensuite, j'
examinerai également
la forme générale des jambes. Maintenant, parce que le corps est
penché vers l'avant et peu, nous aurions aussi une
pression ici parce que notre personnage masculin tient aussi quelqu'un d'autre. On va donc créer
les jambes un peu arrière pour que notre personnage masculin
puisse garder son équilibre. L'une des jambes
serait en arrière. L'autre
serait un peu en avant. Parce que comme je l'ai dit, il tient un autre personnage
dans ses bras et donc, il y a beaucoup de
pressions sur lui. Il doit donc placer
ses jambes de cette façon dans cette position
afin de garder son équilibre. OK. Maintenant, je peux aussi
aux chevilles ici. Et en gros, nous devons
créer la première étape un peu au-dessus la deuxième étape car,
comme je l'ai déjà dit, la jambe gauche est en fait
plus en arrière. Il serait donc plus haut
parce qu'il va en perspective. Ensuite, je créerai ma jambe
droite ici, créant la cheville et le pied. OK. Je vais maintenant déterminer le placement des bras de
nos personnages masculins. Et puis je peux créer le corps de mes personnages
féminins. OK ? Si vous voulez que notre
personnage tienne un autre personnage dans ses bras, l'
un des bras devrait venir
vers elle à l'intérieur du corps, et l'autre doit
être plié ici. Juste à côté du
corps de ce côté. Je vais créer le style
de mon personnage féminin. Je veux dire la position et
la forme d'elle. Et puis je pourrai compléter
les mâles. C'est la ligne
d'action de mon personnage féminin, que j'envisage
ici. Il devrait donc avoir
un style comme celui-ci. Maintenant, je vais également déterminer le placement de mes personnages
féminins touchés. Ce serait son crâne. Et puis je lui ajouterai une mâchoire
plus arrondie par
rapport à mon personnage masculin. Ensuite, je peux également créer plusieurs lignes ici
afin de montrer la direction
du visage. Ensuite, j'ajouterais le
cou à mon personnage. Ensuite, je
terminerai le volume
du corps sous cette forme. Par exemple, nous pouvons
amener l'un des
bras femelles derrière le cou du
personnage masculin, allant sur l'épaule et
vers l'arrière de son corps. Nous pouvons donc également montrer que ces deux personnages sont
très proches l'un de l'autre. Et en gros, je
veux dire que physiquement après avoir créé la zone
thoracique et les seins, je vais créer le
bassin par ici, puis j'ajouterai les
jambes sur ses bras. Et puis nous compléterons les deux jambes lorsqu'une seule ligne
comme celle-ci, très facilement. S'il s'agit d'un genou, les jambes
descendent comme ça. Très bien. Maintenant, je vais considérer
les chevilles ici et vaincre. Vous pouvez également créer
l'autre jambe. Parce que même si c'est
derrière notre première étape, ce qui est plus proche de nous, mais une partie de celle-ci peut
encore être vue, surtout si je la ramène arrière et que je
la retire de derrière la première étape que nous avons créé pour
que vous puissiez en voir certaines parties. OK. Maintenant, vous pouvez considérer
l'autre bras de notre personnage à côté de
son corps comme ça. Très bien. C'est ça. C'est notre autre bras. que nous pouvons créer
dans cette forme avec un volume comme celui-ci
et une forme comme celle-ci. Très bien, je vais maintenant
compléter l'autre
bras de mon personnage, qui se trouve derrière les personnages de mon
homme. Nick. Je peux continuer le bras
et je peux même replacer la main sur l'épaule de l'
homme comme ça. Maintenant, vous pouvez clairement voir que nos personnages sont
terminés de cette façon. Je veux dire, la base d'
entre eux serait achevée. Je vais travailler sur les
volumes un peu plus parce que j'ai encore besoin de
déterminer le placement
des personnages de mon homme. bras. Donc, l'un d'entre eux
tiendra la
femme ici. Vous ne pouvez donc voir que la forme des doigts et peut-être
un peu les risques, car les risques du bras de
l'homme sont derrière notre personnage féminin
et ne peuvent être vus parce qu'il la tenait. Et écoutez sous les jambes. Je vais apporter
l'autre main. De mon personnage masculin. Encore une fois, une partie de
leur poignet. OK. Il s'agit donc
d'une forme générale. Maintenant, je vais travailler sur ces
formes et ces volumes un peu plus là, car mon personnage
peut mieux se montrer. Et je vais le
faire avec mon édition. D'accord, pour le reste
de notre personnage, nous allons ajouter les détails. De cette façon. Je veux dire, vous n'allez pas
ajouter autant de détails. Nous allons simplement faire en sorte que notre
anatomie soit plus avancée. Ainsi, après avoir mieux façonné la tête de
nos personnages masculins, nous pouvons créer nos personnages
féminins bras et mains avec ces formes. Et puis parce que cette main est moi , ce bras va derrière la
gorge et le cou de l'homme. Nous pouvons avoir le cou de notre homme. De l'autre côté. Ici, nous aurions un peu de nos personnages sont des personnages
masculins. Ensuite, nous arrivons ici parce que dans cette zone
sur l'épaule de l'homme, nous pouvons commencer la forme de
nos corps féminins. Et vous pouvez aussi ajouter
ses seins ici, juste à côté de l'épaule. Nous pouvons également envisager quelques lignes ici
afin de montrer que les muscles
du corps de notre
homme se manifestent parce qu'il tolère une pression
très, très élevée. Et évidemment
parce qu'il tient quelqu'un d'autre dans ses mains, définitivement on
aurait plus de pression, donc ça aurait plus de
muscles qui se montrent bien, mon personnage peut
faire un poing sur ici, afin de montrer que la chose qui
tient est presque lourde. Et ensuite, nous pouvons créer cette
seconde main de ce côté. Et nous pouvons également
considérer celle-ci pressée ou comme la forme
d'un poing. Juste comme ça. Ensuite, nous
allons également compléter ce côté du corps des
personnages féminins. De cette façon. Je terminerai le bras et la main après ça. OK. Ensuite, je vais
créer les doigts d'ici. En fait. Je peux les souligner pour montrer encore plus
la forme et le style de
sa main. Et puis je créerai une ligne courbée pour montrer
la paume de sa main. Ensuite, je veux travailler sur le visage de
mes personnages féminins. Donc, juste comme ça, gros, après leur mort, je relierai le
cou au bras. Je peux créer des lignes plus courbes ici afin de mettre l'accent
sur la forme des seins. Et ici aussi, nous pouvons également considérer certaines courbes parce
que ce
bras s'est déplacé vers le haut. Nous pouvons créer des lignes pour
montrer la position de cette situation. OK. Maintenant, il s'agit de déchets féminins. Et puis en descendant, j'atteins essentiellement la zone des fesses de la
femme ou du bassin. Puis je l'apporte
ici pour créer sa jambe. Cette jambe est celle
qui est la plus proche de nous. Nous devrions considérer cela
pendant que nous y travaillons. Et à partir de là, à partir de la
partie inférieure de la zone des fesses, nous allons
diviser cette ligne en deux parties afin de montrer
la jambe qui se trouve
de l'autre côté, qui est également de l'
autre côté. Ensuite, à partir de là, nous allons le plier. Et qui aurait
le pied ici ? Il aura donc la
forme de la jambe. Et nous l'évoquons jusqu'à ce que
nous atteignions la main de l'homme. Et pour l'autre
jambe, évidemment, je commence d'ici et je la ramène
vers le pied. OK. Nous allons maintenant compléter le corps de notre personnage
masculin. Eh bien, nous allons
créer sa taille. Ensuite. Nous passons par le bassin
pour passer par les jambes. OK. Ensuite, il va
descendre et il y aurait
créé le reste du pied. Il y a une partie de la jambe
jusqu'à ce qu'elle atteigne le pied. Donc, ici, j'
aurais la cheville et ensuite la forme du
pied lui-même. Très bien. Maintenant, nous allons également travailler
sur l'autre jambe. Une fois encore. Pour cette jambe, nous
allons la sortir derrière le corps
de la femme. Et en gros, en faisant tomber. Et puis, à partir d'ici,
je vais séparer cette jambe droite en allant à Denise. Et encore une fois, je dis avec
plusieurs lignes sur les jambes, sur les genoux et certaines
parties des jambes. Nous pouvons montrer la pression
sur notre personnage masculin parce qu'il tient
une chose lourde. Il porte une femme. Il aurait donc de
la pression sur ses jambes. Même si la femme est
encore légère, c'est un humain, donc il subira une
certaine pression là-bas. En fait, nous montrons mieux les
muscles et plus encore. Ensuite, nous créions
une ligne comme celle-ci. Nous pouvons niveler les jambes les unes à
côté des autres. Nous saurions donc qu'ils sont
au bon endroit pour maintenir l'
équilibre anatomique de notre corps. C'est donc en fait sont nos deux personnages qui sont créés
dans cette position, c'est-à-dire que l'homme tient la femme
entre ses mains comme ça.
16. Le deuxième style de levage d'une dame par un gentleman: Bonjour à tous mes amis les
plus chers. Je suis de nouveau ici avec une autre session de
tutoriel pour vous. Eh bien, au cours de cette session, nous allons créer deux
autres
actions ensemble. Je veux dire, cette fois on va créer
notre personnage masculin, en plaçant un de ses
genoux par terre. Et le personnage féminin sera en fait
sur ses épaules, en fait assis
sur ses épaules. Eh bien, le jeune enfant crée également des positions
similaires à celles que nous créons en ce moment. Nous vous les donnons simplement
à titre d'échantillon. Donc, si vous voulez même en
créer un similaire, vous
les utiliseriez pour obtenir ce que vous voulez. Très bien, tout d'abord, tout ce que
nous allons
créer ce style de notre personnage masculin
avec une ligne d'action. Parce que c'est leur
personnage masculin qui est placé plus bas. Donc, d'abord, tu créerais
ça parce qu'il se penche vers le bas. Je vais créer une ligne comme
celle-ci pour le corps. Très bien. Il apportait donc von Knee Bend assis
devant lui et l'
autre était de nouveau
plié ici vers le bas. Ok, maintenant, considérez également le style
général et la forme générale de mon personnage
féminin. Ensuite, je vais créer
mes personnages. Donc, si c'est la tête de mon
personnage masculin, mes personnages féminins devraient
être assis sur ses épaules. Je vais donc envisager
une ligne comme celle-ci pour la ligne d'action de
mon personnage féminin. Je peux même amener une jambe de
mes personnages féminins ici, qui descend
directement sur son épaule. Maintenant que le placement général de mes personnages
a été déterminé, je commence mon travail avec le personnage masculin et
je commence par sa tête. Je répète que nous créons deux personnes dans une autre position
d'action. Je vais donc d'abord créer l'école. Ensuite, j'ajouterai la
mâchoire à mon personnage. Et évidemment, je veux que mon personnage soit en
trois phases. Maintenant, je vais
créer le cou masculin, mais on ne peut pas le voir complètement car la
jambe des personnages féminins va le couvrir. Mais en ce moment, parce que nous sommes de
créer l'anatomie des hommes, nous allons juste la créer
même si elle est derrière. Et plus tard, nous
voulons rendre nos lignes sombres pour créer notre trou et notre forme principale ou
une forme générale. Nous allons le modifier. Il s'agirait donc de la partie
médiane du corps. Et puis le bassin
serait ajouté ici de ce côté, à cette partie essentiellement. Et puis, du bas du bassin, je considère les jambes comme ça. Il s'agit donc d'un genou qui
peut être plié et notre jambe va
baisser comme ça. Très bien ? Maintenant, si vous
descendez du genou, nous pouvons atteindre la
cheville par ici. Et puis, après cela, nous pourrons
évidemment retrouver
notre pied avec une forme
générale comme celle-ci. Et plus tard, nous
allons travailler un
peu plus sur ce sujet pour
ajouter les détails. D'accord ? Ensuite, nous voulons que l'
autre jambe soit créée ici et je veux que le genou soit posé
au sol cette fois. Nous allons donc créer le reste
de la jambe comme ça dérisoire. Il serait au
sol car le genou est posé
au sol. Et ensuite, je créerai le reste
de la jambe que on
peut voir comme ça ici. Ensuite, je considérerais
la cheville ici. Et bien évidemment, Atlas,
ce serait le pied. D'accord. Maintenant, je vais
créer le personnage féminin, qui est
au-dessus de nos hommes. Encore une fois, comme d'habitude, je
commence par la tête de mon personnage, qui serait placée ici. Je vais donc considérer la forme
du crâne de cette façon. Ensuite, j'ajouterai la mâchoire. Ensuite, je peux déterminer la
direction du visage. Et après cela, je peux
créer le
cou et la partie supérieure du corps de mon personnage . Très bien. Maintenant, je veux que ce personnage amène
ou prenne un de ses bras avant pour pouvoir montrer la forme de ma
main vers ce côté. Et de cette façon. Après cela,
j'arrive évidemment au poignet et la main elle-même. Très bien. On dirait que ma
femme essaie de ****, essayant de garder son
équilibre quand elle va sur ses épaules. D'accord. C'est en fait sa partie
centrale du corps. Et puis je vais créer un bassin
capillaire. Cette forme. Et le reste du
corps serait placé derrière la tête de l'homme
pour ne pas être vu. Ensuite, je vais créer la
jambe des personnages féminins de cette façon. Ensuite, des côtés de
nos personnages ici, je baisserai la jambe et je la plierai
ici, vers le bas. Et ensuite, ici, je vais créer la cheville de
notre personnage féminin. Et après ça, je
peux créer son pied. Et l'autre jambe
sortirait derrière la tête du
personnage masculin. Il sortira de derrière
la tête du personnage masculin, qui se trouverait en fait dans
le bassin continu. Ensuite, je le
créerai dans cette forme jusqu'à ce que j'atteigne le genou
, puis je le ramène à nouveau. Et évidemment Atlas, j'
arrive à la cheville et mon deuxième pied. Très bien. Maintenant, nous devrions considérer cela là où nous pouvons créer les armes des personnages
masculins. C'est aussi important. En gros, juste en dessous de cette jambe, nous allons créer ce bras, son premier bras, qui
est plus proche de nous. Et cela serait en
fait tourné vers ce côté-ci. En fait, on
dirait que c'est l'homme. J'essaie de tenir la jambe de la
femme avec sa main. Nous pouvons même créer
un indice comme un poing. Il essaie juste de
tenir la jambe de la femme. C'est pourquoi nous avons tourné le bras vers l'intérieur
du corps et sur la jambe. Et pour l'autre bras, nous pouvons faire de même. Nous pouvons lever le bras, en plaçant l'autre main
sur l'autre jambe, en fait sur les Romains
ou sur leur genou. Si nous voulons être plus précis. C'est notre seconde main. Et je vais créer le deuxième bras pour
mon personnage féminin. Ensuite, je peux continuer à créer les lignes principales de
mes personnages. Vous saurez donc
quelles parties doivent être éliminées parce qu'
elles ne peuvent pas être vues. Et cela rendrait
mon travail complet et prêt. Bon, maintenant je vais utiliser mon
crayon pour terminer mon travail. Donc, pour terminer mon travail, je vais commencer par
mes personnages féminins. Fais le façonner plus ici. Je peux donc aller de l'avant
avec mon travail, l'
améliorer et le compléter. Ensuite, ici, je peux créer
des lignes pour le corps. De cette façon. Dan, je vais créer
le bras pour elle. Même jusqu'à la ligne des aisselles. Ensuite, je peux créer
le reste du bras comme ça jusqu'au poignet et à
la main. Après avoir créé la main, je peux même créer
plusieurs doigts pour elle. Très bien, après leur mort, je vais aussi travailler sur
l'autre bras. Alors je l'ai sorti, je l'
étire. Voici la
place du coude. Et puis je passerai à
l'avant pour atteindre le poignet. Et ici, comme je l'ai déjà
déterminé, je vais créer les doigts dans cette forme
et dans cette position. Je peux même ombrer
ces doigts
pour voir, voir et montrer qu'
ils sont plus à l'arrière. Puis de l'aisselle, je vais descendre pour créer la forme de la poitrine et
plus précisément de son sein. Puis je descends au milieu
du gaspillage et de l'estomac. J'ai frappé les demandes frappées. Je vais continuer ça depuis son dos jusqu'à la zone des
fesses ou au bassin. Et je vais le
relier à la jambe. Et à partir de là, je
vais créer des demandes. Frappez à nouveau,
d'abord en cercle, puis façonnez-le avec la
perceuse de manière plus cohérente. Et je vais déterminer la
direction de son visage. Et après papa, je peux
créer sa deuxième étape. Et quand j'atteins le genou, je dois créer la main du mâle
ici avec ses doigts. Ensuite, je peux leur demander d'
aller de l'avant avec mon travail. Je descends cette jambe
à travers le visage de l'homme et je
la ramène jusqu'à
ce que je frappe la
cheville et le pied. Comme vous pouvez le constater, la jambe
couvre une partie de son visage et la majeure partie de son
cou et de ses épaules. Ensuite, je ferai la même chose
pour l'autre jambe. Je crée la partie supérieure de la jambe, faisant descendre jusqu'à la cheville et au pied. Très bien. Nous pouvons maintenant créer un deuxième bras pour
notre personnage masculin. Et puis je l'ai fait
passer par la jambe de ma femelle. Et je crée le poignet. Et la main sous cette
forme. Comme vous pouvez le voir. En fait. Et techniquement, la main devrait
passer au-dessus de sa jambe. devrait couvrir une partie de sa jambe. Donc pour s'assurer qu'elle ne tombera pas. Pour les doigts de cette main, nous venons de créer plusieurs
lignes pour montrer les formes. Pour ce bras. Je vais descendre
de l'aisselle et ensuite déterminer la
partie thoracique du personnage masculin. Ensuite, je vais
créer le dos de mon personnage masculin que
les fesses ou le bassin. Et évidemment, enfin, j'atteindrai les jambes mâles. Et celui qui est plus proche de nous et qui est
le
plus devant est celui qui est
penché du genou
vers le sol. J'arrive donc au genou, je le ramène à la
cheville et au pied. Je le ramènerais aussi
un peu plus en arrière. Ce serait la
partie finale du pied. Son pied. Dan, je vais amener l'autre jambe
qui vient d'ici vers le bas. Et nous devrions créer cette
jambe de notre personnage, cette jambe vers le bas comme le chemin, comme on peut le voir avec
cette même ligne. Puis ici, après avoir remplacé le genou au
sol par un virage. Nous allons à gauche pour
créer le reste de la jambe et le pied
sur le sol. Ainsi, notre personnage peut
garder son équilibre tout en mettant quelqu'un
sur ses épaules. Et nous pouvons également
rendre cette ligne plus droite et l'agrandir. Nous pouvons donc mieux montrer la forme de
notre jambe. C'est donc ça. Et maintenant, je peux effacer
certaines lignes qui, selon
moi , sont nécessaires pour mieux
montrer nos formes. Par exemple, ce bras est le plus
placé devant. Par exemple,
cette ligne de jambe située sous la
main de l'homme doit être effacée. Je ne fais que effacer les
lignes qui sont en plus. Et si nous les effacons, ils vont
réellement vous aider à mieux
voir votre travail et
ils sont inutiles en fait, si vous voulez continuer votre
travail et le développer davantage. Ici encore, cette partie de la
jambe parce que nous voulions
montrer que son bras est enroulé
autour de sa jambe. Et là où nous en
avons besoin, nous allons l'utiliser pour
effacer toutes ces lignes supplémentaires. Très bien, mes chers amis, c'est une autre
position de deux personnes, deux personnages ensemble
qui font une action, ou mieux disent, une
interaction ensemble. C'est donc ça.
17. Style de danse double: Bonjour aussi, j'adore
mes amis les plus chers. Je suis ici pour vous dans
une autre session de tutoriel. Au cours de cette session, nous allons
créer à nouveau deux
personnes ensemble. Mais cette fois, nous
allons
les créer dans une position de danse. Nous voulons voir comment cela se passe. Premièrement, voir la position de leur corps et de
leurs mouvements. Très bien, tout d'abord, je
vais commencer par créer le postérieur et la position du personnage
masculin. Parce que je veux créer
un front-end de publipostage. Créez une femelle à l'arrière. Très bien. Je vais commencer par créer la ligne
d'action de cette façon. Ensuite, je vais montrer l'action qui va
se dérouler
ici avec cette ligne. Cela déterminerait réellement la position de notre corps entier. Ensuite, nous devrions déterminer
le placement de la tête. Et nous devrions considérer
que nous
voyons presque les personnages masculins se
diriger derrière lui. Je veux dire, la plus grande partie de
sa tête va être
vue de derrière elle, de l'arrière. Ensuite, je vais lui
ajouter le cou. Et dans la partie avant, je vais ajouter un peu la forme de la mâchoire jusqu'ici
parce que, comme je l'ai déjà dit, on ne peut pas la voir complètement. On voit la plupart de ses têtes en arrière. Maintenant, lorsque nous déterminons le
positionnement de l'oreille, vous saurez où
se trouve le visage de notre personnage et
combien il a été vu. Vous pouvez voir essentiellement la partie
arrière de cette personne. Maintenant, pour la partie supérieure du corps, je vais d'abord envisager une forme
générale. Et vous devriez le savoir. Encore une fois, je dis que nous créons
notre corps par derrière. Nous ne verrions donc pas
les parties qui se trouvent devant le corps. Si je voulais déterminer
le placement des R parce que l'
action que je crée ici est un mouvement dansant. Je dois créer les bras
de manière à pouvoir y ajouter
les bras femelles. Nous serions en mesure de
le faire essentiellement. Créez mes mains
compte tenu de ce fait. Ensuite, je vais aussi considérer
l'autre côté. Mais le point pour celui-là c'est que je veux
considérer ce bras et cette main sur mes
personnages féminins sur sa taille. Par conséquent, je ne fais que créer une forme générale et une partie de celle-ci qui, plus tard, lorsque j'aurai
ajouté mon personnage féminin, je vais également compléter
ce bras. Parce que lorsque vous créez des
scènes ou des personnages ou tout ce qui
consiste en deux anatomies pour les personnes ou autre,
vous devez prendre en compte. La position et le
placement des
deux afin de créer
chacun d'entre eux. Considérez sa jambe ici. Ce serait son genou. Et puis la
partie inférieure de la jambe, le tibia va être créé. Maintenant, notre jambe n'est
pas complètement en l'air ou au
sol. Donc, nous envisageons simplement
une vue latérale de notre pied et traîne maintenant je le
crée en général et plus tard, j'en compléterai plus
et je l'expliquerai plus. Maintenant, l'autre jambe de notre personnage masculin est en fait placée de l'
autre côté du corps. Mais avant tout,
avant de créer l'autre jambe, je devrais créer
mon personnage féminin. Je verrais donc la position des cheveux devenir intime avec lui. Et puis je peux créer la deuxième jambe de
ma mère. Parce que mon
personnage féminin est un peu. court et plus à l'arrière. Je vais considérer que mes
femelles se dirigent ici parce que les phases devraient être en fait
devant les autres. Il peut donc
mieux montrer le mouvement de
danse , et plus encore pour que les phases soient exactement devant
les autres. Et nos
personnages féminins à l'arrière. Nous avons donc créé un peu
plus court. Par ici. Je détermine la
position de l'oreille. Par conséquent, il s'agirait de la
direction de la femelle Y face. OK. Ensuite, je vais créer
son cou comme ça. Et puis, ici, j'ajouterais la partie supérieure du corps à
mon personnage féminin. Le fait est qu'un côté
de mes personnages féminins, corps ou corps, ne peut être vu et il passe
derrière le corps de l'homme. Nous n'allons donc
considérer que les pièces
que nous pouvons voir, surtout lorsque nous voulons
compléter davantage nos lignes. Si je veux
considérer le bassin. Parce que nos personnages féminins
sont des personnages féminins,
le corps est tourné. Il sera placé
dans cette position. Je vais donc créer le
bassin juste après la partie du corps
et une de ses jambes. Cette jambe va en
fait à côté des exigences de jambe dans la
même direction. Et fondamentalement la même forme. Parce que notre personnage féminin
est plus dans le sac. Par conséquent, nous devrions créer
la jambe plus tendue. Ce sont les choses
que vous devriez prendre
en compte lors de la création de votre travail, je travaillerais sur la contrainte, désolé, sur la cheville et
enfin sur le pied. Je vais donc créer une forme
générale pour la jambe. Maintenant, comme vous pouvez le voir, mes personnages féminins en
trois phases voient ajouter une de ses jambes sort à
côté de cela. Ensuite, nous devrions amener
l'autre jambe qui sort d'ici sous la jambe de l'homme. Ensuite, nous devrions
le faire baisser afin de maintenir l'
équilibre de notre personnage. Et pour que notre action soit complète, notre mouvement de danse est terminé. C'est le genou de mes
personnages féminins. Puis j'arrive à ses
chevilles et à son pied. Je vais donc créer le pied posé sur le
sol avec ses orteils. Alors bien sûr, lieu sait que
vos personnages dansent, vous pouvez plus tard venir
créer des talons hauts pour elle. Maintenant que nous avons créé la jambe de nos personnages
féminins, nous pouvons créer une autre
jambe pour notre homme. Exactement. Au contraire de cela. L'autre jambe de
notre personnage du personnage masculin se trouve
derrière notre jambe femelle. Et c'est presque dans la même
position. Il est penché
vers le sol. Encore une fois, il est courbé
par le genou. Nous ne pouvons pas en voir trop, mais nous pouvons en créer une forme de base
et générale. Derrière la jambe de la femme. On ne le verra plus. Et enfin, je vais
créer les bras femelles. Je le fais descendre, puis je le ramène ici à
nos exigences. Je peux donc placer sa main
sur le dos de l'homme. Très bien. On y va. Voir. Nous ne pouvons pas avoir le reste des soins de l'homme
exige le bras en fait parce qu'il va juste derrière notre femme
et sur son dos. Et pour ce domaine, je peux voir le reste du bras de ma
femme, le deuxième bras des cheveux. Et ça devrait vraiment
commencer à partir d'ici. Mais parce que notre
personnage homme le couvre, vous ne pouvez pas voir cette zone. Nous ne créerons donc que
la partie que nous pouvons voir. Si vous ne voulez pas le créer
complètement ou si vous
voulez simplement ne pas perdre la
position de votre bras. Il peut utiliser une
ligne d'action pour continuer afin vous
sachiez où votre bras serait placé lorsqu'il sort de ce côté au-dessus
du corps de l'homme. Ensuite, nous pourrons compléter
les demandes en main. Nous pouvons créer la main des femelles à l'intérieur de la
main de l'homme ici. Et encore une fois, je le répète, nous ne créons
que les pièces que nous voyons ici. Ils se tiennent la main
dans ce mouvement de danse. Et comme ça, nous pouvons relier ces deux mains ensemble en ressemblant à ceci. Très bien. Maintenant que nous avons créé
la forme générale de notre travail et de nos personnages, nous allons y ajouter
d'autres détails, afin de les rendre plus avancés
et plus complets. Je vais commencer par la tête
des personnages masculins, qui ressemble à ceci. Et c'est l'
arrière de sa tête. Pour cette partie avant, je peux envisager une ligne
comme celle-ci pour relier la tête à l'épaule car on peut toujours voir
l'arrière du cou. Et puis je peux continuer
de descendre des épaules vers le bras jusqu'à ce qu'il soit
coupé par la main de la femme. Le bras de la femme. Très bien. Je vais commencer l'
autre bras de la même façon. De la part du Schaller. Je me dirige vers le DR et
ensuite, à partir d'ici, je le reprends. Je l'apporte vers le bras et la main de ma
femme. Et ensuite, ici, nous créons
essentiellement leurs
deux mains. Je vais donc continuer le
bras jusqu'au bas
vers le
coude, puis vers l'aisselle. Ensuite, nous l'apportons à nouveau, je dis à l'aisselle, et puis même après cela, je prendrai cette
ligne vers les déchets. Et juste comme ça, je vais créer cette
partie inférieure du dos. Et maintenant, nous pouvons, en fait, avec cette ligne,
montrer l'arrière de notre corps. Et vous pouvez utiliser ces lignes
courbes pour
montrer que nous sommes en train de créer
l'arrière de notre corps. Et parce qu'il est en
mouvement, c'est danser, on peut aussi voir quelques muscles. Très bien. Maintenant, pour la partie
avant du corps, pour l'estomac et le bassin ou la
zone des fesses. Je vais créer les
lignes plus courtes et partie par
partie jusqu'à ce que j'arrive à la jambe et je vais les
relier ici. Également du sac, de la zone des fesses. Je continue cette ligne jusqu'à ce qu'
elle atteigne la jambe
et je suis descendu. Je peux donc appuyer
à nouveau sur Supprimer ici. Et je peux montrer le genou avec une ligne courbée comme
celle-ci, mieux et plus encore. Je vais donc créer la partie
inférieure de la jambe dans cette forme et je me dirige vers
la cheville. C'est vrai. Je le fais descendre
vers la cheville. Et ici, je vais
commencer le pied. D'abord. Je crée une colline. Et puis je vais chercher les orteils. Tout aussi facile que ça. OK. C'est ça. Voici nos
personnages masculins, jambes et pieds. Maintenant, nous allons travailler à nouveau sur
notre personnage féminin. C'est un peu plus. Je pars de sa
tête, évidemment. Je continue ça
jusqu'au cou. Et aussi de ce côté, je le ramène et je le
ramène en même temps. Ensuite, lorsque vous déterminez le
placement de l'oreille, vous pouvez également ajouter une
ligne pour la mâchoire, et je peux même lui créer
des cheveux. Nous pouvons donc mettre l'accent
sur le genre de notre personnage avec
ces beaux cheveux. Ensuite, je créerai
la zone du cou, l'épaule,
en descendant jusqu'aux bras. J'ai créé une partie très
importante, petite et
proéminente ici
parce que c'est en fait le continu sur la main de mon homme qui
va derrière son corps, allant vers son dos. Parce que j'ai peut-être
une certaine pression ici. Je viens de créer plusieurs
lignes afin de mettre l'accent sur les muscles de
son bras aussi. Puis sur sa tête, je vais montrer
plusieurs doigts un
peu éloignés l'un de l'
autre avec quelques
espaces entre eux. Juste pour mieux montrer la position
du danseur. Ensuite, je commencerai mes
personnages comme d'ici, il la tient
de la taille. Je vais donc commencer
la jambe à partir d'ici. Et puis je
descends la jambe avec cette forme. De ce côté, je
sors un peu, ce qui en fait une leçon importante. Ils y vont, puis je rentre à l'intérieur. Et je le ferai pour les deux
parties, pour les deux côtés. Très bien. Une fois que nous aurons atteint cette partie, je vais
déterminer la cheville. Et puis complétez par
des aliments de cette forme. Et une fois que nous aurons
terminé cette autre étape pour notre personnage féminin, œuvres d'art sont presque terminées ici. Je vais créer la cheville, pied et mon pied, et ma jambe sera
complétée de cette façon. OK. Je peux même créer des
os ou des muscles sur le genou avec
plusieurs lignes courbes et je peux créer une chaussure à
talons hauts pour elle. Ici, nous pouvons maintenant voir l'autre partie de notre personnage
masculin. Vous ne pouvez voir qu'une partie de sa jambe et de son pied,
qui s'il est créé. Et la dernière partie
serait celle de nos personnages féminins, bras et de nos mains,
qui tiennent ceux de l'homme. C'est donc ça. C'est la position et le
style de deux personnes dansant ensemble dans cette position et style que vous pouvez
créer parfaitement.
 Amelie Braun, Artist & Cartoonist