Transcripts
1. Trailer: And now next class on begin a figure drawing. We're going to start delving into one of the more advanced areas, and that's clothing and drapery. Up until now, we've been drawing the figure with little consideration about clothing. So now it's time to start tackling this complex area. Throughout this lesson, we're going to learn about the basics of constructing drapery. We're going to learn about compressions and folds. And as always, we're going to finish it off with some demonstrations as well as a time drawing exercise for you to follow. This is the beginning of a far more advanced areas of figure drawing. So if you're up for the challenge, let's get started.
2. An Overview of Clothing and Drapery: Over the last 14 lessons, we've broken down the entirety of the human figure. We've looked over at the basic fundamentals of construction, gesture and proportion for the whole body. And then took a more detailed look at each area of the body individually the whole time. However, we've been drawing without any thought as to what happens to these concepts if and when we want to start adding in clothing on top. What normally happens when we start to add in fabric to our figures is we start to get lost with exactly what it is we are supposed to do that bear on that was once easy for us to see it. Shaping gesture, relatively easy to work out, has now become hidden amidst a series of fabrics, folds increases. On top of that, we are presented with the additional challenge of not only having to make these items of clothing work together with our underlying gestures and structures, but also the challenge of working out what the clothing's behavior is, what type of material it's made of, as well as the type of folds that are being created. So in the same way, we had to learn how to construct the human figure. We have to learn how to construct drapery. Now, it must be studied before beginning due to the complex nature of fabric and how it interacts with the body, as well as the number of ways the clothing can fold and compress it. It's going to be asking too much of ourselves to try and cover every aspect of this topic in one lesson. As such, this class is going to cover it the general basic concepts for drawing clothing on our figures. If we can get even a rudimentary understanding of this complex topic, it's going to go a long way to giving us the freedom to eventually create not just the clothing that we see in our models, but also create clothing and costumes from our imagination as well. So let's begin.
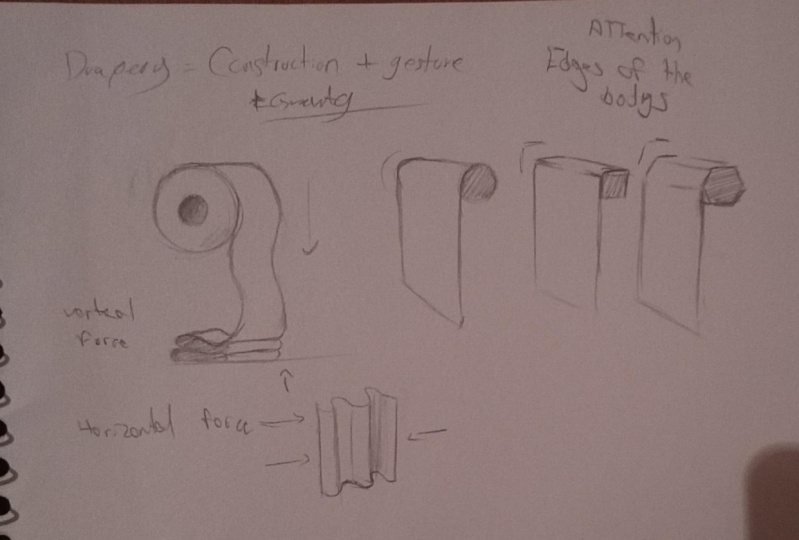
3. Defining Drapery: Before beginning, let's just cover the basic terminology we're going to be using when we talk about drapery. Normally we simply think of it as the clothing we are wearing. And for my literal perspective, that's correct. But in the same way we've talked in the past about thinking of the human figure as being a set of original ideas that we combine together. We're going to have to do the same thing with clothing. So in this instance, we don't want to be thinking about that shirt as a shirt or that dress as adress. Instead, we wanted to create a set of simplified IDs and concepts for what drapery remains and what its function is. For our drawing purpose, we are now going to define drapery as being the description of construction plus gesture. Drapery is going to describe both the form that it sits upon, as well as the movement or action the form has made. Now, let's just expand upon this by looking at what we've gone over in previous lessons. In previous lessons, we've defined construction as being the individual body parts of the figure, the head, torso, arms, et cetera. Each area is its own small construction piece. One, we've defined by a shape that is easy to draw yet recognizable. And gesture we've defined as being the relationship, oh, the suggested movement, these pots and making together, in essence, just yet is the glue holding these pots together, describing their action. At the most fundamental level we've stated construction are coronas and gesture is curves. When we start adding drapery into the equation, what we are doing is helping to reinforce both of these IDs. Any type of drapery we place over alpha is inevitably going to attach itself in some way to the shape of the construction pot that it's sitting on. This is great because the creases and folds that end up being created almost act like cross contour lines, helping to define the three-dimensionality of these pots. The added bonus is these folds increases in general also helped to define the gesture, or in other words, the action or the movement the figure has just made. One of the easiest mistakes begin off as mike, when we start drawing closed on our figure, is we forget about these underlying gestures and structures. We jump headfirst into the folds, increases and forget entirely about the fact that those folds increases. Sitting on a three-dimensional surface. More often than not, this leaves us with clothing on our figures that not only doesn't adhere to the surface of the structures, but it also looks incredibly stiff in two-dimensional. We need to be aware that no matter what type of material it is we are drawing or what shape that material might be. We always first thinking about the underlying structures that drapery is sitting upon and design our clothing with those structures in mind. But as we said, drapery also describes the gesture of the figure. What action FDA has just made is going to determine what shape the drapery is making. Simply put, drapery will react to gesture. If Africa has one on rised and one arm relaxed, we have two very different actions happening with our oms. If out figure it was two, then wear a shirt with loose sleeves AT clothing is going to react accordingly to those compositions. So again, for our purpose, we are defining drapery as being the description of construction plus gesture. But there's a little more we have to expand upon with these ideas. So let's move on to that now.
4. Gravity: So we've established that the fundamental concept we're going to be using for this tutorial is drapery being the description of construction plus gesture. If this is all we needed, then creating clothing would be pretty straightforward. But we have another factor that comes into play in that's gravity. No matter what type of fabric it is we are dealing with. Gravity is a force that is going to be playing a pot and how things are constructed for our clothing. It doesn't matter if it's a tank top. Shorts are a big billowing superhero cape, or whether the fabric is lying on the ground or hanging over a table. At all times, gravity is going to be consistently pulling down our clothing and helping to shape its form. If we look at these examples here, we've got pieces of fabric all adhering to the surfaces of these different shaped objects. Each object gives us a slightly different fabric fault being created relative to this shape. What we'll see however, is once our fabric starts to fall over the edge of each object, gravity will eventually take hold and pull them down in exactly the same white regardless of what shape these fabric pieces is sitting on. So in other words, as we draw in drapery, we have to pay attention to approximately where the edge of our body parts are and where gravity is likely to stop pulling down our drapery. Even if we are creating a character in an environment where there is no gravity at plight, maybe some type of spice setting with an intergalactic alien character or a Greenland's and top of superhero or even something onto water. We want to be mindful of the effects gravity has on our drapery. Let's have a look at an example. The image on the left has been drawn taking gravity into consideration, whilst the one on the right hasn't taken out of how the sleeves on the rod image feels like it's both very flat and stiff. And also feels like it's unnaturally clinging to the surface of the arm. This leaves seems to just stick out almost like does a solid structure supporting it underneath the sleeves on the left. In comparison, clings to the arm surface for only so long before gravity starts to pull it away and towards the ground. Not only does this feel far more three-dimensional, it also feels a lot more natural. What we can say then is at a certain point out drapery, we'll stop sticking to the shape of the surface that it's resting on and will stop being pulled down and away from that surface by gravity. This will go for all types of clothing we wish to draw in all types of big opposes.
5. Basic Clothing Structures: The biggest and most challenging area of drapery that we as beginner artists, a Guide to face are simply the folds that are going to be created. What many of us begin artists tend to do when we are confronted with this maze of folds that come along with the long sleeve shirts and beautiful flowing dresses, Is that we tend to just scribble in faults. We take a rough guess as to where these folds are and just sketch in a couple of lines hoping that it will resemble something that looks like compressed clothing. The reason we do this, of course, is we don't have an understanding of what's actually going on. The problem we face is that it's not always easy to figure out what's actually happening with all these folds. Many classes on drapery and clothing will often talk about the different folds that can be created. Generally speaking, there are about seven different types of folds and drapery that can be broken down into roughly three categories. But what most drapery classes generally don't do is dive into the anatomy of how folds are created in the first place. If we want to break free of just using reference images all the time and create our own fantasy or sci-fi costumes from imagination. Then we have to start understanding the mechanics of drapery unfolds. Now because of the complex nature of Draper and folds, we are never going to be able to learn everything in just one listen. So we're going to start with some general ideas to get the ball rolling for us. The most fortunate thing for drapery is the fact that the vast majority of the clothing that we wear, as well as the faults that are created can be broken down into simple cylinder shapes. Long sleeve shirts, short sleeve shirts, tank tops, shorts, pants, long dresses, miniskirts, socks, hats even brought an underwear can more or less be broken down into basic cylinder shapes. The different body parts by their very nature, are very cylindrical. And so it makes sense then that all of our clothing is designed to reflect those shapes. We have some exceptions, of course, with things like ties, baseball caps, ponchos, et cetera. But for the vast majority of our clothing, it's made to fit us with those cylinder shapes in mind. In general, we have large cylinder shapes for the areas around the torso and waist. Smaller cylinder shapes around the limbs, and sometimes even smaller cylinders for the toes and fingers. Knowing that the majority of our clothing is cylinder shape gives us at least a starting point, but it's not the only thing we have to think about at the beginning. There are two other factors we have to think about before applying pencil to paper. The first thing we have to consider are the behaviors of the cylinders. If we simplify our clothing to be cylinder shapes, then that's cylinder cannot be a firm round object. What we need are fluid cylinders. The loose nature of drapery and fabric, and how it is affected quite easily both by the underlying form gesture in gravity, as well as anything else it comes into contact with. Means. We have to consider that cylinder as having a very fluid, almost water-like behavior. When thinking of these fluids, Linda's, we need to ask ourselves questions about how they should be reacting to the pose we're working on. Is that cylinder going to be straight or at the top, and Lucia and curvy are at the bottom. Is that cylinder going to get more compressed if I move that limb in this direction? Essentially, we need to ask ourselves questions about the behaviors the cylinders are making. The other thing we need to consider is simply the sex of the figure that we are drawing. The differences I'm not going to be major between men and women, but we are going to have to take into consideration the differences with women with their wider hips and of course their breast shapes compared to men who have narrower hips and wider shoulders. These in general aren't major differences. But if we are designing clothing specifically for 16, then these differences are going to be something we have to take note of. So that's that checklist of things we need to do before putting pencil to paper. So just to recap, we need to simplify our drapery into the basic idea of fluids, cylinders, and create for ourselves a series of questions to ask about how they should be reacting. We start doing this. We're going to have some strong foundations to work from.
6. Folds and Compression: Okay, so where things start to get confusing and sometimes just outright frustrating for any beginner artist when we start drawing enfolds increases. The reason why this often ends up being a very frustrating area where we sit back, scratch our heads, trying to figure out why al folds don't look like they should, is because we don't know the mechanics of how the folds have been created. Or in particular, what we're lacking is an understanding of the thing that causes these folds and that's compression. The first thing we have to remember is that folds have formed. It's surprisingly easy to start drawing them in a way that doesn't take into account that they have a structure of their own. Now, we simplified things in the last video is saying at their most basic, folds are essentially just cylinders. But if we have a look at a more anatomical cross-section, the shape is actually closer to that of a hairpin, where normally not going to have to worry too much about being that specific. But if you're doing anything with long areas of material, then it's additional information that may come in handy. The type of folds these cylinders are easiest to see in a cold 1.2.5 volts. These folds are created, as the name suggests, without drapery is converging to either 1 or converging to two points. These are usually the easiest of the faults to manage and learn. First off, because by more or less retained that cylindrical shape, even the more complex two-point fold or as it's also known, diaper Fault still retains that basic cylindrical form on the edges with the looser, more free-flowing cylinder shapes hanging between the two points. Where things start to get more complicated. The compression folds. If we're starting out with drapery, these folds are usually the area where begin oddest tend to get lost because it looks as if there is so much going on. We've got all these peaks and valleys being created. The fabric seemingly overlapping and crunching in on itself. All the while. We're trying to add heat to the surface underneath where our fisheries, where do we even start with these? As exhausting as it seems, the first thing we need to do is to simply understand the compression force is that plight. Now, we've already said gravity is going to be constantly playing a pot and pulling things down. So you may very well psi t. So if gravity is doing all the work whilst gravity is playing a pot, when it comes to compression, we actually want to look at it from the opposite perspective. Gravity might be pulling out drapery down. But it's only when that drapery comes into contact with something that, that pulling action is interrupted. It's not the pulling action of gravity that's causing app compression. It's the pushing action of the surface the drapery is coming into contact with. So compression at its most basic, is created by a pushing action. So we've got these vertical forces helping to create app compression. But what type of fold does this create? Well, these vertical forces are going to create folds that happened in the opposite direction. A vertical force is going to create horizontal folds. But we've got another force at play here, and that's the fabric itself. Whenever I preached joined together at the seams, what ends up happening is that it essentially is pushing against itself. We don't get a perfect cylinder when we stitch these seams together. Instead, we get something that has a lot of bumpy areas. The fabric pushing against itself is going to result in the opposite happening to our lost set of faults. A horizontal force resulting in vertical folds being created. So we are getting opposite results based on which direction the force is coming from. But in all honesty, this is very much an idealized and hypothetical situation. It's not often that you'll come across a situation where there's only one force at plate. More often than not, what will end up with is a compression fold that is a combination of both of these forces. When both of these vertical and horizontal forces intersect, what we start seeing other type of compression folds we are used to seeing what ends up being created by these intersecting forces. A folds that have a distinct zed shaped patent, a series of cylinders shapes, zigzagging, they weigh down the drapery. We can also look at these peaks as being x shapes. Or if we want to look at the negative space where the bellies are being created, diamond shapes. These zeta o, X-shaped patents are going to vary in size and shape depending on what position the figure is in, as well as what are the external forms and forces the drapery might be coming into contact with. Things start to get a little bit more complicated. Obviously, if the drapery stops being twisted around, will starts bending in on itself. But overall, the vast majority of our folds and compression start with these basic structures.
7. Merging Folds and Transitions: So as you can start to see, there's a lot going on here when it comes to the mechanics of drapery. And to be a 100% honest, it's going to take a long time to really wrap your head around this. And it's made all the more difficult by the fact that clothing comes in so many shapes and styles. So there's no point in sugar coating this and saying, you'll pick this up in no time because the reality is, this is a far more difficult step in our artistic journey. So take your time with this, be patient with yourself, and look around for other tutorial methods on the subject met it to the more information about drapery you can immerse yourself in. The more sketches you do, the better your understanding will be. Now, we've gone over a lot of theoretical and technical information so far. So let's start talking about putting this altogether. As we saw in the last video, we worked out that a zed o, X shaped pattern can emerge from a compression fold and a cylinder shaped pattern can emerge from a pinpoint fold. The truth is these patents are more of a controlled, an idealized situation than what we're likely to see in real life. Generally speaking, compression folds will happen in the jointed areas, the elbows, wrists, pelvis needs et cetera. Whilst pinpoint folds will generally develop off the edge of l Figure, similar to what you'd see with a tablecloth hanging over a table's age as well as from the seams of the clothing as well. However, often with the clothing we way, we'll see these pinpoint in compression folds merging into one another. On top of that, these folds are inevitably going to get a lot more bends and twists in them. The more dynamic the pose is. In short, we're going to have to deal with a lot of blending and merging of these folds. Folds overlapping the form underneath, overlapping and merging into each other. So how do we start all of this without confusing ourselves? Instead of trying to get every single tiny crease in fold down which will drive us in sign. We need to look at implying as to what's happening. First, we need to establish what the biggest most obvious fold shapes our workout. What type of fold is being created? And then gradually work our way down to the smaller lists, obvious faults. We need to analyze what we are drawing and not just scribbled down lines and hope that something comes about. Now in the same way that we don't want to draw an every single strand of hair on our character's head. We don't need to place in every tiny crease in fall that's happening in our drapery. It's just too much information for the view up. And more often than not, will lead to things looking a lot messier and overdrawn. As long as we've got enough information that are drapery is reacting according to the forms underneath, as well as the gesture of our figure. The audience's mind will do the rest of the work. But what we're also looking for to help construct things is a transition of contours for our drapery. What do we mean by this? Well, in the same way that we transition from light to chateaux with a degradation of values. We want to do something similar. He FOR out folds, we need to think three-dimensionally and transition the contours of folds around the form. If we have a look at this example here of some fabric covering a cylinder, take note of how this inner contour of our fabric gradually turns into an outside come to us. And how this outside contour starts grid eating into the inside of our drapery. So we tend to have these alternating inside, outside overlapping patterns emerging in our clothing. If we keep these patterns in our mind for our contours, it's going to go a long way to helping sell the illusion that the clothing is wrapping around the figure. So that's going to cover it for our introduction into clothing and drapery. It's a lot of information to take in no doubt, and it will take some time to really wrap your head around everything. So I encourage you to go over this a few times and look for other methods as well to help you build your mental library. So with the lecture out of the way, let's start doing the demonstrations.
8. Demonstration 1 - Sleeve and Shirt: Okay, let's get started. We've got a bit of an underlying sketchy for foundation. And it's a pretty good idea to actually do a little bit of an underlying mannequin like this to help us with our construction of ad drapery. Because it's just going to be a little bit difficult if we're starting out just diving head first into trying to draw these folds in these creases. So having that little bit of underlying form underneath, there's really going to help us, not just with the construction of the fabric and the clothing itself, but it's also going to help reinforce the figure underneath. So we said in the lecture that we have to consider drapery to be the description of gesture plus construction. We can also look at it as a means to enhance the construction and the gesture in the same way that we use things like folds in the skin as visual mock is to help us with the position of the body pots. We can do the sign he without fabric and out drapery. So I've just got a cylinder shape info. Now sleep and again, as we went in the lecture, the cylinder is the primary foundation that's going to be used for the vast majority of clothing items, even in an image like this where the should is tied together and is really only loosely joined. We still want to think of it as being a cylindrical structure. Now, the other thing we have to remember, of course, is that we don't want that cylinder structure to be too rigid. We have to always remember our drapery is going to be influenced very easily. So at the moment here I've got my shorts sleeve that I'm putting in a rough cylinder shape of course. And it's probably just a little bit too stiff and to strike. So if I was to work on this for a little bit longer, I'll probably try to loosen that up a little bit more. And that's a key fault when we're drawing fabric is we don't really want any real sharp hot edges in a, occasionally we're going to get some folds that come along with it. We are going to get very sharp corners. But the vast majority of the Tom again, to have these nice cook wavy motions throughout our clothing. So I've just got the color and hey, that I'm starting to build in with that Noyce curved action. And we've talked about how a clothing has to reinforce the underlying structure and gesture the figure. But we also have to remember that L, fabric and drapery is going to have its own structure and its own gesture as well. The gesture that our clothing and fabric is going to make is going to be in reaction to the underlying pose is. So we've got to have to remember that. It's not just a case of just drawing random lines in. We have to really stop and think about what it is we are doing and how it relates to everything underneath. And this is where it drapery is really going to start to slow you down because we really have to pay special attention to what's actually going on when we're drawing the figure without any clothes on, things are a little bit more straightforward. We have some relatively easy shapes that we can define. But when we start having to cover all these areas, that's when things start to get a little bit lost for us. Well, those noss, foundations that we had suddenly being hidden by all these layers of fabric increases. So that's why it's a good idea to start with a little sketch underneath. First of you'll figure and then slowly build things up from that. So we've built up as shut slowly, We've got a few outcome push unfolds. You got a little bit of an indication of the soft defaults that are happening in the slave. So now move on to the naughty, where I showed is being taught together. Now we had a look at pinpoint falls during the lecture, and this is very much acting in that white. We've got out creases which are converging to this point where the two pots of the should of being tied together. So it's a good idea as we're drawing out drapery sometimes, and especially where I've falls are being created to work out exactly what type of folded is that we are drawing. What folded is we are seeing? Now it's not always going to be super obvious what type of fold is being created. As we said during the lecture, al folds are going to have a tendency to blend into each other. So if we're drawing from a live model, from a reference image, just take a few seconds to really analyze what's happening. Tech not have roughly how as cylinder shapes of sitting and also take note of where our folds are converging to. Okay, let's move on to another image.
9. Demonstration 2 - Skirt: Okay, let's move on to doing is good. Now, skirts actually like this one, a very good place to start if we're just getting into drapery and clothing, because they all moral is just a cylinder shape. You've got this very useful seam up the top there, which is wrapping around the torso, giving us a nice visual aid as to what position things are in. So I'm just bringing down this fault hay for US good. And we really have to make sure that the school is wrapping around this leg properly. We don't really want any sharp corners. He we really need to feel as if this piece of material is wrapping around an over that leg. And that's one of the biggest challenges with Guide to have without drapery is getting that material to feel as if it's wrapping around that Lego, wrapping around that torso. We have to imagine that there's another side he in that we are wrapping our head around it. So I've got these foundations in, so I'll start up the taupe and stop bringing in some of these compression folds that are starting to be developed got a little bit of interference here with that piece of rope, which is going to influence things. So it's not just going to be the body itself that is going to be warping this material. It's going to be external factors as well. Just wrapping around this area, we are really going to come across a lot of hay pain, stall movements with our fabric and our drapery. A lot of wavy type of actions that are going to be blending into each other. And when we say blending, we didn't necessarily mean about smudging together, but it's about the transition from one fold into the next. And that's a little bit of a difficult thing to kind of wrap your head around at first, but with a little bit of practice and a little bit of time starts become a little bit easier. In fact, you'll start to see these patterns that we've talked about in the lecture being a lot more obvious once you start getting used to drawing them. And pretty much what will happen eventually is that you'll start seeing them in real life as well. All of a sudden something that looked like it was completely random, all of a sudden has a certain logic to it. Those X0 zed shapes, cylinders snaking, they wide down that Lego, down that long sleeve should, suddenly you start to see them every way. And this is great because it means that we can start to draw these things from our imagination. At present, we are looking at these folds in these creases and we're getting lost very easily because we just don't understand that there's a certain pattern that we can find heat. And once we have that knowledge, we can play around with things, adding additional strokes like this to help emphasize that gesture even if it's not in the reference image. So when we learned as a patent and we can start using our imagination, of course, it all starts from very basics. First and foremost, we've got our cylinder shape, he for US good, which is just flaring Atwood's. And it's an overly simplified idea of what's going on here. But it also rings very much true. We can use this foundation and then start to build everything else out from it. Throughout L series of figure drawing classes, we've talked about using the simplest forms that up the most recognisable. And we wanna do something similarly heat for OWL, drapery, same concept just being used in a different context. All right, let's move on to a new image.
10. Demonstration 3 - Robes: Okay, let's move on to another one. We're going to focus on the law half of this image because some nice long flowing robes hear nice big cylinder shape at the bottom. So it's an AZ, foundation for us to work with. We are going to break it down as we go along. Now the issue we might come across with this type of really thick draperies that we start to lose the underlying structure of the figure. Not every item of clothing that we wear is going to make it easy for us to see the underlying structure. So this is why it's important to put some type of foundation for slightly down first and then to slowly start to build things out from there. If we just start drawing in those folds increases without taking into consideration the underlying figure structure, then there's a really good chance that out drapery is not going to adhere to the form very well, will probably end up pushing things out further than what they should be, stretching things out longer than they need to be, and really losing the sense that there's a figure underneath it. So try to avoid just ignoring the underlying structure and just drawing what you're seeing. So as you can see, I've started to break this cylinder up and to the most obvious areas of folds, we got this big dark shadowy area on the right-hand side, which is hoping to create a shape which is separate from that underlying cylinder foundation. It's all about analyzing, looking at what the most obvious shapes office and then looking to the shadows and folds to figure out, well, which is my next shape he, that's most obvious. And then slowly but surely stop breaking it down from there, working from big to small and ensuring that we out following around the contours of this figure the whole time. So we've got out most obvious shapes in at the moment. And so I'm now going to start to bring in some of the shadow areas. And that's the other thing we want to look for as well. We want to look for the separation between light and shadow. Because this is the area where we see how folds coming into focus a lot more and gives us a pretty good indication of what type of fold is being created. So well. So it's important to try to work out exactly where things are positioned with our phones and try to imagine moving out pencil over those peaks and into those valleys. We ever stop getting lost, especially if we're working from a modal or from a reference image, always break it down to the areas of light and shadow. That's where we can usually start to see those cylindrical patterns or those zigzagging X-shaped patterns emerging. In this instance, we've got a lot of the cylinder shaped patents that are being formed because of the horizontal compression that's happening with that sash on his waist. That session is pushing those pieces of material together, which is causing those horizontal folds to be formed. These horizontal folds are essentially what I like to think of as a shallow couldn't patent. If you look in your bathroom and look at the shell code and how it's hanging up. You'll see the same cylindrical folds being created. There's always going to be some type of compression happening with our fabric and add drapery. It's going to be extraordinarily rare to come across an instance way on unfolds being created. There's usually going to be something coming into contact with the material affecting it. In this instance, of course, we've got the sash which is pushing and material together here, which is causing those folds, as we've made mentioned, creating that shower curtain type of patent. So as we said in the last couple of demos, once we start to see these patents, things start to become a lot easier for us. But again, we don't want to overlook the underlying figure. We don't need to go into crazy amount of detail for that underlying mannequin. But it's going to be far more important for us to have something that as a foundation to build upon then nothing at all. All right, let's do another demo.
11. Demonstration 4 - Compressed Sock: All right, we start to move on to the more complicated compression fold. Now, you can see very much in this image, we've got that zigzagging patent that's occurring with the cylinder shapes that are being formed with that compression. Now that compression is happening far more at the bottom of that sock where it's coming into contact with the shoe than it is in the middle. Gravity is pulling down the Salk. The top of the shoe is interrupting that pool, which is resulting in the compression folds being formed. Now what you might notice here is that there's a lot more compression and folds happening at the bottom than there is at the top. So this is another pattern that can emerge. The more patents that we can work out for drapery, the easier things are going to become. As we said during the lecture, when we start to focus on fabric and drapery, We have a tendency to just guess at things. We sketch some random lines in towards the direction we think things are going in, cross your fingers and then just hope for the best. Then we step back looking outward, compare to the reference image that we were drawing from and scratch our heads because our drawings don't look anything like the drapery With that we were referencing. And the problem with most tutorials and most books on fabric and drapery is that they often done go into the mechanics of how these patents out being formed. There'll be an overview usually on the different types of folds that are being created. And we'll even look at the anatomy of how folds is shaped. But in most cases there's not really a detailed explanation as to how folds up created in the first place, what forces are at play, and what happens when our horizontal and vertical faults intersect with each other. So once we understand that there's a certain way that OUT drapery falls, it really starts to free us up a lot. And it means we can get things done a lot quicker. We don't have to be continuously referring back to our reference image, all the modal that we're working from. And of course, as we've already made mention, it means that we can start to work from our imagination. We don't necessarily want to be stuck just drawing that live modal or drawing from that reference image. Many of us wants to really create those cool sci-fi fantasy characters with those awesome costumes. But of course, all of that is just going to come in. Todd is going to be a lot of frustration associated with drawing drapery and in particular these type of folds here, these compression folds. But we just have to remember to always try to keep things simple and always go back to the patents that we've gone over. We're going to come across a lot of odd items of clothing that end up being very challenging. They going to make us pause and really have to think carefully about, well, what's going on here with this, this fall? Which direction is it coming from? How are these things being compress? But all we really need is a checklist for ourselves and to ask things like, well, what direction is this zigzag actually going in? What is the general shape of our drapery here at the bottom and compare it to the top. We've talked about using cylinder foundations, but maybe we can expand upon this a little bit more insight to ourselves. Well, it's thicker at the bottom here than it is at the top. So maybe we split this up into two cylinder shapes. One that is a little bit thinner at the top compared to the bottom. Almost a screw like shapes. So ask yourself these questions as you putting pencil to paper.
12. Demonstration 5 - Twisting Pose: I kind of got a more action oriented pose right now. So I've got this arm which is lifting up, which is really what's going to be the driving factor in all of our drapery. He also got a little bit of a twist as well, which is happening to, so we've got these gestures that figure is making here, which is really going to be influencing things for how folds and drapery in general. So if we have a look at what's happening here, we've got the sash around m modals waste, which is compressing things down. But because of the way the figure is stretching and rotating, we're actually getting a lot of cylinder folds that are emanating from the weiss, which are then cooling up and around and creating more compression folds towards the NIC and area. So even though we went over some generalities in the lecture about will weigh roughly each type of fault ends up being created. This is not always going to be the case. Once we start moving things around without figure, we get more of these spirally type of patents that stop emerging. But also take note of what type of patent is still being present. He even things up far more stretched out and cooling around in a spiral taught fashion. If we take a closer look at what's happening towards the shoulder and the NYC. The cylinder faults at the whitest, curving up and around and still creating that zed shaped patent. Will that zigzag type of patent, the closer it gets to the neck. So we've got our pinpoint folds which are merging upwards this time and turning into compression foals. And thus patents that we've talked about, those compression patents are still very much present. He, that just being stretched out along more, if we were to zoom in on this image and trace over it without pencil, we can still find that there are these X or zigzag patents that are occurring heat, it's just a lot more difficult to see once the fault stopping stretched out. So this is where things start getting a little bit more complicated, but that's going to be a nother listen for another day. So as we wanted this up nail without demonstrations, it's now time to move on to the time during session. There are going to be four images, each being allotted five minutes each of drawing time. But there's also going to be two versions of that image is going to be a full body shot, as well as I close up of some of the folded areas. So take you time and pick and choose which areas you want to work on. Or if you wanna try doing the whole figure by all means, give that a shot. Now, I recommend doing a little underlying figure sketch prior to starting each post. That way you can spend the full five minutes on the drapery itself and not having to worry about drawing the figure at all. So choose whichever image you want to work on or if you want to split the time between the two, that's fine as well. So I'll leave you to practice that up for the next 20 minutes or so. And then I'll come back and do my sketches.
13. Timed Drawing Session: Okay. Oh. Okay. Okay. Okay. Why Yeah. Yeah. Okay. Yeah. Okay. Okay.
14. Timed Drawing Demonstration: Alright, let's get started with good I, beautiful zombie broad to start with these nice cylinder falls, Jeff forming offer addressees. So relatively easier one to start with. So as we made mentioned during the lecture, these cylinder folds, or you might also be referred to as pipe faults tend to be the easiest wants to start with with drapery. If we've drawn enough cylinder shapes as we've been practicing our figures, nude figures, then these shapes a relatively straightforward to start to construct, but we also don't want them to be too straight either. I'm just working on the upper arm first we got a lot of lice here which is happening and the upper part of the wedding dress, but the same things are going to be happening here. We've got the compression that's wrapping itself around the jointed area. They now this lice is quite thin compared to the dress, which is a lot thicker, I think a lot of material. And that's another thing we're going to have to be aware of. When we start putting drapery onto our figure, the thickness of the material is going to affect how these folds react as well. So with something thing like these lice, it's not going to produce the same type of compression folds in the joints that we're likely to see with something a lot thicker, like a jacket or even a long-sleeved should that we'll have thicker material. So material thickness, the top of the material that we're trying to draw here is something we also have to contend with. That doesn't necessarily mean the patents that we've gone over going to change. It just means they're not going to be as obvious in some cases. And some cases that compression fold might in fact end up looking more like a pinpoint fold. So there's going to be instances where the rules that we've gone over aren't always going to apply in the same way. So this is why the different cuts in different thicknesses of material going to have to be considered when we stopped putting pencil to paper. The more close fitting the material is to the skin, something like a pair of leggings or LEA taught or something like that, the less folds we are actually going to see produced. And conversely to that the thick of the material is the more prominent thee folds in the drapery and how it starts to compress in on itself and overlap itself. How much more obvious that starts to become. So. Now, moving on to the dress and again, just thinking things in terms of simple cylinders at this stage. And then once we get this sorted and it's rough position constructed, we can then start to coming up at the top with these small similar does that are being formed. And trying to think my way through this hell, the cylinder is now wrapping over that toe which is peeking through and how it's gonna go behind. The rest of this dress. So we've always got to think about drawing around to the back of our figure. Oh, drawing around to the back of that dress, we don't have the advantage that someone like a 3D artist has an they compute up or even a clay sculptor, I can turn their creations around to the other side. We've got to imagine that there's a backside to that tool. So in this instance, that dress. So we've really got to imagine there's another side to everything that way, drawing. One way we can do that without drapery is as we saw during the lecture, if we use that inside, outside transition of contours, that's certainly going to help sell the illusion that we're dealing with something that has formed to it. So it was always going to be thinking about the forms that withdrawing drawing, not just underneath but what's happening on top. The other problem we're going to have with drapery as well as not just trying to get it to add heat to the figure underneath. But if we've got several layers of clothing stacking on top of each other, then we have to think about that too. So perhaps if we're drawing a character who's wearing a should and then a vest and then a jacket over the top of that. That's going to affect things as well, just building up more layers. So a lot of things we have to think about, which is what makes clothing a very tricky subject meta to start to dive into. A zombie brides, pretty much done for the moment. So let's move on to our next pose. Right? We've got a nice fluid dynamic Posey, so we're going to have a lot of movement going on. He not just with the figure but will say how drapery than, especially in this section here where the armpit is all of these folds which are converging to this point. He Fu, who should. So we can look at it as a drapery is being pulled up to this point. You might heat terminology used like tension points in drapery clauses. And there's nothing inherently wrong with looking at it from that perspective. But from a liberal perspective, it's not a pulling force that's causing these folds. It's a pushing force. If you were to stretch out a square piece of material, maybe a handkerchief or a napkin between our fingers. Git falls that are being created, but it's not because we've pulling on that material. That's because our fingers are pressing down, pushing into that material as we're stretching it. And that's ultimately what's causing the faults to be created. So if we transfer that to our figure here, what's sort of happening is this loose piece of drapery at the back here is really curling around in, pushing in on itself. And that's really what's causing these folds to be created. But amides actually tells us that this looks like it is being. Pulled up and that's what's creating the folds So we can look at it from that perspective as well as nothing. As we said, nothing inherently wrong with using a list literal interpretation. We've done that without Figure Drawing. Pos lessons, we haven't necessarily define things as being literal. And even in this lesson, we talked about what drape remains in an artistic context. We're really only looking for it in this instance to help to define the form of figure, to help to define the gesture. To really enhance the figure. When we start adding in flowing dresses and low hanging shirts like this and taught form fitting pants. It starts to give a lot more personality to the character way, drawing. All of a sudden it's going from just a nice representation of the human form. And they all of a sudden one way it putting in jeans and tied up show it's like this. Suddenly we start to have a character evolving. We start to be able to tell a story. And it's not that we can't tell a story with just the figure on its own. If you look at the old mostest paintings and sketches from the likes of da Vinci and Raphael and those monsters. They really do tell a story even just with the figure alone. But once we start to add in clothing, then it really starts to take things to a different level. And if we're going to do that, we really need to ensure that all that we're starting to layer on top is working in conjunction with the underlying figure structure. We are taking that initial story and adding additional meaning to it. It's goes from being a sketch into something that starts until a much fuller picture. And really that's what many of us want to do with it. Trying to do original character designs or maybe we're doing concept art for someone else. We really need to convey the story of who this character is and the clothing that they wear is definitely going to be a part of that. You know, there's no point sending in an image of a nude figure of someone's asked for a soldier. But to think about the clothing that they wear and how it might react to the pose that they are marine. And do a little research is we'll going to have to do a lot of trial and error without drapery. We're going to look at a lot of different styles of fabric and how they react to the falls that we've gone over. And not just folds or cross the figure, but it's a good idea to practice with just any old clothing that you've got lying around. So we've got a towel that you can throw over a CHE and just draw from that. Keeping in mind that that's more of an Inuit fold that we only looked at briefly. Why don't we have to look at the seven different types of folds that are generally created. We haven't really focused on that type of fold in this lecture. We may look at that at a later point. For now, we just want to focus on the ones that relate to clothing. And drive around the figure. Alright, so let's move on to our next image. Like I've got to know as twisty, bendy pose here as well. And we have gravity really playing a pot and this image really dragging stuff to the ground but got the material which is bunching up on itself wrought with the the leg and the torso mate. You might be able to see here also the white stretched out here. It's a little bit hard to tell, but we can still see these zig-zag and patents that are occurring here. Even when things are starting to be stretched out. In some instances, it might actually be easier to, not so much Look for the excellent zed shape patents, the peaks of those folds, but looking to the valleys where those diamond-shaped patents end up being created. So it might be a case where certain poses lend themselves better to looking to either the peaks or the valleys. I have a tendency to look more towards those negative space areas with others, diamond shapes are being created as opposed to the peaks, just structurally speaking, tend to find that ends up being a little bit of an easier way to lay things out first, then going through the tops of those folds, those peaks poking out. So we've got a couple of different options for us to really tackle drapery and assign y that we want to have different tools available to us when we're drawing the figure. We want the same thing for a drapery as well. So go back and forth between the top of patents that we've talked about, see which one works for you. Well, maybe it's just a case way. It's going to be entirely dependent on what the posies, which, which way you end up going. So it's all just part of an artist's toolbox here. And I'm really trying to pay special attention to what's happening with this bunch of folds that's happening where our torso, NL leg, a meeting. And this is where we can get a little bit lost because we've got so much going on. He so many different things that are converging to this point. That's very easy to stop losing track of stuff. But we don't always have to be a 100% literal either. If we get enough information in as to what's happening with these folds, then the audience's mind will tend to fill in the rest. So similar to the hair, we don't need to put an every little Christen fold that's present here. And the sign guys would pretty much anything that would draw and we don't need to put in every single lump and bump for the muscles. And I figure if we're doing one without clothing on. And so it all comes back to you just getting the audience to do some of the work for us. As long as we're adhering to the forms of the figure, we can actually get away with a lot that the audience themselves will simply fill in the little bit of a strange way to look at it. But when people view creative works, they kinda like to lie to themselves in a, in a weed white. So even though that we can clearly state that what we're doing here is not something that's three-dimensional or even lifelike. If we do enough work, if we lead our pencil around in the right way, then we can get the audience to believe that what they're looking at, at the very least has a representation of something that is three-dimensional. It has form, it has perspective. We can make that leg Lucas if it's coming towards a small than the one at the back. And we can use these gestural rhythms to really give a sense of action to the image 2D. So unnoticed, developing performs, hey, we developing a sense of story too. And as we said earlier, the clothing is just going to be an additional layer to that. So we've got some pretty casual clothing that way. Using for most of these, most of these images, things that you'd normally see. The last image is a bit more of a fantasy style costume, just to break things up a little bit. Because as we made mention, many of us, we really want to draw and design those top of fantasy characters and straight clothing. Casual clothing is all well and good. But the fun stuff is when we get to do pirates and Vikings and worry women. But casual clothing is a pretty good place to stop because it's usually not too complicated in its design. So start with the casual stuff first and then work your way up to the, the Kula, more fantasy based stuff. Alright, let's move on to our last image. All right, our final five-minute pose. Some type of armed Warrior Woman for this one. So we get to do something a little bit more extravagant this time around, but it's not going to matter too much. Just what type of fantasy costume we end up creating. We are still going to come back to these ideas and concepts that we've gone over through out this lesson. The folds aren't going to change too much. No matter how many layers of cool fantasy items we stop putting on top. Or we have to do then is just start to become mindful of what we're actually adding onto a fantasy costumes. So maybe we're putting on gauntlets over a long sleeve or maybe we've got a superhero kite that we've got on the back there or some type of Klocal hood. Maybe we've got some belts and some she's facades. Some topic battles, good for working on a warrior woman, some type of heavy armor up top. For now I'll super soldier character. All of these outside forces that are going to start pressing into our drapery and start affecting it. So it's a good idea to, as we've said, start to ask ourselves questions about how our drapery is likely to react or how it's reacting. So at this point in time, I'm looking at this long sleeve which is being formed tea. And keeping note that I've really got to try to emphasize that it's hooking around her wrist, getting the feeling that it's flowing up and over. The backside to that, to that drapery. And asking myself as I'm drawing, what type of folds are being created here and looking to the side that's closest to her torso and saying, well, that's clearly assumed to fall, that's being created there a pinpoint fold. Then up the top, closer to weigh. The sleeve is joining to the torso, got some compression that's happening there, right with the jointed area is nice zigzagging patent coming down from the armpit and snaking its white gradually down the arm. So when we talk about transition of folds, we get these instances way. Folds look like they are more prominent and look thicker and fuller and gradually work their way out to being a lot smoother. So, as we said in electorates, and they'll two dissimilar from upgradation of value, how we transitioned from the light to the chateaux. We are transitioning from very pronounced folds to being very subtle folds in all the wall just slowly building things up. We really just want to consider the sketches here as being just the rough foundations for us what we would do once we get the bicycle buyout fall, drapery for clothing. He is N2, come back up at the top and stopped, were fond things even more. We can then start to think about the light and shadow areas, stopped to think about any additional things. We've got all these little buckles going up tool so that we can then start to add in and any belts and whatever may just seems are available to have gotten a pretty big scene which is going down her torso that we would have to think about as well. So some additional things that we have to come back out of the top width lighter on if we were to do something that was a bit more detail but more rent it. This is where things start to slow down a lot for us, but it also ends up being quite fun as well when we get to see these costumed characters that withdrawing or if we're just drawing the figure that as we sing it from a logic model, from a reference, it's really, as we said earlier, it starts to bring things to life a lot more and makes things look a lot more interesting to, doesn't have to be costumed characters. Of course, you might very well be content just drawing what you seeing. Many of the most famous paintings from the Renaissance era, of course, with just people draped in cloths and robes and things like that. So if that's all you're really interested in, is perfectly fine as well. So part of the journey. So as we start to want things up here, I hope this lecture has been a value, say, very tricky topic. So be patient and also be conscious. So if there's going to be a great deal of frustration sometimes, but if you keep going, you'll get through there eventually. So as we start to finish this off now I'll leave you to practice with the additional references that are available in the project section. Look around on lawn for some additional references and practice with that too. So we'll call this a diet. Kate practicing HOD. And I'll see you in the next lesson.
 JW Learning, Drawing the Body, Head and Hands