Transcripts
1. Trailer: in the first of three lessons covering the head. We're going to start to look at the intermediate structures off the face and the skull. We're going to build up from the foundations that will emerge in earlier lessons and start to develop more sophisticated designs. We're going to look at our proportions in gesture in a little more detail and stop building on our secondary structures, voting something that is very complicated. So that's why we're splitting it up into three parts. So let's get started with pot one.
2. Skull and Face Structures : all right. The head is the obvious place to start when it comes to breaking down the individual parts of the figure. It's usually going to be the first place we look at when we look at an image. It's also usually the first place we start to play. A gesture lines down, so this is the logical place to begin. A more detailed look at the body. Awful. The areas of the figure that we need to get right. This is probably the most important. It's not only going to be the first place, most people look at an image. It's also going to be a useful measuring stick for ourselves for the bodies proportions. Now we've already looked at the head as being more or less one, shaping out earlier lectures. But in truth, the head can be broken up into two main areas. The full rounded shape with skull and the flatter shape of the face, which houses thief facial features. These two areas workers a unit. But it's going to be super useful. Tow us to think of them as individual parts. So if we're saying that the head has two main parts, that means they're going to be looked at differently in the front than they will in the profile. So let's start with pro fall, the main shape for this skull. He is going to be an egg shape. Obviously, this is going to vary from character to character will find as we draw from our image references or from our life models. There's going to be differences in just how elongated the profile of this skull is going to be. Some people will have more spherical structures of the skull. Some will be a little most stretched, but as a starting point, an egg is a safe it and a crucial design for when we connect the skull to the neck. So that's structure number one. Now structure number two is going to be the facial area. This sits in front of that egg and overlays on top of it. And, of course, it's where our facial features are going to sit. This is a far more boxier structure, so we've got at egg shaped for the skull and our boxer structure for the face. By making these two distinct shapes, it helps to distinguish one area from the other, and this is going to help with positioning of the skull. When we get to that lesson later on, we can obviously use different shapes to build this. Of course, we can make use of two egg shapes for the skull in the face, or we can even group them together as one rounded box shape likely initially learned a few lessons back, so using to eggs is going to give us the advantage of having this nice, clean movement from one part of the head into the other. The disadvantage, though, is it's going to make positioning more difficult to get right if we go back to a few lessons ago when we talked about positioning, we know that the more corners we have, the better idea we have is to wear in space al forms of city. So if we look at this example, we can start to see we might get a little bit lost with all these curves going on. This might have some benefit for us if we were drawing, say, a young child or a younger person, because they'll tend to have more rounded features in their face and skull. But it's also going to give us some challenges with positioning and for our singular, rounded book shape here, whilst it's convenient in terms of being fast put down, it's a very nice little short cut for us, especially if we don't have a great deal of time. It's ultimately going to mean a little more work for us because we're going to have to go back and refine it more. It's probably a bit too simple. It's perfectly fine if we're just doing a basic foundation off. We're just doing a quick sketch down, but the reality is it doesn't really have the proper characteristics off the skull in the face. But it's also less likely we'll get lost when it comes to positioning for this particular shape. So it has its advantages also. So there's going to be pros and cons for the choices that we make. We can make it super easy for ourselves initially, or we can spend a little more time doing something a little more sophisticated. The choice is ultimately going to be yours. As he develop and improve your skills, you'll find a method that best suits you. But whatever choices we want to come back to our original concept from Lesson one off easy and identifiable choices shapes that are quick to put down that also resemble the body parts were drawing. We were enough information that has the characteristics of the skull in the face, so we could then start to build the rest of the facial features on top. Think of it a bit like clay, and these are the first few pieces that were molding and will come back later on and start to refine the more detailed areas, adding pieces in taking pieces away, etcetera. So that's the profile. Now the front view. If we turn that egg towards us, it becomes spherical. So if you have an egg in your kitchen, well, something that's egg shapes that you've got around you and you look at it from the front perspective, it's going to lose that elongated shape and turn it to something that is more spherical. Now we know that the social masks structure is going to cover that sphere, but that doesn't mean we should forget about it entirely. It's still a good idea, especially if you want to stop making really sophisticated designs to actually put that initial spherical foundation down and build your facial structure from that. Just doing an egg shaped alone for the front is fine for a quick sketch. But if you want to do something more fine, there's going to be a benefit to keeping that spherical structure there underneath. That facial structure is going to different from person to person, of course, but the easiest desire to build from that initial sphere is either a kill or a capsule shaped design. Now you can refine this. How have you please, if the person say has a narrower jawline, you can take of that shape in and give it more of a point. Some joy lines. They're going to be more rounded, more squarish, more elongated, heart shaped. Adjust it to however you need. So it is going to a lot of options here, So that's the basic structures of our head and our face.
3. Gestures and Proportions: all right, we've gone over the structural components of the head. Now, if we go back to lesson one, we talked about how construction and just your work together. So let's just do a little recap of that. We've got construction, sorted the skull in the face. So without gesture, there's actually two gesture lines we can stop with for our head. Remember, we're always looking for the longest possible curse for out gestures, but for the head we've actually got to to choose from. We've got the skull and the face, which are about equidistant in length, so it's not really going to matter too much. Which of these we put down first. We used to gestures here because we want to avoid distorting the head. See if we were to just use one long gesture curve from the chin to the back of the head. As you can see, it doesn't really represent the shape of the skull that will. It's way too curved. It looks more like some type of weed. SciFi home it and it just doesn't really feel right. So that's why we need to break this skull up like this to define the shape properly. We've got to construction parts, and we've got to gesture lines. So we've got out just to hear going back, which we will develop into a skull and just going down, which is going to create the Mosque of the Vice. Even though both gestures are about the same length, the facial gesture is probably the more important to get right because it's going to merge into the neck, which is going to connect into the torso into the pulse all the way down. That's the profile. If we have looked at the front perspective now, the longest line available to us is going to be the body's natural centerline. This perspective is the only time will be using a straight line for the gesture off their head. Any position that is off center is going to result in that gesture line becoming curved. All right, let's just cover the proportions again. We already addressed this summer in lesson for, but we need to go of its again here in a little more detail. If we look at the profile here minus the facial features, I'm just going to books this off now. When we box this off, we get a square shape that is a little bit longer in the face than it isn't skull. It's not a perfect square. And in fact, sometimes you might find the opposite rings truck. When you start at in the nose, the hair stone, all the other facial features, it starts to bulge out. But usually when you start the faces, the longer area. Now we're going to split this up horizontally into more or less to equal parts. They don't have to be exactly the same. In fact, sometimes it's better that they aren't. It's important, though, where you make that choice. However, character with a slightly more elongated jaw and chin tends to look a bit better and look a bit more natural than a character with a larger forehead. So lean towards the longer jawline and chin era. Unless, of course, you're creating some type of alien monster fantasy character. Then you can kind of go to town in that area, and this is where the ice it almost exactly in the middle of the head, almost exactly in the center. Off this first line, this centre line is our online and in the back it's also roughly where the neck next into our sculpt. There's a bit more room to play in this area, especially for a more muscular character. The neck might end up looking a little higher or lower, but in general this is the area where the connection point is going to be. So. If we split that area between the eye line and the chin, we will get the bottom of the nose. Now, when I say the bottom of the nose, I'm referring to where the nose at the top of the mouth area meat, not the tip of the nose, the area with a nose and the mouth muscles converge. This is roughly split in half. You find more often than not, that the area underneath the nose tends to be a little longer, so I would always suggest to split these areas a little unequally. But again, a lot is going to depend on person that you're drawing somewhere in this area is usually pretty safe. Split this section again, and we're going to get the bottom off the lip, approximately where the bottom lip begins to turn down into the chin. So right on this edge and like in the other areas. You're better off making this a little longer than the pot above. Making the splits I'll do on even is actually going to stop a lot of frustration for you, because whilst these measurements are useful guides, they're not going to be any exact mathematical equation for every face you come across. If you try to make your measurements be 100% exact, everything split perfectly 50 50. You'll usually find that something ends up not being quite right with your design and you'll get frustrated. And that's because our faces are not built equally so it's good to know ahead of time. You're better off making things a little on even in certain areas, then keeping them 100% symmetrical. It's also just going to end up making things look a bit more realistic, know when it's perfectly even or symmetrical. So consider these as guidelines, not hard and fast rules. So if you go back to the face it, we need to look over the bread line. We can find that by using the area between the chin and the bottom of the nose as a ruler and measuring up. If we were to take the island away. The top of the eyeball is where the brown line starts. Now we split the head horizontally, but we also have to do it vertically. Ticket out E positions out is going to see it some way in the area between the brown line and the bottom of the nose. We have a little bit of wiggle room here. Some people's ease will only cop as faras the eyes. Some will sit a little lower than knows, but somewhere in this space is a good fit. They also lean backwards. They don't sit up straight and upright like this. The top of the leans further back, the bottom of the more or less connects exactly to weigh the jury's. The last landmark on the profile is the corner of the skull seaside plane of the head. We have this flattened area on the sort of our head right where the ice bucket starts. The easiest way to find this is to break this front structure of the head into three equal or any equal parts. The corner is about 1/3 in that will get you the edge of that side plane, and you can indicate the soccer with this rounded, triangular not shape notice that if we include the cheekbone, this makes a kind of question mark designed for the corner of ahead. This is the way I like to remember where the corner is in its most simplified form. One big elongated question mark notch that indicates the side plane. We're going to look at the side planes of the head a little bit more later on. But for now, that's the more detail proportions for the profile. For the front, the facial proportions are going to be the same as the profile. There's only a few areas that we really have to work out because the perspective has changed. So if we look at the eyes first, they're going to sit about I apart from each other. So the distance from where the corner of the island meets and that measurement is roughly the same to the side of the head, which gives us the width of the whole face. So if we were to split head up into five equal parts, the eyes would sit in slots two and four. So if the face is about five eyes in week, some people are going to be closer to four and 3/4 or even 4.5, but that's a good ballpark area. Work within the nose is going to sit in that third slot and the wings of the nose. The nostrils are going toe a line with the inside corner of the eyes. Now we've got the guide for the bottom of the lip, where the opening of the mouth is positioned is going to depend on how thick the lips up. But for the width, the mouth ends roughly in line with the center of the eyes. So where the pupils up? One area that I've looked in the lost lecture about proportions was the hairline. The hair doesn't actually stop right on top of the head. It starts a little lower than that, so the measurement will use is the same one that we use for our brown line. So when measuring from the bottom of the nose to the chin up to get the brown line, we'll use that same measurement from the brown line up to get out hairline. Now, the only area we have left to work out is the side planes of the head. We're going to get to that briefly when we start to break down the secondary structures. But in short, the pick of the eyebrow is where the corner of the head starts. So that's the more detailed breakdown off the proportions and basic structures. This is going to give us a more sophisticated bunch of ideas in order for us to start building our head construction. Now let's move on to the next area.
4. Neck Transition: All right, let's get onto the neck. We started to develop a more sophisticated structure for the head, so we need to do the same for the nick. We need to connect the head so it doesn't look like it's just stuck on. So from the front perspective, we'll go over what we talked about a few lessons ago. The basic shape off the neck is a cylinder. The length and thickness of it is going to depend on the six and athleticism of the person . Women will have a longer thin and neck. In general, you'll tend to find young Children have a longer and thinner nick. Also, men will have a thicker and slightly shorter nick. Slightly more stocky up age is also going to play a part, but you can play around with the thickness indeed, length as much as you want, depending on what character it is you drawing. So if you're doing a superhero type of character, you might have a nick that is as wide as the head itself. You might even have a situation where you will do a monster type of character. Some big 10 foot tall humanoid creature alien from out of space that might actually have a neck that bulges out like a bloated cylinder shape. So even though the cylinder is quite simple, we've actually got quite a few options that we can use now. The front is fairly straightforward. The purple needs to be worked at a little more in order to have it merged with the neck properly. One place that's going to help with that transition is going to be this area here, the area where a double chin will form on a heavy a person. This particular muscle area type is in at an angle from the Jewell line into the neck. You can sometimes see a little bit of this from the front in the full of the U shape, but it's going to be far more noticeable on the side. The bottom of the chin and the George isn't just a straight line that connects into the neck. There's a fullness there that actually follows the jawline, a transitional plane that merges into the neck, and that transition also has a little bit of a sagging arc to it started from the chin, we have this muscle plane that transitions into the cylinder shape for the back. We already made mention that the back of the neck joins the skull roughly in this area where the ice connect, it's super important to remember that the neck connects to the torso low in front and high in the back. If you look in the mirror, you'll see the color off. The shirt that you're wearing sits higher at the back than it does at the front. This is going to go a long way into making sure the head looks like it's actually positioned correctly on the body and for the overall shape, noticed that we've got this compressed cylinder shape that forms. Obviously, this is going to change a bit, depending on positioning. Whether the head tilts or twists etcetera, there's going to be a lot more curvature when this happens. But in a more relaxed, upright state, this is the default form this is going to make so it from the front we have more or less a basic cylinder shape, and from the profile, it's eight more squeezed cylinder shape
5. Boxier Structures: let's get into some more advanced stuff. Now, instead of just mapping out the areas off the two money structures, the skull and the face getting their basic shapes in positioning down, we want to start looking at the secondary structures of the head. Now specifically, the face as thes skull structure isn't really going to change too much here. Most of the work for that area has been done for us already, so it's really going to be the face will be concerning ourselves with. So we're going to have to build in some additional information in order for us to eventually adding and develop al facial features so we can eventually get that beautifully rendered portrait. If we look at these skull and break it down, we'll see that it merges into the facial structure. So we're going to have to work out some transitional areas to help with that. We've got the brow ridge area, the eye sockets, cheekbones now and chain all these additional structures that we have to develop. All we're doing is building on top of what we've alert so far. We're not changing anything underneath all those primary structures that we lay down earlier are going to remain as they are. So we've still got an underlying egg and push obstructions before. But we're going to make a slight alteration to our thinking. We're going to start thinking more in terms of corners now if we go back to Lesson one, where we were discussing positioning, we said that the more quarters we have in a structure, the more information we have about its position in space. The more detailed breakdown about that is available in less than one. But just as a recap, the egg foam has an interior corner. It has this long and short access, so we can tell by looking at this long and short exits that it's leaning, but not much else about its position. The cylinder has an exterior corner, so we can tell looking at this example that it's both leaning and tilting, but we still lack the information about what direction it's facing. The box gives us that last piece of information because it has the most corners. It gives us an idea of the lean, the tilt and the facing direction off their object. The more corners we have, the more information we have for our structures. So we want to start thinking off using more boxes structures For these more sophisticated and more complicated areas, it's going to be far more beneficial to us than trying to use fees and cylinders he, especially when we have to start positioning the head.
6. Forehead and Cheekbone Structures: So let's just first put down what we've already developed. Egg shaped head halfway point for the eyes each I about one I apart from each other. Half down from that, we've got nose half down again for the bottom of the lip brown line. A little above the eyes. Hail on a little down from the top E sitting in the middle chicken neck for the mild enough for the female, the only areas we haven't marked yet off with side planes. And that's because we want to take a greater look at these now. So let's first pay attention to the eyebrows and eye sockets and in particular, the arch of the AWB Rose. Now we've already stated earlier that where the eyebrow speak or where they start to curb down, is where the side plane off the head begins, which is about in line with the edge of the eyes. That art for some people is going to be very sharp. And for others it's going to be far more gradual. Some might not even have one there at all, but there's usually some sense of where that peak of the eyebrow is and where it starts to cook down. Now if we got to, that eyebrow arch again will find that this is approximately where the corner of the forehead is. We've got the front plane off the forehead, which is quite curved, which breaks and turns into the side off the forehead, which is basically the temple line. That side plate isn't a strike books. It tapers out and then flattens up again. Now, if we take a look at the interior part, we need to develop the transition area for below the brown line into the nose. We've got this major landmark here, this keystone shape that tilts inwards towards the eyes that's going to merge into our forehead. You can see better here in the profile view, the head thrusts forward, the forehead thrusts forward and outward, and that keystone shape pushes back in. Would, which leads into the nose pushing outwards again. And that keystone shape can be more straighter or it can tilt a lot more. It's going to be different from person to person, and it's not just a flat surface. If we were to look at this three dimensionally here, it's got depth to it. Think of it like an actual keystone in a brick archway that you'd walk through so that lay mark is going to be super important as a transitional part of the head. From there, we're going to start to hook this area around to indicate the bottom of the eye socket, roughly between the eye line and the bottom of the nose. Just like that. Now, let's go back to our eyebrow arches again. If we go back to our profile, we drove this lad again. Notice where the arch in the eyebrow is. That's out Temple in. That's outside plane. That's the natural corner off the head, so that gives us a nice architectural layout for the full head area. And if we go back to the front to that eyebrow arch and draw down to the R line, this is where our cheek area is going to start and I'll do it again. He in the profile to show you on the Barbara watch into the R line to get the cheek line. So the pick of the eyebrow is going to roughly give us the side planes of the skull, the temple area and the side of the cheekbones. And that side plane is actually going to swing down through the corners, off the mouth and into the corners of their chin. All just boxes, chap. A little First, establish out corners here so you can see it better. But notice how out cheeks structures he start to imply the spherical structures of this skull underneath. You can see here in the image the image reference that the cheek air out and the skull area some more intersect. So what we get out of all of this is we've established a front plane in a side plane for our head. We've got corner landmarks for the forehead, the cheek and the chin front planes into outside planes. You can see here that the chicks are actually the widest pot, all of the structures, whilst the chin is the narrowest part of the structure and notice what happens when I add the years in that cheek actually overlaps the is. All of these structures are thrusting out in front and the ears are behind all of them. So don't destroy the ear stuck on make sure they are sitting behind all of these parts.
7. Nose Structure: all right that covers the main structures. The nose is really the only structural left that we have to give special attention to. At this early stage, Every other feature of the face can be simplified toe work within the front and side planes that we've already developed. There are some areas, like where the teeth sit that bulge out a little, but we'll cover all of that in a more events lesson. But for the most part, the nose is the only future of the head where we have to contend with at the start. The eyes is in mouth. All these parts can sit somewhere neatly on the existing planes that we've already developed. They obviously have their instructions and shapes, but we could develop them later. On. The nose is the only facial feature that has to be addressed. When we put down our initial foundations, it's something we just can't avoid. We've only got a mark there for the moment, so let's just build on from that. The nose is really just this big, continuing gesture that moves into that keystone shape that we looked at early up, and it continues through and into the eye socket. So if we mark off the bottom of that keystone shape, we can start to develop the structure down. The shape flares out and it's going to eat narrow, uh, at the top and water at the bottom. And that's really all there is to that top plane Now to get outside planes, we're going to look to the inside corner of the eyes is our starting point. We're going to fall out the same direction as that top lying down, but we are going to drop. These gesture lines are a little further down from there. This is because we have this bottom plane of the noise visible to us as a result of the noises position. So if we go back to our pencil test from Lesson one, we can see from the front view that being knows tilt backwards into the face. So we've got three planes to the nose. We've got the top here, the sides going in this direction and the bottom plane that is facing towards us. Now this area becomes a bit more difficult toe workout. When it comes to the overall position of the head, there's going to be a lot of tricky, overlapping and for shortening that takes place when we start to put the head in more dynamic positions. When we come to that in our next lesson, when we talk about positions, we'll start to see why our box you're structures are going to be the better options for us . For the price fall. Things are a little bit easy for a sick. We've got out special plane moving down and l knows, tilting backwards into the head and then thrusting out. I thought, We push. That is obviously going to depend on who it is we are drawing, and its most basic, though the shape of the nose is going to be a triangular shaped. From this perspective, we get a little bit off that top plane, but it's not really worth worrying about from this perspective at this stage. We do, however, get more of that bottom plane, though it is this small triangular wedge. And if you know to see you, we've got this zigzag pattern emerging. Yeah, this is similar to what we talked about in less than one without gesture lives. We've got these nice flowing rhythms in the face announced in out all the way down, so that's the profile for the knows. It's a bit easier for us from this perspective, but the nose can get very tricky in some spots, especially when we start to move their head around. So it's going to take a little bit of work to get used to this and to be able to construct it correctly, but it's nothing that we can't overcome.
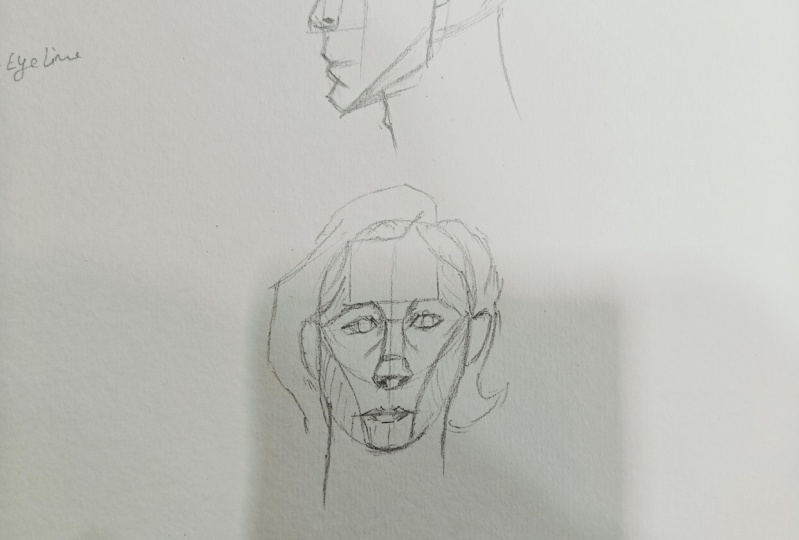
8. Demonstration - Profile: All right, let's do a demo now. So feel free to either draw along with me or watch as I do this first and then go back and try it yourself. So I'm just going to put down my gestures first here. Now, as I said earlier, it's not going to matter too much. Which of these you put down first. All of your choices are really just about what's comfortable for you. So if you feel comfortable doing things completely differently to what I'm doing right now , that's perfectly fine. All that matters is that the information you're getting down is something that you comprehend. At the end of the day. The end result is all that matters. This No one that's going to come over your house and start yelling at you because you didn't do the gestures the correct way or you didn't do the structures are 100% exactly how it should be. It's all about what you are comfortable with. So I've got the basic structure down, and I've got the center line in from my eyes, and I'm not doing too much different from what we learned in less than one about those initial shapes. Those initial foundations were really just doing the exact same process, but at a more refined level. This is how we start to get evermore refined shapes, ever more refined gestures. This is how we start to bring out the detail in our figures. So I've got the no structuring. I've got parts of the eye socket in now and always keeping an eye on the proportions. You really want to get into the habit off, measuring your proportions every, say 30 to 45 seconds. You will start to eyeball it eventually when you start getting better. But don't rely on that entirely because even the professionals out there will still be checking their measurements. Every so often it's super important. So it's all looking super boxy at the moment, and that's exactly what we want. We're going to learn more in the next lesson when we talk positioning why boxers structures are a better option. So I've got the main features in now and now I've gotta work on that plane in the face that transitions into the neck. It's a very easy area toe overlook. It's easy to think it's just a flat service, a very sharp corner there, but it's a very subtle transition. We have to be aware off. So as I start to build the cheek and eye socket area, you can see that question marks shape appearing. So this is a pretty solid foundation, and from here on, I can start to add even more details and start doing some more chiseling and looking for more corners and more boxier structures. So I'm just building the nose up a bit more now, defining the corners a lot more. You understand more when we start discussing light and shadow why it's important to define these areas. So I'm just going to develop that keystone shape now cause I haven't really done a good job of that so far. It's a little bit hard to really see from this perspective because you've kind of got a lot of things overlapping it. You got the nose intersecting it, you got the eyebrow line there. It's just a lot of stuff, so it becomes a little bit more difficult to see from this angle, so moving on to the neck and ensuring that the front of our nick is lower than the back. That's pretty much all the my instructions there, so I'm just gonna fill it in with a little bit of hair. We're gonna go to crazy with this when you're putting in here. Just think about sort of getting the basic shaping at this stage. So think of chiseling. That's the It's a weed way to look at drawing. But movie a pencil is if you're sort of carving areas out with chiselled straight lines, the head gets very complicated very easily. So it's always good when you start laying in the shape for your hair to really just two straight edges and straight lines. At this stage, you know, I would normally not put in the Adam's apple in this particular image, but because it's so pronounced that I think I've got a choice, all right, I think we'll call that one done
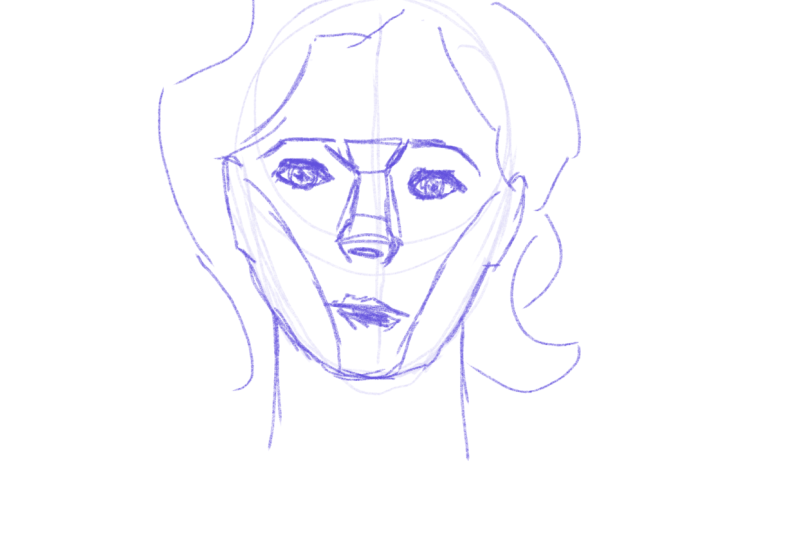
9. Demonstration - Front: all right, let's start to build our front perspective, then getting our Yeah egg shaped in and getting our initial gesture line down the center line of the face, of course, is going to be out gesture line from this perspective. So, as I said earlier, the front on view is the only time will be using a straight line for our gesture. Steve Body's natural satellite. And that won't follow away down if we got a front perspective off the figure, the strike line is going to be the default gesture line for us. So I've got my egg shape in. Just got a very faint indication off the steer underneath. So now it's time to stop building this stuff up. We're looking up ever so slightly to this head, so I'm just indicating boy marking, see to reflect that will go into more about that in the lesson on positioning. So just to finding the start of the brown line, he now this models eyebrows have a very subtle art to them. So I'm just going to exaggerate things, and you can do that and you'll find to do that, especially when you understand your anatomy better so defining thesis. I'd planes for where the cheeks are and them's gonna develop that all important Keystone Lane mock and start building the noise up. Now the nose has actually got a lot more structure going on. Then what we actually going over? This is just a very rudimentary knows that we've put together the noise is actually a lot more corners and changes in directions than what you realize. But we'll break all that down when we get to the individual facial features. So I'm just going to indicate a little bit off the here shape at the moment. That's really just to help myself figure out where in the process you don't have to start from the top of work away, down, putting down the eyes Now just a rough arm and Schapelle dove into that when we get to the facial features. So I'm happy with. Have these foundations are so now gives me the chance to stop, too. Put more detail into the structures, just defining the edges a little more, especially here at the chin, which I haven't really how much attention to just yet that's a bit more defined. Stop building up the nick now probably made it a little too thick. A. But that's all right. It still works. Trying to copy. Exactly. Remember, it is gonna develop the Keystone shape a little more. Add some three dimensionality tours. Now don't worry too much if you're not getting the perspective quite right for this area and especially the nose as well. It's very tricky, especially when you're starting out. Teoh really get used to the idea of things moving backwards into space on a flat to the surface. Getting that sense of three D and that sense of volume is is difficult for even the best of artists. But we're going to try to do something about that in the next. Listen, when we start to break down the positioning of the head, they're going to be areas that, ah, very tricky to get looking rights when the head starts moving around. But there's a few tricks and shortcuts there are available to us, so we'll go over them toe, hopefully make drawing process a lot easier because it's very easy to get lost when we stop moving the head around. There's a lot going on here, and a lot of structures that we have to make sure or working together. What we're doing is very complicated, so we're going to try to make it as painless for ourselves as we possibly can. I think this one is just about them.
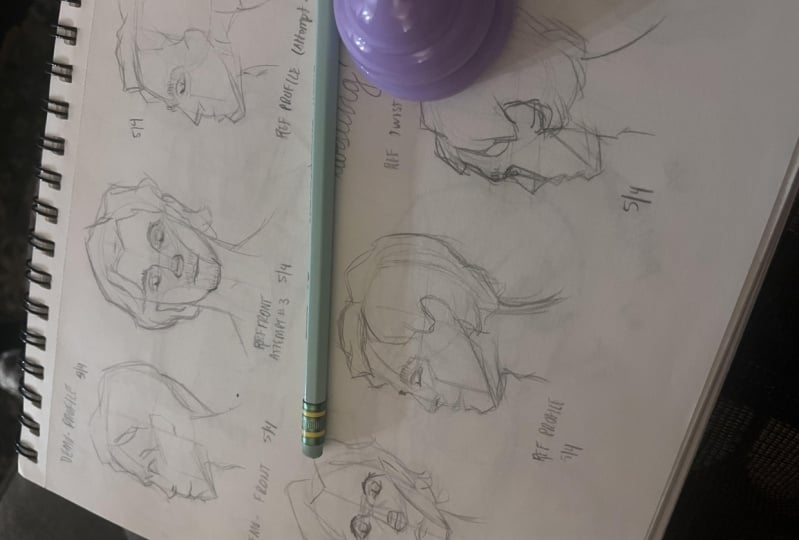
10. Assignment and Part 2 Preview: all right. The assignment for this lesson is to study what we've learned and to follow along with the demonstrations. Now, don't go over this. Just wanted twice. Go over this several times. Really Try to immerse yourself in it. This is a super complex area of the body. There's a lot going on here, and it's gonna take a great deal of time, too. I understand how it starts toe work. This is just the Bonior structures. We haven't even touched apart muscles just yet. I've included the image references that we used in the demonstration, along with some images of the skull that were in the listen as well. I've also added in some images of the head in some different positions. We're going to cover more of that in part two off the head lecture, Siri's. So if you want to take what you've learned so far and try one of these more difficult angles, by all means give that a shot. But more of that's going to be covered in part to part two. We're going to look at tilting the head up, down. We're gonna look at it from the back from the top. We've got all these tricky areas, so there's a lot more to cover left in this series. So for now, just go over these intermediate structures in these intermediate ideas again and again, and I'll see you in the next lesson.
 JW Learning, Drawing the Body, Head and Hands