Transcripts
1. Introduction: Hi, I'm Na Dene. I'm a war color artist
from Melbourne Australia. And I often get
students coming to me because they want
to paint loosely, and I am fairly
loose in my style. Having said that, I like them. Also do like a little
bit of detail. And what I want to do today is show you that you can
kind of have the boast of both worlds that you can paint loosely for
a lot of the subject, but then really focus in
on the areas that you're interested in and add as
much detail as you want. So we're going to
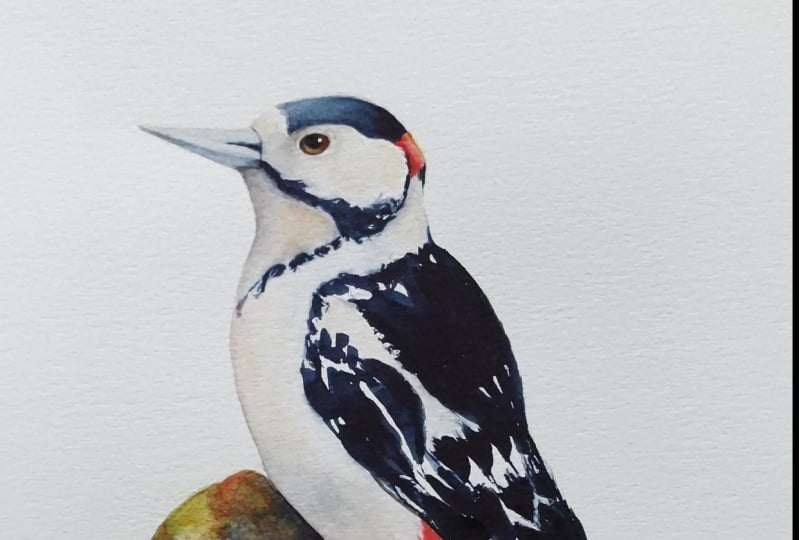
do that today with a great spotted woodpecker. And this is a lovely
one because it's got really nice contrast between the black and the
white of the bird, and you can get the wings in with lots of
nice loose strokes, just one hit, get
it on the paper, no fuss, and then spend
hours, if you want, getting the shading, getting
the detail in the face, getting a log, we're
actually painting a branch in this one and doing
the detail in that. So I'm hoping with this one, you can see that You really
need to find your own, your own happy place, how much looseness you want and
how much detail you want, and everyone will
be a little bit different, and that's okay. So we'll go through
the materials. We'll go through the sketch,
and then step by step, like always with this painting. It is quite fiddly, this one, so make sure you've got some chocolate or
some coffee on hand. And I'm hoping by the end of it, you'll be happy with what
you've got, as always, I'd love you to
pop a photo of you finished work on the
project sections for me to have a look at. So let's get started. O h.
2. Materials: Materials for today's class, first, the reference photo. Now, I've got a link to
this photo from Pixabay on the Skillshare site and the material section that
you can navigate to. I'm painting on 300 gram
Archers Cl Press paper. Now I am painting on a board, but I'm not taping it
down because I'm moving it around a lot when I paint. You'll need a regular pencil
and a regular eraser. Now, something that I
didn't really say at with the sketch is that because we're painting with
yellow and red here, be a bit careful with
your pencil lines. It can be hard to get them
off underneath yellow. As well, be a bit soft with
them around the chest, where you've got a lot of white, go easy on the pencil. In terms of paints. We're using all of this black
is Daniel Smith Indigo. The red, I've got a combination. I've got an under paint of Daniel Smith Hunts
yellow medium, and I've got some
Daniel Smith pyro red there the two
that I generally use. You could use cad
yellow cad red, whatever you've got
doesn't really matter. I'm using a touch
of Burnt Sienna. I'm also using some yellow
oak or you could use ciena. For heaven's sake,
don't buy tube, this big, you'll
never get through it. I've had that for
about five years, so I didn't know
what I was thinking. I'm also putting a
tiny little spot of white gash in the eye here. Don't go out and buy
that, especially you could use titanium white or China white or you
could just leave it unpainted if you
don't have this, so just leave the white paper. In terms of brushes,
I'm really using two, I've thrown one of
them on the floor. This is a little synthetic
size, is it a size three? It's brand new so it
has a beautiful tip. This was really nice for
getting in the sharp point of the beak and the detail
around the eye and the feet. I use that. Actually, I interchange between
these two quite a bit. Then this is just a bigger
brush that I've chosen because this one is a synthetic
squirrel taclon mix. Because the shape of that forms this nice shape of
the wing tips there. This brush, choose it depending on the size that you've
done your drawing. If you're bigger than this, you're going to need
a bigger brush, if you're smaller, you
might find that you need something a little bit
smaller than that. Now, I also use a
couple of times. You don't need this,
but I made a couple of mistakes that I decided to leave in to show you how to fix, and I fix them using this. It's just a bright
stiff synthetic, and it's good for lifting paint, but you don't really need
it for the painting. If you do it right, you don't
need this to fix mistakes. Other than that,
I'm being really classy and using
some toilet paper. I've got a palette
and a jar of water. You might need a couple of
those or you'll need to change it a few times because we're painting
with a lot of indigo, I will get dirty pretty quickly. I think
we're good to go.
3. Sketching Up: First up the sketch
for this one. Now, I am painting the log in. I'm not sketching any of
the detail in the log, I'm going to handle
that when I paint it. I want you to pay attention to the detail around the face, make sure you've got the
position of the eye right, and give yourself an
indication of some of these white to
black transitions. Because often when you're
painting something like this, you end up painting
through a bit that you should have left white, and then you realize too late that you should
have left it. White. Make sure you've
got those borders in. I'm not worrying all this
patterning in the wing. I don't want to
draw that in now, I don't want to sketch
that in because that will make me tense and slow me down when
I'm actually painting. I want to handle that
with the actual paint. Remembering that no
one is ever going to have this sitting next
to your painting, saying, you haven't quite got the striping right on the wing. I'm just giving myself the position of the wings and
I'll deal with that later. Pop in the transition here
between the red and the white. This time I am unusually for me, popping in the cloth pretty much because I'm
putting in the log. Now, if you don't want
to sketch it yourself, I have included a template that you can download
from the site if you would rather use that.
I think we're good to go.
4. Getting in the Shape of the Beak and Eye: I'm going to start
in the beak and eye. I've got a nice brand
new paint brush so that I can get into
some of those tight spots. I'm going to go on. When you
look at the beak actually, you could use a bit of
purple, a little bit of pink. There are all sort
of colors in there. I'm going to keep it
simple and I'm going to go just with some
really milky indigo. Really watery paint. Test it on a piece of paper
first, if you're not sure. What you're going to
get. I taking the water off the heel of my brush
and coming straight on, I think I'm going to
turn my hand a bit. Into the point coming down. I just got a bit
much water on there. I'm keeping it really light initially into
the front of the face. Then the bottom one
is slightly darker. I see if I can get that in, so little bit more
pigment on the top. But I'm trying to look
at the reference, trying to not touch until I get to the base of the
beak there because I don't want all of this to run
into the top of the beak. If you do touch it
doesn't it's not a drama, but I'm just thinking
there's a little bit of a gap between top
and the bottom beak. I'm seeing if I can
get that in there. You can wait until one dries before you
put the other on and you don't have to do it
all at the same time. I don't think I've got
the right glasses on. I can't quite see. I've
come out of my line now. So I've come a little bit under, but I might tie that up. Later. It's never a good sign when you make a mistake
in the first 1 minute of painting, but that's okay. What I don't want to do now is try to come in and fix where I've marked up a
bit now because I'm wet and all I do is push the pigment where
I don't want it. So I need to let that 100% dry, and I'm going to come in and put the nostri on that kind
of thing in later. I'll leave that a. Then
I'm just going to. I think I'm going to pop
burnt ser in the eye. Let me have a look if
I can actually have a I reckon that's quite brown. I'm just going to initially to show myself where things are. I'm just going to
paint in my circle. Well, not quite circle. That's just milky milky to
creamy, but cena in here. It's darker than that,
but I want to start light and then
darken it as I go. There's always say it's
easier to go dark, if you've left it too light,
hard to go the other way. With this, because it's
a circle on an ellipse, it's always good to just tilt your page up and just make
sure you've got the shapes right so you're not skewed when I'm because
we're painting flat, it can throw off your
perception of the shape. I'm going to let that
fully dry while I'm deciding whether to come in
with the red or black first. 5 minutes, 5 minutes to dry.
5. Face and Wing: All right. So I'm
completely dry in here now. And that bit that
I sort of macked up on the beat doesn't
really bother me now, so it was a good
idea to leave it. We're going to Do the hard bit. We're going to go
straight with the black. The only reason I
say that's hard is because you can't change your
mind once you put it on. We'll get that bit
out of the way before we worry about the reds. I'm going to use the small brush that I
used for the beak, and then I want something
that's got a bit more mp. I'm using this brush. It will depend on how big
you've drawn your bird, but this will give me a nice
shape in these feathers. I've squeezed out fresh paint. Now that's important
because I want this to be really strong
pigment, strong tone. I don't want to have to
go back 1 million times. I don't mind if I have
to go back once, maybe, but I want to try and get a really solid hit of
color first time round. Squeeze fresh out of
the tube if you can. Now, if I look at
the top of the head, there's actually quite a
lot of light in there. I don't want to go
too solid upper top. I'm going to paint it with water first and then drop
some pigment in. Now, I want it to be wet. I don't want it to be soaking, if I can catch, where am I there. If it's too wet, when I put the pigment on,
when it starts to dry, that pigment will push
out to the edges, and I'll get a really hard line on the top of the head,
which I don't want. I've got to keep an eye on that. I'm going to pick up a
little bit of pigment, not initially and come
down into the base. Of that shape and
just pop that in. Then I'm going to
dry the pigment off my brush and I'm going to
push it out to the edge because I want to wick up that
water so that I don't end up with the hard line. I'm just teasing it out. Now this will dilute the
pigment and that's fine. I can then while it's still
wet, drop in a bit more. It's here that I want
to keep an eye on. That's quite whipped off a
bit of that water there. Then I'm going to pick
up really creamy paint, really thick consistency,
tooth pasty more consistency. Then I'm coming
into that wet page and dropping that pigment in. What I'm hoping is that because now I've sopped
up a bit of that water, that it's going to
spread a bit, but it's not going to fully run all the way
to that top edge. I had less water on my
brush than in the page, It'll be a bit darker
at the back so I can tease that out. I'm just drive my
brush and now I'm just blending that together. Be I'm picking up
each time I do this, I'm picking up more
water off the page, so I don't want to just
keep moving that around. I want to actually get
that water off my brush. And just watching
for that hard edge. Now here it's the
lightest up here. You got a little bit
of an edge there, but not too much, and just before I
get out of there. I'm going to just go one more
round while I've still got a touch of water in the
page because I know I'm going to have to go back
in here and strengthen that. Just to help me along a bit, just a bit more
before it's drying. Now if you put that more pigment on and it doesn't go anywhere, it doesn't spread
at all, that means your page is now too dry
and you need to get out. I promise the rest of the
black won't be this fiddly. It's just this one
where I want to leave that glow on
the top of the head. If you mess it up,
there are ways you can lift paint after or you can even if you have to,
you can add a bit of gas. I find it's nicer if you can
get it this way initially. Now, it's not quite right, but I've been in there a while, so I need to get out of that
or I'm going to muck it up. I'll come back to that to
strengthen that later. Now I'm going to come down
and think about some of these starks and in the
shoulder through the wing. Now here there's still a
little bit of light on this. I'm not going to be as
fussy as I was up here, but I will drop a little
bit of water on there. I take my bigger brush. And just underneath here,
where's that white? So that's what I
was talking about. I haven't quite drawn my line. Actually, that is where
the black should be. So here is about. I nearly painted into
the white there. Be careful. All right. I'm going to just chuck
a bit of water on there, maybe a little bit through here. Not soaking just damp. Now, I'm going to keep this brush in
hand to see how I go. I'm going to come through here, put this stark in and then
move into the shoulder. I'm stalling now because
this is a hart bit. That's why I'm talking so much. Creamy tooth pasty paint. Let's see. I'm going to come straight
onto the dry paper. And I'm using that
the dry strokes there to get some of that detail in without having to
really think about it. I'm just doing
whatever the brush is giving me. I'm going with it. There's a little bit
of dark down there. Then this is where I come
into the back, where I wet. Now I need to pick
up some more paint. Now you can see that this
is a lot darker than that. I am going to have to match
that up when this is dry, but I don't want to think
about that yet. More paint. I'm going to start here where
that shoulders and come up, tidy up that shape. I haven't left a lot of light there, but I don't really mind. I might leave those
broken strikes. Bit of a mess, that shape
is going to bug me. I put water there, but actually I haven't left a lot of light, but I think I mind. I don't think I mind that. I think I'm going to leave that solid and I've got the little
brakes to paper there. I quite like this bleeding
that's coming in there, but I'm not sure whether that
will stay when I do this. I'm going to come with this
thicker part of the wing, then I'm going to worry
about those strip bits. About here, the wing is solid. I've left some whites to tell my eye that there's
some white in there, but it doesn't
have to be exactly how it is in the reference. Now, tricky bit here. I'm going to start to
bring this wing up. I'm going to paint
all these feathers in and I want to
leave some gaps. Toothpaste you paint, starting
in the tip of the wing here up down up, then I'm going to
straighten that shape out. Pick up some more. You got to live with whatever
your brush decides to do. That's it. I'm then
straightening the shape as I go. Probably a bit more
white through here. Tip, and up, tip down, and up. Tip down and up tie a couple of those up to
give I want that idea that there's a straight line. Maybe I'll just drag
a couple through. I think that's probably okay. I'm just looking at this one. Might tidy that up just a bit. Can stop for a second and take a breath. So what you can see. What I want you to
do is know that I didn't pay much attention, but I've left some white paper, given myself a few
straight lines through here to tidy up the
shapes, and that's enough. That gives me the idea that
there's patterning through the wing without having to sit and look and compare
to the reference. So that's all I want
to do for that. Now, before I let you stop, I'm going to come back
to the top of the head because it bugs me that
I don't match here yet, so I want to sort
that out before I worry about any of the rest. Now, I'm not going to write now If you've got a lot
of pigment on your brush, you don't have to wash
that off right now. You can use it in here. You don't have to switch to the small brush because it's always disappointing washing
all that pigment off. What I want to do up here, I want to strengthen the black
at the back of the head. I'm going to go on to
I'm fully dry up there now. I come on. Paint onto the
back of that head. Then I'm going to wash my brush and I'm going to tease that up. I've got to keep washing
my brush and dilute the pigment as I'm moving
up. Wash it again. I'm painting my tissue as I go. To get rid of the excess. I'm just working
with this wet edge. Again. I want to come over the entire area that I've
painted so that I don't get. You can't see the difference between the first
and second washes. Sometimes you don't notice when you're actually
painting it, and then you realize
you can see a big line. I don't want to make
decisions about how much more to put in there until I finished all the rest of
the detail in the face, because I might decide I
need it lighter darker, but it's too soon to tell. Now, because I feel slightly
tense after doing that, I'm going to make a coffee while this dries, give it a good ten. Maybe you go have a
coffee as well or perhaps tea if the
coffee makes a jittery, and then we'll come
back and start to work underneath the tummy here.
6. Tail and Chest: It's been about 20 minutes
for me and I'm fully dry. I think what I'm going to
do is pop in this tail, then come into the chest here. Now for the tail, I don't
want to paint into this wing, to make it a bit easier for me. I'm just going to wet down a bit just underneath
at the top of that tail so that my pigment can wick up a bit and I've got
a bit more control. Then I take my bigger
brush. I do the same thing. I'm going to push my brush down, come up, down, and come up, and I know sorry you can't
see under my hand when I'm doing this spotty one, but then I'm going to just leave a little bit of
dry paper in here. We'll see how we go. I'm
coming my tip of my brush, I'm going to come right to
here and then paint up, and then I came thicker
than I really needed to. Now I'm going to do that. Then I might switch to my
smaller one to now just tidy up my shape. Because that was wet, I can now get in here and drag
pigment up and tidy up underneath here without
having to worry about painting that stroke all the way through and painting
it into the wing. I don't mind that
little spot of white. I might leave that. Now, I need to be
der underneath here. But I want to do
that at the moment. I've got the shape.
I'm happy with that. I can let that dry, then I
can come and fix it later. I'm going to come
into the chest. I'm going to clean my big brush. You might need to
change your water. I'm going to paint down with
water in the tummy here. S down to where
that red join is. Now, all the way up here. Because this is indigo, this is going to keep bleeding. I can use that to my advantage. I can touch to some of these edges and get a little
bit of pigment bleeding. If you can see here, it
might be a bit hard to see. But I've just got a
little bit of bleeding. See if I can get
some to move down. There we go under the wing here. I'm just going to tease that
out because I'm looking now to try and get a bit
of three dimension going. Coming down to that red. I just want at the moment,
just soft bleeding. Now there's a bit of red. I reckon a little we
can get away with a little bit of
burn through this. I'm just going to soften
that. Edge there. I'm going to take a tiny bit
of piral red and just drop. My page wasn't wet,
switch my smaller brush. I didn't have much water there. I'm just going to want a
bit of water over that. I've probably got a
bit more than I want, so I'm going to just take a bit of tissue and
just touch to it. Bit more water. I want it messy. I don't want to overthink it. Want a bit of a blush because I can come back and restate that later if I want to. Now, I'm just going
to chase that. Because I've got pigment there, I'm going to get a hard edge
where I meet my dry page. I'm actually going
to wet down with my smaller brush all the way
underneath the neck as well. We'll do all of this
at the same time. I think my beak
probably stopped a bit earlier than it
should have been. Wetting it down into that indigo to get just
a bit of a bleeding. And I might have to
tidy up my beak. I'm just walking water around, letting it do it thing, getting a bit of softened
hard edges in there. All of this is a bam. While that's a bit damp, I'm going to a bit of bit of burnt sienna into that we page. I probably a bit
under here as well. Oh, I picked up I must have
some bandi in there as well. Just that little bit of warmth. Again, being really messy. Touch into the
Indigo. That's okay. This is all about soft
soft building up to it. Now, I think I want. I might at the moment, I've got color in
here, nothing up here. I'm going to do a similar thing now
coming around the head. Around the face, I'm
just going to wet down that whole area, around the eye. There's red up there that
I haven't put in yet, and over this part of
the forehead there. Now, when I look
at the reference, this is white, but there
is some warmth in there. I'm going to start with a
little bit of burnt sienna. Into that wet page, I'm just going to drop a little
bit of that burnt sienna. Just drive my brush,
move it around. Just a touch initially. Then again, I'm
going to make use of the pigment that's
already in the page, touch to that indigo edge, and just let it bleed out a bit. I'm going to drag
that under the eye. Slowly building up a
little bit of form. I re there'll need
to be a bit of warmth in the back here as well. Again, a bit more
of my too much, so I'm just going to
get a bit of water and just flood that. If you put that on and it was
way too much, that's not, but you can just
touch your tissue to it and back it off a bit in touching randomly
to that indigo. I do this really slowly
and deliberately so that I can decide how much
I actually need. I'd rather go a bit at a time than try and
have to back it off. Now, I need stronger underneath
the beak like a shadow. I'm going to pick
up a little bit of my sienna and a
little bit of my indigo together and form a bit
of that gray bit browny. Drop that. Wash my
brush and blend it in. Really nice and soft. I think maybe I want that a
bit bluer than the brown, so I might drop a
little bit more indigo. I just pick that up from the
stripe there in the face. But I want to transition out. I want it darkest
underneath the be here, and I want it to softly transition out and come
a little bit lighter as we're coming down
the chest into here. Now, I think I
probably need to put the red that's throw me a bit. Now, I didn't do it here, but underneath this red, I want a little bit
of yellow first. I tend to paint
yellow underneath the red just to keep
it a bit brighter. I've got some hunts
of yellow in here. I'm just going to paint that in. Now, here you want to be
careful to try and not to touch your indigo because it will
bleed into the yellow. You get a mucky yellow,
and that's all bad. I'm not going to
paint the red yet. I'm going to do this
yellow under wash first. I also going to do
it while I've got it out in this tail area as well. I'm going to take
my bigger brush, I'm going to go
straight onto dry paper with the hunts yellow.
This is dry ish. Now it doesn't matter
if it's a bit wet and just paint where I think
that red is going to end up. Again, trying not to touch. I don't want to touch yet
too much to that indigo. I'm going to let that dry
and then I'll come back in. I'm just looking now that
I've got my eye in there. I think I probably need to
add a little bit of stuff in here because this is
bright white paper. This is now not, and here
we're bright white too. We need to back that off a bit. I'm just going to wet
it down just a touch. C. Touch a bit to
my indigo edge. And I'm also just going to drop again a little
bit of that warmth, ale bit of the burnt
sienna in there. Now, that probably
wouldn't matter as much if you were doing
a background here, if I was painting
all of this green. It wouldn't matter so much
that I got something in here because I'd have the contrast between the green
and the white paper. But because I'm not, I
need a bit of something, even though in the reference,
it's bright white, or it will be lost against
the white of the paper. I'm going to give
that 10 minutes before we come in
and build up into that and then we're
going to have a little look at the
foot and the log.
7. Adding the Red and the Feet: All right. I'm dry, but I'm going to just fix up. Hopefully, you don't
need to do this because you did it right in
the first place. But I just want to show you
this is bugging me here because my beak should really come out just
a little bit more. I've cut it off a bit. What I'm going to do, I'm just
taking my flat oil brush. I'm just going to
see if I can lift that back a bit
and get the shape. This depending on
what paper you're on, because this is arches, it pretty happy
with being lifted. Not all paper will lift. I know it's a little thing, but every time I look at
it, it was annoying me. I think it's important to
learn how to fix stuff, not just paint perfectly. I think I'm a bit
happier with that. Now I'm going to do? I might put in the
pupil. And then we're going to come
in and do the reds. Now, my pencils a little bit heavy and that can be a problem, particularly
under yellows. Normally, I would
try and rub off the pencil before I got
my yellows and reds on, but I want you to be able
to see where I'm going. Just be a little
bit aware of that. I'll try and remember to
say that of the materials that you need to be careful
of your pencil lines. I'm just going to
pop a pupil in. Guess. I'm going to take my
small brush, bit of indigo. We are going to go darker
around the top of this eye. And also again,
that thing tilted up so that you know that
you're getting the shape. If you circle, that circle
is a little bit messy. But what I don't want
to do is try and chase. If I keep now trying to tidy
that up while it's wet, I'm just going to keep getting bigger and
bigger and bigger. I'm going to leave
that and see how that settles in. Let's have
a look at the red. Clean my brush.
Get some pyro red, and we're going to
do this bit first. Straight onto the dry paper, picking up a bit of my pyro red. Not too much water on my brush because this is a small area, and I'm just going to
paint that's too wet. That's a beautiful new brush, but it holds an
awful lot of water. This is like the of the head. I want it M red is going to
be more solid on this side, bit lighter coming out
to the back of the head. I've got to keep
washing my brush, taking the pigment off so I can tease that if I want
to keep any light. Again, being really careful of that indigo because
that will bleed. Again, you might
not be able to see, it's such a small thing, but I'm a little bit
lighter on this side. I'm going to just t up
that little gap in there, a really chunky paint there. Tidy up my shape. Now you can put little flicks into the white here if you want. I can I've left
myself enough room. In there, just to give yourself
the idea of feathering. That's all I'm going
to do for that part. There is actually
a little bit of black here on the
back of the head, but I can't do that
until this is fully dry. Now I'm going to come
into my red here, switch to my bigger brush. And my reference.
There's more on. Let's just wing it.
Picking up some pyal red, coming onto my page. I've got to cover that
whole Yellow wash. It's a bit messy in here. I'm just going to
drag a few flicks up. That's just how effective those are depend on what the
tip of your brush is like. Test it out before
you pick which brush, make sure you can get
those nice shapes. There'll be a bit of
dark under there. Now, again, I haven't quite
followed I've made it a bit tidier in there than
it actually is on the reference because
I don't want to fuss. Just trying to see
if I can cover My yellow there. You can see here, I do want a bit more light. You can see the yellow
pushing through. I'm just going to go a little
bit more pigment up here. Now there will be some shadows and things
to go under there. I don't have to get
to busy and if you're starting to fiddle,
you need to come out. We'll see how whether
that drives dark enough. Now, one more thing
before we take a break. I'm going to start the feet now. I'm going to wet
it down first with some water and then
drop a little bit of indigo in there a
funny color actually. I'm going to do the same
thing as I do with the beak. I'm just going to assume
that it's indigo. I've got my small brush. I don't want to get fussy. I'm just going to drop a
little bit of water in. No soaked, just a
touch of water, then I'm going to get a
little bit of indigo. Start under the shape, and just let that pigment. Run around and do its own
thing to stop me fussing. Some of you will do really
detailed beautiful feet. That's fine. You go for it. I just hate putting in feet. I just tend to
suggest them rather than get to hung up on it. Again, I will drop
a bit more pigment down underneath and
looks on that side. I'm looking at the reference. I just want a little
bit of variation. Then I'm going to
put in the clause. I'm just going to
stick with the indigo. What does that one do?
That is a funny one. I probably said it for
in others of my lesson. The reason I don't tend to do feet is I don't tend
to do backgrounds, and if you do feet, you then need a log or a branch or something
to anchor it to, which isn't how I tend to work. That's all. But I
know some of you will delight in doing this. I think I'll worry
about whether it needs more dts and things once we put the log in. I'm fiddling now, so I need to absolutely need to stop that. I'm going to come out of that. Let that fully dry
because then I want to start on the log before
we do anything else. Then we've got all
the bit more shading, the shadows, some of
the smaller details, but we'll get this
larger shape in next. Give it a 5 minutes to drive.
8. Adding the Branch: I'm dry again now. I'm just
going to pop in this log. Now, this log has got a lot of different colors in
it and absolutely, you can decide what
you want to put in, whatever your
favorite colors are, you greens, you browns, grays. But I'm trying to because I don't want to tell you to
buy a whole lot of paints. I'm trying to keep
the palette simple. I'm actually going to use
the colors that I've already been using so far. I'm going to wet this down. Be careful under your foot. You can just do this roughly. You don't have to
get it perfectly chiseled out initially. I whacked on, where are we? Just damp. Then I'm going to throw in a
bit of my burnt sienna and just do its own thing. Just looking what
happens where it comes. What I want to use in here, mix of wet and wet went into dry and cauliflowers
basically forcing blooms. To do that, I need to
get enough pigment on to be able to
force the bloom. But down here, I don't want
the log to look cut off. As I'm coming down here, I'm just dragging a few strokes. That disappears without I don't have a really
hard line across. Now I'm going to pick up maybe a bit of indigo into some
of these darker spots. I'm thinking about where
that shadow is forming. And I'll probably put a bit
of that underneath the foot. I've come a little bit
into my tummy here, but I'll deal with that later. We just want this
all nice and wet and wet and soft initially. Then I'm going to
grab as it's drying. I'm going to grab a few bits of my burnt sienna and chuck
some really hard scena in. Again, I'm just looking
for variation and I want the paper in the
pigment to do the work. I don't want to overthink this. Then I'm also going to put in. I'm going to make a little
bit of the green with the Hans yellow and the indigo, just because that's what
we've been using in the bird. Just touch, see what
of green it makes. Bit of an olive green. I'm just going to throw
that around the place ale It's darker on this side, so I'm going to grab a little
bit more of my indigo, a little bit more of my Bensena. You've got to remember
this well all mix together and
do its own thing. You can have a couple
of goes of this. You don't have to get it all in. But this is also a bit about seeing what
the timing is like. When I can force coul flowers or blooms versus when it's just
going to form a flat wash. I'm going to come and pop
some dark while it's drying, bit more dark under here. I think I might switch
to my smaller brush now. It's getting a bit
tricky in there. I'm just chiseling out now the shape a bit
more carefully. I might make use of the
bit more bent sienna. Let's say, you can use
whatever colors you want. I just I'm conscious of making you go out and
buy a whole lot of paints. You can write what when you post your picture,
you can write. You can see I keep
encroaching into the chest here and I'll show you
with my hard brush how to get rid of that on it. I've got a bit of a hard
line forming there. I'm going to make use of that
maybe set up a little bit. I'm going to see if I can add
bent sienna through here. The Bent sienna and the
indigo should form you a nice dark when
they're together. If you start thinking, I don't know where to go, I
don't know what to do, just come out, let it dry, and then you can
add another layer. It doesn't have to all be in. I. I'm going to pick
a bit of my bca and a bit of my indigo and just drag a couple of
a few little lines. Now, right now, I
don't want to add too much more pigment because I can feel I'm getting
a bit fiddly, but what I want to do
is now I want to think about forcing some blooms
to add a bit more interest. A little bit of water, test out a few areas and see whether
it's going to do anything. If it's too wet,
nothing will happen, if it's too, nothing
will happen. This is that if you
did the i lesson, that timing thing of
working out what happens, depending on how much water
you've got on your page, how is in your brush. Se here when I put that's dry. When I put the water on
there, nothing happens. When I put water on here, I'm still pushing blooms,
a little bit there. How long you've got to do this, how long you can play, as I've said before, will depend on how warm your room is. If it's really warm, you're not going to
have long to do it. If your room is freezing, your paper is going
to take ages to dry and you'll have
quite a while to play. I just about have to get out, but I'm just going to see Just
a few more bits of random. Seeing how your paper
is going to behave. I've been in there a while,
so I probably need to stop fiddling now and I
can come back and fix up anything I need to later. I'm going to come
back into the eye. I can't do the chest
yet until I deal with this little bit
that I've Med up. In the eye, I want to go darker. I'm going to get a mix
of ciena and my indigo. Make up a bit of a puddle. I'm just going to
darken around the top. I'm going to wash my brush, take off the pigment,
and then test around. I want a little bit more
light at the bottom, than the top, not as much
light as I've got though. Backing that off. I don't want too much water in
here as I'm teasing it. If things start to move
in here, it's too wet, just come out, let it dry,
and then you can go again. That's why I didn't worry too much about fixing
that the shape of my pupil because I knew
I was going to be coming in and mucking in here. Now, because I
came out of there, this is nearly dry. I
can see you wether. That I think is nothing
much now is going to happen if I add
water to that. But I need that
to fully dry now. I'm going to come out of
that for a good 10 minutes or until this is dry to touch, and then we'll come back
and we've just got lots of little details to add it doesn't have enough
form at the moment, so getting the shadows
and rounding it up. But time, take a break.
9. Building Form: I'm fully dry. Before
I do anything, I've got to fix up that bit in the tummy.
I've got my oil brush. I've just cleaned it, taken off the water, and I just want to
get that shape back. I just got to keep cleaning
it, and lifting the pigment. Or the fiddy bits to go now. Well, that was all fiddly. But there's no
dimension to it yet. Bits and pieces to do now. First thing I'm going
to do, I'm going to add that little bit of black that's
at the back of the neck. Straight into my indigo, and just onto dry paper. Pop that dark. In. Then I want to darken
off the bottom of my beak and put
in the nostrils. I'm going to take milky indigo, and I'm just going to
paint onto dry paper. Now, something I did mention
before I started this, I've just because I've actually been away from
this for quite a while. I've just rubbed off all my pencil lines
so that I can see, which is why this looks
really white there. I just tying up. I'm just letting
that indigo bleed a bit into the area
where I fixed up. Then I need this
nostril on the top. To do that, I'm going to
just put a bit of water. D. Then I'm going to get my tissue. Touch it to that because I
don't want it super wet. Less water on my
brush than my page. Bit of indigo. I'm just
going to pop that. In. Didn't really I dried it
off possibly a bit too much. I'm just going to I just want
a little bit of bleeding, so wet my brush again. Just run my damp brush
just along either edge. So I get just a little
bit of a soft spread. I tease that out a little bit. Now, this here because I rub that pencil line
off, that's disappeared, that shape of the head, so
I need to put something on there to show where
the forehead is, so I'm just going to go
with some burnt sienna. Wetting down, and
I'm going to take just a tiniest bit of burniena, and put that into the
front just so that you can see that there are
feathers there. And you might not
need to do that. Yours might have bled enough when you were mucking
in here before. I think there's
probably a bit of dark between the join here. I'm just taking a little bit
of indigo and I can just pop touch a paint in there. Really little things, but little things like
that can really help. Now, there's a little bit of deep more detail around the eye. I've got a bit of a white line that I don't mind
around the eye. I think I want a
bit around here. I'm going to just take my water. I'll leave that white
above the eye there. But I'm just going to get
a bit more strength of pigment in this area at
the front way around. I might be able to
pick up to a mix. I'm picking up some
pigment because I've just touched to
that indigo edge. And I might just grab a ble bit of burn sienna in there that's
mixed with my indigo. Again, I'm doing it wet and wet, so it's nice and soft
and not too controlled. I still probably want to drag it just a bit more underneath. I know I keep saying
it, but you don't have to get all that in now. It doesn't matter
if you do it and then decide you need more. You can put someone
let it dry and can come back to it and see
how you feel about it. I talk about balance quite
a lot when I'm painting, and now for me, that I need that color and
that it needs to match under beak here on the throat. I'm going to do the
same thing. Make sure you're dry underneath the beak. But I'm going to
do the same thing. I'm going to wet down a bit. I'm just going to strengthen this dark underneath the chin. Just wet it down. I want to match the
amount of brown and blue. I have to this area here. I've picked up a
bit of my brown, bit of my indigo, softly dropping that in and
teasing it down. Still think my beak
might need to be darker, but I wait until it's all dry. Washing my brush,
teasing it down. Now I need to do some
of that around here. Before I do that, I want to do the shadow on the tummy here. It's quite dark along here. I'm dry now where
I've corrected, so I can wet this down
and pick up the same, the burnt sienna and the indigo, and whack that
into the wet page. Also lets me tidy up if my shape along that chest was
messy, I can tidy that up. I still don't think
that's strong enough. B, the blue and the brown. I'm going to chisel
out a harder shape in there once it's dry. I'm going to come in.
Doesn't matter if the red moves a bit. That's okay? It's pretty dark every time I look up and then I
look at the reference. I think, actually, there's
quite a lot in here. There's also quite a bit of I
don't know, it my eyesight, but it feels like
there's a bit of a red glow still
through his chest here. We might add a little
bit of that in. Just for fun. Pick up the tiniest bit of pyro re
and just put a touch in. Comes in through the
cheek there too. Still not dark
enough. It because I know it's going
to dry lighter. I still need a bit more mph. Because I've got a few
minutes while it's drying to muck in there
before I get into strife. I can touch to that wing and
lend some of that into goo. Up here. Now, down here. I'm starting to curve this
around with this shadow. It probably isn't strong enough, but I actually want to
put the dark underneath here before I decide if
I need more on that. But I want to this is
quite two dimensional now. I want to work on
this. Now, here I want darker underneath
here as a red shadow. To do that, I'm
actually just going to use a little bit of my
piral red with a touch of indigo in it to make my shadow color if I can find a clean spot on my
palette to do that. I'm just making a
slightly deeper s. Red. I'm going to come
onto dry paper now. The red is tricky. It will move on you. You've got to be a little bit delicate. Doing this. It's one of my least favorite
colors to work with. I'm just drying my brush,
softening that back in. Again, whether or not you
need this will depend on what that first was looked like you might have a
nice transition and not need to put anything more here. Nearly, just slightly darker. I think I'm just
going to restate. I'm looking at I can see
quite a flash of yellow here. I'm going to just use a
little bit of yellow. Just blend that in where
I want this light here, just to restate so that
it talks to that a bit. While it's all wet,
just throw that in. Just about need to get out of there because the red lifting. It's tricky. Red is tricky. I'm going to close
up that light. I'm going to let that dry. I'm going to pop a high light in the eye in the back
of the eye there. I've got a little
bit of white gash. I'm just going to
stick my brush in. And that was meant
to be a circle of. I did a blip, but anyway, a little highlight there. And then just seeing whether
I can get in there yet. I don't think I can. I
have to let this dry. We're so close. We need to work a
little bit in here. I probably need a little
bit of yellow ochre around again just for
the idea of warmth. The other thing I just
noticed as I've sat back. Again, this is really
bright white and that's the only other place
that it's bright white. I need to Muss this up ale bit. But I'm just going to w
on a little bit of water, and I just need
just to back that white off just to touch. It doesn't all have to be but I don't the contrast if
I'm too white here, that's where my eye will be pulled and I really
want the eye to be pulled up to the
face and possibly. I'm just thinking I probably
need to match that. I'm just going to
pop a little bit of b in here in there because I want that color to
talk to that color. Just to back it off a touch. I have to come out of
that so that we can get these last shadows in down the bottom here and
decide we wear finish. I know it's fiddly,
I promise it'll be worth the pain in the end.
Come out and let that dry.
10. Are We There Yet??: What I want to do now, I want to add I want to strengthen the darks that we have underneath here, probably need to play
a bit in the foot. I'm going to go wet and wet, so I'm going to wet down underneath the tummy here
onto the top of the foot. Damp. Then there's quite a bit of dark underneath here as well. Try and be careful of
chiseling out your foot. Now I'm going to
pick up a bit of my burnt sienna and
a bit of my indigo. Just going to drop
that bit more indico into that wet page. I wash my brush, just want to tease that down. I after this soft edge up
here as well and that I might tease up to where the chest is sitting
over log there. If as you're doing that, the pigment disappears on you because you're
diluting it out, just grab more while
it's still wet. And drop it in. I'm just chasing that edge so
that it's nice and soft. I don't want this
hard transition. I just got to keep washing my
brush and softening it in. Now I need to do a bit of that same dark underneath
the foot here. I'm going to do
the, I meant to do I've got paint on the edge
of my water container. Coming under wet that down. Close in that little
white and take that mix. I' going to drop that.
Underneath the foot and let it do its own thing. I need to get a bit of
that color underneath so it settles in a bit. Now I've actually got more
brown than indigo in this. I'm just going to take a touch
more indigo. Chisel out. Shape that's where if
the shape of your foot, you haven't got it
quite how you want it, you can tidy it up now, chiseling out the shape. Then I need to back down. This is a little bit bright. I'm going to take my same
indigo and Bert Sienna. I'm going to go a little bit
milky and onto that foot and just Te it down just a bit. This is just a
little bit to white. I might get a little bit more. I've got a mix of wet on
to dry and wet on to wet. It's got all the it's quite
rough scaly skin there, so you can probably just drop in a few little
bits of paint to suggest that it's a
bit gnarly. In there. Couple of This potentially once it's dry, might
need strengthening. But we've been here a long time. I'm not sure how I probably wouldn't fiddle
with it today anyway. What I do want to
do? I want to pop a little bit of yellow och. I just want a little bit of
something through the face. I've got a wet brush,
clean wet brush, just dampening that, take a little bit of
yellow och or ci. And just a little bit
of messy through there. If it's too much, just
touch your tissue to it. Again, I'll take a photo of
this so that you can see it, but it might be a
bit hard to see. But I've just got a little
blush of color there. I'm going to do a little
bit of that here. Same thing. Nice wet and wet. Then I think I'm just
going to work through these white areas and
just add a touch. Remembering as well that it will dry lighter than it appears here. Just a bit. If it's too much, just put your tissue to it and
back it off a bit. I think I'm going to have
to put some up here to reconcile what's
happening in the back of the neck here. Wet that down. Wash my brush. Back that off. When you do that, when
you touch with a tissue, because I've had this tissue in my hand for ages,
just be careful. Sometimes you'll do that and you'll have a big lump
of paint like that and you end up popping a bit of paint that
you don't want. Do change tissues before you da. I I reckon I am going to have to strengthen in there.
I will do that now. I'm not quite dry in there. I'm just going to see if I can add strength pigment just a bit. It's just dry a
little bit too light. You can wait until
this was fully 100% dry before you did that, but just because I can see already that it's going
to dry too light, and I'll do it era
here too, I think. Just a bit too bright. Then I think I'm going to just restate just a little bit of the dark under pop that
on, wash my brush. Just want a bit more ph. The only reason to
be doing all this is to just try and
settle that down with these shadows
is trying to settle the bird down actually
onto the log. Then I think I might wonder
if I should. Let's see. I might just at
the slides bit of a shadow underneath
this wing here. I just picked up a bit
of indigo burnt sienna. K putting a shadow under there. When we did this tail, I thought I was going to
make that darker and I probably I'm going to use that
to make a shadow as well, and then we're done a promise. I'm just going to extend
that. Wash my brush. Because all I'm
trying to suggest there is that that feather is sitting over this tail and I quite
like that flash of light, so I'm going to leave that. I think I'm finished. No, I could go
darker in the beak. But I quite like
the light in there, so I would probably
wait until this was fully and decide whether I
needed anything in there. Okay. So that's where I'm
going to put my brush down. So I hope that I've shown you, it's a real combination between fussy and detail and
then loose strokes, but you can get the
best of both worlds, and you can focus on
the details that you like and ignore the
ones that you don't. So when you finish your
painting, if you're happy, pop a photo up in the project section
for me to have a look at, I love seeing them. And I'd be interested to see I know that
there'll be lots of you that do a beautiful
job in this log a better job than I've done, so I'll be interested
to see how you go with that and pop the colors that you've used up
there so I can see. Okay, thanks for joining me.
 Nadine Dudek, Professional Watercolour Artist