Transcripts
1. Introduction: Hi, I'm Nadine. I'm
a watercolor artist from Melbourne, Australia, and today I want to do
another class with you that's all about using wet and wet and a nice loose technique
and combining that with a small amount of detail to
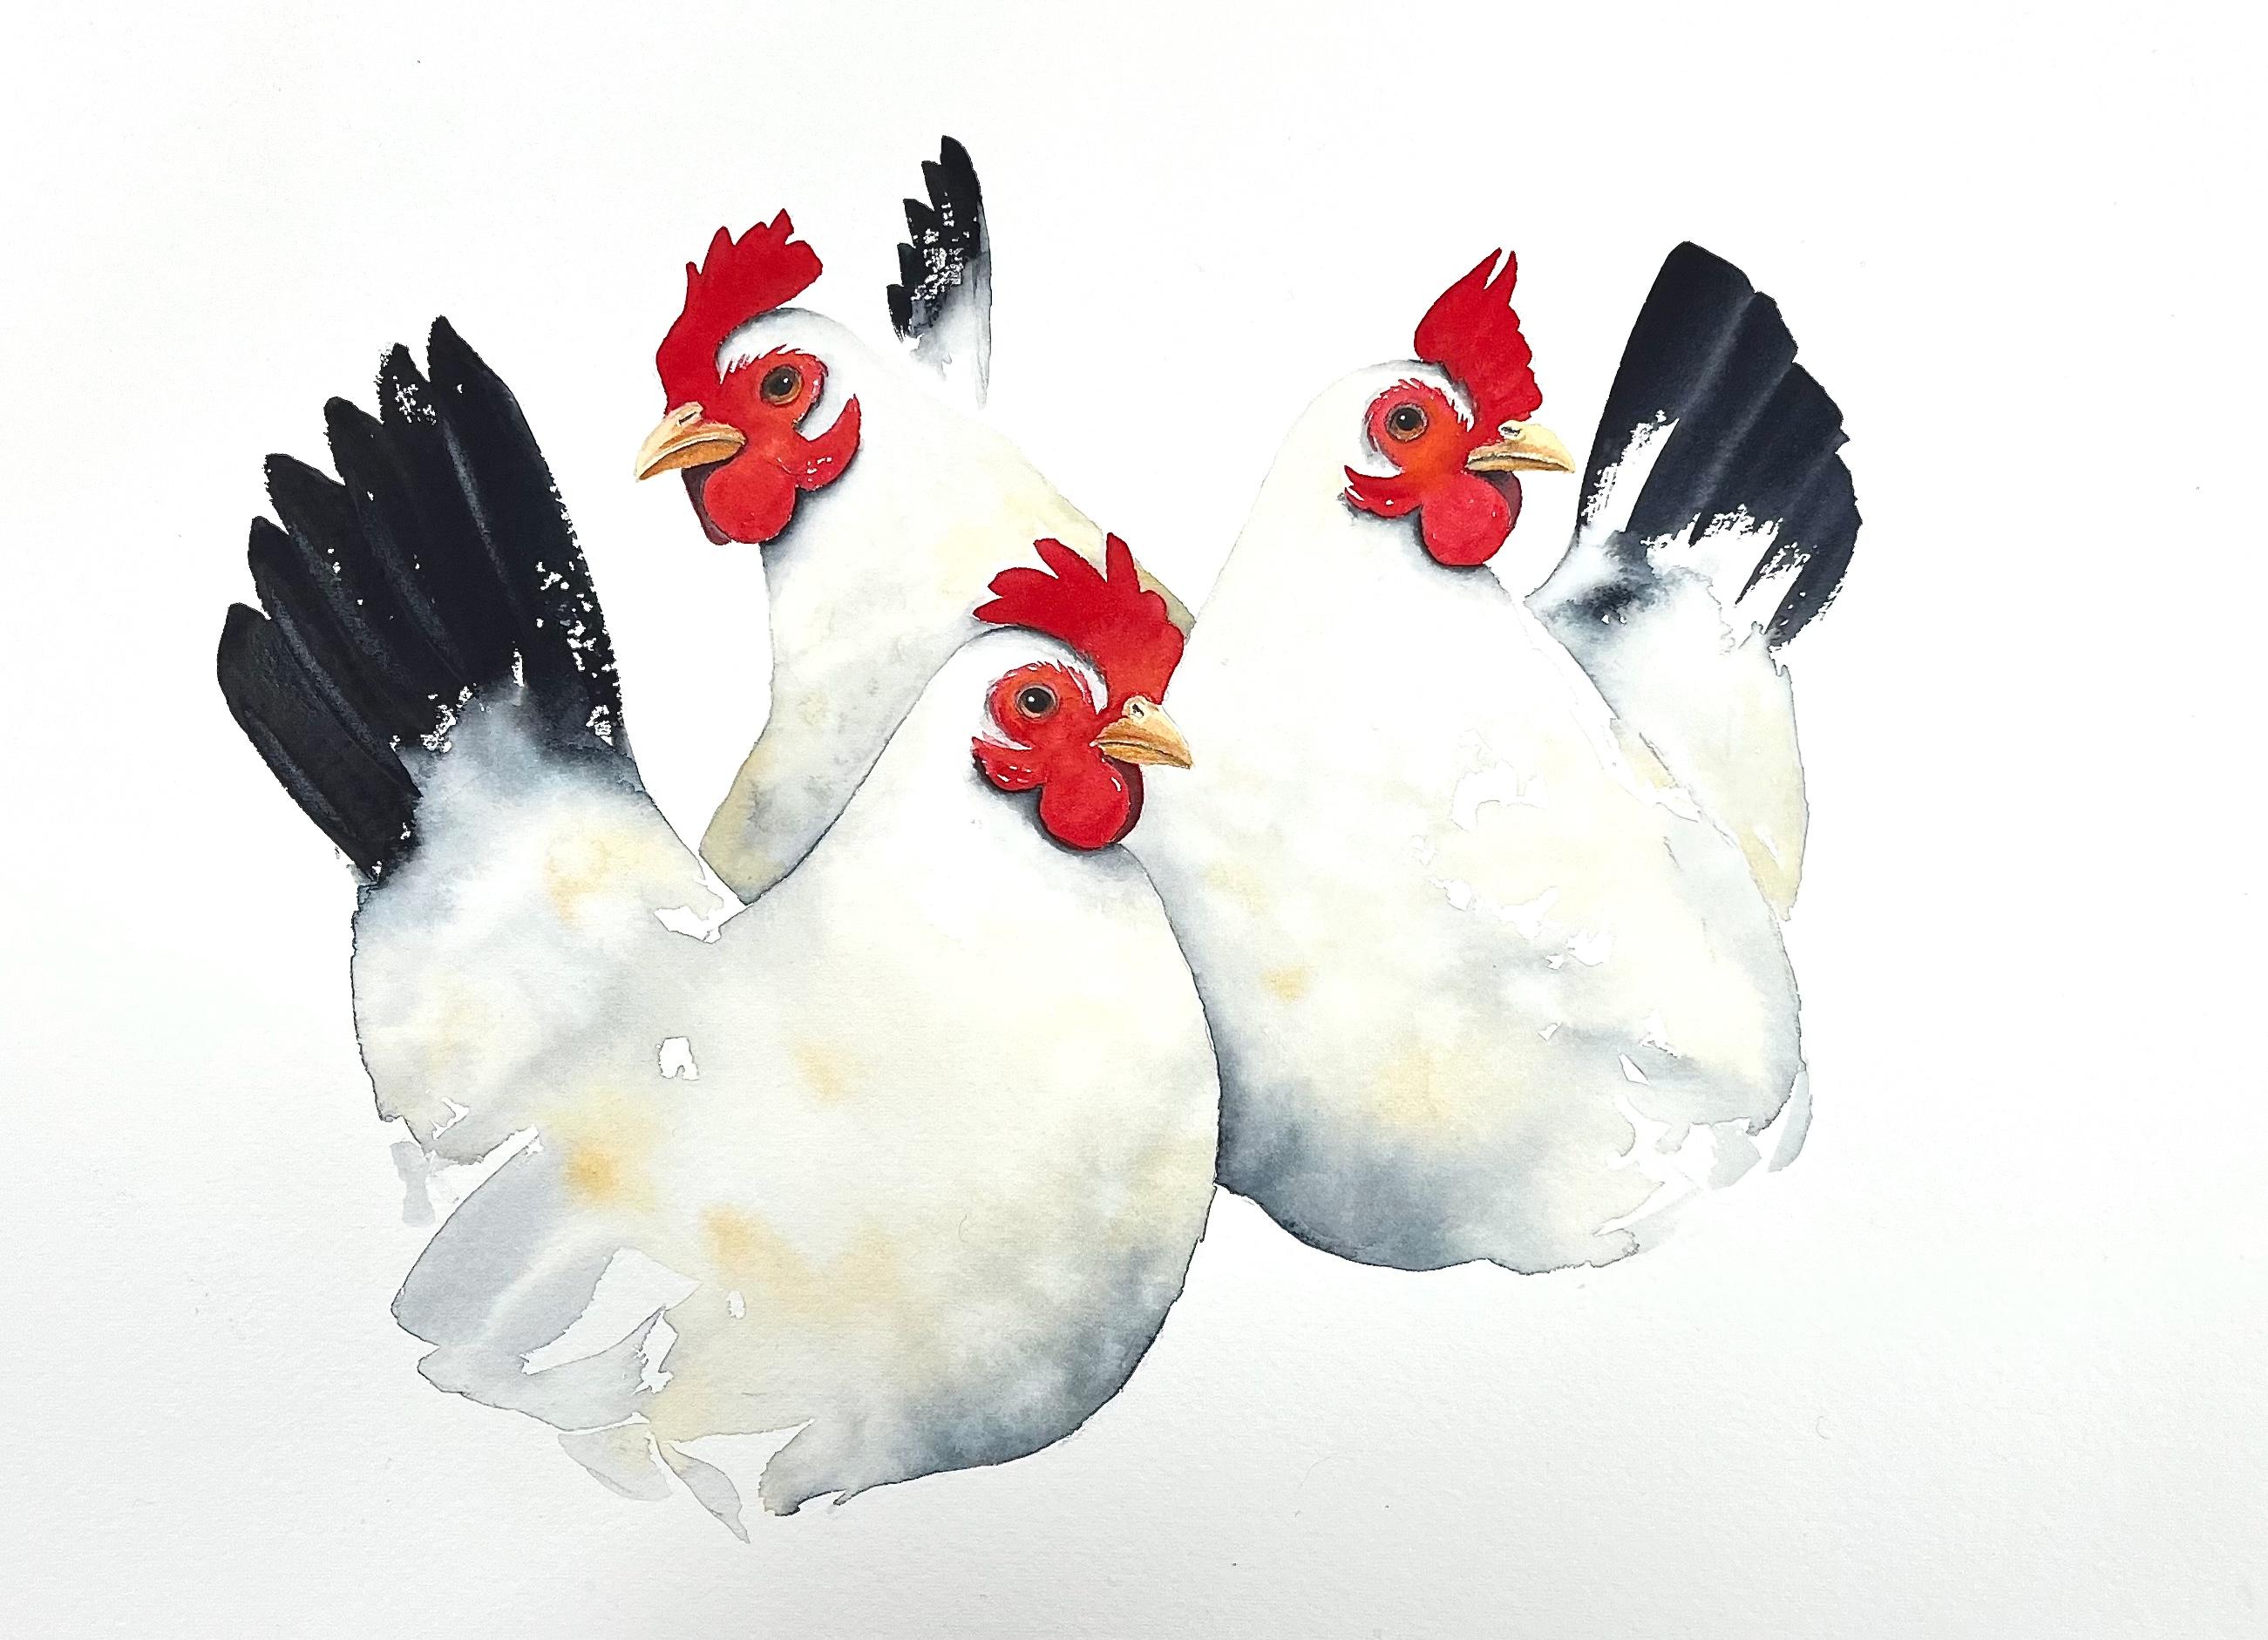
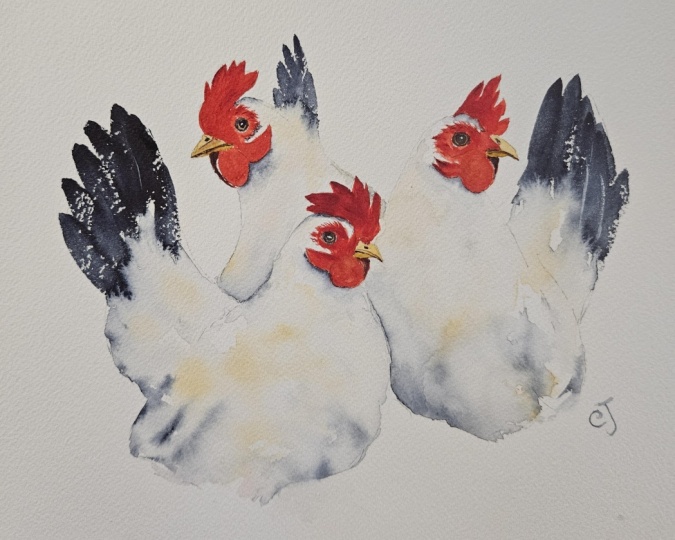
really make the painting pop. Now, this one, we're
painting some chickens, and I'm making it
slightly harder by putting three together.
We're not just painting one. Often I just paint one, largely because less room
for error when you do that. But this one got three chooks, so it gives you
the opportunity to work with making shadows to get the subjects to sit together and using lots of little details
and making sure that they're the same on
each of the chickens, which, you know, that
can be quite tricky. So for that reason, I have
set it to intermediate, but it's not a very hard lesson. It's just for me
probably a little bit longer than most
of my other lessons. So what we'll do is we'll
go through the sketch. We'll go step by step
through the painting, and I reckon you'll end up happy by the
end because you can't really go
wrong with chooks. They're hilarious and
they always look great. So let's get painting.
2. Materials: Look, we'll go through the materials first
up for the class. Now, the reference photo, mine has seen better days. I knocked over my water and I can't bring myself to
print out another copy. Now this is my photo. It's three photos put into one, and you can download
this directly from the Skillshare site. I'm painting on 300 gram
Arches called pressed paper. I'm painting flat on a board, but I'm not taping it down. You'll need a pencil and an
eraser, in terms of paints. So I've got a few. I'm using some Daniel Smith for the face. So I've got par reg and I've got some Hansa Yellow medium. For the warmth through
the body here, I'm using some Winsor
and Newton yellow oka. You could use asiena
would be fine for that. Now for the black, I'm using Art Spectrum
Paynes Grey for that. Now, depending where you are, you mightn't be
able to get that. So if you don't have Art
Spectrum Paynes Grey, gosh, that's hard to say. You could use some
Daniel Smith indigo. It's very similar. The brand does matter
for the indigo, um some brands, they're beautiful, but
they're much bluer. I find that the Daniel
Smith is nice and black. Other than that, you
don't need to buy this, but I've just popped
a little highlight in the eye with
some white gouache. Brand of that doesn't
matter. For the brushes. I'm using three main ones. You probably won't
need to use that one. I've got a nice big sized well for getting
around the bulk of the body. This one is for getting the little combs in and then this tiny one for the
detail around the face. Now, I also did lift
a little bit of paint using this bright stiff
synthetic just through the tail. You might not need to do that, so you don't necessarily
need this brush. Now the details of these
are on the Skillshare site. Other than that,
you'll need a pale some tissues and a pot of water and maybe even two pots of water because
with this black, we get quite dirty and I kept not going to
change my water. So if you've got a couple of pots, that's probably better. We'll move on to the sketch.
3. Sketching Up: Okay, so we'll have a look
at the sketch for this one. So first up with the
reference image, what I've done here, these are three
different photos of the same chicken that
I've pasted together, and it's something that
I quite often do because it lets you play with
the composition a bit. What that does mean is that the lighting
will be a bit off, and we'll have to
make up the shadows, which is, I don't know, I find quite liberating being
able to being able to bet. So with the sketch,
what I want you to do, I've actually gone a
little bit larger than the reference photo. You can do it whatever size you like. It doesn't really matter.
Keep it nice and simple. Don't get stuck
on the details in the feathers in here or how many tail feathers,
anything like that. But do pay attention to the shape of the beak and
the positioning of the eye. That's really important
to get that right. But keep the rest pretty simple. If you don't want to
sketch it up yourself, I have included a template on the Skillshare site that you can download and use that.
So we'll get painting.
4. Starting the Beaks and Eyes: Okay, we're going
to start off small. So we're going to
paint in the beaks and also the first
wash in the eye. We're going to do them
all at the same time so that the colors match sometimes. I think if I were to do one chook and then come back
and start the next one, the chances are
the mix that I use here won't be the same as the mix that I use
on the next one. So I do like to do them
all at the same time. So I've got a
really small brush, and I'm going to
take up a little bit of milky consistency
Yellow Ochre. Or you could use raw sienna. I'm just going to
pop a bit of a wash. That's quite dark. I'm just going to back that off and make it a
little bit lighter. In the beak. This is probably
the trickiest bit because the beaks got quite
a sharp points. Now when I put the
bottom one in, I'm going to leave
just a slight gap between the top and the bottom, 'cause I'm going to go slightly darker on this bottom one. It doesn't really
matter if you touch, but just that's how
I tend to work. So I'm gonna pop
slightly thicker paint in that bottom part of the beak. Then what I'm going
to do is take I've got some I think this
is transparent brown. You could use Burnt
Sienna for this. I kind of alternate
between the two. So I'm just gonna take up a
bit of a bit of a milky wash of fat and paint in the eye. So what I'm gonna do now is I'm gonna come out of
that and let that dry for 5 minutes we're going to do
the red around the head next, and I don't want it to bleed
into the beak or the eye. So make yourself a
copper and let that dry. Y.
5. Wattle and Comb: Okay. I'm fully dry now. A couple of things I want to
point out before we start. I'm going to move up to
a slightly bigger brush. I pick this brush because
it's the right size for these little bits in the comb because I want to get those
in in a single stroke. The other thing I'm
going to do is there's a lot of detail and messiness around the eye here where there's
sort of feather and then the skinny bit, there's white and red
all through there. I'm not going to worry
about that. Instead, what I'm going to do is do a little bit of wet
and wet in here. So I'm going to wet down around the eye. Is there anything else? Oh, the other thing, normally
if I was painting red, red is quite hard to use, and to get it to
look a bit warmer, a bit stronger, I would normally
underpaint with yellow. But because with
this, I want to get the shape of the comm
with a single stroke, I don't want to
be having to mess about with putting
down yellow and then trying to get
the same stroke with red once that's dry. So I'm going to go
straight on with red, and if I need to boost the color then I'm going to
do that afterwards. Alright. So I'm going to start, just paint my tissue a little bit so that my brush
is damp but not soaking. And then I'm just going
to paint a little bit of water around the eye. I'm also going to pop
a little bit in here and just at the front there just to help the pigment
move a little bit. All right. Then I'm
going to pick up my plural red, creamy mix. I want it reasonably thick. I'm going to start where
am I going to start. I'm going to start
at the back here. Now for this one, it's
slightly rounder, so I'm going to put my
brush a little bit on the side and bring in and keep moving. Coming in now to touch
where I've got that water. I'm going to I'm just going to drag a little
bit of paint while it's still wet just to make that
slightly bigger there. Okay. Then coming around into this Now, coming around the
eye, I'm going to use a few little flicks to
get that idea that, there's a little bit of
messiness around the eye. And then because I've got a
little bit of water there, the pigments running for me. I did leave those whites, but because I haven't
left anywhere else, I'm gonna close a
few of those in. All right. Now, I'm not
going to go completely to the brown just yet. I'm going to just
drag a couple more of those flicks up in there. All right. Now, I'm just
looking at the reference. Now that I've got
that main wash on, I'm just going to tidy up
around the beak there. At the reference, it sort
of comes I like that. And then I'm not going
to worry about why am I? No, I'll do it now.
I'll do it now. So I'm going to then
pop a little bit of the red underneath here. Now, you could wait
until all of this was dried before you'd put this in because I need to make
sure I don't want to touch this red. But
like I just did. I was trying not to touch that red just because I
don't want to introduce water into the first wash
and get it to bleed. Yeah, I'll form cauliflowers,
which I don't really want. But I'm just going
to pop that in and leave just a little
bit of a gap. I'm going to move on
to this one and do the same thing on this chook. Actually, I might do
this one first so that I don't drag my
hand through wet paint. A little bit of water
around the eye. Not soaking, just damp. Little bit just coming
down into here, maybe a little bit through the front to help me get going, then pick up my creamy mix. This guy, I'm going to
start on this edge. So I'm pushing down
in the brush to get those thicker shapes. And here where
it's a bit tricky, I'm just going to come up onto the tip to get that shape in. I can't do a single
stroke there. Okay. And then coming through here a few little bits
of white into the wattle. So my natural I
find flicks going that way slightly harder.
Maybe I'll come that way. Oh, I've got between the rain,
I've got a thunderstorm. I've got the traffic,
and now I've got a flock of cockatoos
going overhead. So my microphone is
gonna be having a fit. And then the same
thing on this side. You can wait until
it's dry if you want. Then I'm gonna pop it in. Last one. Okay. So I think that's probably the
hardest bit done. So what we're going to do
is we're going to let that fully dry and then we're
going to move on to doing the bulk of each bird. A
6. Wet in Wet for First Chook: All right. I think
the cockatoos are finished and I'm completely dry, so we're going to start
on the bulk of the bird. Now I'm going to take I've
got a really big brush. This is the size
12 because I want to get around quite
a large area. So I'm going to use this
one, and I'm also going to use the size five that
we used for the combs, make sure that the reds
cleaned off it. Okay. So I'm going to just throw in a little bit of water initially. So really rough. So not saturated, but I've got a reasonable
amount of water on. I'm gonna chuck on a
little bit I've got some yellow ochre that
I'm going to just throw into that wet messing around. And this is where
these pencil lines are going to be a little bit of a problem because
they're so heavy, but I'm not going to stress
too much about that. Now I'm going to come up
onto the tip and just pop in a little bit of a wash
over the head there. Okay. Then I'm going to
do these tail feathers. Now, I've got a bit of
water up to around here. I'm going to drag
from dry on to wet into to get those
tail feathers in. So I'm going to get some
fresh I'm using Paynes Grey, Art Spectrum Paynes Grey, but that's tricky to get if
you're not in Australia. So indigo is
acceptable for this. Okay. I want to just
get this in one hit. I'm getting really toothpaste
consistency paint, not much water in my brush,
I'm going to touch the heel. Get that I've got quite a bit of water in
there at the moment, so really dry paint. Then I'm going to go. Which way am I going to go? I
think I'm going to go. Now, I'm going to end up
my brush is quite pointy, so these shapes are
probably going to end up a little bit pointier
than they actually are, but I'm not too
worried about that. So I'm going to come
and not do that. I was trying to get my hand
out of the way of the camera. All right. So I'm looking for coming into the wet and
letting that bleed. Now, while I've still
got this on my brush, I'm going to throw a little bit in where I want a
little bit of rounding. And then I might. I'm
going to wash that off. And while that's sort of
like a bit dirty water, I'm going to just chuck a
bit more in to that wing. Alright. Then I'm going
to switch brushes. And I'm going to tidy up. So this is going to bug me because I've got
that little gap there, so I'm just going to
drag that shape down. I'm going to let this
I've got dry paper here. I'm going to force
some blooms here, so I'm going to
chuck some water up. And just let that
bleed a little bit. I'm going to just
drag a little bit down here because I want that tail to be a
little bit fatter there. Then maybe I'll
tidy up this shape. Although that was really
quick getting those on, I can then fiddle a bit
to settle things in. Now here, I want to
tidy up the tummy. I'm going to drag
I've just clean my brush and I'm going to
drag it to that pencil edge. And I'm leaving this
all very messy because this chicken was sitting
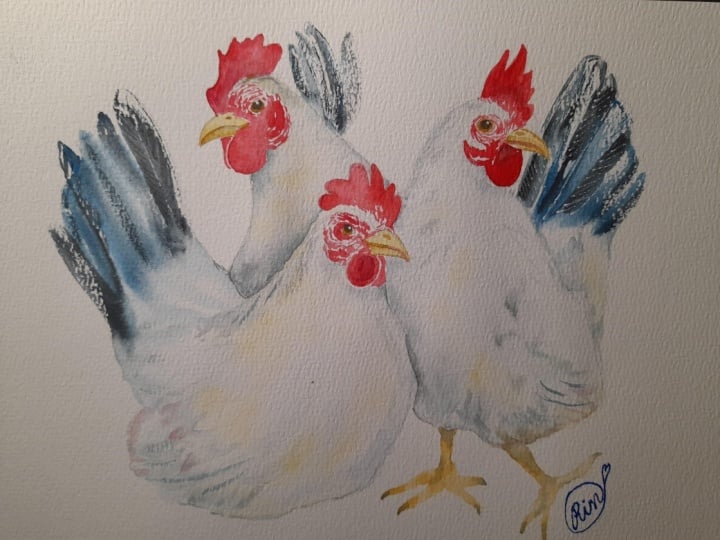
on the hay mostly. So I can't really see any feet, and I'm just gonna let that
disappear because I don't want to really put the feet in chicken feed are really ugly. You can if you want, and I know some of you will.
I'm not going to. Alright. I'm just bringing
that up to that pencil lege. Now, something else
that I'm going to do, you can in here
force cauliflowers. That's fine to create
a bit of interest. And what I'm talking about
there is forcing blooms. As it's drying, it's
touch it and see. So you can start to add my boater need my
board is pretty dirty. I should go and clean
it. But in a minute. As I'm dropping water on, if it's at the right wetness, it's going to push pigment out and force blooms
or cauliflowers. If it's too wet, it will just form a flat wash. If it's too dry, nothing's
going to happen. You just a bit of a suck it and see and
sometimes it works, sometimes it doesn't nothing much really happened there because I think I'm
still pretty wet. My room's quite cold. So I don't I'm drying
pretty slowly. I'm going to throw a
bit more Yellow Ochre, warm it up a little bit, just around the place while everything's not
too much thought. Okay. The last thing I'm going to
do before this is fully dry, I'm going to just
take a tiny bit of my pains gray or your indigo depending
on what you're using. I'm not quite dry here, but I want to just
suggest a bit more of a stroke in
there for the wing, and I'm going to touch
just a bit more in here, and then I'm going to
get out of that and let that dry before
I start fiddling. Come out of that.
Let that fully dry.
7. Chooks Two and Three: Okay. I'm dry and well,
yeah, pretty dry. And I've cleaned my water
and cleaned my brushes. So we're going to start
on this one next. I'm just going to
get rid of some of the pencil lines around the red there so that I don't have to
stress about them later. Okay. So same thing on this one. I'm going to throw check that
yet, my brush isn't clean. Just make sure you
brush is clean because I'm using the big one that
I had the paints gray on. I just want it takes a lot of
cleaning to get rid of it. Mostly clean. All right. I'm not going to touch
just yet to this chook. Going to try and
leave a flash of dry paper there. And same. I don't really want
to touch to that beak all the comb yet. Doing the same idea where I'm wetting down
just not everything. The throwing a bit of water
on throwing now a bit of my Yellow Ochre the
word I was looking for. Letting that run
up in that wing. It's a really messy
little bit into the tail. I'm just going to close. I
don't want too big a gap. The it'll be hard
to fill in later. Alright, now we're going
to do the tail again. So thick paint. This time, I'm going to
start on the top one, and I'm going to come, that's maybe a bit wetter
than I want too late. I don't mind that. That's okay. Whatever you really
only get one hit at that stuck with what you do. Now again, while this
is still on the brush, I'm just going to chop a
little bit of that down there. Switch brushes. Now, I've
got a lot of water there, so it's pulled a little
bit further than I want. Before it goes all the way up, I'm just going to
tidy up a little bit. And I'm going to use a
bit of that paint in there to do you like the kind
of strokes we did in here? Give me a little bit of
the wing there. Okay. Washing my brush,
tidying up here. Now, what do I want
to happen up here? I think I just going to drag that down here,
bring that up there. I quite like how
that's turned out, actually, despite thinking
I was a little bit wet. What I like about
that is I've got this flash of light
on each of those. That's happy. I don't I was
getting a hard edge there, so now I want to
bring that water. I'm just painting water now. Okay. And I'm going
to do in this one, I brought the Yellow
Ochre up right away. I didn't do it with this bird, so I'm going to get a
really milky wash of Yellow Ochre and just bring
that up over the head. I'm being conscious
to leave gaps. I've got bits of
white paper in here. I don't want to put a full
wash over everything. I'm going to bring that close to that red comb and the beak. While that's drying,
I might throw in a couple more bits
of Yellow Ochre. Just through here. If you've got
nothing interesting happening in here, again, you can sit and see
if you can force a few cauliflowers.
I'm pretty wet. Maybe I'll come back to that and throw some because
what I'm going to do, I go straight onto this one. This one's only little, so I don't have to wait for
all of this to dry. I can get in here
and do that one, but I'm going to use
the smaller brush because if I use the
big brush there, I'm going to get
tory pretty quickly. Now I'm just going to wet
down to the small brush, being a bit careful in here. I'm going to throw a
bit of Yellow Ochre in, keep it pretty light
initially. Okay. Now, that actually might be a bit hard to
see on the video. I'm going to take
a little bit of really weak pains gray and
just chuck a bit in here and come as close as I can to the back of that chook
without actually touching it. Okay. And then we're
going to do the tail now. I can't use a big
brush for this tail. So what I'm going to
do is to use this one. But I'm going to pop
a touch of water. So here, this is
dry. This is dry. I've got a touch
of water in there. I'm going to now grab my
paints gray on my indigo. I'm going to take
a deep breath and then pop that tail in. So I kind of miss that
bit, but that's okay. All right I wash my brush. I'm just going to soften those couple of
sharp edges there. So I've got that pencil I've got a pencil line there
that's pulling the eye a bit, but I can't really do anything
about that at the moment. Okay, and then before
I let you stop. Firstly, I'm going
to see if I can get any cauliflowers
in here. Any blooms. Got some really
subtle ones you might not be able to see
clearly on the video. I'm also going to just touch a little bit of my yellow acre
over the top of the head. Don't think I'm gonna get
any cauliflowers here. I'm just going to
throw a little bit of Yellow Ochre in there as well just to get a
bit more colour. Before I muck anything up,
I need to come out of that. I say, as I start fiddling,
I'm just chasing. I don't want too many
hard edges there, so I'm just kind of
chasing the wash back. So that I don't
get any hard bits. All right, so I need
to come out of that, and I absolutely need to let that 100% dry because what I'm going to do then is I'm going to rub out all the
pencil lines that I can, and then we're going
to start to put in all the little fiddly details. So I want to give
this a good 15, 20 minutes to dry fully
before I start thinking about using an eraser on this, or I'll drag paint everywhere. So have a nice break now.
8. Starting the Details: Okay, so I'm pretty dry now, and I've managed to get off most of the pencil ones,
not all, but most of them. So we're going to do what's now technically called
the fiddly bits, starting off with the
pupil for each eye. So I'm going to use my
Paynes Grey or indigo, if that's what you're using
and my smallest brush. And I'm going to
paint the circle in. Now, when I do this,
although I'm painting flat, when I'm trying to paint
a circle or an oval, I want to tilt the
page towards me, or I'm going to get
the wrong shape. So I'm going to tilt it up
and just pop in each eye. All right. So I'm
going to then use these two brushes and
my middle and my tiny. Make sure it's clean. I'm going to tidy up some of the shapes. So in here, I'm going
to wet down first. So just clean water. Going to come over the back of that chook and
underneath the comb. I'm now going to put a bit of a suggested shadow to kind of chisel out the
shape that's in there. So now I'm going to switch
to my little brush. Take milky pains gray. Then I'm going to come
in here and just chisel out join those two shape
go easy initially. It's easy to add more
hard to take off. I'm going to leave
that little flash I quite like that
little flash there. And this is where
I'm looking I'm not looking at the reference photos for this
because like I said, these are stitched together
from three different photos, so I want to do what works for the painting that I've got, not the collage that I've
made of the reference photo. Okay. So I'm just going to wash my brush and just let
that soften back a bit. And I'm going to
I want to chisel out the shape kind of
underneath the comb here. So I'm going to just bring that in and
then again get water. And let the pigment
do its thing. Throwing water everywhere. Okay. While I've got
the small brush, I'm going to suggest a bit of a shadow underneath
the wattle here. So I'm going to paint
it first with water. My water's gotten dirty again. You're probably better
off when you've got something like pains
grow when you go to have a couple of pots of water with you when you paint. Alright. So I'm wetting underneath,
damp not saturated, just a little bit
damp, just to help the pigment move a little. Picked up a bit of my paint. I'm just dragging
it. Just underneath. Wash my brush. Then
I'm going to soften. Just dragging my damp
brush along that edge because I want it to
just gently tease out. But when I do that, that pigment is going
to come diluted, so I'm going to have to go
and drop more pigment in. It's just because I'm
trying not to get a really hard edge here. I'm going to grab a
bit more pigment. A little less water now
and just drag that under. That might be too much pigment. Let's see. Let's see
what happens when I tease that out. So
I wash my brush. And just run my damp
brush underneath. No, I think that's okay. So again, I'm just looking
to soften this join. I don't mind a few hard edges, but I don't want
this to be too hard, but that gives a bit of a
shadow underneath there, and we can add more
if we need it. I'm also going to do a
little bit of the same around here and under the comb. So wetting down. When I want soft
shadows like this, I would generally wet
down with water first. Okay. So now thick ish paint. I'm going to drop
a little bit under that comb wash my brush. Soften the edge out. And then a little bit
underneath this part. And because I've as I teased
that in, it's disappeared. So now take a little
bit more pigment, not much water at all, and just drop it into that web page
and then soften it back. And you can always
add more later. Now, these are really
subtle small details, but I find that they make
quite a bit difference. So we're going to
move on to the beak and then we'll finish the eye, and then we'll go and do the same thing with
the other birds. So now I left that a
little bit darker, but the beaks disappeared.
It's not very interesting. So what I'm going to do, I'm
going to take a little bit of that transparent brown. I'm going to paint a line on the bottom of the
beak there and drag it. It's going to make it
a fraction darker. Then I'm going to take
going onto the dry paper, I'm going to put some
more of this brown, but I'm not going to touch
to what I put there. I'm going to pop a bit of a
line in come into the red, grab one more and
pop a little bit more just on the top
around that nostril. I am going to paint
in the nostril. I just haven't got to it yet. I'm just softening that back in. So I'm after a little bit of variation in what I have there. Before that dries, I'm
going to get stronger, thicker, less water on
my brush with the brown. And just drag a few more lines through now that
it's sort of wet. So I'm kind of trying to let the water do some work for me. When that fully dries,
I'm going to put the nostril in and
then I'm going to pop a little bit of black under here, but I'll
let that dry first. Now, coming onto the eye next. Now, I'm going to paint. I left that white around there, but I'm going to take a
little bit of my pains gray, and I'm just going
to fill in that white around the top
half of that eye. Drag that through so it's
slightly lighter at the bottom. I've just backed off that
white paper, basically. Now, what I want to
do I want to darken off the top half of that. Aye. So I'm going to take
my transparent brown, and I'm just going to paint
the top half of that. Mm. Actually, I'm going
to have to put a bit my pins into the brow. So I've taken a little
bit of the pains gray, a little bit of the brown just so it's just not
quite dark enough. I'm just going to throw that. In. I just I want the
flash of light here. I want the top to be darker, and I'm going to have to This little light here is hurting me, which I think needs to be red. So I'm just going to
grab a bit of my red without much water in
it and just tidy up. Okay. Now, this is dry here. So I'm just going to take a
little bit of my pains gray. I'm going to pop a little bit
of a dark in that nostril. And then I'm going to paint
where I left that gap. I'm just going to pop a
little bit of a line, and then I'm going to
smooth that out so it's not too hard. Just a little bit. I think I probably still need that base
of the beak to go darker, so I'm just going
to darken that. Let you stop in a second, but
I just That's a bit better. Then I am going to
do a little bit more around the wattle here, but I've been
in there for a bit. So all I'm going to do now is just stick a
highlight in the eye. So straight into my
tube of white gouache, and I'm just going to
stick a little spot there. I will fiddle a little
bit more maybe with that with the shadow
underneath here. But I've been in there
for a little bit, so I'm going to
come out of that. I'm going to move
on to those two, but I'm going to take
a pause in the video here so that you
can take a breath.
9. Same on the Other Birds : So that was pretty tedious. Unfortunately, we've got to go through and do it
on the other two. I'll try and shorten
the video so you don't have to watch
quite so long, because we're doing
exactly the same thing. So I'm going to start
with the shadow. It's underneath the
wattle on the comb. So wetting down
first. Picking up my pains, softening it in. And doing the same thing, darkening off the
top of the eye. And then onto the k. And now that that one's done, we'll do the same
with the last bit. So under the wattle, wet down, dropping in pains, and
then softening the edge. Into the eye. And then into the beak. Okay. And while I'm
thinking small, I'm going to tidy up
these little shapes here. So I've got a small
brush painting down with water with gale
force winds outside. Put a little bit
up there as well. So I want to chisel out
this much like we did here. I want to kind of
chisel out this shape. So I just picked up some indigo, some Paine's gray, and I'm just throwing that
into that web page. Painting with water
from outside coming in. So if I put my brush
through in this edge, I end up chasing
that pigment back. So if I want to soften it, if I come from outside and
then touch the pigment, I find it's much easier to get a soft edge than chasing
the pigment the other way. So just softly
closing up that gap. I might pop a little bit
more pigment. Just in here. Okay, I'm going to
come out of that, let that dry and
we've got a couple of really small
things just to finish off once I stepped away from it for a second,
and then we're done.
10. Last Details: So just a couple of
things to finish off. I want to darken
under the wattle. So I've just taken
my small brush, and I've gone straight
into my pins gray. And I just want to
push that one back. So straight on to dry
and tidy up that shape. And I might actually pop a
little bit more red in it. Just needs to be a slightly darker than that one in front. Same thing on the next bird. And the last one. Just be careful be careful where
you put your hand. I probably should have
started with this one. Now, I did say at the start that often I
would paint with yellow. I'm not so worried about my intensity in my red,
but I'll show you. I might just have a
look and see. I've got some hearts of yellow here. If I pick an area
around the eye there, just go straight on to that red. So I'm completely dry. I'm coming up into this comb, well, you may or may not
be able to see, actually. It gives it a little bit of warmth, a little bit more depth, and you can just blend it
into that wash underneath. And if it gets too yellow, you can just grab a bit more of the red and just dump
it dump it back in. So it's very subtle. As I said, my red
didn't up that week, so I'm not all that bothered, but I'll go around and
do it for each of them. Yeah, I think I prefer I think I like the yellow
over the top there. Okay. And I'm just thinking I probably need a
couple of things I need. I'm going to This
chicken comes down here, but you can't really see
it because I haven't painted much of a washing.
So I'm going to pop. I'm going on to dry paper. I've got a little
bit of Yellow Ochre, and I'll have to bring that up. Here. Then I'm just
going to soften that in so that the Yellow
Ochre kind of disappears. And then while that's still wet, I'm just going to drop
a touch of my paints gray into here to kind of
make show that that's behind. Okay. Then probably now that I've got that
Yellow Ochre there, I probably want to match that. I'm looking at the balance
and I feel like I want a little bit of that color on this side of that chook too. So that talks to that a bit. Maybe I want some down
in here on this tail. I'm dry here, whacking
on some water. I'm just going to touch, get a little bit of
that Yellow Ochre in there as well. No,
I think that's okay. The only other thing I'm going
to do I'm going to lift. It might not work, but
I'll give it a go. I'm just going to
take my oil brush. This one. Stiff is it a bright white?
What are they called? A bright stiff synthetic
is what it is. I've got this nice
light in this one, and I've got nice
light in there. This one's a bit solid. So what I'm going to try and do wash my brush, take
off the excess, and I'm just going to lift
a little bit of light back. To do that, I've got to
keep washing the brush. Push pretty hard. Just to get a little bit of a
couple of little veins. Just not really doing it probably where the reference is because it's not exactly
like the reference. I just want a touch of light. Washing my brush, and
you might not need it. I just I went
really heavy there. It's really about
making that talk to that and maybe one more on here. But go gently, don't
lift too much. Officially starting
to fiddle now. That I think is where
I'm going to stop.
11. A Final Word and Flattening the Pesky Paper: Okay, so I'm fully dry
now, reach the end. So I want you to
take away from this. The first part of the
painting is really quick, the bulk of the painting
is really fast, but it is worth spending time on these really
little details, the soft little shadows, the little nitty
gritty bits because I think they really do
lift the final piece. Now, something I
didn't say, because I don't usually prestretch and because I've had a
lot of water on here, this is quite wobbly. And I don't prestretch because I'm a little bit lazy and when I want to paint, I
want to paint now. But if I get to the end and I actually like the painting,
I want to keep it. So this one I couldn't frame as it is, I would
have to flatten it. So to do that, I would
take I've got my board. I take a clean piece of watercolor paper and
pop that on the top. Pop that face down, take a spray bottle, and Hmm. I'm not a I will do it. Let me move my computer.
That could go badly, couldn't it? What if I put that? Don't spray your computer. And I'm just going to
spray the back of the. It's fairly wet. Like
I'm going to get a fair amount of water on
it, particularly here. I've got a real bump
there. So nice and wet. You could paint it
with a paintbrush. I'll just find this easier. Then grab another board, pop it on the top or
a book, anything. Be careful if it was
the book because it will soak into your book. And make sure that the board or the book that
you put on the top of that is bigger than the piece of paper because if
I put that there, when this settles down, I'll get a crease along
where that board sits. So make sure it covers
the whole painting. And then on here, you need to wax and wet. I use my kids dumbbells
or another book, anything you've got
lying around just to keep the weight on that, and that will stretch the
painting out for you. Um, Okay, so if you're happy
with what you've done, even if you're not really
happy with what you've done, pop a photo of your project
for me and have a look at. Always love seeing
what you've done and happy to give feedback
and ask questions. So thanks for joining me.
 Nadine Dudek, Professional Watercolour Artist