Transcripts
1. Introduction: Hi I'm Nadine. Thanks for joining me today. We're going to be
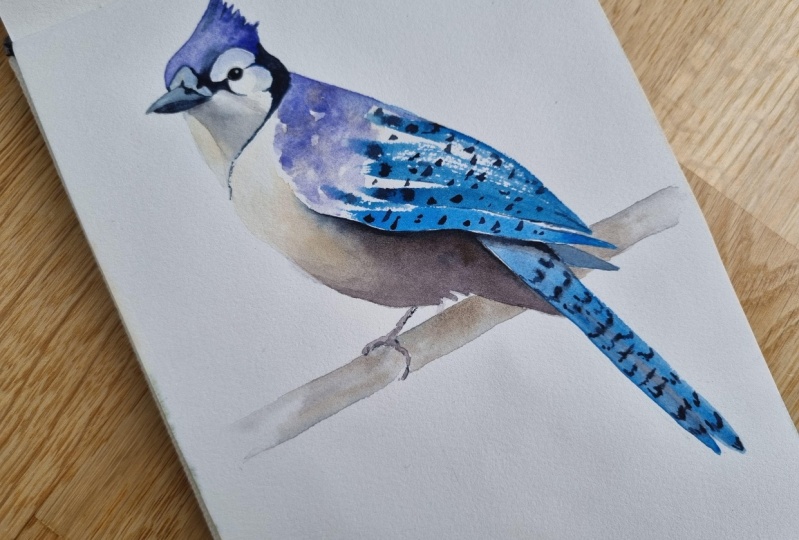
painting this Bluejay. The lesson is twofold today. Firstly, I want to,
as always convince you, that you don't
have to put a lot of detail in to make a
convincing painting. So I don't want to worry too much about all the pattening. The other thing the
lesson is about is lots of layering of soft, wet-in-wet so lots of soft bleeds to
get this nice roundness in the tummy of the bird and that's layering and letting it dry in between without lifting
the layers underneath, which takes a little
bit of patience. So we'll go through the reference materials and then we'll go step-by-step
through the painting. And hopefully at the end, you're happy with what you've produced.
2. Materials: So we'll go through the materials
that you need today. So to start off with, the reference photo
is from Pixabay. I've got that up
on the Skillshare site that you can download. I've also got a template if you would rather not
sketch it yourself. For the paper, I'm
using 300 gram Arches cold pressed paper and I'm
painting flat on a board. I'm not taping it down. You can, if you don't
like the paper moving, but I tend to turn my
paper while I'm painting. In terms of the sketch, I'm just using a regular HB
pencil and eraser and paints. I've got a few of the main
ones would be these three. So I'm using Daniel
Smith lavender, which is this lovely
purple through here. I've got some Windsor
and Newton cerulean. And the dark here is
Daniel Smith, indigo. Now also to help with
the darks in my shadows, I'm using some Daniel
Smith Van Dyck brown, the warmth on the chest is some Winsor and Newton
yellow ochre. And I do sort of put my brush into some Windsor and
Newton French ultramarine, but I really didn't
get much in here. You don't need
that. It's probably one that you've got hanging around so you can use
it if you've got it but you don't need it. The only other thing I'm
using is some white gouache that's just a little
highlight in the eye and the highlight on the beak. In terms of brushes. Just using the two today, I've got a neef size 8. This is a squirrel
taklon mix. It just holds a reasonable amount of Paint, comes to a nice point. And then for the small details, I've just got a
little synthetic. Other than that,
you'll need a palette, pot of water and some tissues or toilet paper or tea towel
or whatever you like to use. And I think that's
probably all we need. So we'll get onto the sketch.
3. Sketching Up: So we'll start off
with the sketch. I'm just using a
regular HB pencil and a normal eraser do keep
the sketch fairly loose. But I do want you to pay
attention up in the face here because it's got all these white patches
around the eye. If you don't give
yourself a bit of an indication of those, chances are, you'll paint
through them when we do it. And then it's really hard
to get the white back, so put the detail in get the
shape of the beak right. Don't worry about all the
striping through the wing here. We're just going to
suggest that and we'll do that as we paint. And the same with
the tail for that, get the width of the tail and the tip
where it, where it ends. So you know where
you're starting from. But don't worry about all
the striping through here. Now, I'm also leaving out the branch in the foot by all means if you
want to put that in, go ahead and put it in, I'm just going to leave it. I'm finishing off at the tummy. Now. Sketch that up. If you don't want to
sketch it up yourself, I have included a
template that you can download from the Skillshare
site if you would rather. Ok I think we're
probably ready to paint.
4. Starting the Beak and Eye: Okay, So it doesn't really
matter where you start. I think I'm going to start
in the beak and the eye, so we'll ease into it. So I'm just going to
take my small synthetic. I'm painting flat. I'm going to grab, I've got a very messy palette, but I'm resisting cleaning it. I've got some indigo in here. I'm going to take my
small brush and I'm going to paint the top and
the bottom of the beak. So really milky wash initially, I'm going to come straight
onto dry paper, paint the bottom of the beak. and pick up that same wash and
then do the top of the beak. Now I'm actually just
going to leave a bit of a gap between the
top and the bottom really just so that I
can check my shape. So I don't really want them
bleeding into each other. Just washing my brush
and I'm just going to drag I'm just dragging
a little bit of water through the top, pushing up to the
top of the beak. So I can get the shape I want. Now it's not dark enough, but I just want to get
my positioning right. I'm going to drag that into the little cheek there
I probably need to come up. And I probably you know I said you can start
wherever you like. I probably do start in
the beak because if you get the beak wrong, the rest of the bird
will look rubbish, whatever you do. So, way too light, but I'm okay with
the shape. So I'm going to put in the shape of the pupil, the eye here. So I'm just going to take again the indigo small
synthetic onto dry paper. Because I'm painting flat. You do want to just check it, tilt up and check that the
shape is right before you go on because you'll get a skewed perspective because
we're painting, painting on a flat surface. That's all I'm going to do. Initially, I'm going to come
out, let that dry. Perhaps I'll clean up my
palette, perhaps not, but we'll come back
in 5 min and we'll start with the
crest and the wing.
5. Crest and Wing: So it's been five-minutes
and I'm completely dry, resisted the urge to
clean my palette. So I'm going to start with
my medium-size brush size 8. And I've got some
lavender in here in this. Well, I'm going to take
a little bit of paint. Creamy to milky really. And if you're not sure, just grab a piece of scrap and test it
out before you go. Get a bit of paint on it coming in to the top
of the head here. Start on the edge. I'm going
to push my brush down and just put those
flicks in at the back. Then I'm going to pull my shape over the white bit
at the front there. colour that in. Wash my brush. I haven't quite
reached my pencil. I'm washing my brush, take the
excess off my brush there, and I'm just going
to push that purple out to the edge,
to my pencil edge. Now, that will stop that hard line of
paint forming there. But what I don't want
to do is introduce a whole lot more water into
there and make this all bleed. Now, that's not going to
be quite dark enough. But what I want to do is keep the light on the
front so I don't want to go really heavy
initially and then not be able to pull
anything back. I can build up the
color if I need to. So I'm just pushing
that out to that edge. Then I'll come out
and let that dry. So again, just when you're coming out to that pencil edge, not too much water
in because you don't want to create blooms in there. Then I'm going to do the
wing while that's drying. Now here again, I want to
keep the idea of light. So I'm going to patchily
wet down with some water and maybe
a little bit of yellow ocher in here. Then I'm going to use a dry brush stroke
for the actual wing. And I'm going to
use a combination. I'm going to use my
lavender and yellow ocher up in the top of the wing here. Down here, I'm going to
use probably bit of lavender, but I'm also going to
introduce some cerulean, maybe a little bit
of French ultra. I'll see how it's looking. So clean brush, patchy, wet on the back of the wing there if I hold up there. So you can see I'm not
covering everything in. I'm leaving some
white bits of paper. I'm going to grab
because I want it soft. I'm going to grab a
little bit of yellow ocher, touch a tiny bit of that
yellow ocher into the wing. Then I'm going to
grab my lavender. I'm going to start
lower and let it bleed up because I don't want to go too dark at the top here again, I'm, I'm kinda trying to
retain that feeling of light. So I want all that bleeding in there, tease that out just
to the pencil edge there. We can add more if
we need to later. And I'm also going
to see, I can see I'm not quite to my
pencil line here, so I'm just going to drag that. Okay. Now, while that's still wet, I'm going to look at this wing, so I've got some cerulean here
it's just dried up a bit. Freshly squeezed is best. I'm going to start at this tip. I might pick up cerulean and I'm going to pick
up a touch of my, I'm just touching my brush into some French ultra as well. So when i come on point down, you're not going to be able to
see underneath my wrist. And I'm going to just
drag that up. Now I'm going to leave
a little bit of space in-between, right And now more cerulean, I didn't get much French ultra
in there, but that's okay. So I want to leave some whites. Just tidying up the shape. Now. And I'm, the tip of the wing is going to be
the shape that my brush forms. That's all still wet. So now what I'm going to do
wash my brush, take off the excess paint. I'm going to take
really solid indigo. I might've said I was going
to use lavender I can't remember. I didn't it's all cerulean and a
little bit of French ultra. I've just squeezed
out some indigo. I'm still wet in here. I'm going to touch
really sticky paint. I want really not much
water in here at all, so I can touch it to my tissue. I'm just going to while
that paint is drying, just touch a few blacks. Not paying attention to really particularly to the pattening in the bird or what's going on. I just want to give the idea that there's a little bit of
spotting through there. Now, what you don't want to do is have a whole lot
of water in here, put a whole lot of
water in there, and then the indigo
will bleed and you're just form cauliflower. We can add more paint to
that later if we need to. So now I'm going
to come out of that and I'm going
to let that dry. And then we'll start
probably on the body.
6. Starting the Tummy: Okay. So it's been again
about five-minutes. I'm pretty dry in there. I can see I probably will need to strengthen
up the lavender, but I don't want to do
that now at this stage, I want to wait until
I've got everything in before I make
decisions like that. So I'm going back
to my medium brush. I'm going to wet down and
start in the body here. I've got two areas here. I'm just going to do this bit
underneath the chin first. Then we'll come back and do
the face. So clean water. I'm just going to well that's not
really clean water. Try and do clean water. I'm going to follow
that pencil edge wetting down and I'm wetting
the whole thing down. So I'm not leaving
patches like I did there. I'm wetting the
whole thing down, leaving a little bit
of a gap between the wing and the tummy there. And I'll come back. I'm not ready to
do the tail yet, so I'm just going to paint
with water down here. I could have done
the tail first, but it doesn't really matter. Okay, now that
that's nice and wet, I'm going to start just so
I can orientate myself. I'm going to start with some yellow ocher. Really just see, make sure
I've got enough water on there because I
want this all soft. Okay a little bit of yellow ochre. I can see where I'm wet. Then I'm going to take some really milky Indigo initially. And I'm going to put that
underneath the wing. Dropping into nice
wet paper, tease that down. And I just want to let that
bleed going to wash my brush, run my wet brush along the edge, just encouraging
it to spread out. And here where the tummy ends I'm
just going to drag a couple of flicks of with my brush just to show that's
where the tummy ends. I don't want just a
smooth line under the tummy. Okay, now I'm retaining
light up the top here. So if you get too
dark at the top, just grab some
water and flush it, whack it on and that
will disperse the pigment. Now, it's diluting a lot. I'm going to need to be
a lot darker than that. I don't have to get
dark in this first go. What I'm going to do, I
think I'm going to take, I'm going to introduce a
little bit of brown as well. So I've got some Van Dyck here. And to the same spot where I added the Indigo I'm going to
put the Van Dyck brown. You can see it
spread. I've probably put a bit more than
I wanted there. So while that's doing that, I'm going to clean my brush. Just flood that with some water. Push it back just a little bit. Just went a bit further
than I was anticipating. I probably am going to need to add more of it later anyway. But just, and I'm just going to tease
that out to this edge. So everything is saturated
in here at the moment. Keeping out of this up the top. Okay. last bit, I'm just going to add
little bit more of the blue the indigo in
there wash my brush. So any minute now this paper is
going to start to dry and it will be too
gammy to keep working. So I've got a lot of
water in it in here at the moment so I can
push and pull a bit. But I'm starting to get to that point where I
need to get out. Now, if you've got
tons of water in here, is probably going to
do things that you're not going to be happy
about as it dries. So what you want to
do, I don't actually have too much water in
there, but if you do, just tip it and wick off
the excess water here because although we wanted all
the water to help the pigment move, we don't want it
to pool and form blooms while this is
drying and hard edges. So just keep an eye on how
much water is in there. Tilt and we could, you, can you can use a tissue to
take off the excess water. Just be careful not to dab with the tissue because
it will leave marks. Alright, so I'm going
to come out of that now and let that dry. I could do this
at the same time. But because I'm
quite dry up here. If I come amd wet
down this part of the face and I touch
to this bit, again, it will push all the pigment out so I probably
want to play it safe and just stay out of there
for now and let that dry.
7. Tail: Okay. Because this was really wet. I've been out of
here a bit longer. It's been about 10 min and
I'm dry in there now, bit cold still, so
maybe a little bit of water but nothing dramatic. You can see that it's
actually dried a lot lighter than it looked when
we were putting that pigment on. So I am going to have
to build up the darks. But what I'm going to do next, I'm actually going
to do the tail. So this is just a couple
of brushstrokes very similar to the way we did the. Top wing. Now, I want to make it a little bit
easier for myself here in that I want to
just do some strokes, but I don't want to accidentally
paint into this wing. But also I don't want
to stop here and have a whole gap going on
underneath this wing So what I'm going to
do, I'm going to take some clean water
a little bit of water, take
the excess off my brush on a tissue. Just going to paint a
little bit of water. Just on this top
bit of the tail. I'm not touching to this
bit where I've got pigment, I'm just leaving a
little bit of a gap. So not soaking, just damp. The idea being that when
I do my brushstroke, I come up and
touching to that and can pull out before
I touch this wing and the pigment
will wick up into the top of the tail. I'm talking a lot because
I'm procrastinating. I'm putting off actually
starting the tail I always find this bit, gotta take a deep
breath and just do it. So starting at this point here, taking my cerulean,
quite, creamy. And again, if you're unsure, do it on a piece of paper first. So I need probably a bit more. That's probably too much water, That's probably
going to be too wet. So I might just a
wick off a bit, I'm just touching
the heel of my brush to the tissue just to take
off that excess water. Coming down onto my page, pushing down, pulling up. And maybe one more. I kinda took up the whole space. And then I'm going to come
out, take the excess off. I've just got
a bit more paint, take the water off. And I'm just going to make sure this teases all the way
up to underneath that wing. I don't want a really
great big lump of white underneath there. I don't mind the gap here.
I'll play with that. I'll probably put another line
in there when this is dry. I'm just making sure
that this line kinda matches up one coming up to the top underneath
the wing there. Right. Now, what you can't do with
this is that you can't muck with the end shape here. So whatever shape
your brush makes, you've really got to
live because if you start trying to change
the shape down here, once you've got that
first stroke on, it will get puddly
and messy and you'll regret ever touching it. So practice on a
piece of paper to see what shape the
brush forms first. And if you don't like
the shape that it forms, pick a different brush. That one is fine. I'm quite happy with that. Now, while this is still wet, I'm going to do the same thing. Take some indigo
that we did with the wing, take some indigo. And I'm just going to
touch a few stripes in, not going to overthink it. I've angled it
down a little bit. I've just got that suggestion. That's enough for that. I'm going to come out of there. I do want to paint this
bit of the opposite wing, but I don't want to do
that while this is all wet because if I touch
into there again, it'll do things that
I don't want and come out of that and come
back into the face. Now, if because I'm
now moving up to here, be careful not to put
your sleeve in the tail. So clean water. I'm going to paint
down underneath the beak through
the throat there. I've got my reference
next to me here because I just want
to make sure I'm not covering any bits that I
shouldn't, coming touching the cheek and this little area at the top above the eye there. I'm just going to
throw initially, a little bit of yellow
ocher under the throat. Just really keeping it light, just getting a touch of color
on letting it softly bleed, making sure I'm happy
with where I've wet down. Okay. At the top I'm
going to switch to, I'm going to take
a smaller brush. I'm gonna put a little
bit of lavender, behind the eye there. So I've touched my
brush into the paint. I'm going to take the excess off ,the water off on my tissue. Just going to touch
I took off. Didn't get enough on there, touch a little
bit into that wet. Now, you might not be able to see that very
well on the video, I've just got the faintest
bit of lavender coming through and a little
bit coming down. Now, there is this line here, lavender and a bit of
cerulean in there. I am going to take
a bit of lavender, touch of Cerulean made sure I don't
have any water on my brush. And I'm just going to drag
a little bit of a line. So it's touching the
wet paper on this side, it's dry on this side, so it will stay
sharp on this side, might be a bit bleedy. On that side. just dragging that up, lets me know where my
black is going to start. I've got, I think I've got
to either a pencil line or a paint brush hair in there. Okay. Then I'm also going to, last thing I'm going
to do before I let that dry. I'm going to wet down, this area here. So clean water, not flooded. Just painting down that little bit and I'm gonna pop again a
little bit of lavender. Initially, bit much I'll back
that off in this side. And a little bit of yellow
ocher on the other side. So it's more color, more of the blues and the
purple down on this side, keeping it a little bit
lighter on that side. Very minor things so far, but that's where I
want to come out. I'm going to come out
and let that dry. And then we're going to
start to strengthen up, work on with blacks
through here. And we'll start to strengthen up these shadows that we need.
8. First Darks in the Head: Okay. So I'm fully
dry now and I'm going to come in with
my small synthetic and do some of these darks. I'm going to go in with my
indigo and I apologize, next door has just
started grinding a tree, so I'm hoping I'll
be able to edit out the noise from that, but I don't want to stop. I don't want to stop halfway
through the painting. So small synthetic coming in and just getting a bit
of water into that indigo. All right, so onto
the dry paper, I'm going to come into
the spec but the head. So I want a really
solid paint here. I'm just going to paint. I'm going to drag a little
bit down into that line, but I've got too much
paint on my brush. so I'm going to paint
my tissue and just drag a little bit of that down. Okay. And maybe, I'm just
going to push that. I'm just running a
little bit of water. Well, my brush is
a little bit damp, just a touch of bleeding along the edge I just wanted to, I don't
want to be too precious. Okay. Coming into the eye. So I've got a line
that comes in there. And then on the other side, I'm going to fill in that space. And my pupil, my eye
here isn't dark enough, but I'm going to do these
other darks first. Again, not too much water on my brush because I want
this to stay really solid. Okay. Now there is a little bit
of dark over top here, I'm going to wash my brush, take off the excess, don't do that my tissue was dirty then that I would
get that off either with a magic sponge or a scalpel, but I'm going
to leave that for now. I don't think I've
got any magic sponges, just at the moment, so we'll see how we go. All right. I'm just going to drag. What I did then was
I touched my brush, my damp brush into the dark that I've got here and then just dragged that across the top and I'm
just pulling that through. Okay. Now, I've also got
a bit of dark in here. So while I've got a little
bit of moisture there, I'm just going to
take, again touch into that dark and just sort of scribble my brush just
to strengthen up the color. Now because next door
just started up a chainsaw. I'm going to pause there. I'm going to try
and get rid of this and I'll come back
when he's finished.
9. Strengthening Shadows: Okay. So fully dry now and
while I was waiting, I've just tidied up around the beak I've lifted a little bit of paint off the tip here
that I'll have to fix. But while we're talking
about fixing things. This is all I've got
left of my magic sponge. So just from the supermarket, I think they're for
getting marks off walls, but they're really good
for lifting paint, anything that you can't get to. I use a scalpel blade and
if you're careful and just scrape on the flat of the blade, you can lift off little marks, not big marks but little marks. Okay, so what we're going to do is we're going
to come and really strengthen the
shadow underneath the tummy here and we
might pop in this wing. I'm going to do this
wet in wet, pretty much the same way
we did in the first place. Clean brush, clean water, wetting it down, being careful to come right to the
edge of the pencil line. And these flicks
you need to come right into those shapes. So just making sure all of that's wet. Now, I want some yellow
ocher on the front. Bit of warmth
coming all the way down. So pick up a touch
of yellow ocher, touch a bit up here. And then I'm going to be stronger. I'm going to pick up some
indigo and some Van Dyck brown and really strengthen that dark underneath the wing. Tease that across to this side. Again, being careful that I come into those little flicks. Okay, Now I don't
want it to wick, too much up into that yellow, so I'm just going to clean my
brush, get a bit of water, just tease that down, I've lifted
some of that yellow ochre. So I'm just going to pop
a bit more yellow ocher. And what I might do, I might tilt my page
just ever so slightly, just so that I don't
want this to wick up too far up there. But I want to strengthen
again then underneath here. So a bit more of my indigo, bit more of my Van
Dyck, everything's wet. Drop that in. Now I'm not really paying attention to the
reference for this. I'm just doing what I think works for the
painting in front of me. The reference is just a guide. And it may be that you have to do this two or three times, but it's still better
to have multiple, put it on, let it
dry, come back, strengthen it, let it dry than going
too dark initially, and then you can't get it off, because it is a little tricky to judge
how light it's going to dry. Cleaning my brush again,
just softening. I haven't got much water
on my brush then I washed the brush taken
off the excess on the tissue just so that I can get a little bit of smoothing. I don't want to sharp
dark across the chest, the tummy there
just softening that in. I can see that I'm not going
to be dark enough there. Okay. I can probably go
I've probably got enough water in the page
that I can do one more. And then I have to get out Indigo, Van Dyck really hard underneath the
dark underneath there. And then I'm going
to just let it do its own thing and not fiddle with that
anymore for the moment. Now while that's drying,
I'm going to come up into the underneath the chin. here. Okay. Same idea. Now I didn't wet, I'm dry
along this edge here, so I can put water
up in here this time without getting
into any trouble. I'm just doing the same thing. Wetting down that whole area. And then I'm going to again take some yellow ocher, for that
side of the throat. Now, I'm I'm not
I'm not saturated. I'm just damp. Not got puddles of water. I don't want to be too wet. And while that's drying, I'm going to take a little bit
of my van Dyck, a little bit of my indigo. And I'm going to do this. Wet in wet kind of shadow, soft, nice and soft, which is why I've
gone wet in wet. Why I've wet the paper first, wash my brush, take
off the excess water. And soften that. Each side there. Again, I can come back and
do this multiple times, which I would rather do than put on a huge dark here
and then think, oh, that's, that's a bit much, I think I probably
want a little bit of yellow ochre up this side as well. So I've got a little bit of
water there, not much. Just a little bit
of color in there. And then a little bit of
yellow ochre in the top here. So just a little
bit of yellow ocher. At the top. I'm going to come. and finish the eye and have
a look at the beak now. So I'm going to take my small
synthetic, I'm going to strengthen that pupil, the eye. I've got straight
indigo on my brush. I'm just going to paint that. Now. I've left. I can see little flashes
of light either side there, the front, which I don't mind I'm not sure if you'll be
able to see that. I'm think I'm going to leave
that if it don't like it, I'll fill it back in later, but for now I'll just leave that little suggestion of light. Now I'm going to do, I think I'm dry there, underneath the beak. So to make that stronger, be a bit careful, I just felt, I don't think I'm particularly
wet underneath there, but I'm gonna be a
little bit careful not to flood a whole lot of pigment underneath
the beak there. Okay, so now I'm going to
do the top of the beak. I might keep the top of
the beak slightly lighter. Careful where you put your hand. I didnt get enough I haven't got enough
water on my brush this and nothing's moving. Slightly milkier wash of the Indigo. And I've touched to that darker I'm just closing in that
line, letting it bleed a bit. So the top and the bottom
have sort of touched a bit. And then I have to tidy up. I've lost the point of my beak there not sure how
good this brush is. So I'm just going to
get a bit more paint, not much water, and see if I
can just tidy up that shape. So I've let that pigment bleed into the wet
top of the beak. That's probably okay. Now, I might need to
tidy that up some more, but because I'm quiet, everything is quite
wet in there and I'm going to get into strike if I
stay in there much longer. So I'd rather come out and fix it up later if I need
to, just while this is damp though
on that where it touches
where the feather start. I'm just going to just pick up a little bit of indigo and
I'm just going to run. a little bit of indigo just underneath those feathers
and that nostril go. Okay, now my shadows
aren't strong enough here, but I'm going to stay
out of there for now. What I'm going to do is I'm
going to strengthen a bit of the color in the crest. So I'm going to paint
down with water. I probably should, would be easier to use my bigger brush,
but that's alright. I can get there with this. I wanted to retain the
light at the front here. I'm going to drop a bit
more lavender into this part. But if I only wet this part, then I'll get a hard line. So I want the lavender that I'm putting in
to transition over. So picking up a bit of lavender. I'm dropping that into the wet. Again, being careful
to come, cover the first wash or you'll be
able to see the two washes. I'm going to come right up to
those little flicks. So keeping out the front there. I'm just cleaning my brush
and making sure that I don't have any hard transitions, softly, softly, all
the way across. Now, I think what I might do, I'm going to drop just
the tiniest bit of indigo that was too
tiny in the back here to just strengthen the dark, the suggestion of a little bit of a
shadow behind there. Okay. I'm pretty happy with
that. Now I said when I did it that I don't think there's
enough lavender in here. So I need to give
this a bit of umph. But I want it to be patchy and I don't want
to overthink it. So I'm just going to take my bigger brush and I'm just going to touch
a bit more water. Patchy, patchy
water. Pick up some, doing basically the same
thing that we did initially. Just getting a bit
more pigment in there. It's just dried a little bit
too light. That's a bit stronger. I'm still not dark
enough in there, but I'm going to wait
until it's fully dry. So give this another 10 min
and we'll come back in and we'll finish up the tail and strengthen
some of the shadows.
10. Always More Shadows: Okay. I'm going to turn my attention
to the wing down here. I'm going to add in
this little feather, might use a combination of cerulean and maybe touch of indigo, my medium-sized brush. And I'm just going
to pop a stroke in so touch to my cerulean, maybe touch to the Indigo, onto dry paper and
maybe Okay. That's it for
that, that feather. So then I'm going to
start and think about some shadows to push the tail
underneath the wing there. So I'm going to leave
that gap in there. Here. I'm going to take a
little bit of water, touch it underneath the wing
there and just pull it down. A little bit of a curve
coming down with tail there And I'm going to pick up
a little bit of indigo. I'm just going to touch that
in to the wet page there. So I want to start this softly because I want
to make sure I'm happy with the position
of the shadow. Because if I go on really
hard and I change my mind, I've got no chance
of getting it off. Alright, so I'm happy
with that shape. And then I've just picked up a bit of Van Dyck as well. So I've got my blue and my brown. Just touch those in and
that should bleed down. You can help it. If you wash your brush, dry it off, just kinda tease it. If pigments, if you start
to lift the blue underneath just get out and you
can do it again. Once it's dry. I need to strengthen the shadow
underneath the beak there. And I need to go one
more round stronger here now because I've done this a couple of times,
not dark enough. I'm actually just going
to go on to dry paper, pick up a bit of my Van
Dyck and a bit of my indigo. come up the top
here. Not enough. Okay, then I'm going
to dry my brush, take off the excess water, and drag it along
the join between the wet wash and dry page. Might bring it softly
transition that over. So just rubbing my dry, my clean damp brush. along that join and I think, probably want
a little bit of that. I think it probably
is too white there, so i'm just going to take a little bit
of that and just drag that up into the
cheek there. Okay. Again, if it gets too, because we're pushing
and pulling it a bit, if it gets too light, I'm going to go a bit darker,
close to the beak. I'm just going to grab a bit
more of my blue bit more of my brown chuck it in there. And just let that
do its own thing. If you want to move it around,
you can wash your brush, take the excess off your brush, and just ever so
gently tease it. Don't introduce any
more water into there if you introduce more water
in there games ok. Okay. probably a little bit
more at the top here too. Again, I'm going to go onto dry
paper around the eye there. Then I'm going to wash my brush. Just kinda rough it
up a little bit. Don't want to be too tidy. Don't want to overthink it. And then I'm going to
strengthen down in here. I want a little bit more
yellow ocher on there, but not until it's dry. So down here again,
I'm going to pick up, going to dry paper this
time and make it stronger. Straight onto the dry paper. Be careful of your wet tail. So you just need to be if you're coming
onto the dry paper, you don't have the luxury of the longer drying time if my page was really
wet to start with, I have more time to play. So your hard, your edge up the top here will
dry more quickly. So you want to be aware
of that and get to it before it before it dries. So you have to have
quick hands, so wash my brush and just tease that edge out so that I don't end
up with a really hard line. But you don't want
to introduce, again. I know I keep saying this, but you don't want to
introduce more water. Here. You need that brush to be damp
but not wet because if you introduce water here,
you'll create blooms. you can sort
of see that it's happening a little bit here. Just going to keep drying my brush and just tease
that around a bit. Okay, I think I want the, I think it's not like
that in the reference, but I think I'm just
going to drag a bit of a dark just down the
edge of the tail. I wash my brush. So that was indigo. Again, don't introduce
any water there. And I'm just going
to blend that, rough up the edge a bit so
it's not too hard a line. Okay, and then my shadow that
I put here has disappeared. It's too light. So I'm going to now, now that I know that I'm happy with
the position of it, straight indigo and
just actually paint that in onto dry paper. Because that needs
to be stronger. Couple of little details. I'm going to put a
little nostril in. Use this brush. only because it's got a good tip probably better
than my small brush. I'm just going to pop
really small bit of indigo just on the beak there. And I might strengthen up the
dark underneath that beak. So with the same brush, I'm just going to
restate that bottom. bit of the beak. Now I want a little bit more. Warmth. Probably want to strengthen
up few of those darks maybe. But what I'm going to do
is let that fully dry come back and we're just going to add
a little bit of yellow, a little highlight in the
eye will probably be done.
11. Fishing Off: A couple of little
things to finish up. So to start with,
I'm going to pop a little highlight in the eye. So I'm just going to
take some white gouache. Stick my
paintbrush straight into the tube and just put a little line in there. Then I'm going to
put a little bit of a highlight on the beak, just a touch of
gouache along the beak. So you can see that
sort of dry and split. Then I'm going to wash my brush, take off the excess water. And then I'm just going to blend that in, wash my brush again. So the gouache will blend in
with the color underneath. Once you've got it on,
you can't get it off, so you have to be sure
that you want it. Okay Alright. Now, I want a little bit
more warmth around the face. and I want a
little bit stronger, a bit messier dark
around the shadows here. So I'm going to take my
same old blue and brown, my van dyck and my indigo. I'm just going to
get a bit messy. So I'm dry there. Wash my brush. Just mess it up a bit. it's just a bit tight and
a bit tidy in there. Okay. And then a little bit more around the back of the eye here. So I'm going on to dry page, and then just cleaning my brush and running it over because I don't want
to get too particular. Okay. And while that's a bit damp, I'm going to take, same with
the small brush. Little bit of yellow
ochre, milky wash. Just walk that around a little bit. So I've got a mix of
wet and dry edges here. I want to put a bit of yellow ocher
in the top of the crest. Bit by it's beak. This is the one place if you put it on and it's too heavy, you can just touch it tissue
to it and get it off. This is the one time
that you're allowed to dab with a tissue. Okay. So probably think I'm just looking probably need to
strengthen a bit down there, but that's possibly, I'd
think about that when it was fully dry and I
came back a day later. Alright. And I want a bit more messy
yellow ocher on the chest. And this time again, you can chuck it on and then the pattening from the tissue
in this case kind of helps, doesn't hinder, can put some
on and just dab that off. Okay, Then the last
thing I want to do, one more, go in here this time, I want to keep it. Don't wanna go over
the top, take my small no maybe medium brush, and
get some water. I'm just going to
paint down that edge. Pick up some indigo. just going to a few
places with a bit Stronger indigo, bleed. And if it doesn't move, you can just run your
brush underneath it. Just little bleeds is.
What I'm after. Just do something a little
bit more interesting. Because it's these kind of little
bleeds that really help. Just lift a little. Okay And I also am going to do one last strengthening of this shadow because
now but I put those darks in that's
too, too light. Wash my brush. I think the very last
thing I'm going to do, I'm just going to run. Let's see, I might regret, this, take a little bit
of lavender and a touch of indigo. I'm just going to
run a little bit of, actually I didn't get any
paint then, a little bit of a broken line
just over the top. And I want to make this
line just a little bit, just a little bit more stuff. I think is the official term. Then I'm just going
to wet my brush and just run my damp brush. I just mess it up just
a little bit. Okay. So now I'm officially
starting to muck. So I need to come out
of that step away from that let it dry for 48 h, and then come back
and see if I need to strengthen any of those
darks or do anything else. But it's at the point now
it's been sitting on it for awhile and we really
need to step away. So if you do a painting and you're happy with it, and
you're happy to share it. Please post it in
the project section. Also, if you've got questions, feel free to message
me or even Put a comment in the discussion section and then everyone can see if you've got questions that might be relevant
to them as well. So I'm always happy
to give feedback. I hope you enjoyed the class and I'll talk to you next time.
 Nadine Dudek, Professional Watercolour Artist