Transcripts
1. Introduction: Hi, I'm Nadine, thanks
for joining me today, We're going to be painting a macaw. Two main takeaways from
this lesson today. Firstly, it's keeping
really clean, vibrant colors without making mud when we're
working wet in wet. And the second thing
that I want you to take away from this
lesson is getting, getting strokes in using
a single brushstroke. So just relying on the
paint and the brush to do the work for you and not
going back in and fiddling. Now, having said
that, I actually didn't necessarily succeed
the whole time in doing that. And I made a
couple of mistakes while I was painting this one. And I decided I was going to
go back and re film. And I decided that
actually you probably benefit more from
saying may make a mistake and fix it than me re editing a
perfect video. So I've left a
couple of those in. So what we'll do is we'll go
through the reference photo, we'll go through the
materials in the sketch, and then we'll go step-by-step
through the painting. And hopefully by the end you've got something that
you're happy with.
2. Materials: So we'll go through
the materials that you're going to need
for today's lesson. So starting off with
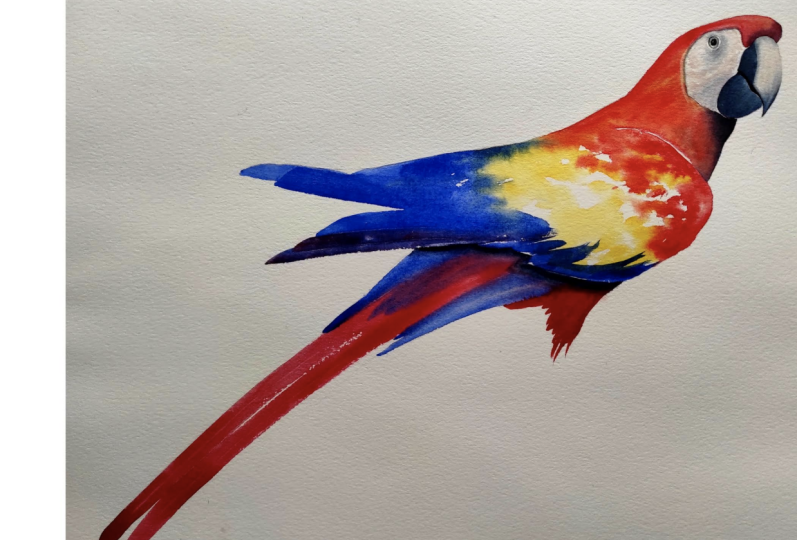
the reference photo, this one's from Pixabay. You can download that
from the Skillshare site. And I've also included for you, if you don't want to
stress about the sketch, I've got a template for that, actually two templates
because I want you to go a little
bit bigger with this. I've got it up as
two A4 sheets and you can stitch them
together to get the full bird. In terms of paper,
I'm painting on 300 gram Arches
cold press paper. I'm painting flat on a board. I'm not taping it down.
You can if you like. If you do tape it down, you
may as well pre-stretch it so you can wet the front and the back with either
a brush or with a spray bottle and tape it to the board and let it fully dry. I'm not going to
bother with that. Paint - so I've got a whole
lot actually, possibly more than I needed, but for the red and yellow. I'm using some Daniel
Smith pyrrol red and some Daniel
Smith Hansa, yellow medium. For the blue, I'm using
some Winsor and Newton cerulean and some Winsor
Newton French ultramarine. For the darks. I've got a little bit of Daniel Smith
quinacridone violet, and some Daniel Smith indigo. And I'm also using
a little bit of yellow ocher from Winsor Newton and a touch of white gouache just for the highlight
in the eye and the beak. It doesn't matter
what brand gouache. It doesn't matter if
you don't have gouache, you can use china white
or titanium white for that For brushes. I'm using a handful
of brushes this time. I've got a couple of just little synthetics just to get the detail around the face. I have two medium-sized
brushes now these are both squirrel taxlon
mix brushes from Neef. I've got 4750 LP size 12 and 8. Now really the choice
of your brush for this will depend on how
big your sketch is. And for me, this bigger brush, this gives me the nice shape on those feathers and it
will go the distance. And then the smaller
one I'm using for some of the
shadows under here. You just want something
is big enough that you don't have to keep loading up. I'm also using just
a stiff oil brushes, so bright white just to lift
out a couple of highlights. So just something that's
hard is good for that. Other than that,
you'll need an eraser, HB pencil, pot of water, maybe a couple of pots
of water because we're using yellow and the red, you'll get dirty very quickly. So a couple of jars of water, is probably a good idea. Some tissue or toilet
paper and your palette. I don't think we need
anything other than that. We're probably good to
start with the sketch.
3. Sketching Up: Okay, there's not
much to this sketch, so I'm not worrying about all the details in
the feathering. I'm just after the general
shape of the body and where these feathers
actually end. That is important
because I need to know where to start my brush. I'm not drawing in the claw. I just I just don't
like doing feet. You can if you want,
but then usually you probably need
to ground the bird. So I'm just going to
let that disappear on this little fluffy
red bit of its leg. I'm am going to pay a bit
of attention in the face to make sure I get the
shape of the beak right, the position of the eye right. But I'm not going to worry
about all the patterning that's around the face there. I'll worry about that when
we're actually painting it. So not very much to it. I have gone a little bit
bigger than I have for my previous lessons do try and go, with something like this. The bigger you go, the
easier it is to paint. So try not to get too
small because the smaller you get the
tighteer you'll get. I have, if you're not keen on
sketching it yourself, I have put up a template. And with this one, because I want you to do
it a little bit bigger. It's effectively two
A4 sheets and just, you just need to match up
roughly those little x's on on both sheets to get the
right the right picture. I think there's really
anything else to say other than that. We will get painting.
4. Starting the Eye and Beak: So the first place we're
going to go is into the beak. And I'm going to take a
small, a small brush. I'm actually going
to wet this down first with some clean water. Then I'm going to drop in a little bit of yellow ocher, maybe a little bit of
cerulean, maybe a little bit. of the red, even just a
few little colors in there, to start to get a wash going, clean water, straight
onto dry paper. Making sure I stay
within my pencil lines. When I come down to
the tip of the beak, I just need to be careful. I might switch this
brush isn't, doesn't have very good point. So I'll just switch to
a smaller brush just to get, make sure I get a nice tip. On the edge of the beak there just staying in this
top half of the beak. Get a little bit
of yellow ochre, really milky, yellow ochre
or raw sienna. Just drop that in
just roughly around the place, then I'm
going to pick up a tiny bit of some cerulean. Doesn't really matter. Whatever you've got on your
palette. Just drop that in. I just want a bit of interest
I don't want it to just be a flat wash, I reckon I can see it a little
bit of pinky red in there. I'm just going to
use for the sake of keeping it not too many colors. I'm just going to take a
little bit of pyrrol red really milky. So go easy on this one. And while I've still got
all that water in the page, I'm just going to drop a
little bit of red in there, maybe down the
front of the beak. Now, my pencil line
is really heavy here, which normally I wouldn't do. I've only done that
so that you can see what I'm actually doing. But having a heavy
pencil line like that, particularly under the
yellow ochre it can be really hard to get
that off at the end. So I would normally
just back that pencil off a little bit with an eraser
before I start painting. Now I want to kind of
accentuate this curve. So I'm going to take
maybe a little bit more of the pyrrol
red, tiny bit. And just while again,
while it's still wet, just drag that down along
the curve of the beak. Just so that I make sure I've, I'm thinking about the shape, not getting a, getting horizontal lines
there on the beak, might just do one
more with cerulean. And then i'm, I'm starting to fiddle so I need to
get out and it's starting to dry so I can't really get in here
very much more. I'm not actually
getting any paint. I'm trying to keep
my brush drier than the page, because
at this point, if I if I add any more water, it will ruin all those colors so everything will
bleed into each other. So I'm trying to keep my
paintbrush pretty dry. So it's a very
light, very subtle. You might not actually be
able to see it well on the Video, but I've just got
a mix of the yellow, a little bit blue, little bit of the red coming through there. I need to come out of
that and let that dry. While that's drying,
I'm going to put the first wash on
the base here. Now. I'm going to put
I'm going to wet it down just some
yellow ocher so I can see where I'm going rather
than the clean water only because I don't want to
touch the top beak now, I want to keep these
shapes separate. So to help me if I do
that with clean water, chances are it won't really
be able to see where I'm going. And I'll touch the top. So I'm using the yellow
ocher just to help me work out where I am. And then I'm going to drop
some indigo into that. So really milky,
really watery paint, not touching the top beak, being very careful when I
come to this join here. So now that I've pretty
much pretty wet the paper with yellow ochre, I'm going to now
come into my indigo. And I'm just going
to drop that in. Move it around. Make sure I come
to my pencil and I'm just going to wash my brush. and clean it
off too, so don't have too
much water on there. Just dried it off on my tissue and just bring that shape up. Again, being careful not to touch the top of the beak there. Now this will need
this won't be dark enough but I don't I'm just getting the shapes
right at the moment. So once that's all dry, I'll come back and
build up the tone. And then I don't want to,
don't want to fiddle. I can see there are various, you know, there there are
lights and things in there. I don't want to touch that. I want to let that dry. The last thing I'm going to do
before I come completely out, I'm going to put a
really light wash. I think maybe a little bit of cerulean and yellow
ocher together. So really milky. Just after a bit of a green. It's too dark, so I'm
just going to wash that off my brush and tease that around. So I'm just painting in that
colored part of the eye. Then I'm going to come out and
I'm going to let that dry.
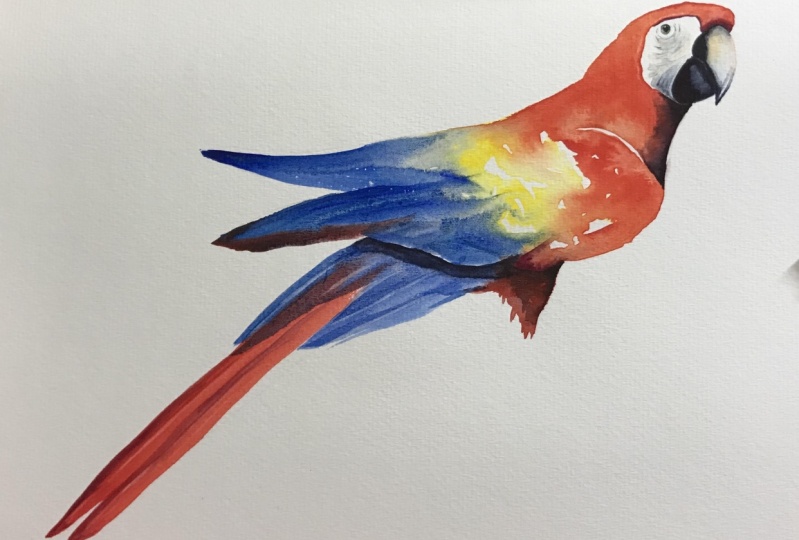
5. First Wash on Body: I've been out of here
probably ten minutes now, and this is all dry. And I'm going to
start the fun bit. We're going to do the
body in two hits. So we're going to paint this part and then
once that's dry, we'll come down and do the tail only because I don't want to hit you
with too much at once. If I was painting for myself, I'd probably paint through
the whole thing, but I think it's easier
to do it in the two hits. I'm going to use this brush. I've got a big brush here depends whether you've
drawn it, the size. I have or not as to
what size brush you need, but this one will go a long way and it's got a nice point on it. So I should be able
to get into some of the tighter areas. So what I'm going to do first is I'm going to paint
down with water. But I'm going to leave lots
of patches of dry paper. Make sure your brush is clean, particularly because
we're using yellow and it's really easy to
get mucky with yellow. So make sure you really check
that your brush is clean. So we need clean water. And I'm going to paint down
over the throughout the head. So around the white
of the cheek there I'm going to leave a little line of dry paper between the
neck and the shoulder. He's so I'm not going to join
those two shapes together. I'm just going to let a
lot of white paper. I'll show you how wet
I am once I've got it on, I might see
if can I get around. If you go out, if your
pencil lines with the water, just go and have a coffee and let it dry and come
back and wet it down again because the
paint obviously will go wherever you wet
and you don't want to be chasing paint that's
heading out of the lines. So when I come
across here, again, I'm leaving a little bit of a gap between the neck
and the shoulder there and I'm patchy here so I'm not wetting
down the whole thing. I'm just throwing
on a little bit of water to help the paint move. Now, if you've taken ages doing that and it's dried on
you while you're doing it. You can come back and just flood some more water on and re-wet. So bring it around the shoulder. I'll just see if I
can catch the light. Which way. Okay. So you can see I've
got pools of water and patches of dry paper
in there as well. Alright. Now I'm going to,
oh I can see I didn't quite come
to my pencil there. Now I'm going to come in. I've squeezed out
because I want this really nice and vibrant. I've squeezed fresh
paint out of the tube. I don't want to be trying to
get it off a dry palette. So I'm going to start with some Hansa yellow I've got here, make up a bit of
a puddle of that. I'm going to come and
just whack some paint into that midsection where I've got the wet and dry paper. Then I'm going to bring that up
into the neck and the head. Just come to my pencil on there. And tease that around
the top of the head. Then I'm going to pick up
while that's all really wet. I'm now going to pick
up some pyrrol red. Creamy, creamy, milky. And I'm going to drop
that into that wet page, bring it into that yellow. And I'm going to use the
shape of my brush to just get the first idea of a feather
in there tease it down. Now, as I come across the
top of the head here, I don't want it really heavy
red just on the top. So I'm going to switch back
to one of my smaller brushes. Wash my brush,
and just tease that across wash my brush, I'm
washing my brush then taking off the excess paint or
excess water, sorry. Clean it, dry it
and tease it down. Okay. Then we're going to think
about some blue. Now, if you look in here and
it's too tight, if you don't have
enough bleeding, you can just grab
a bit of water. And at this stage you can
just chuck it on the top. Again, I am painting
flat at the moment, so it's sort of
sitting and pooling. Now I've still got enough water in this page that now
I can do my blues. So I'm going to pick up
a little bit of French, ultra, little bit of cerulean. And I'm going to come on here. You could actually use a
bit of purple in there. You could pick up
some quin violet too if you wanted to, or
another violet. I'm going to start at this tip. Grab some more paint. And the idea is that I want
to run it into this wet area. You know, I missed my paint there I'm just
going to drag that up. Then this one underneath. Bit more, touching it
into my two blues. Actually it's probably
red under there. I'm going to put a stroke
in, another stroke. Come into that wet paint. Now I might pick
up a little bit of red and do this
other feather here. And sort of whatever you, like it's a little bit wiggly, but
it doesn't really matter. Then I need to come out
of that for a second. And I'm going to switch
to my smaller brush. I'm just going to have a
look at what's going on. So I need to tidy up up
here so I'll wash my brush, take off the excess water. And just because I've missed with that stroke, missed
a little bit. So I'm just going to tidy
up that shape a bit. But I don't want to
introduce there now, while I'm doing that tidying up, I don't want to introduce
a whole lot more water. Okay. And I might drop a
bit more yellow in there. Okay. And now what I need
to do is I need to just come out and
let that do its thing. Now, I can see that
I've got two things. I can see that my water
is running that way. I've got a big pool of water. I probably want it
to run down a bit, so I'm going to take
a tube of paint. I'm just going to stick
it under there and see my pigment run down this way. What I'm also going to do, is I'm gonna make this
a little bit tighter. I'm going to join these
shapes a little bit, get the white-space a
little bit smaller. Having trouble with
my words today, also just noticed
my fingernails. I've been out in the
garden this morning. I apologize for the
state of those, so teasing It down I don't I
still don't want to touch the two shapes together, but I'm just tidying up, making that gap a bit smaller. And I might, I reckon I've got a bit more of a
gap than I need there. I might just close
that in a little bit. And up here, up around the
face now I can pay attention. have a look at my
reference and just, I'm taking the excess off my, too much water on my brush because I'm trying to
get a small shape here, just tidy that up
to come up to the beak. Okay, and now I can see
that's running down. I don't want it to go too
much into the yellow, so I'm going to
change the direction. And what I'm going to do is I'm
going to get the water to pool down into here. See if I can. And I'm just going to see
if I can get it to come. I've got too much here. What I'm trying to do is
get the water to come into a spot in the
painting where I can wick it off so I don't want I wanted all the water
to get it to move, but I don't want all that red
to bleed into the yellow, so I need to wick
some of that off. Now you can do it with a tissue. The only problem with that
is it will leave marks. You get the imprint
of the tissue. So I'm just trying to kinda
get it to go into one spot. Just wick off that excess water. So all I'm going to do now
is I'm just going to sit here and keep an eye on it and make sure that I'm not getting any funny bleeds that
I don't like. This. Well, meaning that if
this red was still coming too much into the yellow, I just took it up and
keep lifting it off. So at this point, although you don't want
to touch it too much, you don't want to walk away. Because if you walk away,
when you come back, you'll find that it's done
something that you don't like. Just sit and keep
an eye on that. So I reckon I'm going
to sit here for probably ten minutes and just make sure that
it's drying okay.
6. Tail Feathers: So it's been about ten minutes and nothing
dramatic has happened. I'm fine with how it's dried. I'm a little bit annoyed.
I shouldn't have put this little pencil
line here because I can now see that under
the yellow because I haven't brought my
red down this far. I'm not sure whether it'll
be able to get that off. So maybe don't put
that pencil line in. I'm going to do the tail. Now. Now the idea with this is that we want to
rely on the shape of the brush and we just
want to get this in in a couple of strokes
I don't want to fuss. I don't want to fiddle. But to help me because I don't want to put a brush stroke up here and then paint into
the rest of the body here. I'm going to put a little bit of water through here so that I can come up and touch to it and the paint will wick up
into the wet area. So don't leave your brush in the water
like that, that's bad. I do it all the time. I'm just going to
take a small brush and I'm just going to wet down
just to touch underneath. I'm not actually
touching those feathers. I'm just coming close as I can
without actually touching. And just, I should
have clean water. I've got kind of slightly
red water, but that's okay. And I'm going to also just
tease it just a little bit into that front of the
leg here. Just a touch. Okay. Not overthinking that, then I'm going to take
that same big brush. We're going to go two strokes with red and then come in
with some blue, So where's my red,
There's my red. don't overthink this. We're just, we're just
putting on some brushstrokes. So tip down, up This one down, up. That's it. Then I'm going to
come in with my blue, a bit of French ultra
bit of cerulean. And then I'm going to put
that on top, bit more. More. And you can see where I'm
touching there to the wet. It's wicking up a little bit. Okay. And then in here, a bit more blue, I think. So again, just using
the shape of the brush, I'm going to go to the tip and just fill
that in a bit. And then here I probably
need to switch to red. I'm not sure I like
that little bit there. I think I might
straighten that up. And then I think I'm going
to come into my red. Put a little stroke
underneath here. Now use the tip of my brush. A bit much paint
it's really solid there So I'm just going to take off a little bit of that pigment, dried my brush off. I'm just going to
tease that down. And might. Again, take the
excess off my brush. I'm just going to tidy up
the shape underneath there. Right So that's the tail in. Now, sit back and have
a look I need to fix. See, i've, I've
missed this bit here. So drier brush, then I want not very much water on my brush. I'm just going to tidy that up. I don't want to introduce a whole lot of water
here or that will push all the pigment and
I'll get a big bloom. Just want to tidy up that shape. Drag that in. I'm going to just drag that. as close as I can get to the feathers that
are already there. So I've got a shadow
to go under there. Just tidy that up a touch. I'm going to drag that around. And I might, there's a little
bit too much light there. He looks too, I'm just looking. He's
too thin. I think I need another stroke. So I'm just going to
take a beat up my blue and come underneath here. Now I'm getting into dangerous
territory because I've got my page is nearly dry. And I'm going to start getting bleeds and things
that I don't want. So if I need to fatten him or
change anything else, I'm better off doing it
once that's fully dry. I feel like I possibly need
another stroke up there. I'll tempt fate. I'll do it now. Don't do this. Get it right the first time. I think I might just need
a little bit thicker. Just going up there. Just made him a little
bit too skinny. I think. I've been sitting
here watching it dry. I tried to work out
what's what's wrong. And I think what's
wrong is that I'm too, I've got too much of a curve in here that needs to
be a bit more stuff. I've missed that in
that first wash. So this isn't ideal
to have to do. It's much harder to add
things after like that, but I do need to make it a bit a bit broader in the chest
there, so what I'm going to do, I'm going to take the
red even though in the reference
is actually blue. I think it'll be easier
to fix for me with red. And I'm just going to
pull that out a bit. Yours might have
been perfect the first time you don't
need to do it. But mine's just a little
bit too small there. Okay. So I've just added
that extra bit in. I'm cleaning my taking
the excess off my brush, excess water off my brush
and then just blending it into that wash underneath. So I'll see whether
that's once that's dry, I'll have a look and see
how I feel about that. So it's not, it's not the
most fun have to do that. Um, but sometimes you, you can't, you keep
looking at it, thinking there's
something wrong. Just going to close up a
little bit of that light. I think one more one
more on his leg. Might come this way. Okay. Officially fiddling now So I'm going to stop.
7. Working in the Face: Okay. So while that's sitting there
drying nearly dry there, I'm going to come into the face, keep me out of trouble. So small, synthetic. I'm going to wet down initially just this little part of
the beak that's also black. So I'm just taking
up the excess water off my brush because I don't
want it to be soaking. Just dropping some
water in there. Then I'm going to
take my indigo. Just drop that into that shape. I'm washing my brush, take off the excess and
I'm just going to run my damp brush just
along the edge of that. Indigo just so that my, a little bit of bleeding, don't get a really sharp line. I have to come back and backfill
into that a little bit. Once it's dry, then I'm going
to stay with that water. And I'm going to come wet down into the tip
of the beak there. The reason I'm wetting
it first is I just want these darks initially to
go on a little bit softer and a little
bit of bleeding, not too many hard edges. So taking some indigo, dropping that in, not
too much water on my brush because I don't
want to flood in here. I might switch to my smaller
if your synthetics got a nice it's got a nice
tip stick with it, but that one that
I was just using, It's a little bit too
blunt on the end. So just tidying up
the shape in there. And while I've got
this small brush out, I'm just going to paint in the pupil now because
I'm painting flat. I do want to tilt up when I paint this circle in so that
I actually get a circle. So straight indigo. if you're painting is too small, like if you're
finding that difficult, you can just use a
black fine liner to put that circle in. Now, there's a whole lot of
stuff going on in the face. So what I'm going to do, I'm going to take a little bit of yellow ochre, milky
yellow ocher. And I'm just going
to roughly wet down in kind of rings. Just roughly wet the paper with a bit of yellow ocher
in the direction that those wrinkles are going with
that same small synthetic. Now, when I get down
to the bottom here, stronger paint and
I'm going to put in that little shape there
coming into its beak. Now while I'm kinda damp
with the yellow ocher, I'm going to touch to
take just a touch of indigo, really small amount. And I'm just going to
restate that shape. And I'm not going
to color it all in. I'm going to skip my brush
across it, dry my brush off, and then just drag
some water through it, I just, want to rough
up that shape a bit. I don't want a flat
wash of anything there. I want variation in the wash. While I'm still a bit damp, I'm going to grab
another tiny bit of indigo, really milky. And I'm just going to drag
I didn't actually get any paint then just while it's damp. Skip my brush across
and just put a few of those lines in. These ones. Kind of
curving that way, these curving the other way. Now, I'll get a bit more serious
up towards the eye here. So I'm just wetting
my brush again. I'm going to leave
a bit of a white, white around the colored
part of the eye. And I just want to
strengthen the dark underneath the eye so I've wet
it down a little bit more, grabbed a little bit of indigo, and I'm just roughly
dragging that through. Now, you're better off with this. Putting it a little
bit on coming out, coming back, adding more in. Like if you go too
much initially, it can be really
difficult to take off. So you're better off doing
a bit coming out, seeing how you feel about it, going back and putting
more in if you need it. Now, I might there
is that little touch of it almost looks like red
from the reference. I am going to drag a little bit. I've got now some
little bit of my pyrrol red and it's still
quite damp in there. I'm just going to drag
a little bit through. Okay. Now I've been fiddling in
there while it's not finished, but I need to come out of that now and just let that settle in. I'm going to come back into
the dark of this beak, so I'll see if I can
stick with this. I'm going onto dry paper now. Picked up some
indigo straight onto that bit at the
bottom of the beak. around,
a bit more paint. Now I'm going to wash my brush, take off the excess water, and just drag my
damp brush so that this area is damp
but not soaking. I don't want too much pigment, pigment in there. Just dragging along. Wash my brush again. I've just now got
the clean, damp brush. I'm just dragging it over
the top just to displace that pigment a bit
so that I've got just a touch more light. Then in this top
bit of the beak, I'm going to paint with water just on that edge where we
tried to bleed a little bit. It hasn't really, again,
strengthen that up. Indigo onto the dry
paper there and let it bleed into that edge. The edge there. And I'm going to, while
this is still, I've still got a bit of
moisture in the page there, so I'm just going to
drop a bit more of my indigo onto the bottom of that bottom part of the beak. Clean my brush, and
just blend that in. You do have, to get really
strong darks, you do have to go. It can take a few layers
to get it strong enough, but you better off
working up to it. Than going to strong initially.
8. Still Working in the Face: Now I want to think about the shadow over the
top of the head here. So I'm going to clean my brush. I'm going to paint a
little bit of water just over the top, the head there. Then what I'm going to do is I'm going to grab a little bit of quin violet and a little bit of my pyroll red together. And I'm just going to
drop that into the wet, clean my brush off because I've got
that lovely I've got this lovely
light on the top, so I don't want to
back that all off. I need to get a little
bit of dimension to it. Now because I'm drying, I'm drying my brush and
I'm dampening the edge. And so what I've
done is I've now diluted that pigment too much. So while that paper
is still damp, I'm going to grab a bit
more and drop it in. And this is another
one where you're better off working up to it, than going to hard initially and not being
able to pull it back. So bit of the violet bit of the red, I think I've got a bit
more violent than red. Then. Wash my brush. I've got I didn't
get enough, red. I'm just going to grab okay. Now, I might have to come back into there
to re strengthen it, but I've been fiddling
in there for a bit, so I need to come out
and let that dry. I've got to shadow to go
on the top there as well, on top of the beak and a bit more wash in the beak as well. So I'll let that settle in. I'm going to paint
a bit of a dark underneath underneath
the red there. So I've just picked
up again a bit at my red and a bit of
my quin violet. And I'm just going
to paint a bit of a dark underneath where the
red joining the white. there, just a touch. While I've got that,
this will become, I'm going to lift
a little bit of a highlight on the top of that. Once that's settled in, I want to put a little
bit of a shadow underneath the chin
while I've got that same red and
violet mix out. So I'm going to pick up
a bit of quin violet, a bit of my pyrrol red. Come underneath the neck here. I'm dry here. Put that on, bring it down to the joint
of the shoulder there. I'm going to wash
my brush and I'm just going to soften the edge. So I'm trying to
sit sit that back into the wash underneath. Gotta be careful with red. It will lift pretty easily. So you just go, go easy, very gently. So I've effectively, I've effectively wet that page with a little bit of red
and a little bit of violet. And now I'm going
to strengthen that. I'm just teasing this
you can see I just got a pop of light there
because the wash lifted. So gotta be really careful. I can come fix that up when
it's dry if I need to. So what I'm going to do
while this is damp, I'm now going to
drop a bit of indigo into this little edge
there, wash my brush. And then tease that in
soften that back, dilute that back into the red. So the red and the purple just initially let me know where I was going to go without
damaging the wash too much. Although I have lifted
that bit there. Then I'm just soft
and you've also got to remember this
will dry lighter. But I do want it pretty strong. Underneath there. Again, not well, not again, I don't know that I've
said that in this, in this lesson, but I don't need to pay too much
attention to the reference. I'm kinda working with what works with the painting
in front of me. And I want a bit of a shadow. I want a bit of a
dark underneath here. Bring that down just into
the front of the chest. Now, if things are starting to move and it's not behaving, come out, let it fully dry, and then you can
go back in. Okay. And then I need to, make sure my dark I've got too much light underneath
the beak now there as well. So because I'm in here
moving around this indigo, I've probably got enough
on my brush to just put a touch of paint in there so that's dry in
there, wash my brush. And then tease that
around the beak. And then if it hasn't
stayed dark enough, then I'm just going
to grab a touch more indigo and just drop that in. And now it's pretty
wet under there now. So I probably need to get
out and let that bit dry. But while I've got this small
brush and the indigo out, I'm going to close up the
top and the bottom there. My brush might just switch
to the smaller one. And I might come back, I might come back in once that's dry and just put that little bit of the there's a
little kink there. I might put that in a minute. Let that dry first, I've been
the reason I, oh hang on. There it is. So I can, I've just lifted that
because it's damp in there now I just lifted a bit
of paint to get that funny shape of the beak as it comes back up into
meet the top bit there. Right now I don't have much. I need a little bit
more happening in the front of the beak there. So I'm going to wet down
with a bit of water, touch a bit more
yellow ocher in there. Wash my brush, just move
that around and touch. And then maybe a bit more of the cerulean to the top of that. Okay, what I'm also going to do is I'm going to, I'm
dry up in that bit. Now. I'm going to take
little bit of indigo. I'm just going to pop a touch
of indigo on top of there. Wash my brush. I'm going to follow
the curve a bit. Now because I'm on pushing
the paint around a bit. I've taken most of the pigment out trying to
decide what shape I want. So I'm going to pick
now thicker paint, take the excess
water off my brush. And just while it's wet, just come in,
re-state that dark, wash my brush take all the water
off and soften that in. And if it dries too light, I can come back and restate it. I think I need darker
on the top of there, but now I'm quiet gammy
in there now so I really need to come out
and let that dry. I am going to just
add, I'm going to, I'm going to extend that black a little
bit because I want to, it'll become clear why shortly, but I'm just going to make that a bit, so I'm dry here. I'm going to make
it a bit bigger. Wash my brush, take
off the water, and just blend that up a bit. So I've put the
pigment on and then I want to transition a little bit, so get it a little
bit softer coming up. Now, before I come out, I'm just going to darken
the top half of that eye. I think I did with
cerulean and yellow ocher. I'm going to take
a little bit of cerulean and a little bit of yellow ocher and a
little bit of indigo, and just paint into
the top of that. So my pupils dry
I just want to darken off that top half of the eye
that I'm washing my brush, taking off the water
and just teasing it around so that it transitions from dark to light coming down. Last thing we'll do
before I give you a rest. I can see now this is still not dark enough
underneath the eye. So I'm going to take a
little bit of milky indigo. Come on and just rough that up a bit
so it's dry in there. And then I wash my brush and
just soften those edges. So I'm after that kinda
white ring around the eye, I'm going to come out
for a little bit, let that dry then
we'll come and put the shadow in
underneath the wing here and then come back
and finish off the face.
9. Finishing Off: Okay. So I will come
back into the face, but I just want to add a
little bit of a shadow underneath the wing here. So I'm going to take my
medium-size brush. This is a slightly smaller
than the one that I did. All of those with, I'm going to take some milky
Indigo initially. I'm going to come onto the
dry paper starting there, and then I'm going to paint
underneath that wing. Switch to my small
synthetic now I'm going to take slightly thicker paint. And while that's wet
I'm now going to tidy up, I'm closing that white because that page
is wet now with the first line of
indigo that I did, that should tease out
just letting it run. Now, we can strengthen
that if we need to. But I'd rather get that on, get the shape right, and
then come back to it. Now the next one I
want to think about is this one under here. It's going to look at,
I've made a little bit tricky for myself. I'm just trying to decide. Let's see, I'm going to take
this small brush. I'm going to just
put a shadow in. So come onto dry paper. With that indigo and I'm just
giving myself a bit of a division to show me that that's a feather that sitting
on top of the leg there, wash my brush and tease that down. And again, because
this is on the red, be careful that you don't
start lifting the wash. I've made a little spot of white there that I'll
when that's fully dry. I'll come back and just drop
a bit of indigo in that. Now, I was a bit slow
and my dark here, I've got a little bit too
much of a transition between this dark to that
next layer of indigo. So when that's dry, I'll back that off slightly, but I'll come out of that
while that's drying, I'm going to come up into
this join here on the neck. I'm dry. I'm going to take my
indigo and my small brush. I'm actually just going to back off a little bit
of that light that I left and strengthen
that shadow so wash my brush and just
blend that back in. So that's that's dry there
now so I can just fix up. I'm going to take that same shape brush
and I'm just going to put another line of
indigo following that exact wash trick being
that I have to make sure I completely come to the
edge of that first wash. Otherwise you'll see
funny bits of light. This wasn't quiet,
strong enough. And then I'm going
to wash this brush, take off the excess water. I'm just going to run my brush, along the edge. I'm just going to soften
the edge just a touch. Then I've probably got
too much light. This one keeps catching my eyes. So I think I'm going to just
close in that red a little bit. Here. just picked up some red, just back that off a little bit. Wash my brush and I'm to
tease into the wash underneath. So as far as I'm concerned, the bodies all finished. One thing you can do if, if you've gotten too heavy on your tail and you don't like it, you can lift a little bit of
a highlight back into that. So I don't really need to, but I'll just show
you I've got my my flat oil brush, bright white and I can clean it, take off the excess water. And now I can just
drag a vein. You have to keep
cleaning the brush so that you don't just smudge
pigment everywhere. Do it again. You've got to press pretty hard on. So that's if you've got if you've got a really
solid bit of paint that you don't like and you want to get a bit more
light in there. Just only important thing
to do is keep washing your brush and taking that pigment off so that you
can actually lift pigment. The brush needs to
be pretty hard. I'll do another in here so you might be able to see bit better. So clean it. And just lifting a little bit of that highlight through and
you might not need it. It's just sometimes if you've got the direction
isn't quite right and you want to restate where
the feathers are going. You can get a little
bit of that in, same up here. As I said, you
might not need it. And if you put it in,
you don't like it, you can take it
out, but it does, it, it is an easy way of
getting a bit more interest in. Just to finish off on the face. Lift a little bit of
a highlight over the, eye, I'm going to take
my small synthetic, just the same idea. I'm going to wet my brush, take off the excess
water and I'm just going to run it along to
keep wetting it. That one's a bit small I might.
go to my next one up. Wet the brush and just I'm
pushing down, washing it, taking off the excess
so it's a clean, damp brush, not
flooding it with water. So just a touch of
a highlight there. And I'm going to do
the same thing just along around the chin here. Cheek, I guess. So. Just make sure you
keep washing the brush. And this is one
that because of the red will lift pretty easily. Just to get a little bit
of more 3D into the face. I guess. You don't need much. I'm going to strengthen the red, the dark at the front. I'm going to
take a bit of red. Re-state over where
I had the red and, the violet there
it's dry in there now, wash my brush and just
run that along the Join. Now I'm going to put a little
bit of random yellow ocher, a little bit of
warmth in the face. So I've just taken
my little synthetic. I've just dropped it into the yellow ocher and
I'm just going to walk just a little bit
of that paint around. And then I'm going to strengthen up with a little bit of indigo. Going to put a little bit
darker on the bottom. of the part of the skin
that's coming over the beak. Touching it a little bit
more and just a little bit darker on the bottom. And what we might do
there is we might lift, I'm going to need a
harder brush for this. So the same brush that I used to lift the highlights
in the tail, I'm just going to lift. Just a flash of white around where the beak joins
into their skin. Just a little bit. They're just
very small things that just add a bit I'll probably
have to darken back off I might just darken
off the bottom here bit more, nearly there. Now I've put that, um, I extended that dark
a little bit there. So what I'm going to do, I going to take a tube
of white gouache. I'm going to put. My brush
straight to my gouache. I'm taking tiny bit
of white gouache. And I'm going to come straight on and drag that up and
going to wash my brush, take off the excess, and just blend a bit. So just trying to get a little bit of a
sheen with that gouache. Along the dark of the beak there. And then with the same
brush, I'm just going to take a
tiny bit of gouache and put a tiny little highlight
just in the eye. And then I think the
last thing I'm going to do, I'm going just one
more into my indigo. Just one more. I'm messy. Under the eye
there. Just to make that white stick out the ring around the eye,
just slightly brighter. And then I think I think that's probably
where I'm going to stop. And what I would do is I
would come back the next day, see if this needed
to be stronger, or whether I was
happy with that. See whether I needed
anything more around here, all
those kind of things. But I think you need
to step away from it for a while to decide
whether it needs anything else and
make sure it's fully dry before you rub out any
of those pencil lines. So thanks for joining
me for the class. If you are happy to feel
free to post a photo of your work on the projects page and I can have a look
and leave a comment, so I hope you enjoyed it.
 Nadine Dudek, Professional Watercolour Artist